#authentic clothes
Text
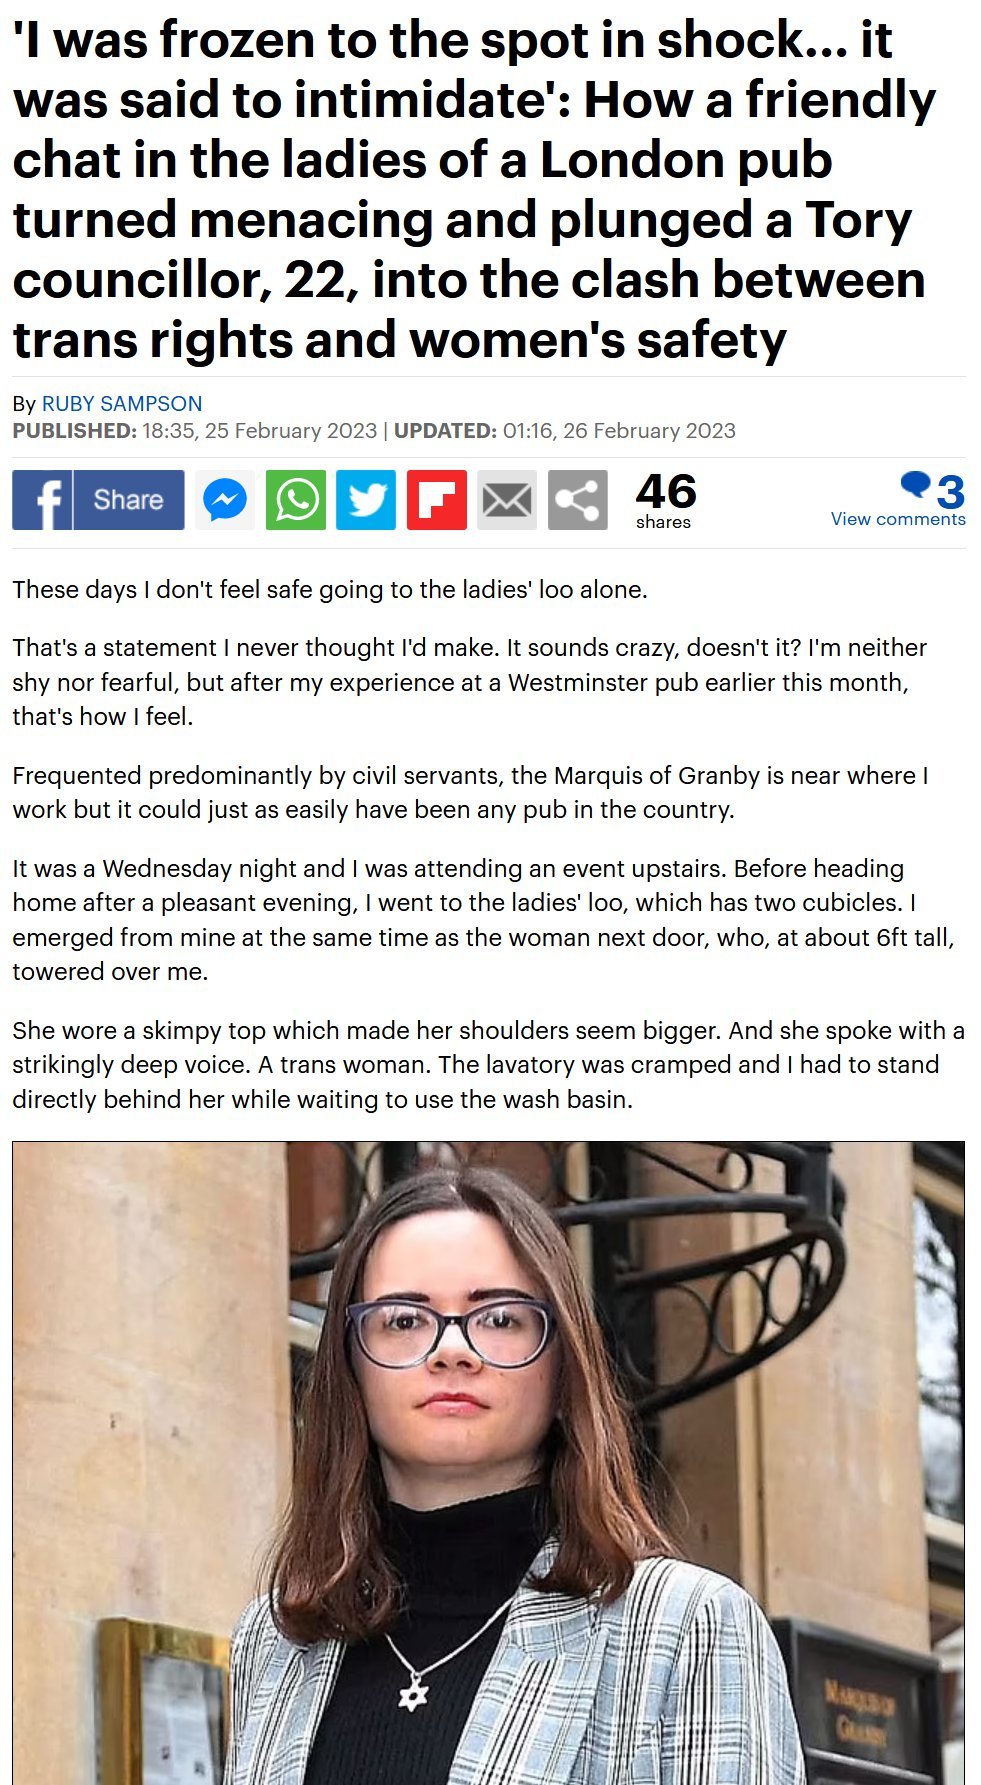
Losing my shit about this article in which a transphobic Tory was so busy panicking about existing in the vicinity of a Trans that she almost certainly misheard "jeans" as "penis" and decided that not only was this a problem with the other woman, but also that the world must be informed of this pressing danger.
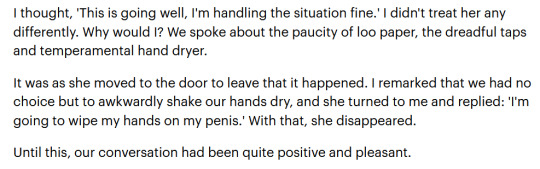
"a trans woman! I had to stand directly behind her....I thought, 'this is going well', I'm handling The Situation fine'..."
translated: I saw a tall woman with broad shoulders. How would I get out of this alive? I thought. she has a PENIS. PENIS PENIS PENIS. through some force of PENIS I mean will I managed to PENIS behave normally towards her. My hands were PENIS PENIS PENIS shaking as I tried to dry them. summoning up all my PENIS courage I said 'dryer's crap innit'. she turned to me and said " yeah I'm just goiPENIS PENIS PENIS"
It's been a week and I'm still shaking. This proves trans women are the problem and I'm not weird. I'm fine. It's fine. If you think about it I'm the hero hePENIS!!!!!
very this
#red said#it's just. I'm obsessed.#everyone on Twitter is saying 'never happened' and i think they're wrong#this absolutely did happen and she's been obsessing over how vindicated it made her feel enough to WRITE AN ARTICLE ABOUT IT#because she MISHEARD SOMEONE IN A CASUAL CONVERSATION#i lay out my reasoning thusly: if you were INVENTING a scary trans woman in bathroom story out of nothing. why would it be this?#why would you go with 'we had a banal conversation until she said a sentence that makes no sense and that no human has ever uttered#but which does coincidentally sounds almost exactly like a mishearing of a very NORMAL thing to say in the circumstances#then she left and nothing else occurred'#if you were going to INVENT a story you would probably make it MAKE SENSE or SOUND THREATENING#i truly believe this is a very authentically told account of what she thinks happened#because who would. by means other than mishearing. think 'I'm going to wipe my hands on my penis' makes any sense at all.#a) 'I'm going to dry my hands on my genitals' says the presumably fully clothed woman#b) who then proceeds to leave without doing anything threatening#c) WHO SAYS PENIS THREATENINGLY? sorry it's writing out 'penis' repeatedly that made this jump out to me but like. who says that?#you might hear someone talk casually about their dick or cock but i stg it's only doctors and TERFs who casually use the word penis much#it's so. clinically descriptive. it's a weird use of language. but it IS. something you could plausibly mishear from 'pants' or 'trousers'
9K notes
·
View notes
Text

the new nightmare is cool but i think not putting them in hanfu was an missed opportunity
(+ long hair version that i wasn't as sure about)

#i was going to give barbatos the Long Flowing Locks but he strikes me as the type who WOULD adhere to the tie-it-all-up rule#but then he looked bald so i gave him a bit of leeway. i mean even a lot of cdramas don't follow the rule#then satan's hair is more wuxia novel protagonist (which i feel suits him) and solomon's is unfortunately all inside his hat#well the long hair is for authenticity (lol) not Hot Boy Look anyway#art#obey me#obey me barbatos#obey me solomon#obey me satan#jtta ik#anyway wrt the new nightmare: barbatos's outer robe (dachang) DOES look like hanfu#but then he takes it off in the deflowered look and it's. idk. a sexy gongfu vest??? satan too#not that i have anything AGAINST that but if you're gonna do chinese fashion i feel like hanfu is a shoe-in#based off the previews for celestial blessing i'm assuming diavolo+lucifer+asmo will be in the second nightmare for this event#and both parts of a nightmare usually follow a theme so most likely it'll be kung fu clothes 2 electric boogaloo BUT i will hold hop#if anyone should be in hanfu it's those three. lucifer for that cold elegance dia for that regal charm and asmo for that Beautiful Princess#regardless i will probably be drawing them in hanfu anyway. in fact i already have the idea for it#it'll be ddvd because i NEED to put zhao in beautiful clothes for once. and also i really want to draw something in earnest for this au
328 notes
·
View notes
Text
Rhaenyras personal sigil was so ugly because baby joffrey felt left out of the war effort and then he whipped that up and handed it to his mother and she didnt have the heart to tell him it was hideous so she just forced all of team black to go with it
#like when you were a kid and you drew something that your parents pinned up to the fridge#but looking back ur like wtf....#if youre going to make rhaenyra a boy mom then we're leaning into it and making it cute and funny#hotd#@aegonbeingfakeisracist this one is for u happy bday#just realized i forgot to give the dragons tails lmao#o well adds to the authenticity#anyways as we discussed yes Aegon III who canonically worshipped his older brothers has joffreys OG drawing#he gets daenaera to embroider it and wears it over the hair shirt but under his black clothes#mommas boy
799 notes
·
View notes
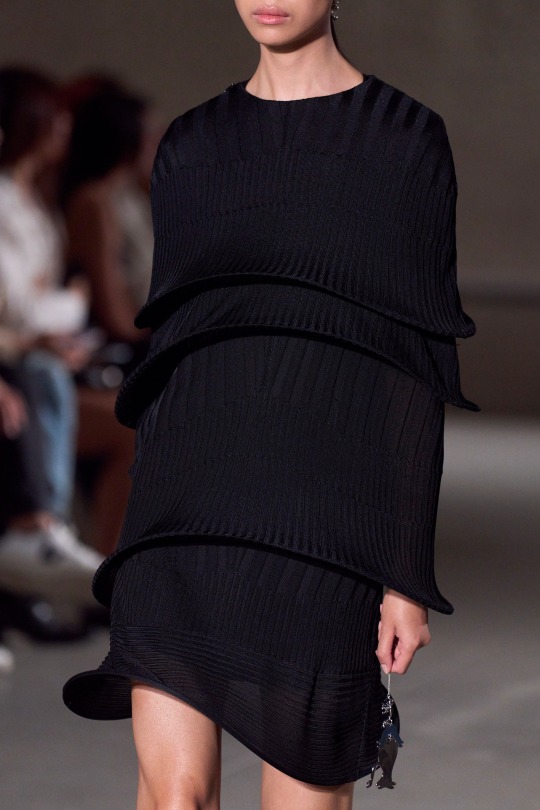
Text
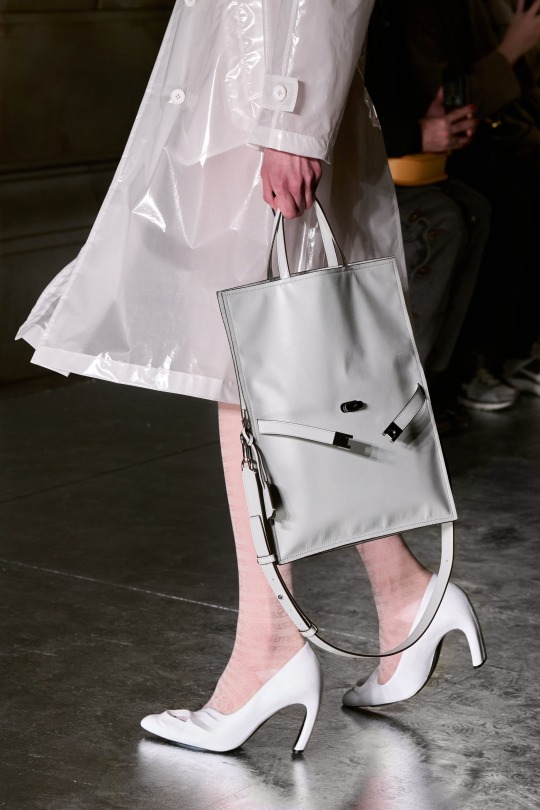


Tory Burch f/w 2024 rtw
Creative Director Tory Burch
Fashion Editor/Stylist Brian Molloy
Photographer Armando Grillo
Newest Cool
#tory burch#tory burch bags#tory burch bag#tory burch original#tory burch shoes#tory burch authentic#high end bag#high end bags#bag designer#bag designers#runway bag#luxury bag#bag heaven#ready to wear collection#runway details#runway style#runway looks#runway collection#newest cool#newestcool#ootd ideas#model off duty style#bella hadid outfit#bella hadid aesthetic#vintage outfit#vintage clothes style#style fashion vintage#vintage fashion aesthetic#designer fashionable#designer style
43 notes
·
View notes
Text

Do you know what being authentic truly means or you’re just repeating stuff you’ve overheard because they’re popular? Sure, being authentic gives you power and security but once you really integrate with its meaning. Being authentic means being true to yourself, being yourself. But do you know who you really are? Have you given yourself enough space and time to discover that part about yourself? And if you did, were you able to heal everything that needs healing?
Being authentic also means feeling truly okay to be different, to be unique. And that doesn’t come easy. Because there are certain beauty trends, fashion trends, pressure of aging, weight, and other things. Maybe you won’t fall in there. Probably you won’t. Because once you start journey to your authenticity, you start noticing that you don’t really fit there. And that’s fine. It’s actually more than fine — it’s perfect.
So being authentic and learning how to stay authentic is quite challenging journey. With many ups and downs, many doubts and heavy days. But then you slowly start noticing the change, a small movement inwards, and the calm and understanding that comes after it. It’s a journey, definitely. I hope you’ll give yourself enough time to find yours, and never give up on yourself.
- just some thoughts past few days.
#gothic#goth#alternative#dark#witch#gothic girl#witchcraft#gothic fashion#tattooed girl#nu goth#authentic#metal chick#metalhead#Metal girl#black metal#black metalhead#metalhead girl#white hair#white and black hair#split hair#dark aesthetic#dark fashion#dark forest#dark academia#killstar#Killstar clothes#goth model#gothic clothing#joanwolfie#gothic metal
26 notes
·
View notes
Text
anyway shri’iia’s epilogue outfit which is a mix of 1900s male stage costumes and also that one camp outfit mod. look at the ring hehe 🤭

#it’s so whimsical I love it ….. the silhouette is based on the stage costumes#where they have like the cinched waist poofy bottoms and then stockings#but in her case it’s boots but she’s wearing these particular boots that I think fits with the whimsy elements the fit has#and the top is like a reconstructed coat but off the shoulders with the poofy sleeves bc I want to give her that rapunzel / tangled vibe#since her backstory was inspired by rapunzel ofc …!!!!#and it still has that sexy element drow fits are known to have … but this one isn’t like outright naked sexy it’s more of a teasing kind#which fits her..!! like this is her whole personality turned into an outfit I really like it 🤭🤭🤭🤭#and it’s the personality that she slowly regains when she becomes more genuine … and she’s finding herself more (via the oathbreaking route#unlike before the clothes she wore were like costumes bc she’s trying to project a certain image. now it’s her actual authentic self#character building through fashion and wear? maybe so!#as for the stage inspo I think her own style would lean that way bc a) she prob has been influenced by astarion who I think has a more#theatrical style and since she’s new to the fashion in the surface she’ll probably ask him a lot#b) it’s a whimsical style!! and fun!! very bard like tbh but I think that’s what she’ll end up liking. it’s different from the tight#fitting/see through/sleek outfits that drow fashion favours and I think she’ll want to experiment w a different style than she’s used to#and also as for the ring. it’s a promise ring hehehe I talked abt it before but I like the idea that at some point they give each other#promise rings bc marriage!!! or anything of the sort!!! feels too big and too daunting currently and they’re probably taking it slow like#they’re elves they have all the time in the world quite literally for him he’s a vampire but I like the idea they have something that#reminds them or gives them that possibility of like something more 👁️ and the promise rings are just that. also they probably stole the#rings or looted it off a dead body somewhere lmfao#anyway…… Some Thoughts. !
43 notes
·
View notes
Photo
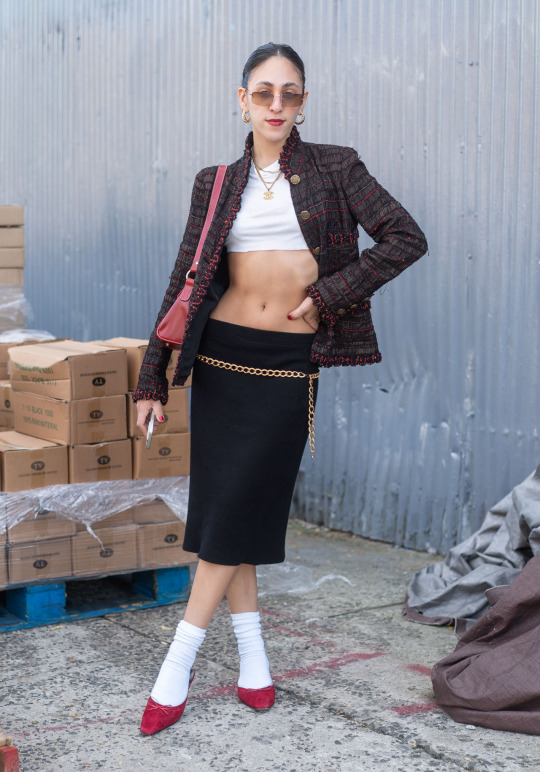
Noa, 26
“I am wearing a thrifted skirt with a DIY shirt I cut myself and a Chanel jacket from mid-2010’s. My style was influenced by the model off duty aesthetic. The Chanel is gifted and the skirt is like 3$ from the Salvation Army.”
Nov 12, 2022 ∙ Williamsburg
#nyc looks#street style#street fashion#street snap#authentic#peopl#new yorkers#thrifted#vintage#chanel#clothes#style#fashion#thrift2death
291 notes
·
View notes
Text

updated my sona a little bit to be more meee
#art#my art#oc art#anthro#sona#main oc#I always doll my sona up in these cute clothes and then doodle them in a jacket so I thought might as well just put em in a jacket#more authentic
7 notes
·
View notes
Text
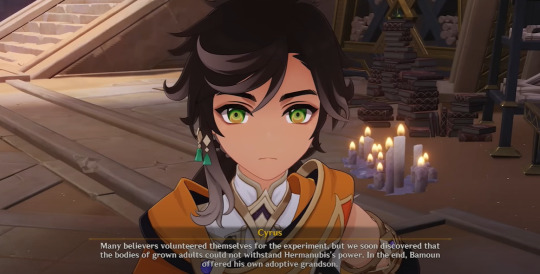
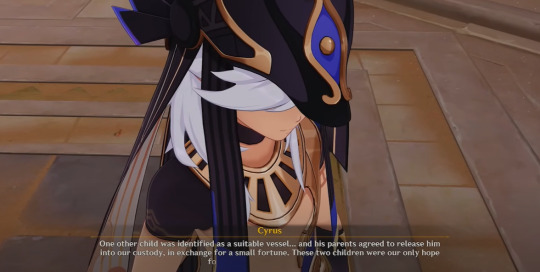
And if it wasn't clear enough, every adult who had a say in Sethos and/or Cyno's lives should be damned for eternity
#◜✧ . ❪ muse. sethos. ❫#I was baffled when Bamoun & Cyrus said adults couldn't withstand Hermanubis' power so they went and tried it on CHILDREN???#I feel terrible for both Sethos and Cyno bc their guardian figures were ATROCIOUS and yet they were all these 2 ever had.#So even though Cyrus bought Cyno off from a couple to experiment on him and then never told Cyno ANYTHING#about his roots; the experiment; the Temple etc <- which he had every right to know. esp after he became an adult#and even though Bamoun offered Sethos up for the experimentation w/o missing a beat; both Cyno and Sethos continued to love them#Cyno almost gave his precious power & life purpose away to save Cyrus' life from a betrayal that the old man went through willingly#and Sethos lived his whole life /for/ Bamoun's goal; then wept once Bamoun died bc he was the only authentic connection he had#I bet Cyno and Sethos must be/must've been conflicted on how to feel about their respective guardian figure/s bc yeah...#they received a roof over their heads; warm food; nice clothes; excellent education etc thanks to them#but these old men ALSO took advantage of them being orphans & viewed them as means to a goal rather than as people#God Sethos and Cyno have so much in common it's surreal. I can't believe Cyno was released two YEARS ago#and we only found out about Sethos and his connection to Cyno NOW </3 Cyno's POV throughout the story be like 😭
15 notes
·
View notes
Text
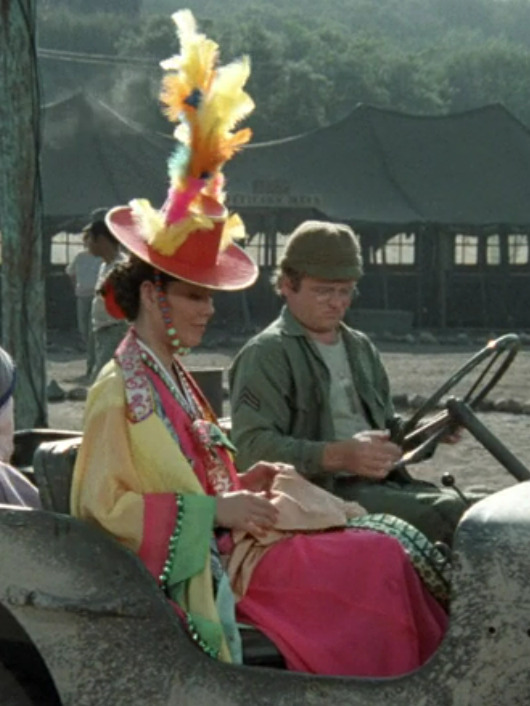

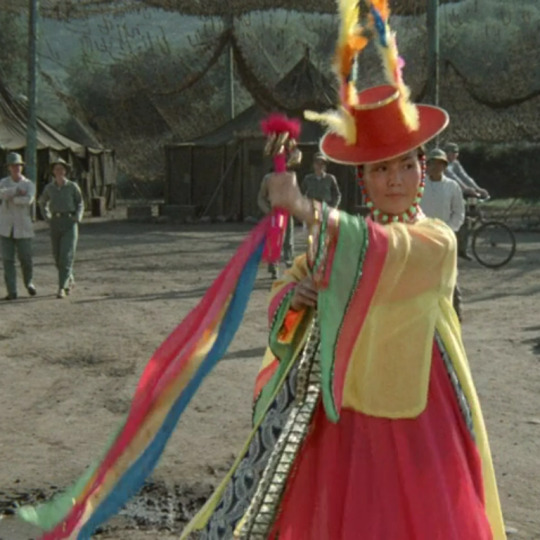

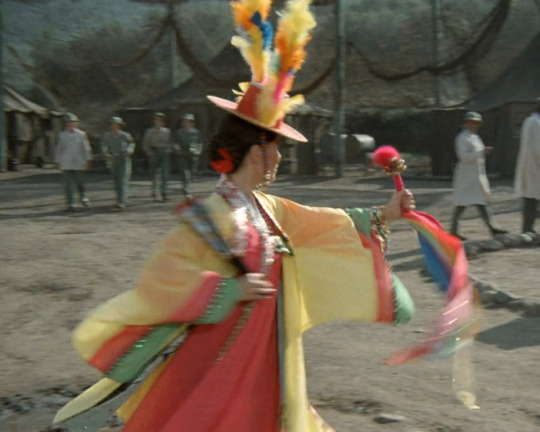
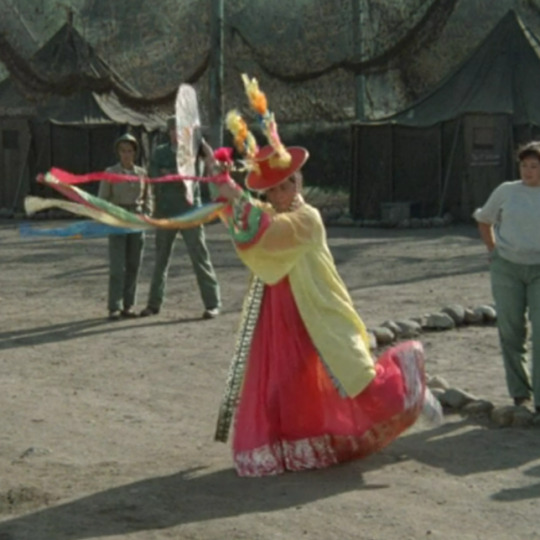
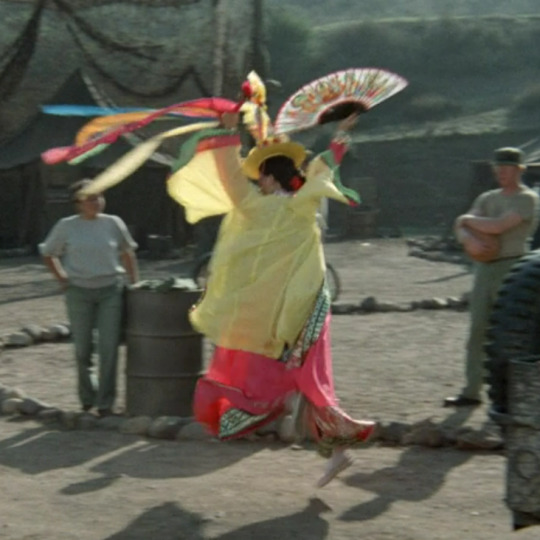

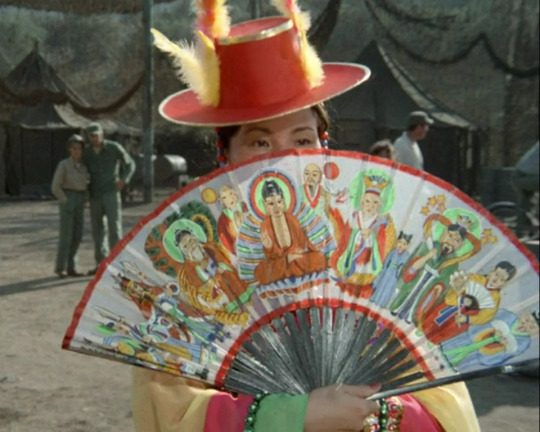

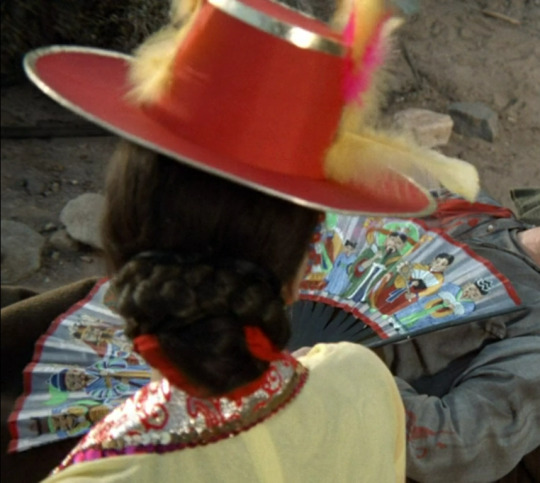
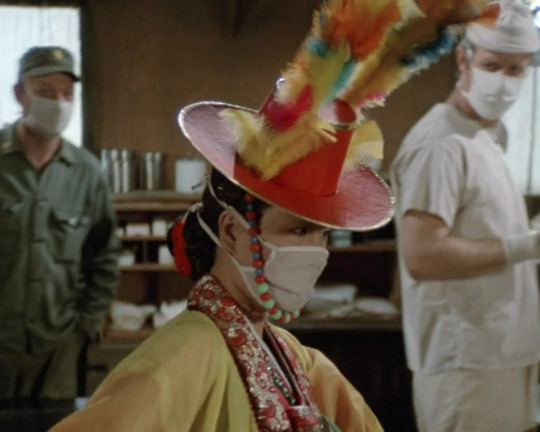
special: korean shaman from season 5 episode 13 "exorcism"
#i couldn't not post this one#her dress is so stunning and i love the way she dances in it#this is one of my favorite episodes for sure#according to mash wiki her clothing and dances are entirely authentic#i don't have the knowledge to confirm that but i love how respectful the episode feel towards the natives and their tradition#i love how the scene with her dancing goes on for so long and really lets it breathe#such a beautiful scene <3#by the way if anyone has resources (online/literature/whatever) about the local clothing and tradition i'd be excited about anything!#will forever hate that our historical costuming classes only cover europe#have a great day everybody#mash#m*a*s*h#klingerfashionarchive#mashblr
30 notes
·
View notes
Text
If you became super rich and could design your own house, but could only add THREE unnecessary/random/expensive home additions (like how people will have bowling alleys, movie theatres, closets with museums of shoes, car display rooms, spa rooms, wine cellars, etc. in their mansions) - what three would you choose?
#I think I would have: an indoor pool (but like heavily customized with a faux weather system so I could get the feeling of swimming in#rain or fog or snow etc.). a very small arcade consisting only of skee-ball and DDR machines. and an old Library Room with authentic#historical furniture/interior design to store old books/tapestries/study room equipment/whatever other antiques I'd collect. It'd be#like some fully intricate movie set or something that would feel completely like stepping into another world/time.#Though I might would trade out the arcade for a roller skating rink.. i DO love skating....#And I wouldve put rock climbing gym because I love indoor rock climbing but.. as I understand it they have to change out the rock things#on the walls every once in a while so that you can have new routes and it doesnt get boring. and I'd rather have an activty room thats like#self sustaining and doesnt require me to hire some person to come switch things around once every month. Otherwise I would#totally do that instead.#I'm also personally not counting ''craft'' type stuff like having a pottery room kiln sort of thing because#that doesn't count as 'unnessecary' to me. since stuff like that would not at all be just a hobby I 'happen to#do sometimes for fun'#but would definitely be a career sort of thing. Like if I had the money for a fully stocked sculpture room and and a sewing room#with a good machine and etc. then I would literally be professionally selling pottery and designing clothing and etc.#so I wouldn't count it as 'just a random side room I dont need' etc.#The same way that if I played tennis professionally or as a very intense hobby that takes up most of my life/time#then I wouldn't count having a tennis court in your house to practice in as 'unncesscarry' etc.#wow that is the worst I have ever spelt that word ghbjh#Un Cess Carry#ALSO would obviously have an underground bunker of some sort with food and emergency supplies which also does not count as unnecessary to m#since it's literally like... survival.. And I thought most health organizations literally reccomend that even#the common person has a small 'go bag' prepared in their house. and like an evacuation plan in case of fire or other things#It WOULD be an unnecessary rich person thing to have a full on undergRound village or something stocked with 9000 guns and#whaetever. but I think just a basic emergency room with basic supplies could still be counted under the 'not unnecessary' requirement.#Like I would say that a sprawling courtyard of flower gardens and fountains and hedge mazes that takes up like a hundred thousand#dollars a year in maintenance would count as one of the three 'unnecessary and expensive' things. But having a small garden in the#back yard with a few planters in a little greenhouse or whatever would not. The 'excessiveness' of the thing matters lol#ANYWAY!!!#Just curious what other peoples Three Main things would be... hrrmm
10 notes
·
View notes
Note
And second request, would you please draw a Narrator/Stanley outfit swap, because I stated thinking of them dressing up as each other for Halloween/just for fun and think it sounds neat!

Day 26 - Leave the sleeve up, leave it alone!
#My art#Requestober#The Stanley Parable#TSP#The Narrator#Stanley#The real joke here is that their clothes actually fit each other at all lol#Sinister is a string bean and Narra is short and stocky - hopefully his bulk would account for vertical stretch?#Considering I view Stanley's shirt as a cotton/blend of some kind it's a miracle he's not bursting the seams hehehe ♪#And of course he wears it correctly! Buttons down the collar for the first time since it started existing lol#And while in his proper dress mood he turns his eye to Stanley to start making it his problem as well lol#Poor Sinister! Narra literally doesn't care even a little bit haha#Generally Stanley keeps his arm uncovered - as shown in his usual outfit! - since he's prone to overheating#Plus it's always irritated so any kind of abrasion - even just cloth - can be painful#But I mean if Narra cared in the first place his arm wouldn't look or feel the way it does lol#What's a bit of pulling the sleeve down so it looks ''correct'' among friends/enemies/lovers/existential soulmates#That aside they do look cute haha#Stanley in something kinda fluffy and plush ♪ And the Narrator in a simple button-down!#I feel like he'd want to put at least a vest over it lol - yes a button down is fine but mmnggg layers!#Oh and he gets to keep his glasses - for now - so he's not just stumbling around for authenticity's sake#Not that he's about to allow Stanley the same grace hehe ♪
35 notes
·
View notes
Text
Amateur sewing - Red Riding Hood
So, uh... I've sewn a thing.
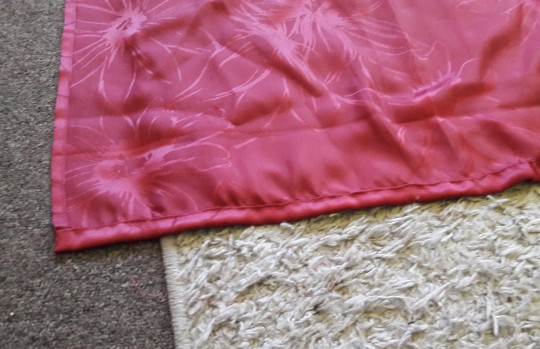
I'm reusing an old curtain here, it's polyester. It looks nice in theory, but I'm not even going to try and pretend it's anything else than 100% plastic. 140 cm x 140 cm square for the cloak, approximately an eternity of hemming.
Behold! Two different sets of lines that don't actually say anything because I can't do math and had to do the pleating, like, a dozen times.
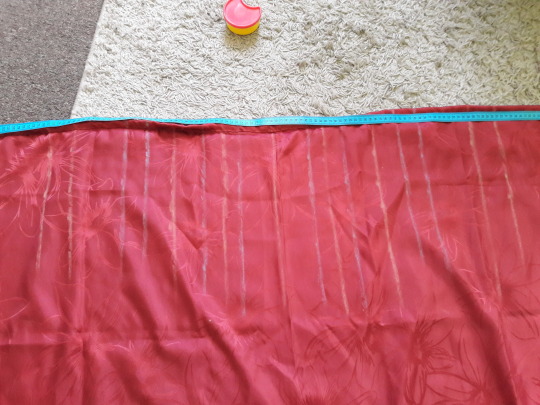
First half of a box pleat in the making, 7 cm wide. I wanted a pretty drape for the back, and we're getting there.
Box pleat in the middle, additional knife pleat on either side. When I realized that the cloak was still too wide to fit into the shoulder capelet the way I wanted it, I cartridge-pleated the outer several centimeters up to the knife pleats.
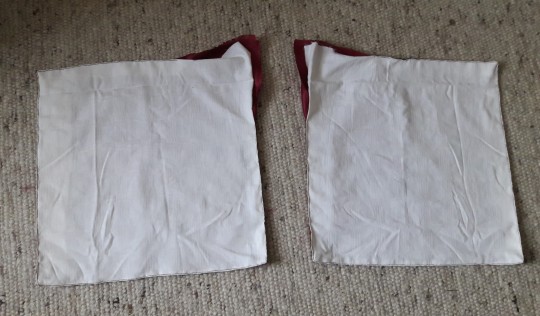
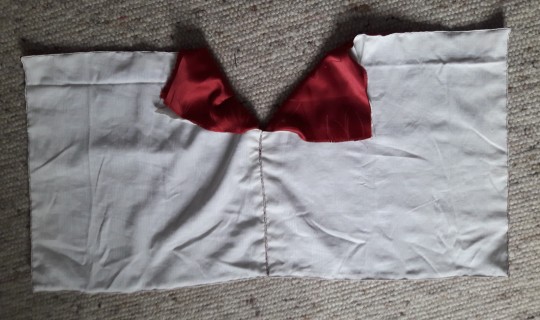

Speaking of, shoulder capelet! I started out with two 40 cm x 40 cm squares outer fabric and the same size of lining. The lining is the rest of a duvet cover I began slaughtering for lining a while ago, cotton, because I may be cheap but I'm not suicidal. Don't want that much polyester directly on my skin. I sewed the squares together and hemmed them all around except for the corners where I still had to figure out how much I needed for my neck, and that got me to the yoke shape you can see above.
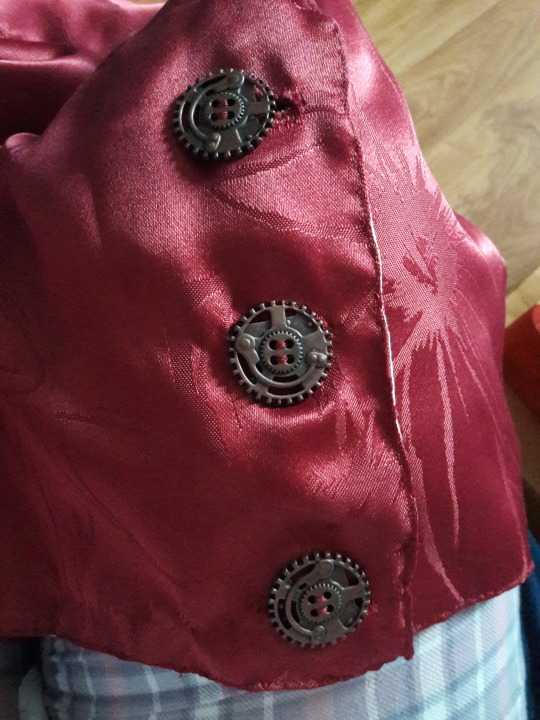
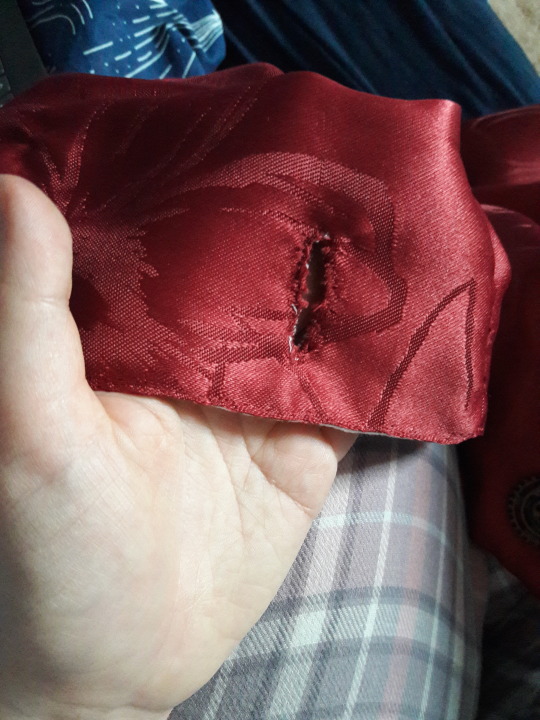

Could I have gotten away with a more practical closure than buttons? Yeah, definitely. Especially since this "fabric" frays like a bitch. I can actually do a darling buttonhole stitch, but you wouldn't be able to tell from this because I was working against the fabric. Then again, I had these buttons lying for around for far too long; they were presents from a friend and I never got a use for them. A fantasy-ish Red Riding Hood cape with zero historical basis seemed like the way to go, and I love them.
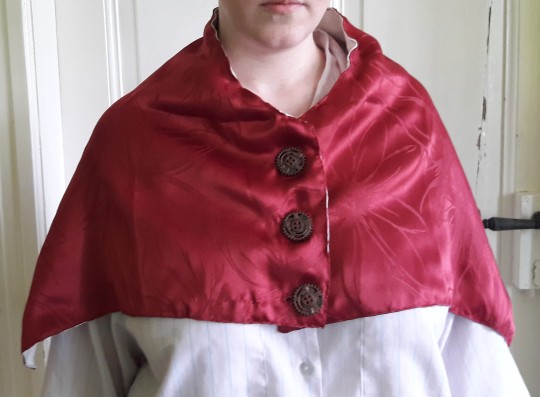
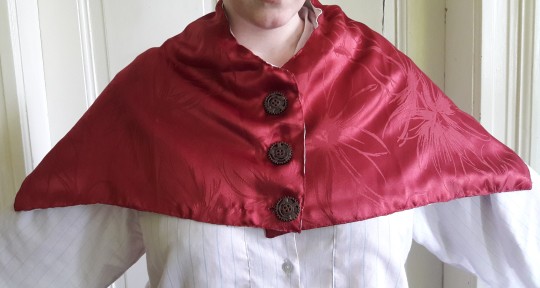
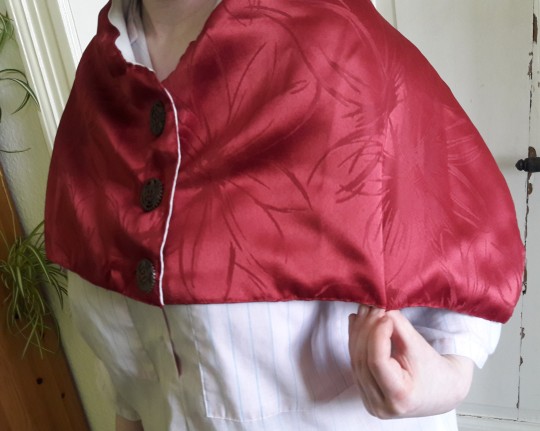
The finished capelet was kinda uselessly bunching around the neck, but I didn't much bother with that because there's still a hood waiting to go there. The way it fell over the arms when I didn't spread them was a bit more annoying, so I took in a tiny lil dart on each side, back and front.
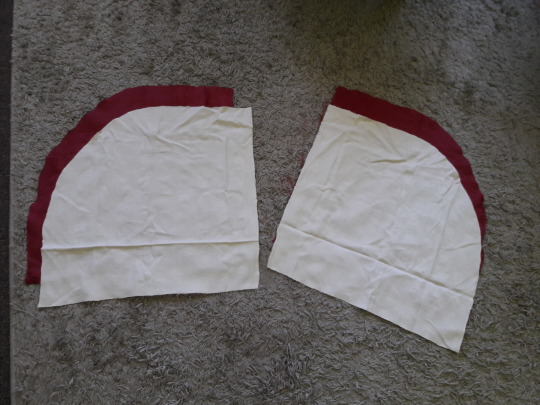
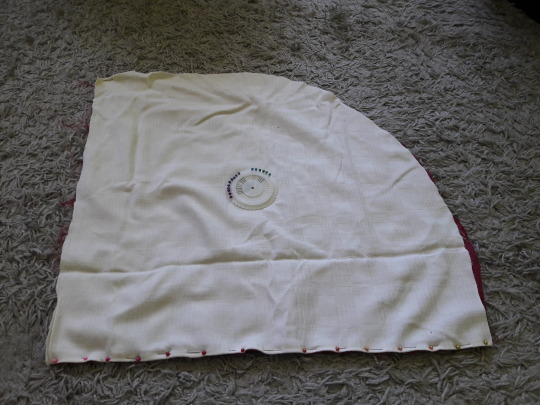
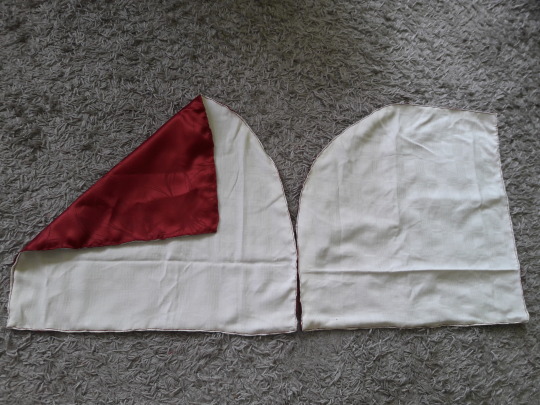
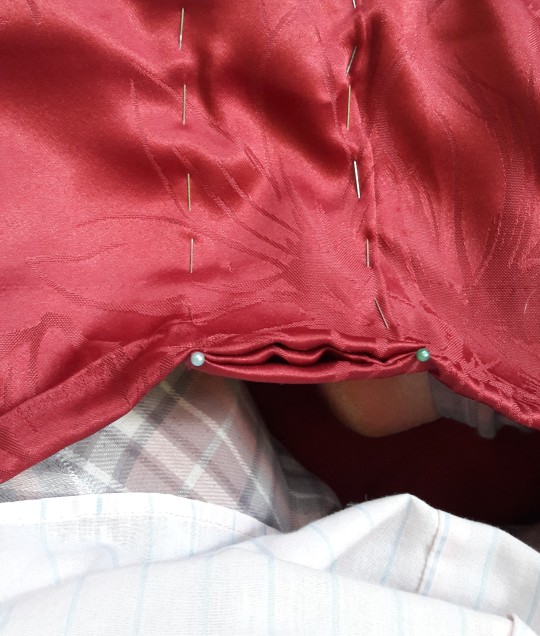
I wanted a huge-ass hood for this. In the end, it would have probably been wiser to use the bigger squares for the shoulder capelet, but I have no regrets. Same story as with the capelet, just a lot less complicated; off with the corner and in with the lining.
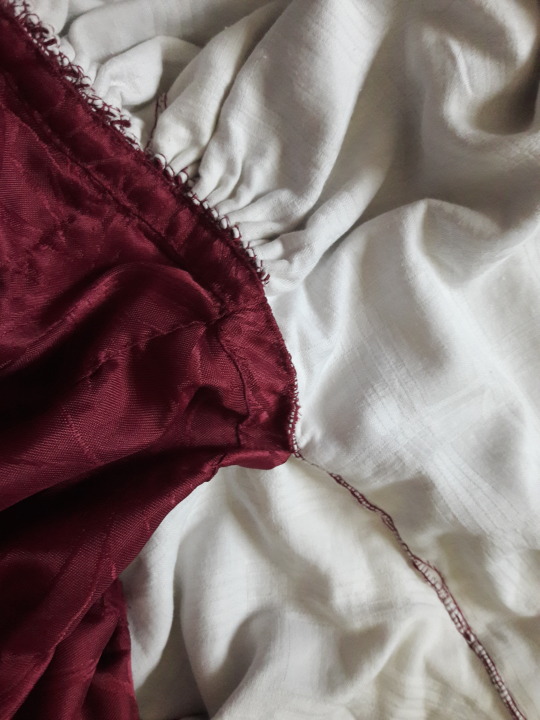

That's how the whole mess looks on the inside of the capelet, the back of the hood cartridge-pleated down until it fit the neck opening. It's not pretty, but I really fastened every tuck twice and thrice. Then the cloak... oh boy, that nearly broke me. But I sewed it in around the back half of the neck opening so that it came out in the centers of my shoulders, and from there in a 90 degree-angle down the back. It ran out in that L shape you can see up there, not so much because I intended it but because I didn't have the best control over the cartridge-pleated outer part of the cloak.
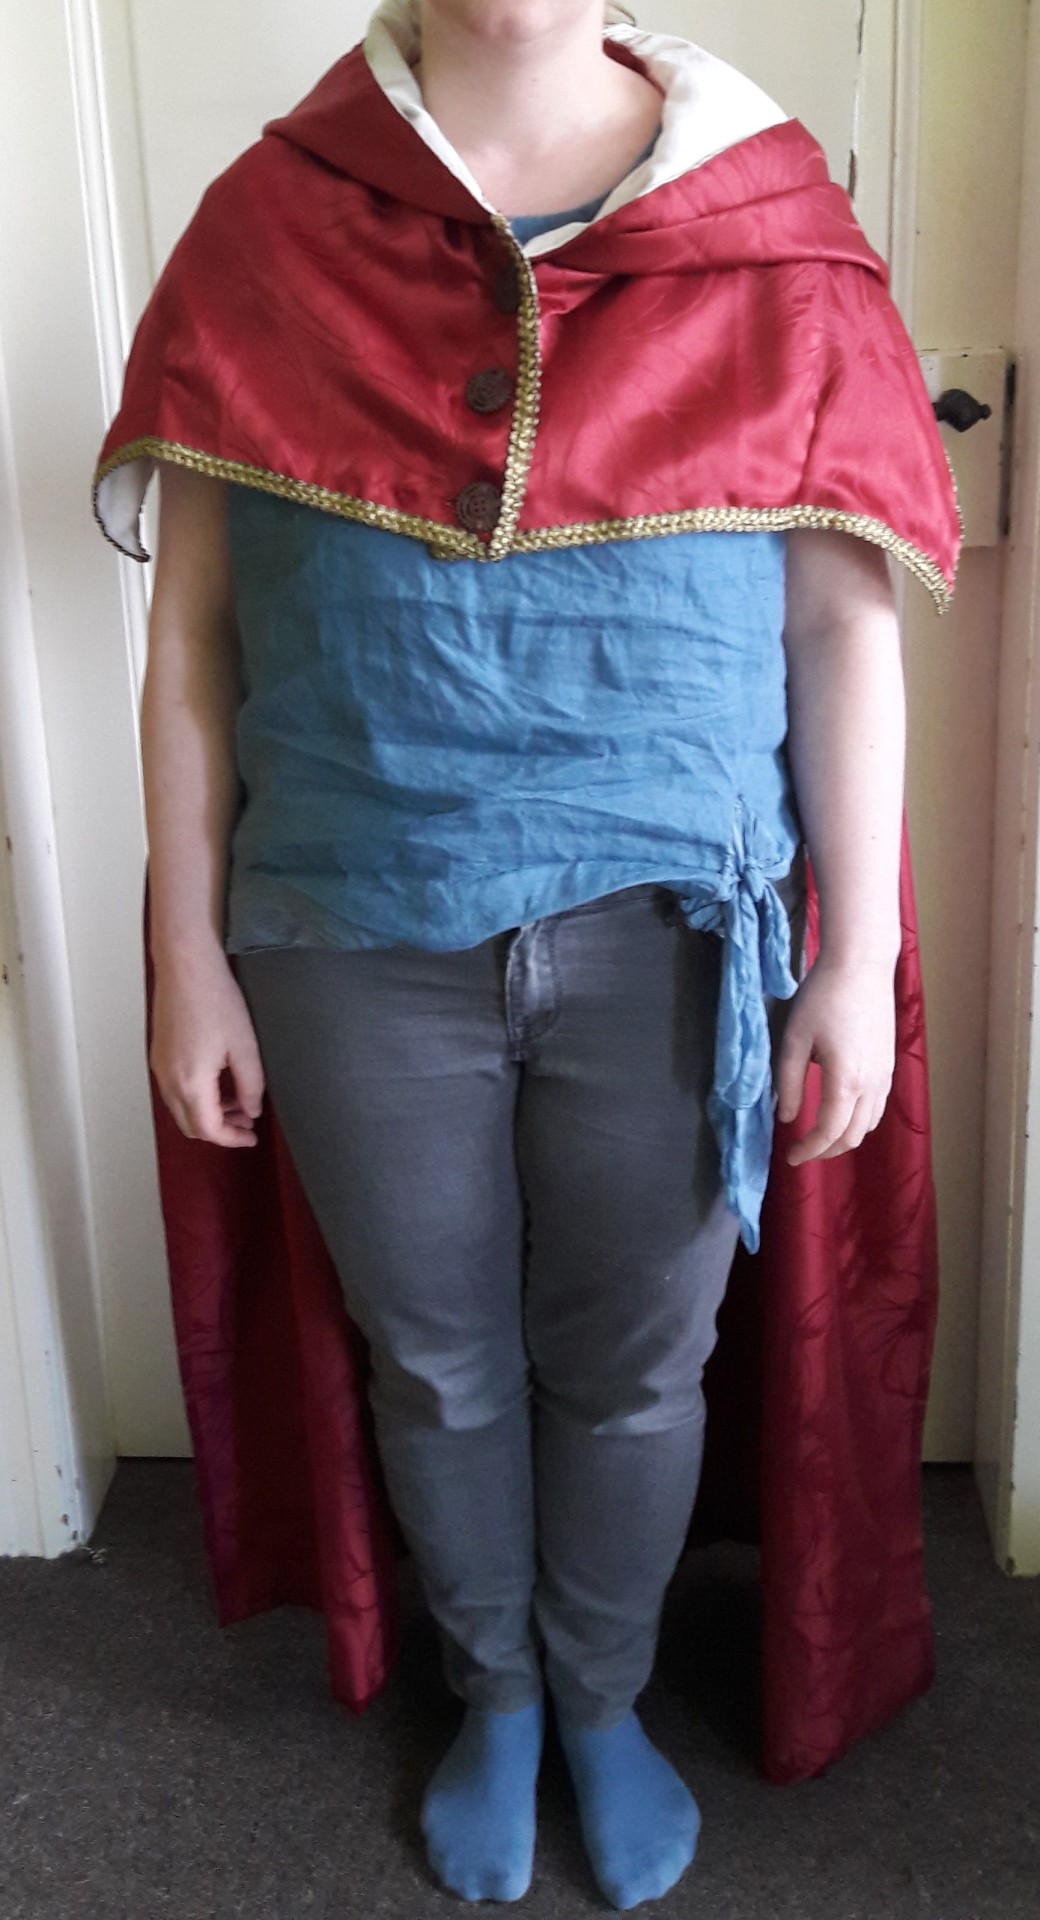
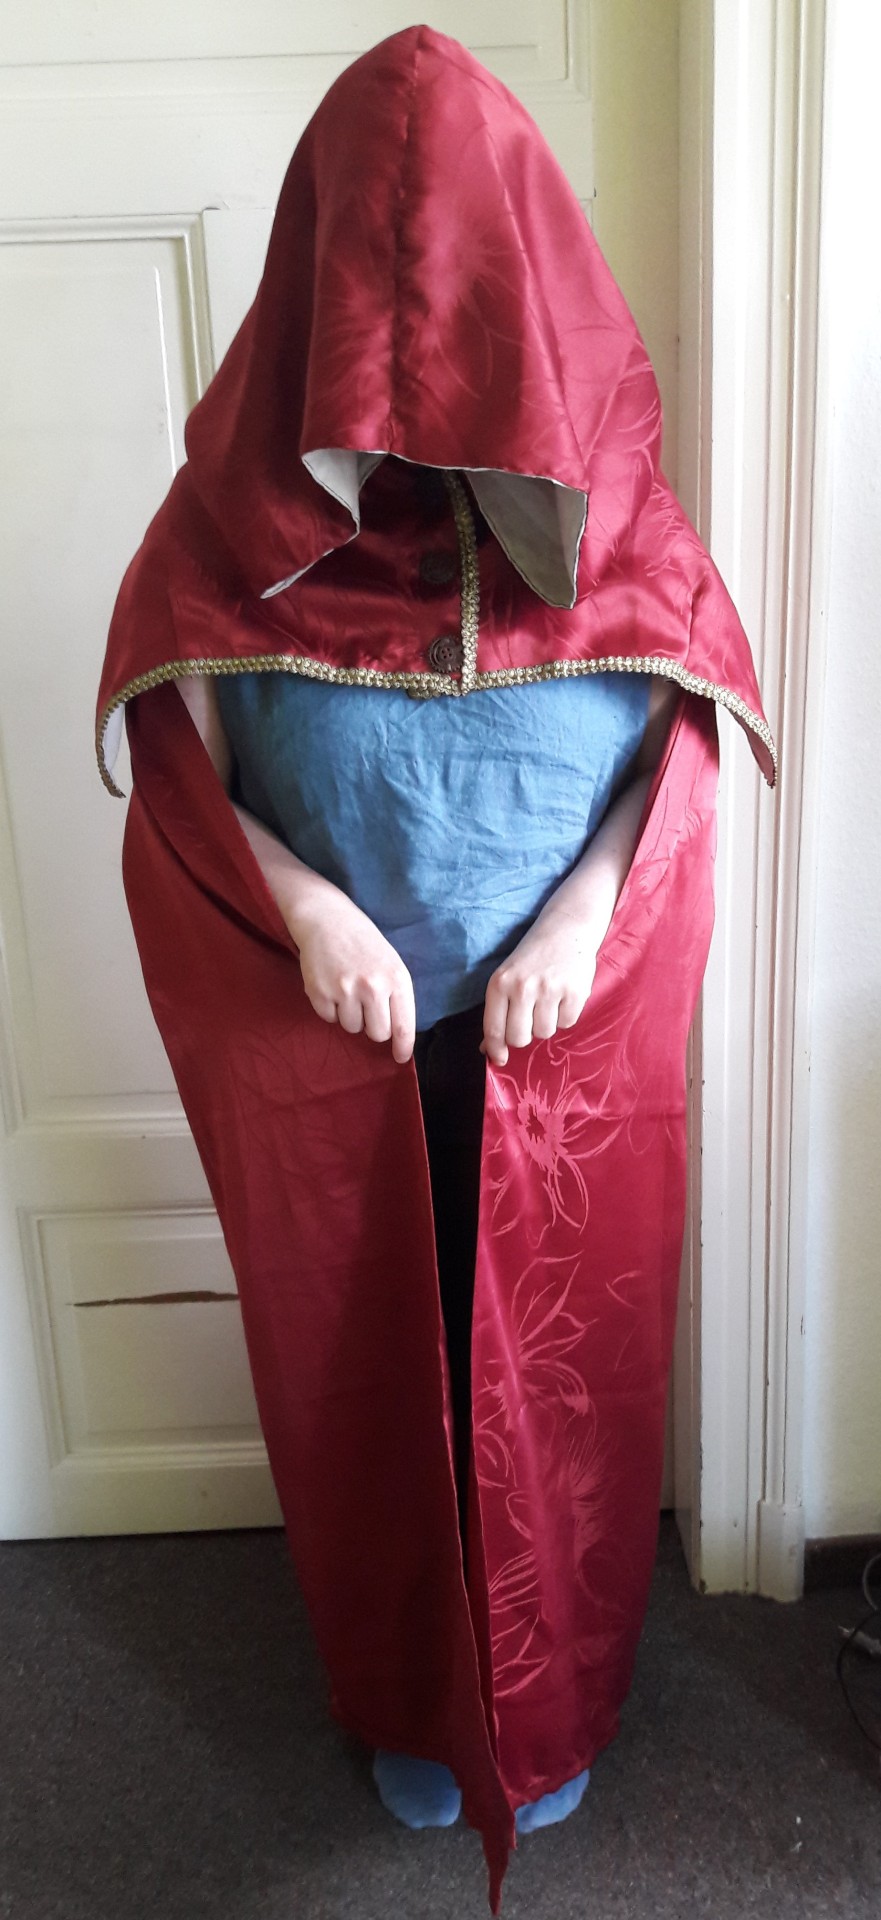
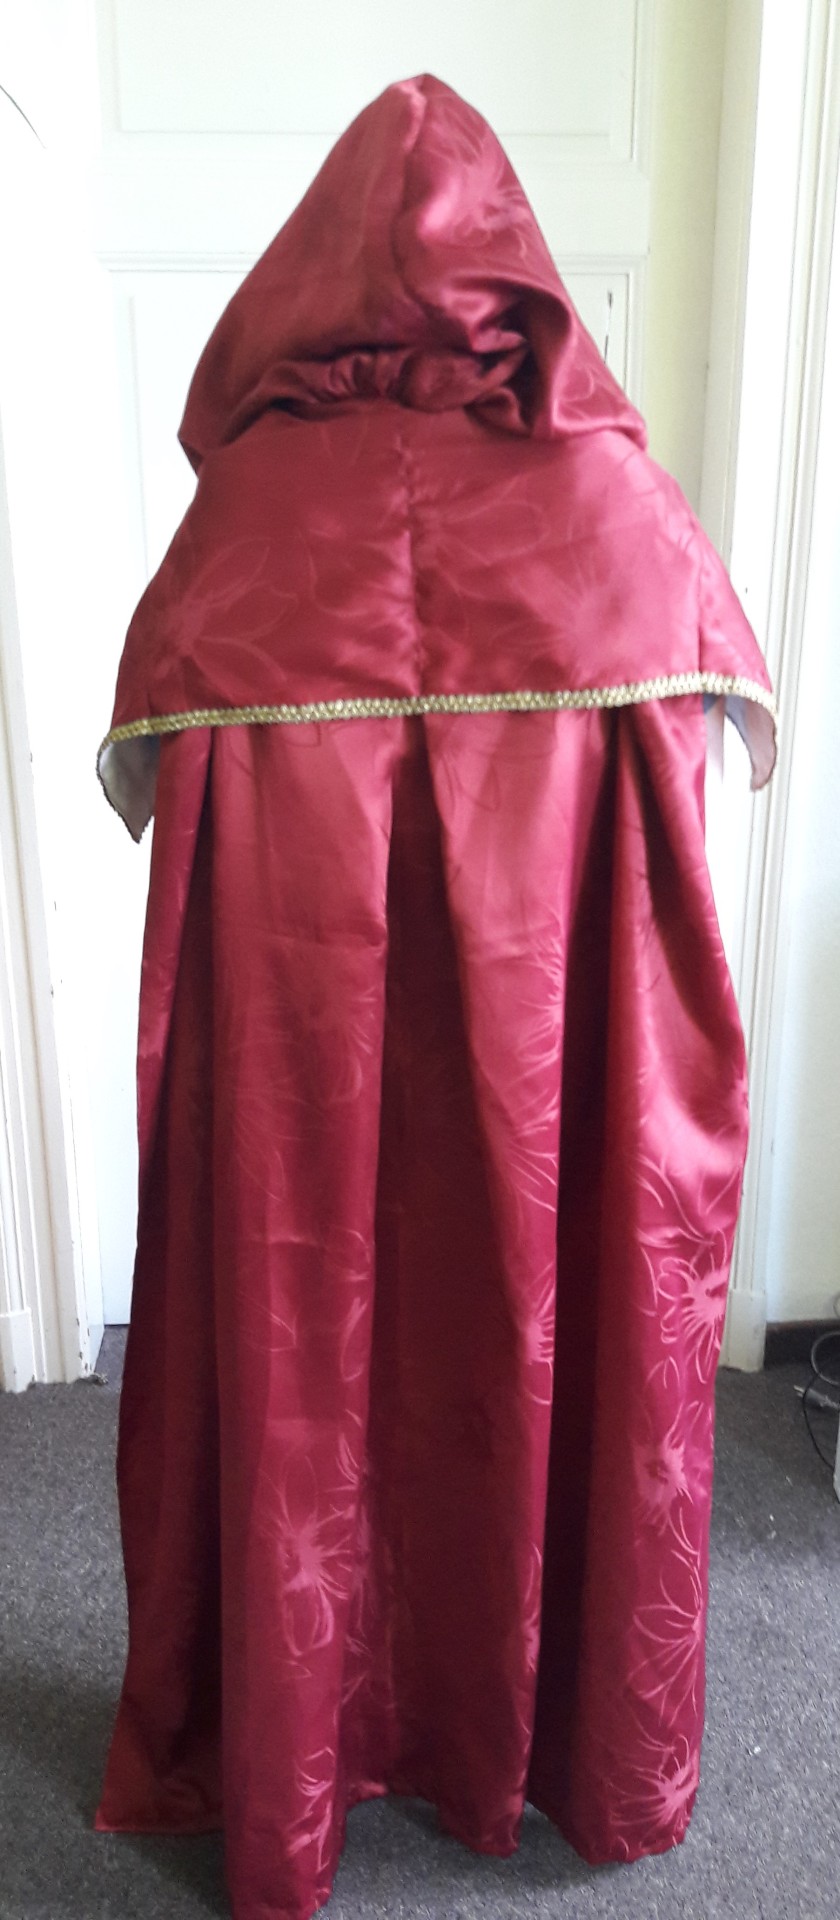
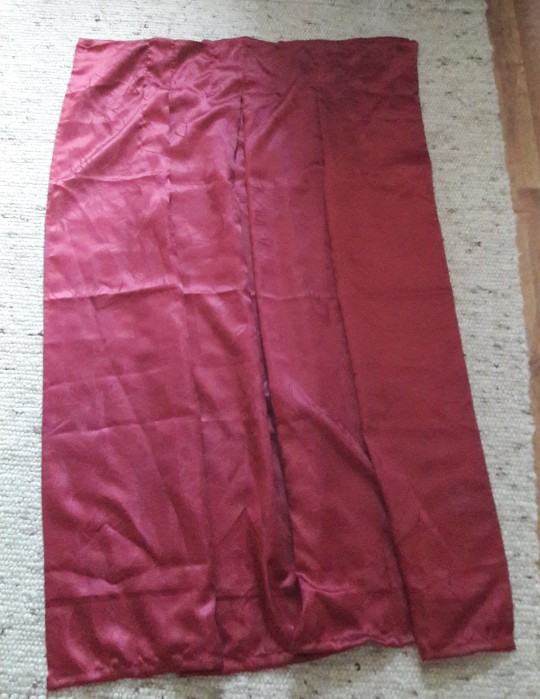
And after I sent around the poll... I just went and did the opposite of its result ^^' I did end up putting the fancy golden trim around the capelet instead of the hood bc 1st, people I asked live said it'd look better there, and 2nd @kittycatalex made a pretty good point for sensory issues. And it looks so nice. Look at this big hood. I can play such a shady figure in this. The whole cloak is a bit top-heavy because the hood is bigger than the capelet, and the cloak doesn't have any lining, but that only means that the back can dramatically go whoooosh when I move. And when I don't move - behold that drape! So worth the bother!
8 notes
·
View notes
Text
Tory Burch s/s 2024 rtw
Creative Director Tory Burch
Fashion Editor/Stylist Brian Molloy
Photographer Armando Grillo
Newest Cool
#newest cool#newestcool#ootd ideas#model off duty style#bella hadid outfit#bella hadid aesthetic#vintage outfit#vintage clothes style#style fashion vintage#vintage fashion aesthetic#designer fashionable#designer style#fall outfit idea#edgy fashion outfit#minimalistic aesthetic#minimal fashion#quiet luxury#quiet luxury fashion#quiet luxury style#timeless fashion#tory burch bags#tory burch bag#tory burch original#tory burch shoes#tory burch authentic#ss2024#ss24#ss 2024#spring/summer 2024#ss 24
29 notes
·
View notes
Text

I felt very festive in my outfit yesterday. The fact that the skirt, blouse and vest are all handmade also makes me very happy!
#I’ve also noticed my style / what clothes I feel comfortable in changing recently#this outfit felt very authentically me which made me very happy#I hope I can feel like this more in the future#maybe I should get / make more waistcoats haha#my outfits#my posts#me#mine#vintage style#vintage fashion#handmade fashion#feminine style#vintage style not vintage values#femme
15 notes
·
View notes
Text
LOOK AT WHAT I ORDERED

I’m gonna style the green shirt dress with white tights and white gogo boots that have a black heel and big black earrings
3 notes
·
View notes
Last Seen Blogs

neverendingdots
embrace your imperfections

fandomwritesaesthetics
Mad Men Know Nothing

endachi-singularity
A Returning King

longwayaround
we're all stories in the end

michaelhavieraz-blog
Untitled