#autossh
Explore tagged Tumblr posts
Visit Tumblr Blog
Explore Tumblr blogs with no restrictions, modern design and the best experience.
Last Seen Tumblr Blogs


Fun Fact
Tumblr’s reach among the 26-to-35-year-olds in the US is 11%.
Text
Autossh – automatically restart SSH sessions and tunnels
https://github.com/Autossh/autossh
0 notes
Text
WSLのインストールから、外部からのSSH環境構築までの備忘録
インストール
ここを参考にした。 以前WSL1を触った時はMicrosoftストアからイメージをDLする感じだったと記憶しているが、コマンドだけでインストールできた。 Powershellでのコマンド:
wsl --install
これだけでUbuntu20.04が自動でインストールされた。
イメージの移動
デフォルトではCドライブにインストールされる。 しかし後々ディスク容量を逼迫することが目に見えたので、別ドライブにイメージを移動させた。 ここを参考にした。 Fドライブに1TBのSSDを増設したので、基本ここの直下を使うことにした。 Powershellでのコマンド:
wsl --shutdown wsl --export Ubuntu F:Ubuntu.tar wsl --unregister Ubuntu wsl --import Ubuntu F:Ubuntu D:Ubuntu.tar --version 2
これを行うことで、デフォルトユーザーがrootになってしまう問題がある。 基本vscodeのremote sshで接続する予定なのであまり問題はないが、リンクを参考にしてユーザー権限で起動するショートカットを作成した。
また、後々明らかになったのだが、デフォルトのイメージはディスク容量が256GBを最大値として作られるようだった。 容量を拡張するために、ここに従ってコマンドを実行した。
同一LANからWSLにSSHする
Ubuntu内でsshサービスを立ち上げておく必要がある。 いろいろ試行錯誤したため記憶が定かでないが、open-sshは初めからインストールされていた。 なので鍵がうまく設定されていさえすれば、同一LANの外部から接続できそうだが、問題が2つある。
WSLではsystemdが動いておらず、サービスを自動で起動することができない。
WSL2ではホストであるWindowsと異なるIPが使用されており、直接外部から接続することが難しい。
このうち1. はWSLを起動するときにオプションでシェルスクリプトを実行できるので、それで解決した。 具体的にはWSL内でinit-wsl.shとかの名前のスクリプトを作成しておき、WSL起動時に
wsl -d Ubuntu -u root exec /home/user/init-wsl.sh
とすればよい。init-wsl.shの中身として
#!/bin/sh service ssh restart service cron restart
などと、起動したいサービスの名前を書いておく。 これでsshやcronなどのコマンドを実行できる。
つぎに2. は、Windowsポート22に来たパケットをwslのポート22に転送する設定を実施した。
for /F %%i in ('wsl -d Ubuntu exec hostname -I') do set ip=%%i netsh interface portproxy delete v4tov4 listenport=22 netsh interface portproxy add v4tov4 listenport=22 connectaddress=%ip%
この設定はここを真似した。 これらがWindowsが起動されるたびに自動で実施するために、
wsl -d Ubuntu -u root exec /home/user/init-wsl.sh for /F %%i in ('wsl -d Ubuntu exec hostname -I') do set ip=%%i netsh interface portproxy delete v4tov4 listenport=22 netsh interface portproxy add v4tov4 listenport=22 connectaddress=%ip%
とまとめたstart-wsl.batなるファイルを作成し、windowsのタスクスケジューラに設定した。
全般
最上位の特権で実行する: on
トリガー
タスクの開始: ログオン時
遅延時間を指定する: 30秒間
操作
操作: プログラムの開始
プログラム/スクリプト: 上記のファイルを置いたパス という感じ。
別LANから接続したい
GCEの無料枠の作成
別LANから接続する際の問題は
グローバルIPが固定されていないこと
である。 プロバイダのオプションで固定してくれるサービスもあったが、課金制だったため、無料で行う方法を探していたら、 ここを見つけた。 つまりsshのリモートフォワードを利用して、VPSを経由した接続を実現するというもの。 VPSの調達先として、Googleが提供しているCompute Engineをうまく使えば、課金なしで踏み台用の固定IPが手に入る。 設定はここが参考になった。
一点、GCEで作成するイメージとして、無料枠のマシンの名前が、2021年7月まではf1-microだったのが、8月以降e2-microに変わっている。 古い記事だけを参考にすると、誤って課金されてしまうので注意。 こことかに変更のあらましが述べられている。
もう一点、GCEのアドレスは外部に公開されるため、ssh用のポートは変更しておくことが望ましい。 これも確か上の記事の中でやり方が書かれていたはずなので説明割愛。
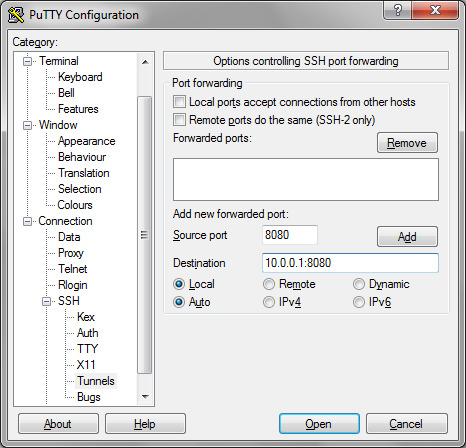
リモートフォワード設定
GCEのsshのポートは11111とする。 Windowsマシンのsshのポートは22とする。 このとき、WSL側で実行するコマンドは
autossh -f -N gce -p 11111 -R 22222:localhost:22
となる。 22222は別に空いていればなんでもよい。 接続先のgceの部分はWSL側の.ssh/configで良しなに設定されているとする。 sshでなくautosshとしているのは、接続が切れたとき再接続してほしいからである(aptでインストール可能)。 -f -Nなどのオプションは検索されたい。 -Rがリモートフォワードを指定するオプションで、gceマシンの22222ポートをlocalhost、つまりwslの22番ポートにリモートフォワードしている。
つぎに外部PC(ここではmacbookとする)で実行するコマンドは
ssh gce -p 11111 -L 33333:localhost:22222 ssh localhost -p 33333
となる。 もちろんmacbook側からも、gceを./ssh/configで設定しておく必要がある。 ポート33333も、空いていればなんでもよい。 また、1行目と2行目は、それぞれ別ターミナルから実行することに注意。 1行目でmacbookの33333ポートをgceマシンのlocalhost:22222にローカルフォワードしている。 この状態でmacbookのlocalhostの33333にsshでログインすると、macbook->gceマシン->wslというログインが可能になる。
もちろん、それぞれのsshコマンドでは、鍵が良しなに設定されていなければならない。
WSLでのssh自動実行
これでリモートで作業する環境が整ったのだが、
autossh -f -N gce -p 11111 -R 22222:localhost:22
のコマンドは、できればwsl開始時に自動で起動させたい。 ここでふたたび問題になるのが、WSLでsystemdが動いていない問題である。 さきほどのinit-wsl.shの下のほうにコマンドを追記しても、うまく動かなかった。 また、どうやら最近導入されたWSLのバージョンで、/etc/wsl.confの中で起動時に実行するコマンドを指定できるようになったらしいのだが、自分の環境ではうまく動かなかった。
いろいろ調べると、genieなるソフトを使えばsystemdを強制的に動かすこともできると書かれていたが、CPU使用率を上げてしまうという情報もあったので、避けることにした。
そこで、多少強引だがcronを使うことにした。 具体的には、上記のautosshのコマンド1行からなるtunnel_to_gce.shという名前のスクリプトを作成し、crontabに下記を追記した。
*/1 * * * * user pidof -x tunnel_to_gce.sh >/dev/null || /home/user/tunnel_to_gce.sh
1分ごとに実行されるので、かなり冗長だが、一応前半のpidof -x tunnel_to_gce.sh >/dev/null ||あたりの記述で、重複実行は避けられるらしい(シェルスクリプトよくわかってない…)
余談
とりあえず以上で
windowsが起動->wsl起動->ssh, cronサービス起動->autosshでgceにリモートフォワード
まで自動化できた。 したがってwindowsマシンが起動さえすれば、いつでも外部からssh可能になった。
あとはWake on LANまでできたら最高だが、Switchbotのスイッチが使えるという情報をみつけ、確かにそうだなと思ったので、早速ぽちった。 今日届いてPCの電源ボタンにつけてみたが、簡単に使えた。 いざという時の強制再起動に役立てられそう。
最後に、時にはGUI環境でWindowsに接続したい時もある。 これは普通にWindowsのRDP機能を使えばよい。 …のだが、なんとRDPサーバーの機能はWindows Proでなければ使えないことがわかった。
このため先ほどMicrosoft Storeから泣く泣くProライセンスを購入したところ。 ~~狡い商売しやがって、Microsoft許さん~~
以上です。 研究頑張ります。
3 notes
·
View notes
Text
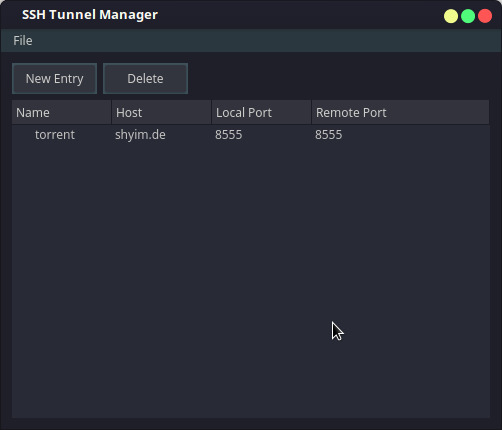
SSH Tunnel Manager

Sponsored Link
Under the Windows, traditional way for keeping SSH tunnels in good shape includes installing Linux tools (starting from SSH itself, Putty, Cygwin, autossh and so on) and street magic with scripts. Now you can forget about this hell, just setup your SSH tunnels. SSH Tunnel Manager SSH Tunnel Manager is a tool to manage SSH Tunnels (commonly invoked with -L and -R arguments in the console). With SSH Tunnel Manager you can set up as many tunnels as. Free is proffered, but please post information about any good windows SSH tunnel manager. Windows ssh vpn. Edited May 9 '09 at 7:44. 17.7k 6 6 gold badges 45 45 silver badges 54 54 bronze badges. Asked May 2 '09 at 5:59. Zoredache Zoredache. After downloading and extracting the zip file (Portable, No installation needed) you can run SSHTunnelManagerGUI.exe The first screen will ask for a location and password for your 'Encrypted. The Session Manager Port Forwarding creates a tunnel similar to SSH tunneling, as illustrated below. Port Forwarding works for Windows and Linux instances. It is available today in all AWS Regions where AWS Systems Manager is available, at no additional cost when connecting to EC2 instances, you will be charged for the outgoing bandwidth from.
gSTM, the Gnome SSH Tunnel Manager, is a front-end for managing SSH-tunneled port redirects. It stores tunnel configurations in a simple XML format. The tunnels, with local and remote port redirections, can be created, deleted, modified, and individually started and stopped through one simple interface. It is useful for anyone wanting to securely access private services over an encrypted tunnel.
Install Gnome SSH Tunnel Manager in Ubuntu
First you need to download the .deb package from here using the following command
wget http://kent.dl.sourceforge.net/sourceforge/gstm/gstm_1.2_i386.deb
Once you have the gstm_1.2_i386.deb package you need to install this using the following command
sudo dpkg -i gstm_1.2_i386.deb

This will complete the installation.
If you want to open this application go to Applications--->Internet--->gSTM
Double Ssh Tunnel Manager
Once it opens you should see the following screen
If you want to add ssh tunnel you need to click on add now you should see the following screen here you need to enter the name of the tunnel and click ok
Once you click ok you can see the following screen here you need to fill all the required detailed for your host and click ok
If you want to add a port redirection you need to select add under portforwarding in the above screen
Once you click on ok you should see the following screen if you want to connect to SSH tunnel select your host and click on start it should start connecting to your host

Ssh Tunnel Manager Windows
Examples

Remote Desktop
Ssh Tunnel Manager Linux
Remote Desktop to various Windoze servers in the private LAN. Although Remote Desktop supports some degree of encryption itself and you can easily create a port-forward in your firewall. First of all you don’t want to create a port-forward for every desktop you want to reach. Second and most important, you don’t want the Remote Desktop ports open for the world to see… for obvious security reasons.
Ssh Tunnel Manager Ubuntu
Secure POP3
Ssh Tunnel Manager
If you are running a POP3 service on your *nix router/server you are probably aware of the fact POP3 is an unencrypted, plain-text protocol. Hypothetically this means any ‘man-in-the-middle’ is able to read your username, password and e-mail content. Obviously, on your private LAN this isn’t a problem, however you might want to read your mail over the internet one day…
One solution would be to install pop3s or better yet, imaps. However there is another way, without having to install additional services: an SSH tunnel.The way it works is, you connect to your router/firewall through ssh and set up a portredirect over it (ie. a tunnel). You can then connect your e-mail client to your localhost. The connection will then be redirected over the encrypted SSH connection to your POP3 service. Et voila, a secure POP3 connection.
Sponsored Link
Ssh Tunnel Manager Expected Key Exchange
Related posts
Webmin Installation and Configuration in Ubuntu Linux (22)
Upgrade Ubuntu Server 6.10 (Edgy Eft) to 7.04 (Feisty Fawn) (4)
Update IP addresses at dynamic DNS services Using ddclient (17)
Ubuntu 7.04 (Feisty Fawn) LAMP Server Setup (16)
Settingup an FTP Server on Ubuntu with ProFTPD (28)
Securing SSH Using Denyhosts (10)
Mount a Remote Folder using SSH on Ubuntu (19)
1 note
·
View note
Text
MeterSSH – Meterpreter over SSH
MeterSSH is a way to take shellcode, inject it into memory then tunnel whatever port you want to over SSH to mask any type of communications as a normal SSH connection. The way it works is by injecting shellcode into memory, then wrapping a port spawned (meterpreter in this case) by the shellcode over SSH back to the attacker’s machine. Then connecting with meterpreter’s listener to localhost…
View On WordPress
#autossh#backtrack#backtrack (operating system)#backtrack 5#clientalivemaxcount#hack#hacker (fictional job title)#hacking#hacking class#hacking tutorial#hacking video#kali#kali linux#kali linux 2017.1#keepalive#linux#metasploit#metasploit project (software)#metasploit tutorial#meterpreter#modules#msf#msfconsole#nat#nat traversal#network address translation#penetration testing#pentest#pentesting#persistent ssh
0 notes
Link
1 What is SSH port forwarding? 2 Why use SSH port forwarding? 3 How many SSH port forwarding sessions are possible? 4 Local port forwarding 5 Test SSH port forwarding 6 Persistent SSH tunnels (Using Autossh) 7 Remote port forwarding 8 Dynamic port forwarding 9 Multiple port forwarding 10 List port forwarding 11 Limit port forwarding 12 Low latency
1 note
·
View note
Text
为了方便的用Jupiter lab
最后用了socat,做ipv6到内网ipv4的端口转发,很特殊的端口转发,所以得用到这种工��才可以。
好像是成了。yeahh
———
之前是用香港的vps搭了一个远程的ssh tunnnel , 也类似于端口转发,可以很稳定的保持一两天,但是,后来还是在某个时间段莫名其妙的失败断开了。
我猜测是因为公网ip动态换了之后导致的,然后autossh或者是ssh本身没有很好的解决换了ip这种问题,导致也没办法自动成功恢复,纯属猜测,,,,,
——
因为半夜上网冲浪的时候,偶然无聊查到了公网ip相关的信息,才发现我们是有权要求使用公网ip的。。。。然后就玩到了ipv6这里。
其实,用公网ipv4的话在这里的连接速度会高很多,但是我懒得搞了。
0 notes
Text
Exposing the on-premises Rancher API endpoint to your Amazon EKS clusters
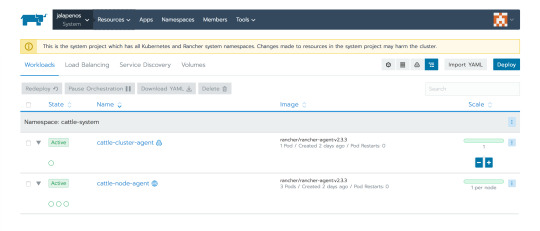
I’ll file this under port forwarding tricks your mother warned you about. I don’t recommend you try this at home and do not use for production. A common pattern is to deploy Rancher to manage on-premises clusters. It’s also very convenient to deploy an Amazon Elastic Kubernetes Service (EKS) cluster on the side for a hybrid deployment. This works great until you realize that the cattle-cluster-agent and cattle-node-agent isn’t coming up on the EKS cluster. Further investigation proves that the agents are trying to reach the Rancher API endpoint of your on-premises Rancher instance. The challenge here is two fold:
Your internal DNS is not available externally
You don’t allow or don’t have control of the corporate firewall to create the inbound rule even if you make the DNS name resolve
If you are thinking about deploying Rancher in this scenario for production, please use a proper site-to-site VPN and do involve your IT Ops.
In the Cloud
First you need to spin up an EC2 instance. Just use the Amazon Linux AMI. Attach it to the same security group as your EKS nodes. Also make sure inbound SSH traffic is allow from the same network the on-premises Rancher instance is communicating with AWS.
Next, the root user needs to be accessible. Copy the autorized_keys file from the ec2-user account and chown accordingly.
sudo cp ~/.ssh/authorized_keys /root/.ssh/authorized_keys sudo chown 0.0 /root/.ssh/authorized_keys
Next up, the OpenSSH daemon needs to be tweaked to allow tunneling ports on non-local interfaces. Ensure the below is set in /etc/ssh/sshd_config:
GatewayPorts yes
Then, restart sshd:
sudo systemctl restart sshd
Before proceeding, make sure you can SSH to your instance using the root account, passwordless.
Private DNS with Route 53
In the AWS console. Navigate to the Route 53 service and create a new private zone that is connected to the same VPC as your EKS worker nodes. The zone name should match the internal domain name where Rancher is running. Create a single PTR entry that matches the hostname of the internal Rancher API endpoint pointing to the internal address of the EC2 instance.
On-Premises
A Linux machine is required on the on-premises network that may communicate both with Rancher API endpoint and being able to reach the EC2 instance using SSH. Let’s assume we have an Ubuntu VM:
apt-get install -y autossh
AutoSSH will keep the remote SSH connection alive between the endpoints. Make sure you also have the SSH key the EC2 instance was created with to allow access to it. Make sure the SSH connection works, and then setup the tunnel.
sudo ssh -i mykey.pem [email protected] hostname sudo autossh -f -R \*:443:rancher.example.com:443 -i mykey.pem [email protected]
This is should spawn a autossh process from the local machine to the remote server and tunnel the remote port to the local API server. Make sure to replace the hostnames and key name to match the file (requires to be chmod’ed 400).
Presto!
Simply login to the Rancher UI, navigate to the EKS cluster’s System Project and go to Workloads. The cattle-cluster-agent and cattle-node-agent should eventually come online. Delete the individual Pods to speed up the process.
As I mentioned. Do not run in production!
0 notes
Text
Can you not remote tunnel via SSH / autossh diff ip's/servers using the same local port?
Can you not remote tunnel via SSH / autossh diff ip’s/servers using the same local port?
[ad_1]
So my Internet where I live run by crazy jerks who want all the ports blocked… So I run my stuff via tunnels. For fun I wanted to know if I could run 3 tunnels on 3 diff servers under 1 firewall/ip remotely. For fun it's more for Load Balance as people might be eating up a lot on the first server so they can use the 2nd or third… I hear ssh has a bit of a connection limit.
autossh -M…
View On WordPress
0 notes
Quote
ngrokに比べたデメリット ちょくちょく接続が切れてる 長時間放置してたりすると接続が切れてたりする。 これが結構な頻度で切れてるので、autosshを取り入れるのはありかなと。 Automatically reconnect Use autossh for more persistent tunnels. Use “-M 0” to disable autossh’s connectivity checking (rely on ServerAliveInterval and ServerAliveCountMax instead): autossh -M 0 -R 80:localhost:8888 serveo.net
試しにngrokからserveoに乗り換えてみた | Life Retrospective
0 notes
Text
autossh version 1.4b for OS X
The formula for autossh was recently updated to version 1.4b.
To install autossh on your Mac, open your Terminal application and run the following commands;
brew update brew install autossh
The updated formula is as follows:
1 2 3 4 5 6 7 8 9 10 11 12 13 14 15 16 17 18 19 20 21 22 23 24 25 26 27 28 29 30
require 'formula' class Autossh < Formula url 'http://www.harding.motd.ca/autossh/autossh-1.4b.tgz' homepage 'http://www.harding.motd.ca/autossh/' md5 '8f9aa006f6f69e912d3c2f504622d6f7' def patches DATA end def install system "./configure", "--prefix=#{prefix}", "--mandir=#{man}", "--disable-debug", "--disable-dependency-tracking" system "make install" bin.install 'rscreen' end end __END__ diff --git a/rscreen b/rscreen index f0bbced..ce232c3 100755 --- a/rscreen +++ b/rscreen @@ -23,4 +23,4 @@ fi #AUTOSSH_PATH=/usr/local/bin/ssh export AUTOSSH_POLL AUTOSSH_LOGFILE AUTOSSH_DEBUG AUTOSSH_PATH AUTOSSH_GATETIME AUTOSSH_PORT -autossh -M 20004 -t $1 "screen -e^Zz -D -R" +autossh -M 20004 -t $1 "screen -D -R"
Currently autossh has no dependencies in homebrew.
See which packages depend on autossh.
1 note
·
View note