#but later it doesnt work anymore
Text
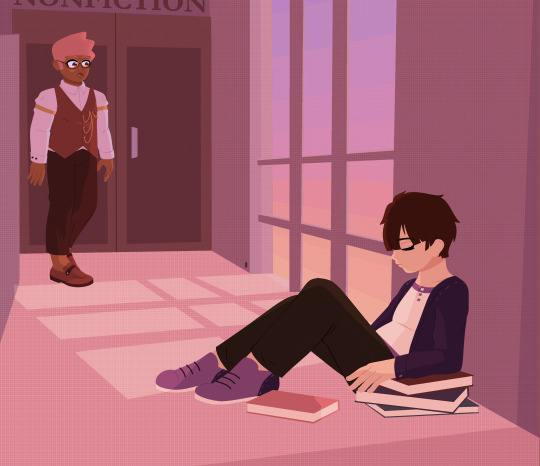
pov the new hire at your detective agency turns out to be the infamous gravity-manipulator and mafia executive who went missing two years ago wwyd
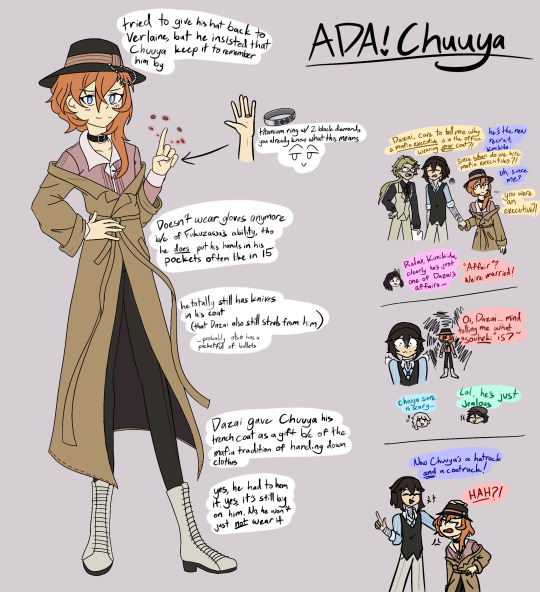
remember this post I made a few days ago about ADA!Chuuya wearing Dazai's coat? yeah well i went ahead and drew the loser and his oversized coat
(i may or may not have added the ring impulsively only bc i was inspired by this lovely fanfic i read last night)
#i forgot to add to the og coat post but chuuya also keeps the coat bc detective murase also wore a coat like that#dazai just doesnt wear his coat anymore. idk. maybe later on chuuya gets him a new coat eventually as thanks for bringing him to the light#Chuuya gets a red shirt to match dazai's blue shirt bc they really do be the red/blue gays#also i think chuuya should get boots. combat boots even. for obvious reasons#chuuya definitely clings to dazai for his first few weeks at the agency (not that hed ever admit it)#dw tho he fits in sooner or later. he works well with ranpo and kenji and also he's drinking buddies w/ yosano#chuuya watching kunikida argue with dazai: wow thats harsh could never be me#MonarchArt#Soukoku#bungo stray dogs#chuuya nakahara#dazai drags chuuya into the ada au#dazai osamu#kunikida doppo#yosano akiko#edogawa ranpo#nakajima atsushi
532 notes
·
View notes
Text

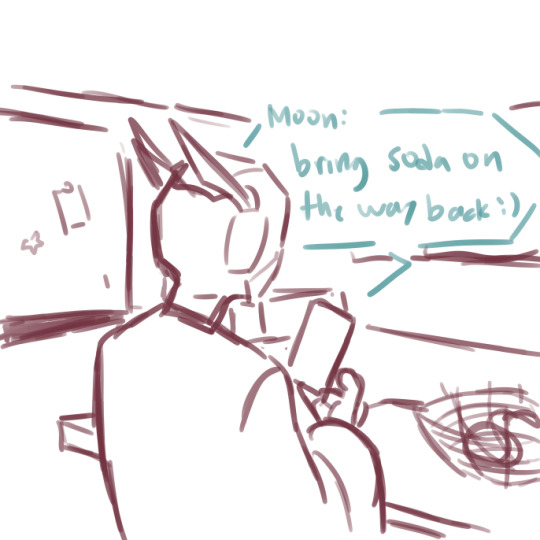
do you think they be like that
#sketch#rain world#iterator#looks to the moon#five pebbles#sibling#they being sibling#and i like to picture that moon can be an annoying big sis#silently#and pebbles is either#“whatever ok”#or “you bitch get your own”#i think moon will purposely annoy pebbles#by asking pebbles to buy or bring shits for her#and if he refuses#she'll go like “dont you remember the times when you almost get me killed. like twice”#and pebbles would go#but later it doesnt work anymore#and become their inside joke
243 notes
·
View notes
Text
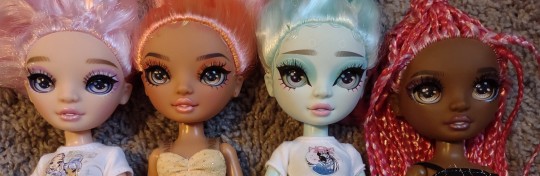
did a round of eye swaps this weekend! it's the most ive done all at once, and i gotta say, i do not recommend it. by the time i got new eyes in these four, my hands were begging me to stop, so poor Priscilla sat eyeless for a while. but I'm really happy with the results!
let me walk you through the process a bit.
i used this guide to help decide which eyes i wanted to use.
this all started because i wanted Daria's eyes for Zooey.

Daria's eyes don't match her color scheme at all, and this has always bothered me about her. they stand out too much, and its jarring. but that minty blue and pale pink are Zooey's colors exactly, it would complete her alien vibe perfectly.
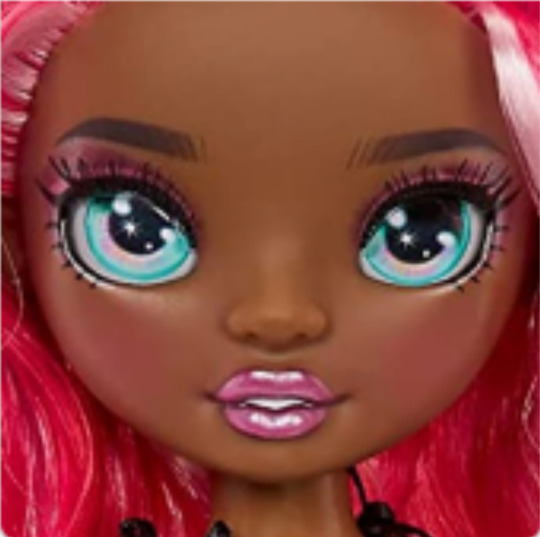
but, unfortunately, Zooey and Daria have different eye chips. Daria has the Twins eye chip, which has four pegs to keep it in place in the socket, and Zooey has the newer B2 chip, which has only two prongs. i was worried that Daria's eyes wouldnt fit in Zooey's head, so i prepared a backup donor: Simone.
Simone has the CNY eye chip, first introduced in Lily Cheng, the Special Edition doll for the Chinese New Year in 2022. this eye mold is more similar to the B2 eyes since it also has only two prongs, so if Daria's eyes didnt sit right in Zooey, these might be a better fit. the colors arent as perfect, but it could work.

except that Darias eyes fit Zooey perfectly. she looks so cute! now her eyebrows are even more out of place, but I'll get to that later.
i had already taken out Simone's eyes to compare the two, so she was given Zooey's eyes.

i was blown away by how incredible she looks! so soft and sweet. i was fond of her before, but she's crawled up into my top ten faves with this one alteration.
now, i was going to give those eyes to Daria, but they obviously belong to Simone now. Daria still needs brown eyes though, so i brought out a more fitting donor for her: Priscilla. she has the same color eyes as Zooey, but in the Twins eye chip.
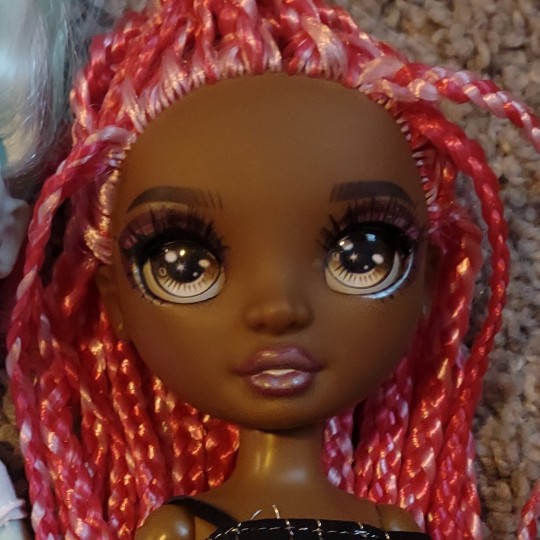
perfect for ms. Daria, much more natural. it's just what she needed.
now, i wasn't intending to bring Minnie into this, but her eyes are a bit unusually dark, and i had Simone's eyes sitting there.. and well. i already had the hair dryer out.

honestly? a serve. she has B2 eyes originally, like Zooey, so the lashes are Just under her eyelid but they still fit her sculpt pretty well.
at this point, my hands were aching, and i had worn a blister into my thumb, so i had to take a break. Pris was going into the stock box anyway, so there was no pressure to finish her, but the next day i came back and gave her Minnie's eyes for safekeeping.

she looks a little sleepy, but overall pretty cute. she probably won't stay this way because she's going into the potential custom pile, but its fine for now.

look at these four and how perfect they are!! Zooey and Daria came out exactly how i planned, but i am still so shook by how beautiful Simone is now. i just cant stop looking at her.
I'll be reblogging to add more photos, including side by side comparisons to the stock photos since tungle will only let me post 10 pictures at a time
#or is it 12? idk theres a limit though#im very pleased with my work but the tips of my thumbs are just numb now.#i really recommend wearing some sort of gloves if youre going to do this#just because the plastic has to be Hot and you wont realize your fingers are burning until theyre already burned#maybe like a cheap winter glove or a gardening glove#rubber/vinyl/latex gloves are probably too thin to actually help#I've done other eye swaps before just never this many at a time#i was feeling crafty i guess#well i was mostly looking at daria and zooey and Wishing. and then i remembered i could fix them#and again#zooey still doesnt look like this anymore#i took off her brows later#and she looks AWESOME#photos coming soon.#also more pics of simone because shes perfect.#my dolls#dolls#rainbow high#shadow high#rainbow high collection#rainbow high collector#doll collector#dollblr#doll custom#custom doll#doll mods#doll customization#rh#doll#rainbow high doll
56 notes
·
View notes
Text
a friend who'd wait :)
#im posting this very late because i was sort of weary of how it came out and ended up messing w it until it was like 4am oops.#and i have plans tmrw so... oh well! i did my best and ill put it out while i can!#and i tried to make the scene match barnard's colors lol#finn's ocs#finn's art#i know i said id do more sillay stuff with the simpler screentone only style but i had a couple more of these in me#and this is the first piece im making thats like an actual part of the story too rather than just setting stuff for fun#i wanna write something to go with it too but for now ill just sort of briefly explain the context in the tags here:#barnard has a pretty bad case of OCD and his compulsions have made it difficult to make friends in the past#he was never outright bullied or anything but people just didnt really have the patience to deal with it#he has compulsions that include stuff like walking through doors until it feels right and needing things to be perfectly aligned#which in group settings has lead to people having to wait for him to finish his rituals and join them#they might find it tolerable at first but eventually they grow impatient and hes just... not invited to stuff anymore#but juno is a newer member of the guild who ends up frequenting the same library. hes also kinda a little weird#and they dont become fast friends or anything but just sort of naturally spend time in the same place#though they never plan meetups they eventually fall into a routine. around the same time theyd just both be at the library#and read next to each other. and maybe talk a bit. and eventually they end up walking back to the guildhall together#since theyre going to the same place after all. and juno always waits for barnard outside the door#eventually barnard asks if this bothers him. juno kinda just tells him 'of course it does' without any malice or anything. just a statement#barnard is surprised and apologizes and juno says not to. but the next day juno doesnt show up at the usual time.#barnard assumes hes committed somekinda more by bringing it up. he ends up staying there late reading to get his mind off it & not ruminate#but when he leaves juno is in fact still waiting for him down the hall (see pic) having collected a bunch of books literally abt ocd#he fell asleep bc barnard stayed later than expected. and hes an eepy guy generally. and also one very bad at expressing himself#but now barnard gets that juno's 'of course it [bothers me]' had the implication of 'but its worth it' which no friend has previously done.#and from the interaction juno was also able to understand that this isn't something barnard just does for the hell of it so. he studies.#and checks a bunch of stuff out because he thinks it could help his friend too (theres ocd workbooks and such- i remember working w them)#and thats the point where they became more ''friends'' than ''pleasant library acquaintances''#from there on they also do get into juno's problems. whole other bag of worms. but this specific scene is more about bernard from his pov#sorry about when i said briefly explain. i lied </3#but compared to the whole sequence im picturing its brief so shhh
18 notes
·
View notes
Text
from old panel i didnt like

TO NEW PANEL I LOVE!
✨Improvement✨
#servamp#mahiru shirota#shirota mahiru#puff draws#puff's succubus comic#god the first one doesnt even look like mahiru to me anymore ndjcjdndnfn#I am working on both UTBM and Succubus comic at around the same time but im doing both REALLY SLOWLY#HELP#the first attempt only looks like dat cuz i was pushing through it even tho i didnt like it#and now its a couple months later and i remembered the wip existed and now im back!! from outter space!!!#fr tho ive been so distraught about not writing much ive forgotten my other baby#i have two (2) big wips#one for art one for writing#both will be the death of me
32 notes
·
View notes
Photo
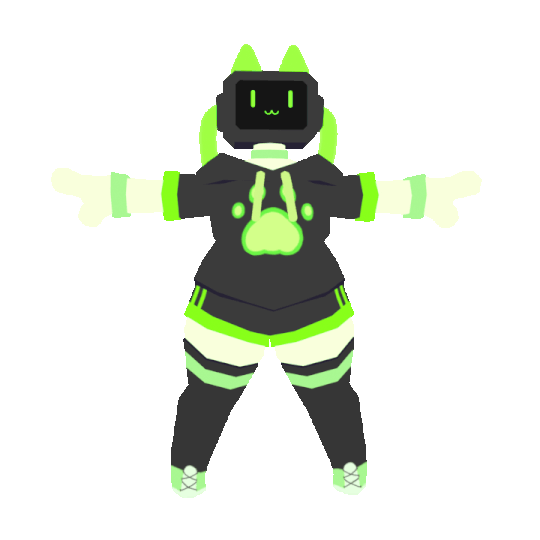

i modeled my friend’s vtuber persona Tox!
#gif#3d#3d model#3d modeling#blender#low poly#lowpoly#tv head#objecthead#its been a while since i modeled anything so i thought i'd make something before i forget how blender works lmao#turns out the thing i had forgotten was to FUCKING SAVE YOUR FILE AT EVERY POINT#because a good while in my computer crashed and i hadnt saved a single time#and blenders auto save last session refreshes when you reboot your computer so there was no saving her#so i started from scratch lmao#well i remember now#shes unrigged rn i might rig her later if i feel like it or if my friend wants it rigged#could even do a facial rig for the expressions#she doesnt stream anymore tho so idk if its necessary
31 notes
·
View notes
Text
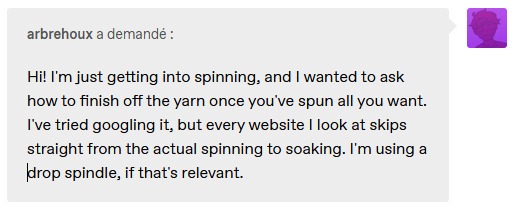
[image description: an ask by @arbrehoux that says “Hi! I’m just getting into spinning, and I wanted to ask how to finish off the yarn once you’ve spun all you want. I’ve tried googling it, but every website I look at skips straight from the actual spinning to soaking. I’m using a drop spindle, if that’s relevant.” end image description]
soaking usually IS the way to finish yarn ! i'll give you the best step by step i can though (and for future reference, this applies to pretty much every single spinning method, so you can do this with yarns spun on a spinning wheel, a supported spindle, a drop spindle, a navajo spindle, a charkha wheel, or whatever else you might encounter. it's all yarn, so it can all be finished the same way.)
step 0: if you plan on plying your yarn, do it before finishing. you don't need to finish singles if you plan to ply them. finishing relaxes the yarn, so if you finish a singles and then ply it, it will end up being somewhat limp unless you overply it (which makes yarn less elastic and more rough) but if you spun a singles and want it to remain a singles, never to be plied, then you can certainly finish it as a singles.
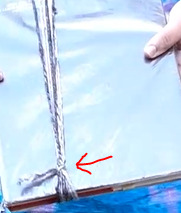
step 1: remove the yarn from your spindle (or bobbin, or whatever it is on) and wrap it around something as it comes off. a niddy noddy is great for this, but not necessary. you can wrap your yarn around a big hardcover book or the back of a chair, or whatever. when taking yarn off a drop spindle, i usually just toss the spindle on the ground and let it roll around as I wind the yarn off. if you’re worried about it catching on something, put the drop spindle in a box or mixing bowl instead and let it roll around in there.

[image description: a somewhat blurry closeup of a tattooed man’s hands. in his right hand he’s holding a hardcover book. in his left he’s wrapping yarn around the book lengthwise. a red line has been drawn in to show the path of the yarn as he winds. end image description]
step 2: tie your yarn off. you can use the messy looking ends of the yarn if you wish, or another piece of yarn or string. just tie a simple knot around the hank. you want at least two knots, but if you're really worried about it tangling, you can do more. the purpose of tying your yarn off is to stop it from tangling in the next steps, to make it easier to work with when you wind it into a ball or cake later, and to keep it looking tidy.
[image description: a closeup of the yarn on the book from the previous image. a knot has been tied around all the strands of yarn on that side. there is a red arrow pointing to the knot. end image description]
step 2.5: if you want to know your yardage or meterage, this is the time to do so. first, count how many strands you have. second, measure how many inches or centimeters it takes to span the entire length of the book (so, front, back, and the width of both the top and bottom). In this case I think it was 8 strands and 24 inches for the whole book. that means the whole yarn is 192 inches (8x24=192) and the yardage is 5.3 (192/36=5.3). same steps if it’s centimeters and meters, of course. also, if you’re thinking “wow, I have to measure whatever i’m winding my yarn on every time ? that sounds annoying”, then you’re seeing why niddy noddys are so helpful and you should get or make one. my niddy noddy takes 2 yards to span it, meaning whenever i wind yarn on, after counting it i can just multiply my result by 2 and know how many yards i have (if i have 100 strands and i know each strand spans 2 yards, that means my whole skein is 200 yards. so much simpler.)
step 3: soak your yarn. or just get it wet. i usually run my yarn under the tap for a few seconds to make sure it is fully wet, but you can also put it in a bowl with some water and make sure it's fully submerged. leave it there for a few minutes.
step 3.5: if your yarn isn't very soft and you want it to be softer, you can add conditioner (just like, the normal stuff you use for your hair) to the bowl before you put the yarn in to soak. if you're softening it this way, leave it in the bowl of water for at least an hour, or even overnight. when you take it out, rinse it briefly. this step is only necessary if you want your yarn softer.
step 4 (optional): go outside and snap your yarn like a whip a few times. this evens out twist and flicks a lot of the water off, so it will dry faster too. if your yarn has some spots that are really undertwisted or overtwisted or both, this is a good way to help reduce that and make more evenly plied.
step 5: let your yarn dry completely. in the summer i hang my yarn over the clothesline, and in the winter i usually put it over a heating vent. doesn't matter how you do it. remember that wool in particular can feel dry even when it has a fair amount of water in it, so don't grab it the second it feels dry--give it a while longer to actually dry.
you should notice that your yarn looks different now that it's dry. if it's wool, it's likely puffed up some (to varying degrees depending on the breed of animal it came from, as well as whether it was roving or a batt or a rolag or whatever else, and also depending on how you spun it. it's a cool thing to pay attention to.)
step 6: skein your yarn. pick up the hank and drape it over your thumb or hand or whatever. the vast majority of yarns will twist a little in one direction when you do this, from residual twist. some yarns will twist a lot, others only barely. note the direction that it twists in--to the left or to the right. put your other thumb at the other end of the hank, and start twisting one thumb in the opposite direction that your hank twisted in. i usually twist with one thumb until i can't easily twist it anymore, and then twist with the other thumb. your nice loop should now look kind of like a piece of rope, with your thumbs still hooked into each end.

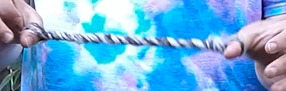
[image description: the first image shows the yarn hooked over each thumb, with two twists in the middle. the second image shows that same yarn, which now has so much twist it looks like rope. his thumbs are still hooked into each end. end image description]
you now want to find the center point of your ‘rope’ and fold it there. your ‘rope’ should kind of snap into place, looking like a much larger version of a 2 ply yarn. it’s nice and stable like this, and can be transported or stored easily (plus it’s pretty !). the last step is to take one of the loops you had your thumb in and push it through the other loop. this stops it from unraveling.
btw: the reason we twist it the opposite direction that it wants to turn is the same reason we ply in the opposite direction that we spin. if you spin Z and ply Z your yarn isn’t going to be structurally sound, and it’ll look pretty bad, too. when it comes to skeining you’re not adding any structural stability to the actual yarn, but the looks still matter--if your Z plied yarn is twisted Z while skeining, your skein will be limp and lifeless and not very pretty. if it’s twisted S, it’ll be nice and balanced and neat looking. it’s purely an aesthetics thing, but it also only takes half a second to figure out, so why not do it ?
and you’re done ! your yarn is now finished and skeined, and you know the yardage/meterage. you can label it with all relevant info if you want (for example: 4 ounces shetland roving, 2 ply, 350 yards, light worsted weight, finished august 2022, spun on a wheel)
#sorry this isnt an ask anymore#i somehow corrupted the original post by adding images and then saving it as a draft to work on later#idk... tumblr.#anyway those pictures are from a little video i made that im now somewhat too embarassed to post#although if this doesn't make sense and seeing it in video form would be helpful lmk and ill just link it anyway#it has to be a youtube video bc its too big to post on tumblr normally even after trying to condense it so#anyway sorry this took a while to answer ! it's hard to put most fiber instructions into words#spinning#handspun yarn#drop spindle#tutorial#also im not gonna go into shrinkage bc honestly i like to pretend it isn't a thing so that it doesnt mess up my yardage measuring#but if it immediately pops off the book/niddy noddy/whatever and looks way smaller that means your yarn is definitely shorter#than the actual yardage. calculating how long it really is while still using the same tools is rly hard#so i dont bother. you can minimize shrinkage by wrapping very loosely and not pulling on the yarn or putting it#under any tension as you wind. thats what i do with yarns when i really NEED to know the actual yardage#such as for a specific project or if i want to sell it#anyway yeah !
112 notes
·
View notes
Text
today is not a good day
#i am so done with this semester you have no idea#i dont even know why i am still in college i feel like i should just drop out#no matter how hard i study for an exam i cant get so much as a fucking C on any of them#i worked my ass off for this exam and i thought for sure i could get a high B but i didnt even come close#i dont understand i did well enough on my last two exams but i fucked this one up so bad and it doesnt make any sense#theres just no use in me even trying anymore ill never get better than a D on any of my exams#its like these classes are setting me up to fail#im so lost i dont know what is going wrong in my head but it just isnt working#and i hate this#sorry to vent on main but i am so done i am so tired of being stupid i want to go back to when i wasnt failing everything#im so genuinely lost because i thought i knew this material so well so what the fuck happened#to delete later
22 notes
·
View notes
Text
One thing ive been thinking about lately is that like
Its okay to only ever make bad art. Its okay to only paint "boring" things or only draw the same thing a million times or only be "okay" at sewing or crochet. Sometimes i think theres this idea that its okay to make bad art because its part of the process of making good art, but i think its fine to make art that is bad or just okay and not keep looking at it thinking about ways it is flawed or ways to make it better. If you want to improve and grow, thats great and you will through the process of just doing something over and over or looking for advice or other ways of learning.
But its also totally okay to only ever want to make bad art
#art#delete later#idk ive been thinking a lot about how like#for the last few years the vast majority of my art has been drawing d&d characters largely by tracing over refs#and just drawing the same things over and over#because it makes me happy!#and sometimes i just see this come off as like. a way to moralize taste/lack of satisfaction with how your work turned out#because that peice doesnt matter its just one step on the way to making better ones#but if you only ever make lumpy pottery thats fine! you made a lumpy pottery!#like my great aunts house is covered in paintings shes made#and theyre not to my taste they feel kinda generic and bland to me#but she is showing more of her art in her house than i am in mine and im like. which of us is happier as an artist#value your art where it is#especially if its a fucking hobby! jesus christ!#if its a hobby do you want to spend so much time and energy hating it you dont enjoy it anymore? fuck!#like i just finished a sweater and now a part of me wants to break fom knitting/crochet for a bit bc ive been working hard at it for a whil#and it turned out fine but with some fit issues i know to fix in future projects#but idk#i need to allow myself the freedom to let bad art be completed art#anyway this got weirdly sentimental#i should go paint some weird fish now#also from my own experience. it helps me appreciate other artists more#because it helps me stop going oh i could do that/could never do that#and i can just go. wow look at the cool art and technical skill on display
3 notes
·
View notes
Text

so today (12/30/22) marks the 10 year anniversary of me making a gijinka of clippy and literally altering the course of my life... i've talked in-depth about the specifics multiple times but that doesn't matter right now... what matters is Clippy is still one of my favorite characters of all time and i love him so much
#clipart#clippitag#i had no idea what to do w the background but i cant look at this anymore so just. take it.#fun fact! i was 17 when i designed my gijinka of him. and his gijinka's age was 22#i later changed it to 24 but now im. 27. im officially like. decently older than him#tho tbh if/when i ever revisit my like. story for him and the other OA's#i might make him closer to 30 based on how my 20's were... his character doesnt really work as well#anyway my life is completely different 10 years later which is wild to think about#but this funny paperclip man has helped me through a lot of it#also these days im more attached to Normal Clippy but human!clip is still really important to me
34 notes
·
View notes
Text
Me: k done being salty I'm going to write now!
Computer, which has been on the cord all day and for some reason not charged: so about tha-*dies*
#apparently this cord doesnt work anymore and i dont have the spare cord with me rn which is really fun and neat#romy can talk#delete later#maybe ill write. on my phone. ugh.
5 notes
·
View notes
Text
I used to have this theory that Wally had a connection to the real world in that he could like go back and forth between Home and the Real World. But he didn't really like. Get it. So he just like. Lost Stuff all the time bc he would drop it in the real world or smth Without Realizing.
I don't have a point to this I just remembered and thought it was funny.
#i hope i can work it into an actual theory or smth with a later update#frank doesnt let him hold stuff anymore#bc he'd turn away and back and it would just be Gone#welcome home project#welcome home#welcome home wally#welcome home theory#/j
6 notes
·
View notes
Text
my future when it comes to still being Active on social media is teebeedee, but my main resolution for 2024 is like...be comfortable w/ being completely offline even if it's just for a day or a week.
#the good news is that i don't check sm during the am hours anymore (by that i mean like as soon as i wake up i still need to work#on being less online during the after hours aka anything later than 9-10pm ish)#BUT i've learned that being active hasn't made my ppl pleasing tendencies better and that there are many many things i need to like#work on far away from places like tumblr and The Big Four#(that being ig twitter still not calling it x fb and like...reddit#though tbf i haven't been ACTIVE active on twitter + fb for almost 4/5 years now so theres that#i still lurk the former when i'm feeling REAL bored but thats rare these days which is an improvement?#though i also have to work on doing shit that doesnt involve online brainrot 24/7 aka reading and writing and like...watching media that#isnt like...football (soccer 4 the us/canada/aus folks)#but lb ruined my love of film for a LONG long time bc it values getting the most pop review over idk actually loving movies#idk its just me rambling abt my relationship w/ sm and where it stands atm perdon sghdjfhj#the tl;dr is i need to shut up and log off when my body is telling me to stop gsbdhjfghjikejr#be quiet drea
3 notes
·
View notes
Text
I swear people in Reddit have some type of reading problem. I asked them how long they think it took the tadpole gang to reach to Baldur's Gate from Shadowlands.
Some answered with "I dunno but I took this many long rests/Withers says in epilogue..."
One genius answered with "it depends on how many long rests you take and Larian kept it vague on purpose." *facepalm*
I'm literally asking the moment between leaving the Shadowlands and arriving at Wyrm's crossing? How should I have phrased the question so you can fucking understand what I'm saying.
I know majority of the people just read the title and skip to replying without reading the description but the description wasn't even that long.
#fucking reddit#I srsly need to erase my account#it's a burner anyway#and the app doesnt work on my phone anymore xD#anyways probbaly gonna delete this later and make a question for tumblr people who are sooo much better at reading and understanding
2 notes
·
View notes
Text
-> go to draw
-> arm hurts + nothing looks right
-> give up
-> decide to come back to it hours later
-> tablet bluetooth broken and wont connect
#im gonna have to troubleshoot it later i just rrmgngnhhh#and every time it breaks its like whatever i did last time to fix it doesnt work anymore#🫠#personal
3 notes
·
View notes
Text
ratio + ayano and haruka finish hs going to night school together + takane falsifies her documents and never finishes + shintaro also never finishes and doesn't even have documentation. #slay
#doesnt matter school is easy for shintaro. i love smart characters who just cant do school bc it sucks♥️#hes like wow. no thanks#cant go to school like ayano and haruka bc social anxiety and even if hes not a shut in anymore its still. difficult.#to suddenly go back to a rutine like that#tries doing it online but also flunks because he cant bring himself to sign in or have the energy to actually do assignments#maybe he'd finish it but definitely a lot later#erm#hehe#kagevinnie#headcanons#i say ayano and kido are the only ones to go to college but realistically haruka would like to as well. but i think he's too busy with work#and doesnt have time 💔#haruka and takane work on an indie game together teeheeeee shintaro makes the music👍👍👍 ayano writes the story👍👍👍
14 notes
·
View notes
Last Seen Blogs
dawnstrider-thedirkrider-blog
turntechGoddesshead

johanmurillo
Untitled

wrapkings-blog
Wrap Kings

tophotproperty
Untitled