#cache level 5
Explore tagged Tumblr posts
Visit Tumblr Blog
Explore Tumblr blogs with no restrictions, modern design and the best experience.
Last Seen Tumblr Blogs


Fun Fact
US Tumblr user growth rate is estimated to slow down to 4.1%.
Text
Elevate your healthcare career with CNA Training Institute, a premier educational hub offering specialized Cache courses in Dubai. Our institute is dedicated to providing comprehensive training that aligns with global standards, ensuring you receive internationally recognized qualifications. Join us to acquire the skills and knowledge essential for success in the dynamic field of care, health, and education. Your journey to professional excellence starts here at CNA Training Institute. Enroll today and unlock a world of opportunities in healthcare.
0 notes
Text
Odds of Survival Part 5
Customer Service Prowl.
Credit to @keferon for creating the tf mecha AU!
———————————————————————
The door behind the tactician hissed shut, isolating him from the outside world.
Prowl had a short walk, 11.2 clicks, to the communications terminal. He took exactly as long as was necessary. Not a click sooner.
Injury warning messages were manually silenced. He’d neglected his own self repair for lower priority tasks before. This was no different.
Shutting Tacnet off from working on the Jazz Mystery was a greater struggle. It’d been so long since Prowl had gotten to work through a puzzle like this, it had him booting up long dormant scripts he hadn’t used since working as a detective. The mental stretching warmed him up. It felt good. But it wasn’t what was currently required of him. He shut off that branch of his processor too.
Tactical estimates only.
For now.
Like packing up his room, Prowl “got into uniform”.
Optic hue shifted to within the parameters of the socially accepted spectrum.
Doorwings lifted high and almost pressed together, neither spread out in intimidation nor lowered in submission.
Helm tiled forward 24 degrees to cast the maximum level of shadow over his features while not obscuring vision.
Prowl reached the terminal like a silent storm.
He nodded the minimum angle required to be interpreted as bowing for the manifestation of War resolving on the screen.
“Lord Megatron.”
He glared from beneath his chevron, pricks of light in a darkened room.
“What are your demands?”
———————————
The course of action Megatron required tactical support for was frankly amateur. The solution incredibly simple.
Sentinel Prime had once more prodded the leader of the revolution into a vengeful fury, so now Megatron wanted to, of course, retaliate violently.
The correct course of action was to not engage.
It was clearly a trap designed to whittle away their limited resources, which would have been idiotic even if the Quintessons were not a factor in the equation. Since they were however, it lowered Prowls opinion of both leaders even further that they’d even considered reigniting the civil war at a time like this.
No, what truly challenged Prowls strategic prowess wasn’t the request itself, but how to tell Megatron “That is an idiotic idea and how dare you expect me to entertain it.”
The trick, after much trial and error, was to not tell him at all.
“There are 24 optimal targets for a retaliatory attack Lord Megatron. 8 of which would yield material gain if taken and 3 of which would yield additional territory.”
All three of the territorial land grabs overlapped with the material gains category. However, when phrased correctly, it both implied even more options for Megatron to pick through and forced him to choose from plans Prowl had decided in advance.
Megatron gave the illusion of consideration.
He selected the land grab options, for the obvious purpose of irking the standing Prime. It took one to know one and megalomaniacs despised having their property made smaller. Stolen goods were numbers on a page. A map was a picture of what was lost.
“Very well. For the most expedient retaliatory strike, the mining depot on ES 9-B33 will be ideal for your conquering.”
Prowl had the mining depot mission lined up for close to a vorn. It was on the edge of Cybertronian territory, minimally guarded and would provide the Decepticons with a cache of ever needed raw materials. And while it was a great boon for their small faction, to the sprawling colonial power of Cybertron, it was hardly worth notice.
Which meant Sentinel and the Functionalist government shouldn’t waste resources on restarting the Civil war (66%).
Megatron, satisfied in his ignorance, ordered Prowl to draw up the assault plans immediately.
Prowl was sorely tempted to tell the deception to “do it himself” and not just to get him out of the picture for a time.
It was a very rare thing for Tacnet to come up with 100% certainty. However, Prowl could say, with terrible absolute certainty, that nothing short of a true Prime, or maybe an exploding star, could take Megatron in a fight.
The mech had forced Prowl to reset his parameters of what a cybertronian could physically survive no less than 13 times. At least 5 of those being assassination attempts from Starscream, whose preferred method of execution was “beyond all reasonable restraint.”
Until further notice, Megatron was an immovable piece of the board that required skillful circumvention.
“The plan will be drafted in 4 breems Lord Megatron.” Prowl dipped his helm and did not break eye contact until the screen went dark.
Prowl connected to the communications system, pinging Soundwave for the most recent updates on ES 9-B33, layering the new information over his original outline.
Once received, it required only a fractional amount of processing power to run through which decepticons were available for action, filter out those not suited for the job and sort the minutiae of coordinating supply ships to reroute to arrive at the depot as the assault team would be wrapping up.
Will softened by boredom, temptation won out and Prowl turned the bulk his processing power to Jazz.
Details laid out plainly, it painted a concerning picture.
Jazz was a highly skilled combatant, he solely exists to kill Quintessons by his own admission.
And he loves music.
Jazz speaks a language neither Prowl nor Bluestreak have ever encountered, Jazz himself having never interacted with Common, let alone standard Cybertronian.
Jazz was exceptionally sociable, even going as far as to try and play card games with hostile organics. Yet even pressed chassis to chassis, not once did Prowl detect an EM field.
And he’s a shameless flirt.
Jazz had many unusual physical attributes, such as abnormal ranges of motion, multi jointed legs, and in spite of all his injuries, Prowl hadn’t seen so much as a drop of energon.
Jazz possessed a disturbingly high pain tolerance, and was at best accustomed to substandard medical treatment, if not outright abuse.
And he’s never felt a kind touch before.
When Bluestreak had asked about him, Prowl had told his brother that Jazz was an alien mechanical lifeform and to not harass him unnecessarily. Between his physical bizarreness and lack of common knowledge among cybertronians, it was a natural conclusion.
But something hadn’t been quite right ever since Prowl had rescued the mech. There was this nagging inconsistency with Jazz’s behavior.
He was very curious about Prowl, yet seemed far more in awe of the other alien life forms and ships they’d been traveling with. There was also the immediate (and somewhat overwhelming) familiarity with which Jazz conducted himself around Prowl.
It was almost as if…
Jazz doesn’t consider Prowl to be alien (88%).
If he thinks Prowl is the same species as him, then would that mean Jazz doesn’t realize he’s the alien?
Unless.
An alternate, unpleasant theory began to weave.
Unless Jazz isn’t an alien at all.
Prowl finished the assault plan and sent it with a harsh hand. Re-opening his comms to the backlog of messages from Bluestreak, he scrolled back to something his brother had said when he’d been repairing Jazz’s visor.
BLUESTREAK: [WTF WTF WTF WTF WTF.]
Too far.
PROWL: [Please do not comment aloud.]
BLUESTREAK: [Is he really fully in recharge? Just like that?]
PROWL: [No. Jazz is still conscious. He’s not completely limp either just… very sedated.]
BLUESTREAK: [Just from holding his face? C’mon Prowl, that’s weird. This is weird. You found a weird, weird mech who definitely has a thing for you.]
PROWL: [He does not have a “thing” for me.]
BLUESTREAK: [Oh yeah? What are you getting from his EM field then?]
PROWL: [Nothing. He doesn’t have an EM field Bluestreak. Jazz is an alien and likely doesn’t have all the same traits as a cybertronian.]
BLUESTREAK: [Are you sure? I mean, the anesthetic worked fine. And he looks pretty cybertronian to me.]
BLUESTREAK: [Maybe he has field atrophy? You had that once. I couldn’t feel you even if I was touching you.]
That was when Prowl had been apart of the decepticon High Command. He’d spent multiple Vorn isolating himself, doing nothing but churning through battle plans and inventory logs and reconnaissance reports with little rest. Then there was the first time he crashed.
A minor setback at first. Almost immediately Prowl went back to work. Over and over again, he’d bypass previous limitations of the decepticon military. With each success, the bar was placed a little higher, with is successive crash, the recovery took a little longer.
There were always improvements to be made. He’d long moved on from the most needed structural changes to continuously finer tuned modifications to how the entire faction operated. He sharpened Megatrons rebellion scrap into keen edged blades.
Prowl did anything for the edge.
Even down to the smallest percent.
Even down to the smallest decimal point of a percent.
At Prowls worse, when he had just started to tip over to spending the majority (51%) of his waking time in recovery from continuous Crashes, he had come up with a strategy that would give the decepticons a 0.04% advantage in the long run against the Quintessons.
Repairing critically damaged ships was not cost effective. If a ship’s structural integrity fell beneath 14%, Prowl had instituted a script to cause the ship to self destruct. Therefore causing maximum damage to surrounding attackers in a final blow.
Prowl stared at his reflection in the black glass.
You couldn’t see the break in his nose anymore, Smokescreen had punched him in the medbay so it was fixed fairly quickly.
0.04%
Bluestreak was stuck in the medbay for a quarter of a Vorn.
Prowl straightened, optics returning to his default blue. The injury warning messages eeked back into his processor, causing his doorwings to shake briefly before Prowl allowed them to drop.
If the Functionalists had someone like him in their employ, then Jazz may not be an alien at all.
———————————————————————
To all the folks who picked up on the clues, good job! There’s no Optimus and there’s no Autobots. Yet.
There’s more to how Prowl got into his current situation later and I’m sure Jazz will be “totally cool” with Prowls past life choices. And current life choices. And general sense of ethics.
Bluestreak knows Prowl’s responsible for blowing him up and uses it to blackmail him constantly once their relationship got better again.
(Cybertronian timescales are weird, but a Vorn is basically a “year” for them, and fifty years for a human. A breem is pretty consistently 8 minutes.)
-SSTP
<- First Next ->
327 notes
·
View notes
Text
National Rainbow Week of Action in Canada

In this post I have compiled all the information I could find regarding upcoming events for the Rainbow Week of Action. There are two online events, and dozens on in-person events across the country.
"Within the Rainbow Week of Action, we are pushing governments and elected officials at every level to take action for Rainbow Equality and address rising anti-2SLGBTQIA+ hate. As such, we have identified calls to action for every level of government. These calls to action can be reviewed here."
Event list below:
Events are listed in date order, provinces in general west-to-east order. I have included as much detail as possible, please reference the links at the bottom of the post. At this time, there are no events in N.W.T. and Nova Scotia. Last updated: May 14th, 9:53pm PDT. Please note that I am not officially affiliated with / an organizer of these events, I have simply compiled all the dates to share on tumblr. Original post content.
B.C. EVENTS:
15th: Fernie; Fernie Seniors Drop-In Centre, 572 3rd Avenue, 6:00PM. (Letter writing and Potluck)
17th: Vancouver; šxʷƛ̓ənəq Xwtl'e7énḵ Square - Vancouver Art Gallery North Plaza, 750 Hornby St, 5:30PM. (Rally)
19th, Sunday: Abbotsford; Jubilee Park, 5:00PM. (Rally)
ALBERTA EVENTS:
15th: Lethbridge; McKillop United Church, 2329 15th Ave S, 12:00-1:00PM (letter writing)
17th, Friday: Calgary; Central Memorial Park, 1221 2 St SW, 5:30PM. (Rally)
17th: Edmonton; Wilbert McIntyre Park, 8331 104 St NW, 6:00PM. (Rally)
SASKATCHEWAN EVENTS:
17th: Saskatoon; Vimy Memorial Park, 500 Spadina Crescent E, 5:30PM. (Rally)
17th: Regina; Legislative Grounds, 2405 Legislative Dr, 6:30PM. (Rally)
May 18th: Saskatoon; Grovenor Park United Church, 407 Cumberland Ave S, 6:00PM. (Art event)
MANITOBA EVENTS:
16th: Carman; Paul's Place, 20 1 Ave SW, 7:00-9:00PM. (Letter writing)
19th: Winnipeg; Manitoba Legislature, 450 Broadway, 12:00PM. (Rally)
ONTARIO EVENTS:
15th: Barrie; UPlift Black, 12 Dunlop St E, 6:00-7:30PM. (Letter writing)
15th: Chatham; CK Gay Pride Association, 48 Centre St, 5:00-6:30PM. (Letter writing)
15th: Peterborough; Trinity Community Centre, 360 Reid St, 12:00-3:00PM. (Letter writing)
16th: Midland; Midland Public Library, 4:30-7:30PM. (Letter writing and pizza)
16th: Ottawa; Impact Hub, 123 Slater Street, 2:00PM. (Letter writing)
16th: Toronto; Barbara Hall Park, 519 Church St, 11:30AM. (Rally)
17th, Friday: Barrie; City Hall, 70 Collier St, 6:00PM. (Rally)
17th: Cornwall; 167 Pitt St, 5:30PM. (Rally)
17th: Essex; St. Paul's Anglican Church, 92 St. Paul St, 6:00-8:00PM. (Letter writing and pizza)
17th: Hamilton; City Hall, 71 Main St W, 6:00PM. (Rally)
17th: Kitchener; City Hall, 200 King St W, 6:00PM. (Rally)
17th: London; City Hall, 300 Dufferin Ave, 6:00PM. (Rally)
17th: Sarnia; City Hall, 255 Christina St N, 1:00PM. (Rally)
17th: Sault Ste Marie; City Hall, 99 Foster Dr, 11:30AM. (Rally)
17th: Ottawa; Confederation Park, Elgin St, 5:30PM. (Rally)
22nd: Renfrew; 161 Raglan St. South, 7:00PM. (Letter writing, fashion and makeup event, and pizza)
QUEBEC EVENTS:
May 15th: Lachute; CDC Lachute, 57, rue Harriet, 12:30PM. (Letter writing event)
NEW BRUNSWICK EVENTS:
17th: Woodstock; Citizen's Square, Chapel St, Next to the L.P. Fisher Public Library, 12:00-1:00PM. (rally)
17th: Saint John; City Hall, 15 Market Square, 12:30PM. (Rally, flag raising)
18th, Saturday: Fredericton; Legislative Grounds, 706 Queen Street, 1:00PM. (Rally)
NOVA SCOTIA EVENTS:
May 17th: Middleton; NSCC AVC RM 121, 6:30-8:30PM (letter writing and pizza)
P.E.I. EVENTS:
May 15th: Charlottetown; Peers Alliance Office, 250B Queen Street, 6:00-8:00PM. (Adult drop-in)
May 16th: Charlottetown, Peers Alliance Office, 250B Queen Street, 6:00-7:00PM.
May 17th: Charlottetown; PEI Legislative Assembly, 165 Richmond St, 12:00PM. (Rally)
YUKON EVENTS:
16th: Whitehorse; The Cache, 4230 4 Ave, 2:00-7:00PM. (Letter writing)
NUNAVUT EVENTS:
May 16th, Thursday: Iqaluit; Four Corners, 922 Niaqunngusiariaq St, 5:00PM. (Letter writing)
Reference links:
About the Rainbow Week of Action.
Website letter writing events list (does not include all events)
General events website list (does not include all events)
Instagram general events image list
Instagram letter writing / pizza party image list
#rainbow week of action#lgbt#cdnpoli#lgbtq#canada#alberta#british columbia#saskatchewan#manitoba#new brunswick#newfoundland and labrador#yukon#nunavut#prince edward island#ontario#quebec#nova scotia
117 notes
·
View notes
Text
I bought it because I like pain I guess
TS2:
Initial load up was fast
Intro video still loud as fuck
Shadows are permanently off
Graphics can be scaled up to highest screen resolution, smooth edges etc
Refresh rate 48 the only option available, animations smooth without stuttering
Seemed only fitting to start out with the Goths. A slight hang on the 4th column of icons like always when loading but otherwise fast
Tool tips, neighbourhood stories, sim bio etc all unchanged. Graphics and assets unchanged (except Ikea stuff is missing - RIP)
Zoom levels, camera, lighting no visible change
I have a migraine so may not be coherent
Uh oh, stuttering during a scripted event
Worth noting that my laptop is old and has been on for over 24 hours with another game loaded up - my other version of the game would 100% have not worked until I restarted my entire laptop
On that note my laptop is not searing me alive like it did previously
I can't seem to use the middle mouse button to rotate the camera. Was that a mod?
Shadows have automatically turned on now? And the option is no longer grayed out. Weird
Cassandra and Don just got married
I minimised the game from full screen and reopened the window, it took a couple of seconds to load but didn't crash
My husband has asked what snacks I want for our gaming night, this is very important
Stress testing minimise and reopen. This is hurting my head. The game hasn't crashed at all
My kids are watching in interest. "Good job" says the youngest. We shall see
Cheats still work and all of the same options seem to be there
I've chosen 'invite all neighbours'. It stuttered as they loaded in but did not freeze as my previous game would have
Darren is NOT amused that Cassandra is married
Sorry my husband came home and I had to rip myself away temporarily
Middle button rotate is back? Not sure why this stuff is kicking in as I play
My husband said "holy shit it's not crashed yet"
Could be because I don't have 50GB of CC... yet
Running smooth as butter with 20+ sims
Don set fire to the kitchen - no lag loading in the fire engine etc
The documents folder is called The Sims 2 Legacy
Layout inside the documents is the same
Programme files are categorised TS4 style but the contents seem similar? I'm not a modder but there's still neighbourhood templates etc
Loading the bin families up took 2 seconds
CAS loaded up quick
Swapping heads really fast and overloading it with clicks - it lagged but didn't crash
Hair and outfits loading notably faster, moving through catalogues quicker
Still not stutter or lag free though, definitely still waiting for those cache and thumbnail files to fill and load up
So far it does seem to run better vs my old vanilla game. There might genuinely have been some work done on it.
Store CAS stuff isn't included
Loaded in to a new lot quickly
I've filled a 64x64 lot with chairs as homage to LGR. It hasn't crashed
I've made a gigantic household using the tombstone of life and death - the frame rate has dropped a bit, but it's handling it pretty well. I definitely would have had pink soup by now usually. Lots of audio didn't play errors in the cheat console but I think that's because of how many sims there are.
Gun's camera mod is working, also it let me replace the files without closing down the game? And the new cameras worked instantly without restarting. Could you always do that?
My eye and skin defaults still work
Put a few hacks in and they didnt immediately crash everything
I've closed and reloaded the game several times in a row and no crashes, it loads into the neighbourhood faster now that it's gotten past the first load lag
CC required a restart to load in
Overall I played mostly vanilla for 5 hours with no crashes or pink soup. This was while the Sims 1 amd Dragon age installed in the background and I had a few web pages open. My previous game with no CC wouldn't have even loaded up under those conditions in the past so to play for so long was incredible.
I'm sure as I add CC back in it will slow down again and the pink soup will return but all in all I feel there is a definite improvement in this version on my setup specifically (beat up old gaming laptop with shit ram).
20 notes
·
View notes
Text
mid level just incorrectness abt utube & firefox rn, the 5 seconds thing doesnt check user agent at all so it cannot be specifically related 2 firefox lmao blease do some lite research. anyway, theres already a workaround, do ublock settings ->purge all caches ->update now 2 fix
cf this post on firefox sub
88 notes
·
View notes
Text
Adahla Lavellan Stream Archive
Mostly for my own reference. The two playlist links at the top should update automatically; summaries will likely be updated in bursts rather than after every stream.
Master Playlist Link
Part 1: Features character creation, the prologue, arriving in Haven, meeting the advisors and Haven NPCs (first flirt with Solas 3:05), exploring the Haven map, reaching the Hinterlands, exploring the southeastern portion of the Hinterlands, getting very stuck on a Fade rift, reaching and clearing the fortress in the west, exploring the central/western portion of the Hinterlands, getting very frustrated with a misplaced map marker for a refugee cache (6:58), returning to have more conversations with advisors and companions (7:15), first war table missions, talking with Varric about Hawke, talking to Solas about the Fade and about himself, talking to Cassandra.
Part 2: Features a renamed PC, more exploration of central/north Hinterlands, first glimpse of the dragon in the northeast, collecting shards, especially one after ten years (0:53), exploring the northern Hinterlands and hitting a leveled rift, making a round of the companions at Haven (Solas at 2:32), exploring and then immediately leaving the Fallow Mire (2:50), exploring and then immediately leaving the Storm Coast, arriving in Val Royeaux for plot (3:10), meeting Sera and Vivienne (3:52), another tour of companions at Haven, war table missions, speaking with Solas about himself (4:57 - 2nd flirt).
Part 3: Features collecting Bull, exploring the Storm Coast, returning to the Hinterlands southwest area (2:30), picking up Blackwall, more clearing of southwestern Hinterlands rifts.
Part 4: Features talking with Blackwall in camp, talking to Krem and Bull, finishing off the southwestern Hinterlands. Immediately continued in Part 5.
Part 5: Features returning to the leveled northern Hinterlands, a lengthy discussion of the portrayal of religion in western RPGs (0:28-1:15), exploring the Deep Roads thaig in the Hinterlands (1:02), discussing change in characters (1:15-1:30), looping convos with companions at Haven, reaching Redcliffe for the first time (2:26), struggling with Lord Woolsley (2:34), In Hushed Whispers, companions at Haven (Solas at 5:29) & discussion of Adahla's changing opinions of Solas, the Fallow Mire, a failed attempt at the Hinterlands dragon, In Your Heart Shall Burn, arriving at Skyhold, my hot DA takes (8:55), beginning and then immediately abandoning a talk with Solas.
Part 6: Features exploring Skyhold, war table missions regarding Lavellan clan, meeting Hawke (1:30), more war table missions, exploring the Emerald Graves, exploring expanded Skyhold (3:30), picking up some companion quests.
Part 7: Features selecting beige clothing replacement, sitting in judgement in Skyhold for the first time, war table missions, another take at the Hinterlands dragon, exploring the northern Emerald Graves, struggling with the haunted villa, doing the first astrarium without Solas (1:50), continuing to explore the Emerald Graves, returning to Skyhold (3:58), war table missions, sitting in judgement of Alexius, Cassandra reading schlock (4:25), Sera's personal quest, the first Quizquisition question, introducing the specializations, the first Fade conversation (and first kiss) with Solas (5:34), some minor upgrades to Skyhold, returning to the Emerald Graves (6:07), arriving at and exploring the Forbidden Oasis (6:11).
Part 8: Features defeating the Emerald Graves dragon, war table missions, arriving at the Emprise du Lion (0:48), discussion of hobbies (1:24), returning to Skyhold for companion conversations & war table missions (2:51), drinking with Bull (2:57), picking up Solas's personal quest (3:13), crafting, war table missions, back to the Emprise (3:51), fighting Imshael (3:06), fighting two dragons (4:35-5:10), Dorian's personal quest.
Part 9: Features wrapping up Dorian's personal quest, elven serving man (0:40), Solas's Halamshiral conversation (0:55), then a long, torturous, and eventually fruitless attempt at the Winter Palace, including a discussion of level design at 3:16 and the most tragic realization at 3:50; then backing up to the Exalted Plains at 3:52, Solas's personal quest at 4:08, a loop of conversations at Skyhold, exploring the Exalted Plains, returning the golden halla, and one attempt at the Solas romance lock-in conversation at 5:27.
Part 10: Features exploring the Exalted Plains, the official Solas romance lock-in convo (1:04), the Temple of Dirthamen, fighting the Exalted Plains dragon (3:26), discussing the length of the games (3:53), returning to the Emerald Graves for some wrap-up quests (4:04), conversations at Skyhold including meeting the Chargers (4:10), playing chess with Cullen, committing to the rift mage specialty, war table missions.
Part 11: Features the actual final end of Wicked Hearts, the Solas Halamshiral dance flirt (0:04), the Solas dance (0:38), replaying to temporarily judge the box that is Florianne (0:51), war table missions, returning to the Storm Coast for small missions for Blackwall and Varric, struggling again with shards in the Forbidden Oasis, war table missions (including the next Lavellan clan stage), landing at the Western Approach.
Part 12: Features exploring the Western Approach, Adahla realizing she's interested in becoming a scholar (0:23), discussion of DAI romances (1:00), horse adventures (1:09), taking Caer Branach (1:14), discussion of college academics (2:00-2:22), the Still Ruins (2:03), Skyhold companion convos including ruminations on the Divine (2:32), meeting Kieran (3:19), upgrading to the mage tower, war table quests, agonizing over the number of war table quests (3:51), returning to the Approach & fighting the dragon (4:07), exploring Coracavus, solving the Fenrir astrarium (5:06), backing up about an hour to fix a broken quest, returning to Skyhold after completing the Western Approach and sitting in judgement (6:08), war table missions, turning in some shards, the Cradle of Sulevin (6:28), Bull's personal quest (7:00), Vivienne's personal quest (7:19), Da'nan Hinan (7:24), more war table missions, exploring the Hissing Wastes (8:26), getting physically sick at an ocularum (8:28), a discussion of Hot Fade Ladies In Your Area (9:03-9:08), horse movement (10:01), a discussion of open world travel mechanics (10:02-10:08), discovering the dog merchant (10:19), discussion of Dorian having a bad time (10:43, 10:52, 10:56), fighting the dragon outside of hunting season (10:59), leaving for Val Royeaux for Josephine's quest (11:28).
Part 13: Features discussion of collections, review of videos finishing the Western Approach missing areas, receiving the prize from the […] woman in the Hissing Wastes, war table missions for mounts, turning in the last shards (0:35), more war table missions, wrapping up Vivienne's personal quest (0:53), rescuing Sutherland (1:07), wrapping up Josie's quest (1:12-1:22), fighting the Highland Ravager & discussing how characters react to tragedy (1:26), finding Maddox (1:53), talking with companions at Skyhold (2:04), arriving at Crestwood (2:08), Dorian having a bad time (2:50), the conclusion of the chess game (3:02), taking Caer Bronach (3:03), restoring the dam (3:48), fighting the Crestwood dragon (3:52).
Part 14: Features the Quizquisition (part 2!), companion conversations at Skyhold including a discussion of Adahla's gardening & childhood (0:28), picking up the nug mounts, returning to Crestwood (0:45), meeting Hawke & Stroud (0:55), discussion of game design (1:10-1:22), Plants vs. Zombies codex (1:12), more discussion of the Divine (1:30), exploring Old Crestwood (1:36), discussion of persuasion options in games (1:40), backing up about an hour for a broken quest, discussion of Merrill's nationality and Nevarra (2:06), discussion of MMOs (2:21), stopping the rain (2:36), meeting Hawke & Stroud in the Western Approach (2:42), starting Here Lies the Abyss (3:00), Dorian having a bad time (4:07), Nightmare challenging Hawke (3:15), gravestones (4:49), Virmire-lite (5:04), discussing why (5:07), deciding the fate of the Wardens (5:19), briefly replaying to check the other Warden option, a round of companion conversations, Morrigan taking Adahla through the eluvian (5:42), extremely frustrating conversations with Giselle (5:49), meeting Bianca (6:06), discussing the Divine with Leliana (6:22), Bull, Cassandra, Sera, Cole/Solas, Cullen, Blackwall, sitting in judgement, talking with Blackwall again in a very depressing bar scene (6:46), falling down in jail (6:54), saving Lavellan at last (6:58), war table missions, collecting the last mosaic pieces, Dorian continuing to have a bad time (7:18), review of completed collections, picking up Blackwall's personal quest (7:25), the third and final Quizquisition (7:27), the Boon of the Spoon (7:29), official stream end (7:39), recap for Silk.
Part 15: Features the personal quests of Varric & Blackwall, the WIcked Grace game (1:07), meeting Vivienne's friends, picking up Cassandra's personal quest (1:23), war table missions, wrapping up with Blackwall, pranking with Sera (1:45), discussing Adamant with Cole, Cole's personal quest (1:54), Cassandra's personal quest (2:12), Solas and Adahla's very specific form of flirting (2:26-2:32, esp. the last three minutes), picking up Leliana's personal quest, a letter from the HoF (2:44), Leliana's personal quest, a round of companions (2:58), and arriving in the Frostback Basin (3:13).
Part 16: Features an introduction to the Frostback Basin, exploring the southern and western portions of the map, astrariums (0:31), closing rifts, Dorian/Bull banter (0:41), meeting the conspiracy theorist and other Avvar tribesmen (1:30), a tough fight against despair demons on the southern island (2:20), Tilana's death (2:28), another astrarium (2:50), exploring the Tevinter ruins & solving puzzles (3:06), exploring the tomb (3:23).
Part 17: A night of bad internet. Features following Ameridan's trail, exploring the northern edge of the basin, freeing Storvackr (0:54), discussion of Adahla's possible future (1:10), the last astrarium of the game (1:28), first reaching of the Old Temple (1:35), Solas being a DPS Mercy (1:45), a lengthy discussion of political organizations in Thedas, reading some very bad poetry (2:09), reaching the astrarium cave. Internet drop, then a bit of exploration and a continued discussion of Solas. Internet drop, then a jump to hotspot internet, completion of Sigurd's quest (2:40), turn-in of many quests to the Avvar hold, discussion of god-runes with the augur (2:51), Varric meets a fan (3:00), picking up Finn's quest for his father (3:09), the Avvar trials (3:12), disappointment at the lack of verse trials (3:20), discovering that falling won't kill me has changed gameplay + wasp/leech discussion (3:38). Internet drop, then banter, completion of the Nox Mortua quest, returning to the Avvar hold to turn in several quests (4:16), beginning the DLC conclusion (4:28), entering the Old Temple (4:41), reaching the heart and final fight of the Old Temple (4;59), beginning the conversation with Ameridan (5:06), unpacking what just happened (5:13), me losing my mind at the parallels (5:25), and again (5:34), beginning the dragon fight (5:45), thinking about the relationship between Ameridan and Hakkon, finishing the battle (5:55), marveling at the events of this DLC, discussing the outcome with the Avvar, judging Storvackr (6:04), wrapping up with Kenric, a loop of companions including Cole's post-quest wrap-up, war table missions.
Part 18: Features What Pride Has Wrought with Dread Corgi part one (1:25) and Dread Corgi part two (1:31), culminating in Adahla drinking from the Well of Sorrows (1:35), a loop of companion conversations including cutscenes with Cullen and Cole, then the final romance cutscene with Solas (2:19). Internet drop, then multiple replays of the Solas cutscene, the judgement of Samson (3:11), following Morrigan into the Fade and meeting Flemeth (3:17), the Altar of Mythal, wandering around for a little banter in the Emerald Graves, replaying the Solas scene for additional dialogue options (4:04).
Part 19: Features a little Cole banter about the Solas breakup, thoughts about Adahla's relationship with the others going into endgame (0:05), a final round of conversations with all companions, Silk FREAKING ME OUT about someone getting arrested (0:14), beginning endgame (0:24), the defeat and explosion (0:37), discussing the outcome with companions (0:41), making myself laugh really hard about Solas (0:44), balcony and epilogue (1:03), thoughts about the game, Solas and Mythal (1:17), quick discussion with Cole, more thoughts on Solas & the breakup as well as the narrative going into VG, accidentally banning stealthflower for 10 minutes (1:33), me laughing the hardest I ever have on stream (1:44-2:02), entering the Deep Roads fissure (1:57), establishing the first camp (2:17), Towers of Hanoi!!!! (2:40), discussing viscerally disturbing video games (2:49), Adahla coping badly with Solas leaving (2:51), exploring the second level, breaking the darkspawn siege (3:41), setting up the second camp (4:07).
Part 20: Features continuing down the Deep Roads, exploring the expanded bridges & getting Spooked (0:35), Renn's death (0:41), discovering the road to His Majesty (1:20), fighting around a lake of blood (1:41), game crash, collecting the last gears, entering the final area (2:32), final boss battle (2:44), aftermath (2:46), final Expedition Table missions (3:00), back to Skyhold, one final round of Skyhold companions and discussions of their friendships, discussion of choice of Divine (3:16), one final war table surprise from Dagna, final base game & romance thoughts, starting Trespasser (3:53), briefly jumping back to talk to Morrigan, Josie & Varric's reunions.
Part 21: Features speaking to all companions about their last two years (including the most hilarious spa day ever at 0:54), reading several Hard in Hightown chapters, struggling for fifteen minutes on a jump puzzle, beginning negotiations with Ferelden and Orlais (1:25), going through the eluvian (1:31), exploring the Crossroads, me losing my mind at an incredibly dumb codex joke (1:39), defeating the blue fire my own way (1:47), discovering elvish history and thinking about Tevinter parallels (1:57, 2:04-2:20), discussions of throwing Varric (2:20), me forgetting what fruits palm trees make (2:26), examining a mural & Adahla half-realizing who Solas is (2:29), me making a puzzle much harder than it has to be, first Dread Wolf codex entry (2:33), discovering the back treasury entrance, me laughing at Solas again (2:36), more elvish history, returning to Halamshiral (2:47), talking with friends again, back into the Crossroads (3:15), a lovely codex entry (3:17), into the Deep Roads (3:27), second Dread Wolf codex entry (3:40).
Part 22: Features concluding the Deep Roads, returning to Halamshiral & remanding the Inquisition guard (0:18), discussions with companions, very dumb easter eggs (0:45), multiple books about the Evanuris, Sandal's diary (0:53), discussing the library's fall with the spirit (0:56), getting clues about who she's chasing (0:59), more spirit convos (1:07), third DW codex entry along with another key mural & discussion of Adahla's feelings on now knowing who Solas is (1:09 through 1:22), Hard in Hightown chapter ??? (1:28), meeting the Viddasala (1:44), returning to Halamshiral (1:55), fireworks (2:18), alimony (2:27), me being holy jumpscared by a puzzle (2:46) and then moved by the prize, beginning the final approach (3:13), the last DW codex and the last mural & Adahla's thoughts, the last last astrarium (3:20), Adahla coming to terms with who she's chasing (3:21), Adahla thinking about death (3:27), Adahla writing her will via yelling it at Dorian (3:39), freeing the dragon & meeting Viddasala again & discussing Solas (3:46), entering the final map section (3:50), the final battle (4:10), stepping through the last mirror (4:18), returning to Halamshiral (4:31), epilogue slides (4:41), initial discussion (4:56-5:17), back through the mirror, discussion of Solas's motives, third trip through the mirror and discussion of new hobbies for Solas (5:37), discussion of Adahla's feelings (5:53), watching the low approval version of the scene (5:58), discussion of how unbelievably dumb Solas can be, one last replay (6:07), discussion of ramifications of tearing down the Veil (6:26-6:36), reflections on Adahla's narrative, reflections on gameplay (6:45), final reflections on Solas & the romance (6:57), brief discussions of Veilguard, wrap-up, and thanks.
#quark's streaming tag#quark plays dai#adahla lavellan#quark's streaming archive#solas#solavellan#dragon age inquisition
11 notes
·
View notes
Text
USA-G10 'Glitter Boy'

Art credit: Kevin Long
Model Type: USA-G 10 Class: Laser Resistant Infantry Personnel Assault Unit. Crew: One pilot.
Height: 10 feet, 5 inches (3 .1 m). Width : 4 feet, 4 inches ( 1 .3 m). Length : 4 feet (1.2 m). Weight: 1 .2 tons fully loaded.
Suggested proxies: Shadowhawk, Phoenix hawk
Glitter Boy power armor is an amazingly small and mobile, oneperson, armored robot vehicle. The robot suit stands approximately 10 feet tall (3 m) and offers fully articulated hands and the mobility of the human body. As such, it is considered an all terrain vehicle. The superdense chrome armor is constructed on a molecular level and can withstand more Mega-Damage than any other power armor created since. The robotic frame is nearly indestructible, resilient, and virtually maintenance free. The armor-shielded joints and padded pilot's compartment enable the machine to absorb impacts and cushion its pilot. It is also one of the few robots or power armors designed to comfortably accommodate a pilot for days or even weeks at a time. A refrigeration unit holds 10 gallons of drinking water, while another contains a high protein, multi-vitamin nutrient paste (about a four week supply), as well as a few other storage compartments where additional food or personal items can be contained. However, it is not recommended that the pilot remain inside the cushioned and air-conditioned unit for more than 24 hours at a time....
The former Coalition State of Free Quebec is the only kingdom in North America that manufactures and deploys Glitter Boys as a part of its army and national defenses. In fact, Free Quebec deploys and maintains the largest contingent of Glitter Boys in the world. A scheme that helped put a quick end to the Coalition's plans to invade and conquer Free Quebec when it proclaimed its independence and seceded from the Coalition States. Other than the secret factories at Free Quebec, there are no known manufacturers of Glitter Boy power armor in North America. However, there has been a sudden proliferation of new looking suits over the last few years, spawning a rumor that a pre-Rifts cache of Glitter Boy armor was recently excavated from an old American military installation in the western US or Canada and sold by hightech bandits. However, the Coalition suspects there may be a manufacturing facility in production in the West, and if so, intends to find it and destroy it. Bandito Arms is a top suspect, but so is Free Quebec, though few talk about that possibility.
5 notes
·
View notes
Text
Web Design Trends Redefining the Digital Realm
The rise of immersive experiences: How 3D and virtual reality are revolutionizing web design. Beyond static visuals: Interactive design elements that engage users on a deeper level. The evolving role of AI in personalization: Tailoring websites to individual user preferences.

Get Free website designing course 2025 👈
Clear Purpose and Goals: Define the primary objective of the website. Ensure that every element on the site supports this goal.
User-Friendly Design: Prioritize intuitive navigation and clean layout. Make sure the design is accessible and easy to use for all users.
Responsive and Mobile-First Design: Ensure the website works well on all screen sizes. Start with mobile design as more users access websites on mobile devices.
5 Important ways to develop responsive website
Fast Load Time and Performance
Optimize images and code for faster loading.
Use caching, a good hosting provider, and efficient coding practices.
Strong SEO and Content Strategy
Use relevant keywords, proper headings, and metadata.
Create valuable, high-quality content that helps your audience and ranks well on search engines.
#us school system#education system#high school education#free science education#3d image design#learn web development#learn design#learn graphic design#learn animation#learn website design#learn web design#responsive web design#website development#website design#well designed website#web graphics#web development#web design#website optimization#website developer near me
5 notes
·
View notes
Note
I'm making a second post to address a second point. It's more of a request really. Basically me and my irl gf LOVE going to arcade. The sims 3 has a lot of arcade machines, but not a lot of arcade functionality. Would it be possible to make a mod where the machines give out tickets (similar to festival tickets) that you can exchange for high quality items at the kiosk? Also, adding more prizes to claw machines (I love collection plushies from claw machines, my room is stuffed).
Yeah, I hate how all the arcade machines are free, that's super annoying. I would actually want something where you have to buy festival tickets to use them rather than getting festival tickets from using them. I do know someone has said they wanted to work on a mod that is basically what you are saying so depending on where they are with it, stayed tuned!
Hiya and thanks! I think? Not sure if I should take that "yuck" personally since I was the one that converted and edited the gym board. 😅 But I appreciate you sandwiching your mild insult between compliments. 😭😭 To answer your questions, (1) Transmogrifier or create your own object and put the script in the OBJK file (Note: the board has a routing slot so you need to make sure whatever object you replace it with also has the same slots or it will be unusable), and (2) replace the MODL files of the ingredients and the linked texture images with your own mesh. You probably also should regenerate a new thumbnail for it so it shows as your replaced ingredient. I usually just delete my Thumbnails cache.

Ask a:
Licensed doctor
Common criminal (anyone in Criminal career < Level 5)
Someone that has pills in their inventory
23 notes
·
View notes
Text
March on HAXYR3: Idioms, Podcasts & More!
Hey language lovers! Did you miss the epic content I unleashed on HAXYR3 this March? Don't worry, comrades, I've got your back!
This month was all about mastering those tricky Russian idioms that make you sound like a native. I unleashed four sets of 10 everyday idioms EACH, complete with downloadable flashcards on the website. Forget stuffy textbook expressions - these are the ones native speakers use on the street! Here's a taste:
Death with a Twist: From the poetic "уйти в лучший мир" (go to a better world) to the quirky "сыграть в ящик" (play in the box)! ⚰️
Mind Games: Dive deep into idioms describing intellectual challenges - because let's face it, learning Russian can be a wild ride!
Native-Level Ninja: Master these colloquial gems to navigate awkward situations and conquer anxiety like a boss.
Everyday Essential Expressions: Spice up your Russian with these common phrases and sound like you've been living in Siberia forever!
I threw down some quizzes to see if you guys could crack these common expressions. Turns out, idioms can be tricky beasts! Phrases like "куда ни шло" and "в том числе" had everyone scratching their heads. But fear not! Download those flashcards and be on your way to mastering idiomatic Russian.
My podcast "Пять Минут" (Five Minutes) is BACK! I'm all excited to share this podcast designed specifically for upper-intermediate and advanced learners. It's 100% pure, unaltered Russian, but don't worry, I won't leave you hanging. Each 5-minute episode comes with a full transcript for you to read along and boost your listening skills. This season, we're diving into hidden gems of Russian culture. I started with a mind-blowing Soviet movie that predicted our AI reality and the whimsical tales of Sergey Kozlov. The AI story was so fascinating, I even shared it in English!
Looking Ahead & How You Can Help!
March was a treasure trove of free resources, but April promises even more! To keep this awesomeness rolling, consider supporting me on Patreon. My patrons are basically my rockstars! Their suggestions for future topics get top billing, and they unlock exclusive deals on paid materials and merch.
Spread the Love!
Hit those like, share, and comment buttons! Your feedback fuels my fire and helps me craft even better mini-lessons for YOU! See you in April!

Cache the Magnificent assisting me in my podcast studio
15 notes
·
View notes
Text
🎵Doomed Commercial Area
3. "I'm not sure, Kim... but I think I can hear someone talking upstairs."
KIM KITSURAGI - "Wait, really?" He looks up at the ceiling. "Maybe it's coming from behind those safety curtains we saw upstairs?"
3. Smear your hands with coal.
CENTRAL FURNACE - A lush layer of coal now covers your skin, sinking into the wrinkles. Your hands look ancient.
INLAND EMPIRE [Medium: Success] - You feel the spirit of Ramout Karzai, ancient hero of Graad, pulsing through you. All that's left is to cover your face in war-paint.
Hadramut Karzai! Smear your cheeks black with coal.
No, let's not express ourselves. Let's just wipe our hands clean on our pants.
INLAND EMPIRE - Three dangerous stripes appear onto your cheeks, telling stories of your wild soul.
KIM KITSURAGI - "What... what are you doing?"
"I am the reincarnation of an ancient Iilmaraan warrior."
"Nothing!" (Wipe your face clean.) "Sorry, that was stupid."
KIM KITSURAGI - "Please wipe your face clean, officer."
CONCEPTUALIZATION [Medium: Success] - No, you're a proud warrior, keep it.

[Authority - Medium 11] Don't wipe it.
Wipe it clean.
+1 Kim trusts you.
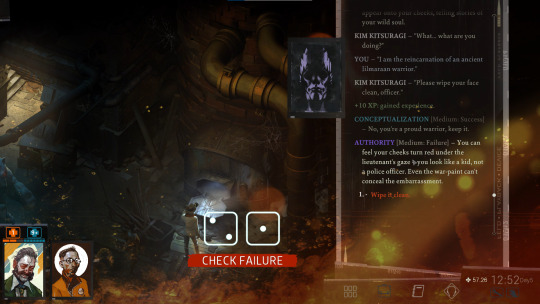
AUTHORITY [Medium: Failure] - You can feel your cheeks turn red under the lieutenant's gaze -- you look like a kid, not a police officer. Even the war-paint can't conceal the embarrassment.
Wipe it clean.
KIM KITSURAGI - "Thank you," the lieutenant nods. "So, where were we?" He turns back to the furnace.
4. "Those voices I heard... Maybe it's the malignant Entity? Plaisance said it lives in a chimney."
KIM KITSURAGI - "You're right, the rooms do look like they're connected. But *malignant Entities* don't exist -- at least not the *supra-natural* kind."
RHETORIC [Medium: Success] - Always has to be the sceptic, this man...
HALF LIGHT [Medium: Success] - Then what was the chatter you heard?
6. Kick it with your foot.
CENTRAL FURNACE - A hollow ring echoes through the furnace. Your toe hurts.
-1 Health +1 The Destroyer

5. [Physical Instrument - Medium 10] Yell "Hello!" into the furnace.
+1 Kicked the furnace. +1 Called Slipstream SCA again. +1 Helping Soona with research.
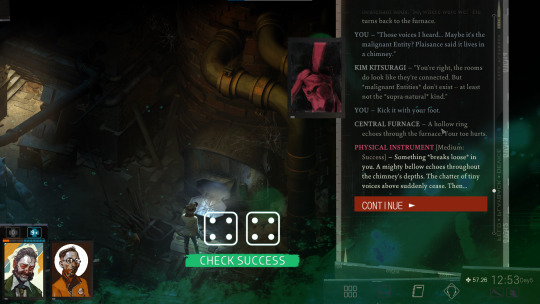
PHYSICAL INSTRUMENT [Medium: Success] - Something *breaks loose* in you. A mighty bellow echoes throughout the chimney's depths. The chatter of tiny voices above suddenly cease. Then...
CENTRAL FURNACE - "Hello?" you hear a woman's voice answer.
INLAND EMPIRE [Easy: Success] - You've awakened the entity!
"This is the Remote Viewers Division! Identify yourself!"
"I summon the ghost of this Doomed Commercial Area. Answer me, spirit!"
"Hello! Are you there? Speak to me!"
CENTRAL FURNACE - "Hello! Did you say anything?" There's a pause. "I can't hear you, please come upstairs! There's a safety curtain on the second floor, I'll open it!"
+5 XP
Level up!
PERCEPTION (HEARING) [Easy: Success] - You hear a low rumble upstairs -- the sound of a curtain being pulled aside.
KIM KITSURAGI - The lieutenant nods, then points upstairs. "After you, officer."
6. [Leave.]
We're not quite done down here yet.
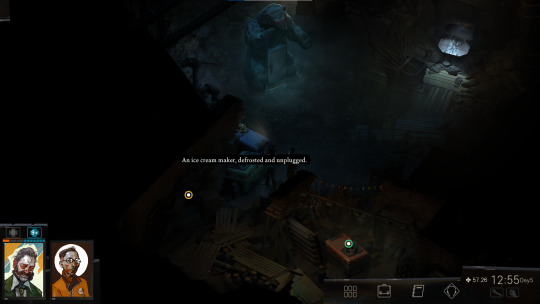
An ice cream maker, defrosted and unplugged.
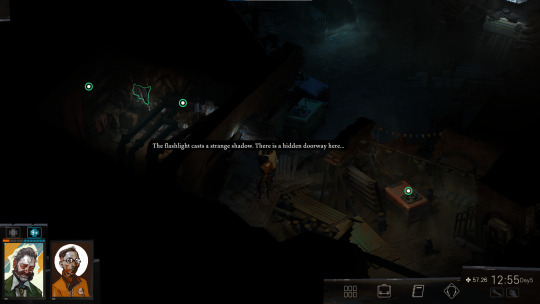
The flashlight casts a strange shadow. There is a hidden doorway here...
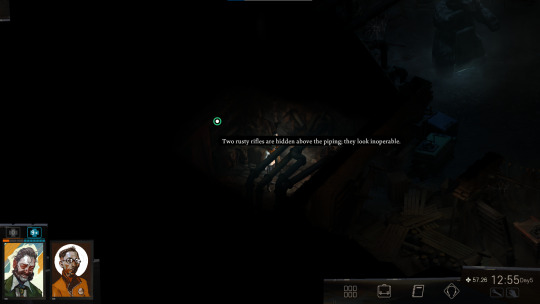
Two rusty rifles are hidden above the piping, they look inoperable.
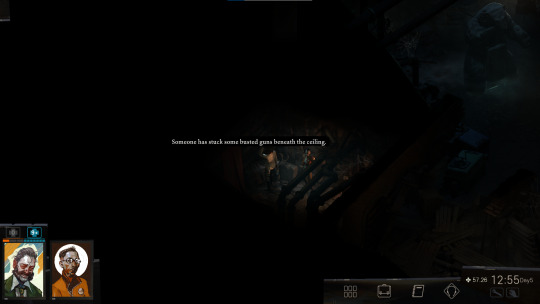
Someone has stuck some busted guns beneath the ceiling.
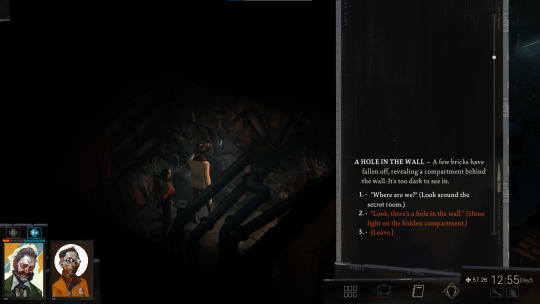
A HOLE IN THE WALL - A few bricks have fallen off, revealing a compartment behind the wall. It's too dark to see in.
"Where are we?" (Look around the secret room.)
"Look, there's a hole in the wall." (Shine light on the hidden compartment.)
[Leave.]
KIM KITSURAGI - "Seems like an old bunker from the Revolutionary period. Look at all those rifles..." He points up, at the rifles under the ceiling. "Must be an old weapons cache."
2. "Look, there's a hole in the wall." (Shine light on the hidden compartment.)
KIM KITSURAGI - "There is, yes. And there also appears to be something *inside* the hole... Interesting. Do you want to take a look?"
"Okay, I do…" (Look inside.)
"No, you do the honours." (Back off.)
A HOLE IN THE WALL - Your hand reaches deep into darkness and spider webs, rummaging around. You find rusty rifles, hidden away...
"Rifles, Kim!"
Inspect the rifles.
KIM KITSURAGI - The lieutenant steps closer, curious: "Are these any good?"
Inspect the rifles.
A HOLE IN THE WALL - Most of them are rusty and inoperable like the rest, but one catches your eye -- a bolt action model with a fine wood stock. In better cosmetic order than the others.
AUTHORITY [Easy: Success] - Take it! You're a police officer. Police officers carry guns.
"This one looks nice." (Take the rifle.)
KIM KITSURAGI - "An old Belle-Magrave, from the Revolution," the lieutenant notes with approval. His eyes are gleaming. "Seems to no longer be functional, but still -- a beautiful thing, in its own way."
Item Gained: Antique Belle-Magrave rifle
"Could the murder weapon we're looking for be similar?"
KIM KITSURAGI - "It's the same *type* of weapon, yes. A breechloader. An interesting coincidence that we should find something so similar. But I'm afraid our search for the real murder weapon must continue."
2. "What does this mean -- a rifle here?"
+1 Reputation
KIM KITSURAGI - "It means there are firearms -- albeit inoperable -- still lying around in Martinaise. It's an interesting coincidence, I would say. Might come in useful in the future."
+5 XP
EMPATHY [Trivial: Success] - He likes this find.
3. [Leave.]
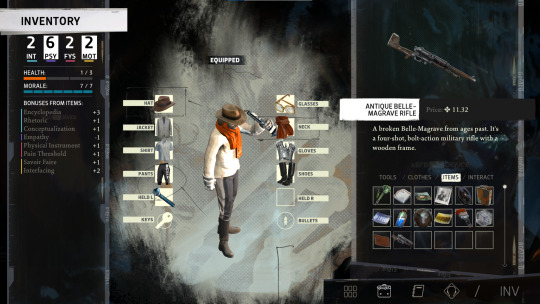
ANTIQUE BELLE-MAGRAVE RIFLE
A broken Belle-Magrave BM446 from ages past. It's a four-shot, bolt-action military rifle with a wooden frame. It misses a bolt-spring and the mechanism is jammed shut.
Hmm... you know what?
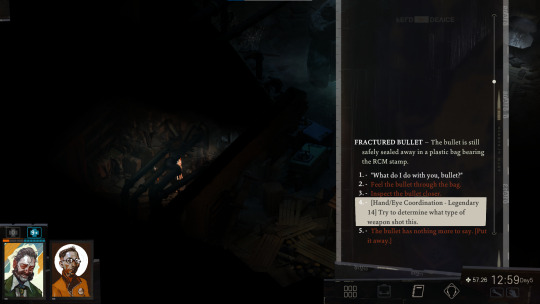
FRACTURED BULLET - The bullet is still safely sealed away in a plastic bag bearing the RCM stamp.
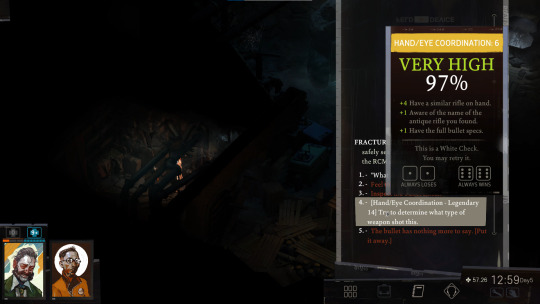
4. [Hand/Eye Coordination - Legendary 14] Try to determine what type of weapon shot this.
+4 Have a similar rifle on hand. +1 Aware of the name of the antique rifle you found. +1 Have the full bullet specs.
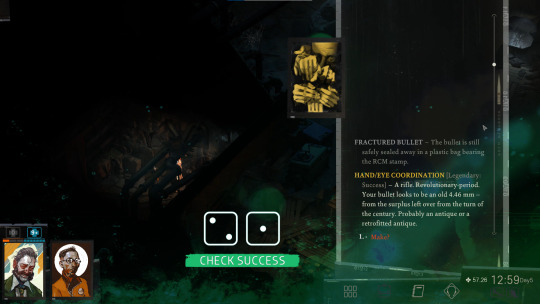
HAND/EYE COORDINATION [Legendary: Success] - A rifle. Revolutionary-period. Your bullet looks to be an old 4.46 mm -- from the surplus left over from the turn of the century. Probably an antique or a retrofitted antique.
Make?
HAND/EYE COORDINATION - The 4.46 calibre was widely used with the *Belle-Magrave* rifle, a Revacholian manufacturer. The B-M dominated the battlefields of the Insulindian theatre of the Antecentennial Revolution, 50 years ago.
Incidentally, you have just such a rifle with you. The dusty old thing you found hidden in the basement below the commercial area. It's unusable, sadly. If it were, the bullet would *probably* fit the chamber.
+5 XP
Is anyone still making these rifles?
HAND/EYE COORDINATION - No, but Zieleger, a major firearm manufacturer, ended up with a surplus after the war, so there are still a lot of these old military rifles floating around, usually broken. The quality was appalling.
Who uses Belle-Magrave rifles these days?
HAND/EYE COORDINATION - Antiques enthusiasts, guerrilla fighters in distant countries, a few lucky Jamrock bangers. You're looking for the same thing you found in that hidden weapons cache -- only in working order.
KIM KITSURAGI - "Hmm..." The lieutenant jots something down in his notebook. "What are you thinking? Bullet?"
4. "I think I know where this came from." (Dangle the bag thoughtfully.)
KIM KITSURAGI - "Okay. And?"
"The shot probably came from a Belle-Magrave rifle."
"I mean... have some ideas, but I can't be sure..."
KIM KITSURAGI - "An antique. That makes sense. There can't be many breech-loading rifles floating around in Martinaise, or anywhere in Revachol, really..."
"Why not?"
"That's probably a good thing."
KIM KITSURAGI - He nods. "I have to hand it to the monarchs -- it's quite admirable that they took the advice of criminologists last century and banned the use of breechloaders in peacetime."
"Some new RCM recruits get impatient with their muzzleloaders once they've trained with military-grade weapons, but they realize it's worth it, in the end."
ENCYCLOPEDIA [Medium: Success] - Prohibiting peacetime law-enforcement to front loaded rifles is a policy enforced by the Moralist International in all the nations of the Reál Belt.
"Worth what? Getting shot?"
"I think we should have more *powerful* guns. We're the law!"
"Makes you consider every shot. I like it."
KIM KITSURAGI - "Imagine if everyone -- cops, citizens -- had access to firearms that could shoot multiple rounds without pausing to reload. After the first shot, the second, third, and so on -- come much easier."
"But back to the investigation."
"Seems we're looking for an antiques enthusiast."
"Could the victim have been mixed up with some foreign guerrilla fighters?"
"Have well-armed Jamrock bangers started crossing over into Martinaise?"
"Yes. Something *mysterious* is afoot with this antique bullet type."
KIM KITSURAGI - "Let's find out. Next step -- finding the gun itself."
+5 XP
5. The bullet has nothing more to say. [Put it away.]

A frozen ice cream maker that's still running.

INSANE MESH TANK TOP
+1 Drama: Clinically insane
Where did you even get that one? No really, who put it in that drawer. No further comments. Wear it at your own risk.
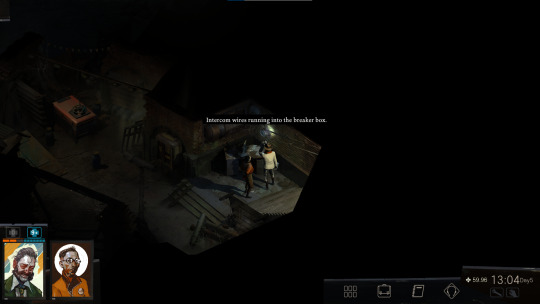
Intercom wires running into the breaker box.
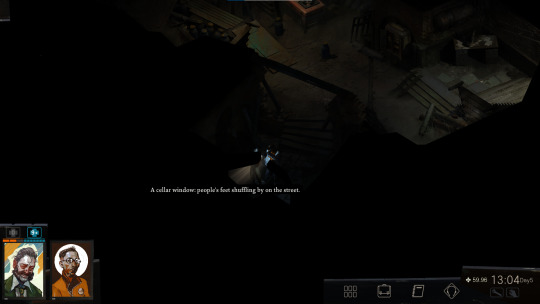
A cellar window: people's feet shuffling by on the street.
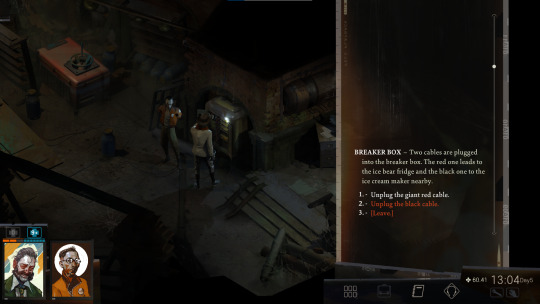
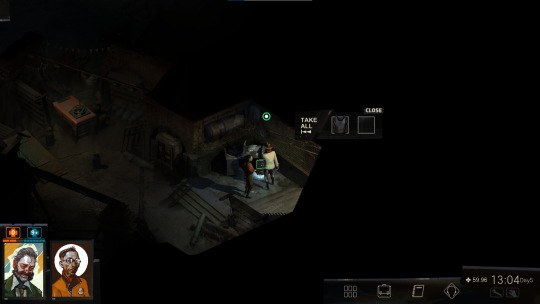
BREAKER BOX - Two cables are plugged into the breaker box. The red one leads to the ice bear fridge and the black one to the ice cream maker nearby.
Unplug the giant red cable.
Unplug the black cable.
[Leave.]
BREAKER BOX - An electric sizzle! The room is slightly quieter now.
Maybe turning the ice bear fridge off will help stay the curse. A little.
2. Unplug the black cable.
BREAKER BOX - Something close to you dies with a soft electric purr.
KIM KITSURAGI - "Why did you do that?"
"It's black, it's not like it's the red one."
"Because it's black, the colour of immeasurable cosmos."
"I don't know why I unplugged it, I do things without any reason."
KIM KITSURAGI - The lieutenant raises his brows, but doesn't say anything. The electric distribution board now has one cable missing.
3. [Leave.]
Before we continue, I just want to show that these stairs lead to this door, which we can now open from this side.
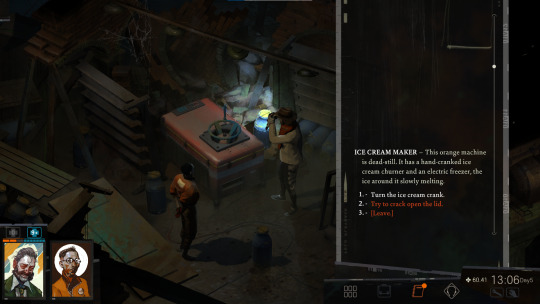
ICE CREAM MAKER - This orange machine is dead-still. It has a hand-cranked ice cream churner and an electric freezer, the ice around it slowly melting.
Turn the ice cream crank.
Try to crack open the lid.
[Leave.]
ICE CREAM MAKER - Turning the crank feels oddly satisfying, like stirring your childhood dreams... In the distance you hear water dripping.
INLAND EMPIRE [Easy: Success] - It's all gone now. You never became a poet or an entroponaut.
ELECTROCHEMISTRY [Medium: Success] - What better to assuage the creeping sense of failure than some frozen fat and sugar?
2. Try to crack open the lid.
ICE CREAM MAKER - You slip your fingers under the frozen lid, but the ice is too cold for you to get a good grip. A prybar would come handy here... or something stronger, like the Kvalsund KR+2 Multi-Tool.
KIM KITSURAGI - "Didn't Soona give you a perfect tool for this kind of job -- the Kvalsund? You should take it out."
TUTORIAL AGENT - Equip the MULTI-TOOL by going to the TOOLS tab in your INVENTORY. From there, you can equip it to a HELD slot.
Yeah, ok, I got it the first time.
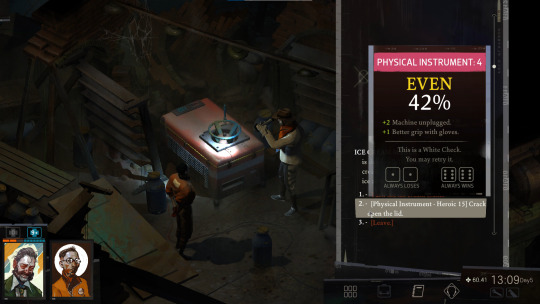
2. [Physical Instrument - Heroic 15] Crack open the lid.
+2 Machine unplugged. +1 Better grip with gloves.

PHYSICAL INSTRUMENT [Heroic: Success] - Ice groans and howls under the strain of your giant Kvalsund multitool -- until the lid cracks open.
ICE CREAM MAKER - Darkness lies inside, but you can faintly make out an object, intricate and foreign, left there for a sub-zero beauty sleep -- a filament memory with the words "OFF-SITE COPY" written on its side.
ELECTROCHEMISTRY [Medium: Success] - Disappointment washes over you as you stare into the almost-empty ice cream maker.
"What? No ice cream..."
Take the filament memory.
KIM KITSURAGI - "A scoop of ice cream would have been nice, yes," the lieutenant agrees. Someone's stomach grumbles. The room feels very cold.
Take the filament memory.
ICE CREAM MAKER - You gently lift the cube from its frosty bedding, careful to not damage it.
Item Gained: "Off-Site Copy" Filament Memory
KIM KITSURAGI - "We should take it back to Miss Luukanen-Kilde as soon as possible. I'm not sure how well unused filaments tolerate room temperatures."
INTERFACING [Easy: Success] - Yes, but aren't you curious to know what's on the precious filament? There's a radiocomputer upstairs...
[Close the lid.]
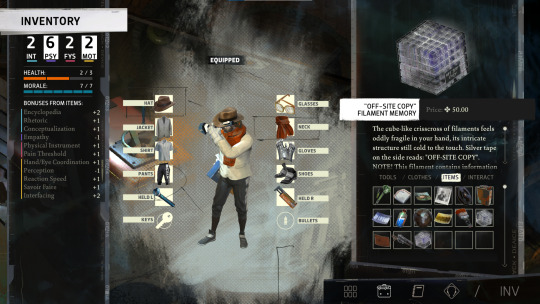
"OFF-SITE COPY" FILAMENT MEMORY
The cube-like crisscross of filaments feels oddly fragile in your hand, its intricate structure still cold to the touch. Silver tape on the side reads: OFF-SITE COPY. NOTE! This filament contains information that can be read using a radiocomputer.
You know, I *do* want to know.
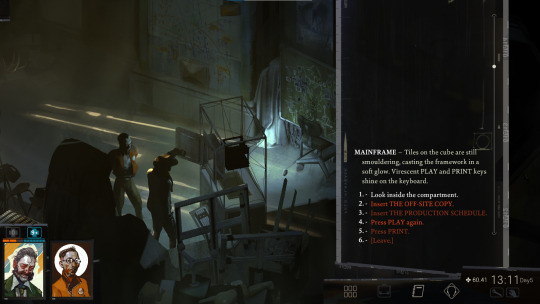
MAINFRAME - Tiles on the cube are still smouldering, casting the framework in a soft glow. Virescent PLAY and PRINT keys shine on the keyboard.
2. Insert THE OFF-SITE COPY.
MAINFRAME - Like a smooth drawer, the filament slides into place. On the keyboard, the PLAY key starts blinking.
+5 XP
3. Press PLAY again.
MAINFRAME - The speaker comes to life, static seeps through the machine's planar magnetic driver. An old lady greets you, her voice sounds a hundred years old...
EAST-INSULINDIAN REPEATER STATION - "Good afternoon, Fortress Accident on Rue de Saint-Ghislaine, this is East-Insulindian Repeater Station 1."
"Please repeat, is this the off-site copy?"
2. "I might have a password for the off-site copy."
EAST-INSULINDIAN REPEATER STATION - "Good. Please repeat the password."
Say: "After life -- death."
EAST-INSULINDIAN REPEATER STATION - Her answer is short and sharp: "No, that's not it."
HALF LIGHT [Medium: Success] - What does she mean *that's not it*?! What's the password then???
CONCEPTUALIZATION [Medium: Success] - Maybe it's the second part of the leitmotiv you saw on the stained glass window.
Say: "After death -- life again."
EAST-INSULINDIAN REPEATER STATION - "Good, I've unlocked the off-site copy. After ending the call, please press PRINT to access the filament."
CONCEPTUALIZATION - *Ka-ching*!
EAST-INSULINDIAN REPEATER STATION - "Fortress Accident, is there anything else I can do for you today?"
3. "That's all for now." (Press OFF/SILENT.)
EAST-INSULINDIAN REPEATER STATION - "Thank you and good bye," the old lady's voice disappears along with the static.
MAINFRAME - Tiles on the cube are still smouldering, casting the framework in a soft glow. Virescent PLAY and PRINT keys shine on the keyboard.
4. Press PRINT.
MAINFRAME - It sounds like something cracks, before the piece of paper starts filling up with pure black ink.
INTERFACING [Medium: Success] - Something's broken. Machines aren't supposed to behave like this.
2. Remove THE OFF-SITE COPY.
MAINFRAME - The filament slides out of its glowing nest.
7. [Leave.]
Well, I think we've done enough for one day. Tomorrow we'll confront *The Entity*.
10 notes
·
View notes
Text
How to Connect Your TON Wallet to STON.fi: A Simple Guide for Beginners

The world of crypto can feel overwhelming, especially if you're just starting out. There's a lot to figure out, and setting up wallets and connecting them to platforms can sometimes feel like a maze. But here’s the good news: connecting your TON wallet to STON.fi is actually much simpler than it seems.
Imagine you're heading into your favorite online store, but before you start shopping, you need to set up a payment method. Connecting your wallet to STON.fi is exactly like that—it’s just the key that unlocks your access to all the powerful features STON.fi offers. Let’s break it down step by step.
Why Do You Need to Connect Your Wallet
Think of your wallet as your digital passport in the world of crypto. Without it, you're like a tourist without a visa—ready to explore but unable to interact. Connecting your TON wallet to STON.fi lets you access the blockchain.
Once you're connected, you can trade tokens, stake assets, and fully immerse yourself in the world of decentralized finance (DeFi). Without this step, you're just watching from the sidelines. But once you connect, you get to play the game.
Step 1: Open the STON.fi Application
First things first—head over to STON.fi. This is your gateway to everything STON.fi has to offer. Think of this website like an online store where you can buy and trade your digital assets.
It’s a clean, easy-to-use platform. No need to worry about overwhelming pages or techy jargon. Just a simple interface ready for you to start using.
Step 2: Click on "Connect Wallet"
Once you’ve loaded the STON.fi homepage, look for the “Connect Wallet” button. It should be right there, easy to spot. This is your cue that you’re about to link your wallet to the platform, just like plugging your payment info into an online checkout.
Click on it, and let’s move on.
Step 3: Choose Your Wallet
After clicking the “Connect Wallet” button, you’ll see a pop-up window with a list of wallet options. Select the wallet you’ve set up to use with STON.fi.
If you don’t see your wallet in the list, don’t worry! Just click the “View All Wallets” option, and you’ll be able to see a full list of supported wallets. If your wallet still isn’t listed, you might need to set it up correctly first.
Step 4: Scan the QR Code
Here’s where the magic happens. Your wallet app will have a QR code scanner built right in. Open your wallet, use the scanner to scan the code shown on STON.fi, and bam—you’re almost there.
Think of this like scanning a QR code to pay at a checkout—it’s simple and secure.
Step 5: Confirm the Connection
Once your wallet app scans the QR code, you’ll get a notification asking you to confirm the connection. Once you approve it, your wallet is now connected to STON.fi.
That’s it! You’re now ready to explore and use all of STON.fi’s features. Your wallet will stay connected until you manually disconnect it or clear your browser cache, so no need to repeat this process every time.
What Does This Connection Mean for You
Now that your wallet is connected, you’ve unlocked a whole new level of control over your crypto assets. It's like entering a digital world where you hold the keys.
With your wallet connected, you can:
Trade your tokens and assets securely
Stake your crypto to earn rewards
Explore all the opportunities DeFi has to offer
You’re no longer just a visitor—you’re a participant in this world of decentralized finance.
One of the most common questions when connecting wallets to new platforms is, “Is it safe?” The short answer: Yes.
When you connect your wallet to STON.fi, you’re not giving anyone access to your funds. It’s more like logging into your banking app—you’re in control, and everything is secure. Think of it as giving a trusted store permission to check your ID before you buy.
Final Thoughts: A New World at Your Fingertips
Getting started with STON.fi might seem like a complicated task at first, but it’s really just a few clicks away. Connecting your wallet is the first step to taking full control of your crypto assets and diving into the world of decentralized finance.
Remember, once your wallet is connected, you’re ready to:
Trade tokens
Earn passive rewards
Stake your assets for long-term gains
Just like learning to use a new app or setting up your first online payment system, this process gets easier with time. The key is to start simple, and as you get more comfortable, the world of DeFi will open up to you.
So go ahead—connect your wallet, step into the future of finance, and start exploring all the opportunities waiting for you on STON.fi. The journey has just begun, and you’re already on your way.
4 notes
·
View notes
Text
Part 4: Level Breakdown: Levels 1 - 5
Dishonored has 9 levels, not counting the introduction in the tower. Each level, bar the first, culminates with a target that either needs to be eliminated or rescued.
There are 2 types of level: city levels, that culminate in a single enclosed location and single location levels.
Opening:
The first location in the game is Kaldwin Tower, one of the few places we will be visiting again. For now, you can marvel at the waterlock system that grants access into the tower, and talk to your companion Captain Geoff Curnow, who will be important later.
This level is a pretty elegant tutorial. You learn how to move, run and hide, by playing hide and seek with Emily, how to interact with objects by stealing High Overseer Campbell’s cyder and handing Jessamine the letter and you meet a few of the main players: Royal Physician and Painter Anton Sokolov, Royal Spymaster Hiram Burrows, and of course, Jessamine and Emily Kaldwin.
At the gazebo, Daud and his Whalers attack. Regardless of how many Whalers you kill, Corvo is no match for Daud’s Outsider mark, Jessamine is killed, Emily taken and Corvo accused of the crime.
Dishonored:
The game proper starts 6 months later. Corvo has been held at Coldridge Prison and is being tortured into signing a confession that he killed Jessamine. Hiram Burrows, now the Lord Regent, has grown tired of Corvo’s refusal to acquiesce and has scheduled his execution.
A Guard brings Corvo’s meal, along with a key to his cell and instructions on how to escape the prison.
This level introduces a lot, very quickly, and as such it can be pretty relentless. It’s hard not to kill anyone, since your only 2 weapons are a pistol which alerts ALL the Guards in the building, and a sword, but in an enclosed area with no high ground it’s hard to sneak up on Guards to knock them out.
The level introduces you to some of the mechanics the game will be utilizing a lot: opening hatches, gates, safes and crates, manipulating rat swarms by using corpses, and platforming over pipes and grates.
A cache of weapons, including Corvo's trusty crossbow have been left in the sewers, and after you acquire them, you meet Samuel, the boatman. He will be Corvo’s guide to and from each level and he takes Corvo to the Hound Pits Pub, to meet the Loyalists.
Hound Pits Pub:
The Pub is this game’s base; it’s a non-hostile area where you can rest, get mission briefings, restock, and upgrade gear and weapons. The Pub also introduces your allies: Samuel, Admiral Farley Havelock, Lord Treavor Pendleton, Pierro Jopin, Cecilia, Lydia and Wallace.
Samuel is a sailor who served under Havelock. He’s a good-natured man, who likes Corvo a lot if you’re on low and abhors Corvo if you’re on high chaos. He comments on the state of things, especially how Corvo’s actions are affecting the city, and generally gives very useful advice at the start of every level.
Havelock and Pendleton are two of the three Loyalists. Havelock is an Admiral who respects Corvo because of Corvo’s military background. He’s calm and pragmatic, not very forthcoming with words, and a bit tech-illiterate; after failing to record an audiograph he tosses the machine out of the window.
Pendleton is the chattier one; his family is one of Dunwall's founding families and he's very rich. Especially at the start, he’s more sceptical if the money and risk spent to break Corvo out is justified.
Wallace, Cecilia or Lydia, are friendly NPCs that Corvo can listen to. They provide funny anecdotes and flavour-text for the world, but out of the 3, Cecilia is the only one who has any kind of contribution to the main story.
Piero is an inventor who has a one-sided and very uncomfortable grudge against Sokolov. He's generally creepy and unpleasant, and I kept waiting for him to betray Corvo or do something evil, but no, he's just a weidro. He does make Corvos’ mask and all his weapons and upgrades.
After you meet everyone and explore the pub you get a visit from the Outsider. The Void is beautiful and eerie, but I screamed at the Outsider's detailed and lovingly rendered progression of Corvo’s-no-good-very-bad-day.
In the first game, the Outsider is a neutral figure, who despite marking Corvo doesn't seem at all invested in his success at saving Emilly. He isn't interested in human morality, and his commentary is generally perfunctory, save for the vitriol he has for Daud and the Abbey.
After your mark, you can test out Blink and the heart, and then you get your first mission: killing the High Overseer.
High Overseer Campbell:
This first level is by far the best designed. It's not the longest, but it has 2 substantial side quests, and introduces many important locations and characters, so forgive me if I'm a bit longwinded.
Before each mission, Havelock and Pendleton give you a brief. High Overseer Campbell has a black book he uses for blackmail, and the Loyalists need it, among other things, because it contains the location of Emily Kaldwin. Havelock asks you to rescue the third Loyalist, Overseer Teague Martin who orchestrated Corvo's jailbreak.
Before you leave for Dunwall, you speak to Calista Curnow. She is Captain Curnow’s niece, and she’s heard that Campbell intends to murder him, since he can’t be corrupted. She asks Corvo to save him, which is your first official side quest.
Sam drops you off under Clavering Boulevard, in the Textile District. He mentions that the streets are heavily guarded, and perhaps someone named Granny Rags can help you. My advice, and not just because I like her, is to seek her out. The rewards for her side quests are runes and they are vital this early on, especially for non-lethal playthroughs.
Throughout the levels you will encounter characters and vignettes that really capture the desolate and desperate atmosphere of the city. You are immediately greeted by City Watch dumping infected, dead bodies into a container from the bridge, headed for the condemned Flooded District, including still living people.
Down the alley, you can find your first, civilian; a girl, speaking to herself about what she has to do to get elixir, which is the only moment in the game where the misogyny of the world is acknowledged, and it of course has to do with sexual coercion.
Thankfully, next you meet Granny Rags, who lightens up the mood. She's in a condemned building across from the Dunwall Distillery, which is Bottle Street Gang territory. She asks that you get rid of her Gentlemen Callers, for a special price.
This is also where you encounter your first Outsider Shrine. At each shrine, the Outsider gives a bit of backstory on the characters, in this case Granny Rags, as well as the ‘cult devoted to hating him’, the Abbey of the Everyman.
The Gentlemen Callers are members of the Bottle Street Gang, who’ve come to rob Granny Rags. The reward is a rune, and it’s enough to knock them out, to get it.
Like mana, health depletes every time you take damage, and you can replenish it by drinking Sokolov’s elixir (or eating food if you have the charm), which you can find or purchase. Slackjaw, the leader of the Bottlestreet Gang, is making his own bootleg batch of the elixir, and selling it for cheap. If you decide to accept Granny Rags’ second quest, you will be poisoning said batch.
To do the quest, you need to sneak into the apartment of Robert Galvani, a doctor who is working on a cure for the plague. You have to steal the intestines of a plague infected rat and put them in the elixir brew in the Distillery. Galvani lives on Clavering Boulevard, so on your way to his apartment, you might want to rescue Griff from some more Bottle Street thugs.
Griff is a vendor, though his prices are much higher than Pierro’s. He’s still useful though, especially for buying upgrades and replenishing sleep darts in a pinch. His venue is right under the roof you want to climb so you can use the pipes to get to Clavering.
Galvni’s apartment is huge, and there are Guards inside, as well as some maids, and I hate the maids more than I hate the Guards. Since they are civilians you can’t kill them, but if they spot you, they alert Guards and activate alarms.
The rat viscera are in a lab on the third floor. Galvani, like Pierro is obsessed with Sokolov, so the code to his safe is the day they met. Another thing to note is that Galvani has realized that the plague carrying rat isn’t native to Dunwall.
After you get the intestines, you have to sneak into the Distillery. Sneaking across the yard is easy; just go on the pipes. Once inside, it’s more difficult to navigate around the distillery without getting spotted. The brewing stand is in the basement, and you can use it before you poison it if you’re running low. Once you get your rune, you are done, although you won’t see the consequences of your work until the next level.
The next big hurdle is the wall of light, which is what separates Clavering Boulevard from Holger Square. The wall of light is this game’s version of a checkpoint. It was designed by Sokolov to keep rats and the infected from crossing between districts and spreading the plague. In reality, it’s a convenient way to separate the levels into sections.
There are 3 ways to deal with the wall of light. The first is to shut it off, which can be accomplished by removing the whale oil canister. The second is to rewire the wall of light to let you through, but this will kill anyone who passes through it, which is no bueno for non-lethal and low chaos playthroughs. For both, Dark Vision 2 is especially helpful. The third and usually easiest option is to find a way around.
Holger Square is where you find Martin. At present, he’s being taunted by another Overseer, though listening to Martin make ‘yo mama’ jokes might be the real torture.
Freeing him lets you know that Campbell is indeed about to kill Curnow, and he will be using poisoned wine. One thing to note is that there is a non-lethal way of disposing of Campbell; you will learn about it in the very next area, but though Martin definitely knows about it, he doesn't mention it.
The non-lethal option is the Heretic’s Brand, which is what is done to members of the Overseer order who break the seven scriptures.
At this point you have several options on how to approach your target. There are the roofs which take you straight to the second floor; the ground level which is the best guarded; the kennels; and the backyard. This is a good time to decide on how you want to neutralize Campbell because that will determine your approach.
Killing Campbell is the easier option; he’s on the third floor so it’s trivial to get up high and either switch the poisoned glass or shoot him. If you want to save Captain Curnow, you have to clear the second floor is clear of guards and disable the alarms so he can exit the building on his own. Otherwise, you have to knock him out and carry his body far enough from the building.
If you want to brand Campbell, you need to steal a key that will get you inside the Interrogation room, where you find the branding instructions. Knock Campbell out and put him in the chair to administer the brand; he’ll stay put.
There are a few other areas of note in the residence. One is Campbell’s secret room, where you will find the portrait, he was sitting in for the day Jessamine died. You’ll also find proof that he’s a frequent user and abuser of the girls in the Golden Cat, as well as an audiograph which confirms that Emily is being held at the Cat, by 'the twins'.
In the Archive you can hear an Overseer discuss how Martin planned your jailbreak and read depositions of the Guards and other inmates. You can also listen to a Whaler interrogation and learn that the Whalers carry poison to end their lives if they’re captured.
You can make your escape through the backyard. There are a few more optional encounters here: you can save an Overseer and his sister from overzealous colleagues who think she’s a witch, and you’ll get the code to a safe in the Overseer barracks as thanks. You can also witness two other Overseers execute one who is infected with the plague, to prevent him from becoming a Weeper.
After all that, the only thing left to do is make your way to Samuel and bounce.
House of Pleasure:
The second level is also fittingly, my second favourite. For all my whinging about sex work in this game, I actually really enjoy fictional brothels, and this level is mostly set in the Golden Cat.
However, getting to the Cat is easier said than done, and in a series staple, first, you have to revisit Clavering Boulevard.
Corvo wakes up to some commotion in the Pub; it seems Weepers have somehow appeared in the sewers under the building. Havelock asks you to dispose of them, and if you do it non-lethally, Pierro will award you some sleep darts, and promise that they will be treated with dignity at the Academy.
After this bit, you are informed of your next target: Pendleton’s very own older twin brothers Custus and Morgan.
Throughout the game, Lord Pendleton will write journals and record audiographs about his life; through them you can learn that he’s estranged from the twins, mostly because they have spent his entire childhood abusing him, even almost killing him as a baby. Despite this, he still tries to reason with them, and it’s very clear that killing them isn’t something he wants to do. The only reason he agreed to it is to prove his loyalty to Havelock.
What I love is that Pendleton isn't entirely selfless; if you end up disposing of his brothers non-lethally, Pendleton will make a comment when you kidnap Sokolov that he wants a new portrait - this one of just himself. However, if you do kill the twins (and for the brief moment before Pendleton learns you didn't) he is mean and passive aggressive to Corvo. It's only when he learns that the twins are alive does he thank you.
Pendleton is the best developed and characterized of the Loyalists, and for that he's my favourite.
The bridge to Clavering now has a watchtower that shoots at anyone who gets caught in the light. Luckily you don’t need to go there, and you are immediately approached by Bottle Street thugs who ask you if you want to do a job for Slackjaw.
I really like the Bottle Street gang. Their design is great; the bowler hats, the suspenders, the dozens of rings, blowing fire as their weapon of choice. Hilariously though, the game repeatedly calls attention to the fact that the Bottle Street gang are mostly teenagers, and yet every single character model looks like a man with a mortgage.

the face of a teenager
Since you are doing a job for Slackjaw you can just walk around the Distillery yard and overhear conversations between the gangsters. I think the developers did a great job of humanizing the gangsters; my favourite was one boy admitting that he can't pay with coins because he gets his numbers mixed up.
This is where you learn what happened with the poisoned elixir - it has turned over half of the gang and innocent civilians caught in the crossfire into Weepers. They are locked in the yard next to the Distillery entrance. If you don’t knock them out, once you leave the Distillery they will break out and attack the Bottle Street members in the yard.
I could write a whole paper on Slackjaw, and believe me, people have written entire books. Yes, he is a gangster, but he’s a net positive to the city. He makes a bootleg, much cheaper version of the elixir and ‘employs’ the disaffected youth of Dunwall. He never attacks Corvo, and after you complete his side quests, he keeps his word and never turns hostile. So not only has Corvo halved Slackjaw's gang, but he's also destroyed the ability for dozens of people to protect themselves from the plague. And for what? A rune from a crazy, blind woman who thinks you are her dead husband?
Slackjaw doesn’t know you did anything to the elixir, but he does know you’re after the Pendletons. He offers to help you enter the Golden Cat if you do a job for him. Someone has been attacking his men and stealing territory, so he’s sent one of his men, Crowley to investigate Galvani’s apartment. Crowley's disappeared.
On your way to the apartment, be careful not to fall into the Whaler trap; they are stalking the roofs and apartments around the area where Griff stands. Like the prologue, they can use pull and blink, so make sure to knock them out.
This is the only level that doesn’t have an Outsider shrine; one of the apartments has a Weeper who seemingly tried to make one, with a bone charm instead of a rune.
You can also save a servant girl from two City Watch thugs who want to kill her for her elixir. She will give you the key to the Art Dealer’s apartment, and tell you he’s fired all his staff, but he keeps something valuable in his safe.
The Bottle street gang is already in the apartment, but they are having trouble opening the safe, and if you want to rob it, you will have to come back too.
Inside Galvani’s apartment you'll find Crowley’s dead body and two Guards arguing over how to classify his death. Crowley recorded an audiograph so you can take that back to Slackjaw.
We don’t learn who’s after Slackjaw from the audiograph, but you can guess it’s either Daud or Granny Rags. Slackjaw seems genuinely distraught that Crowley is dead, and he keeps his end of the deal, giving you a key to a hotel called the Captain’s Chair which you can use to get inside the Cat.
He also offers to get rid of the Pendletons quietly, if you can find the art dealer, Bunting, get the safe code from him and bring it back to Slackjaw.
Like before, there are several ways into the Cat. One involves Granny Rags who has made a new home in the Weeper infested underpass. My preferred method is the Captain’s Chair, because it lets you get on the balcony of the Cat, right on top of Madame Prudence.
To balance out the previous level, it's actually easier to deal with the twins on the non-lethal route.
Bunting is in the Silver Room, strapped to an electric chair. He doesn’t realize you are not a sex worker, so you can torture the combination out of him (it’s ok he’s into it). He also admits that he has been slowly defrauding the Pendletons, by lying to them that their collection is worthless, when it’s in fact worth thousands. The Pendletons are haemorrhaging money; both brothers lament how they had to borrow to even get into the Cat, and Morgan talks about killing himself as soon as the money runs out. Don’t feel bad for them though; their family has made their fortune by using slave-run silver mines.
From Prudence you learn that Emily tried to escape twice, and the last time, she got the closest by finding the VIP entrance. To make sure she stays put, Prudence keeps the master key on her, which you can easily steal.
If you want to kill the brothers, Prudence will let you know that one of them is the Golden Room and the other in the Steam Room. Whoever is in the Steam Room is very easy to kill with the pipe pressure.
Once you rescue Emily, you can use the VIP entrance which will take you to Granny Rags’ underpass. Emily will find her own way to Samuel, though from her dialogue, you can surmise that Granny Rags helped her.
Return to Slackjaw to report the code, and he’ll tell you what he intends to do with the twins: cut their tongues off, shave their heads, and put them to work in their own mines. This is the first time in the game where the non-lethal route is worse than simply killing the target, but it won’t be the last.
The only thing left to do is to rob the safe before Slackjaw can, just be aware that you need to be quick, since 3 Bottle Street thugs will appear on the second floor once you open it. When you’re done, meet Sam and Emily and bounce.
The Royal Physician:
This level is the first one that takes us to a different location: Kaldwin Bridge. It’s also the first level where you don’t have to kill anyone; instead, you are kidnapping Anton Sokolov.
The Loyalists need Sokolov, because he painted a portrait of Hiram Burrows’ mistress, and you need her name.
Kaldwin Bridge is a cool, albeit slightly underused location. Sam drops you off on the Southside, because the bridge has newly installed floodlights which make it impossible to get to Sokolov’s house. Moreover since it’s sundown, the mandatory curfew is in effect, so City Watch is everywhere making sure it’s being enforced.
The first real thing of note is Lord Pratchett arguing with a City Watch Guard about the curfew. His house is well stocked and well connected to the neighbouring apartments, though one of his neighbours seems to have been driven mad by the Outsider shrine.
Sokolov is the first person the Outsider has a lot to say on, namely how much he fucking hates him.

Sokolov has spent decades doing everything in his power from occult rituals to human experiments to get the Outsider to speak to him, but though everyone in-universe is obsessed with him, the Outsider thinks he's boring.
This area is full of apartments you can explore and rob, and there is also a woman you can save from a rat swarm. She will tell you the rats became aggressive after a man brought a bone charm inside, and everyone who was hiding with him is also dead.
Eventually you will make your way to a roof which gives you the best vantage point of the bridge and a new arc pylon is at the foot of it. A few Bottle Street thugs lie in wait.
The City Watch talk about how many desperate boys will try to do a suicide run at them, in hopes that they’ll either cross the bridge or die before they catch the plague. These guys are not here for that; they are trying to rescue their friend Alec from the brig, but they get incinerated or shot regardless.
Blink 2 is very handy here, since you can just blink on the chains of the bridge without alerting anyone. The towers have many platforms and Guards, as well as the way to disable the floodlights. Alec is in the brig for stealing pearls from River Crusts. You can get him out, but make sure you have cleared a way for him on the other side, because if you haven't, he will alert every single City Watch quicker than you trying to shoot a River Crust.
Once you cross the bridge you can break into the apartment where Alec’s friends are waiting and steal all the pearls they’ve gathered. You have to avoid another pylon, and it can be done the same way as the first one.
Before Sokolov’s house, which likewise has several ways inside, there is a group of prisoners. If you listen to the City Watch they are to be Sokolov’s test subjects; the problem is most of his test subjects die. You can free them by disabling the pylon, though be careful not to do what I did and accidentally blink yourself inside the cage.
The best and easiest way to get to Sokolov is through the roof. He is working in his greenhouse, recording an audiograph. You can talk to him and he won’t turn hostile, but you still have to knock him out to get him to Samuel. There is also a female test subject you can rescue.
The hard part is actually getting Sokolov to Samuel. The house is crawling with guards and if Sokolov touches water he immediately drowns. The best way to do it, is to fix his private elevator on the lower floor, knock out the guards and rewire the alarm at the house entrance, and drag him out.
Lady Boyle’s Last Party:
Like the title says: you’re going to a party.
But first, you need to make Sokolov talk.
Sokolov is a great character, though he’s a bit underutilized in the first game. He’s a true Renaissance man; a genius inventor who developed the City Watch technology like the arc pylon, the tallboys, and the wall of light. He’s also a doctor, having created the plague elixir, and searching for a cure, while also being a painter and an occultist. The only people who are not obsessively fawning over him, despise him.
You can get Sokolov to talk in two ways; releasing a swarm of rats on him or bribing him with expensive alcohol. If you pick the alcohol, you get to break up the aforementioned spying on Calista scene, just so we are clear which game we are still playing.
Sokolov explains that one of the 3 Boyle sisters is Burrows’ lover but he doesn’t know which one, since he painted her from behind. The Boyles are throwing a party that night and he was supposed to meet the elusive mistress, but obviously he won’t be appearing. Since it’s a masked ball, Corvo can simply go as himself, the masked vigilante from the wanted posters, and no one will suspect a thing.
The problem is, because of the party, the entire City Watch is camping around the mansion, and they bring out the big boys: tallboys.
Ahem.
The tallboys are men in armor on stills who can see from above and fire explosive bolts at you. The best way to deal with them is to blink past the one on the street, and enter the Boyle Estate ground. After that all the tallboys disappear.
It’s worth exploring around the estate first. There are several Weeper infested apartments around, one of which contains a shrine. The Outsider says that regardless of whether you cut Boyle's life short, or let her live a long time in hiding, this is her last ball.
Like always, there are multiple ways into the mansion; whichever one you choose, once you are inside, you’re in neutral land.
There are a few things you can do to get noticed; killing or attacking any of the partygoers, trespassing on the second floor, stealing too many things in quick succession, or annoying Lord Ramsey. Otherwise, everyone thinks you are wearing a provocative mask, and they will even comment in interest or disgust.
So much of this level is just funny details. For example, you can sign the guestbook as Corvo Attano to piss off the Lord Regent. You can steal from the Boyles and other guests will comment on how everyone does it. You can duel!
Before the ball, Pendleton gives you a letter that you are to deliver to Lord Shaw. You never learn what’s in the letter or why Pendleton wanted Shaw dead; all you know is that as soon as you hand him the envelope you are enrolled in a duel as Pendleton’s representative.
In order to win the duel and retain your non-lethal run, you have to wait for the countdown, use Bend Time and shoot Shaw with a dart. Pendleton will thank you, and give you a rune.
I am still not sure what the deal with this side quest is. You would assume that the duel is a set-up by Pendleton, his way of avenging his brothers. However, if you kill Shaw, he thanks you and gives you a rune.
Moreover, if you never deliver the letter, he is mad at you for putting him in a precarious position. So, was he hoping you would kill Shaw? Was he trying to get you killed? My theory is that after you dispose of the twins, Pendleton becomes a worse version of himself, and he abuses the missions to have you deal with his personal enemies.
The actual gimmick of the level are the sisters. All 3 are dressed in an identical outfit, save for the colour. You can either kill all 3 or guess the correct sister. You can imagine which one I chose.
Finding out the correct Boyle can be done in several ways. The easiest is to talk to a Lord Brisby who will outright tell you who the sister is and ask you to take her to the cellar where he has a boat ready to take her away. This is also the non-lethal solution.
The other more fun way involves getting a partygoer, Miss White drunk so she’ll tell you about the game. You can also sneak upstairs and go through the sisters’ rooms. Waverly and Esma’s rooms share a secret passage which can circumvent some of the guards on the second floor.
The Boyle lover will have a letter from the Regent in her room as well as a skeleton key to Dunwall Tower. After you learn who the correct sister is, the next step is getting her to come with you to a private area.
The intended way to do this is to 'intuit' each sister’s personality, because the game wants me to believe they are different. The flavours are horny (Esma), alcoholic (Lydia), and paranoid (Waverly). Once you get the correct sister to follow you, (and you are blessed if Waverly is your sister because she goes straight to the cellar) you can get rid of her.
Let’s talk about the non-lethal solution. Once again, I want to remind everyone that Lady Boyle’s ‘crime’ is sleeping with the wrong person.
Lord Brisby tells Corvo that he has been in love with Boyle for years. He begs you not to kill her, and if you bring her to him, he will hide her and keep her safe with him.
There is ZERO indication that Boyle even knows Brisby is, let alone wants to spend the rest of her life with him. I have to stress, a big part of this level is reading Lady Boyle's DIARY, and yet she doesn't mention him ONCE. Even if Boyle does know Brisby, and maybe would be down to clown, why would you then need to trick her into following you, knocking her out and carrying her to Brisby, like a sack of potatoes, instead of, you know, telling her he is waiting with a boat in the basement?
Once again, Corvo Attano, brave Royal Protector, goes along with a scheme to kidnap and sentence a woman to marital rape and capture for the rest of her life, on the word of a masked man, and this is the ACTUAL, CANON choice in the series. Not only that, but the next morning Covro receives a rune from the Boyle family, thanking them for ridding them of the 'problem' that Lady Boyle had caused them.
I am baffled. This could've been fixed so easily. You can read Boyle's diary. You can talk to her, hell, you have no other choice! That's the only way to get her to go with you to the cellar! One simple line about Brisby would've fixed this horrible plot-thread.
I was so mad about this, that I actually looked up to see what Arkane had to say for itself. Lead developer Harvey Smith did say on Twitter, that he regrets this decision. While I appreciate this, writing Boyle later on as someone who manages to manipulate Brisby enough to have a good life is not great. I’m glad they owned up to the poor writing, but I don’t like the way they are still trying to weasel out of it.
After that terrible decision, you have to avoid the watchtower lights on the river and get to Sam’s boat.
With that, we finish the first half of the game, and the 5 best designed levels. All that's left is to take down the Lord Regent himself, and that's exactly what we will be doing next.
Part 5: Dishonored: Level Breakdown 6 - 9
Part 3: Dishonored: Gameplay
Main Menu
3 notes
·
View notes
Text

Room 13: Flooded grotto. A shoddy wooden bridge connects the dry passages. Two dead Argonian men and one woman, all wearing sliced-open robes of a monk of Kynareth, float in the water.
Room 14: Four Split Hand tribe goblins are carving a large statue of Akatosh out of a tree trunk using Iron axes and shortswords. They have a pile of several spare axes at hand and will throw them at evasive foes. The weapons are bloodstained and covered in a gritty purple mineral residue. A "pot" made of five roughly flat stones in the southwest corner contains 300 septims and a pewter cup full of mashed tomatoes.
Room 15: The floor of the western passage into this room is coated in a thick layer of animal glue, except for a small bare patch which the Split Hand use to hopscotch between the chambers. Five goblins in this chamber test each others' mettle with a bed of hot coals. Two have Iron shortbows and one has a Hide shield. They move at half speed (burnt feet).
Room 16: Above the passage to 19 is a boulder with a skeleton embedded in it; it resembles a very large dog with a lizard-like head. A pile of bloodstained amulets of Akatosh sits next to the rock. The Split Hand shaman, Pohgo, performs rites in honor of Kadosh (the skeleton) most of the day. 6+2d6 goblins are 50% likely to attend a rite in progress, along with the tribe's warchief Guzbl. A battered, bloodstained wooden chest is tucked behind the rock, containing 540 septims, a silver talisman bearing the crest of Leyawiin (120 gp), and a large cut topaz (80 gp).
Pohgo: Devout, dogmatic, no concept of personal space. 3 HD, can cast Magic Missile 1/day, wields an Ironwood staff of Lesser Polymorph (1d6 turn duration); desiccated goblin head on staff shouts Goblin battlecries when used.
Guzbl: Controlling, bullheaded, laughs at the end of every sentence. Can speak Cyrodiilic but can't read or write. 4 HD, piecemeal Rattan armor with a Steel mace, Rattan shield, and two vials of Atrophy poison.
Room 17: Warchief's chambers. His mistreated but ambitious manservants, Dzerk and Yilgib, sleep here when not polishing the chief's weapons. Guzbl sleeps on a linen canopy bed (20 gp) in the northwest corner; under the bed is a bottle of Argonian Bloodwine (30 gp) and Guzbl's trained pet boa constrictor (3 HD). Its name is Crunch and it likes salted meats. There are two weapon racks and crude target dummies in the southeast corner.
Room 18: Goblin barracks. They sleep on 15' tall terraces along the northern and southern walls with a narrow path in between. 1d4 are present during the day and 27 at night. Dragons are drawn on the walls in chalk; one at the top of the southern terrace conceals a cache containing a pair of black silk gloves (15 gp), a pair of gold onyx earrings (80 gp), and a Potion of Diminution. The goblins don't know it's there.
Room 19: Two stick cages flank the path between the northeast passage and the stairs down; the northwest cage contains a gaunt, disheveled Bosmer woman wearing a robe made of thin, scaly hide. Her name is Quilawen, but she won't talk unless freed. The southeast cage appears to be empty but contains a starved Ahuimusu. A pressure plate concealed under some mud will open the latter cage if pressed, and the creature will attack with a 5-in-6 chance to surprise. Pohgo and Guzbl know about the pressure plate; other goblins are under orders not to approach the cages.
Ahuimusu: 3 HD, 7 AC, Move 12. Attacks: bite+claw, or tail (save or be paralyzed for 1d4 turns). Can blend into surroundings- 5-in-6 chance to surprise when aware of threats. XP 60.
Quilawen: Unruly, unworldly, unhealthy love of rat meat. Is able to speak with and exert influence on Ahuimusu and other reptiles. Level 4 Thief.
Room 20: Shaman's quarters. Giant goblin head made of rocks and mud against north wall. Cauldron of rat stew boils through the night in the center. Pohgo sleeps on the head's lolling tongue. A crude emblem of a partially split goblin hand is carved in the forehead. A limeware plater caked in congealed grease and dirt (30 gp, or 650 if cleaned) with a human skull on it sits on the ground next to the cauldron. The pattern of the grease stains on the face of the platter, if examined, strikingly resembles a snapshot of the warchief's chambers (17). Indeed, the platter is enchanted: three skullfulls of boiled rat grease poured onto it will take the shape of a specific place named aloud before pouring.
Room 21: Crusaders' wall. Fire breathing dragon statue. Five armored goblins. A crudely but sturdily built wooden palisade, 10' tall, from east to west blocks a passage down to the Rootbound Crypt. The wall is manned by five goblins with piecemeal Steel armor, shields, and weapons. Each has a shortbow, 15 arrows, and a melee weapon. A cob statue of a dragon stands at the edge of the wall; oil or liquid grease (the goblins keep two jars handy) poured down the statue's horn while the wick in its mouth is lit will cause the statue to "breathe fire" (save or 1d6 damage plus ignition) on anything in a 10' area in front of the wall. There is a 12' ladder to let through goblins returning from an excursion into the crypt, but the defenders are otherwise ordered to attack anyone and anything that emerges from it.
3 notes
·
View notes
Text
Proven Techniques for Ranking Higher on Google

Google is a powerful search engine, and seeking ways to place one's website at the top is important for enhancing the website's visibility, attracting more traffic, as well as the success of the online presence. At the digital marketing agency, we recognize that optimization is vital as there are millions of sites competing for the first places. Therefore, it is possible to use effective methods which cut across Google’s successful methods. In this article, we present systems that have been tested and proven to improve your google ranking and more traffic to your website.
1.Do a proper keyword research
Keyword research is the most important part of an SEO strategy. It is because by knowing what the intended audience is searching for you will be able to develop content that cuts across.
Action Steps:
Use Keyword Tools: Use high traffic specific keywords’ search volume tools like Google Keyword planner, Ahref, SEM rush etc. to search for keywords with low competition.
Analyze Competitors: Look at the keywords that are working for your competitors and narrow dow n on the related ones.
Focus on Long-Tail Keywords: The phrases are less competitive in nature and since they are more specific they lead to higher conversions.
2. Better the On-Page SEO Optimization
On page SEO Optimization is the process of editing and facilitating changes on the pages of a web document in order to make them rank well and fit to the targeted audience. Such changes may involve content optimization of the webpage, markup optimization improvement of the HTML source code.
Action Steps:
Rewriting and Optimization Strategy Title Tags and Meta Descriptions: Always ensure you note your page title and all the meta area as it has been promised to the readers and throughout the website.
Header Tags: Help cluster words and enhance comprehension by assigning H1 tags for the headline as the highest, H2, H3, etc for the subtitles.
URL Structure: Lines should be simple and moderate but include powerful words that are in line with what you are targeting.
Internal Linking: Where necessary links are created to other pages which are relevant to the current page being viewed by users and helps to spread out the link equity within the site.
3. Create High-Quality Content
Content is a very important element of SEO. Content, when properly designed, well written and is valuable and informative, will drive visitors, retain them and help establish credibility on a given niche.
Action Steps: Write for Your Audience: Use Solutions oriented approach where every word helps to eliminate audience problems.
Incorporate Keywords Naturally: Avoid abrupt keyword inclusion or excess use of keywords in the content.
Use Multimedia: Use of multimedia such as, images, animations, values etc to assist in a more appealing manner and also hold attention.
4.Enhance User Experience (UX)
The most important aspect with any Google ranking of the website is the user experience. Along with other factors, page speed, mobile usability, and site hierarchy are considerable for rankings.
Action Steps:
Improve Page Speed: It is possible to analyze why their site is slow through the use of Google PageSpeed and rectify the site’s speed. Spelling out some issues – Image compression, browser caching, CSS and javascript files minification.
Mobile-friendly Site Design: Create a website that is responsive to any device and that offers the same level of interaction regardless of the device used. With Google focusing on mobile first indexing, this becomes self-explanatory.
Utilize simple Structure: Website usability should be observed through the enabling of a better navigation structure and size of the website. This enables the website content to be easily accessed reducing the levels of bouncing.
5. Improve Quality of Backlinks
Links are an essential component of the parameters used in the Google algorithm, page rank among them. Backlinks from other websites with high reputation which are also relevant to the topic covered by a site will in most cases optimize the site.
Action Steps:
Develop Great Content: Write content that will drive people to share it, persuasive contents such as how to guides and case studies, original research.
Advertising through blogs: Write articles as a guest for reputable blogs in the niche and ensure to include a link to one’s site in the author information or within the article text.
6. Geo-targeting
For businesses that are into a certain geographic perspective, optimizing local search can get them local patrons and also enhance the local ranking.
Action Steps:
Claim Your Google My Business Listing: Your Google My Business profile must have all relevant details about your ventures such as addresses and business hours.
Social Media – Add Local Clientele Keywords: Identify local phrases and use them when generating content, title tags and meta descriptions.
Encouraging Reviews: Actively ask clients to review your services on Google and any other outlets and respond to them if possible, as good reviews will help boost your visibility in local search results.
7.Review and Performance metrics
It allows you to keep track of and evaluate your performance in line with search engine optimization. Bring out the strengths and weaknesses by utilizing the right tools.
Action Steps:
Google Analytics: Establish and analyze google analytical for effective tracking of such elements as the frequency of visitors, viewership and even exit of visitors.
Google Search Console: Use the GSC to see how well your web page performs, fixes, and submits the sitemap of your web page.
Finesse your strategies: With the use of prior or primary researches, refine any of your current seo methods. Adequate emphasis should be placed on aspects with some room for growth as well as recent developments on global search engine behaviors.
8. Follow New SEO Trends
SEO, as any other discipline, is dynamic, thus, it is important for the SEO professionals to go on top of the new developments and any new releases in a bid to keep their positions and even enhance them.
Action Steps:
Follow Industry Blogs: Sign up to popular and authoritative SEO blog sites and forums as fresh content and relevant changes are posted.
Participate in Webinars and Conferences: Join the SEO web-based presentations and conferences to listen to the views from other relevant fields.
Adapt to Algorithm Changes: Many changes concerning the Google algorithm are commonplace. This means these things are happening in a constant rush and therefore SEO strategies had to be altered with the changes.
Conclusion
Achieving a good rank on Google is a process that requires effective execution of multiple strategies like keyword research, website on-page and off page optimization, content writing and technical enhancement, etc. Downham Digital Marketing is dedicated to assist companies who wish to adopt these tested approaches to increase their online exposures. Keep in mind that SEO is not a one-time thing; it requires persistent revisions and improvements for the strategies to survive the competitive scene. For further assistance with your SEO efforts, be sure to contact our team of experts at SS TECH SERVICES as they employ state-of-the-art strategies and approaches.
#SEOtips#fromchallengetosuccess#innovationunleashed#transformwithUs#boostyourtraffic#SEO#PPC#contentcreation#localSEO#onlinegrowth#emptyroadsfullpotential#websiteredesign#techtransformation#sstechservices#websitedesign#businessboost#moderndesign#professionalwebsite#elevateyourbrand#webdesign#salesboost#digitalsuccess#websitedevelopment#digitaljourney#businessgrowth
2 notes
·
View notes
Text
37. Starter Villain, by John Scalzi
Owned: No, library Page count: 262 My summary: Charlie is a substitute teacher. Recently divorced, no money, and his only companion is his cat. When his estranged billionaire uncle dies, it's barely on his radar. Until, that is, he gets a mysterious request to attend his uncle's funeral, and assassins show up to stab his corpse. Now he's embroiled in the world of villainy, and there's no going back. Not while the dolphins are striking, at least... My rating: 4/5 My commentary:
I can't actually remember why I reserved this book. I think it was something I saw online and thought could be fun - a story about a man who suddenly inherits his reclusive uncle's business, only to find out that said uncle was a villain by trade and owns a volcano lair on a private island. What's not to love there? This kind of genre isn't usually my bag, but I came away from this book more enamoured than I thought I was going to be. Sentient cats, unionised dolphins, the secret lives of the wealthy and evil…there was a lot going on here, and I thoroughly enjoyed it all.
Our protagonist is Charlie, a thirty two year old admitted loser working as a substitute teacher after a divorce and falling out of his career as a business journalist. He's affable, snarky, largely in over his head, but warm-hearted and very likeable. Sure, he's a bit of a standard protagonist for this sort of genre, but when he starts actively taking charge and making decisions towards the midpoint of the book, he shows a lot of vibrancy and wit. And he's got his human sides, too. He's genuinely caring to Hera, his cat, he makes concessions to the striking dolphins that get them to listen to him and the company, and he cares about human life and about the downtrodden underclass. When he's in a burning hotel, he goes back for Hera. When confronted with the idea of killing a CIA agent, he's vehemently against it. And when the time comes for a supervillain showdown, he's careful to evacuate the civilians and minimise damage as much as he can. He cares, and that endeared me to him.
So yeah, about those cats and dolphins and such. The worldbuilding for this book is very much James Bond levels of villainy. Charlie's uncle engineered cats and dolphins with a human level of intelligence to use as spies and agents. The reality of this is that they're still treated like animals, which is unfair and unethical for a sapient species, and the book doesn't shy away from that! What was interesting was that, for all the book uses Bond gadgets and similar such nonsense, it was all in a realistic enough way that I could totally buy that this is just what rich men do behind the scenes. Are you telling me that you can't see Elon Musk with a Bond villain business and a volcano island? Exactly.
The plot in and of itself…like I said, this genre isn't really my thing, but it kept me engaged throughout. There's conspiracies within conspiracies regarding the secret league of villains that Charlie's uncle belonged to, and he's been thrust in at the deep end. The various villains are broke and need access to a cache of stolen artworks Charlie's uncle had on the island - Charlie's happy to give them over, as they were stolen by the Nazis and he wants nothing to do with them, but he has to outmaneuver the others who definitely want him dead over it. While also, you know, not enabling horrible rich men any more than they already are. In the words of the prophets, the plot starts coming and it doesn't stop coming, but I think that's to the book's benefit - keeps the action going and keeps the tension very well, while also managing to have enough downtime to properly humanise and characterise its characters. I had fun, and I'd definitely recommend it!
Next up, something from real life - a defector's tale.
4 notes
·
View notes