#can html id have spaces
Explore tagged Tumblr posts
Visit Tumblr Blog
Explore Tumblr blogs with no restrictions, modern design and the best experience.
Last Seen Tumblr Blogs


Fun Fact
Tumblr Inc. is funded by 13 investors.
Text

Welcome to the eel blog! This blog's goal is to reblog and post anything related to eels. Art, photography, videos, crafts, species highlights etc. as long as it is about our favorite long slimy beasts! Asks are open, feel free to show/ask me anything eel related

Mod is @gremzon , he/him, adult. Keep in mind this is just my hobby, I am not a biologist or professional, I just like eels, so I apologize if I make mistakes like identifying species wrong. Feel free to correct me in my asks, as long as you're being respectful

Tags:

Real-life things (pictures, videos): #eel-rl Art: #eel art Furry/ anthro eels: #anthro eel Eel facts: #eel facts Fake eels (like electric eels): #not so eel Memes/funny stuff: #meelme Original/ personal posts: #eelposting Asks: #talking to eels Queue tag: #eel's tail
Eel species repertory:
Species are tagged if identified, here are the species we have so far: (some species might be added but not posted yet because they are in the queue)
Fresh water eels European eel New Zealand long fined eel American eel Japanese eel Shortfinned eel Moray eels Freshwater moray eel Goldentail (banana) moray eel Green moray eel Yellow moray eel Black moray eel White eyed moray eel Blackcheek moray eel Snowflake moray eel Zebra moray eel Spotted moray eel Fangtooth moray eel Honeycomb moray eel Kidako moray eel Undulated moray eel Fimbriated moray eel Giant moray eel Mediterranean moray eel California moray eel Berndt's moray eel Stout moray eel Yellow edged moray eel Geometric moray eel Whitemouth moray eel Viper moray eel Tiger moray eel Gymnothorax parini Ribbon eel White ribbon eel Garden eels Spotted garden eel Orange barred garden eel Yellow garden eel Taylor's garden eel Conger eels Little conger eel Whitespotted conger eel Hawaiian mustache conger eel European conger eel Common pike conger eel Dagertooth pike conger eel Snake eels Spotted snake eel Napoleon snake eel Deep sea eels Gulper eel Snipe eel Prehistoric eels Anguillavus Other fish No ID
Other blogs:
Main blog: @gremzon Art blog: @gremzart Writing blog: @gremztxt
About me:
You can call me Grem, or Cain, if you prefer. My pronouns are he/him, I'm trying out it/its. I'm a digital artist who likes eels and radioactive rocks, I occasionally do HTML and craft, and I have an eel fursuit. I love my ocs so, so much, if you wanna see them, check my art blog! I'm an adult, but I am not comfortable with nsfw. I'm trans, aroace, neurodivergent, and European. I also have a website
If you wish to support my work, consider dropping me a tip on my ko-fi!
My links, if you want to find me somewhere else:
Website Bluesky Artfol Kofi
Q&A, rules and these kinds of things:
This place is a safe space, unless you support AI, NFTs and crypto stuff. Eels support minorities and hate bigots;
I do not like DNIs and trigger warnings, but as a simple rule of thumbs, don't be a prick. Asks are open but stay respectful, like I said, I'm not a professional and this is just a hobby. Also, if you are here only to say that you hate/eat eels, please don't;
Please do not send donation asks, this blog is only about eels and these kinds of things trigger my OCD;
No nsfw;
This blog is focusing on "true eels", fish belonging to the order Anguilla. As much as i love them, electric eels are not eels, sorry;
If you have a favorite eel and want me to make a species highlight post about it, ask me!
Thanks for reading, I hope you will enjoy the eels!
Last update: 18/02/25 - added species, changed "pelican eel" to "gulper eel"
16 notes
·
View notes
Text
If you're someone who's interested in collecting physical media, especially DVDs and blu-rays, I cannot overstate how good an investment a blu-ray drive for your computer is.
There are copious free resources that will allow you to digitize your collection for additional preservation and convenience... and I've placed them beneath this break!
MakeMKV: https://www.makemkv.com/
MakeMKV is the program I use for backing up blu-rays and DVD. It’s “free while in beta”, and as far as I can tell it’s going to continue to be in beta forever. You just need to register the program with the beta code, which can be found here: https://forum.makemkv.com/forum/viewtopic.php?t=1053. If your registration ever expires, you can just go to that post and they’ll have it updated with a new one.
“MKV” is “Matroska Video”, which is a container format (named after the Russian nesting doll) that collects the video track, audio track(s), and subtitle track(s) all into one file, which is super convenient for anime, because that means you don’t need to worry about making separate files for different combinations of dubs and subs. My understanding is that this is, essentially, a lossless video copy, and I’ve done comparisons comparing screenshots taken from video playing off the disc and from the .mkv, and I haven’t been able to notice a difference. As for playing .mkv files…
VLC Media Player: https://www.videolan.org/vlc/
The Combined Community Codec Pack (CCCP): https://download.cnet.com/Combined-Community-Codec-Pack/3000-2139_4-10966585.html
VLC is my media player of choice for watching back the stuff I back up. I’m not 100% sure if you need to download the CCCP for this- my backups play fine on my tablet just using the VLC app, and I recently found out they even work off a USB stick plugged into a Samsung Smart TV- but it doesn’t hurt to have.
MakeMKV can also be directly integrated with VLC Media Player to play blu-rays right from the drive, which is tremendously valuable if you're not interest in/don't have the hard drive space for digitization. I think I’ve encountered maybe one thing that couldn’t be played off the disc with this solution, and that was fixed in a subsequent update to MakeMKV. The full breakdown of how to do that can be found here: https://stolafcarleton.teamdynamix.com/TDClient/1893/StOlaf/KB/ArticleDet?ID=128854.
MKVToolNix: https://mkvtoolnix.download/downloads.html
Different companies author discs differently, and I like to keep my stuff organized the same way, which is where this tool comes in. I won’t go into too much detail on this here, but if you ever need to split one large file into smaller files (for example, a disc has 9 episodes of a show to a single title/file, and you want to split them into individual episodes), edit or remove chapter information, or rename audio/subtitle tracks, this is the tool to do it. There's a lot to this, so I would suggest reading the official documentation, but I could also whip up a guide if people are interested.
HandBrake: https://handbrake.fr/
The video encoder for shrinking those backups down to size- my favorite example was getting all 49 episodes of G Gundam down from almost 300gb off-the-discs to just under 50gb. This is also going to be heavily dependent on how powerful your computer is, because encoding takes up a lot of resources. On my computer, which is by no means top-of-the-line, I’d say on average it takes about 50 minutes to encode a 24 minute episode of anime, and that increases exponentially the longer the source material is.
I got the settings I use in HandBrake from this incredibly detailed breakdown of how video encoding works: https://kokomins.wordpress.com/2019/10/10/anime-encoding-guide-for-x265-and-why-to-never-use-flac/#tldr-summary-for-x265-encode-settings. There's a lot of information there, too, but it also provides generic settings to plug in to HandBrake if you don't care to manually adjust the settings for each project you're doing.
And that’s everything I use for my process! A lot of this was trial and error with other programs that cost money, performed worse, and were generally aggravating to use. It's a bit of elbow grease, but the reward is that once something is digitized, you have it forever, exactly the way you want it.
66 notes
·
View notes
Note
what uuup, chronicallyjirai here but sadly my blog is *also* a sideblog so anon it is.
depending on what you feel like doing w/ programming i HIGHLY recommend getting into the indie web/small web space, neocities is an incredible lil place where you can code your own website!
it's great programming practice for css/html/javascript and you *can* branch out into other areas from there for sure, i'm just lazy and stick to html bc it's all i know :p
idk tooo much about hacking/cybersecurity stuff beyond basic internet safety but i'd be certain there are people w/in that community that know more than me and can direct you from there :3
Yesss, ive been meaning to get into html to do something with my neocities acc. I just don't have the motivation to actually study lol
Neocities is so cool, there are many amazing ppl over there. Im just worried ill be considered creepy or something, im not very charming or talented so id just be asking weird programming questions lol
Thanks for the ask! I love asks!
2 notes
·
View notes
Text
We've had a few questions and a bunch of feedback about the new posting format so I'm just going to clarify a few things:
The new format was NOT intended to be permanent. I meant what I said when I said it was just an experiment we were trying because we got slammed with 80+ asks (and half of them were about the same thing).
Going forward, we will bulk post for similar situations in which a lot of asks are saying the same thing about a specific topic. This is largely to prevent topics dragging out for days and becoming circular and repetitive.
I find the bulk posting format much easier. This is mainly because Tumblr doesn't actually allow you to post blank replies to asks. Every ask we post has a space character in reply, and on top of this, the space doesn't count unless it's in HTML/Markdown, so for every post I have to switch the post formatting to one of those two. It's very tedious. You can test this by sending an anon ask to yourself and trying to post it.
One anon was concerned that people wouldn't be able to defend themselves here if we were no longer posting replies to posts. To be clear, if someone comes in like, "I want to say this in response to the anon who said blah" that's fine, we just won't post asks given with post ID numbers that could have been a reply. We delete a lot of asks that just look like: "/post/857372759699295 no, you're wrong"
I hope this alleviates some concerns and explains some of our reasoning. -Secretmin
31 notes
·
View notes
Text
I've recently learned how to scrape websites that require a login. This took a lot of work and seemed to have very little documentation online so I decided to go ahead and write my own tutorial on how to do it.
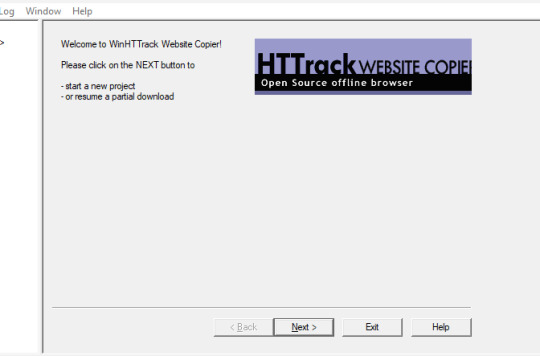
We're using HTTrack as I think that Cyotek does basically the same thing but it's just more complicated. Plus, I'm more familiar with HTTrack and I like the way it works.
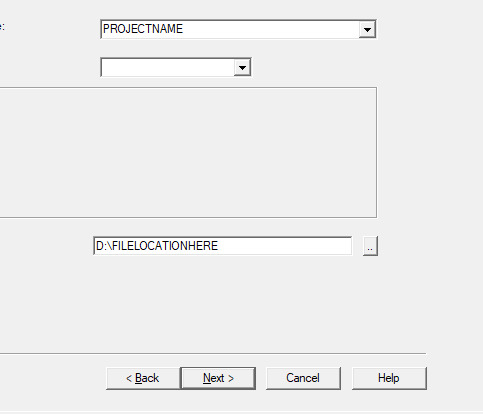
So first thing you'll do is give your project a name. This name is what the file that stores your scrape information will be called. If you need to come back to this later, you'll find that file.
Also, be sure to pick a good file-location for your scrape. It's a pain to have to restart a scrape (even if it's not from scratch) because you ran out of room on a drive. I have a secondary drive, so I'll put my scrape data there.
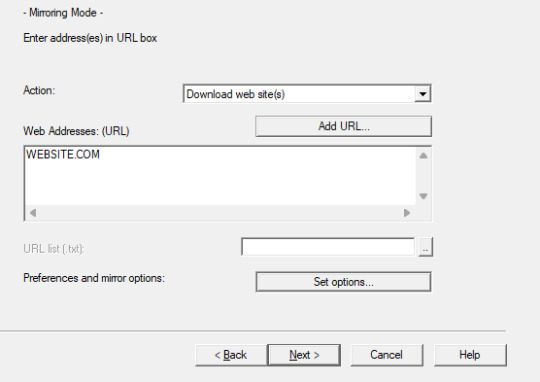
Next you'll put in your WEBSITE NAME and you'll hit "SET OPTIONS..."

This is where things get a little bit complicated. So when the window pops up you'll hit 'browser ID' in the tabs menu up top. You'll see this screen.
What you're doing here is giving the program the cookies that you're using to log in. You'll need two things. You'll need your cookie and the ID of your browser. To do this you'll need to go to the website you plan to scrape and log in.
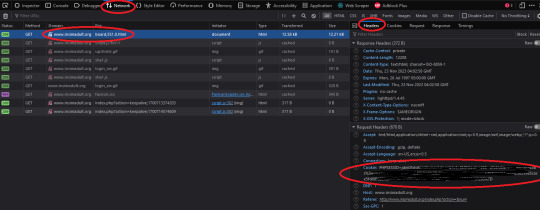
Once you're logged in press F12. You'll see a page pop up at the bottom of your screen on Firefox. I believe that for chrome it's on the side. I'll be using Firefox for this demonstration but everything is located in basically the same place so if you don't have Firefox don't worry.
So you'll need to click on some link within the website. You should see the area below be populated by items. Click on one and then click 'header' and then scroll down until you see cookies and browser id. Just copy those and put those into the corresponding text boxes in HTTrack! Be sure to add "Cookies: " before you paste your cookie text. Also make sure you have ONE space between the colon and the cookie.
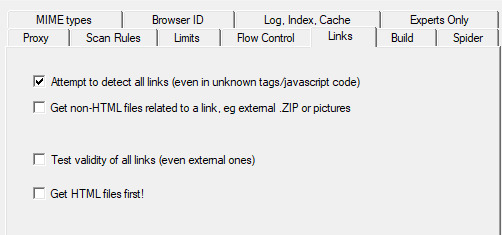
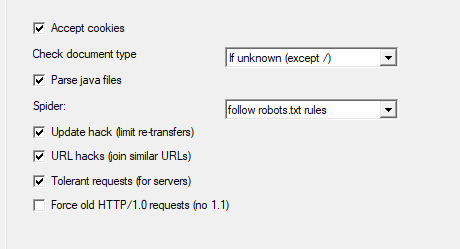
Next we're going to make two stops and make sure that we hit a few more smaller options before we add the rule set. First, we'll make a stop at LINKS and click GET NON-HTML LINKS and next we'll go and find the page where we turn on "TOLERANT REQUESTS", turn on "ACCEPT COOKIES" and select "DO NOT FOLLOW ROBOTS.TXT"
This will make sure that you're not overloading the servers, that you're getting everything from the scrape and NOT just pages, and that you're not following the websites indexing bot rules for Googlebots. Basically you want to get the pages that the website tells Google not to index!
Okay, last section. This part is a little difficult so be sure to read carefully!
So when I first started trying to do this, I kept having an issue where I kept getting logged out. I worked for hours until I realized that it's because the scraper was clicking "log out' to scrape the information and logging itself out! I tried to exclude the link by simply adding it to an exclude list but then I realized that wasn't enough.
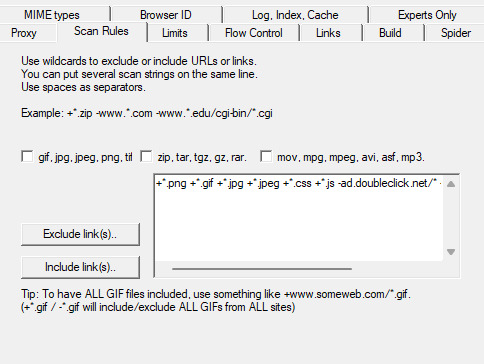
So instead, I decided to only download certain files. So I'm going to show you how to do that. First I want to show you the two buttons over to the side. These will help you add rules. However, once you get good at this you'll be able to write your own by hand or copy and past a rule set that you like from a text file. That's what I did!

Here is my pre-written rule set. Basically this just tells the downloader that I want ALL images, I want any item that includes the following keyword, and the -* means that I want NOTHING ELSE. The 'attach' means that I'll get all .zip files and images that are attached since the website that I'm scraping has attachments with the word 'attach' in the URL.
It would probably be a good time to look at your website and find out what key words are important if you haven't already. You can base your rule set off of mine if you want!
WARNING: It is VERY important that you add -* at the END of the list or else it will basically ignore ALL of your rules. And anything added AFTER it will ALSO be ignored.

Good to go!

And you're scraping! I was using INSIMADULT as my test.
There are a few notes to keep in mind: This may take up to several days. You'll want to leave your computer on. Also, if you need to restart a scrape from a saved file, it still has to re-verify ALL of those links that it already downloaded. It's faster that starting from scratch but it still takes a while. It's better to just let it do it's thing all in one go.
Also, if you need to cancel a scrape but want all the data that is in the process of being added already then ONLY press cancel ONCE. If you press it twice it keeps all the temp files. Like I said, it's better to let it do its thing but if you need to stop it, only press cancel once. That way it can finish up the URLs already scanned before it closes.
40 notes
·
View notes
Text
Learn HTML and CSS: A Comprehensive Guide for Beginners
Introduction to HTML and CSS
HTML (HyperText Markup Language) and CSS (Cascading Style Sheets) are the core technologies for creating web pages. HTML provides the structure of the page, while CSS defines its style and layout. This guide aims to equip beginners with the essential knowledge to start building and designing web pages.
Why Learn HTML and CSS?
HTML and CSS are fundamental skills for web development. Whether you're looking to create personal websites, start a career in web development, or enhance your current skill set, understanding these technologies is crucial. They form the basis for more advanced languages and frameworks like JavaScript, React, and Angular.
Getting Started with HTML and CSS
To get started, you need a text editor and a web browser. Popular text editors include Visual Studio Code, Sublime Text, and Atom. Browsers like Google Chrome, Firefox, and Safari are excellent for viewing and testing your web pages.
Basic HTML Structure
HTML documents have a basic structure composed of various elements and tags. Here’s a simple example:
html
Copy code
<!DOCTYPE html>
<html>
<head>
<title>My First Web Page</title>
<link rel="stylesheet" type="text/css" href="styles.css">
</head>
<body>
<h1>Welcome to My Web Page</h1>
<p>This is a paragraph of text on my web page.</p>
</body>
</html>
: Declares the document type and HTML version.
: The root element of an HTML page.
: Contains meta-information about the document.
: Connects the HTML to an external CSS file.
: Contains the content of the web page.
Essential HTML Tags
HTML uses various tags to define different parts of a web page:
to : Headings of different levels.
: Paragraph of text.
: Anchor tag for hyperlinks.
: Embeds images.
: Defines divisions or sections.
: Inline container for text.
Creating Your First HTML Page
Follow these steps to create a simple HTML page:
Open your text editor.
Write the basic HTML structure as shown above.
Add a heading with the tag.
Add a paragraph with the tag.
Save the file with a .html extension (e.g., index.html).
Open the file in your web browser to view your web page.
Introduction to CSS
CSS is used to style and layout HTML elements. It can be included within the HTML file using the <style> tag or in a separate .css file linked with the <link> tag.
Basic CSS Syntax
CSS consists of selectors and declarations. Here’s an example:
css
Copy code
h1 {
color: blue;
font-size: 24px;
}
Selector (h1): Specifies the HTML element to be styled.
Declaration Block: Contains one or more declarations, each consisting of a property and a value.
Styling HTML with CSS
To style your HTML elements, you can use different selectors:
Element Selector: Styles all instances of an element.
Class Selector: Styles elements with a specific class.
ID Selector: Styles a single element with a specific ID.
Example:
html
Copy code
<!DOCTYPE html>
<html>
<head>
<title>Styled Page</title>
<link rel="stylesheet" type="text/css" href="styles.css">
</head>
<body>
<h1 class="main-heading">Hello, World!</h1>
<p id="intro">This is an introduction paragraph.</p>
</body>
</html>
In the styles.css file:
css
Copy code
.main-heading {
color: green;
text-align: center;
}
#intro {
font-size: 18px;
color: grey;
}
CSS Layout Techniques
CSS provides several layout techniques to design complex web pages:
Box Model: Defines the structure of an element’s content, padding, border, and margin.
Flexbox: A layout model for arranging items within a container, making it easier to design flexible responsive layouts.
Grid Layout: A two-dimensional layout system for more complex layouts.
Example of Flexbox:
css
Copy code
.container {
display: flex;
justify-content: space-around;
}
.item {
width: 100px;
height: 100px;
background-color: lightblue;
}
Best Practices for Writing HTML and CSS
Semantic HTML: Use HTML tags that describe their meaning clearly (e.g., , , ).
Clean Code: Indent nested elements and use comments for better readability.
Validation: Use tools like the W3C Markup Validation Service to ensure your HTML and CSS are error-free and standards-compliant.
Accessibility: Make sure your website is accessible to all users, including those with disabilities, by using proper HTML tags and attributes.
Free Resources to Learn HTML and CSS
W3Schools: Comprehensive tutorials and references.
MDN Web Docs: Detailed documentation and guides for HTML, CSS, and JavaScript.
Codecademy: Interactive courses on web development.
FreeCodeCamp: Extensive curriculum covering HTML, CSS, and more.
Khan Academy: Lessons on computer programming and web development.
FAQs about Learning HTML and CSS
Q: What is HTML and CSS? A: HTML (HyperText Markup Language) structures web pages, while CSS (Cascading Style Sheets) styles and layouts the web pages.
Q: Why should I learn HTML and CSS? A: Learning HTML and CSS is essential for creating websites, understanding web development frameworks, and progressing to more advanced programming languages.
Q: Do I need prior experience to learn HTML and CSS? A: No prior experience is required. HTML and CSS are beginner-friendly and easy to learn.
Q: How long does it take to learn HTML and CSS? A: The time varies depending on your learning pace. With consistent practice, you can grasp the basics in a few weeks.
Q: Can I create a website using only HTML and CSS? A: Yes, you can create a basic website. For more complex functionality, you'll need to learn JavaScript.
Q: What tools do I need to start learning HTML and CSS? A: You need a text editor (e.g., Visual Studio Code, Sublime Text) and a web browser (e.g., Google Chrome, Firefox).
Q: Are there free resources available to learn HTML and CSS? A: Yes, there are many free resources available online, including W3Schools, MDN Web Docs, Codecademy, FreeCodeCamp, and Khan Academy.
#how to learn html and css#html & css course#html & css tutorial#html and css#html course#html css tutorial#html learn#html learn website#learn html#learn html and css#html and css course#html and css full course#html and css online course#how to learn html and css for beginners
3 notes
·
View notes
Text
a non exhaustive list of things i love about tumblr that have made it the only Usable Social Media(tm), as someone who follows the maximum amount (5000) of people and has seen it All:
-the tags. every othere sm requires tags to be uninterrupted, no spaces phrases and you can write full fucking novels in the tags on tumblr. this created a completely new ecosystem for how conversations and posts are structured on here. ppl post screenshots of tags, mention previous tags, encourage other people's writing and art in the tags, all while avoiding cluttering the original post's text with every reblog when you want to comment. you can make hushed commentary that sometimes gets noticed and adds a lot to posts when its picked up on!
-the ask system. we used to have fan mail on this site a few years ago but i don't know that it was as successful, so the ask and submissions system became the main way to go. its not as common to have themed ask blogs anymore (like "ask rainbow dash" where people draw responses, i've had a few of these kinds of blogs in the past) but it really allows people to acknowledge each other, get questions answered, and interact in a way i think is really missing from the internet in the late 2020s. its abused sometimes and anon hate still shows up on this site, but i think the culture has changed noticeably in that this kind of hate is brushed off more easily in most cases.
-the longevity of posts and how everything is archived. its so much easier to find old posts on tumblr than other places and you can sort archives of people's blogs based on a lot of different types, like photos only or text only, years posted, etc. really cool especially for looking back on your blog through the years and in the age of the New Posts Only its really refreshing to be able to revisit old posts. I see posts on here that show up from 2012 and its such a pleasant surprise since so much of the internet is being overwritten
- the absurdly customizeable color palettes and appearances of the site. its so customizeable and even though desktop blog sites aren't as common of a way to interact anymore (i miss them rip blogs with no desktop versions) you can literally edit the css and html and show your own personal aesthetics as much as you want to.
-the april fool's day rebrands
-the art is so good and photosets allow for longform posts which i never see ANYWHERE else on social media. you can post like up to 30 images in a photo set i think??? which was increased from i think max 10 and its all consecutive. also that we have a read more button to give people the option to choose to open long posts or not.
-the id system. i've seen a lot of people id posts and make posts more accessible. also people providing trigger warnings which you don't get other places tbh like i've never seen anywhere online where you could straight up choose what you didn't want to see so you don't have to encounter it in the wild! its really nice especially for someone like me who has several phobias lol
i could keep going but like.....i love you tumblr as someone who has been here for literally over a decade.
3 notes
·
View notes
Text
I'm still a novice in it obviously, but I have to say, the dynamic between html and css, specifically an html page and a css external style sheet, is just
sublime
the way that content and presentation can be efficiently adjusted independently from each other, that with sufficient foresight in terms of class and ids, you can simply reconfigure the final outcome according to your whims.
adjust colors and spacing, or adjust text with the comforting knowledge that the spacing will adapt automatically to compensate
idk I just want to stare at the text for awhile.
3 notes
·
View notes
Text

This is Round Three of the Artist Claims for the 2023 round of WIPBB. You may claim as many fics as you want this round. If you want only one fic, please fill out the form once with your top choices. If you want two fics, fill out the form twice with your first choice in the first form submission with one unique ID and the second choice in another submission with a different unique ID. If you want to claim three or more, fill out the form each time with a unique ID.
The synopses are located at https://wipbigbang.dreamwidth.org/172787.html
The form is located at https://forms.gle/RLv3ZuRYyJYMPB6c7.
Round three of the art claims will go on until July 8th.
The Untamed/MDZS
#175
Title: Til Death Do Us Part
Pairing/Characters: poly Jin Ling/Jiang Cheng/Jin Guangyao
Rating Explicit | E
Warnings/Tags: Non-con/Rape, incest, suicidal ideation
Other general tags include: time travel fix it, canon divergence, everyone (you care about) lives, wedding fic, wedding sex, secret (incest) wedding, threesome, smut, angst, angst with a happy ending
Notes on the rape tag: I'm tagging it this for two reasons. One is that two of the characters have experienced violent rape in the past, and while it *probably* won't come up in any explicit detail in this fic but it very much does in the series as a whole and may be referenced. The second reason is that while it doesn't happen on-screen in this installment of the series, one of the main conflicts of this series has been Jin Ling's deception of Jiang Cheng while they are in a relationship, causing them to breakup at the end of the last (already published) fic when Jiang Cheng discovers that he'd intentionally withheld information about himself to keep Jiang Cheng from finding out that their relationship is incestuous because he does not want him to reject him for this reason as the Jiang Cheng in Jin Ling's timeline had (temporarily). Jin Ling and Jiang Cheng getting back together in this installment involves Jiang Cheng forgiving him for rape by deception and while it's not explicitly spelled out as that I think it deserves a warning. Jin Ling's actions aren't *intentionally* malicious, they're driven by fear, loneliness and selfishness, but he sure does know he's doing a bad thing and rationalizes it away until Jiang Cheng is very, very obviously and badly hurt by it.
Summary: This fic is the 5th installment of a series (first 4 are already published here: https://archiveofourown.org/series/2835754) in which a 40yo, very powerful Jin Ling time travels to the past to prevent some terrible things. Something goes wrong, he arrives years later than he meant to and gets stranded, and decides to build a life for himself and fix what he still can.
He keeps his identity a secret, joins the Jiang sect, and enters into an incestuous relationship with Jiang Cheng, his uncle, who in this world is younger than him and has absolutely no idea they're related, as Jin Ling himself has not yet been born.
He does his best to keep his loved ones from befalling the same fates as before, to varying levels of success, and spends years living this new life.
In the last installment Jin Ling convinces Jiang Cheng and Jin Guangyao to marry to keep the latter safe. Jiang Cheng discovers who Jin Ling actually is and breaks off their relationship, kicking him out, telling him he needs space to decide if he even wants to speak to him again. Jin Ling leaves, and Jiang Cheng decides to go through with the marriage to Jin Guangyao anyway.
This last installment is focused on the romantic relationship developing between Jiang Cheng and Jin Guangyao as they plan their wedding, and Jiang Cheng's lingering/Jin Guangyao's budding feelings for Jin Ling, who is trying to find a way back to his original timeline, since he is no longer wanted in this one.
#fandom event#wip big bang#fanart#art event#looking for fanart#the untamed#mo dao zu shi#mdzs#jin ling#jiang cheng#jin guangyao#jin ling x jiang cheng x jin guangyao
4 notes
·
View notes
Text
[post text: YOUR WEBSITE'S TITLE HERE
Going to put all this in its own post too by popular request: here's how you make your own website with no understanding of HTML code at all, no software, no backend, absolutely nothing but a text file and image files!
First get website server space of your own, like at NEOCITIES. The free version has enough room to host a whole fan page, your art, a simple comic series, whatever!
The link I've provided goes to a silly comic that will tell you how to save the page as an html file and make it into a page for your own site. The bare minimum of all you need to do with it is JUST THIS: /end ID]
[image ID: a creature explaining what to change after you save the html to make it your own website: “Guess what? The circled bits are all you ever need to change to make it your OWN PAGE” The sections circled in red are:
the text of the page's tab, between "head" and "title" tags. it says “YOUR WEBSITE'S TITLE HERE”; the full line is: <head><title>YOUR WEBSITE'S TITLE HERE</title><head>
a header for the page, between "h1" and "p" tags. it says “BIG, CENTERED TEXT”; the full line is: <h1><p style="font-size:40px">BIG, CENTERED TEXT</p><h1>
a link to the image files of the comic, between an "h1" tag and inside an "img." tag. it says “thisisntyourcomic.png”; the full line is: <h1><img src="thisisntyourcomic.png"></h1>
the three navigation links, each inside an "a" tag. the first link applies to the word “Previous”, the second applies to the word “Home”, and the third to the word “Next”; the first line is: <a href="001.html"><b>Previous</b></a> . the second line is: <a href="YOURWEBSITE.WHATEVER"><b>Home</b></a>&nps;&nps; . the third line is: <a href="001.html"><b>Next</b></a>
/end ID]
[post text: Change the titles, text, and image url's to whatever you want them to be, upload your image files and the html file together to your free website (or the same subfolder in that website), and now you have a webpage with those pictures on it. That's it!!!!!
.....But if you want to change some more super basic things about it, here's additional tips from the same terrible little guy: /end PT]
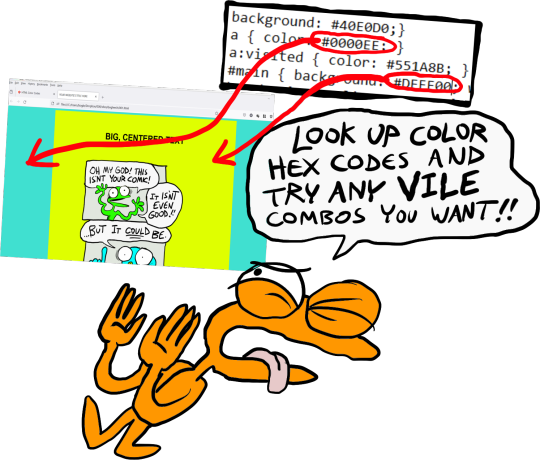
[image ID: the creature from before, explaining how to change the background colors: “AAH! It's extra stuff! Here's where you can change colors!” a few spots for hexcodes and code segments are circled and labelled. The lines of code are:
color: "#000000;" labelled “Font”
background: "#FFFFFF;" labelled “Background 1”
a { color: "#0000EE;" } labelled “Links”
a:visited { "color: #551A8B;" } labelled “Visited Links”
#main { "background: #FFFFFF;" width: 900…} labelled “Background 2”
The creature continues: “There's two different ones for "background" because the sample file has this nice middle column for your content!”
/end ID]
[image ID: a demonstration of the different background colors. Background 1 applies to the background of the webpage, and Background 2 applies to the background of the content column. The creature instructs: “Look up color hex codes and try any vile combos you want!” /end ID]
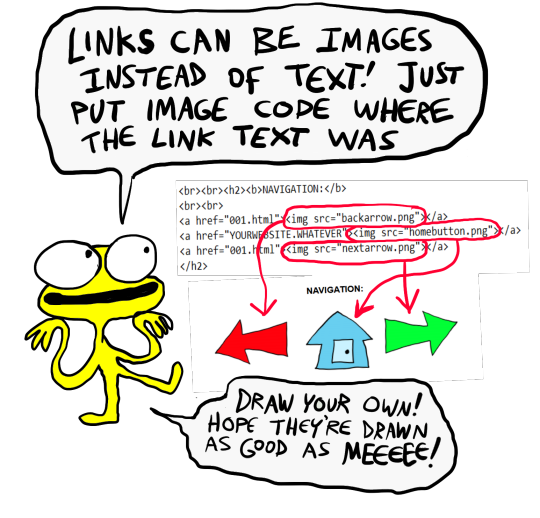
[image ID: the creature explaining how to change the navigation at the bottom: “Links can be images instead of text! Just put an image code where the link text was.” The code segment from the first image for navigation links except with the "Previous", "Home", and "Next" texts replaced with <img src="backbutton.png">, <img src="homebutton.png"> and <img src="nextbutton.png"> /end ID]
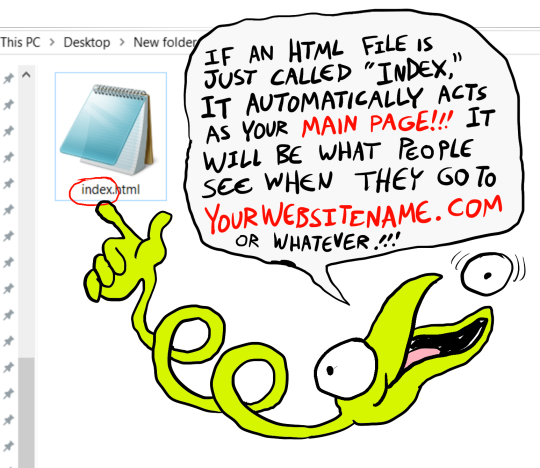
[image ID: a screenshot of the html code inside the computer's files, with the creature explaining: “If an html file is just called "Index," it automatically acts as your main page! It will be what people see when they go to yourwebsitename.com or whatever!” /end ID]
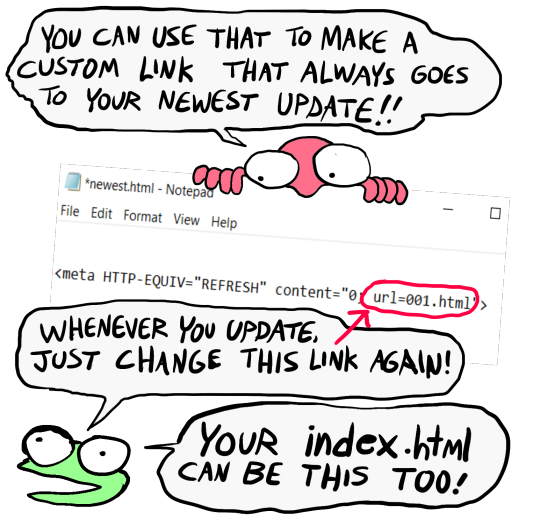
[image ID: a singular line of code: <meta HTTP-EQUIV="REFRESH" content="0; url=yourwebsite.com"> The creature says: “If you make a page with only this one line of code, anyone who goes to the page will be taken to whatever URL you put there!” /end ID]
[image ID: the creature further explains: "You can use that to make a custom link that always goes to your newest update! Whenever you update, just change this link again! Your index.html can be this, too!" There's an arrow pointing towards the "url=yourwebsite.com" in the code segment from the previous image. /end ID]
[post text: That last code by itself is:
<meta HTTP-EQUIV="REFRESH" content="0; url=001.html">
Change "001.html" to wherever you want that link to take people. THIS IS THE REASON WHY when you go to bogleech.com/pokemon/ you are taken instantly to the newest Pokemon review, because the /pokemon/ directory of my website has an "index.html" page with this single line of code. Every pokemon review has its own permanent link, but I change that single line in the index file so it points to the newest page whenever I need it to!
While I catered these instructions to updating a webcomic, you can use the same template to make blog type posts, articles or just image galleries. Anything you want! You can delete the navigational links entirely, you can make your site's index.html into a simple list of text links OR fun little image links to your different content, whatever! Your website can be nothing but a big ugly deep fried JPEG of goku with a recipe for potato salad on it, no other content ever, who cares! We did that kind of nonsense all the time in the 1990's and thought it was the pinnacle of comedy!! Maybe it still can be?!?! Or maybe you just want a place to put some artwork and thoughts of yours that doesn't come with the same baggage as big social media?
Make a webpage this way and it will look the same in any browser, any operating system for years and years to come, because it's the same kind of basic raw code most of the internet depends upon!
/end PT]
小い.> very useful guide~ thank you for making it!♡
게터.> neocities time〜 have fun everyone :]
ゆの.> web liberation W
additional useful things people added in the notes:
alternatives for making a link to the newest update, because the method privided by the guide above will break the back button
website for learning more html and css
how to make the text properly formatted and visible on mobile
Going to put all this in its own post too by popular request: here's how you make your own website with no understanding of HTML code at all, no software, no backend, absolutely nothing but a text file and image files! First get website server space of your own, like at NEOCITIES. The free version has enough room to host a whole fan page, your art, a simple comic series, whatever! The link I've provided goes to a silly comic that will tell you how to save the page as an html file and make it into a page for your own site. The bare minimum of all you need to do with it is JUST THIS:

Change the titles, text, and image url's to whatever you want them to be, upload your image files and the html file together to your free website (or the same subfolder in that website), and now you have a webpage with those pictures on it. That's it!!!!! .....But if you want to change some more super basic things about it, here's additional tips from the same terrible little guy:


That last code by itself is: <meta HTTP-EQUIV="REFRESH" content="0; url=001.html"> Change "001.html" to wherever you want that link to take people. THIS IS THE REASON WHY when you go to bogleech.com/pokemon/ you are taken instantly to the newest Pokemon review, because the /pokemon/ directory of my website has an "index.html" page with this single line of code. Every pokemon review has its own permanent link, but I change that single line in the index file so it points to the newest page whenever I need it to! While I catered these instructions to updating a webcomic, you can use the same template to make blog type posts, articles or just image galleries. Anything you want! You can delete the navigational links entirely, you can make your site's index.html into a simple list of text links OR fun little image links to your different content, whatever! Your website can be nothing but a big ugly deep fried JPEG of goku with a recipe for potato salad on it, no other content ever, who cares! We did that kind of nonsense all the time in the 1990's and thought it was the pinnacle of comedy!! Maybe it still can be?!?! Or maybe you just want a place to put some artwork and thoughts of yours that doesn't come with the same baggage as big social media? Make a webpage this way and it will look the same in any browser, any operating system for years and years to come, because it's the same kind of basic raw code most of the internet depends upon!
#chroma…#〖게타⎯⎯⎯ ʳᵉᵈᵃᶜᵗᵉᵈ : ⿻␘␇ ױ⸋⸋⸋𓐄𓐄𓐄⸋⸋⸋〗#id added#described#neocities#website#htmlcoding#html css#learn to code#indie comics#comics#website development#coding guide#website guide
12K notes
·
View notes
Text
Price: [price_with_discount] (as of [price_update_date] - Details) [ad_1] Compatible file formatMusic: M4A / AIFF / CAF / MP3 / WAV(Due to DRM (Digital Rights Management), we cannot download Music or Video files by the 3rd APP to the iPhone USB flash drive)Image: GIF / JPG / PNG / JPEGImage: GIF / JPG / PNG / JPEGDocument: DOC / PPT / XLS / XLSX / PDF / HTML / TXComputer systems supported: Windows xp/vista/win7/win 10,mac os 9.x and above,linux 2.4.x,ios 8/9/10,Android 5.1.Due to the inner system and procedure data will occupy some space and the real capacity will reduce lightly.Warning tips:1.For iPhone or iPad,you need to install a free App "Y-disk" after connecting the iPhone flash drive to your device,but Android Phone not.2.If there is no response after connecting the photostick, please remove the iPhone protective cases before using (because the phone case will affect the connection between the phone and the usb flash drive)3.Before ordering,please check if your Android phone has OTG function,because the flash drive only support OTG function for Android ;Most Android device with OTG function, can use flash drive directly when inserting, can find the iPhone storage drive on your device in : File Manager. (The flash drive is equipped with a type-c adapter for the latest Android phones) If your phone doesn't work, please enable OTG function in the other setting of your phone.4.Due to RM (Digital Rights Management), we can’t download Music or Video files in iTunes or by the 3rd APP directly to the iphone photostick.When using usb flash drive for iphone,please do not remove it,otherwise data may be lost.5.If the product cannot keep the original date of the photo, please connect the iphone external storage to the computer and format it as "EXFAT". (Please download the highest version of the App 1.4.7) 【Instantly Expand Mobile Phone Capacity,Just Use iPhone Flash Drive 256GB External Storage 】Are you still worried about your phone was full of storage? And don’t know what to do with all the precious pictures of your family or friends?The photo stick has multiple ports:iPhone port,Micro USB,Type-C and USB ,so you can share and transfer data between various devices(iPhone/iPad/Android phone and Computer) to keep your device more memory. 【Unique Design of Photo Stick & Support Passward-protected File】The iphone usb flash drive adopts 360°rotation and 90°stuck point design which is very easy to use and carry around with you.Besides,as we all know,everyone has their own secret,the iphone external storage drive is very reliable to protect your privacy.You can protect the entire storage file on the iphone’s ios flash drive by touch id and passward via Y-disk APP. 【Share your Data to iPhone Photo Stick Anytime and Anywhere ,Even If no WiFi or Internet】Feel free to store your favorite music,movies,pictures ,videos or important files to the photo stick ,so that you can not only play music or watch movies directly from the photo stick mobile for iphone to relax your mind when feel tired ,but also one-click backup important office files anytime and anywhere.Even if there is no WiFi or internet,you can also share pictures or videos with your friends. 【High Speed Data Transmission,USB 3.0 Flash Drive For iPhone】LANSLSY usb memory stick adapts usb 3.0 port,which saves your time by avoiding repeated loading while transferring large files.You can move your photos or videos from mobile phone or computer to the iphone flash drive rapidly .Transfer Speed of USB 3.0 Flash Drive 256GB can reach up to 40-80MB/s(Read ),20-40MB/s(Write) 【24 Months Warranty of The Photo Stick for iPhone】We have been pursuing good quality and provide the best service for our customers,so the USB stick will provide you with 100%satisfactory service and 24 months warranty .If you have any problem with our products,welcome to contact us anytime. [ad_2]
0 notes
Note
Hello! I love your theme! I read your cred page and have a million questions but I’ll keep it to two hehe. 1. how did you make it so that your description on web vs mobile are different? and 2. how did you put text and stuff on your ask page? Thanks in advance for your help! 🥹
hello!
different description boxes
you'll have to go into "edit HTML" when you're customizing your theme. you'll notice toward the beginning of your theme, there will be a handful of meta tags; these are what allow you to have those text spaces/color choices/etc. that are available on the first page when you first enter the customizer.
usually, the way description works is the HTML will just say something like <div class="CLASS NAME">{Description}</div>, where the {Description} block is whatever you put into the text box in the customizer. this block is also what shows up on your mobile theme.
so to make them different, we have to make a meta tag and replace the {Description} block! in my case, i named it "desc" to make it easy, and i put
<meta name="text:desc" content=""/>
where all the other meta tags live (again, somewhere in the beginning). then, i went to wherever the description block is in the HTML (you can ctrl/cmd+f "{Description}"; it will be after "<body>"), and I replace "Description" with "{text:desc}" so that it looks like this:
<div class="description">{text:desc}</div>
then, when you save and exit the "edit HTML" page, you should now have a box called "desc" (or whatever you named your new description block). when you fill it out, it will be different from your mobile description :)
putting text on my ask page
this one comes with a caveat: you have to make a new blog page, so if someone visits your ask page from the mobile app, it will go to the original /ask where there's no text vs. the page you made. so hopefully, you don't mind that!
when you're customizing your theme, scroll all the way down and click "add a page." i used the standard layout, but you can use a blank page if you want it super custom. choose a link name; mine is just /asks. then, ofc, fill it out with whatever text you want! when you're ready to add your ask box, put this code in:
<iframe frameborder="0" height="190" id="ask_form" scrolling="no" src="https://www.tumblr.com/ask_form/[URL]" width="100%" style="background-color: transparent; overflow: hidden; height: 190px;"></iframe></p>
replace [URL] with your tumblr address (e.g. mine would say joshujin.tumblr.com). when you're previewing it, it will probably say "request denied" where your ask box is supposed to be, but once you save and view the page, it will act like normal!
and that's it!
hope that helps! don't feel like you have to limit your Qs! you can ask whatever you want and if i can help, i will, and if i can't, i will try to point you in the right direction :)
happy coding!
0 notes
Note
hey there :)
i recently re-read "heaven help the fools" and i love the hoover function you are using in the story.
I was checking the tutorial for the skin by La_Temperanza but some things I didn't quite get like where to put the code exactly inside the "Work Text". Maybe you could help me out since you did such amazing work in your story? 👉👈
thank you so much in advance 💜💚
Bro, hi :DD
Okay, so I found working with this skin a little tricky and it took me a lot of trial and error to get it right, so I'll try to explain it as best as I can.
The code will go in the place of the word/phrase you want to translate in your work. For example, on my doc when working on "heaven helps the fools", I'll have my text with whatever I'm translating in between brackets, so it's easier to just CTRL+F when I paste it on the HTML editor, kind of like this:
Then when you're on AO3 you can just search for the brackets and paste your code in their place, kind of like this:
Another thing is that the placement of the code gets easier or harder to format depending where in the story you're using it. For example, it's easier to put it at the beginning of a paragraph, like above, than when you have your translation in the middle of a paragraph like this:
Because then you have the beginning of the paragraph, the code, and then the rest of the paragraph. (I say it's trickier because if it gets messed up somehow then it's just harder to find out exactly where it went wrong)
Also, for the work text, you'll want to always edit on the HTML editor. I found out the hard way that if I go to the Rich Text side for any reason then the skin just stops working (not sure if I did something wrong to cause that tbh, but I avoid going on Rich Text now when using this skin)
And since I can't go to the Rich Text side, I got to using this AO3 Posting Script (I don't know if you already use it, so I'm linking it here just in case)
It makes things a lot easier to then go into the HTML editor on AO3 and just paste the code at the right places.
Also, if you're interested, I made some changes to the code that I think worked out well.
For the bit of code that goes on the skin, I use the exact same as La_Temperaza's, but for the part that goes into the work text, I tweaked a few things.
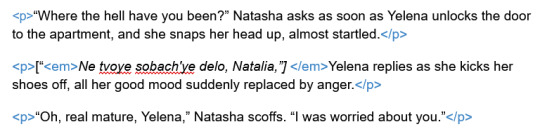
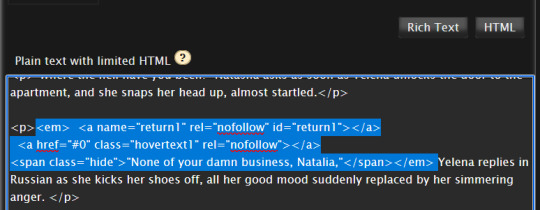
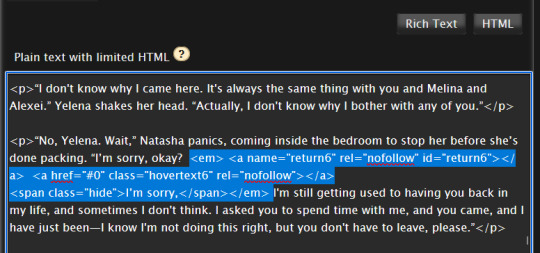
For context, this is La_Temperanza's template:
<a name="return1" id="return1"></a><a href="#return1" class="hovertext1"><span class="hide">Text with Creator's Style turned off</span></a>
and here is what I use on my work (minus the spaces)
< em> < a name="return1" rel="nofollow" id="return1" > < /a >< br /> < a href="#0" rel="nofollow" > < /a > < br /> < span > < em > "Text with creator's style turned off" < /em > < /span > </em>
the < em> /</em > is so that both the text and translation are in italics whether the creator's style is turned on or not. The href="#0" is so that when you click the hover text, it doesn't take you to the bottom/top of the page.
(Those changes were partly based on another tutorial I saw, but I can't find it right now :/)
This is it, I think. I hope it helps!❤️
#also hope it makes sense#but if it's a little confusing please feel free to DM me#seriously#I'd be more than happy to help :)
1 note
·
View note
Text
Web Developer Tools
posted by codemyjourney on Instagram
metatags.io - You can use this tool to test and view your website’s preview when viewed on Google, Facebook or Twitter. You’ll see the title, description and image of your website exactly the way visitors see it.
whatruns.com - It helps to peek at other site’s themes, plugins and server info used. WhatRuns can be installed on Chrome without taking up so much space.
responsively.app - This browser is designed to help you see what your website looks like on different technology devices at once.
extractcss.com - You can use this online tool to extract element ID, class and inline styles from HTML documents and output them as CSS stylesheets. You don’t have to do anything except type or copy/paste the HTML, and this tool will get the job done.
unminify.com - Free tool to minify (unpack, deobfuscate) Javascript, CSS, HTML. XML and JSON code, making it readable and pretty.
0 notes
Text
how to structure a multi-timeline story?
RE:cursion, my new wip, is very fun to write because it's giving me permission to write non-linearly and my brain is loving it. since it's an interactive fic, I'm currently working on what the structure of the narrative will look like.
I'm following the advice from ncase on this. when presenting choices in a choice-based narrative, these choices can do two things. one, it can change the flavor of the text but without diverging the story. and two, it can create a divergent point where the narrative branches into different pathways.


branching paths vs flavor text. from this video.
changing flavor text is easy, especially since AO3 won't allow me to use javascript, so an html-only interactive fic would be limited already. I've already done an example of that with the dream sequence scene, which I posted partially before.
creating divergent points are not easy. so here's my attempt at structuring divergent points in RE:cursion.
how many endings?
I have six "main" endings in mind. the basic structure of the narrative should look like this:
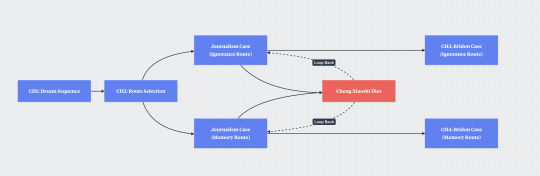

I actually have a more timeline-like image for each ending, but I think I might hit post limit if I post all of them here. I'll make a separate update with those pictures when I've written more and I'm more confident with my plot. after all, it could still change.
but for the moment, I'll share what the timeline looks like for the "dive" ending from the ignorance route, and the "return together ending" from the memory route (I consider the latter to be the "true" ending, personally).
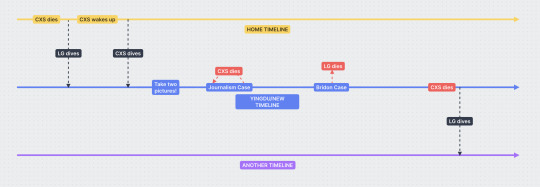
ignorance route // dive ending

memory route // both return
I won't go into plot details in this post, such as how they can dive back when 12h have already passed and such, or why death is important to this (I have thought about the logistics of how diving works in my fic, don't worry). this post is just to document my progress with structuring a multi-timeline story.
so I'm thinking that there will be two main routes. the ignorance route and the memory route. the premise of the story is that lu guang starts off with gaps in his memories. the ignorance route will have him, well, not figure out how to fix this. he also won't be brave enough to ask cheng xiaoshi to share his secret in this route.
the memory route will have him working to the bone trying to fix his memory, and it's also the route where he has a chance to discover what cheng xiaoshi is hiding about the timeline. (it's hard to explain without going into plot details, but there's a reason why cheng xiaoshi is, for once, more knowledgeable about the timelines than lu guang is in this particular instance).
from these two routes, the story branches off into "early/bad" endings and "main" endings. of course, since this is a link click fic, the bad endings are when someone dies and lu guang has to loop back. the main endings are the ones where lu guang actually has to decide what future he wants for himself.
okay, but how does it look like in writing?
on scrivener, this is how my writing set-up looks like. I'm basically nesting scenes that branch off from a parent scene.

the codes at the beginning (e.g. L00-A) are just for me to give each scene an ID to go by, which I'll need later on when formatting this in html.
the "..." scenes are the nebulous middle parts of the story that I clearly have not outlined yet lol. of course, it will still be broken up into different scenes. I'm actually not the kind of writer who outlines too much in detail. this level of outlining is the most comfortable for me. I like leaving myself some space to explore and discover the story and pants my way around. of course, pantsing in a time travel interactive fic will doom me, so I do need to have some kind of structure. hence, this post.
there will still be choices in those middle scenes as well, but they're more for flavor text and won't drastically change the narrative (or if they do, the branches will be so small that they'll diverge back to the main timeline anyway).
the ones I laid out here are the major nodes of the timeline, where the choice creates a huge divergence in the narrative. all of this is for lu guang's side of the story, which covers chapters 1-4.
the fic will have a sort of "bonus" chapter that is a companion story dedicated to cheng xiaoshi's side of things. cheng xiaoshi's chapter is much more straightforward in comparison. it only has one major node towards the end.

note that I have not written out the actual scenes themselves. I'm just mapping out the choices that need to be written for the divergence points. so the scenes right now look like the following two pictures. very empty of text, but the choices are there to provide structure, and they act as my notes for how the scene should go.

this references the dream sequence scene, which I already posted partially here. lu guang can't ask in the ignorance route, but he can ask in the memory route. here, I'm also using "choices" as its own storytelling medium. they all lead to the same scene, but the act of choosing adds to the reading experience. it's up to the reader to decide for themselves why lu guang, in this particular route, cannot ask cheng xiaoshi to spill his secrets. or perhaps, all of these reasons are true, to varying degrees.

this one is from cheng xiaoshi's chapter. see the presence of the "..." again? I'm just writing the bare minimum for me to jot down what this scene needs. it's not the final version yet; it's barely even a first draft. there is only one divergence point in cheng xiaoshi's chapter, which is this one. both of them lead to xiaochen epilogues. both of them I have already written in full. yes, I'm writing the endings first before everything else.
(I'm also realizing, as I'm writing this post, that I sometimes switch between second person and third person in the choices. hmmm. that's something I have to decide what to do with so the writing is consistent. I know the story itself will be in close limited third person pov, but the interactive portions... would they benefit from the text saying "you" or would it just be a distraction?)
finally, I'm also making sure that I have a "cheatsheet" to provide readers with so they can jump to other nodes easily once they finish an ending.

reading the book is how you get the memory route; going downstairs is the ignorance route.
whew, okay. I spent a whole saturday afternoon on this, so I am quite pleased. this... is admittedly a huge project, and I have abandoned many projects before. but! I'm super interested in writing it at the moment. I just hope my hyperfixation will pull me through lol. or I'll have the stamina/discipline to continue. I still have to finish the next chapter for AZAZEL too, and plan my dnd campaign, and... urgh... I promise I do have an ongoing draft for AZAZEL. it's being written. slowly.
0 notes
Text
Common Mistakes Web Developers Make | 2025
Custom website development Manchester has been one of the maximum favorite, and well-paid, careers in recent years. Everyone wants to understand more about development, and how to make an amazing dwelling from it.
However, there are a variety of mistakes that builders make, specifically novices. That’s why we've decided to invite our crew of experienced developers to share their expertise and valuable advice on the subject.

Top Common Mistakes Web Developers Make
Forgetting Device Compatibility
When writing code, quite a few budget-friendly web design in Manchester only do not forget the computing device view, and absolutely overlook approximately mobile and pill perspectives, which have special dimensions. Therefore, each the cell and pill versions of the website isn't optimized and appearance terrible.
Don’t make those mistakes, and consider to continually code and check device compatibility, until you’re certain the whole lot is working well across all gadgets.
Not Reusing Code When Possible
One of the maximum not unusual mistakes builders make isn't reusing code wherein feasible.
There are regularly reusable blocks of code that you may use, so you don’t waste it slow and power. It’s now not “stealing”, it’s just optimizing your developer workflow.
Bad Code Structure
When you’re writing code, it’s important to structure it nicely, considering that if some other developer is studying your code, and it’s no longer nicely-structured, it will be difficult for them to understand the whole thing quickly.
This ends in an useless waste of time, that can easily be avoided, in case you just observe proper code structure, which it’s smooth for everybody to understand.
Failing to Meet Coding Standards
Again, in phrases of formatting and shape, special programming languages require a distinct technique. For instance, the spacing might be distinct for Java, CSS, HTML, PHP, C++, and so on.
Another coding popular staple is the use of IDE (Integrated Development Environment). In all instances, maintain in thoughts that sooner or later a person else might inherit your code. Also, you may need to work on it, or even worse, you might ought to continue operating on some thing which you ultimate touched a long time in the past.
Spare each person the headache, and comply with the coding standards.
Forgetting to Clear Browser Cache
One of the maximum commonplace errors web developers could make is forgetting to clean browser cache. By not doing this you may spend a whole lot of time searching out an errors that doesn’t definitely exist, or if it does, it’s on an older version of the website. Remember to always clear your cache, so that you don’t end up losing time.
Work Directly on Staging
It can be faster and simpler to work at once on staging, rather than regionally. You see, if something breaks even as you’re operating on staging, you’ll need to load a backup model of the site, and so as to soak up greater of your valuable time.
Uploading Unoptimized Images
When you upload large, unoptimized photograph documents to a website, you will inevitably purpose the website to load slower. This is also one of the challenges in Cost-effective web development UK which could without difficulty be fixed.
It’s easy: continually make sure to optimize the photographs you’re the use of, following the satisfactory practices. Since a sluggish-loading web site could be awful for commercial enterprise.

Relying on Plugins Too Much
Plugins are an vital a part of WordPress. However, your task as a mobile-friendly web design Manchester is to use them only when it makes feel, and whilst it optimizes the complete internet site enjoy.
Everyone, which includes human beings with 0 technical revel in, can deploy plugins. However, it’s your job to take care of the backend or front-give up a part of a internet site.
A not unusual false impression is that putting in plugins will make everything easier and easier. To a positive extent, this is genuine, despite the fact that ultimately, you’ll need to update, and hold the ones plugins. And we recognise that too many plugins can slow down or maybe damage a website, so use them accurately.
0 notes