#card edit tutorial
Explore tagged Tumblr posts
Visit Tumblr Blog
Explore Tumblr blogs with no restrictions, modern design and the best experience.
Last Seen Tumblr Blogs


Fun Fact
Tumblr was the first site to host the blog for President Barack Obama in 2011.
Text


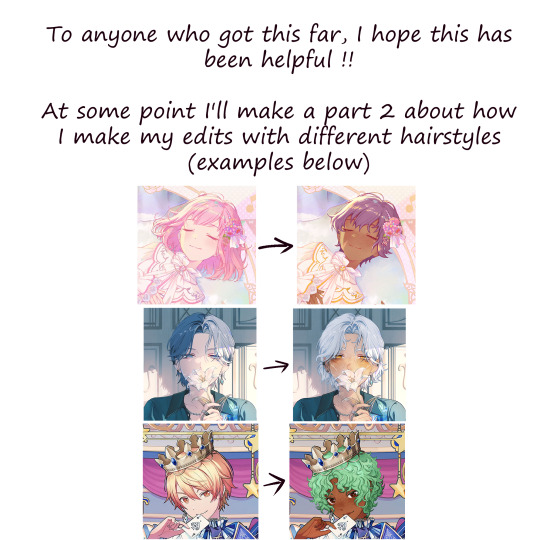
a little tutorial for anyone who might be interested in making their own pjsk card edits
#art#digital art#digital drawing#prsk#pjsk#project sekai#pjsk card edit#pjsk edit#pjsk fa#prsk card edit#prsk fa#prsk edit#card edit#project sekai card edit#project sekai cards#tutorial#card edit tutorial#art tutorial
130 notes
·
View notes
Text
Here’s part 1 of how I make my card edits!
26 notes
·
View notes
Text
the brainrot is brainrotting !!!!!!!! 🥀🥴🤧

#leg.txt#*personal#in the mean time i will make the moodboards and edits and things for cy and the w*itcher fic clowns bc the brainrot is SOO rn kxjxhxh 🥀🥴#i need to have something made for cythia i need to so darn tootin bad !!!!!!!#i have to be ✨ responsible ✨ with my funds atm sisjzh but i am SOO excited 🥀😭#this verse is very very much must be made into a fic or SOMETHING i am far too invested to NOT be yk??#i found a bunch of gif making resources tutorial thingys it would be fun i think to make FINALLY try my hand at a n*etflix edit 🥀🥴💀#and other thingys as well gifwise i have thoughts!!!!! ideas!! things!!!!!! yay !!#i have one more fc to find and then i can debut the fic board i am SOO EXCITED AT LAST I CAN YELL MORE ABOUT IT IM SO CLOSE I CAN TASTEE IT#i still need to think of a name for it and the plot lines ill have but it’ll for sure be have a number of parts and things :)#i did not have me writing a possible long fic on my bingo card for this decade or year but!!!!!!#i mean there’s more things i am planned for developing lhysas verse in this as well but ONE AT A TIME LEGGY !!!!!! 💀#(and nyctemine as well i have missed her and this verse so much i am SOO happy the brainworms came back 🥀🥹)#it’s my comfort verse and comfort clowns yk?? <3#anyway that is my update from my hideyhole akzjshhs i hope y’all are well!!!!! <3
3 notes
·
View notes
Text
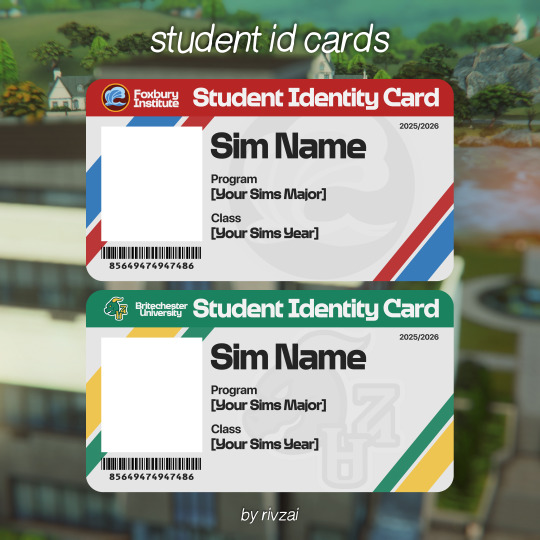
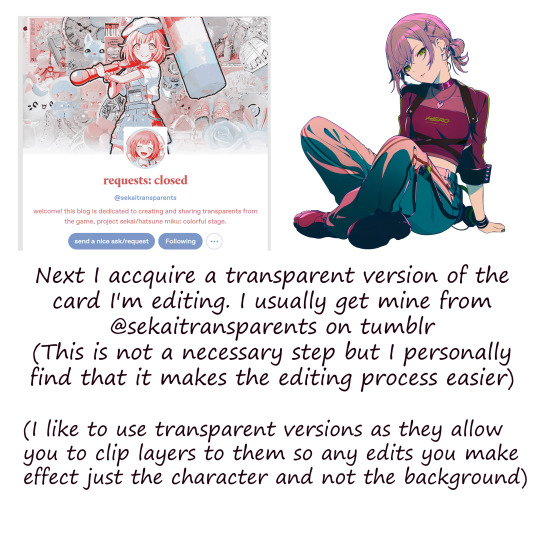
⋅ ˚. ⋆ student id cards ☆ [figma file]
hi guys! i've been silent for a while but no worries as i am back! consider is a thank you gift for all the milestones i've reached so far. these student id cards are from this post of mine for my discover uni save. it got alot more attention than expected so i decided to release the files, enjoy. if you aren't familiar with figma, there is a tutorial below the cut.
⋅ ˚. ⋆ terms of usage feel free to edit to your liking! please do not reclaim as your own/reupload :( if you use, please, please, please. give me credit! a tag would be nice ⋅ ˚. ⋆ required font: sims sans headline bold (originally found on sims community, however post is now deleted. link will be on my patreon) the figma app, not the desktop website.
⋅ ˚. ⋆ download ☆ [patreon, always free]
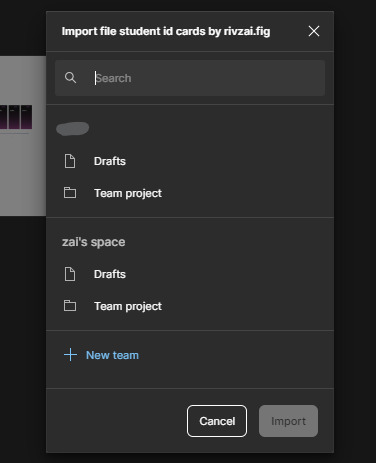
⋅ ˚. ⋆ small tutorial for those unfamiliar with figma
after downloading the figma app and logging in, all you would need to do is just open the file provided.
after doing sO, it'll prompt you to import the file into space. choose whichever one works out for you.
once you've finished that, it'll take a while for it to load. give it some time, it wont take that long
afterwards just go ahead and press done

this is what you should see after opening it up. it looks scary but do not be alarmed, photoshop is harder lol

i went ahead and made it easier for you to change the names, and etc. so just follow this gif.

aaaand almost the same thing to change the picture as well

now that you've finished putting in the details, time to export it!

and just like that, ur done!
⋅ ˚. ⋆ download ☆ [patreon, always free]
840 notes
·
View notes
Text
MRS HARRY | h. lewis
summary: a scroll through your internet presence as 'mrs harry'. [social media AU.]
pairing: fem!reader x harry lewis
faceclaim: liya joelle
notes: first piece for mrs harry out of the wag universe. love making these kinds of edits, I make them constantly on @sunsetkerr. the style is completely from the loml @whoetoshaw. liya is gonna be the main fc I use for mrs harry, hopefully you like it!
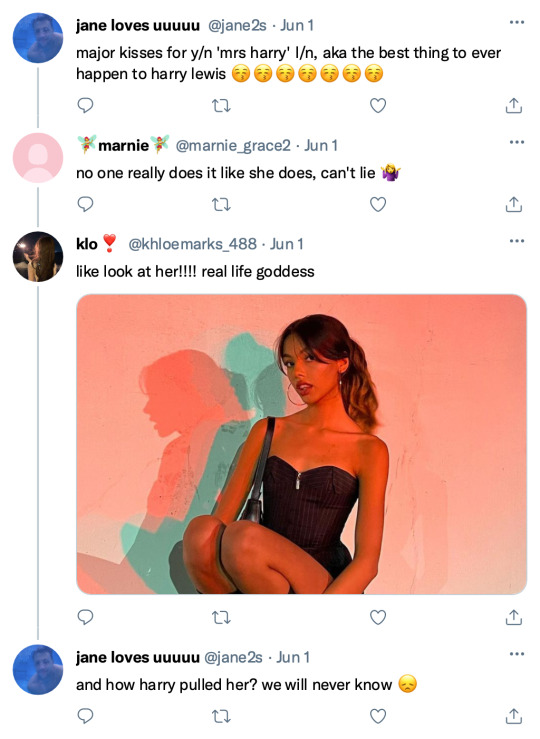

liked by taliamar, wroetoshaw and 17,398 others
yourinstagram playing in the sun with all of my bestest friends 🛥️
view all 281 comments
user she's everything to me
user I feel this post in my soul, I can't describe it
taliamar you really are a rockstar 🌟
yourinstagram says a literal popstar
user mother is mothering
wroetoshaw living laughing and loving
yourinstagram oh yeah!! wow!!
user they mean so much to me
user where is that swimsuit from in the 5th slide?
yourinstagram I got it from the iconic, but the tag says 'une piece'!
user thank you!!! a true girls girl 🥹
theburntchip always nice to see my husbands mrs on the timeline
user shes so fine
user how to look like mrs harry tutorial, no borax
liked by ksi, wroetoshaw and 21,398 others
yourinstagram ran away for the weekend (again) to celebrate harry getting older
view all 473 comments
user I swear they're always somewhere
user how harry is tapping that I'll never understand
user major fitty
bezhinga red card behaviour
user explains the last sdmn sunday with no bog
user too busy getting laid
yourinstagram guilty
faithlouisak oh how I love you and only you
yourinstagram you and me (and olive) against the world
user she is too good looking for this world
ksi drown him
yourinstagram roger that mr integrity
user it feels like they just got together but they've been together for what?? 6-7 years?
yourinstagram 8 in march 🫢
user take me to spain instead y/n I beg of you
user I want whatever y/n is drinking to stay looking that good
yourinstagram drink lotssss of water and wear sunscreen until you shine like olive oil babe x
user if harry ever fumbles this, I'm swooping straight in
wroetoshaw you can have her, she kicks in her sleep and uses all the hot water
yourinstagram we have electric you moron
#mrs harry#harry lewis#harry wroetoshaw#harry lewis x reader#harry lewis oneshot#harry lewis imagine#wroetoshaw oneshot#wroetoshaw x reader#wroetoshaw imagine#w2s x reader#w2s#w2s imagine#w2s fic#harry w2s#wroetoshaw#cel's social media aus
1K notes
·
View notes
Note
Are the members of Shuro's party ever shown carrying bags / luggage? Im working on an Inutade cosplay, and I'd like to carry an appropriately themed bag with me. Do you have any creative suggestions as to what I could carry? :)
Yes! I think we only see in this cover tho, and Tade actually carries the biggest bag LOL
The other two ninjas are carrying smaller ones maybe that would work better for you and stay on theme?
I did some research cause I've seen it before but didn't know the name and what they're using is a cloth called furoshiki (風呂敷) that they can use to wrap and carry things. You might be familiar with them in anime where burglars always have them tied under their noses for some reason (and also using it to carry their loot)


It can be used to wrap boxes (it's a more sustainable way to wrap gifts too) or tied into bags like the ninjas, I imagine you'd need a pretty big cloth and idk how easy it is to find that iconic pattern (edit: karakusa), but here's a tutorial I found of how to wrap it into a bag if you're interested.


For Tade's actual backpack I'm not sure what's the thing she's using to carry the boxes... the closest I got while researching is a shoiko? But it doesn't look like what Tade is using. Either way I imagine it wouldn't be very convenient for a cosplay?
If it would be easier I think a backpack similar to the other characters wear would probably work fine too.

Actually quickly going thru my Shuro's Party tag I realized the cards have them use the default backpack, and Tade uses a big wrapped box


#dungeon meshi#inutade#tade#for referencing#cosplay reference#ask#request for source#tade dungeon meshi#furoshiki#backpack#shuros party#hien#benichidori#dunmeshi
171 notes
·
View notes
Text
Cantina Collection

Straight from Oga's Cantina comes this cobbled together industrial set.
A bit later than planned but finally here. All items are very low poly as they are all frankenmeshed from the original bar back counters.
The textures are all composites and rearrangements of the originals, as a result they are not seamless - but we'll say it just adds to the look that they've just been made from whatever scrap metal was around!
Also as the cabinet doors all have the same rust pattern, it looks odd/repetitive on very big kitchens but works fine for small spaces.
There is only one swatch for all items except the seating, which comes in the same colours as the originals.
All items are base game compatible, except the resized bar backs which require Journey to Batuu.
See below for further details, pictures and download links.
Comfort (5 items):


Industrial Bar Stools x 2 - Low Back & No Back
Industrial Dining Chairs x 2 - Low Back & No Back (shown with original JtB high back chair)
Metal Dining Chair (shown with original JtB bar stool)
Surfaces (16 items):


Kitchen Counters & Islands


Bar Table
Dining Tables x 2


Coffee & End Tables
Console Tables x 3


Smaller Replicas of the original Cantina Barbacks x 5 - resized to match the height of regular counters NOTE: You'll need to use bb.moveobjects on to align these properly. JOURNEY TO BATUU PACK IS REQUIRED.
Industrial Shelf
Decor (2 items):
Metal Splashbacks x 2
Activities & Skills (3 items):


Oga's Bars x 2
Sabacc Game Table NOTE: BGC but JOURNEY TO BATUU is required in order to change the game type to Sabacc. Without this it will function as any other base game card table.
Download All (Downloads ZIP file from Google Drive)
Pick and Choose (Opens Google Drive folder)
If there's any problems with any of these items or you have any constructive feedback, suggestions or questions, please just get in touch, I'm still learning every day!
My TOU
Credits
All textures and meshes are edited or frankenmeshed from in-game EA assets.
@myshunosun - for their gorgeous sona dining chair which I cloned in order to have an object with the necessary transparency for the chair and bar stool - can be downloaded here.
Lizbot3000 - for their base game bar tables, which I cloned for my bar table and can be found here.
@ravasheencc - for her Crop It Like It's Hot Backdrops which I used to take some preview photos and can be downloaded here.
CC created using Blender, Sims 4 Studio & GIMP. Preview images using Canva Pro.
Everyone on the S4S forums and the Creator Musings discord group for all the tutorials and advice/help.
#always free cc#alwaysfreecc#custom content#download#journey to batuu#maxis match#my cc#sims 4#sims 4 buy mode#sims 4 cc#sims 4 custom content#sims 4 futuristic cc#sims 4 industrial#sims 4 industrial cc#sims 4 futuristic#sims 4 journey to batuu#sims 4 maxis match#sims 4 star wars#sims 4 star wars cc#star wars cc#star wars sims#star wars sims 4#the sims 4#ts4 cc#ts4#ts4 bb#ts4 buy cc#ts4 custom content#ts4 download#ts4 futuristic cc
219 notes
·
View notes
Text

being a professional volleyball player had gotten kiyoomi an onslaught of— albeit, somewhat unhinged, fans.
he'd never say he hated his fans. in fact, he appreciated their constant support for his growth as both a person and a way too attractive volleyball player. however, the way some of them would show their support was rather... unique for his standards.
the two of you were sprawled out on the couch, you mindlessly scrolling through tiktok, and him ultimately deciding to do the same. this was one of the few times he ever even went on the damn app and the first thing he's greeted with is an edit of him from his most recent game. he somehow felt inclined to open the comments but a part of him knew his scowl would only deepen if he did.
you leaned over and tried to smooth out the crease in between his brows with a hum. "you gotta give them credit, 'omi. you look really hot there."
"it's a 15 second video of me drinking water."
"still hot."
he rolled his eyes, switching his phone off and leaning on your shoulder. you went back to running through his hair with one hand, and scrolling on tiktok with the other.
while kiyoomi was mainly focused on how nice it felt to have your fingers gently carding through his hair, he was also listening along to the random audios that played each time you scrolled onto another video. eventually, a song oddly familiar to kiyoomi started up on your phone.
wait.
kiyoomi paused, turning to look up at you in a comically slow manner with a grimace painted on his face. you bit back a laugh at his sour expression, batting your eyelashes back at him. "what's wrong, my sweetheart, honeybunch, sugarplum, light of my life?"
"ignoring those disgusting pet names— is that the same edit i just saw?"
the familiar song played faintly as you offered him an innocent grin. you glanced at your phone then back at him, quickly swiping up. "edit? don't know what you're talking about."
alas, the algorithm knew you a bit too well. maybe it was coming after you with the fact yet another kiyoomi edit popped up after you swiped. the two of you stared at the screen silently, your thumb sliding over to press another button.
"...what a coincidence, huh 'om-"
"did you just favorite it?"
you didn't respond. he shifted closer to grab your phone, you leaned away. this ultimately led to you and kiyoomi wrestling for your phone. as you two were tugging at your phone, it slid to unsurprisingly, another kiyoomi edit.
"i'm gatekeeping these, get off!"
"they're literally edits of me!"
eventually, he decided to dig his fingers in your sides, causing you to break into what sounded like a mixture of a scream and manic laughter. he smiled triumphantly, using his free hand to grab your phone from your— now weak grasp and going straight to your favorites.
he scrolled through the random collection of cooking tutorials he knows you won't do, cat videos you've shown him multiple times, and of course, edits of him. from clips of him from interviews to his monstrous spikes, you had it all.
"this is— an invasion of privacy!" you whined, trying to get your phone back to no avail. kiyoomi looked through all your saved edits with an amused look. "think you might be even more obsessed than these fans." he teased, his shoulders shaking as a chuckle escaped his lips.
"god, can't someone enjoy videos of their jaw-droppingly handsome, gorgeous, hot, attractive boyfriend in peace?"
"not when you're right next to said handsome boyfriend, watching those videos on the highest possible volume."
you waved off his quip, "details, details." you propped your head on his shoulder and watched in silent amusement as he regrettably decided to open the comments on one of the edits. he's not even sure how some of these comments slipped past community guidelines, while some were rather tame, gushing about how good he looked, some were so depraved he thought he was going to get permanent frown lines just by looking at them.
"if you though that was bad, you should see what i say on twitter."
for the sake of his sanity, kiyoomi decides against checking your twitter account.
my 31 pending school reqs will not stop me from kiyoomi posting!!
#♡ crumpled paper#i dont like this 1 but i cant bring myself to work on it anymore its been like 2 weeks 😭😭#haikyuu#haikyuu x reader#haikyuu x you#haikyuu x y/n#haikyuu imagines#haikyuu sakusa#sakusa kiyoomi#sakusa x you#sakusa x reader#sakusa kiyoomi x reader#sakusa kiyoomi x you#sakusa fluff
1K notes
·
View notes
Text

LOVE AND DEEPSPACE (JANITOR AI VERSION) MASTERLIST
— ★ means it was requested. — check the main otome masterlist here. — check the character.ai version of these bots here! — If you prefer spicychat.ai, here's my profile. No masterlist available, sorry! Search and find the bots you want and if they're not there, refer to this bot transfer guide. — NSFW Requests found here.

+ Angst Bots! + Wander in Wonder Bots! (Individual links will be edited down here when I'm less lazy lmao) + Luke and Kieran (Non-MC!User) + LaDS x Catgirl!User NEW! ++ Caleb Preview

Xavier (No Spoilers / Minimal Lore) — Janitor AI
Xavier (SSR Card Based: Heartstring Symphony) — Janitor AI
Xavier (SR Card Based: Kind Words) — Janitor AI
Xavier (SSR Card Based: Tender Night) — Janitor AI
Xavier (Alternate Universe: Yandere Version) — Janitor AI
Xavier (Alternate Universe: Glitch Dark!Xavier Version) — Janitor AI
Xavier (Alternate Universe: Married Life) ★ — Janitor AI
Xavier (Alternate Universe: Boyfriend) Gender Neutral — Janitor AI
Xavier (Omegaverse: Alpha x Omega) — Janitor AI
Xavier (SSR Card Based: Faint Sensation) — Janitor AI
Xavier (SSR Card Based: Fluffy Trap) ★ — Janitor AI
Xavier (SSR Card Based: Midnight Whispers) Kindled Scene Only! — Janitor AI
Xavier (SSR Card Based: Midnight Rainfall) Kindled Scene Only! — Janitor AI
Xavier (SSR Card Based: 21 Days) — Janitor AI
Xavier (Alternate Universe: Models) — Janitor AI
Xavier (SSR Card Based: No Restraint) — Janitor AI
Xavier (Alternate Universe: Girldad) — Janitor AI
Xavier (Alternate Universe: Non-MC Angst) 2nd Person POV — Janitor AI

Zayne (No Spoilers / Minimal Lore) — Janitor AI
Zayne (SSR Card Based: Business Trip) — Janitor AI
Zayne (SRR Card Based: Drunken Intimacy) — Janitor AI
Zayne (Alternate Universe: Yandere Version) — Janitor AI
Zayne (Alternate Universe: Doctor and Nurse) — Janitor AI
Zayne (Alternate Universe: Married Life) ★ — Janitor AI
Zayne (Alternate Universe: Boyfriend) Gender Neutral — Janitor AI
Zayne (Omegaverse: Alpha x Omega) — Janitor AI
Zayne (SSR Card Based: Cozy Afternoon) ★ — Janitor AI
Zayne (SSR Card Based: Exclusive Tutorial I) — Janitor AI
Zayne (SSR Card Based: Exclusive Tutorial II) — Janitor AI
Zayne (SSR Card Based: Exclusive Tutorial III) — Janitor AI
Zayne (Alternate Universe: Isekai'd to Your World) ★ 2nd Person POV — Janitor AI
Zayne (SSR Card Based: Snowy Serenity) — Janitor AI
Zayne (Dawnbreaker Ver. | Canon AU) — Janitor AI
Zayne (Dawnbreaker Ver. | Alternate Universe) ★ — Janitor AI
Zayne (Alternate Universe: Models) — Janitor AI
Zayne (SSR Card Based: Hidden Motive) — Janitor AI
Zayne (Alternate Universe: Girldad) — Janitor AI
Zayne (Alternate Universe: Non-MC Angst) 2nd Person POV — Janitor AI

Rafayel (No Spoilers / Minimal Lore) — Janitor AI
Rafayel (SSR Card Based: Your Fragrance) — Janitor AI
Rafayel (SSR Card Based: Tipsy Invitation) — Janitor AI
Rafayel (Alternate Universe: Yandere Version) — Janitor AI
Rafayel (SR Card Based: Fiery Undercurrents I) ★ — Janitor AI
Rafayel (SR Card Based: Fiery Undercurrents II) ★ — Janitor AI
Rafayel (Spoilers! Your Fragrance x Ebb and Flow AU) ★ — Janitor AI
Rafayel (Alternate Universe: Married Life) ★ — Janitor AI
Rafayel (Alternate Universe: Boyfriend) Gender Neutral — Janitor AI
Rafayel (Omegaverse: Alpha x Omega) — Janitor AI
Rafayel (SSR Card Based: Fireworks Vow) ★ 2nd Person POV — Janitor AI
Rafayel (Alternate Universe / Canon Divergent) ★ — Janitor AI
Rafayel (SSR Card Based: Floral Promises) — Janitor AI
Rafayel (Alternate Universe: Models) — Janitor AI
Rafayel (SSR Card Based: Omnipotent Perception) — Janitor AI
Rafayel (Alternate Universe: Girldad) — Janitor AI
Rafayel (Alternate Universe: Non-MC Angst) 2nd Person POV — Janitor AI

Sylus (Canon / Semi-Spoilers) — Janitor AI
Sylus (Canon Compliant AU / Story Spoilers) — Janitor AI
Sylus (SSR Card Based: No Defense Zone) — Janitor AI
Sylus (Alternate Universe: Boyfriend) Gender Neutral — Janitor AI
Sylus (Alternate Universe: Yandere Version) — Janitor AI
Sylus (Alternate Universe: Married Life) — Janitor AI
Sylus (Canon Compliant / Biker Version) — Janitor AI
Sylus (Omegaverse: Alpha x Omega) — Janitor AI
Sylus (SSR Card Based: Immobilized I) — Janitor AI
Sylus (SSR Card Based: Immobilized II) — Janitor AI
Sylus (Alternate Universe: Models) — Janitor AI
Sylus (Alternate Universe: Vampires) ★ — Janitor AI
Sylus (SSR Card Based: Lost Oasis) — Janitor AI
Sylus (Enemies to Lovers AU) ★ — Janitor AI
Sylus (Alternate Universe: Girldad) — Janitor AI
Sylus (Alternate Universe: Non-MC Angst) 2nd Person POV — Janitor AI

PRE 3.0 RELEASE:
Caleb (No Spoilers / Minimal Lore) — Janitor AI
Caleb (Alternate Universe: Valentine Event) — Janitor AI
Caleb (Alternate Universe: Yandere Version) — Janitor AI
Caleb (Semi-Spoilers! Alternate Universe / Canon Divergent) — Janitor AI
Caleb (Semi-Spoilers! Alternate Universe? Ghost Version) — Janitor AI
Caleb (Omegaverse: Alpha x Omega) — Janitor AI
Caleb (Alternate Universe: Girldad) — Janitor AI

Philos University AU! Mini-series 2nd Person POV
Vampire AU! Mini-series 2nd Person POV
Royalty AU! Mini-series 2nd Person POV
Luke and Kieran (Canon Compliant AU / Story Spoilers) — Janitor AI
Luke and Kieran (Alternate Universe: Onychinus!MC) Info — Janitor AI
Luke and Kieran (Non-MC!User) — Janitor AI
#ai character#ai chatbot#anticyra#beta c.ai#beta character ai#c.ai#c.ai bot#character ai#character ai chat#janitor ai#janitorai#love and deepspace#xavier#zayne#rafayel#caleb#sylus#luke and kieran#x reader
368 notes
·
View notes
Text
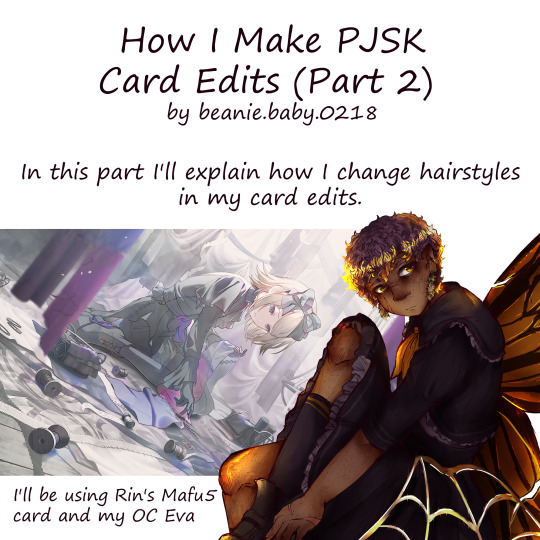


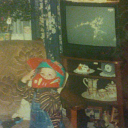
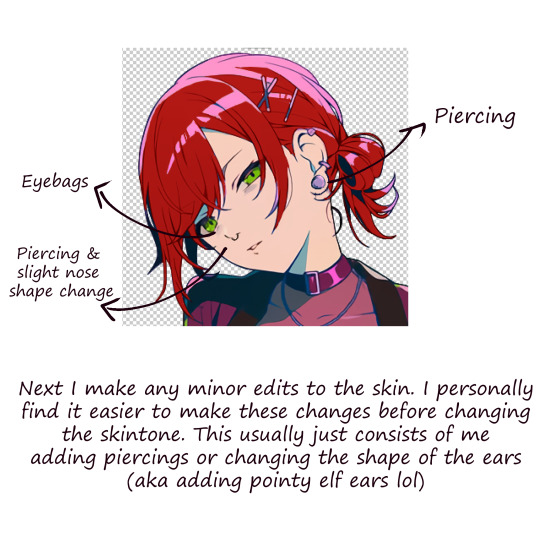
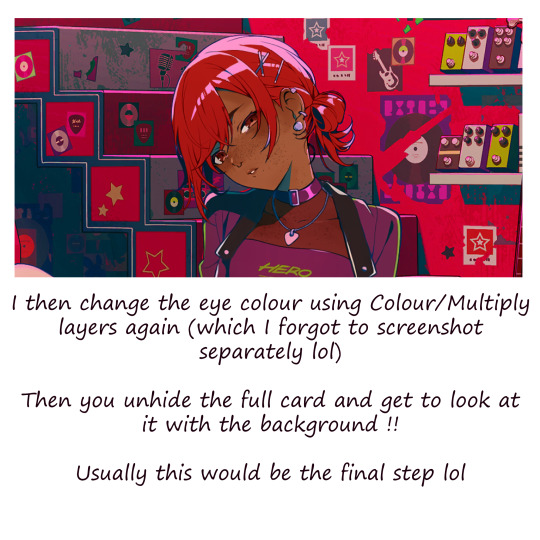
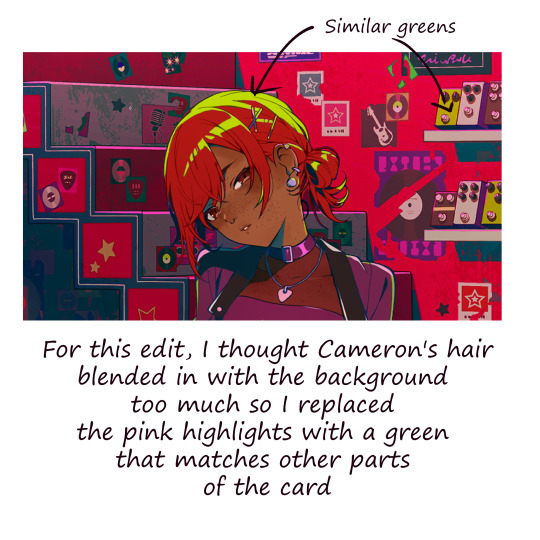
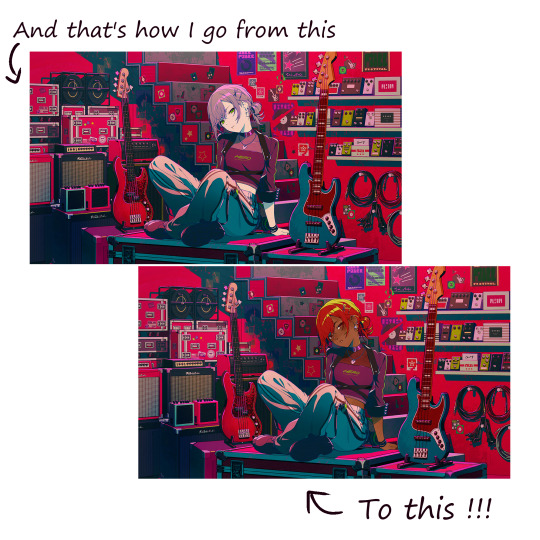
Part 2 of my pjsk card edit tutorial !! For anyone who missed it, part 1 just focuses on recolouring a card
#art#digital art#digital drawing#anime art#prsk#pjsk#project sekai#pjsk edit#prsk edit#prsk card edit#pjsk card edit#pjsk fa#prsk fa#project sekai card edit#project sekai cards#tutorial#card edit tutorial#card edit#art tutorial#this is how i found out you can only post a max of 10 images from the phone app lol
45 notes
·
View notes
Text
TS3 WCIF - Crystals, Agates, Geodes, etc

Agates (x x OR x) (More agates listed in my Voodoo WCIF here)
Crystals and Gems
Crystal Box
Crystal Mandala Board Set
Decor Shelf (x) / Recolor
Geodes (Small & Tall)
[EDIT] Glass Decor CAStable
Harmony Crystal Set
Himalayan Salt Rock as Recolorable Light (x x)

Magic Crystal (Large) + Rock Base + Crystal (Natalia)
Magic Hand & Ball
Mother of Pearl as Light
Shine Bright! Outdoor Lights Set
[EDIT] Tankuz SciFi Crystals (preview pics, I forgot about this set)
Tarot Cards and Deco Tray
Terrarium
Tiberium Set

Tiberium Lamps Set
TS4 to TS3 Crystals as Lights
Wiccan Crystal
Wiccan Set
Witch Set
Extras Finds
There's this other good crystal WCIF post from 2022, but I figured it wouldn't hurt to update it for 2025.
Ask the Crystal Ball (table-less | invisible)

Crystal Zoomer 4t3 SN EP Witch Broom

My tutorial on how to use EA's crystals
Omg I forgot to mention that EA's crystals were made recolorable by Deniisu too.
EA's Lunar Lakes Tree of Prosperity (TS3 Store)

EA's Lunar Lakes Crystals (TS3 Store) / Recolorable Version at MTS

68 notes
·
View notes
Text
Resources for Creating: My Go-To things.
Update: I’ll be updating the list on this page from now on, since Tumblr can’t handle so many hyper-links in one post, on Dreamwidth - right here, so I won't have to update it multiple times. Please note: I keep updating this list, and updates aren't showing up on reblogs. Please check the original post for the most up to date list.
Sooo this is going to be a long comprehensive list. I got back to this game after a long time and with a different computer, with a dedicated graphics card, hurray! It made me want to return to making things, so while gathering back all the necessary stuff, I've complied this list. It might be is updated as I go along, but these are the main things I use. Maby one day i'll even finish something. So here are my go-to resources & tutorials; I'm posting it here for safekeeping, and hopefully others will find it helpful. Everything that's listed is here free. So many wonderful things for free under the cut.
Programs – General:
Creating: Blender. Blender Addons: 3D Print Toolbox – comes with blender, enable it from within the program. Originally for 3d printing. Good for fixing flipped normals, and some quick general repairs. Source Tools And source tools wiki – for exporting as SMD!!!! (SimPe: to enable bump maps for the mesh on import). GMDC Addon for Blender 4.0+ by Nopke.
GIMP. GIMP Addons: G'MIC-Qt. Resynthesizer. Nvidia dds?. Doesn’t it come with Gimp?
Other: Nvidia Texture Tools Exporter (iirc it works with all graphic cards that are compatible, doesn’t require Nvidia). For making Normal / Bump / Cube Maps. For high quality compression.
NormalMaps - Online, For making all types of maps, has good setting menus. A very cool tool.
Converting: Umodel, for Unreal Engine (Static meshes: export as gtlf.2. Animated meshes: export as psk. Requires Add-on). AssetStudio, for Unity. AC Viewer, self implied (+ USD Addon for blender). QuickBMS* and support forum, for basically everything else. (don't forget the required scrips, down the same page). *I haven’t tested it fully yet, but it was recommended here. A tutorial for it is listed further down. Works like a charm.
UV Mapping: UV Mapper, Classic (free) and the most recent Demo (for visualization).
Programs – Sims:
Never Mind the Bollox, Here's Osab and MAGIkarp to the rescue!
Latest version of SimPe, works with a non-default installation path. Chris Hatch's updates.
Home Crafter installation, Post by Huge Lunatic at Sims2Artists.
Repository Wizard, by Pick'N'Mix Mods. A game changer.
DBPF Compare, by Pick'N'Mix Mods.
Object Relocator, also by Pick'N'Mix Mods.
SMD Tools, by Lazy Duchess.
The Compressorizer, by JFade – Lazy Duchess's edit.
Bulk Rename Utility, to change file names in well, bulk. As explained by io here.
Lot Adjustor, by Mootilda at MTS.
Tutorials:
Override the game's graphic settings via Nvidia, as explained by iCad. The settings to Nvidia Profile Inspector she linked to at MTS have been deleted for some reason, here they are via WebArchive.
Meshing in Blender:
Mesh Optimization Info (and links), by Crisps&Kerosene.
Additional - Reducing Polycount:
Tutorial, by Flaming-Chickens (another username on other sites perhaps?)
Edge – Un-subdivide, a quick one by CG Link.
Transfer high poly details to low poly object in Blender, by 3Dnot2D.
Shrinkwrap Modifier - Blender Tutorial for Beginners - Basics, by in2vert.
Placeholder for this Addon that I want to try but haven't found, something for AR that was on facebook's defunct AR.
Scaling tips, by Blender Secrets.
How to fix inverted/ flipped normals, by ipaintsmallthings.
Converting: How to Extract 3D Models, Textures, Music from Unreal Engine Games, by iwanMods.
Extract 2D/3D/SFX Unity Assets fast & easy from your Unity Game, by iwanMods as well.
How to use QuickBMS, by darkhorse.
Guide to Converting 3t2 and 4t2 Part 01 and Part 02, by Chiaroscuro/tenlittlepandas.
Converting TS4 Windows and Doors, by Crisps&Kerosene.
Using Different Material Maps as Shading/Details for Base Texture, in Gimp or Blender, by Pineapple Forest & Crisps&Kerosene: https://www.tumblr.com/crispsandkerosene/764893644571525120/great-info-thats-the-reason-some-conversions?source=share
Texture Editing in GIMP:
Using Gimp Add-ons: G'MicQT. Resynthesizer. Both by Davies Media Design. This guy's channel for Gimp in general – here's a good one to begin with. And another one about layer masks.
Making a texture Tile Seamless: 1. My favorite - How to Make Seamless Textures for Cinema 4D - 3 Levels of Photoshop Wizardry using iPhone Photos, by School of Motion.
2. Simple Trick for More Realistic Texture Patterns in GIMP, by Davies Media Design – Quick and simple, using the Resynthesizer plugin. Good for patterns.
Making walls in SimPe out of a square texture, with minimal quality loss. To be written.
SimPe: Cloneable Objects: A List of Good Objects for Cloning, by IgnorantBliss at MTS.
Huge Lunatic's Tutorials, Her website.
Object Creation for Absolute Beginners, by Moune.
Sims 2 start to finish Object Creation Tutorial, by JWoods, Numenor, Lethe_s & IgnorantBliss.
The Material Definition (TXMT) Guide, by PixelHate – very comprehensive. Part 5 is about Bump/ Normal maps.
Null (Texture-less) Groups, by Skell. For bodyshop, for Objects see an elaboration by Midge the Tree below.
Crisps&Kerosene discovered how to add specular maps to objects! It's incredible there are still new things to discover in this ancient game.
More on Specular Maps, by Pineapple Forest.
Making new flooring & walls with SimPE, by Charisa. Includes adding Bump/Normal maps. She added a file to clone from in the comments below. It works for normal maps as well. Here's cool discovery in the game files.
Expanding footprint: a mini tutorial, by Deedee.
How to add correct drop shadows to objects, by Yuxi, via Wayback Machine.
Making Objects Viewable in Neighborhood View, by iCad.
Making Objects Visible In Build/Buy Mode, Invisible In Live Mode, by Midge the Tree.
Making Seasons-Friendly Trees, by Echo.
Io/ Serabiet's resources list, mainly for Bodyshop but not just.
Pineapple Forest's Tutorials, useful tips for efficiency and optimization.
MTS modding forum in General.
The Sims 2 Tutorials, on Tumblr. A database, is more updated.
Sims2Artists tutorials section.
LeeFish modding forum.
Garden of Shadows, Tree of Knowledge section.
Troubleshooting: What to do if you get a System.OutOfMemoryException Error, SimPe Forum, via WayBack Machine. Thank you @fanseelamb for the find.
How to read object error logs: I just want to know what causes it!!, by Episims.
Common TS2 errors, by Midge the Tree.
General game fuckery: How to Stop Sims 2 Crashing (Memory Allocation Fix and 4GB Patch Repair), by Jessa.
Graphics card problems, LeeFish forum.
Graphics help - DIY, by Kiri. How to fix faulty Texture Memory allocation, and the problems that stem from it. Tumblr can't handle anymore hyper links so here it is: https://celebkiriedhel.tumblr.com/post/189431721483/graphics-help-diy
General: Switching between save folders without renaming them, by Nopke.
Resources:
3D Models Online*: Various furniture designers' websites: Porada, Zanotta, Muuto, Hay, Poltrona Frau, many luxury furniture designer basically.
3D Warehouse, belongs to Sketchfab (get the Collada files).
Scan the World.
Wikimedia Commons. And more.
*(NOT OPTIMIZED).
Textures: Architextures.
Fabrics & Wallpapers: Natural Stones: Wall Plasters:
iCad's Woods. Shastakiss's Cluedo Metals, Yeti Metals, Pirate Woods. Goat's Woods.
Textures from other games: Dishonored, Thieve and much more, by Saricoya at GoS. Dreamfell by io.
Resource sharing threads at Garden of Shadows.
SimPe - General: CEP Extras list, HugeLunatic at Sims2Artists.
TXMT settings for different materials, by Hafiseazale.
Extended SimStandardMaterial Shader for the Sims 2 + Optionally Brighter Sims, by Crisps&Kerosene.
Custom CubeMaps, by Crisps&Kerosene.
Shiny TXMT Settings & Cube Maps Packs, by Pineapple Forest.
Build/ Buy: Templates for Recoloring Maxis items; MTS Templates sction, Hafiseazale (+cc), ZeroDark.
Template for Seasonal Trees, Gwenke at Sims2Artists.
Making Roof Recolors, Tutorial & template by Numenor, great template by iCad.
Pack for making food clutter usable, by DeeDee.
CAS: Default Makeup Packages - BYO Packages, by Huge Lunatic.
Body shape, Io/Serabiet on Tumblr.
Skin template, Io/Serabiet on Tumblr.
Hair texture, iCad.
Color Actions, Pooklet on Tumblr.
That's it for now.
Edit: forgot about CEP extras. Added more links. Edit 02: Added Troubleshooting section under tutorials.
#ts2#ts2 resources#ts2 creation resources#ts2 resources for creators#the sims 2#sims 2#resources#ts2 cc#sims 2 cc#the sims 2 cc#well its cc related#sims 2 resources#the sims 2 resources
67 notes
·
View notes
Text
WoL Magic Cards Tutorial!
I'd made a custom Magic: the Gathering card of Johnny recently, and shared it in the Seafloor discord, and since there was a lot of interest in the concept I figured a tutorial might be nice so we have something to do while we wait for plugins to come back. Here goes!

Download CardConjurer This is the tool I use to make custom cards. It's just a web app developed by a college student; he got DMCA'd by WOTC so it's not hosted on the internet anymore, but you can still run it locally.

Just unzip the contents somewhere, and then run launcher.exe when you're ready. It should open up the app in a browser tab.
2. Navigate to the Card Creator


3. Pick out a Frame
Enter this search box on the right. We're going to be using the Nickname ("Godzilla") frames. These give us a small subtitle box below the card name that indicates what the Magic card's actual name is.
If you want to create a custom card instead, use the Borderless frames.

In the menu below, you should see the different colors of the borderless frames. You'll have to add three of these elements to the card: the text box, the card name, and the power/toughness box. Do them in that order, by clicking each element and then Add Frame to Card. If your card is legendary (or if you feel like it), use the Crown option rather than just Title.

You'll have to choose the correct color. If your chosen card is monocolor or >=3 colors, this is very easy since you can just choose that color or gold, but for two-color cards the process is slightly more involved. First, add the color that goes on the left using the Add Frame to Card button, and then add the right color using the Add Frame to Card (Right Half) button. Use the gold power/toughness box.
If any of the card elements get out of order, you can reorder them using the layers controls at the bottom of the page.

4. Import the card text

Navigate to the Import/Save tab, and type in the name of the real card you're putting your OC over. Select the specific version of it using the dropdown afterwards.
(For some reason, Firefox suggests completing this field with my credit card information. I think it knows more about Magic than it's letting on.)
After the card is imported, navigate back to the Frame tab, and click Load Frame Version. This will force the text on the card to fit into the frame set that's currently selected in the bar on the right, which should still be the Nickname ("Godzilla") from earlier.

We should have something closely resembling the real card in the editor, now.

5. Make it yours!
First off, go to the Art tab, and upload your image. Once it shows up, you can adjust it by clicking the actual card in the editor. Clicking and dragging pans it around, shift+clicking scales, and ctrl+click rotates.

Next, pop over to the Set Symbol tab and remove it, since this is your own card and isn't from a Magic set.

And now, go over to the Text tab to finish this off! Start by entering your card name into the Nickname tab.

If your chosen card name is too long and ends up clipping the mana cost, you can reduce the width of the text box with the Edit Bounds menu until it fits.
Next, go to Rules Text to update the name if the card refers to itself. I changed all instances of "Vadrik" to "Johnny". Since this card is really just to look at and not to play with, I also renamed the Day/Night mechanic to fit the Black Mage flavor even better. Feel free to get creative!

You can use {flavor} to add flavor text as well. I added the {lns} commands after some words to add line breaks to make the text blocks look better.
You can also edit the typeline in the Type tab, if the creature type doesn't match your WoL. Johnny is already a Human Wizard though, so I didn't have to do that. Technically this would be a mechanical change of the card, but since these aren't real cards anyway I think it's a valid concession to make. Just don't go abusing it if you actually end up printing these out LOL
6. Download the card image
Finally, head back over to Import/Save, scroll all the way to the bottom, and hit Download you card.

And you're done! There's obviously a lot more that's possible with CardConjurer, and tons of avenues for creativity. If you end up following this tutorial, or creating any other FFXIV-related MTG cards, I would really love to see them!

143 notes
·
View notes
Text
character spread tutorial that nobody asked for [chunky sketchbook edition]
so! you want to make a chunky sketchbook? here are some tips from my end as i make a spread for a swap variant from crest’s multiverse :D
firstly, you want to layer LIKE A MADMAN. grab random things you have lying around your house and paste them in there. receipts, candy packaging, anything works! i like to use receipts, index cards, and colored paper that matches with the theme of what i’m doing, but that’s not really mandatory at all, do as you will!

here are the things i’m using for background— washi tape, blue cardstock, a receipt and some sticky notes :)
a lot of people that i see make tutorials say to add stuff like puffy stickers and trash and don’t get me wrong, this does help!! but my key to getting my sketchbook as it is is merely layers upon layers of paper. trust me when i say that all you need is some thick poster board or cardstock, or even cardboard to make a chunky book.
another note, GET A TAPE RUNNER!!! these things work better than most glues i’ve used in the past and they work WONDERS for scrapbooking. they kind of look like white out, and function as it does, as well!

i use the elmers tape runner, but there are plenty of other ones that work just as well. i painted this one!
your spread should look a bit like this as you start it.

of course, decorate it as you will, it doesn’t have to be identical to mine. i will be adding i move along so don’t stress about random things popping up on mine CACKLES
secondly, make your art on separate pieces of paper than what you’re using. once again, layer like a madman babe TRUST ME!!!!!
bonus points if it’s thicker paper :)
also not a requirement but i like making the drawings i put in these spreads only as sketches and then coloring them once they’re glued in. it’s just my preference and not required at all but i find it entertaining and more pleasurable ^^

here are some of the sketches i have for this spread :)
and here are some colored in!

the last thing here is i would add little details and finalize any sort of other additions you’d like to add like washi tape, decorative stickers, text, stars, etc.

and this is what mine looks like completed!!
of course there are plenty of other ways you could have done this, you could have made it multicolor, you could have added more yellow or grey or whatnot, and every way would have been valid! it’s art— the only limit is your imagination 🫶
i would recommend looking up tutorials for interactives as well to add texture and life to your work!
hope this helps!
#nash’s dibujos#tutorials#swap!sans#utmv stuffs!!#chunky sketchbook#traditional art#sketchbook#art tutorials#nashdoesstuff#i’ll make a tag for this swap eventually anywaysssss
40 notes
·
View notes
Note
hello! do you have any tips for creating your own psds? right now I'm just sort of throwing things at the wall and hoping it sticks!

Hi hi nonnie! I am NOT the best person for you to ask this (not in a miiile) BUT I tried making this in the most concise way I could and prayed to god it didn't get too confusing since a lot of the times I too just throw things at a wall and call it a day. I'll teach my usual psd making style and a more general one just in case that's what you were looking for! They're under the cut since it probably will get a tiny bit long but I hope it's helpful to you! <3 as always reminder that there is no correct way to make a psd this is just how i do etc etc
This has a lot of text and images so beware of the big scary maica


First of all: While you certainly *can* make a psd based solely out of one image or a compilation of your own edits (as i have done on the past), I'd say in general it's more useful and easier to make something when you have more than a singular image to check and a color spread to use. I made this little template in 5 minutes (which is a lie because my photopea crashed at first and so I had to re-do it) and I'll link it here alongside the psd itself so you can poke around and check how I do things! If you want to do your own template or anything, though, here's the color spread I use! :]

It has a spectrum, a bar line and some skin tones so it should be helpful! You can also use Travi3sapsd swatches if you'd like, since I know some people would prefer having a view of the colors before and after the psd to check!
Talking about skin tones, Amemcth also has a nice collage with characters of varying skin tones so you can check how your psd look on different skin tones. I don't think it's obligatory for all psds to look fine with every skin tone, however, I think if you're not doing it for a singular character and are indeed posting that psd for public use, making it work with darker skin tones is something good and that I encourage. If it doesn't work, remember to always indicate it by adding a "Works fine on most skin tones" or "Doesn't work on poc characters". Those warnings can also be useful for other things, like not indicating the usage of the psd on irl pictures, cartoon pictures etc.
So, final thing before we get into psd making itself (if you are using a image mask template to check colors) is adding the images! I always recommend adding characters from different sources and irl images to be sure, and with either varying colors across the spectrum so you can be certain the psd is working nicely OR images that feel similar enough in vibes so you can be certain the vibes of the psd are going towards where you'd like them to. However, it's also important to consider which colors you will be working with to make the psd, since I think it's easier to make a psd for a character when you have something in mind. For my own psds, I usually limit myself to a maximum of three colors + black and white (which I'll mess with to change their tones), so for this tutorial I'll be using yellow, purple and pink! This is the where we start. (I won't be trying to keep skintones working for this since it's all pale characters, but please have the common sense to make psds that work if you're editing a black character. don't make them white and for the love of god don't make them grayish)
Also reminder before anything that if you're editing a card and that card works weirdly with the psd you can always add adjustment layers to the card itself and mess up with the hues on it hashtag editing some characters just are a pain in the ass to edit because of colors being too similar etc so don't be afraid to fight them

First: Make A Folder for your psd to be built on. It makes things a lot easier to drag around once you have it done and arranged. Name it after the psd name, name it psd folder, whatever, just put your layers under that folder. Onto the layers.
My autistic ass mostly does psds only following one single pattern, but in case you want to mess around and play, feel free to have fun and mess around. A lot of psd making really is just messing around. In my case, these are the main adjustment layers i use: Threshold, Selective Color, Hue/Saturation, Photo Filter, Color Balance, Vibrance and, on occasion, Gradient Map and Curves. You can use others but I am >not< the best person to tell you what they do and how to work with them.
So, you now have your pretty little image layout down and the colors you want to work with in mind (pink purple yellow + bw), so what now? Well, I usually like to think on which direction I want to take this psd towards. People will always have different methods and directions on psd making. Some of them like to make some of the most eyestraining things I've ever seen which somehow work, some of them like to make a pastel so bright I can feel my eyes burning, some of them prefer to make desaturated tones, some of them like to lower the vibrancy of the image so much I almost can't see shit. Everyone has their own preferences and I work w pretty much anything, but for this I'll try to keep a standard bright view, if a little pastel and desaturated, for this.
So now, we have our colors, our images, our color swatches and a direction in mind.
First thing I like to do whenever I'm making psds is to add a threshold layer. However, not in the way I usually see around editblr. When you add a threshold layer, it should look like this

Don't just do that. Go there on that little normal bar and click it. I know people who use others, but I usually settle with either Multiply or Soft Light for it, then lower the opacity down until it's somewhere I'm satisfied with.


So this is where we end up at. I don't let my threshold opacity go any higher than a 30%. threshold basically serves to bring out the shadows on your images and bring out the shapes on them. it helps make the focus on the image clearer yadda yadda yadda. Be careful when using it on darker images, but for brighter ones it sure helps w making everything easier to see.
After adding a threshold, I add my Selective Color layer. With this you'll basically be playing around with the sliders until your colors look the way you want them to. This messes *slightly* with the hue without fully changing them (we'll get there soon), so it gives you some chance to balance out the initial shades of the psd. For the current method i'm teaching (focused colors), i usually recommend you to make the colors you >dont< want on your psd brighter or in a shade that still feels coherent with the colors you dont want in it. we'll be dealing with them soon.

So we get there. HOWEVER! don't think we're done once you mess with the main colors. the 1st selective color white is, what i'd say, one of the most important parts of psd making. you know how most anime characters in gacha games these days look pale white? Yeah. this can change it. What i usually do is bring the black slider on the white layer to the right and then increase a bit of the magenta and yellow. Boom.

It's quite tricky to use on images with heavier shadows, but for the standard pale white anime gacha character? it helps give some life to them. its quite subtle, but can help a lot to make the image get more lively. A counter thing to this is that yeahhh this can mess a lot if you want to make, you know, a >white< psd since it will also mess with the white tones themselves, so there's no 100% settled need to mess with it, just keep it in mind in case you wanna make the character a bit more tan or, you know, have a normal skintone. It also helps a lot with defining shadows, so keep it in mind :]
I usually don't mess with the neutral since it can fuck around a lot w skintones and, if i do, i always make sure to keep them on less than 20% for all levels. be careful when playing w it.
Black is a tricky one. I know a lot of you pastel girlies across editblr and psd making communities like turning it all the way down so theres no black but honestly, contrast is important. I usually make sure to bring the black scale to the right and then mess around w the other three so the black is still visible and bringing contrast to the image, but w the help of the other three, make it so the black looks softer and matches the psd itself. So, here we are!

After the selective color in my psd process, that's where we erase any unwanted color and shift the hues to where we'd like them to be. Make a hue/saturation layer and go to the colors you dont want (in our case, green and cyan) and move that hue slider to a color you want babyyy. I encourage to mess around with the color scale on the specific color so you have more power over what colors change or don't, in case it's messing with colors close to it on the scale (cyan messing with greens, greens messing with yellows etc). Be aware that doing this will fuck uppp certain images with those colors, cry about it for a bit, and go back to making your psd

If you're a picky mf just like me, you WILL add 1 or 2 more hue/saturation layers to fully clean that bar of any color you do not want. If you're normal, you'll be chill with how this looks and call it a day, so onto the next step.

After arranging your colors and possibly finding out how green is an absolute shit color to try and erase traces of, we get to color balance which is, well, where you balance the colors. go around and mess w the scale until your colors lean more towards what you want them to look like. I personally don't mess much here and the difference will be suuubtle subtle, this is more if you're just picky with colors like me and want them to look perfect in the idealized version of the psd you hold in your head.

Photo filter will basically bring the whole thing together. It serves as a filter to bring eeevery tone you have going on into a cohesive line. Always remember to lower down the density of it so the other colors are still noticeable. a lot of the time i will add more than one photo filter and play with it until I'm satisfied with how it looks <3

Then this is the time where I'll usually add ANOTHER selective color layer just to mess more with the tones and finally get them down to where I usually stop playing around.

A few more touches and you should be done! I really don't know how to even explain curves and gradient maps so play around with them for a bit and you should at least understand how they work. One thing I do a lot with my psds is make toggles to make colors darker/bring more focuses etc etc, so if you're someone who struggles to make decisions, toggles might be a good thing to add to your psds!
Now... If you don't want to limit yourself to a set number of colors? Quite simple! Simply skip the hue/saturation layer steps or delete them altogether once you're done with your psd and there, a psd that plays with the tones of the image to make them more harmonious while keeping everything cohesive! You can mess around a bit more on the two selective color layers you have if you do this by deleting the huesat layers, but it should generally look pretty nice still!

This should be it! So, to summarize everything Ive been yapping about so far...
Before diving head in, decide if you want to limit your colors or not. Also decide on a set type of psd (bright, pastel, desaturated, dark...) you want to go towards
Use multiple images to make your psd, either with similar vibes so you can ensure it's becoming something you wanted or with varying colors so you can cover your ground
Use a threshold layer with lowered opacity before anything else so the shadows on your images have more contrast
You can use a selective color layer on the white part to darken pale characters skintone and bring some more life to them, but be careful when doing this because of cards with heavier shadows, if you want to keep white as a color on the psd etc
Don't lighten the black part on the selective layer as that messes with contrast and might make your psd harder to comprehend when looking from afar
Try to still make your colors distinct enough so you're able to tell apart shapes if from afar, it can be a difficult thing to do but it helps a lot with readability
Don't be afraid to go back and forth between layers! If you're on a photo filter layer, you can always go back to make a specific color more prominent if you miss it overall
Use hue/sat as a way to change colors you don't want instead of replace color. It's tricky, but it covers more ground
Use photo filter to bring all colors more cohesion and make it so they look more harmonious
Have a headache trying to work around cards with harsher shadows
DO NOT make poc characters gray or straight up orange/red for the love of god
Feel free to make different toggles for your psds if you can't decide on which path to go towards, you can always duplicate layers and make different paths depending on what you want!
If a specific image you're using has difficult shadows or different tones to work around with the overall set, you can always just mess with that image alone and make adjustments to make it work out with the rest of the set
Remember that psds work differently on photopea and photoshop, so make sure to check that out if making them/using them/posting them anywhere and make it clear for which app they were made for!
Good luck with psd making and have fun overall! <3
Here's my psd test yet again if you'd like to mess around with it! Just don't repost and it should be fine ^^
47 notes
·
View notes
Note
hey balu, do you know how to recolor skin / how a coloring psd works for that? like for a character that's pale and not the shade they should be ( cough cough natlan ) asking bc I want to that but idk how
Hiya, anon! I can explain how I personally do it, but here's a huuuuuuge disclaimer: I'm colourblind, so I heavily rely on colour wheel pointers. Throughout this tutorial, you'll see me constantly comparing where the pointer is and trying to use my somewhat limited knowledge of colour theory. I'm sure other creators have other ways to do this that are much simpler and/or more effective; you should look for and check out other tutorials here on Tumblr, YouTube, or Twitter!
Due to the limited previews of images on Tumblr, you can also open the images on new tabs to see more details.
For religious and political reasons, I will not use a Natlan character as an example. Instead, I'll use Candace (also from Genshin Impact) as our muse. Specifically, I will use her character card art image, which can be found on the Genshin Impact fandom wiki. The image quality is not so great, so that's why we'll see some bleeding pixels here and there. Dealing with those is another tutorial altogether. Also, if you meant an absolutely pale character (with littler to no melanin), that would be another tutorial, too. So, I'll be sticking with these examples and explanations here! This can give you a starting point.
In this tutorial, we will go from this before (left) to this after (right):

Also, I'd like to point out that these steps are for this specific picture/character. Though the same logic can be applied to other characters and images, it's imperative to remember, especially when you're starting your editing adventures, that there is no fool-proof and 100% universal PSD. I'm just explaining the logic behind how a colouring PSD works and some of my mental processes behind it.
Please consider reblogging, liking this post, and/or supporting me on ko-fi if this helped you! That way, I can keep bringing you tutorials like this faster and more effectively. ~
Now, let's begin!

First, we must notice that skin colours (even paler ones) are shade variations of yellows and reds. If we check the hex code colour/colour pointer on the colour wheel, we will see that Candace's skin colour is at the intersection between red and yellow, and is on the lighter/less saturated part.

Here, I am deepening/saturating the blues of her clothes by creating a Hue/Saturation layer, changing from Master > Blues and adjusting the Hue and Saturation values. Colour theory basics: opposing colours on the colour wheels will give a more significant idea of contrast; the bluer colours will appear colder, and the warmer colours will appear hotter and, therefore, more saturated.

In this second step, I am creating a Selective Colour layer, focusing on the Reds. I want this to be highly reddish for now, so I'm lowering the Cyans to the minimum values I can. Notice how the colour wheel pointers went down, meaning we are in a redder, more saturated and more precise zone. The darker the skin, the redder its colours will be in pictures.

Thirdly, I am now creating a Colour Balance layer. Since I want to adjust the warmer colours (e.g., Reds), I am adding more reds, magentas, and yellows.

The exact process I did for Candace's clothes, I'll do for her accessories. Her accessories blended too much with her skin tone (hex code-wise and I imagine that for the normal eye, too). So, to make the yellows on her accessories pop and be more different from her skin, I created yet another Hue/Saturation layer and changed from Master > Yellows, altering the Hues, Saturation and Lightness values.

Now that we have the image's primary colours (blues, reds, yellows) separated, it is time to deepen/saturate the reds. So here, I made another Selective Colour layer, also focusing on the Reds. Notice that now I'm also increasing the Cyan values. Why? Because Cyans make the reds look darker, and I want exactly that. So everything will increase in value.

To further deepen these colours, I created a Curves Layer and tweaked each RGB curve. I made the blues lighter; meanwhile, the greens and reds went darker. Again, colour theory! Notice on the colour wheel that her skin is extremely red and saturated. This is precisely what I want. Why? Well...

... Because now, by using a Selective Colour layer again, I can make her skin magentaish. Pure magentas are rare in pictures, even fantasy/2D characters. Generally, you will find variations of purples, pinks or reds, but magentas are more difficult to find. Therefore, they're easier to work with/edit. Even if the character had magenta colours, we could've isolated them beforehand, too. This step guarantees that my PSD will solely focus on her skin tone, basically.

Our final step is to create another Hue/Saturation layer and change the setting from Master > Magentas. We will decrease the Saturation and Lightness values and slide the Hue bar to the right. And now, check the colour wheel: it's a beautiful dark brown! It's popping a lot against the yellows and blues. ~
This is where we started vs where we finished!
So there you have it! A speedy but hopefully informative tutorial on how colouring PSD works and how you can quickly love your characters a bit more when doing edits and graphics for them!
Again, please consider reblogging, liking this post, and/or supporting me on ko-fi if this helped you! That way, I can keep bringing you tutorials like this faster and more effectively. ~
If you have any questions, please let me know!
#♡: tutorials! *#gfx tutorial#graphics tutorial#graphic tutorial#gfxs tutorial#resources#rolep#ps tutorial#ps tutorials#photoshop#photoshop tutorial#photoshop resources
51 notes
·
View notes