#compress file online
Explore tagged Tumblr posts
Visit Tumblr Blog
Explore Tumblr blogs with no restrictions, modern design and the best experience.
Last Seen Tumblr Blogs


Fun Fact
70% of Tumblr users say the Dashboard is their favorite place to spend time online.
Text
Choosing Wisely: Picking the Perfect Mp4 Video Compressor for You
With the increasing popularity of videos in today's digital landscape, the need for efficient file compression solutions has become paramount. Mp4 video compressors offer a way to reduce file sizes without compromising on video quality. However, with numerous options available, it is essential to choose the perfect mp4 video compressor that suits your specific needs. In this article, we will explore the key factors to consider when selecting an mp4 video compressor, helping you make an informed decision.
Compression Quality: The primary consideration when choosing an mp4 video compressor is the quality of the compressed videos it produces. Look for compressors that utilize advanced algorithms to ensure optimal video quality. The compressor should effectively reduce file size while maintaining acceptable visual and audio clarity. It is advisable to test the compressor using sample videos to assess the quality of the compressed output.
Compression Speed: Compression speed is another significant factor to consider. Some compressors are faster than others, which can significantly impact your productivity, especially when dealing with a large number of videos. Look for compressors that offer a balance between compression speed and quality to ensure efficient processing of your video files.
Customization Options: Different videos may require specific compression settings to achieve the desired balance between file size and quality. Look for compressors that provide customization options, such as adjusting bitrate, frame rate, resolution, and audio settings. This flexibility allows you to tailor the compression settings to the specific requirements of your videos.
User-Friendly Interface: A user-friendly interface is crucial for a smooth compression experience. Look for compressors that have an intuitive and easy-to-use interface. The compression process should be straightforward, with clear instructions and a logical workflow. A user-friendly interface ensures that even those with limited technical expertise can navigate the compressor efficiently.
Format Compatibility: Consider the compatibility of the mp4 video compressor with various video formats. While mp4 is a widely supported format, it is beneficial to choose a compressor that can handle other popular video formats as well. This ensures that you can compress videos in different formats without the need for multiple compression tools.
File Size Reduction: The primary purpose of using an mp4 video compressor is to reduce file size. However, different compressors may achieve varying levels of compression. Look for compressors that can effectively reduce file sizes while maintaining video quality. Compare the compression ratios achieved by different compressors to find the one that offers the best file size reduction without compromising on quality.
Batch Processing: If you frequently work with multiple videos, consider compressors that support batch processing. This feature allows you to compress multiple videos simultaneously, saving time and effort. Batch processing streamlines your workflow, making it more efficient and effective.
AI Detection of Plagiarism:
While selecting an mp4 compressor is essential for efficient file management, it is equally important to address the issue of plagiarism. AI-powered plagiarism detection tools can help ensure the originality and integrity of your video content. These tools compare your content against a vast database of existing texts, identifying any instances of plagiarism or similarity. By utilizing these tools, you can maintain the authenticity of your work and protect against unintentional plagiarism.
Conclusion:
Choosing the perfect mp4 video compressor requires careful consideration of various factors, including compression quality, compression speed, customization options, user-friendly interface, format compatibility, file size reduction, and batch processing capabilities. By selecting the right compressor, you can efficiently compress your videos while maintaining optimal video quality. Additionally, leverage AI-powered plagiarism detection tools to ensure the originality and authenticity of your video content. Take the time to evaluate multiple options, test sample videos, and choose wisely. A well-chosen mp4 video compressor will enhance your file management experience and enable you to effectively handle and share your video files.
1 note
·
View note
Text
#JPEG#Image Compression#Lossy Compression#Image File Formats#Digital Images#Graphic Design#Photography#Web Graphics#Image Quality#File Size Reduction#Digital Photos#Image Optimization#Online Media#Visual Content#Image Sharing#Website Performance#Image Loading Speed#Image Storage#Image Formats Comparison#Multimedia Files
1 note
·
View note
Note
Beepity boopity :3
#something something “doing this to you” something something#I didn't really have any reason to do this other than figuring out if I could make similar things#It didn't fare well against mp3 compression but it's still receivable. mostly.#I definitely did it differently than prev#I know there are online generators/receivers but I decided it'd be fun to mess around with actual desktop software#so I made this with QSSTV#which sucked because it doesn't have audio file IO#I had to use a pipewire graph editor to manually pipe audio from a media player in#and to save the output file I had to let QSSTV output to the speakers and I had to set ffmpeg to capture the ALSA output monitor#then I just trimmed the audio with audacity and made it an mp3 with ffmpeg#definitely a more roundabout way of doing things#but the most important thing is the friends we made along the way#officially friends with thasune now#sorry thanook. this robot is WAY cooler than you. /j
17 notes
·
View notes
Text
how to build a digital music collection and stuff
spotify sucks aaaass. so start downloading shit!!
file format glossary
.wav is highest quality and biggest
.mp3 is very small, but uses lossy compression which means it's lower quality
.flac is smaller than .wav, but uses lossless compression so it's high quality
.m4a is an audio file format that apple uses. that's all i really know
downloading the music
doubledouble.top is a life saver. you can download from a variety of services including but not limited to apple music, spotify, soundcloud, tidal, deezer, etc.
i'd recommend ripping your music from tidal or apple music since they're the best quality (i think apple music gives you lossless audio anyway. .m4a can be both lossy and lossless, but from the text on doubledouble i assume they're ripping HQ files off apple music)
i also love love love cobalt.tools for ripping audio/video from youtube (they support a lot of other platforms too!)
of course, many artists have their music on bandcamp — purchase or download directly from them if you can. bandcamp offers a variety of file formats for download
file conversion
if you're downloading from apple music with doubledouble, it spits out an .m4a file.
.m4a is ok for some people but if you prefer .flac, you may wanna convert it. ffmpeg is a CLI (terminal) tool to help with media conversion
if you're on linux or macOS, you can use parameter expansion to batch convert all files in a folder. put the files in one place first, then with your terminal, cd into the directory and run:
for i in *.m4a; do ffmpeg -i "$i" "${i%.*}.flac"; done
this converts from .m4a to .flac — change the file extensions if needed.
soulseek
another way to get music is through soulseek. soulseek is a peer-to-peer file sharing network which is mainly used for music. nicotine+ is a pretty intuitive (and open-source) client if you don't like the official one.
you can probably find a better tutorial on soulseek somewhere else. just wanted to make this option known
it's bad etiquette to download from people without sharing files of your own, so make sure you've got something shared. also try to avoid queuing up more than 1-2 albums from one person in a row
tagging & organizing your music
tagging: adding metadata to a music file (eg. song name, artist name, album) that music players can recognize and display
if you've ripped music from a streaming platform, chances are it's already tagged. i've gotten files with slightly incorrect tags from doubledouble though, so if you care about that then you might wanna look into it
i use musicbrainz picard for my tagging. they've got pretty extensive documentation, which will probably be more useful than me
basically, you can look up album data from an online database into the program, and then match each track with its file. the program will tag each file correctly for you (there's also options for renaming the file according to a certain structure if you're into that!)
there's also beets, which is a CLI tool for... a lot of music collection management stuff. i haven't really used it myself, but if you feel up to it then they've got extensive documentation too. for most people, though, it's not really a necessity
how you wanna organize your music is completely up to you. my preferred filestructure is:
artist > album > track # track

using a music player
the options for this are pretty expansive. commonly used players i see include VLC, foobar2000, clementine (or a fork of it called strawberry), and cmus (for the terminal)
you can also totally use iTunes or something. i don't know what audio players other systems come with
i personally use dopamine. it's a little bit slow, but it's got a nice UI and is themeable plus has last.fm support (!!!)
don't let the github page fool you, you don't have to build from source. you can find the releases here
click the "assets" dropdown on the most recent release, and download whichever one is compatible with your OS
syncing
if you're fine with your files just being on one device (perhaps your computer, but perhaps also an USB drive or an mp3 player), you don't have to do this
you can sync with something like google drive, but i hate google more than i hate spotify
you can get a free nextcloud account from one of their providers with 2GB of free storage. you can use webDAV to access your files from an app on your phone or other device (documents by readdle has webDAV support, which is what i use)
disroot and blahaj.land are a couple providers i know that offer other services as well as nextcloud (so you get more with your account), but accounts are manually approved. do give them a look though!!
if you're tech-savvy and have an unused machine lying around, look into self-hosting your own nextcloud, or better yet, your own media server. i've heard that navidrome is a pretty good audio server. i unfortunately don't have experience with self-hosting at the moment so i have like zero advice to give here. yunohost seems to be a really easy way to manage a server
afterword
i don't know if any of this is helpful, but i just wanted to consolidate my personal advice in one place. fuck big tech. own your media, they could take it away from you at any moment
2K notes
·
View notes
Text
USEFUL SOFTWARE FOR THE SIMS 2

This is a list of programs that will make your life easier if you're an avid Sims 2 player. Click on program titles to get download links.
SimPE The most known software for The Sims 2 that lets you edit package files. You can do basic stuff like rename a Sim, change family name, edit Sims' genetics as well as edit/create mods. Don't use if you have no idea what you're doing, watch a tutorial first or back up your neighborhood beforehand in case you mess something up! The newest version also has a terrain editor.
Sims2Pack Clean Installer The best program for installing downloaded lots and Sims. Those don't just go into Downloads, you need to install them!
Hood Checker This program checks neighborhood references and can clean out ones that are broken. Also useful for bringing back lost graves (it's still good to have NoUnlinkOnDelete).
HCDU Plus The Hack Conflict Detector Utility lets you scan your Downloads folder to check if you have any mods that edit the same aspect of the game, so can potentially be in conflict. Also useful to navigate which mods load first (load order is important for some mods to work).
What Caused This When you have 'testingcheats' on, the game gives you error messages if there's something going on. Not all of them mean there's a serious problem, but What Caused This can help you navigate what the source is. Upload the log file (Documents/EA/TS2/Logs) in the program, give it your Downloads folder and it will scan it to look for the culprit. Might give you straighforward information on which mod conflict caused the issue or that you lack Smarter EP Check for a mod that requires it.
The Compressorizer You can compress your Downloads to take up less space.
Delphy's Download Organiser You can filter your files to a certain category, scan for orphans (files that don't fully work if other files are missing, such as meshes), duplicates, and clean up your Downloads folder in an easier way than trying to track it inside the folder manually.
Outfit Organiser You downloaded CC clothes that the creator marked as outerwear but you think they don't fit in that category? With this program you can quickly change that! It's also doable in SimPE, but Outfit Organiser is a lot easier to use.
CPack Editor If you want to make plastic surgery genetic, there's no need to do it manually in SimPE, especially if it's more than one Sim. In CPack Editor, you just choose your neighborhood's folder, run the program, and it changes ALL surgery faces in that neighborhood to genetic!
Lot Adjuster This program lets you edit already existing lots. If you want a smaller or bigger lot than possible in-game, you can do it here! Also great for creating pavilions or row houses that are all separate lots, as you can get rid of the 2-tile border separating buildings by making the lots smaller and copying them.
Lifespan Builder A simple online tool by Lazy Duchess that lets you make your own custom lifespan without SimPE! You just put the numbers in and download a ready mod. Note: the number in game files is always 1 day shorter than it shows in the Sim's age bar, so example: if you want the toddler stage to be 5 days in-game (as in, it shows "5 days away" after growing up from a baby), you need to put in 4.
798 notes
·
View notes
Text
Art of Arcane Full PDF Download
Briefly, the entirety of the Art of Artcane artbook was available to view online. Me being me, I painstakingly downloaded every single spread, compressed the JPEG file size down using JPEGmini, and compiled them into a PDF.
Now I share said PDF with you!


488 notes
·
View notes
Text
words for users !
ideias de palavras aleatórias para ajudar você a criar seu próprio user;
random ideas of words to help you to create your own user.

core -> aesthetic core
vlog -> daily videos
logs -> daily facts
mp3 -> audio file format
m4p -> apple audio file format
mp4 -> video file format
txt -> text format
jpeg -> image file format
jpg -> image file format
png -> image file format
gif -> animated file format
raw -> uncompressed file format
zip -> compressed archive file format
rar -> compressed archive file format
web -> internet file format
doc -> document file
pdf -> document file
vinyl -> phonograph record
film -> motion picture; photography
user -> person who utilizes a computer or network service
i2 -> "keeping it real"
self -> a person's essential being
itself -> a person's essential being
priv -> private
luv -> love's short form
tale -> a fictitious or true narrative or story
archive -> to place or store (something) in an archive
list -> connected items
tier -> a type of hierarchy
talk -> speak in order to express something
chat -> to have a conversation
post -> to announce or publish something
zone -> a subject to particular restrictions
vie -> life in french
tie -> to form a knot or bow in
on/online -> connected to a network
byte -> a group of binary digits
bits -> a small piece, part, or quantity of something
ram -> hardware in a computing device
8bit -> computer term used to designate either color depth
pixel -> a minute area of illumination on a display screen
data -> things known or assumed as facts
series -> a number of things, events, or people of a similar kind
village -> a self-contained community within a town or city
lab -> a laboratory
lady -> a woman
miss -> a form of address to a woman
mister -> a form of address to a man
error -> something not found
art -> the various branches of creative activity
petit -> small in french
poet -> a person possessing special powers of imagination or expression
thing -> an object without a specific name
stuff -> a vague reference to additional things
vogue -> the prevailing fashion or style at a particular time
tv -> taylor's version and/or television as a system or form of media
media -> the main means of mass communication
topia -> an imagined place or state of things in which everything is perfect
saur -> forming names of extinct reptiles such as dinosaurs
tune -> a melody, one that characterizes a particular piece of music
deun -> melody in deutsch
off/offline -> disconnected from the Internet
gloss -> shine or luster on a smooth surface
fae -> a fairy, in modern fantasy fiction
#random users#cute usernames#tumblr users#twitter users#usernames#user ideas#aesthetic usernames#soft users#users#aesthetic url#messycore#messy aesthetic#alt aesthetic#messy packs#aesthetic core#user#user name#random#random user ideas#random user#random ideas#text post#masterpost#masterlist#long post#long list
5K notes
·
View notes
Text
Convert Images Between WebP and PNG Formats for Free
As someone who runs a small business online, I'm always looking for ways to optimize my images without sacrificing quality. That's why I was excited to find webppng.com, a free online image converter that lets you quickly switch between WebP and PNG file formats.
For those not familiar, WebP is an advanced compressed image type created by Google that can drastically reduce file sizes compared to PNGs. The only catch is that some older browsers don't support WebP.
That's where webppng.com comes in! Their free WebP to PNG converter lets me upload my WebP product photos and download optimized PNG versions compatible with more websites and apps. And when I have PNGs, their PNG to WebP converter lets me benefit from the smaller file sizes of the WebP format.
I love that webppng.com offers:
Fast bulk conversion right in your browser
Preserved image quality with customizable compression
An easy drag and drop interface that's simple to use
Unlimited usage with no hidden costs or limits
Being able to seamlessly switch between WebP and PNG has been a huge help for my small online store. I can have smaller WebP files for modern browsers while still supporting PNGs for maximum compatibility across platforms.
If you work with lots of product images like me, I'd definitely recommend checking out webppng.com's free WebP and PNG converter. It's an easy way to optimize your site's images for speed and performance.
2K notes
·
View notes
Text
RNZ interview mirror - the original file is exactly 700 kb too big for tumblr so I had to compress it slightly 🙃
Transcript under the cut!
YouTube megastars Dan and Phil will be coming to Aotearoa next week with a live show full of scandalous stories. For those who don't know them, these two Brits invented being internet famous. Coming to stardom in 2009, the pair have amassed a media empire with over 40 million combined followers, 2 billion views on YouTube, as well as a handful of best-selling books. Dan and Phil went on hiatus in 2018, with each coming out as gay soon after. This is their first tour together since then. The show is called Terrible Influence and it's coming to Auckland's Kiri Te Kanawa Theatre next Thursday, the 19th of December. I caught up with Dan and Phil earlier on the line from Australia.
DnP: Hello.
(Interviewer laughs)
D: Sorry, was that a weird stereo hello there? That must have been disturbing.
I: That's exactly how I wanted you to answer the call.
P: Yes, that's how we speak all the time. D: We share one braincell.
I: You speak in unison.
P: Yes. (laughs)
I: Because you two have lived together for quite some time, haven't you? D: We have. I: Not only working together for many years.
D: Yeah, like imagine like being really fed up with your co-worker and then you want to come home and you want to be like, God, this guy, I can't stand him. Like, what are we doing here, people?
P: Then he's in your house.
I: How long have you lived together for?
D: Errr, fourteen- P: No. D: No, thirteen- twel- P: Twelve years. I want to say twelve years. D: Twelve years, but it feels like 2000. Do you know what I mean? P: Time is not real. We don't know what's going on. D: At this point, we're like, you know, when you go to a zoo and there's two elderly tortoises that are about 400 years old. P: Yeah. D: That's how we feel. P: Yeah.
I: I'm glad that you've decided to, you know, take air travel to get to New Zealand.
D: It's literally the furthest place from home we could ever. So we get some tweets from people that are like, Dan and Phil, thank you for coming to New Zealand because, by golly, you've travelled a bit of a way. But hey, we're happy to be there. New Zealand is a beautiful country. P: Yes. D: And so are the people.
P: Whenever I come to New Zealand, I just want to move to New Zealand. I'm like, why am I in London when I could be in this beautiful, verdant land?
D: A lot of people do abandon for New Zealand and we understand why.
I: Yeah. Yeah. I'm glad that you do understand that. And it's your first big tour back since coming out in 2018. D: It is. I: The show is kind of a little bit like a gossip session. Is that right? Setting some things straight?
D: Absolutely. We're people that have been on the internet for a very long time and people have talked a lot of smack about us over the years, as a lot of people do with anyone with a lot of followers. And we're like, you know what? We all deserve to look back at our past. We all deserve to be roasted for the things that we did and said. That includes us being embarrassing and what our audience were like when they were all teenagers on the internet. But if we have a bit of a therapy session slash Catholic confession, we can end it with a bit of a hug and a pat on the back and go, it's okay. We survived. Here we are now in 2024. So it's like a roast and a healing session at the same time.
I: That must be quite an interesting thing because, you know, you both grew up on the internet and made so much content. You have this huge following that you've built. And so many people work really hard to kind of erase their former selves online. And that's probably something that you cannot do.
D: Oh, no. I would love to. It's too late. P: That's the thing as well. Sometimes our audience know us better than we know ourselves because they watch these videos so much. I never watch my videos back ever. So they'll come up to us at a meet and greet like, remember that thing you did in 2014? I'm like, no. D: No, I don't. P: I don't know what I said or did. D: But Phil, you love this ice cream flavour. P: Yeah. Speaking of ice cream, I'm excited for the Hokey Pokey ice cream. That was the thing I remember in New Zealand. I: It is good.
D: Yeah. Someone said, hey, you're excited to have it again. I was like, what was that? P: We don't have that. D: Don't you remember the time that you had it? P: No. D: Here, I've got this photo on my phone. P: Yeah. I'm going to have some more when I get there for sure.
D: That is not the main reason why we made the travel, but it will help with the jet lag.
P: It's 80% of the reason, I'll be honest.
I: Why is the show called Terrible Influence?
D: I think there's this idea that everyone on the internet, all these creators, all these TikTokers and podcasters are just horrible people that are trying to sell you some kind of crypto scam. And the truth is 90% of them are. And the question that we're asking is, were we terrible? What did we do to all these young people that watch it? Maybe the other question is, what did they do to us? Is what we do inherently bad? Is it a two-way street? Well, maybe we can answer that question and along the way just giggle so much that we kind of forgive and forget.
I: I'm sure you have a pretty good idea of the extent of your influence. But being in high school in New Zealand when Dan and Phil were first starting out, it was almost like a code word. (Dan laughs) It was how weirdos, kind of, identified with each other.
P: I think we've always been happy to kind of have representation for the slightly alternative people of the world.
D: Yeah, we like to joke that it's for the goths, the girls, the gays and the geeks. Any type of person that feels like on any level, they may not be completely mainstream. They may not be vanilla. They might feel other in any kind of way. We have an audience and we look out now because you understand when all these people were 14, it kind of looked like they were all teenagers. Now that they're all adults, some people are coming up to us, they're like, hi, Dan and Phil, meet my child. (laughs) But all these people have been in such different journeys in life. But it's knowing that, you know, back in the day, there was a place where no matter what kind of person they are, they felt like, you know what? Here in this comment section with these guys, I can just be myself and that makes me happy. I think whether that is something that we did do intentionally or it's an accidental byproduct of our influence, we'll take it.
P: And a lot of them have grown up with us as well. That's the lovely thing. So we're meeting people now that are just much older, but they're still watching the videos because we've- we've grown up and they've grown up as well.
I: Absolutely. And you took this hiatus, you know, from the internet. How long was that hiatus for and what was the impetus for it? And for coming back?
D: It was five dark years. P: Five years. D: And there was no Dan and Phil in the world until one day, like Jesus, we returned and here we are now.
P: We did. I think it's always a good thing to kind of have a moment where you're like, what's going on in life? Have a reset. And and I think we're kind of back now.
D: You know, like when everyone, you know, there was a pandemic and then they were like, you know what? My relationship, my job, you have decided it's not for me. I think we were trendsetters there. We did that early, voluntarily style, because we'd been going nonstop since 2009. And I was like, I just need to hit the brakes and look around for a little bit. And then I came back and I was like, hi, guys, I'm gay now. And they were like, ah, yes, that makes sense. But sometimes you have to hit the brake in life in order to take the space, look around you, take stock of things, make decisions. And ultimately, when you come back, it'll be healthier and happier.
P: And we didn't know this Dan and Phil thing- Like when we came back, we're like, do you guys still want these videos? And then, like, the reaction has been incredible, like, so many people watching the gaming channel. D: To the extent people thought Dan and Phil, you need to go on a tour right now. You need to get your butts all the way to Auckland (laughs) because I've been waiting for you to come back and we need to have a good night together. P: Yeah.
I: Yeah. And get out from behind the screen and kind of just interact face to face. You two are hugely into gaming and it's been quite a good pivot from YouTube to kind of try and be more successful, I guess. It's incredible how popular you are on these platforms. Can you tell me a little bit more about how that works and how you kind of make a career out of this?
D: Well, Phil's been doing it so long that he did it before YouTube could even monetize videos. He was doing it purely out of boredom and passion for the craft. P: Yeah. D: That's terrifying.
P: I'm a YouTube dinosaur. But I think with the gaming, we've got a Sims series, which we've got- how many episodes now? Like- D: Oh a hundred or so. P: A hundred episodes. And I think people follow along the journey with us playing the games. And it's like, I guess it's like when you were a little kid and you're watching your big brother play a video game. It's kind of that thing. You're just like watching along, having the bants. So I think what the people come to our videos for is more of the personality and us having a laugh rather than getting really into gaming.
D: Yeah! I mean, gaming is just the topic. It's like any type of TV or radio talk or commentary show, it could be about football, it could be about music and pop culture or the news, you just want to see people that you relate to, that you find entertaining, doing something that you find interesting and then you pair it together, and for lots of people they go: yeah! This is what i want to see P: Yeah.
I: Phil, how have you noticed the kind of gaming culture change over time, and was that something you're a little bit hesitant about, you know coming out as gay in that kind of domain, because we know generally that - you know, over the last decade-
D: The gamers are the worst demographic in the world absolutely- I: Things have changed. D: We’ve been on the internet since the ancient times and it's hard to say, like in a way obviously the internet these days, it feels like it's more terrible than ever, but in a sense it is a lot less toxic and a lot more wholesome and inclusive than it used to be.
P: Yeah, I'd say coming out on the internet is always going to be a scary thing, when you're saying that and being kind of vulnerable in front of so many people. Thankfully we've got such a great audience that the reaction was incredible, I would say.
D: And i think that what's great about the internet is that people can find their own communities, so even within spaces that you might think, oh they're dominated by this type of person – any subculture, any type of person that feels like, I want this space for myself – you can find it. If you want to order you know a ping pong club for girls with ginger hair called Susan that drink wine on a Tuesday, you can start that discord server, people will love it.
I: And I think it's nice to have those pocket on the internet where people can feel safe and can kind of commune together. You will be playing the Kiri Te Kanawa Theatre in Tāmaki Makaurau, Auckland, on December the 19th. What about people who didn't grow up watching you, who think you might be quite funny right now. Like what could you say to them if you want them to come to your show?
P: I'd say, well luckily for you we have got a whole section of the start of the show which is the complete history of Dan and Phil in five minutes, so if you might have just slightly known who we are and be like, what's going on with these guys? We're going to catch you up in no time.
D: A lot of people drag their boyfriends, their sisters, sometimes like that mum that you need to drive you so you can have a couple of cocktails to the show, and we're like we need something for these people, we're going to catch them up, we're going to get them on our side, and if we have a spot- there's like a grumpy dad folding his arms in row three, I'm like, I'm going to crack you P: but- D: My mission for the night is you're going to be belly laughing by the end. P: They're always smiling at the end though. That's the thing, we do. We do crack them.
I: Oh and this will be your last show before a well deserved Christmas break, then back into the new year. What will Christmas look like for both of you?
P: I mean we're going to try and get home for Christmas. D: Yeah, yeah the question is, can we get back from Auckland on the 21st of December? P: Twenty- yeah. I think it's gonna be a challenge to get all the way home, but then I'm probably just gonna be asleep on my mum's sofa with jet lag, hoping to drink a lot of cocktails. D: I'm gonna slip into a nice coma.
I: I'm really glad to hear you are back together again.
D: Oh, well thank you! We really, really appreciate it and we're so excited for the show, so thank you New Zealand. P: Nice speaking to you!
@dnp-described
#dan and phil#phan#shoutout to tumblr for crashing while i proofread the transcript#daniel howell#amazingphil
194 notes
·
View notes
Text
Not again
a/n I don’t want to do all the work of pre-writing summary ect. I already wrote it. It’s just mic’d up again
“I would just like to say, y’all begged for me. I know yall want me bad. I mean who wouldn’t?”
You strutted into the gym in gray sweats rolled at the waist, a white compression shirt tucked into your bra, and your silver chain glinting under the lights. “The mic is on. Get excited yall. Not too excited though. You freaks.”
____
“You eating that banana real suspiciously, Icy,” you said, staring at her with narrowed eyes.
Ice paused. “It’s literally a banana, how else do I eat it?”
“Why you makin’ eye contact with me while doing it? Didn’t know you were a freak like that for real.”
____
“Coach Geno told me to lock in, but he already knows I’m locked in with my girl.”
You pointed to Morgan, who was tying her hair up.
“See that slick back? Y’all. I’m fighting for my life right now. Sum else is slick I’ll tell you that much.”
____
You walked into the locker room, dribbling a ball.
“Mic’d up and dripped out. I’m like if Sue Bird and Sexy red had a love child. You’re welcome.”
____
“Paige told me to touch some grass today. I said nah, I’m too busy touching feelings. Mostly hers.”
She threw a towel at you. “I will file a restraining order.”
“Who told you I liked being restrained.”
____
“I just want the record to show Morgan said I couldn’t go a full practice without being inappropriate.”
You turned dead serious to the camera.
“I lasted seven minutes. That’s character development. Growth.”
“She’s right it used to be three.” Morgan said walking by. You nodded and smiled proudly.
“It was 7 minutes in hell wayyy worse than 7 minutes in heaven I can tell yall that.”
____
You pointed the camera at Aubrey mid-stretch.
“Y’all see that arch? I’d hit. I’ll tell yall that much”
“Get outta my face, Y/n.”
“Too late. I’m already imagining the wedding.”
____
“Sarah said she can outlift me. I said baby I don’t need to lift, I got you to do the heavy lifting in this relationship.”
“We’re not even dating.” Sarah said from the bench where she was taking of her shoes
“Shhh” you said pressing your finger to her lips “That’s a mindset issue.”
____
Camera cut to KK again.
“She’s bricked five in a row. She’s building a house at this point.”
KK: “Say one more thing and I’m snatching that mic off your chest.”
You: “Kinky. I’m listening.”
____
Morgan handed you your water bottle.
You sipped, looked into the lens, and said:
“Hydration is important. Especially when you’re thirsty…for your girl.”
“You’re lucky I think you’re cute.” Morgan said taking the water back
“I’m lucky you have no standards.”
____
You were stretching again, badly. Like, barely reached past your shins badly.
“Okay but imagine the positions I could be flexible in. Use your imagination.”
“Please stop.” KK said covering her face
“No.”
____
Practice ended. You collapsed on the floor, mic still on.
“That’s all folks. Practice is over. My ass looks great. My reputation is ruined. 10/10, would do it again.”
____
Editor: “Y/n, this can’t go online.”
“Put it on TikTok with sexy background music. Trust me. I’m a brand now.”
.
UConn_wife13| fear Y/n is the most unserious person alive and also the love of my life.
hoops4life| Y/n gonna flirt with the whole team and then cry when Morgan gives her the silent treatment for 20 minutes.
icefan3000|
The way Ice didn’t even flinch at the banana comment… she’s seen too much.
notgenoauriememeguy|
Y/n: flirts with everyone
Also Y/n: “I’m a loyal girlfriend”
Morgan blinked twice at the end. Should we call someone?
paigeshairgel|The Geno cameo was crazy. Bro looked like he aged 10 years in 3 seconds.
sarahslayz|
I dunno how but she makes everything freaky
user8183|
“Positions I could be flexible in” NAH Y/N GOTTA BE BANNED FROM THE MIC 😭😭
editorruss|
As the editor who had to bleep half this video… I haven’t known peace since Wednesday.
Fan69402|
Why does Morgan just sit there calmly like her girl isn’t out here trying to seduce the whole gym?
benchwarmersunite|
Y/n got 10 points per game but 40 points in unspoken rizz.
#paige bueckers#kk arnold#inês bettencourt#nika muhl#uconn wbb#morgan cheli x reader#caitlin clark#morgan cheli#uconn women’s basketball#wlw
71 notes
·
View notes
Text
I'm not upset that blu-rays are being phased out. Formats all become obsolete and then die out.
My worry is there is not an adequate replacement for physical media. If you stream a 4K movie, it is usually over compressed and has a lossy audio track. Usually the quality *improves* when you move on to the next thing. But in this case, only the convenience is improved.
And there is no way to truly own the media you buy online. Even on Amazon when you "buy" something, that just means you have indefinite access to the file on their server. But if they lose the rights to that content or decide to delete it for tax purposes, you lose it too.
There is a service called Kaleidescape. It allows you to download blu-ray quality movie files onto local storage. Unfortunately the service has way too many caveats. You can only play the movies on their proprietary equipment. If they go out of business you will lose all of your movie purchases. And while they have a lot of mainstream, big budget movies, their selection is far from vast.
Oh, and their hardware starts at $8,000 and each movie is between $10 and $30 to purchase. And if you want to save more than 125 movies, the cost balloons to nearly $20K for the hardware.
The quality issue will eventually solve itself. New codecs like AV1 and H.266 will allow files to be compressed without losing any quality.
But I have no idea what to do about being unable to truly own your media. No studio will agree to DRM-free downloads that you can store anywhere and play with any device.
Maybe they can create a system where you can register any device you own and be allowed to play the file on those registered devices. So you get a file you can download, but the DRM requires verification you own the device it is being played on.
Perhaps they could designate a few cloud storage services as approved download platforms. You are free to shift your media from cloud to cloud, but it must always stay on the cloud and be registered to you. That way if a cloud storage company bites the dust, you still have the option to move your media to another place.
It's not as good as DRM-free local storage, but I don't see studios agreeing to anything else.
In truth, people are probably never going to buy movies in the future. If you have the option to rent for $3 or buy for $20, people probably aren't going to see the value in spending that much to own a movie.
Maybe the solution lies in some kind of law. If a platform no longer wishes to host a show or movie and they can't sell it to another streaming service, then they must give up the rights and allow the Library of Congress to save and distribute it.
1K notes
·
View notes
Text
Resources for Creating: My Go-To things.
Update: I’ll be updating the list on this page from now on, since Tumblr can’t handle so many hyper-links in one post, on Dreamwidth - right here, so I won't have to update it multiple times. Please note: I keep updating this list, and updates aren't showing up on reblogs. Please check the original post for the most up to date list.
Sooo this is going to be a long comprehensive list. I got back to this game after a long time and with a different computer, with a dedicated graphics card, hurray! It made me want to return to making things, so while gathering back all the necessary stuff, I've complied this list. It might be is updated as I go along, but these are the main things I use. Maby one day i'll even finish something. So here are my go-to resources & tutorials; I'm posting it here for safekeeping, and hopefully others will find it helpful. Everything that's listed is here free. So many wonderful things for free under the cut.
Programs – General:
Creating: Blender. Blender Addons: 3D Print Toolbox – comes with blender, enable it from within the program. Originally for 3d printing. Good for fixing flipped normals, and some quick general repairs. Source Tools And source tools wiki – for exporting as SMD!!!! (SimPe: to enable bump maps for the mesh on import). GMDC Addon for Blender 4.0+ by Nopke.
GIMP. GIMP Addons: G'MIC-Qt. Resynthesizer. Nvidia dds?. Doesn’t it come with Gimp?
Other: Nvidia Texture Tools Exporter (iirc it works with all graphic cards that are compatible, doesn’t require Nvidia). For making Normal / Bump / Cube Maps. For high quality compression.
NormalMaps - Online, For making all types of maps, has good setting menus. A very cool tool.
Converting: Umodel, for Unreal Engine (Static meshes: export as gtlf.2. Animated meshes: export as psk. Requires Add-on). AssetStudio, for Unity. AC Viewer, self implied (+ USD Addon for blender). QuickBMS* and support forum, for basically everything else. (don't forget the required scrips, down the same page). *I haven’t tested it fully yet, but it was recommended here. A tutorial for it is listed further down. Works like a charm.
UV Mapping: UV Mapper, Classic (free) and the most recent Demo (for visualization).
Programs – Sims:
Never Mind the Bollox, Here's Osab and MAGIkarp to the rescue!
Latest version of SimPe, works with a non-default installation path. Chris Hatch's updates.
Home Crafter installation, Post by Huge Lunatic at Sims2Artists.
Repository Wizard, by Pick'N'Mix Mods. A game changer.
DBPF Compare, by Pick'N'Mix Mods.
Object Relocator, also by Pick'N'Mix Mods.
SMD Tools, by Lazy Duchess.
The Compressorizer, by JFade – Lazy Duchess's edit.
Bulk Rename Utility, to change file names in well, bulk. As explained by io here.
Lot Adjustor, by Mootilda at MTS.
Tutorials:
Override the game's graphic settings via Nvidia, as explained by iCad. The settings to Nvidia Profile Inspector she linked to at MTS have been deleted for some reason, here they are via WebArchive.
Meshing in Blender:
Mesh Optimization Info (and links), by Crisps&Kerosene.
Additional - Reducing Polycount:
Tutorial, by Flaming-Chickens (another username on other sites perhaps?)
Edge – Un-subdivide, a quick one by CG Link.
Transfer high poly details to low poly object in Blender, by 3Dnot2D.
Shrinkwrap Modifier - Blender Tutorial for Beginners - Basics, by in2vert.
Placeholder for this Addon that I want to try but haven't found, something for AR that was on facebook's defunct AR.
Scaling tips, by Blender Secrets.
How to fix inverted/ flipped normals, by ipaintsmallthings.
Converting: How to Extract 3D Models, Textures, Music from Unreal Engine Games, by iwanMods.
Extract 2D/3D/SFX Unity Assets fast & easy from your Unity Game, by iwanMods as well.
How to use QuickBMS, by darkhorse.
Guide to Converting 3t2 and 4t2 Part 01 and Part 02, by Chiaroscuro/tenlittlepandas.
Converting TS4 Windows and Doors, by Crisps&Kerosene.
Using Different Material Maps as Shading/Details for Base Texture, in Gimp or Blender, by Pineapple Forest & Crisps&Kerosene: https://www.tumblr.com/crispsandkerosene/764893644571525120/great-info-thats-the-reason-some-conversions?source=share
Texture Editing in GIMP:
Using Gimp Add-ons: G'MicQT. Resynthesizer. Both by Davies Media Design. This guy's channel for Gimp in general – here's a good one to begin with. And another one about layer masks.
Making a texture Tile Seamless: 1. My favorite - How to Make Seamless Textures for Cinema 4D - 3 Levels of Photoshop Wizardry using iPhone Photos, by School of Motion.
2. Simple Trick for More Realistic Texture Patterns in GIMP, by Davies Media Design – Quick and simple, using the Resynthesizer plugin. Good for patterns.
Making walls in SimPe out of a square texture, with minimal quality loss. To be written.
SimPe: Cloneable Objects: A List of Good Objects for Cloning, by IgnorantBliss at MTS.
Huge Lunatic's Tutorials, Her website.
Object Creation for Absolute Beginners, by Moune.
Sims 2 start to finish Object Creation Tutorial, by JWoods, Numenor, Lethe_s & IgnorantBliss.
The Material Definition (TXMT) Guide, by PixelHate – very comprehensive. Part 5 is about Bump/ Normal maps.
Null (Texture-less) Groups, by Skell. For bodyshop, for Objects see an elaboration by Midge the Tree below.
Crisps&Kerosene discovered how to add specular maps to objects! It's incredible there are still new things to discover in this ancient game.
More on Specular Maps, by Pineapple Forest.
Making new flooring & walls with SimPE, by Charisa. Includes adding Bump/Normal maps. She added a file to clone from in the comments below. It works for normal maps as well. Here's cool discovery in the game files.
Expanding footprint: a mini tutorial, by Deedee.
How to add correct drop shadows to objects, by Yuxi, via Wayback Machine.
Making Objects Viewable in Neighborhood View, by iCad.
Making Objects Visible In Build/Buy Mode, Invisible In Live Mode, by Midge the Tree.
Making Seasons-Friendly Trees, by Echo.
Io/ Serabiet's resources list, mainly for Bodyshop but not just.
Pineapple Forest's Tutorials, useful tips for efficiency and optimization.
MTS modding forum in General.
The Sims 2 Tutorials, on Tumblr. A database, is more updated.
Sims2Artists tutorials section.
LeeFish modding forum.
Garden of Shadows, Tree of Knowledge section.
Troubleshooting: What to do if you get a System.OutOfMemoryException Error, SimPe Forum, via WayBack Machine. Thank you @fanseelamb for the find.
How to read object error logs: I just want to know what causes it!!, by Episims.
Common TS2 errors, by Midge the Tree.
General game fuckery: How to Stop Sims 2 Crashing (Memory Allocation Fix and 4GB Patch Repair), by Jessa.
Graphics card problems, LeeFish forum.
Graphics help - DIY, by Kiri. How to fix faulty Texture Memory allocation, and the problems that stem from it. Tumblr can't handle anymore hyper links so here it is: https://celebkiriedhel.tumblr.com/post/189431721483/graphics-help-diy
General: Switching between save folders without renaming them, by Nopke.
Resources:
3D Models Online*: Various furniture designers' websites: Porada, Zanotta, Muuto, Hay, Poltrona Frau, many luxury furniture designer basically.
3D Warehouse, belongs to Sketchfab (get the Collada files).
Scan the World.
Wikimedia Commons. And more.
*(NOT OPTIMIZED).
Textures: Architextures.
Fabrics & Wallpapers: Natural Stones: Wall Plasters:
iCad's Woods. Shastakiss's Cluedo Metals, Yeti Metals, Pirate Woods. Goat's Woods.
Textures from other games: Dishonored, Thieve and much more, by Saricoya at GoS. Dreamfell by io.
Resource sharing threads at Garden of Shadows.
SimPe - General: CEP Extras list, HugeLunatic at Sims2Artists.
TXMT settings for different materials, by Hafiseazale.
Extended SimStandardMaterial Shader for the Sims 2 + Optionally Brighter Sims, by Crisps&Kerosene.
Custom CubeMaps, by Crisps&Kerosene.
Shiny TXMT Settings & Cube Maps Packs, by Pineapple Forest.
Build/ Buy: Templates for Recoloring Maxis items; MTS Templates sction, Hafiseazale (+cc), ZeroDark.
Template for Seasonal Trees, Gwenke at Sims2Artists.
Making Roof Recolors, Tutorial & template by Numenor, great template by iCad.
Pack for making food clutter usable, by DeeDee.
CAS: Default Makeup Packages - BYO Packages, by Huge Lunatic.
Body shape, Io/Serabiet on Tumblr.
Skin template, Io/Serabiet on Tumblr.
Hair texture, iCad.
Color Actions, Pooklet on Tumblr.
That's it for now.
Edit: forgot about CEP extras. Added more links. Edit 02: Added Troubleshooting section under tutorials.
#ts2#ts2 resources#ts2 creation resources#ts2 resources for creators#the sims 2#sims 2#resources#ts2 cc#sims 2 cc#the sims 2 cc#well its cc related#sims 2 resources#the sims 2 resources
67 notes
·
View notes
Note
i hope this hasn't been asked before. what size do you make your canvas? and do you crop it to fit other socials (like Instagram for example)? i hear that 300 dpi is standard. i never know if it's good to make my canvas big or not.
hi i think this ask is like at least 4 months old but i was scanning my sketchbooks from last year and i abruptly remembered i had gotten this ask because i had made a little chart in my sketchbook trying to figure out how to answer it
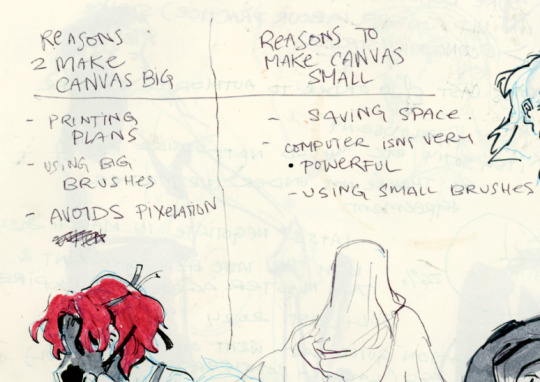
anyways theres pros and cons. and the size of your canvas is really going to depend on personal needs + preference. how good ur computer is, how complicated ur art style, how comfortable drawing feels, how much disk space you have to spare, what youre gonna end up using the art for in the end...300dpi is standard for PRINTING specifically, if you only plan to ever post things online then 72dpi works great and will save you space (fun fact a lot of professional animation files i deal with are 72dpi. and those eventually go on your tv screen). but personally i make everything i draw 300dpi because i am always printing stuff for cons, zines, etc and its nice to have the option even if i dont end up printing.
when I was a teen I used to draw on a rly shitty laptop and i made everything 800x800px 300dpi because big canvases would cause a lot of lag and also the resolution on this laptop was pretty small so 800px was a lot of the screen already. now i have a slightly better laptop with a bigger resolution and i sketch on giant 10000px-40000px canvases with the hard round brush and no shape dynamics or transfer whatsoever to minimize lag. when it comes to making a final illustration when i know ill be using a bunch of layer effects/blending modes/colors/mixing brushes etc etc ill generally crop the canvas down to the 6000px range. most illustrations i try to make sure are comfortably printable on tabloid size paper so thats pretty much anything hovering around or above 3000x5000px w 300dpi (so 11x17in). HOPE THIS HELPS?
EDIT: OH ALSO re: socials. i always ALWAYS size down my art to post on the internet. i think its crazy when other artists dont. because why would i ever let the internet have my hi-res file for free. also in general i think it looks better if you do the resizing yourself because if you don't then many social media sites will compress your file for you! a lot of people will post a hi-res file to twitter and then go "Wow twitter killed the quality of this img!!!" UH YEAH because they have an automatic image compressor. because they need to save space too lol and they dont want your image to take 248263895 years to load. same with instagram and to a lesser extent tumblr. when i post anything on social media i resize it down to 1200px-1600px on the longest side... its a little arbitrary but im kind of basing it on the smallest resolution of widely available screens. mostly because i think it looks stupid when u open up an image file fullsize and u have to scroll to see the whole thing... also iirc instagram only takes images up to 1080px before it resizes them? granted if you upload something smaller than that itll also resize it up which will look worse so I think bumping the numbers just over 1080px is pretty safe.
I should really be bringing the dpi down to 72 too when i post online but often im too lazy to do that. but it will technically help ur image load faster and stuff. and make it less likely for people to yoink it off the web and print it themselves.
148 notes
·
View notes
Note
What is your creation process? :3c
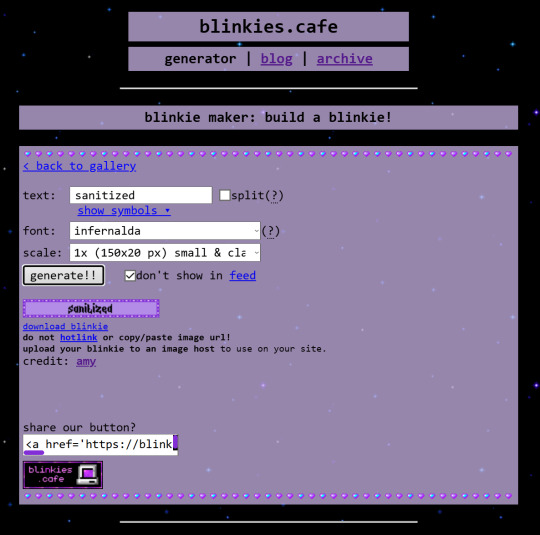
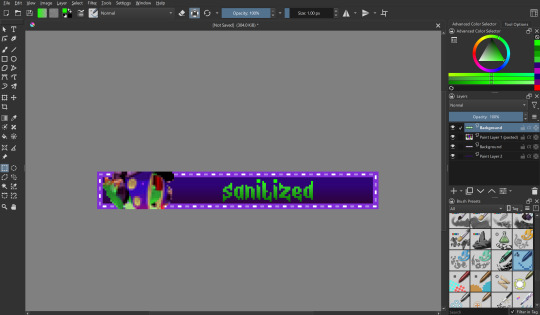
hey, thanks for the inquiry! i've been meaning to make a post like this for some time now. NOTE: this will only cover how i make my blinkies. if you want me to go in depth about how i make stamps, please send another ask! i just think they're kind of self explanatory in comparison >_>
MY BLINKIE MAKING PROCESS
for this demonstration, i will make this graphic of Acht Mizuta from Splatoon 3. it's free to use btw:

i make my graphics in Krita, which is great for editing pixel art, but does not have an option to disable font antialiasing. this leads me to generate my pixel text through external online services, but i usually generate it on blinkies.cafe and get an editable template to go along with it. my go-to is the simple purple template, since it has a simple palette and the text has its own color so i can put it in a separate layer easier.
i import it as a single frame that i will animate later. usually what i do first is cut+paste the inner content of the blinkie into a separate layer:
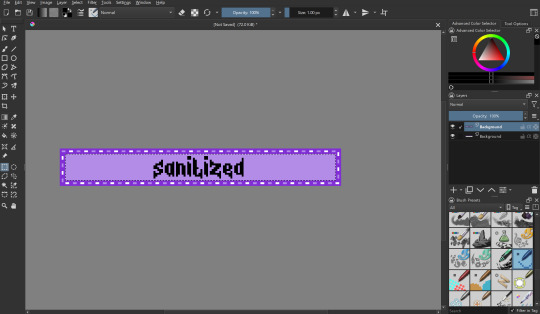
then i remove the background with a fill erase on the third mode, and move it around as i see fit. i put it in a separate layer before this so it's easier to color and add things like outlines.

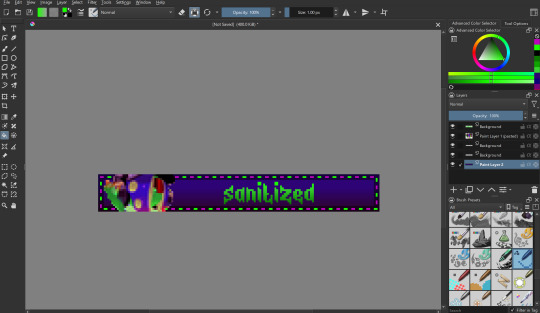
let's import graphics! usually i find a transparent png and overlay it onto the background, but in this case i'm using a full background, so it needs to be prepared:

(source: splatoon 3 side order locker reward banner)
i import the image into a new file with the same resolution as the blinkie. i edit it to have a wider resolution so it fits better:
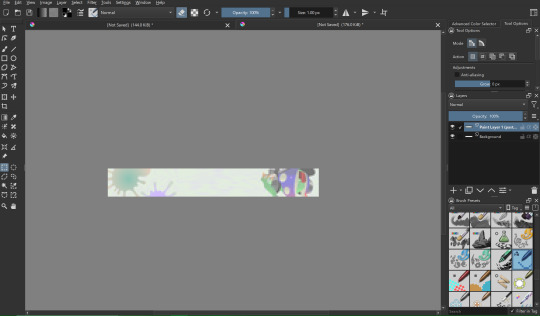
i use a lasso tool to put acht in a separate layer (so they stick out of the frame)
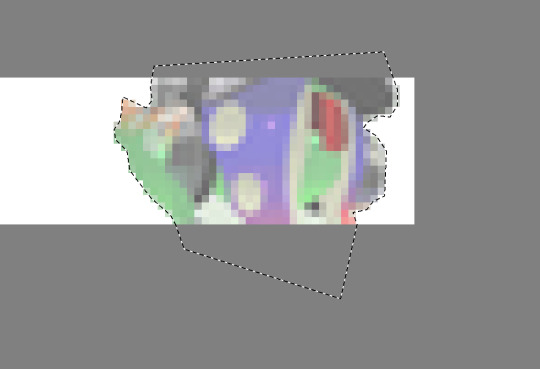
i import the two layers into the original file with the text. though i feel the images could use a little color grading...
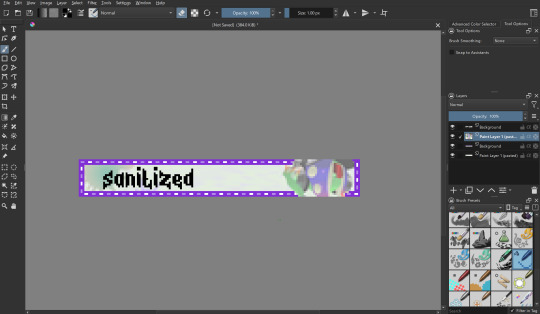
at this point i begin to mess around with the layout a little, trying to match the original "sanitized" theme i had in mind. i also do color grading on the render of acht and change out the background. now we're getting somewhere! i also color the text at this point to be a nice gradient green.
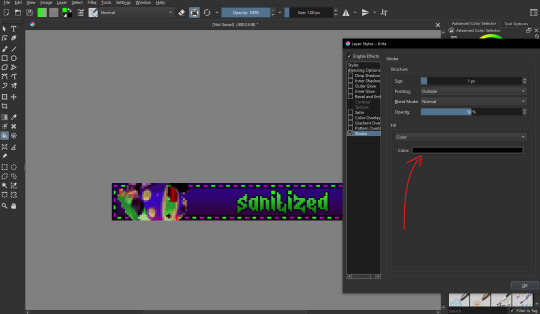
let's color the outer part of the blinkie! i thought i would make the border a transparent black, with the lights being neon green and a dark magenta respectively.
i also want to make the text have a nice little border around it, so i put a stroke filter on the text layer with the following settings. these usually change depending on graphic but the thickness is always 1px (any more and it gets antialiasing)
that's it for designing the blinkie, now it's time to animate it! i do this internally in krita, since it has an animation feature:

i make a new frame for the animation and change the colors and positions around. i also set up my clip settings - ending at frame 1 (2 frames - frame 0 and frame 1) at 6fps.

that's pretty much it! the gif is ready to export, just make sure you export it in the right format and don't accidentally compress it or make it too big.
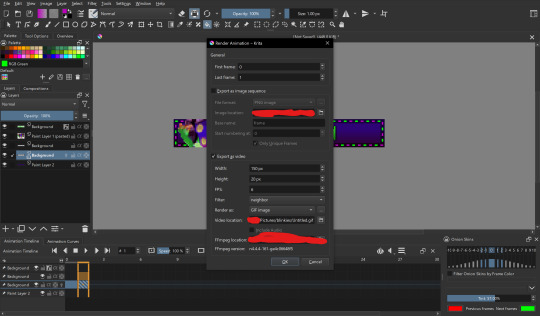
the gif is ready!! wahoo!! i hope this was somewhat enlightening, i'm not the best at explaining stuff but i tried to go in depth as much as i could
#dj's commentary#pixels garage#web graphics#blinkies#dedf1sh#acht mizuta#acht splatoon#blinkies.cafe#tutorial
46 notes
·
View notes
Note
sorry to bother but I was wondering how you make your gifs so smooth and get rid of pixelation?
Hi, anon! Sorry for the late reply! And no worries, you're not being a bother at all. ^^
Regarding your question, these are some of the tips I can give which I typically do on my GIFs:
Use video sources with higher resolution
In all honesty, I am not doing that much to make my edits look smooth and HD. I just always make sure to download videos that are not less than 720p. I typically download 1080p but 720p would suffice since the suggested width for images here on Tumblr is 540p.
Use good editing apps
I use Photoshop which is a good app but if you're not using this, you may use Photopea (this is like an online version of PS). There was a time when I didn't have a PC and I tried making GIFs on my mobile phone but even when I'm using high-resolution videos, the output was not as good when making it on PS. I also used Photoscape before. This was my first app when I was still starting making GIFs and oh boy, the quality is just... XD Anyway, PS is good with the compression of images when you're saving the frames as GIFs even when resizing the file to a smaller scale.
Maintain the original size until the export
I've seen tutorials where they are already adjusting the size at the beginning of their edit. I personally don't do this because this contributes to the reduction of the quality of your GIFs. And if I want to crop (because I want a different width and height compared to the original), I will see to it that the height is the same with the original (only the width will change).
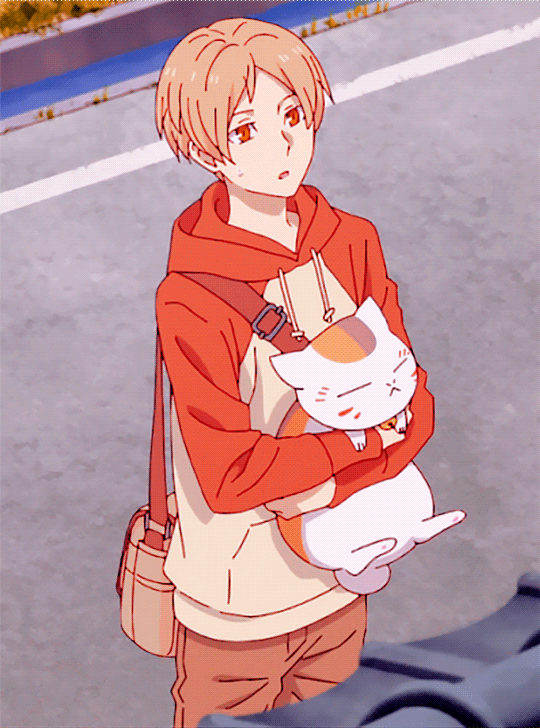
Take a look at this example:

This is a 1920p x 1080p image but I wanted to crop it to a 400 x 540 aspect ratio. What I would do is after cropping the image, I would resize the image to make the height 1080p again.
After cropping, this is now the dimensions of the image:
Then I will revert the height back to 1080p (the value of the width doesn't matter):
Of course, 1080p is just my preferred resolution. You can select a lower resolution but not lower than the original image or the final size of your GIF.

As you can see, even without further editing, the image already looks good and does not appear to be pixilated. Then after cropping, I will apply my coloring. If I save this as it is using 540p width, this is how the GIF's gonna look like.

As you can see, there is almost no difference between the 540p (width) gif and the 1080p (height) image. That's because I only resized the image during export and not in the middle of editing.
Use sharpening tools to make your GIFs look HD
The key to fooling the eyes is to make them look in a different direction. XD So what do I mean by this? Like I said, I'm not doing that much to remove pixelations from my edits. I just make it so people will focus on other stuff. If you don't want them to focus on the pixels, let them focus on the line art.
Just a reminder that this last tip is only applicable to anime GIFs.
In my case, I always start with frame animations, then later on convert to a video timeline. And then I will convert the frames to a single smart object so I can apply filters to all the frames at the same time.
These are the steps I do when I sharpen my GIFs.
Apply SMART SHARPEN. (Filter > Sharpen > Smart Sharpen)
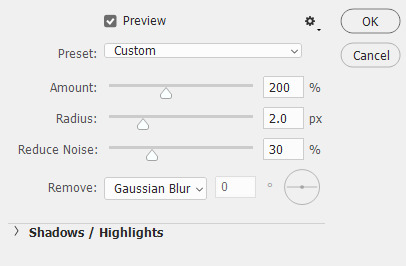
These are my preferred settings but you can also explore your own.
[Comparison of GIF without sharpening filter and with sharpening filter]
2. Apply POSTER EDGES filter. (Filter > Filter Gallery > Artistic > Poster Edges)
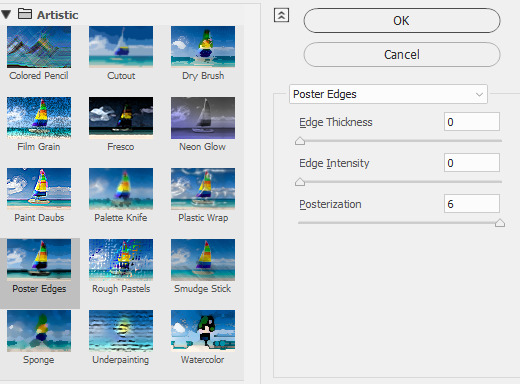
These are my settings. You can adjust the Edge Thickness if you want to have thicker art lines. As for Edge Intensity, it's better to set it to zero to avoid adding unnecessary details to the shadows of your image.
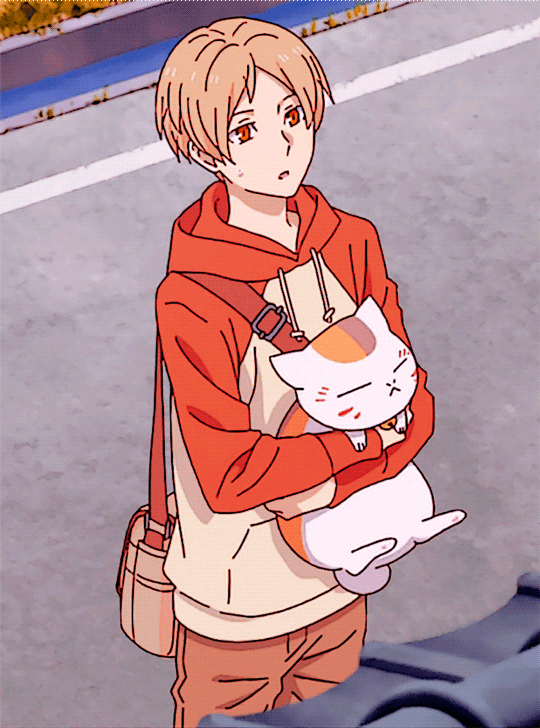
[Comparison of GIF without sharpening filter and with sharpening filter]
3. Apply POSTER EDGES again.
This is an optional step. I typically use this whenever I want the art lines to be thicker. I use the same settings in the second step.

[Comparison of GIF without sharpening filter and with sharpening filter]
And that's about it! I hope this helps! By the way, this is just my own way of sharpening my GIFs. If you're not using PS or Photopea, you might want to check other tutorials that are specific to the app that you are using.
41 notes
·
View notes
Text
I've got a small pile of unanswered asks, sorry for the wait! got myself busy again with other projects, like a christmas themed kids book I need to get done by thanksgiving.
I've been noticing that when my uncle has the books printed, they come out very dark and muddy, which is not great! I tried to research rgb to cmyk conversion and ran into all sorts of different advice on which profiles to use, found that most of the instructions rely on very specific art software, only to ultimately learn that many places used for printing art will just apply their own cmyk profile anyways. which can actually make the colors worse if you already converted the file yourself.
and furthermore, the problem is extra bad with these books because my uncle has been going through Amazon and they use a variety of third party printers! based on the results with the books, I'd say they're cutting costs with low quality cheap printers >:/ which means there's nothing I can actually do on my end to ensure that the illustrations accurately print with the colors I'm using.
However. I don't give up so easy. I've seen artists make all sorts of color choices just so the end results looks a specific way under specific circumstances. Like using negative colors so the image only looks "normal" when it's been inverted. or using blue and red so the image looks different based on whether it's under a red lens or a blue lens. making color illusions like that blue/black vs white/gold dress or the illusion of grey strawberries looking red when they're surrounded by cyan. I did a final project in college on the topic of color illusion, making my own example paintings.
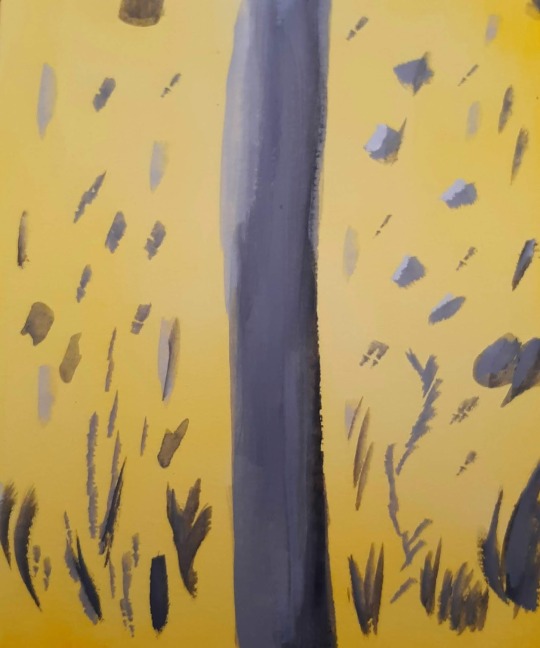
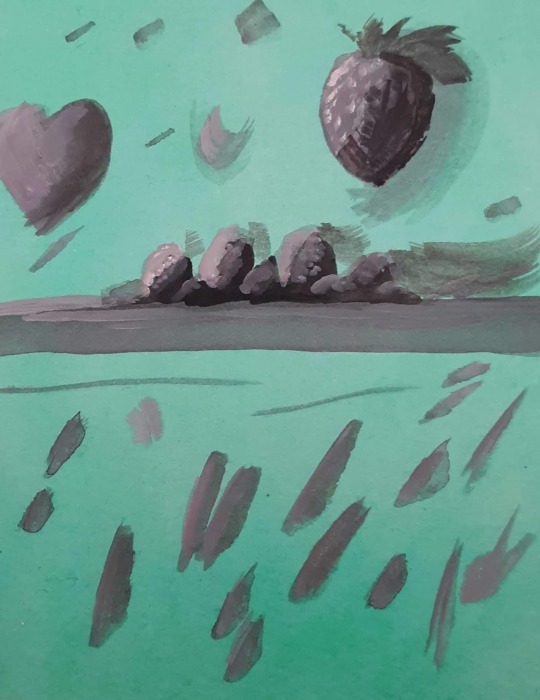
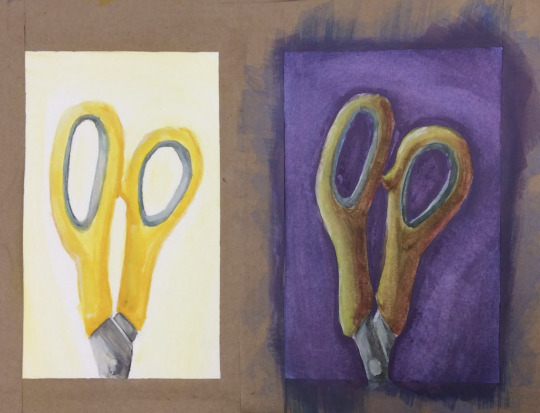
(image description: three photos of small paintings. the first two images are solid yellow and green respectively, with neutral grey abstract shapes painted over them. because of the solid color backgrounds, however, the neutral greys appear to be slightly tinged with the compliment color of their backgrounds; blue tinged on the yellow and pink tinged on the green. the third painting shows a side by side comparison of the same pair of yellow scissor handles. on one side, they are painted bright yellow on a plain white background. on the other side, a dark purple background and more dramatic lighting still give it the appearance of being yellow scissors, but in actuality the handles are painted in shades of green and orange, blended together in some places and darkened or lightened with other colors. they simply look more yellow because of the purple background and the warm shading. end description.)
So I know a thing or two about color strategy. and I am not losing a war against low quality cheap printers, not today. I spent a while looking for cmyk color charts and palettes, testing images through an online cmyk converter, and I have finally achieved my goal. the final test will come when the book is done and sent to print. essentially, I just ran a cmyk color chart through a converter to see how it might look after being printed, then set the original and the converted version next to each other on my file. I can now use the brighter original colors but base the colors I pick on how they'll look in the printed result rather than how they look on my screen. this means the version on my screen is far more pastel than I would normally go for! but the test results so far prove the method, and I think this book will print just fine.

(image description: screenshot of the rgb and cmyk versions of the same painting, which look very small and compressed because they're thumbnail images. the rgb version looks very light and uses a lot of pastel colors and soft shading, while the cmyk version looks much darker and has more distinct shading. it depicts a family out caroling around Christmas, standing at the porch of another family who look very happy to hear the song. end description.)
by golly I am not going to let Amazon keep turning my hard work into muddied disasters. I get paid for these illustrations and I'll make them look good in print by any means available to me.
here's the colors btw if anyone else needs to use this trick:
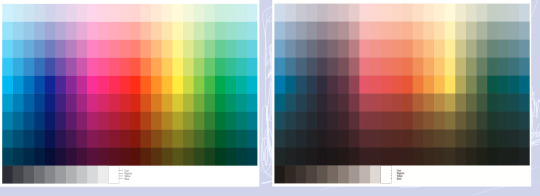
(image description: two color charts. one is very bright and rainbow, the other is much lower contrast and dark. the colors that are the most affected are the blues and greens, while the reds and yellows are somewhat more intact. the greys have also become more brown in the second version. end description.)
just figure out what the end result needs to look like and pick the brighter color accordingly. should make the low quality print jobs look at least passingly decent! sometimes you really have to plan ahead to make things look the way you want.
27 notes
·
View notes