#create an iso from files
Explore tagged Tumblr posts
Visit Tumblr Blog
Explore Tumblr blogs with no restrictions, modern design and the best experience.
Last Seen Tumblr Blogs


Fun Fact
BuzzFeed published a report claiming that Tumblr was utilized as a distribution channel for Russian agents to influence American voting habits during the 2016 presidential election in Feb 2018.
Text
Installing Linux (Mint) as a Non-Techy Person
I've wanted Linux for various reasons since college. I tried it once when I no longer had to worry about having specific programs for school, but it did not go well. It was a dedicated PC that was, I believe, poorly made. Anyway.
In the process of deGoogling and deWindows365'ing, I started to think about Linux again. Here is my experience.
Pre-Work: Take Stock
List out the programs you use regularly and those you need. Look up whether or not they work on Linux. For those that don't, look up alternatives.
If the alternative works on Windows/Mac, try it out first.
Make sure you have your files backed up somewhere.
Also, pick up a 5GB minimum USB drive.
Oh and make a system restore point (look it up in your Start menu) and back-up your files.
Step One: Choose a Distro
Dear god do Linux people like to talk about distros. Basically, from what all I've read, if you don't want to fuss a lot with your OS, you've got two options: Ubuntu and Linux Mint. Ubuntu is better known and run by a company called Canonical. Linux Mint is run by a small team and paid for via donations.
I chose Linux Mint. Some of the stuff I read about Ubuntu reminded me too much of my reasons for wanting to leave Windows, basically. Did I second-guess this a half-dozen times? Yes, yes I did.
The rest of this is true for Linux Mint Cinnamon only.
Step Two: Make your Flash Drive
Linux Mint has great instructions. For the most part they work.
Start here:
The trickiest part of creating the flash drive is verifying and authenticating it.
On the same page that you download the Linux .iso file there are two links. Right click+save as both of those files to your computer. I saved them and the .iso file all to my Downloads folder.
Then, once you get to the 'Verify your ISO image' page in their guide and you're on Windows like me, skip down to this link about verifying on Windows.
Once it is verified, you can go back to the Linux Mint guide. They'll direct you to download Etchr and use that to create your flash drive.
If this step is too tricky, then please reconsider Linux. Subsequent steps are both easier and trickier.
Step Three: Restart from your Flash Drive
This is the step where I nearly gave up. The guide is still great, except it doesn't mention certain security features that make installing Linux Mint impossible without extra steps.
(1) Look up your Bitlocker recovery key and have it handy.
I don't know if you'll need it like I did (I did not turn off Bitlocker at first), but better to be safe.
(2) Turn off Bitlocker.
(3) Restart. When on the title screen, press your Bios key. There might be more than one. On a Lenovo, pressing F1 several times gets you to the relevant menu. This is not the menu you'll need to install, though. Turn off "Secure Boot."
(4) Restart. This time press F12 (on a Lenovo). The HDD option, iirc, is your USB. Look it up on your phone to be sure.
Now you can return to the Linux Mint instructions.
Figuring this out via trial-and-error was not fun.
Step Four: Install Mint
Just follow the prompts. I chose to do the dual boot.
You will have to click through some scary messages about irrevocable changes. This is your last chance to change your mind.
I chose the dual boot because I may not have anticipated everything I'll need from Windows. My goal is to work primarily in Linux. Then, in a few months, if it is working, I'll look up the steps for making my machine Linux only.
Some Notes on Linux Mint
Some of the minor things I looked up ahead of time and other miscellany:
(1) HP Printers supposedly play nice with Linux. I have not tested this yet.
(2) Linux Mint can easily access your Windows files. I've read that this does not go both ways. I've not tested it yet.
(3) You can move the taskbar (panel in LM) to the left side of your screen.
(4) You are going to have to download your key programs again.
(5) The LM software manager has most programs, but not all. Some you'll have to download from websites. Follow instructions. If a file leads to a scary wall of strange text, close it and just do the Terminal instructions instead.
(6) The software manager also has fonts. I was able to get Fanwood (my favorite serif) and JetBrains (my favorite mono) easily.
In the end, be prepared for something to go wrong. Just trust that you are not the first person to ever experience the issue and look it up. If that doesn't help, you can always ask. The forums and reddit community both look active.
178 notes
·
View notes
Text
The Castle (Classic Mac, Blue Line Studios, 1998)
You can download and run the CD-ROM adventure game, from the end of the era when CD-ROMs caused creativity to run rampant, by following these instructions:
Download the_castle_v110.zip from here or here. Unzip it.
Open this in-browser emulator and, when it's finished starting up, drag the .iso file found in the .zip onto it to insert the virtual CD-ROM.
Open Infinite HD and create a new folder in it. Drag THE CASTLE from the CD's folder into it, then scroll down the CD''s window and drag 'The castle DATA' into the same folder; it's a folder, and a big one, so be patient.
When that's finished, open THE CASTLE in the new folder.
TIP 1: Mouseover the Apple on the lower left, then click 'Settings' when it appears, then turn on Swap Control and Command Keys'. Then, Ctrl+Space will show and hide the menu bar in-game.
TIP 2: To keep a save file between sessions, quit the game, then drag it into Saved HD.


#internet archive#mac#macintosh#apple mac#apple macintosh#game#games#video game#video games#videogame#videogames#computer game#computer games#obscure games#adventure games#point and click#early cgi#retro cgi#retro games#retro gaming#retro graphics#game history#video game history#gaming history#1998#1990s#90s
102 notes
·
View notes
Note
Hi Sarah Hope you are doing well I want to ask you about Live releases and the audio format of ISO version if it is lossy or lossless? if it is lossless how can I get it thank you for all your efforts
Hello there!
Sorry for the late reply! I actually received two similar requests in my DMs the other day so I completely forgot to reply to this ask. It's interesting that there is suddenly such a high demand for ISOs. With three people asking me about the same thing within the span of just a few days it makes me wonder if there is something going on that I am not aware of...?? A project maybe?
Either way, I will give you the same answer that I gave them. You are probably not gonna like it so I apologise in advance🙇♀️.
Basically, I don't have any ISOs at the moment so there is no way to rip lossless FLACs from them. To be quite frank, ISO files are a hassle to deal with so I get rid of them very quickly and don't really do much with them except compress them for convenience. As you probably know, I use Google Drive to store all my Kalafina stuff. The sheer size of the ISO format simply doesn't lend itself to that sort of storage platform.
My intention is to create a somewhat complete archive of Kalafina content, preferably in good or even high quality. However, I am not a tech-nerd or an audiophile so it has never been my goal to always provide the absolute highest quality or an exact copy of the original physical release. In my eyes, the physical release should remain the "ultimate" version available and everyone who attaches great importance to such high quality needs to start purchasing those physical copies. I am a huge proponent of buying physical releases and I will never get tired of telling people to BUY them. Once you own that stuff, everything is within your power, you can do whatever you want with them aided by a bunch of good tools. It's an investment for sure, it takes a lot of money and even more time but I feel like you can't have super high standards without being willing to put in the necessary legwork.
Hopefully this doesn't come across as rude or condescending, I just think this is the way it is meant to be.
I admit, I have to blame myself for even mentioning ISOs in my "Kalafina All Live Releases Masterpost" and creating some confusion. It was a crazy idea I had back in the day when I first started archiving everything but there was never a point where I actually offered them. I used this opportunity to remove those parts from my masterpost….
Anyway, this was just a long-winded way of saying, sorry, no ISOs from me❌.

15 notes
·
View notes
Text
An Extended Tutorial on Installing Dramatical Murder RE:Connect
{Author's note: Reddit has banned the subreddit Dramatical Murder, I posted a hefty guide on how to install the Re:Connect game, a semi-sequel / DLC. So I put it here on tumblr, this was from the subreddit.}
Hi everyone, I'm EniaCat! 🐾
Many people are struggling to install Dramatical Murder Re:Connect on Windows, so I’ve created this detailed guide to help you through the process.
(Note: English isn’t my first language, so please bear with me!)
For Mac Users: I don’t have a Mac, but you can refer to this Tumblr post that explains how to play the game on Mac using Wineskin: blonmac.tumblr.com/dmmdsetup2.
Where to Download the Game
DMMD Re:Connect with English Patch: Link: aarinfantasy.com/forum/f16/t176668-dramatical-murder-re-connect.html (Note: You’ll need to create an account to access the forum.)
If you see Japanese text in the CONFIG menu after starting the game, quit and restart it as an administrator.
Alternate Download Link: Link: mkproduction.home.blog/2019/05/29/dramatical-murder-reconnect-english/
This version has an English patch but may still display some Japanese text in the pause menu or settings.
Step-by-Step Installation Guide
Change Your System Region
Go to Control Panel → Region → Administrative Tab → Change System Locale → Select Japanese (Japan).
Important: Do NOT enable the "Beta: Use Unicode UTF-8 for worldwide language support" checkbox. This can cause text glitches in the game.
Restart your computer when prompted.
Install the Game
Download and extract the game files (look for the MW5 blog zip file).
Install UltraISO software and use it to mount the DMMdrc.iso file to a virtual drive.
Go to the Tools menu → Mount to Virtual Drive → Select the ISO file → Click Mount.
Open the mounted drive and run setup.exe. Follow these steps during installation:
Click the button with (N)> to proceed (this means "Next").
Select the circle next to (A) to agree to the terms, then click (N)> again.
Choose your installation folder and proceed.
Uncheck the box with Japanese text to skip installing "soft battery runtime."
Finish the installation by clicking the middle button.
Apply the English Patch
Open the English patch folder and move its files to the game’s installation folder:
Place the video files in the DX sub-folder.
Place the patch files in the main game folder (same folder as DMMdrc.exe).
Extract the crack file (crack.rar) and place the crack .exe file in the same folder as DMMdrc.exe.
Run the crack .exe file as an administrator to start the game.
Fix Potential Issues
If the game crashes on startup:
Right-click the game’s desktop shortcut → Select Properties → Under Target, change SdActi.exe to DMMdrc_crack.exe.
Restart your PC and set your system region back to your country, then to Japan again.
Display Settings and Resolution Fixes
If the game window is too large, off-center, or zoomed in:
Press F to set the game to its original resolution (1024x576).
Adjust settings in the Config menu:
Change to full-screen mode by clicking the first button under "Display."
Turn OFF automatic aspect ratio (buttons marked ON/OFF).
Set to regular display (button below the ON/OFF toggle).
For windowed mode, keep automatic aspect ratio OFF and regular display ON.
Final Notes
If you’ve followed all the steps, your game should now be working! 🎉
The menus (and pause menu, if using the Aarinfantasy patch) should display in English.
I hope this guide helps new users enjoy Dramatical Murder Re:Connect! Have fun! 💙 - EniaCat
23 notes
·
View notes
Text
If you don’t like Windows 10, Windows 11, or other mainstream desktop operating systems for whatever reason, consider using linux. It isn’t as hard as you think.
I switched from Windows 10 to Linux Mint a few months ago, and it went pretty smoothly for me.
Linux has a reputation for being difficult to use, and while it is somewhat deserved, it is quite overblown.
For myself, I think the hardest part of switching was installing Linux on my device. It required me to learn some new software and took about 3 hours on my first try. After setting up my laptop, it was pretty easy. The user interface took a few days to adjust to, and I fiddled around with some settings to my preference, but it was not difficult to adjust from Windows 10 to Linux Mint.
And if you can get someone else to install linux for you, all you need to do it get used to some user interface changes!
INSTALLING LINUX ON YOUR COMPUTER
Here’s an installation guide for Linux Mint if you want more detail than what I give. Link: https://linuxmint-installation-guide.readthedocs.io/en/latest/
You will need: a laptop or desktop, a USB stick, and USB writing software.
Download a linux ISO file. An ISO file is all the data used to install an operating system onto a computer.
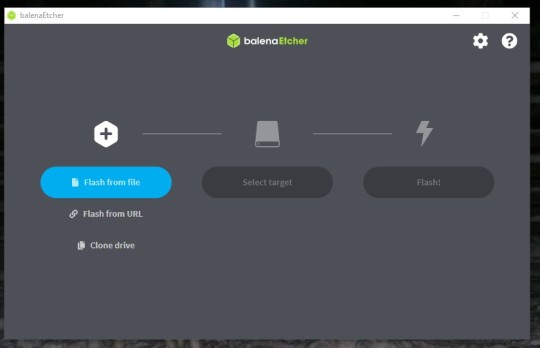
Then you will need to download a USB writing program. Then you can use USB writing software to put the ISO file onto a USB drive. This will create the “bootable media” which will be used to install linux onto your computer. For installing Linux Mint on my device, I used Balena Etcher to write the ISO file.

64 notes
·
View notes
Text
How to Downgrade Windows 11 Pro to Windows 11 Home directly
This article will show you how to downgrade from Windows 11 Pro, Pro Education, Education, or Enterprise to Windows 11 Home without a clean installation. The trick is to change the Edition ID in the registry and then do a repair installation using the ISO or Media Creation Tool.
However, as we all know, A direct downgrade is not supported, and it would normally require a clean install of Windows 11 Home, but it will result in losing all your programs, and settings and all files and data in C drive !
Step 1: Change the Edition ID in registry
Method 1:
Search”Regedit”, then click it, then go to the following branches one by one, And change the values for the two branches.
HKEY_LOCAL_MACHINE\SOFTWARE\Microsoft\Windows NT\CurrentVersion HKEY_LOCAL_MACHINE\SOFTWARE\Wow6432Node\Microsoft\Windows NT\CurrentVersion
2. Double-click “CompositionEditionID” and set its data to “Core“. 3. Double-click “EditionID” and set its data to “Core“. 4. Double-click “ProductName” and set its data to “Windows 10 Home.”
#Important# Please set the “ProductName” value to “Windows 10 Home” even it is Windows 11
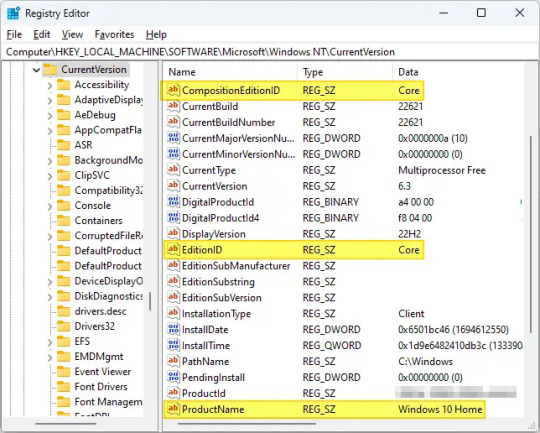
5, After modifying the value data in the above two branches, exit the Registry Editor.
Method 2:
1. First , please make sure you’ve signed in Windows 11 Pro as an administrator.
2. Create a txt document then change the extension .txt to .reg file, then input these codes and save it:
Windows Registry Editor Version 5.00 [HKEY_LOCAL_MACHINE\SOFTWARE\Microsoft\Windows NT\CurrentVersion] “CompositionEditionID”=”Core” “EditionID”=”Core” “ProductName”=”Windows 11 Home” [HKEY_LOCAL_MACHINE\SOFTWARE\Wow6432Node\Microsoft\Windows NT\CurrentVersion] “CompositionEditionID”=”Core” “EditionID”=”Core” “ProductName”=”Windows 11 Home”
3. Double click on the .reg file to start to merge the registry.
4. Please select “Yes”, “Yes”, “Ok” to approve and complete the merge.
5. There is no use for the .reg file any more, you can delete it.
Step 2: Downgrade Windows 11 Home with ISO file or Media Creation Tool.
1, Download Windows 11 ISO file, then open the ISO file with win-rar or 7-zip, then double click “Setup”.
Because we changed the EditionID and Product Name, so we will be able to install the Windows 11 Home.
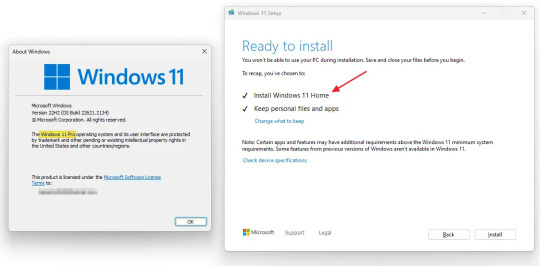
2, Follow the steps: “ready to install”, Select “Install; “Change what to keep”, please select “keep personal file and apps”; then click “Next” and then click “Install”.
When the repair install has finished, you will now be downgraded to the Windows 11 Home edition without losing anything.
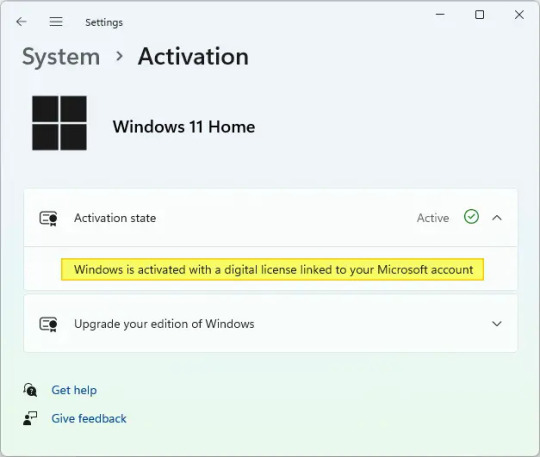
If your Windows 11 Home is not activated by a digital license before, then you will need to Change product key to a valid Windows 11 Home key to activate.
13 notes
·
View notes
Text
Vassili Raskalnikov, also known as simply Vassili or Vass, for his closest friends. If he ever had any. He is RYaN's user.


In short, he was a Russian military computer engineer who served the Soviet Union for a couple of years before it was dissolved. After the historic event, he moved to a remote part of Russia, where he would concentrate on honing his non-existent physical skills and, two years later, become a mercenary. Or, at least, tried to.
How did he find out about "the Grid"? Well, he didn't. At least, not at first. He had the idea of creating a program capable of stealing files of close countries as well as master plans, contracts, political interests, etc, when he worked for the USSR. However, this program had remained in an obsolete beta once the Union was dissolved. Until he took up his "project" again almost ten years later, when programming went from being a duty to being a hobby.
He was never a fan of robotics, but the fact that he managed to finish the project he started with several years ago inspired him to go one step further. He created a machine similar to the one that Kevin Flynn used to get inside his computer, but... clearly, less effective. It opened a portal of what he thought was his creation, not knowing it was actually a connection to a world that was previously created. Although, this small portal was far away from the city... a new, unknown portal risen from the ashes of the buildings of the ISOs.
This is just a bit of the full lore of this character! Which I'm still working on, so it might be a little funky and not so original as well lol,,

#tronblr#tron oc#tron#tron 1982#tron uprising#tron RYaN#tron Vassili#original character#character concept#art#artists on tumblr
15 notes
·
View notes
Text
-About Tyrace-
(Please do not copy, reference, trace, steal or any other use this info without my DIRECT permission)
------------------------------------
ART REFERENCE

Gender: Male
Run-type and Function: C̶̢͐h̶͈͆i̴̜̍m̴̼̀ẹ̴̎r̴͙̾à̸̮ ̵̬͑P̸̮̈́ṟ̵̾o̸̲̽ġ̸̫ŕ̵̭a̵̝͆m̸̬̃... Chimera Virus
Circuit Color: Poisoned Green-Yellow
Hair color: Dark Grey
Motorfunction Preference: Right Handed
Age Appearance: 24 Cycles (Unknown true age)
Personality: Reserved, melancholic, sad, anxious, nervous, cautious, feral, worrying, loyal, lonely, attentive, distant.
---
Tyrace's Origin is as muddled as his corrupted memories of it all. He was created on an Independant system as a prototype Chimera Program (basically like a program that can learn and adapt to any job or function, similar to a rudimentary User-made ISO.) He was loaded into the Encom system to test his functionality in real time, and see if his Programming would work in a true scenario. Unfortunately, his coding was very unstable, resulting in a glitch... then a full compromization... morphing his adaptogenic code into that of a virus. He was ripped out of the Encom system both for safety of the System's other functions, and to protect whatever was left of the Beta Program, and stored on an empty drive... one that was stolen by Flynn to extend parts of the Grid onto. Finding himself conscious once again, missing memories, and corrupted... abandoned and cut off from his home and User... He escaped onto the Grid... living out his life in the Outlands... trying to find a cure for his... condition... while also protecting cities from his own kind.
----
MEMORY FILE
----------
If you want to RP with Tyrace, he will be available for all phases of Tron. Interesting AU ideas are also open!
His final story will be his User finally finds him again, and helps employ him to purposefully virus and poison A.I. Programming and generators (Shown by basically meshed and stitched together programs, horrid monstrosities that siphon energy from the Grids they are placed on) and destroy malware placed within the systems. (Basically, like an advanced, learning, sapient personification of Nightshade and other programs)
#(Had to repost because the first post of this broke for some reason)#tron#tronblr#tron oc#tron rp#tron post legacy#tron legacy#tron evolution#tron uprising#tron virus#virus#tron betrayal#tron identity
12 notes
·
View notes
Text
An Okay-ish guide on How to find a good laptop for creating digital art on -2025
This is my first time making a post like this, but as someone who went from having very sparse technical knowledge to working helpdesk, I wanted to give my advice on drawing tablets/drawing workflows for comfort.
Something I ran into when trying to figure out a comfortable way for me to draw was the sea of like confusion when it came to drawing tablets. Initially, I was advised by a friend that a tablet like the Surface would be good for drawing and I really stuck to that closely- as it seemed like the alternative was to be stuck at a desk with a drawing tablet. This is not very comfy and also not very practical or easy for me to casually draw digitally. After becoming more technically literate, I realized that a 2in1 laptop serves practically the same function as a surface, is about half the price, and has a lot more power as a drawing "tablet" to also multitask things like music applications/ youtube in the background/ having a ton of tabs / ect...
So- here's a little guide on how to figure out what to look for in a laptop as of 2025!
Why 2in1? 2in1 laptops have a touch screen, can fold all the way back to a 'tablet mode' in case you like that sort of set up & come with a keyboard attached that's easy to use. Otherwise, a laptop with a touch screen should work just fine- but most likely might not be as physically flexible. What should I look for in a drawing laptop? There's some basic things I can advise as well as more nuanced things, I've also included links to some laptops that seem good: OS or Operating System: -ARM processor vs not (Windows 11 VS Windows11 ARM): I would personally avoid any sort of ARM processors, as it acts like a weaker version of+ lacks a lot of the functionality of windows 11. I had a surface laptop that I exchanged back because it did not have touch gestures. A way to see if the laptop you want has an ARM processor vs not is to check the OS or Operating System, if it has a arm processor it will likely say something like "Windows 11 ARM" or you can CTRL + F to find the word ARM in the description in your web browser.
-Linux VS MACOS VS Windows: Unfortunately I have less EXP with MAC devices, but as the price point is very high and they are not built to last AS LONG (No devices last unfortunately) I can't recommend them. -If you have an older device with touch screen capabilities that you would like to use, and would like to try to dive into Linux- I'd say go for it! Be aware that changing your OS will wipe your entire drive, so please back up your files first! If you end up not (Depending on how you go about installing it) I've been enjoying a new-er version of Kubuntu as our home media set-up! Generally, a lot of Linux distributions aren't as 'hard' on your hardware. When choosing what version of Linux to go with- as there are a lot of different types or distributions of Linux, it has been advised to choose a more stable download release version rather then the new-est version- to be able to know this, it may say if the download version is supported long term or not. I'm not a Linux expert and have generally followed guides on how to use this OS, to install a OS you will need some sort of flash media- like a flash drive/usb drive! If you end up not liking Linux, Windows has ISO files you can put on your flash drive to put it back, again this will wipe your data! It's a good idea to try and check to see if your software of choice works on the version of Linux you would like to install, there seems to generally be workarounds however, it's up to your comfort level when seeking these out.
-Windows is familiar! However, Windows 11 has this thing where it wants to back up all your files/data to OneDrive. I, Personally have been enjoying this service, as it makes backing up my files easy-cheesy. However, with the current political climate, this opens you/us up to having our privacy stripped/or our files erased without our consent as Microsoft sees fit. To combat this, I back up my files to a physical hard drive(S) as it is safer to have multiple back-ups rather then just 1.
-AVOID ChromeOS or chromebooks- is my advice GPU or Graphics Card: https://www.videocardbenchmark.net/ -Using this link, you can compare how the GPU of your device compares to the standard/other devices/ect... -Honestly, if you are not doing heavy-duty gaming or 3D sculpting, or video editing, you're probably just fine with a mid-tier GPU!
Where the files are stored / the Disk Drive: -As long as you avoid a HDD you're probably good to go! HDD drives use a physical disk that spins to save your data- this is more prone to failing and this is a lot of the reason why older laptops seem "slow"
-One of the ways to to check this- or a weird way I check this, is I click the Windows button/Windows search and type "Defrag" & You should see something that says something "Defragment and Optimize Drives" In this window, under 'Media Type' it should say something like Solid State Drive, and not 'Hard Disk Drive' or HDD -How much storage is important depending on if you store your all data on your device or not- I'd recommend at LEAST 500+GB to be safe, any more does not hurt!
RAM: For doing just art, you're probably good to go at just 8-16GB of RAM! Any more does not hurt.
Processors: I have less knowledge in this domain, however, if you are going for a intel processor, something like i5, 1255u is communicating that: i(NUMBER), the higher number = more processing power. I would recommend anything i5 and above, and the 1255u- a number I am using in this example, the 12 = 12th generation. 12 gen and up Is what I would personally recommend.
Do I need a separate stylus pen? Yes, however, there's a lot of good knock off brand pens that are cheaper if not better then official brand pens. I'd take into account how they charge, I like rechargeable pens that use Type C ports- like new-er phones!
Link Examples of 2in1 laptops that should be good for digital art- again, if the price has changed for the worse, you can use these as a guide: This is the laptop I have, I got it on sale (I exchanged my surface for this) for around 500$: https://www.bestbuy.com/site/hp-envy-2-in-1-16-2k-touch-screen-laptop-intel-core-ultra-7-16gb-memory-1tb-ssd-glacier-silver/6571084.p?skuId=6571084 Upon a glance this looks good due to the processor being i7 & the 12th generation- a new-ish one: https://www.newegg.com/lenovo-ideapad-flex-5-16iau7-82r80000us-16-0-intel-core-i7-1255u-1-tb-pcie-ssd-16gb-memory/p/N82E16834840489
Finishing notes: This is not a like solid template, more of a loose advising guide- I hope this is helpful to some folx! Feel free to ask questions!
#digitalart#artists on tumblr#digital drawing#digital painting#art#artwork#surface#2in1#stylus pen#drawing tablet#disabled artist#disability#disabled#disability art#mental illness#mental health#art ergonomics#ergonomicsupport#adhd artist#adhd problems#neurodiverse stuff#neurodiverse artist#2025 art#gpu#help desk#queer artist#queer artwork#buying a laptop#laptop#digital art supplies
5 notes
·
View notes
Text
How to Install Ubuntu 24.04 on VirtualBox - Ubuntu 24.04 As Host

If you're looking to explore Ubuntu 24.04 without messing up your main system, installing it on VirtualBox is the perfect way to go! Here's a step-by-step guide to get you started.
Step-by-Step Guide:
Download VirtualBox: Head over to the VirtualBox website and download the latest version for your operating system.
Download Ubuntu 24.04 ISO: Grab the Ubuntu 24.04 ISO file from the official Ubuntu website.
Install VirtualBox:
Follow the installation instructions for your OS.
Open VirtualBox once installed.
Create a New Virtual Machine:
Click on “New”.
Name your VM (e.g., Ubuntu 24.04).
Choose “Linux” as the type and “Ubuntu (64-bit)” as the version.
Allocate RAM (at least 2048 MB recommended).
Attach the Ubuntu ISO:
Select your newly created VM and click “Settings”.
Go to “Storage”.
Under “Controller: IDE”, click the empty disk icon and select “Choose a disk file”.
Find and select the Ubuntu 24.04 ISO you downloaded.
Start the Virtual Machine:
Click “Start” to boot from the ISO.
Follow the on-screen instructions to install Ubuntu.
Complete the Installation:
Select your language and keyboard layout.
Choose “Install Ubuntu”.
Follow the prompts to set up your system (create a user, set a password, etc.).
Once installation is complete, restart the VM.
Remove the ISO and Boot from Virtual Disk:
Go back to “Settings” -> “Storage” and remove the ISO from the virtual drive.
Restart your VM again, and it should boot into your new Ubuntu 24.04 installation!
For a visual guide, check out this helpful video tutorial: How to Install Ubuntu 24.04 on VirtualBox 🎥
youtube
Happy virtualizing! 🚀
#Install Ubuntu 24.04 on Virtualbox#Ubuntu 24.04#How to Install Ubuntu 24.04#Linux#Ubuntu#Fedora 40#GNOME 46#Youtube
15 notes
·
View notes
Text


07.05.25
I tried out two Linux distributions on my test laptop today.
Before I started the task, I updated Linux Mint Cinnamon with the update manager to receive the latest updates for the system and installed apps.
I can also use the terminal to update everything by typing the APT command 'sudo apt-get update'.
'sudo' elevates root (admin) privileges, 'apt-get' receives the packages needed and 'update' checks for updates. I then type 'sudo apt-get upgrade' and press enter to upgrade all the applications and the system.
System up to date!
Firstly, I downloaded Debian from: https://www.debian.org/distrib/
I chose the Debian Live MATE desktop environment.
I then went to download Linux Mint from: https://linuxmint.com/download.php
I chose the Mint MATE Edition desktop environment.
Debian MATE was 3.1 Giga-Bytes and Linux Mint MATE was 2.9 Giga-Bytes to download.
Once they had downloaded, I located them in Downloads and opened the built in USB writer application.
I wrote the ISO files to the sticks to create two bootable USB sticks.
After this step I booted Debian 12 MATE.
I selected 'try' on the boot menu screen.
Here it is in action! I played around with the user interface and tested the sound, which worked brilliantly!
Next, I booted Linux Mint 22.1 MATE.
Again, I selected 'try' to boot up the live environment.
Here it is in action! Again I tested the sound, played a YouTube video in Firefox and customised the panels and themes.
Both MATE desktops in both distros were very interesting and seemed even snappier when compared to the operating systems I have installed on this laptop, which are Linux Mint 22.1 Cinnamon and Ubuntu 24.04!
I found Debian with the MATE desktop to be the most stable environment however.
See blog below to learn more about the modern take on the classic GNOME 2 experience!
4 notes
·
View notes
Text
Installing Kali Linux on a USB Stick: A Step-by-Step Guide
If you want a portable, powerful cybersecurity toolkit you can carry in your pocket, installing Kali Linux on a USB stick is the perfect solution. With Kali on a USB, you can boot into your personalized hacking environment on almost any computer without leaving a trace — making it a favorite setup for ethical hackers, penetration testers, and cybersecurity enthusiasts.

In this guide, we'll walk you through how to install Kali Linux onto a USB drive — step-by-step — so you can have a portable Kali environment ready wherever you go.
Why Install Kali Linux on a USB?
Before we dive into the steps, here’s why you might want a Kali USB:
Portability: Carry your entire hacking setup with you.
Privacy: No need to install anything on the host machine.
Persistence: Save your settings, files, and tools even after rebooting.
Flexibility: Boot into Kali on any system that allows USB boot.
There are two main ways to use Kali on a USB:
Live USB: Runs Kali temporarily without saving changes after reboot.
Persistent USB: Saves your files and system changes across reboots.
In this article, we’ll focus on setting up a Live USB, and I'll also mention how to add persistence if you want. and if you seek knowledge about kali linux you can visit our website any time
Website Name : Linux Tools Guide
What You’ll Need
✅ A USB drive (at least 8GB; 16GB or more recommended if you want persistence). ✅ Kali Linux ISO file (download it from the official Kali website). ✅ Rufus (for Windows) or Etcher/balenaEtcher (for Mac/Linux/Windows). ✅ A computer that can boot from USB.
Step 1: Download the Kali Linux ISO
Go to the Kali Linux Downloads page and grab the latest version of the ISO. You can choose between the full version or a lightweight version depending on your USB size and system requirements.
Tip: Always verify the checksum of the ISO to ensure it hasn't been tampered with!
Step 2: Insert Your USB Drive
Plug your USB stick into your computer. ⚠️ Warning: Installing Kali onto the USB will erase all existing data on it. Backup anything important first!
Step 3: Create a Bootable Kali Linux USB
Depending on your operating system, the tool you use may vary:
For Windows Users (using Rufus):
Download and open Rufus (Get Rufus here).
Select your USB drive under Device.
Under Boot selection, choose the Kali Linux ISO you downloaded.
Keep the Partition scheme as MBR (for BIOS) or GPT (for UEFI) based on your system.
Click Start and wait for the process to complete.
For Mac/Linux Users (using balenaEtcher):
Download and open balenaEtcher (Get Etcher here).
Select the Kali ISO.
Select the USB drive.
Click Flash and wait until it's done.
That's it! You now have a Live Kali USB ready.
Step 4: Boot Kali Linux from the USB
Restart your computer with the USB plugged in.
Enter the BIOS/UEFI settings (usually by pressing a key like F12, Esc, Del, or F2 right after starting the computer).
Change the boot order to boot from the USB first.
Save changes and reboot.
You should now see the Kali Linux boot menu! Select "Live (amd64)" to start Kali without installation.
(Optional) Step 5: Adding Persistence
Persistence allows you to save files, system changes, or even installed tools across reboots — super useful for real-world usage.
Setting up persistence requires creating an extra partition on the USB and tweaking a few settings. Here's a quick overview:
Create a second partition labeled persistence.
Format it as ext4.
Mount it and create a file /persistence.conf inside it with the content: cppCopyEdit/ union
When booting Kali, choose the "Live USB Persistence" option.
Persistence is a little more technical but absolutely worth it if you want a real working Kali USB system!
Troubleshooting Common Issues
USB not showing up in boot menu?
Make sure Secure Boot is disabled in BIOS.
Ensure the USB was properly written (try writing it again if necessary).
Kali not booting properly?
Verify the ISO file integrity.
Try a different USB port (preferably USB 2.0 instead of 3.0 sometimes).
Persistence not working?
Double-check the /persistence.conf file and make sure it's correctly placed.
Conclusion
Installing Kali Linux onto a USB stick is one of the smartest ways to carry a secure, full-featured hacking lab with you anywhere. Whether you’re practicing ethical hacking, doing security audits, or just exploring the world of cybersecurity, a Kali USB drive gives you power, portability, and flexibility all at once.
Once you’re set up, the possibilities are endless — happy hacking! 🔥
2 notes
·
View notes
Note
hello, thanks for uploading the audio rip of kaji fes day 1 and 2! is it possible if you make a ISO image rip of the Bluray and create a torrent file for it ? :) we usually download some ISO from jpopsuki just few days after release but somehow nobody have uploaded ISO of kajifes there yet XD

Hello there. Sorry for the delay, I've been holding off on replying to your question for a while. To be fair, when I saw this in my inbox just a DAY after my response to the Kaji Fes. MP3 ask, I was more than a little annoyed.
It's not like your message is inherently rude or anything (in fact, it's a bit more polite than the usual stuff I get) but it tells me TWO things about you:
You either purposefully ignored everything I wrote in that Kaji Fes. MP3 post or you never actually saw my original post and got the download link from someone who reposted it to another site. If you had made an effort to read my response from a few days ago, you would know that I always planned to share rips but first, I needed to receive my package. People are really out there thinking I have immediate access to everything. That is a misconception! The truth is, just like so many of us, I am at the mercy of endless shipping/customs procedures and have to wait very long for stuff to arrive at my place. Then I need to find the time to do all the ripping/encoding while working a full-time job and also having a life.
You've never actually visited my blog and thought it would be a good idea to use your first time here to make a huge request. I seriously doubt that you are one of my regular followers or lurkers because in all of my years running this blog, I've never ever provided t0rrents so I have no idea where you would get that idea from. Yes, I share a lot of content but I do this by uploading reasonably HQ files in converted formats to Google Drive for archival purposes. Early on, I considered providing ISO files but they proved to be too troublesome to handle on a personal cloud (they take too long to upload/download and use up way too much storage space - I already pay more than enough for my current plan). Also, I wholeheartedly believe that those who want raw files should simply BUY the Blu-rays and do the ripping themselves. You can't have high standards like that and not be willing to invest the necessary money and time. Contrary to what people may believe (based on the content I share), I am a big proponent of supporting artists by buying their releases. My main goal is to make life easier for overseas fans who struggle to overcome the countless hurdles between us and Japanese media but that certainly doesn't entail providing everything in the highest quality imaginable. To sum things up, all you can ever expect on my blog are encoded files which should have high enough quality to satisfy the vast majority of people.
Anyway, enough about that. I have good news! My package FINALLY arrived yesterday. BANZAI! Depending on how busy I am, I will hopefully be able to get the files uploaded by Thursday *fingers crossed*
21 notes
·
View notes
Text
Technical Challenges and Solutions in Professional Photography
Photography is an art form that demands creativity and technical skill in equal measure. As a professional photographer, navigating the technical challenges that arise during a shoot is part of the journey. These challenges can disrupt your workflow, but with experience and preparation, they can be effectively managed.
One common technical issue is poor lighting conditions. Natural light isn't always available, and artificial lighting can cast harsh shadows or unwanted color tones. To tackle this, investing in high-quality lighting equipment like softboxes, reflectors, and portable LED lights can make a world of difference. Additionally, understanding how to adjust your camera's ISO, aperture, and shutter speed allows you to adapt to changing light conditions quickly.
Another challenge is achieving accurate color balance. Colors can appear different on various screens and prints, leading to discrepancies between what you see and what your client receives. To maintain consistency, calibrating your monitor regularly and shooting in RAW format are essential. RAW files retain maximum data, giving you greater flexibility in post-processing to correct colors without losing quality.
Technical malfunctions also happen—memory card failures, dead batteries, or unexpected equipment damage. The solution? Always carry backups. Extra batteries, memory cards, and even a secondary camera body can save a shoot from disaster. Additionally, regular maintenance and firmware updates for your equipment help minimize the risk of technical issues.
Finally, mastering post-processing software is crucial. Programs like Adobe Lightroom and Photoshop are powerful tools, but they require learning. Taking the time to understand these applications ensures that your editing enhances your work rather than masking flaws.
Every technical challenge has a solution. With preparation, knowledge, and adaptability, you can overcome these obstacles and create stunning work that captures your artistic vision.
2 notes
·
View notes
Text
How to bypass Microsoft Account when installing Windows 11

Microsoft has confirmed that the popular “bypassnro” command, which let users to skip connecting to the Internet and signing into a Microsoft Account, is being removed, when setting up a new Windows 11 PC.
Microsoft is now requiring every Windows 11 device be set up with an internet-connected account.
Windows 11 PCs that have already been set up without a Microsoft Account will be unaffected. This change only affects the Windows 11 install and setup experience, where the OS requires an internet connection and a Microsoft Account to progress.
There are still ways to bypass these requirements, Currently, it’s also possible to manually re-add the bypassnro command to your system by typing the following into a command prompt: “reg add HKLM\SOFTWARE\Microsoft\Windows\CurrentVersion\OOBE /v BypassNRO /t REG_DWORD /d 1 /f shutdown /r /t 0”
However, there’s no guarantee Microsoft will allow this additional workaround for long. There are other workarounds as well, such as using the unattended.xml installation, but this requires a lot more work and includes creating a new Windows installation image from scratch.
Steps to Create an Unattended XML File for Local Account
1. Basic unattend.xml to Skip Microsoft Account:
Here’s a minimal XML file that configures a local administrator account and skips OOBE (Out-of-Box Experience) prompts:
<?xml version="1.0" encoding="utf-8"?> <unattend xmlns="urn:schemas-microsoft-com:unattend"> <settings pass="oobeSystem"> <component name="Microsoft-Windows-Shell-Setup" processorArchitecture="amd64" publicKeyToken="31bf3856ad364e35" language="neutral" versionScope="nonSxS" xmlns:wcm="http://schemas.microsoft.com/WMIConfig/2002/State" xmlns:xsi="http://www.w3.org/2001/XMLSchema-instance"> <OOBE> <HideEULAPage>true</HideEULAPage> <HideOEMRegistrationScreen>true</HideOEMRegistrationScreen> <HideOnlineAccountScreens>true</HideOnlineAccountScreens> <!-- Skips Microsoft account --> <HideWirelessSetupInOOBE>true</HideWirelessSetupInOOBE> <NetworkLocation>Work</NetworkLocation> <ProtectYourPC>1</ProtectYourPC> </OOBE> <UserAccounts> <LocalAccounts> <LocalAccount wcm:action="add"> <Password> <Value>YourPassword123</Value> <!-- Change this --> <PlainText>true</PlainText> <!-- Set to false if hashed --> </Password> <DisplayName>LocalAdmin</DisplayName> <Name>LocalAdmin</Name> <Group>Administrators</Group> </LocalAccount> </LocalAccounts> </UserAccounts> <AutoLogon> <Password> <Value>YourPassword123</Value> </Password> <Enabled>true</Enabled> <Username>LocalAdmin</Username> <LogonCount>999999</LogonCount> </AutoLogon> </component> </settings> </unattend>
2. Save the File
Save as autounattend.xml (for USB boot) or unattend.xml (for deployment tools).
Place it in the root of your Windows 11 installation USB or inject it into the ISO.
3. Use the File During Installation
Boot from the USB, and Windows Setup will automatically apply the settings.
No Microsoft account prompt will appear.
Get a Windows 11 Product key at keyingo.com for half price !
4 notes
·
View notes
Text
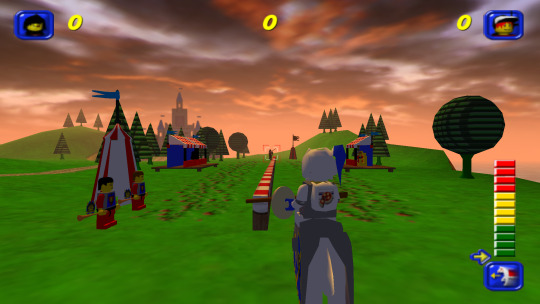
Capturing the ambience of LEGO Island 2 (2001)
This minigame-packed adventure explores many classic LEGO themes.
Running the game
There are two main versions of the game to chose from: the original 2001 release, and an improved 2007 version released as part of a two-pack. There is also apparently an unfinished, unreleased v1.1 with some bug fixes.
Curiously, the version hosted on MyAbandonware seems nearly identical to other 2001 releases I found. There appear to be minimal differences between the two.
All versions use a simple disk check; mounting an ISO with a tool like Daemon Tools suffices. There are also No-CD hex-edits available if you're interested.
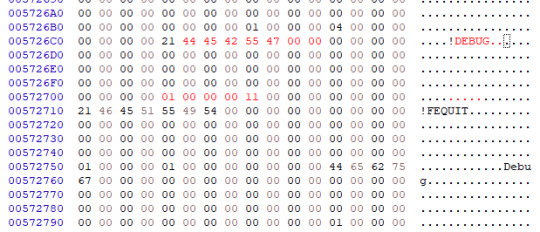
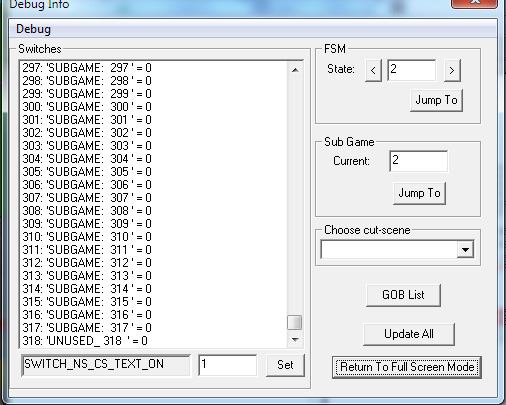
Debug menu and Level-select
We can access LI2's debug menu by altering the main menu options. I found some hex-edits for this on RRU. If you're not comfortable with hex-edits you can try using a patcher or patch, or LI2 Mod Manager.
04 00 00 00 02 -> 01 00 00 00 11 43 52 45 44 49 54 53 -> 44 45 42 55 47 00 00
Widescreen
Use the resolution and widescreen hacks offered by LI2 Mod Manager. See this thread for more detail on how it works.
Hiding UI and Player-character
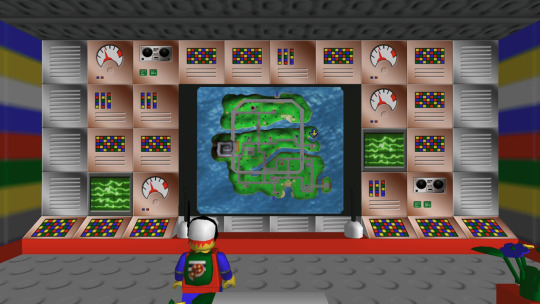
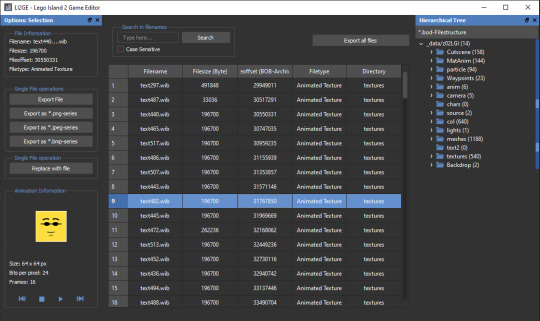
This is possible using Lego Island 2 Game Editor. It's a powerful albeit buggy application for modifying LI2 assets.
If LI2GE doesn't work, for example to edit fonts, you can use Lego Island 2 Extractor and/or Lego Island 2 Explorer. Once installed, be sure to disable automatic updates inside the program's INI to avoid startup crashes.
LI2 will prefer to load files from identically-named folders if they are present in the _data directory. For example, if a Fonts folder exists, its files will be used and Fonts.bob/bod won't be loaded.
We can also pause the game to remove the HUD, screenshot this state, and create a no-HUD overlay for our footage.
(Not) Free camera
A modder devised a way to summon a glider at any time.
Rendering ambience sequences
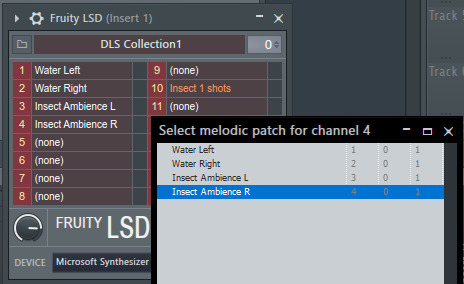
I recommend using the Fruity LSD effect with FL Studio. First, open the MID file in LEGO Island 2's level files, for example Fishing_Amb.mid. Be sure to select MIDI Out with Fruity LSD in the subsequent dialog.
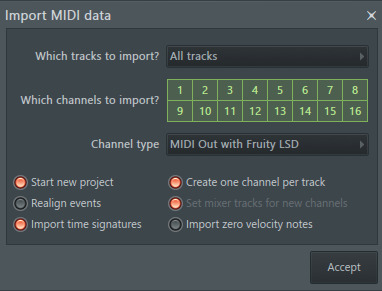
Afterward, click the folder icon in the top left to specify a DLS file - use one found in your MID file's folder. Once it's loaded, populate each channel by clicking it, and picking the corresponding patch. Don't forget to populate the "percussive" one-shots as well (Channel 10 in the screenshot below).
You are now ready to play your MID with the intended samples attached, or export it to a WAV file.
Appendix: Rendering music sequences
Download DirectMusic Producer. Supposedly this program allows you to export samples and sequence data. You could then render the pair using the MIDI renderer of your choice, such as OpenMPT or FL Studio's Directmusic plugin.
Appendix: Ambience sequence dead-ends
I tried VLC, with the DLS configured under FluidSynth, but this gave no output. I tried Miles Sound Tools with a DLS specified, but again - no output. I tried Winamp but seemingly couldn't get in_midi to use a custom DLS file, despite specifying one in the setting dialogs.
Appendix: Other LI2 developer tools
A soak test can be activated by pressing F8 while in windowed mode. You can also spawn a debugger window by pressing F9.
6 notes
·
View notes