#css background animation loop
Explore tagged Tumblr posts
Visit Tumblr Blog
Explore Tumblr blogs with no restrictions, modern design and the best experience.
Last Seen Tumblr Blogs


Fun Fact
130K people were victims of a chain letter scam that affected Tumblr in May 2011.
Text

CSS only animated background
#animated background#css background animation loop#html css#css#html#divinectorweb#animated backgrounds#css animation snippets#css animation examples#css3#learn to code#frontenddevelopment
3 notes
·
View notes
Text

Animated Background with CSS
#css animated background#css background loop animation#css background animation#css animation tutorial#css tutorial#html css animation#css effects#css tricks#codenewbies#css animation examples#html css#html5 css3#pure css animation
3 notes
·
View notes
Text

Day 4 - 100 Days CSS Challenge
CSS ANIMATIONS
Hey everyone!
Today, we’re working with three circles and our goal is to create a smooth animation where the circles scale up and down in a staggered sequence.
Step 1: The Basics
First, let’s talk about the structure. The design is made up of three circles:
Circle 1: The largest circle.
Circle 2: Medium-sized, nested inside Circle 1.
Circle 3: The smallest, nested inside Circle 2.
All three circles are white, and they animate against that reddish background. The animation involves scaling the circles up and down in a staggered sequence.
Step 2: The Animation Struggle
The main challenge here was getting the circles to animate one after the other instead of all at the same time. At first, I thought, "Easy, just add some delays!" But it wasn’t that straightforward. Here’s what I learned:
animation-delay
To create the staggered effect, I used the animation-delay property. This property allows you to delay the start of an animation for a specific amount of time. For example:
Circle 1: No delay (0s).
Circle 2: Delayed by 0.2s.
Circle 3: Delayed by 0.4s.
This way, each circle starts its animation slightly after the previous one, creating that beautiful cascading effect.
Step 3: Understanding animation-fill-mode
One of the biggest "aha!" moments for me was understanding the animation-fill-mode property. This property determines how an element is styled before and after the animation runs.
animation-fill-mode: both: ensures that the element retains the styles defined in the first and last keyframes of the animation. Without this, the circles would snap back to their default state (scale 0) after the animation ends, which would ruin the smooth transition.
What happens if we don’t use it? Without animation-fill-mode: both, the circles would abruptly disappear or reset at the end of the animation, making the whole thing look janky.
Step 4: The Magic of alternate
The alternate value in the animation property is what makes the animation reverse direction after each cycle. Here’s how it works:
Without alternate, the animation would play forward and then jump back to the start.
With alternate, the animation plays forward, then reverses, creating a smooth back-and-forth effect.
This is perfect for our circles because it makes them scale up and then scale down seamlessly, without any awkward jumps.
Step 5: reverse vs. alternate
You might be wondering, "What’s the difference between reverse and alternate?" Great question!
reverse: The animation plays backwards from 100% to 0%. It doesn’t alternate; it just runs in reverse.
alternate: The animation plays forward (0% to 100%) and then backwards (100% to 0%) in a continuous loop.
So alternate is NOT reverse + infinite
For our circles, alternate is the way to go because we want them to scale up and down repeatedly.
What I Learned :
animation-delay is your best friend when you want staggered animations.
animation-fill-mode: both is crucial for smooth transitions.
alternate creates a seamless back-and-forth effect.
cubic-bezier gives you fine control over the animation’s timing.
I’m so excited to keep going with this challenge, and I can’t wait to see what Day 5 has in store.
Keep coding and keep learning.
#100dayscssChallenge#codeblr#code#css#html#javascript#java development company#python#studyblr#progblr#programming#comp sci#web design#web developers#web development#website design#webdev#website#tech#html css#learn to code
1 note
·
View note
Text
Micro-Interactions: How Small Details Enhance User Experience
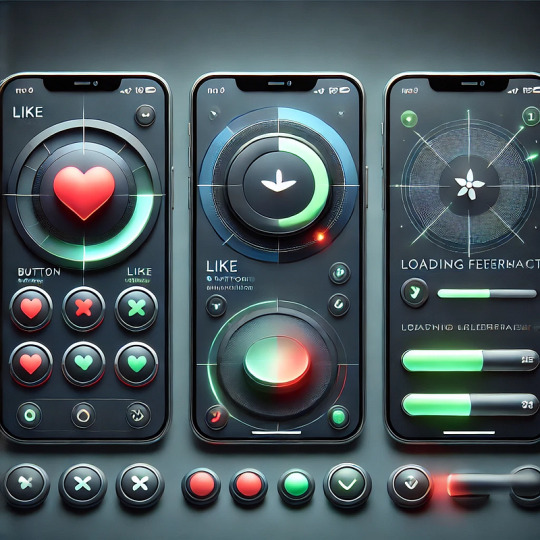
Micro-Interactions: How Small Details Enhance User Experience
Micro-interactions are subtle animations and feedback mechanisms that make digital experiences more engaging, intuitive, and user-friendly. These small details significantly impact usability, engagement, and delight without overwhelming users.
1. What Are Micro-Interactions?
A micro-interaction is a small, functional animation that occurs in response to a user’s action. They guide users, provide feedback, and improve the overall UX.
🔹 Examples: ✅ A “like” button that animates when clicked ❤️ ✅ A password strength meter while typing 🔒 ✅ A loading spinner when fetching data ⏳
💡 Micro-interactions improve UX by making interfaces feel alive, intuitive, and responsive.
2. Key Components of Micro-Interactions
Every micro-interaction consists of four key parts:
1️⃣ Trigger — The user action or system event that initiates the micro-interaction. 2️⃣ Rules — Define what happens once the interaction starts. 3️⃣ Feedback — Provides real-time response (e.g., animation, vibration). 4️⃣ Loop & Mode — Determines if the interaction repeats or adapts based on context.
🔹 Example: Toggle Button Animation
Trigger: User taps the toggle switch.
Rules: The toggle state changes from “Off” to “On.”
Feedback: The switch smoothly slides and changes color.
Loop & Mode: The toggle remains in its new state until changed.
3. Why Micro-Interactions Matter in UX Design
✅ Enhance User Engagement: Makes the UI more interactive and fun. ✅ Provide Instant Feedback: Shows the result of an action in real time. ✅ Improve Usability: Helps guide users intuitively. ✅ Add Personality to a Brand: Creates a more human and relatable experience.
4. Common Micro-Interaction Examples
🔹 Loading Animations
🔄 Prevent frustration by keeping users informed. Instead of a boring “Loading…” message, a creative animation can improve perceived performance.
✅ Example:
Spinning loader (⏳)
Skeleton screens (gradually load content)
Progress bars (indicate completion)
🔹 Button Feedback & Hover Effects
📍 Enhances interactions and confirms user actions.
✅ Example:
Buttons change color or size when hovered.
A ripple effect when clicking a button.
cssCopyEditbutton:active { transform: scale(0.95); }
🔹 Form Validations & Input Feedback
✍️ Makes form-filling easier and error-free.
✅ Example:
Inline validation messages (✅ or ❌).
Password strength indicators.
Shake animation for incorrect input.
javascriptif (password.length < 6) { inputField.classList.add("shake"); }
🔹 Like, Share, & Favorite Animations
❤️ Encourages engagement and interaction.
✅ Example:
Clicking a heart icon makes it pop & change color.
Social media reactions (e.g., Facebook’s Like button).
javascriptheartIcon.addEventListener("click", () => { heartIcon.classList.add("animate-heart"); });
🔹 Toggle Switch & Dark Mode
🌗 Smooth transitions improve experience.
✅ Example:
A toggle switch animates when switching between light and dark modes.
Background and elements smoothly transition between themes.
javascripttoggleButton.addEventListener("click", () => { document.body.classList.toggle("dark-mode"); });
5. Best Practices for Designing Micro-Interactions
🎯 Keep it Simple — Subtle animations work best; avoid overuse. ⚡ Make it Fast — Animations should be quick (0.2–0.5s). 🎨 Match the Brand Personality — Ensure animations align with the app’s tone. 🎯 Provide Feedback — Always let users know what’s happening. 📱 Ensure Accessibility — Avoid relying only on color; support screen readers.
6. Tools to Create Micro-Interactions
🚀 For UI Designers:
Figma, Adobe XD, Sketch — For prototyping animations.
Lottie (Airbnb) — Lightweight animated SVGs & JSON-based animations.
💻 For Developers:
CSS Animations & Transitions — For simple hover and click effects.
JavaScript & GSAP — For dynamic and interactive animations.
Framer Motion (React) — For smooth UI animations.
7. Conclusion
Micro-interactions may seem small, but they greatly enhance user experience by making interfaces more engaging, intuitive, and fun. When used effectively, they improve usability, reduce friction, and add a human touch to digital products.
WEBSITE: https://www.ficusoft.in/web-designing-training-in-chennai/
0 notes
Text
Creating Animated Icons: Techniques for Engaging User Interfaces
Icon Design: Key Queries Explained
1.How do I use ionic icons?
To use Ionic icons, first include the Ionic Icons library in your project via a CDN link or by installing it through npm. Then, add the desired icon in your HTML using the `<ion-icon>` tag, like this: `<ion-icon name="home"></ion-icon>`. You can customize the size and color through CSS or attributes.
2. How do I use animated icons?
To use animated icons, first select the icons you want from a library or create your own. Import them into your project, ensuring they are in a compatible format (like GIF, SVG, or APNG). Use CSS or JavaScript to control their animation if needed. Finally, place the icons in your layout, adjusting size and position as desired.
3. How to create GIF icons?
To create GIF icons, use graphic design software like Adobe Photoshop or free tools like GIMP. Start by designing your icon, then animate it by creating multiple frames. Export your project as a GIF file, ensuring to select settings for looping and frame delay. You can also use online GIF makers by uploading images and adjusting animation settings.
4. How to create SVG icons?
To create SVG icons, use a vector graphics editor like Adobe Illustrator or Inkscape. Design your icon, then export it as an SVG file. Alternatively, you can write SVG code manually using a text editor, defining shapes with elements like `<svg>`, `<circle>`, `<rect>`, and `<path>`. Keep the design simple for clarity and scalability.
5. How to create a CSS icon?
To create a CSS icon, use the `::before` or `::after` pseudo-elements with the `content` property to insert a symbol or character. Style it with `font-size`, `color`, and `background` properties. You can also use CSS shapes like circles or squares by manipulating `border-radius` and `width`/`height`. Alternatively, use a web font like Font Awesome for more complex icons.
Visit: VS Website See: VS Portfolio
0 notes
Text
How to Optimize Mobile App Design for Speed
In today’s fast-paced digital world, users demand swift and seamless experiences from mobile applications. A slow app can lead to user frustration, high abandonment rates, and ultimately, negative reviews. Therefore, optimizing mobile app design for speed is crucial for ensuring user satisfaction and achieving high conversion rates. This comprehensive guide explores the best practices for creating a lightning-fast mobile app.
Understanding the Importance of Speed in Mobile App Design
User Expectations and Behavior
Users have become accustomed to instant access and quick interactions. Studies show that the average mobile user expects an app to load within two seconds. If an app takes longer, users are likely to abandon it in favor of a faster alternative. Speed directly impacts user retention, engagement, and overall satisfaction.
Impact on Conversion Rates
Speed is not just about user experience; it also affects conversion rates. A fast app encourages users to stay longer and engage more, increasing the likelihood of conversions, whether it’s making a purchase, signing up for a service, or completing any desired action.
Key Strategies for Optimizing Mobile App Speed
Efficient Coding Practices
Minimize Code Complexity
Writing clean, efficient, and minimal code is fundamental. Reducing the complexity of the codebase helps in faster execution. Avoid redundant code and use efficient algorithms to streamline processes.
Optimize Loops and Conditional Statements
Loops and conditional statements can slow down an app if not optimized. Ensure that loops run efficiently and conditional statements are simplified to reduce processing time.
Image Optimization
Use Compressed Image Formats
Images are often the largest elements in an app, significantly affecting load times. Use compressed formats like JPEG or WebP to reduce file size without compromising quality.
Implement Lazy Loading
Lazy loading defers the loading of images until they are needed, such as when they come into the user’s viewport. This approach reduces initial load times and improves perceived performance.
Data Management
Efficient Data Fetching
Fetch only the necessary data required for the immediate user interaction. Using pagination or infinite scroll can help manage large datasets efficiently.
Cache Data Locally
Local caching reduces the need to fetch data from the server repeatedly. Implementing smart caching strategies ensures that frequently accessed data is available instantly.
Network Optimization
Reduce API Call Overheads
Reduce the quantity of API queries made by grouping requests together.Batch multiple requests into a single call when possible to reduce network overhead.
Use Content Delivery Networks (CDNs)
CDNs distribute content across multiple servers globally, reducing the distance data has to travel. This results in faster load times, especially for global user bases.
Performance Monitoring and Testing
Continuous Performance Testing
Regularly test the app’s performance using automated tools to identify and address bottlenecks. Tools like JMeter and Appium can simulate user interactions and provide detailed performance metrics.
Real-User Monitoring
Implement real-user monitoring to gather performance data from actual users. This provides insights into real-world performance issues that automated testing might miss.
Frontend Optimization
Minimize DOM Elements
A large number of DOM elements can slow down rendering. Keep the DOM tree shallow and reduce the number of elements to enhance rendering speed.
Use Hardware Acceleration
Leverage the device’s GPU for rendering complex graphics and animations. Using CSS properties like transform and opacity can trigger hardware acceleration, improving performance.
Background Processes Management
Optimize Background Tasks
Background tasks can consume resources and slow down the app. Optimize these tasks to run efficiently without impacting the app’s performance. Use background processing judiciously to balance performance and functionality.
Use Efficient Algorithms for Data Processing
Implement efficient algorithms for tasks like data sorting, searching, and filtering. Efficient algorithms reduce processing time and improve overall app speed.
Advanced Techniques for Speed Optimization
Progressive Web App (PWA) Techniques
Implementing PWA techniques can enhance the speed and performance of mobile apps. Features like service workers enable background syncing and caching, providing a seamless user experience even with poor network conditions.
App Bundle Optimization
Use Android App Bundles and iOS App Thinning to optimize the size of your app. These techniques deliver only the necessary resources to the user’s device, reducing download and installation times.
Preloading and Prefetching
Preloading critical resources and prefetching data that might be needed soon can significantly improve load times. This technique anticipates user actions and prepares resources in advance.
Conclusion
Optimizing mobile app design for speed is a multifaceted approach that requires attention to coding practices, image and data management, network optimization, and performance monitoring. By implementing these strategies, you can create a mobile app that meets user expectations, enhances engagement, and drives conversions. Keep in mind that every millisecond matters in the realm of mobile apps.
#MobileAppDesign#AppOptimization#UserExperience#MobilePerformance#FastLoadingApps#EfficientCoding#ImageOptimization#DataManagement#NetworkOptimization#PerformanceTesting#FrontendOptimization#BackgroundProcessing#SpeedOptimization#ProgressiveWebApps#AppBundleOptimization#Preloading#Prefetching#UserRetention#ConversionRates#MobileAppDevelopment#PerformanceMonitoring
0 notes
Text
5 Udemy Paid Course for Free with Certification.(Limited Time for Enrollment)

1. HTML & CSS - Certification Course for Beginners
Learn the Foundations of HTML & CSS to Create Fully Customized, Mobile Responsive Web Pages
What you'll learn
The Structure of an HTML Page
Core HTML Tags
HTML Spacing
HTML Text Formatting & Decoration
HTML Lists (Ordered, Unordered)
HTML Image Insertion
HTML Embedding Videos
Absolute vs. Relative File Referencing
Link Creation, Anchor Tags, Tables
Table Background Images
Form Tags and Attributes - Buttons, Input Areas, Select Menus
Parts of a CSS Rule
CSS - Classes, Spans, Divisions
CSS Text Properties, Margins, & Padding
CSS Borders, Backgrounds, & Transparency
CSS Positioning - Relative, Absolute, Fixed, Float, Clear
CSS Z-Index, Styling Links, Tables
Responsive Web Page Design using CSS
Take This Course
👇👇👇👇👇👇👇
5 Udemy Paid Course for Free with Certification. (Limited Time for Enrollment)
2. Bootstrap & jQuery - Certification Course for Beginners
Learn to Create fully Animated, Interactive, Mobile Responsive Web Pages using Bootstrap & jQuery Library.
What you'll learn
How to create Mobile-Responsive web pages using the Bootstrap Grid System
How to create custom, drop-down navigation menus with animation
How to create collapse panels, accordion menus, pill menus and other types of UI elements
Working with Typography in Bootstrap for modern, stylish fonts
Working with Lists and Pagination to organize content
How to add events to page elements using jQuery
How to create animations in jQuery (Fade, Toggle, Slide, Animate, Hide-Show)
How to add and remove elements using Selectors (Id, Class)
How to use the Get Content function to retrieve Values and Attributes
How to use the jQuery Callback, and Chaining Function
Master the use of jQuery Animate with Multiple Params, Relative Values, and Queue Functionality
Take This Course
👇👇👇👇👇👇👇👇
5 Udemy Paid Course for Free with Certification.(Limited Time for Enrollment)
3. AWS Beginner to Intermediate: EC2, IAM, ELB, ASG, Route 53
AWS Accounts | Billing | IAM Admin | EC2 Config | Ubuntu | AWS Storage | EBS | EFS | AMI | Load Balancers | Route 53
What you'll learn
AWS Account Registration and Administration
Account Billing and Basic Security
AWS Identity and Access Management (IAM)
Creating IAM Users, Groups, Policies, and Roles
Deploying and Administering Amazon EC2 Instances
Creating Amazon Machine Images
Navigating the EC2 Instances Console
Working with Elastic IPs
Remote Instance Administration using Terminal and PuTTY
Exploring various AWS Storage Solutions (EBS, EFS)
Creating EBS Snapshots
Working with the EC2 Image Builder
Working with the Elastic File System (EFS)
Deploying Elastic Load Balancers (ELB)
Working with Auto Scaling Groups (ASG)
Dynamic Scaling using ELB + ASG
Creating Launch Templates
Configuring Hosted-Zones using Route 53
Take This Course
👇👇👇👇👇👇👇👇
5 Udemy Paid Course for Free with Certification.(Limited Time for Enrollment)
4. Google Analytics 4 (GA4) Certification. How to Pass the Exam
A Step-by-Step Guide to Passing the Google Analytics 4 (GA4) Certification Exam!
What you'll learn
Master key terms and concepts to effortlessly pass the Google Analytics 4 Certification Exam
Understand GA4 settings to optimize data flow to your site
Utilize the power of tags and events for effective data collection
Learn to track important metrics like events, conversions, LTV, etc. for operational decisions
Navigate GA4’s user-friendly interface to create and interpret impactful reports and analyses
Gain insider tips and sample questions to effortlessly pass the certification test
Take This Course
👇👇👇👇👇👇👇👇
5 Udemy Paid Course for Free with Certification.(Limited Time for Enrollment)
5. The Complete C & C++ Programming Course - Mastering C & C++
Complete C & C++ Programming Course basic to advanced
What you'll learn
Fundamentals of Programming
No outdated C++ Coding Style
Loops - while, do-while, for
The right way to code in C++
Gain confidence in C++ memory management
Take This Course
👇👇👇👇👇👇👇👇
5 Udemy Paid Course for Free with Certification.(Limited Time for Enrollment)
0 notes
Text
15+ CSS Animated Backgrounds

Collection of hand-picked free HTML and CSS animated background code examples. ANIMATED RIPPLES BACKGROUND Compatible browsers:Chrome, Edge, Firefox, Opera, Safari and made with HTML (Haml) / CSS…
#background animation css codepen#CSS Animated Backgrounds#css animation#css animation codepen#css background animation examples#css background animation loop#css background effects#how to make animated website background#jquery background animation effects#HTML / CSS
0 notes
Photo


Clayton Shonkwiler: Math Professor, Artist
“the unique thing about GIFs is that they treat time like a circle rather than a line” - Clayton Shonkwiler
There is a post on Cross Connect with more of Clayton’s work here, or you can go to his website here. He generously answered questions from me at length, which is what follows:
--------
Where are you located? What do you do?
I live in Fort Collins, CO, where I’m a math professor at Colorado State University.
Where are you from?
I grew up in and around Boulder, CO, which isn’t that far from Fort Collins, but after high school I spent 15 years living in Tennessee, Pennsylvania, Georgia, and the UK before eventually making my way back to Colorado.
Do you have any art education or background?
Not really. I mean, I had the usual elementary school art classes, but one thing I definitely learned from them was that I have no innate talent for drawing or painting or working with clay.
I was interested in photography from a pretty young age, and convinced my dad to give me an old SLR that he had, but I mostly just took photos on vacations, not as an everyday thing. Somehow my middle school had a darkroom, so I did take a photography class in seventh grade that was really fun because you got to develop your own photos and the teacher encouraged us to do things like take long exposure photos of the stars. But that’s really it for my formal art education.
That being said, my mom was an art history major before becoming a librarian and my dad is an architect, so there were always lots of art and architecture books and prints around and we would always make a point of going to art museums or interesting buildings on trips, so I probably picked up a bit from that. My dad’s architectural drawings always seemed like an impossible ideal of straight lines and perfect measurements, but he designed the house I lived in until age 10, which was very different from any of the other houses I visited, so I did have a sense that those idealized drawings could be made real, and also that it was possible to get pretty creative even with something as literally everyday as a house.
Why do you make gifs?
Mostly because it’s fun. The first GIF I made was just intended to illustrate something in a research talk, but that planted the seed that it wasn’t actually that hard to make a GIF in code. The second GIF I made was to illustrate a hypercube for a geometry class I was covering for a colleague. It wasn’t actually that good, but it was compelling enough that I started getting the idea that maybe some of the math I knew could lead to interesting animations. For a while I was just trying to figure out how to turn every interesting math thing I knew into a GIF, and if you do that pretty much every day for a couple of years, it becomes part of who you are.
I think there’s also an aspect of laziness, honestly. The actual practice of making GIFs and of doing research (which is what I spend most of my professional time doing) is pretty much identical: both mainly involve typing code into a computer. So when I’m done working it’s just as easy to start a GIF as it is to check Twitter, which means I do it more than I would if it required going to a studio or heading out to walk around town with a camera.
Do you think that gifs are a unique art form?
Definitely. I tend to think about things geometrically, so to me the unique thing about GIFs is that they treat time like a circle rather than a line, and to me the most interesting GIFs are the ones where the looping is somehow surprising or clever. Looping animations obviously aren’t without historical precedent – think zoetropes and Muybridge’s zoopraxiscope – but the GIF format makes them vastly more accessible for both creators and viewers.
Which is not to fetishize the format too much: GIF is a terrible format in many, many ways, and at this point browsers support a lot of more modern ways of producing looping animations, from APNG to CSS and SVG animations, but until the big social networks support them they’re going to be niche options at best.
171 notes
·
View notes
Text

Animated Background with CSS
#css background animation loop#html css#divinectorweb#html css animation#css animation#css animation examples#css animation tutorial#animated background css#learn to code#frontenddevelopment#html#css3#webdesign#pure css animation
4 notes
·
View notes
Text
Background Loop CSS
#css background loop animation#pure css animation#css animation tutorial#html css animation#animation#html css#codenewbies#frontenddevelopment#css animation examples#css#html5 css3#code#animated
4 notes
·
View notes
Text
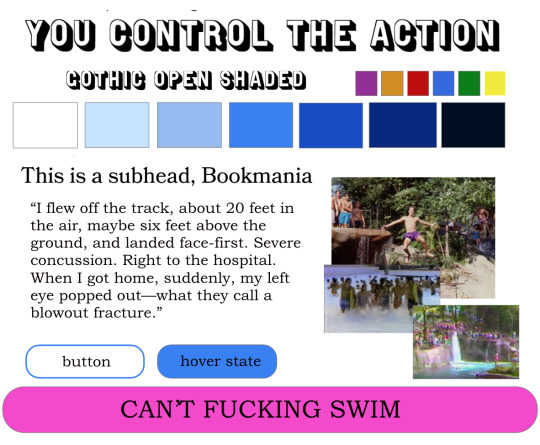
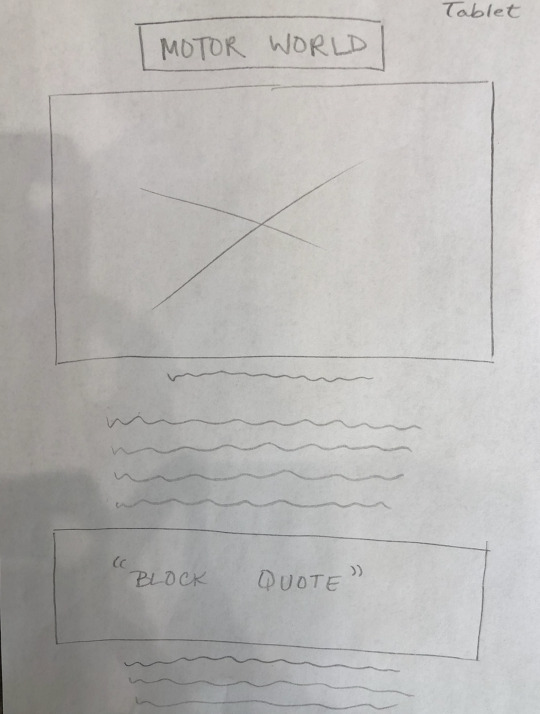
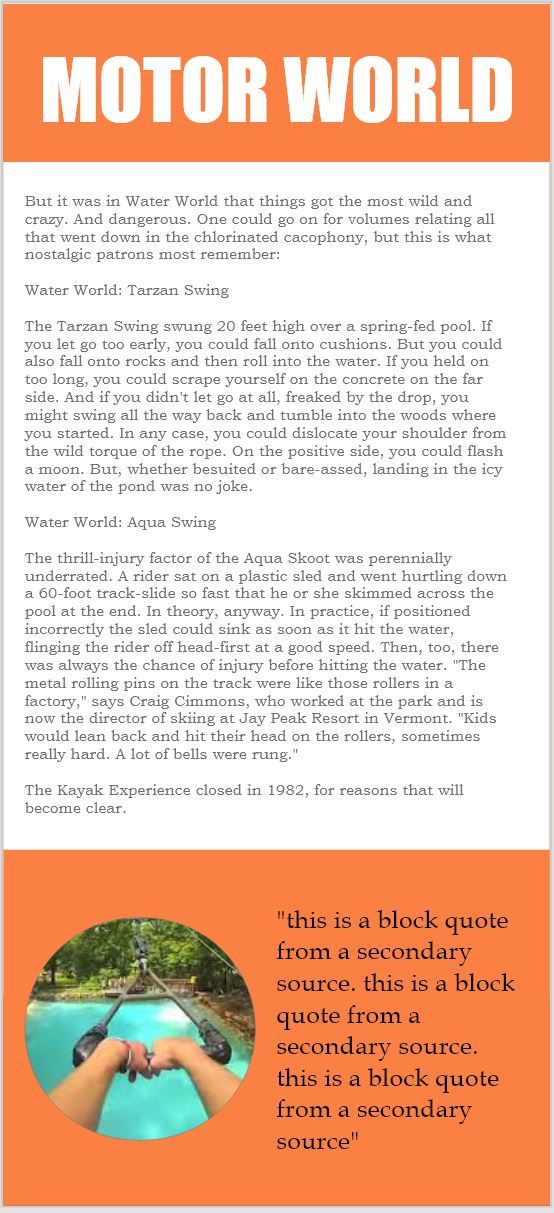
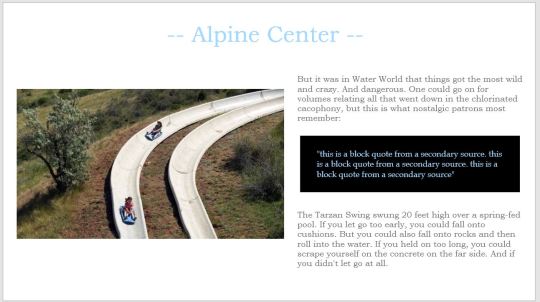
Web Design Final - Julia Stengle and Dan Rahill
Project 3: Longform Journalism Experience
For this project, Dan and I re-designed the experience of Jack McCallum’s Sports Illustrated article, “Remembering Action Park, America’s Most Dangerous, Daring Water Park.” The assignment required us to make a single, responsive webpage using HTML and CSS. We were tasked to incorporate 4 images, 2 pull quotes, 1 audio clip, and 1 video clip into our re-design.
Part 1: Research
Ideation for this project began with discovering long-form journalism articles with compelling interaction and designs. We admired the altering left/right alignment of Propublica article linked here: https://www.propublica.org/article/false-rape-accusations-an-unbelievable-story.
The images of Pitchfork’s Janelle Monae’s article, too, provided a nice example of color inclusion which we wanted to incorporate into our article. ( https://pitchfork.com/features/cover-story/reader/janelle-monae/)
We liked the animation fade in and fade outs also present in this article: https://www.mercedes-benz.com/en/
Lastly, this NBC news article inspired our header image with the full-width video content: (https://www.nbcnews.com/health/health-care/there-s-shortage-volunteer-ems-workers-ambulances-rural-america-n1068556)
Part of this process included examining each available article for Project 3 on Sakai. We were assigned Action Park and were drawn to the park’s screwball nature and felt we could create a fun experience, given this non-fiction narrative. Sports Illustrated’s original article merely broke up text sections with pictures and had limited interaction. The site, too, did not really change between desktop, Ipad, and mobile.
Part 2: Inspiration
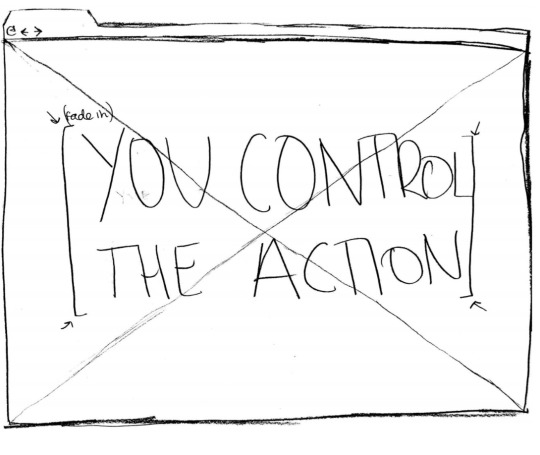
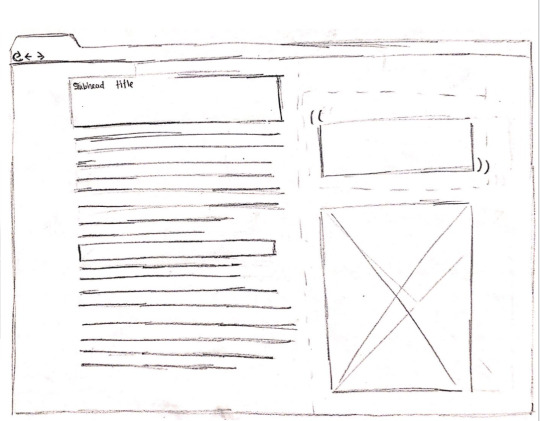
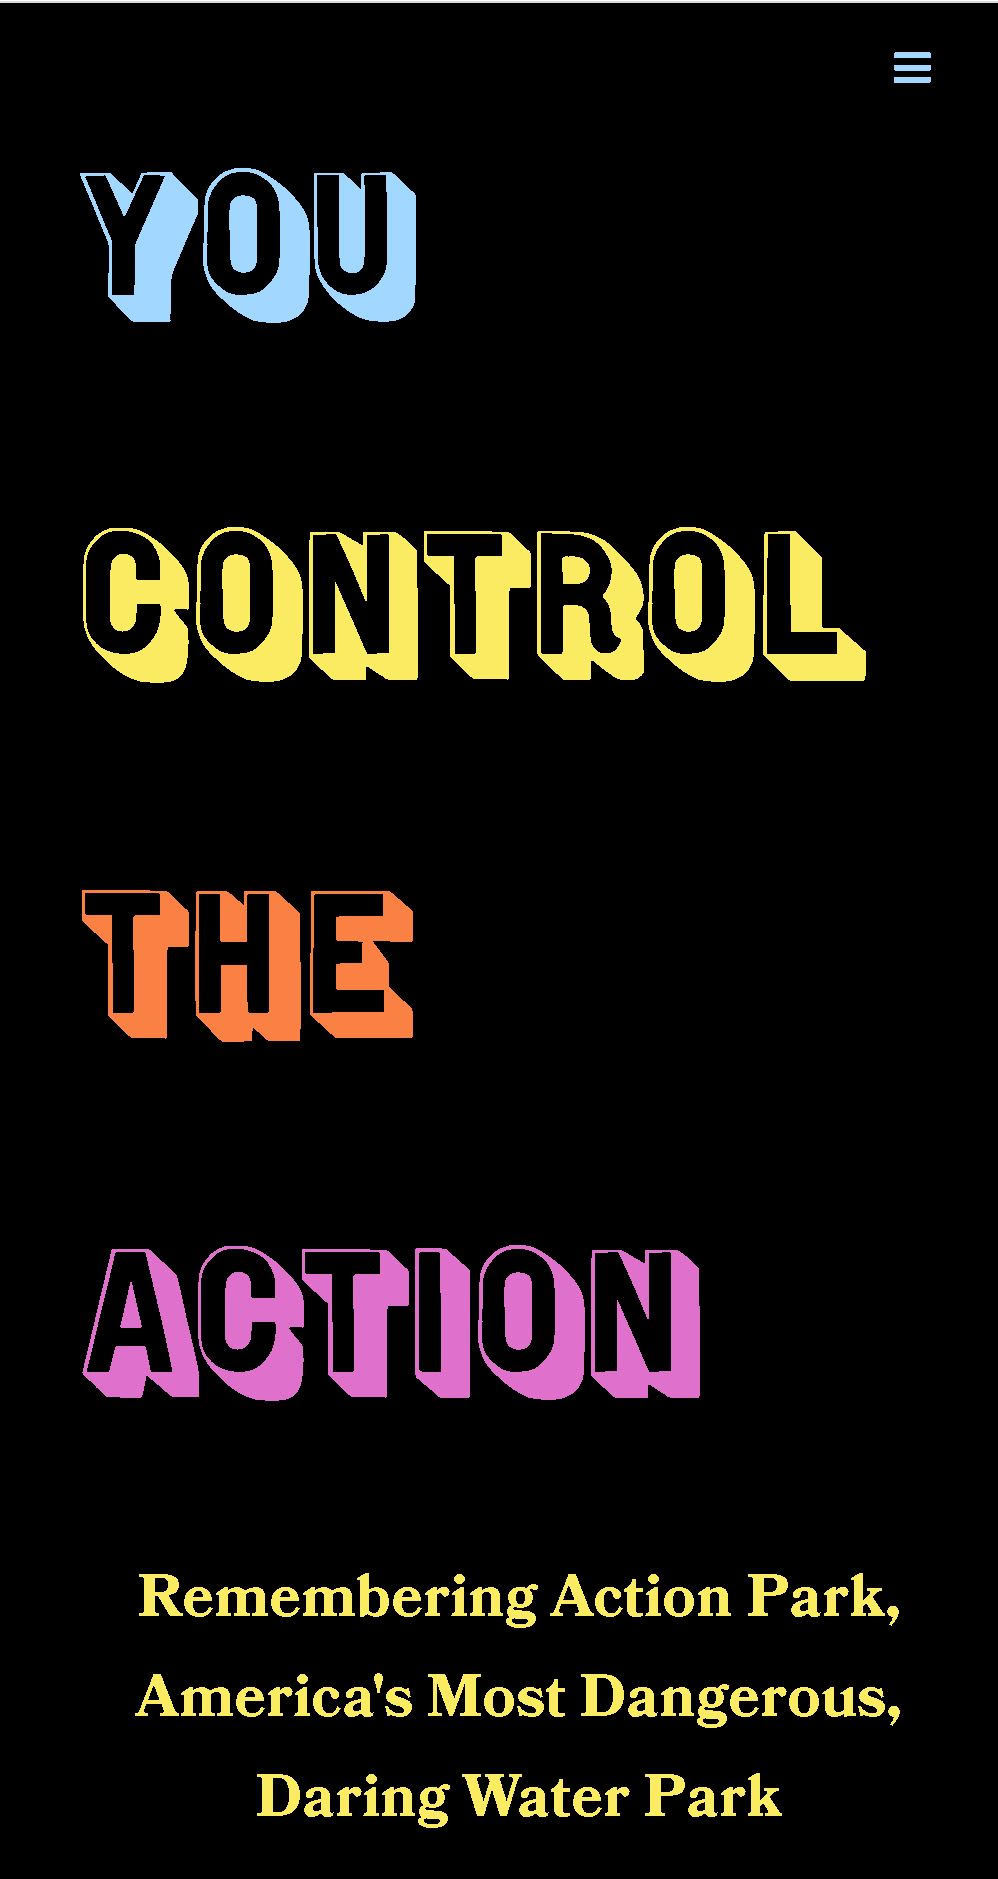
Once we read our article, we split the content up into seven sections: 1)
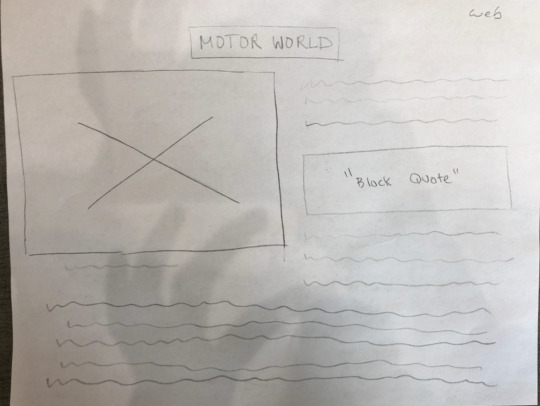
Remembering Action Park, America's Most Dangerous, Daring Water Park“You control the action” - video of a guy swinging, 2) Action Point Interview with Johnny Knoxville2. Have trailer and stats on the side (reviews, box office, budget) 3) Alpine Center (Alpine Slide) 4) Motor World (bumper cars, speed boats, etc). 5) Water World (Cannonball Loop, Tarzan Swing, Aqua Scoot) 6) Tragedies and 7) Legacy of Gene Mulvihill.
We looked to Action Park maps, commercials, merchandise, stickers, and accounts of fearful, true stories to better understand the world of Action Park. Our pull quotes came from the Mental Floss article and the rest of our inspiration is linked here:
https://www.mentalfloss.com/article/536412/action-park-water-park-oral-history
Action point logo
Bloody Action Park
Action Park Logo
Funny t-shirt
https://www.youtube.com/watch?v=VKWJpFEJw9M
https://www.youtube.com/watch?v=4r6bOaJ4ww0
https://www.barstoolsports.com/newyork/this-13-minute-short-film-about-how-action-park-was-the-most-dangerous-amusement-park-ever-is-damn-near-must-watch-for-people-in-the-tri-state-area
https://sometimes-interesting.com/wp-content/uploads/2014/02/vernon_nj_postcard.jpg
https://sometimes-interesting.com/2014/02/07/action-park/
Part 3: Style Tiles
This is our original style tile. We wanted to mimic the chaos of Action Park with an 80s style of a black background with vibrant colors. We felt this mirrored the saturation of older images and spoke to the madness that the park was. After class commentary and early coding stages, we decided to stick with this theme.

Early wireframes for this style tile are pictured below. As you can see, we attempted to incorporate fade-in animations, a video header, and split right and left sections. Notice we carried over a video header and fade in animations, but modified the left and right split.


This is our second tile, which eliminated the neon, 80s look and focused on a more blue-tone. As you can see, the font and pictures choices do not change much between the first and second style tiles. Although we did not select this style tile, we still incorporated different blue hues within the Parks and rides sections.
Early wireframes for our second style tile are picture below. The differences between the first and second style tiles are within the right and left alignments. There is more content separation between the text and images, which we did incorporate into our final site.
Part 4: Wireframes
Using the wireframes we had already created, we developed ones for desktop, ipad, and mobile. We focused on combining the right and left alignment patterns within one of our sections for this part. Such sketches influenced our digital mockups and wireframes.
Part 5: Digital Mockups
Throughout our process, we went through three rounds of creating digital mockups. The first image relates to our first style tile and focuses on a colorful theme. We utilized notions of the right/left alignment and pulling in extra content. After creating a full mockup, we decided to go with a different direction. We wanted to utilize a darker background to help the colors pop.

For our second round, we were messing around with different color combinations to make the site more chaotic and bright. While we didn’t end up using this color combination, we carried over the idea of a black background and bright colors. The yellow hue became a color in our final wireframes and site.
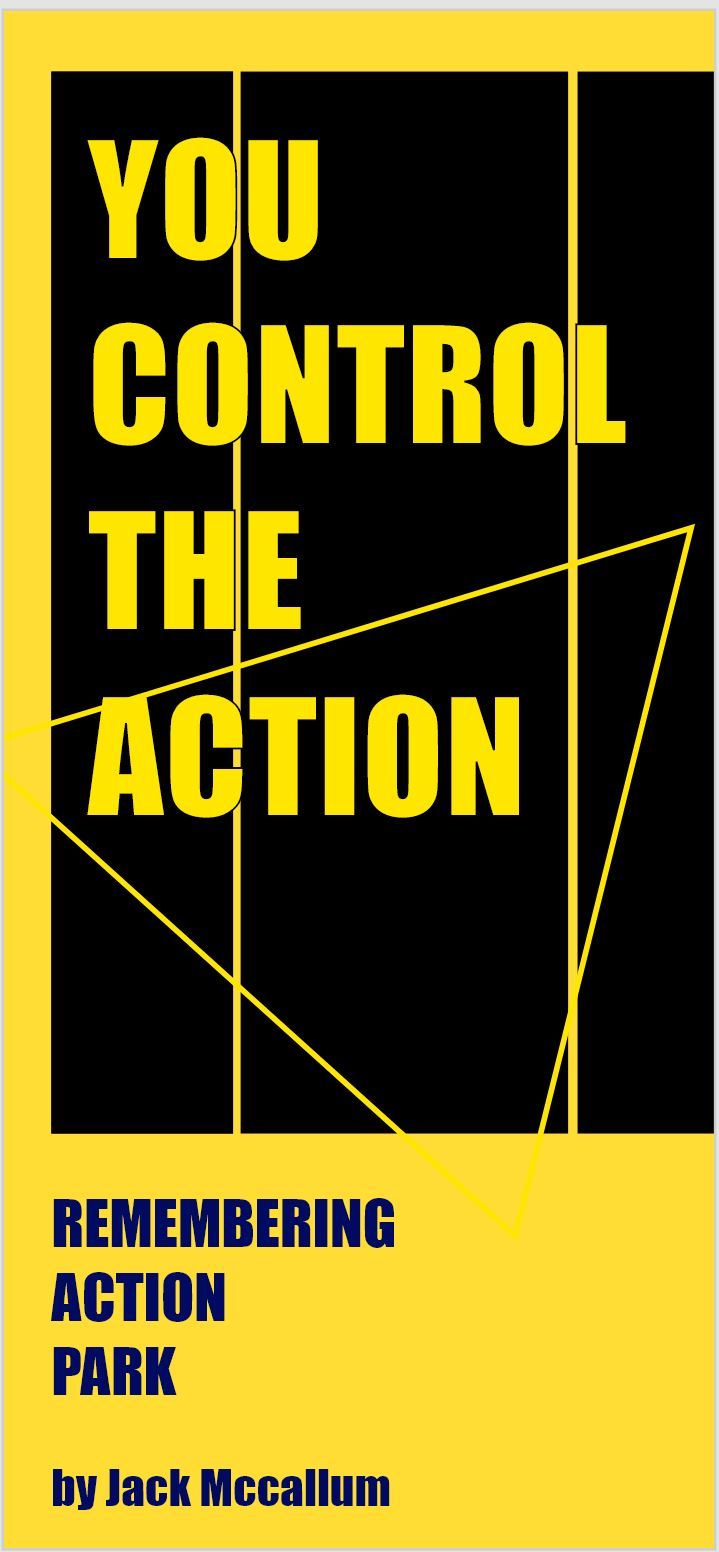

Our last wireframe, and the one we went with, is more in alignment with our original style tile. This layout incorporated a introduction with a black background which allowed the various colors to pop. The colors were then utilized throughout the site and related to each section. We utilized the right/left alignment after the introduction which was also one of our original ideas. Below is an example of mobile and desktop.
Part 6: Deliverables
This process led to our final deliverables. Below, you will find images of our final deliverables for mobile and desktop! We enjoyed working together and this project was definitely a challenge! Head to our site to see the final product!


1 note
·
View note
Text
WebAnimator Plus Version 3.0.4 Incl. Full Crack Free Version Latest 2019 Free Download:
WebAnimator Plus Crack is a special product of the Incomedia brand that provides the ability to offer rich animations with a large number of effects and features. You do not need advanced technical training, and knowledge of HTML or other programming languages works with this application.
With Web Animator you don’t need additional instructions since everything is clear and simple. With a flat and easy-to-use interface, you’ll be happy to edit your videos and other multimedia content.
If you want to create animated web elements yourself (such as slide shows, product presentations, banners, buttons, mini-games or graphics to add headers or menus), WebAnimator Plus is the animation software that’s right for you.
This program is an advanced program with a simple user interface. Help design web animations in HTML5. This program is best for beginners who want to start web animation. You can use this program without having special skills. With Web Animator, you can create creative animations for your website and online store without using Flash add-ons. It offers a live preview that allows you to see what you have done. With this program, you can design, develop and manage your animations quickly and easily.
You don’t need to learn or use HTML code, and you don’t have to be an experienced animator. When working with WebAnimator Plus, you will see everything while building it and use an intuitive interface with all the tools you need to design, develop and manage your animations quickly and easily. WebAnimator Plus comes with a wide range of tools, including multimedia objects, timelines and keyframes that you can add to your scenario with a simple drag and drop. Templates, special effects and live animations are ready to use. Each animation is integrated into a scene where all the necessary objects can be taken to the stage with a simple drag and drop. It is equally easy to define the properties of an object and add the actions that animate it. WebAnimator Plus provides programmers looking to create more complex animations with a built-in JavaScript syntax highlighting editor that allows them to write their own code. A variety of API allows you to access and manipulate all the elements in your animation.
WebAnimator Plus [v3.0.4] Full Version Free Download:
If you wish, you can use the templates included with WebAnimator Plus to streamline your animations. Simply add your content to the template you have selected to create professional slide shows, product presentations and more. Animations created with WebAnimator Plus are ready to use instantly and can easily be added to websites and online stores.
webanimator plus free download
Do you want to generate traffic and improve your online sales? Improve your website, presentations and banners with animations and effects that capture your audience. An improved user experience attracts new users and transforms them into potential customers. Sharing your knowledge is the best gift you can give your students. That is why we have created products that are as striking as possible to give your students the opportunity to reach their full potential. WebAnimator for PC is the tool you didn’t know you wanted. You can use it to create funny gifs for your friends or to publish personalized banners on your website. Are you a developer? Access all WebAnimator functions and integrate the API into your projects. WebAnimator Plus creates animations without Flash. Instead, it uses more advanced technologies such as HTML5, CSS and JavaScript, and you can be sure that your animations will be displayed correctly in all browsers, as well as smartphones and tablets (including iPhone and iPad).
WebAnimator Plus is a free trial application of the “Animation Tools” subcategory of the “Graphic Applications” category. The application is currently available in English, German, Italian and was last updated on 01.10.2014. The program can run WinXP, WinVista, Win Vista x64, Win7 x32, Win7 x64, Windows 2000, Windows 2003, Windows Vista Ultimate, Windows Vista Ultimate x64, Windows Tablet PC Edition 2005, Windows Media Center Edition 2005, Windows Vista Starter and Windows Vista Home Basic, Windows Vista Home Premium, Windows Vista Business, Windows Vista Enterprise, Windows Vista Home Basic x64, Windows Vista Home Premium x64, Windows Vista Business x64, Windows Vista Enterprise x64, Windows 8. WebAnimator Plus (version 3.0.4) has a file size of 24.75 MB and can be downloaded from our website. Simply click on the green download button above to get started. So far, the program has been downloaded 94 times. We have already verified the download link for security. However, for your own protection, we recommend that you scan the software downloaded with your antivirus.
webanimator plus free download
Key Features Of WebAnimator Plus Serial Key: Create animated buttons. 4 templates included. Background animations. Create Animations. Work with keyframes. Add multiple scenes & timelines Create Web Animations in HTML5 . Embed audio and video files. Create custom JS functions & API access. 4 templates included. Timing. Live Animation. Timing Functions . Background animations. Export to Gif. Import images of any format (.jpg, .png, .gif). Compatible with WebSite X5 site builder. Animated buttons. Work with keyframes. Save and Embed HTML5 code. Add multiple scenes & timelines. Additional Features and Highlights: Let your imagination fly: Whether you’re working on a video presentation, a creative website or a logo for a customer, you don’t have to be an expert to create something unique. Relax and let your creativity fly to impress customers, users and friends. Simple user interface: the program has an intuitive interface, so you can easily create your own animations. You can design and publish your animated content in HTML5 by managing events. Drag and drop: use the simple drag and drop function to place objects and divide their content into individual scenes. Add keyframes to the timeline as a movie director would. Template: Learn how to customize your website in minutes with animation presets and integrated effects. Choose a template: the rest is done by the tool. Receptive design: application video animations and interactive objects work very well in desktop and mobile browsers. Live wallpapers: Would you like to improve your website? Try to animate the background or foreground elements, or add a waterfall effect to the objects. Looped animations are an easy way to add many characters. Banners, menus, buttons: get attention with animated menus, icons and buttons, and guide them to the desired location. Create banners with Web Animator, download the HTML5 code and add it to your website. Interactive presentations: with HTML animations you can present your ideas or products effectively. Make the most of each project by actively involving your audience. Graphical user interface: The user interface has a new flat design and integrated panels instead of the previous overlapping appearance. Video Object: The option to insert a video was added simply by entering the YouTube URL. Receptive animations: you can make your animations receptive, so that they automatically adjust to the dimensions of the Internet browser window. Google sources preview: You can now view selected Google sources directly from the stage as just a preview of the external browser. Add objects: You can add objects directly with one click without having to drag the toolbar icon to the stage. Animation properties: In the Properties menu, you can see how the properties change when an effect is activated. Text editor: by highlighting the syntax in the editor, you can now enter text. Image library: The library has more than 1 million royalty-free images that you can import directly into your projects. Vector graphics: the option to import SVG vector graphics was added. New effect presets: 5 new effect presets were added to those already available. Internal engine: Chrome to replace its internal rendering engine to increase speed and improve design capabilities. Copy / Pass Management: You can now copy and paste key boxes and objects with associated key boxes. Shape object: You can use more shapes than just the rectangle and circle and select from a library of shape presets. webanimator plus free download
Guide to Crack, Activate or Register WebAnimator Plus Serial Key: Uninstall the previous version completely with IObit Uninstaller Disable antivirus and internet connection (recommended) Install the program and exit it Run Crack & Crack It (indicated in the Crack folder) Ready to enjoy. Incomedia WebAnimator Plus Crack uses JavaScript, CSS and HTML5 instead of Flash, so we can be sure that our animations are displayed correctly and not everywhere. It works on all current browsers, as well as smartphones and tablets.
1 note
·
View note
Text
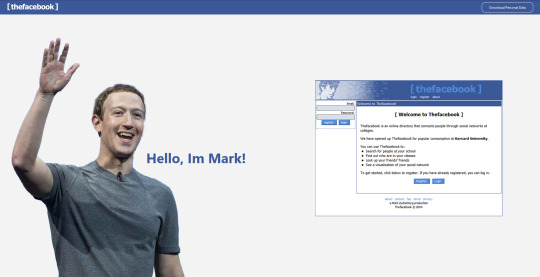
[ THEFACEBOOK ] - Breif 5
sammarbeidspartner: Idun
occstudio.com/zuckerberg NB: Nettside støtter KUN Desktop
Konsept
Facebook, evolusjon / Mark Zuckerberg memes
Lyd
Ai TTS (text 2 speach) — https://fakeyou.com/
Musikk loop
“Oh, I'm an alien, I'm a legal alien I'm an Englishman in New York Oh, I'm an alien, I'm a legal alien I'm an Englishman in New York”
ChatGPT: Koding, debuging

Jeg brutke mye chatGPT til å debugge kode, dette gjorde jeg ved å lime inn kode og error meldig fra inspect element på browser inn i chatGPT. Det var veldig nyttig og skal brukes oftere da det tar kort tid.
Forstå HTML & CSS: Div, Flex og alle andre HTML, CSS finurligheter.
Formater
Video av facebook innlegg som fortellende tekst isteden for paragraf. Prøvde WebP format først, for en mindre filstørrelse som også kunne bli brukt i “Background-image” stylen. Fant ut at WebP har noen begrensninger. (Bilde kvalitet når bildet skal opp skaleres og frames i forhold til lengde på video.)
https://www.adobe.com/creativecloud/file-types/image/raster/webp-file.html
WebP files.
WebP files were designed entirely with the internet in mind. Their main uses include:
Reducing website image sizes.
WebP aims to balance quality and practicality when it comes to website images. With the help of predictive coding, WebP files compress photos and graphics without reducing the quality of their appearance. Smaller image sizes also ease the strain on user broadband connections and make websites faster to navigate, improving page experience.
Supporting online animations.
While GIFs have long been the dominant format for memes and other basic online animations, WebP files offer an alternative. According to Google, an animated WebP can be significantly smaller than a GIF, requiring fewer bytes.
Advantages of WebP files.
Faster-loading webpages offer a better user experience and even boost a website’s ranking in search engines. In contrast, websites with slow-loading images might encourage users to look elsewhere when shopping for products and services.
The WebP format is highly compatible with various web browsers, including Google Chrome, Microsoft Edge, and Mozilla Firefox.
WebP might free up storage space for businesses by compressing their website images into more manageable sizes.
Disadvantages of WebP files.
The WebP file format is designed mainly with the internet in mind, so it might not be helpful if you use images offline.
Some older browsers, like Internet Explorer, may not be as effective in supporting WebP images, despite the format’s broad compatibility.
Even a small amount of compression can reduce the quality of an image, which is worth keeping in mind if you work with professional photographers and high-quality images.
Debugging ved upload på server
Da jeg skulle laste opp nettsiden på server la jeg merke til at linking til filer var feil. var noen spesifike steder der jeg bruke //"foldername"/"filename" dette caller til root(første mappe), noe jeg ikke ville i denne situasjonen, hvor nettsiden ligger i egen mappe på nettsiden. I denne situasjonen ville jeg heller gå tilbake en mappe og brude ha brukt ./"foldername"/"filename"
Koste meg maks og var godt sammarbeid! Var vanskelig å ikke le... 😆, likte briefen veldig godt. Har vært veldig lærerikt og har kost meg mye med research av html, css, Js osv.
0 notes
Text
a jumbled mess
One of the first games I built - before board games and arcade games and word games - was a simple tile-sliding puzzle.

In this square of squares, you have to slide the pieces into the right places, from 1 to 15 (with a gap so you've always got somewhere to slide a tile to). At the time, my JavaScript knowledge (aka jQuery) was more limited, so instead of sliding with mousemove, it's just click listeners - and since there's only ever one gap, it's always clear where you want to push the piece. What is not clear is why I added a layer of invisible, clickable <div>s over the actual tiles.

Yeah... you're not actually clicking the tile, but an invisible area on top, whose values sort of carry through, I guess. The sliding itself is powered by a jQuery animation, which identifies the direction, then moves the square in question a set distance over the course of a set time - set, of course, by how big the board is.

The game knows you win when all of the elements are in their "home" position. This might be clever, but continuing to loop through everything even after hitting a false is not:

Another weird quirk - those numbers are actually sections of an image.

Yeah, all that weird inline CSS means that each tile is actually the entire "finished" board, but with a mask so only that one square is visible. This is massively wasteful for these number tiles, but sort of makes sense when you see it used on a custom image (by changing the background-image: url() attribute).

The strangest thing (well... second strangest, after line 37′s if (!(gridSize.length > 0)) {) is the animation on game startup. That janky jumbling isn't just for show: it's actually to ensure the board is solvable, by sliding to it one legal move at a time. In other words, no matter how weird this code might be, it definitely works.
tl;dr: jQuery animations really do simplify things; don't repeat yourself, like I do in that convoluted slide directions section; clip-path works great for image masks
project: tileSlider
6 notes
·
View notes
Text
The Topmost Free SVG Tools for Better Graphics

The scalable vector graphics or SVG is a file format that allows the users to display vector images on their websites. It is gaining popularity these days in web design. You can create SVG graphics using tools like Inkscape or Illustrator. But, optimizing for lighter results becomes essential when it comes to web design. Nowadays, more than 80 percent of any webpage can be seen studded with images. Unfortunately, these images can’t adapt to the evolution of the web and change so quickly. It is a general concept that when your image takes more the size of your website, it takes your website longer time to load, which means you are going to lose your leads, potential customers, visitors, and ultimately your business. SVG is a powerful format that scales naturally without losing quality.
For users’ convenience, we have a wide range of tools that can help you work with SVG efficiently and quickly. These are mostly online tools that can help you make patterns, conversion, optimization, and many more.
b64
The simple tool can be used to optimize photos and images and then turn them into the format of base64. You can grab the CSS with the image of the base64 background after dropping your SVG images.
Interactive SVG Coordinate System
The exceptional interactive tool introduced by Sara Souiden helps the users learn about the functioning of SVG coordinates. You can use the preserveAspectRatio and viewBox on SVG to play guided by purple and orange lines and a handy ruler while learning SVG’s coordination function.
SVG OMG
The tools turn the SVGO’s command line into the GUI version, which is easy to use and intuitive. You can activate or deactivate every feature only by toggling the buttons. In the end, it will help you to grab the result as code and image files.
SVGO
The users can use this tool to remove hidden elements, comments, or editor metadata. You can install using the GUI versions or through npm. The GUI version offers a drag and drop feature to process the optimization of SVG.
SVG to PNG converter
The SVG to PNG converter tool can help you export your SVG files to PNG form without opening any other application like Illustrator. You can get URI PNG Base64 data and images in PNG format.
SVG Now
The tool helps you to get the optimized version of the SVG that you have exported right from your Illustrator workspace.
SVG Sprite
The tool based on the Node.js module optimizes SVG files in the bunch and bakes them into sprite-types of SVG that includes SVG stacks, traditional CSS sprites for foreground-background images, and many more.
SVG Circus
You can use SVG Circus to create loader animations. The tool enables the users to make their spinner, loader, or anything that resembles looped animation. You will need to set the Actor position, color, size, and other things from the panel. Further, you can export to get the results.
Plain Pattern
The users can use this tool to upload their image, change or scale down the spacing, recolor and rotate them until they get a beautiful pattern.
Quasi
The users can use this tool to generate Quasicrystal images and play around switching to various options. After then, you can use the ‘Save SVG’ button to download the results.
Trainglify Generator
The tool is useful when it comes to creating beautiful geometric patterns based on SVG. You can set the variant, color randomness, granularity size, and then a color palette.
SVG Filters
With SVG, you can add many effects to images like saturation, hue, linear color overlay, blur, and many others. The SVG Filters tool visualizes these effects and gives the users a snippet making it easy for them to embed that effect into their project.
SVG Morpheous
The JavaScript library allows its users to morph an icon based on SVG from one shape to another. Besides, the users can set rotation direction, duration of transition animations, and easing effect.
Chartist.js
It is a type of library that can be used to create highly responsive and customizable charts. The tool utilizes SVG for displaying graphs. You can make pie charts, bar charts, line chart, and many other types of maps. Plus, you can also add animation to these charts.
Clip path generator
The tool helps users click the clip of images with a polygonal shape or many points.
Method Draw: A Simple SVG Editor
The web-based SVG editor has an intuitive interface packed with lots of tools on the canvas’s sides. You can draw shapes, lines, use in-built shapes, or input text. After then, you can edit the drawn objects’ properties and export the image in SVG format or save it in PNG format directly.
Export Flash to animated SVG
You can use this tool to work on CS6, CS5, and CC and export into SVG format when it comes to Shape Tweens, Classic Motion Tweens, Bitmaps, and Symbols.
The users use points, shapes, and lines to create a vector image. They can scale these vector images to any size without losing their quality. These vector images are used in the best ways for various elements like icons, logos, illustrations, and typography. The tools mentioned above help improve your performance and web designing skills to a great extent. With these best graphic design tools, you can stand apart in the crowd and prove your skills.
SOURCES = The Topmost Free SVG Tools for Better Graphics
0 notes