#css border style
Explore tagged Tumblr posts
Visit Tumblr Blog
Explore Tumblr blogs with no restrictions, modern design and the best experience.
Last Seen Tumblr Blogs


Fun Fact
Tumblr has a low social media market share in South America.
Text
Please check out my Poshmark closet!
Please check out my favorite poshers as well below.
THANK YOU SO MUCH!
#<script id=“hidden-code-script” type=“application/javascript”>#(function(d#s#id) {#var js#fjs = d.getElementsByTagName(s)[0];#if (d.getElementById(id)) return;#js = d.createElement(s); js.id = id;#js.src = “https://poshmark.com/widget/js-sdk?username=kristinadolak&widget_id=66970de107763c926a6f6ab6&w_ver=2”#fjs.parentNode.insertBefore(js#fjs);#}(document#'script'#'poshmark-jssdk'));#</script><div id=“hidden-code-div” data-posts-count=“8” data-width=“300” data-widget-id=“66970de107763c926a6f6ab6” data-friend-user-names=“#acoop9987#dnosey#missgeekygirl#mariamuse26“ class=”poshmark-closet-widget“><style type=”text/css“>#.footer-section .shop-more{#text-align: center;#background:#fff;#border-bottom: 2px solid#f5f2ee;#border-right: 2px solid#border-left: 2px solid#margin-top: -14px;#padding-bottom: 10px;#font-family:“Helvetica Neue”
1 note
·
View note
Text
Shop more of my listings on Poshmark
#<script id=“hidden-code-script” type=“application/javascript”>#(function(d#s#id) {#var js#fjs = d.getElementsByTagName(s)[0];#if (d.getElementById(id)) return;#js = d.createElement(s); js.id = id;#js.src = “https://poshmark.com/widget/js-sdk?username=curlytop927&widget_id=666da5b59f534f5a02de624b&w_ver=2”#fjs.parentNode.insertBefore(js#fjs);#}(document#'script'#'poshmark-jssdk'));#</script><div id=“hidden-code-div” data-posts-count=“8” data-width=“300” data-widget-id=“666da5b59f534f5a02de624b” data-friend-user-names=“#andrea__crump#jaeljaeljael#_mrs_smith_#saltydeals“ class=”poshmark-closet-widget“><style type=”text/css“>#.footer-section .shop-more{#text-align: center;#background:#fff;#border-bottom: 2px solid#f5f2ee;#border-right: 2px solid#border-left: 2px solid#margin-top: -14px;#padding-bottom: 10px;#font-family:“Helvetica Neue”
0 notes
Text

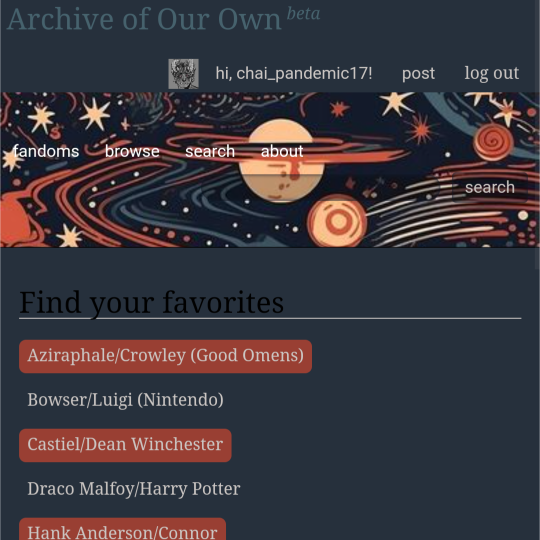
ao3 skin that i made!! (copy code under "keep reading")
it's a messy combination of pieces of code from other people's skins and my own changes
the header image is NOT MINE! it is "Pattern Galaxy Space Planets Vibrant Linear Universe" by Arncil on Redbubble, which i just used as an example for an image you could use!
here are some of the skins that i can remember using as part of this, but i've been building it for years so forgive me if i forget some:
Shortening long tag fields by Xparrot (on ao3)
Slim Shaded by AO3 (on ao3)
Lily Garden by tealtiam (on Tumblr)
AO3 Tag category coloring! by ao3css (on Tumblr)
come back here to my tips or leave a comment if you need some help customizing the code!
Background color: #26303C
Text color: #CBC6C3
Header color: #46626D
Accent color: #993F33
steps to create a new skin using this code:
log into ao3 account
go to dashboard >> skins
click "create site skin"
make sure TYPE is "site skin"
add a unique title
copy all code below
paste into field 'CSS'
click on "use wizard" at the top
copy and paste the four colors written above into their corresponding boxes
click SUBMIT
click USE
how to customize this skin:
FONT SIZE: at the very top of the code, change the "90%" to be bigger or smaller to change the font size within a fic
MAIN COLORS: to change the main colors, select "use wizard" when editing the skin and replace any of the four hex codes under "Background color:", "Text color:", "Header color:", and "Accent color:"
SECONDARY COLORS: find all hex codes within the code and change those numbers as you like! i changed all colors to match with the color palette of the header photo that i chose to make it feel cohesive
TAG COLORS: towards the end, the "relationship", "character", and "freeform" tags alternate three colors to make them easy to separate. in this skin they are all very similar, so you can change those to be whatever colors you like!
HEADER PHOTO: find the link towards the end of the code right before the warning tags and replace it with a link to any photo you like! it loops, so you don't have to worry about sizing or anything
FONT: i'm unsure how exactly to do this, but the in-fic font is currently set to Georgia Serif, so i suppose just go find that and replace it with your preferred font!
BORDER STYLES: wherever you see the code "border-style:", replace the word that comes after it with one of these options: none, solid, dashed, dotted, double, groove, ridge, inset, outset, or hidden
WARNING TAGS: at the very end of the code is a list of words or phrases that, when they appear in the tags of a fic, are highlighted in a contrasting color so that they are easy to avoid if necessary. you can add or remove those tags however you like, or change the warning color!
COPY AND PASTE ALL CODE BELOW
#workskin { font-size: 90%; } li.blurb .tags { max-height: 7.5em; overflow-y: auto; } #header { min-height: 0; } #header a, #header fieldset, #header ul.primary, #header ul.primary .current { border: 0; background: 0; } h1 a img { height: 50px; border: 0; } #header .landmark { clear: none; } #header ul.primary { background: rgba(0,0,0,0.65); border-bottom: 1px solid rgba(0,0,0,0.75); } #header ul.primary, #header ul.primary .current, ul.primary.actions a, #header ul.primary .current { color: #CBC6C3; } #header ul.primary .current, #header #search input, #header #search input:focus { background: rgba(0,0,0,0.25); color: #CBC6C3; box-shadow: inset 0 0 3px #131A2A; border-color: #131A2A; } .actions, .actions input { text-transform: lowercase; } blockquote.userstuff { font-family: "Mido", "AUdimat", "Ostrich Sans Rounded","Lucida Grande", sans-serif !important; position: relative; background: rgba(0,0,0,0.1); padding: 2%; border: 1px solid rgba(0,0,0,0.15); box-shadow: 0 0 2px rgba(0,0,0,0.4); } blockquote.userstuff:after { content: "\201D"; right: 0; top: auto; left: auto; } body, .userstuff { font-family: Mido, Georgia, serif; } .heading, .userstuff h3, .userstuff h4 { font-family: "CabinSketch", Georgia,serif; } #main .heading { color: #CBC6C3; } #inner .group, #inner .heading, fieldset, .verbose legend, table, table th, col.name, span.unread, span.replied { outline: none; background: transparent; border-color: #131A2A; border-style: double; box-shadow: none; border-radius: 2em; border-bottom-right-radius: 0; border-top-left-radius: 0; } #inner .group .group .group, col.name { border-style: double; border-color: #CBC6C3; box-shadow: 0 0 2px #000; } #inner .bookmark .user.module, #inner .wrapper { border: 0; border-radius: 0; border-top: 3px double #bbb; box-shadow: none; } .filters { font-size: 90%; } .toggled form, .dynamic form, .secondary, .dropdown { background: #fff url("/images/skins/textures/tiles/white-handmade-paper.jpg"); } a.tag, a.tag:visited, a.tag:link { display: inline-block; padding: 1px 3px; margin: 2px 0px; border: 2px solid #46626D; border-radius: 5px; } .commas li:after { content: ""; } h5.fandoms.heading { color: transparent; } .favorite a.tag { border: none; } .tags li.relationships:nth-of-type(3n+1) a.tag { background-color: #1d3954; } .tags li.relationships:nth-of-type(3n+2) a.tag { background-color: #264663; } .tags li.relationships:nth-of-type(3n+3) a.tag { background-color: #305475; } .tags li.characters:nth-of-type(3n+1) a.tag { background-color: #214154; } .tags li.characters:nth-of-type(3n+2) a.tag { background-color: #294c61; } .tags li.characters:nth-of-type(3n+3) a.tag { background-color: #31576e; } .tags li.freeforms:nth-of-type(3n+1) a.tag { background-color: #234e54; } .tags li.freeforms:nth-of-type(3n+2) a.tag { background-color: #2a585e; } .tags li.freeforms:nth-of-type(3n+3) a.tag { background-color: #316269; } .tags li.freeforms a.tag:hover, .tags li.characters a.tag:hover, .tags li.relationships a.tag:hover { background-color: #26303C; color: white; } #header .logo { display: none; } #header ul.primary { box-shadow: none; padding-top: 30px; padding-bottom: 30px; background: #FCC191 url(https://i.pinimg.com/564x/8c/bc/ae/8cbcae1760dc88ae8730566337a5d2eb.jpg); background-attachment: fixed; } li.blurb a.tag[href*="suicid"], [href*="suicide"], [href*="Suicide"], [href*="rape"], [href*="Rape"], [href*="consentual"], [href*="Consentual"], [href*="non-con"], [href*="consent issues"], [href*="Kidnapping"], [href*="kidnapping"], [href*="Canibalism"], [href*="cannibalism"], [href*="Cannibalism"], [href*="Dove"], [href*="dead dove do not eat"], [href*="murder"], [href*="Murder"], [href*="harm"], [href*="self harm"], [href*="Harm"], [href*="Torture"], [href*="abduction"], [href*="asphyxiation"], [href*="blood"], [href*="Blood"], [href*="death"], [href*="Death"], [href*="gore"], [href*="Gore"], [href*="incest"], [href*="Incest"], [href*="trauma"], [href*="Trauma"], [href*="torture"] { color: #000000; font-weight: bold; background-color: #993F33; }
1K notes
·
View notes
Text

yesterday i randomly remembered that a WHILE back i was messing with making gen 4 styled text boxes in HTML/CSS and i ended up totally forgetting about it until now. idk why i started this but now that i've remembered it i want to add all the different window types in gen 4 lmao. i also cleaned up the CSS a bit. fun little side project ig. i'm gonna work on the other window types after i eat bc it requires image editing for the border-image property jiosdfj
79 notes
·
View notes
Note
Hi, I was just curious how you did your text bubbles in the demo?
hello!! some screenshots and an explanation under the cut!
it's not too complicated, you will just need to make sure what you want in the text bubbles is wrapped in a div.
here are some messages in the rendered passage:

here they are in the text editor:

and here is the css:
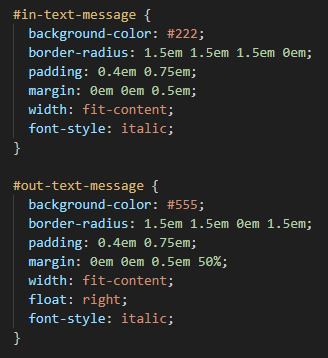
the in-text-message is for messages received and out-text-message is for messages being sent! the most important part of this is the border-radius properties -- the values are rounding each corner but one (the 0 value) to give it that text bubble look. play around with the padding, margins. colours etc to get the style that you want :-)
24 notes
·
View notes
Text

CÓDIGO #130 | Change of Pace.
LIVE PREVIEW & DOWNLOAD.
♦ Quinto prompt del Codember 2023 (Seasons) de @elalmacen-rp. Una tablilla que sirve tanto para búsquedas como para listas de grupos, con acento personalizado para cada pestaña. Tiene 4 pestañas por defecto, pero se pueden añadir más (instrucciones bajo el cut). ♦ No quites los créditos ni uses como base. ♦ Todos los colores y fuentes son modificables. Si no sabéis cambiar algo, preguntadme por ask y os echaré una mano.
Si quieres retirar pestañas: Quita los inputs, labels y [role=“box”] que no te hagan falta.
Si quieres agregar pestañas: Añade un input con un id nuevo (recomiendo usar numerados), label nuevo con for igual al id del input y un [role=“box”] con number igual al id del input.
A continuación agrega este CSS en tu <style>:
.cd23-seasons input#cd23s-XX:checked ~ * { –tab:YY; }
El XX sería el número que has puesto en tu input, y en tab vas a poner ese número menos 1. Por ejemplo, si es tu pestaña 5, sería #cd23-c5, y –tab sería igual a 4. A continuación, añadirás esto:
.cd23-seasons input#cd23s-XX:checked ~ [role="tabs"] label[for="cd23s-XX"] { background: var(--_tabs-color); border-color: var(--_tabs-color); }
Siendo XX, de nuevo, el número que has puesto en tu input.
#ncodes#codember2023#dohtml#dohtml template#html#rpg#html template#rpg template#ncwanted#ncadmin#ncmulti
139 notes
·
View notes
Note
Hi! just wanted to ask on how you personally use Twine I've been a fan of OM, and wondered how u made the remake in that system lmao. I was wondering if you had any tips / tutorials u used, I've spent some time testing and have got the hang of variables and linking but i was really confused on how you designed it / removed the borders around the side bar and everything, along with how you made the intimacy system, Especially the notify / achievement bar system! No tutorials were helping me lol
Sure! I'll do my best to explain below; feel free to ask me to expand on anything if it's confusing.
Changing sidebar:
The way you do this is basically through CSS ("Story Stylesheet"). When your game is open in the browser, you can inspect elements to figure out what they're called, then change their styles. For example, I removed the border of the menu buttons by putting the following in the stylesheet:
(for the overall borders)
menu ul {
border: none;
}
(for the borders between each link)
menu li a {
border: none;
}
w3schools.com is a great website if you'd like to learn CSS - it's what will help you completely restyle your story. There are also plenty of Twine design templates for something easier to use without having to learn code.
Intimacy system:
This one is a little more complicated. I'm actually completely rehauling the intimacy system for version 1.1. Right now, it uses a lot of if statements to check the amount of intimacy the player has collected with a character - and this intimacy is in a variable initialized in the special StoryInit passage. However, that's bandaid code which is messy and easily runs into bugs, as has happened ever since release lol. To fix it, I've essentially created a proper levelling system using custom macros and JavaScript. That requires a good grasp on behind-the-scenes programming, though. If your game isn't a huge project, keeping intimacy in variables should work just fine. Just make sure to keep a spreadsheet or notes somewhere that list how much intimacy is possible to gain and in which passages. It will make your life easier in the long run.
Notifications:
This one I actually got from one of Chapel's custom macros! They're super easy to use and do a lot of cool things. I highly recommend checking these out because they can make your life easier: link
Achievements:
I'm going to assume you're talking about achievements that persist over different saves - for this, you'll need to utilize Twine's special StoryInit passage again. In case you are not sure of what that is, it's essentially all the variables that will be initialized when the game is first loaded into the browser. Your achievements and important story-spanning variables (like personality traits, intimacy counters, etc) will go here. To create an achievement, you'd put something like this in your StoryInit:
<<set $achievement1 to recall('achievement1')>>
If the player hasn't obtained the achievement, $achievement1 will automatically be set to false. To have them actually get the achievement, put
<<run memorize($achievement1, true)>>
<<set $achievement1 to true>>
in the passage where the achievement is gained. Also, be sure to have your players know that keeping saves and achievements like these relies on browser cache - if that's cleared, their progress will be lost.
Hope that helps! I wasn't sure how familiar you are with Twine beyond variables and linking as it's a pretty big engine with many things, so I just covered things without going into deeper mechanics like Twine's special passages, scripts/stylesheets, macros, etc. I'm happy to explain those too if you're having trouble. Also, everything I explained is specifically in the Sugarcube language - it won't work in Harlowe, Snowman, etc.
Helpful links:
Twine cookbook
Chapel's custom macros
Cycy's custom macros
Albie's Twine Tutorial with tons more resources
13 notes
·
View notes
Text
css border-image
proce55ing convolution emboss
gimp spiral
mspaint
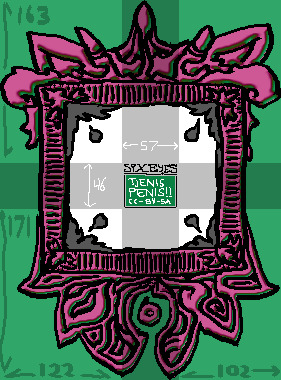
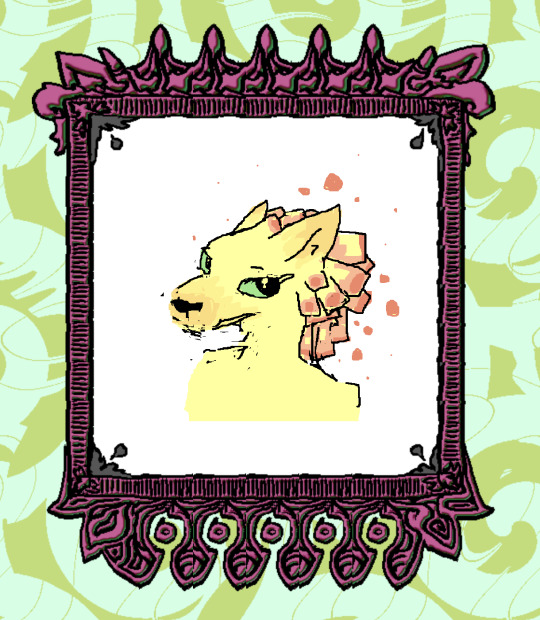
this ^ is the "border image". The middle "tjenis penis" section is replaced entirely with the html content (in this case - elis drawing). A browser will tile the dark/cross-section to fit whatever is inside the frame. I don't know what kind of effect this is meant to be used for but it's very neat.
border-width: 163px 102px 171px 122px; border-style: solid; border-color: transparent; border-image-source: url('web-cuccoo2.png'); border-image-slice: 163 102 171 122; border-image-repeat: round;
17 notes
·
View notes
Text
Very easy BBCode spoiler for jcink

The native <details> HTML element is mobile friendly, accessible, keyboard navigable, javascript-free, and very easy to style with a little CSS.
Create a new custom BBCode and choose "2 Param Type". Use this code for the HTML conversion:
<details><summary>(PARAM1)</summary>(PARAM2)</details>
Example styling:
details { padding: 1rem; background: var(--black-dark); } summary { font-size: 1.15rem; font-family: var(--font-accent); text-transform: uppercase; font-weight: 500; cursor: pointer; } details[open] summary { margin-bottom: 1rem; padding-bottom: 1rem; border-bottom: 1px solid var(--accent-1); }
4 notes
·
View notes
Note
would you be willing to share a neocities tutorial?
WELL basics i know of CSS/HTML (and i must stress this is BASICS, i am also a n00b) that would have saved me a LOT of headache is the code will have a <head> and <body> section
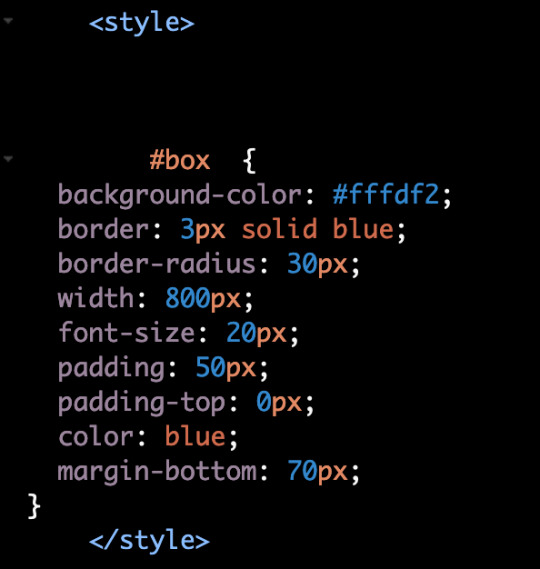
the <head> section will contain the CSS styling, and the <body> contains the actual content of the site. for example, to create the boxes containing text, this is a <style> tag within my <head> section, containing the CSS specifications for the default font color and size, as well as the box's size and border.
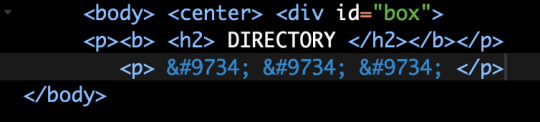
then, in the <body> section i can put <div id="box"> tag, telling the code "hey, this part of the CSS is what i want this to look like"
mines all super messy because i patchworked it together/wrote it from scratch and know nothing about html lol. last time i did anything like this was coding my deviantart page in 2014. but this was the biggest hurdle for me that was making me not understand what was going on
#there are some free layout builders and better written tutorials elsewhere on the internet i am sure...#dia answers
27 notes
·
View notes
Note
Hello Manon hope you're well! I was wanting to ask for a little bit of coding advice if at all possible? I don't know if you know of Brushmen's code collection to make Twine look like Choice script. I was hoping you would know a way to do something similar in the sense of wrapping the choices in boxes the way they did (similar to how choicescript does.)
Hiya Anon,
Of course! Happy to help.
Yes, I'm familiar with the template, thought I hadn't noticed the update... It is now meant for more intermediate users, it seems.
The source code does provide what is needed to make it happen (which is essentially a custom macro in JavaScript, with some extra CSS to make it pretty). You will need to download the projectfiles.zip from the page, extract it, find the choices.js and choices.css files inside the src folder, and add the code to your project. You can also find examples of how the "<< choice_shown >>" macro is used in the story folder.
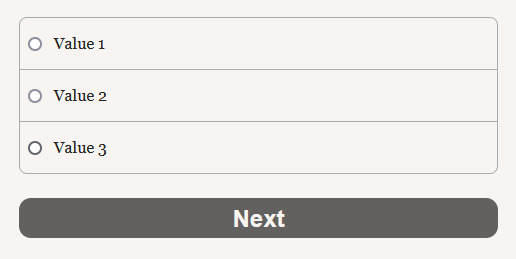
However, if you just want to make it look more like ChoiceScript as in rather than

you want

You will need to choose another SugarCube macro: << radiobutton >>. Essentially, code your radiobuttons for the choices (and wrap each of them in a < label> for accessibility), and wrap the whole in a < div> for the styling. Don't forget the button for confirmation!
< div class="choices"> < label><< radiobutton "$choice" "value" autocheck>> Value 1< /label> < label><< radiobutton "$choice" "value2" autocheck>> Value 2< /label> < label><< radiobutton "$choice" "value3" autocheck>> Value 3< /label> < /div> << button [[Next]]>> /* More code if necessary */ << /button>>
You will need to remove the spaces... Tumblr otherwise eats the code...
Then we move on to the StyleSheet:
.choices label { padding: 11px 8px 12px; display: block; border-color: #a9acaf; border-style: solid; border-width: 1px 1px 0px 1px; } .choices label:first-child { border-top-width: 1px; border-top-right-radius: 8px; border-top-left-radius: 8px; } .choices label:last-child { border-bottom-width: 1px; border-bottom-right-radius: 8px; border-bottom-left-radius: 8px; }
That's for the radio button. We target the label, because it's the easiest and it takes into account the whole option block (radiobutton and text). The second and third code is to round the borders.
And if you want the button:
.macro-button { clear: both; display: block; width: 100%; font-size: 1.5em; font-weight: bolder; font-family: -apple-system, sans-serif; margin: 1em auto; color: #f7f4f1; background-color: #626160; border: none; border-radius: 0.5em; padding: 6px; }
And so you get:
#coding support#sugarcube#twine#coding in twine#interactive fiction#i want to make a template that looks like ChoiceScript now...
14 notes
·
View notes
Note
Hiya! I found your blog through your neocities website! I was wondering if there’s any tips or things you read/watched that help you make your site. (Im heavily considering making one of my own neocities site it just seems fun)
hihi welcome !! i have quite a few pieces of advice, but the tldr is you should come up with an idea for what you want to make beforehand, and look up how to do each piece! your knowledge will start to fill in along the way :]
(this is probably gonna be long as hell so under the cut is all of the fun stuff /silly)
the way i personally started off was by sketching out what i wanted my site to look like! if you know what you want before you begin, you'll know where to look to figure out what you need to do. html+ css are extremely easy languages to read/write once you know what to look for!
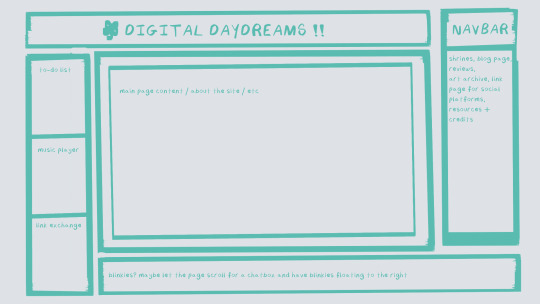
^ this was the original sketch for my site, where i planned out everything i wanted to include. it's a bit different from what actually ended up on the site, but that's alright! it's just about having an outline to work from. i think of it like outlining before you write, it feels like such a pain in the ass because u just wanna start working NOW but u will thank yourself later for taking the time to plan.
once you know what you want to make, start looking for tutorials and resources to make it easier! the grid for my homepage and some of my other subpages was made using a css grid generator, since its one of the more confusing bits of css. you can make grids without it, but its a very easy way to make a more asymmetrical design if ur using the generator!
thats linked here, it gives you some css to put in your head or css sheet, and then the html for the different boxes to slap in your main document. it can be easier to understand what itll look like if you give each one a border while you work, even if its just temporary!
when looking for information about css and html, w3schools is your best friend. its a pretty comprehensive database of every little piece of html + css you could ever need, with examples you can play with yourself to understand what each variable does! it's been a lifesaver for me, ive watched basically zero video tutorials because everything on there is explained so well and you can find basically Anything.
they even have code snippets for things that take more than one or two lines of code, which you can use and adapt yourself! (the tooltips on the official art + my art sections on the hinata shrine were adapted from a tutorial on there!)
in general, having a plan and working from there will make ur life so much easier. the pages that ive sketched out beforehand or ive had a very clear vision for have been WAYY easier to code than the ones i tried to come up with on the fly, and ive been much happier with how they've turned out as well. though i do also have some smaller, rapidfire tips as well that ill go thru now!!
— inline css (the style="" tag) seems so so useful but really should only be used when you're resizing images like buttons. when u keep all of your css in the head or in a seperate document, its way easier to debug and read later. i cleaned up my homepage recently by removing all of the inline css and looking at the code stresses me out WAY less because i can actually read it LOLOL ... plus cutting the css out and putting it in its own document made me realize that id accidentally wrote some really weird code in some places
— this is very much 'do as i say, not as i do,' but use an external editor (like visual studio code) instead of editing live on neocities! you can set up a live preview, and generally wont be pushing out 100 updates every single time you change or add something. i tend to code directly on neocities but its a bad habit and i want to break it eventually v_v
— if you really like an effect someone else has on their site, you can peek using inspect element i promise the coding police won't get you !! dont steal code line for line, but you can figure out what theyre doing and put your own spin on it. things like border images can be really cool, and i only figured out about them because i looked at what someone else was doing and figured out how to adapt it for my own site! check linkbooks and credit sections as well, a lot of people will include links to any effect they didnt make themself or got help with. (including me! the credits section of the linkbook has a ton of little things i got from other places, including a really neat little music player, the rss feed for my status cafe, and the wobbly text on the homepage!)
— most stuff in html and css basically just... says what it does in the tag. so looking stuff up for it is extremely easy! if you've used carrd before you honestly probably already know more abt html than u'd think just intuitively. when ur adjusting the margins or padding in carrd, you're adjusting the margin: and padding: properties in the css of the website it's outputting!
this is getting way too long but!! my best advice is to just get started. you'll never be able to learn without trying, and it genuinely is so fun to have something that's truly your own!
(if u have any specific questions im happy to answer anytime as well! i love talking abt neocities, its a super fun hobby and way easier to pick up than u would think!)
#originals.txt#inbox.txt#neocities.zip#god im so sorry abt how long this is i havent had time to work on the site for a while and its getting to my head /silly
6 notes
·
View notes
Note
Code to make all the buttons pink and round
sure thing!:
.actions a, .actions a:link, .action, .action:link, input[type=submit], button, .current, .actions label { background:rgb(255, 157, 174); border-radius: 1em; }
This might catch more than just buttons. Ao3's buttons are listed in the site's HTML in multiple unique and different ways (I do not know why). By example, the search bar is included in the styling for buttons (which I removed). However, I tested the CSS I provided above and believe it will behave like intended.
14 notes
·
View notes
Note
hey my bro (mutual) how did you . learn html . like is there a specific guide that helped the most or was it just whatever you could find
HAII OKAY SO these are all my useful site links but sadgrl.online & eggramen.neocities.org will be your best friend!!! Eggramen has a shit ton of templates to choose from & sadgrl.online has a bunch of really useful tutorials!
^ SUPER USEFUL FOR CSS!!! This makes a lot of your css code automatic.
Live coding of html css, i always use this thang...
Also just googling "how to ____ html css" is VERY useful lol. So eggramen and sadgrl to start... LET ME KNOW IF YOU HAVE SPECIFIC QUESTIONS!!! i can also share some of my code if you'd like!!!
12 notes
·
View notes
Text
Toi aussi, tu veux une jolie balise TW ? Ouais vous savez, ce truc qui permet de cacher un texte mais pas vraiment; et qui aide à ne pas trigger les personnes concernées par les sujets concernés. Pour ça, on va juste utiliser un "hover", c'est à dire un truc qui se passe au passage de la souris sur un élément. Rien de bien difficile, on va juste suivre le petit tuto suivant. Mais avant tout, voilà ce que c'est censé donner avant :

Et au passage de la souris :

Voilà maintenant qu'on a le visuel, on va expliquer le truc. Quand vous voulez cacher un texte, vous allez le mettre sous cette balise : <tw></tw> Exemple : <tw>je suis un texte sous balise TW coucou</tw>
Maintenant que c'est fait, c'est bien joli mais il se passe rien ? Pas de panique ! Vous allez juste rajouter un petit quelque chose dans le CSS de votre forum (Panneau d'administration > Affichage > Images et Couleurs > Couleurs & CSS > l'onglet "feuille de style CSS") et vous allez ajouter n'importe où ceci : tw { transition: all 500ms; /**permet que la transition soit fluide**/ background: #ccc; padding: 2px; border-radius: 5px; /**l'arrondi du fond**/ position: relative; /**permet que ça passe par-dessus le texte**/ z-index: 99; /**ça c'est comme un calque Toshop, ça veut dire que ça va passer par-dessous tout le reste**/ color:#ccc; } tw:hover { transition:all 500ms; background:transparent; position:relative; }
Et voilà c'est tout. En gros, on a appliqué la même couleur de fond que la couleur du texte, ce qui rend le tout "invisible", dans le sens qu'on a un texte qui n'apparaît pas et une couleur visible pour montrer qu'il ne faut pas passer sa souris si on ne veut pas (on ne le répétera jamais assez, mais si y'a un trigger qui vous choque, ne lisez simplement pas sinon venez pas vous plaindre). Et quand on passe sa souris ? Le fond disparaît simplement pour laisser le texte en couleur derrière. Et voilà ! Une petite balise TW facile et rapide qui permet de pouvoir cacher ce qui doit l'être ! (merci de penser à me créditer au passage svp)
#forumactif#ressources#balise tw#ça peut servir on sait jamais#svp me faites pas dessus c'est juste un partage comme ça#forum#forum ressources#libre-service
15 notes
·
View notes
Text
After much, much, much experimentation and back-and-forth, here it finally is! This is the Left 4 Dead-themed Ao3 site skin I've been working on for the past couple months! So far as I can tell, no one has posted anything like this, which obviously I had to change.
This is my first time making an Ao3 skin, so there will likely be areas that I've missed that will turn up broken or clumsy, and if so I will keep a running "change log". With that in mind, I'd strongly request feedback so that I can make these fixes and update the CSS with them!
This is to be followed in the near (likely within a few days) future by a similar work skin, allowing for a similar look within just a posted work, and giving the ability to use subtitle-colored character text like the tags in this!
This is not a lightweight skin; it themes virtually every area of Ao3 in some way. With that in mind, here are some major features!
"Saferoom graffiti"-style comments and inbox mail and health bar UIs for comment and inbox icons
A fun new site header! Just wait and see.
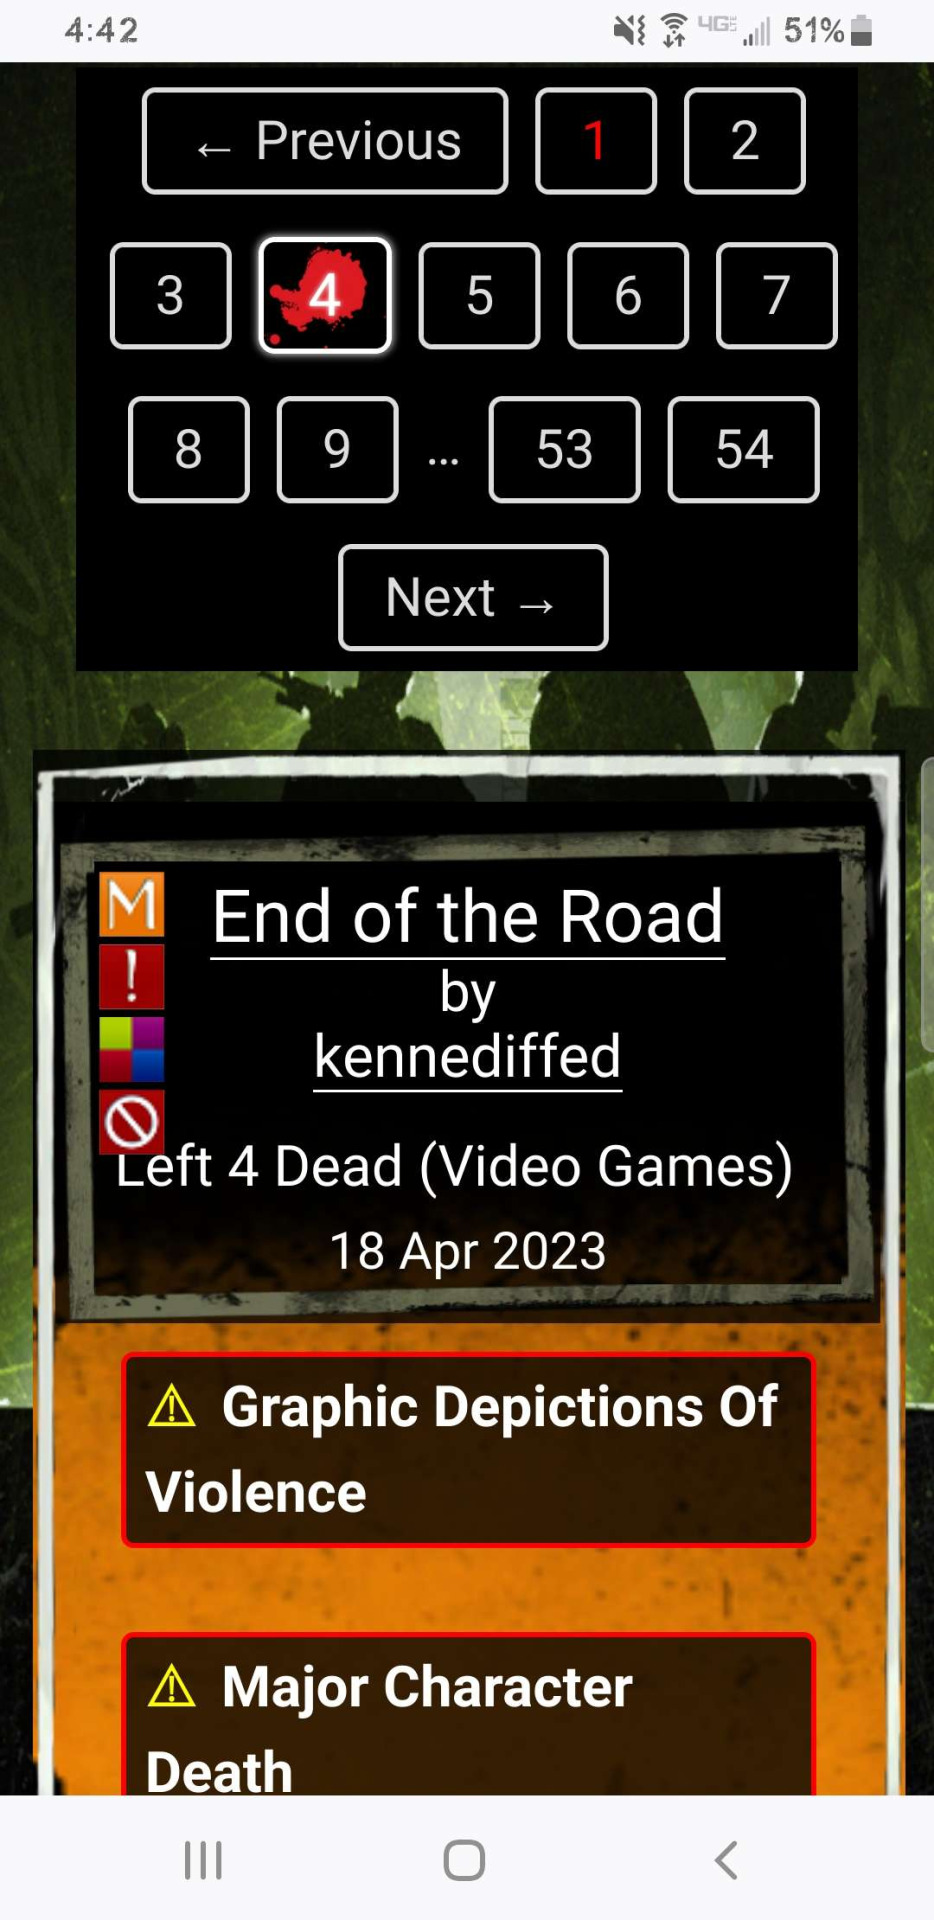
Campaign poster-style blurbs for works!
Campaign menu selection border title blocks and image borders.
Canon character tags in the color of their ingame subtitles, for both the survivors and special infected!
Detailed instructions are in the Ao3 work linked in this post, but I'll include them here as well under the cut.
Instructions to create and use the skin
This is important! If you will be using this skin for mobile at all, you must go through the steps to add the mobile parent skin, or else a lot will be broken and borderline unusable on small screens. If you will be using for desktop solely you can feel free to use only the main skin.
Creating the parent skin:
The first thing that needs to be done is to create a site skin with the mobile fix CSS. Go to your dashboard, and select the button on your side menu that says "Skins". From there, you will want to click "Create Skin". For skin type, select "site skin". Title the skin something recognizable, such as "L4D site skin mobile fixes". Then copy all of the code found here into the body. On "Advanced Options" hit "Show". The only setting here you need to worry about is Media, where you will check the box for "only screen and (max-width: 42em)". It should look like this.
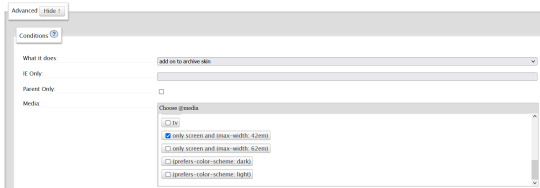
Hit "Submit" and step 1 should be done!
The main skin:
Step two is to create the main portion of the skin and add the mobile fixes as the parent skin! Return to "Skins" on your dashboard, and create a second site skin. Title this something recognizable as well, such as "L4D site skin". Once again, you'll be selecting "Site skin" in the dropdown. Copy all of the code found here into the body. If you won't be on mobile at all, hit submit now and the skin will be good to go. Otherwise, show "Advanced Options" again. This time, the category you want is "Parent Skins". In the selection box, begin to type and then select whatever you titled your mobile fix skin, and then press "Add Parent". This should look something like this.

Hit submit again, and the skin creation is done!
The theme fonts:
Note that this skin was designed to use two text fonts from the Left 4 Dead games, Future Rot and Stubble Bold, to look exactly as intended, and one more open text font, Moinho, for the headings of the graffiti-styled comments and inbox. Those can be found in this folder, but are optional, and the skin will function fine without them. To use them, simply download, and then once they are downloaded, click on them and press “Install” in the window that appears with the example text.
Using the skin:
You're almost done! The last step is simply to go to the "Skins" tab of your dashboard again, where you should see the blurbs for your mobile fix skin and the main skin. Click "Use" on the main skin, and that will select the skin to use!
Here are, without spoiling a couple of the fun easter eggs, some preview images of the skin on desktop!


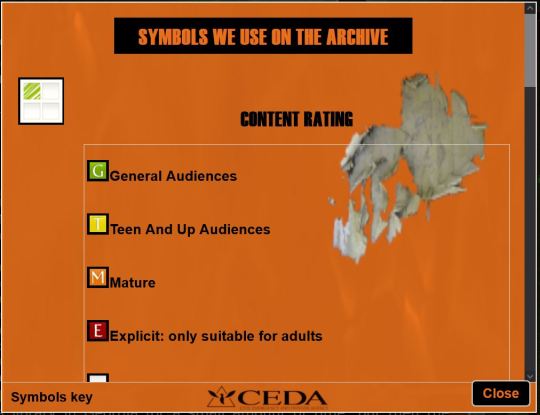
...And on mobile!


49 notes
·
View notes