#day1 of java
Explore tagged Tumblr posts
Visit Tumblr Blog
Explore Tumblr blogs with no restrictions, modern design and the best experience.
Last Seen Tumblr Blogs


Fun Fact
Tumblr Inc. has $15.1M in annual revenue.
Text
🔰 Starting out in Java? You’ve probably seen this line over and over: public static void main(String[] args) { // your code here } But did you know Java allows several valid variations of the main method? Let’s break it down for clarity! 👇 ✅ 𝑽𝒂𝒍𝒊𝒅 𝒎𝒂𝒊𝒏 𝑴𝒆𝒕𝒉𝒐𝒅 𝑺𝒚𝒏𝒕𝒂𝒙𝒆𝒔: 1️⃣ public static void main(String[] args) → Standard & most widely used 2️⃣ public static void main(String args[]) → Old-school array syntax (still valid) 3️⃣ public static void main(String... args) → Uses varargs — flexible and works the same 4️⃣ public static void main(String[] myCustomName) → Parameter name can be anything! ❌ 𝙄𝙣𝙫𝙖𝙡𝙞𝙙 𝙎𝙮𝙣𝙩𝙖𝙭𝙚𝙨: 🚫 public void main(String[] args) → Missing static 🚫 static void main(String[] args) → Missing public 🚫 public static void main(int[] args) → Wrong parameter type 🔎 The JVM specifically looks for: public static void main(String[] args) 🧠 𝙁𝙪𝙣 𝙁𝙖𝙘𝙩: You can overload the main method, but only the correct one (String[] args) will run by default! 📚 𝗡𝗲𝘄 𝘁𝗼 𝗝𝗮𝘃𝗮? Check out my full beginner-friendly blog post on this topic: 👉 https://wp.me/paNbWh-2l 💬 Got any Java tricks you wish you knew earlier? Drop them below 👇 Let’s grow together. #Java #100DaysOfCode #FullStackDevelopment #CodingJourney #LinkedInLearning #Beginners
#app development#backend#beginner#code like a pro#core java#datastructures#day1 of java#day2 of java#different type of main method#different type of main method in Java#frontend#fullst#fullstack#fullstackdeveloper#Java#main methods#output#print#programming
0 notes
Text
Six Days Java Bali Tour Package
Get the details of Six Days Java Bali Tour Package for your best holiday travels to Java and Bali islands. This best starter exploration of Indonesia should be continued to make other great journeys! Day1: Arrival at Yogyakarta International Airport (YIA) Our team is happy to welcome you and escort your visiting the huge temple complex of Prambanan. It depends on your flight time; we will have a…
0 notes
Photo

"Love recognizes no barriers. It jumps hurdles, leaps fences, penetrates walls to arrive at its destination full of hope." . #mayaangelou #faith #hope #love . Always taking care of business! . #bass #bassist #bassplayer #food #foodie #whole30 #day1 #coffee #java #espresso (at Seguin, Texas) https://www.instagram.com/p/BvvDBOBllm9/?utm_source=ig_tumblr_share&igshid=uwdgcnjvnri8
1 note
·
View note
Photo

selamat pagi dunia ... #siapsiap #prepare #start #tour #duty #tourofduty #banyuwangi #eastjava #java #trip #twowheels #culture #culturetrip #culinary #food #foodporn #day1 #monday #desalogi #bastamanography (at Banyuwangi, Jawa Timur, Indonesia) https://www.instagram.com/p/B8XSbuqAAVw/?igshid=yqzh5vdk16mv
#siapsiap#prepare#start#tour#duty#tourofduty#banyuwangi#eastjava#java#trip#twowheels#culture#culturetrip#culinary#food#foodporn#day1#monday#desalogi#bastamanography
0 notes
Text
Hey tumblr!
So I don't know if it counts but here is how my first day went into the challenge. So I tried waking up at 4 am and I did but i dozed off again as the weather was quite cold.
Then I woke up by 9 am and took lecture 1 from Cs50 about SCRATCH. Then I built a Scratch project, a rough fruit ninja game. "I'll share link to my projects here soon."
I tried listening to another lecture, but I felt quite unmotivated.
Highly disappointed by DAY1 but won't drop here. So I am listing my Day 2 targets here.
1. Complete Python course on Sololearn and Kaggle both.
2. Complete Java course on Sololearn and w3s.
3. See Android studio basics.(YOUTUBE)
4. Complete one certification on freecodecamp.
It's lot and unrealistic but this way i can get atleast half done. 😂😂
Also waking up at 4 am for sure.
P.s. Taking writing challenge too, will share poems and short stories shortly.
#learn to code#java#learn python#learn programming#programming#30daysofcode#30 day writing challenge#software engineering#software development#software#coderdojo#followlike#lifestyle#study hard#study motivation#planner#studywithme#study tips#studyblr
13 notes
·
View notes
Photo

On every night during 11 pm, I will updating about my day and how Ive been doing with my activities.
I will use the hashtag
#dailyreport #day1 #improvising #ctf #java #website #religion #python
0 notes
Photo

太久沒有當學生,orientation day1坐在教室內聽了一個小時的介紹就超想睡。結果第二天就考了整天的試,考完後的心得只有問自己為什麼在這個地方😂 經濟統計財管會計考的都不難,都是6年前學過但現在忘光光的東西,但是Java的考試實在是讓每個人出來都是一臉傻眼黑人問號,90分鐘內要回答完30題選擇題,加上實作一個import/sort/query from .txt的project實在是太震撼教育了,沒辦法形容拿到考題當下有多黑人問號,考完大概只剩在外面曬曬太陽走走路放空的想法😭 而且也很明顯可以看出程度差異,除了幾個超強印度人60分鐘內寫完全部,全班大概只有幾個人可以一直在鍵盤上打字,其他人完全想打字連一個function都不知道該怎麼寫😱出來後見面打招呼只剩see you guys in the class 教授還說這只是a piece of cake comparing with the final exam?!?!?!Damn...... #walkingtothesky #welcometocmu #longday #20180515
1 note
·
View note
Photo

Day 1 : 7 Days 7 Project Challenge Full demo available here : https://thecodersgig-7dayproject-day1.web.app/ For complete source code dm us #coder #frontend #devops #madeinindia #nodejs #aws #gcp #docker #reactjs #java #c #c++ (at India) https://www.instagram.com/p/CKuHrIsgdCS/?igshid=1ogukkkwq62ap
0 notes
Photo

Day 1: Home made
This snack is home made. Not by mine but another.
In frame: Rempeyek – a traditional snack from Java. Usually, one of its ingredients is peanut but in this frame was exchanged with dried shrimp. So crunchy and salty!
What is your snack(s) today?
0 notes
Text
2017年終了!今年は何があったか?
概要
今年何をやったのかを振り返る。努力していないわけではないが、あまり成長のない1年だった。何かやったという実感も特になかった。
今年始めたこと
公開用の Android アプリ開発
Kotlin
GitHub 緑化活動
転職ドラフト
ノー残業……4月から9か月連続でゼロだった。なお年収は
Tumblr
インプット
読書
今年は IPA の情報処理技術者試験を受けなかったので、それだけ多く本を読むことができた。 国立国会図書館に行くことを覚えて、そこで本を無料で読むようになったのも良かった。
『レガシーソフトウェア改善ガイド』
『ケント・ベックのSmallTalkベストプラクティス・パターン』
『オブジェクト指向ワークブック』
『リファクタリング』
『Javaパフォーマンス』
『Java本格入門』
『Android Pattern Cookbook』
『Androidアプリ開発の極意』
『Effective Debugging』
『Kotlinスタートブック』
『RxJavaリアクティブプログラミング』
『情熱プログラマー』
"Reactive Java Programming"
『コーディングを支える技術』
『Androidアプリ開発 74のアンチパターン』
『Androidを支える技術(II)』
『実装パターン』
『ThoughtWorksアンソロジー』
『Javaによる関数型プログラミング』
特に『リファクタリング』には感銘を受けた。もっと早く読むべきだった。旧版でも十分な価値がある。 『Androidアプリ開発の極意』『Androidアプリ開発 74のアンチパターン』『Androidを支える技術(II)』 の3冊は私の Android 観を再構成するのに非常に有益だった。『ThoughtWorksアンソロジー』はさすがに今となっては古い本だが、 オブジェクト指向エクササイズやファーストクラスコレクション、StringUtilsがなぜ微妙なのか、などまだまだ役立つ内容が載っていた。 当時の ThoughtWorks が Groovy/JRuby/Jaskell をやたらと推していたのを再確認するのにも役立った。
カンファレンス聴講
自費(約60万円)&有給休暇5日を使って海外カンファレンスに行くという経験をして、海外カンファレンスは会社の金で行くものだという認識を強めることができた。
DroidKaigi 2017
Devoxx US 2017
Droidcon Vietnam 2017
JavaOne 2017
レポート
Devoxx US 2017
https://reminiscencesoftoastkid.tumblr.com/post/160693403713/devoxx-us-2017-short-report
Droidcon Vietnam 2018
https://reminiscencesoftoastkid.tumblr.com/post/159716738388/droidcon-vietnam-2017-flash-report
なお2018も開催予定とのこと
JavaOne 2017
JavaOne 2017 Day1 Flash Report
JavaOne 2017 Day2 Flash Report
JavaOne 2017 Day3 Flash Report
JavaOne 2017 Day4 Flash Report
JavaOne 2017 Day5 Flash Report
アウトプット
書いた記事
今年は Qiita に 24 の記事を投稿した。 NIO2 の初歩的な内容の記事だけはいいねが30を超えたが、あとはどれも1桁だった。仕事で知見を溜められるようにならないとダメだと痛感した。
Date Title 2017/01/03(Tue) Gradle プロジェクトで静的解析ツールを使う 2017/01/17(Tue) TestFX で JavaFX アプリケーションのテストを書く 2017/01/31(Tue) java.io.File のコードを java.nio.Path と java.nio.Files を使って書き直す 2017/02/16(Thu) JavaFX でスライドショーツールを作る 2017/02/20(Mon) Googleの入社試験(非公式)にGroovyでチャレンジしてみる 2017/04/03(Mon) minimal-json で JSON を扱う 2017/04/05(Wed) 正式リリース前に Eclipse で JUnit 5を愉しむ 2017/04/08(Sat) Optional の7つのルールについて考える 2017/06/02(Fri) JavaFX の Clipboard API を使う 2017/06/13(Tue) Android の AppWidget で Snackbar を使う 2017/07/17(Mon) 特定の Fragment でだけ使うメニュー項目を共用の Toolbar に inflate する 2017/07/30(Sun) RecyclerView の要素を循環させる 2017/08/12(Sat) Moshi を使って Java オブジェクトと JSON を相互変換する 2017/08/14(Mon) enum の定数値ごとに振る舞いを変えるのを Kotlin でやってみる 2017/08/21(Mon) Android アプリの Java ソースコードを Kotlin に変換して躓いた点をまとめる 2017/09/15(Fri) android.text.TextUtils のメソッドを調べる 2017/09/23(Sat) Android 用の ColorPicker を探す 2017/10/09(Mon) Android プロジェクトで JUnit5 を使う 2017/10/31(Tue) Kotlin の sealed クラスを使う 2017/11/05(Sun) Android Studio のメニュー文字サイズを変える 2017/12/01(Fri) RxPermissions で Runtime Permission の処理をする 2017/12/03(Sun) RxJava を非同期処理を書きやすくするライブラリとして考える 2017/12/19(Tue) プログラムで生成した TextInputLayout に EditText をセットする 2017/12/30(Sat) TextView の CompoundDrawable に ColorFilter をかける
曜日で見ると半分を月曜と火曜に投稿している。休日はいいねをもらいにくいというイメージがあるのと、 休み中に完成しなかった記事を月・火に投稿していたのとでこうなったのかと思う。
Day of week Count Mon 6 Tue 6 Wed 1 Thu 1 Fri 3 Sat 4 Sun 3
Tumblr
春くらいにQiitaの規約改正があって、それを機に勉強会のメモをQiitaに投稿するのを止め、完全にプログラミングのネタだけを投稿することにした。 そして別に Tumblr を始めてみたところ、本当に誰も読んでいなくて草も生えない。Tumblr は画像を投稿したり、 気になった記事のメモをちょっと書いておくという使い方なら適しているのだが、ブログを書くサービスとしては微妙なところがあり、 特にコードブロックが標準だと全然ダメなのが本当に困る。 たまに Qiita に書くほどでもないなと思ったネタを Tumblr に書いていたが、すぐにやめてしまった。 今ではお昼の画像をアップするのと、気になったWeb記事のクリッピング程度にしか使っていない。
Android アプリ
趣味のプログラミングでも Android アプリの開発をやらないと学習量が全然足らないと感じ、今年の6月からやり始めた。 学習効果が高まったのと、流用できるコード群をストックできるようになったのとで、仕事にプラスになったのは大きかった。
なお公開については、いくつか作ってはみたが全然ダメだった。唯一、Wi-Fi の状態を切り替えるウィジェットはちょっとだけ受けていた。 一番力を入れているWeb検索アプリが全然インストールされなくて、 その前に作っていたしょぼいアプリの方が3倍インストールされている。 よくわからない。
https://play.google.com/store/apps/developer?id=toastkidjp
ちなみにいくら稼いだか書いておくと、4か月で14円である。ティッシュも買えない。
Kotlin
これまで情報収集しかしてこなかったが、Google I/O 以降一気に世間が傾き始めた。 転職ドラフト等でも 「Kotlin やってます」という企業ばかりになってきて、いい加減やらないとまずいと感じ、 趣味のプログラミングで使い始めた。
最初は違和感が強かったが、すべてのコードを一括で Kotlin 変換する、というスパルタ式学習法により2週間程度で逆転した。 JavaOne では Kotlin のセッションを中心に聞きまくって、やや物足りなさを感じるくらいにはなっていた (当然だが JavaOne では Kotlin を知らない人向けのセッションが多いためである)。
もう Kotlin しか使っていない企業でもやっていけるという根拠のない自信ができた。
GitHub 緑化活動
転職で有利だというので、軽薄な気持ちで始めたところ100日以上続いた。 commit数が会社の GitHub Enterprise のアカウントより多かったという。
これをやることで日常的にコードを改善する習慣が身についた。が、一方で、1日で終わらないような大掛かりな修正を(心理的に) しにくくなったと感じる。
買ったもの
ThinkPad X1 Carbon
高性能だが、無難で面白いところはなく、ThinkPad X1 Tablet とかに比べると情熱は感じないマシンだった。
Covia L7
Android アプリ開発を趣味で始めるのに実機が必要だったので購入した。
長所
1万円程度で入手可能
非常に軽い
短所
安っぽい
性能が貧弱
解像度が低め……逆に狭い画面の確認には使える
OS 6.0、Runtime Permission の検証がギリギリできる程度
Galaxy Feel
ましな検証端末が欲しいと思って探したところ、某キャリアの販売戦略により在庫がダブついているらしく、Amazon のマーケットプレイスで25,000円程度で購入できた。
調書
OSが7.0
そこそこいいスペック
そこそこ軽い
有機ELディスプレイ
短所
OSが7.0(AppShortcutsが使えない)
ホームキーがハードウェア
バックキーとタスクキーが通常と逆
Activity のアニメーションが独自実装されている
ClipboardManager の実装がおかしいのか、 LeakCanary で誤検知されまくる
他の端末と同じコードでフラッシュを制御できない
……なんか書いてみたら有機ELディスプレイ以外の長所がないような気がする。
507SH
13,000円と非常に安かったので購入したところ、液晶保護フィルムを貼ったところで満足して箱にしまってある。
仕事
モチベーショングラフを書くと山から谷まであった。基本、谷の方が多かった。同期や後輩のAndroid 開発者が次々と転職していて、 会社から評価されない仕事をしていることへの焦りが募る年だった。まあ、どの仕事に割り当てられるかなど私が決められるものではないから、 運が悪いと思って諦めるよりほかになく、それが残業ゼロ運動と草につながっているという。
内容で言うと、完全にサーバサイドの仕事がなくなってAndroid アプリ開発ばかりをやるようになり、 夜中に電話がかかってくることがなくなったり休日にPCを持って帰ったりしなくてよくなったのが非常によかった。 ……よかったのだが、来年からまたサーバサイドの開発と運用をやらないといけなくなりそうで困っている。
来年の抱負
まず DroidKaigi 2018 で発表する機会をいただいた。そこできちんと喋れるように準備をする。
Android アプリを開発する……1つくらい収益の柱になるアプリを作りたい
Qiita の 100記事 & 1,000 Contribution を目指す……達成するとは一言も言っていない
GitHub の緑化を継続する
0 notes
Text
Tweeted
Super Excited to learn @Java this week from @johnowenteachcs!! #Day1 here we go!! @weteachcs #techieteacher #happyteacher
— Hollie Mae Alvarez (@MrsHAlvarez) July 23, 2018
0 notes
Text
まったり改造Slackを作って日々の作業を楽するRTA Day2
Day2 : botと会話しよう!
まったり改造Slackを作って日々の作業を楽するRTA 2日目
こんばんわ、 (HMD|hamaguchi) です。 なんとか1日目の記事をTumblrに投稿したものの、1記事書くのに3hかかったり、Tumblrのmarkdownとリッチテキストの変換がうまくいかなかったりでめちゃめちゃ消耗しました。また、変換の結果文章が飛んでるところがあったので、後から直す羽目になりもしました。昨日の失敗を反面教師にして、今日はHackMDで記事を書いています。 今日は昨日の続きということで、ターミナル上でなくSlack上でbotとやり取りできるようにしたり、botのスクリプトを編集したりしました。CoffeeScriptは生まれて初めて書い��ので結構楽しかったです。
それでは今日も ゆっくりしていってね
目次
SlackとHubotを連携する
CoffeeScriptを学ぶ
botのスクリプトを編集し、おしゃべりする
まとめ
1. SlackとHubotを連携する
今日はまず、昨日もリンクを貼ったこの記事(*1)を参考にSlackとHubotの連携をしていきます。
最初に、昨日のbotの設定ではSlackでやり取りできないので、新たにHubotを作り直します。昨日とは別のディレクトリを作りHubotを立ち上げるコマンドを打ちます。
// 今回はディレクトリの名前をslack-local-botとする $ mkdir slack-local-bot $ cd slack-local-bot $ yo hubot
これでまた昨日の奴が出るので必要情報を打ち込んでいきます。

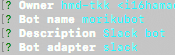
ここで注意する必要があるのが、質問最後の「Bot Adapter」に対し、昨日と違い「slack」と答えることです。これを忘れるとslackで動くbotにできないので気をつけてください。(ちゃんと調べてないが、コマンドが終わった後に生成されてるファイルを書き換えれば、後からSlackに対応したbotにできるっぽい?)
次にSlack上でbotが動くようにbotを起動します。以下のコマンドを叩きます。
HUBOT_SLACK_TOKEN=<MYAPP_HUBOT_TOKEN> bin/hubot --adapter slack
ここでMYAPP_HUBOT_TOKENというのは、SlackにHubotを追加した時に生成される文字列です。botのConfigure設定を開いたらページの上部に
HUBOT_SLACK_TOKEN=うんたらかんたら
と書いてあり、その「うんたらかんたら」の部分がTokenに当たります。 Tokenをチェックしたら上のコマンドを実行しbotの起動です。adapterというオプションに slack を設定するのを忘れないようにしましょう。コマンド実行後、Slackに移動するとAppsにいるHubotがONLINEになってるので、DMに「ping」と送ってみます。すると...

これはHubotの初期状態から使えるもので、Userのpingに対しbotがPONGと反応する、というコマンドです。
これで一応SlackとHubotの連携はできました。ただこのままでは味気ないので、とりあえずスクリプトをいじってキャラクターっぽくしたいと思います。
2. CoffeeScriptを学ぶ
スクリプトをいじる前に、スクリプト記述用に使われているCoffeeScriptの勉強をしておきたいな、と思ったのでそうします。とりあえず以下のことをしました。
公式のDocument(*2)に軽く目を通す
Qiitaを漁る
ブログを漁る
scriptsディレクトリに最初から入ってる example.coffee を読んでみる
1〜4を飽きるまでやる
特に4は効果的です。2,3と並行してやればスクリプトによる自由度が上がる気がします。 勉強に飽きたらコーディングです。scriptsディレクトリにスクリプトを作りましょう。
3. botのスクリプトを編集し、おしゃべりする
botをキャラクター(森久保乃々)っぽくするために、scriptsディレクトリに「Userが『森久保』と呼びかけたら、あらかじめ設定した森久保っぽい口調のセリフをbotが返す」という仕様のスクリプトを用意しましょう。
scrits以下に freetalk.coffee というファイルを作り以下のように編集します。
module.exports = (robot) -> robot.hear /森久保/, (res)-> res.send 'な、なんでしょうか...'
コードの解説をしていきます。 まず1行目ですが、これはJavaでいうpsvm、Cでいう#includeみたいなものです。つまりはおまじないですね...(まだコードの実態をちゃんと把握できてない)次に2行目ですが、ここで robot.hear という関数を呼び出し、引数に正規表現とコールバック関数(のようなもの)を渡しています。3行目は関数の中身で、res.send でセリフを書いた文字列を渡しています。この robot.hear ですが、「Slackに打ち込まれた文字列と正規表現に一致が合った時、第二引数の関数を呼び出す」という関数なので、この場合Slackに「森久保」の文字列を含む投稿をすればbotが反応し「な、なんでしょうか...」と喋るということになります。それでは実践してみましょう!


「森久保」の文字列を含めば反応するのでなんか面白いことになってます(他人事) でもとりあえずbotと思い通りなおしゃべりできたので今日はOKです
4. まとめ
今日はここまで
今日やったこと
botとSlack上でおしゃべりしたよ①
「ping」→「PONG」
CoffeeScriptの勉強をしたよ
botのスクリプトを編集して呼びかけに対応するようにしたよ
botとSlack上でおしゃべりしたよ②
キャラの口調っぽくレスポンスが帰ってくる
それではDay3でまた会いましょう!
引用など
記事(*1): SlackのBot(hubot)を作ってみる URL: https://qiita.com/mochidamochiko/items/29c2d77715d8a1ff062a
記事(*2): CoffeeScript 公式ページ URL: http://coffeescript.org/
0 notes
Text
Adaptive UI Tutorial for Android with Kotlin
Update Note: This tutorial is now up to date with the latest version of Android Studio version 3.0.1, and uses Kotlin for app development. Update by Joe Howard. Original tutorial by James Nocentini.
Android runs on a wide variety of devices that offer different screen sizes and densities. Because of this, it is important for Android apps to have a responsive user interface that can adapt to these different screens. Since the early days of the Android platform, system APIs have provided very powerful abstractions to design adaptive UIs, also known as adaptive layouts.
This is an update to our adaptive UI in Android tutorial which will show you how to build apps that work across different devices by dealing with the fragmentation in the Android device market. You’ll learn about:
Configuration qualifiers
Alternative layouts and drawables
And layout previews in Android Studio — an immensely useful tool
What would a tutorial be without something to tinker with? It’d be pretty boring. So, you’ll build the user interface for a simple weather app completely from scratch! When you’re done, the screen will display an image, text labels and a map in three different configurations. Apps look so cool and well built when they have an adaptive UI. :]
Getting Started
Download the starter project named Adaptive Weather here, and open it in Android Studio 3.0.1 or later. Then build and run.
The app displays a simple RecyclerView listing several cities.
To learn all about RecyclerViews, we recommend reading our Android RecyclerView tutorial.
Open the build.gradle file of the app module to declare the following dependency:
dependencies { ... implementation 'com.google.android:flexbox:0.3.2' }
Google’s FlexBox provides an implementation of the FlexBox specification on the Android platform. As you will see later on, it is a very useful tool for designing adaptive layouts. And combining it with Android’s resource qualifier system makes it even more powerful!
Note: The Android platform is constantly updated and the version numbers may have increased since we published this tutorial. You can find details of the different versions, including the most recent on the support library pages on the Android developer site.
During this tutorial, you’ll often switch between the Android and Project modes in the Project navigator. Generally speaking:
Android mode is the default when working within Android Studio because it provides a clean and simple file structure.
Project mode is also necessary for building alternative layouts.
Weather Icons
Android devices have different screen densities, and for that reason it’s a good practice to import static images in multiple sizes. This is one way Android’s system APIs provide a way to create adaptive UIs. As described in the Supporting Multiple Screens guide, the categories of screen densities are:
ldpi (low) ~120dpi
mdpi (medium) ~160dpi
hdpi (high) ~240dpi
xhdpi (extra-high) ~320dpi
xxhdpi (extra-extra-high) ~480dpi
xxxhdpi (extra-extra-extra-high) ~640dpi
Whilst some UI editors make it easy to export images in different sizes, we will be exploring a different approach in this tutorial. Android Studio recently added support for Vector Drawables. This means that all your assets can be imported once and will be scaled at runtime depending on the device configuration (screen size and orientation).
Download the Weather Icons and extract. In Android Studio right-click on res/drawable and click on the New\Vector Asset menu item:
Select Local file (SVG, PSD) under Asset Type. From the filesystem location chooser under Path locate the weather-icons folder and choose the first icon, cloud.svg. Make sure to check the Override under Size setting otherwise your icons will look a bit distorted later on (¯\_(ツ)_/¯). Click Next and Finish:
Now you should see your icon in Android Studio as res/drawable/ic_cloud.xml. Repeat the same operations for the other icons: fog, rain, snow, sun, thunder.
Finally, enable the use of Vector Drawables in the app module’s build.gradle as follows:
android { ... defaultConfig { ... vectorDrawables.useSupportLibrary = true } }
With scalable assets now in place in the project, you’re ready to start customizing the layouts.
Building layouts
With the dependencies declared, you get to shift your focus to building some layouts!
This simple application only contains one screen, which is represented by MainActivity. From the Project navigator, open res/layout/activity_main.xml. Click on the Preview button on the right side to see it in action.
An activity comprises a Kotlin or Java class — in this case MainActivity.kt — and a layout file. In fact, one activity can have several layouts, as you’ll see shortly. For now, it’s important to remember that the existing layout file, activity_main.xml, is the default layout.
Forecast Grid View
First, define the default layout for your main activity. To start this, open res/values/colors.xml and replace its content with the following:
<?xml version="1.0" encoding="utf-8"?> <resources> <color name="color_primary">#9B26AF</color> <color name="color_primary_dark">#89229b</color> <color name="text_color_primary">#ffffff</color> <color name="forecast_grid_background">#89bef2</color> </resources>
Here you’re overriding the default Material theme colors and providing a background color for the forecast grid. Next, right-click on the values folder and select the New\Value resource file menu:
Enter fractions.xml for the file name and paste the following:
<?xml version="1.0" encoding="utf-8"?> <resources> <item name="weather_icon" type="fraction">33%</item> </resources>
Here you’re specifying that the width taken by each icon should be 1/3 of the total width.
Next, create a new layout in res/layout called forecast_grid.xml and add the following list of images inside a FlexboxLayout:
<?xml version="1.0" encoding="utf-8"?> <com.google.android.flexbox.FlexboxLayout xmlns:android="http://schemas.android.com/apk/res/android" xmlns:app="http://schemas.android.com/apk/res-auto" android:id="@+id/forecast" android:layout_width="match_parent" android:layout_height="match_parent" android:background="@color/forecast_grid_background" app:alignItems="center" app:flexWrap="wrap" app:justifyContent="space_around"> <android.support.v7.widget.AppCompatImageView android:id="@+id/day1" android:layout_width="wrap_content" android:layout_height="60dp" app:layout_flexBasisPercent="@fraction/weather_icon" app:srcCompat="@drawable/ic_thunder" /> <android.support.v7.widget.AppCompatImageView android:id="@+id/day2" android:layout_width="wrap_content" android:layout_height="60dp" app:layout_flexBasisPercent="@fraction/weather_icon" app:srcCompat="@drawable/ic_fog" /> <android.support.v7.widget.AppCompatImageView android:id="@+id/day3" android:layout_width="wrap_content" android:layout_height="60dp" app:layout_flexBasisPercent="@fraction/weather_icon" app:srcCompat="@drawable/ic_rain" /> <android.support.v7.widget.AppCompatImageView android:id="@+id/day4" android:layout_width="wrap_content" android:layout_height="60dp" app:layout_flexBasisPercent="@fraction/weather_icon" app:srcCompat="@drawable/ic_snow" /> <android.support.v7.widget.AppCompatImageView android:id="@+id/day5" android:layout_width="wrap_content" android:layout_height="60dp" app:layout_flexBasisPercent="@fraction/weather_icon" app:srcCompat="@drawable/ic_cloud" /> <android.support.v7.widget.AppCompatImageView android:id="@+id/day6" android:layout_width="wrap_content" android:layout_height="60dp" app:layout_flexBasisPercent="@fraction/weather_icon" app:srcCompat="@drawable/ic_sun" /> </com.google.android.flexbox.FlexboxLayout>
There are a couple things to note with the above block:
You’re using the com.google.android.flexbox.FlexboxLayout resource to layout the icons on the screen.
You’re using the android.support.v7.widget.AppCompatImageView resource to draw the weather icons on the screen. You would normally use the ImageView resource with plain images (.png, .jpg) but for Vector Drawables you must use this component instead.
In the Preview pane, you see should the weather icons aligned perfectly:
This is already starting to feel adaptive!
Instead of positioning the icons with margins or using a relative layout you have used the FlexBox properties to spread them symmetrically. If you remove a middle icon for example, the remaining ones will automatically shift to the left to fill in the empty space. This is the true power of using FlexBox in layouts. The forecast grid is now ready to be used in your default layout for the main activity.
Main Activity
Open res/layout/activity_main.xml and replace its contents with the following:
<?xml version="1.0" encoding="utf-8"?> <LinearLayout xmlns:android="http://schemas.android.com/apk/res/android" android:layout_width="match_parent" android:layout_height="match_parent" android:orientation="vertical"> <include layout="@layout/forecast_grid" android:layout_width="match_parent" android:layout_height="0dp" android:layout_weight="1" /> <android.support.v7.widget.RecyclerView android:id="@+id/list" android:layout_width="match_parent" android:layout_height="0dp" android:layout_weight="1" /> </LinearLayout>
Here’s what is happening in this layout:
Orientation for the LinearLayout is set to vertical
Dimensions: using the layout_weight XML attribute you’re setting each child view to take half of the screen height
Layout reuse: using the include XML tag you’re placing the forecast grid on the top half by referencing the forecast_grid.xml layout. This is one of the core functionalities to creating different layouts without duplicating the code.
Notice that the preview in the editor gets instantly updated. At this point you still haven’t deployed the application to a device or emulator which is astonishing.
Build and run. You should now see the weather icons above the list of locations.
Updating the Weather Forecast
Take a look at the static JSON data in assets/data.json. The forecast for a given location is represented as an array of strings. You could create another RecyclerView with a GridLayout to dynamically create the forecast, but that’s asking for trouble :]. Instead you will write a method that maps each possible forecast value to a corresponding drawable icon.
In MainActivity, add a new method:
private fun mapWeatherToDrawable(forecast: String): Drawable? { var drawableId = 0 when (forecast) { "sun" -> drawableId = R.drawable.ic_sun "rain" -> drawableId = R.drawable.ic_rain "fog" -> drawableId = R.drawable.ic_fog "thunder" -> drawableId = R.drawable.ic_thunder "cloud" -> drawableId = R.drawable.ic_cloud "snow" -> drawableId = R.drawable.ic_snow } return ContextCompat.getDrawable(this, drawableId) }
Now you are ready to write the code that responds to the click event of a RecyclerView row. Add the following method to MainActivity:
private fun loadForecast(forecast: List<String>) { val forecastView = findViewById<View>(R.id.forecast) as FlexboxLayout for (i in 0 until forecastView.childCount) { val dayView = forecastView.getChildAt(i) as AppCompatImageView dayView.setImageDrawable(mapWeatherToDrawable(forecast[i])) } }
Then find // TODO in MainActivity and replace it with the following:
loadForecast(location.forecast)
Build and run. Click on a location name and notice the weather forecast gets updated:
Good job, what a beautiful looking weather application! The weather in San Francisco isn’t looking so beautiful though :].
Creating Adaptive UI: Landscape Layout
So far, you built this application with the portrait mode in mind but let’s take a look at what happens when the phone is rotated to landscape. Open activity_main.xml, in the layout editor click on the orientation icon, and choose Switch to Landscape:
At this stage, you could run the app on multiple Android devices or simulators. But this method of testing alternative layouts is time consuming and repetitive at best, and error prone at worst. There must be another way.
Thankfully, Android Studio has extensive previewing capabilities. Open the default activity_main.xml file, and hover your mouse over the bottom right corner of the screen to resize the layout. Notice that upon clicking the handle, Android Studio automatically displayed guides for different device sizes.
Ugh — landscape mode is none too kind to your design. Let’s try to have both views side by side instead. To tell the system which resource to pick for a given dimension, you place the layout resource in a folder named in a particular way. The system will pick the correct activity layout for the current device’s screen dimensions. This way, you will have adaptive UIs for your app.
Layout qualifiers
Back in Android Studio, right-click on res/layout and click on the New\Layout resource file menu:
Name the file activity_main and add the landscape resource qualifier:
The layout editor now shows a blank screen for the landscape mode because it picked the newly-created layout file layout-land/activity_main.xml. This only contains an empty ConstraintLayout, though not for much longer :]. Add the following to reuse the weather forecast layout and RecyclerView in a horizontal orientation this time.
<?xml version="1.0" encoding="utf-8"?> <LinearLayout xmlns:android="http://schemas.android.com/apk/res/android" android:layout_width="match_parent" android:layout_height="match_parent" android:orientation="horizontal"> <include layout="@layout/forecast_grid" android:layout_width="0dp" android:layout_height="match_parent" android:layout_weight="1" /> <android.support.v7.widget.RecyclerView android:id="@+id/list" android:layout_width="0dp" android:layout_height="match_parent" android:layout_weight="1" /> </LinearLayout>
And the layout editor now shows all your elements in landscape orientation.
Well done! You have created the first layout qualifier in this application. There are layout qualifiers for plenty of other configurations (screen width, height, aspect ratio etc.). In the next section we will modify the landscape layout even further with just a one-line change.
Resource qualifiers
Another enhancement you could make to the layout is to organize the weather icons as 2 columns and 3 rows as opposed to the current 3 columns and 2 rows layout. We could duplicate the forecast_grid.xml layout, but then it would be duplicated code and harder to maintain. The width occupied by each weather icon in relation to the FlexBox view width is determined by the layout_flexBasisPercent attribute:
<android.support.v7.widget.AppCompatImageView android:id="@+id/day1" android:layout_width="wrap_content" android:layout_height="60dp" app:layout_flexBasisPercent="@fraction/weather_icon" app:srcCompat="@drawable/ic_thunder" />
The value is a fraction type and is currently equal to 33% in the resource qualifier file res/values/fractions.xml. Following the same approach to creating a landscape layout, you can create resource files for the landscape configuration. Right-click on res/values and select the New\Values resource file menu item. Name the file fractions and add the landscape orientation qualifier:
Inside the resources XML tag, add the following:
<item name="weather_icon" type="fraction">49%</item>
Return to the main activity layout in landscape mode and notice the weather icons are laid out on 2 columns and 3 rows:
Well done! You can pause here and appreciate the fact that once again, you didn’t have to deploy the application to achieve this result. Of course now you should build & run though and make sure it works :]
The configuration qualifiers can be applied to any attribute type in your XML layout (font size, colors, margins etc.).
Extra Large Layout
Return to the portrait orientation in the layout editor and drag the screen size all the way to the X-Large size range.
For devices with that much screen real estate, you could show all the weather icons on 1 row. Go ahead and right-click on res/values and select the New\Values resource file menu item. Name the file fractions and add the X-Large Size qualifier:
Add the following inside the resources XML tag:
<item name="weather_icon" type="fraction">16%</item>
Return to the layout editor and notice that all the weather icons are aligned on 1 row.
Configuration Calculations
Don’t worry, the content in this section isn’t as scary as the title makes it sound. When the user interacts with the application, the layout state changes over time (rows are selected, input fields populated with text etc.). When the layout changes (for example when the orientation changes), the existing layout is thrown away a new layout is inflated. But the system has no way of knowing how to restore the state because the two layouts could be completely different as far as it knows.
To see a live example of this in action, build and run the application. Select a location then change the orientation and notice the location isn’t selected anymore!
If you are not already surprised that the forecast in London is sunny all week then you may also notice that the selected row was deselected after switching to landscape.
To fix this, you will hook into the activity lifecycle methods to save the selected location to a bundle and retrieve after the screen rotation.
Add the following at the top of MainActivity, below the properties:
companion object { private const val SELECTED_LOCATION_INDEX = "selectedLocationIndex" }
Then add the following method to MainActivity below the onCreate() method:
override fun onSaveInstanceState(outState: Bundle) { super.onSaveInstanceState(outState) outState.putInt(SELECTED_LOCATION_INDEX, locationAdapter.selectedLocationIndex) }
Add the following to the end of onCreate():
if (savedInstanceState != null) { val index = savedInstanceState.getInt(SELECTED_LOCATION_INDEX) if (index >= 0 && index < locations.size) { locationAdapter.selectedLocationIndex = index loadForecast(locations[index].forecast) } }
Build and run again and this time the location remains selected across configuration changes. Hooray!
Where to Go From Here
Well done! You’ve built your first Android app with adaptive layouts and you learned how activities can make use of multiple layouts. You learned how drawables work with different displays, and how to make your app come to life on practically any Android device.
Of course, there's a lot more to Android than layouts, and no shortage of ways to build on the adaptive UI principles you discovered in this adaptive UI for Android tutorial. To learn more, check out Google's guidelines on the best UI practices. If you want, you can challenge yourself by trying the following:
Use another available qualifier to have yet another type of layout. For example, what if you'd like to have a different background color based on the locale qualifier?
Or, try using size qualifier on other resources, such as strings. You could add a TextView which shows a short message, or a longer message with the same name if the screen is in landscape?
Get the full source code for this project as a downloadable zip.
Feel free to share your feedback, findings or ask any questions in the comments below or in the forums. Talk to you soon!
The post Adaptive UI Tutorial for Android with Kotlin appeared first on Ray Wenderlich.
Adaptive UI Tutorial for Android with Kotlin published first on https://medium.com/@koresol
0 notes
Photo

Morgan James at Java Jazz Festival 2017. #Day1 #javajazzfestival #javajazz2017 #BNI46 #BNIJJFPhotoContest #matacokelat_ #muthiarys
0 notes
Photo

Java Jazz Festival 2017 #Day1 #temantulus 😍
0 notes