#div shadow css generator
Explore tagged Tumblr posts
Visit Tumblr Blog
Explore Tumblr blogs with no restrictions, modern design and the best experience.
Last Seen Tumblr Blogs


Fun Fact
Tumblr Inc. is funded by 13 investors.
Link
Box Shadow Generator - Best box shadow generator - CSS box shadow
#box shadow generator#css box shadow generator#css shadow generator#css drop shadow generator#border shadow generator#border shadow css generator#css box generator#css inner shadow generator#shadow box css generator#box shadow creator#html box shadow generator#div shadow css generator#font shadow css generator#box shadow css generator online
1 note
·
View note
Text
Tutorial: Simple Carousel without using <input>
Hello everyone!
I always wanted to create a Carousel-based theme, upon researching, I found yeoli-thm‘s tutorial (link is at the demo) but I had a difficulty in understanding it as I am not a huge fan of <input>. Luckily, I managed to create a simpler version of the carousel without using <input>.
Here's the result:
Preview
By having this result, you can create your very own pages and all-in-one themes! The base code will be provided in the demo but if you want to learn how to create this from scratch, please do read this till the end!
IMPORTANT!:
Please like and/or reblog this post if you like this tutorial. If you intend of using this code as a based code, you are required to mention me in your theme post.
This tutorial consists of four aspects:
General styling
Basic Container
Navigation
Carousel
The concept of creating a carousel derives from my smooth scrolling tutorial. If you haven’t check that out, I highly recommend for you check it out.
General Styling
1. Firstly, you need to add the basic code for your carousel. You can retrieve it from this site.
2. Add the universal selector at the style/CSS area:
/*GENERAL STYLING*/ *{ margin:0; box-sizing: border-box; scroll-behavior: smooth; }
It is pertinent to add scroll-behavior:smooth. This is to create a smooth scrolling effect.
3. Once you're done with it, you can create a basic styling for the body, fonts, etc at the style/css area. In my demo, I made a basic styling of the body, paragraph, title, and scrollbar. Example can be seen as follow:
/*BODY AND FONTS*/ body{ background: rgb(248,248,255); background-image: linear-gradient(180deg, rgba(248,248,255,1) 0%, rgba(223,223,255,1) 50%); font-family:geo sans light; text-align:justify; line-height:150%; } @font-face { font-family: geo sans light; src: url(https://static.tumblr.com/v6akjgz/MQbqf9ocl/geosanslight.ttf); } p{ margin-bottom:2rem; } h1{ font-family:vintage fair; text-align:center; color:#1f1b1b; text-shadow:-1px 0 black; font-weight:300; margin-bottom:1rem; line-height:1.15; } @font-face { font-family:vintage fair; src: url(https://static.tumblr.com/v6akjgz/SNhqfaujo/vintage_fair.ttf); } /*SCROLLBAR*/ ::-webkit-scrollbar { width: 18px; height: 18px; } ::-webkit-scrollbar-track { border: 8px solid #fff; background-color: rgba(0,0,0,.05); } ::-webkit-scrollbar-thumb { background-color: #acacff; border: 8px solid #fff; }
NOTE!: There's no need for you to copy and paste the above code. You can always edit it or create other designs that you like to add.
Basic Container
A basic container is a place where you'll be adding the carousel. You can design it however you want in the style/CSS area but at the most basic, you can style it this way:
/*BASIC CONTAINER*/ .content{ /*Basic*/ width: 50%; height: 60%; /*Position*/ position: fixed; top: 50%; left: 50%; transform: translate(-50%, -50%); /*Important*/ overflow: hidden; /*Design*/ background-color:lightblue; border-radius: 5px; border: 1px solid rgb(58, 2, 58); }
Please do take note that this is one of the many ways of creating the basic container. If you know your ways in CSS, you can style it however you want!
IMPORTANT: It is very important for you to add overflow:hidden;. Without this, it will cause the scrollbar to appear and make it less pleasing to see.
For the HTML area, add the following code:
<!--CONTENT--> <div class="content"> <!---THIS IS WHERE THE CODE FOR CAROUSEL WOULD BE SITUATED AT--> </div>
By now, if you click [Update Preview] and [Save], you will now see the container on your page.
Navigation
Navigation is the place where all the links to the section will be wrapped in.
1. Add the code below /body.
<!--NAVIGATION--> <div class="contentlink"> <ul> <li><a href="#partone">First</a> <li><a href="#parttwo">Second</a></li> <li><a href="#partthree">Third</a></li> <li><a href="#partfour">Fourth</a></li> </ul> </div>
2. After that, you are required to style it at the CSS/style are (preferably below the content). The most basic ways to do it is by doing it this way:
/*NAVIGATION*/ .contentlink{ width:5rem; height:10rem; position:fixed; top:30%; right:10%; } .contentlink ul{ list-style-type: none; padding:0; } .contentlink li{ background-color:ghostwhite; border:1px solid lightblue; border-radius: 5px; display: block; margin-bottom: 1rem; padding:1rem; text-align: center; } .contentlink li a{ text-decoration: none; color:rgb(24, 91, 136); transition: 0.25s ease-in; } .contentlink li a:hover{ color: midnightblue; font-weight: 600; transition: 0.25s ease-out; }
So let me explain one-by-one what's the function of each selector:
.contentlink: This is the wrapper for all the navigation links for the carousel.
.contentlink ul: This is the wrapper for the list. Since we don't want any bullets nor padding/indents, it is essential for us to set the list-style-type and padding to none and 0 respectively.
.contentlink li a & .contentlink li a:hover: These are essential to customize the link.
Take Note!
If you are the kind of person who focuses on accessibility, this type of code may not suit your needs. So, you may need to modify both the HTML and CSS code.
Again, this is one of the many ways of styling the navigation section. If you know your ways in CSS and HTML, you can always modify it however you like.
The number of navigation sections does not necessarily be four. It can be two or even six if you like! So, add/remove the link that suits your need.
If you intend to create an effect where whenever you click the section, it will show an indication to it, I would say that it may not be possible to do so as it requires input.
By now, you will see that everything is starting to come up to life. But if you click the button, you'll see that it won't move to another section. This is because we have yet to create the content section.
Carousel
This is where the content of each section lies. Firstly, you need to add the code inside the the div class="content" :
<!--CAROUSEL--> <div class="default" id="partone"> <!-- YOUR CONTENT--> </div> <div class="default" id="parttwo"> <!-- YOUR CONTENT--> </div> <div class="default" id="partthree"> <!-- YOUR CONTENT--> </div> <div class="default" id="partfour"> <!-- YOUR CONTENT--> </div>
Take note!:
class="default" is where you uniformize all the settings to be the same instead of rewriting the same setting in each id
partone,parttwo, etc represents the 'section for the link'. If you refer back tp the navigation above, you'll see that the link/href name is the same as this section. You may change the name to whatever you want to. However, you need to ensure that you also do the same with the link in the navigation area.
Now that you done with this, you can customize default and/or the sections at the css/style area. This is what I did for it:
.default{ width: 100%; height: 100%; overflow: auto; padding:2rem; } .default a{ color:rgb(58, 2, 58); text-decoration:none; font-weight:bold; } .default a:hover{ text-decoration:underline; font-weight:normal; } .default img{ width:100%; margin-bottom:1rem; margin-top:0.5rem; } #partone{ background: rgb(248,248,255); background: linear-gradient(180deg, rgba(248,248,255,1) 0%, rgba(223,223,255,1) 50%); } #parttwo{ background: rgb(223,223,255); background: linear-gradient(180deg, rgba(223,223,255,1) 0%, rgba(197,197,255,1) 50%); } #partthree{ background: rgb(197,197,255); background: linear-gradient(180deg, rgba(197,197,255,1) 0%, rgba(172,172,255,1) 50%); } #partfour{ background: rgb(172,172,255); background: linear-gradient(180deg, rgba(172,172,255,1) 0%, rgba(134,134,254,1) 50%); }
Take note!
If you want to uniformize everything (ie not wanting each section to have a different background-color/image), you can simply remove #partone all down to #partfour.
It is important to set the width and height to 100%. This is to ensure that your section will have its own section.
Set the overflow to auto. This is to allow the carousel to scroll in case if the contents overflow.
With that, you’re done! Please take note that what I’m sharing with you is just an idea of how to create a carousel effect using CSS and HTML. There are myriads of ways of creating this design as long as you follow the said concept:
Set your scroll behavior to smooth.
For the basic container, make sure that overflow is set to hidden.
For the navigation, make sure that the link is set to #THE NAME OF THE SELECTOR.
For the carousel, make sure that height and width are set to 100% + overflow is set to auto.
For each carousel, make sure its id is the same as the navigation.
All the best!
18 notes
·
View notes
Note
¡Hola, Necro! Gracias por todos tus hermosos tutoriales e infinita paciencia. Ahora bien, venía a preguntarte si sabrías cómo lograr algo similar a Reddit: Cuando el usuario que comienza el hilo responde su propio tema, aparece un cartelito al lado que dice "OP". ¿Es posible lograrlo en foroactivo? (ModernBB) Ando intentando hacer un foro de discusiones y esas cosas(?). Gracias desde ya (人 •͈ᴗ•͈)❤️✨
¡Interesante idea anon! He estado haciendo algunos testeos y esto es más que posible. Lo único que tienes que tener en cuenta es un par de cosas. Explico bajo el cut.
Lo primero es tener activado el recordatorio del primer mensaje. Esto es para que el JS pueda encontrar el primer post correcto y no te cambie el OP en cada página. Esto se activa en General > Mensajes y Emails > Siempre anunciar el 1er mensaje del tema en todas sus páginas.
Ahora, nos toca ir al template y buscar las variables <!-- BEGIN postrow --> y <!-- END postrow -->. Justo antes y después vamos a rodearlo con un div llamado .posteos (o el que quieras, pero para el ejemplo, usaré esta clase). Vamos, para que te quede tal que:
<div class="posteos"> <!-- BEGIN postrow --> tu HTML del post <!-- END postrow --> </div>
También tendremos que asegurarnos de tener localizado nuestro username. En mi caso, el div que lo contiene es .ppname, si el tuyo es diferente, esa es la class a cambiar en el JS.
Ahora que tenemos eso puesto, simplemente nos toca poner nuestro JS.
$('.posteos').each(function(){ var $firstpost = $(this).find('.post:first-of-type'); var firstId = $firstpost.find('.ppname a').attr('href'); $('.post').each(function(){ var postId = $(this).find('.ppname a').attr('href'); if (postId === firstId) { $(this).addClass('post-op'); } }); });
Revisa comillas y toda la parafernalia. Ahora, te quedará poner una cajita con el texto de op. Aunque puedes hacerlo con JS directamente (en lugar de añadir una class, simplemente agrega HTML donde quieras), yo he preferido hacerlo con CSS:
.post-op .postbody .content:before { content: 'OP'; background: var(--accent2); padding: 1px 20px; display: block; width: fit-content; font-weight: 700; color: white; text-shadow: var(--shadow-d); border-radius: 0 0 0 10px; margin: -20px -20px 20px 20px; font-size: 12px; margin-left: auto; }
Y ya estaría:

¡Espero que te sirva!
5 notes
·
View notes
Note
¡Hola! Primero que nada quería decirte que me encantan las tablillas y firmas que has hecho, ¡muchas gracias por dejarnos usarlas! Segundo, quería saber si me podías ayudar en una duda bastante estúpida que tengo, verás, estoy en proceso de aprender a crear un skin para un foro que quiero abrir y vi el tutorial de las variables CSS y me preguntaba: ¿dónde coloco eso? ._. Es lo de :root, Lo siento por la pregunta xd pero me da miedo meterlo en un lado que no sea y arruinar todo unu
¡Hola!
En primer lugar, ¡muchas gracias! Me alegro mucho de que os gusten las cositas que subo, aunque sean pocas y a estas alturas de la vida estén medio desfasadas del todo ya <3
Ahora, en cuanto a las variables, pues, a ver, yo en su día me guié por el tutorial que dejó @necromancercoding en su tumblr, que es el que yo reblogueé hace mil millones de años. ¿Puede ser ese el que has visto tú y que sea Necro al que hayas creído enviarle la duda?
En cualquier caso, sea así o no, te recomiendo que te pases por allí para ver todas las cositas que sube, porque son super útiles. Además, siempre tiene muy buena disposición a echar una mano cuando hay dudas como esta, así que recomiendo a cualquiera que lea esto y a ti, anon, en especial, echarle una visita a su blog, porque es mi go to cuando estoy más perdida que un pulpo en una cacharrería.
De todas formas, como yo me atasqué mucho al principio, intentaré resolver tu duda desde mi experiencia con las variables, aunque siempre recalcando el crédito a Necro y aprovechando para darle las gracias por enésima vez por el trabajazo que se marca compartiendo recursos para la comunidad <3
Antes de empezar, diré también que solo he utilizado variables para los colores del skin actual de @thechemtrailsrpg y estoy super contenta por lo mucho que nos han facilitado mucho las cosas a mi compi @accioblack y a mí, evitándonos tener que apuntar colores o que copiar y pegar cada hex una y otra vez. Las variables se pueden usar para más cosas, pero nosotras las hemos centrado en eso, el color y ya.
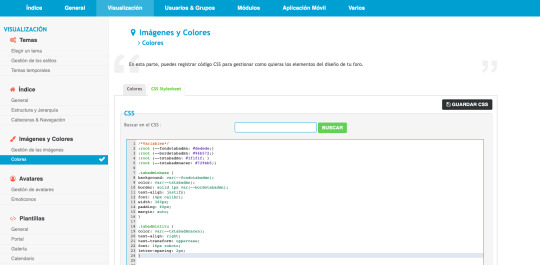
Para que sea más sencillo, voy a tirar de capturas de pantalla, porque en lo personal me facilita mucho la tarea ver dónde y cómo van colocadas las cosas para entenderlas bien y, como ejemplo, pongamos que queremos crear el set de tablillas de ambientación/administración de nuestro foro.
Paso one
Lo primero de todo sería crear una variable. Aquí puedes ir añadiéndolas según avances con el diseño, así que no tienes que preocuparte por tenerlas todas antes de empezar.
Para eso, solo tienes que ir al CSS de tu foro PA - Visualización - Colores - CSS Stylesheet. No hay mucha ciencia en este paso, aunque a mí me gusta ponerlas al principio del todo porque así es más fácil localizarlas, sobre todo si eres como yo y a veces se te olvida hasta cómo te llamas.
Entonces, poniendo que queremos que el fondo de nuestras tablillas sea de un color gris claro, que lleve un borde verde, que su texto general sea de un gris más oscuro y el título azul, añadiríamos estas líneas al CSS.
:root {
--fondotabadmn: #dedede;}
--bordetabadmn: #96b572;
--txtabadmn: #1f1f1f;
--txtabadmnacen: #729bb5;
}
El :root no se toca, los guiones tampoco, solo tendrías que darle un nombre a tu variable (como fondotabadmn (fondo de la tablilla), bordertabadmn (borde de la tablilla), txtabadmn (texto general de la tablilla) y txtabadmnacen (título) y aplicarles un valor que, en este caso, es el color. Quedaría así:

Paso two
Aquí vendríamos a crear lo que es la tablilla en sí, con su HTML y su CSS correspondiente.
HTML
Como quiero una estructura sencilla, voy a crear dos divs distintos. Uno que llevará la clase de la tablilla en sí y que englobará tanto el título como el contenido de la misma y otro para el título como tal. Es decir:
<div class="tabadminbase">
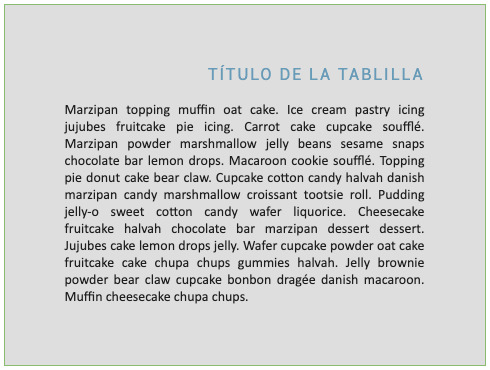
<div class="tabadmintitu">Título de la tablilla</div>
Contenido de la tablilla.
</div>
Este HTML, en cuanto lo pase a ForoActivo, irá todo seguido, sin saltos de línea, pero así, con ellos, se ve mejor qué va dentro de qué. Como ya digo, en el foro quedaría así:
<div class="tabadminbase"><div class="tabadmintitu">Título de la tablilla</div>Contenido de la tablilla.</div>
CSS
Una vez tengamos nuestro HTML, podemos toquetear al gusto las clases hasta que obtengamos un aspecto que nos agrade. Mi resultado, sin utilizar las variables que hemos creado antes, ha sido este:

CSS del cuerpo de la tablilla:
.tabadminbase {
border: solid 1px;
text-align: justify;
font: 14px calibri;
width: 360px;
padding: 60px;
}
CSS del título de la tablilla:
.tabadmintitu {
text-align: right;
text-transform: uppercase;
font: 16px roboto;
letter-spacing: 2px;
}
Ahora, ¿cómo quedaría esto, que ya de por sí es soso, usando las variables? Pues igual, pero con más vidilla. La que es basic es basic. El CSS, ya con variables, sería el siguiente:
CSS del cuerpo de la tablilla:
.tabadminbase {
background: var(--fondotabadmn);
color: var(--txtabadmn);
border: solid 1px var(--bordetabadmn);
text-align: justify;
font: 14px calibri;
width: 360px;
padding: 60px;
margin: auto;
}
CSS del título de la tablilla:
.tabadmintitu {
color: var(--txtabadmnacen);
text-align: right;
text-transform: uppercase;
font: 16px roboto;
letter-spacing: 2px;
}
Con esto, habríamos obtenido la misma tablilla, pero con los colores que marca la variable:
El CSS, ya implementado en el foro, tendría esta pinta:
Como ves, es simple. En vez de usar color: #1f1f1f o border: solid 1px #96b572, empleamos la variable en sustitución del hex. En un principio puede parecer una tontería, pero si, como nosotras, según vas haciendo el skin, dices: joder, no me gusta cómo queda esto en este color, en vez de tener que buscar el hex las tropecientas veces que aparece en el código cuando ya has avanzado, basta con recurrir a la variable, cambiarlo allí y ya estaría. Guardas y a vivir la vida, porque te habrás ahorrado el ir línea por línea (por más que uses el control/cmd+f/replace) y podrás usar ese rato en tomarte una cerve, tocarte la barriga o comerte la cabeza con otro código, que eso siempre gusta.
Caso aplicado a foro
Para terminar con un ejemplo más cercano a la realidad, porque una tablilla como que se me queda un poco corto, te diré que el skin de The Chem, tiene como veinte variables en total, más o menos. En este ejemplo, no le hagáis mucho caso a que haya una línea de root por cada variable, sino que pueden estar todas dentro de la misma, como en el ejemplo del primer paso (gracias a Necro y @dustydispatch por el aviso <3).
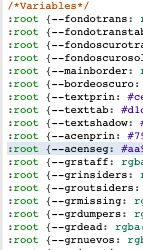
Como ves, tenemos unos cuantos fondos definidos (categorías, tablillas...), un borde principal, otro oscuro, el texto general, un text-shadow, dos acentos principales, varios grupos y alguna cosilla más que nos fue surgiendo por el camino. De ahí, si quisiésemos hacer un cambio drástico a la paleta, podríamos cambiar las variables y al estar todos los colores regidos por ellas, no necesitaríamos editar ninguna otra parte del código.
Ahora sí que sí, ¡ya está todo!
Creo que no me he saltado nada, pero básicamente eso es lo que hago yo a partir del tutorial de Necro. Es muy posible que haya explicado, nombrado o loqueseado mal ciento setenta mil cosas porque todo mi background, tanto teórico como práctico y de momento, proviene de tutoriales y otras muchas maravillas que hay en el fantástico mundo de la internete.
Por eso, si alguien aprecia alguna irregularidad, carencia lo que sea que se podría mejorar (será mucho, no vengáis a destruir pls, que esto lo hago con todo el amor del mundo dentro de mis conocimientos), se me avisa y edito con los arreglos pertinentes.
Gracias, anon, por la pregunta, gracias a @necromancercoding mil veces por tanto y a quien sea que lea esto por llegar hasta el final.
Besitos pa tós <3
#foroactivo#recursos#soporte#tutorial#necromancercoding#respuestas#asks#answered#answered asks#no sé si tengo tag para esto tampoco#what a mess
5 notes
·
View notes
Text
Introduction to Web Components

When you begin your journey as a developer, you learn that you should reuse code as much as possible. For front-end development, though, it is not so easy. When you have to create custom markup structures, they end up in being complex in style and script and using them multiple times can turn your page into a mess. Web Components, that are called the building blocks of web applications, promise to solve such problems.
Web components are a set of web platform APIs that allow us to create custom, reusable and encapsulated HTML tags for web pages and web apps. Such custom components and widgets build on the established standards, can work across various browsers, and can be used with any JavaScript library or framework that works with HTML.
Web components specifications
Web components incorporate four (in certain classifications, three) main technologies that can be used together to create versatile custom elements with encapsulated and reusable functionality:
Custom Elements
Custom elements are in essence fully-valid HTML elements, just like <div>, or <article>, but they have custom templates, behaviors and tag names (e.g. <one-dialog>) made with JavaScript APIs. They would always have a hyphen in their name, like <calendar-slider> and browser vendors have committed to create no new built-in elements containing a dash in their names to prevent conflicts. They can be used out-of-the-box with today’s most popular frameworks, including Angular, React, Vue, etc. with minimal effort. Custom elements contain their own semantics, behaviors, markup that can be checked in the HTML Living Standard specification.
Example:
class ComponentExample extends HTMLElement { connectedCallback() { this.innerHTML = `<h1>Hello world</h1>`; } }customElements.define(‘component-example’, ComponentExample);
As you can see, custom elements (in this case, <component-example>) must in some way extend an HTMLElement in order to be registered with the browser.
Shadow DOM
The shadow DOM is an encapsulated version of the DOM. It isolates DOM fragments from one another, including anything that could be used as a CSS selector and the corresponding styles, in a somewhat similar to <iframe> manner. At the same time, when we create a shadow root, we still have total control over that part of our page, but scoped to a context. It is critically important as it ensures that a component will work in any environment even if the page has other CSS or JavaScript. More information on how to use encapsulated style and markup in web components can be found in the shadow DOM specification.
Example:
To attach a shadow root, we should run something like:
const shadowRoot = document.getElementById(‘shadow’).attachShadow({ mode: ‘open’ });shadowRoot.innerHTML = ' <style> button { color: purple; } </style> <button id=”button”>Switch to use the CSS color purple <slot></slot></button>';
HTML Template
The HTML <template> element allows us to stamp out reusable templates of code inside a normal HTML flow that is not immediately rendered, but can be used at a later time when called upon. You can write a template of any shape or structure that could be created at a later time. To learn how to declare fragments of markup that go unused at page load, but can be instantiated later on at runtime you can check the HTML template element specification.
Example:
<template id=”movie-template”> <ul id=”movies”><li> <span class=”name”></span> — <span class=”year”></span> — <span class=”director”></span> </li></ul> </template>
The example above doesn’t render any content until a script has consumes the template, instantiates the code and tells the browser what to do with it.
ES Modules
ES Modules is the recent ECMAScript standard for working with modules. The standardization of a module system for browsers completed with ES6 and browsers started implementing it, so that now ES Modules are supported in Chrome, Safari, Edge and Firefox (since version 60). Modules as collections of smaller components that can be reused in our application, let developers encapsulate all kinds of functionality, and expose this functionality to other JavaScript files, as libraries. The process of including JS documents in a standards based, modular, performant way is defined in the ES Modules specification.
Example:
// From component folder import { Users } from ‘../components/users.js’; import { Issues } from ‘../components/issues.js’;class Dashboard { loadDashboard(){ // Create new instances const users = new Users(); const issues = new Issues(); console.log(‘Dashboard component is loaded’); } }export { Dashboard }
Benefits of web components
Web Components provide multiple benefits for developers and business.

Benefits for code:
Reusability: Once created, web components can be imported, used and reused in applications;
Readability: Compartmentalized, reusable code reduces the application size, simplified debugging and makes it more readable;
Declaration: You can more easily declare components on your page;
Composability: Shadow DOM allows composing applications with smaller chunks of code;
Extensibility: Custom elements API can extend browser elements or custom web components;
Scoping: Shadow DOM ensures DOM and CSS scoping so that styles don’t leak out and component DOM is local;
Interoperability: Native web components are interoperable at the browsers lowest (DOM) level.
Benefits for project
Brand consistency: Having your front-end application code split up into component libraries or even design systems can ensure brand consistency through the company. It also provides an additional benefit of the ability to be used by all teams, regardless of tech stack;
Cost-efficiency: Developers will have the ability to focus solely on making native reusable components, similar to LEGOs, and use these blocks in other applications across teams, which in the end saves money;
Faster deployments: Having ready-made code blocks, developers will be able to build and deploy applications more quickly. This leads to less time devoted to developing new features;
Quality improvement: As a by-product of reusing and reviewing the same code multiple times, the overall quality will improve in the course of time.
How to use web components?
To use a custom element you can simply import it and use the new tags in an HTML document. The ways to install custom elements, though can vary. Most elements today can be installed with NPM, but it is recommended to look at the README for the commands to install the specific element. NPM also handles installing the components’ dependencies. For more information on NPM, see npmjs.com.
Generally speaking, using a custom element is no different to using a <div> or any other element. Instances can be declared on the page, created dynamically in JavaScript, event listeners can be attached, and so on.
Libraries for building web components
Many libraries already exist that make it easier to build web components, including the following that we find useful:
Polymer provides a set of features for creating custom elements.
Slim.js provides data-binding and extended capabilities for components, using es6 native class inheritance.
Stencil generates standards-compliant web components.
Hybrids is a UI library for creating Web Components.
Angular provides the createCustomElement() function for converting an Angular component, together with its dependencies, to a custom element.
HTML and DOM specs already add features to support web components, letting web developers easily extend HTML with new elements with encapsulated styling and custom behavior. This proves that web components are already our present and it is time we start using them in applications.
3 notes
·
View notes
Text
Generate pagination in laravel like a pro

Table of Contents
What is pagination in Laravel ?
How to implement Eloquent pagination using Laravel ?
Ebooks available now
Why do we need to paginate in Laravel ?
get() vs paginate()
Generate html pagination links using Bootstrap css
What is pagination in Laravel ?
Pagination in Laravel is a way to fetch limited model data in chunks with functionality to represent fetched data in dynamic links as pages. That is, let’s take an example of a book. A book a collection information represented as pages. A page contains a small portion of information which a book holds. In a similar way, when laravel interact with models, it fetches information from databases collectively and put on user’s webpage.
Why do we need to paginate in Laravel ?
We are not required to paginate our data when we are damn sure that information from DB is very little, but can we guarantee it always ?, Of Course NOT.
Let’s assume a database query which takes 0.01 seconds to fetch 50 records from a table, and then pass this data into foreach loop to display in html table, let me ask you one simple question then, how much time will the same operation take for 10000 rows ?
That’s a huge time as a developer perspective but as per user perspective, will a user scroll down to 10000 rows on a single webpage ? A definite No.
That is why we need to paginate data to save time as well as to enhance the User eXperience.
How to implement Eloquent pagination using Laravel ?
get() vs paginate()
There are two main methods to get data from Eloquent ORM in laravel.
get() method fetches all the records from a database table and it should only be used in background processing tasks.
paginate() method accepts an integer parameter denoting a number of data to fetch from a collection. By default, even if we do not pass this parameter then it is set to 10 records per page.
Generate html pagination links using Bootstrap css
Lets create a simple laravel application where,
UserController.php
public function getUsers(Request $request) { $per_page = $request->per_page ?? 10; $users = App\User::fetchUsers($per_page); return view('users',compact($users)); }
App\User.php
Public static function fetchUsers($per_page) { return self::paginate($per_page); }
users.blade.php
<table class="table table-hover"> <thead> <tr> <th scope="col" >#ID</th> <th scope="col" >Username</th> <th scope="col" >First Name</th> <th scope="col" >Last Name</th> </tr> </thead> <tbody class="rw-shadow"> @foreach($users as $key => $user) <tr> <td > # {{ $key + $users->firstItem() }}</td> <td > {{ $user->username }}</td> <td > {{ $user->first_name }}</td> <td > {{ $user->last_name }}</td> </tr> @endforeach </tbody> </table> <!-- paginations -- > {{ $users->links('pagination') }}
pagination.blade.php
@if ($paginator->hasPages()) <div class="row text-right mr-2"> <nav aria-label="Page navigation" class="ml-auto"> <ul class="pagination"> {{-- Previous Page Link --}} @if ($paginator->onFirstPage()) <li class="page-item"> <a class="page-link" href="#" aria-label="Previous"> <span aria-hidden="true">«</span> <span class="sr-only">Previous</span> </a> </li> @else <li class="page-item"> <a class="page-link" href="{{ $paginator->previousPageUrl() }}" aria-label="Previous"> <span aria-hidden="true">«</span> <span class="sr-only">Previous</span> </a> </li> @endif {{-- Pagination Elements --}} @foreach ($elements as $element) {{-- "Three Dots" Separator --}} @if (is_string($element)) <li class="page-item disabled"><span>{{ $element }}</span></li> @endif {{-- Array Of Links --}} @if (is_array($element)) @foreach ($element as $page => $url) @if ($page == $paginator->currentPage()) <li class="page-item"><a class="page-link active" href="#">{{ $page }}</a></li> @else <li class="page-item"><a class="page-link" href="{{ $url }}">{{ $page }}</a></li> @endif @endforeach @endif @endforeach {{-- Next Page Link --}} @if ($paginator->hasMorePages()) <li class="page-item"> <a class="page-link" href="{{ $paginator->nextPageUrl() }}" aria-label="Next"> <span aria-hidden="true">»</span> <span class="sr-only">Next</span> </a> </li> @else <li class="page-item"> <a class="page-link" href="#" aria-label="Next"> <span aria-hidden="true">»</span> <span class="sr-only">Next</span> </a> </li> @endif </ul> </nav> </div> @endif
Output:

Ebooks available now
You can download this article’s PDF eBooks for offline reading from below:
Issuu
Slide Share
Edocr
AuthorStream
#laravel#Laravel 6#php#ajax pagination#pagination: page links#pagination: load more#blog post#blog articles#tutorial#guide
3 notes
·
View notes
Text
@snw-cnvs
<head> <style type="text/css"> /**PLEASE don't steal my stuff, friends. You're welcome to edit, but I'd really love it if it wasn't reposted or stolen. I don't ever post my themes on the chance that someone might steal them**/
body { background-color:#fff; font-size:9px; color:#000; overflow-y:hidden; } /**THIS CHANGES THE LOOK OF THE LINKS ON THE PAGE**/ a { color:#000; } /**THIS IS THE TITLES ON THE MUSE PAGES**/ h2 { font-size:15px; font-family:arial; text-align:center; color:#ccc; text-shadow:1px 1px 2px #000; } /** THIS CUSTOMIZES THE QUOTE **/ h3 { font-size:11px; font-family:arial; text-align:center; color:#000; text-shadow:1px 1px 2px #888; }
/** THIS IS THE BOX THAT EVERYTHING IS INSIDE**/ #container { width:500px; height:300px; background-color:#fff; margin-left:350px; margin-top:200px; border:1px solid #eee; overflow:scroll;
}
/**THIS IS THE TITLE BASICALLY**/ #bar{ width:490px; height:30px; background:#000; padding:5px; text-align:right; font-size:20px; text-decoration:underline; font-family:arial; color:#fff; position:fixed; }
#main { padding:20px; width: 240px; margin: 200px auto; background: #000; border:1px solid #e2e2e2; }
.tab { width:400px; margin: 0 auto;
}
.tab label { color: #999; letter-spacing: 2px; font-size: 8px; line-height: 14px; font-weight: bold; background-color: #eee; width:160px; padding:10px; text-transform: uppercase; height: 15px; text-align: center; cursor: pointer; display: block; margin-bottom:-35px; margin-top:42px; margin-left:-50px; }
.tab label:hover { background: #333; color:#eee; }
[type=radio]:checked ~ label { z-index: 2; color: #fff; background: #000; }
.tab [type=radio] { display: none; }
.content { color: #000; background-color: #fff; width: 299px; margin-top: 211px; margin-left: 130px; height: 240px; padding: 10px; overflow: scroll; text-align: justify; position: absolute; top:30px; border-left:1px solid #eee; overflow:auto; overflow-x:hidden; }
.content a { color: #999; padding: 3px; font-size: 8px; margin-bottom: 2px; text-decoration: underline; text-transform: uppercase; }
.content a:hover { letter-spacing: 2px; text-align:center; color: #666; font-weight: bold; padding: 2px;
}
[type=radio]:checked ~ label ~ .content { z-index: 1; }
/**CREDIT**/
#credit { position:fixed; font-family:'courier'; text-transform:uppercase; font-size:8px; right:9px; bottom:9px; padding:4px; background-color:{color:post background}; letter-spacing:1px; }
#credit a{ color:#eee; }
#credit a:hover{ color:#888; }
</style> </head>
<body>
<div id="container"> <div id="bar"><i>muses</i></div>
<div class="main">
<div class="tab"> <input type="radio" id="tab-1" name="tab-group-1" checked> <label for="tab-1">LUKE</label> <div class="content"> <center><h2><i> —*&; Luke </i></h2></center> <center><h3><i> active // shipping status: 1/3</i></h3></center><br> <img src="https://i.imgur.com/rcabdng.png" style="border: 10px solid #ffffff; outline: 1px solid #f0f0f0; margin-left:30px;"> <img src="https://i.imgur.com/ZLFn3q1.png" style="border: 10px solid #ffffff; outline: 1px solid #f0f0f0;"><br> <h2><i>—*&; General Information</i></h2><br> <b>—NAME.</b> Luke <br> <b>—NICKNAME/S.</b> Lou, Lulu <br> <b>—DOB.</b> 18th may (20 yrs old) <br> <b>—GENDER.</b> male <br> <b>—ORIENTATION.</b> bi-curious <br> <b>—ETHNICITY.</i> Adopted; unknown <br> <b>—SPOKEN LANGUES.</b> english, spanish, japanese. <br> <b>—OCCUPATION.</b> studying // part time mechanic. <br> <h2><i>—*&; Appearance & Personality</i></h2><br> <b>—HAIR COLOUR.</b> Black <br> <b>—EYE COLOUR</b> Blue <br> <b>—HEIGHT</b> 185cm 6'1 <br> <b>—BODY BUILD.</b> Fit well toned <br> <b>—TATTOOS + PIERCINGS.</b> none <br> <b>—INTELLIGENCE.</b> high <br> <b>—LIKES.</b> drinking, dogs, problem solving <br> <b>—DISLIKES.</b> bullies, obnoxious people <br> <b>—PHOBIAS.</b>n/a <br> <b>—DISPOSITION.</b> Sarcasm. So much sarcasm. Usually he's pretty reserved and polite, gives the impression he was raised well. But the more you get to know him the more he'll loosen up. He's pretty kind and selfless, but because of his big size and typically nuetral expression he gets roped into fights a lot.<br>
<h2><i>—*&; Bio</i></h2><br> Luke was adopted by a loving family when he was 6 months old. He’d pretty much always known he wads adopted as his parents looked different to him. But he knew they loved him and never had an issue with it. <br><br>
Although his family was loving, he was put under a lot of pressure. They lived in a small town where everyone knew everyone and you couldn’t get away with anything. His parents were very religious and a little bigoted, which didn’t sit well with him but he never spoke out against them. He was expected to get good grades and behave himself. Which he did. He was always putting pressure on himself to be a good son, feeling like he owed it to his parents for choosing him. He was never top of the class or outstanding in any particular field, but he was always up there. <br><br>
As much as Luke loves his parents, when he turned 18 and it was time to start his next phase of life, he moved away, far away to study. He works part time as a mechanic, having learnt the skills from his father, and studies the rest of the time.
<br><br> MORE TBA
</div> </div>
<div class="tab"> <input type="radio" id="tab-2" name="tab-group-1"> <label for="tab-2">ANDREW</label> <div class="content"> <center><h2><i> —*&; ANDREW </i></h2></center> <center><h3><i> active // shipping status: 1/2 </i></h3></center><br> <img src="https://i.imgur.com/uKtLeI0.png" style="border: 10px solid #ffffff; outline: 1px solid #f0f0f0; margin-left:30px;"> <img src="https://i.imgur.com/FvioeVW.png" style="border: 10px solid #ffffff; outline: 1px solid #f0f0f0;"><br> <h2><i>—*&; General Information</i></h2><br> <b>—NAME.</b> Andrew Svensson <br> <b>—NICKNAME/S.</b> Andy, Drew<br> <b>—DOB.</b> 19 years old <br> <b>—GENDER.</b> male <br> <b>—ORIENTATION.</b> (closeted) homosexual <br> <b>—ETHNICITY.</i>English // Swedish // Spanish <br> <b>—SPOKEN LANGUES.</b>English // Swedish // Japenese (adequately) // Spanish (somewhat) <br> <b>—OCCUPATION.</b> bass player in a band // convenience store // cafe <br> <h2><i>—*&; Appearance & Personality</i></h2><br> <b>—HAIR COLOUR.</b>blonde. <br> <b>—EYE COLOUR</b>green <br> <b>—HEIGHT</b> 167cm. <br> <b>—BODY BUILD.</b>He's in shape, goes for runs to exercize, but is still a little on the lanky side. <br> <b>—TATTOOS + PIERCINGS.</b>N/A <br> <b>—INTELLIGENCE.</b>high <br> <b>—LIKES.</b>Music, coffee, books, quiet peaceful places, cats <br> <b>—DISLIKES.</b> Bullies/rude people, big dogs <br> <b>—PHOBIAS.</b>n/a <br> <b>—DISPOSITION.</b>He's SUPER socially awkward, he doesn't really get sarcasm most of the time and takes things at face value. He struggles make friends. He's typically very honest, to the point of being blunt and sometimes unintentionally rude. Doesn't mean any harm deep down though. Just a bit of an awkward guy. <br>
<h2><i>—*&; Bio</i></h2><br> When Andrew was 6 years old his mother left him and his father. Andrew was of course sad because of this, but at the time was too young to properly realize what had happened. A few years later when he was 9 his father remarried. Then a year later, 10, his step-mother gave birth to his little sister and brother, twins. <br><br>
Andrew is welcome at his home, his step-mother has always treated him well, but when he turned 18 he chose to move out. His parents worked a lot, and even when they weren’t he was expected to take care of the twins a lot. His father works as a high up in a pretty well off company, and he expects good things from Andrew. So he always felt a bit pressured when it came to grades and the like. Andrew’s family is also very religious, because of this he never felt comfortable coming out to anyone, not even himself fully. All of these reason encouraged him to leave. He loves his family, but he needed some space and freedom. </div> </div>
<div class="tab"> <input type="radio" id="tab-3" name="tab-group-1"> <label for="tab-3">LEVI</label> <div class="content"> <center><h2><i> —*&; Levi </i></h2></center> <center><h3><i> semi-active // shipping status: closed </i></h3></center><br> <img src="https://i.imgur.com/b004Pto.png" style="border: 10px solid #ffffff; outline: 1px solid #f0f0f0; margin-left:30px;"> <img src="https://i.imgur.com/22VlJI6.png" style="border: 10px solid #ffffff; outline: 1px solid #f0f0f0;"><br> <h2><i>—*&; General Information</i></h2><br> <b>—NAME.</b> Levi Fay <br> <b>—NICKNAME/S.</b> Levy, Lev<br> <b>—DOB.</b> 15th August (20 years old) <br> <b>—GENDER.</b> male <br> <b>—ORIENTATION.</b> Pansexual/romantic <br> <b>—ETHNICITY.</i>Demigod - half greek (god) // half american/english <br> <b>—SPOKEN LANGUES.</b>english, french <br> <b>—OCCUPATION.</b> studying <br> <h2><i>—*&; Appearance & Personality</i></h2><br> <b>—HAIR COLOUR.</b> Sandy blonde <br> <b>—EYE COLOUR</b> Blue (changes a lot) <br> <b>—HEIGHT</b> 180cm <br> <b>—BODY BUILD.</b>Athletic <br> <b>—TATTOOS + PIERCINGS.</b>none <br> <b>—INTELLIGENCE.</b>fairly intelligent <br> <b>—LIKES.</b>Fashion, trends, flirting, love, styling himself & others <br> <b>—DISLIKES.</b> fighting, getting his hands dirty <br> <b>—PHOBIAS.</b>n/a <br> <b>—DISPOSITION.</b>Sarcastic, blunt, affectionate, loving, short attention span, obnoxious, self-involved <br> <h2><i>—*&; Abilities</i></h2><br> <b>—LANGUAGE:</b> Ancient greek/latin & French <br> <b>—AMOKINESIS:</b> Has some control over many degrees of control over love, lust, beauty, etc. though on a much smaller scale than his mother. Can attract the opposite gender when he walks by, also has magical control over clothes, makeup, and jewelry, much like the other Aphrodite kids.<br> <b>—CHARMSPEAK:</b> Charmspeaking is a rare type of hypnotism ability that chosen children of Aphrodite possess. A type of hypnotism or persuasion in which it allows the speaker to convince someone else to do or get whatever they want. The strength of the command depends on the tone and the emotion of the charmspeaker's voice, as well as their skill with it. Charmspeak can be negated through a number of ways; people with strong wills or intentions are unaffected, if someone is aware of a persons ability to charmspeak, then it will have a reduced effect, and beings of the same gender tend to have some resistance to charmspeak.
<h2><i>—*&; Bio</i></h2><br> <br> Levi lived alone with his father in his early years. He seemed to always get himself into some sort of trouble, when teased for either his girlish looks or "girlish" likes (such as clothes, dolls, makeup etc) he wouldn't take it quietly and would fight back. Not to mention his ADHD meant it was very hard for him to sit still in class. All this time he never understood why he was so different, it didn't bother him that much but he did wonder why. Until he turned 7 years old and was found by a satyr, then after a long talk with his father, taken off to camp halfblood. He learnt who his mother was; Aphrodite, and everything seemed to now make sense. Levi loves staying at camp halfblood, and would stay there year round but he feels bad for his father. He was already abandoned by his lover (Aphrodite(, then dumped with a kid, he couldn't bare the thought of him being left alone. <br><br>
The more he grew and learnt about what is was to be an Aphrodite kid the more he came into himself. He felt more at home and more confident expressing his interests and likes, now with no shame.<br><br>
He somehow managed to make it through school (not with the best grades). His goal is to study fashion, though it's a little hard avoiding monsters. The older and more powerful he gets the more he attracts. And so he is spending more and more time at camp. </div> </div>
<div class="tab"> <input type="radio" id="tab-4" name="tab-group-1"> <label for="tab-4">AKITO</label> <div class="content"> <center><h2><i> —*&; Akito </i></h2></center> <center><h3><i> semi-active // shipping status: multiship</i></h3></center><br> <img src="https://i.imgur.com/4CQS9E9.png" style="border: 10px solid #ffffff; outline: 1px solid #f0f0f0; margin-left:30px;"> <img src="https://i.imgur.com/6GXex4l.png" style="border: 10px solid #ffffff; outline: 1px solid #f0f0f0;"><br> <h2><i>—*&; General Information</i></h2><br> <b>—NAME.</b> Akito <br> <b>—NICKNAME/S.</b> Aki<br> <b>—DOB.</b> Unknown (350+) <br> <b>—GENDER.</b> Genderless (can assume whatever gender he pleases, typically male) <br> <b>—ORIENTATION.</b>demiromantic // pansexual <br> <b>—ETHNICITY.</i>Kitsune <br> <b>—OCCUPATION.</b> >n/a wanders from place to place looking for fun and food <br> <h2><i>—*&; Appearance & Personality</i></h2><br> <b>—HAIR COLOUR.</b> white <br> <b>—EYE COLOUR</b> yellow <br> <b>—HEIGHT</b> 168cm <br> <b>—BODY BUILD.</b>petite, but well toned muscles. <br> <b>—TATTOOS + PIERCINGS.</b>none <br> <b>—INTELLIGENCE.</b>high <br> <b>—LIKES.</b>having fun, playing tricks, foxes, forests, nature, food, worship, strong or powerful people, respect <br> <b>—DISLIKES.</b> dogs, cities, rude or offensive people, weak people <br> <b>—PHOBIAS.</b>n/a <br> <b>—DISPOSITION.</b>on the surface he seems friendly and easy going, but it's only a facade. he wants to have fun and play around, being still young in kitsune terms, however he is prone to mood swings and if not shown respect he will lash out. he himself can be pretty disrespectful however, unless he sees you as stronger/more powerful than him. all in all a bit of a brat <br>
<h2><i>—*&; Abilities</i></h2><br> <br>
<b>SHAPESHIFTING:</b> He is able to tranform from his usal form, a (currently) two tailed fox into a human being, either male or female though he usually prefers male. <br> <b>TEETH & CLAWS:</b> He has sharp teeth and claws which he can use to inflict damadge if he wishes.<br> <b>FOXFIRE:</b> He is able to create flames, though as he is young they are not too large and he isn't as skilled at controlling them.<br> <b>ILLUSIONS:</b> A new ability of his, he doesn't have great control over it yet but he is able to create small illusions for a short period of time.
<h2><i>—*&; Bio</i></h2><br> <br> When he was young he lived with his mother and father and siblings, growing up having the time of his life, playing around the forest with his family. However the happy times quickly came to an end when most of his forest was destroyed in a fire. He was separated from his family and never found them again, not knowing if they are alive or dead. <br><br>
From here he began wandering from place to place, searching for somewhere to settle down and call his own. He’s still rather immature and has a lot to learn, though with the passing years he grows in intelligence, strength and ability. </div> </div>
<div class="tab"> <input type="radio" id="tab-5" name="tab-group-1"> <label for="tab-5">JAYLEN</label> <div class="content"> <center><h2><i> —*&; Jaylen </i></h2></center> <center><h3><i> semi-active // shipping status: 1/3</i></h3></center><br> <img src="https://i.imgur.com/Q8fScc2.png" style="border: 10px solid #ffffff; outline: 1px solid #f0f0f0; margin-left:30px;"> <img src="https://i.imgur.com/0oeLusL.png" style="border: 10px solid #ffffff; outline: 1px solid #f0f0f0;"><br> <h2><i>—*&; General Information</i></h2><br> <b>—NAME.</b> Jaylen <br> <b>—NICKNAME/S.</b>Jay <br> <b>—DOB.</b> 22nd November (22 years old) <br> <b>—GENDER.</b> male <br> <b>—ORIENTATION.</b>Pansexual/romantic <br> <b>—ETHNICITY.</b>(half-vampire) Irish//English mix <br> <b>—SPOKEN LANGUES.</b>english <br> <b>—OCCUPATION.</b> Student - studying nursing <br> <h2><i>—*&; Appearance & Personality</i></h2><br> <b>—HAIR COLOUR.</b> Amber orange <br> <b>—EYE COLOUR</b> Light brown <br> <b>—HEIGHT</b> 183cm <br> <b>—BODY BUILD.</b>Fit, keeps in good shape. mesomorph. <br> <b>—OTHER.</b>Has very sharp canines. <br> <b>—TATTOOS + PIERCINGS.</b> none <br> <b>—INTELLIGENCE.</b> Average <br> <b>—LIKES.</b>Dogs, helping people, his job, socializing, meat <br> <b>—DISLIKES.</b> Vampires, rude obnoxious people, bullies <br> <b>—PHOBIAS.</b>n/a <br> <b>—DISPOSITION.</b> Jaylen is super friendly and kind to everyone. He's a bit of a dudebro, he likes to have fun rather than be serious all the time. He's very empathetic and finds it easy to amkes friends<br> <b>MENTAL DISORDERS.</b> Mild depression <br> <b> WHEN DIAGNOSED.</b> 19
<h2><i>—*&; Abilities</i></h2><br> <br>
<b>Strength/Speed:</b> He's stronger than the average human, though because he refuses to drink blood he isn't at full strength, if he was he'd be superhumanly strong. The same applies for his speed and jumping abilities.
<h2><i>—*&; Bio</i></h2><br> <br> </div> </div>
<div class="tab"> <input type="radio" id="tab-6" name="tab-group-1"> <label for="tab-6">ADONIS</label> <div class="content"> <center><h2><i> —*&; Adonis </i></h2></center> <center><h3><i> active // shipping status: 1/??</i></h3></center><br> <img src="https://i.imgur.com/hNOtVZO.png" style="border: 10px solid #ffffff; outline: 1px solid #f0f0f0; margin-left:30px;"> <img src="https://i.imgur.com/Jse5jY5.png" style="border: 10px solid #ffffff; outline: 1px solid #f0f0f0;"><br> <h2><i>—*&; General Information</i></h2><br> <b>—NAME.</b> Adonis Kyknos Hinode <br> <b>—NICKNAME/S.</b> 21<br> <b>—DOB.</b> 23rd September (21 years old) <br> <b>—GENDER.</b> male <br> <b>—ORIENTATION.</b> bisexual <br> <b>—ETHNICITY.</i> greek demigod<br> <b>—SPOKEN LANGUES.</b> english, japaense, ancient greek/latin <br> <b>—OCCUPATION.</b> studying to be a doctor // part-time model <br> <h2><i>—*&; Appearance & Personality</i></h2><br> <b>—HAIR COLOUR.</b> strawberry blonde <br> <b>—EYE COLOUR</b> amber/gold <br> <b>—HEIGHT</b> 5'8 <br> <b>—BODY BUILD.</b> athletic <br> <b>—TATTOOS + PIERCINGS.</b> none<br> <b>—INTELLIGENCE.</b> high <br> <b>—LIKES.</b>helping people/healing people, daylight, sunrise, archery, music <br> <b>—DISLIKES.</b>nighttime, violence <br> <b>—PHOBIAS.</b>n/a <br> <b>—DISPOSITION.</b>He’s very dedicated, and diligent, a hard worker who takes his responsibility and commitments seriously. Generally a kind hearted person, he wants to help other's. He's pretty easily emabrrassed. Though kind he won't put up with mean or rude people. <br>
<h2><i>—*&; Abilities</i></h2><br> <br>
TBA- healing, singing, accurate shot, harnessing sunlight
<h2><i>—*&; Bio</i></h2><br> <br> TBA </div> </div>
<div class="tab"> <input type="radio" id="tab-7" name="tab-group-1"> <label for="tab-7">INDIGO</label> <div class="content"> <center><h2><i> —*&; Indigo </i></h2></center> <center><h3><i> active // shipping status: ??</i></h3></center><br> <img src="https://i.imgur.com/O4UFgdk.png" style="border: 10px solid #ffffff; outline: 1px solid #f0f0f0; margin-left:30px;"> <img src="https://i.imgur.com/UZPNvh9.png" style="border: 10px solid #ffffff; outline: 1px solid #f0f0f0;"><br> <h2><i>—*&; General Information</i></h2><br> <b>—NAME.</b> Indigo <br> <b>—NICKNAME/S.</b> Indy <br> <b>—DOB.</b> 27 <br> <b>—GENDER.</b> male <br> <b>—ORIENTATION.</b> homo(demi)romantic // pansexual <br> <b>—ETHNICITY.</i> <br> <b>—SPOKEN LANGUES.</b> <br> <b>—OCCUPATION.</b> Owns a bookshop // (verse dependent) <br> <h2><i>—*&; Appearance & Personality</i></h2><br> <b>—HAIR COLOUR.</b> Faded grey-blue <br> <b>—EYE COLOUR</b> Ahsy black <br> <b>—HEIGHT</b> tiny // 5'5 <br> <b>—BODY BUILD.</b> on the thin side<br> <b>—TATTOOS + PIERCINGS.</b> ear<br> <b>EXTRA.</b> mole on left cheek under eye <br> <b>—INTELLIGENCE.</b> average <br> <b>—LIKES.</b>books/reading, quiet <br> <b>—DISLIKES.</b> being touched without permisson, rich people, rude people <br> <b>—PHOBIAS.</b>n/a <br> <b>—DISPOSITION.</b> A little sassy, has a bit of a temper, but once you're on his good side he's good to you. <br>
<h2><i>—*&; Bio</i></h2><br> <br> Looks super pretty and young, baby face af, but it actually 27 and is actually 80 yrs old at heart. Had 0 fucking time for any of you honestly. Just leave him along with his books and let him be happy. <br><br>
Highkey was the child of an affair with some kind of ?? important person?? royal/diplomat/politician??? who knows not fking me. Mama was sooooo pretty that papa just could not resist a quick fuck or two, or three, or a lot of fucks. Was kept a secret for the first few years of his life until mama died. Taken to rich whatever he is papa’s place and oh no he has a wife :/ Was Not Treated Well. Ended up being kicked out when he was 17. Highkey lived a very VERY shitty life from then on. But honestly he was kinda glad to be gone. Also lowkey sold himself to get by bc ya gotta do what ya gotta do sometimes when ur penniless and homeless :/ not like papa was in any contact with him or giving any mulla. Finally when he was abt 24 papa found him and was like, i rlly wanna see u, pls give me a chance etc etc. Honestly he was at the lowest point in his life, he didn’t expect anything, but he lowkey did and just hOPEd for once something would go right for him. Papa arrived and asked him to sign a non-disclosure agreement and never speak of who was his papa. Also offered him a lOT of money for it. <br><br> That one hurt. Hurt him deep. But he was like :))))) give me ur money, i’ll sign, and literally nEVER show ur face to me again bitch. Now he runs a lil book store bc he’s always loved reading and now he can read whatever he wants when he wants :’) </div> </div>
<div class="tab"> <input type="radio" id="tab-8" name="tab-group-1"> <label for="tab-8">DANTE</label> <div class="content"> <center><h2><i> —*&; Dante </i></h2></center> <center><h3><i> ❝ quote or something can go here any kind of length looks ok!! but it depends on <b>you</b>❞</i></h3></center><br> <img src="https://i.imgur.com/uhI5OMB.png" style="border: 10px solid #ffffff; outline: 1px solid #f0f0f0; margin-left:30px;"> <img src="https://i.imgur.com/lbBeWSS.png" style="border: 10px solid #ffffff; outline: 1px solid #f0f0f0;"><br> <h2><i>—*&; General Information</i></h2><br> <b>—NAME.</b> Dante (goes by Dee mostly) <br> <b>—NICKNAME/S.</b> Dee, Dan<br> <b>—DOB.</b> 19 years old <br> <b>—GENDER.</b> male <br> <b>—ORIENTATION.</b> bisexual <br> <b>—ETHNICITY.</i> eh <br> <b>—SPOKEN LANGUES.</b> eh <br> <b>—OCCUPATION.</b> basically just a rich boy <br> <h2><i>—*&; Appearance & Personality</i></h2><br> <b>—HAIR COLOUR.</b>dyed platinum blonde <br> <b>—EYE COLOUR</b>green, appears almost aqua <br> <b>—HEIGHT</b> 5'10 <br> <b>—BODY BUILD.</b>Very atheletic, well definied muscles <br> <b>—TATTOOS + PIERCINGS.</b>three silver rings on his left ear <br> <b>—INTELLIGENCE.</b>high <br> <b>—LIKES.</b> drinking, smoking, partying,having fun <br> <b>—DISLIKES.</b> his dad, being at home <br> <b>—PHOBIAS.</b>n/a <br> <b>—DISPOSITION.</b>Pretty friendly and easy going, always joking around and rarely serious. <br>
<h2><i>—*&; Bio</i></h2><br> TBA </div> </div>
<div class="tab"> <input type="radio" id="tab-9" name="tab-group-1"> <label for="tab-9">Ezra</label> <div class="content"> <center><h2><i> —*&; Ezra </i></h2></center> <center><h3><i> ❝ quote or something can go here any kind of length looks ok!! but it depends on <b>you</b>❞</i></h3></center><br> <img src="https://64.media.tumblr.com/6bb1917ee668d58c2e888e7fe8f90641/tumblr_o4oiqnRA5l1u4r8r1o1_100.png" style="border: 10px solid #ffffff; outline: 1px solid #f0f0f0; margin-left:30px;"> <img src="https://64.media.tumblr.com/6bb1917ee668d58c2e888e7fe8f90641/tumblr_o4oiqnRA5l1u4r8r1o1_100.png" style="border: 10px solid #ffffff; outline: 1px solid #f0f0f0;"><br> <h2><i>—*&; General Information</i></h2><br> <b>—NAME.</b> Ezra Flynn<br> <b>—NICKNAME/S.</b> Ez <br> <b>—DOB.</b> 26 <br> <b>—GENDER.</b> male <br> <b>—ORIENTATION.</b> eh <br> <b>—ETHNICITY.</i> caucasian <br> <b>—SPOKEN LANGUES.</b> english <br> <b>—OCCUPATION.</b> high school teacher <br> <h2><i>—*&; Appearance & Personality</i></h2><br> <b>—HAIR COLOUR.</b> light brown <br> <b>—EYE COLOUR</b> amber <br> <b>—HEIGHT</b> 4′11 <br> <b>—BODY BUILD.</b> tiny, little muscle, thin <br> <b>—TATTOOS + PIERCINGS.</b> none <br> <b>—INTELLIGENCE.</b> average/high <br> <b>—LIKES.</b> teaching kids, an occasional drink, <br> <b>—DISLIKES.</b> BULLIES he will fight every bully ever. some of this kids in his classes tbh. his height <br> <b>—PHOBIAS.</b>n/a <br> <b>—DISPOSITION.</b> friendly, welcoming, helpful. will scold you if you misbehave though. <br>
<h2><i>—*&; Bio</i></h2><br>
TBA </div> </div>
</div>
</div>
<div id="credit"><a href="http://palsrph">palsrph</a></div> </body>
1 note
·
View note
Text
Very simple multi-syllable random name generator
So someone I follow was talking about random name generators for their world building and I made this one for mine awhile back. It is very simple, css for buttons, js for generating the name, and html for viewing the outcome. If you want to see it in action or fiddle with it, here it is on Codepen. If you're not coding savvy, you could probably still use it by pasting this into a plain text editor (notepad and the like) and saving it as an .html file. Then you can view it in the browser from your own computer without uploading it (though you can upload it too.) I had a much better post about this but Tumblr was a huge bitch about pasting the code into the box and I lost it trying to figure it out. On that note, Tumblr slaughtered the indentation, so sorry ahead of time if you actually code. Please feel free to use this, edit it, and ask me questions. You don't need to give me credit either unless you really feel strongly about it :)
<!DOCTYPE html> <html> <head> <!This is the css for the buttons.> <style> .button { display: inline-block; padding: 15px 25px; font-size: 24px; cursor: pointer; text-align: center; text-decoration: none; outline: none; color: #fff; background-color: #4CAF50; border: none; border-radius: 15px; box-shadow: 0 9px #999; }
.button:hover {background-color: #3e8e41} .button:active { background-color: #3e8e41; box-shadow: 0 5px #666; transform: translateY(4px); } </style> <! This is the javascript part.> <script> function promptGen() { // This makes a 2 part phrase like a multi-syllable name var firstPart = ["La", "Bo", "Re", "Xo", "Ku", "Fe"];
var secondPart = ["rune", "son", "dor", "ros", "var", "kev", "dos", "ney", "krag"]; // generate name, this puts them together randomly var name = firstPart[Math.floor(Math.random() * firstPart.length)] + secondPart[Math.floor(Math.random() * secondPart.length)];
// remove the previous name if (document.getElementById("name")) { document.getElementById("placeholder").removeChild(document.getElementById("name")); }
// print the new name var element = document.createElement("div"); element.setAttribute("id", "name"); element.appendChild(document.createTextNode(name)); document.getElementById("placeholder").appendChild(element); } </script>
</head> <body> <p></p> <button class="button" onclick="promptGen()">Two Syllable Name</button> <p></p> <div id="placeholder"></div> <p></p> </body> </html>
1 note
·
View note
Text
df
Watch Fire Force - Season 2 Episode 12 : Shadows Cast by Divine Light HD free TV Show | TV Shows & Movies
HOME
POPULAR
ON AIR TV
TV SCHEDULE
BOX OFFICE
UPCOMING
TOP RATED
REQUEST
LOGIN
Home
Fire Force
Season 2
Episode 12 : Shadows Cast by Divine Light

Fire Force - Season 2 Episode 12 : Shadows Cast by Divine Light
00:00:00
HD
HD 720p
HD 480p
• 360p
• Auto
00:24:14
/* General menu styling */ .nav { position: relative; margin: 0; padding: 0; line-height: 22px; } /* The main navigation link containers */ .nav>li { display: block; float: left; /* Displaying them on the same line */ margin: 0; padding: 0; } /* The main navigation links */ .nav>li>a { /* Layout */ display: block; position: relative; padding: 10px 20px; /* Text */ font-family: "Open Sans Condensed", Arial, Helvetica, sans-serif; color: #fff; font-size: 22px; text-decoration: none; /* Background */ background: black; /* For older browsers */ background: rgba(0, 0, 0, .6); /* Transparent background for modern browsers */ /* Making the color to change on hover with a transition */ -webkit-transition: color .3s ease-in; -moz-transition: color .3s ease-in; -o-transition: color .3s ease-in; -ms-transition: color .3s ease-in; } /* Changing the color on hover */ .nav>li>a:hover, .nav>li:hover>a { color: #5DB550; } /* The links which contain dropdowns menu are wider, because they have a little arrow */ .nav>.dropdown>a { padding: 10px 30px 10px 20px; } /* The arrow indicating the dropdown */ .dropdown>a::after { content:'\2022'; position: absolute; top: 17px; right: 100px; width: 7px; height: 7px; -webkit-transform: rotate(45deg); -ms-transform: rotate(45deg); -moz-transform: rotate(45deg); -o-transform: rotate(45deg); border-bottom: 1px solid #fff; border-right: 1px solid #fff; } /* Changing the color of the arrow on hover */ .dropdown>a:hover::after, .dropdown:hover>a::after { border-color: #5DB550; } /* The submenus */ .nav ul { position: absolute; margin: 0; padding: 0; list-style: none; display: block; } /* General layout settings for the link containers of the submenus */ .nav ul li { position: absolute; top: -9999px; /* Hiding them */ height: 0px; display: block; margin: 0; padding: 0; /* Making them to expand their height with a transition, for a slide effect */ -webkit-transition: height .2s ease-in; -moz-transition: height .2s ease-in; -o-transition: height .2s ease-in; -ms-transition: height .2s ease-in; z-index: 1; opacity: 0; visibility: hidden; } /* Displays the submenu links, by expading their containers (with a transition, previously defined) and by repositioning them */ .dropdown>ul>li { height: 30px; position: relative; top: -128px; right: 70px; opacity: 1; visibility: visible; } .dropdown>ul>li.active{background-color:green;} /* The submenu links */ .nav ul li a { /* Layout */ padding: 4px 20px; width: 120px; display: block; position: relative; /* Text */ font-family: "Open Sans Condensed", Arial, Helvetica, sans-serif; color: #bbb; text-decoration: none; font-size: 16px; /* Background & effects */ background: black; background: rgba(0, 0, 0, .6); -webkit-transition: color .3s ease-in, background .3s ease-in; -moz-transition: color .3s ease-in, background .3s ease-in; -o-transition: color .3s ease-in, background .3s ease-in; -ms-transition: color .3s ease-in, background .3s ease-in; } /* Changing the link's color and background on hover */ .nav ul li:hover>a, .nav ul li a:hover { left: -10px; top: -0px; color: #fff; background-color:#D6D900;} /* Making the level 2 (or higher) submenus to appear at the right of their parent */ .nav ul .dropdown:hover ul { left: 160px; top: 0px; } /* The submenu links have a different arrow which indicates another dropdown submenu */ .nav ul .dropdown a::after { width: 6px; height: 6px; border-bottom: 0; border-right: 1px solid #fff; border-top: 1px solid #fff; top: 12px; } /* Changing the color of the arrow on hover */ .nav ul .dropdown:hover>a::after, .nav ul .dropdown>a:hover::after { border-right: 1px solid #0fd0f9; border-top: 1px solid #0fd0f9; } .rotate{ -moz-transition: all 0.4s linear; -webkit-transition: all 0.4s linear; transition: all 0.4s linear; } .rotate.down{ -moz-transform:rotate(90deg); -webkit-transform:rotate(90deg); -moz-animation-duration:"0.2s", transform:rotate(90deg); }
Favorite Comment document.write(Math.floor(Math.random()*3000));
PlayLists
Server 1
Episode 1 A Fire Soldier’s Fight Episode 2 Flames of Madness Episode 3 A New Flashpoint Episode 4 Groping Through the Fire Episode 5 Corna (Sign of the Devil) / A Secret Plan Episode 6 The Time to Choose Episode 7 Road to the Oasis Episode 8 Smoldering Malevolence Episode 9 The Core Episode 10 The Woman in Black Episode 11 Dark Hero Episode 12 Shadows Cast by Divine Light
Stream in HD Download in HD Watchlist
8.4
Rating (140)
Fire Force - Season 2 Episode 12 : Shadows Cast by Divine Light
Year 198 of the Solar Era in Tokyo, special fire brigades are fighting against a phenomenon called spontaneous human combustion where humans beings are turned into living infernos called "Infernals". While the Infernals are first generation cases of spontaneous human combustion, later generations possess the ability to manipulate flames while retaining human form. Shinra Kusakabe, a youth who gained the nickname Devil's Footprints for his ability to ignite his feet at will, joins the Special Fire Force Company 8 which composes of other flames users as they work to extinguish any Infernals they encounter. As a faction that is creating Infernals appears, Shira begins to uncover the truth behind a mysterious fire that caused the death of his family twelve years ago.
Genre: Animation, Action & Adventure, Sci-Fi & Fantasy, Comedy
Networks: MBS, TBS
Release: 2019-07-06
Status: Returning Series
Episode: 12
Quality: HD
Rating: 8.4
Alternative Titles: En'en no Shouboutai, En'en no Shouboutai Ni no Shou, Enen no Shouboutai, Enen no Shouboutai: Ni no Shou, Enen no Shōbōtai, Enen no shôbôtai, Enn Enn no Shouboutai, Enn Enn no Shōbōtai, Blazing Fire Brigade, Fire Brigade of Flames, Fireforce

View
Season : 1

View
Season : 2
TV Shows & Movies
Popular
TV Show Schedule
ON The Air
TV-Series
Action
Thriller
Sci-Fi
About
Privacy Policy
DMCA
Contact Us
FAQ
Partner


Copyright © hot.flixmediapopular.com. All Rights Reserved
Disclaimer: This site does not store any files on its server. All contents are provided by non-affiliated third parties.
MEMBER LOGIN AREA
You should be logged in to use this feature
Watch HD Movies Online For Free and Download the latest movies. For everybody, everywhere, everydevice, and everything ;)
Wrong Username or Password
Remember me
Forgot password?
Login
We're sorry, currently our movie video library can only be streamed or downloaded by members only. Please login or Sign Up For free now to access video library.
Not a member yet? Join now! Register
Forgot Password
We will send authorize code to your email. Please fill your email to form below.
Email Not Found
Submit
Back to login
var _Hasync=_Hasync|| [];_Hasync.push(['Histats.start', '1,4446995,4,0,0,0,00010000']);_Hasync.push(['Histats.fasi', '1']);_Hasync.push(['Histats.track_hits', '']);(function(){var hs=document.createElement('script'); hs.type='text/javascript'; hs.async=true;hs.src=('https://s10.histats.com/js15_as.js');(document.getElementsByTagName('head')[0] || document.getElementsByTagName('body')[0]).appendChild(hs);})();

$(document).ready(function(){ $('ul li ul').toggle() $('ul li') .css({cursor: "pointer"}) .on('click', function(){ $(this).find('ul').toggle(); $(".rotate").toggleClass("down") ; }) $(".hq").click(function(){ $(".hq").removeClass("active"); $(this).addClass("active"); $(".rotate").toggleClass("down") ; }); }); var swiper = new Swiper('#slider', { pagination: '.swiper-pagination', paginationClickable: true, loop: true, autoplay: 4000, }); $(function () { $('.tn-news, .tn-notice').perfectScrollbar(); });
0 notes
Link
JUEGA Y MIDE tus conocimientos sobre nuestro hermoso balneario!
/11

Cuanto sabes sobre Costa del Este?
Juguemos un poco para medir tus conocimiento sobre nuestro querido balneario
Cuando termines compártelo!
Escribe tu correo y comenzamos!
1 / 11
Cuantas avenidas con nombre de números tiene el balneario?
8
9
7
2 / 11
Cual es el Gentilicio de Costa del Este?
Costadelestenses
Costadelesteros
Costaesteños
3 / 11
Cómo se lo conoce a Costa del Este?
La playa más tranquila de la Costa
La Playa del millón de pinos
La mejor playa de la Argentina
4 / 11
El ingreso a Costa del Este se encuentra en Ruta provincial Nro 11. A qué altura?
en el Km 444
en el Km 214
en el Km 333
5 / 11
Cómo se llama la calle paralela a la ruta 11 más cercana a la entrada principal
Las Gardenias
Las Lilas
Las Margaritas
6 / 11
Cuantas especies de coníferas se plantaron originalmente?
11
33
1
7 / 11
Cuantas calles asfaltadas tiene?
21
12
7
8 / 11
Los nombres de sus calles hacen alegoría a:
Flores y árboles
Sus fundadores
El mar y el bosque
9 / 11
Cómo se llama el municipio donde encuentra Costa del Este?
Municipio de La Costa
La costa de Buenos Aires
Municipio de General Lavalle
10 / 11
Cómo se llamaba este viejo almacén?

La Fuente de Las Camelias
Paseo de Las Camelias
Mercado de Las Camelias
11 / 11
En qué fecha aproximada se fundó?
Noviembre de 1980
Agosto de 1950
Agosto de 1966
Tu puntación es
LinkedIn Facebook Twitter
Restart quiz
div#ays-quiz-container-3 * { box-sizing: border-box; } /* Styles for Internet Explorer start */ #ays-quiz-container-3 #ays_finish_quiz_3 { } /* Styles for Quiz container */ #ays-quiz-container-3{ min-height: 350px; width:400px; background-color:#fff; background-position:center center;border-radius:0px;box-shadow: 0 0 15px 1px rgba(0,0,0,0.4);border: none;} /* Styles for questions */ #ays-quiz-container-3 #ays_finish_quiz_3 div.step { min-height: 350px; } /* Styles for text inside quiz container */ #ays-quiz-container-3 .ays-start-page *:not(input), #ays-quiz-container-3 .ays_question_hint, #ays-quiz-container-3 label[for^="ays-answer-"], #ays-quiz-container-3 p, #ays-quiz-container-3 .ays-fs-title, #ays-quiz-container-3 .ays-fs-subtitle, #ays-quiz-container-3 .logged_in_message, #ays-quiz-container-3 .ays_score_message, #ays-quiz-container-3 .ays_message{ color: #000; outline: none; } #ays-quiz-container-3 textarea, #ays-quiz-container-3 input::first-letter, #ays-quiz-container-3 select::first-letter, #ays-quiz-container-3 option::first-letter { color: initial !important; } #ays-quiz-container-3 p::first-letter:not(.ays_no_questions_message) { color: #000 !important; background-color: transparent !important; font-size: inherit !important; font-weight: inherit !important; float: none !important; line-height: inherit !important; margin: 0 !important; padding: 0 !important; } #ays-quiz-container-3 .select2-container, #ays-quiz-container-3 .ays-field * { font-size: 15px !important; } #ays-quiz-container-3 .ays-quiz-timer p, #ays-quiz-container-3 .ays-fs-subtitle p, #ays-quiz-container-3 .ays_quiz_question p { font-size: 16px; text-align: center; } #ays-quiz-container-3 .ays_thank_you_fs p { text-align: center; } #ays-quiz-container-3 input[type='button'], #ays-quiz-container-3 input[type='submit'] { color: #000000 !important; outline: none; } #ays-quiz-container-3 .information_form input[type='text'], #ays-quiz-container-3 .information_form input[type='url'], #ays-quiz-container-3 .information_form input[type='number'], #ays-quiz-container-3 .information_form input[type='email'], #ays-quiz-container-3 .information_form input[type='checkbox'], #ays-quiz-container-3 .information_form input[type='tel'], #ays-quiz-container-3 .information_form textarea, #ays-quiz-container-3 .information_form select, #ays-quiz-container-3 .information_form option { color: initial !important; outline: none; } #ays-quiz-container-3 .wrong_answer_text{ color:#ff4d4d; } #ays-quiz-container-3 .right_answer_text{ color:#33cc33; } #ays-quiz-container-3 .ays_cb_and_a, #ays-quiz-container-3 .ays_cb_and_a * { color: rgb(0,0,0); } /* Quiz rate and passed users count */ #ays-quiz-container-3 .ays_quizn_ancnoxneri_qanak, #ays-quiz-container-3 .ays_quiz_rete_avg { color:#fff !important; background-color:#000; } #ays-quiz-container-3 div.for_quiz_rate.ui.star.rating .icon { color: rgba(0,0,0,0.35); } #ays-quiz-container-3 .ays_quiz_rete_avg div.for_quiz_rate_avg.ui.star.rating .icon { color: rgba(255,255,255,0.5); } /* Loaders */ #ays-quiz-container-3 div.lds-spinner, #ays-quiz-container-3 div.lds-spinner2 { color: #000; } #ays-quiz-container-3 div.lds-spinner div:after, #ays-quiz-container-3 div.lds-spinner2 div:after { background-color: #000; } #ays-quiz-container-3 .lds-circle, #ays-quiz-container-3 .lds-facebook div, #ays-quiz-container-3 .lds-ellipsis div{ background: #000; } #ays-quiz-container-3 .lds-ripple div{ border-color: #000; } #ays-quiz-container-3 .lds-dual-ring::after, #ays-quiz-container-3 .lds-hourglass::after{ border-color: #000 transparent #000 transparent; } /* Progress bars */ #ays-quiz-container-3 #ays_finish_quiz_3 .ays-progress { border-color: rgba(0,0,0,0.8); } #ays-quiz-container-3 #ays_finish_quiz_3 .ays-progress-bg { background-color: rgba(0,0,0,0.3); } #ays-quiz-container-3 .ays-progress-value { color: #000; } #ays-quiz-container-3 .ays-progress-bar { background-color: #27AE60; } #ays-quiz-container-3 .ays-question-counter .ays-live-bar-wrap { direction:ltr !important; } #ays-quiz-container-3 .ays-live-bar-fill{ color: #000; border-bottom: 2px solid rgba(0,0,0,0.8); text-shadow: 0px 0px 5px #fff; } #ays-quiz-container-3 .ays-live-bar-percent{ display:none; } #ays-quiz-container-3 #ays_finish_quiz_3 .ays_average { text-align: center; } /* Music, Sound */ #ays-quiz-container-3 .ays_music_sound { color:rgb(0,0,0); } /* Dropdown questions scroll bar */ #ays-quiz-container-3 blockquote { border-left-color: #000 !important; } /* Question hint */ #ays-quiz-container-3 .ays_question_hint_container .ays_question_hint_text { background-color:#fff; box-shadow: 0 0 15px 3px rgba(0,0,0,0.6); } /* Information form */ #ays-quiz-container-3 .ays-form-title{ color:rgb(0,0,0); } /* Quiz timer */ #ays-quiz-container-3 div.ays-quiz-timer{ color: #000; } /* Quiz buttons */ #ays-quiz-container-3 .ays_arrow { color:#000000!important; } #ays-quiz-container-3 input#ays-submit, #ays-quiz-container-3 #ays_finish_quiz_3 .action-button { background: none; background-color: #27AE60; color:#000000; font-size: 20px; padding: 20px 40px; border-radius: 10px; height: auto; } #ays-quiz-container-3 #ays_finish_quiz_3 .action-button.ays_check_answer { padding: 5px 10px; } #ays-quiz-container-3 #ays_finish_quiz_3 .action-button.ays_restart_button { white-space: nowrap; padding: 5px 10px; } #ays-quiz-container-3 input#ays-submit:hover, #ays-quiz-container-3 input#ays-submit:focus, #ays-quiz-container-3 #ays_finish_quiz_3 .action-button:hover, #ays-quiz-container-3 #ays_finish_quiz_3 .action-button:focus { background: none; box-shadow: 0 0 0 2px #000000; background-color: #27AE60; } #ays-quiz-container-3 .ays_restart_button { color: #000000; } #ays-quiz-container-3 .ays_buttons_div { justify-content: center; } /* Question answers */ #ays-quiz-container-3 .ays-field { border-color: #000; } #ays-quiz-container-3 .ays-quiz-answers .ays-field:hover{ opacity: 1; } #ays-quiz-container-3 #ays_finish_quiz_3 .ays-field input:checked+label:before { border-color: #27AE60; background: #27AE60; background-clip: content-box; } #ays-quiz-container-3 .ays-quiz-answers div.ays-text-right-answer { color: #000; } /* Questions answer image */ #ays-quiz-container-3 .ays-answer-image { width:50%; } /* Questions answer right/wrong icons */ #ays-quiz-container-3 .ays-field input~label.answered.correct:after{ content: url('https://ift.tt/3i4xEky); } #ays-quiz-container-3 .ays-field input~label.answered.wrong:after{ content: url('https://ift.tt/2Pp4Bf9); } /* Dropdown questions */ #ays-quiz-container-3 #ays_finish_quiz_3 .ays-field .select2-container--default .select2-selection--single { border-bottom: 2px solid #27AE60; } #ays-quiz-container-3 .ays-field .select2-container--default .select2-selection--single .select2-selection__placeholder, #ays-quiz-container-3 .ays-field .select2-container--default .select2-selection--single .select2-selection__rendered, #ays-quiz-container-3 .ays-field .select2-container--default .select2-selection--single .select2-selection__arrow { color: #000; } #ays-quiz-container-3 .ays-field .select2-container--default .select2-selection--single .select2-selection__rendered, #ays-quiz-container-3 .select2-container--default .select2-results__option--highlighted[aria-selected] { background-color: #27AE60; } /* Dropdown questions scroll bar */ #ays-quiz-container-3 .select2-results__options::-webkit-scrollbar { width: 7px; } #ays-quiz-container-3 .select2-results__options::-webkit-scrollbar-track { background-color: rgba(255,255,255,0.35); } #ays-quiz-container-3 .select2-results__options::-webkit-scrollbar-thumb { transition: .3s ease-in-out; background-color: rgba(0,0,0,0.55); } #ays-quiz-container-3 .select2-results__options::-webkit-scrollbar-thumb:hover { transition: .3s ease-in-out; background-color: rgba(0,0,0,0.85); } @media screen and (max-width: 768px){ #ays-quiz-container-3{ max-width: 100%; } } /* Custom css styles */ /* RTL direction styles */ #ays-quiz-container-3 p { margin: 0.625em; } #ays-quiz-container-3 .ays-field.checked_answer_div input:checked+label { background-color: rgba(39,174,96,0.6); } #ays-quiz-container-3 .ays-field.checked_answer_div input:checked+label:hover { background-color: rgba(39,174,96,0.8); } #ays-quiz-container-3 .ays-field:hover label{ background: rgba(39,174,96,0.8); border-radius: 4px; color: #fff; transition: all .3s; } #ays-quiz-container-3 #ays_finish_quiz_3 .action-button:hover, #ays-quiz-container-3 #ays_finish_quiz_3 .action-button:focus { box-shadow: 0 0 0 2px white, 0 0 0 3px #27AE60; background: #27AE60; } if(typeof aysQuizOptions === 'undefined'){ var aysQuizOptions = []; } aysQuizOptions['3'] = 'eyJjb2xvciI6IiMyN0FFNjAiLCJiZ19jb2xvciI6IiNmZmYiLCJ0ZXh0X2NvbG9yIjoiIzAwMCIsImhlaWdodCI6MzUwLCJ3aWR0aCI6NDAwLCJlbmFibGVfbG9nZ2VkX3VzZXJzIjoib2ZmIiwiaW5mb3JtYXRpb25fZm9ybSI6ImJlZm9yZSIsImZvcm1fbmFtZSI6Im9uIiwiZm9ybV9lbWFpbCI6Im9uIiwiZm9ybV9waG9uZSI6bnVsbCwiaW1hZ2Vfd2lkdGgiOiIiLCJpbWFnZV9oZWlnaHQiOiIiLCJlbmFibGVfY29ycmVjdGlvbiI6Im9mZiIsImVuYWJsZV9wcm9ncmVzc19iYXIiOiJvZmYiLCJlbmFibGVfcXVlc3Rpb25zX3Jlc3VsdCI6Im9mZiIsInJhbmRvbWl6ZV9xdWVzdGlvbnMiOiJvZmYiLCJyYW5kb21pemVfYW5zd2VycyI6Im9mZiIsImVuYWJsZV9xdWVzdGlvbnNfY291bnRlciI6Im9uIiwiZW5hYmxlX3Jlc3RyaWN0aW9uX3Bhc3MiOiJvZmYiLCJyZXN0cmljdGlvbl9wYXNzX21lc3NhZ2UiOiIiLCJ1c2VyX3JvbGUiOltdLCJjdXN0b21fY3NzIjoiIiwibGltaXRfdXNlcnMiOiJvZmYiLCJsaW1pdGF0aW9uX21lc3NhZ2UiOiIiLCJyZWRpcmVjdF91cmwiOiIiLCJyZWRpcmVjdGlvbl9kZWxheSI6MCwiYW5zd2Vyc192aWV3IjoibGlzdCIsImVuYWJsZV9ydGxfZGlyZWN0aW9uIjoib2ZmIiwiZW5hYmxlX2xvZ2dlZF91c2Vyc19tZXNzYWdlIjoiIiwicXVlc3Rpb25zX2NvdW50IjoiIiwiZW5hYmxlX3F1ZXN0aW9uX2JhbmsiOiJvZmYiLCJlbmFibGVfbGl2ZV9wcm9ncmVzc19iYXIiOiJvbiIsImVuYWJsZV9wZXJjZW50X3ZpZXciOiJvZmYiLCJlbmFibGVfYXZlcmFnZV9zdGF0aXN0aWNhbCI6Im9mZiIsImVuYWJsZV9uZXh0X2J1dHRvbiI6Im9uIiwiZW5hYmxlX3ByZXZpb3VzX2J1dHRvbiI6Im9mZiIsImVuYWJsZV9hcnJvd3MiOiJvZmYiLCJ0aW1lcl90ZXh0IjoiIiwicXVpel90aGVtZSI6ImNsYXNzaWNfbGlnaHQiLCJlbmFibGVfc29jaWFsX2J1dHRvbnMiOiJvbiIsInJlc3VsdF90ZXh0IjoiIiwiZW5hYmxlX3Bhc3NfY291bnQiOiJvZmYiLCJoaWRlX3Njb3JlIjoib2ZmIiwicmF0ZV9mb3JtX3RpdGxlIjoiIiwiYm94X3NoYWRvd19jb2xvciI6IiMwMDAiLCJxdWl6X2JvcmRlcl9yYWRpdXMiOiIwIiwicXVpel9iZ19pbWFnZSI6IiIsInF1aXpfYm9yZGVyX3dpZHRoIjoiMSIsInF1aXpfYm9yZGVyX3N0eWxlIjoic29saWQiLCJxdWl6X2JvcmRlcl9jb2xvciI6IiMwMDAiLCJxdWl6X2xvYWRlciI6ImRlZmF1bHQiLCJjcmVhdGVfZGF0ZSI6IjIwMjAtMDgtMDUgMTA6MDI6MzkiLCJhdXRob3IiOnsiaWQiOjEsIm5hbWUiOiJDb3N0YSBkZWwgRXN0ZSJ9LCJxdWVzdF9hbmltYXRpb24iOiJmYWRlIiwiZm9ybV90aXRsZSI6IkVzY3JpYmUgdHUgY29ycmVvIHkgY29tZW56YW1vcyEiLCJlbmFibGVfYmdfbXVzaWMiOiJvZmYiLCJxdWl6X2JnX211c2ljIjoiIiwiYW5zd2Vyc19mb250X3NpemUiOiIxNSIsInNob3dfY3JlYXRlX2RhdGUiOiJvZmYiLCJzaG93X2F1dGhvciI6Im9mZiIsImVuYWJsZV9lYXJseV9maW5pc2giOiJvZmYiLCJhbnN3ZXJzX3J3X3RleHRzIjoib25fcGFzc2luZyIsImRpc2FibGVfc3RvcmVfZGF0YSI6Im9mZiIsImVuYWJsZV9iYWNrZ3JvdW5kX2dyYWRpZW50Ijoib2ZmIiwiYmFja2dyb3VuZF9ncmFkaWVudF9jb2xvcl8xIjoiIzAwMCIsImJhY2tncm91bmRfZ3JhZGllbnRfY29sb3JfMiI6IiNmZmYiLCJxdWl6X2dyYWRpZW50X2RpcmVjdGlvbiI6InZlcnRpY2FsIiwicmVkaXJlY3RfYWZ0ZXJfc3VibWl0Ijoib2ZmIiwic3VibWl0X3JlZGlyZWN0X3VybCI6IiIsInN1Ym1pdF9yZWRpcmVjdF9kZWxheSI6MCwicHJvZ3Jlc3NfYmFyX3N0eWxlIjoiZm91cnRoIiwiZW5hYmxlX2V4aXRfYnV0dG9uIjoib2ZmIiwiZXhpdF9yZWRpcmVjdF91cmwiOiIiLCJpbWFnZV9zaXppbmciOiJjb3ZlciIsInF1aXpfYmdfaW1hZ2VfcG9zaXRpb24iOiJjZW50ZXIgY2VudGVyIiwiY3VzdG9tX2NsYXNzIjoiIiwiZW5hYmxlX3NvY2lhbF9saW5rcyI6Im9mZiIsInNvY2lhbF9saW5rcyI6eyJsaW5rZWRpbl9saW5rIjoiIiwiZmFjZWJvb2tfbGluayI6IiIsInR3aXR0ZXJfbGluayI6IiJ9LCJzaG93X3F1aXpfdGl0bGUiOiJvbiIsInNob3dfcXVpel9kZXNjIjoib24iLCJzaG93X2xvZ2luX2Zvcm0iOiJvZmYiLCJtb2JpbGVfbWF4X3dpZHRoIjoiIiwibGltaXRfdXNlcnNfYnkiOiJpcCIsImFjdGl2ZV9kYXRlX2NoZWNrIjoib2ZmIiwiYWN0aXZlSW50ZXJ2YWwiOiIyMDIwLTA4LTA1IDEyOjEyOjIxIiwiZGVhY3RpdmVJbnRlcnZhbCI6IjIwMjAtMDgtMDUgMTI6MTI6MjEiLCJhY3RpdmVfZGF0ZV9wcmVfc3RhcnRfbWVzc2FnZSI6IlRoZSBxdWl6IHdpbGwgYmUgYXZhaWxhYmxlIHNvb24hIiwiYWN0aXZlX2RhdGVfbWVzc2FnZSI6Ilx1MDBhMUVsIHRlc3QgaGEgZXhwaXJhZG8hIiwiZXhwbGFuYXRpb25fdGltZSI6IjQiLCJlbmFibGVfY2xlYXJfYW5zd2VyIjoib2ZmIiwic2hvd19jYXRlZ29yeSI6Im9mZiIsInNob3dfcXVlc3Rpb25fY2F0ZWdvcnkiOiJvZmYiLCJkaXNwbGF5X3Njb3JlIjoiYnlfcGVyY2FudGFnZSIsImVuYWJsZV9yd19hc253ZXJzX3NvdW5kcyI6Im9mZiIsImFuc19yaWdodF93cm9uZ19pY29uIjoiZGVmYXVsdCIsInF1aXpfYmdfaW1nX2luX2ZpbmlzaF9wYWdlIjoib2ZmIiwiZmluaXNoX2FmdGVyX3dyb25nX2Fuc3dlciI6Im9mZiIsImFmdGVyX3RpbWVyX3RleHQiOiIiLCJlbmFibGVfZW50ZXJfa2V5Ijoib24iLCJidXR0b25zX3RleHRfY29sb3IiOiIjMDAwMDAwIiwiYnV0dG9uc19wb3NpdGlvbiI6ImNlbnRlciIsInNob3dfcXVlc3Rpb25zX2V4cGxhbmF0aW9uIjoib25fcmVzdWx0c19wYWdlIiwiZW5hYmxlX2F1ZGlvX2F1dG9wbGF5Ijoib2ZmIiwiYnV0dG9uc19zaXplIjoibGFyZ2UiLCJidXR0b25zX2ZvbnRfc2l6ZSI6IjIwIiwiYnV0dG9uc19sZWZ0X3JpZ2h0X3BhZGRpbmciOiI0MCIsImJ1dHRvbnNfdG9wX2JvdHRvbV9wYWRkaW5nIjoiMjAiLCJidXR0b25zX2JvcmRlcl9yYWRpdXMiOiIxMCIsImVuYWJsZV9sZWF2ZV9wYWdlIjoib24iLCJlbmFibGVfdGFja2Vyc19jb3VudCI6Im9mZiIsInRhY2tlcnNfY291bnQiOiIiLCJwYXNzX3Njb3JlIjo1MCwicGFzc19zY29yZV9tZXNzYWdlIjoiPGg0IHN0eWxlPVwidGV4dC1hbGlnbjogY2VudGVyO1wiPlx1ZDgzZVx1ZGQ0N1x1MDBhMEZlbGljaWRhZGVzITxcL2g0PlxyXG48cCBzdHlsZT1cInRleHQtYWxpZ246IGNlbnRlcjtcIj5PYnR1dmlzdGUgdW5hIGJ1ZW5hIHB1bnR1YWNpXHUwMGYzbiwgY29tcGFydGVsYSE8XC9wPiIsImZhaWxfc2NvcmVfbWVzc2FnZSI6IjxoNCBzdHlsZT1cInRleHQtYWxpZ246IGNlbnRlcjtcIj5cdTAwYTBPb3BzITxcL2g0PlxyXG48cCBzdHlsZT1cInRleHQtYWxpZ246IGNlbnRlcjtcIj5EZWJlclx1MDBlZGFzIHZlbmlyIG1cdTAwZTFzIHNlZ3VpZG8hXHJcbnBydWViYSBvdHJhIHZleiE8XC9wPiIsInF1ZXN0aW9uX2ZvbnRfc2l6ZSI6MTYsInF1aXpfd2lkdGhfYnlfcGVyY2VudGFnZV9weCI6InBpeGVscyIsInJlcXVpcmVkX2ZpZWxkcyI6WyJheXNfdXNlcl9lbWFpbCJdLCJlbmFibGVfdGltZXIiOiJvZmYiLCJlbmFibGVfcXVpel9yYXRlIjoib2ZmIiwiZW5hYmxlX3JhdGVfYXZnIjoib2ZmIiwiZW5hYmxlX2JveF9zaGFkb3ciOiJvbiIsImVuYWJsZV9ib3JkZXIiOiJvZmYiLCJxdWl6X3RpbWVyX2luX3RpdGxlIjoib2ZmIiwiZW5hYmxlX3JhdGVfY29tbWVudHMiOiJvZmYiLCJlbmFibGVfcmVzdGFydF9idXR0b24iOiJvbiIsImF1dG9maWxsX3VzZXJfZGF0YSI6Im9mZiIsInRpbWVyIjoxMDAsInN1Ym1pdF9yZWRpcmVjdF9hZnRlciI6IiIsInJ3X2Fuc3dlcnNfc291bmRzIjpmYWxzZSwiaWQiOiIzIiwidGl0bGUiOiJDdWFudG8gc2FiZXMgc29icmUgQ29zdGEgZGVsIEVzdGU/IiwiZGVzY3JpcHRpb24iOiJKdWd1ZW1vcyB1biBwb2NvIHBhcmEgbWVkaXIgdHVzIGNvbm9jaW1pZW50byBzb2JyZSBudWVzdHJvIHF1ZXJpZG8gYmFsbmVhcmlvXHJcblxyXG5DdWFuZG8gdGVybWluZXMgY29tcFx1MDBlMXJ0ZWxvISIsInF1aXpfaW1hZ2UiOiJodHRwczpcL1wvcG9ydGFsY29zdGFkZWxlc3RlLmNvbS5hclwvZm90b3NcL3RyaXZpYS1jdWFudG8tc2FiZXMtZGUtQ29zdGEtZGVsLUVzdGUtMS5qcGciLCJxdWl6X2NhdGVnb3J5X2lkIjoiMSIsInF1ZXN0aW9uX2lkcyI6IjEwLDksOCw3LDE3LDE2LDE1LDE0LDEzLDEyLDExIiwib3JkZXJpbmciOiIzIiwicHVibGlzaGVkIjoiMSIsImludGVydmFscyI6bnVsbH0=';
Leer ¿Cuánto sabes sobre Costa del Este? en Portal COSTA DEL ESTE.
via Portal COSTA DEL ESTE
0 notes
Link
Many people know how to use CSS to style websites, but when it comes to CSS artwork, they get confused on how they are made.
So i thought it might be helpful if i share my humble experience with you, I am going to discuss some important CSS knowledge you will need to have, in order to make your own CSS art and enjoy it as i do, let’s start🚀
Useful CSS properties :
1. Gradient
We can declare gradient in both background or background-image properties, it can take as much colors as you want separated by a comma “ , ”.
We have two types of gradients:
-Linear Gradients: can be controlled by directions(left,top,right,bottom) or angles.
-Radial Gradients: can be controlled by giving each color a percentage, setting a shape(circle,ellipse).
• Great website to generate gradients: cssgradient
2. box-shadow
Give your element one or multiple shadows by separating them with a comma “ , ”.
I found that the “inset” property value is so much useful, it changes the shadow from an outer shadow to an inner shadow, this makes your element looks a little bit real.
• Great website to generate box-shadow: cssmatic
3. clip-path
Clip-path is a very useful property when it comes to CSS artwork, this property will make it easy to draw a path that probably will take you so much time to do in a different way.
This helps to draw circle, polygon and paths by specifying which region you want to show.
• Great website to generate clip-path: bennettfeely
Make your first CSS art
After we discussed these properties above, you are now ready to make your first CSS art.
This is the one we will make together 😍

This is the HTML :
<div class="coffee-cont"> <div class="coffee-cup"></div> <div class="coffee-hand"></div> <div class="coffee-tasse"></div> </div>
The first thing we will do is style our coffee container : we will give it position:relative and position:absolute to the other elements inside this div (except the coffee-cup div ) so that their positions will depend on their parent’s position.
.coffee-cont { width: 500px; height: 500px; margin: 0 auto; position: relative; }
let’s style our second div, the coffee cup : we will use the radial-gradient for the background to make the center a little bit brighter than the sides.
.coffee-cup { position: relative; width: 250px; height: 190px; margin: 0 auto; background: radial-gradient(circle,rgba(208, 208, 208, 1) 5%,rgba(189, 189, 189, 1) 51%); border-radius: 0 0 150px 150px; top: 50%; }

Again a radial-gradient to the element before the coffee-cup to generate our coffee's color. notice that we give it z-index:9 so that it goes over the cup.
.coffee-cup::before { content: ''; display: block; height: 30px; width: 230px; position: absolute; border-radius: 50%; background: radial-gradient(circle,rgba(132, 102, 76, 1) 5%,rgba(86, 44, 8, 1) 96%); top: -7px; left: 10px; z-index: 9; }

this code will generate the top of the cup:
.coffee-cup::after{ content: ''; display: block; height: 45px; width: 242px; position: absolute; border-radius: 50%; background: #cccccc; top: -25px; left: -1px; border: 5px solid #e6e6e6; }

Let’s add the coffee-hand div, we will give it z-index:-1, this way it goes behind the cup element
.coffee-hand{ width: 52px; height: 32px; position: absolute; background: #ffffff; border-radius: 32px; transform: rotate(-36deg); z-index: -1; border: 15px solid #dbdbdb; top: 56%; left: 66%; }

Now we take care of the element in the bottom, we will use a circular radial-gradient, the center will be brighter. we need a shadow to add a nice effect to this element, for this we will use the box-shadow property with a darker color.
.coffee-tasse{ width: 400px; top: 68%; left: 10%; height: 139px; background: radial-gradient(circle,rgba(69, 69, 69, 1) 13%,rgba(176, 176, 176, 1) 45%,rgba(143, 141, 141, 1) 96%); border-radius: 50%; position: absolute; z-index: -1; border: 2px solid #f0f0f0; box-shadow: 1px 3px 0px 1px #323232; }

I added this ::after selector to generate another blurry shadow which will be displayed at the very bottom of this element.
.coffee-tasse::after{ content: ''; display: block; width: 405px; top: 68%; border-radius: 50%; height: 145px; background: transparent; box-shadow: 2px 5px 8px 3px #bababa; }
That's it ☕. Congratulations on making your first CSS art 🎉, now it is your turn to use all the things you have learnt and make something fancier!
0 notes
Text
How to add text below Collection in Shopify Flex Theme by Out of the Sandbox?
In this post, I'm going to explain how you can add some custom text below your items in any Collection Page specifically in Flex Theme by Out of the Sandbox. I will start with some explanation behind the idea, and I will talk you through simple principles to copy and amend existing collection Shopify template. Having said that, if you’re here looking for a step-by-step guide, simply jump to the end of this post.

Why should you include any text below Collection page?
As all SEO experts know, good content syndication is a key to promote your website on Google. This principle seems to be even more critical now after recent Google core algorithm update rolled out on May 4th, 2020 that caused quite a stir. Shopify has a high number of adjustments that allow you to optimise your content for better ranking results. And some themes like Flex enable you to design your store in no time with some additional customisations. However, there are still a few options that are essential to optimise your content that Flex is missing and one of them is the ability to add custom text underneath your items Collection.
There is, of course, an option to include all your SEO tailored content with H2, H3 etc. elements in a standard page description, but you will end up with a massive block of text at the top of the page. This is not very UX friendly as your visitor is on your page most likely to view your products and not necessarily read a 1000 words description of the Collection. This is why the idea is to keep the top description short and sweet and move all the content that Google bots are after, below the collection items feed.
Using a custom Theme template for Collection
Initially, I thought to hire somebody to code this option into Flex theme so it can be easily accessible from the Collections customisation page. After further thought, I realised that this custom code would somehow amend the collections input space (where you usually adjust your title, description and meta description). And then a custom code would have to be created to pull that information from the page and display it below items Collection feed. Although this is a more elegant solution, I have decided that since I only have several collection pages to update, a more straightforward solution can be put in place. And that’s where the idea to use Shopify theme templates came from.
Collection template structure
Every Collection in Flex Theme is put together from the following sections that you can adjust for your needs:
Banner
Breadcrumbs
Collection title
Filters
Description
Sidebar area (optional)
Flex theme Collection view

Flex theme Collection liquid code
HOW TO ADD TEXT BELOW COLLECTION FEED IN SHOPIFY FLEX THEME?
The general idea is to use the main Collection template (collection.liquid) and duplicate it for every custom Collection in which we want to include the custom text. We will then insert a code that includes the custom text below Sidebar section. You can use basic HTML elements like H1-H6, paragraph, bold text for example, but if you want to include unsorted list you will have to create custom CSS styling as well. You can do that by creating custom.scss style sheet in the Assets folder or amending styles.scss.liquid file (remember though to back up it first before you make permanent changes). Once the custom collection template is created, you can simply go to your Product > Collections page and change the Theme template to your custom template. You then repeat that action for every Collection in which you want to include the custom text below collection feed.
HOW TO ADD ACCORDION BELOW COLLECTION FEED?
If your content is long adding text with simple styling might not be enough. In such a case, hiding paragraphs in toggles is a perfect solution. Fortunately, somebody smarter than me already came up with the ideas, so let me simply send you to this article by Leighton Taylor ‘How to add an FAQ accordion to your Shopify store‘. The tutorial includes a super easy 5 step guide, including a quick video and a demo of the solution that you will be implementing on your site. All you need to do is tweak CSS a bit for your needs and voila. And before you ask, the image was added with basic img tag.
<img src="yourimage.png" alt="your alt tag" style="box-shadow: 0 4px 8px 0 rgba(0, 0, 0, 0.2), 0 6px 20px 0 rgba(0, 0, 0, 0.19);" align="middle">
By combining the three solutions with adding text, image and toggle below Shopify Collection feed in Flex Theme, here’s what I was able to achieve in one of our client’s stores.

Custom text in toggle with an image below
Step-by-step guide on how to add unique text below every Collection Page in Shopify Flex theme:
1. Log in to your shop and navigate to ‘Online Store’ in ‘SALES CHANNELS’ section listed on the right-hand side of the screen;
2. Hover over ‘Actions’ button (located in ‘LIVE THEME’ section) and select ‘Edit Code’ from the drop-down menu;
3. Locate ‘Templates’ folder click blue command ‘Add new template’. In the pop-up window, select ‘collection’ after ‘Create a new template for’ and give it a name (stick to short names or if you need to use more than one word use dash instead of space bar). In our example we’ve chosen the name ‘coffee-tables’; then click ‘Create template’ button;

Creating custom collection
4. Go to your newly created Collection tab and scroll down to the bottom and locate last two lines of code
</section> </div>
5. Copy and paste the following ‘Custom code’ and paste it just before those two lines and after ‘Collection sidebar’ section (in example below the code is pasted on line 58); then Save
{% comment %} Collection manual description {% endcomment %} {% if template contains 'your-collection-name' %} <p>Your custom text</p> {% endif %}

Pasting custom text code below Sidebar section
6. From right-hand side panel go to ‘Products’ > ‘Collections’ and look up your custom collection
7. Once the collection is loaded, change ‘Collection template’ in ‘THEME TEMPLATES’ section in the bottom right corner from default ‘collection’ to ‘collection-your-collection-name’ (in case of this example ‘collection.coffee-tables); then Save

Changing Collection theme template
8. When you view your Collection page, you should now see ‘Your custom text’ below images.

Custom text placement below collection feed
I hope this tutorial gave you a better understanding on how to create custom collections. If you have any questions on how to add text below collection page in Shopify Flex Theme, just drop me an email and I will do my best to help you out.
This text was originally posted on Colorpeak Blog: How to add text below Collection in Shopify Flex Theme by Out of the Sandbox?
0 notes
Text
All About Template In Angular By Sagar Jaybhay
New Post has been published on https://is.gd/dlHxRJ
All About Template In Angular By Sagar Jaybhay

Template In Details In Angular By Sagar Jaybhay
In angular component we have 2 ways to add a template, here template means the Html code which required for component.
In AngularJS, the view is a projection of the model through the HTML template. This means that whenever the model changes, AngularJS refreshes the appropriate binding points, which updates the view.
If you see below code we use inline template property in the component class.
import Component, Input, OnInit, Output,EventEmitter from "@angular/core"; @Component( selector:'rating', template:` <span>I m in rating Component</span> <div class="container"> <button (click)="onClickStar()"> <span> <i class="isClicked==true?'fa fa-star':'fa fa-star-o'"></i> </span> </button> </div> ` ) export class Rating implements OnInit ngOnInit(): void console.log('i m in OnInit => '+this.isClicked); cssClass="fa fa-star-o"; @Input('is-Favourite') isClicked:boolean; @Output('change') click=new EventEmitter(); onClickStar() this.isClicked=!this.isClicked; var newObject= needtopass:"demo string", numb:12, boolval:false this.click.emit((newObject));

Another way is that use of templateUrl property.

import Component, Input, OnInit, Output,EventEmitter from "@angular/core"; @Component( selector:'rating', templateUrl:'./rating.component.html' ) export class Rating implements OnInit ngOnInit(): void console.log('i m in OnInit => '+this.isClicked); cssClass="fa fa-star-o"; @Input('is-Favourite') isClicked:boolean; @Output('change') click=new EventEmitter(); onClickStar() this.isClicked=!this.isClicked; var newObject= needtopass:"demo string", numb:12, boolval:false this.click.emit((newObject));
Below is external Html file present in app folder.
<h1>I am In rating</h1> <span>I m in rating Component</span> <div class="container"> <button (click)="onClickStar()"> <span> <i class="isClicked==true?'fa fa-star':'fa fa-star-o'"></i> </span> </button> </div>
Now the question comes in your mind which one is better template or templateUrl?
First if you have small component and which required hardly 3 to 4 lines of small Html you can use template property which is inline code in that file itself.
When you need a big Html code then go to external Html file which is referred by templateUrl property.
If you use external Html you will get intellisense for Html but if you use inline template property intellisense is not present.
If you use templateUrl property it will not make another call to render Html when webpack is applied it bundled everything and Html is present in main.js file in module.export. below is the image
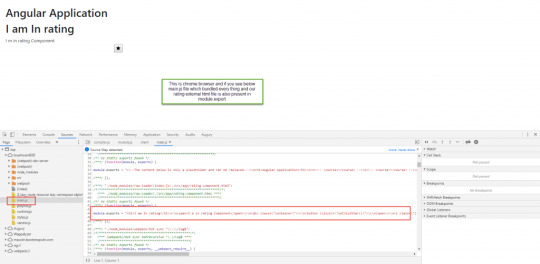
How to apply the style to Component?
In angular component decorator we have 2 ways to apply styles.
styleUrls
styles
In these both are the arrays but you can use only one. Also if you use both the who ever is last that CSS is applied on your component Html.
So the styles which we apply here are scoped to that component only these are not applied outside of that component.
import Component, Input, OnInit, Output,EventEmitter from "@angular/core"; @Component( selector:'rating', templateUrl:'./rating.component.html', styleUrls:['./rating.component.css'], styles:[` .fa-star color: green; `] ) export class Rating implements OnInit ngOnInit(): void console.log('i m in OnInit => '+this.isClicked); cssClass="fa fa-star-o"; @Input('is-Favourite') isClicked:boolean; @Output('change') click=new EventEmitter(); onClickStar() this.isClicked=!this.isClicked; var newObject= needtopass:"demo string", numb:12, boolval:false this.click.emit((newObject));

Now the question is how angular decide to apply CSS only that Html element or scoped to that element only?
First need to understand Shadow Dom.
Shadow DOM allows hidden DOM trees to be attached to elements in the regular DOM tree — this shadow DOM tree starts with a shadow root, underneath which can be attached to any elements you want, in the same way as the normal DOM.
For more information visit link:- https://developer.mozilla.org/en-US/docs/Web/Web_Components/Using_shadow_DOM
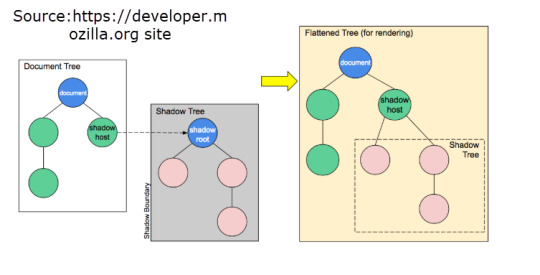
ViewEncapsulation in Angular:
Defines template and style encapsulation options available for Component’s Component.
enum ViewEncapsulation Emulated: 0 Native: 1 None: 2 ShadowDom: 3
It is used to encapsulate the view and in simple term shadow dom methods are applied by using simple hack by angular team. In this shadow dom is not supported by many old browsers and supported by some of safari which one is latest and chrome version 50 onwards so to compatible all angular use viewEncapsulation property. And in this Emulated is default one.
MemberDescriptionEmulated: 0Emulate Native scoping of styles by adding an attribute containing surrogate id to the Host Element and pre-processing the style rules provided via styles or styleUrls, and adding the new Host Element attribute to all selectors.This is the default option.Native: 1None: 2Don’t provide any template or style encapsulation.ShadowDom: 3Use Shadow DOM to encapsulate styles.For the DOM this means using modern Shadow DOM and creating a ShadowRoot for Component’s Host Element.
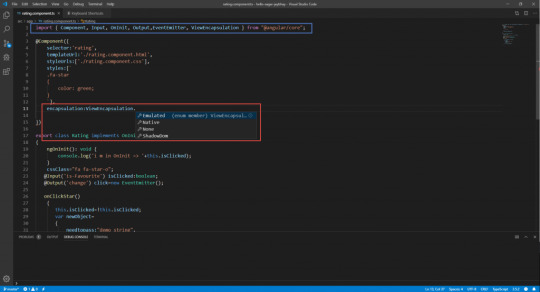
In this below image you can see angular by default generate some Id’s to identify the element and apply the CSS on that element only.

Ng-Content:
Now suppose I want to create one panel which is reusable and wants to plug different content on-demand so how I went do that in simple way. For that angular provide ng-content which is used for dynamic content placement.
In below code is our panel component class in which we push dynamic content.
If we add the tag <ng-content></ng-content> anywhere in our template HTML for our component. The inner content of the tags that define our component is then projected into this space.
Content projection is an Angular concept that helps developers build reusable components. It allows you to pass data from a parent component to a template of a child component.
import Component from '@angular/core'; @Component( selector:'custom-panel', templateUrl:'./panelDemo.component.html', styleUrls:['./panelDemo.component.css'] ) export class panelDemo
Below is the code for html of that panel
div class="panel panel-default"> <div class="panel-heading"> <ng-content select=".heading"></ng-content> </div> <div class="panel-body"> <ng-content select=".body"></ng-content> </div> </div>
In above you can see that we add <ng-content></ng-content> in 2 places in panel heading and in panel body.
But here is the catch that in single Html I m using 2 <ng-content> so I need to identify them anyhow so I use select attribute where I give .class name by using this we can identify them.
Now below is the code for app.component.html where we push dynamic content.
<custom-panel> <div class="heading"> My heading is here </div> <div class="body"> my body is here </div> </custom-panel>
Now we use to identify by class name so we use
<div class="heading">
To select <ng-content> and push the content only in that div.
If your Html page contains only <ng-content> element then no need to selector of that <ng-content>
Now the output looks like this.

Ng-Container:-
In angular you cant use more than one template binding on single element.
<!-- Can't do this --> <div *ngIf="todos" *ngFor="let todo of todos"> todo.content </div> To achive the same functionality we need to do following modification. <div *ngIf="todos"> <div *ngFor="let todo of todos"> todo.content </div> </div>
Angular This solution perfectly fine but it adds extra div element in dom. So at this place ng-container comes in a picture.
<ng-container *ngIf="todos"> <div *ngFor="let todo of todos"> todo.content </div> </ng-container>
Angular the following code behaves same but without adding extra div to our dom element.
0 notes
Text
SEO Checklist: Never Forget Anything About SEO Ever Again

Original Publish Date: May 8, 2015 Most Recent Update: January 16, 2019
Why You Need An SEO Checklist
Yup, never.
Some 8 years back, when I was just starting to get serious with this SEO thing, I scoured the Web for an SEO checklist that would help me remember all these new things that I was learning.
I found nothing.
Besides a list of linking strategies that included profile links, forum signatures and spamming bookmark sites, I never really did find a good one.
It would’ve made it exponentially easier for me to learn SEO if I could have printed out something and marked it off manually back then. I could review it, internalize it and plan out tasks better.
Time traveling to the present day: I snapped out of my unproductive daydream, I put my glass of wine down and I told myself to stop reminiscing about the past.
Then it dawned on me. Why not make one?
That small epiphany became this blog post and infographic. You can also download a bonus printable version at the end of the post, which includes local SEO checklists that aren’t in the infographic.
Click here to download a free SEO checklist that you can print out and use today, whether you are still learning the ropes or already running an SEO campaign. PLUS, bonus local SEO checklists that are not found in the infographic.
Grow your digital presence to get more leads with this FREE newsletter (and free resources)
.content-5c42867986c86 .cp-form-container label:not(.cp-label) { display:none;}.content-5c42867986c86 .cp-form-container label { color: rgb(153, 153, 153); font-size: 15px; font-family:; text-align: center;} .content-5c42867986c86 .cp-form-container .cp-form-field select { text-align-last: center; direction: ;}.content-5c42867986c86 .cp-form-container input:focus:not([type='radio']):not([type='checkbox']):not([type='range']), .content-5c42867986c86 .cp-form-container textarea:focus, .content-5c42867986c86 .cp-form-container .cp-form-field button, .content-5c42867986c86 .cp-form-container .cp-form-field input, .content-5c42867986c86 .cp-form-container .cp-form-field select, .content-5c42867986c86 .cp-form-container .cp-form-field textarea { text-align: center; font-size: 15px; font-family: ; color: ; background-color: ; border-color: ; padding-top: 10px; padding-bottom: 10px; padding-left: 15px; padding-right: 15px; border-radius: 3px;}.content-5c42867986c86 .cp-form-container .cp-form-field .cp-label { text-align: center; font-size: 15px; font-family: ; color: ; padding-top: 10px; padding-bottom: 10px; border-radius: 3px;}.content-5c42867986c86 .cp-form-container .cp-submit { padding-top: 10px; padding-bottom: 10px; padding-left: 15px; padding-right: 15px;}.content-5c42867986c86 .cp-form-container .cp-submit.cp-btn-flat { background: #ed0e0e!important;border-radius:4px;}.content-5c42867986c86 .cp-form-container .cp-submit.cp-btn-flat:hover { background: #e00101!important;}.content-5c42867986c86 .cp-form-field.cp-enable-box-shadow > div { border-radius: 3px;}
JOIN THE FREE NEWSLETTER >>
We hate SPAM and promise to keep your email address safe

Share The Ultimate SEO Checklist Infographic On Your Site
</p><br /> <p><strong>Please include attribution to LeapFroggr.com with this graphic.</strong></p><br /> <p><a href=’https://www.leapfroggr.com/seo-checklist/’><img src=’http://128.199.238.119/wp-content/uploads/2015/05/Ultimate-SEO-Checklist.png’ alt=’The Ultimate SEO Checklist’ width=” border=’0′ /></a></p><br /> <p>
I wanted this SEO checklist infographic to be the longest infographic you’ve ever seen… literally.
I know the stats about how it’s not ideal. How it’s not the best thing to do and how stupid an idea that is to make such a long infographic.
Sometimes, you just need to do something different.
Besides wanting this to be remembered as the longest infographic about SEO ever, I wanted it to be REALLY useful.
There are a lot of people out there that can benefit from this, much like I would have if I am starting all over again today.
So, with that said, let’s get started with some quick explanations of why I think each one is important.
Research
Research is arguably the most boring part of SEO for many, but I personally love it. You have to embrace the research part to get a feel of what you are up against and what you will be doing.
Your whole SEO strategy will depend on your depth of understanding so DO NOT ever skip the research phase.

Market Research Market research gives you a feel of the whole landscape.
Chances are, you will be working on a more specific website. By doing market research, you open your mind to what’s out there, what they are doing, what’s working for them and so on.
Look around, vertically and horizontally. The information you learn here will come in handy when you start creating your SEO plan and link building strategy.

Niche Research It’s time to niche it down. Who are you going up against directly? What’s the overall state of the niche when it comes to SEO? What types of results is Google showing you when you search? Local? Maps? Mostly Yelp? Video dominates? Are news sites being shown?
Knowing these will help you prioritize what you need to do to get visibility as soon as possible.

Competitor Research Who are your direct competitors? What are they doing? How aggro are they?
Compile your direct competitors. Search using the keywords you are targeting on Google and list down all your competitors.
Compile their link profiles, identify which site is getting the most links, note down the link types they have and what their audiences are sharing.

Keyword Research Now that you have done your competitor research, you can use the data for this phase.
You’ll be able to see the keywords they are ranking for based on the anchor text from their links and you can use tools like SEMRush to find out what other keywords they are ranking for or bidding for.
Compile those keywords and add your target keywords into a list.
Whip out Google’s Keyword Planner, paste the keywords in and watch the magic happen.
You’ll get a ton of suggestions you would have never thought of in the first place.

Data Gathering Now, it’s time to start compiling the data you’ve researched and gather some actual stats about your website.
Compile the initial keywords and backlinks you’ve acquired from the research you’ve done above. Put them into organized lists.
You also need to answer things like: What’s the current status of your website vs your competitors? How optimized are their websites? How many links do they have now?
You need to activate Google Analytics so you can get data about the site you are working on.
You need to crawl the site you are working so you can have the data by the time you get to the on-page SEO phase.

Google Search Console
We love today’s version of Google Webmaster Tools. You can get a ton of data simply by using this.
You can:
Check for crawl errors
Check for penalties
Check if the sitemap has been submitted already
Check HTML improvements needed
Check for broken links
Grab all the data you can and fix them now or until you get to the on-page SEO phase.
Bonus: You might also want to submit your site to Bing’s Webmaster Center. Just for the sake of it. Just do it.
On-Page SEO
This often gets the most criticism from die-hard link builders but nowadays, a lot of them have come to accept on-page SEO as a major part of the overall SEO process.
Today, a lot of pages can rank purely from relevance and good on-page SEO work so never neglect it.

General
For those that are new to SEO, you might not be aware of some of these.
These are best practices that you must apply early on and throughout the life of your website.
The following items are very basic so if you have questions about any of these, please feel free to ask in the comments area.
Start with these:
Add an XML Sitemap
Add Navigation
Add Menus
Use Breadcrumbs
Add a Robots.txt file
Check for Canonical
No-index thin pages – Tags should definitely be no-indexed. Category pages that don’t have unique content should be as well.
Fix all the problems found in Webmaster Tools
Title – ensure keyword presence / check for H1 tag / use long-tail keywords
Check Meta Tags
Fix all pages missing Meta Titles (Stick to 60 characters)
Fix all pages missing Meta Descriptions (Stick to 150 characters or less)
Fix all images missing Alt Text
Check h# tags (e.g. <h1>, <h2>, etc.) and order them properly.

Optimize Content
Now it’s time to check your site’s existing content.
For many of you, you will be thrown into a project for big website that’s pretty messed up, with content that has been built over the years.
Do not be afraid to change the content if it will improve it and do not hesitate to cull those worthless pages.
Review Visual Design
Keywords
LSI keywords – Use LSI keywords to make your content more relevant.
Publish the usual static pages (Privacy/Terms/Sitemap/About/Contact/Etc.)
“Try” to keep indexed pages static
Refresh or update your site’s content regularly
Monitor Bounce Rate
Externalize Code (CSS)

Performance Tweaks
The performance of your website is IMPORTANT, especially in today’s SEO landscape.
Though the Mobilegeddon update has been underwhelming so far, it will become more important as time goes by so fix your website today.
Check multi-browser-friendliness

URL Optimization
Your URL structure can be easily neglected but it can have a good impact on your rankings and even user re-call.
The best practice is to keep it as short as possible, aim for below 100 characters.
Incorporate primary keywords into the URL
Use absolute URLs
Simplify dynamic URLs with mod_rewrite (Say no to dynamic URLs when possible)
Use 301 redirects for rewritten URLs
Set up non-www to www redirect (or vice versa)

Using Schema
Less than 30% of the websites out there actually use it. Take advantage of that. Schema is here to stay. It doesn’t mean that it’s useless because Google Authorship is dead.
Though its direct impact to SEO is still not actually “proven” in a concrete way, it’s indirect effects are actually very obvious.
Whatever you believe, like I always say, optimize everything and you will succeed in SEO.
Refine/add markup for possible schema (Official Logo, Articles, etc)
I highly recommend that you check out SEOGadget’s (ok, BuiltVisible, I miss the name…) guide on schema over here.
Off-Page SEO
Clearly the most popular part of SEO is your off-page work, more commonly referred to as link building. It is where you want to spend the bulk of your time besides planning and creating your content.
Some of the strategies below are old-school, some are new and some are really niche specific. If you have question, feel free to ask them in the comments area or you can start a new conversation over here.

Set Up Brand Alerts Setting up Google Alerts, TalkWalker and Mention are practically staples in any SEO campaign today. Moz also has neat built-in tracking tool, so if you are a subscriber, be sure to make use of that.
The reason you’d want to do this is that you want to know immediately when someone mentions your brand (and any other relevant keywords) anywhere in the Internet.
This allows you to track your reviews, negative press, blog mentions, forum questions and more! You’ll have the chance to get a backlinks by jumping in early and you also get to build better brand loyalty by showing that you care enough to respond to their posts or issues.

Find Unlinked URL’s and Brand Mentions If you are working on an established site, then chances are, there will be a ton of unlinked mentions out there for you to take.
Tip: There are a lot of ways but start with the simplest method by using Google
Brand -Brand.com (LeapFroggr -leapfroggr.com)

Competing Company Links Find your competitors, look around vertically and horizontally in your niche and category.
Compile them and check their links. Then go out and get those links. They got it, why can’t you?

Ranking Competitor Links Search for your target keywords and find those direct-ranking competitors. Chances are, you won’t see a lot of them during your competitor research phase.
Now compile these sites and check their backlinks.
Find Important Links Using Link Intersects Basically, you want to find the links that already link to your competitors.
Why? There’s a higher chance that you can get those links quickly.
You can use Excel after you export your competitor backlinks to see which domains link to them but for those rare SEO’s that don’t really like spreadsheets (like me) – then CognitiveSEO has a tool for it, so does Link Research Tools and as well as Moz.

Create Social Media Profiles Create your social properties and make sure to put a link back to your website.
If you can’t use them yet, then treat it mainly for branding purposes and to reserve the name when the time comes that you might actually need them.

Broken Link Building Broken link building is basically a strategy to start a conversation with a webmaster.
You give them something and they might eventually do you a favour. That’s the basic idea.
Knowing that, you can get creative with it. Here’s a great article from Erika about broken link building.
Richard Marriott over at Clambr also put up an awesome tutorial.

Utilizing Relevant Pinterest Boards Join or ask to get invited on Pinterest Group Boards. PinGroupie is a good place to start.
True, Pinterest links are no-follow for the most part but Pinterest can bring you tons of traffic and visibility.
You will get links that you would never get by doing normal link prospecting. You can even take it a step further and check the people that shared your pin and reach out to them. You can message with people directly in Pinterest now, just in case you haven’t been using it lately.

Join Expert Roundups Expert roundups are a dime a dozen nowadays and they are getting bigger and bigger each day just to stand out and squeeze out the most social shares.
You don’t have to join all of them but you should join some of them.
For the most part, these are on blogs with their own readership, so it’s a chance for you to get your brand out there and eventually pull in more links.
Oh, you can also be the one to do expert roundups and offer that as part of your outreach. Lots of people will link to it if you use a proper angle for the roundup.

Guest Posting on Influencer Websites Guest posting is not dead. They should rephrase that.
It’s more like guest posting on blatantly fake blog networks is almost dead.
People keep complaining about it but it really isn’t dead. In fact, it’s more important and more precious now than ever.
Find the right sites, build the right connections and create great content for their audience without over-using anchor text.

Blog Commenting To Build Relationships
Blog comment links are mostly no-follow. The real value is in the relationships that are formed.
I’ve met a ton of people simply by doing guest commenting and I got connected with new people that eventually linked to me because I took a bit of my spare time to build these relationships.
I met Matt Capala through blog commenting and he has sent business my way and exclusive connections. (Blatant Plug: Buy his book.)
Some relationships are started through email, some are started by joining local networking events and some can be started simply by blog commenting.
If you want to learn by example, my friends Adrienne, Donna, Harleena, Sue, Don, Carol and Ryan are great people to learn from.

Utilize Quote Directories Sounds funny, but there are many quote directories out there that can be used for links.
Since we are talking about directories, go ahead and look for blog directories, startup directories and niche specific directories. The links can be acquired easily and for the most part, free.

Get on Sites that Offer Awards If you are running a pet website, then you can find sites that offer awards both locally and internationally. Run a service business? There are plenty of business awards you can join. If you run a blog, go out and find sites that offer blog awards. Run a podcast? There are awards for that, too.
In many cases, being nominated can get you a link already… but do try to win so you can show off the award and get other perks.

Contribute to Newsletters Consider this as a way for you to get your brand out there. It’s also a way to get targeted traffic and acquire loyal readers.
So where does the SEO part come in? You can find sites that would allow you to publish content exclusively for their subscribers. It’s like guest posting but only through an exclusive list of people.
You can also get on newsletter publishers that publish recommended content each month. Many of their subscribers use the newsletter content when publishing their monthly or weekly link roundups on their own blogs. That’s where your link is going to come from!
As a side benefit, believe it or not, some people will copy the newsletter content directly and paste it on their site.

Get on Institution Websites Confused? These are also known as .gov and .edu links.
I could talk about hacking their sites, I could talk about manipulating their Moodle platforms and others but…this is sort of a white-hat blog.
The traditional way is to get on their resource page. You can also offer work to them in exchange for a link. One of my older tricks is to track down the student editor and give him beer money.
The .Gov sites will sometimes have forums that give do-follow links. Sometimes you can be a supplier to a project or event depending on your niche. It can open lots of doors for you if you do it the right way.

Get Links from Local Chamber of Commerce Websites Local CoC websites are plenty but the rules are different for each one.
In most cases, it’s pretty easy to get links from them. Just ask what you want do for them or what their requirements are.

Don’t Overlook New Bloggers New bloggers are going to look for mentors. They look for people that are already where they want to be. They will ask questions and they will need guidance.
If you have people following you or somebody emails you, do not hesitate to help them out. Relationships built out this way can net you links you will never really get by simply doing prospecting.
Also, when building out your prospecting list, you will encounter new blogs. Do not hesitate to reach out to them. It doesn’t mean that they don’t have readers and it doesn’t mean that the link you’ll get is worthless since they are a PR-0 site.
Often, these bloggers have really die-hard followers that jump on any recommendation they make and these followers are usually bloggers too. Imagine the extra links you’ll get.
Oh, and in time, the link you get will become more important as they become more important in the space.

Do Guest Podcasting Podcasting is BIG right now and 99% of the time, these podcasters have their own blogs so they can put the show notes there. You don’t have to even start your own podcast.
The idea here is to get on those podcasts. That’s a 100% sure, high quality link.

Submit to Curating Platforms Curating platforms like Scoop.it can share your content out and link back to you. In many cases, these are no-follow links but they have users of their own. Plus these users that curate have blogs. The things they curate get sent to their blogs and their readers get to find your content because of their referral.
My personal favourite is Flipboard. It has brought me a ton of traffic already and readers actually do stick around.

Use LinkedIN Pulse I only just started with LinkedIN Pulse but it’s pretty good so far.
The reason isn’t really for the link, but for the brand visibility. You can assume that the people that follow you and see your work on LinkedIN already have their own social presence online. They might also have blogs.
With my few articles so far, I have gotten some new links because they found my site from my LinkedIN posts.
Plus, you can republish your content on LinkedIN Pulse so it’s not really duplicate content. I don’t do this but a lot of other people do. Maybe you should try it out.
For tips, Paul Shapiro made the best article about it (ever) over here at Noah Kagan’s blog.

Get on Publisher Websites I consider the top tier publishing sites here, such as Entrepreneur, HuffPo, BusinessInsider and more. Depending on your niche, you will find other really big publishers so make sure to get on them.
I also consider the viral sites, like Buzzfeed, under this category. The normal way to get on these sites is to write on their backend and try hard to get your work on the main site. If not, then it won’t really be indexed.
If you want to be creative, my favorite tactic to get on these viral sites is to start from the smaller blogs and work my way up. I spread news or rumors on smaller blogs that I know these viral sites take news from. Once it’s picked up, you push it again on the next level and things will again, snowball from there.

Find Community Websites Community sites like and Kingged can give you some good initial traction. You’ll be able to meet new people, share your work, gain visibility and eventually, links.

Don’t Forget StumbleUpon and Reddit If you look at the StumbleUpon idea, it can look so Web1.0 but it can still bring in good traffic. Their Ad platform is also good if you plan it out right and know how to get it to catch on. Once it does, it will snowball. You’ll get links, one way or another. One of the people I’ve been following since forever is Ross Hudgens. They put out this cool guide about SU that you can check out here.
As for Reddit, it is only getting hotter so people can say whatever they want about how worthless it is for SEO but for me, Reddit has brought my sites tons of traffic and netted me links from hardcore, badass sites. Ain’t too shabby. Plus, it can do this…thanks for the spot Dan.

Find Uncredited Images It’s inevitable.
People will steal your images. Steal? Sounds harsh. Well, sometimes bloggers just grab it off Google images. It’s a completely innocent thing to do so I understand.
Good thing we know SEO! That practically means a free link in my eyes.
Use Google’s image search and upload a photo. It’ll show you places where the image was used. You can also use Tineye to do this.
Oh, infographic promotion can fall under this as well.

Submit to Slideshare If you do speaking gigs, present to your company or other groups, then you probably have a collection of slide decks. Simply use sites like Slideshare and share your content there!
Do you create blog posts? Repurpose your blog content into slides!
Need more Slideshare tips and tricks? Then get it from no other but the queen herself, Ana Hoffman from TGC.
Note: You can also submit PDF’s to Slideshare but there are also places to submit PDF’s so you can share your book or whitepaper to the world.

Get on Magazine and News Sites Local ones will tend to be easier to get featured on to but bigger, global news sites are still possible. It will just take a bit more work and patience.
What I do is to find the editor or a connection to the editor. Once I get introduced, it’s easy to submit a piece and get a piece published.
Joining HARO, which will be mentioned shortly, can also help you get on some of these sites.

Find Resource Pages Resource pages is one of the oldest plays in the book and it’s still one of my favorites.
Why? Competitors neglect them and I don’t have to worry about content. Easy, relevant links. Boom.

Join HARO and Participate Help A Reporter Out aka HARO is one of the best ways to get free press.
You get emails with different topics. You reply to the reporter and send an expert direct-to-the-point answer.
HARO isn’t the only game in town, I listed down some of the others here.
Here’s a tip: Use your mail to filter out the daily emails to find relevant phrases or words so you don’t have to check each one.

Use and Monitor Hashtags like #PRRequest Besides HARO type sites, there are hashtags out there that are used by journalists. It’s a way for them to get stories and participants. You can tweet out your topic with the hashtag or just monitor it.
Again, much like HARO, you need to pick your spots and be patient with this. Once it works for you, it’s gold.

Do a Link Bait You basically write about something controversial, something timely, something that’s not the norm. Put it out in front of the right people and BAM! You get links!
I covered it a bit more on this post.

Create Badges This is old school but still effective today, especially for certain niches today.
You create a gimmick badge, you share it to the community with a link back to you to show their support or to brag about their level in the community.
It’s sort of like those blog directories that want you to put their link on your site first to confirm your ownership. Then you forget to remove the badge and you just gave them a free link.

Find Links Pointing to Your Social Media Account but Not Your Website This is simple yet highly neglected.
By doing a simple backlink check on your own social profiles, you can dig out some pretty easy links.
To take this a step further, compile your competitor’s social accounts and check their links.

Use a Service? Submit a Testimonial! If you use a service or bought a course or maybe you are a member of a group/newsletter, then you can try to share your learnings, testimonials and results to the owner.
If you are purely in this for the link, which I know you are, then make sure the site you are contacting has a testimonial area.
For a more extensive process, Bryan Harris, THE poster boy, explains this like no other.

Support Crowd Funding Projects I mentioned it briefly here but I have talked about this on the newsletter pretty extensively in the past.
You basically find crowd funding projects that offer a link from their websites. You support them and get the link when they go live.

Charities to Support There are tons of charities you can support. Look around your local area and find those with websites.
Of course, you need to be aligned with their vision. >_>

Q&A Sites Q&A sites are mostly no-follow links but they bring in relevant traffic. They also rank pretty well and can get you spots in Google’s results.
That way, you can get more visibility, new users and eventually, new links.

Find Forums Forum links are not dead. They are still really nice and they still bring in targeted traffic.
You just need to look for relevant forums and jump into the conversation… or you can manufacture a way to start a conversation and jump in later to pitch your link.
Google removed my fav filter, which is “discussions” so just for you, here’s my secret. This nifty Chrome plugin.
Note: Just don’t go out there buying mass forum signature and profile links.

Research How an Author Did it I love this technique because I can sort of see how someone I look up to got to where he is today.
I could see how hard they worked, how they did it, the creativity they showed and more!
I could then do something similar and set myself apart from what he already did.
I talked about this extensively on the newsletter and I mentioned it on my post over here.

Supplier Websites This is mainly for e-commerce websites where you have suppliers that have sites. Just ask for those links.
If you are a business or a blog and have someone you work with that has a site, then you can also ask for a link from them. Easy, high quality links are always welcome.

Do Successful Content BETTER As mentioned in my previous post, my go-to strategy when it comes to link building is simply just doing better content than what’s already working out there and get all their links!
It basically means that people are interested and you can get those links.
Brian Dean calls this the Skyscraper Technique so if you want to learn more about this, check out his blog post!

Comment Scouting Comment scouting is a way for me to simply get ideas from the comments area (be it in my own blog or another blog) and create content for whatever the need I see there.
Then you contact the commenters and commenters on other blog posts with a similar topic.
I am creating a post about this and I’ll be posting it soon. Signup for our newsletter so you never miss an update!
③⓪① Build Category Specific Sites – 301 Them Category pages on a website are probably the hardest pages to get links for. E-commerce sites will benefit from getting links to these pages greatly so one way of getting links is by creating separate websites.
Cultivate them, get them links and then 301 those domains to your main category. #WIN
Since you read all the way here, here are a few bonus strategies that aren’t in the infographic!
Speaking and Conference Links Volunteer to speak in front of an organization or a conference. That’s almost a guaranteed link.
Does the conference have sponsors? They probably mentioned the conference on their website as well. Ask for a link back to your site!

Management and Sponsor Links Let’s say you are working on a celebrity’s site, then get a link from her agency’s site. Get links from her sponsors and magazines that mention her.
Are you getting paid to show off products? Get links from your sponsor’s website!

WikiPedia There are certainly different ways to get WikiPedia links. Knowing a moderator, sheer luck or WikiGrabber.
Use it and find a way to get a link. Don’t forget your etiquette.

Infographic Links Lastly, infographic promotion. Submit it to directories, reach out to sites that already publish infographic posts or sites that can be granted exclusivity.
It’s really a versatile way to build links so you can get really creative with it.
BTW, if you liked this infographic, please use our embed code that you saw at the bottom of the infographic.
Tell us about it and we’ll help you promote it. We’ll even write a unique intro for you!
Everything Else
Once you get to this point, it’s basically icing on the cake. Most of these are things that can’t be qualified under the categories above.
Some are minor, some are really vital once you start ranking and some are just for maintenance.

Social Media
I had to start it off with this.
When it comes to discussing social media’s direct effect to SEO, it will almost always be controversial. No matter what people say, social media is a part of our online and offline brands moving forward.
For me, social media does not have a direct effect, but a more indirect one. Actually, there are plenty of indirect ones!
The point of this being included here in the checklist is that you need to make sure that your website is set up properly and linked to your brand’s official social platforms.
Create those social media accounts – these basically help with SEO indirectly as they carry your brand name.
Adding social sharing buttons can potentially help you acquire new users and eventually links.
Link these social media accounts to your website – For example, Google+ can ask you to verify your site and page.
Also, you can use Schema to link your official social profiles.

Conversion Rate Optimization
CRO, which is an art on it’s own, does have processes that affect your overall SEO. Plus, it doesn’t hurt to convert more of your existing visitors.
Some of the things you need to do are:
Continue to speed up your website
Check your bounce rates
Be sure you don’t cause duplicate content when A/B testing
Track if you are ranking the correct page (that is converting)
Sound familiar? They should be.

Knowledge Graph
The knowledge graph is still a mystery for many. If your brand is still not an entity within the Knowledge Graph, then you need to start taking some steps to include yourself there.
Start by getting a Freebase account (by the time you read this, Google might have moved over to WikiData)
Check out Andrew Isidoro’s post as well as Krystian Szastok’s post.

Rank Tracking
Rank tracking is not as talked about as it used to be but if you are serious about your SEO work, then it’s still a must.
The Google Webmaster Tools data you get about your rankings are simply an average of where you place.
If you want more accurate data, be it local or country specific, then you need to track it yourself, be it using software (we use Rank Tracker and Advanced Web Ranking) or one of the many cloud hosted rank tracking tools out there.
Just to throw it in here: I get this question a lot. Does it hurt your ranking if you keep checking the rankings daily? I haven’t seen any evidence of it as I track things pretty aggressively.
Reputation Management
Skeptical?
Let’s start by mentioning that you need to claim your brand’s identity everywhere. It will save you a ton of time and headaches in the future when the brand you are working on is big enough.
You also need to monitor mentions about your brands either to stop negative things from escalating or get links.
So, can online reputation management be a part of SEO? Definitely.

Ongoing Server Configuration Checks
Your server will need to be tweaked regularly. Especially as you grow your traffic more and more.
The last thing you want is a slow site or a site that is down for long periods of time.
Things can get misconfigured, it’s just the way it is so doing regular checks are important.

Other Avenues to Improve Branding Online
You can do more besides traditional link building.
You can build up your brands on different ecosystems that are also crawled by Google.
From YouTube, to Apple and even Amazon. These are all major search engines on their own and building your brand within them can add to your SEO… and they take up space in Google’s results so that’s another bonus for you.

Keep Up with New Google Guidelines
Google’s guidelines will keep on changing. It’s just the nature of the game.
If you don’t monitor SEO news regularly, make it a point to pick your favorite SEO websites and subscribe to their newsletter (like ours) or RSS feed. Schedule a time in the month to do quick reading sessions to keep yourself up to date.

Schedule On-Page SEO Checks
As you publish more and more content, things can get lost in the shuffle.
Maybe you don’t have a system in place yet for other authors that publish within your site. Maybe you are just forgetful when it comes to SEO and just want to focus on creating content.
Doing a regular on-page SEO checkup will only help you in the long run so don’t overlook this.
Screaming Frog is our favorite but Google Webmaster Tools can also give you some good data.

Schedule Regular Backlink Profile Checks
This is probably the most ignored thing EVER. I cannot stress the importance of this especially if you are already working on a popular site or a competitive market.
Things can go wrong rather quickly (penalty/de-indexed) or it can be the reason why your site is being held back from improving in the rankings.
Checking your link profile regularly will help you see what’s wrong. Maybe you are over using your anchor text, maybe somebody is sending you spammy links or maybe you just aren’t doing enough.
I would suggest using and even Google Webmaster Tools when doing link profile checks.
Now Here’s How You Can Put It to Use
As I mentioned earlier in the article, we created a FREE SEO checklist that you can download and print out.
It’s basically a group of printable checklists, including 2 checklists for on-page and off-page local SEO.
Here’s where you can download the checklist:
Grow your digital presence to get more leads with this FREE newsletter (and free resources)
.content-5c428679880b1 .cp-form-container label:not(.cp-label) { display:none;}.content-5c428679880b1 .cp-form-container label { color: rgb(153, 153, 153); font-size: 15px; font-family:; text-align: center;} .content-5c428679880b1 .cp-form-container .cp-form-field select { text-align-last: center; direction: ;}.content-5c428679880b1 .cp-form-container input:focus:not([type='radio']):not([type='checkbox']):not([type='range']), .content-5c428679880b1 .cp-form-container textarea:focus, .content-5c428679880b1 .cp-form-container .cp-form-field button, .content-5c428679880b1 .cp-form-container .cp-form-field input, .content-5c428679880b1 .cp-form-container .cp-form-field select, .content-5c428679880b1 .cp-form-container .cp-form-field textarea { text-align: center; font-size: 15px; font-family: ; color: ; background-color: ; border-color: ; padding-top: 10px; padding-bottom: 10px; padding-left: 15px; padding-right: 15px; border-radius: 3px;}.content-5c428679880b1 .cp-form-container .cp-form-field .cp-label { text-align: center; font-size: 15px; font-family: ; color: ; padding-top: 10px; padding-bottom: 10px; border-radius: 3px;}.content-5c428679880b1 .cp-form-container .cp-submit { padding-top: 10px; padding-bottom: 10px; padding-left: 15px; padding-right: 15px;}.content-5c428679880b1 .cp-form-container .cp-submit.cp-btn-flat { background: #ed0e0e!important;border-radius:4px;}.content-5c428679880b1 .cp-form-container .cp-submit.cp-btn-flat:hover { background: #e00101!important;}.content-5c428679880b1 .cp-form-field.cp-enable-box-shadow > div { border-radius: 3px;}
JOIN THE FREE NEWSLETTER >>
We hate SPAM and promise to keep your email address safe
The post SEO Checklist: Never Forget Anything About SEO Ever Again appeared first on LeapFroggr.
This content was originally published here.
0 notes
Photo
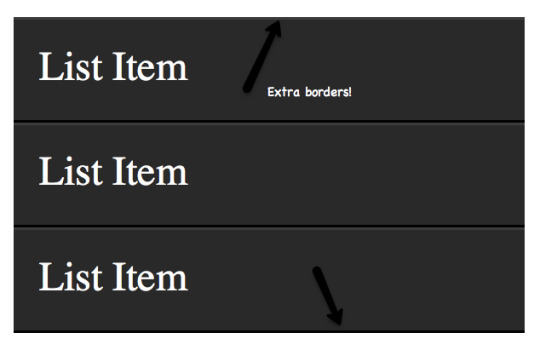
The 30 CSS Selectors You Must Memorize
Learn CSS: The Complete Guide
We've built a complete guide to help you learn CSS, whether you're just getting started with the basics or you want to explore more advanced CSS.
CSS Selectors
So you learned the base id, class, and descendant selectors—and then called it a day? If so, you're missing out on an enormous level of flexibility. You owe it to yourself to commit these advanced CSS and CSS3 selectors to memory.
Basic Selectors
1. *
* { margin: 0; padding: 0; }
Let's knock the obvious ones out, for the beginners, before we move onto the more advanced selectors.
The star symbol will target every single element on the page. Many developers will use this trick to zero out the margins and padding. While this is certainly fine for quick tests, I'd advise you to never use this in production code. It adds too much weight on the browser, and is unnecessary.
The * can also be used with child selectors.
#container * { border: 1px solid black; }
This will target every single element that is a child of the #container div. Again, try not to use this technique very much, if ever.
2. #X
#container { width: 960px; margin: auto; }
Prefixing the hash symbol to a selector allows us to target by id. This is easily the most common usage, however be cautious when using id selectors.
Ask yourself: do I absolutely need to apply an id to this element in order to target it?
id selectors are rigid and don't allow for reuse. If possible, first try to use a tag name, one of the new HTML5 elements, or even a pseudo-class.
3. .X
.error { color: red; }
This is a class selector. The difference between ids and classes is that, with the latter, you can target multiple elements. Use classes when you want your styling to apply to a group of elements. Alternatively, use ids to find a needle-in-a-haystack, and style only that specific element.
4. X
a { color: red; } ul { margin-left: 0; }
What if you want to target all elements on a page, according to their type, rather than an id or classname? Keep it simple, and use a type selector. If you need to target all unordered lists, use ul {}.
Live Demo of Basic Selectors
Combinator Selectors
5. X Y
li a { text-decoration: none; }
The next most common selector is the descendant selector. When you need to be more specific with your selectors, you use these. For example, what if, rather than targeting allanchor tags, you only need to target the anchors which are within an unordered list? This is specifically when you'd use a descendant selector.
Pro-tip: If your selector looks like X Y Z A B.error, you're doing it wrong. Always ask yourself if it's absolutely necessary to apply all of that weight.
6. X + Y
ul + p { color: red; }
This is referred to as an adjacent selector. It will select only the element that is immediately preceded by the former element. In this case, only the first paragraph after each ul will have red text.
7. X > Y
div#container > ul { border: 1px solid black; }
The difference between the standard X Y and X > Y is that the latter will only select direct children. For example, consider the following markup.
<div id="container"> <ul> <li> List Item <ul> <li> Child </li> </ul> </li> <li> List Item </li> <li> List Item </li> <li> List Item </li> </ul> </div>
A selector of #container > ul will only target the uls which are direct children of the div with an id of container. It will not target, for instance, the ul that is a child of the first li.
For this reason, there are performance benefits in using the child combinator. In fact, it's recommended particularly when working with JavaScript-based CSS selector engines.
8. X ~ Y
ul ~ p { color: red; }
This sibling combinator is similar to X + Y, however, it's less strict. While an adjacent selector (ul + p) will only select the first element that is immediately preceded by the former selector, this one is more generalized. It will select, referring to our example above, any p elements, as long as they follow a ul.
Live Demo of Combinator Selectors
Attribute Selectors
9. X[title]
a[title] { color: green; }
Referred to as an attributes selector, in our example above, this will only select the anchor tags that have a title attribute. Anchor tags which do not will not receive this particular styling. But, what if you need to be more specific? Check out the next example!
10. X[href="foo"]
a[href="https://code.tutsplus.com"] { color: #83b348; /* Envato green */ }
The snippet above will style all anchor tags which link to https://code.tutsplus.com; they'll receive our branded green color. All other anchor tags will remain unaffected.
Note that we're wrapping the value in quotes. Remember to also do this when using a JavaScript CSS selector engine. When possible, always use CSS3 selectors over unofficial methods.
This works well, though, it's a bit rigid. What if the link does indeed direct to Envato Tuts+, but, maybe, the path is code.tutsplus.com rather than the full URL? In those cases we can use a bit of the regular expressions syntax.
11. X[href*="foo"]
a[href*="tutsplus"] { color: #83b348; /* Envato green */ }
There we go; that's what we need. The star designates that the proceeding value must appear somewhere in the attribute's value. That way, this covers tutsplus.com, code.tutsplus.com, and even webdesign.tutsplus.com.
Keep in mind that this is a broad statement. What if the anchor tag linked to some non-Envato site with the string tutsplus in the URL? When you need to be more specific, use ^ and $, to reference the beginning and end of a string, respectively.
12. X[href^="http"]
a[href^="http"] { background: url(path/to/external/icon.png) no-repeat; padding-left: 10px; }
Ever wonder how some websites are able to display a little icon next to the links which are external? I'm sure you've seen these before; they're nice reminders that the link will direct you to an entirely different website.
This is a cinch with the carat symbol. It's most commonly used in regular expressions to designate the beginning of a string. If we want to target all anchor tags that have a href which begins with http, we could use a selector similar to the snippet shown above.
Notice that we're not searching for https://; that's unnecessary, and doesn't account for the URLs that begin with https://.
Now, what if we wanted to instead style all anchors which link to, say, a photo? In those cases, let's search for the end of the string.
13. X[href$=".jpg"]
a[href$=".jpg"] { color: red; }
Again, we use a regular expressions symbol, $, to refer to the end of a string. In this case, we're searching for all anchors which link to an image—or at least a URL that ends with .jpg. Keep in mind that this won't capture GIF and PNG images.
14. X[data-*="foo"]
a[data-filetype="image"] { color: red; }
How do we compensate for all of the various image types? Well, we could create multiple selectors, such as:
a[href$=".jpg"], a[href$=".jpeg"], a[href$=".png"], a[href$=".gif"] { color: red; }
But, that's a pain, and is inefficient. Another possible solution is to use custom attributes. What if we added our own data-filetype attribute to each anchor that links to an image?
<a href="path/to/image.jpg" data-filetype="image"> Image Link </a>
Then, with that hook in place, we can use a standard attributes selector to target only those anchors.
a[data-filetype="image"] { color: red; }
15. X[foo~="bar"]
a[data-info~="external"] { color: red; } a[data-info~="image"] { border: 1px solid black; }
Here's a special one that'll impress your friends. Not too many people know about this trick. The tilde (~) symbol allows us to target an attribute which has a space-separated list of values.
Going along with our custom attribute from number fifteen, above, we could create a data-info attribute, which can receive a space-separated list of anything we need to make note of. In this case, we'll make note of external links and links to images—just for the example.
"<a href="path/to/image.jpg" data-info="external image"> Click Me, Fool </a>
With that markup in place, now we can target any tags that have either of those values, by using the ~ attributes selector trick.
/* Target data-info attr that contains the value "external" */ a[data-info~="external"] { color: red; } /* And which contain the value "image" */ a[data-info~="image"] { border: 1px solid black; }
Pretty nifty, huh?
Live Demo of Attribute Selectors
Pseudo Selectors
16. X:visited and X:link
a:link { color: red; } a:visited { color: purple; }
We use the :link pseudo-class to target all anchors tags which have yet to be clicked on.
Alternatively, we also have the :visited pseudo class, which, as you'd expect, allows us to apply specific styling to only the anchor tags on the page which have been clicked on, or "visited".
17. X:checked
input[type=radio]:checked { border: 1px solid black; }
This pseudo class will only target a user interface element that has been checked—like a radio button, or checkbox. It's as simple as that.
18. X:after
The before and after pseudo classes are great. Every day, it seems, people are finding new and creative ways to use them effectively. They simply generate content around the selected element.
Many were first introduced to these classes when they encountered the clear-fix hack.
.clearfix:after { content: ""; display: block; clear: both; visibility: hidden; font-size: 0; height: 0; } .clearfix { *display: inline-block; _height: 1%; }
This hack uses the :after pseudo class to append a space after the element, and then clear it. It's an excellent trick to have in your tool bag, particularly in the cases when the overflow: hidden; method isn't possible.
For another creative use of this, refer to my quick tip on creating shadows.
According to the CSS3 Selectors specification, you should technically use the pseudo element syntax of two colons ::. However, to remain compatible, the user-agent will accept a single colon usage as well.
19. X:hover
div:hover { background: #e3e3e3; }
Oh come on. You know this one. The official term for this is "user action pseudo class". It sounds confusing, but it really isn't. Want to apply specific styling when a user hovers over an element? This will get the job done!
Keep in mind that older version of Internet Explorer don't respond when the :hover pseudo class is applied to anything other than an anchor tag.
You'll most often use this selector when applying, for example, a border-bottom to anchor tags, when hovered over.
a:hover { border-bottom: 1px solid black; }
Pro-tip: border-bottom: 1px solid black; looks better than text-decoration: underline;.
20. X:not(selector)
div:not(#container) { color: blue; }
The negation pseudo class is particularly helpful. Let's say I want to select all divs, except for the one which has an id of container. The snippet above will handle that task perfectly.
Or, if I wanted to select every single element (not advised) except for paragraph tags, we could do:
*:not(p) { color: green; }
21. X::pseudoElement
p::first-line { font-weight: bold; font-size: 1.2em; }
We can use pseudo elements (designated by ::) to style fragments of an element, such as the first line, or the first letter. Keep in mind that these must be applied to block-level elements in order to take effect.
A pseudo-element is composed of two colons: ::
Target the First Letter of a Paragraph
p::first-letter { float: left; font-size: 2em; font-weight: bold; font-family: cursive; padding-right: 2px; }
This snippet is an abstraction that will find all paragraphs on the page, and then sub-target only the first letter of that element.
This is most often used to create newspaper-like styling for the first letter of an article.
Target the First Line of a Paragraph
p::first-line { font-weight: bold; font-size: 1.2em; }
Similarly, the ::first-line pseudo element will, as expected, style the first line of the element only.
"For compatibility with existing style sheets, user agents must also accept the previous one-colon notation for pseudo-elements introduced in CSS levels 1 and 2 (namely, :first-line, :first-letter, :before and :after). This compatibility is not allowed for the new pseudo-elements introduced in this specification."—W3C Selectors Specs
Live Demo of Pseudo Selectors
Nth Child and Type Selectors
22. X:nth-child(n)
li:nth-child(3) { color: red; }
Remember the days when we had no way to target specific elements in a stack? The nth-child pseudo class solves that!
Please note that nth-child accepts an integer as a parameter, however, this is not zero-based. If you wish to target the second list item, use li:nth-child(2).
We can even use this to select a variable set of children. For example, we could do li:nth-child(4n) to select every fourth list item.
23. X:nth-last-child(n)
li:nth-last-child(2) { color: red; }
What if you had a huge list of items in a ul, and only needed to access, say, the third to the last item? Rather than doing li:nth-child(397), you could instead use the nth-last-child pseudo class.
This technique works almost identically from number sixteen above, however, the difference is that it begins at the end of the collection, and works its way back.
24. X:nth-of-type(n)
ul:nth-of-type(3) { border: 1px solid black; }
There will be times when, rather than selecting a child, you instead need to select according to the type of element.
Imagine markup that contains five unordered lists. If you wanted to style only the third ul, and didn't have a unique id to hook into, you could use the nth-of-type(n) pseudo class. In the snippet above, only the third ul will have a border around it.
25. X:nth-last-of-type(n)
ul:nth-last-of-type(3) { border: 1px solid black; }
And yes, to remain consistent, we can also use nth-last-of-type to begin at the end of the selectors list, and work our way back to target the desired element.
26. X:first-child
ul li:first-child { border-top: none; }
This structural pseudo class allows us to target only the first child of the element's parent. You'll often use this to remove borders from the first and last list items.
For example, let's say you have a list of rows, and each one has a border-top and a border-bottom. Well, with that arrangement, the first and last item in that set will look a bit odd.
Many designers apply classes of first and last to compensate for this. Instead, you can use these pseudo classes.
27. X:last-child
ul > li:last-child { color: green; }
The opposite of first-child, last-child will target the last item of the element's parent.
last-child Selector Example
Let's build a simple example to demonstrate one possible use of these classes. We'll create a styled list item.
<ul> <li> List Item </li> <li> List Item </li> <li> List Item </li> </ul>
For the markup, there's nothing special: just a simple list.
Here's the CSS:
ul { width: 200px; background: #292929; color: white; list-style: none; padding-left: 0; } li { padding: 10px; border-bottom: 1px solid black; border-top: 1px solid #3c3c3c; }
This styling will set a background, remove the browser default padding on the ul, and apply borders to each li to provide a bit of depth.
To add depth to your lists, apply a border-bottom to each li that is a shade or two darker than the li's background color. Next, apply a border-top which is a couple shades lighter.
The only problem, as shown in the image above, is that a border will be applied to the very top and bottom of the unordered list - which looks odd. Let's use the :first-child and :last-child pseudo classes to fix this.
li:first-child { border-top: none; } li:last-child { border-bottom: none; }
There we go; that fixes it!
28. X:only-child
div p:only-child { color: red; }
Truthfully, you probably won't find yourself using the only-child pseudo class too often. Nonetheless, it's available, should you need it.
It allows you to target elements which are the only child of its parent. For example, referencing the snippet above, only the paragraph that is the only child of the div will be colored, red.
Let's assume the following markup.
<div><p> My paragraph here. </p></div> <div> <p> Two paragraphs total. </p> <p> Two paragraphs total. </p> </div>
In this case, the second div's paragraphs will not be targeted; only the first div. As soon as you apply more than one child to an element, the only-child pseudo class ceases to take effect.
29. X:only-of-type
li:only-of-type { font-weight: bold; }
This structural pseudo class can be used in some clever ways. It will target elements that do not have any siblings within its parent container. As an example, let's target all uls, which have only a single list item.
First, ask yourself how you would accomplish this task? You could do ul li, but, this would target all list items. The only solution is to use only-of-type.
ul > li:only-of-type { font-weight: bold; }
30. X:first-of-type
The first-of-type pseudo class allows you to select the first siblings of its type.
A Test
To better understand this, let's have a test. Copy the following mark-up into your code editor:
<div> <p> My paragraph here. </p> <ul> <li> List Item 1 </li> <li> List Item 2 </li> </ul> <ul> <li> List Item 3 </li> <li> List Item 4 </li> </ul> </div>
Now, without reading further, try to figure out how to target only "List Item 2". When you've figured it out (or given up), read on.
Solution 1
There are a variety of ways to solve this test. We'll review a handful of them. Let's begin by using first-of-type.
ul:first-of-type > li:nth-child(2) { font-weight: bold; }
This snippet essentially says, to find the first unordered list on the page, then find only the immediate children, which are list items. Next, filter that down to only the second list item in that set.
Solution 2
Another option is to use the adjacent selector.
p + ul li:last-child { font-weight: bold; }
In this scenario, we find the ul that immediately proceeds the p tag, and then find the very last child of the element.
Solution 3
We can be as obnoxious or as playful as we want with these selectors.
ul:first-of-type li:nth-last-child(1) { font-weight: bold; }
This time, we grab the first ul on the page, and then find the very first list item, but starting from the bottom!
Live Demo of Nth Child and Type Selectors
Conclusion
If you're compensating for older browsers, like Internet Explorer 6, you still need to be careful when using these newer selectors. But, please don't let that deter you from learning these. You'd be doing a huge disservice to yourself. Be sure to refer here for a browser-compatibility list. Alternatively, you can use Dean Edward's excellent IE9.js script to bring support for these selectors to older browsers.
Secondly, when working with JavaScript libraries, like the popular jQuery, always try to use these native CSS3 selectors over the library's custom methods/selectors, when possible. It'll make your code faster, as the selector engine can use the browser's native parsing, rather than its own.
It’s great that you’re spending time learning web design fundamentals, but if you need a quick solution, one of our ready-to-use CSS templates might be a good option. We also have a few premium CSS items for you to consider.
CSS3
12 Elegant CSS Pricing Tables for Your Latest Web Project
Monty Shokeen
Bootstrap 4
18 Best Bootstrap 4 Plugins
Monty Shokeen
by Jeffrey Way via Envato Tuts+ Code https://ift.tt/3cugNpH
0 notes