#dump and go instant pot recipes
Text
Dump & Go meals are probably going to be some of the easiest meals for people who struggle with depression, anxiety, or other types of disabilities.
If you're preparing for surgery, giving birth, or just feel exhausted all the time please look into them.
There's a few different types of dump and go meals.
Instant pot : VERY fast and efficient, you typically throw shit in there with MINIMAL work and press a few buttons and wait.
Crock pot: SLOW. Very slow. Your food will take hours to be ready so if you're going to be at home all day, throw it in there in the morning and it'll be done for dinner. For breakfast and lunch you can have easy meals like premade lunchables or sandwiches.
Pan: You throw everything on a big sheet pan and into the oven! Less dishes, simple and easy to do.
Stove: This one requires the most ACTIVE cooking. You'll need to stir/add/etc occasionally to check on it. Unlike the others where you practically add a couple things and walk away.
This also promotes eating at home and EATING in general. I'm no stranger to forgetting to eat for an entire day and then not eating only because I didn't have enough spoons to cook.
"Okay but how do I find them?" Go online, whether tiktok, youtube, or google and look up instant pot recipes, crock pot recipes, dump & go recipes, and freezer meal recipes.
MAKE SURE you thaw these out in the fridge! Every night before bed just pull one out and put it in the fridge :)
Edit: I will also make note! You can often find freezer meals that work WONDERFULLY ! An example is pre seasoning + cutting some chicken, potatoes, and broccoli. Label it CLEARLY with directions !
That means you can freeze a batch of 15+ dinners/lunches AT ONCE and then not have to panic about cooking. If you’re a rice lover like myself you can buy a small rice cooker and turn it on while the other pot goes and that’s IT that’s all it takes for healthy yummy dinner
517 notes
·
View notes
Note
The idea of reader inviting Eddie over to make dinner together (or more like sit on the counter being a menace bc you can’t tell me that man knows how to cook)??? Lazily making out until they get spooked apart by the kitchen timer going off? God he’s totally a person who when you say ‘try this’ licks the spoon then drops it back Into the pot

NO YOU’RE SO RIGHT he’s a menace, you’re trying to cook and he’s a MENACE.
“No, I can totally help.” He’ll tell you, slouching through your kitchen and picking up your book of recipes to read it. You’re relieved. The six different dishes for your family reunion tomorrow aren’t going to cook themselves.
And then SMASH cut to Eddie absolutely doing more damage than good. He tries, bless him, but the only thing the guy can really make is microwave instant meals.
You have to squawk in alarm and grab the salt from him because he’s dumping it on the chicken like sand. He’s fiddling with the oven dials idly, always needing to do something with his hands, and you have to slap them away because he’s messing with the warming drawer. He chops the celery too thickly for the soup. He mutters “shit” when he cracks an egg in a bowl and fishes out shell bits for twenty minutes.
He’s… bad. He’s so bad it literally makes you laugh.
So you end up cooking, just like you planned, but now you have a tall, lanky metal-head bobbing to the radio, coming up behind you hum the lyrics in your ear and kiss the nape of your neck as you stir the pasta. He’ll pluck the ladle out of your hands and just sing louder when you protest, pressing your hips back against the countertop and kissing you again. And again. And again.
Silky-sweet, soft kisses. They’re tender enough to make you forget your own name. He smells like smoke and sweat. Stupid, pretty, gold-hearted menace.
And then the timer is going off and the chicken is smoking and you’re fumbling past him with a cry of dismay, Eddie clenching his teeth in a yikes when the bird is burnt.
“You know,” he rumbles out, coming up behind you and lacing his fingers around your torso. Resting his chin on your head. “You could always just feed ‘em hamburger helper. That stuff is really good.”
#HE’S AN ACTIVE DISTRACTION YOUR HONOR#Eddie Munson x reader#Stranger Things imagine#my writing#Eddie Munson#thank u for the anon <3 <3
544 notes
·
View notes
Text
easy ""recipe"" for disabled people.
at least 1 can great value / store brand roast beef, or whatever meat you want instead.
you can add vegetables if you want but I loathe them.
instant mashed potato flakes, or actual mashed potatoes.
milk, or heavy whipping cream or water, or whatever you put in mashed potatoes. Anything that's not plain water will make them taste a million times better. (especially if you have shitty tap water like we do)
butter or whatever else you put in mashed potatoes
can be done in the microwave or on the stove top.
dump can of roast beef into bowl or pot, break up the chunks of meat. (or don't, if you like big chunks)
Add butter and milk, stir, and heat until warm. Not boiling. It's unnecessary.
Add the potato flakes a bit at a time and stir in each time until it's as thick as you want it. Feel free to add more milk or whatever.
There you go. roast beef and mashed potatoes. without having to use a giant heavy crock pot. or chop potatoes.
Tastes good cold too.
if you want to figure out actual proper measurements, go ahead but I'm too lazy. I'll just wing it each time.
#food#recipes#actuallyautistic#actually autistic#cripplepunk#actually physically disabled#actuallyphysicallydisabled#disabled recipes#low spoons recipes
26 notes
·
View notes
Text

Instant Pot Ham and Bean Soup
Easy, hearty, flavorful smoky Instant Pot ham and bean soup. A family-favorite way to use leftover holiday ham. No need to soak your beans. Includes Dump-and-Go or Fancy options.
Get Recipe: Ham and Bean Soup Instant Pot
#instant pot#recipes#recipe#food#comfort food#food blog#cooking#easter#soup time#soup recipes#souplovers
8 notes
·
View notes
Text
instant pot rice pilaf sorta?
So this is one of my comfort-food recipes which I'm not sure I've related here before, but by request I'm writing it down properly with quantities and such.
This is, for me, an Instant Pot recipe, but you can adapt it for stovetop pretty easily. If you do it on the stovetop you can make it more risotto-like by stirring it a lot and such. Consult a decent risotto recipe and adapt.
You can use any kind of root vegetable, pretty much any kind of meat you like, and either white or brown rice for this. Use whatever stock you have. The leafy greens are optional.
Dice an onion. Melt fat (oil, butter, lard, bacon grease, like 2-3 Tbsp) in your Instant Pot on the "saute" setting (I do mine on Normal, but there's a lot of variation in individual pots how intense that is. You want it to lightly sizzle but not burn) and dump your onion in until it's as done as you like. (I want it to be clear, maybe just browning a little at the edges here and there, but you can go browner if you want.)
1a) IF YOU WANT TO USE MEAT you can do that. If I'm using lamb shanks, I will brown them first before adding the onion. If I'm using ground meat I will cook it after I've started softening the onion. You could throw in cooked leftover meat too, or if it's in your stock that's fine. Really this dish does fine without, but it's also a great way to stretch a small amount of meat to be a whole meal for several people. A lamb shank, a pork chop, a ham hock, some short ribs, a chicken leg-- some skimpy cut with a bone is ideal for this, but you can also use bulk sausage or ground meat or chicken breast or whatever you want, just adjust cooking times.
Dice carrots or beets while this is happening (or both). I'm a bit inspired by Central Asian plov, which is traditionally made with finely-julienned yellow carrots and like a whole lot of them, but I love beets in this. Set your diced root vegetables aside for right now. I'm going to say you want like, a cup or so of diced vegetable.
Put in your rice, stirring it around until it's all coated in the melted fat. I'm going to say to use 2c of rice. Let it cook for a couple of minutes.
Optional: throw in about 1/4 cup of white wine to kind of deglaze the pan, scrub up your rice in case it stuck at all (you need it not to stick or your pot will give a "burn" notice and not finish). Do this quickly, don't let it sit too long.
Throw in your root vegetables.
Add stock. I use Trash Stock, which I make in the pressure cooker out of all my leftover bones and vegetable scraps. You could use salted water, you could use canned broth, you could use whatever you like to cook rice in or whatever you make soup with. Follow the guidelines from your Instant Pot-- both white and brown rice are recommended as 1:1-- but I would be generous with the liquid, this always turns out a little dry for me because I think the root vegetables absorb water. I made this just now with 2c brown rice and a scant 3c stock and it was not watery at all. If you're using stock that is not adequately salted you'll want to throw some additional salt in. I also season with thyme, as that's the primary herb in plov, but you can really put in whatever herbs you like with whatever root vegetable you picked. I once made an incredibly intensely rosemaryed risotto that was actually pretty incredible. Use what you have.
Cook according to your Instant Pot's guidelines for the type of rice you're using, but on the longer side. I used brown rice, which IP said was "20-22 minutes" so I did it at 22 minutes on high pressure. White rice is only like, I forget, 3-5 minutes? Do it for the longer end, because you want those beets/carrots done through. (If you're using meat, then cook it however long the meat needs, if it's longer than what the rice needs. If I'm doing lamb shanks or something bone-in, then I use water instead of broth because the bones will make it be broth, I am more generous with the water, and I let it cook 25 minutes at least regardless of the rice. Shanks are fantastic because they're so tough otherwise, but have so much collagen they give a really velvety finish.)
When the pressure cook cycle is over, release pressure on the pot, and then dice up some leafy green-- spinach is great, mustard greens are great, I used some of the greens from my beets because I had them-- and I only used a scant cup, maybe even less, but if you have good spinach this is a great way to cram a ton of it into something-- and throw your leafy green in, stir it well, and then stick the lid back on.
(if you've got shanks or some other bone-on meat, you'll need to take those out, pull all the meat off, throw it back in, discard your bones or better still put them in your freezer bag for later trash stock-- stir the meat back in along with your leafy greens, and put it on keep warm if it's had too long to cool off.)
Cut a few chunks of a lovely soft cheese, I recommend chevre. Once the leafy greens have wilted (really stirring them in should be plenty, or a minute or two with the lid on and the residual heat from the Pot), then dish your plov into bowls and top with crumbles of cheese.
(For a more risotto-like variant, stir in a pat of butter at the end and top with Parmesan or similar. It's gonna depend on your flavor profile.)
sorry if this is real wordy, I really have tried to make it be Concrete Amounts but it's more a technique than a recipe, I always cook in story-frameworks like this because I just can't follow directions anymore, LOL.
29 notes
·
View notes
Text
Hey! So I have some lived experience in being poor and mentally ill I had to learn the hard way in my adulthood after growing up with abusive neglectful narcissistic parents. Maybe it will help someone else.
1. Instant pot. Crock pot. Rice cooker. You only need one, but all 3 are versatile, can use very little electricity to run, and are perfect to dump ingredients into and come back later to a healthy, cooked dinner.
You can research which is best for you by looking up "crock pot recipes" "rice cooker meals" to get a feel for what types of meals you can prepare in each and how it's purposes can best fit your cooking style.
2. Get your electronics secondhand. Phone companies make so much off of poor people bc they contract us into pay plans that mean that by the time our phones are needing replacing, we've paid for it 2 or more times over. Consider going Sim only and getting your phone secondhand.
Websites like backmarket and envirophone sell refurbished phones, tablets, laptops, smart watches, TVs, consoles, headphones, all sorts like new and for a fraction of the price point you'd usually get them at. I've not bought an electronic new since 2015 and the products I get refurbished last just as long as if I'd bought them new. Plus it's better for the environment. Even if I had money I don't think I'd go back to buying new honestly.
3. Static charger. If you're Autistic and can't sit still, like me you might be finding that the first thing to go on your electronics is your charge port. It's really annoying because it's not a cheap fix and I have had to replace phones early when they won't charge any more.
Last year my girlfriend and I got static chargers. It's an adapter that sits in your phone/tablets charger slot that magnetically connects to a universal charger. Its great for us because now everything rechargeable (phones/tablets, but also headphones, game controllers, keyboards/mouses) takes the same cable. It's really handy, but for me the best part is that the adapter doesn't move. So even if I'm fidgeting with my phone on charge it won't wear down the charger pins over time. We paid £20 for 3 and it's paid for itself because I've not had to take my phone for it's yearly fix since I got it.
4. Make a cozy space outside of bed. As a bedrotting girlie I know the allure of just saying "fuck it" and curling up in bed is so strong. I also know that when I do it for days at a time my sleep quality gets worse, my days blur together and my mental health gets so much worse. Especially if I'm working, watching TV, eating all my meals and doing my hobbies all from my bed.
One thing that helps me break up the bedrotting and at least helps me get some decent sleep so I might wake up feeling better tomorrow, is having a cozy spot that isn't in bed I can spend at least some of my day in.
For me, it's the couch in my living room. I've furnished it with pillows, blankets, and a little coffee table I can rest my stuff on so I can feel as comfy as I do in bed, but not actually be in bed most of the day. For You it could be a book nook, or a floor bed, or a desk with a chair in your bedroom.
5. Giant water bottle. This one is really simple. We need 8 glasses of water a day to be healthy and hydrated. Basically nobody depressed has the energy to fill up a glass of water 8 times a day. If you can get a water bottle that holds 2 litres (65oz) of water, now you only need to fill one drinking vessel once a day to be healthy and hydrated.
It's really simple and sill but it honestly saved my life. I buy those drink flavor packets because I drink more when it tastes nice. Is it as healthy as plain water? No. Is it healthier than no water? Yes. Easy peasy.
My bottle is from Meoky, its the 64oz stainless steel camping bottle with a flip straw I got for under £20. I like it because it keeps my water cold and I'd rather walk on hot coals than take a sip without a straw, but I've bought same size BPA free plastic bottles for like £3 and they have lasted me 2-3 years too so the budget options are absolutely worth it too.
6. Reconsider what's worth getting second hand. Generally when thinking about buying secondhand we mean clothes at the thrift, and that's great, but buying pre loved can be anything, and you can buy some high ticket items at an affordable price point that way.
If I ever want an appliance I always look second hand first. My rice cooker is secondhand and it is my favourite appliance. I've also bought a popcorn maker for a fraction of the price I'd buy it new, and I'm looking for a Kitchen Aid mixer for no more than a third the price they usually sell at. My vanity houses my shark air styler, I got it refurbished second hand and it was like new when I bought it. I use it every day and it still has so much wear in it.
Generally, the bigger and heavier something is, the closer to free you can get it, because the people getting rid of it just want it gone. If you ever need a washing machine or some furniture, look on gumtree or local no buy groups first. Type "free ___" followed by where you live into Google to get an idea whats available. If you're furnishing a space it's very likely you can get everything you need for the cost of the van you hired to collect it all.
7. Frozen vegetables. Fresh produce is getting more expensive and because we neurodivergent and mentally ill people can have a habit of letting fresh produce rot in the fridge, wasting money and making more mess to clean up, it's usually not worth it. The thing is, frozen produce is cheaper because it is picked in season, healther because it is frozen at optimum ripeness, and can be safely stored in your freezer for months, it's so worth doing.
They're usually pre-cut and can generally just be chucked into your dish frozen to defrost while cooking, making them easy and accessible. You can buy mixed vegetable packs (in the UK the most common is sweetcorn/peas/carrots and broccoli/cauliflower/) for some variety too, which I like to just dump a portion into soups or broths for some added vitamins.
8. Medication delivery. I've been medicated for mental illness for years, and a regular problem I used to have was I would neglect going to pick up my meds because I was depressed, then I'd run out and be unable to collect them because the lack of meds was making me more depressed.
Now however, I'm signed up with an online pharmacy. They processes my prescriptions exactly the same way any other pharmacy would and dispense them through the post in a box that fits through my letterbox. I never have to leave the house for meds again which is actually a lifesaver, the shipping is super cheap, like free for 3 day delivery and £2.99 for next day, and it's all processed through a super simple app that I only have to use like one a month when I request my refill.
It's so worth it and if you struggle to get out like me I absolutely recommend it. In the UK it's called Lloyd's Direct Pharmacy, but I'm sure it's a service you can find in other places of the world too.
9. Laundry separation is a lie. Which isn't a big deal for people who don't care about throwing money away on extra loads or people who have the spoons to faff around separating their clothes arbitrarily, but for poor neurodivergent people, it is.
So here's the thing, the rules of separating laundry by colour came about when clothes were made of all natural materials that would stick to each other when agitated and natural dyes that would run in water. Nowadays, clothes are made of synthetic or blended materials that can handle the friction of a modern machine and synthetic dyes that hold up to basically anything. 99% of clothes on the market, and therefore probably 99% of your wardrobe, is polycotton or some other poly-blend. So generally, everything you have can just all go in together on a warm wash.
Now, if you have woolen, linen or cashmere pieces, you should be separating them and following the care instructions on the label, but everything else, just shove it in mate, nothing bad will happen.
10. Protein powder. Protein powder is cheap, it's stored dry to it basically never goes bad, it's obviously protein so it's a really good addition to your diet, it tastes of whatever flavour you buy it in so it's a good meal substitute if you're depressed and your appetite is low, and it comes together really easily.
I usually get it in big tubs because they're cheaper per gram that way and I just add them to my coffee/hot chocolate for a boost or stir it into some Greek yogurt for a quick healthy snack. Thats actually my favourite way to get protein in because it's like 2 minutes and it covers up that sour taste yogurt has. I've also stirred it into milk for my cereal to varying success but it's good because the fat in the milk and the carbs and fortified vitamins in the cereal make it basically a meal. If I'm struggling for breakfast I usually add a scoop or two to an instant porridge pot and I have a ready to eat nutritional meal ready in the time it takes to boil the kettle.
6 notes
·
View notes
Text
The Cooking Project: Yakitori-don
The next card in the stack was a recipe from a friend who I believe lived in Japan for a year. She shared it in Slack, and I wrote it down on a card because free Slack instances have limited history availability. (there will be another recipe later, I think, with a similar origin) I don't know exactly how long ago I wrote it down (2 or 3 years ago, probably), and I've never made it.
Summary: pretty good, would make again with a couple of mods. Unfortunately, there will be a long digression into rice cooking first.

Recipe text, transcribed
Yakitori-don (from Amanda C.)
2-4 chicken breasts
1 c soy sauce
1/2 c sugar
1 tsp garlic salt
1 onion, chopped
all into crock pot on low, 8 hrs [arrow leads to a notes that says try instant for 10 min & quick release]
shred chicken, stir back into sauce
serve over Nishiki (?) rice
[Nishiki rice, when I looked it up, turns out to be a medium grain white rice similar to Calrose. we'll get to Problems With Rice next]
Things that happen when you move while Trauma, or: Problems With Rice
So my favorite way to make rice, not owning a rice cooker, is with an instant pot. As it happens, I own two of them, because Ryn brought one when they moved out here. Which, I thought: perfect! One for the chicken and one for the rice.
Except, as it turns out, Ryn's rice cooker has a detachable cord. Which was detached at some point presumably in August or September 2021, and is........ SOMEWHERE. Is that somewhere in the box, which is probably in the garage? Is it in another shelf in the kitchen behind a bunch of stuff? Is it in the landfill? I have no idea (yet).

[the Instant Pot that betrayed me]
Which means there was only one instant pot, which is a lot less fun than there was only one bed.
I didn't buy medium grain white rice for this recipe, because I had long grain on hand, and, eh. But that means that my rice is in a container and does not have cooking instructions. So I opened up my trusty copy of How to Cook Everything Vegetarian, which I think I got as a Christmas present like 10 years ago, on the assumption that it would have the usual X rice to Y water for Z time formula that one might find on the back of a bag of rice. Instead, he suggests a method that is "Far easier and more reliable [...] which will work well for any kind of white rice at all" that involves a lot of watching and fiddling with the heat. (which on a gas stove can be quite tricky!) Without getting too deep into it:

I think it might have been cooked properly at the bottom, but the top was almost entirely uncooked. So I started over using his microwave method, which was fine (slightly undercooked) but also got wet starch all over the inside of my microwave. Do not recommend.
tl;dr: If I can't find the power cord for that instant pot, I will probably be buying a rice cooker.
Ok, but how was the chicken?
My one mod in prepping is my standard: I hate the texture of onion, cooked or raw, and at some point I discovered that grating an onion gets the umami of it without the texture. So I did that.
Dumped everything in the instant pot (two chicken breasts, btw), stirred it around a bit, and then set it for ...
Possibly 8 minutes, because I was distracted by all the rice shenanigans, and was just glancing at the card when I set the timer, and uh, may have read the number next to "crock pot" instead of the number next to "instant".
In any case, I did that, set it for 5 minutes before releasing (because that matched the time the microwaved rice needed to sit), and shredded, then let that sit for a little bit while I did a few other things in the kitchen.
[none of the photos I took are particularly good or interesting, tbh]
Final thoughts
It was: fine. I think I just don't really like chicken breast very much; the whole thing definitely needed a fat of some kind to be properly satisfying. But also, it's hard to go wrong with soy sauce and sugar and garlic and onion. I will say that I think cooking the onion raw in liquid made the house smell weird.
It was a decent dinner, made just enough to have leftovers for lunch today. Mostly I wish I'd had some snow peas or something, tho.
I will probably make it again with the following modifications: chicken thighs instead of breast, and either onion powder or saute the onion first for a little better onion flavor (slash less-weird house smell).
If I were being ✨ fancy ✨, I'd reduce the sauce a bit, maybe with a little cornstarch, and I can see where this is probably a big difference between crock pot (which I don't own) and instant pot.
All of that contingent on actually being able to make good rice, though.
#food as play#I also had a weird intense emotion reaction to it maybe not turning out related to some personal trauma history#which was helpful (!) in uncovering more thoughts about why getting back to cooking is hard#so already I've learned something!
12 notes
·
View notes
Text
Ok. I know you motherfuckers are going to have some options here, so I decided to share with you one of my favourite recipes: shit noodles (also known as scrap noodles, white noodles, or chow mein)
One thing that's important to note is that I generally try to use as few utensils for this as possible, so if you like the idea then all you're allowed to use is a pot, a pan, a pot lid to drain, and some chopsticks or a fork. Use the same utensils you used to cook with to eat with
So, it's basically just fried noodles and some filler, so let's start with the filler. I'm using scallions, garlic, and whatever scraps of meat I could find, but you coukd use spinach, bok choy, mushrooms, peppers, or whatever else you feel like. I generally wouldn't use cured meat but if you want to experiment, feel free


I chop all of that as fine as I can (this is personal preference because of sensory shit. Do whatever you feel like) and then start boiling the noodles. You could boil the noodles while you do this, but I've found it's better to have this ready because it takes a while to chop
Also, if you chose chopsticks earlier you can place them across your pan and they'll stop it from boiling over assuming they're wood
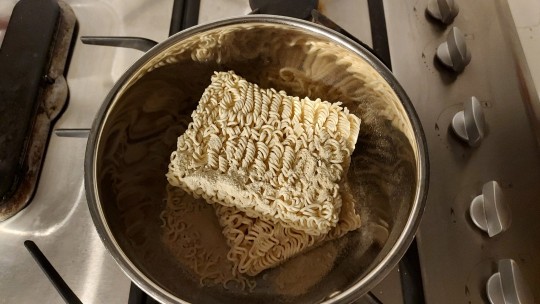
They need boiling because they're freeze-dried but if you use higher quality noodles they'll be all noodly already and not hard and crunchy, so this isn't necessary. Of course, at that point you risk losing the vibe of this being a quick, cheap college meal and becoming actual dinner
I generally use two blocks of instant noodles for this and eat it all, but this time I used three and saved some for later. Actually, after my first bowl I tried to go back for the rest thinking I was hungrier than I was and saved what I couldn't eat for today
Anyway. Boil those until they're softer, but still good and wavy. If they get too soft in the pot then they'll get even softer in the pan and might not be the texture you're looking for. Experiment with what works best for you
Also, I use the flavour packet. It's not the only flavouring I use as you'll see, but I find that it doesn't hurt
Next, drain the noodles and throw all the other ingredients in a wok, skillet or frying pan with either sesame oil or butter. If you do use oil, only use a little bit. You'll be using butter later. I also put the veg in before the meat since that's already been cooked, but you do you. I also put in some salt, a lot of pepper, and a little ginger powder since I didn't have fresh ginger

Fry all of that to your heart's content, and then dump in your noodles. Try and probably fail to combine the finicky little bits with the giant mass that you just covered them with, and throw in as much soy sauce as you're comfortable with, and a metric fucktonne (that's a little bit for imperial users. A smidgen. A nip) of butter. If you missed the salt and pepper before you could do it here but it feels wrong. Stir fry and toss in your wok to feel cool until everything is combined and the noodles dry out a little bit, and then serve

This makes enough for it to be a one a day kind of meal, so I generally make it at 2am when I haven't had breakfast yet. Today I was feeling fancy though, so I poured a small glass of my friend's insane pear mead that I'll never publicly admit is better than mine, and sat down to unwind.

Enjoy, my friends. And enjoy telling me how wrong my cooking is. I've seen some real crimes and know that god has bigger worries than my survival

3 notes
·
View notes
Note
Can you share the recipe you used for the chocolate cinnamon haupia 🥺🙏
hell yeah!! i kinda bullshitted the pudding recipe based off of a few other recipes + past experience, so here ya go!!
(i had previously opened an 18oz can of coconut cream and these measurements are based on that leftover amount of coconut. it made about... 1.75cups of pudding. if you have a full 18oz can, i'd say roughly double these amounts)
10oz coconut cream (regular coconut milk works just fine, but the cream is definitely nicer)
3/8 cup cocoa powder (better cocoa = better pudd)
1tbsp vanilla extract
1/2tsp salt
3/8 cup brown sugar (regular sugar is ok, i just always use brown sugar for everything)
1tbsp arrowroot powder (probably needed a bit more. or equivalent amount of cornstarch)
1.5tbsp (i think) cinnamon (i was a little overzealous with the cinnamon) (also if you have it maybe also include a pinch of nutmeg+allspice+clove here for a more well rounded spice)
dump the coconut cream into a small heavy-bottom saucepan. i used my little ramen pot—anything that will have even and consistent contact with the burner. heat on medium (4/10 heat). whisk a bit to even out the consistency, since the cream will probably be a bit separated.
add the cocoa powder. first 1/4 cup, then whisk until fully dispersed. it didn't look dark enough so i added another half a 1/4 cup. keep adding cocoa til it looks chocolatey!
add salt, 1/4 cup sugar, and a moderate pour of vanilla. whisk. keep gently whisking. taste it. is it sweet enough? if not add another 1/8 cup of sugar (or just another brown sugar clump lol)
keeeeeep whisking. add in your thickener (arrowroot/corn starch) and cinnamon. whisk more.
by now if your stove is decent, you'll be starting to boil a bit. keep whisking. never stop (gently!) whisking. lightly scrape the bottom of the pot with the whisk. a little down there will stick/burn, but that's okay. it cleans out after a soapy hot water soak well enough.
whisk for 2-5 minutes at that low boil. you might need to lower the heat a notch here, but don't let it get so cold it stops wanting to bubble the instant you stop stirring. corn starch will thicken faster than arrowroot during this phase.
kill the heat and pour into a bowl. scrape out every last drop with a spatula. lick the spatula. revel in your creation. seal bowl with lid/plastic wrap and refrigerate for a few hours until cold. placing the bowl in the fridge on top of/surrounded by ice packs will expedite this process (while also not disturbing your fridge's standing temp too much)
enjoy!!!
#i always always forget how easy making pudding is#it's just a lot of stirring#i tried to write this really detailed bc i dunno your cooking skills but also i feel like most recipies are extremely vague#and there's so much more to cooking than just dumping shit in a pot on high heat lol#and i wanna be the change i wanna see in the world of highly-explanatory recipe directions#and also writing recipes is really fun#recipes#replies#if you make it let me know!!!!#this is making me wanna share some of my otner recipes. should i become a foodie blog? XD
2 notes
·
View notes
Text
Low-spoon cooking
Today, I am going to share my favorite low-spoon recipes. Why? Because this is my blog, I want to, and I have more bots than humans following me at this point, so. Why not.
1. Pasta salad. This is a make-ahead recipe, which is normally hard for me, but it’s very simple.
You will need:
2 boxes of tricolor rotini. Or bowties, if you prefer.
A normal-sized bottle of Italian dressing (or half a big one)
2 cans of tuna (the good kind, unless you want bloating.)
1 small can of sliced black olives (or half a big one)
1 package of frozen mixed vegetables
Step 1 - cook the pasta.
Step 2 - dump the rest of the ingredients in the pot (drain the tuna and olives first) Quick note from Jasper - tuna juice is delicious and your kitty definitely deserves some. If you don’t have a kitty, he’ll be happy to drink it for you.
Step 3 - refrigerate until chilled.
Has carbs, protein, and veggies, tastes like fresh food even though all the ingredients keep forever, and is meant to be eaten without heating it up first. Make a ton all at once and just get some whenever you get hungry. You can even make this in a dorm (scaled down, of course) if you can find a way to cook the pasta.
2. Instant rice with black beans and salsa.
Do I even have to explain this one? Cook instant rice. Add black beans (drained) from can. Add salsa. (Or rotel, or just plain tomatoes.) If you have sour cream or cheese, you can add those, too. It’s not *good*, but it’s also not *bad*, and you can make it in about six minutes from cheap, shelf-stable ingredients. This one can *definitely* be made in a dorm/hotel, as long you have access to a microwave or electric kettle.
1 note
·
View note
Text
So, I've been dipping my toes into slow cooker/Instant Pot cooking and fashion.
These aren't new topics, really. With regards to personal style, I remember being quite sensitive to what I wore in the summer leading up to my freshman year and gaining a newfound appreciation for UNIQLO and all of the mall outlets. As for cooking, I often wondered for the February of last year when my parents and grandma were overseas how I would cook for myself once I went off to a 4-year university and had to become more independent.
The main difference between then and now is their level of abstraction and relevance. Nowadays, as I'm being more and more independent, topics like cooking and personal style are much more tangible. What do I want to wear? What do I want to eat? Is it really feasible for me to buy lunch at my current 2-year college's dining services two times a week regularly? If I don't care about these things now, I might have a harder time caring about them later.
Of course, all of my research into these two have been from the safety of my computer and the internet. It is only truthful to say that I really don't have much personal experience with either. But, I'm beginning to detect some patterns in each topic. Slow cooker and pressure recipes seem to work well with dump and go styles; browning and sauteeing ingredients before stewing; aligning ingredients by how fast they cook or how well they stand up to increase cook time. For fashion, I seem to prefer color theory (color-blocking; treating neutrals like whitespace/rest space; clothing proportions; layers and textures.
To the risk of sounding robotic, I find these topics valuable targets for the meta-skillset (see: [[combinational creativity]]) that personal knowledge management has also sensitized me to! I can't wait to make my own recipes from fusions of styles and cultures, or to tailor my own clothing and play with dimensions. I think I've explored my head enough -- I want to ground myself better.
0 notes
Text
Basic Chili
this recipe uses dried beans and takes about 3-4 hours from start to finish, but most of that time is cooking time that requires no monitoring other than checking a timer if you feel like it. it makes 6-8 hearty servings, so it's perfect to make ahead and freeze or half a week's leftovers for two.
ingredients:
1 Cup dry red beans
1 Cup dry black beans
4-5 cups water
2 14oz cans crushed or diced tomatoes
1/2 lb bacon or breakfast sausage* (you can easily use a full pound if you like, I just like to stretch my bacon a little farther)
1-2 onions diced (or 1/3-1/2 Cup dried onion flakes)
1/4 cup blackstrap molasses
2-3 Tablespoons minced garlic**
1-2 Tablespoon salt
1 Tablespoon ground black pepper
1 Tablespoon cumin
1-3 teaspoons cinnamon
1-2 Tablespoons red chili powder or flakes of choice
* if you prefer to use a different type of protein or forego meat altogether, be sure to add an appropriate amount of fat of your choice (1-2 Tablespoons of butter or vegetable oil should work)
** dry, canned, or fresh minced garlic will all suffice, or substitute 1-2 Tablespoons of garlic powder
instructions:
rinse the beans and remove any rocks or gross-looking beans
place the beans in the instant pot and cover with 4-5 cups fresh water
seal the lid closed on the instant pot and make sure the vent indicator is pointed to "sealing". press the "beans/chili" button and increase the cooking time to 45 minutes.
use the time the beans are cooking to gather and prepare the rest of the ingredients. measure molasses and spices, cut and/or brown meats, dice onions, and get out cans of tomatoes. set everything next to the instant pot for convenience, then go do something else for an hour or so.
after the instant pot preheats and 45 minutes of cooking have passed, the instant pot should automatically switch to "keep warm" mode and will display the number of minutes that have passed since the cooking cycle ended. give it at least 30 minutes to naturally release pressure (this gives the beans a little extra cooking time and makes them softer. beans will not increase in softness after you add tomatoes because of a weird interaction between beans and acid)
carefully move the vent indicator to the "venting" position to release any residual pressure, then remove the lid and check the beans for doneness (if not soft enough, replace lid and cook on the bean setting for another 15 minutes). dump all the rest of the ingredients into the instant pot on top of the beans and stir with a large spoon to mix everything together.
replace the lid on the instant pot, turn the vent indicator back to "sealing", and select the "meat/stew" option. (you may need to press "cancel" before you can choose another cooking option) set the time to 45 minutes, then go do something else for another 90 minutes or until the post-cooking counter indicates 30 minutes again.
vent residual pressure and open the lid, add more salt to taste if needed, and serve
notes:
if you are using raw meat in your chili I recommend browning it in a pan before adding to chili to make absolute certain it is thoroughly cooked and safe for consumption, or increase the cooking time to up to 60 minutes after adding the rest of the ingredients. if you're using any kind of precooked sausages, this step won't be necessary
omitting any of the spices in this recipe that you don't have or don't like should be fine, but if it tastes like it's lacking something you may need to experiment on your own until you find a mix you like
you can save spoons by making a chili spice mix for yourself ahead of time in medium to large quantities and then using about 1/3 cup per batch
some additional spices you may add to taste to make things more interesting:
lemon pepper, fennel seed, rosemary, or sage in teaspoon-range quantities
coffee, cocoa powder, or ground coriander seed in tablespoon-range quantities
#flavor rating medium#flavor rating strong#low spoons recipe#cleanup rating some extra dishes#test status tested
1 note
·
View note
Text

Clam Chowder For Beginners
Every year for Christmas my family does clam chowder. This is a simple recipe for people who are just learning how to cook or if you're just feeling kinda lazy. If you don't like clams you can leave them out and you still have a pretty good potato soup. There's gonna be a lot of leftovers so make a big party or expect this to be your only meal for a week.
Ingredients:
Bacon: At least 1lb but I used 2 1/2lbs
3 Onions
A bunch of celery
6 russet potatoes
Instant mashed potatoes
1/2 gallon half & half
Clam juice: I used 4 bottles
Canned clams: I used 8 cans
Salt & Pepper to taste
Pop the bacon in the freezer for like an hour before you are going to chop it. It cuts so much easier if it's nice and firm but not frozen solid.
Chop up your vegetables and set them aside. I keep the celery and onion together in one bowl and the potato chunks in another.
Chop your bacon into bite sized pieces. Cross contamination is bad so that's why we chop the veggies first so they don't come in contact with raw pork.
Using a really big soup pot (like 2 gallons) dump your bacon in and fry it up. If you want less fat feel free to drain off the grease or leave it in for flavor.
When the bacon is cooked dump in your celery and onion. Cook for 5 minutes.
Add the half & half, the bottles of clam juice, and drain the juice from the cans of clams into the pot but keep the clams themselves separate for now. Bring the mixture to a boil then add your potatoes and reduce the heat to low. Stir occasionally and let it go for about 10 minutes until the potato chunks are nice and tender.
Now it's time to finish the soup. Add the clams in then mix the insta-mash in to thicken it. Most recipes call for a roux of fat and flour or using a slurry with liquid and corn starch but I never know just how much liquid I'm going to have so I like the potatoes. Just dump some in, mix it for a while, then let it sit for a few minutes. Be patient with this stuff. It takes a while for the potato flakes to fully hydrate so give it a few minutes before you add more in. For this particular batch 3 envelopes of Hungry Jack instant potatoes got it to the thickness I wanted.
And that's it. Your knife work takes most of the effort for this recipe and that's not very bad.
0 notes
Text

Get Recipe: Instant Pot Spaghetti
Love this Easy BusyBee Spaghetti in Flavorful Meat Sauce (with dump-and-go option). Minimal ingredients & prep, on the table in 30 mins. Delish~ 😋👍
#instant pot#recipes#recipe#food#comfort food#foodgasm#one pot meal#easy recipes#food blog#easycooking
14 notes
·
View notes
Text
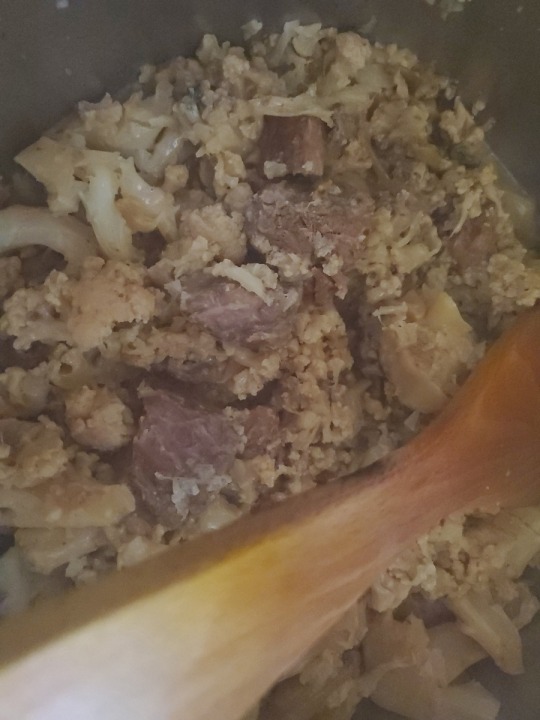
Instant Pot Meat And Veg Slow Cooked Dump And Go
Instant Pot Meat And Veg Slow Cooked Dump And Go
Cooking, recipes, how to
benazir's blog
Hi lovely people at times I just want a no fuss meal and it happens when I am undecided then I get an idea like this. I know I have done posts similar but this one will be amazing when it is finished.
This is so funny this is the first ever post I have done without using a notepad on my phone or ipad. This recipe is so simple there wasn’t really a need.…
View On WordPress
0 notes
Text
Recipes! Dump and Go - Instant Pot Breakfast
Recipes! Dump and Go – Instant Pot Breakfast
Recipes Dump And Go Instant Pot Breakfast
Recipes! Dump and Go – Instant Pot Breakfast
I’m a HUGE fan of the dump and go Instant Pot recipes! These are my 3 Dump and Go Breakfast recipes and I just have to tell you, they are delicious! The easiest one I’ve made so far is the Oatmeal! Be sure to stay till the end so you can see my Easy Oatmeal perfect for beginners! My recipes are: Instant Pot…

View On WordPress
#breakfast instant pot#breakfast instant pot recipes#dump and go instant pot recipes#easy instant pot recipes#easy instant pot recipes for beginners#easy instant pot recipes youtube#instant pot breakfast recipes#recipe#SixSistersStuff
5 notes
·
View notes
Last Seen Blogs

chrisspider69
Untitled

quinnquinnjoe
Sem título

transalphabf
Trans Alpha BF


toucanplaymusic
Untitled