#eleventy tutorial
Explore tagged Tumblr posts
Visit Tumblr Blog
Explore Tumblr blogs with no restrictions, modern design and the best experience.
Last Seen Tumblr Blogs


Fun Fact
Tumblr posted its first advertisements in May 2012 and subsequently earned $13M in revenue.
Text
here's a list of all the intermediate coding tutorials i've written so far!
git / github tutorial
npm (and node.js) tutorial (+ how to use the command line) (this one's a prerequisite for the following 2 tutorials)
webpack tutorial (a module builder for JavaScript and (S)CSS)
11ty (eleventy) tutorial (a super easy static site generator!)
if you have ideas/requests, feel free to contact me!
more beginner coding tutorials are coming VERY soon! meanwhile, check out my common questions and common mistakes pages!
#web development#coding#coding tutorials#neocities#git tutorial#npm tutorial#webpack tutorial#eleventy tutorial#static site generator#coding tutorial#git#github#npm#webpack#eleventy#11ty
20 notes
·
View notes
Text
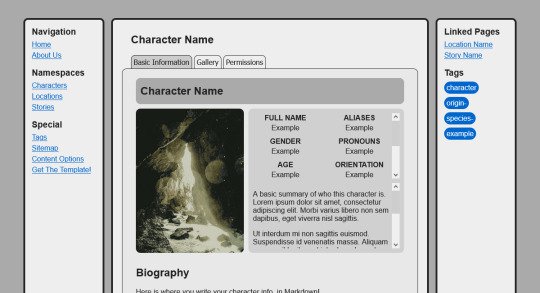
portfiend's oc directory template
three weeks ago i began work on a little Eleventy-based website template for storing character information akin to Toyhou.se. it's been in a releasable state for about a week, but i've also been pushing updates to it near daily!
i also wrote up a quick tutorial for setting up the project on its download page, but i plan to improve it in the future.
click here to preview this template: NeoCities click here to get the code: GitHub
features:
built-in "namespaces" for characters, locations, and stories, with their own page templates and information card formats
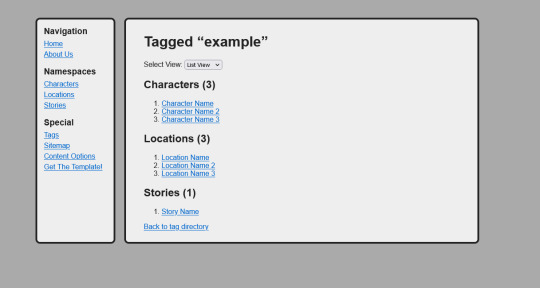
uses eleventy's tagging system to allow you to tag pages for fine categorization
a big focus on linking to other pages. each "creative" page lets you navigate between the previous/next item in the category. pages have a "linked pages" list that allow you to navigate to related pages, including "what links here"
a content filtering system allowing developers to hide/blur certain content from people who have not opted into it. optionally supports needing to click an "i am 18+" box before entering the site
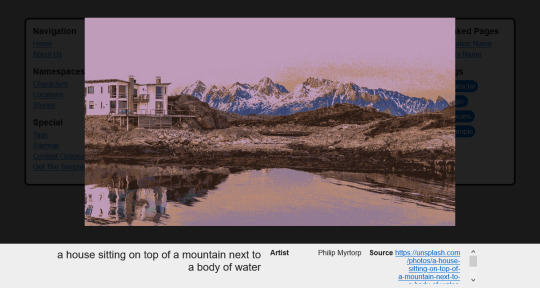
lightbox images; clickable image links that can reveal metadata such as captions and artist credits
tabbed views allow you to view specific sections of content at a time, used in the various creative pages
SASS wrapper for optional better-formatted stylesheets. don't know how to use SASS syntax? SASS also supports regular CSS!
this project is licensed under MIT License.
#neocities#neocities template#website template#web resources#webdev#indie web#indieweb#character directory#original character#worldbuilding#worldbuilding resources
502 notes
·
View notes
Note
Hi!! I wanted to say that I loved reading about your journey of creating a personal website. I'm still unsure between Vercel and Netlify. I have a small question to ask. See, one of the reasons I want to make a website is to archive drawings and journal/sketchbook. Would you have any tips for creating an area on my website just for the diary/journal, which has tags, files for each entry, etc.?
Bello!

Really happy to hear about your interest in websites! I want everyone to make their own site so I don't have to log into social media and get instant tummyaches ♥
Vercel vs Netlify: I think I settled on Vercel for absolutely no reason whatsoever. I just made a site on Netlify, then tested on Vercel, and now I have like 5 websites on Vercel so I just kept using it LOL. I'm sure a more tech-savvy person would know the difference - I think they have certain integrations with specific programs.
Creating a diary or journal with tags:
There's a couple of different ways you can do that, with different levels of work needed.
you got me yapping again:
This sadgrl tutorial might be outdated and may or may not work, but explains the process better than I can.
Easiest: make a journal on Dreamwidth, or another blogging site (wordpress??) that allows easy tags and RSS feed, and embed that RSS feed onto your site.
This requires almost no HTML set-up, and the easiest to organize tags, but you don't truly have the data on your own site since it's just embedded.
When I snuck into a web design class at college, this was one of the methods that the professor used for a blog within a portfolio site LOL.
Shit like wordpress is what a LOT of ~professional~ sites do for their blog section. They code it separately from the main site haha. It's the most popular thing, but not necessarily the best. And wait til you read on what the CEO of wordpress has been having meltdowns about... he owns tumblr too!
It's made with a tutorial for Neocities if that's what you use.
Medium: Set up zonelets.
It will require some HTML and JS editing, but will help automate making headers/footers for each page of a blog.
I've never used it myself, but I see other people speak highly of it.
HARD FOR ME CUZ I'M A GORILLA: I believe a lot of professional web devs will slap your face with their coding cock until you use a static site generator (SSG) to make your site.
You will need some coding knowledge to set up the tagging system since it doesn't come with it enabled by default. But it's made explicitly to be an alternative to big Static Site Generators which are...
It requires some more intimidating knowledge, because it's a lot of scripts that turn files that are not HTML/CSS/JS into plain HTML.
Also you have to use the command line, and that doesn't come with buttons that tell you what you can do. You have to copy/paste all that shit or memorize the code to 'dev build astro' and it all looks silly.
I've used Eleventy, and now am using Astro. Other people use Hugo or Jekyll or some other stuff with crazy names like Glup Shitto. I hate all these sites cuz none of the words mean anything to me. This is a common theme for me and tech. I don't know what NODES or CONTENT or ISLANDS are!!!
I had the most success attempting to learn how to use a SSG by downloading a template and altering it with github + VScodium. Here's the template page for Astro. You click on a theme you like, and it takes you to its github page. (If you don't want to use evil Microsoft stuff sorry. Skip this entire section.) Follow the instructions on the page for "forking" the glup shitto. When it tells you to run commands, I run those commands through the terminal window in VScodium. These tutorials never tell you what these commands do cuz they assume you already know. Usually those commands automatically install the files you need onto your computer, and create the final files.
You can see my wip here for a "tag system" that SHOULD show members of a web listing haha but I don't know what I'm doing and I have a reading disorder AND don't know cumputer good.
THEORETICALLY this will be the simplest and easiest way to maintain tags and files, because after you set it up you just have to write the "content" of the blog page. And you don't have to set up the header/footer ever again. I see the vision, and potential, but I am not there yet when it takes me 5 hours a day to figure out what any of the words in the documentation mean and I don't want to ask an actual tech person cuz they will be like 'obviously just press the Blip on the Repository and then Suck My Ass in the command line".
(side note I haven't updated fujofans in like a year cuz I'm struggling with this part to make updating easier).
Con: the final HTML/CSS code is really ugly if it's "minified", and a lot of themes use """"""professional"""""" CSS libraries like Bootstrap and Tailwind that I honestly think are ugly cuz that's what every fuckin' tech website uses to style their pages and make them look Professional and Minimalist with stupid code like style="500-w dark-gray-balls D-cup-bra" on every single element. Even Toyhouse uses Bootstrap. Eugh!
But maybe you're smarter than me and can wrangle these things better!
That was really long. Woops. I hope you can slug through this wall of text and find something helpful. Feel free to email me if you have any more specific questions. I may or may not be helpful.
If someone else sees this and has better suggestions for making BLOGS, please chime in. I'm begging you.
64 notes
·
View notes
Text
me: i have eleventy billion things to do. do not add more things to the list.
my brain: could we... could we use a bookbinding tutorial to make new dvd cases for our dvds so they look like cute book collections?
7 notes
·
View notes
Text
Links page update!
Added:

Custat's the biggest .hack fan you'll ever see. Their site and art reflects their love for the early 2000's!
StarSubculture: A directory of personal sites for artists, musicians, and other creative types.
Complete beginner's guide to installing Mastodon (+ Hometown) : Ostensibly says that a complete beginner can follow it to make their own instance, but it requires you to use linux/command line which is gonna kill 90% of beginners.
broider: "This a tool for making "9-patch" borders. You can copy the css to use with your own sites!"
Strawberry Starter: A simple and cute 11ty/eleventy template, geared for those using Neocities and looking to get into SSGs.
Clip.cafe: Clip.Cafe is a database for movie and TV show quotes. Search a dialogue line, find a video clip.
Short Skirt Defence: Hardy Boyz fanfiction site. An interesting snapshot of early 2000's wrestling fandom at the time, which included gratuitous RPF incest.
Wrestlefic: Archive of early 2000's wrestling fic. Includes cast of characters (wrestlers), fic terms, and HTML tutorials. Another great snapshot of fan feelings at the time.
Two Into One: Another wrestling fic archive.
The Cypress Club: Fic archive for a friend group's wrestling AU - full of snuff, violence, and other horrible things. IN KAYFABE!!!
I need to maybe make different pages for each type of link at this point... this is getting big!
4 notes
·
View notes
Text
for the love of god I fucking hate eleventy.. like please 11ty write better fucking documentation and tutorials on how to chain layouts!! like this feels like almost everything they've written is for doctors who have been at it for 10 years, not someone who literally only knows css and html and is trying to learn this shit for the first time.
so much tech shit is so inaccessible because they just expect people to know things so they don't ever make proper tutorials, and their documentation is the bare fucking minimum to be considered helpful. I fucking hate this shit.
0 notes
Text
also can we discuss how battinson is clearly tightlining his eye makeup?
#the batman 2022#did he watch beauty tutorials about that#or did he just stab himself in the eye eleventy thousand times circa 2008 trying to perfect his mall goth asthetic#and then the skillset became relevent once more when he became a vigilante?#these are the questions i have.#watch the battinson movie
15 notes
·
View notes
Text
Question for people who make objects?
Is there an easy way to add the "IsVisibleInWorldBuilder" flag(?) to an object? I would like to make lots of CC flowers and flowering shrubs and stuff that I have available in Edit Town so that I can flower-fy the world, not just the lots, for this fairy/plantsim world I want to play. I know how to edit the OBJD to do so, but some of the flowers/shrubs that I want to edit don't have that IsVisibleinWorldBuilder flag in the Common Block of the OBJD to begin with, so I can't do the Worldifying. Is there a way to add this line/flag/whatever without making an entirely new object by recloning, etc.? Because I don't know how to make new objects.
I've been googling about this, but since I don't know exactly how to word what I want to do, I'm not having much luck. And the object-making tutorials I've looked at go waaaaaay over my head...
EDIT: Oh, for pie's sake! Of course after I post this, I find something with instructions that includes this problem! Never fails. Well, for anyone else who might want to Worldify your shit, check out this thread on the NRaas forums. I'm off to edit about eleventy-billion plants now. See y'all in a few years...
15 notes
·
View notes
Note
What is some advice you can give to a new CC creator? I really love all of your work and you're one of my favorite creators I've found so far. Is there anything you wish you knew starting off that would have been really helpful?
Hi! Thank you so much for your sweet words 💚
There are lots of technical things I’ve learned along the way, but I’m still really quite green compared to a lot of others in that regard. Still, the studio.exportall and studio.importall cheats for Sims 4 Studio would have saved me *a lot* of time when I made my first eleventy billion wall sets. Spending time reading through the S4S tutorials and regularly reading the creator help section even when you don’t need help can teach you the odd thing here and there. And when you do need help, don’t be afraid to ask.
The main piece of advice I have, though, is to focus on making what you want to make, and not to worry about what you think others want you to make. Make things as often or as infrequently as you want, don’t stick to a schedule because you think it’s the right thing to do, or to increase visibility, or to chase numbers, or anything like that - you’ll burn out and it’ll stop being fun. If you want to post 1 thing a month then do that. If you want to post 3 things in a day, go right ahead.
This is especially true if you ever start a Patreon or anything like that. Even if you don’t do early access (which I don’t - I don’t want anyone to feel pressured into supporting me because they have no choice, if they like my stuff they will support me and that’s all that matters), the pressure is always there to think constantly about whether you’re driving people over there and keeping visibility. Try to remember why you started making cc to begin with: presumably because there were things you wanted in your own game that you couldn’t find, and because you wanted to be able to share that with others.
It’s fun to make things and see them come to life in your own game. It’s fun to see them come to life in other people’s games. And it’s incredibly rewarding to hear people say they enjoy what you make. Try to hold onto that joy and let that be the metric that guides you, rather than worrying about numbers or popularity or any of that other stuff. It’ll help you stay motivated, and stop you feeling like it’s a chore.
Ultimately, if people find your content fun or useful they’ll support you, and they’ll be happier to do so if they know you’re happy doing what you do. You can’t force that, and staying true to yourself (as cliché as that sounds) is the best thing you can do.
Good luck with your cc journey! You’ll probably get frustrated at times when things go wrong but that’s fine! Persevere and just keep doing what’s fun!
40 notes
·
View notes
Text
where are k4's videos, eleventy's videos, how about the CURRENT 1.15 wr???? how about videos from current speedrunners and the mcsr communities hello? why not put an all advancements run?
WHERE'S MATTHEW BOLAN? KARL JOBST?
WHY IS A DREAM MANHUNT THERE????? no shade but WHAT THE FUCK???? Dream hasn't even speedran in a fucking year man
skip the tutorial?????? what??????
YOUTUBE WHERE ARE YOU GOING??? WHAT ARE YOU DOING??? i hate to be this salty but like???? this isn't the mcsr i know
where the FUCK are my speedrunners in the 1 trillion Minecraft views majj
31 notes
·
View notes
Photo

An ultimate guide to grid design
Frontend
Focus
#464 — October 28, 2020 | Read on the web
Responsive Grid Design: An Ultimate Guide — A comprehensive and highly visual guide to using grid for layout (think column structure, gutters, side margin values, etc). The sort of thing that's handy for reference.
Nitish Khagwal
A Primer on the Different Types of Browser Storage — The browser has many options we can utilize to store data, this post from Ido Shamun runs through them.
CSS-Tricks
New Course: Introduction to Next.js, The Full-Stack React Framework — Next.js is a complete framework built on top of React.js. You'll learn server-side rendering, static site generation, data fetching, code API endpoints, creating pages with the file system, add CSS modules, and more.
Frontend Masters sponsor
Prevent Layout Shifts with CSS Grid Stacks — A detailed explanation with real examples of a CSS grid technique used to prevent layout shifts when a component state changes.
Hubert Sablonnière
Faster Web App Delivery with PRPL — PRPL is a pattern for structuring and serving web applications and Progressive Web Apps with an emphasis on improved app delivery and launch performance.
Addy Osmani
⚡️ Quick bits:
The draft of CSS Grid Level 3 is up, and includes Masonry layouts.
Mozilla is running a survey to better understand the needs of developers.
Starting next month, Microsoft will forcibly open over 1,000 websites in Edge instead of Internet Explorer.
Caniuse is partnering with BrowserStack to help you test features on real browsers/devices.
Here's a round up of the deprecations and removals in Chrome 87 to help you plan.
Why isn't loading="lazy" the default behavior for browsers? This discussion on dev.to is asking just that.
Using the Eleventy SSG? Here's a growing collection of Eleventy (11ty) projects, plugins, and resources.
Release notes for Safari Technology Preview 115.
💻 Jobs
JavaScript/TypeScript Architect + Developer Advocate, London UK — It’s time to build your masterpiece – can you design a platform and a framework used by the NHS, HMRC, Valve, and Microsoft?
CareersJS
Frontend Developer at X-Team (Remote) — Join the most energizing community for developers and work on projects for Riot Games, FOX, Sony, Coinbase, and more.
X-Team
Find Your Next Job Through Vettery — Create a profile on Vettery to connect with hiring managers at startups and Fortune 500 companies. It's free for job-seekers.
Vettery
🧑💻 Looking to share your job listing in Frontend Focus? There's more info here.
📙 Tutorials, Articles & Opinion
Creating CSS Shapes with Emoji — This is pretty neat. A mash-up of sorts, bringing together CSS Shapes with various 😎 emoji to create interesting text-wrapping effects.
Preethi Sam
Getting Started with Chrome's Origin Trials — Origin trials give you access to a new or experimental features before they are made available to everyone. Here’s how to register for them.
Sam Dutton
Comparing Tools for Quality Engineering for Web UIs — When tasked with automating his front-end tests, a developer set out to explore the options and shares an interesting comparison table here.
Vitali Malinouski
Anima 4.0: Go Straight From Design to React in the Design Handoff — Lets you cherry-pick elements straight from a design and get fully written React components that just work. Here's more about the Anima 4.0 release.
Geoff Graham
Web Performance: 11 Must-Read Tips to Give Your Site a Speed Boost
Shopify Partners sponsor
When Will Web Browsers Be Complete? — A short exploration into the ‘end game’ of web browsers. Lots of chatter on this over on HN too.
Lee LF94
How to Timeout a fetch() Request — How to use setTimeout(), the abort controller, and fetch() API to make requests with a configurable timeout.
Dmitri Pavlutin
How to Build A Progressively Enhanced Accordion Component with Vanilla JS
Chris Ferdinandi
🔧 Code, Tools and Resources

Radix Icons: A Crisp Set of 15×15 Icons in a Variety of Formats — Assets available for Figma, Sketch, IconJar, SVG, installable via npm, and as React components.
modulz
A Better Way to Work With Git? — Trying to remember all those Git commands? Still afraid of using Git’s advanced features? There’s a better way.
Tower sponsor
NSFW JS: TensorFlow-Powered Client Side Indecent Content Checking — Would it be helpful for you to detect.. ‘unseemly’ images on the client side? Enter NSFW JS. We first featured this over a year ago but it’s just had a significant performance-oriented update.
Infinite Red, Inc.
Butter Slider: A Simple Drag and Hold Slider with No Dependencies — You can set it up with data-* attributes in the HTML with a simple init() call, or do it from your script. Demo here.
Armand SALLE

Pure CSS Oil Painting — Another amazing project from Diana, all done with just HTML and CSS. This time the page is presented like a game character creation screen, in which you can customize elements - such as hair color. The detail on the necklace is particularly impressive.
Diana Smith
Rocket Validator: Automated Accessibility Scanner for Large Sites — Not free, but you can sign up for a trial. This tool will automatically scan your site, from a single starting URL, to find markup and accessibility errors and warnings.
rocket validator
Fingerprint JS 3.0: Modern and Flexible Browser Fingerprinting Library — With v3 it’s become completely modular and has been rewritten in TypeScript. Definitely one of those ‘please use this for good, not evil’ type projects though.
FingerprintJS
by via Frontend Focus https://ift.tt/3e5fIFA
0 notes
Text
How to Make a Simple CMS With Cloudflare, GitHub Actions and Metalsmith
Let’s build ourselves a CMS. But rather than build out a UI, we’re going to get that UI for free in the form of GitHub itself! We’ll be leveraging GitHub as the way to manage the content for our static site generator (it could be any static site generator). Here’s the gist of it: GitHub is going to be the place to manage, version control, and store files, and also be the place we’ll do our content editing. When edits occur, a series of automations will test, verify, and ultimately deploy our content to Cloudflare.
You can find the completed code for the project is available on GitHub. I power my own website, jonpauluritis.com, this exact way.
What does the full stack look like?
Here’s the tech stack we’ll be working with in this article:
Any Markdown Editor (Optional. e.g Typora.io)
A Static Site Generator (e.g. Metalsmith)
Github w/ Github Actions (CICD and Deployment)
Cloudflare Workers
Why should you care about about this setup? This setup is potentially the leanest, fastest, cheapest (~$5/month), and easiest way to manage a website (or Jamstack site). It’s awesome both from a technical side and from a user experience perspective. This setup is so awesome I literally went out and bought stock in Microsoft and Cloudflare.
But before we start…
I’m not going to walk you through setting up accounts on these services, I’m sure you can do that yourself. Here are the accounts you need to setup:
GitHub (Sign up for GitHub Actions.)
Cloudflare Workers Sites (This is the one that costs $5/month.)
I would also recommend Typora for an amazing Markdown writing experience, but Markdown editors are a very personal thing, so use which editor feels right for you.
Project structure
To give you a sense of where we’re headed, here’s the structure of the completed project:
├── build.js ├── .github/workflows │ ├── deploy.yml │ └── nodejs.js ├── layouts │ ├── about.hbs │ ├── article.hbs │ ├── index.hbs │ └── partials │ └── navigation.hbs ├── package-lock.json ├── package.json ├── public ├── src │ ├── about.md │ ├── articles │ │ ├── post1.md │ │ └── post2.md │ └── index.md ├── workers-site └── wrangler.toml
Step 1: Command line stuff
In a terminal, change directory to wherever you keep these sorts of projects and type this:
$ mkdir cms && cd cms && npm init -y
That will create a new directory, move into it, and initialize the use of npm.
The next thing we want to do is stand on the shoulders of giants. We’ll be using a number of npm packages that help us do things, the meat of which is using the static site generator Metalsmith:
$ npm install --save-dev metalsmith metalsmith-markdown metalsmith-layouts metalsmith-collections metalsmith-permalinks handlebars jstransformer-handlebars
Along with Metalsmith, there are a couple of other useful bits and bobs. Why Metalsmith? Let’s talk about that.
Step 2: Metalsmith
I’ve been trying out static site generators for 2-3 years now, and I still haven’t found “the one.” All of the big names — like Eleventy, Gatsby, Hugo, Jekyll, Hexo, and Vuepress — are totally badass but I can’t get past Metalsmith’s simplicity and extensibility.
As an example, this will code will actually build you a site:
// EXAMPLE... NOT WHAT WE ARE USING FOR THIS TUTORIAL Metalsmith(__dirname) .source('src') .destination('dest') .use(markdown()) .use(layouts()) .build((err) => if (err) throw err);
Pretty cool right?
For sake of brevity, type this into the terminal and we’ll scaffold out some structure and files to start with.
First, make the directories:
$ mkdir -p src/articles && mkdir -p layouts/partials
Then, create the build file:
$ touch build.js
Next, we’ll create some layout files:
$ touch layouts/index.hbs && touch layouts/about.hbs && touch layouts/article.hbs && touch layouts/partials/navigation.hbt
And, finally, we’ll set up our content resources:
$ touch src/index.md && touch src/about.md && touch src/articles/post1.md && touch src/articles/post1.md touch src/articles/post2.md
The project folder should look something like this:
├── build.js ├── layouts │ ├── about.hbs │ ├── article.hbs │ ├── index.hbs │ └── partials │ └── navigation.hbs ├── package-lock.json ├── package.json └── src ├── about.md ├── articles │ ├── post1.md │ └── post2.md └── index.md
Step 3: Let’s add some code
To save space (and time), you can use the commands below to create the content for our fictional website. Feel free to hop into “articles” and create your own blog posts. The key is that the posts need some meta data (also called “Front Matter”) to be able to generate properly. The files you would want to edit are index.md, post1.md and post2.md.
The meta data should look something like this:
--- title: 'Post1' layout: article.hbs --- ## Post content here....
Or, if you’re lazy like me, use these terminal commands to add mock content from GitHub Gists to your site:
$ curl https://gist.githubusercontent.com/jppope/35dd682f962e311241d2f502e3d8fa25/raw/ec9991fb2d5d2c2095ea9d9161f33290e7d9bb9e/index.md > src/index.md $ curl https://gist.githubusercontent.com/jppope/2f6b3a602a3654b334c4d8df047db846/raw/88d90cec62be6ad0b3ee113ad0e1179dfbbb132b/about.md > src/about.md $ curl https://gist.githubusercontent.com/jppope/98a31761a9e086604897e115548829c4/raw/6fc1a538e62c237f5de01a926865568926f545e1/post1.md > src/articles/post1.md $ curl https://gist.githubusercontent.com/jppope/b686802621853a94a8a7695eb2bc4c84/raw/9dc07085d56953a718aeca40a3f71319d14410e7/post2.md > src/articles/post2.md
Next, we’ll be creating our layouts and partial layouts (“partials”). We’re going to use Handlebars.js for our templating language in this tutorial, but you can use whatever templating language floats your boat. Metalsmith can work with pretty much all of them, and I don’t have any strong opinions about templating languages.
Build the index layout
<!DOCTYPE html> <html lang="en"> <head> <style> /* Keeping it simple for the tutorial */ body { font-family: 'Avenir', Helvetica, Arial, sans-serif; -webkit-font-smoothing: antialiased; -moz-osx-font-smoothing: grayscale; text-align: center; color: #2c3e50; margin-top: 60px; } .navigation { display: flex; justify-content: center; margin: 2rem 1rem; } .button { margin: 1rem; border: solid 1px #ccc; border-radius: 4px; padding: 0.5rem 1rem; text-decoration: none; } </style> </head> <body> <div> <a href=""><h3></h3></a> <p></p> </div> </body> </html>
A couple of notes:
Our “navigation” hasn’t been defined yet, but will ultimately replace the area where resides.
will iterate through the “collection” of articles that metalsmith will generate during its build process.
Metalsmith has lots of plugins you can use for things like stylesheets, tags, etc., but that’s not what this tutorial is about, so we’ll leave that for you to explore.
Build the About page
Add the following to your about.hbs page:
<!DOCTYPE html> <html lang="en"> <head> <style> /* Keeping it simple for the tutorial */ body { font-family: 'Avenir', Helvetica, Arial, sans-serif; -webkit-font-smoothing: antialiased; -moz-osx-font-smoothing: grayscale; text-align: center; color: #2c3e50; margin-top: 60px; } .navigation { display: flex; justify-content: center; margin: 2rem 1rem; } .button { margin: 1rem; border: solid 1px #ccc; border-radius: 4px; padding: 0.5rem 1rem; text-decoration: none; } </style> </head> <body> <div> } </div> </body> </html>
Build the Articles layout
<!DOCTYPE html> <html lang="en"> <head> <style> /* Keeping it simple for the tutorial */ body { font-family: 'Avenir', Helvetica, Arial, sans-serif; -webkit-font-smoothing: antialiased; -moz-osx-font-smoothing: grayscale; text-align: center; color: #2c3e50; margin-top: 60px; } .navigation { display: flex; justify-content: center; margin: 2rem 1rem; } .button { margin: 1rem; border: solid 1px #ccc; border-radius: 4px; padding: 0.5rem 1rem; text-decoration: none; } </style> </head> <body> <div> } </div> </body> </html>
You may have noticed that this is the exact same layout as the About page. It is. I just wanted to cover how to add additional pages so you’d know how to do that. If you want this one to be different, go for it.
Add navigation
Add the following to the layouts/partials/navigation.hbs file
<div class="navigation"> <div> <a class="button" href="/">Home</a> <a class="button" href="/about">About</a> </div> </div>
Sure there’s not much to it… but this really isn’t supposed to be a Metalsmith/SSG tutorial. ¯\_(ツ)_/¯
Step 4: The Build file
The heart and soul of Metalsmith is the build file. For sake of thoroughness, I’m going to go through it line-by-line.
We start by importing the dependencies
Quick note: Metalsmith was created in 2014, and the predominant module system at the time was common.js , so I’m going to stick with require statements as opposed to ES modules. It’s also worth noting that most of the other tutorials are using require statements as well, so skipping a build step with Babel will just make life a little less complex here.
// What we use to glue everything together const Metalsmith = require('metalsmith');
// compile from markdown (you can use targets as well) const markdown = require('metalsmith-markdown');
// compiles layouts const layouts = require('metalsmith-layouts');
// used to build collections of articles const collections = require('metalsmith-collections');
// permalinks to clean up routes const permalinks = require('metalsmith-permalinks');
// templating const handlebars = require('handlebars');
// register the navigation const fs = require('fs'); handlebars.registerPartial('navigation', fs.readFileSync(__dirname + '/layouts/partials/navigation.hbt').toString());
// NOTE: Uncomment if you want a server for development // const serve = require('metalsmith-serve'); // const watch = require('metalsmith-watch');
Next, we’ll be including Metalsmith and telling it where to find its compile targets:
// Metalsmith Metalsmith(__dirname) // where your markdown files are .source('src') // where you want the compliled files to be rendered .destination('public')
So far, so good. After we have the source and target set, we’re going to set up the markdown rendering, the layouts rendering, and let Metalsmith know to use “Collections.” These are a way to group files together. An easy example would be something like “blog posts” but it could really be anything, say recipes, whiskey reviews, or whatever. In the above example, we’re calling the collection “articles.”
// previous code would go here
// collections create groups of similar content .use(collections({ articles: { pattern: 'articles/*.md', }, })) // compile from markdown .use(markdown()) // nicer looking links .use(permalinks({ pattern: ':collection/:title' })) // build layouts using handlebars templates // also tell metalsmith where to find the raw input .use(layouts({ engine: 'handlebars', directory: './layouts', default: 'article.html', pattern: ["*/*/*html", "*/*html", "*html"], partials: { navigation: 'partials/navigation', } }))
// NOTE: Uncomment if you want a server for development // .use(serve({ // port: 8081, // verbose: true // })) // .use(watch({ // paths: { // "${source}/**/*": true, // "layouts/**/*": "**/*", // } // }))
Next, we’re adding the markdown plugin, so we can use markdown for content to compile to HTML.
From there, we’re using the layouts plugin to wrap our raw content in the layout we define in the layouts folder. You can read more about the nuts and bolts of this on the official plugin site but the result is that we can use } in a template and it will just work.
The last addition to our tiny little build script will be the build method:
// Everything else would be above this .build(function(err) { if (err) { console.error(err) } else { console.log('build completed!'); } });
Putting everything together, we should get a build script that looks like this:
const Metalsmith = require('metalsmith'); const markdown = require('metalsmith-markdown'); const layouts = require('metalsmith-layouts'); const collections = require('metalsmith-collections'); const permalinks = require('metalsmith-permalinks'); const handlebars = require('handlebars'); const fs = require('fs');
// Navigation handlebars.registerPartial('navigation', fs.readFileSync(__dirname + '/layouts/partials/navigation.hbt').toString());
Metalsmith(__dirname) .source('src') .destination('public') .use(collections({ articles: { pattern: 'articles/*.md', }, })) .use(markdown()) .use(permalinks({ pattern: ':collection/:title' })) .use(layouts({ engine: 'handlebars', directory: './layouts', default: 'article.html', pattern: ["*/*/*html", "*/*html", "*html"], partials: { navigation: 'partials/navigation', } })) .build(function (err) { if (err) { console.error(err) } else { console.log('build completed!'); } });
I’m a sucker for simple and clean and, in my humble opinion, it doesn’t get any simpler or cleaner than a Metalsmith build. We just need to make one quick update to the package.json file and we’ll be able to give this a run:
"name": "buffaloTraceRoute", "version": "1.0.0", "description": "", "main": "index.js", "scripts": { "build": "node build.js", "test": "echo \"No Tests Yet!\" " }, "keywords": [], "author": "Your Name", "license": "ISC", "devDependencies": { // these should be the current versions // also... comments aren't allowed in JSON } }
If you want to see your handy work, you can uncomment the parts of the build file that will let you serve your project and do things like run npm run build. Just make sure you remove this code before deploying.
Working with Cloudflare
Next, we’re going to work with Cloudflare to get access to their Cloudflare Workers. This is where the $5/month cost comes into play.
Now, you might be asking: “OK, but why Cloudflare? What about using something free like GutHub Pages or Netlify?” It’s a good question. There are lots of ways to deploy a static site, so why choose one method over another?
Well, Cloudflare has a few things going for it…
Speed and performance
One of the biggest reasons to switch to a static site generator is to improve your website performance. Using Cloudflare Workers Site can improve your performance even more.
Here’s a graph that shows Cloudflare compared to two competing alternatives:
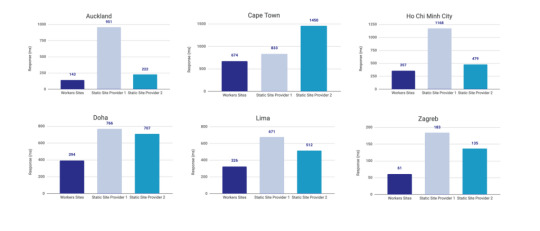
Courtesy of Cloudflare
The simple reason why Cloudflare is the fastest: a site is deployed to 190+ data centers around the world. This reduces latency since users will be served the assets from a location that’s physically closer to them.
Simplicity
Admittedly, the initial configuration of Cloudflare Workers may be a little tricky if you don’t know how to setup environmental variables. But after you setup the basic configurations for your computer, deploying to Cloudflare is as simple as wrangler publish from the site directory. This tutorial is focused on the CI/CD aspect of deploying to Cloudflare which is a little more involved, but it’s still incredibly simple compared to most other deployment processes.
(It’s worth mentioning GitHub Pages, Netlify are also killing it in this area. The developer experience of all three companies is amazing.)
More bang for the buck
While Github Pages and Netlify both have free tiers, your usage is (soft) limited to 100GB of bandwidth a month. Don’t get me wrong, that’s a super generous limit. But after that you’re out of luck. GitHub Pages doesn’t offer anything more than that and Netlify jumps up to $45/month, making Cloudflare’s $5/month price tag very reasonable.
Service Free Tier Bandwidth Paid Tier Price Paid Tier Requests / Bandwidth GitHub Pages 100GB N/A N/A Netlify 100GB $45 ~150K / 400 GB Cloudflare Workers Sites none $5 10MM / unlimited
Calculations assume a 3MB average website. Cloudflare has additional limits on CPU use. GitHub Pages should not be used for sites that have credit card transactions.
Sure, there’s no free tier for Cloudflare, but $5 for 10 million requests is a steal. I would also be remise if I didn’t mention that GitHub Pages has had a few outages over the last year. That’s totally fine in my book a demo site, but it would be bad news for a business.
Cloudflare offers a ton of additional features for that worth briefly mentioning: free SSL certificates, free (and easy) DNS routing, a custom Workers Sites domain name for your projects (which is great for staging), unlimited environments (e.g. staging), and registering a domain name at cost (as opposed to the markup pricing imposed by other registrars).
Deploying to Cloudflare
Cloudflare provides some great tutorials for how to use their Cloudflare Workers product. We’ll cover the highlights here.
First, make sure the Cloudflare CLI, Wrangler, is installed:
$ npm i @cloudflare/wrangler -g
Next, we’re going to add Cloudflare Sites to the project, like this:
wrangler init --site cms
Assuming I didn’t mess up and forget about a step, here’s what we should have in the terminal at this point:
⬇ Installing cargo-generate... 🔧 Creating project called `workers-site`... ✨ Done! New project created /Users/<User>/Code/cms/workers-site ✨ Succesfully scaffolded workers site ✨ Succesfully created a `wrangler.toml`
There should also be a generated folder in the project root called /workers-site as well as a config file called wrangler.toml — this is where the magic resides.
name = "cms" type = "webpack" account_id = "" workers_dev = true route = "" zone_id = ""
[site] bucket = "" entry-point = "workers-site"
You might have already guessed what comes next… we need to add some info to the config file! The first key/value pair we’re going to update is the bucket property.
bucket = "./public"
Next, we need to get the Account ID and Zone ID (i.e. the route for your domain name). You can find them in your Cloudflare account all the way at the bottom of the dashboard for your domain:
Stop! Before going any further, don’t forget to click the “Get your API token” button to grab the last config piece that we’ll need. Save it on a notepad or somewhere handy because we’ll need it for the next section.
Phew! Alright, the next task is to add the Account ID and Zone ID we just grabbed to the .toml file:
name = "buffalo-traceroute" type = "webpack" account_id = "d7313702f333457f84f3c648e9d652ff" # Fake... use your account_id workers_dev = true # route = "example.com/*" # zone_id = "805b078ca1294617aead2a1d2a1830b9" # Fake... use your zone_id
[site] bucket = "./public" entry-point = "workers-site" (Again, those IDs are fake.)
Again, those IDs are fake. You may be asked to set up credentials on your computer. If that’s the case, run wrangler config in the terminal.
GitHub Actions
The last piece of the puzzle is to configure GitHub to do automatic deployments for us. Having done previous forays into CI/CD setups, I was ready for the worst on this one but, amazingly, GitHub Actions is very simple for this sort of setup.
So how does this work?
First, let’s make sure that out GitHub account has GitHub Actions activated. It’s technically in beta right now, but I haven’t run into any issues with that so far.
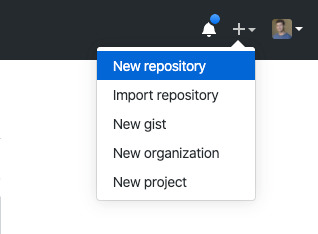
Next, we need to create a repository in GitHub and upload our code to it. Start by going to GitHub and creating a repository.
This tutorial isn’t meant to cover the finer points of Git and/or GitHub, but there’s a great introduction. Or, copy and paste the following commands while in the root directory of the project:
# run commands one after the other $ git init $ touch .gitignore && echo 'node_modules' > .gitignore $ git add . $ git commit -m 'first commit' $ git remote add origin https://github.com/{username}/{repo name} $ git push -u origin master
That should add the project to GitHub. I say that with a little hesitance but this is where everything tends to blow up for me. For example, put too many commands into the terminal and suddenly GitHub has an outage, or the terminal unable to location the path for Python. Tread carefully!
Assuming we’re past that part, our next task is to activate Github Actions and create a directory called .github/workflows in the root of the project directory. (GitHub can also do this automatically by adding the “node” workflow when activating actions. At the time of writing, adding a GitHub Actions Workflow is part of GitHub’s user interface.)
Once we have the directory in the project root, we can add the final two files. Each file is going to handle a different workflow:
A workflow to check that updates can be merged (i.e. the “CI” in CI/CD)
A workflow to deploy changes once they have been merged into master (i.e. the “CD” in CI/CD)
# integration.yml name: Integration
on: pull_request: branches: [ master ]
jobs: build: runs-on: ubuntu-latest strategy: matrix: node-version: [10.x, 12.x] steps: - uses: actions/checkout@v2 - name: Use Node.js $ uses: actions/setup-node@v1 with: node-version: $ - run: npm ci - run: npm run build --if-present - run: npm test env: CI: true
This is a straightforward workflow. So straightforward, in fact, that I copied it straight from the official GitHub Actions docs and barely modified it. Let’s go through what is actually happening in there:
on: Run this workflow only when a pull request is created for the master branch
jobs: Run the below steps for two-node environments (e.g. Node 10, and Node 12 — Node 12 is currently the recommended version). This will build, if a build script is defined. It will also run tests if a test script is defined.
The second file is our deployment script and is a little more involved.
# deploy.yml name: Deploy
on: push: branches: - master
jobs: deploy: runs-on: ubuntu-latest name: Deploy strategy: matrix: node-version: [10.x]
steps: - uses: actions/checkout@v2 - name: Use Node.js $ uses: actions/setup-node@v1 with: node-version: $ - run: npm install - uses: actions/checkout@master - name: Build site run: "npm run build" - name: Publish uses: cloudflare/[email protected] with: apiToken: $
Important! Remember that Cloudflare API token I mentioned way earlier? Now is the time to use it. Go to the project settings and add a secret. Name the secret CF_API_TOKEN and add the API token.
Let’s go through whats going on in this script:
on: Run the steps when code is merged into the master branch
steps: Use Nodejs to install all dependencies, use Nodejs to build the site, then use Cloudflare Wrangler to publish the site
Here’s a quick recap of what the project should look like before running a build (sans node_modules):
├── build.js ├── dist │ └── worker.js ├── layouts │ ├── about.hbs │ ├── article.hbs │ ├── index.hbs │ └── partials │ └── navigation.hbs ├── package-lock.json ├── package.json ├── public ├── src │ ├── about.md │ ├── articles │ │ ├── post1.md │ │ └── post2.md │ └── index.md ├── workers-site │ ├── index.js │ ├── package-lock.json │ ├── package.json │ └── worker │ └── script.js └── wrangler.toml
A GitHub-based CMS
Okay, so I made it this far… I was promised a CMS? Where is the database and my GUI that I log into and stuff?
Don’t worry, you are at the finish line! GitHub is your CMS now and here’s how it works:
Write a markdown file (with front matter).
Open up GitHub and go to the project repository.
Click into the “Articles” directory, and upload the new article. GitHub will ask whether a new branch should be created along with a pull request. The answer is yes.
After the integration is verified, the pull request can be merged, which triggers deployment.
Sit back, relax and wait 10 seconds… the content is being deployed to 164 data centers worldwide.
Congrats! You now have a minimal Git-based CMS that basically anyone can use.
Troubleshooting notes
Metalsmith layouts can sometimes be kinda tricky. Try adding this debug line before the build step to have it kick out something useful: DEBUG=metalsmith-layouts npm run build
Occasionally, Github actions needed me to add node_modules to the commit so it could deploy… this was strange to me (and not a recommended practice) but fixed the deployment.
Please let me know if you run into any trouble and we can add it to this list!
The post How to Make a Simple CMS With Cloudflare, GitHub Actions and Metalsmith appeared first on CSS-Tricks.
source https://css-tricks.com/how-to-make-a-simple-cms-with-cloudflare-github-actions-and-metalsmith/
from WordPress https://ift.tt/3bAGXVM via IFTTT
0 notes
Text
Create A Bookmarking Application With FaunaDB, Netlify And 11ty
Create A Bookmarking Application With FaunaDB, Netlify And 11ty
Bryan Robinson
2019-10-24T13:30:59+02:002019-10-24T13:03:40+00:00
The JAMstack (JavaScript, APIs and Markup) revolution is in full swing. Static sites are secure, fast, reliable and fun to work on. At the heart of the JAMstack are static site generators (SSGs) that store your data as flat files: Markdown, YAML, JSON, HTML, and so on. Sometimes, managing data this way can be overly complicated. Sometimes, we still need a database.
With that in mind, Netlify — a static site host and FaunaDB — a serverless cloud database — collaborated to make combining both systems easier.
Why A Bookmarking Site?
The JAMstack is great for many professional uses, but one of my favorite aspects of this set of technology is its low barrier to entry for personal tools and projects.
There are plenty of good products on the market for most applications I could come up with, but none would be exactly set up for me. None would give me full control over my content. None would come without a cost (monetary or informational).
With that in mind, we can create our own mini-services using JAMstack methods. In this case, we’ll be creating a site to store and publish any interesting articles I come across in my daily technology reading.
I spend a lot of time reading articles that have been shared on Twitter. When I like one, I hit the “heart” icon. Then, within a few days, it’s nearly impossible to find with the influx of new favorites. I want to build something as close to the ease of the “heart,” but that I own and control.
How are we going to do that? I’m glad you asked.
Interested in getting the code? You can grab it on Github or just deploy straight to Netlify from that repository! Take a look at the finished product here.
Our Technologies
Hosting And Serverless Functions: Netlify
For hosting and serverless functions, we’ll be utilizing Netlify. As an added bonus, with the new collaboration mentioned above, Netlify’s CLI — “Netlify Dev” — will automatically connect to FaunaDB and store our API keys as environment variables.
Database: FaunaDB
FaunaDB is a “serverless” NoSQL database. We’ll be using it to store our bookmarks data.
Static Site Generator: 11ty
I’m a big believer in HTML. Because of this, the tutorial won’t be using front-end JavaScript to render our bookmarks. Instead, we’ll utilize 11ty as a static site generator. 11ty has built-in data functionality that makes fetching data from an API as easy as writing a couple of short JavaScript functions.
iOS Shortcuts
We’ll need an easy way to post data to our database. In this case, we’ll use iOS’s Shortcuts app. This could be converted to an Android or desktop JavaScript bookmarklet, as well.
Setting Up FaunaDB Via Netlify Dev
Whether you have already signed up for FaunaDB or you need to create a new account, the easiest way to set up a link between FaunaDB and Netlify is via Netlify’s CLI: Netlify Dev. You can find full instructions from FaunaDB here or follow along below.
If you don’t already have this installed, you can run the following command in Terminal:
npm install netlify-cli -g
From within your project directory, run through the following commands:
netlify init // This will connect your project to a Netlify project netlify addons:create fauna // This will install the FaunaDB "addon" netlify addons:auth fauna // This command will run you through connecting your account or setting up an account
Once this is all connected, you can run netlify dev in your project. This will run any build scripts we set up, but also connect to the Netlify and FaunaDB services and grab any necessary environment variables. Handy!
Creating Our First Data
From here, we’ll log into FaunaDB and create our first data set.
We’ll start by creating a new Database called “bookmarks.” Inside a Database, we have Collections, Documents and Indexes.
A Collection is a categorized group of data. Each piece of data takes the form of a Document. A Document is a “single, changeable record within a FaunaDB database,” according to Fauna’s documentation. You can think of Collections as a traditional database table and a Document as a row.
For our application, we need one Collection, which we’ll call “links.” Each document within the “links” Collection will be a simple JSON object with three properties. To start, we’ll add a new Document that we’ll use to build our first data fetch.
{ "url": "https://css-irl.info/debugging-css-grid-part-2-what-the-fraction/", "pageTitle": "CSS { In Real Life } | Debugging CSS Grid – Part 2: What the Fr(action)?", "description": "CSS In Real Life is a blog covering CSS topics and useful snippets on the web’s most beautiful language. Published by Michelle Barker, front end developer at Ordoo and CSS superfan." }
This creates the basis for the information we’ll need to pull from our bookmarks as well as provides us with our first set of data to pull into our template.
If you’re like me, you want to see the fruits of your labor right away. Let’s get something on the page!
Installing 11ty And Pulling Data Into A Template
Since we want the bookmarks to be rendered in HTML and not fetched by the browser, we’ll need something to do the rendering. There are many great ways of doing it, but for ease and power, I love using the 11ty static site generator.
Since 11ty is a JavaScript static site generator, we can install it via NPM.
npm install --save @11ty/eleventy
From that installation, we can run eleventy or eleventy --serve in our project to get up and running.
Netlify Dev will often detect 11ty as a requirement and run the command for us. To have this work - and make sure we’re ready to deploy, we can also create “serve” and “build” commands in our package.json.
"scripts": { "build": "npx eleventy", "serve": "npx eleventy --serve" }
11ty’s Data Files
Most static site generators have an idea of a “data file” built-in. Usually, these files will be JSON or YAML files that allow you to add extra information to your site.
In 11ty, you can use JSON data files or JavaScript data files. By utilizing a JavaScript file, we can actually make our API calls and return the data directly into a template.
The file will be a JavaScript module. So in order to have anything work, we need to export either our data or a function. In our case, we’ll export a function.
module.exports = async function() { const data = mapBookmarks(await getBookmarks()); return data.reverse() }
Let’s break that down. We have two functions doing our main work here: mapBookmarks() and getBookmarks().
The getBookmarks() function will go fetch our data from our FaunaDB database and mapBookmarks() will take an array of bookmarks and restructure it to work better for our template.
Let’s dig deeper into getBookmarks().
getBookmarks()
First, we’ll need to install and initialize an instance of the FaunaDB JavaScript driver.
npm install --save faunadb
Now that we’ve installed it, let’s add it to the top of our data file. This code is straight from Fauna’s docs.
// Requires the Fauna module and sets up the query module, which we can use to create custom queries. const faunadb = require('faunadb'), q = faunadb.query; // Once required, we need a new instance with our secret var adminClient = new faunadb.Client({ secret: process.env.FAUNADB_SERVER_SECRET });
After that, we can create our function. We’ll start by building our first query using built-in methods on the driver. This first bit of code will return the database references we can use to get full data for all of our bookmarked links. We use the Paginate method, as a helper to manage cursor state should we decide to paginate the data before handing it to 11ty. In our case, we’ll just return all the references.
In this example, I’m assuming you installed and connected FaunaDB via the Netlify Dev CLI. Using this process, you get local environment variables of the FaunaDB secrets. If you didn’t install it this way or aren’t running netlify dev in your project, you’ll need a package like dotenv to create the environment variables. You’ll also need to add your environment variables to your Netlify site configuration to make deploys work later.
adminClient.query(q.Paginate( q.Match( // Match the reference below q.Ref("indexes/all_links") // Reference to match, in this case, our all_links index ) )) .then( response => { ... })
This code will return an array of all of our links in reference form. We can now build a query list to send to our database.
adminClient.query(...) .then((response) => { const linkRefs = response.data; // Get just the references for the links from the response const getAllLinksDataQuery = linkRefs.map((ref) => { return q.Get(ref) // Return a Get query based on the reference passed in }) return adminClient.query(getAllLinksDataQuery).then(ret => { return ret // Return an array of all the links with full data }) }).catch(...)
From here, we just need to clean up the data returned. That’s where mapBookmarks() comes in!
mapBookmarks()
In this function, we deal with two aspects of the data.
First, we get a free dateTime in FaunaDB. For any data created, there’s a timestamp (ts) property. It’s not formatted in a way that makes Liquid’s default date filter happy, so let’s fix that.
function mapBookmarks(data) { return data.map(bookmark => { const dateTime = new Date(bookmark.ts / 1000); ... }) }
With that out of the way, we can build a new object for our data. In this case, it will have a time property, and we’ll use the Spread operator to destructure our data object to make them all live at one level.
function mapBookmarks(data) { return data.map(bookmark => { const dateTime = new Date(bookmark.ts / 1000); return { time: dateTime, ...bookmark.data } }) }
Here’s our data before our function:
{ ref: Ref(Collection("links"), "244778237839802888"), ts: 1569697568650000, data: { url: 'https://sample.com', pageTitle: 'Sample title', description: 'An escaped description goes here' } }
Here’s our data after our function:
{ time: 1569697568650, url: 'https://sample.com', pageTitle: 'Sample title' description: 'An escaped description goes here' }
Now, we’ve got well-formatted data that’s ready for our template!
Let’s write a simple template. We’ll loop through our bookmarks and validate that each has a pageTitle and a url so we don’t look silly.
<div class="bookmarks"> </div>
We’re now ingesting and displaying data from FaunaDB. Let’s take a moment and think about how nice it is that this renders out pure HTML and there’s no need to fetch data on the client side!
But that’s not really enough to make this a useful app for us. Let’s figure out a better way than adding a bookmark in the FaunaDB console.
Enter Netlify Functions
Netlify’s Functions add-on is one of the easier ways to deploy AWS lambda functions. Since there’s no configuration step, it’s perfect for DIY projects where you just want to write the code.
This function will live at a URL in your project that looks like this: https://myproject.com/.netlify/functions/bookmarks assuming the file we create in our functions folder is bookmarks.js.
Basic Flow
Pass a URL as a query parameter to our function URL.
Use the function to load the URL and scrape the page’s title and description if available.
Format the details for FaunaDB.
Push the details to our FaunaDB Collection.
Rebuild the site.
Requirements
We’ve got a few packages we’ll need as we build this out. We’ll use the netlify-lambda CLI to build our functions locally. request-promise is the package we’ll use for making requests. Cheerio.js is the package we’ll use to scrape specific items from our requested page (think jQuery for Node). And finally, we’ll need FaunaDb (which should already be installed.
npm install --save netlify-lambda request-promise cheerio
Once that’s installed, let’s configure our project to build and serve the functions locally.
We’ll modify our “build” and “serve” scripts in our package.json to look like this:
"scripts": { "build": "npx netlify-lambda build lambda --config ./webpack.functions.js && npx eleventy", "serve": "npx netlify-lambda build lambda --config ./webpack.functions.js && npx eleventy --serve" }
Warning: There’s an error with Fauna’s NodeJS driver when compiling with Webpack, which Netlify’s Functions use to build. To get around this, we need to define a configuration file for Webpack. You can save the following code to a new — or existing — webpack.config.js.
const webpack = require('webpack'); module.exports = { plugins: [ new webpack.DefinePlugin({ "global.GENTLY": false }) ] };
Once this file exists, when we use the netlify-lambda command, we’ll need to tell it to run from this configuration. This is why our “serve” and “build scripts use the --config value for that command.
Function Housekeeping
In order to keep our main Function file as clean as possible, we’ll create our functions in a separate bookmarks directory and import them into our main Function file.
import { getDetails, saveBookmark } from "./bookmarks/create";
getDetails(url)
The getDetails() function will take a URL, passed in from our exported handler. From there, we’ll reach out to the site at that URL and grab relevant parts of the page to store as data for our bookmark.
We start by requiring the NPM packages we need:
const rp = require('request-promise'); const cheerio = require('cheerio');
Then, we’ll use the request-promise module to return an HTML string for the requested page and pass that into cheerio to give us a very jQuery-esque interface.
const getDetails = async function(url) { const data = rp(url).then(function(htmlString) { const $ = cheerio.load(htmlString); ... }
From here, we need to get the page title and a meta description. To do that, we’ll use selectors like you would in jQuery.
Note: In this code, we use 'head > title' as the selector to get the title of the page. If you don’t specify this, you may end up getting <title> tags inside of all SVGs on the page, which is less than ideal.
const getDetails = async function(url) { const data = rp(url).then(function(htmlString) { const $ = cheerio.load(htmlString); const title = $('head > title').text(); // Get the text inside the tag const description = $('meta[name="description"]').attr('content'); // Get the text of the content attribute // Return out the data in the structure we expect return { pageTitle: title, description: description }; }); return data //return to our main function }
With data in hand, it’s time to send our bookmark off to our Collection in FaunaDB!
saveBookmark(details)
For our save function, we’ll want to pass the details we acquired from getDetails as well as the URL as a singular object. The Spread operator strikes again!
const savedResponse = await saveBookmark({url, ...details});
In our create.js file, we also need to require and setup our FaunaDB driver. This should look very familiar from our 11ty data file.
const faunadb = require('faunadb'), q = faunadb.query; const adminClient = new faunadb.Client({ secret: process.env.FAUNADB_SERVER_SECRET });
Once we’ve got that out of the way, we can code.
First, we need to format our details into a data structure that Fauna is expecting for our query. Fauna expects an object with a data property containing the data we wish to store.
const saveBookmark = async function(details) { const data = { data: details }; ... }
Then we’ll open a new query to add to our Collection. In this case, we’ll use our query helper and use the Create method. Create() takes two arguments. First is the Collection in which we want to store our data and the second is the data itself.
After we save, we return either success or failure to our handler.
const saveBookmark = async function(details) { const data = { data: details }; return adminClient.query(q.Create(q.Collection("links"), data)) .then((response) => { /* Success! return the response with statusCode 200 */ return { statusCode: 200, body: JSON.stringify(response) } }).catch((error) => { /* Error! return the error with statusCode 400 */ return { statusCode: 400, body: JSON.stringify(error) } }) }
Let’s take a look at the full Function file.
import { getDetails, saveBookmark } from "./bookmarks/create"; import { rebuildSite } from "./utilities/rebuild"; // For rebuilding the site (more on that in a minute) exports.handler = async function(event, context) { try { const url = event.queryStringParameters.url; // Grab the URL const details = await getDetails(url); // Get the details of the page const savedResponse = await saveBookmark({url, ...details}); //Save the URL and the details to Fauna if (savedResponse.statusCode === 200) { // If successful, return success and trigger a Netlify build await rebuildSite(); return { statusCode: 200, body: savedResponse.body } } else { return savedResponse //or else return the error } } catch (err) { return { statusCode: 500, body: `Error: ${err}` }; } };
rebuildSite()
The discerning eye will notice that we have one more function imported into our handler: rebuildSite(). This function will use Netlify’s Deploy Hook functionality to rebuild our site from the new data every time we submit a new — successful — bookmark save.
In your site’s settings in Netlify, you can access your Build & Deploy settings and create a new “Build Hook.” Hooks have a name that appears in the Deploy section and an option for a non-master branch to deploy if you so wish. In our case, we’ll name it “new_link” and deploy our master branch.

A visual reference for the Netlify Admin’s build hook setup (Large preview)
From there, we just need to send a POST request to the URL provided.
We need a way of making requests and since we’ve already installed request-promise, we’ll continue to use that package by requiring it at the top of our file.
const rp = require('request-promise'); const rebuildSite = async function() { var options = { method: 'POST', uri: 'https://api.netlify.com/build_hooks/5d7fa6175504dfd43377688c', body: {}, json: true }; const returned = await rp(options).then(function(res) { console.log('Successfully hit webhook', res); }).catch(function(err) { console.log('Error:', err); }); return returned }
A demo of the Netlify Function setup and the iOS Shortcut setup combined
Setting Up An iOS Shortcut
So, we have a database, a way to display data and a function to add data, but we’re still not very user-friendly.
Netlify provides URLs for our Lambda functions, but they’re not fun to type into a mobile device. We’d also have to pass a URL as a query parameter into it. That’s a LOT of effort. How can we make this as little effort as possible?
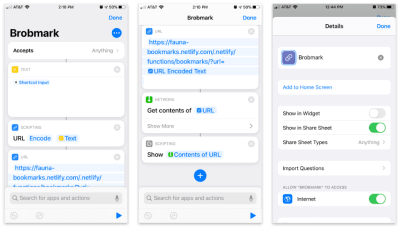
A visual reference for the setup for our Shortcut functionality (Large preview)
Apple’s Shortcuts app allows the building of custom items to go into your share sheet. Inside these shortcuts, we can send various types of requests of data collected in the share process.
Here’s the step-by-step Shortcut:
Accept any items and store that item in a “text” block.
Pass that text into a “Scripting” block to URL encode (just in case).
Pass that string into a URL block with our Netlify Function’s URL and a query parameter of url.
From “Network” use a “Get contents” block to POST to JSON to our URL.
Optional: From “Scripting” “Show” the contents of the last step (to confirm the data we’re sending).
To access this from the sharing menu, we open up the settings for this Shortcut and toggle on the “Show in Share Sheet” option.
As of iOS13, these share “Actions” are able to be favorited and moved to a high position in the dialog.
We now have a working “app” for sharing bookmarks across multiple platforms!
Go The Extra Mile!
If you’re inspired to try this yourself, there are a lot of other possibilities to add functionality. The joy of the DIY web is that you can make these sorts of applications work for you. Here are a few ideas:
Use a faux “API key” for quick authentication, so other users don’t post to your site (mine uses an API key, so don’t try to post to it!).
Add tag functionality to organize bookmarks.
Add an RSS feed for your site so that others can subscribe.
Send out a weekly roundup email programmatically for links that you’ve added.
Really, the sky is the limit, so start experimenting!

(dm, yk)
0 notes
Text
Adding Algolia Search to Eleventy and Netlify
Before I begin, a quick warning. I got things working, but I honestly cannot say this is the best way to do it. I'm still learning and my goal is to add Algolia to my site here, but I failed in that attempt. (I'll explain why after the main tutorial.) I first wrote about search and the Jamstack earlier this year, and one of the first comments I got was about why I had not covered Algolia. At the time, I didn't have a good answer outside of "I just haven't tried it yet." Over the past week I've played with it off and on and I have to say I'm incredibly impressed even after a brief foray into it. As I said, what follows is rough, and just my first attempt, but I hope it helps others.
via Raymond Camden https://ift.tt/31jGvtA
0 notes
Text
Smashing Podcast Episode 19 With Andy Bell: What Is CUBE CSS?
We’re talking about CUBE CSS. What is it, and how does it differ from approaches such as BEM, SMACSS, and OOCSS? Drew McLellan talks to its creator, Andy Bell, to find out.
Today, we’re talking about CUBE CSS. What is it, and how does it differ from approaches such as BEM, SMACSS, and OOCSS? I spoke to its creator, Andy Bell, to find out.
Show Notes
Note: Listeners of the Smashing Podcast can save a whopping 40% on Andy’s Learn Eleventy From Scratch course using the code SMASHINGPOD.
Weekly Update
Transcript
Drew McLellan: He is an educator and freelance web designer based in the U.K. and has worked in the designer web industries for well over a decade. In that time he’s worked with some of the largest organizations in the world, like Harley-Davidson, BSkyB, Unilever, Oracle, and the NHS. Alongside Heydon Pickering, he’s the co-author of Every Layout, as well as running Front-End Challenges Club which is focused on teaching front-end development best practice via short, fun challenges.
Drew: His latest venture is Piccalilli, a website newsletter with tutorials and courses to help you level up as a front-end developer and designer. So we know he’s an experienced developer and educator, but did you know he was the first person allowed to compete at Crufts with a panda?
Drew: My Smashing friends, please welcome, Andy Bell. Hi, Andy, how are you?
Andy Bell: I’m smashing, thanks. How are you?
Drew: I’m very good, thank you very much. Now I wanted to talk to you today about something that you posted on your site, Piccalilli, about a CSS methodology that you’ve developed for yourself over recent years. First of all, I guess we should probably explore what we mean by a CSS methodology because that could mean different things to different people. So when you think of the CSS methodology, what is it to you?
Andy: That’s a good, hard question to start with, Drew. Appreciate that, thank you!
Drew: Welcome!
Andy: It’s a tricky one. So, for context, I’ve used BEM for a long time, and that is Block Element Modifier. That’s been around for a long time. The way that I look at a CSS methodology is, it’s not a framework, it’s an organization structure. That’s how I like to see it. It’s like a process almost. It’s like you’ve got a problem that you need to solve with CSS and you use the methodology to solve it for you and keep things predictable and organized. BEM’s just legendary for that because it’s been wildly successful.
Andy: Then you could almost qualify things like the style components and that sort of thing. You can almost say that they’re methodology orientated even though they’re a bit more framework entwined, but still, it’s a methodology of breaking things into tiny molecules. So essentially that’s what I’m trying to do with CUBE CSS as well. A thinking structure, I think I described it as.
Drew: So it’s an application of process for how you architect and you write CSS, and it’s not so much anything that’s based on tools or any other sort of technology, it’s just a sort of work flow. So there’s lots of different approaches out there. You mentioned BEM. There’s SMACSS, OOCSS, Atomic CSS. And then you’ve got these sort of unusual lovechild approaches like ABEM. Have you seen that one?
Andy: Yeah.
Drew: Why publish your own?
Andy: Yeah, yeah. Why make your own? That’s a very good question. I think those who know me well know I like to sail against the tide a lot. It’s mainly because I tend to do lots of varied projects as well, in varied teams. So it’s very hard, I’ve found, to work with BEM with a traditional developer because they’re used to using CSS for what CSS is all about: the cascade, et cetera, and that’s why I sort of stole that from the language.
Andy: On the other flip side is that less structured methodologies, it’s harder to work with a programmer, JS sort of person because they like structure and organization and small components, which is understandable working with the language that they work in.
Andy: So I found myself in these positions where I was working with different types of people, different types of projects where one methodology wasn’t quite working. Over the years, I’ve just been playing around with this idea of how things go, and then there’s the stuff me and Heydon did, Every Layout, which sort of enforced the big part of it, which is the C, the composition part, and then I’ve just sort of evolved it very rapidly over the last six months.
Andy: The only reason I wrote an article about it was because I was just doing this course and I thought I’d better write some supplementary material to go with it so people understand it, and it’s absolutely blown up. So maybe we’re not over methodologies quite yet, Drew.
Drew: So the course material that you’ve been putting together actually uses CUBE CSS as its methodology, does it?
Andy: Yeah. So a good 50% of the course is actually front-end, even though it’s a course unlimited. It’s so, so deeply entwined in the way that we build the front-end that I couldn’t just say, “Oh, by the way, this is how I write a nice CSS,” and then leave it. I know people like to get into the detail, so I was like, what I’ll do is, I’ll write this post that’s really long and really detailed and then if someone wants to skill up and really understand what we’re doing, then they can do, and the rest is from there. And here we are today, Drew, sitting and chatting about it.
Drew: So if somebody already understands BEM and is maybe already using BEM, as an example, because that’s probably one of the widest adopted methodologies, isn’t it? So if they’ve already got an understanding of BEM and they’re coming to CUBE, is that something that they would find easy to adopt? Are there many similarities or is it completely different?
Andy: Yeah. I’d say going from BEM to CUBE is probably a smooth transition, especially the way I like to still write the CSS for CUBE. So the majority of stuff’s happening at a higher level. So it’s happening at the cascade level and it’s happening global CSS, using the utilities to do a lot of the stuff. But when you come into the nuts and bolts of it, it’s very BEM-like components, blocks and elements. The only thing that’s sort of different from BEM is, instead of having modifiers, we use this thing called exceptions instead which is, instead of using CSS classes, it turns to data attributes, which I think gives a nice bit of separation and a real exception, which is what a modifier should be.
Andy: Part of the reason why I’ve sort of sailed away from BEM was because I found the way I was working with it, especially in design systems, was modifiers were dominated and it became a problem because it was like, what is the role of my block at this point? Because if I’m modifying it to the point where it’s unrecognizable regularly, then is this methodology still working how it’s supposed to work?
Andy: Then there’s the whole design token stuff, the stuff that Jina did with the Lightning Design System which we’ve all started adopting now. The utility class stuff really started to make sense with that approach. So I just sort of smushed all the things I like about other people’s work and slotted into my own instead.
Drew: You talk about with BEM, the sort of modifier approach kind of getting out of control. Was that one of the main pain points with BEM that CUBE tries to address?
Andy: Yeah, absolutely. I do like the modifier approach with BEM, it does make sense. What I like about BEM is something that I still do, is the double underscore for an element, and then there’s the double dash for a modifier. I like that way of organizing things. It was just a case of okay, well, a lot of the modifiers I can actually account for with utility classes and then the other bits…
Andy: So the example I use in the article is, imagine you’ve got a card and then the card is flipped, so the content appears before the image. So then that makes sense, to see display: flex and then you reverse it, reverse the order. That makes sense, to have an exception rule for that because it’s an exception of the card’s default state, and that’s how I like to see it. It’s like an affected state on that component, is what an exception is, and that makes sense.
Andy: With a lot of the stuff that I’ve done more recently, the modern front-end stack with reactive JavaScript, there’s a lot of state changing and it’s makes sense to handle it appropriately between CSS and JavaScript because they are becoming more and more entwined with each other, whether you like it or not. It’s a common language for them. As you can see by my face, very much not, but there you go. You’re probably thinking, “Actually, I’ve been working with react quite a lot recently, so I’m the other way round.” So I can see that as well.
Drew: So let’s get into CUBE then. So CUBE stands for Composition Utility Block Exception. Is that right?
Andy: Yeah. That’s the one.
Drew: What on Earth does that mean?
Andy: Oh, mate, you should have heard it before! I was doing a talk last year. I did a talk, and it was called Keeping it Simple with CSS that scales, and in there I sort of introduced an earlier version of it called CBEUT, which was Cascade Block Element Utility Token. It was rubbish. I hated the name of it. I did it a couple of times, this talk last year, and I really didn’t like the name. Then when I came to doing this stuff this year, I thought, “I really need to think about what it actually is and what it’s called.” I think CUBE is a little less rubbish. I think that’s the best way I can describe it.
Andy: But then, names are always rubbish for these things, aren’t they? I mean, like BEM, what a rubbish name that is! But we all do it. Look at Jamstack: that’s a terrible name as well, isn’t it?
Drew: My lips are sealed!
Andy: Your boss is going, “What?” It’s true. It’s just the way it is, isn’t it, in our industry.
Drew: It seems that a lot of the CSS methodologies try and work around some of the features of CSS, things like the cascade. My understanding from what I read is, CUBE tries to make use of those sort of features and properties of CSS.
Andy: Yeah. A good analogy for it is SCSS, like Sass, is an extension of the natural CSS language, isn’t it? You’re pretty much right in CSS still. So CUBE CSS is like that. So it’s an extension of CSS. So we should still write CSS, as CSS should… well, it’s supposed to be written. Let’s be honest, that how it’s supposed to be written, is the name gives it away: Cascading Style Sheets. So it’s embracing that again because what I’ve found is that I’ve gone all the way down to the micro-optimization level. I’ve been down the path that I see a lot of people going down recently where… and I’ve mentioned this in the article as well, where I can see… there’s some evidence of it recently. I’ve spotted people have been creating spacer components and stuff like that, and I understand that problem, I’ve been in that situation.
Andy: The way I fixed it was, instead of drilling down and trying to micro-optimize, I actually started thinking about things on a compositional level instead because it doesn’t matter how small your components are, at some point they’re going to be pages, they’re going to be views. You cannot avoid that, that’s how it’s going to be. So instead of trying to say, “Right, I need these tiny little helpers to do this layout,” you say, “Right, I’ve got a contact page view, or a product page view, and that’s a skeletal layout composition. Then inside of that I can slot whatever components I want in there.” We’ve got things like Grid and Flexbox now which make that much more achievable, and you can essentially put whatever you want inside of the skeletal layout, it doesn’t matter. Then the components should, at that point, behave how you want them to behave, with or without container queries.
Drew: This is the composition part of CUBE where you’re looking at things at more of a macro level, looking at how components can be composed into a view to create the sort of pages that you need to create for a site or an app or what have you.
Andy: So it’s creating rules, essentially. It’s like guidance. It’s trying to get guidelines for something. It’s not like a strict rules, like, you should do this, you should do that. That’s essentially what you’re doing with the browser, with this methodology, is you’re saying… you’re not forcing it to do anything. You’re saying, “Look, ideally, if you could lay it out like this, that would be great, but I understand that that might not be the case so here’s some bounds and some upper and lower levels that we can work with. Do what you can, and cheers.” Then you just chuck some components at it and let it just do what it does. You add enough control in there for it to not look rubbish.
Andy: So a good example would see… we do a layout in Every Layout called the switcher, which essentially will in-line items until a certain point where the calculation that works out how wide it should will just stack them on top of each other. But because we add margin to the in-line and the block, it works, regardless of what the state of it is, it still looks fine. That’s the idea, is that we’re not telling the browser to say, “You must layer this three column grid out.” We’re saying, “If you can layer a three column grid out, do it. Otherwise, just stack and space instead.” So it’s that sort of methodology, of letting the browser do its job really.
Drew: Many of the different approaches that have come along for CSS over the last few years have very much focused on the component level of dealing with everything like it’s a component. CUBE doesn’t downplay that component aspect so much, it just gives this extra concept over the top of taking those components and composing them into bigger layouts, rather than just saying the layout’s just another component.
Andy: Yeah, that’s a good point, yeah. I think the thing to say about components is they’re important, especially in modern front-end stuff. We do a lot of component stuff, system stuff. But the way I see a component is, it’s a collection of rules that extend what’s already been done.
Andy: The point I make in the article is, by the time you get down to the block level, most of your styling has actually been done, and really what your component is doing is dotting the Is and crossing the Ts and it’s saying, “Right, in this context…” So for a card, for example, make the image have a minimum height of X, and add a bit of padding here. Do this, that and the other. Put a button here. It’s just sort of additional rules on top of what’s already been inherited from the rest of the CSS. I think that’s probably the best way to describe it.
Andy: Whereas in BEM, the component is the source of truth. Until you put that class on the element, nothing has been applied at that point, and that method works. I just found I wrote more CSS by doing that, and more repetitive CSS, which I don’t like doing.
Drew: Would you consider the typography and the colors and the vertical rhythms, spacing, and all of that, is all that part of the idea of composition in this model?
Andy: Yeah. In a global CSS, yeah, absolutely. The vertical rhythm especially, and the flow. We did an article on that at 24 ways, didn’t we, a couple of years ago, the flow and rhythm component. That was a sort of abstract from this approach as well, where you set a base component which essentially uses the lobotomized owl selector. I don’t know how I’m going to describe that on the radio, but we will. We’ll just put, I think, in the show notes about the Heydon article or something. But essentially that, it selects child elements… sorry, sibling elements.
Andy: So it says, “Right, every element that follows element X have margin top of CSS costs and property value,” and then the beauty of that is then you can set that CSS custom property value on a compositional context as well. So you can say, “Right, in this component, if there’s some flow on the go, we’ll set flow space to actually be two rem because we want it to be nice and beefy, the wide space.” Then in another one you might say, “Actually, I want flow space to be half a rem because I want it to be tight.” This is all happening, all the control is coming from a higher level and then what you’re doing is, you’re adding contextual overrides rather than reinventing it each time, reinventing the same thing over and over again.
Drew: So that’s the C, Composition. Next we’ve got U, which is Utility. So what do we mean by utility?
Andy: So it’s a class that does one job, and it does it really well. That could be an implementation of a design token which… it’s an abstract of properties. Usually it’s colors or typography styles, sizing, and rules like that. The idea is you generate utility classes that apply those. So you’ve got a utility that will apply background primary, which is like the primary color, and then color primary, which is the text color. Then you might generate some spacing tokens for marginal padding, and all those sorts of things. They just do one job. They just add that one spacing rule, that one color rule, and that’s it.
Andy: But then you’ve got other utilities as well. So a good example is a wrapper utility. What that will do is, it will put a maximum width on an element and then it will put left and right auto margin to sit it in the middle of the thing. So it’s just got one job, and it’s just doing it efficiently and well.
Andy: So you’ve got your global styles, you’ve done a lot of your typography settings and a lot of your flooring space. Your composition’s then giving context and layout. Then utilities are applying tokens directly to elements to give them those styling that you need. So like a heading, for example, you’re saying, “I want this to be this size and I want it to have this lead in, and I want it to have this measure.” Then at that point… this is what I was saying about the blocks… then you go further down the stack, and you’ve already done most of the work at the point.
Andy: So they give you this really efficient way of working, and because HTML sort of streams down the pipe as well, it’s really nice to abstract the workload onto HTML rather than CSS as well, I’ve found. I used to really get into utility classes, like in this sort of old curmudgeon style of, “Oh, separation of concerns,” but I actually think it’s a really decent way of working. I mention in the article that I actually like Tailwind CSS. I think it does work, and I really like using it for product typing because I can really put something out really quick. But I think it just goes a little bit too far, does Tailwind, whereas I like to rain it in when it goes beyond just applying a single rule on a class. So that’s it, I think. Do you?
Drew: So, yeah, you talk in the article a lot about design tokens, which is something that we’ve talked about on the Smashing Podcast with Jina Anne back in episode three, I think it was. So it sounds like design tokens are a really fundamental aspect.
Andy: Yeah. Oh, God, yeah. I remember so vividly when Jina was doing the Lightning Design System stuff because I was building a design system at the time, or something that resembled a design system, and we were struggling to get executive approval of it. When the Lightning Design System came out, I literally just sent them link after link and I said, “This is what we’re doing. We’re building a design system. This is what Salesforce are currently using it for.” I remember her work at the time actually helped me to get stuff through the door.
Andy: Then the design token stuff has always stuck with me as being a really good way of applying these rules. Because I’m a designer by trade, so I can just sort of see that organization and the ability to organize and create a single source of truth being really useful because it’s something we’ve not really had in digital design, especially in the Adobe era of working with Photoshop and stuff, we just didn’t have that lUXury. We had it in print with the Pantone Book but we didn’t have it in digital with random hex codes all over the shop.
Andy: So it’s just great. I love that level of control. Actually, I think it aids in creativity because you’re not thinking about unimportant stuff anymore, you’re just thinking about what you’re doing with it.
Drew: Does the implementation of those design tokens matter particularly with the approach? Is it always CSS custom properties?
Andy: I think that’s a really important point with CUBE. Some of the responses I’ve had, people have struggled with this a little bit. There’s no mention of technology in it whatsoever. The only technology that’s consistent is CSS. You can do it however you want. You could do all this with whatever CSS and JS things people are doing now, or you could it with just Vanilla CSS. You could do it with Sass. I do it with Sass. Less, if that’s what you’re still doing. All these available technologies, post CSS, all these things. You can do however you want to do it, it doesn’t matter.
Andy: The idea is that if you follow those sort of constructs, you’ll be fine. That’s the idea behind it. It’s a very loose and not strict as some of the methodologies are. I’ve seen it with BEM especially, people get really ingrained in the principles of BEM to the point where it’s like you’re not even solving the problem anymore. I think that you’ve got to be flexible. I said it in this talk last year. I was like, “If you stick to your guns too tightly, you can actually cause problems for yourself in the long run because you try and follow a certain path, and you know it’s not working anymore.” You should always be flexible and work with a system rather than working to the letter to it.
Drew: So the B, the B is Block. You’ve talked about this idea, that by the time you get down to the block level, most of everything should be in place, and then the block level styling is only really concerned with the actual very detail of a particular component. Generally, is the concept of a block similar to what people will be familiar with?
Andy: Oh, absolutely, yeah. So imagine your BEM component and take all the visual stuff out of it, and that’s what you’re left with, essentially, the block. This is what I struggled to articulate when I first started thinking of this methodology. A block is actually really a C, it’s a composition, but that makes it really difficult because you’re into recursive territory there and I think people’s brains would explode. But really that’s what a block is, it’s actually another compositional layer but more of a sort of strict context, so like your card, your button, your carousel, if that’s what you like doing still, and all that sort of stuff.
Andy: It’s like a specific thing, a component, and then inside of there you’re setting specific rules for it to follow, really ignoring the rest so you’re not… You might apply tokens in the blocks, and I do do that still, but really it’s more layout orientated, is a block, as far as I work with them, or at least taking the token and applying it in a specific way, like a button hover status, stuff like that. So really your block should be tiny by the time you get down to them, they shouldn’t be really doing much at all.
Drew: So it could be as small as a hyperlink.
Andy: Yeah.
Drew: But it could also be a compound collection of other blocks?
Andy: Yeah. Like a module sort of thing. You could definitely do that. Because, again, that goes back to the sort of compositional aspect of it, is that whatever goes in it shouldn’t matter. The good example of that is like the card. So the content of a card is, say, like a heading, a summary and a button. You shouldn’t really be specifically targeting those three elements. You should be saying, “Look, anything that happens to find itself in content, have some flow rules in there and have some sort of compositional layout rules,” and then it doesn’t matter what you put in there. You might decide that you want to put an image in that content thing and it should just work, it should just look fine.
Andy: That’s the whole point of working with CSS. It’s a very forgiving way of working with CSS. You’re making your life a lot easier by being less rigid because when stuff accidentally finds itself in something, which it will, it doesn’t look horrific as it could do if you were being more specific about things, is what I’ve found.
Drew: I definitely need a lot of forgiveness around my CSS!
Andy: I know you do!
Drew: Cheers! So that’s the B. The last thing is E: E is Exception. Now we’re not talking about error messages, are we?
Andy: No, no. It’s a sort of-
Drew: We’re not talking about JavaScript exceptions.
Andy: Yeah, yeah. There should be none of that at this point. I should hope not anyway, otherwise you really are in the woods at that point: I don’t think I’m going to be able to help you! The whole idea of this is… so you’ve created the context with your block, and an exception is exactly that, it’s like an exception to the rule: so a flipped card, or it might be a ghost button. So you know those buttons that have just got a border and a transparent background? That would be an exception because a button has probably got a solid background color and then the label color. So it’s creating a sort of distinct state of variation.
Andy: The reason why I do this with data attributes instead of classes, and the reason why that is is because a) I think it’s nice to have a distinction. So when you’re scanning through lots of HTML, you can see data, hyphen something, you’re like, “Right, okay, something has definitely changed on this element.” The other thing is that it’s very nice to give JavaScript access to that state, and vice versa as well. So I really like applying state with data attributes in JavaScript. I think that is essentially what they’re for, a sort of communication layer. The harmony between them seems to work really well.
Andy: So a good example is, say you’ve got a status message and then JavaScript will add data state is either success, error or information, or something. You can then hook into that with your exception styles in CSS. So you know that’s an exception of the status component and it’s going against its default state. So it’s just a really handy way of working with things. It’s predictable on both ends: it’s predictable on the CSS end, and it’s predictable on the JavaScript end as well.
Drew: I guess it’s quite nice that something that class names don’t give you is a property and value. So if you want to have something like that which is the state, and it can either be success or failure or warning or what have you, you can specifically address that state property and flip its value. Whereas with a big long list of class names, if you’re manipulating that in JavaScript, for example, you’re going to have to look at each one of them and add that business logic in there that says, “I can only set one of these,” and what happens if two of those classes are applied to the same element? You can’t get that with a data attribute, it only has one value.
Andy: Yeah. That’s a good way of saying that, yeah. It is very helpful, I’ve found, to work like that.
Drew: That’s quite interesting. I don’t think I’ve seen any other methodologies that take that approach. Is that completely unique to CUBE, doing that?
Andy: It might be. I don’t really pay much attention to other stuff, which I should do. Someone else is probably doing that. I’ll tell you now, it’s been the most controversial aspect of it. Some people really did not like the idea of using data attributes. The thing is as well, and how I respond, is, do what you want. We’re not telling you to do things in a certain way, it’s just suggestions. If you want to do exceptions to CSS classes, like modifiers, then knock yourself out. The CUBE police aren’t going to come knocking at your door. It’s absolutely fine.
Andy: The CUBE thing is a thinking thing, it’s a structure. You apply that structure however you want to apply it, with what tooling you want, or whatever technology you want. As long as you keep things consistent, that’s the important thing.
Drew: So there’s no such thing as pure CUBE?
Andy: The way I write it is pure CUBE, Drew. Everyone else is just a fake, it’s just a weak immitation.
Drew: Apart from to you, no-one can say, “That isn’t textbook CUBE.”
Andy: No, that’s it. No-one can dispute that really, can they? So, yeah, I’ll go with that. Gives you a bit of clout or something, I think, something like that.
Drew: Can you mix and match a CUBE approach with other methodologies? Can you use bits of BEM?
Andy: Yeah, I reckon so. I’ve been thinking about it a little bit because I’m going to do some more stuff on it soon because it’s become quite popular, so people will want more work. One thing I’m going to look at is how to approach using the CUBE methodology with something existing.
Andy: So there’s two opposite ends of the scale. A good question that people have asked is: “How does this work with every layout, the other stuff?” I’m like, basically, every layout is the C. That’s what every layout is, it’s the compositional layer. Then someone else asked, “Well, how would this work with something like Atomic Web Design, like their stuff that Brad Frost did? It’s like, well, you could break those pieces up and apply them at each level. Atomic Design goes all the way down into the micro detail. It’s abstracting that into using, right, okay, well I can apply this with utilities, so the molecules, I think. I can apply that with the utilities, and it’s translating what you know already into this slightly different structure of working.
Andy: Really, it’s a renaming for a lot of things. I’ve not invented anything here, I’ve just sort of, like I say, I’ve just stolen things that I like. I love the way that some of the Atomic Design stuff is thought about. That’s really some smart work. And BEM. The stuff Harry did, the Inverted Triangle CSS, I thought that was really cool. So I’ve just sort of nicked bits that I like from each one of them and sort of stitched them all together into this other hybrid thing, approach. More to come, I think.
Drew: Can the CUBE approach be applied to existing projects that already have CSS in place or is it something you really need to start on a fresh project with?
Andy: That very much depends. So if you’ve got like a bootstrap job and it’s just got thousands of lines of custom CSS, that I’ve definitely been involved in before, then I think you might be trying to put a fire out with a bottle of water at that point. But if you… say, for instance, if you’ve got a rough BEM setup and it’s gone a bit layer-y, you could use CUBE to refactor and actually pull it back into shape again.
Andy: It depends, the answer to that one. But it’s doable, as with everything. If you really want it to work, Drew, you can do it if you want, can’t you? The world is our oyster!
Drew: Especially if your BEM site’s gone layer-y.
Andy: Yeah. Nothing worse than a layer-y BEM site!
Drew: I’ve noticed in the examples that you’ve given… and I’ve got an eagle eye, I’ve seen you’ve been doing this for a while… a lot of your class values in the HTML attribute are wrapped in square brackets.
Andy: Oh, God, yeah. Tell you what, Drew-
Drew: What is that about? What is that about?
Andy: I’ll tell you what, if there’s ever one thing that I’ve done in my whole career that’s just been absolutely outrageously controversial… and you follow me on Twitter, you’ve seen what comes out of my mouth… it’s those bloody brackets! My, God! People either love them or hate them. They’re Marmite, they are.
Andy: The reason I do them is a grouping mechanism. So if you look at the way that they’re structured, the way I do it is, block at the start and then I’ll do a utilities after that. Then what I might do is, in between a block group and a utility group, there might be another block class. So a good example of that would be… we’ll go back to the card again. But then say that there’s a specific block called a CTA, like a call to action. You might have that applied to the card as well, and then your utilities are enforcing the design attributes, so the colors and all that business. So then you’ve got three groups of stuff.
Andy: When you come to it, if you’ve got that order in your head each time, you know, okay, right, this first group’s blocks. Oh, that’s looks like another block. I’ve got that one. Then it’s like, right, they’re definitely utility classes. Then what I might even do is, if there’s a lot of design token implementation, have that in a separate group. So it’s just very clear what each group is doing, and there’s a separation inside of the classes there as well. I’ve found it really helpful. Some people find it incredibly offensive. It’s definitely a do it if you want to do it. Definitely you don’t have to do it.
Andy: It’s quite funny, when I published that article, so many people finished halfway through to ask me, “What is it with these brackets?” I was like, “Did you finish the article? Because there’s a big section at the end where it explains exactly what they’re doing,” to the point where I actually had to write a bit in the middle of the article of, “If the brackets are essentially doing your head in, click here and I’ll skip you all the way down to that explanation bit so you can just read about them.” It can be quite controversial.
Andy: When I’ve worked on really, really complex front-ends… and we did a little bit of stuff together, didn’t we, last year?
Drew: Yeah.
Andy: You’ve seen the sort of design implementation on that project that we were on. It requires that sort of grouping because there’s just so much going on at the time, there’s so much different stuff happening. I’ve just found it really, really useful over the years, and also get lots of questions about it, to the point where I was almost going to write just one page on my website that I could just fire people to to answer the question for them.
Drew: Slash, what’s with the brackets?
Andy: Yeah. Slash, brackets. Have you seen that new Hey Email thing that’s just come out? They’ve bought a domain of itsnotatypo.com, just to answer the whole Imbox, like im with an M rather than an in. Basically, I was like, “I think I need to do that,” like, whatswiththebrackets.com, and just do a one-pager about it.
Drew: It strikes me that the approach with brackets actually could be something that might be useful when using things like Tailwind or something that has a lot of classes because that can-
Andy: Yeah. Oh, God, yes.
Drew: You have classes that are addressing your break points and what have you, and then you’ll have things that are for layout, things that are for color or type, or what have you. So it might also be a useful way of dealing in situations like that.
Andy: I’d definitely agree with that. A good analogy… not analogy. A good bit of info about Tailwind is that I actually quite like Tailwind. I’ve used that on very big projects. The one thing that really opened my eyes to Tailwind though was when I saw a junior developer try to work out what was going on, and it was really, really eye-opening because they just didn’t have a clue what was happening.
Andy: I think that’s one problem I’ve found with these sort of over-engineered approaches, which I think it’s fair to say Tailwind is, is that there’s a certain skill level that is required to work with it. I know the industry tends to have an obsession with seniority now, but there’s still people that are just getting into the game that we need to accommodate, and I think having stuff that’s closer to the language itself is more helpful in those situations because they’re probably learning material that is the language as it is. So I think it’s just a bit more helpful. Especially having a diverse team of people as well. Just food for thought for everyone.
Drew: People might look at all the different methodologies that are out there and say, “This is evidence that CSS is terrible and broken, that we need… all these problems have to be solved by hacking stuff on top. We need tools to fix bits of CSS. We need strict procedures for how we implement it, just to get it to work.” Should the platform be adapting itself? Do we need new bits of CSS to try and solve these problems or are we all right just hacking around and making up funny acronyms?
Andy: I think the power of CSS, I think, is its flexibility. So if you’re going to program CSS, a lot of the knowledge is less of the syntax and more of the workings of a browser and how it works. I think that might be a suggestion, that the problem is that people might not have learnt CSS quite as thoroughly as they thought they might have learnt it, who created these problems. I’ve seen that in evidence myself. I spotted a spacing mechanism that had been invested, which was very complicated, and I thought, “This person has not learnt what padding is because padding would actually fix this problem for them, understanding how padding works and the box model.” That’s not to be snidey about it.
Andy: We work in an industry now that moves at an even faster pace than it has done previously and I think there’s a lot less time for people to learn things in detail. But, on that front, I think CSS still does have work to do in terms of the working group, who I think do a bloody good job. A great, shining example of their work was the Grid spec which was just phenomenal. The way that rolled out in pretty much every browser on day one, I thought that was so good.
Andy: But we’ve got more work to do, I think, and I think maybe the pace might need to increase a little, especially with stuff like container queries, we all love talking about them. Stuff like that I think would help to put CSS in a different light with people, I think. But I think CSS is brilliant, I love it. I’ve never had a problem with it in lots of years really. I do find some of the solutions a bit odd, but there you go.
Drew: What’s the response been like to CUBE since you published the article?
Andy: Mind-blowing. I honestly published it as just supporting material, and that’s all I expected it to be, and it’s just blown up all over the place. A lot of people have been reading it, asking about it, been really interested about it. There’s definitely more to come on it.
Andy: I did say in the article, I said, “Look, if people are actually quite interested in this, I’ll expand on this post and actually make some documentation.” I’ve got bits of documentation dotted around all over the place, but to sort of centralize that, and then I was thinking of doing some workshops and stuff. So there’s stuff to go. It’s how Every Layout started as well. We both had these scattered ideas about layout and then we sort of merged them together. So something like that, I suppose, will come in the future.
Drew: Are there any downsides that you’re aware of to using CUBE? Are there problems that it doesn’t attempt to solve?
Andy: Yeah. This accent, Drew, it just won’t go way, no matter what I do! In all seriousness, I think CUBE’s got as close as I can get to being happy with the front-end, which is saying a lot, I think. You never know, things might change again. This has evolved over more recent years. Give it another five years, I’ll probably be struggling with this and trying something else. I think that’s the key point, is to just keep working on yourself and working on what you know and how you approach things.
Andy: This definitely won’t work for everyone as well, I know that for a fact. I know that from my comments. I don’t expect it to work for everyone. I don’t expect anything to work for everyone. It’s the same with JavaScript stuff: some people like the reactive stuff and some people don’t. It is what it is. We’re all people at the end of the day, we all have different tastes. It’s all about communicating with your teammates at the end of the day, that’s the important thing.
Drew: I know you as a very talented designer and developer and you, like many of us, you’re just working on real projects all day, every day. But you’ve recently started publishing on this site, Piccalilli, which is where the CUBE CSS introduction article was. So Piccalilli is kind of a new venture for you, isn’t it? What’s it all about?
Andy: Very kind of you to say, Drew. You’ve actually worked with me, so that’s high praise. But the Piccalilli thing is an evolution. So I’m a freelancer. I do client work, but I think this has become apparent with the pandemic, that that is not the most sustainable thing in the world in some industries. I think freelancing can be very, very tough, as a developer and designer. It’s something that I’ve been doing it for so long now, 10 years… well, 12 years now actually.
Andy: I fancied doing something a bit different and applying the knowledge that I’ve got and actually sharing it with people. I’ve always been very open and sharing, and I wanted to formalize that. So I created Piccalilli to write tutorials, but mainly for courses that I’m producing: that’s the main meat and potatoes. And then there’s the newsletter which is… people are really enjoying the newsletter because I share cool things I’ve found on the internet every week. That’s the backbone of it. It’s just going really well. That’s essentially where I want to see myself doing more and more full-time, as the years go on, I think.
Drew: So what’s coming next for Piccalilli? Have you got anything that you’ve got coming out?
Andy: Thanks for the door open there, Drew! By the time this recording goes out, the first course will be live: Learn Eleventy From Scratch, and that’s where we learn how to build a Gatsby website! No, you learn how to build an Eleventy site. So you start off with a completely empty directory, there’s nothing in it, it’s empty, and then at the end of it you’ll finish up with this really nice-looking agency site. We learn all sorts in it. You learn how to really go to town with Eleventy. We pull remote data in from places. We use CUBE CSS to build a really nice front-end for it.
Andy: If you want to get into the Jamstack and you want to get into static site generators, or just how to build a nice website, it’s just a really handy course, I hope, for that. It’s currently being edited within an inch of its life as we’re talking. It’s going to be cool, I hope, and useful. But that’s an accumulation of a lot of stuff I’ve been doing over the last couple of years. So it should be fun.
Andy: So buy it, and I’ll do a discount code, do like smashingpod for 40% off, and you can get it when it comes out.
Drew: Amazing. We’ll link that up. Have you figured out how to spell Piccalilli reliably yet?
Andy: I was on with Chris and Dave with the ShopTalk Show and I said on there, “If there’s ever one thing you want to hire me for it’s to write Piccalilli by hand first time without even thinking about it,” because I’ve written that word so many times that I just know exactly how to spell it off by heart. So the answer to your question is yes.
Drew: Well, I’m still struggling, I’ll tell you that much!
Andy: It is hard. Oh, God. I totally empathize. It took me a long time to learn how to spell it but it’s one of those words in our vocabulary. This year I’m trying to spell necessary without making a spelling mistake!
Drew: So I’ve been learning all about CUBE CSS. What have you been learning about lately, Andy?
Andy: Do you know what? This is going to surprise you, Drew. MySQL is what I’ve been learning about recently. So, basically, Piccalilli is totally self-published. It’s an Eleventy site but it’s got an API behind it, and that’s got a MySQL database behind it. The stuff that gives people content that they’ve purchased requires some pretty hefty querying. So I’ve just actually properly invested in some MySQL… especially the difference between joins, which I didn’t actually realize there was a difference between each type of join. So that’s been really useful and it’s resulted in some pretty speedy interactions with the database.
Andy: I used to run this thing called Front-End Challenges Club and when I first launched it it just collapsed and died on itself because MySQL was shoddy to say the least. So I’ve really been learning how to do that because I’m not a backend person at all, I’m a pixel-pusher. So it’s definitely not in my remit. That’s more your neck of the woods, isn’t it? I find it really cool, MySQL. I actually really like writing it. It’s a really nice, instructional language, isn’t it?
Drew: It is, it’s great. I learnt SQL at school.
Andy: Wow!
Drew: We’re talking like 20 years ago now.
Andy: Did they have computers in those days?
Drew: They did, yeah. We had to wind-
Andy: Did you have to write it by hand?
Drew: We had to wind them up! We did. But, I tell you, for a developer, it’s akin to learning your times tables: one of those things that seems like a bit of a chore but once you’re fluent, it just becomes useful time and time again.
Andy: Yeah. For sure. There’s really tangible differences as well. You really see the difference in speed. I really like working with Node because that’s really fast but Node and MySQL is just… not a very common choice, but I think it’s a pretty good choice. I think it works really, really well. So I’m happy with that. As you know, I don’t like writing PHP. So that’s never going to be an option.
Drew: If you, dear listener, would like to hear more from Andy, you can follow him on Twitter where he’s at hankchizljaw. You can find Piccalilli at piccalil.li, where you’ll also find the article describing CUBE CSS, and we’ll also add links to all of those in the show notes, of course.
Drew: Thanks for joining us today, Andy. Did you have any parting words?
Andy: Stay safe, and wear your mask.
(il)
Website Design & SEO Delray Beach by DBL07.co
Delray Beach SEO
Via http://www.scpie.org/smashing-podcast-episode-19-with-andy-bell-what-is-cube-css/
source https://scpie.weebly.com/blog/smashing-podcast-episode-19-with-andy-bell-what-is-cube-css
1 note
·
View note
Text
Smashing Podcast Episode 19 With Andy Bell: What Is CUBE CSS?
We’re talking about CUBE CSS. What is it, and how does it differ from approaches such as BEM, SMACSS, and OOCSS? Drew McLellan talks to its creator, Andy Bell, to find out.
Today, we’re talking about CUBE CSS. What is it, and how does it differ from approaches such as BEM, SMACSS, and OOCSS? I spoke to its creator, Andy Bell, to find out.
Show Notes
Note: Listeners of the Smashing Podcast can save a whopping 40% on Andy’s Learn Eleventy From Scratch course using the code SMASHINGPOD.
Weekly Update
Transcript
Drew McLellan: He is an educator and freelance web designer based in the U.K. and has worked in the designer web industries for well over a decade. In that time he’s worked with some of the largest organizations in the world, like Harley-Davidson, BSkyB, Unilever, Oracle, and the NHS. Alongside Heydon Pickering, he’s the co-author of Every Layout, as well as running Front-End Challenges Club which is focused on teaching front-end development best practice via short, fun challenges.
Drew: His latest venture is Piccalilli, a website newsletter with tutorials and courses to help you level up as a front-end developer and designer. So we know he’s an experienced developer and educator, but did you know he was the first person allowed to compete at Crufts with a panda?
Drew: My Smashing friends, please welcome, Andy Bell. Hi, Andy, how are you?
Andy Bell: I’m smashing, thanks. How are you?
Drew: I’m very good, thank you very much. Now I wanted to talk to you today about something that you posted on your site, Piccalilli, about a CSS methodology that you’ve developed for yourself over recent years. First of all, I guess we should probably explore what we mean by a CSS methodology because that could mean different things to different people. So when you think of the CSS methodology, what is it to you?
Andy: That’s a good, hard question to start with, Drew. Appreciate that, thank you!
Drew: Welcome!
Andy: It’s a tricky one. So, for context, I’ve used BEM for a long time, and that is Block Element Modifier. That’s been around for a long time. The way that I look at a CSS methodology is, it’s not a framework, it’s an organization structure. That’s how I like to see it. It’s like a process almost. It’s like you’ve got a problem that you need to solve with CSS and you use the methodology to solve it for you and keep things predictable and organized. BEM’s just legendary for that because it’s been wildly successful.
Andy: Then you could almost qualify things like the style components and that sort of thing. You can almost say that they’re methodology orientated even though they’re a bit more framework entwined, but still, it’s a methodology of breaking things into tiny molecules. So essentially that’s what I’m trying to do with CUBE CSS as well. A thinking structure, I think I described it as.
Drew: So it’s an application of process for how you architect and you write CSS, and it’s not so much anything that’s based on tools or any other sort of technology, it’s just a sort of work flow. So there’s lots of different approaches out there. You mentioned BEM. There’s SMACSS, OOCSS, Atomic CSS. And then you’ve got these sort of unusual lovechild approaches like ABEM. Have you seen that one?
Andy: Yeah.
Drew: Why publish your own?
Andy: Yeah, yeah. Why make your own? That’s a very good question. I think those who know me well know I like to sail against the tide a lot. It’s mainly because I tend to do lots of varied projects as well, in varied teams. So it’s very hard, I’ve found, to work with BEM with a traditional developer because they’re used to using CSS for what CSS is all about: the cascade, et cetera, and that’s why I sort of stole that from the language.
Andy: On the other flip side is that less structured methodologies, it’s harder to work with a programmer, JS sort of person because they like structure and organization and small components, which is understandable working with the language that they work in.
Andy: So I found myself in these positions where I was working with different types of people, different types of projects where one methodology wasn’t quite working. Over the years, I’ve just been playing around with this idea of how things go, and then there’s the stuff me and Heydon did, Every Layout, which sort of enforced the big part of it, which is the C, the composition part, and then I’ve just sort of evolved it very rapidly over the last six months.
Andy: The only reason I wrote an article about it was because I was just doing this course and I thought I’d better write some supplementary material to go with it so people understand it, and it’s absolutely blown up. So maybe we’re not over methodologies quite yet, Drew.
Drew: So the course material that you’ve been putting together actually uses CUBE CSS as its methodology, does it?
Andy: Yeah. So a good 50% of the course is actually front-end, even though it’s a course unlimited. It’s so, so deeply entwined in the way that we build the front-end that I couldn’t just say, “Oh, by the way, this is how I write a nice CSS,” and then leave it. I know people like to get into the detail, so I was like, what I’ll do is, I’ll write this post that’s really long and really detailed and then if someone wants to skill up and really understand what we’re doing, then they can do, and the rest is from there. And here we are today, Drew, sitting and chatting about it.
Drew: So if somebody already understands BEM and is maybe already using BEM, as an example, because that’s probably one of the widest adopted methodologies, isn’t it? So if they’ve already got an understanding of BEM and they’re coming to CUBE, is that something that they would find easy to adopt? Are there many similarities or is it completely different?
Andy: Yeah. I’d say going from BEM to CUBE is probably a smooth transition, especially the way I like to still write the CSS for CUBE. So the majority of stuff’s happening at a higher level. So it’s happening at the cascade level and it’s happening global CSS, using the utilities to do a lot of the stuff. But when you come into the nuts and bolts of it, it’s very BEM-like components, blocks and elements. The only thing that’s sort of different from BEM is, instead of having modifiers, we use this thing called exceptions instead which is, instead of using CSS classes, it turns to data attributes, which I think gives a nice bit of separation and a real exception, which is what a modifier should be.
Andy: Part of the reason why I’ve sort of sailed away from BEM was because I found the way I was working with it, especially in design systems, was modifiers were dominated and it became a problem because it was like, what is the role of my block at this point? Because if I’m modifying it to the point where it’s unrecognizable regularly, then is this methodology still working how it’s supposed to work?
Andy: Then there’s the whole design token stuff, the stuff that Jina did with the Lightning Design System which we’ve all started adopting now. The utility class stuff really started to make sense with that approach. So I just sort of smushed all the things I like about other people’s work and slotted into my own instead.
Drew: You talk about with BEM, the sort of modifier approach kind of getting out of control. Was that one of the main pain points with BEM that CUBE tries to address?
Andy: Yeah, absolutely. I do like the modifier approach with BEM, it does make sense. What I like about BEM is something that I still do, is the double underscore for an element, and then there’s the double dash for a modifier. I like that way of organizing things. It was just a case of okay, well, a lot of the modifiers I can actually account for with utility classes and then the other bits…
Andy: So the example I use in the article is, imagine you’ve got a card and then the card is flipped, so the content appears before the image. So then that makes sense, to see display: flex and then you reverse it, reverse the order. That makes sense, to have an exception rule for that because it’s an exception of the card’s default state, and that’s how I like to see it. It’s like an affected state on that component, is what an exception is, and that makes sense.
Andy: With a lot of the stuff that I’ve done more recently, the modern front-end stack with reactive JavaScript, there’s a lot of state changing and it’s makes sense to handle it appropriately between CSS and JavaScript because they are becoming more and more entwined with each other, whether you like it or not. It’s a common language for them. As you can see by my face, very much not, but there you go. You’re probably thinking, “Actually, I’ve been working with react quite a lot recently, so I’m the other way round.” So I can see that as well.
Drew: So let’s get into CUBE then. So CUBE stands for Composition Utility Block Exception. Is that right?
Andy: Yeah. That’s the one.
Drew: What on Earth does that mean?
Andy: Oh, mate, you should have heard it before! I was doing a talk last year. I did a talk, and it was called Keeping it Simple with CSS that scales, and in there I sort of introduced an earlier version of it called CBEUT, which was Cascade Block Element Utility Token. It was rubbish. I hated the name of it. I did it a couple of times, this talk last year, and I really didn’t like the name. Then when I came to doing this stuff this year, I thought, “I really need to think about what it actually is and what it’s called.” I think CUBE is a little less rubbish. I think that’s the best way I can describe it.
Andy: But then, names are always rubbish for these things, aren’t they? I mean, like BEM, what a rubbish name that is! But we all do it. Look at Jamstack: that’s a terrible name as well, isn’t it?
Drew: My lips are sealed!
Andy: Your boss is going, “What?” It’s true. It’s just the way it is, isn’t it, in our industry.
Drew: It seems that a lot of the CSS methodologies try and work around some of the features of CSS, things like the cascade. My understanding from what I read is, CUBE tries to make use of those sort of features and properties of CSS.
Andy: Yeah. A good analogy for it is SCSS, like Sass, is an extension of the natural CSS language, isn’t it? You’re pretty much right in CSS still. So CUBE CSS is like that. So it’s an extension of CSS. So we should still write CSS, as CSS should… well, it’s supposed to be written. Let’s be honest, that how it’s supposed to be written, is the name gives it away: Cascading Style Sheets. So it’s embracing that again because what I’ve found is that I’ve gone all the way down to the micro-optimization level. I’ve been down the path that I see a lot of people going down recently where… and I’ve mentioned this in the article as well, where I can see… there’s some evidence of it recently. I’ve spotted people have been creating spacer components and stuff like that, and I understand that problem, I’ve been in that situation.
Andy: The way I fixed it was, instead of drilling down and trying to micro-optimize, I actually started thinking about things on a compositional level instead because it doesn’t matter how small your components are, at some point they’re going to be pages, they’re going to be views. You cannot avoid that, that’s how it’s going to be. So instead of trying to say, “Right, I need these tiny little helpers to do this layout,” you say, “Right, I’ve got a contact page view, or a product page view, and that’s a skeletal layout composition. Then inside of that I can slot whatever components I want in there.” We’ve got things like Grid and Flexbox now which make that much more achievable, and you can essentially put whatever you want inside of the skeletal layout, it doesn’t matter. Then the components should, at that point, behave how you want them to behave, with or without container queries.
Drew: This is the composition part of CUBE where you’re looking at things at more of a macro level, looking at how components can be composed into a view to create the sort of pages that you need to create for a site or an app or what have you.
Andy: So it’s creating rules, essentially. It’s like guidance. It’s trying to get guidelines for something. It’s not like a strict rules, like, you should do this, you should do that. That’s essentially what you’re doing with the browser, with this methodology, is you’re saying… you’re not forcing it to do anything. You’re saying, “Look, ideally, if you could lay it out like this, that would be great, but I understand that that might not be the case so here’s some bounds and some upper and lower levels that we can work with. Do what you can, and cheers.” Then you just chuck some components at it and let it just do what it does. You add enough control in there for it to not look rubbish.
Andy: So a good example would see… we do a layout in Every Layout called the switcher, which essentially will in-line items until a certain point where the calculation that works out how wide it should will just stack them on top of each other. But because we add margin to the in-line and the block, it works, regardless of what the state of it is, it still looks fine. That’s the idea, is that we’re not telling the browser to say, “You must layer this three column grid out.” We’re saying, “If you can layer a three column grid out, do it. Otherwise, just stack and space instead.” So it’s that sort of methodology, of letting the browser do its job really.
Drew: Many of the different approaches that have come along for CSS over the last few years have very much focused on the component level of dealing with everything like it’s a component. CUBE doesn’t downplay that component aspect so much, it just gives this extra concept over the top of taking those components and composing them into bigger layouts, rather than just saying the layout’s just another component.
Andy: Yeah, that’s a good point, yeah. I think the thing to say about components is they’re important, especially in modern front-end stuff. We do a lot of component stuff, system stuff. But the way I see a component is, it’s a collection of rules that extend what’s already been done.
Andy: The point I make in the article is, by the time you get down to the block level, most of your styling has actually been done, and really what your component is doing is dotting the Is and crossing the Ts and it’s saying, “Right, in this context…” So for a card, for example, make the image have a minimum height of X, and add a bit of padding here. Do this, that and the other. Put a button here. It’s just sort of additional rules on top of what’s already been inherited from the rest of the CSS. I think that’s probably the best way to describe it.
Andy: Whereas in BEM, the component is the source of truth. Until you put that class on the element, nothing has been applied at that point, and that method works. I just found I wrote more CSS by doing that, and more repetitive CSS, which I don’t like doing.
Drew: Would you consider the typography and the colors and the vertical rhythms, spacing, and all of that, is all that part of the idea of composition in this model?
Andy: Yeah. In a global CSS, yeah, absolutely. The vertical rhythm especially, and the flow. We did an article on that at 24 ways, didn’t we, a couple of years ago, the flow and rhythm component. That was a sort of abstract from this approach as well, where you set a base component which essentially uses the lobotomized owl selector. I don’t know how I’m going to describe that on the radio, but we will. We’ll just put, I think, in the show notes about the Heydon article or something. But essentially that, it selects child elements… sorry, sibling elements.
Andy: So it says, “Right, every element that follows element X have margin top of CSS costs and property value,” and then the beauty of that is then you can set that CSS custom property value on a compositional context as well. So you can say, “Right, in this component, if there’s some flow on the go, we’ll set flow space to actually be two rem because we want it to be nice and beefy, the wide space.” Then in another one you might say, “Actually, I want flow space to be half a rem because I want it to be tight.” This is all happening, all the control is coming from a higher level and then what you’re doing is, you’re adding contextual overrides rather than reinventing it each time, reinventing the same thing over and over again.
Drew: So that’s the C, Composition. Next we’ve got U, which is Utility. So what do we mean by utility?
Andy: So it’s a class that does one job, and it does it really well. That could be an implementation of a design token which… it’s an abstract of properties. Usually it’s colors or typography styles, sizing, and rules like that. The idea is you generate utility classes that apply those. So you’ve got a utility that will apply background primary, which is like the primary color, and then color primary, which is the text color. Then you might generate some spacing tokens for marginal padding, and all those sorts of things. They just do one job. They just add that one spacing rule, that one color rule, and that’s it.
Andy: But then you’ve got other utilities as well. So a good example is a wrapper utility. What that will do is, it will put a maximum width on an element and then it will put left and right auto margin to sit it in the middle of the thing. So it’s just got one job, and it’s just doing it efficiently and well.
Andy: So you’ve got your global styles, you’ve done a lot of your typography settings and a lot of your flooring space. Your composition’s then giving context and layout. Then utilities are applying tokens directly to elements to give them those styling that you need. So like a heading, for example, you’re saying, “I want this to be this size and I want it to have this lead in, and I want it to have this measure.” Then at that point… this is what I was saying about the blocks… then you go further down the stack, and you’ve already done most of the work at the point.
Andy: So they give you this really efficient way of working, and because HTML sort of streams down the pipe as well, it’s really nice to abstract the workload onto HTML rather than CSS as well, I’ve found. I used to really get into utility classes, like in this sort of old curmudgeon style of, “Oh, separation of concerns,” but I actually think it’s a really decent way of working. I mention in the article that I actually like Tailwind CSS. I think it does work, and I really like using it for product typing because I can really put something out really quick. But I think it just goes a little bit too far, does Tailwind, whereas I like to rain it in when it goes beyond just applying a single rule on a class. So that’s it, I think. Do you?
Drew: So, yeah, you talk in the article a lot about design tokens, which is something that we’ve talked about on the Smashing Podcast with Jina Anne back in episode three, I think it was. So it sounds like design tokens are a really fundamental aspect.
Andy: Yeah. Oh, God, yeah. I remember so vividly when Jina was doing the Lightning Design System stuff because I was building a design system at the time, or something that resembled a design system, and we were struggling to get executive approval of it. When the Lightning Design System came out, I literally just sent them link after link and I said, “This is what we’re doing. We’re building a design system. This is what Salesforce are currently using it for.” I remember her work at the time actually helped me to get stuff through the door.
Andy: Then the design token stuff has always stuck with me as being a really good way of applying these rules. Because I’m a designer by trade, so I can just sort of see that organization and the ability to organize and create a single source of truth being really useful because it’s something we’ve not really had in digital design, especially in the Adobe era of working with Photoshop and stuff, we just didn’t have that lUXury. We had it in print with the Pantone Book but we didn’t have it in digital with random hex codes all over the shop.
Andy: So it’s just great. I love that level of control. Actually, I think it aids in creativity because you’re not thinking about unimportant stuff anymore, you’re just thinking about what you’re doing with it.
Drew: Does the implementation of those design tokens matter particularly with the approach? Is it always CSS custom properties?
Andy: I think that’s a really important point with CUBE. Some of the responses I’ve had, people have struggled with this a little bit. There’s no mention of technology in it whatsoever. The only technology that’s consistent is CSS. You can do it however you want. You could do all this with whatever CSS and JS things people are doing now, or you could it with just Vanilla CSS. You could do it with Sass. I do it with Sass. Less, if that’s what you’re still doing. All these available technologies, post CSS, all these things. You can do however you want to do it, it doesn’t matter.
Andy: The idea is that if you follow those sort of constructs, you’ll be fine. That’s the idea behind it. It’s a very loose and not strict as some of the methodologies are. I’ve seen it with BEM especially, people get really ingrained in the principles of BEM to the point where it’s like you’re not even solving the problem anymore. I think that you’ve got to be flexible. I said it in this talk last year. I was like, “If you stick to your guns too tightly, you can actually cause problems for yourself in the long run because you try and follow a certain path, and you know it’s not working anymore.” You should always be flexible and work with a system rather than working to the letter to it.
Drew: So the B, the B is Block. You’ve talked about this idea, that by the time you get down to the block level, most of everything should be in place, and then the block level styling is only really concerned with the actual very detail of a particular component. Generally, is the concept of a block similar to what people will be familiar with?
Andy: Oh, absolutely, yeah. So imagine your BEM component and take all the visual stuff out of it, and that’s what you’re left with, essentially, the block. This is what I struggled to articulate when I first started thinking of this methodology. A block is actually really a C, it’s a composition, but that makes it really difficult because you’re into recursive territory there and I think people’s brains would explode. But really that’s what a block is, it’s actually another compositional layer but more of a sort of strict context, so like your card, your button, your carousel, if that’s what you like doing still, and all that sort of stuff.
Andy: It’s like a specific thing, a component, and then inside of there you’re setting specific rules for it to follow, really ignoring the rest so you’re not… You might apply tokens in the blocks, and I do do that still, but really it’s more layout orientated, is a block, as far as I work with them, or at least taking the token and applying it in a specific way, like a button hover status, stuff like that. So really your block should be tiny by the time you get down to them, they shouldn’t be really doing much at all.
Drew: So it could be as small as a hyperlink.
Andy: Yeah.
Drew: But it could also be a compound collection of other blocks?
Andy: Yeah. Like a module sort of thing. You could definitely do that. Because, again, that goes back to the sort of compositional aspect of it, is that whatever goes in it shouldn’t matter. The good example of that is like the card. So the content of a card is, say, like a heading, a summary and a button. You shouldn’t really be specifically targeting those three elements. You should be saying, “Look, anything that happens to find itself in content, have some flow rules in there and have some sort of compositional layout rules,” and then it doesn’t matter what you put in there. You might decide that you want to put an image in that content thing and it should just work, it should just look fine.
Andy: That’s the whole point of working with CSS. It’s a very forgiving way of working with CSS. You’re making your life a lot easier by being less rigid because when stuff accidentally finds itself in something, which it will, it doesn’t look horrific as it could do if you were being more specific about things, is what I’ve found.
Drew: I definitely need a lot of forgiveness around my CSS!
Andy: I know you do!
Drew: Cheers! So that’s the B. The last thing is E: E is Exception. Now we’re not talking about error messages, are we?
Andy: No, no. It’s a sort of-
Drew: We’re not talking about JavaScript exceptions.
Andy: Yeah, yeah. There should be none of that at this point. I should hope not anyway, otherwise you really are in the woods at that point: I don’t think I’m going to be able to help you! The whole idea of this is… so you’ve created the context with your block, and an exception is exactly that, it’s like an exception to the rule: so a flipped card, or it might be a ghost button. So you know those buttons that have just got a border and a transparent background? That would be an exception because a button has probably got a solid background color and then the label color. So it’s creating a sort of distinct state of variation.
Andy: The reason why I do this with data attributes instead of classes, and the reason why that is is because a) I think it’s nice to have a distinction. So when you’re scanning through lots of HTML, you can see data, hyphen something, you’re like, “Right, okay, something has definitely changed on this element.” The other thing is that it’s very nice to give JavaScript access to that state, and vice versa as well. So I really like applying state with data attributes in JavaScript. I think that is essentially what they’re for, a sort of communication layer. The harmony between them seems to work really well.
Andy: So a good example is, say you’ve got a status message and then JavaScript will add data state is either success, error or information, or something. You can then hook into that with your exception styles in CSS. So you know that’s an exception of the status component and it’s going against its default state. So it’s just a really handy way of working with things. It’s predictable on both ends: it’s predictable on the CSS end, and it’s predictable on the JavaScript end as well.
Drew: I guess it’s quite nice that something that class names don’t give you is a property and value. So if you want to have something like that which is the state, and it can either be success or failure or warning or what have you, you can specifically address that state property and flip its value. Whereas with a big long list of class names, if you’re manipulating that in JavaScript, for example, you’re going to have to look at each one of them and add that business logic in there that says, “I can only set one of these,” and what happens if two of those classes are applied to the same element? You can’t get that with a data attribute, it only has one value.
Andy: Yeah. That’s a good way of saying that, yeah. It is very helpful, I’ve found, to work like that.
Drew: That’s quite interesting. I don’t think I’ve seen any other methodologies that take that approach. Is that completely unique to CUBE, doing that?
Andy: It might be. I don’t really pay much attention to other stuff, which I should do. Someone else is probably doing that. I’ll tell you now, it’s been the most controversial aspect of it. Some people really did not like the idea of using data attributes. The thing is as well, and how I respond, is, do what you want. We’re not telling you to do things in a certain way, it’s just suggestions. If you want to do exceptions to CSS classes, like modifiers, then knock yourself out. The CUBE police aren’t going to come knocking at your door. It’s absolutely fine.
Andy: The CUBE thing is a thinking thing, it’s a structure. You apply that structure however you want to apply it, with what tooling you want, or whatever technology you want. As long as you keep things consistent, that’s the important thing.
Drew: So there’s no such thing as pure CUBE?
Andy: The way I write it is pure CUBE, Drew. Everyone else is just a fake, it’s just a weak immitation.
Drew: Apart from to you, no-one can say, “That isn’t textbook CUBE.”
Andy: No, that’s it. No-one can dispute that really, can they? So, yeah, I’ll go with that. Gives you a bit of clout or something, I think, something like that.
Drew: Can you mix and match a CUBE approach with other methodologies? Can you use bits of BEM?
Andy: Yeah, I reckon so. I’ve been thinking about it a little bit because I’m going to do some more stuff on it soon because it’s become quite popular, so people will want more work. One thing I’m going to look at is how to approach using the CUBE methodology with something existing.
Andy: So there’s two opposite ends of the scale. A good question that people have asked is: “How does this work with every layout, the other stuff?” I’m like, basically, every layout is the C. That’s what every layout is, it’s the compositional layer. Then someone else asked, “Well, how would this work with something like Atomic Web Design, like their stuff that Brad Frost did? It’s like, well, you could break those pieces up and apply them at each level. Atomic Design goes all the way down into the micro detail. It’s abstracting that into using, right, okay, well I can apply this with utilities, so the molecules, I think. I can apply that with the utilities, and it’s translating what you know already into this slightly different structure of working.
Andy: Really, it’s a renaming for a lot of things. I’ve not invented anything here, I’ve just sort of, like I say, I’ve just stolen things that I like. I love the way that some of the Atomic Design stuff is thought about. That’s really some smart work. And BEM. The stuff Harry did, the Inverted Triangle CSS, I thought that was really cool. So I’ve just sort of nicked bits that I like from each one of them and sort of stitched them all together into this other hybrid thing, approach. More to come, I think.
Drew: Can the CUBE approach be applied to existing projects that already have CSS in place or is it something you really need to start on a fresh project with?
Andy: That very much depends. So if you’ve got like a bootstrap job and it’s just got thousands of lines of custom CSS, that I’ve definitely been involved in before, then I think you might be trying to put a fire out with a bottle of water at that point. But if you… say, for instance, if you’ve got a rough BEM setup and it’s gone a bit layer-y, you could use CUBE to refactor and actually pull it back into shape again.
Andy: It depends, the answer to that one. But it’s doable, as with everything. If you really want it to work, Drew, you can do it if you want, can’t you? The world is our oyster!
Drew: Especially if your BEM site’s gone layer-y.
Andy: Yeah. Nothing worse than a layer-y BEM site!
Drew: I’ve noticed in the examples that you’ve given… and I’ve got an eagle eye, I’ve seen you’ve been doing this for a while… a lot of your class values in the HTML attribute are wrapped in square brackets.
Andy: Oh, God, yeah. Tell you what, Drew-
Drew: What is that about? What is that about?
Andy: I’ll tell you what, if there’s ever one thing that I’ve done in my whole career that’s just been absolutely outrageously controversial… and you follow me on Twitter, you’ve seen what comes out of my mouth… it’s those bloody brackets! My, God! People either love them or hate them. They’re Marmite, they are.
Andy: The reason I do them is a grouping mechanism. So if you look at the way that they’re structured, the way I do it is, block at the start and then I’ll do a utilities after that. Then what I might do is, in between a block group and a utility group, there might be another block class. So a good example of that would be… we’ll go back to the card again. But then say that there’s a specific block called a CTA, like a call to action. You might have that applied to the card as well, and then your utilities are enforcing the design attributes, so the colors and all that business. So then you’ve got three groups of stuff.
Andy: When you come to it, if you’ve got that order in your head each time, you know, okay, right, this first group’s blocks. Oh, that’s looks like another block. I’ve got that one. Then it’s like, right, they’re definitely utility classes. Then what I might even do is, if there’s a lot of design token implementation, have that in a separate group. So it’s just very clear what each group is doing, and there’s a separation inside of the classes there as well. I’ve found it really helpful. Some people find it incredibly offensive. It’s definitely a do it if you want to do it. Definitely you don’t have to do it.
Andy: It’s quite funny, when I published that article, so many people finished halfway through to ask me, “What is it with these brackets?” I was like, “Did you finish the article? Because there’s a big section at the end where it explains exactly what they’re doing,” to the point where I actually had to write a bit in the middle of the article of, “If the brackets are essentially doing your head in, click here and I’ll skip you all the way down to that explanation bit so you can just read about them.” It can be quite controversial.
Andy: When I’ve worked on really, really complex front-ends… and we did a little bit of stuff together, didn’t we, last year?
Drew: Yeah.
Andy: You’ve seen the sort of design implementation on that project that we were on. It requires that sort of grouping because there’s just so much going on at the time, there’s so much different stuff happening. I’ve just found it really, really useful over the years, and also get lots of questions about it, to the point where I was almost going to write just one page on my website that I could just fire people to to answer the question for them.
Drew: Slash, what’s with the brackets?
Andy: Yeah. Slash, brackets. Have you seen that new Hey Email thing that’s just come out? They’ve bought a domain of itsnotatypo.com, just to answer the whole Imbox, like im with an M rather than an in. Basically, I was like, “I think I need to do that,” like, whatswiththebrackets.com, and just do a one-pager about it.
Drew: It strikes me that the approach with brackets actually could be something that might be useful when using things like Tailwind or something that has a lot of classes because that can-
Andy: Yeah. Oh, God, yes.
Drew: You have classes that are addressing your break points and what have you, and then you’ll have things that are for layout, things that are for color or type, or what have you. So it might also be a useful way of dealing in situations like that.
Andy: I’d definitely agree with that. A good analogy… not analogy. A good bit of info about Tailwind is that I actually quite like Tailwind. I’ve used that on very big projects. The one thing that really opened my eyes to Tailwind though was when I saw a junior developer try to work out what was going on, and it was really, really eye-opening because they just didn’t have a clue what was happening.
Andy: I think that’s one problem I’ve found with these sort of over-engineered approaches, which I think it’s fair to say Tailwind is, is that there’s a certain skill level that is required to work with it. I know the industry tends to have an obsession with seniority now, but there’s still people that are just getting into the game that we need to accommodate, and I think having stuff that’s closer to the language itself is more helpful in those situations because they’re probably learning material that is the language as it is. So I think it’s just a bit more helpful. Especially having a diverse team of people as well. Just food for thought for everyone.
Drew: People might look at all the different methodologies that are out there and say, “This is evidence that CSS is terrible and broken, that we need… all these problems have to be solved by hacking stuff on top. We need tools to fix bits of CSS. We need strict procedures for how we implement it, just to get it to work.” Should the platform be adapting itself? Do we need new bits of CSS to try and solve these problems or are we all right just hacking around and making up funny acronyms?
Andy: I think the power of CSS, I think, is its flexibility. So if you’re going to program CSS, a lot of the knowledge is less of the syntax and more of the workings of a browser and how it works. I think that might be a suggestion, that the problem is that people might not have learnt CSS quite as thoroughly as they thought they might have learnt it, who created these problems. I’ve seen that in evidence myself. I spotted a spacing mechanism that had been invested, which was very complicated, and I thought, “This person has not learnt what padding is because padding would actually fix this problem for them, understanding how padding works and the box model.” That’s not to be snidey about it.
Andy: We work in an industry now that moves at an even faster pace than it has done previously and I think there’s a lot less time for people to learn things in detail. But, on that front, I think CSS still does have work to do in terms of the working group, who I think do a bloody good job. A great, shining example of their work was the Grid spec which was just phenomenal. The way that rolled out in pretty much every browser on day one, I thought that was so good.
Andy: But we’ve got more work to do, I think, and I think maybe the pace might need to increase a little, especially with stuff like container queries, we all love talking about them. Stuff like that I think would help to put CSS in a different light with people, I think. But I think CSS is brilliant, I love it. I’ve never had a problem with it in lots of years really. I do find some of the solutions a bit odd, but there you go.
Drew: What’s the response been like to CUBE since you published the article?
Andy: Mind-blowing. I honestly published it as just supporting material, and that’s all I expected it to be, and it’s just blown up all over the place. A lot of people have been reading it, asking about it, been really interested about it. There’s definitely more to come on it.
Andy: I did say in the article, I said, “Look, if people are actually quite interested in this, I’ll expand on this post and actually make some documentation.” I’ve got bits of documentation dotted around all over the place, but to sort of centralize that, and then I was thinking of doing some workshops and stuff. So there’s stuff to go. It’s how Every Layout started as well. We both had these scattered ideas about layout and then we sort of merged them together. So something like that, I suppose, will come in the future.
Drew: Are there any downsides that you’re aware of to using CUBE? Are there problems that it doesn’t attempt to solve?
Andy: Yeah. This accent, Drew, it just won’t go way, no matter what I do! In all seriousness, I think CUBE’s got as close as I can get to being happy with the front-end, which is saying a lot, I think. You never know, things might change again. This has evolved over more recent years. Give it another five years, I’ll probably be struggling with this and trying something else. I think that’s the key point, is to just keep working on yourself and working on what you know and how you approach things.
Andy: This definitely won’t work for everyone as well, I know that for a fact. I know that from my comments. I don’t expect it to work for everyone. I don’t expect anything to work for everyone. It’s the same with JavaScript stuff: some people like the reactive stuff and some people don’t. It is what it is. We’re all people at the end of the day, we all have different tastes. It’s all about communicating with your teammates at the end of the day, that’s the important thing.
Drew: I know you as a very talented designer and developer and you, like many of us, you’re just working on real projects all day, every day. But you’ve recently started publishing on this site, Piccalilli, which is where the CUBE CSS introduction article was. So Piccalilli is kind of a new venture for you, isn’t it? What’s it all about?
Andy: Very kind of you to say, Drew. You’ve actually worked with me, so that’s high praise. But the Piccalilli thing is an evolution. So I’m a freelancer. I do client work, but I think this has become apparent with the pandemic, that that is not the most sustainable thing in the world in some industries. I think freelancing can be very, very tough, as a developer and designer. It’s something that I’ve been doing it for so long now, 10 years… well, 12 years now actually.
Andy: I fancied doing something a bit different and applying the knowledge that I’ve got and actually sharing it with people. I’ve always been very open and sharing, and I wanted to formalize that. So I created Piccalilli to write tutorials, but mainly for courses that I’m producing: that’s the main meat and potatoes. And then there’s the newsletter which is… people are really enjoying the newsletter because I share cool things I’ve found on the internet every week. That’s the backbone of it. It’s just going really well. That’s essentially where I want to see myself doing more and more full-time, as the years go on, I think.
Drew: So what’s coming next for Piccalilli? Have you got anything that you’ve got coming out?
Andy: Thanks for the door open there, Drew! By the time this recording goes out, the first course will be live: Learn Eleventy From Scratch, and that’s where we learn how to build a Gatsby website! No, you learn how to build an Eleventy site. So you start off with a completely empty directory, there’s nothing in it, it’s empty, and then at the end of it you’ll finish up with this really nice-looking agency site. We learn all sorts in it. You learn how to really go to town with Eleventy. We pull remote data in from places. We use CUBE CSS to build a really nice front-end for it.
Andy: If you want to get into the Jamstack and you want to get into static site generators, or just how to build a nice website, it’s just a really handy course, I hope, for that. It’s currently being edited within an inch of its life as we’re talking. It’s going to be cool, I hope, and useful. But that’s an accumulation of a lot of stuff I’ve been doing over the last couple of years. So it should be fun.
Andy: So buy it, and I’ll do a discount code, do like smashingpod for 40% off, and you can get it when it comes out.
Drew: Amazing. We’ll link that up. Have you figured out how to spell Piccalilli reliably yet?
Andy: I was on with Chris and Dave with the ShopTalk Show and I said on there, “If there’s ever one thing you want to hire me for it’s to write Piccalilli by hand first time without even thinking about it,” because I’ve written that word so many times that I just know exactly how to spell it off by heart. So the answer to your question is yes.
Drew: Well, I’m still struggling, I’ll tell you that much!
Andy: It is hard. Oh, God. I totally empathize. It took me a long time to learn how to spell it but it’s one of those words in our vocabulary. This year I’m trying to spell necessary without making a spelling mistake!
Drew: So I’ve been learning all about CUBE CSS. What have you been learning about lately, Andy?
Andy: Do you know what? This is going to surprise you, Drew. MySQL is what I’ve been learning about recently. So, basically, Piccalilli is totally self-published. It’s an Eleventy site but it’s got an API behind it, and that’s got a MySQL database behind it. The stuff that gives people content that they’ve purchased requires some pretty hefty querying. So I’ve just actually properly invested in some MySQL… especially the difference between joins, which I didn’t actually realize there was a difference between each type of join. So that’s been really useful and it’s resulted in some pretty speedy interactions with the database.
Andy: I used to run this thing called Front-End Challenges Club and when I first launched it it just collapsed and died on itself because MySQL was shoddy to say the least. So I’ve really been learning how to do that because I’m not a backend person at all, I’m a pixel-pusher. So it’s definitely not in my remit. That’s more your neck of the woods, isn’t it? I find it really cool, MySQL. I actually really like writing it. It’s a really nice, instructional language, isn’t it?
Drew: It is, it’s great. I learnt SQL at school.
Andy: Wow!
Drew: We’re talking like 20 years ago now.
Andy: Did they have computers in those days?
Drew: They did, yeah. We had to wind-
Andy: Did you have to write it by hand?
Drew: We had to wind them up! We did. But, I tell you, for a developer, it’s akin to learning your times tables: one of those things that seems like a bit of a chore but once you’re fluent, it just becomes useful time and time again.
Andy: Yeah. For sure. There’s really tangible differences as well. You really see the difference in speed. I really like working with Node because that’s really fast but Node and MySQL is just… not a very common choice, but I think it’s a pretty good choice. I think it works really, really well. So I’m happy with that. As you know, I don’t like writing PHP. So that’s never going to be an option.
Drew: If you, dear listener, would like to hear more from Andy, you can follow him on Twitter where he’s at hankchizljaw. You can find Piccalilli at piccalil.li, where you’ll also find the article describing CUBE CSS, and we’ll also add links to all of those in the show notes, of course.
Drew: Thanks for joining us today, Andy. Did you have any parting words?
Andy: Stay safe, and wear your mask.
(il)
Website Design & SEO Delray Beach by DBL07.co
Delray Beach SEO
source http://www.scpie.org/smashing-podcast-episode-19-with-andy-bell-what-is-cube-css/ source https://scpie1.blogspot.com/2020/07/smashing-podcast-episode-19-with-andy.html
1 note
·
View note