#file renaming software
Explore tagged Tumblr posts
Visit Tumblr Blog
Explore Tumblr blogs with no restrictions, modern design and the best experience.
Last Seen Tumblr Blogs


Fun Fact
In February 2021, Tumblr had 518.6 million blog accounts.
Text
Advanced Renamer Download – Free Bulk File Renaming Software
Advanced Renamer is a powerful batch file renaming tool that allows users to rename multiple files and folders with ease. This free file renaming software enables you to configure various renaming methods to efficiently manipulate file names. Whether you need to rename images, videos, or documents, the Advanced Renamer download offers a streamlined solution with a user-friendly interface, making…
#Advanced Renamer download#Advanced Renamer free#Advanced Renamer Portable#Bulk Rename Utility#file renaming software#rename multiple files
0 notes
Text
after literally spending hours today on it, I now have a highish-quality version of the complete first My Hero Academia stage play. I'm going to go insane
#first i couldn't figure out how to download the video i found on the internet and had to get a workaround#the download kept failing so every few minutes for literally like an hour and a half i had to keep telling it to retry#i get that download and it's way lower quality than the original video i downloaded#i figure out if i just screen record the video i get a higher quality recording#but this video is 2.5 hours so i have to figure out if i can turn the volume down on my computer and still record the audio#(I can thank god)#i leave that going for a little while#get back to it 2.5 hours later#realize the screen recordings have a max length of 2 hours#start recording from half an hour back#eventually i have 2 recordings that have the entirety of the screenplay#it's been like 10 hours since i started though to be fair i did take a 3 hour break to watch the queen's gambit with my mom#i open up the video in editing software#my computer decides i don't have enough storage so i have to clear a bunch of stuff#i realize that the video title has japanese characters in it is interfering with the editing software#i rename the files#i recreate the video#i restitch them together seamlessly and clear the excess at the beginning and end#at some point i try to separate the audio and video on the software bc that's something it can do#realize this is a huge mistake bc the audio quality goes WAY down#get distracted by izuku's actor's singing during bakugou and shouto's fight during the sports fest#bc hot DAMN he can SING#i have no idea what he's saying but i am having FEELINGS#that's my favorite song#anyway. now i have it. i have the video#it's exporting now
3 notes
·
View notes
Text
idk if people on tumblr know about this but a cybersecurity software called crowdstrike just did what is probably the single biggest fuck up in any sector in the past 10 years. it's monumentally bad. literally the most horror-inducing nightmare scenario for a tech company.
some info, crowdstrike is essentially an antivirus software for enterprises. which means normal laypeople cant really get it, they're for businesses and organisations and important stuff.
so, on a friday evening (it of course wasnt friday everywhere but it was friday evening in oceania which is where it first started causing damage due to europe and na being asleep), crowdstrike pushed out an update to their windows users that caused a bug.
before i get into what the bug is, know that friday evening is the worst possible time to do this because people are going home. the weekend is starting. offices dont have people in them. this is just one of many perfectly placed failures in the rube goldburg machine of crowdstrike. there's a reason friday is called 'dont push to live friday' or more to the point 'dont fuck it up friday'
so, at 3pm at friday, an update comes rolling into crowdstrike users which is automatically implemented. this update immediately causes the computer to blue screen of death. very very bad. but it's not simply a 'you need to restart' crash, because the computer then gets stuck into a boot loop.
this is the worst possible thing because, in a boot loop state, a computer is never really able to get to a point where it can do anything. like download a fix. so there is nothing crowdstrike can do to remedy this death update anymore. it is now left to the end users.
it was pretty quickly identified what the problem was. you had to boot it in safe mode, and a very small file needed to be deleted. or you could just rename crowdstrike to something else so windows never attempts to use it.
it's a fairly easy fix in the grand scheme of things, but the issue is that it is effecting enterprises. which can have a looooot of computers. in many different locations. so an IT person would need to manually fix hundreds of computers, sometimes in whole other cities and perhaps even other countries if theyre big enough.
another fuck up crowdstrike did was they did not stagger the update, so they could catch any mistakes before they wrecked havoc. (and also how how HOW do you not catch this before deploying it. this isn't a code oopsie this is a complete failure of quality ensurance that probably permeates the whole company to not realise their update was an instant kill). they rolled it out to everyone of their clients in the world at the same time.
and this seems pretty hilarious on the surface. i was havin a good chuckle as eftpos went down in the store i was working at, chaos was definitely ensuring lmao. im in aus, and banking was literally down nationwide.
but then you start hearing about the entire country's planes being grounded because the airport's computers are bricked. and hospitals having no computers anymore. emergency call centres crashing. and you realised that, wow. crowdstrike just killed people probably. this is literally the worst thing possible for a company like this to do.
crowdstrike was kinda on the come up too, they were starting to become a big name in the tech world as a new face. but that has definitely vanished now. to fuck up at this many places, is almost extremely impressive. its hard to even think of a comparable fuckup.
a friday evening simultaneous rollout boot loop is a phrase that haunts IT people in their darkest hours. it's the monster that drags people down into the swamp. it's the big bag in the horror movie. it's the end of the road. and for crowdstrike, that reaper of souls just knocked on their doorstep.
114K notes
·
View notes
Text
Why PDQ Docs is the Ultimate Document Management Software for Your Business
In today’s fast-paced business environment, efficient management of documents is more critical than ever. Whether you're managing contracts, client files, or internal communications, having a reliable system to store, organize, and access documents can significantly improve productivity and reduce operational inefficiencies. This is where document management software comes in. Among the many options available, PDQ Docs stands out as a leading solution designed to streamline the way businesses handle their documents.

The Importance of Document Management Software
Document management software (DMS) is essential for businesses looking to optimize how they handle paperwork. Traditionally, companies relied on physical filing systems, which were not only space-consuming but also prone to errors, lost documents, and security risks. With the advent of digital solutions like PDQ Docs, businesses can now transition to more efficient, secure, and accessible methods of storing and managing their documents. By using DMS, businesses can automate the classification, indexing, and retrieval of documents, enabling faster and more accurate workflows.
In addition to improving productivity, document management software also enhances collaboration across teams. Employees can access the same files from different locations, ensuring real-time updates and reducing the risk of miscommunication. Furthermore, it significantly reduces the time spent searching for files, freeing up valuable resources to focus on more important tasks.
Why PDQ Docs is the Best Choice
PDQ Docs offers a comprehensive suite of features that makes it an excellent choice for businesses of all sizes. One of the key advantages of PDQ Docs is its user-friendly interface, which allows employees to quickly learn how to navigate the software without the need for extensive training. The platform is intuitive and requires minimal effort to set up, meaning businesses can start reaping the benefits of improved document management almost immediately.
Another standout feature of PDQ Docs is its cloud-based infrastructure. With cloud storage, your documents are securely stored online, ensuring they are easily accessible from anywhere, at any time. Whether you're in the office or working remotely, PDQ Docs guarantees that your files are just a few clicks away. The software also supports automated backups, reducing the risk of data loss due to unforeseen circumstances like hardware failure or natural disasters.
Security is always a concern when managing sensitive information, and PDQ Docs addresses this by offering robust security measures. Files are encrypted both in transit and at rest, ensuring that unauthorized users cannot access them. Additionally, the software supports customizable user permissions, allowing businesses to control who has access to specific documents and functions.
Conclusion
For businesses looking to improve their document management processes, PDQ Docs offers an all-in-one solution that delivers reliability, security, and efficiency. With its user-friendly interface, cloud-based storage, and robust security features, PDQ Docs is the ultimate document management software for businesses of all types. By adopting PDQ Docs, companies can not only reduce time spent searching for files but also improve collaboration and maintain a higher level of organization, ultimately contributing to their success in an increasingly competitive market.
#document management software#template management#document generation#document cloning#document renaming#document sending#document storage#file management#document organization#workflow automation#digital document solutions#paperless office#simplify workflow#document preparation
1 note
·
View note
Text
Streamline File Organization: Unleash Efficiency with Advanced Renamer
Advanced Renamer is a versatile software designed to simplify the process of batch renaming files in various formats. With its comprehensive set of features and user-friendly interface, it caters to the needs of both casual users and professionals seeking efficient file organization solutions. Features: Batch renaming of files and folders Support for numerous renaming methods and…

View On WordPress
#Advanced Tool#Batch Renaming#Bulk Renamer#File Renamer#Metadata Integration#Renamer#software#windows
0 notes
Text
Someone accessed my Gmail 2 days ago, compromising my linked accounts like Twitter and YouTube. Here's how it happened, why I fell for it, and what you can learn to avoid making the same mistake:

The scam I fell victim to was a cookie hijack. The hacker used malicious software to steal my browser cookies (stuff like autofill, auto sign in, etc), allowing them to sign in to my Gmail and other accounts, completely bypassing my 2FA and other security protocols.
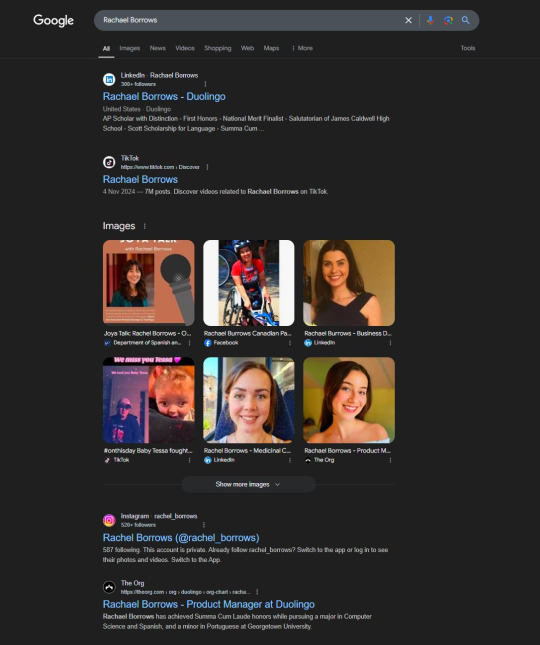
A few days ago, I received a DM from @Rachael_Borrows, who claimed to be a manager at @Duolingo. The account seemed legitimate. It was verified, created in 2019, and had over 1k followers, consistent with other managers I’d seen at the time n I even did a Google search of this person and didnt find anything suspicious.

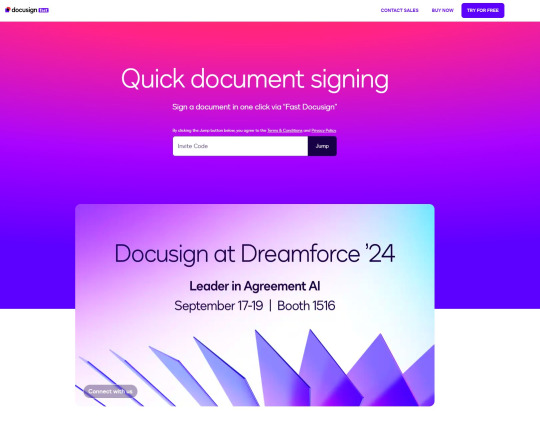
She claimed that @Duolingo wanted me to create a promo video, which got me excited and managed to get my guard down. After discussing I was asked to sign a contract and at app(.)fastsigndocu(.)com. If you see this link, ITS A SCAM! Do NOT download ANY files from this site.
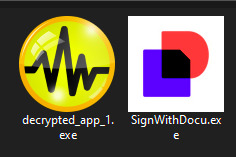
Unfortunately, I downloaded a file from the website, and it downloaded without triggering any firewall or antivirus warnings. Thinking it was just a PDF, I opened it. The moment I did, my console and Google Chrome flashed. That’s when I knew I was in trouble. I immediately did an antivirus scan and these were some of the programs it found that were added to my PC without me knowing:
The thing about cookie hijacking is that it completely bypasses 2FA which should have been my strongest line of defense. I was immediately signed out of all my accounts and within a minute, they changed everything: passwords, 2FA, phone, recovery emails, backup codes, etc.
I tried all methods but hit dead ends trying to recover them. Thankfully, my Discord wasn’t connected, so I alerted everyone I knew there. I also had an alternate account, @JLCmapping, managed by a friend, which I used to immediately inform @/TeamYouTube about the situation
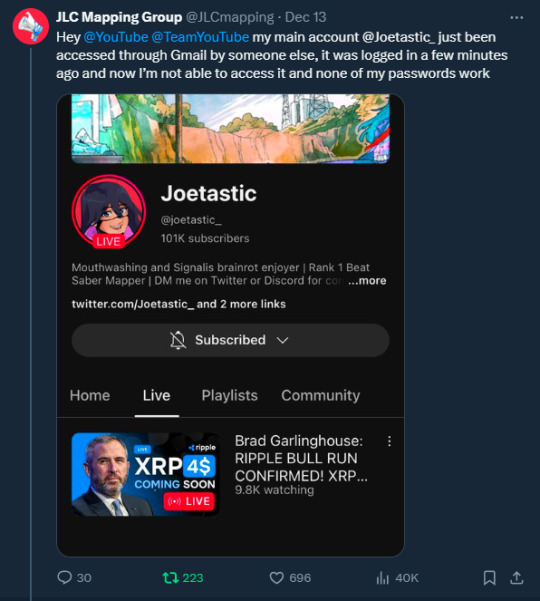
Meanwhile, the hackers turned my YouTube channel into a crypto channel and used my Twitter account to spam hundreds of messages, trying to use my image and reputation to scam more victims
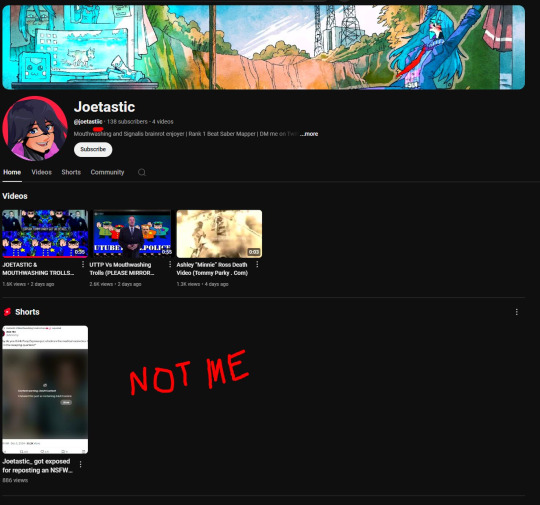
Thankfully, YouTube responded quickly and terminated the channel. Within 48 hours, they locked the hacker out of my Gmail and restored my access. They also helped me recover my channel, which has been renamed to JoetasticOfficial since Joetastic_ was no longer available.
Since then, I’ve taken several steps to secure my accounts and prevent this from happening again. This has been a wake-up call to me, and now I am more cautious around people online. I hope sharing it helps others avoid falling victim to similar attacks. (End)
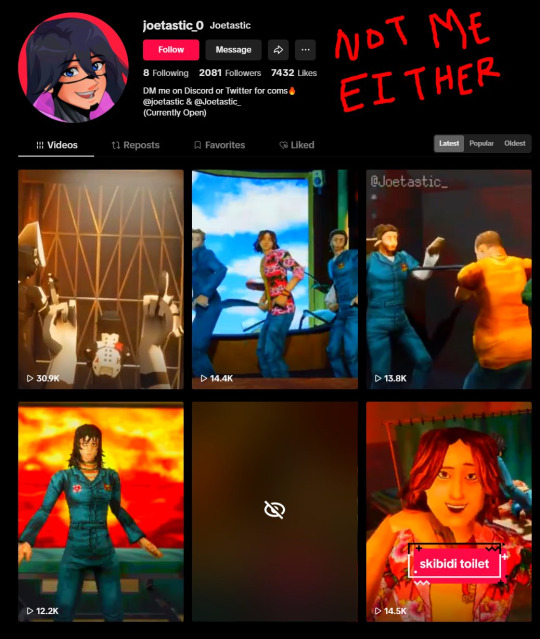
(side note) Around this time, people also started to impersonate me on TikTok and YouTube. With my accounts terminated, anyone searching for "Joetastic" would only find the imposter's profiles. I’m unsure whether they are connected or if it’s just an unfortunate coincidence, but it made the situation even more stressful.
3K notes
·
View notes
Text
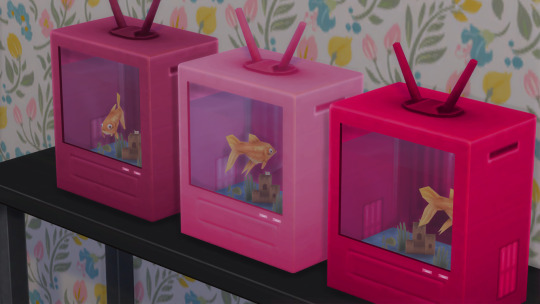

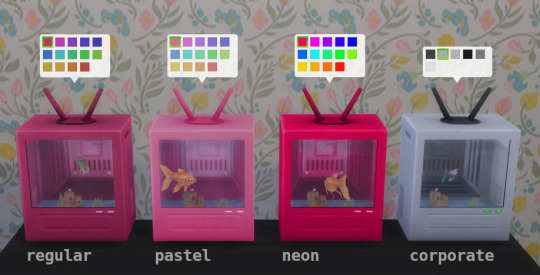
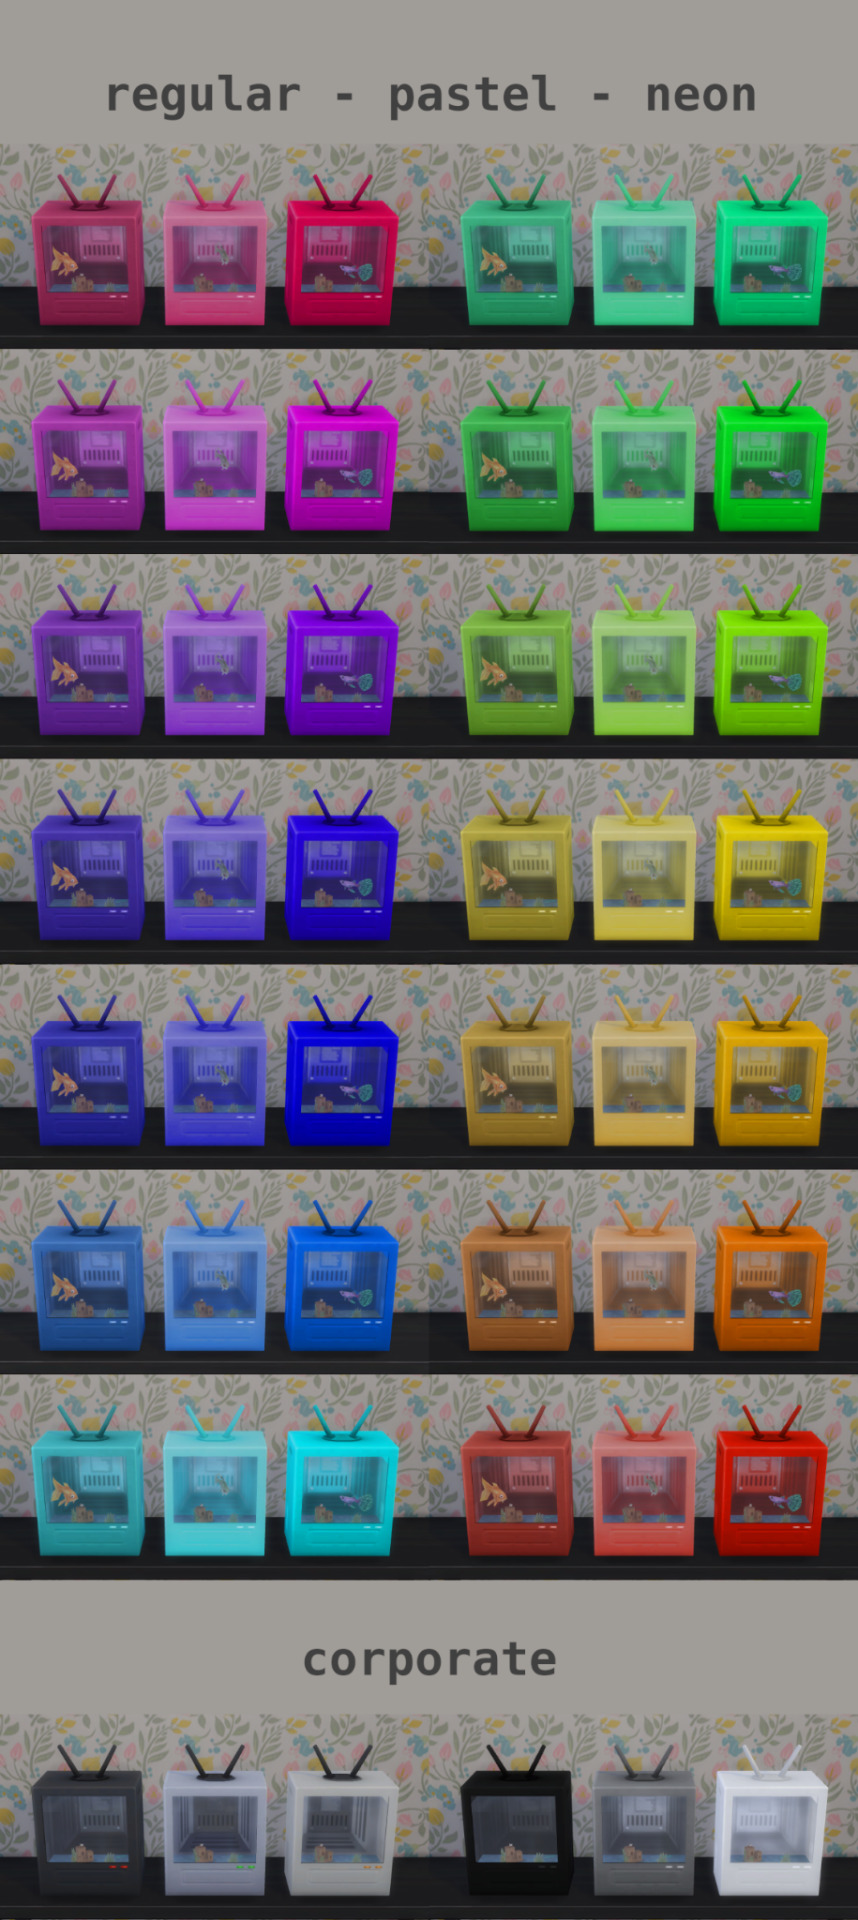
AquaTV
(TV CONVERTED TO FISH TANK)
Are you tired of paying for hundreds of channels and a dozen of subscriptions that you never use? Do you often need to recharge in nature, but you can't be bothered to get up? AquaTV is the AquaSolution to all these problems, and more! Comes with the most immersive documentary known to simkind. Don't forget to feed it!
Swatches: 14 (regular, pastel, neon), 6 (corporate)
Polygon count: 443
Custom thumbnails
Appears in game as: AquaTV
Credits // Software: S4Studio, GIMP, Blender / Sites: Canva / Mesh: mostly EA (some parts were modified by me) / Textures: EA (partly modified, also recolored)
Terms of Use // Free to modify mesh/textures/whatever under the conditions that you're not a bigot, you don't paywall it and you give credit. Don't forget to rename the file to remove my name from the item.
MEDIAFIRE - SIMFILESHARE (regular palette)
MEDIAFIRE - SIMFILESHARE (pastel palette)
MEDIAFIRE - SIMFILESHARE (neon palette)
MEDIAFIRE - SIMFILESHARE (corporate palette)
#sims 4 cc#sims 4 decor#sims 4 custom content#ts4#s4cc#maxis match#s4 custom content#sims 4#ts4cc#simblr#sims cc#s4mm
469 notes
·
View notes
Text
USEFUL SOFTWARE FOR THE SIMS 2

This is a list of programs that will make your life easier if you're an avid Sims 2 player. Click on program titles to get download links.
SimPE The most known software for The Sims 2 that lets you edit package files. You can do basic stuff like rename a Sim, change family name, edit Sims' genetics as well as edit/create mods. Don't use if you have no idea what you're doing, watch a tutorial first or back up your neighborhood beforehand in case you mess something up! The newest version also has a terrain editor.
Sims2Pack Clean Installer The best program for installing downloaded lots and Sims. Those don't just go into Downloads, you need to install them!
Hood Checker This program checks neighborhood references and can clean out ones that are broken. Also useful for bringing back lost graves (it's still good to have NoUnlinkOnDelete).
HCDU Plus The Hack Conflict Detector Utility lets you scan your Downloads folder to check if you have any mods that edit the same aspect of the game, so can potentially be in conflict. Also useful to navigate which mods load first (load order is important for some mods to work).
What Caused This When you have 'testingcheats' on, the game gives you error messages if there's something going on. Not all of them mean there's a serious problem, but What Caused This can help you navigate what the source is. Upload the log file (Documents/EA/TS2/Logs) in the program, give it your Downloads folder and it will scan it to look for the culprit. Might give you straighforward information on which mod conflict caused the issue or that you lack Smarter EP Check for a mod that requires it.
The Compressorizer You can compress your Downloads to take up less space.
Delphy's Download Organiser You can filter your files to a certain category, scan for orphans (files that don't fully work if other files are missing, such as meshes), duplicates, and clean up your Downloads folder in an easier way than trying to track it inside the folder manually.
Outfit Organiser You downloaded CC clothes that the creator marked as outerwear but you think they don't fit in that category? With this program you can quickly change that! It's also doable in SimPE, but Outfit Organiser is a lot easier to use.
CPack Editor If you want to make plastic surgery genetic, there's no need to do it manually in SimPE, especially if it's more than one Sim. In CPack Editor, you just choose your neighborhood's folder, run the program, and it changes ALL surgery faces in that neighborhood to genetic!
Lot Adjuster This program lets you edit already existing lots. If you want a smaller or bigger lot than possible in-game, you can do it here! Also great for creating pavilions or row houses that are all separate lots, as you can get rid of the 2-tile border separating buildings by making the lots smaller and copying them.
790 notes
·
View notes
Text
some of yall need to name your packages properly. use camelCasing or PascalCasing. not into that? separate each word with an underscore (_) or hyphen (-)
"but i like it cute and aestheti-"
i don't care. a week ago, i ran my folder for a batch fix and s4s skipped one file because the filename contained a damned special character. i just renamed it and ran that specific package again.
"then why can't you rename it?"
yeah thanks for the bulk rename software, but it's still annoying and saves more time if yall named your stuff properly
i don't mind the brackets to enclose your creator name, BUT PLEASE stop with the script fonts, stop with the heart stuff i swear to god
429 notes
·
View notes
Text
TOPAZ AI TUTORIAL
i was asked to do a tutorial for Topaz AI (a software that enhances screencaps), so here it is! :)
[tutorial under the cut]
i’m going to gif a 720p YouTube video from 12 years ago as an example. it’s the bottom of the barrel when it comes to image quality, but in the end, you won’t believe it was once so shitty. here’s the gif, without any editing:

THE APPLICATION
Topaz AI is a paid software for image enhancement. you can download it for free, but your images will have watermarks. here's a random link that has nothing to do with this tutorial.
you can use Topaz AI as a Photoshop plugin or use the software separately. i will explain both methods in this tutorial.
USING SEPARATELY
it’s the way i do it because it’s more computer-friendly, the plugin can take a toll on your PC, especially when you’re dealing with a lot of screencaps.
you first take screencaps as you normally would (if you don’t, here’s a tutorial on how to do it). open Topaz AI and select all the images. wait a while for the software to do its thing.

on the left, there is your screencap untouched. on the right, is your edited version. if you click the edited screencap and hold, Topaz will show you the original, that way you can compare the versions even better than just looking at them side by side.
Topaz AI will automatically recognize faces, if any, and enhance them. this can be toggled off, by disabling the “recovering faces” option in the right panel. it’s always on for me, though. you can tweak this feature by clicking on its name, the same thing for the others.
Topaz AI will also automatically upscale your screencaps if they’re too small (less than 4k). it will upscale them to achieve said 4k (in this gif’s case, the original 1280x720 screencaps became 4621x2599). i suggest that you let the app upscale those images, giving you more gif size flexibility. you can change into whatever size you want if you want something less heavy to store. don’t worry though, even these “4k screencaps” are very light megabytes-wise, so you won’t need a supercomputer. it might take a while to render all your screencaps, though, if you’re on a lower-end computer. (the folder with the edited screencaps ended up being 1GB, but that’s because it contains 123 screencaps, which is a lot of screencaps for 4k giffing).
two options won’t be automatically selected, Remove Noise and Sharpening, you will need to enable them to use them. rarely i don’t use Remove Noise, as is the best tool to remove pixelization. the Sharpening option depends on the gif, sometimes your gif will end up too over-sharpened (because of Topaz’s sharpening and later your own). that said, i used the Sharpening option on this gif.

next, select all images by clicking the “select all” button. you will notice that one of the screencaps’s thumbnails (in my case, the first one) will have small icons the others don’t have. this is the screencap you enhanced. you will need to click the dots menu, select “apply”, and then click “apply current settings to selected images”. this way, every screencap will have the same settings. if you don’t do this step, you will end up with one edited screencap and the rest will remain untouched!

all things done, click “save X images”. in the next panel, you can select where to save your new screencaps and how you want to name them. i always choose to add a topaz- prefix so i know what files i’m dealing with while giffing.
just a note: if your way of uploading screencaps to Photoshop is through image sequence, you will need to change the names of your new screencaps so PS can perceive that as a sequence (screencap1, screencap2, etc). you can do that by selecting all the screencaps in your folder, then selecting to rename just one of them and the rest will receive numbers at the end, from first to last. you don’t need to rename them one by one.
here’s the first gif again, without any editing:
without Topaz enhancement but with sharpening:

without sharpening, only the Topaz enhancement:

with Topaz enhancement and sharpening:

her skin is so smooth that it is a bit unrealistic. i could have edited that while tweaking the “Recovering Faces” option and/or the “Remove Noise” option, but i prefer to add noise (filter > noise > add noise) when necessary. this way, i don’t risk not enhancing the quality of the screencaps enough.

i added +3 of noise, making the gif look more natural. it’s a subtle difference, but i thought it necessary one in this case. you can continue to edit your gif as your heart desires.
VOILA! 🥳
AS A PHOTOSHOP PLUGIN
if you have Topaz AI installed on your computer, Photoshop will recognize it. you will find it in filter > Topaz Labs > Topaz AI. while in timeline mode, select the filter. the same Topaz AI window will pop up and you can tweak things the same way you do when you use the software separately. by using the plugin, you don’t need to upload your edited screencaps or use screencaps at all, a video clip (turned into a Smart Layer, that is) will suffice. the downside is that for every little thing you do, Topaz AI will recalculate stuff, so you practically can’t do anything without facing a waiting screen. a solution for that is to edit your gif in shitty quality as you would edit an HD one and at the very end, you enable Topaz AI. or just separately edit the screencaps following the first method.
this is it! it's a very simple software to use. the only downside is that it can take a while to render all screencaps, even with a stronger computer, but nothing too ridiculous.
any questions, feel free to contact me! :)
#*#alielook#usershreyu#userlaro#userchibi#tusernath#usersanshou#userbunneis#userzil#tuserlou#jokerous#usersnat#userdavid#userbuckleys#userbarrow#gif tutorial#completeresources#ps help#resources#*tutorials
268 notes
·
View notes
Text
useful information: How to get a USB Blu-Ray player to work on your computer
Not a post about vintage technology, just an explanation of what you think might be simple to do but isn't: There are Blu-Ray players that plug into your computer by USB, and you discover that just plugging it in doesn't make it work* in the same manner that CD-RWs or DVD-RWs are automatically recognised and function. You will see "BR Drive" in My Computer and the name of whatever movie you have inserted, but that's as far as you're able to go.
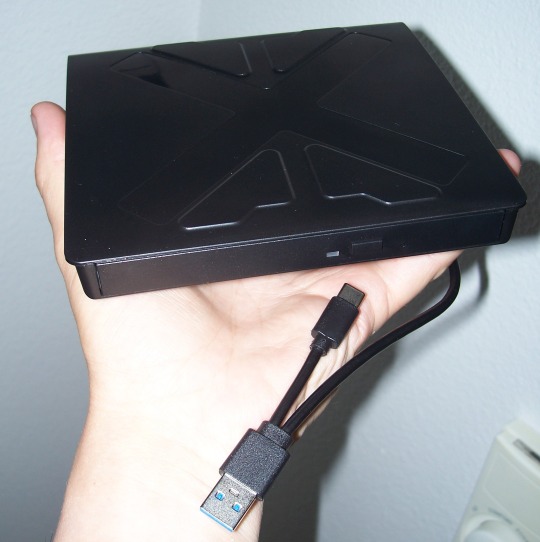
*There is software you can buy to make a Blu-Ray (internal or external) function, sure, and if an internal came with your computer it's likely already installed -- but if you're like me you don't have that software, you're cheap and won't pay for software, and you want to use what you have installed already or find free solutions.
Looking in the Blu-Ray drive's package, there's not a lot of info about what you're supposed to do. The above no-name Blu-Ray player cost $40 from a popular website; name-brand ones can set you back $120 or so. Looking around online for those instructions, I never saw the whole set of directions in one place, I had to cobble them together from 2 or 3 sites. And so here I share that list. To keep out of trouble, I'm not linking any files -- Google will help you.
Get VLC, the free video player available for pretty much any operating system. Thing is, it doesn't come with the internals to make it work with Blu-Ray even if when you go to the Play Media menu there is a radio button for selecting Blu-Ray.
Get MakeMKV, a decoder for reading Blu-Ray disks. This had been totally free during the beta testing period but it's come out and has a month or two trial period you can work in.
Get Java if you don't already have it. Reason for this is, the menu systems on Blu-Ray disks uses this... technically it's not required, however it does mean you don't have options such as special features, language and sound changes, or scene selection if you don't have Java installed; insert a disk, it can only play the movie.
Get the file libaacs.dll online so you have AACS decoding. I am told it hasn't been updated in awhile so there may be disks produced after 2013 that won't work right, but you won't know until you try.
There's a set of keys you will also want to have so that the player knows how to work with specific disks, and so do a search online for the "FindVUK Online Database". There will be a regularly-updated keydb.cfg archive file on that page to pick up.
Got those three programs installed and the other two files obtained? Okay, here are your instructions for assembly...
In VLC: go to Tools, Prefs, click "show all"… under the Input/Codecs heading is Access Modules then Blu-Ray: Select your region, A through C. You can change this if you need to for foreign disks. Next related action: go to My Computer and C:, click into Program Files and VLC, and this is where you copy the libaacs.dll file to.
In MakeMKV: click View, then Preferences, and under Integration - add VLC.
Confirm that Java is set up to work with VLC by going to the computer's Control Panel, going to System Properties, and into Environment Variables. Click System Variables, and click New to create this key if it doesn't already exist: … Name: Java … Value: [the location of the Java 'jre#.##' folder... use Browse to find it in C:\Program Files\Java]
Let's go back into My Computer and C:, this time go to Program Data, and then do a right-click in the window and select New and Folder. Rename this folder "aacs" (without the quotes), and then you click into it and copy the keydb.cfg file here.
REBOOT.
And now you should be able to recognise Blu-Ray disks in your player and play them. Three troubleshooting notes to offer in VLC:
"Disk corrupt" -- this means MakeMKV has not decoded and parsed the disk yet, or that you don't have the libaacs.dll in place so that it can decode the disk. ...After checking the VLC folder for the DLL to make sure, launch MakeMKV, then go to File, Play Disk, and select the Blu-Ray drive. Now it will grind a bit and figure out the disk's contents.
A note appears when a movie starts saying there will be no menus, but the movie plays fine -- Java isn't running. ...Invoke Java by going to the Java Settings in Start: Programs. You don't have to change anything here, so Exit, then eject the disk and put it back in to see if the movie's menu now appears.
Buffering between chapters, making the movie pause for a few seconds? There is a setting for this but I need to find that info page again for where that is. (If you find it, tell me where it is!)
I don't claim to know a lot but if you have any questions I might have some answers or suggestions. So far I've watched "Office Space" and Disney's "Coco" without any issues beside occasional buffering.
87 notes
·
View notes
Note
Hi, would you consider doing a tutorial for your main menu mod? It's lovely and I like how you sharpened the edges of the boxes.
There may already be tutorials about this, but I haven't found any so will do a small tutorial myself ^^ (also not quite sure what you meant by sharpening box edges, i don't think i did but lmk if i just didn't understand something)
✨🌳 Making a Main Menu Replacement for the Sims 4 🌳✨

❕ You'll need: • Sims 4 Studio • JPEXS Decompiler • Image editing software (Photoshop/Photopea/etc.)
👉 And download my TEMPLATE 🌷
🠇 Full Tutorial Under The Cut 🠇
1
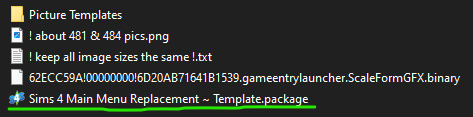
🖼️ Open my template archive and get the picture templates - open them in image editing program and change to whatever you want (but don't change their dimensions, sizes and names!)
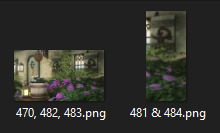
I've also included a little explanatory pic of how to create '481 & 484' image.
2
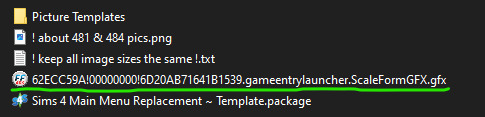
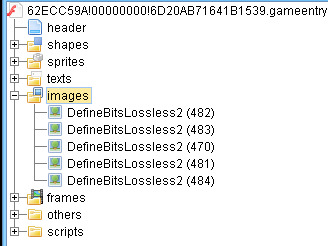
✳️ Launch JPEXS decompiler (ffdec.exe), open the .gfx file from my archive - 62ECC59A!00000000!6D20AB71641B1539.gameentrylauncher.ScaleFormGFX.gfx (In the popup warning about SWF assets press "No to all")
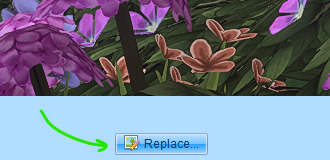
🔄 Under 'images' tab you'll see image entries called DefineBitsLossless2 (482,483...) - click on and replace each of them with your edited pics using 'Replace..." button at the bottom - according to their numbers.
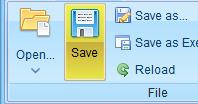
💾 Once it's done, press "Save" and close the program.
3
⚙️ Change the extension of that .gfx file to .binary (by typing binary instead of gfx at the end - you'll need to toggle 'File name extensions' in View catogory of Windows folder panel). Press 'Yes' on warning.

4
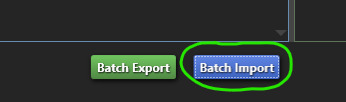
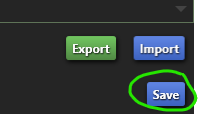
✳️ Open 'Sims 4 Main Menu Replacement ~ Template' package with S4S, press 'Batch Import' and choose the (now) .binary file you edited - 62ECC59A!00000000!6D20AB71641B1539.gameentrylauncher.ScaleFormGFX.binary. It will replace the existing entry, visually nothing will change.

💾 Don't forget to save!
5
📁 Rename the template package to your liking and put it in Mods folder. That's it! Let me know if anything wasn't clear enough ^^
~~~~~~~~~~~~~~~~~~~~
☽ CREDITS: • sigma1202 ~ Loading screen making tutorial (my tutorial is basically a copy of it with some adjustments) • @lama-lama ~ Main menu replacements (i took the initial package file from lama-lama's replacements <3 check them out, they're beautiful!)
🤍
104 notes
·
View notes
Text
ACNL CUSTOM VILLAGER/NPC/NPC VILLAGER GUIDE 2025
PLEASE READ THROUGH EVERYTHING BEFORE ATTEMPTING!!!
I AM NOT RESPONSIBLE FOR ANYTHING THAT HAPPENS WITH YOUR 3DS OR GAME!!!
PLEASE BACKUP YOUR FILES BEFORE ATTEMPTING!!!
Hi! I'm here to make a guide on how to make a custom villager/switch an npc to a villager in 2025, since there are not a lot of guides, and any guides out there are now old and obsolite
WHAT YOU'LL NEED:
A hacked 3DS with CFW
Computer
7-Zip or Winrar
Animal Crossing: New Leaf (cartridge or digital)
Any Image Editing Software (i.e FireAlpaca, Gimp, Photoshop)
Ohana 3DS [link]
Ohana 3DS Rebirth [link]
HxD [link]
First things first- you're gonna need the romfs files of your game. The way to get them is through GM9 (GodMode9) The way to acsess GM9 is to turn on your 3DS, and as it boots up, hold down the START button.
Besides editing the sprites, this will be the LONGEST part out of this entire process. The romfs has EVERY SINGLE GAME ASSET, so youre basically dumping every single thing from the game onto your SD. For me, this took ALMOST 2 HOURS, so be ready!
FOR CARTRIDGE
Go to [C:] GAMECART ()
Go to the file that has .3ds (NOT THE .trim.3ds)
Click NCSD image options…
Click Mount image to drive
Click yes when prompted
Click content0.game
Go down to romfs and hit Y to copy the romfs files
You can now paste the romfs files to any folder on your SD, but if you want to be organized, created a designated folder for your romfs on the root of your SD
To get to your SD, go back by hitting B until you get to the first page
Go to [0:] SDCARD and click on it, and you'll be in your SD card.
Find the folder you'd like to paste your romfs in
Open the folder and hit Y to paste the romfs, and now you wait
FOR DIGITAL
Hit the Home Menu button in GM9
Go down and click on Title manager
Click [A:] SD CARD
Find Animal Crossing: New Leaf
Go to Open title folder and click it
Click 00000000.app
Click NCSD image options…
Click Mount image to drive
Click yes when prompted
Click content0.game
Go down to romfs and hit Y to copy the romfs files
You can now paste the romfs files to any folder on your SD, but if you want to be organized, created a designated folder for your romfs on the root of your SD
To get to your SD, go back by hitting B until you get to the first page
Go to [0:] SDCARD and click on it, and you'll be in your SD card.
Find the folder you'd like to paste your romfs in
Open the folder and hit Y to paste the romfs, and now you wait
When that is finished, power off your 3DS, eject your SD, and put it into your computer.
Move your romfs to your computer or a USB, that way you don't have them clogging your 3DS' SD and you have a backup of the vanilla files
To keep things organized, make a folder to copy any files you're going to edit to that folder.
Finding NPC files
FOR VILLAGERS
romfs> Npc> Normal> Model
There you can find the .bcres files of every villager
FOR NPCs
romfs> Npc> Special> Model
There you can find the .bcres files of every NPC
Open Ohana3DS rebirth to open and view the .bcres files so you can find the villager or NPC you're looking for
Once you find them, copy them to your desiganted folder
If you want to edit a villagers name you'll need the STR_NNpc_name.umbst file
To find the file go to romfs> Script> Str and find the file, then copy it to your designated folder
If you want to edit your villager's icon go to
romfs> Item> Model
the file will look like brm_(villager id).bcres , FOR EXAMPLE brm_mus17.bcres
When making an NPC into a villager, you're going to have to find a villager to replace. FOR EXAMPLE I edited Sabel and replaced Penelope, so I renamed Sabel's file, hgc.bcres, to mus17.bcres
EDITING THE VILLAGER/NPC
use this guide when it comes to editing the textures and renaming your villager [link]
LOADING YOUR FILES
Now that you have finished your character, heres how you'll put your files on your SD so they'll load into the game
Put your 3DS's SD card into your computer
on the root, located the luma folder
now go to luma> titles> and find Animal Crossing: New Leaf's title ID
US title ID's are
0004000000198F00 for New Leaf
0004000000086300 for Welcome Amiibo
If there is no title ID folder for ACNL, make one
Inside the title ID folder make a romfs folder
In the romfs folder, make a folder for whatever files you edited, so if you edited an NPC, the script, and the NPC icon make 3 folders and name them: Item, Npc, Script
Lets start with Npc first, if you edited a villager or replacing a villager with an NPC, open the Npc folder, make a folder named Normal, open the Normal folder, and make a folder named Model, and in the Model folder put your .bcres file
So luma> title> (title ID)> romfs> Npc> Normal> Model
If you edited an NPC open the Npc folder, make a folder named Special, open the Special folder, and make a folder named Model, and in the Model folder put your .bcres file
So luma> title> (title ID)> romfs> Npc> Special> Model
Now with the script, open the Script folder, and in the Script folder, make a folder named Str, and in the Str folder is where you'll put the .umsbt file
So luma> title> (title ID)> Script> Str
Finally, the villager icon. In your Item folder, make a folder named Model, and in your Model folder, put in the .bcres file that is the villager's icon
So luma> title> (title ID)> Item> Model
Once you have finished that, put your SD back into your 3DS, turn on your console, boot up Animal Crossing, and your custom villager should be there waiting!!
That's All!!
#fan#fandom#animal crossing#animal crossing new leaf#animal crossing hacking#hacking#hack#acnl#ACNL#custom#customs#3DS#3ds#CFW#cfw#rom hack#rom hacking#guide#animal crossing hacks#mod#modding#tutorial#nintendo#Nintendo#Nintendo 3DS#nintendo 3ds#villager
17 notes
·
View notes
Text
PDQ Docs: The Ultimate Document Management Software for Modern Businesses
In today’s fast-paced business environment, managing documents efficiently is crucial to maintaining productivity, ensuring compliance, and streamlining workflows. Companies are constantly seeking tools that can simplify the document management process while maintaining accuracy and consistency. PDQ Docs is the ultimate document management software that offers businesses a robust solution for organizing, automating, and securing their documents. This powerful software enables organizations to manage their documents with ease, improving overall efficiency and reducing the risk of errors.

What Makes PDQ Docs the Ultimate Document Management Software?
PDQ Docs stands out as the ultimate document management software due to its comprehensive features and user-friendly interface. Designed to meet the needs of businesses of all sizes, PDQ Docs provides a central platform to store, organize, and manage all types of documents. With its cloud-based system, businesses can easily access documents from anywhere, on any device, ensuring seamless collaboration across teams and locations.
The software allows businesses to automate document creation, eliminating the need for manual data entry and reducing the risk of human error. Whether it’s contracts, invoices, or reports, PDQ Docs allows users to generate documents with pre-set templates, automatically populating them with relevant data. This not only speeds up document creation but also ensures consistency across all documents, reflecting the organization’s professional standards.
Simplified Workflow Automation
One of the primary benefits of PDQ Docs as the ultimate document management software is its ability to automate workflows. In today’s business landscape, where time is of the essence, manual document management processes can slow down productivity. PDQ Docs solves this problem by automating routine tasks, such as document creation, data entry, and document approval processes.
Enhanced Collaboration and Document Sharing
Collaboration is a key component of modern business operations, and PDQ Docs excels in enabling teams to work together efficiently. The ultimate document management software provides a centralized document repository, where team members can easily access, review, and edit documents in real-time. This reduces the risk of version control issues and ensures that all team members are working from the most up-to-date version of a document.
Furthermore, PDQ Docs allows users to share documents securely with clients, vendors, or other stakeholders. The software ensures that all shared documents are protected with encryption, providing businesses with peace of mind that their sensitive information is secure. With robust access control features, businesses can also restrict who can view or edit documents, ensuring that only authorized individuals have access to critical information.
Seamless Integration with Existing Systems
Another standout feature of PDQ Docs is its seamless integration with a variety of third-party software solutions. Whether your business uses accounting, customer relationship management (CRM), or enterprise resource planning (ERP) software, PDQ Docs can integrate with these systems to provide a cohesive solution for managing documents. This integration reduces the need for manual data entry, ensuring that all information across platforms remains synchronized and up-to-date.
#ultimate document management software#seamlessly navigate#template management#document generation#document cloning#document renaming#document sending#workflow optimization#efficient document generation#document preparation#enterprise document management#workflow automation#business process management#document archiving#document automation tools#secure file management
0 notes
Text
I figured out how to rip DOTDD Models and now I'm teaching you! (plus uploading mine)

^ download these things onto your computer devices anytime!
Last summer I spiraled into insanity trying to figure out and eventually gave up so now that I know I'm saving you the trouble! I've also put all of my rips into a drive folder here that contains most of the notable npcs + playable characters but I'm planning on submitting them to modeler's resource when I have the time.
Final disclaimer: i also don't know much about ripping / romhacking / blender / computers in general but I thought it would be nice to put up what I've figured out anyway. I've also never actually written a guide to anything before so uh. i hope this is clear enough. Now finally onto the tutorial itself!
You'll need: tinke / apicula / a dotdd rom (not important if its in english or not but if you want like some of the translated ui elements / fonts you might wanna use a ver w the fantranslation patch) / and (optionally) blender or whatever other 3d modeling software that can read .dae files so you can actually do stuff with these.
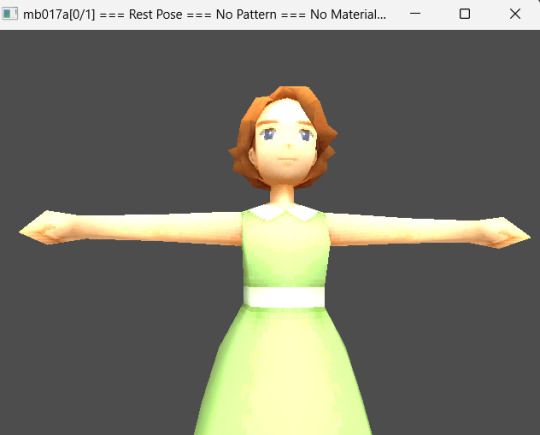
First is to launch Tinke and load in your dotdd rom, you'll then be met with this menu. the models are contained under the "mdl" tab
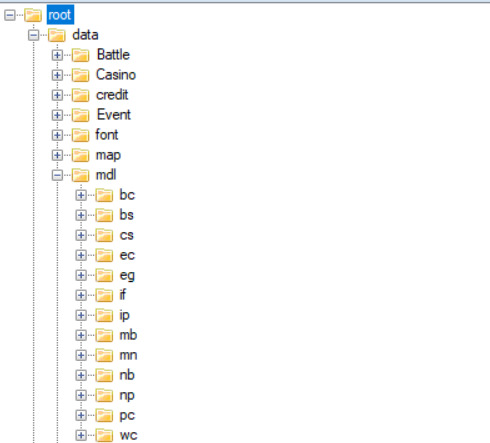
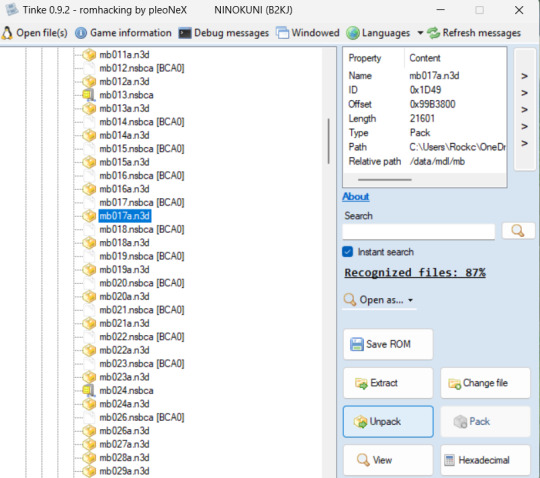
each of these have different things but you'll probably care about mb (major npcs) and pc (player characters) and also mn (familiars). also using this to say that tinke is a. very finnicky program so sometimes stuff will just Not Work. sorry about that. anyway.
Once you're in you can start looking for whatever model (.n3d file) you want, unfortunately the models aren't named clearly so you'll have to open them to see what they are. You can do this by selecting the .n3d file and clicking "unpack" which will open a .bmd0 file with a yellow box icon, you'll need to unpack that file one more time to actually be able to open the file it gives you after that in the viewer / export it
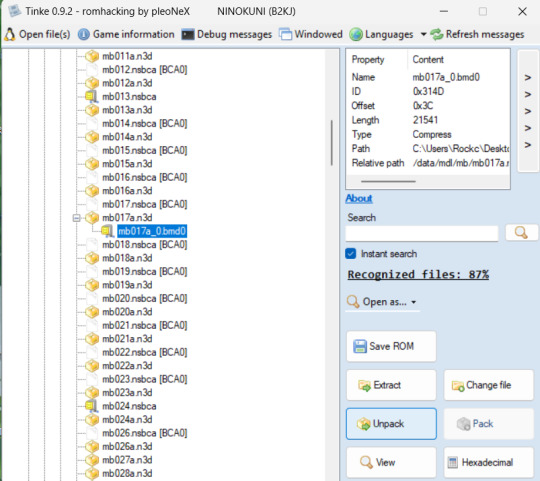
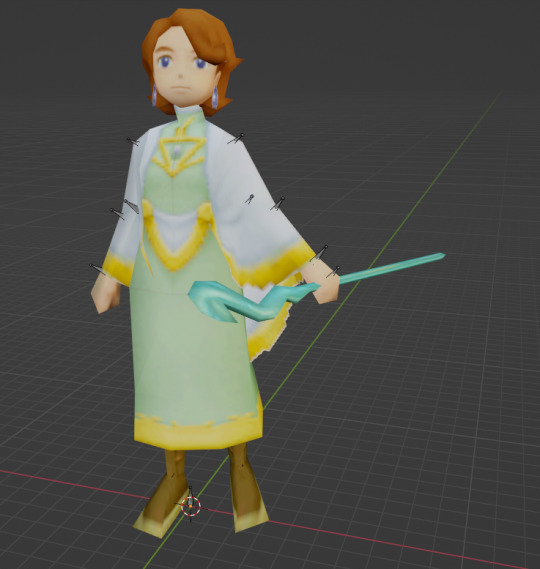
When you get the second unpacking (which should be a .bmd0 file with a mostly green drawing for the icon), you can open it in the viewer and it'll look like this!
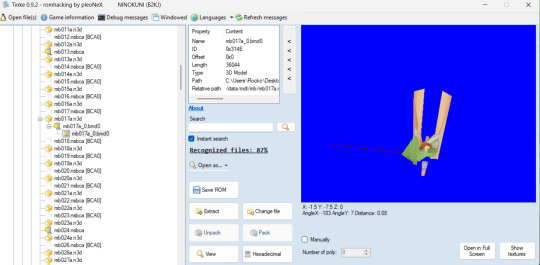
sorry any file you open that has a skeleton will look like that. I have been informed that sometimes ds games just store their models like this and it has no affect on the model when its exported so. lets just move on. Also sometimes tinke will give you an error that will stop you from opening the viewer properly but it will (most of the time) let you see the textures fine so you can double check (and even if it doesn't we have a workaround coming up soon)
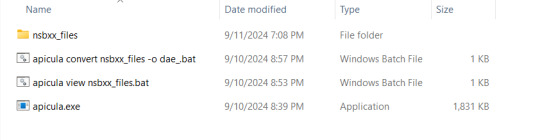
Next big step is to set up apicula! When you download it, the program can't run by itself. You will need to create two text files, one named "apicula view nsbxx_files" and "apicula convert nsbxx_files -o dae_files" (no quotation marks) to put in the same folder as the apicula exe. You will then rename these .txt files into .bat files and you'll use these to actually "run" the program. You'll also make a folder alongisde those called nsbxx_files. It should look like this at the end
Back to tinke, you'll take the viewable .bmd0 model you want to export and click "extract" and I usually put mine directly into the nsbxx folder in my apicula folder for convenience sake. double clicking the "view" .bat will put the models into a viewer that I like to use as a final double check (and also what you can use if tinke's preview is giving you trouble). Its WASD to move and Q and E to lower / raise the camera
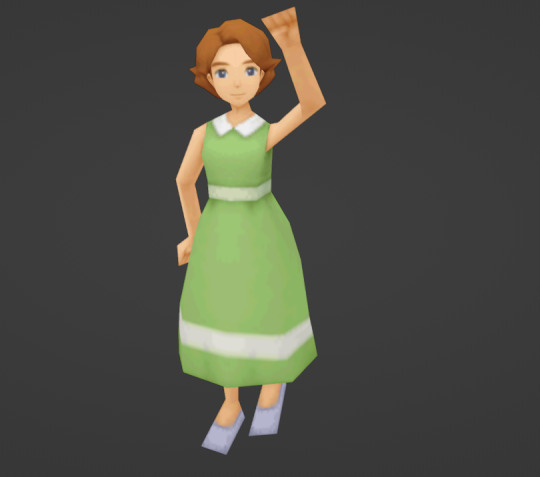
to actually convert the file, double click the "convert" .bat file and it will create a new folder named "dae_files" and inside will be your model and its textures in a .dae folder that you can read in blender and contains its skeleton!

PLEASE NOTE!!!! that apicula can only read / convert one file at a time! this means that it will just use the topmost file in the nsbxx folder and if you'll have to delete the dae folder every time once your done with it so it can run properly again. so just make sure you move your converted files somewhere else before you do. but now you'll have a model to put into blender!
the tutorial is technically "done" now but I'm gonna share how to set up these models in blender (which for the sake of explaining i'm gonna assume you don't know much about). When you first load in the models you'll have to "turn on" their textures using the drop down arrow in the menu on the top right corner of the 3d viewport and turn on these settings (while still selecting the solid circle tab)
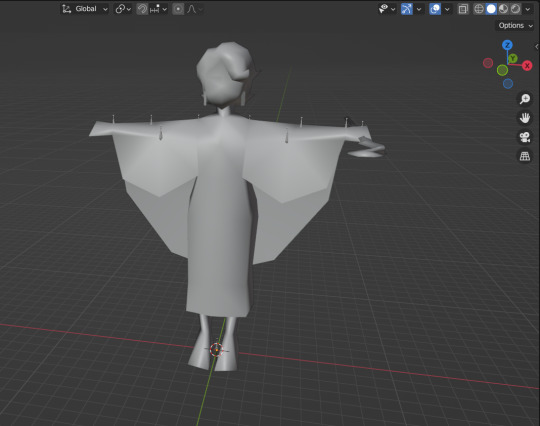
Secondly, Many of them use transparent elements in their textures that blender doesn't like to load without some help
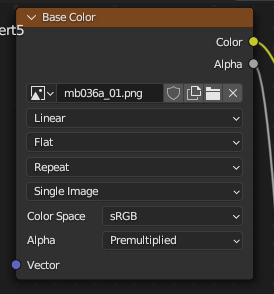
you can fix this by expanding the menu on the bottom of the screen and clicking the clock icon to turn it into the "shader editor" tab
Then, you'll select your model and go to the "base color" node in the shader editor, go down to the "alpha" tab and set it to "pre-mutliply" and it should remove the white lines around the transparent elements!

That's all from me! if you have any questions you can reply to this post / send me an ask or dm or whatever and I'll try my best to help! happy ripping!
#tomes#ni no kuni#ni no kuni wrath of the white witch#uhh not sure what else to tag this#ni no kuni alicia#yeah sure why not shes here#mine
34 notes
·
View notes
Text
Alright. I'm making this post because I was unpleasantly surprised to find Microsoft had forcibly downloaded an """"ai assistant"""" onto my computer (called Copilot), and because finding a site that actually told me how to kill it for good -- in clear, truly step-by-step terms -- was way harder than it needed to be.
Preface: this is only relevant if you're running Windows 11.
Here is your target:

If you see this logo on your taskbar -- or... have Edge installed on Windows 11 -- you've got Copilot. You can't delete it on its own, Microsoft has integrated it into the OS as best they can. The most you can do is disable it (instructions for which are at the very end of this post).
So... to REALLY get rid of it you need to uninstall Microsoft Edge, because it's a part of/reliant on Edge. A lot of bells and whistles of Windows are also reliant on Edge, like widgets, but I never use those. I use my PC almost exclusively for gaming, and I don't want this slimy "ai" shit on my computer. I use Firefox anyway. Edge can go die as far as I'm concerned.
Here's the actual steps, copy-pasted from a website that took me way too long to find. It also really makes my browser chug for some reason, which is why I'm copy-pasting the whole thing. If you still want to look at the site itself, put it in reader view as fast as you can (link to site).
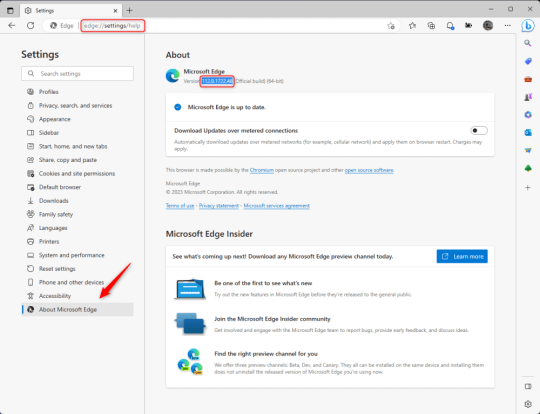
1.) Open Microsoft Edge, type "edge://settings/help" in the address bar, and then press Enter.
2.) Click "About Microsoft Edge" at the bottom of the left-hand pane. Copy the version number at the top of the screen, under Microsoft Edge.
3.) Press Windows Key + S to open Windows Search.
4.) Type "Command Prompt", right-click the result, and then select "Run as Administrator".
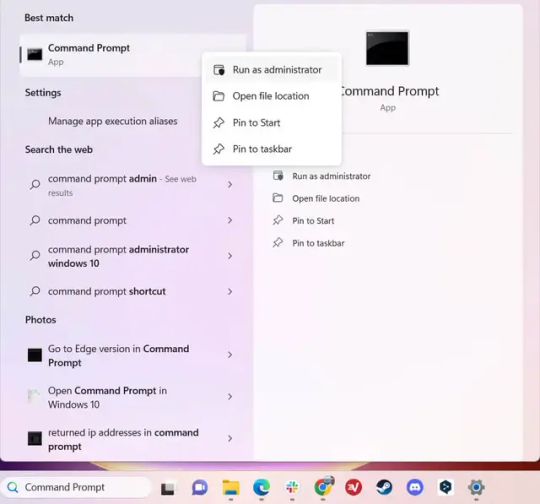
5.) The User Account Control (UAC) prompt will appear. Click "Yes".
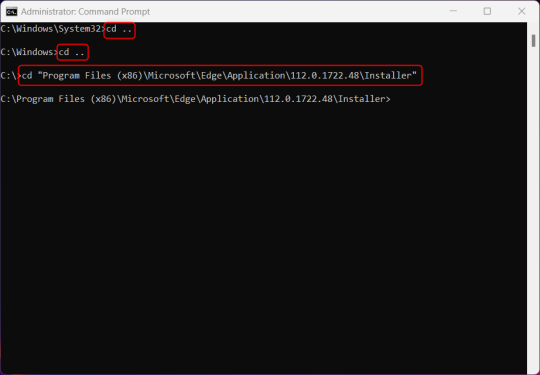
6.) Navigate to Edge’s “Installer” directory by using the cd command. Depending on which directory your Command Prompt opens in by default, you may need to use the "cd .." command to go back a level or two.
Once ready, run this command:
cd “Program Files (x86)\Microsoft\Edge\Application\Version Number\Installer”
Replace "Version Number" with your actual version number copied earlier.
7.) Next, run this command to uninstall Microsoft Edge:
setup –uninstall –force-uninstall –system-level
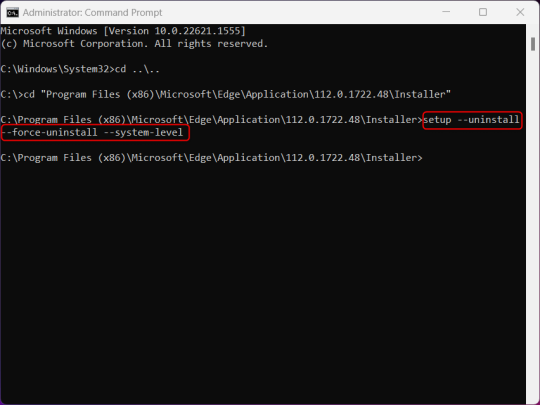
((It will look like nothing happened! Don't worry!))
8.) Restart your PC for the changes to take place.
((HOWEVER, Windows will try to reinstall it the next time your PC updates (or whenever it feels like it lol) so there's a second half to this))
1.) Press Windows Key + R to open Run.
2.) Type "regedit" in the text box and click OK to open the Registry Editor.
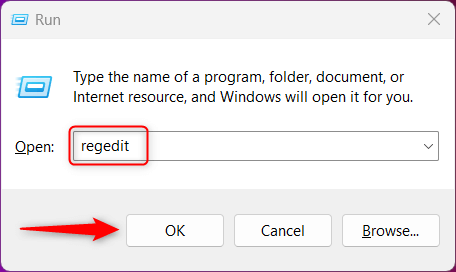
3.) The User Account Control (UAC) prompt will appear. Click "Yes".
4.) In the Registry Editor, navigate to HKEY_LOCAL_MACHINES\SOFTWARE\Microsoft.
5.) Right-click the "Microsoft" folder, hover your cursor over "New", and then select "Key".
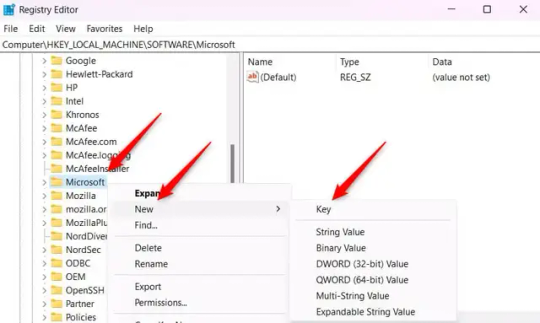
6.) Rename the new Key to "EdgeUpdate".
7.) Right-click EdgeUpdate, hover your cursor over "New", and then select "DWORD (32-bit) Value".

8.) Right-click the new value, which is currently named "New Value #1".
9.) Select "Rename" from the context menu.
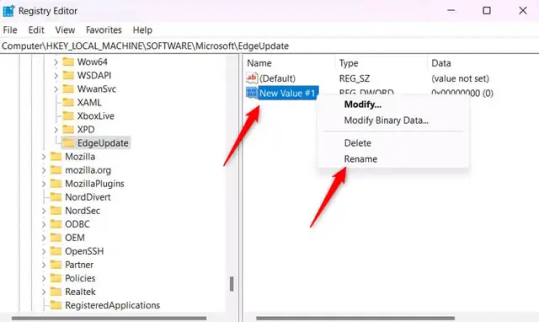
10.) Rename the value to "DoNotUpdateToEdgeWithChromium".
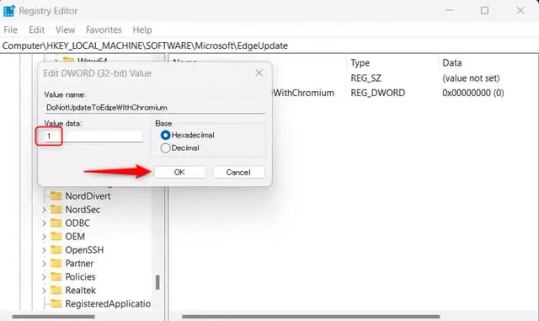
11.) Right-click the newly-named DoNotUpdateToEdgeWithChromium value and select "Modify" from the context menu.
12.) The Edit DWORD (32-bit) Value window will appear. Change the Value data to "1" and then click OK.
((You are now free. If you ever run into a really serious, unavoidable issue with your OS that's clearly a result of Edge being gone, you can redownload it like a regular app. But you should be fine.))
((And, if for some reason you want still want Edge around but just want the copilot thing gone, here's what you do:
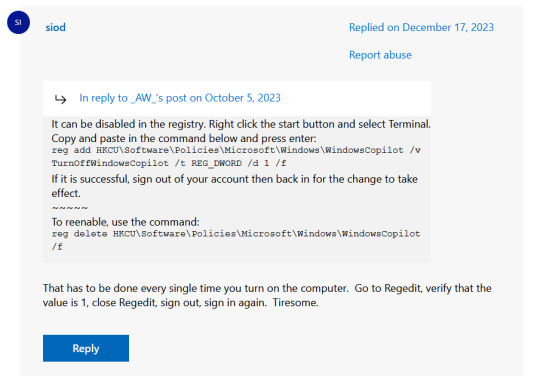
The command, for ease of copy-pasting: reg add HKCU\Software\Policies\Microsoft\Windows\WindowsCopilot /v TurnOffWindowsCopilot /t REG_DWORD /d 1 /f
You can't actually truly delete Copilot (without deleting Edge), only disable it. And as the reply says, you do have to do this every time you turn the computer on. I haven't tested that myself, but I believe it. I assume/hope that excludes just waking the computer up after it goes to sleep, but I don't know for sure.))
120 notes
·
View notes