#getElementById () method
Explore tagged Tumblr posts
Visit Tumblr Blog
Explore Tumblr blogs with no restrictions, modern design and the best experience.
Last Seen Tumblr Blogs


Fun Fact
Tumblr was attacked by a cross-site scripting worm deployed by the Internet troll group GNAA on Dec 3, 2012.
Text
JavaScript Fundamentals
I have recently completed a course that extensively covered the foundational principles of JavaScript, and I'm here to provide you with a concise overview. This post will enable you to grasp the fundamental concepts without the need to enroll in the course.
Prerequisites: Fundamental HTML Comprehension
Before delving into JavaScript, it is imperative to possess a basic understanding of HTML. Knowledge of CSS, while beneficial, is not mandatory, as it primarily pertains to the visual aspects of web pages.
Manipulating HTML Text with JavaScript
When it comes to modifying text using JavaScript, the innerHTML function is the go-to tool. Let's break down the process step by step:
Initiate the process by selecting the HTML element whose text you intend to modify. This selection can be accomplished by employing various DOM (Document Object Model) element selection methods offered by JavaScript ( I'll talk about them in a second )
Optionally, you can store the selected element in a variable (we'll get into variables shortly).
Employ the innerHTML function to substitute the existing text with your desired content.
Element Selection: IDs or Classes
You have the opportunity to enhance your element selection by assigning either an ID or a class:
Assigning an ID:
To uniquely identify an element, the .getElementById() function is your go-to choice. Here's an example in HTML and JavaScript:
HTML:
<button id="btnSearch">Search</button>
JavaScript:
document.getElementById("btnSearch").innerHTML = "Not working";
This code snippet will alter the text within the button from "Search" to "Not working."
Assigning a Class:
For broader selections of elements, you can assign a class and use the .querySelector() function. Keep in mind that this method can select multiple elements, in contrast to .getElementById(), which typically focuses on a single element and is more commonly used.
Variables
Let's keep it simple: What's a variable? Well, think of it as a container where you can put different things—these things could be numbers, words, characters, or even true/false values. These various types of stuff that you can store in a variable are called DATA TYPES.
Now, some programming languages are pretty strict about mentioning these data types. Take C and C++, for instance; they're what we call "Typed" languages, and they really care about knowing the data type.
But here's where JavaScript stands out: When you create a variable in JavaScript, you don't have to specify its data type or anything like that. JavaScript is pretty laid-back when it comes to data types.
So, how do you make a variable in JavaScript?
There are three main keywords you need to know: var, let, and const.
But if you're just starting out, here's what you need to know :
const: Use this when you want your variable to stay the same, not change. It's like a constant, as the name suggests.
var and let: These are the ones you use when you're planning to change the value stored in the variable as your program runs.
Note that var is rarely used nowadays
Check this out:
let Variable1 = 3; var Variable2 = "This is a string"; const Variable3 = true;
Notice how we can store all sorts of stuff without worrying about declaring their types in JavaScript. It's one of the reasons JavaScript is a popular choice for beginners.
Arrays
Arrays are a basically just a group of variables stored in one container ( A container is what ? a variable , So an array is also just a variable ) , now again since JavaScript is easy with datatypes it is not considered an error to store variables of different datatypeslet
for example :
myArray = [1 , 2, 4 , "Name"];
Objects in JavaScript
Objects play a significant role, especially in the world of OOP : object-oriented programming (which we'll talk about in another post). For now, let's focus on understanding what objects are and how they mirror real-world objects.
In our everyday world, objects possess characteristics or properties. Take a car, for instance; it boasts attributes like its color, speed rate, and make.
So, how do we represent a car in JavaScript? A regular variable won't quite cut it, and neither will an array. The answer lies in using an object.
const Car = { color: "red", speedRate: "200km", make: "Range Rover" };
In this example, we've encapsulated the car's properties within an object called Car. This structure is not only intuitive but also aligns with how real-world objects are conceptualized and represented in JavaScript.
Variable Scope
There are three variable scopes : global scope, local scope, and function scope. Let's break it down in plain terms.
Global Scope: Think of global scope as the wild west of variables. When you declare a variable here, it's like planting a flag that says, "I'm available everywhere in the code!" No need for any special enclosures or curly braces.
Local Scope: Picture local scope as a cozy room with its own rules. When you create a variable inside a pair of curly braces, like this:
//Not here { const Variable1 = true; //Variable1 can only be used here } //Neither here
Variable1 becomes a room-bound secret. You can't use it anywhere else in the code
Function Scope: When you declare a variable inside a function (don't worry, we'll cover functions soon), it's a member of an exclusive group. This means you can only name-drop it within that function. .
So, variable scope is all about where you place your variables and where they're allowed to be used.
Adding in user input
To capture user input in JavaScript, you can use various methods and techniques depending on the context, such as web forms, text fields, or command-line interfaces.We’ll only talk for now about HTML forms
HTML Forms:
You can create HTML forms using the <;form> element and capture user input using various input elements like text fields, radio buttons, checkboxes, and more.
JavaScript can then be used to access and process the user's input.
Functions in JavaScript
Think of a function as a helpful individual with a specific task. Whenever you need that task performed in your code, you simply call upon this capable "person" to get the job done.
Declaring a Function: Declaring a function is straightforward. You define it like this:
function functionName() { // The code that defines what the function does goes here }
Then, when you need the function to carry out its task, you call it by name:
functionName();
Using Functions in HTML: Functions are often used in HTML to handle events. But what exactly is an event? It's when a user interacts with something on a web page, like clicking a button, following a link, or interacting with an image.
Event Handling: JavaScript helps us determine what should happen when a user interacts with elements on a webpage. Here's how you might use it:
HTML:
<button onclick="FunctionName()" id="btnEvent">Click me</button>
JavaScript:
function FunctionName() { var toHandle = document.getElementById("btnEvent"); // Once I've identified my button, I can specify how to handle the click event here }
In this example, when the user clicks the "Click me" button, the JavaScript function FunctionName() is called, and you can specify how to handle that event within the function.
Arrow functions : is a type of functions that was introduced in ES6, you can read more about it in the link below
If Statements
These simple constructs come into play in your code, no matter how advanced your projects become.
If Statements Demystified: Let's break it down. "If" is precisely what it sounds like: if something holds true, then do something. You define a condition within parentheses, and if that condition evaluates to true, the code enclosed in curly braces executes.
If statements are your go-to tool for handling various scenarios, including error management, addressing specific cases, and more.
Writing an If Statement:
if (Variable === "help") { console.log("Send help"); // The console.log() function outputs information to the console }
In this example, if the condition inside the parentheses (in this case, checking if the Variable is equal to "help") is true, the code within the curly braces gets executed.
Else and Else If Statements
Else: When the "if" condition is not met, the "else" part kicks in. It serves as a safety net, ensuring your program doesn't break and allowing you to specify what should happen in such cases.
Else If: Now, what if you need to check for a particular condition within a series of possibilities? That's where "else if" steps in. It allows you to examine and handle specific cases that require unique treatment.
Styling Elements with JavaScript
This is the beginner-friendly approach to changing the style of elements in JavaScript. It involves selecting an element using its ID or class, then making use of the .style.property method to set the desired styling property.
Example:
Let's say you have an HTML button with the ID "myButton," and you want to change its background color to red using JavaScript. Here's how you can do it:
HTML: <button id="myButton">Click me</button>
JavaScript:
// Select the button element by its ID const buttonElement = document.getElementById("myButton"); // Change the background color property buttonElement.style.backgroundColor = "red";
In this example, we first select the button element by its ID using document.getElementById("myButton"). Then, we use .style.backgroundColor to set the background color property of the button to "red." This straightforward approach allows you to dynamically change the style of HTML elements using JavaScript.
#studyblr#code#codeblr#css#html#javascript#java development company#python#study#progblr#programming#studying#comp sci#web design#web developers#web development#website design#ui ux design#reactjs#webdev#website#tech
400 notes
·
View notes
Text
Day 30 — 35/ 100 Days of Code
I learned how to handle JavaScript features (default parameters, spread, rest, and destructuring).
And I finally reached the DOM chapeter, 'The Document Object' which contains representations of all the content on a page. I'm still discovering its methods and properties.
So far, I've learned about the most useful ones: getElementById(), querySelector, changing styles, manipulating attributes, and the append method.
I'm doing some silly practice exercises just to get more familiar with the DOM methods. The more I progress in my course, the more fun things seem to get. I'm really excited to start building stuff with code and combining HTML, CSS, and JS all together.
#100 days of code journal#learning#coding#webdevelopment#codeblr#studyblr#growing#imporving#self improvement#cs#computer science#programming#codenewbie#tech#learn to code#frontend#100daysofcode#coding blog#htlm#css#JavaScript#The DOM
66 notes
·
View notes
Text
KEVIN BROWN DEFEATS JOHN BAUZA TO RETAIN WBA SUPERLIGHTWEIGHT CONTINENTAL AMERICAS TITLE
(adsbygoogle = window.adsbygoogle || []).push({});
Follow @Frontproofmedia!function(d,s,id){var js,fjs=d.getElementsByTagName(s)[0],p=/^http:/.test(d.location)?'http':'https';if(!d. getElementById(id))(document, 'script', 'twitter-wjs');
Published: September 10, 2024
KEVIN BROWN DEFEATS JOHN BAUZA TO RETAIN WBA SUPERLIGHTWEIGHT CONTINENTAL AMERICAS TITLE ON MVP’S MOST VALUABLE PROSPECTS 8 IN ORLANDO, FLORIDA, AVAILABLE GLOBALLY ON DAZN
Hendri Cedeno and Yoelvis Gomez take home TKO victories, with Carlos Lebron and Luis Quiles battling to a majority draw on the main card
Bree Howling illustrates top contender status with a UD win over Beata Dudek, and Antraveous Ingram puts on a show with a TKO victory against Cruse Stewart.
Nat Dove takes UD win over Wendy Villegas in another impressive showing for the up and coming star.
ORLANDO, FL -Kevin Brown (6-0, 3 KOs) successfully defended his WBA Super Lightweight Continental Americas title with a thrilling UD victory (96-93, 98-91, 97-92) over John Bauza (18-2, 8 KOs) at MVP’s Most Valuable Prospects 8 tonight at the Caribe Royale Resort in Orlando, FL. The undefeated rising star and WBA’s #14 ranked contender from Camaguey, Cuba, showcased his power and skill, dominating the bout from start to finish. Despite the vast difference in professional experience, Brown controlled the pace with sharp combinations and relentless pressure, knocking Bauza down with a hard body shot late in the first round. As the fight wore on, his confidence and power became more evident as Brown delivered some vicious shots throughout the bout. With this impressive win, Brown maintains his unbeaten record and continues his rise as a formidable force in the super lightweight division. MVP’s fourth installment of the 2024 Most Valuable Prospects series, presented by CELSIUS Live Fit Essential Energy, took place at the Caribe Royale Resort in Orlando, FL, available globally on DAZN subscription with Boxlab Promotions serving as the official licensed promoter.
Dominican prospect Hendri “La Bazuca” Cedeno (14-0, 11 KOs) maintained his unbeaten streak with a decisive TKO win over Enriko “Gudan” Gogokhia (13-2-2, 8 KOs) in their 8-round super lightweight bout on the main card. Cedeno, a 26-year-old rising talent from La Romana, Dominican Republic, displayed impressive speed, footwork, and precise punching against the seasoned Gogokhia. Cedeno remained in control, while Gogokhia showed grit and promise with unorthodox style and well-placed shots. Despite showing intent to continue at the end of the fourth round, Gogokhia suffered a shoulder dislocation, leading to a TKO victory for La Bazuca before the start of the fifth round.
In a main card matchup, 26-year-old Yoelvis “La Joya” Gomez (8-1, 7 KOs) showcased his knockout power with a thrilling TKO victory over Diego Ferreira (11-3-1, 7 KOs) in their 8-round middleweight fight. Gomez, the rising Cuban standout, made his mark from the opening bell with his aggressive style and relentless pressure. As the fight progressed, Gomez continued to find openings, landing a series of massive right hands throughout the fourth round, ultimately wearing down Gomez and leading him to retire at the end of the fourth round.
In the main card opener, Orlando, Florida’s 19-year-old talent Carlos “Pretty Boy” Lebron (3-1-1, 3 KOs) went the distance against Cidra, Puerto Rico’s Luis Quiles (2-0-1, 1 KO) in a four-round bantamweight fight. Lebron, who entered the bout with all his wins by knockout, methodically broke down Quiles with powerful combinations in the opening two rounds. Quiles made a strong showing late in the bout, coming to life in the third round and mounting a steady attack against Lebron’s power and precision through the end of the bout, resulting in a majority draw (39-37, 38-38 x2).
Kissimmee, Florida’s promising prospect Antraveous Ingram (8-0, 3 KOs) kept his undefeated record intact with a fifth-round TKO victory over Cruse “Hitman” Stewart (8-4, 6 KOs) in a super welterweight bout on the preliminary card. Ingram, fighting in front of his enthusiastic home fans, used his speed and footwork to neutralize Stewart’s power from the opening bell. Stewart pressed the action, but Ingram’s defense and heavy counterattacks knocked Stewart down in the fourth round before ultimately landing a vicious body shot at 1:31 in the fifth round, sending Stewart to the mat for good.
26-year-old Bree “Bam Bam” Howling (8-0, 2 KOs) continued her undefeated streak with a commanding performance, defeating Hungary’s Beata Dudek (4-4, 4 KOs) by unanimous decision (80-72 x3) in an 8-round bantamweight bout on the preliminary card. Howling, ranked in the top 10 by the WBA, proved her future contender potential with technical skill and speed. Despite Dudek’s height and reach advantage, Howling controlled the pace and distance, earning the unanimous victory.
Nat “No Love” Dove (3-0) put on a commanding performance against Wendy Villegas (2-3, 2 KOs) in their four-round bantamweight bout, securing a unanimous decision (40-36 x3) victory. Dove, a training partner to MVP’s own Javon “Wanna” Walton, dominated from the opening bell with superior speed, footwork, and striking power. Throughout all the rounds, Dove's relentless pressure and impressive combinations left Villegas unable to mount a significant offense. The judges awarded Dove a unanimous decision, keeping her perfect record intact and further highlighting her potential as a rising talent in the ring.
In a thrilling 4-round lightweight bout on the preliminary card, Harley “Dennis the Menace” Mederos (7-0, 6 KOs) delivered an impressive TKO win against Russia’s Nikolai Buzolin (9-10-1, 5 KOs). Mederos knocked down Buzolin in the first round with a series of devastating blows to the head and body, and repeated the feat in the second round. In the third round, Mederos unleashed a relentless barrage, knocking Buzolin down three times before the referee stepped in to stop the fight, awarding Mederos a TKO victory.
In the final fight of the night, Christian Rivera (1-0) defeated Rommel Toran (1-2-1, 1 KO) by unanimous decision in a 4 round welterweight fight
(Featured Photo: Joseph Correa/MVP)
0 notes
Text
Every TypeScript example and tutorial I've come across so far mainly focuses on language features, static typing, and working with Visual Studio. However, I couldn't find much guidance on how to use TypeScript effectively with JavaScript and the DOM.
I remember having the same question a while back, just like Johnny on Stack Overflow. "Can we use TypeScript to manipulate the DOM?" This question motivated me to dive deeper and figure it out, and I'm here to share what I've learned.
Configuration: Using TypeScript for DOM manipulation is straightforward, but it does require some configuration. You'll need to include the specific types for DOM access, which aren't available by default in TypeScript. To do this, you must explicitly configure the TypeScript compiler to include the "dom" library in the compilerOptions section of your tsconfig.json file. It's worth noting that the decision not to include these types by default might suggest that TypeScript's creators initially intended it more for server-side development with Node.js than for front-end work.
/** tsconfig.json - Configuration file in the project folder for the TypeScript compiler */ { "compilerOptions": { "lib": [ "es2015", "dom" ], "strict": true, "target": "es2015" } }
Hello World: In this article, I'll create a simple "Hello, world!" program to demonstrate how to use the DOM in TypeScript. Since this is my first post about TypeScript, I'll cover the basics of working with DOM types and address a common challenge that beginners might encounter. Please note that I won't be discussing DOM events in this post; that's a topic for a future article.
Let's start with the basics by changing the inner text value of an existing HTML element. I began by creating an HTML file with a standard HTML5 boilerplate, including an <h1> element with the id "greeter" in the body.
<!DOCTYPE html> <html lang="en"> <head> <!-- ... --> </head> <body> <h1 id="greeter">Hello</h1> </body> </html>
Next, I opened a new TypeScript file and added the following code:
let greeter: HTMLHeadingElement = document.getElementById("greeter") as HTMLHeadingElement; greeter.innerText = "Hello world!";
In this code, I created a variable called greeter and assigned the type HTMLHeadingElement to it. The HTMLHeadingElement type is defined in the "dom" library we added to the configuration. It tells the TypeScript compiler that greeter expects an HTML heading element and nothing else. Then, I assigned the greeter to the value returned by the getElementById function, which selects an element by its ID. Finally, I set the inner text of the greeter element to "Hello world."
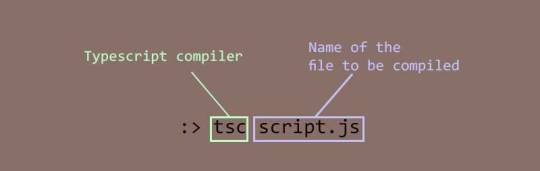
When I compiled the code with the following command:
tsc script.ts
It produced the following error:
Type 'HTMLElement | null' is not assignable to type 'HTMLHeadingElement'. Type 'null' is not assignable to type 'HTMLHeadingElement'.
It's a bit frustrating, but TypeScript is doing its job. This error means that I tried to assign a greeter, which is of type HTMLHeadingElement, with an object of type HTMLElement that the getElementById method returned. The HTMLElement | null in the error message indicates that the method's return value can be either of type HTMLElement or null.
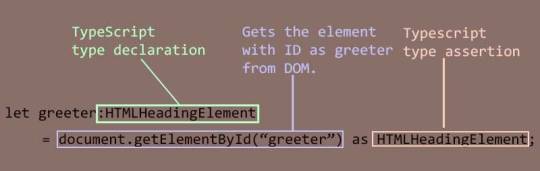
To address this, I used TypeScript's type assertion feature to tell the compiler that the element returned by getElementById is indeed a heading element, and it doesn't need to worry about it. Here's the updated code:
let greeter: HTMLHeadingElement = document.getElementById("greeter") as HTMLHeadingElement; greeter.innerText = "Hello world!";
With this change, the compilation was successful. I included the script.js file generated by the compiler in the HTML document and opened it in a browser.
Decoration Time: Now that I've confirmed that everything works as intended, it's time to make the page more visually appealing. I wanted a font style that was informal, so I chose the "Rock Salt" font from Google Fonts. I imported it into my stylesheet, along with "Dancing Script" as a secondary font, using CSS imports. I then added a few more elements to the HTML document, centered all the text using CSS flexbox, added a background from UI gradients, and adjusted the positions of some elements for proper arrangement. The page now looked beautiful.
Animation: To add a finishing touch, I wanted to include a background animation of orbs rising to the top like bubbles. To create the orbs, I decided to use <div> elements. Since I wanted several orbs with different sizes, I split the task into two steps to simplify the work.
First, I created a common style for all the orbs and defined a custom animation for the orbs in CSS. Then, I created the orbs dynamically using TypeScript. I created a set number of <div> elements, assigned them the pre-defined style, and randomized their sizes, positions, and animation delays to make them appear more natural.
Here's an excerpt of the code for creating the bubbles:
function createBubbles() { for (let i = 0; i < bubbleCount; i++) { let div: HTMLDivElement = document.createElement("div") as HTMLDivElement; let divSize = getSize(); div.style.left = getLeftPosition() + "px"; div.style.width = divSize + "px"; div.style.height = divSize + "px"; div.style.animationDelay = i * randomFloat(0, 30) + "s"; div.style.filter = "blur(" + randomFloat(2, 5) + "px)"; div.classList.add("bubble"); bubbleBuffer.push(div); } console.log("Bubbles created"); }
After creating the orbs, I added them to the DOM and started the animation:
function releaseBubbles() { createBubbles(); for (let i = 0; i < bubbleCount; i++) { containerDiv.appendChild(bubbleBuffer[i]); } console.log("Bubbles released"); }
And with that, the animation of orbs rising like bubbles was set in motion.
Here's the final output:
youtube
You can find the complete code in this repository.
Conclusion: While writing this article and creating the example, I realized the involvement of advanced concepts like type assertion and union types. I now understand why the authors of those tutorials didn't include them; introducing them could confuse beginners. It's best to learn TypeScript thoroughly before venturing into DOM manipulation.
In my example, I skipped null checking when fixing the type mismatch error, as it seemed unnecessary for the demonstration. However, in real projects, it's important to check for null values to avoid runtime errors. I also didn't
#While writing this article and creating the example#I realized the involvement of advanced concepts like type assertion and union types. I now understand why the authors of those tutorials di#beginner#typescript#dom manipulation#Youtube
0 notes
Text
How to use JavaScript for data visualization
Data visualization is the process of transforming data into graphical or visual representations, such as charts, graphs, maps, etc. Data visualization can help us understand, analyze, and communicate data more effectively and efficiently.
JavaScript is a powerful and popular programming language that can be used for creating dynamic and interactive data visualizations in web browsers. JavaScript can manipulate the HTML and CSS elements of a web page, as well as fetch data from external sources, such as APIs, databases, or files.
To use JavaScript for data visualization, we need to learn how to:
Select and manipulate HTML elements: We can use JavaScript to select HTML elements by their id, class, tag name, attribute, or CSS selector. We can use methods such as getElementById(), getElementsByClassName(), getElementsByTagName(), querySelector(), or querySelectorAll() to return one or more elements. We can then use properties and methods such as innerHTML, style, setAttribute(), removeAttribute(), appendChild(), removeChild(), etc. to manipulate the selected elements.
Create and modify SVG elements: SVG (Scalable Vector Graphics) is a standard for creating vector graphics in XML format. SVG elements can be scaled without losing quality, and can be styled and animated with CSS and JavaScript. We can use JavaScript to create and modify SVG elements, such as , , , , , etc. We can use methods such as createElementNS(), setAttributeNS(), appendChild(), etc. to manipulate the SVG elements.
Handle events: We can use JavaScript to handle events that occur on the web page, such as mouse clicks, keyboard presses, window resizing, page loading, etc. We can use methods such as addEventListener() or removeEventListener() to attach or detach event handlers to elements. We can also use properties such as onclick, onkeyup, onload, etc. to assign event handlers to elements. An event handler is a function that runs when an event occurs. We can use the event object to access information about the event, such as its type, target, coordinates, key code, etc.
Use AJAX: We can use AJAX (Asynchronous JavaScript and XML) to send and receive data from a server without reloading the web page. We can use objects such as XMLHttpRequest or Fetch API to create and send requests to a server. We can also use methods such as open(), send(), then(), catch(), etc. to specify the request parameters, send the request, and handle the response. We can use properties such as readyState, status, responseText, responseJSON, etc. to access the state, status, and data of the response.
These are some of the basic skills we need to use JavaScript for data visualization. However, writing JavaScript code from scratch for data visualization can be challenging and time-consuming. That’s why many developers use JavaScript libraries and frameworks that provide pre-written code and templates for creating various types of data visualizations.
Some of the most popular JavaScript libraries and frameworks for data visualization are:
D3.js: D3.js (short for Data-Driven Documents) is a JavaScript library for producing dynamic and interactive data visualizations in web browsers. It makes use of SVG, HTML5, and CSS standards. D3.js allows us to bind data to DOM elements, apply data-driven transformations to them, and create custom visualizations with unparalleled flexibility1.
Chart.js: Chart.js is a JavaScript library for creating simple and responsive charts in web browsers. It uses HTML5 canvas element to render the charts. Chart.js supports various types of charts, such as line, bar, pie, doughnut, radar, polar area, bubble, scatter, etc.2
Highcharts: Highcharts is a JavaScript library for creating interactive and high-quality charts in web browsers. It supports SVG and canvas rendering modes. Highcharts supports various types of charts, such as line, spline, area, column, bar, pie, scatter, bubble, gauge, heatmap, treemap, etc. Highcharts also provides features such as zooming, panning, exporting, annotations, drilldowns, etc.
These are some of the popular JavaScript libraries and frameworks for data visualization. To use them in your web development project, you need to follow these steps:
Choose the right library or framework for your project: Depending on your project’s requirements, goals, and preferences, you need to select the most suitable library or framework that can help you create the data visualizations you want. You should consider factors such as the learning curve, documentation, community support, performance, compatibility, scalability, etc. of each library or framework before making a decision.
Add the library or framework to your web page: You can add a library or framework to your web page using either a script tag or an external file. The script tag can be placed either in the head or the body section of the HTML document. The external file can be linked to the HTML document using the src attribute of the script tag.
Learn how to use the library or framework features and functionalities: You need to read the documentation and guides of the library or framework you are using to understand how to use its features and functionalities effectively. You should also follow some tutorials and examples to get familiar with the syntax, conventions, patterns, and best practices of the library or framework.
Write your application code using the library or framework: You need to write your application code using the library or framework functions, methods, objects, components, etc. You should also test and debug your code regularly to ensure its functionality and quality.
These are some of the ways you can use JavaScript for data visualization. To learn more about JavaScript and data visualization, you can visit some of the online resources that offer tutorials, examples, exercises, and quizzes. Some of them are:
[W3Schools]: A website that provides free web development tutorials and references for HTML, CSS, JavaScript, and other web technologies.
[MDN Web Docs]: A website that provides documentation and guides for web developers, covering topics such as HTML, CSS, JavaScript, Web APIs, and more.
[Data Visualization with D3.js]: A website that provides a comprehensive course on data visualization with D3.js.
[e-Tutitions]: A website that provides online courses and for web , development, Learn JavaScript and you can book a free demo class.
[Codecademy]: A website that provides interactive online courses and projects for various programming languages and technologies.
0 notes
Link
JavaScript Introduction, JavaScript has multiple methods, one of which is the getElementById () method. JavaScript can change HTML style. JavaScript can change HTML attributes, Password show, Password Hide, , JavaScript getElementById method, JavaScript button, JavaScript onclick
#js password show#JavaScript Introduction#JavaScript Introductionbasic#javascript#getElementById () method#JavaScript onclick#JavaScript button#change HTML attributes#Password Hide
1 note
·
View note
Photo
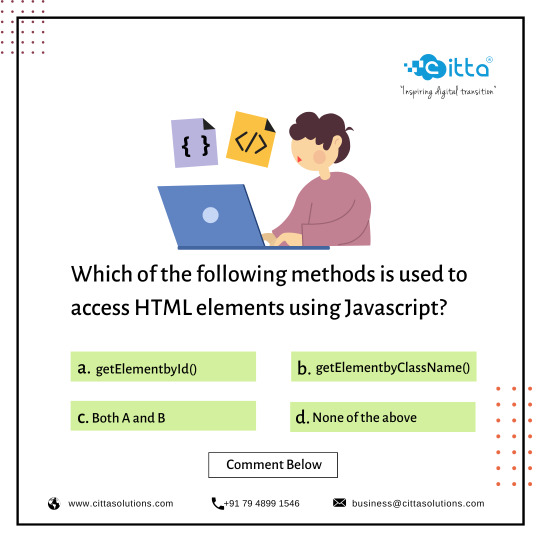
Comment on your answer:
Which of the following methods is used to access HTML elements using Javascript? a) getElementbyId() b)getElementbyClassName() c) Both A and B d) None of the above
#Citta Cittasolutions development#Javascript Javascriptdevelopment Javascriptdedicateddevelopers#dedicatedJavascriptdevelopers Programmimg Softwaredeveloper#Hirededecateddeveloper Hirewebdeveloper
0 notes
Text
Adobe animate tutorials export self contained

ADOBE ANIMATE TUTORIALS EXPORT SELF CONTAINED HOW TO
Similarly, we have created image2 object and assigned /images/http.gif in this object. The src property is assigned the name of the external image file called /images/html.gif. The Image() constructor creates and preloads a new image object called image1. If the image object is unavailable, this block will not be executed. Let's see what we are using in the following example −Īt the time of loading this page, the ‘if’ statement checks for the existence of the image object. Here is a simple example showing image rollover with a mouse event. We have added a new function stop() to clear the timer set by setTimeout() function and to set the object at its initial position.Ĭlick the buttons below to handle animation The moveRight() function is calling setTimeout() function to set the position of imgObj. We can automate this process by using the JavaScript function setTimeout() as follows − In the above example, we saw how an image moves to right with every click. You could also set it to a negative value to move it to the left side.Ĭlick button below to move the image to right We are calling initialization function at the time of window load.įinally, we are calling moveRight() function to increase the left distance by 10 pixels. We have defined an initialization function init() to initialize imgObj where we have set its position and left attributes. We are using the JavaScript function getElementById() to get a DOM object and then assigning it to a global variable imgObj. The following list contains different DOM methods. So let's implement one simple animation using DOM object properties and JavaScript functions as follows. Set distance from top edge of the screen. Set distance from left edge of the screen. You can set top and left attribute of an object to position it anywhere on the screen. JavaScript can also set a number of attributes of a DOM object including its position on the screen. SetInterval(function, duration) − This function calls function after every duration milliseconds.ĬlearTimeout(setTimeout_variable) − This function calls clears any timer set by the setTimeout() functions. SetTimeout( function, duration) − This function calls function after duration milliseconds from now. JavaScript provides the following two functions to be frequently used in animation programs. JavaScript can be used to move a number of DOM elements (, or any other HTML element) around the page according to some sort of pattern determined by a logical equation or function.
ADOBE ANIMATE TUTORIALS EXPORT SELF CONTAINED HOW TO
This tutorial provides a basic understanding of how to use JavaScript to create an animation. You might be interested in existing JavaScript based animation library:. You can use JavaScript to create a complex animation having, but not limited to, the following elements −
0 notes
Text
When the Mind Goes Blank (My Strategy on Tackling Code Challenges)
I have been a software engineering student at Flatiron School for a couple of weeks now. After reading the articles and listening to the lectures, I felt like I knew everything. However, each time I am assigned a project, my mind goes blank as soon as I finished reading the instruction. I had no idea what to do, I didn't know where and how to begin. Even though the projects(lecture activities, labs, mock code challenges) are well within the scope of lessons that I thought I have completely absorbed; I felt like I knew absolutely nothing at the most critical moments.
It took me a few failures at the code challenges before I realized why my mind goes blank in those moments. I knew the material and individual codes, but I didn't have plan on how to use them. It's like knowing how to stack a brick on top of another. Without a blueprint, stacking bricks alone cannot build a structurally sound building. I realized that I needed a blueprint to guide me, for the moments when my mind goes blank.
There are three parts to a code challenge when my mind can potentially go blank. First part is retrieving the data from a source. The source may be an API, a remote server or a local virtual server. Without the data from a separate source, nothing else can be done in a code challenge. Because the rest of the code challenge is all about manipulating and interacting with the data retrieved from a source.
The third part of a code challenge is usually adding event listeners to make certain elements in the DOM to be interactive and respond to actions. This may sound tough but as long as you can tackle the second part, which is the middle of the code challenge, then you should do just fine. (Did you think I forgot about the second part? No, I left it for the end on purpose)
The second part of a code challenge usually involves taking the data from the first part and manipulate them according to the instructions; aka DOM Manipulation. Most of the time my mind goes blank in this part, probably because there are so many techniques and codes that can be used for this part and my mind just feels lost about where and how to begin. This is where a blueprint is needed the most.
While coming up with a blueprint I came up with an acronym to help. I call it GAPA: Grab, Anchor, Point & Attach. The code challenge usually wants something done to the data retrieved from the first part. For example, place a picture at a certain spot, or print a sentence at a particular location. When my mind goes blank at this moment, I'll use GAPA to start manipulating the data.
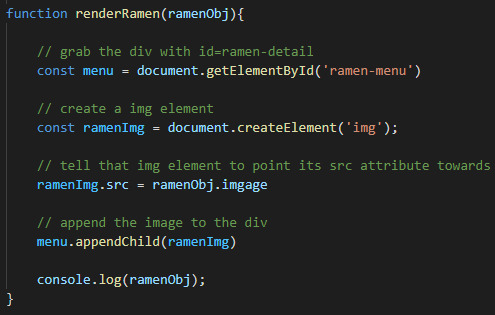
1. Grab. First step in any DOM Manipulation is to locate where the instruction specifies. If the instruction wants me to place a picture under a certain tag, then I first need to GRAB it. I can grab it with document.getElementById() or document.querySelector(), and add an "id" or "class" to the tag if it doesn't already have one.
2. Anchor. Once we have grabbed a location, we need to create an anchor if it doesn't exist already. I usually do it with document.createElement(). Sometimes the HTML already has an anchor created so this step can be skipped.
3. Point. Now that we have a location and anchor point, what do we put in there? It could be a photo or a string, and we need to "point" to the source. For example, if the task is to attach a photo, then we can point the anchor we just created to a source like: anchorImg.src = data.image.
4. Attach. Now that we grabbed the location, created an anchor and pointed to the source, the last step is to attach them. Because at this point we have created a few things but never actually attached them to the DOM; they are still invisible to the naked eyes. As we have identified from the instruction, an image needs to be placed under a tag we grabbed in step one. We can accomplish this with .append, .appendChild or .replaceChildren depending on the situation. It would look like this: location.appendChild(anchorImg).
Conclusion. By following the GAPA method the second part of a code challenge should become clear to the mind, and helps to pave the road to third part as well. It's not a cheat or secret but it's a blueprint that helps with my thought process 100% of the time. To summarize: 1. Grab: usually with .getElementById()/.getElementByClassName or a Query Selector. 2. Anchor: usually with .createElement() or skipped completely. 3. Point: usually with .src for images or .textContent/innerHTML for strings. 4. Attach: usually with .append()/.appendChild() or .replaceChildren().
#education#learning#coding#computer science#software engineering#developer#javascript#flatiron school#code challenge
0 notes
Text
Tạo hình nền điện thoại icon thương thương phát sáng

Hiệu ứng mới độc quyền trên taoanhdep.com để tạo hình nền điện thoại có icon Thương thương và các biểu tượng cảm xúc facebook khác phát sáng lơ lửng trên bàn tay. Hướng dẫn: - Nhấn nút chọn ảnh nền của bạn (Nên lựa hình cảnh buổi tối). - Nhấn nút Tạo ảnh - Nhấn nút Tải ảnh này hoặc giữ vào ảnh 3 giây để lưu ảnh.

Kiểu 1

Kiểu 2
$(document).ready(function(){$(".chonmau input").click(function(){$(".tad-main").removeClass("mau1");$(".tad-main").removeClass("mau2");$(".tad-main").addClass($("input:checked").val())}); $("#khungvienanh").click(function(){ $(".tad-main").toggleClass("bovien"); }); $("#maunen").click(function(){ $(".tad-main").toggleClass("bomau"); }); $("#botron").click(function(){ $(".anhdacat").toggleClass("botron"); }); });.xulyhinhanh img{margin:0!important}.chonanh-avt{width:38px;height:38px;float:left;border:1px solid #ddd;border-radius:5px;overflow:hidden;margin-right:10px}.img-preview{width:36px;height:36px;background:url(//2.bp.blogspot.com/-ZTMZs1MahXE/XqZq3WgQKDI/AAAAAAAAdRI/ib4MFhw49m82VLY9b2LzZBw5w3tItLSrQCK4BGAYYCw/s36/thumbnail-man.png);background-size:36px;background-position: center;}#chonanhModal{display:block!important}#chonanhModal:not(.show){opacity:0;visibility:hidden}.img-container,.img-preview{background-color:#f7f7f7;text-align:center;width:100%}.img-container{margin-bottom:1rem;max-height:300px;min-height:280px}.img-container>img{max-width:100%}.img-preview{margin: auto;margin-bottom:.5rem;margin-right:.5rem;overflow:hidden}.img-preview>img{max-width:100%} #temp{position:fixed;height:0;top:0;left:0;overflow:hidden}.tad-main { width: 1080px; height: 1920px; background: #333; position: relative; }.tad-main canvas { width: 1080px; height: 1920px; position: absolute; top: 0; left: 0; }.tad-tichxanh { background: url(https://2.bp.blogspot.com/-1tC_fjB32Qg/XrD09QNnthI/AAAAAAAAd2w/cLY--1dRZ3IB1RSVgFsmMCLY5i-586KAQCNcBGAsYHQ/s0/banquyen-taoanhdep-bg-1.png); width: 1080px; height: 1920px; position: absolute; z-index: 9; }.tad-main.mau2 .tad-tichxanh{ background: url(https://4.bp.blogspot.com/-1Ffi0W5oYgY/XrD09YAuGYI/AAAAAAAAd20/BtdHCxDn8J47JbL7POKof859g1vR_5YJgCNcBGAsYHQ/s0/banquyen-taoanhdep-bg-2.png); } Upload ảnh ( jpg, png,... )*
Chọn ảnh
Chọn ảnh từ thiết bị
×
Chọn ảnh
Cắt ảnh
Tạo ảnh
Loading...
Tải ảnh này
$('#taianhve')['hide'](); $('#btnScreenShot')['attr']('disabled', 'false'); $('#cropanh')['click'](function() { $('#btnScreenShot')['removeAttr']('disabled') }); $('#btnScreenShot')['click'](function() { $('#taianhve')['show']() }); var $btn = document['getElementById']('btnScreenShot'); var getimg = ''; $btn['addEventListener']('mousedown', onScreenShotClick); function onScreenShotClick(_0x67c5x4) { $('.load-anh')['show'](); html2canvas(document['querySelector']('.tad-main'), { useCORS: !0, scrollX: 0, scrollY: 0, width: 1080, height: 1920, scale: 1 })['then']((_0x67c5x5) => { var _0x67c5x6 = _0x67c5x5['toDataURL']('image/jpeg'); $('#img-out')['html']('<img src=\'' + _0x67c5x6 + '\' alt=\'\u1EA2nh instagram\' class=\'img-thumbnail\'>'); getimg = _0x67c5x6; $('.load-anh')['hide'](); $('#taianhve')['show']() }); $('#taianhve')['click'](function() { $(this)['attr']('download', 'taoanhdep_hinhnenthuongthuong.jpg')['attr']('href', getimg) }) } window['onload'] = function() { 'use strict'; var _0xa3dbx1 = window['Cropper']; var _0xa3dbx2 = window['URL'] || window['webkitURL']; var _0xa3dbx3 = document['querySelector']('.img-container'); var _0xa3dbx4 = _0xa3dbx3['getElementsByTagName']('img')['item'](0); var _0xa3dbx5 = document['getElementById']('download'); var _0xa3dbx6 = document['getElementById']('actions'); var _0xa3dbx7 = { aspectRatio: 9 / 16, viewMode: 1, preview: '.img-preview', autoCrop: true, strict: true, background: true, autoCropArea: 1 }; var _0xa3dbx8 = new _0xa3dbx1(_0xa3dbx4, _0xa3dbx7); var _0xa3dbx9 = _0xa3dbx4['src']; var _0xa3dbxa = 'image/jpeg'; var _0xa3dbxb; if (!document['createElement']('canvas')['getContext']) { $('button[data-method="getCroppedCanvas"]')['prop']('disabled', true) }; if (typeof document['createElement']('cropper')['style']['transition'] === 'undefined') { $('button[data-method="rotate"]')['prop']('disabled', true); $('button[data-method="scale"]')['prop']('disabled', true) }; _0xa3dbx6['querySelector']('.docs-buttons')['onclick'] = function(_0xa3dbxc) { var _0xa3dbxd = _0xa3dbxc || window['event']; var _0xa3dbxe = _0xa3dbxd['target'] || _0xa3dbxd['srcElement']; var _0xa3dbxf; var _0xa3dbx10; var _0xa3dbx11; var _0xa3dbx12; if (!_0xa3dbx8) { return }; while (_0xa3dbxe !== this) { if (_0xa3dbxe['getAttribute']('data-method')) { break }; _0xa3dbxe = _0xa3dbxe['parentNode'] }; if (_0xa3dbxe === this || _0xa3dbxe['disabled'] || _0xa3dbxe['className']['indexOf']('disabled') > -1) { return }; _0xa3dbx12 = { method: _0xa3dbxe['getAttribute']('data-method'), target: _0xa3dbxe['getAttribute']('data-target'), option: _0xa3dbxe['getAttribute']('data-option') || undefined, secondOption: _0xa3dbxe['getAttribute']('data-second-option') || undefined }; _0xa3dbxf = _0xa3dbx8['cropped']; if (_0xa3dbx12['method']) { if (typeof _0xa3dbx12['target'] !== 'undefined') { _0xa3dbx11 = document['querySelector'](_0xa3dbx12['target']); if (!_0xa3dbxe['hasAttribute']('data-option') && _0xa3dbx12['target'] && _0xa3dbx11) { try { _0xa3dbx12['option'] = JSON['parse'](_0xa3dbx11['value']) } catch (_0xa3dbxd) { console['log'](_0xa3dbxd['message']) } } }; switch (_0xa3dbx12['method']) { case 'rotate': if (_0xa3dbxf) { _0xa3dbx8['clear']() }; break; case 'getCroppedCanvas': try { _0xa3dbx12['option'] = JSON['parse'](_0xa3dbx12['option']) } catch (_0xa3dbxd) { console['log'](_0xa3dbxd['message']) }; if (_0xa3dbxa === 'image/jpeg') { if (!_0xa3dbx12['option']) { _0xa3dbx12['option'] = {} }; _0xa3dbx12['option']['fillColor'] = '#fff' }; break }; _0xa3dbx10 = _0xa3dbx8[_0xa3dbx12['method']](_0xa3dbx12['option'], _0xa3dbx12['secondOption']); switch (_0xa3dbx12['method']) { case 'rotate': if (_0xa3dbxf) { _0xa3dbx8['crop']() }; break; case 'scaleX': ; case 'scaleY': _0xa3dbxe['setAttribute']('data-option', -_0xa3dbx12['option']); break; case 'getCroppedCanvas': if (_0xa3dbx10) { $('.anhdacat')['html'](_0xa3dbx10); if (!_0xa3dbx5['disabled']) { _0xa3dbx5['href'] = _0xa3dbx10['toDataURL'](_0xa3dbxa) } }; break; case 'destroy': _0xa3dbx8 = null; if (_0xa3dbxb) { _0xa3dbx2['revokeObjectURL'](_0xa3dbxb); _0xa3dbxb = ''; _0xa3dbx4['src'] = _0xa3dbx9 }; break }; if (typeof _0xa3dbx10 === 'object' && _0xa3dbx10 !== _0xa3dbx8 && _0xa3dbx11) { try { _0xa3dbx11['value'] = JSON['stringify'](_0xa3dbx10) } catch (_0xa3dbxd) { console['log'](_0xa3dbxd['message']) } } } }; document['body']['onkeydown'] = function(_0xa3dbxc) { var _0xa3dbxd = _0xa3dbxc || window['event']; if (!_0xa3dbx8 || this['scrollTop'] > 300) { return }; switch (_0xa3dbxd['keyCode']) { case 37: _0xa3dbxd['preventDefault'](); _0xa3dbx8['move'](-1, 0); break; case 38: _0xa3dbxd['preventDefault'](); _0xa3dbx8['move'](0, -1); break; case 39: _0xa3dbxd['preventDefault'](); _0xa3dbx8['move'](1, 0); break; case 40: _0xa3dbxd['preventDefault'](); _0xa3dbx8['move'](0, 1); break } }; $('.cropanh-container')['hide'](); var _0xa3dbx13 = document['getElementById']('inputImage'); if (_0xa3dbx2) { _0xa3dbx13['onchange'] = function() { var _0xa3dbx14 = this['files']; var _0xa3dbx15; if (_0xa3dbx8 && _0xa3dbx14 && _0xa3dbx14['length']) { _0xa3dbx15 = _0xa3dbx14[0]; if (/^image\/\w+/ ['test'](_0xa3dbx15['type'])) { _0xa3dbxa = _0xa3dbx15['type']; if (_0xa3dbxb) { _0xa3dbx2['revokeObjectURL'](_0xa3dbxb) }; _0xa3dbx4['src'] = _0xa3dbxb = _0xa3dbx2['createObjectURL'](_0xa3dbx15); _0xa3dbx8['destroy'](); _0xa3dbx8 = new _0xa3dbx1(_0xa3dbx4, _0xa3dbx7); _0xa3dbx13['value'] = null; $('.cropanh-container')['show'](); $('.btn-upanh span,.btn-chonanh')['html']('<i class=\'fas fa-upload\'> Ch\u1ECDn \u1EA3nh kh\xE1c') } else { window['alert']('Please choose an image file.') } } } } else { _0xa3dbx13['disabled'] = true; _0xa3dbx13['parentNode']['className'] += ' disabled' } };
Nguồn: https://www.share123bloggertemplates.com/
from Template Blogspot Bán Hàng, Bất Động Sản Đẹp tại Share123 Blogger Templates https://www.share123bloggertemplates.com/2020/05/tao-hinh-nen-ien-thoai-icon-thuong.html via Nguồn: https://www.share123bloggertemplates.com/
0 notes
Text
300+ TOP ADO.NET Objective Questions and Answers
ADO.Net Multiple Choice Questions :-
1. What is the default value for the Method attribute in a ASP.NET server-side Form control A. GET B. POST C. SOAP D. SMTP Answer:- B 2. Which property allows ASP.NET controls to maintain their values when a page is posted to itself. A. EnableViewState B. MaintainValue C. SaveValue D. AutoPostBack Answer:- A 3. In a ASP.NET page, which is the best way to find if the contents of a TextBox has changed after the form containing the TextBox has been posted back to the server A. By comparing the old value with the new value B. By checking the NewValue property of the TextBox control C. By handling the TextBox control's TextChanged event D. By checking the HasChanged property of the TextBox Answer:- C 4. Which statement among the ones below is correct A. The Params and Forms collection of the HTTPRequest class are exactly same and theForms collection has been provided only for backward compatibility B. The HTTPRequest class does include the Params collection C. The HTTPRequest class does include the Forms collection D. The difference between the Params and Forms collection of the HTTPRequest class is that the Params collection also represents QueryStrings, ServerVariables, andCookies Answer:- D 5. Which statement among the ones below is correct a. If you use the server-side version of the tag, you cannot post the form to a different page. b. You can modify the Action attribute of the server-side version of the tag to post the form to a different page c. You have to set the Method and Action attributes of the server-side version of the tag to post the form to a different page d. You can use the SetAction(. method of the server-side version of the tag to post the form to a different page Answer:- A 6. If a form is posted to a different page, the you can retrieve the values of the form elements by a. Using the properties of the ASP.Net controls b. Using the GetElementByID(. method c. Using Request.Params d. The values cannot be retrieved Answer:- C 7. You are performing Form validations with Validation controls. You need to group all the errors at the top of the page and also show error messages besides each element. The messages besides each element need to be detailed and hence different from the messages at top of the page A. You can use the ValidationSummary Control to summarize the messages set in theErrorMessage property of the Validation controls. The messages set in the Text property of the Validation controls can be displayed besides each element. B. The error messages set in the SummaryText property of each Validation control havingisSummary=true will be automatically grouped at the top of the page and the messages set in the Text property can be displayed besides each element. C. The error messages in the Validation control can only be displayed in a popup D. The Validation controls cannot be used in the given scenario Answer:- A 8. How do view states work A. Using Cookies B. Using a hidden form field C. Using Session variables D. Using Application variables Answer:- B 9. You need to dynamically add a TextBox control to a page and display it at specific location A. Place a Label control at the required location in the page and add the control by manipulating the Text property of the Label control B. Place a PlaceHolder control at the required location in the page. Use the Add method of theControls collection of the PlaceHolder control to dynamically add the required control C. Build the HTML for the entire page in a String and insert the HTML code for required control in required place D. You cannot add a control to a page dynamically Answer:- B 10. You require to create an ASP.NET page with the functionality to allow a user to upload a file to the server A. You need to use the System.Web.Upload namespace B. You need to use a COM component to save the file on the server C. You need to use the SaveAs method of the HttpPostedFile class D. The ASP.Net application automatically loops through all the and saves the uploaded files to a virtual folder called "uploads" Answer:- C

ADO.NET MCQs 11. You need to programmatically add a user control without using the Register directive in your code A. Use AddUserControl B. Use cannot programmatically add a user control C. Use UserControl.Add D. Use LoadControl Answer:- D 12. You need to develop a business component myComp.dll in .Net and use it in your ASP.NET page a. You require to register the component using regsvr32.exe b. You require to register the component using TlbExp.exe c. You require to copy the component to the /bin directory in your applications root directory d. You require to copy the component to the /bin directory in your applications root directory and register the component using regsvr32.exe Answer:- C 13. Is it possible for multiple aspx pages to use the same code-behind file, if required A. Yes B. No Answer:- A 14. How is a ASP.NET presentation page associated with its code-behind A. The presentation page includes the code-behind file using #include B. The presentation page includes the code-behind file using C. The presentation page inherits from the code-behind D. The ASP.NET presentation page and the code-behind page have the same name and hence are automatically associated with each other Answer:- C 15. Which namespace would you use if you need to create an ASP.NET application with Microsoft SQL Server 2000 as the database. A. System.Data.SQLServer B. System.Data.SQLClient C. System.Data.OleDb D. System.Data.Microsoft Answer:- B 16. Which namespace would you use if you need to create an ASP.NET application with Oracle as the database. A. System.Data.SQLServer B. System.Data.SQLClient C. System.Data.OleDb D. System.Data.NonMS Answer:- C 17. Which statement among the following is correct while opening a connection using theSQLConnection class A. You cannot specify a connection string B. You need to specify a Provider parameter for the connection string C. You need to use a System DSN D. You cannot use a DSN Answer:- C 18. What method of the Command object would you use if you need to retrieve a single value (for example an aggregate value. from a database A. ExecuteScalar(. B. ExecuteReader(. C. ExecuteSingle(. D. ExecuteNonQuery(. Answer:- A 19. Which are the two things you need to take care of in your ASP.Net application to take advantage of connection pooling (select two. A. You need to set the Pooling property of the Connection object to True B. You need to use the same exact connection string whenever you open a database connection C. You need to call the ReleaseToPool(. method after the connection is closed D. You need to explicitly close the connection with the Close(. method Answer:- B,D 20. You have created a ASP.Net page Transaction by using A. If a transaction already exists, the page will execute within the context of the transaction. However it will not create a new transaction B. If a transaction already exists, the page will execute within the context of the transaction. If a transaction does not exist, it will create a new one C. Creates a new transaction for each request D. You cannot created a ASP.Net page Transaction by using Answer:- B 21. You need to retrieve only schema information about the columns contained in a database table without retrieving data. Which of the following is the best way to retrieve it A. Use the GetSchemaTable(. method of the DataReader in conjunction withCommandBehaviour.SchemaOnly B. Use the SchemaOnly property of the Command class C. Use the GetSchemaOnly(. method of the DataReader D. You cannot retrieve only schema information without retrieving data Answer:- A 23.What will be the values assigned to the two Label controls lblMessage1 & lblMessage2 respectively A. 2 & 3 B. 3 & 3 C. 3 & 4 D. 4 & 4 Answer:- C 23. You need to customize the display format of the DataList control A. Set the DisplayFormat property of the DataList control to Custom B. Set the CustomFormat property of the DataList control to True C. ItemTemplate will allow you to format the appearance of each DataList item D. The display format of the DataList control is predefined and cannot be customized Answer:- C 24. You have a DataList control containing a LinkButton. What would you do to raise theDeleteCommand event in the DataList by clicking on the LinkButton. A. Set CommandName="delete" in the LinkButton B. Set the OnDelete property of the DataList to the ID of the LinkButton C. A DataList control cannot raise an event in response to events raised by its child controls D. A DataList control cannot contain child controls Answer:- A 25. The Products table has a column named ProductName and a primary key column namedProductID. When a user selects an item in the DataList, you want to retrieve the value of theProductID column associated with it. A. In the DataList control set PrimaryKeyField="ProductID" B. In the DataList control set DataKeyField="ProductID" C. In the DataList control set KeyField="ProductID" D. In the DataList control set id="ProductID" Answer:- B 26. You need to enable paging for a DataGrid control A. You can use a DataReader B. You can use a DataTable C. You can use either the DataReader or DataTable D. A DataGrid does not support paging Answer:- B 27. Can you use a DataView to filter rows in a DataTable A. Yes, by setting the Filter property of the DataView B. Yes, by setting the RowFilter property of the DataView C. Yes, by using the SetFilter(. method of the DataView D. No, a DataView cannot be used to filter rows in a DataTable Answer:- B 28. Which statement is an accurate description of the code below (dtsDataset is a DataSet. Cache("myCachedDataSet". = dstDataset a. Adds a DataSet to the application's cache in the server's memory, automatically preserving it between page requests. b. Adds a DataSet to the cache in the client's memory, automatically preserving it between page requests. c. The Cache object cannot be used to cache a DataSet, it can only cache a DataTable d. The code block is syntactically incorrect and should actually be Set Cache("myCachedDataSet". = dstDataset Answer:- A 29. How can you load an XML file directly into a DataSet A. By setting the XML property of the DataSet class B. By using the GetXML(. method of the DataSet class C. By using the ReadXml(. method of the DataSet class D. You cannot load an XML file directly into a DataSet Answer:- C 30. Your site has been restructured and the paths of few pages have changed. Which method would you use to redirect users requesting for a pages using the old URL A. Create an ISAPI filter to do the above task B. Create an entry in the section of the Web.Config file C. Use the Application.Config file D. Handle the Application_BeginRequest event and use the RewritePath(. method Answer:- D 31. Which statement about the Web.Config file is the most accurate A. The Web.Config file can be only placed in the root of a Web Site to override settings in theMachine.Config file for all applications in a particular Web Site B. The Web.Config file can only be placed in the root of a particular virtual directory C. The Web.Config file can be placed in the root of the Web Site and the root of a virtual directory. The settings from the file in the virtual directory overrides the settings from the file in the Web Site D. The Web.Config file can be placed in the root of the Web Site and the root of a virtual directory and in any subdirectory of an application. The settings from a file at a particular level override the settings from the ones above it. Answer:- D 32. The settings in the Web.Config file are case-sensitive A. True B. False Answer:- 33. The settings in the Web.Config file can be configured to apply to A. An application B. An application or a particular directory C. An application or a particular directory or even an individual file D. The Web.Config file always applies to all pages in the current directory and its subdirectories Answer:- C 34. Is there a way to prevent configuration settings in a Web.Config file from being overridden by aWeb.Config file located below it A. Yes, you can use the allowOverride attribute in the tag to prevent configuration settings in a Web.Config file from being overridden by a Web.Config file located below it B. Yes, you can use the tag to prevent configuration settings in aWeb.Config file from being overridden by a Web.Config file located below it C. If a Web.Config file exist at a particular level then all settings in the Web.Config file located above it are always ignored D. You cannot have more than one Web.Config file in an ASP.NET application Answer:- A 35. If you have an ASP.NET application with cookieless sessions enabled, which statement among the A. You cannot use relative URL's with cookieless sessions B. You cannot use absolute URL's with cookieless sessions C. Cookieless sessions have no relation with URL's D. You cannot have cookieless sessions with an ASP.NET application Answer:- B ADO.Net Objective type Questions with Answers 36. You are part of a team that is using Visual Studio .NET to develop a Web application. You have placed a number of configuration settings for the application in the server's Machine.config file. You learn in a meeting that one of your co-workers has created a Web.config file to store these settings, though in comparing notes you realize that you and your co-worker have used different settings. Which of the following describes what will happen when you execute the application a. The application will run correctly and will use the settings in the Web.config file, ignoring theMachine.config settings b. The application will run correctly and will use the settings in the Machine.config file, ignoring the Web.config settings c. The application will not run correctly until you either remove the Web.config file or delete the settings from the Machine.config file d. The application will run correctly, using only the settings that are identical in the Web.configand Machine.config files e. The application will not run correctly until you modify either the Web.config file or theMachine.config file so that the application settings are identical Answer:- A 37. You are preparing to deploy an ASP.NET Web application. You are currently creating the deployment project. You have started the Web setup project, which is namedAccountManagerDeploy, and added the application output to the project, and now you need to set the directory on the Web server to which the application will be installed. Which of the following procedures should you use to do so (Choose two. Each correct answer presents part of the solution.. A. Set the VirtualDirectory property in the Properties window. B. Select the Web Application Folder in the File System Editor. C. Select the AccountManagerDeploy project in the Solution Explorer. D. Set the Folder property in the Properties window. E. Select the Primary output from AccountManagerDeploy icon in the Solution Explorer. Answer:- A, B 38. You are part of a team that is using Visual Studio .NET to develop a Web application. You are looking through the files in the application, and you see the following files: createmembership.aspx createmembership.aspx.vb Which two of the following statements most accurately describe these two files (Select two.. A. The createmembership.aspx.vb file is a Web form, which displays a user interface to the user B. The createmembership.aspx file is a code file, which contains code that interacts with the user interface in the Web form C. The createmembership.aspx file is an uncompiled file that will become createmembership.aspx.vb when it is compiled D. The createmembership.aspx.vb file is a code file, which contains code that interacts with the user interface in the Web form E. The createmembership.aspx file is a Web form, which displays a user interface to the user F. The createmembership.aspx.vb file is the compiled version of createmembership.aspx Answer:- D, E 39. You are using Visual Studio .NET to develop a Web application. You are beginning to debug your application, and you would like to store debug messages in the Windows event log as you proceed with testing. Which of the following will allow you to do so A. TextWriterTraceListener B. DefaultTraceListener C. EventLogTraceListener D. TraceSwitch Answer:- C 40. You are using Visual Studio .NET to develop a Web application for a large video rental store. The titles, as well as other information about the store's videotapes, laser disks, DVDs, and audio books, are stored in a SQL Server 2000 database. The store wants to allow visitors to its Web site to browse the list of titles sorted in various ways, such as by medium (VHS, DVD, etc.., genre, director, and so on. You have created a number of stored procedures to facilitate the different ways of presenting the data. Given an existing DataSet named dsVids and a Connection named conn, which of the following code examples illustrates the correct way to call the stored procedure named ListDVDTitles that returns the list of DVD titles A. Dim daDVDList as New SqlDataAdapter(. daDVDList.SelectCommand = New SqlCommand(. daDVDList.SelectCommand.Connection = conn daDVDList.SelectCommand.CommandText = "ListDVDTitles" daDVDList.SelectCommand.CommandType = CommandType.StoredProcedure daDVDList.Fill(dsVids, "Titles". B. Dim daDVDList as New SqlDataAdapter(. daDVDList.SelectCommand = New StoredProcedure(. daDVDList.SelectCommand.Connection = conn daDVDList.SelectCommand.CommandText = "ListDVDTitles" daDVDList.SelectCommand.CommandType = CommandType.SQLCommand daDVDList.Fill(dsVids, "Titles". C. Dim daDVDList as New SqlDataAdapter(. daDVDList.SelectCommand = New SqlCommand(. daDVDList.SelectCommand.Connection = "ListDVDTitles" daDVDList.SelectCommand.CommandType = CommandType.StoredProcedure daDVDList.Fill(dsVids, "Titles". D. Dim daDVDList as New SqlDataAdapter(. daDVDList.SelectCommand = New SqlCommand(. daDVDList.SelectCommand.CommandText = "ListDVDTitles" daDVDList.SelectCommand.CommandType = CommandType.StoredProcedure daDVDList.Fill(dsVids, "Titles". Answer:- A 42. You are creating a Web service that will include a Web method. You want the method to return its data to the caller as it is created and put into a serial stream, rather than waiting for all of the data to be prepared before returning it. Which of the following WebMethod attributes should you set to enable this 43. The XSLT processor copies the elements of the stylesheet until it finds a command in the format: A. SELECT ... FROM ... WHERE. B. {item, action}. C. {for-each select}. D. none. Answer:- B 44. What standard, protocol or language was generalized to become a standard protocol for sending messages of any type, using any protocol? A. SOAP B. SGML C. SQL D. ADO Answer: A 45. Which of the following statements is not true about XML Schemas: A. They are used to define the content and structure of data. B. They define a set of symbols and the relationships of those symbols. C. They are themselves XML documents. D. They have their own syntax. Answer:- D 46. The most popular way to materialize XML documents is to use: A. DTD. B. XSLT. C. HTML. D. SOAP. Answer:- B 47. With XML: A. views are not limited to one multi-valued path only. B. documents can automatically be generated from database data only. C. database data can automatically be extracted from XML documents only. D. With XML, all of the above are true. Answer:- D 48. To eliminate definition duplication, XML Schemas define: A. an intersection table. B. global elements. C. a normalized definition table. D. None of the above is correct. Answer:- B 48. What is not true about SOAP? A. SOAP originally meant Simple Object Access Protocol. B. SOAP was defined as an XML-based standard for providing remote procedure calls over the Internet. C. SOAP now is just a name, not an acronym D. SOAP was an early form of XML. Answer:- D 49. XML Schemas consist of: A. properties and methods. B. elements and attributes. C. structure and data. D. tables and relationships. Answer:- B 50. The expression FOR XML RAW tells SQL Server to: A. place the values of the columns as attributes in the resulting XML document. B. place the values of the columns into elements rather than attributes. C. place some columns into elements and others into attributes. D. None of the above is correct. Answer:- A 51. ADO.NET provides the ability to create and process in-memory databases called: A. views. B. relations. C. tables. D. datasets. Answer:- D 52. An XML component that defines the structure of a document is known as an A. DOCTYPE. B. DTD. C. #PCDATA. D. HTML Stylesheet. Answer:- B 53. HTML is an application of a more robust document markup language called: A. XHTML. B. XML. C. SGML. D. None of the above is correct. Answer:- C 54. XSLT processors evaluate each statement in the context of the match that has been made. That is, XSLT processors are: A. context oriented. B. procedural oriented. C. object oriented. D. relational oriented. Answer:- A 55. The DTD begins with the word: A. #PCDATA. B. XML. C. DOCTYPE. D. HTTPS. Answer:- C 56. What is not true about XML? A. Web page display is the most important application of XML. B. With XML, there is a clear separation between document structure, content and materialization. C. XML is more powerful than HTML. D. XML documents have two sections. Answer:- A 57. What is not true about XSLT? A. XSLT is a declarative transformation language. B. XSLT uses a set of rules that govern how a document is to be materialized is created. C. XSLT uses a set of procedures that specify how a document is to be programmed. D. XSLT is used to transform the input document into another document. Answer:- C 58. If the XML data instance conforms to the DTD, the document is said to be: A. type-invalid. B. type-valid. C. not-type-valid. D. an HTML document. Answer:- B 59. The document that is used by XSLT to indicate how to transform the elements of the XML document to another format is an A. HTML page. B. DOCTYPE procedure. C. stylesheet. D. stored procedure. Answer:- C 60. If an XML document does not have a DTD, then by definition it is: A. not-type-valid. B. type-valid. C. an HTML document. D. None of the above is correct. Answer:- A 61. Using Which Datasource Control Can Access Oracle DataBase ? a. xmlDatasource b. sqlDataSource c. ObjectDatasource d. All of the Aboove Answer:- C 62. How to get the current user Name ? a. Identity.UserName b. CurrentUser.Identity.Name c. User.Identity.Name d. Based on the Session Variable Name Answer:- C 63.Which is Incorrect ? a. Session objecy is Private to user b. Application Object is global c. Caching can be global or Private d. Application object vaues are accessed accross the application Answer:- C 64. Which is Correct ? a. sql cache invalidation is a new feature in asp.net2.0 b. sql cache invalidation is an existing feature with enhancement c. sql cache invalidation is an existing feature d. sql cache invalidation is a bug in prior version Answer:- D 65.Which is correct ? a. DataTable is member of a DataSet b. DataTable is member of a System.Data c. DataTable is member of a System.Data.SqlClient d. Dataadapter Answer:- B 66.Which is correct ? a. System.String and System.Text are same. System.text is synonym of system.string b. System.String is data type System.Text is Class c. System.String is data type System.Text is namespace d. Non of the abve is right Answer:- D ADO.Net Questions and Answers Pdf Download Read the full article
0 notes
Text
ESP32 Tutorial Arduino web server: 16. Receiving data from JavaScript websocket client
Introduction
In this tutorial we will check how to setup a HTTP web server on the ESP32 that will have a websocket endpoint and that will serve a HTML file containing JavaScript code to establish a websocket connection to the server.
With this tutorial, we aim to illustrate that the asynchronous HTTP web server libraries we are going to use allow simultaneously to work with regular HTTP requests and websocket connections, making it a very good framework choice.
For a tutorial on how to get started with these libraries using the ESP32, please check here. For the websocket related functionalities available on these libraries, please check this tutorial.
When it comes to serving content, this framework offers a great variety of possibilities, like serving string content, serving content from FLASH memory and serving content from the file system.
Since we are going to serve a web page with some complexity, we will use the file system approach. In terms of scalability and organization, keeping the the content in different files on the file system should be the cleanest way for a real case scenario where we want to setup a web server with multiple routes.
For a basic introduction on SPIFFS (SPI Flash File System) on the ESP32, please check here. To make the process of working with files easier, we will use a plugin to upload the HTML file to the ESP32 file system beforehand. So, when we run the HTTP web server code, the file should already be there, ready for serving. You can check here how to use the mentioned plugin.
The mentioned tutorial covers in the detail the whole procedure but, to sum up, we first need to navigate to the folder of the Arduino sketch we want to upload to the ESP32 later. There, we should create a folder named “data” and inside it we should put our file with the HTML and JavaScript code (we will cover its content below).
You can name the file how you want as long as you use the correct file name later in the Arduino code. I’m naming mine ws.html, like illustrated in figure 1.
In order to upload the file and assuming a previous installation of the plugin, you should go to “Tools” in the Arduino IDE and click the “ESP32 Sketch Data Upload” option.
Once the procedure finishes, the file should be located on the SPIFFS file system on the root directory with the same name and extension we gave it. So, its full path will be “/ws.html“.

Figure 1 – Uploading the file to the SPIFFS file system.
In this tutorial we will simplify the HTML and JavaScript as much as possible, so it is easier to understand the end-to-end architecture. So, we are not going to follow all the best practices but please take them in consideration when developing your final code.
We are also not going to use any CSS code, so the final interface that will be shown to the user will be very simple.
The mentioned interface will allow the user to establish the connection to the websocket server, then send some data using a textual input and also allow him to close the connection. After closing a connection, the user can reconnect again.
The tests were performed using a DFRobot’s ESP32 module integrated in a ESP32 development board.
The HTML and JavaScript Code
In order to keep things simple and focus on the ESP32 code, we will develop all the JavaScript and HTML in the same file. Note however that in order to keep the code clean, it is usually a good practice to keep the JavaScript code in a different file.
We will first focus on the HTML code. We will have two main sections, the head and the body. In the head, we will place the JavaScript code that will handle the websocket connection and in the body the HTML elements that will be rendered in the page.
<!DOCTYPE html> <html> <head> <script type = "text/javascript"> // JS code </script> </head> <body> <!-- Body elements--> </body> </html>
The body will have two HTML divs. The first one will contain two buttons, one to establish the web socket connection to the server and the other to disconnect.
Since when the page loads no connection is established, the “connect” button will be enabled and the “disconnect” button will be disabled. Each button will call a JavaScript function to connect and disconnect from the websocket server, respectively.
We will set the id attribute of both buttons so we can later manipulate their disabled status in the JavaScript code when the connection / disconnection events occur.
<div> <button onclick = "OpenWebsocket()" id = "connectButton">CONNECT</button> <button onclick = "CloseWebsocket()" disabled = "true" id = "disconnectButton">DISCONNECT</button> </div>
The second div will have a text input and a submit button, so the user can write text and send it to the websocket server. Both these elements start disabled since, when the page loads, no connection is established, which means it doesn’t make sense to allow the user to send data.
The “send” button will also call a JavaScript function responsible for sending the textual content using the previously opened websocket.
Again, these two elements will have ids so we can easily manipulate their status in the JavaScript code.
<div> <input type = "text" disabled = "true" id = "inputText"></input> <button onclick = "SendData()" disabled = "true" id = "sendButton">SEND</button> </div>
Now we will check the JavaScript code needed. First, we will declare a globally scoped variable so we can later initialize the websocket connection and access it inside the JavaScript functions.
var ws = null;
Then, we will define the functions that will be called when clicking the buttons of our user interface. We need to define a function that will execute when the user clicks the “connect” button.
So, when the user clicks that button, we want to establish the connection. First, we will instantiate an object of class WebSocket, passing as input of the constructor the websocket URL.
The format of the URL is shown below. Note that you should change #yourEspIp# by the IP of your ESP32 and we are assuming that the websocket endpoint will be “/test”, which will be the one we’ll be using in the Arduino code when setting up the server.
ws://#yourEspIp#/test
The code is shown below, already substituted with my ESP32 IP. Note that I know the IP of my ESP32 beforehand from previous tests. Also, my router assigns a static IP to my ESP32, so I know it won’t change.
If you don’t know the IP of your ESP32 yet, then you need to obtain it before finishing this code. You can read more about getting the IP address here. Alternatively, you can just run the Arduino code below, wait for the device to connect to the WiFi network and copy the IP that will be printed. Naturally, at that point, since it won’t have the HTML file yet, the rest of the functionality will not work.
For a more robust solution that doesn’t involve knowing the IP beforehand, you can take advantage of the async HTTP web server libraries template engine and put a placeholder in the IP address and then change it in run time by the IP of the ESP32.
You can check here an introduction to template processing on the ESP32. For the specific use case where the file will be served from the file system (which is what we are going to do), you can check here the code needed for the template substitution.
As an alternative solution, if you don’t want to work with IP addresses directly, you can also setup a mDSN server on the ESP32. The ESP32 async HTTP web server libraries example covers this approach.
ws = new WebSocket("ws://192.168.1.78/test");
Since the WebSocket API works with events, then we need to specify what happens when the connection opened and connection closed events occur. Basically, we need to set handling functions to be executed when these events occur.
In terms of implementation, these handling functions will be very similar. When the onopen event occurs, we know the connection is established, so we disable the “connect” button and enable the “disconnect” button. We will also enable the text input and the “send” button since after that event the user can start sending content to the server.
The onclose event will be the opposite, meaning that we will disable the “disconnect” and “send” buttons and the text input and we are going to enable the “connect” button, in case the user wants to re-connect later. We will also give a message in an alert box indicating the disconnection.
In both event callback functions we access the HTML objects by using the getElementById method of the document object. This method receives as input the ID of the element we want to obtain, as a string. This is why we added the id property to our HTML elements and we should use it here.
In order to change the status of the element, we use the disabled attribute, which we can use to enable / disable the element. To do it, we just need to assign it a Boolean value. If we want to enable it, we set the disabled attribute to false. If we want to disable it, we set the disabled attribute to true.
function OpenWebsocket() { ws = new WebSocket("ws://192.168.1.78/test"); ws.onopen = function() { document.getElementById("inputText").disabled = false; document.getElementById("sendButton").disabled = false; document.getElementById("connectButton").disabled = true; document.getElementById("disconnectButton").disabled = false; }; ws.onclose = function() { document.getElementById("inputText").disabled = true; document.getElementById("sendButton").disabled = true; document.getElementById("connectButton").disabled = false; document.getElementById("disconnectButton").disabled = true; alert("Connection closed"); }; }
The function that will be executed when the user clicks the “disconnect” button will be very simple. We will just need to call the closemethod on our websocket object. After that, when the connection is effectively closed, the corresponding event will be triggered and the handling function we defined before will be executed, performing the enabling / disabling of the HTML events we have described.
function CloseWebsocket(){ ws.close(); }
The function to be executed when the user clicks the “send” button will also be very simple. First, we obtain the value of the text input element and store it in a variable.
Like we did before, we can access the element by using the getElementById method, passing as input the ID of the text input element. Then, we can access its value using the value attribute.
Then, we simply send the value to the server using the send method of the websocket object.
function SendData(){ var textToSend = document.getElementById("inputText").value; ws.send(textToSend); }
The full code can be seen below. Note that the code shown here is not minified but, in order to save some space in the ESP32, we could have done it. Also, take in consideration that we are not following here all the best practices for developing HTML and JavaScript code, for the sake of simplicity.
<!DOCTYPE html> <html> <head> <script type = "text/javascript"> var ws = null; function OpenWebsocket() { ws = new WebSocket("ws://192.168.1.78/test"); ws.onopen = function() { document.getElementById("inputText").disabled = false; document.getElementById("sendButton").disabled = false; document.getElementById("connectButton").disabled = true; document.getElementById("disconnectButton").disabled = false; }; ws.onclose = function() { document.getElementById("inputText").disabled = true; document.getElementById("sendButton").disabled = true; document.getElementById("connectButton").disabled = false; document.getElementById("disconnectButton").disabled = true; alert("Connection closed"); }; } function CloseWebsocket(){ ws.close(); } function SendData(){ var textToSend = document.getElementById("inputText").value; ws.send(textToSend); } </script> </head> <body> <div> <button onclick = "OpenWebsocket()" id = "connectButton">CONNECT</button> <button onclick = "CloseWebsocket()" disabled = "true" id = "disconnectButton">DISCONNECT</button> </div> <div> <input type = "text" disabled = "true" id = "inputText"></input> <button onclick = "SendData()" disabled = "true" id = "sendButton">SEND</button> </div> </body> </html>
The Arduino code
The Arduino code for this tutorial will be built on top of many functionalities we have been covering in previous tutorials.
To get started, we need the library includes that will make available the functionalities we are going to use. We need the WiFi.h in order to be able to connect the ESP32 to a WiFi network and the ESPAsyncWebServer.h, so we can setup the async HTTP web server.
Since we are going to serve the HTML / JavaScript file from the file system then we also need the SPIFFS.h library, so we can interact with the ESP32 file system.
#include "WiFi.h" #include "ESPAsyncWebServer.h" #include "SPIFFS.h"
As usual with all the sketches that involve connecting the ESP32 to a WiFi network, we will need to declare the credentials of that network, to later use them in the Arduino Setup function.
Thus, we need the network name (SSID) and the network password. Before uploading the code to your ESP32, you should change the placeholders below by the actual values of your network.
const char* ssid = "yourNetworkName"; const char* password = "yourNetworkPass";
To continue the global variables declaration, we need an object of class AsyncWebServer, which will be used to setup the HTTP server. Remember that, as input of the constructor, we need to pass the HTTP port where the server will be listening to incoming requests. As usual, we will use 80, which is the default HTTP port.
AsyncWebServer server(80);
Finally, we need an object of class AsyncWebSocket, which will be used to setup the websocket endpoint. The constructor for this class receives as input a string with the route where the websocket can be reached. As we stated in the JavaScript code, it will be “/test”.
AsyncWebSocket ws("/test");
Moving on to the setup function, it will be pretty much similar to what we have been covering in previous posts. We will start by opening a serial connection, initializing the file system and then connecting the ESP32 to the WiFi network, printing the local IP assign to it at the end.
Serial.begin(115200); if(!SPIFFS.begin()){ Serial.println("An Error has occurred while mounting SPIFFS"); return; } WiFi.begin(ssid, password); while (WiFi.status() != WL_CONNECTED) { delay(1000); Serial.println("Connecting to WiFi.."); } Serial.println(WiFi.localIP());
Then, we will bind a handling function to our websocket endpoint by calling the onEvent method on the AsyncWebSocket object. As input, we pass the handling function that will be executed whenever a websocket event occurs. We will define this function later.
ws.onEvent(onWsEvent);
Next, we register the websocket object on our HTTP web server by calling the addHandler method of the AsyncWebServer object. As input, this method will receive the address of our AsyncWebSocket object.
server.addHandler(&ws);
Now that we have configured the websocket endpoint, we still need to add a route to serve the HTML / JavaScript file we have developed in the previous section. This route will be named “/html” and will listen only to HTTP GET requests.
In the handling function implementation, we will simply serve the file from the file system. To do it, we use the send method of the AsyncWebServerRequest object pointer, passing as first input the SPIFFS variable that is used to interact with the ESP32 SPIFFS file system.
As second input we pass the path of the file, so the async web server framework can retrieve it and return it to the client. The file will be on the root directory and it is named ws.html. So, the full path is “/ws.html“
To finalize, we pass as last parameter of the send method a string with the content-type, which will be “text/html“.
server.on("/html", HTTP_GET, [](AsyncWebServerRequest *request){ request->send(SPIFFS, "/ws.html", "text/html"); });
Finally, we call the begin method on the AsyncWebServer object, so it starts listening to incoming HTTP requests.
server.begin();
The final setup function can be seen below.
void setup(){ Serial.begin(115200); if(!SPIFFS.begin()){ Serial.println("An Error has occurred while mounting SPIFFS"); return; } WiFi.begin(ssid, password); while (WiFi.status() != WL_CONNECTED) { delay(1000); Serial.println("Connecting to WiFi.."); } Serial.println(WiFi.localIP()); ws.onEvent(onWsEvent); server.addHandler(&ws); server.on("/html", HTTP_GET, [](AsyncWebServerRequest *request){ request->send(SPIFFS, "/ws.html", "text/html"); }); server.begin(); }
To finalize, we still need to declare the websocket event handling function. As covered in previous tutorials, this function’s signature needs to follow the one defined by the AwsEventHandler type.
The implementation will be simple. We will look for three types of events: client connected, client sent data and client disconnected. We can do this by applying some conditional sentences to the third argument that is passed by the HTTP web server framework to this handling function.
This is an argument of type AwsEventType, which corresponds to an enum indicating the event type.
So, for the connection and disconnection events, we simply print to the serial port a message indicating that the event has occurred. In case we receive a data event, we iterate through the bytes of the data and print them to the serial port.
This printing of data is done by using the fifth and sixth arguments of the callback function, which respectively correspond to an array with the data bytes and the length of the array (so we have a stopping condition for our data reading loop).
The full function can be seen below.
void onWsEvent(AsyncWebSocket * server, AsyncWebSocketClient * client, AwsEventType type, void * arg, uint8_t *data, size_t len){ if(type == WS_EVT_CONNECT){ Serial.println("Websocket client connection received"); } else if(type == WS_EVT_DISCONNECT){ Serial.println("Client disconnected"); Serial.println("-----------------------"); } else if(type == WS_EVT_DATA){ Serial.print("Data received: "); for(int i=0; i < len; i++) { Serial.print((char) data[i]); } Serial.println(); } }
The final source code can be seen below. Recall that the main loop is left empty since the web server framework is asynchronous, which means we don’t need to poll some kind of object periodically to check for incoming clients, but rather provide event callback functions, like we did.
#include "WiFi.h" #include "ESPAsyncWebServer.h" #include "SPIFFS.h" const char* ssid = "yourNetworkName"; const char* password = "yourNetworkPass"; AsyncWebServer server(80); AsyncWebSocket ws("/test"); void onWsEvent(AsyncWebSocket * server, AsyncWebSocketClient * client, AwsEventType type, void * arg, uint8_t *data, size_t len){ if(type == WS_EVT_CONNECT){ Serial.println("Websocket client connection received"); } else if(type == WS_EVT_DISCONNECT){ Serial.println("Client disconnected"); Serial.println("-----------------------"); } else if(type == WS_EVT_DATA){ Serial.print("Data received: "); for(int i=0; i < len; i++) { Serial.print((char) data[i]); } Serial.println(); } } void setup(){ Serial.begin(115200); if(!SPIFFS.begin()){ Serial.println("An Error has occurred while mounting SPIFFS"); return; } WiFi.begin(ssid, password); while (WiFi.status() != WL_CONNECTED) { delay(1000); Serial.println("Connecting to WiFi.."); } Serial.println(WiFi.localIP()); ws.onEvent(onWsEvent); server.addHandler(&ws); server.on("/html", HTTP_GET, [](AsyncWebServerRequest *request){ request->send(SPIFFS, "/ws.html", "text/html"); }); server.begin(); } void loop(){}
Testing the code
Assuming that you have already uploaded the HTML / JavaScript file to the ESP32 file system, simply compile and upload the Arduino code. When the procedure finishes open the Arduino IDE serial monitor and copy the IP address that gets printed.
Then, open a web browser of your choice and type the following in the address bar, changing #yourEspIp# by the IP you have just copied.
http://#yourEspIp#/html
You should get to a web page similar to the one shown below at figure 2. As can be seen, only the connect button is enabled and, at this point, there’s no connection established to the ESP32 server.

Figure 2 – Websocket connection interface, served by the ESP32.
After that, simply click the connect button. It may take a while, but then the status of the elements should change accordingly to what is shown in figure 3, indicating the connection was established and now we can send data to the websocket server.

Figure 3 – Websocket interface after connection established.
If you go back to the Arduino IDE serial monitor, it should have printed a message indicating a connection was established, as illustrated below in figure 4.

Figure 4 – Connection received by the ESP32.
Now you can go back to the HTML page and start sending some textual content to the server. After sending some data, if you go back to the serial monitor, the messages should be printed, as shown in figure 5.

Figure 5 – Data received via websocket printed to the Arduino IDE serial monitor.
Finally, if you click the disconnect button, the UI of the web page should get back to the state shown in figure 2. The corresponding event should be detected on the ESP32 and a message should be printed, as shown in figure 6.

Figure 6 – Disconnection event detected and corresponding message printed.
You can try to reconnect back and send more data and everything should work fine.
0 notes
Text
getElementById
getElementById
In this code we learn about document.getElementById() method in JavaScript.
0 notes
Text
JavaScript Get Element By id, name, class, tag value
JavaScript Get Element By id, name, class, tag value
Javascript accesses a dom element with id, class, name, tag, attribute, and its value. Here you will learn how to get html element values, attributes based on id, class, name, tag, attribute value.
javascript gets elements with id
You can use the javascript getElementById () method to get the value of the html element.
JavaScript gets Element by Example id
JavaScript get Element by id…
View On WordPress
0 notes
Link
If you have started working on ReactJS recently then you might be wondering how to manage state in React so that your application can scale. To solve this state management issue, many companies and people have developed various solutions. Facebook, who developed ReactJS, came up with a solution called Flux. You may have heard about Redux if you have worked on front end technology such as AngularJS or EmberJS. ReactJS also has a library for implementing Redux. But before learning Redux I would advise you to go through Flux and understand it. After that give Redux a try. I say this because Redux is a more advanced version of Flux. If the concepts of Flux are clear then you can learn redux and integrate it into your application.
What is flux?
Flux uses a unidirectional data flow pattern to solve state management complexity. Remember it is not a framework – rather it's more of a pattern that targets to solve the state management issue. Are you wondering what's wrong with the existing MVC framework? Imagine your client's application scales up. You have interaction between many models and views. How would it look?
Credit: Image from Facebook F8 Flux Event
The relationship between components gets complicated. It becomes hard to scale the application. Facebook faced the same issue. To solve this issue they architected a Single directional data flow.

Credit: Image from Facebook's Flux Doc
As you can see from the image above, there are a lot of components used in Flux. Let's go through all the components one by one. View: this component renders the UI. Whenever any user interaction occurs on it (like an event) then it fires off the action. Also when the Store informs the View that some change has occurred, it re-renders itself. For example, if a user clicks the Add button. Action: this handles all the events. These events are passed by the view component. This layer is generally used to make API calls. Once the action is done it is dispatched using the Dispatcher. The action can be something like add a post, delete a post, or any other user interaction. The common structure of the payload for dispatching an event is as follows:
{ actionType: "", data: { title: "Understanding Flux step by step", author: "Sharvin" } }
The actionType key is compulsory and it is used by the dispatcher to pass updates to the related store. It is also a known practice to use constants to hold the value name for actionType key so no typos occur. Data holds the event information that we want to dispatch from Action to Store. The name for this key can be anything. Dispatcher: this is the central hub and singleton registry. It dispatches the payload from Actions to Store. Also makes sure that there are no cascading effects when an action is dispatched to the store. It ensures that no other action happens before the data layer has completed processing and storing operations. Consider this component has a traffic controller in the system. It is a centralized list of callbacks. It invokes the callback and broadcasts the payload it received from the action. Due to this component, the data flow is predictable. Every action updates the specific store with the callback that is registered with the dispatcher. Store: this holds the app state and is a data layer of this pattern. Do not consider it as a model from MVC. An application can have one or many app stores. Stores get updated because they have a callback that is registered using the dispatcher. Node's event emitter is used to update the store and broadcast the update to view. The view never directly updates the application state. It is updated because of the changes to the store. This is only part of Flux that can update the data. Interfaces implemented in the store are as follows:
The EventEmitter is extended to inform the view that store data has been updated.
Listeners like addChangeListener and removeChangeListener are added.
emitChange is used to emit the change.
Consider the above diagram with more stores and views. Still, the pattern and the flow of data will be the same. This is because this is a single direction and predictable data flow, unlike MVC or Two-way binding. This improves the data consistency and it's easier to find the bug.
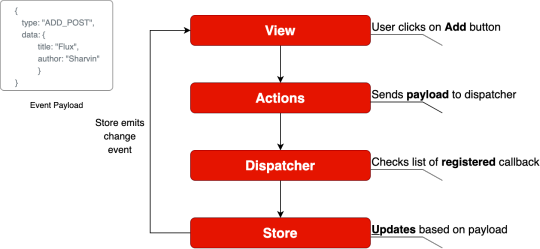
Flux Data Flow
Well, Flux brings the following key benefits to the table with the help of unidirectional data flow:
The code becomes quite clear and easy to understand.
Easily testable using Unit Test.
Scalable apps can be built.
Predictable data flow.
Note: The only drawback with the Flux is that there is some boilerplate that we need to write. Besides the boilerplate, there is little code we need to write when adding components to the existing application.
Application Template
To learn how to implement flux in ReactJS, we will build a Posts page. Here we will display all the posts. The application template is available at this commit. We will use this as the template for integrating Flux on top of it. To clone the code from this commit, use the following command:
git clone https://github.com/Sharvin26/DummyBlog.git
git checkout 0d56987b2d461b794e7841302c9337eda1ad0725
We will require a react-router-dom and bootstrap module. To install these packages, use the following command:
npm install [email protected] [email protected]
Once done you'll see the following application:

DummyBlog
To understand Flux in detail we will only implement the GET posts page. Once that is done you'll realize the process is the same for POST, EDIT and DELETE. Here you'll see the following directory structure:
+-- README.md +-- package-lock.json +-- package.json +-- node_modules +-- .gitignore +-- public | +-- index.html +-- src | +-- +-- components | +-- +-- +-- common | +-- +-- +-- +-- NavBar.js | +-- +-- +-- PostLists.js | +-- +-- pages | +-- +-- +-- Home.js | +-- +-- +-- NotFound.js | +-- +-- +-- Posts.js | +-- index.js | +-- App.js | +-- db.json
Note: We have added here a db.json file. This is a dummy data file. Since we don't want to build APIs and instead focus on Flux, we will retrieve the data from this file.
Our Application's base component is index.js. Here we have rendered the App.js inside the index.html under public directory using the render and getElementById methods. The App.js is used for configuring the routes. We are also adding NavBar component at the top of the other so it will be available for all the components. Inside the pages directory we have 3 files => Home.js, Posts.js, and NotFound.js. Home.js is simply used to display the Home component. When a user routes to a URL which doesn't exist, then NotFound.js renders. The Posts.js is the parent component and it is used to get the data from the db.json file. It passes this data to the PostLists.js under the components directory. This component is a dumb component and it only handles the UI. It gets the data as props from its parent component (Posts.js) and displays it in the form of cards. Now that we are clear about how our blog app is working we will start with integrating Flux on top of it.
Integrating Flux
Install Flux using the following command:
npm install [email protected]
To integrate Flux in our application we will divide this section into 4 subsections:
Dispatcher
Actions
Stores
View
Note: The complete code is available at this repository.
Dispatcher
First, create two new folders named actions and stores under the src directory. After that create a file named appDispatcher.js under the same src directory. Note: From now all the files which are related to Flux will have Camel casing as they are not ReactJS components. Go to the appDispatcher.js and copy-paste the following code:
import { Dispatcher } from "flux"; const dispatcher = new Dispatcher(); export default dispatcher;
Here we are importing the Dispatcher from the flux library that we installed, creating a new object and exporting it so that our actions module can use it.
Actions
Now go to the actions directory and create two files named actionTypes.js and postActions.js. In the actionTypes.js we will define the constants that we require in postActions.js and store module. The reason behind defining constants is that we don't want to make typos. You don't have to define constants but it is generally considered a good practice.
// actionTypes.js export default { GET_POSTS: "GET_POSTS", };
Now inside the postActions.js, we will retrieve the data from db.json and use the dispatcher object to dispatch it.
//postActions.js import dispatcher from "../appDispatcher"; import actionTypes from "./actionTypes"; import data from "../db.json"; export function getPosts() { dispatcher.dispatch({ actionTypes: actionTypes.GET_POSTS, posts: data["posts"], }); }
Here in the above code, we have imported the dispatcher object, actionTypes constant, and data. We are using a dispatcher object's dispatch method to send the data to the store. The data in our case will be sent in the following format:
{ actionTypes: "GET_POSTS", posts: [ { "id": 1, "title": "Hello World", "author": "Sharvin Shah", "body": "Example of blog application" }, { "id": 2, "title": "Hello Again", "author": "John Doe", "body": "Testing another component" } ] }
Stores
Now we need to build the store which will act as a data layer for storing the posts. It will have an event listener to inform the view that something has changed, and will register using dispatcher with the actions to get the data. Go to the store directory and create a new file called postStore.js. Now first, we will import EventEmitter from the Events package. It is available in the NodeJS by default. We will also import the dispatcher object and actionTypes constant file here.
import { EventEmitter } from "events"; import dispatcher from "../appDispatcher"; import actionTypes from "../actions/actionTypes";
We will declare the constant of the change event and a variable to hold the posts whenever the dispatcher passes it.
const CHANGE_EVENT = "change"; let _posts = [];
Now we will write a class that extends the EventEmitter as its base class. We will declare the following methods in this class: addChangeListener: It uses the NodeJS EventEmitter.on. It adds a change listener that accepts the callback function. removeChangeListener: It uses the NodeJS EventEmitter.removeListener. Whenever we don't want to listen for a specific event we use the following method. emitChange: It uses the NodeJS EventEmitter.emit. Whenever any change occurs, it emits that change. This class will also have a method called getPosts which returns the variable _posts that we have declared above the class. Below the variable declaration add the following code:
class PostStore extends EventEmitter { addChangeListener(callback) { this.on(CHANGE_EVENT, callback); } removeChangeListener(callback) { this.removeListener(CHANGE_EVENT, callback); } emitChange() { this.emit(CHANGE_EVENT); } getPosts() { return _posts; } }
Now create the store object of our PostStore class. We will export this object so that we can use it in the view.
const store = new PostStore();
After that, we will use the dispatcher's register method to receive the payload from our Actions component. To register for the specific event, we need to use the actionTypes value and determine which action has occurred and process the data accordingly. Add the following code below the object declaration:
dispatcher.register((action) => { switch (action.actionTypes) { case actionTypes.GET_POSTS: _posts = action.posts; store.emitChange(); break; default: } });
We will export the object from this module so others can use it.
export default store;
View
Now we will update our view to send the event to postActions whenever our Posts page is loaded and receive the payload from the postStore. Go to Posts.js under the pages directory. You'll find the following code inside the useEffect method:
useEffect(() => { setposts(data["posts"]); }, []);
We will change how our useEffect reads and updates the data. First, we will use the addChangeListener method from the postStore class and we will pass an onChange callback to it. We will set the posts state value to have a return value of the getPosts method from the postStore.js file. At the start, the store will return an empty array as there is no data available. So we will call a getPosts method from the postActions.js. This method will read the data and pass it to the store. Then the store will emit the change and addChangeListener will listen to the change and update the value of the posts in its onChange callback. If this seems confusing don't worry – check out the flow chart below which makes it easier to understand.
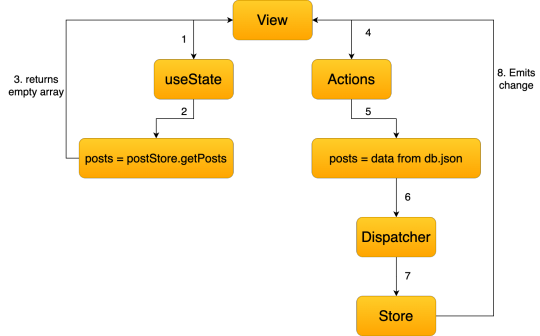
Remove the old code and update the following code inside Posts.js:
import React, { useState, useEffect } from "react"; import PostLists from "../components/PostLists"; import postStore from "../stores/postStore"; import { getPosts } from "../actions/postActions"; function PostPage() { const [posts, setPosts] = useState(postStore.getPosts()); useEffect(() => { postStore.addChangeListener(onChange); if (postStore.getPosts().length === 0) getPosts(); return () => postStore.removeChangeListener(onChange); }, []); function onChange() { setPosts(postStore.getPosts()); } return ( <div> <PostLists posts={posts} /> </div> ); } export default PostPage;
Here you'll find that we have also removed the import and also we are using setPosts inside our callback instead of useEffect method. The return () => postStore.removeChangeListener(onChange); is used to remove the listener once the user leaves that page. With this go to the Blog Page and you'll find that our blog app is working. The only difference is that now instead of reading the data in the useEffect method we are reading it in actions, storing it in the store, and sending it to the components that require it. When using the actual API you'll find that the application loads the data from the API one time and stores it in the store. When we revisit the same page you'll observe that no API call is required again. You can monitor it under the source tab in Chrome Developer console. And we're done!! I hope this tutorial has made the idea of Flux clearer and you'll be able to use it in your projects.
0 notes
Text
Weekly Reflection 7
“I MUST FINISH THIS WEEKLY REFLECTION TODAY!” Jason screamed.
Every head in the class turned to look at him. It was Friday, and the class was just finishing up their daily check-ins. “Colors” was the theme for today; students took turns explaining what color best represented their current emotion. Jason said that he was “red” - filled with rage at iMovie, a missing Micro SD card, and the extent of the things on his to-do list.
Now the room was dead silent. Jason could feel 17 sets of eyes on him, but he didn’t care. He was so focused on finishing his weekly reflection that he was willing to create a false narrative in order to get it done.
It wasn’t like this every Friday, though. Usually Jason could come up with a weekly reflection in an instant - he would take characters from a popular movie franchise, throw them into a weird web-development dilemma, implement a few topics covered in class that week into the plot, and click submit. Easy as pie.
But today Jason was at a loss. Not because he was out of movie franchises, but because he was tired of the old formula. Now, he decided that he was going to alter reality itself!
Michael, who sat next to Jason, finally broke the silence.
“What you need is a plot device,” he said. “Here - I’ll give you one. I’m working on a website right now. Can you help me create a DOM tree for it?” By now the class had returned to what they were working on - a group project using GitHub.
“Yes I will - however that won’t be enough,” Jason said. “I need to go more in-depth with that topic.”
“What topic?” Michael asked.
Jason took a hamburger out of his pocket, and started eating it. “The topic on DOM in general,” he said. “It stands for document object model.”
“So?” Michael said.
“So,” Jason said, after he finished chewing, “JavaScript uses the DOM to locate elements on a website. It takes the HTML and treats all tags as an object. Nested tags are children of those objects, thus creating a tree shape. These objects are ‘nodes’ on the DOM tree, which I am going to draw now.”
Jason finished his burger and took out a piece of paper and a pen. At the top he drew the first box - the “HTML” node, which JavaScript treats as the root node.
“JavaScript uses this format to simplify the read-and-write to elements in HTML,” Jason exlained as he drew. “Also, if the guy writing HTML messes up and forgets to include certain tags, like closing tags, the browser will fix when creating the DOM. Is this OK?” He held up the completed DOM tree, for Michael to check.
Michael snatched the paper from Jason’s hands and ripped it to shreds. “This is beyond terrible, but it’s good enough for the purpose of this narrative,” he answered.
Jason took out another hamburger. “In that case, we should talk about the forms on your website. Did you implement form validation correctly?”
Michael nodded. “If you take a look at my form, it won’t take invalid inputs for the ‘email’ field,”
He typed an obscenity into the form and clicked submit. The text field turned red as an alert appeared on the browser, telling him that what he entered was “not a valid email address.”
"I used the validity object in JavaScript to make sure that the user types something with an @ symbol,” Michael explained. “In my external .js file, I created a function that triggers on the event that the submit button is clicked. There are a few other mouse events, like mouseover and mouseout, but I used the click event because I want this function to work everytime the form is submitted.
“My function simply uses an if statement to determine if the input was valid. If it wasn’t, it changes the text field color. I used the ‘getElementById’ method to edit the right element.”
“Wow, nice work,” Jason said as he finished his second hamburger. “You think it’s good enough to submit?”
“Go ahead, buckaroo,” Michael replied.
0 notes