#change HTML attributes
Explore tagged Tumblr posts
Visit Tumblr Blog
Explore Tumblr blogs with no restrictions, modern design and the best experience.
Last Seen Tumblr Blogs


Fun Fact
China blocked Tumblr because of pornography and censorship problems in 2013.
Text
HTML Email Accessibility Report 2025
New Post has been published on https://thedigitalinsider.com/html-email-accessibility-report-2025/
HTML Email Accessibility Report 2025

Some weekend reading on the heels of Global Accessibility Awareness Day (GAADM), which took place yesterday. The Email Markup Consortium (EMC) released its 2025 study on the accessibility in HTML emails, and the TL;DR is not totally dissimilar from what we heard from WebAIM’s annual web report:
This is the third full year for this report and we are disappointed to see the same issues as we have in previous years. The top 10 issues haven’t changed order since last year, apart from the addition of color contrast, which can be put down to a change in the testing and reporting.
The results come from an analysis of 443,585 emails collected from the past year. According to EMC, only 21 emails passed all accessibility checks — and they were all written by the same author representing two different brands. And, further, that author represents one of the companies that not only sponsors the study, but develops the automated testing tool powering the analysis.
Automated testing is the key here. That’s needed for a project looking at hundreds of thousands of emails, but it won’t surface everything, as noted:
Email that pass our checks may still have accessibility issues that we cannot pick up through automated testing. For example, we check if an alt attribute is present on an image, but we do not check if the text is suitable for that image in the context of that message.
The most common issues relate to internationalization, like leaving out the lang (96% of emails) and dir (98% of emails) attributes. But you’ll be familiar with most of what rounds up the top 10, because it lines up with WebAIM’s findings:
Links must have discernible text
Element has insufficient color contrast
Images must have alternate text
Link text should be descriptive
Links must be distinguishable without relying on color
I appreciate that the report sheds a light on what accessibility features are supported by specific email clients, such as Gmail. The report outlines a set of 20 HTML, CSS, and ARIA features they look for and found that only one email client (SFR Mail?) of the 44 evaluated supports all of the features. Apple Mail and Samsung Email are apparently close behind, but the other 41? Not so much.
AilSo, yeah. Email has a ways to go, like a small microcosm of the web itself.
Direct Link →
#2025#Accessibility#Analysis#apple#apple mail#aria#attributes#author#awareness#brands#change#Color#Companies#CSS#css-tricks#email#emails#Features#Full#Global#Gmail#HTML#html email#images#issues#it#Light#Link#links#mail
0 notes
Text
How to credit GIFs
I know there are other posts around this hellsite of how to do this, but because @khaotunq made this amazing post, I wanted to remind some of you of how to include a GIF that credits the original post/creator even if the GIF does not appear in the GIF options.
Option #1:
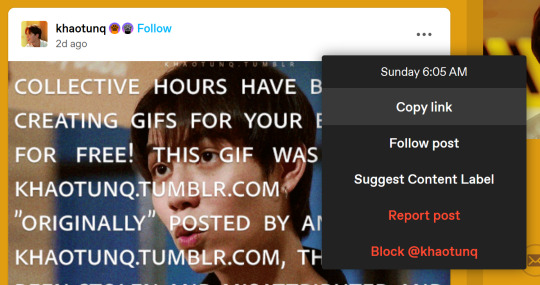
Step #1 - If you know which GIF you want to use, find the post its from, and click the three little dots to bring up the menu. Click "Copy Link"
Now, in your own post, click the "GIF" button

Step #2 - When the next box appears, paste the link you just copied in it.

Step #3 - The GIF should appear, so click it, and it will insert the GIF with credit to the original post and creator.

HOWEVER, it will only insert the first GIF in the post, so if you want a different GIF in the post, you have to make a small change.
Option #2:
Step #1 - Do everything in Option #1. EVERYTHING! Now, once you have inserted the GIF into your post, it will be the first GIF in the original post as stated in Option #1.
Step #2 - Click the wheel at the top of your post

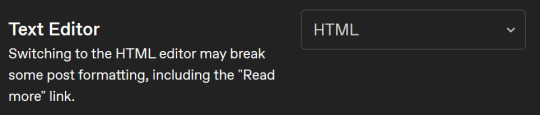
Step #3 - Once you do that a menu box will appear, and where it says "Text Editor," switch from "Rich text" to "HTML"
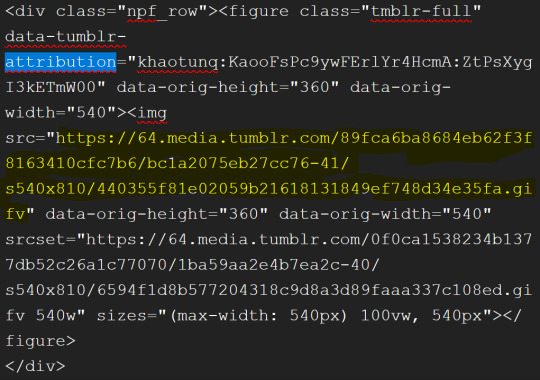
Step #4 - It might look scary now, but have no fear! Hit "Ctrl +F" to find what you need! Type "attribution" and it will locate the GIF for you.
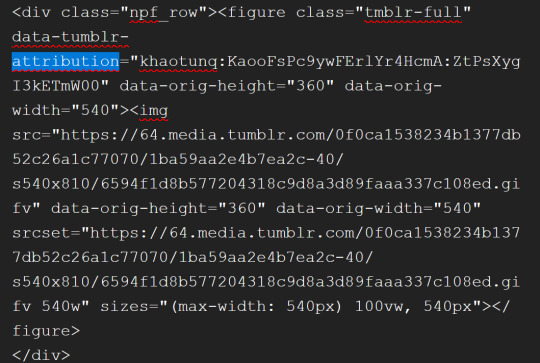
Step #5 - After "attribution" is the GIF's link that you copied earlier in quotes. Look for it!

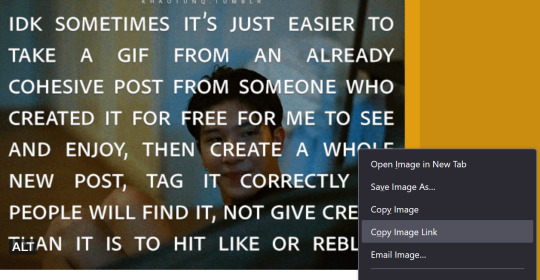
Step #6 - Now, in another window, go back to the original post with all the GIFs and find the GIF you want. Once you see it, right-click on the GIF, and when the menu pops up, select "Copy Image Link"
Step #7 - You will paste that new link into your post in the same spot the other link was within the quotes. In other words, replace the highlighted yellow part with the new link.
Step #8 - Click the little wheel at the top again and select "Rich text" to switch back to your normal viewing mode.

The new GIF will appear!

It seems overwhelming, but once you get the hang of it, it's easy peasy. And if you think this process is too time-consuming, remember that this is nothing compared to how much work GIF makers put into creating these GIFs for us.
Tumblr is actually very user-friendly with some practice, so do our community a favor and be friendly to the people who put in the effort.
#bl things#myspace taught a lot of us how to be tiny little code changers#bl community#be kind and attribute
326 notes
·
View notes
Text
Welcome!
Hello and welcome to The Neopian Biology Project!
This blog is an offshoot of a series of posts started on my main account. It is run by me, @asterixcalibur, in association with Happy Lab Accidents on @cabletwo. I'm an artist and funny person by trade, but a biologist by tragic BDGilbertian retribution.

The goal of this project is to identify all of Neopia's unique species, categorize them by kingdom and region of origin, and find an ideal specimen for each that can be put into a natural history museum (my gallery on Neopets). As of writing, the project has identified over 2000 unique species of Neopian wildlife.
Our main methodology is scouring item descriptions for helpful information. This process also involves researching and standardizing the taxonomical, ecoregional, and evolutionary timeline terminology of Neopia.
Longer term goals are to obtain the ideal specimen of every identified species for the museum, and renovate the museum into a simulated museum experience through careful application of visual assets and CSS/HTML. Maybe one day we can shoot for the Gallery Spotlight?
On Neopets
My account on Neopets is classypotassium. Feel free to ask to be NeoFriends -- just tell me who you are here!
The Neopian Biological Sciences Natural History Museum itself is here.
Ways to Contribute
1. Donate a specimen
If you'd like to donate or loan a specimen to the museum, contact me so we can discuss attribution and collateral!
The gallery's JellyNeo wishlist is here. It will be continually updated as specimens are identified, so consider it a work in progress. As of writing I also haven't checked anything off even if it's been obtained, so double check the museum before offering donations!
2. Donate Neopoints
You can also "donate" by buying a Plushie Fungus from my shop! These are intentionally overpriced so that the change can be considered a charitable donation.
3. Interact here!
A lot of the posts that end up here are going to be asking for people's thoughts on origin, kingdom, uniqueness, and so on, through polls and direct questions.
You can also submit items, images, links, art, specimens, fossils, documentation, scientific papers, primary sources, etc. and so on, for consideration by the Project!
You don't need to know anything about Neopets to put in your two NP (or cents USD). In fact, sometimes it's better to get a perspective grounded in normal Earth biology, because, speaking as a biologist here in Neopia, I can very well say oh ym god please help ohhhh my god you don't even know
Conclusion
You don't need to be into Neopets to enjoy or contribute to this blog; I'll try my best to write posts so that they can be enjoyed by anyone aware of but not necessarily into Neopets. In my experience, explaining Neopets to someone entirely unfamiliar with it is always fun. This shit runs deep, dark, and as spaghetti as its code. Best part of Neopets, to me, is that the site rewards you for exploration, and some of the most consequential but by far weirdest lore can only be found by happening upon a page six links deep into a chain of site features that have gone untouched since 2009, as part of a philosophy of interaction that runs the entire site and is entirely against modern website design principles.
Anyway,

Thank you for visiting!
Science awaits!
56 notes
·
View notes
Text
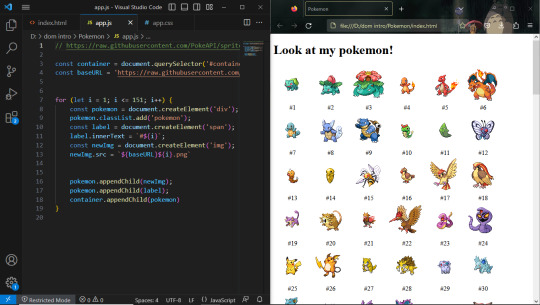
Day 2 [Multimedia Elements In HTML]
Welcome to day 2 :D
Day 1 [Introduction To HTML]

Line By Line Explanation:
(An attribute is extra info added to an HTML tag. So, is a tag. Src, alt, width and height are the attributes)
Tag : Used to add images to webpages
src : Used to give the URL of the image or the name of the image file
alt : specifies what will appear on the browser in case the image doesn't appear.
Width and height : Specifies the width and height.
Tag : Used to add audio
controls: shows a play/pause bar.
: your audio file (paste your file link there).
Type: Tells the browser what file you're showing it
Tag: Used to add videos
controls : lets users play/pause the video.
width and height: size of the video frame.
: your video file (paste your file link there).
Here's The Output →

Additional Tip : Download these two extensions because they're really helpful.

Live Preview helps you to look your output without having to save it every time you make a change in VS code
Live Server is similar, it just shows you the output on the webpage.
You can search for these two in the extensions icon on the side.
_____________________
Hope it helps. Tomorrow, we'll cover links and lists xD
#code#codeblr#css#html#javascript#python#studyblr#progblr#programming#comp sci#web design#web developers#web development#website design#webdev#website#tech#html css#learn to code#school#study motivation#study aesthetic#study blog#student#high school#studying#study tips#studyspo#website development#coding
14 notes
·
View notes
Text
How to Include Any GIF and Make it Attributed
(When GIF Search Fails)
So, you want to include a cool GIF in your post, but the GIF search can't find it, even when you paste in the blog link. Or it's not the first GIF on the post.
Here's how you can manually attribute any GIF.
This is the code you need to paste in the HTML editor, with the bold values replaced for your GIF:
<div class="npf_row"><figure class="tmblr-full" data-tumblr-attribution="BLOGNAME:EMBEDCODE:TINYURL" data-orig-height="YYY" data-orig-width="XXX"><img src="IMAGELINK" data-orig-height="YYY" data-orig-width="XXX" srcset="IMAGELINK XXXw" sizes="(max-width: XXXpx) 100vw, XXXpx"></figure> </div>
Spoiler alert, my sample GIF code is:

For example:
Original GIF Post

1. I think it's easier to do this at the Archive version of the post. The Dash URL is: https://www.tumblr.com/catnipster69/742522018223865857/episode-10x17-the-werther-project So the Archive URL is: https://catnipster69.tumblr.com/post/742522018223865857/episode-10x17-the-werther-project
BLOGNAME
2. In this case, the blog name is catnipster69.
IMAGELINK
3. Right-click the GIF you want, and choose Inspect (I'm using Firefox on the Mac). The image info is highlighted, including the URL (IMAGELINK) and the Height (YYY) and Width (XXX). Double-click to copy the URL and note the height and width.

The IMAGELINK is: https://64.media.tumblr.com/bb8af2e018bbcae2c9d98a635d62b7f9/a71ee1dc9ce83755-7b/s540x810/22b3f901fc453dcd3ab546e53683059306041997.gifv
YYY is 422
XXX is 540
EMBEDCODE
4. Way up at the top right of the page, click the Embed button:

5. Copy the Embed text into a text editor:

6. The interesting bit is in bold (the EMBEDCODE):

The EMBEDCODE is: zTy22yYiZilmbgDRmty9HA
TINYURL
7. Still on the Embed page, right-click anywhere and choose Inspect (or choose Tools > Browser Tools > Web Developer Tools).
8. In the Search HTML field, search for tmblr.co. This should highlight a big block of gobbledygook:

9. Double-click the block and copy it to a text editor.
10. Search for the tmblr.co URL. The interesting bit is in bold (TINYURL):

The TINYURL is: ZYTx4ifDzzTk8y01
Phew!
Paste the GIF Code in the HTML Editor
11. When creating a new post, change to the HTML editor:

12. Paste in your code:

13. Check the Preview:

Final GIF

16 notes
·
View notes
Text
Is there an actually complete guide to AO3's limited HTML somewhere? I know for a fact that some features work but only under slightly weird rules.
For example, if you're using the <a> tag to form an anchor to refer to later, you HTML will end up looking like <a name="Anchor" rel="nofollow" id="Anchor"> when it's done auto-correcting in the Preview. If you type in <a name="Anchor"> or <a name="Anchor" id="NotAnchor">, it will autocorrect to that, but if you type <a id="Anchor"> it will correct to an <a> tag whose only attribute is rel, or <a rel="nofollow">. (The rel="nofollow" attribute has no practical effect for most users' purposes.)
I know that AO3 will autocorrect any incompatible HTML to compatible HTML, but I don't know what the compatible HTML is, and the above <a name="Anchor"> example demonstrates that some things are compatible but don't look compatible unless you do them right!
This is especially confusing because the editor will autocorrect some HTML as soon as you switch from the HTML editor to the Rich Text editor - but it won't correct everything. I've attempted to do slightly funky things with styling that seemingly worked just fine in the editor, but vanish when I preview the chapter.
For example, here I am trying to use using the Greek character Ψ as a list bullet. When I originally typed it into the html field, I used the actual character Ψ. As soon as I switched to rich text and then back to html, it had autocorrected to Ψ, which is the escape character for Ψ. (For those who don't know, escape characters are a special code to tell the browser that this is NOT supposed to be code. <p> is an html tag; < p > will literally render "< p >".) So, it accepted the style attribute and the list-style-type, but it forced it into an escape character. So far so good.
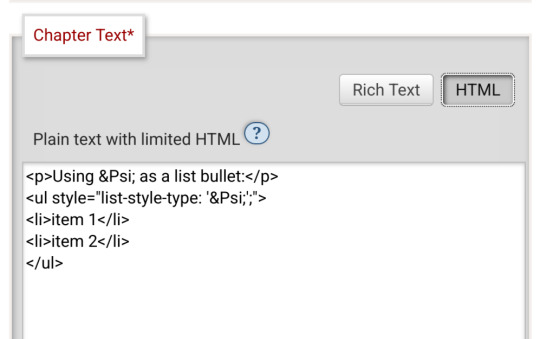
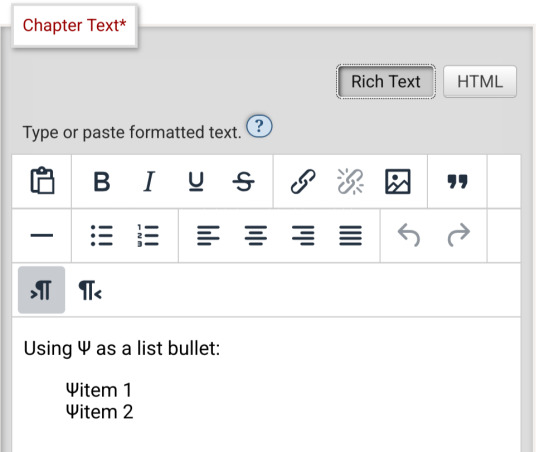
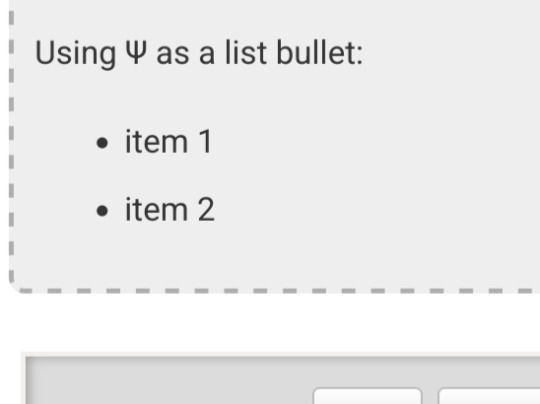
Until I click preview. Now the custom bullet is gone, replaced with the standard circle. If I click edit again, the code has removed the CSS attribute that changed the bullet... and also replaced the escape character Ψ with the character Ψ.
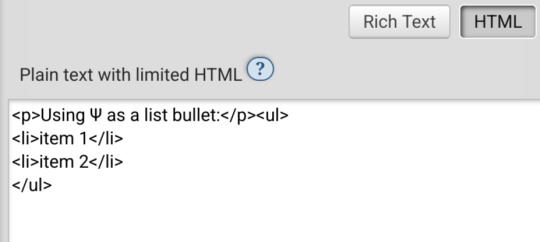
Weird.
#ao3#otw#html#ao3 formatting#ao3 html#I do not mind the lack of a clear standard at all#OTW is a nonprofit full of overworked staff and volunteers#and complete documentation is very hard#I just wanna be able to nerd more effectively#Can anyone direct me to the part of the open-source code that dictates HTML autocorrection? Is that a thing I can examine?
19 notes
·
View notes
Text
neocities heracles trials: from a chaotic newbie
okay so i want to actually start posting here and i finally got it through my thick skull that this is LITERALLY A BLOG. i'm supposed to blog. so here's a blog post.
anyways, for context, i've been working on my neocities for a while now, recently started over to make things more original and more me. another thing to note is that i'm using VScode.
the issue here is that i have zero well not exactly zero but i lack any professional/academic background experience with making websites. the html isn't the issue (thankfully) but holy shit dude...css+javascript implementation . basic styling with css is no biggie, right? absolutely, however...may i introduce: smooth transitions + the absolutely tragic fact that the <marquee> tag is deprecated an accessibility issue.
so, my first goal day one was to recreate a marquee animation through css. so i tried to simply implement this incredibly useful bit of code into my site (in which if you're interested i totally think my failure to get it working was user error so please check it out it works great if you're not me) but, lo and behold, despite me getting it to work in my V1 project, i could not, for the life of me, get it to work. so i, not too familiar with css animation and completely lost when it comes to javascript, started grasping at straws. i ended up finding this tutorial and, with some improvisation since the tutorial is for webflow and i'm manually writing everything, managed to make my own css recreation of a marquee effect essentially from scratch, and even learned about the animation-play-state css attribute so i could pause the effect when the marquee is hovered over! victory, basically.

then, i looked around the many cool and absolutely awesome sites on neocities to get inspiration, and then i was like "hey what if i made a custom button background image" and with some trial and error, made myself a pretty decent base (for now) with aseprite, and learned more about the program in the meantime which is always a plus.
then i decided that i wanted to do more with the buttons. i wanted to make it animate on hover. not too hard right? you'll...you'll see why i struggled...in a moment...
anyways, i settled on a simple shrink animation. which THIS i could do with ease, messed around a bit, got the keyframes, assigned that to the button:hover and all of that and all was good!...until i realized that once i stopped hovering over it, it snapped back to its original scale instead of transitioning smoothly again. THIS is where the "fun" began.
see, although i can wrap my head around things easily when it comes to css, i have to constantly look up what the proper syntax for everything is because otherwise i'll mess everything up. and through my research i had conducted (aka surfing through multiple blogs and reddit posts alongside other things on random forum websites) i had discovered the very neat transition attribute.
but we'll have to return to this because i have adhd, and i ended up getting distracted during this process. see, originally i had decided that the button would change it's visual to appear like it was pressed when the user's mouse hovered over it. then i was like "i don't think this makes sense" so i changed it so that the button wouldn't change its background image unless the user actually clicked on it. so i did that. then i had to make sure that the button wouldn't magically scale up again so i had to transform the styling and blah blah blah those details aren't really that important ANYWAYS the actual important bit about this is that if you use the transition attribute and there's a change in background images that change will also be transitioned unless you set the transition to only apply to a specific change. and i didn't know that originally. so every time i tried to fix things up with a transition so the button wouldn't snap back to it's original size out of nowhere the background would slooowly change as well and i actually got so frustrated with this that i wanted to burn something down because that's a totally normal reaction i guess. anyways, then i started frantically searching for answers on the topic and EVERY. SINGLE. THING. THAT I FOUND. INCLUDED JAVASCRIPT.
i do not know javascript. i have not learned anything about it unlike css and html. it SCARES me and it is FRUSTRATING. but i thought i'd try it anyways. news flash that shit didn't work at all and i almost thought about scrapping the animation entirely especially when it randomly stopped working when i made certain changes, but i ended up eventually figuring out what i mentioned earlier (CSS transitions and the fact that you can assign them to only affect a specific change instead of everything) so with some dabbling here and there i eventually managed to finally figure out how to make everything smooth through pure css and although it still snaps if the element hasn't finished animating i'm happy with it.

moving on to another thing, i wanted to then make a sound effect play when you click the button. yes, we are still talking about buttons. THIS i could not do with css, like, at all. javascript admittedly is for interactivity and i had already been bending the rules quite a bit with the animations since those teechnically should've been done with javascript as well but this? this was impossible without javascript. so i found a free mp3, and searched up a nice little tutorial on the very basics of javascript.
little did I know that apparently, this would be my own personal little hell.
see, no matter how many times i tried a different script, the sound just would not work like at all. i'd do everything in what i assumed to be the correct way, and no matter what, it would not play. knowing that i'd just have to revisit this, i decided it was best to just sort of put it on the back burner.
and this is where i wish i could say this is the end of my absolutely gobstopping rant. however, i cannot.
see, one thing that i really like that i've seen in a lot of other people's sites is draggable windows. i think they're sick. but this ALSO requires javascript, but i didn't think this could POSSIBLY be that bad since so many people did it.
...right?.......right? guys. right?
MOTHERFUCKER I WAS SO WRONG.
see, it turns out that a lot of people do this sort of thing with jQuery, specifically for user interfaces. but vscode doesn't have a "user friendly" way to get jquery to work with it. and because i don't want to mess with program files, i decided that logically speaking jquery just makes writing things in js scripts less complicated and doesn't introduce things that are impossible in vanilla javascript so i decided i could suffer a little bit and try and do things without jquery.
this led me to looking at many sites with draggable windows to look at their own scripts, in which every single time i tried replicating things i FAILED.
i eventually stumbled upon a nice code that worked. but the issue with it - in which unfortunately i can't find it, else i'd link it - is that it works with not only element classes but also a specific ID. see, this would be fine if i only wanted ONE draggable element. but i want multiple. and i thought that maybe if i just duplicated the script and dedicated it to a different ID and changed function names it would work but nooo life cannot be this easy apparently. so after setting up my webmaster status window, getting that to work, i tried doing the aforementioned method for what will eventually be a guestbook of sorts. it failed.
so i decided, "hey i'll revisit this later!!" and i went on to finding a way to implement a status widget into my site. this honestly was really easy as i ended up stumbling upon status.cafe . so i registered, eventually got my account activated, and i got it working in my live port of vscode just fine!! all is good in the world.
well that's what i thought until i found out that since i had created my neocities account in march of 2024, and i'm unemployed since i'm still in high school hence i have a free account, that i could not. use the widget. in neocities. so i tried finding a work around, found this handy guide (which is genuinely useful by the way) and set up things through a RSS feed instead which is essentially just a work around that complies with the security restrictions of neocities that i'm bound by. anyways, this works great but i literally just can't customize it to how i want so this is another fail. then i find imood.com which, although is NICE, doesn't suit what i want on its own. so i'm at a loss here too.
so, again, another thing to put to the side i suppose.

so i started working on getting my guestbook, browsed through people's homepages again, and found chattable . and you probably think i have another paragraph complaining about this but honestly i can't write about something when i can't figure out how to even create a chat to implement onto my site in the first place so...y'know.
plus, i honestly have no clue if it'll work on my site either due to security restrictions so this is fun!!
anyways, after dealing with all of this, i finally decided it was about time i ported what i had so far over onto my neocities account. which isn't actually that hard i just had to wipe all of my files, overwrite the content in my index.html file there and paste in what i have now, and then upload my new files. but for some god awful reason after i went through all of this chrome just. kept depending on my old stylesheet??? so i had to clear some of my browsing data and eventually everything was loading properly for me.
and THIS is finally the end of my ridiculous documentation concering my neocities adventure so far.
i have no doubts i'll end up ranting here AGAIN about all of this but for now this is all i have on my plate...besides finally caving and learning javascript for real and continuing to learn more about html and css. hopefully one day i'll stop having such frequent issues but now is not the time and i doubt that'll be anytime soon either.
moral of the story, if you want to start something new and pick up a new hobby, please for the love of all that is of substance in this world don't go in completely blind like i've done if you're going to be making a project of some sorts. it will only lead to many misfortunes.
anyways you can see what i currently have done in my neocities here, make suggestions or give advice in the notes and whatnot i don't know.
#neocities#rant post#rant#coding#web development#geocities#html#html css#htmlcoding#css#javascript#losing my mind#holy shit#send help
6 notes
·
View notes
Text
Day 30 — 35/ 100 Days of Code
I learned how to handle JavaScript features (default parameters, spread, rest, and destructuring).
And I finally reached the DOM chapeter, 'The Document Object' which contains representations of all the content on a page. I'm still discovering its methods and properties.
So far, I've learned about the most useful ones: getElementById(), querySelector, changing styles, manipulating attributes, and the append method.
I'm doing some silly practice exercises just to get more familiar with the DOM methods. The more I progress in my course, the more fun things seem to get. I'm really excited to start building stuff with code and combining HTML, CSS, and JS all together.
#100 days of code journal#learning#coding#webdevelopment#codeblr#studyblr#growing#imporving#self improvement#cs#computer science#programming#codenewbie#tech#learn to code#frontend#100daysofcode#coding blog#htlm#css#JavaScript#The DOM
66 notes
·
View notes
Text
You know what, I'll bother making this post. It's long overdue.
PSA: Please don't install uBlock Origin rules for Tumblr that use :nth-of-type(), and please remove or fix any you have installed. They can and will hide the wrong things. I'll show you a few alternatives below.
First, an example of how we get here. I've used the uBlock Origin element picker to try to hide the "Get a Domain" sidebar item:
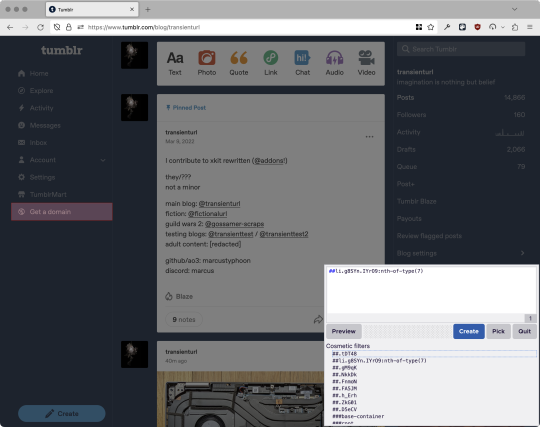
With some different adjustments of the sliders, it gave me these two snippets, one of which targeted a whole bunch of sidebar items, and the other of which selected the right one. Great, right? Read on.
www.tumblr.com##li.g8SYn.IYrO9:nth-of-type(7) www.tumblr.com##.gM9qK > li.g8SYn.IYrO9
As you can see, these both target a particular kind of sidebar item via "li.g8SYn.IYrO9"—fine—and as you can probably guess, the second one counts them all up and hides the seventh it finds.
This is bad, because what it actually hides depends on exactly how many sidebar items there are! Users can "snooze" Tumblr Live, which will make an item appear or disappear, and users with/without Ad-Free subscriptions will have or not have another. I have seen many, many people accidentally hide their activity, messages, inbox, etc using someone else's rule that's supposed to hide Live. Worse, some rules intended for e.g. recommended post carousels that use nth-of-type translate to something like "hide item number three on the dashboard no matter what it is," which will lead to a seemingly random post on your dashboard disappearing!
This isn't a problem specific to Tumblr, of course—I personally think uBlock Origin should never autogenerate these rules—but Tumblr has a ton of elements that aren't in fixed positions, so I feel comfortable wording that PSA the way I did. On a very static site, those rules might be fine. Here they almost always aren't.
So how do we fix this? First of all, as a developer of XKit Rewritten (check out @addons!), I must suggest you check if it has a feature to do what you want. Plenty of times it won't, though, and if not, we want to make a rule that hides an element based on what it is, not where it is. Here are three ways to make a robust rule:
First, I'll right-click the element I want and use the inspect element tool in my browser's developer tools to look at the element I really want (Firefox and Chrome/Edge/Opera have different but overall similar interfaces for this):
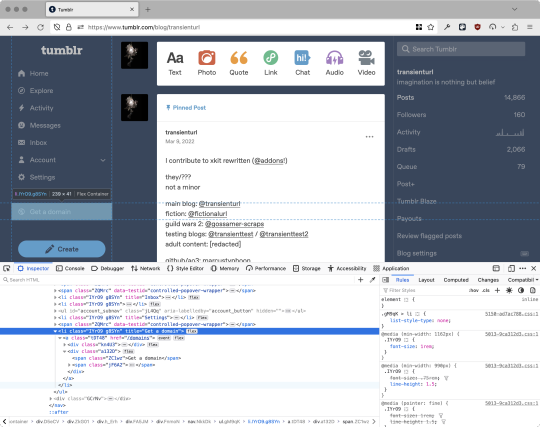
The HTML looks, for reference, like this (Tumblr sucks at code blocks but I'll try):
<li class="IYrO9 g8SYn" title="Get a domain"> <a class="tDT48" href="/domains"> <div class="kn4U3"> <svg> <use href="#managed-icon__earth"></use> </svg> </div> <div class="a132D"> <span class="ZC1wz">Get a domain</span> <!-- other unimportant stuff removed--> </div> </a> </li>
What's something unique about this element, preferably about the outermost element, and preferably contained within the <angle brackets> (HTML tags)? In this case, we have it easy: title="Get a domain" is definitely unambiguous and fulfills all of those three. If you're very familiar with web design using CSS, you'll know how to target that; if you've vaguely heard of CSS, you may be able to look at a reference sheet of CSS selectors, see [attribute=value], and figure it out, and if neither is true, I'll spoil it for you and say that we just put it in square brackets in this case.
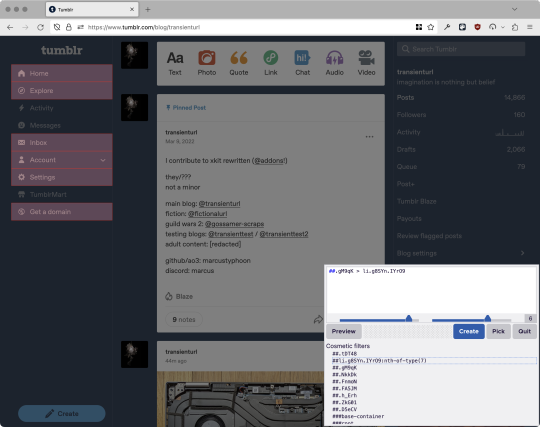
So—taking the rule uBlock Origin made, removing the :nth-of-type() and replacing it with our better selector—here's our first working, bug-free uBlock Origin rule:
##li.g8SYn.IYrO9[title="Get a domain"]
Okay, great. But what if we didn't have that attribute to target? What if our top-level element looks the same as the other ones? What if we want this rule to work if we change our Tumblr language to Spanish? Let's move on to :has().
:has() is a CSS selector (supported in uBlock Origin even in browsers where you can't use it for web development yet, i.e. Firefox), that lets you check the contents of an element for whatever is in the parentheses. Let's assume that Tumblr would never make two sidebar items with the same icon, and target that href="#managed-icon__earth" property:
##li.g8SYn.IYrO9:has([href="#managed-icon__earth"])
Yep, that works too!
Finally, what if we couldn't use either of those because we need to target the content of the page that's not contained within the <angle brackets>? We can take a look at the uBlock Origin documentation and find that it has something for that too: :has-text(). You can do very powerful things with this (e.g. you can sort of implement Blacklist entirely using uBlock Origin using something like article:has-text), but it doesn't perform well and can pretty easily be used incorrectly, so I'd suggest you avoid it when possible.
However, let's try using it here to target the "Get a domain" label text:
##li.g8SYn.IYrO9:has-text(Get a domain)
And that also works!
With these techniques, you should be able to target any specific thing you'd want to hide without using any fragile positional selectors. If you're going to share your uBlock Origin rules with others, please make use of this! If you're just using your rules for yourself, then hopefully I've given you enough information so that you can understand what a rule does and decide for yourself if it's worth bothering to fix (menu item order might not change that often, so maybe you're fine with certain rules being a bit prone to breakage; if your rule hides the first post in your timeline you really do need to fix that one!)
-
And, of course, a note for you web developers out there: :has() isn't natively supported in Firefox quite yet, so you can't really use it (I would not recommend using JQuery's simulated version—it's not quite the same). And :has-text() is just not a thing for CSS at all. Just use javascript at that point! Edit: No longer true in 2024; style away!
Final note: any rule with a random 5-character string like g8SYn will eventually break when Tumblr rebuilds its CSS map, though they haven't done that in ages. But when they do: no, it's not "Tumblr devs breaking our rules because they hate us." (Yes, I hear that sentiment a lot in contexts when it almost always makes zero sense.) If you're fairly experienced with CSS you can sometimes make Stylus/uBlock Origin rules that don't reference any, but it's usually convoluted and more trouble than it's worth.
81 notes
·
View notes
Note
Hello, wanted to say I read and loved the demo. Very well done. I just had a few questions, would love to know what Twine Template you use, especially at the beginning. Where you have the character creator, I love that the box around your selection changes to say/match what you chose. Such as depending on what skin color I choose it changes to signify that. Would love to know if you would share how you did that. I look forward to future updates! Best of luck.
Thank you! 🤍
I'm using the default template for SugarCube, if I remember correctly. Glad that you liked the box effect, it was my solution to reducing the number of passages whilst still allowing the validation of user input in character creation.
I did it through a combination of HTML tags and SugarCube native macros. Technical stuff under the cut:
Here is an example for eye color:
<fieldset class="charbox"><legend id="chareyes" class="chartxt">$p.appearance.eyes</legend> <div class="charoptions">Your eyes are: <<link "hazel">><<set $p.appearance.eyes to "hazel">><<replace "#chareyes">>$p.appearance.eyes<</replace>><</link>> <<link "brown">><<set $p.appearance.eyes to "brown">><<replace "#chareyes">>$p.appearance.eyes<</replace>><</link>> [rest of the options removed for brevity]</div> </fieldset>
The fieldset and the legend HTML tags together form a single box, a so-called legend, which I declare per attribute such as name, skin color, etc. You need a fieldset to make legend work iirc, but legend is where that text is displayed and it is positioned on the box frame by default. Important here is to give a unique ID to the legend tag ("chareyes" in this case), as we are interested in manipulating the text shown in it depending on our box.
In the sample above, the options I present for the eye color are listed within the Twine <<link>> tags. For these links there is no target passage to go to. Instead, you can see it is coded to do two things upon clicking the respective option. One, setting a game variable to the selected color.
<<set $p.appearance.eyes to "brown">>
Two, triggering a replace command to change the value shown in the legend to the description of the selected eye color according to the variable we have set in the same line. This is the bit you are asking about:
<<replace "#chareyes">>$p.appearance.eyes<</replace>>
Replace triggers without changing passages, so this way you can adjust multiple variables on a single "page". You'd obviously need to adjust the corresponding CSS classes to make it look the desired way, but the mechanics are serviced with just this idea above.
Hope this helps!
12 notes
·
View notes
Note
Hello! I'm not sure if you've been asked this before but how did you make the menu part, the "new game" "load game" part, I'm super new to coding so I'm sorry if this is dumb jaja I also tried to recreate the fades but that seems even more complex 😅 thank you for creating this and I hope you have a great day!
If you mean the UI menus like the ones that save and load menus, settings, etc. that all comes from the template I'm using! While I use Vahnya's Template, I highly recommend Vahnya's Template II because it's so gorgeous and already comes with a start menu! I would've used it myself if I hadn't already gotten so far in changing mine, and would've saved me so much grief! I am so thankful for everyone who's made these templates and resources ❤️❤️
If you're not fond of these, though, I highly recommend checking out idrellegames' tutorial (Wayfarer's development blog) on how to create a start menu with the load game and new game. It's extremely detailed and will do a much better way of explaining than me, and I suspect, also a much more sophisticated way of coding it than me!
As for the fades, here's the thread I referenced in Twine, many thanks to TheMadExile! I don't want to share my code with the fading as it is incredibly inefficient and prone to errors, and I do not want to share half-baked code with anyone that I myself am not confident about. While I love my fade effect, the way I ended up doing it took many nights of just troubleshooting it and figuring a way to use it consistently. Even now, it has errors I need to fix and still mystify me. I suggest you look up guides on HTML and CSS to do it yourself!
I hope all these resources are useful, and good luck with your coding endeavors 🫂 my biggest suggestion is to first do the research, use code as reference (and attribute), try it out yourself, and ask questions!
38 notes
·
View notes
Text
This Isn’t Supposed to Happen: Troubleshooting the Impossible
New Post has been published on https://thedigitalinsider.com/this-isnt-supposed-to-happen-troubleshooting-the-impossible/
This Isn’t Supposed to Happen: Troubleshooting the Impossible
I recently rebuilt my portfolio (johnrhea.com). After days and days of troubleshooting and fixing little problems on my local laptop, I uploaded my shiny new portfolio to the server — and triumphantly watched it not work at all…
The browser parses and runs JavaScript, right? Maybe Chrome will handle something a little different from Firefox, but if the same code is on two different servers it should work the same in Chrome (or Firefox) no matter which server you look at, right? Right?
First, the dynamically generated stars wouldn’t appear and when you tried to play the game mode, it was just blank. No really terrible website enemies appeared, nor could they shoot any bad experience missiles at you, at least, not in the game mode, but I guess my buggy website literally sent a bad experience missile at you. Over on the page showing my work, little cars were supposed to zoom down the street, but they didn’t show up, either.
Let me tell you, there was no crying or tears of any kind. I was very strong and thrilled, just thrilled, to accept the challenge of figuring out what was going on. I frantically googled things like “What could cause JavaScript to act differently on two servers?”, “Why would a server change how JavaScript works?”, and “Why does everyone think I’m crying when I’m clearly not?” But to no avail.
There were some errors in the console, but not ones that made sense. I had an SVG element that we’ll call car (because that’s what I named it). I created it in vanilla JavaScript, added it to the page, and zoomed it down the gray strip approximating a street. (It’s a space theme where you can explore planets. It’s really cool. I swear.) I was setting transforms on car using car.style.transform and it was erroring out. car.style was undefined.
I went back to my code on my laptop. Executes flawlessly. No errors.
To get past the initial error, I switched it from car.style to using setAttribute e.g. car.setAttribute('style', 'transform: translate(100px, 200px)');. This just got me to the next error. car was erroring out on some data-* attributes I was using to hold information about the car, e.g. car.dataset.xspeed would also come back undefined when I tried to access them. This latter technology has been supported in SVG elements since 2015, yet it was not working on the server, and worked fine locally. What the Hoobastank could be happening? (Yes, I’m referencing the 1990s band and, no, they have nothing to do with the issue. I just like saying… errr… writing… their name.)
With search engines not being much help (mostly because the problem isn’t supposed to exist), I contacted my host thinking maybe some kind of server configuration was the issue. The very polite tech tried to help, checking for server errors and other simple misconfigurations, but there were no issues he could find. After reluctantly serving as my coding therapist and listening to my (tearless) bemoaning of ever starting a career in web development, he basically said they support JavaScript, but can’t really go into custom code, so best of luck. Well, thanks for nothing, person whom I will call Truckson! (That’s not his real name, but I thought “Carson” was too on the nose.)
Next, and still without tears, I tried to explain my troubles to ChatGPT with the initial prompt: “Why would JavaScript on two different web servers act differently?” It was actually kind of helpful with a bunch of answers that turned out to be very wrong.
Maybe there was an inline SVG vs SVG in an img issue? That wasn’t it.
Could the browser be interpreting the page as plain text instead of HTML through some misconfiguration? Nope, it was pulling down HTML, and the headers were correct.
Maybe the browser is in quirks mode? It wasn’t.
Could the SVG element be created incorrectly? You can’t create an SVG element in HTML using document.createElement('svg') because SVG actually has a different namespace. Instead, you have to use document.createElementNS("http://www.w3.org/2000/svg", 'svg'); because SVG and HTML use similar, but very different, standards. Nope, I’d used the createElementNS function and the correct namespace.
Sidenote: At several points during the chat session, ChatGPT started replies with, “Ah, now we’re getting spicy 🔥” as well as, “Ah, this is a juicy one. 🍇” (emojis included). It also used the word “bulletproof” a few times in what felt like a tech-bro kind of way. Plus there was a “BOOM. 💥 That’s the smoking gun right there”, as well as an “Ahhh okay, sounds like there’s still a small gremlin in the works.” I can’t decide whether I find this awesome, annoying, horrible, or scary. Maybe all four?
Next, desperate, I gave our current/future robot overlord some of my code to give it context and show it that none of these were the issue. It still harped on the misconfiguration and kept having me output things to check if the car element was an SVG element. Again, locally it was an SVG element, but on the server it came back that it wasn’t.
Maybe using innerHTML to add some SVG elements to the car element garbled the car element into not being an SVG element? ChatGPT volunteered to rewrite a portion of code to fix this. I put the new code into my system. It worked locally! Then I uploaded it to the server and… no dice. Same error was still happening.
I wept openly. I mean… I swallowed my emotions in a totally healthy and very manly way. And that’s the end of the article, no redemption, no solution, no answer. Just a broken website and the loud sobs of a man who doesn’t cry… ever…
…You still here?
Okay, you’re right. You know I wouldn’t leave you hanging like that. After the non-existent sob session, I complained to ChatGPT, it again gave me some console logs including having the car element print out its namespace and that’s when the answer came to me. You see the namespace for an SVG is this:
http://www.w3.org/2000/svg
What it actually printed was this:
https://www.w3.org/2000/svg
One letter. That’s the difference.
Normally you want everything to be secure, but that’s not really how namespaces work. And while the differences between these two strings is minimal, I might as well have written document.createElementNS("Gimme-them-SVGzers", "svg");. Hey, W3C, can I be on the namespace committee?
But why was it different? You’d be really mad if you read this far and it was just a typo in my code. Right?
You’ve invested some time into this article, and I already did the fake-out of having no answer. So, having a code typo would probably lead to riots in the streets and hoards of bad reviews.
Don’t worry. The namespace was correct in my code, so where was that errant “s” coming from?
I remembered turning on a feature in my host’s optimization plugin: automatically fix insecure pages. It goes through and changes insecure links to secure ones. In 99% of cases, it’s the right choice. But apparently it also changes namespace URLs in JavaScript code.
I turned that feature off and suddenly I was traversing the galaxy, exploring planets with cars zooming down gray pseudo-elements, and firing lasers at really terrible websites instead of having a really terrible website. There were no tears (joyful or otherwise) nor were there celebratory and wildly embarrassing dance moves that followed.
Have a similar crazy troubleshooting issue? Have you solved an impossible problem? Let me know in the comments.
#ADD#Article#Articles#attributes#Best Of#browser#career#Cars#Case Studies#challenge#change#chatGPT#chrome#code#coding#CSS#css-tricks#dance#data#development#digitalocean#emotions#engines#firefox#Future#Galaxy#game#headers#how#HTML
0 notes
Text
shitfuck I need to. I think I really need to start advertising commissions again. I also, yes, need to stop working myself into the ground on a personal project. to do that.
it's more stressful thinking about the fact that everything I spend so long putting out there into the world is just... gone, though. I want to have this archive up soon. there's a few critical problems I overlooked, the main one being you can't link directly to the entries. but, well, I already have functions set up to handle hash targets to spit out particular entries so I think it's not too tall of an order. it's annoying trying to think what particular identifiers to use because just listing them in a particular order is liable to change so I suppose I could have codes based around the... really stupid file names...
I think I might cull the loader because it's causing more problems than it's fixing but I did figure out how to do that! the onload event listener was what I was looking for, I just didn't realise that applying it to an element only applies to the specific piece of html and not its content - so flagging entry posts with an onload listener isn't very useful, but flagging the individual images with one works.

the one thing I didn't expect is that it fires off every time the html is altered, so every image adds multitudes more 'onload' functions every time more are loaded in. this wasn't hard to solve - I just stuck an extra condition to erase the attribute after it had fired off once.
so a neat experiment, nonetheless.
4 notes
·
View notes
Note
Hello! I hope I don't bother you again. I have two questions for you (I think there are more). I'm writing a zosan fanfic and I came up with the idea of putting "titles" in what happens in the "chapters" separated by the divider, like the titles of anime episodes (very One Piece with spoilers about what happens in the episode), I would like to know what do you think of this idea? I have images of what these titles would look like if you want them for better visualization. 2- Is there a skin work on ao3 that imitates these "titles", as if they were chapter titles of a book (but without having to have several chapters as I want to make a oneshot)?
hello! yes, I think that sounds like a neat idea. you should go for it!!
I don't watch one piece so I hope I'm visualizing it right. if I got it wrong, feel free to send me a picture.
anyway. are you trying to do something like this?
if this is what you're going for, you can try this code out! I also created a pastebin for this one, so you can just copy paste to your own workskin.

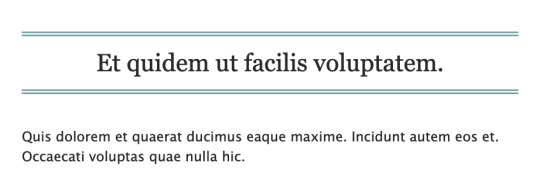
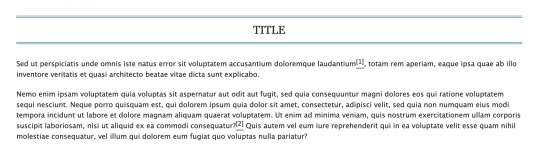
so here, we're creating the lined-title css class. you can just add it to your <p> tags in the html when you want to apply them. e.g.
<p class="lined-title">TITLE</p>
feel free to play around with border-style and the border-color (or any other attribute). you'll want border-style:solid if you just want one single line, for example.
you can also check AO3's FAQ on what colors and fonts you can use. fun fact: border-style:double is the same css they use to add those double lines in the FAQ!
note that this will span the entire width of the page. so if you have a short title, it'll look like this on desktop:
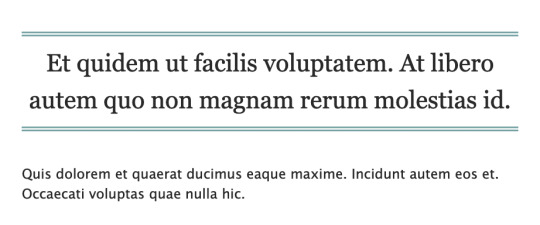
if you don't want it to span the whole page, we could try this instead (also included in the pastebin link):

which will result in this:

however, we can't manipulate the spacing between the text and the lines in this one. on the other hand, it has text-decoration-style:wavy which the first option doesn't have!
for custom scene dividers, you can also check out these guides:
How to Make Customized Page Dividers by La_Temperanza
Dividers & how to style them by skinofthesoul
Rainbow Paragraph Divider by benwvatt
bonus: inspect element
also, are you familiar with inspect element yet? if you are, great! you can just skip this. otherwise, if you're still getting the hang of working with workskins and aren't used to editing css, you can try this:
right click on the text you want to change on AO3, then click "inspect" or "inspect element" (not sure what it's called in browsers these days; on firefox, it's just "inspect"). this will bring up a bunch of developer tools and it kinda looks like this:

it might look different depending on the browser.
but here on the side, you can see the html on top and css at the bottom. as you can see in the screenshot, we are inspecting the title and we can see the different css rules for the title.
if you want to play around with the css, you can just change them from this panel and it will automatically reflect on the page. these changes are not permanent so it's a good way to test different styles without having to go through the cycle of updating the workskin and refreshing the fic page.
if this is your first time trying this out, it might look overwhelming, but it's very helpful if you get the hang of it. but of course, you don't need to learn how to do this to style your fics. :D
9 notes
·
View notes
Text
Accelerate LWC Development With Salesforce’s Local Development Server

Tired of constantly deploying and refreshing your UI every time you update your Lightning web components (LWCs)?
With Local Dev (beta), you can streamline your workflow by developing your LWCs while previewing them in real-time directly within your Lightning app or Experience Cloud site.
Note: Before you begin make sure that you have the latest version of the CLI command, run “sf update”.
Step 1: Install the Local Dev Plugin To begin, install the Local Dev Plugin using one of the following commands based on your environment:
For Production or Scratch orgs:
sf plugins install @salesforce/plugin-lightning-dev
OR
sf plugins install @salesforce/plugin-lightning-dev@latest
For Sandbox environments:
sf plugins install @salesforce/plugin-lightning-dev@prerelease
Step 2: Enable Local Dev
Navigate to Setup in Salesforce.
In the Quick Find box, type Local Dev.
Select Local Dev and enable the feature.

Step 3: Enable Local Dev for Your Scratch Org
To configure Local Dev for a scratch org:
Open your SFDX project.
Locate the config/project-scratch-def.json file.
In the settings section of the file, add the following key “enableLightningPreviewPref”: true

Step 4: Preview
Use Local Dev to run a preview of the following types of Salesforce projects.
Lightning Experience apps (desktop and Salesforce mobile app)
LWR Sites for Experience Cloud
To preview your application, use the following steps:
Run the command below in the CLI to start the guided setup: sf lightning dev app
Alternatively, if you want to bypass the guided steps, you can directly use the following command in the VS Code terminal: sf lightning dev app — target-org — name — device-type — device-id — flags-dir
Replace the placeholders with the appropriate values for your project. This will launch the application preview.
Guided Steps When Running the Command sf lightning dev app:


Step 4: Build an LWC Component and Experience the Real-Time Magic of Local Dev (Beta).
Start by creating a Lightning Web Component (LWC).
Embed the LWC into any Lightning app. For now, you can add it to any page in the Sales App.
Make changes to your LWC, such as modifying the HTML, CSS, or JavaScript. As soon as you save your code, you’ll experience the power of Local Dev (Beta), with changes reflected in real-time on the UI.
Notice how quickly the LWC updates, without needing to deploy your code or refresh the page. The changes are applied instantly!
Considerations and Limitations:
LWCs automatically update for the following changes only.
1. Basic HTML revisions: Changing component attributes, like in our case
lighting-button variant=”neutral” to variant=”brand”
Get More info: https://www.kandisatech.com/blog-details/accelerate-lwc-development-with-salesforces-local-development-server
#Salesforce#salesforcepartner#Lightning#LWC#SalesforceDevelopment#salesforcelightning#SalesforceLWC#LWCDevelopment#usa#uk#salesforceconsultant
2 notes
·
View notes
Text
Putin's War Out of Boredom. Milei Revives Argentina’s Economy. Prisoner Exchange.
You are watching the news from the weekly rally at the Russian Embassy in Lisbon. Today is January 4, 2:30 PM.
On December 19, Putin stated during a live session that when everything is calm, it becomes boring, and you want action. He added that now, bullets are whistling past his temple but claimed the economy is fine overall. https://www.youtube.com/shorts/9bk_NBKJDrc
On December 1, Deutsche Welle reported on changes to Russia’s budget law signed by Putin. Military spending will increase by 25%, alongside a rise in funding for security agencies. https://www.dw.com/ru/putin-utverdil-trehletnij-gosbudzet-s-rekordnymi-voennymi-rashodami/a-70930991
On December 23, journalist Dmitry Nizovtsev explained on the Navalny LIVE channel that the cost of a traditional New Year’s table for 2024 has risen by 23%. Since the start of the full-scale war in Ukraine three years ago, prices have surged by 62%. https://www.youtube.com/watch?v=d3uuBJ9LEqQ
Radio Svoboda listed additional items that will see price hikes starting January 1 due to increased taxes, excise duties, and tariffs. https://www.svoboda.org/a/v-rossii-rastut-tseny-na-tovary-i-uslugi-i-povyshayutsya-nalogi/33260095.html
On October 28, The Moscow Times quoted Putin acknowledging "difficulties" in the Russian economy and inflation accelerating fourfold. He attributed the issues to external sanctions, labor shortages, and a lack of technology. https://www.moscowtimes.ru/2024/10/28/putin-zayavil-o-problemah-v-ekonomike-i-obvinil-v-inflyatsii-zapadnie-sanktsii-a146184
Putin has sacrificed hundreds of thousands of lives, taxes, and lucrative energy contracts inherited from his predecessors to entertain himself with war. He labels those who criticize him as traitors. On December 28, he signed a strategy to combat extremism in Russia. According to Deutsche Welle, this includes monitoring citizens who have left Russia and those who tell the truth about the war in Ukraine, using artificial intelligence. https://www.dw.com/ru/rusofobia-i-ucet-uehavsih-putin-utverdil-antiekstremistskuu-strategiu-rf/a-71177977
Javier Milei, elected as President of Argentina in November 2023, shared insights a year later in an interview on Lex Fridman’s channel. By drastically reducing the role of the state, his administration saved the country from hyperinflation, reduced poverty, and began repaying debts left by the previous government. https://www.youtube.com/watch?v=8NLzc9kobDk https://www.utdt.edu/profesores/mrozada/pobreza
Some good news. On December 30, under mediation by the United Arab Emirates, Russia and Ukraine conducted a prisoner exchange. 189 people returned to Ukraine, and 150 returned to Russia. https://theins.ru/news/277630
Every third Russian was located with the help of the "Hochu Naiti" project. https://hochunaiti.com
On the same day, the United States allocated a military aid package to Ukraine worth nearly $2.5 billion. https://www.whitehouse.gov/briefing-room/statements-releases/2024/12/30/statement-from-president-joe-biden-on-u-s-support-for-ukraines-defense/
According to the Czech news agency CTK, Slovakia’s state-owned electricity grid operator will continue supplying electricity to Ukraine. Previously, Slovakian Prime Minister Robert Fico threatened to cut supplies in response to Ukraine halting Russian gas transit. https://www.irozhlas.cz/ekonomika/ukrajina-o-proud-ze-slovenska-neprijde-tamni-provozovatel-prenosove-soustavy_2501031312_pj
The Times reports that Russian shelling has already damaged or destroyed 80% of Ukraine's energy infrastructure. https://www.thetimes.com/world/russia-ukraine-war/article/energy-corruption-leaves-ukrainians-facing-a-deadly-freeze-9b9tb7gwx
Support the fundraiser for €100,000 to purchase portable power stations for Ukrainian hospitals and schools. https://antiwarcommittee.info/en/energy-for-life/
We wish you a happy upcoming Orthodox Christmas!
Proofs and links are in the description. Subscribe and help!
3 notes
·
View notes