#going through my vlc screenshots
Text
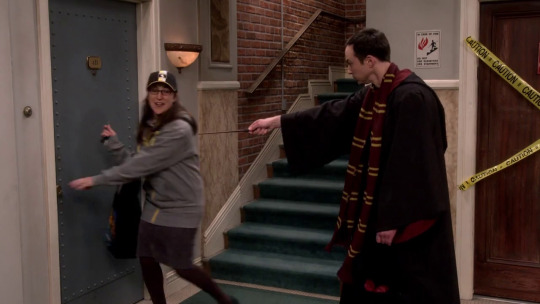

Amy and Sheldon in their HP merch through the seasons. Amy is a Hufflepuff (confirmed 2 times) and Sheldon is a Gryffindor (confirmed 3 times). I think it's a nice touch that the writers didn't go "their nerds lol their obvs Ravenclaws".
I think it sort of fits? Amy is very unpretentious and loyal, Sheldon has a kind of bravado about him. Both have, in each their own way, a strong sense of fairness. It's a small detail, but I like that they don't get reduced to their intellect.
#sheldon cooper#amy farrah fowler#shamy#harry potter#gryffindor#hufflepuff#going through my vlc screenshots#more cynical explanation:#the studio got paid to put them in different houses#to showcase more of the merch#in the last season the main cast received $1 million per episode EACH#(until they reduced their own pay so their co-stars would get more if that story is to be believed)#there was a LOT of money involved#i just assume the studio got paid for product placements like this#tbbt#the big bang theory
145 notes
·
View notes
Text
My GIF Making process: Screen capturing using MPV player, Organizing files, 3 Sharpening settings, Basic Coloring PSD + Actions set

This is a very long post so heads up.
I’ll try to be as thorough and true as much as possible to the way I make my gifs (I already use Photoshop Actions which I’ve long since set up but now for this tutorial I’m reviewing them to show you the exact steps I’ve learned to create my gifs 😃) and present them to you in a semi-coherent way. Also, please bear with me since English is my second language.
First things first. Below are the things and tools we need to do this:
Downloaded 4K or 1080p quality videos (let’s all assume we know where to get these—especially for high definition movies and tv series—so this post doesn’t get removed, okay? 😛)
Adobe Photoshop CC or the CS versions can work as well, but full disclosure I haven’t created gifs using the CS versions since 2020. I’m currently using Adobe Photoshop 2024.
mpv player. Use mpv player to get those frames/screenshots or any other video player that has a screen grabber feature. I’ve used adapter for the longest time but I’ve switched to mpv because the press to screenshot feature while the video is playing has been a game changer not to mention ultimate time saver for me. For adapter you need to play it in another video player (like VLC player), to get the start and end timestamps of the scene you want to gif which takes me ages before I can even open Photoshop.
Anyway! Please stop reading this post for a moment and head over to this amazing tutorial by kylos. She perfectly tells you how to install and use mpv player, both for Mac and Windows users.
One thing I have to share though, I had a tough time when I updated my MacOS to Sonoma since MPV is suddenly either duplicating frames or when I delete the duplicates the player seems to be skipping frames :/ I searched and found a solution here, though it didn’t work for me lol. My workaround for this in the meantime is decreasing the speed down to 0.70 then start screenshotting—it’s not the same pre Sonoma update but it works so I’ll have to accept it rather than have jumpy looking gifs.
Now, after this part of kylos’ tutorial:

you can continue reading the following sections of my gif tutorial below.
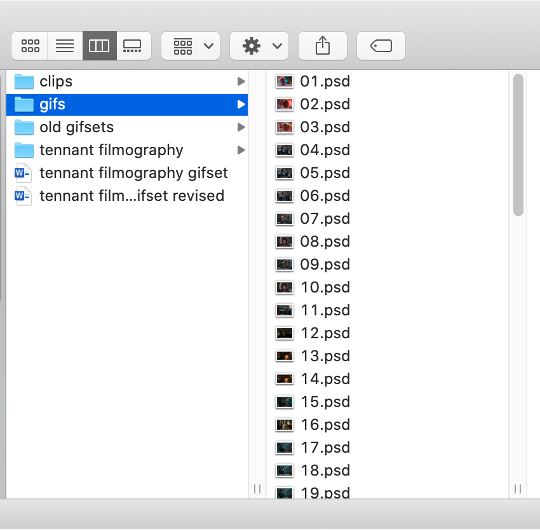
I want to share this little tip (sorry, this will only cater to Mac users) that I hope will be helpful for organizing the screenshots that MPV saved to the folder you have selected. Because believe me you don’t want to go through 1k+ of screenshots to select just 42-50 frames for your gif.
The Control + Command + N shortcut
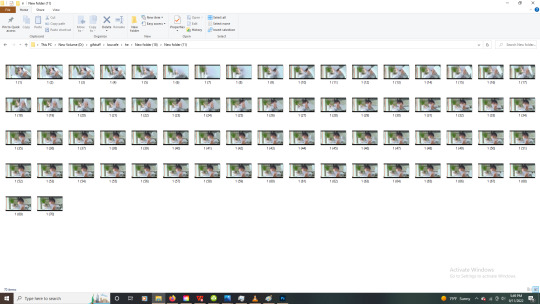
This shortcut allows you to create a new folder from files you have pre-selected. As you can see below I have already created a couple of folders, and inside each folder I have selected screenshots that I want to include in one single gif. It's up to you how you want to divide yours, assuming you intend to create and post a Tumblr gifset rather than just one gif.

Another tip is making use of tags. Most of, if not all the time, I make supercorp gifs so I tag blue for Kara and red (or green) for Lena—just being ridiculously on brand and all that.
Before we finally open Photoshop, there's one more thing I want to say—I know, please bear with me for the third? fourth? time 😅
It's helpful to organize everything into their respective folders so you know the total number of items/frames you have. This way, you can add or delete excess or unnecessary shots before uploading them in Photoshop.
For example below there are 80 screenshots of Kara inside this folder and for a 1:1 (540 x 540 px) Tumblr gif, Photoshop can just work around with 42-50 max number of frames with color adjustments applied before it exceeds the 10 MB file size limit of Tumblr.

Sometimes I skip this step because it can be exhausting (haha) and include everything so I can decide visually which frames to keep later on. You'll understand what I mean later on. But it's important to keep the Tumblr 10 MB file size limit in mind. Fewer frames, or just the right amount of frames, is better.
So, with the screenshot organization out of the way, let's finally head over to Photoshop.
Giffing in Photoshop, yay!
Let’s begin by navigating to File > Scripts > Load Files into Stack…

The Load Layers window will appear. Click the Browse button next.
Find your chosen screenshots folder, press Command + A to select all files from that folder then click Open. Then click OK.
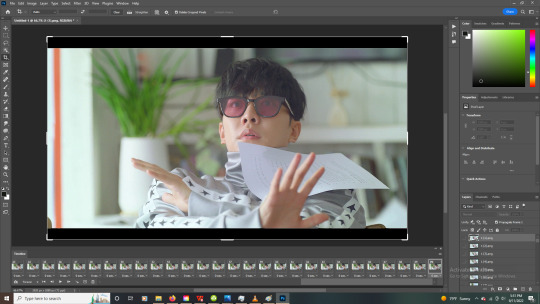
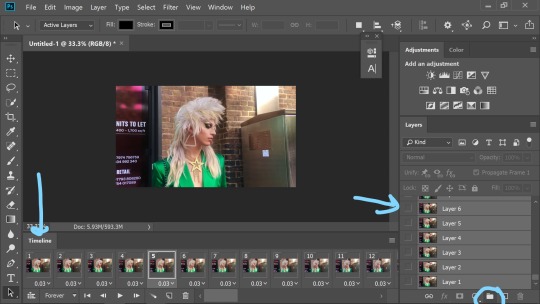
After importing and stacking your files, Photoshop should display the following view:

By the way, I'll be providing the clip I've used in this tutorial so if want to use them to follow along be my guest :)
If you haven't already opened your Timeline panel, navigate to Windows > Timeline.
Now, let's focus on the Timeline panel for the next couple of steps.
Click Create Video Timeline, then you’ll have this:

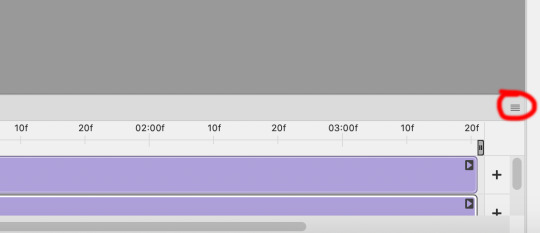
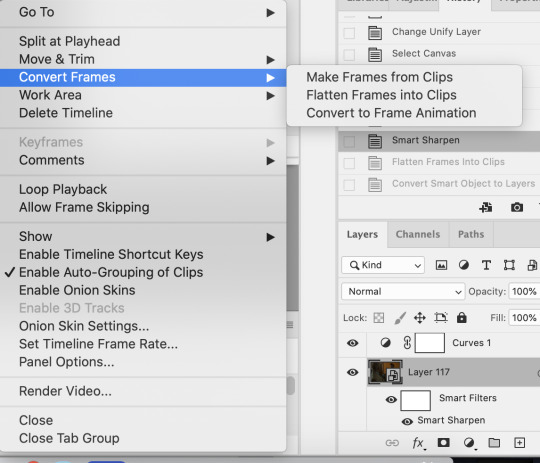
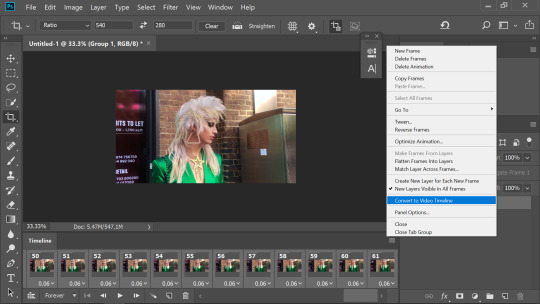
Now click the menu icon on the top right corner then go to Convert Frames > Make Frames from Clips

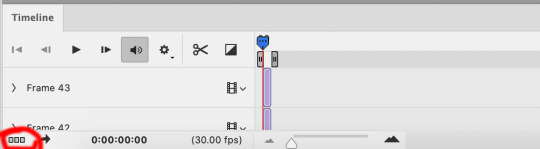
Still working on the Timeline panel, click the bottom left icon this time—the icon with the three tiny boxes—to Convert to Frame Animation
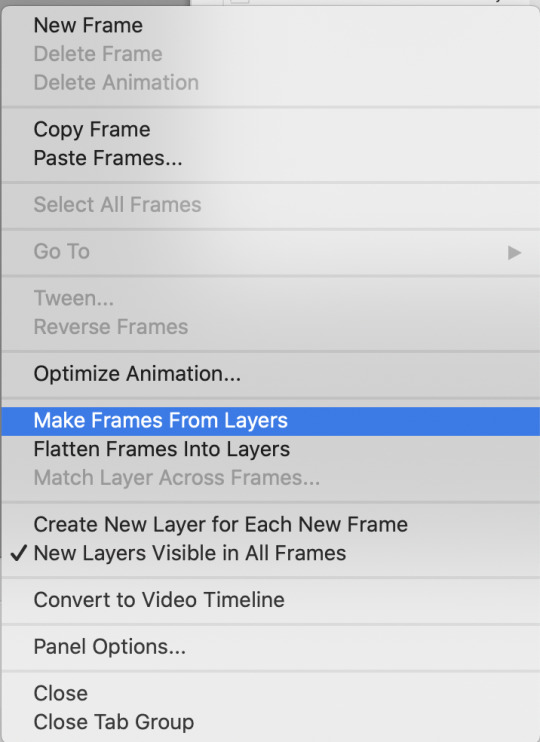
Select Make Frames From Layers from the top right corner menu button.
So now you have this:

Go and click the top right menu icon again to Select All Frames
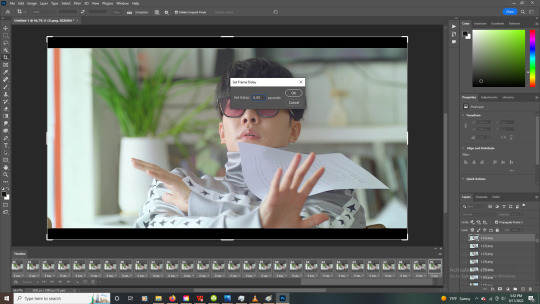
Then click the small dropdown icon to set another value for Frame Delay. Select Other…

The best for me and for most is 0.05 but you can always play around and see what you think works for you.
Click the top right menu icon again to Reverse Frames.
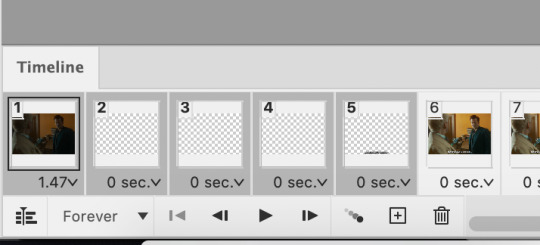
I think Photoshop has long since fixed this issue but usually the first animation frame is empty so I just delete it but now going through all these steps there seems to be none of that but anyways, the delete icon is the last one among the line of feature buttons at the bottom part of the Timeline panel.
Yay, now we can have our first proper GIF preview of a thirsty Lena 😜

Press spacebar to watch your gif play for the very first time! After an hour and half of selecting and cutting off screenshots! 😛 Play it some more. No really, I’m serious. I do this so even as early (lol) as this part in the gif making process, I can see which frames I can/should delete to be within the 10 MB file size limit. You can also do it at the end of course 🙂
Now, let’s go to the next important steps of this tutorial post which I’ve numbered below.
Crop and resize to meet Tumblr's required dimensions. The width value should be either 540px, 268px, or 177px.
Convert the gif to a Smart Object for sharpening.
Apply lighting and basic color adjustments before the heavy coloring. I will be sharing the base adjustments layers I use for my gifs 😃.
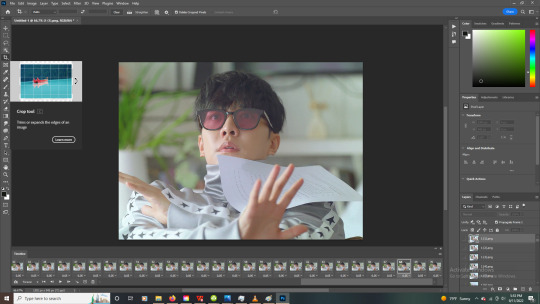
1. Crop and Resize
Click on the Crop tool (shortcut: the C key)

I like my GIFs big so I always set this to 1:1 ratio if the scene allows it. Press the Enter key after selecting the area of the frame that you want to keep.
Side note: If you find that after cropping, you want to adjust the image to the left or another direction, simply unselect the Delete Cropped Pixels option. This way, you will still have the whole frame area available to crop again as needed and as you prefer.
Now we need to resize our gif and the shortcut for that is Command + Opt + I. Type in 540 as the width measurement, then the height will automatically change to follow the ratio you’ve set while cropping.
540 x 540 px for 1:1
540 x 405 px for 4:3
540 x 304 px for 16:9
For the Resample value I prefer Bilinear—but you can always select the other options to see what you like best.
Click OK. Then Command + 0 and Command + - to properly view the those 540 pixels.

Now we get to the exciting part :) the sharpen settings!
2. Sharpen
First we need to have all these layers “compressed” intro a single smart object from which we can apply filters to.
Select this little button on the the bottom left corner of the Timeline panel.


Select > All Layers
Then go to Filter > Convert for Smart Filters
Just click OK when a pop-up shows up.
Now you should have this view on the Layers panel:

Now I have 3 sharpen settings to share but I’ll have download links to the Action packs at the end of this long ass tutorial so if you want to skip ahead, feel free to do so.
Sharpen v1
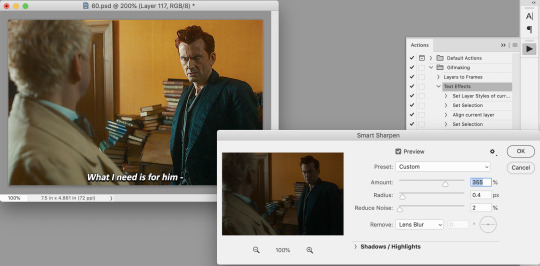
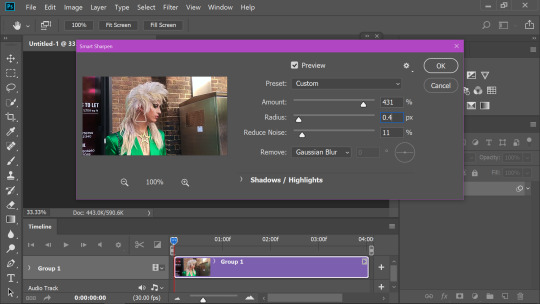
Go to Filter > Sharpen > Smart Sharpen…
Below are my settings. I don’t adjust anything under Shadows/Highlights.
Amount: 500
Radius: 0.4
Click OK then do another Smart Sharpen but this time with the below adjustments.
Amount: 12
Radius: 10.0

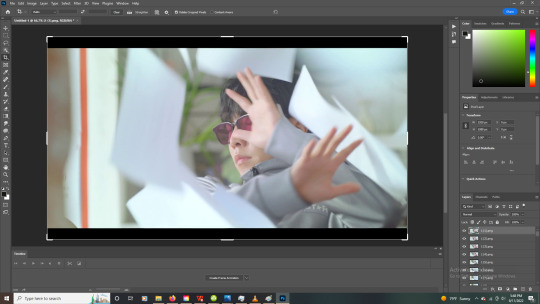
As you can see Lena’s beautiful eyes are “popping out” now with these filters applied. Click OK.
Now we need to Convert to Frame Animation. Follow the steps below.
Click on the menu icon at the top right corner of the Timeline panel, then click Convert Frames > Flatten Frames into Clips
Then Convert Frames > Convert to Frame Animation
One more click to Make Frames From Layers
Delete the first frame then Select All then Set Frame Delay to 0.05

and there you have it! Play your GIF and make sure it’s just around 42-50 frames. This is the time to select and delete.
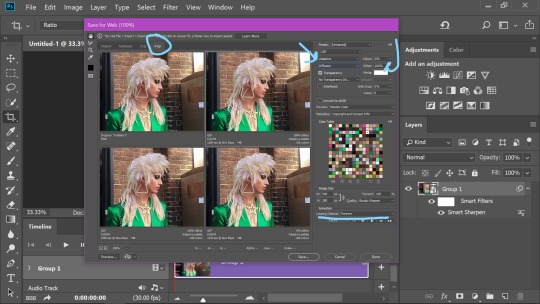
To preview and save your GIF go to File > Export > Save for Web (Legacy)…
Below are my Export settings. Make sure to have the file size around 9.2 MB to 9.4 MB max and not exactly 10 MB.

This time I got away with 55 frames but this is because I haven’t applied lighting and color adjustments yet and not to mention the smart sharpen settings aren't to heavy so let’s take that into consideration.
Sharpen v1 preview:

Sharpen v2
Go back to this part of the tutorial and apply the v2 settings.
Smart Sharpen 1:
Amount: 500
Radius: 0.3
Smart Sharpen 2:
Amount: 20
Radius: 0.5
We’re adding a new type of Filter which is Reduce Noise (Filter > Noise > Reduce Noise...) with the below settings.

Then one last Smart Sharpen:
Amount: 500
Radius: 0.3
Your Layers panel should look like this:

Then do the Convert to Frames Animation section again and see below preview.
Sharpen v2 preview:

Sharpen v3:
Smart Sharpen 1:
Amount: 500
Radius: 0.4
Smart Sharpen 2:
Amount: 12
Radius: 10.0
Reduce Noise:
Strength: 5
Preserve Details: 50%
Reduce Color Noise: 0%
Sharpen Details: 50%
Sharpen v3 preview:

And here they are next to each other with coloring applied:
v1

v2

v3

Congratulations, you've made it to the end of the post 😂
As promised, here is the download link to all the files I used in this tutorial which include:
supercorp 2.05 Crossfire clip
3 PSD files with sharpen settings and basic coloring PSD
Actions set
As always, if you're feeling generous here's my Ko-fi link :) Thank you guys and I hope this tutorial will help you and make you love gif making.
P.S. In the next post I'll be sharing more references I found helpful especially with coloring. I just have to search and gather them all.
-Jill
#tutorial#gif tutorial#photoshop tutorial#gif making#sharpening#sharpening tutorial#photoshop#photoshop resources#psd#psd coloring#gif coloring#supercorp#supercorpedit#lena luthor#supergirl#my tutorial#this has been a long time coming#guys. i'm BEGGING you. use the actions set - it was a pain doing all this manually again ngl LMAO#i've been so used to just playing the actions#so this has been a wild refresher course for me too 😆
124 notes
·
View notes
Text
GIF Tutorial
This is going to be a long post, so I'm going to place the majority of it under the cut.
Disclaimer - There are many ways to make gifs, and this is just one way to make them - it's the process that I have figured out works best for me. I am in no way claiming that this is the "definitive" or "best" way to make gifs. There are probably other, better ways to do things, but because people have asked how I do it, I am sharing my process.
Introduction
I use a Mac. I am assuming most of this will also be applicable to those of you using Windows as well. This tutorial is divided into three parts. Here is a video of the following process as well:
https://www.youtube.com/watch?v=lBRbWC-iMOM
Actions
I use three Actions, that you can download here through my Google drive, if you want. A tutorial for how to install Actions in Photoshop can be found here.
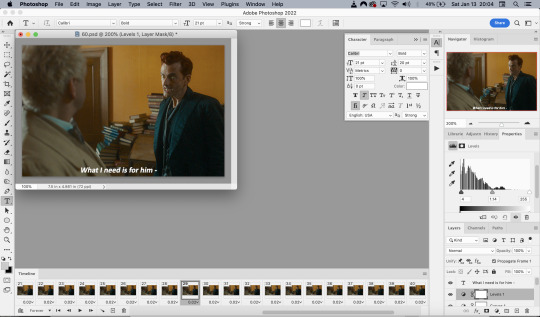
Photoshop Layout
I use Photoshop CC, but I used Photoshop CS5 for years, got used to it, so when I upgraded to CC, I arranged it to resemble what I was used to.
I have the following windows open:
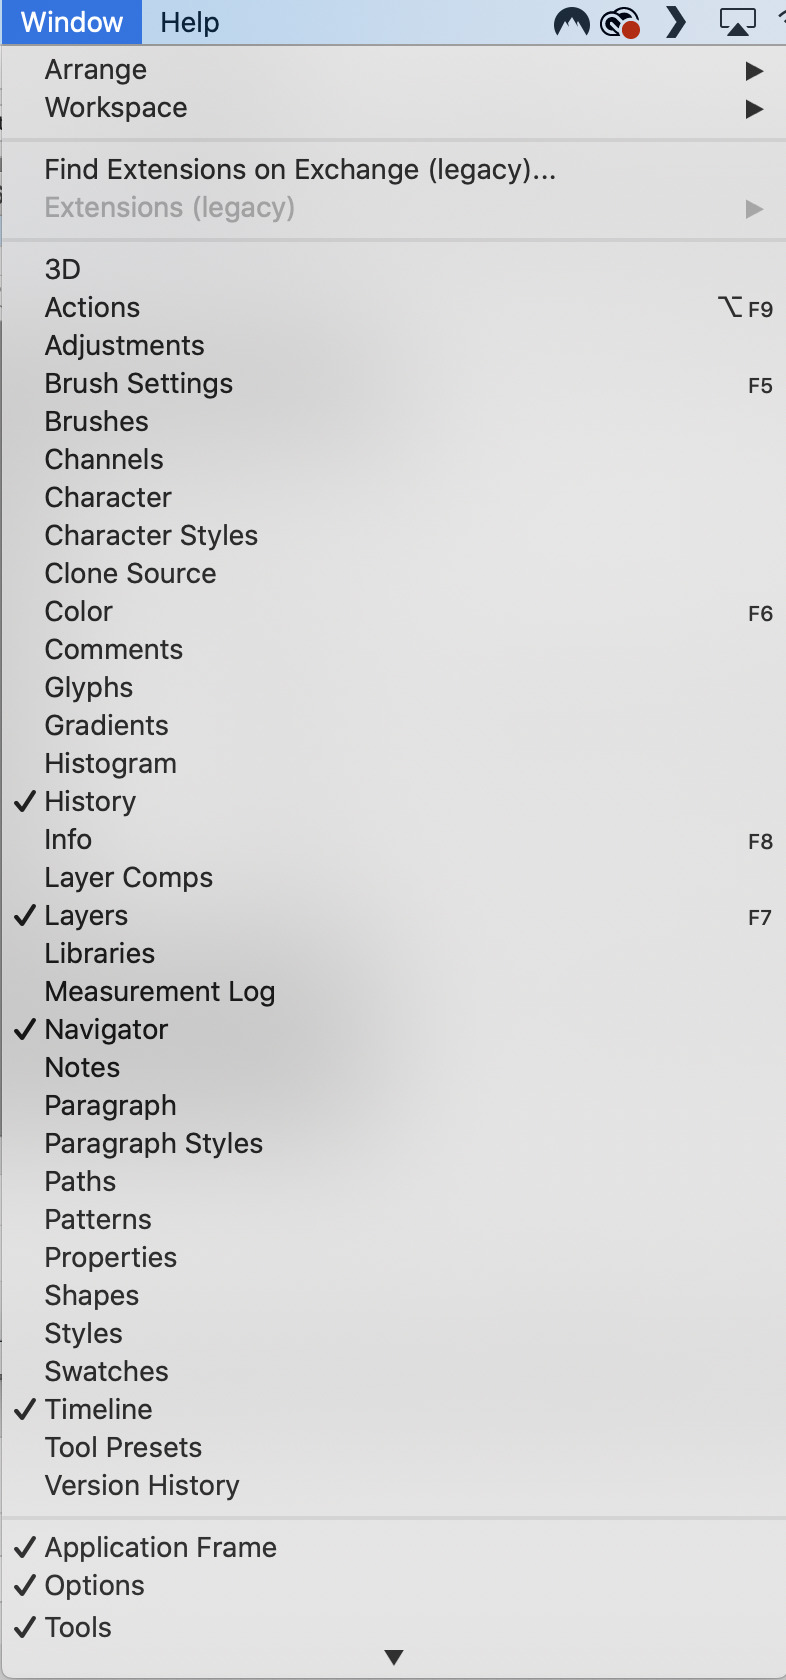
And they are arranged like this:
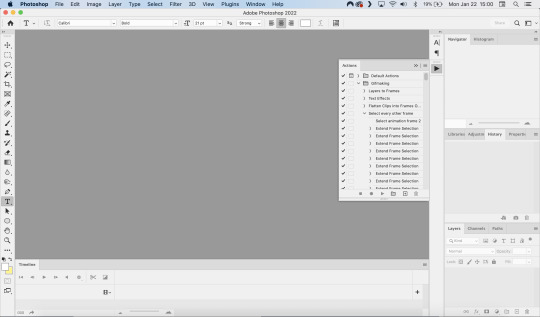
PART ONE - CLIPPING
Part 1 consists of using a screen recorder (i.e., Quicktime) to make short clips of scenes or parts of a scene that you want to make gifs of. I have a Mac, so Quicktime is what I use. For Windows users, I’m sure there are equivalent alternatives that are just as good. Years ago, when I was first starting to make gifs, I frequently heard people refer to KMPlayer as what they used, so that might still be a good option for you if you are a Windows user. The most important part is that it takes high-quality recordings, with as little detail and quality loss as possible.
With this screen recording method, you can make screen recordings of video files that are stored locally on your computer (I use VLC to play videos), or streaming on sites like YouTube, Amazon Prime, Hulu, Disney+, HBO, etc. No downloading of the video is necessary. For some of those websites, if you have trouble with getting it to work, you may have to disable your browser’s hardware acceleration. This process is described here (https://www.theverge.com/23715928/netflix-amazon-prime-screenshot-mac-windows-how-to).
I record the clips with sound, to make it easier to transcribe/write out the dialogue in Photoshop later. When I have recorded all the clips I want, I put the clips into my folder where I store all my clips, and into another folder that is labelled with the episode number so I can remember where each clip came from in order to properly label them later when the time comes to upload them to Tumblr.
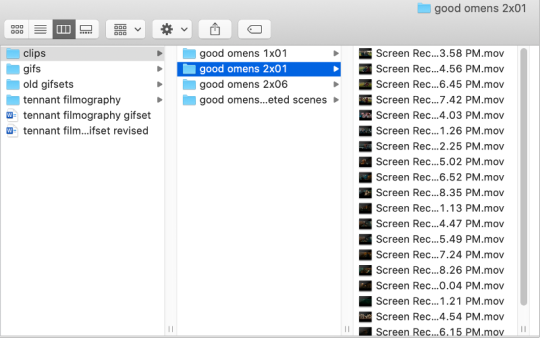
Example: A folder containing clips from Good Omens 2x01
PART TWO: EXTRACTING/MAKING GIFS FROM THE CLIPS
Open video file in Photoshop
To do this, click on File > Import > Video Frames to Layers
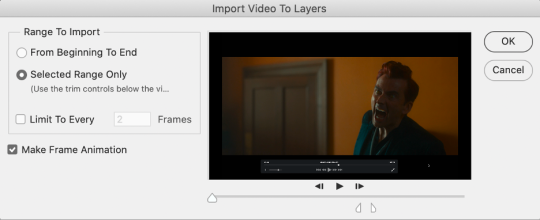
Use the markers to select roughly where you want the gif to begin and end.
With videos that have been clipped with Quicktime (not sure about other programs), the vast majority of the time there are twice as many frames as needed – every other frame is a duplicate. For a smaller gif size and smoother playback, I delete every other frame in the timeline box at the bottom of the screen. I used to do this manually (very time consuming), but now do it with the use of an action that I created that will automatically select every other frame. Downloads and installation instructions for all the actions I use are available above.
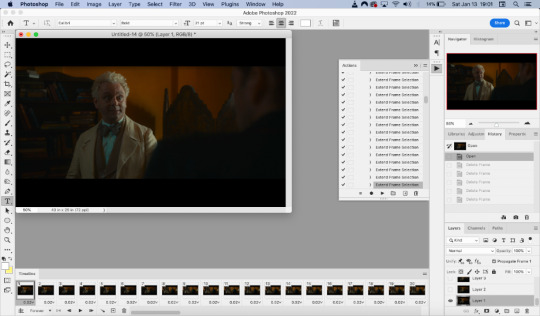
To use an action, click on the title of the action, then click the play button at the bottom of the window.
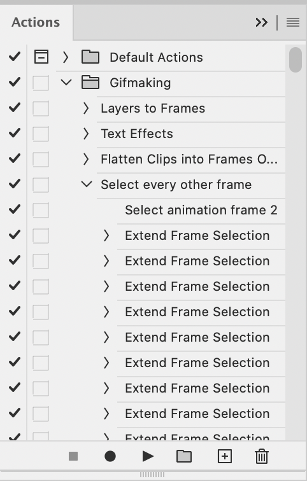
I often get an error message that says “The command ‘Extend Frame Selection’ is not currently available”, but it still works. Just click “stop” and every other frame will be selected.

Click the trash can icon in the timeline window to delete the selected frames.
At this point, you will have half as many frames in your timeline as you did before. You will also likely have extra frames at both the beginning and end of the timeline that you don’t want to be part of the gif – from the previous shot, for example. You can delete those now.
This next step is optional: There will still be some duplicate frames in the timeline that were not deleted earlier. It is not strictly necessary to delete these, and I see many gifmakers who don’t get rid of them. It’s usually not all that noticeable. However, because I’m a bit of a perfectionist, I always go through the timeline frame-by-frame and delete each duplicate. This ultimately will reduce the gif’s file size and make the movement in the gif appear much smoother. I usually find that every fourth or fifth frame is a duplicate. Unfortunately, it’s not always consistent, so using an automated action would not work to make this process go faster.
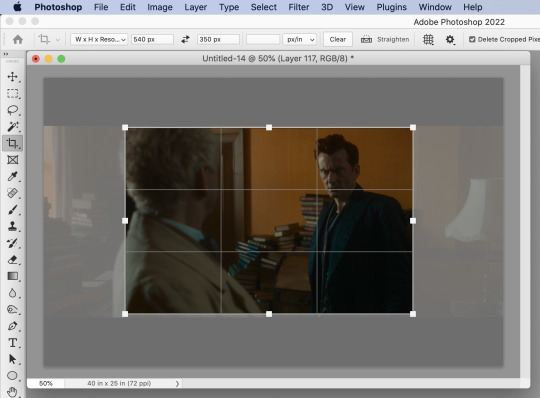
Cropping
Once this part is complete, I select the crop tool. I usually make my gifs 540px wide by 350px high. You can change the height to whatever you want, but Tumblr’s max width is 540px. I find the aspect ratio of 540x350px usually allows gifs to feel large, while at the same time not cutting off too much of the sides. Depending on the type of gif I’m making I may adjust this, but generally, if I’m giffing a scene from a TV show or movie, I stick with my standard 540x350px dimensions.
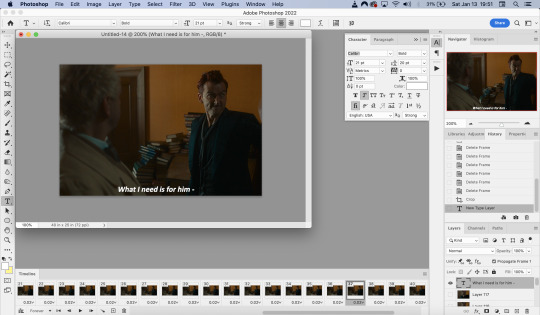
Adding Text
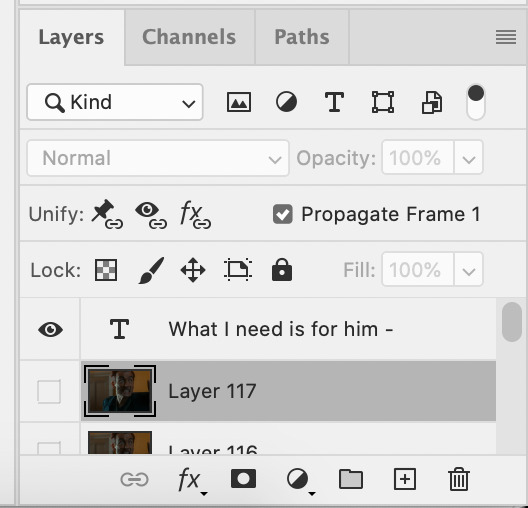
Next, I add text. Select the text icon. In the layers window, make sure the top layer is selected, otherwise the text will not show up when you start typing.
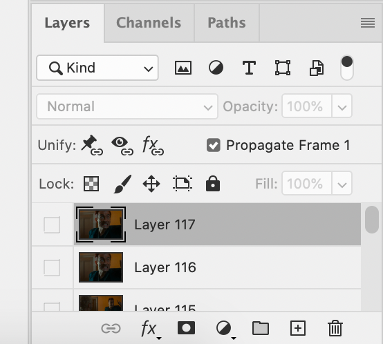
The top layer is selected
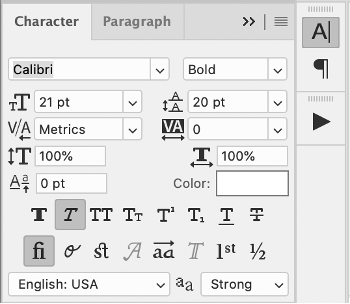
These are the font settings I currently use:
If I am just making one gifset, or one or two gifs, I’ll go straight on to the next steps. However, if I’m making a large amount of gifs, I save the gif right now, close out of it, and repeat the steps in this section for the next gifs, so I eventually have an entire folder of “raw” unedited photoshop files that have been cropped and captioned, and just need to be colored, have text effects added, and be sharpened. For me personally, I find I make gifs more efficiently by doing it in this “batch” style process.
All cropped and unedited gifs (psd files)
PART 3: COLORING, EFFECTS, & SHARPENING
Coloring
I do plan on making a separate tutorial on this at some point, but will include a brief summary here. When it comes to coloring, I generally tend to go by a “less is more” attitude. I am not by any means great at coloring, but nonetheless I’ll explain the types of adjustment layers I typically use.
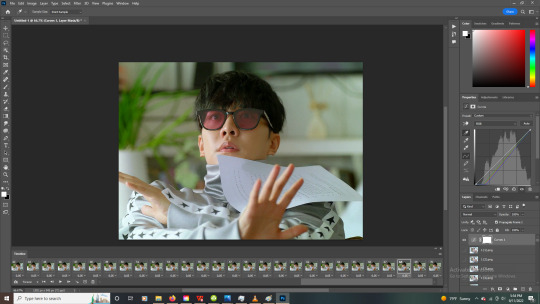
Note: Before making any adjustments, make sure you have the layer directly underneath the text layer selected, as shown in the screencap below, otherwise it will also apply those adjustments to the text, which makes it look weird.
I start with a Curves layer to change the overall brightness/contrast, then a Levels layer to adjust the shadows and highlights, and then a Brightness/Contrast layer to do some final minor tweaks. The only time I ever reuse gif coloring is when they are from the same scene with the same colors, lighting, backgrounds, etc. Every other time, I tailor the adjustment layers to the specific gif.
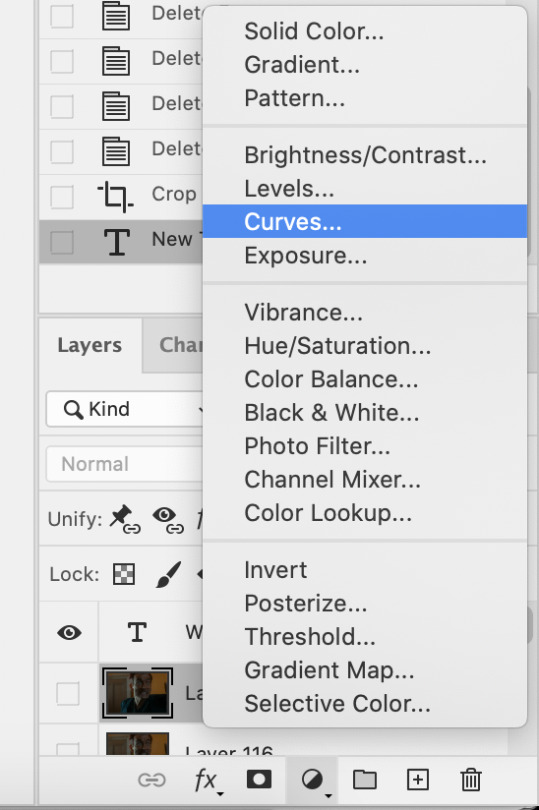
You can add adjustment layers by clicking the half light/dark circle on the bottom of the Layers window.
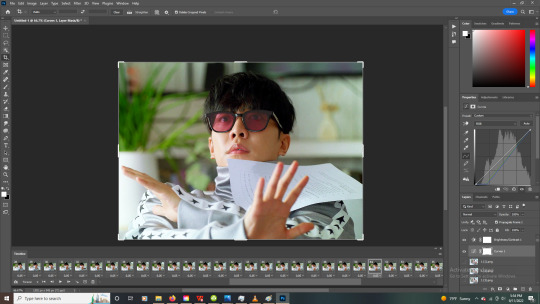
How the gif looks with both a Curves layer and Levels layer
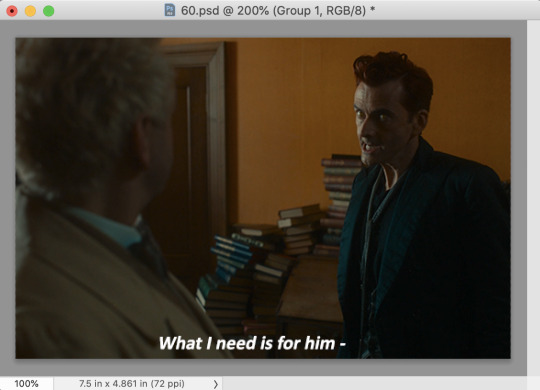
Before adding the adjustment layers
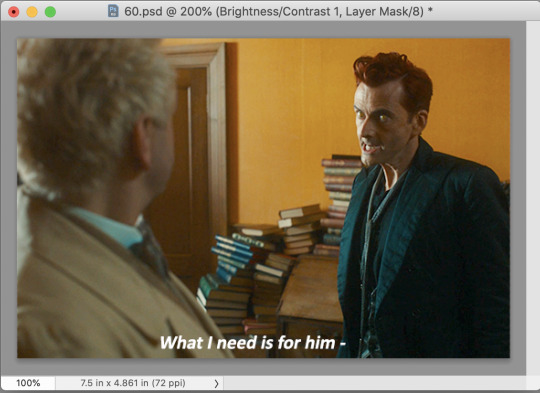
After adding the adjustment layers
A lot of the time, I'll just stick to adjusting the lighting. However, if the colors look gross, or if they are over/undersaturated, I’ll add a Color Balance layer and play around with the settings on that, or use a Hue/Saturation layer and increase/decrease the saturation of specific color channels. It really depends on what you’re going for, and what you think looks good. There is no one “right” way to color a gif.
Text Effects
If you are using the Actions I included in the download, you can just run the "Text Effects" action with the text layer selected, and it will do the following automatically. If not, you can do it manually by doing the following.
Right click on the text layer in the Layers window and click on Blending Options.
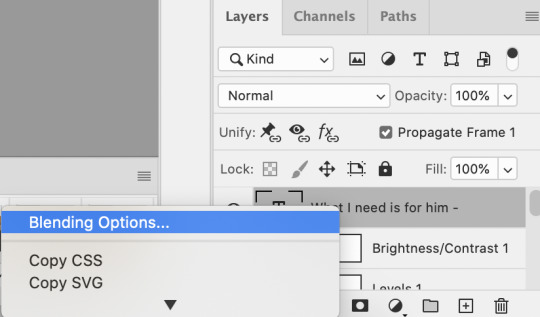
I use a stroke and drop-shadow on my gifs. Here are the settings I use.
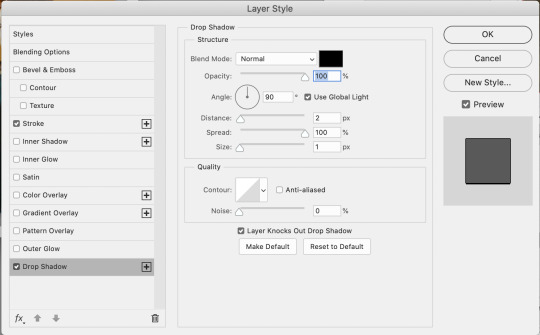
Drop Shadow settings
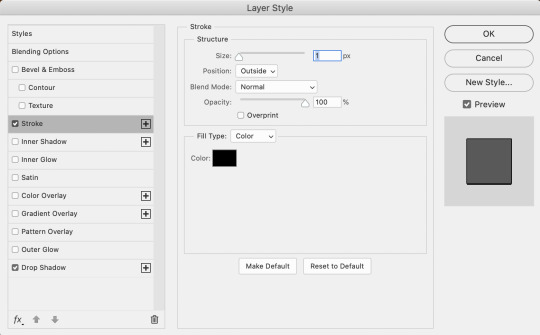
Stroke settings
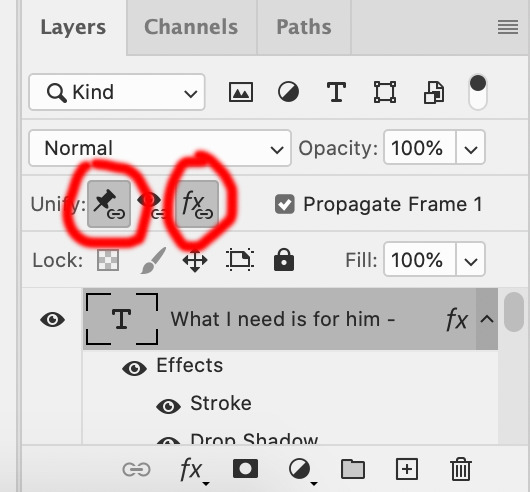
Next, to center the text, click on the text layer. With the text layer selected on the Layers window, Select All by clicking ctrl+a (Windows) or command+a (Mac). Then click on the "Align horizontal centers" icon in the “Move tool” option menu.
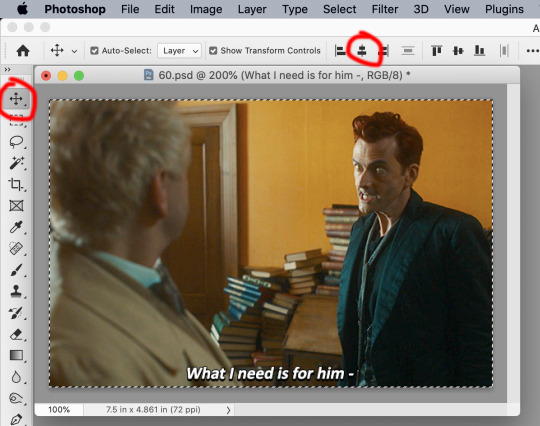
Important – in the Layers menu, make sure the buttons “Unify layer position” and “unify layer effects” are clicked an enabled for the text layer.
Sharpening
Select all the frames in the Timeline window. Then in the lower left-hand corner click “convert to video timeline.”

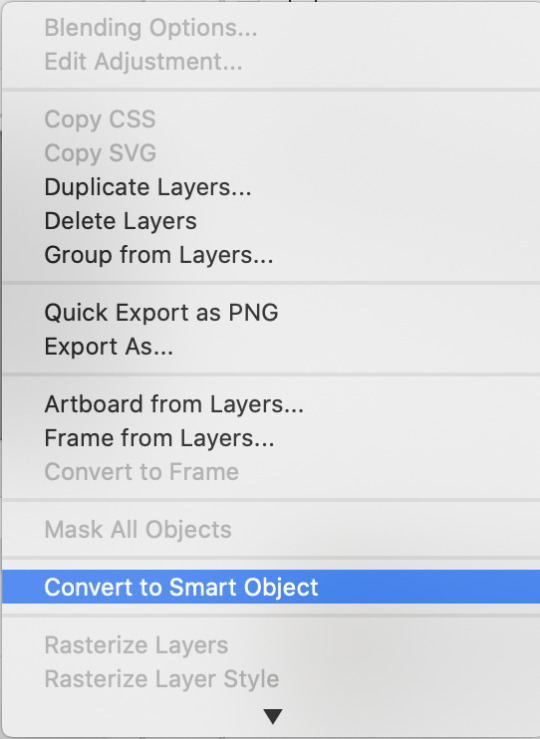
In the Layers window, select all of the frame layers (do not include the text layer or adjustment/coloring layers in the selection) and right click on it. Select “Convert to smart object.”
Select Filter > Sharpen > Smart Sharpen. In the same way that coloring can differ depending on the gif, the ideal settings for sharpening can also differ from gif-to-gif. It can really depend on the quality of the source of the gif, like whether it’s HD or not. These are the settings I’m using for the current gif:
If you are using Actions, you can run the "Layers to Frames" Action. If not, do the following:
Click on the button circled in red
It will open up this menu. Click on "Flatten frames into clips"
Click the button circled in red, then click "Make frames from layers"
Delete the first couple of "junk" frames
Select all of the frames. Right click on the "0 sec." to change the frame rate. I usually use 0.05, but it might depend on the gif itself.
Exporting
Click on File > Export > Save for Web (Legacy)
I cannot add another screencap because I've reached Tumblr's max for this post, but here are the settings I use:
Selective
Diffusion
256 Colors
Dither 100%
You may find that when you try to export your gif, the file size is too big. Tumblr’s gif file size limit is 10mb – try to make it under that – even anywhere in the 9.9mb range. As long as it’s under 10mb, it should work.
To get gifs that are too large to fit under the limit, I usually end up deleting frames from the beginning or end of the gif. If you’re using the 540x350px dimensions, I typically find that the average number of frames I can fit into one gif is between 80-90. Depending on the colors in the gif, it’s sometimes more, sometimes less.
64 notes
·
View notes
Text
Sportacus on the Move! (prod 136)
Chris Crow (https://www.youtube.com/@handle6324) gave GetLazy an .iso of the ninth LazyTown DVD intended for promotional use only. To finally put the .iso to use, I decided to take all the screenshots in this episode myself. I also watched it using VLC.
Original airdate: May 18, 2006
Story by Magnus Scheving
Written by Noah Zachary, Cole Louie, Magnus Scheving
Directed by Magnus Scheving
Executive producers - Magnus Scheving, Ragnheidur Melsted, Raymond P. Le Gue, Mark Read, Brown Johnson, Kay Wilson Stallings
Starring Magnus Scheving, Stefan Karl Steffanson, Julianna Rose Mauriello
Puppeteers - Gudmondor Thor Karason, Jodi Eichelberger, David Matthew Feldman, Julie Westwood, Sarah Burgess
Sportacus is my favourite character, but this is a clip show AND in the style of an autobiographical documentary. So will I really even like it? Beware - I don't really explain most scenes good enough because they're mostly recycled from other episodes, so I keep it short.
The episode begins with a new cold open (good start!) where Sportacus is riding to town on his sky chaser. Once Stephanie sees him she puts in her letter. Sportacus checks on what she's doing, then she sends the letter. Sportacus rides back to his airship to get the letter, and he does.

We get some narration from Sportacus, who is thanking us for our letters. Some letters that were actually sent to LazyTown Entertainment pop up on the screen, with kids reading out their questions - and there's a big last group yell - 'can I be a superhero?' Sportacus says anyone can be a hero, then he walks through his morning.

Here is a recycled cold open from 'Zap It!' that I'll only explain as my Zap It review was rushed. Sportacus gets out of bed and flips into a pair of skating shoes. He grabs a hockey stick and skates over to his bed. He throws away a cushion then arranges the blanket.

He says that's how you make a bed, then skates over to his cupboard, spinning the hockey stick once more then putting it back in it's place, literally. He declares it breakfast time.

A recycled cold open from 'Dear Diary' - he slices up a banana with a ping pong racket, falls to the ground and tries to catch all the slices in his mouth. Still hungry, he calls for an apple but there are none left. So he decides to have some random watermelon that was on the floor.

Recycled cold open from 'Dr. Rottenstein' - he throws away the watermelon, does some cartwheels, jumps in the air, and now he's handstanding on the watermelon. Then he gets off, throws it in the air and catches it doing a power jump. He twirls it on his finger and it shatters to slices as he drops it on the table, then he eats it.

Now, it's teethy cleany time the Twenty Times way! Sportacus flips onto his aerobics bar, hangs on with his legs, and grabs his toothbrush. He jumps off and starts brushin!
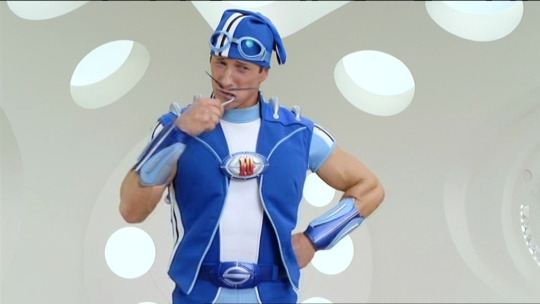
The rest of the LazyTowners are brushing too to 'Twenty Times Time', but that all ends when Sportacus throws the toothbrush out of his accidentally-open door. He jumps out the airship and lands on the sky-chaser, and from then on, it's a mashup of 'Twenty Times Time' & 'Get it Together'. After the whole toothbrush thingy, Sportacus wants to play a little game with the sports spinner.

His first exercise is jumping jacks, and he adds a little Sportatwist to it - in the middle he starts flailing his arms around like those inflated people you see at car shops, then he starts kicking.

Then he just starts to fricking jump. That may just be some practice for his second move and my favourite one - Power jumping! So, he does a bunch of power jumps (no Sportatwists) before going on to a harder move - soccer. A recycled cold open from Soccer Sucker. Meanwhile, the kids are doing nothing!

They're probably bored because Sportacus isn't playing with them, but Milford tells them to do something fun like play basketball, and they all have fun doing so. After he throws back the ball, he says that he's now ready for anything, then something happens. He gets a letter, and reads it.

It's a question about why he moves so much. His answer is that he loves to move, and then he performs Get it Together. Once the song ends, he flips over to his water bottle and puts some water in his cup. Recycled cold open from Miss Roberta - he hits an ice cube using a baseball bat against the walls and it lands in his glass of water and he drinks it.

Then he gets a letter from an unknown person asking him to teach him one-arm pushups. This is my favourite part of the episode. So, he demonstrates normal pushups, triceps pushups, clapping, turning, then he tries ONE ARM!

Then jumping then clapping behind his back! Sure enough, he accomplishes it! Then he does his favourite - one arm, one leg. This is super cool. He calls for paper and a pen and he draws some pictures of his favourite pushups, and of course, a message. He sends his letter using air-mail, but he forgot to sign his name. He runs out, but the door isn't activated yet, so he has to turn the knob a bit. TWICE.
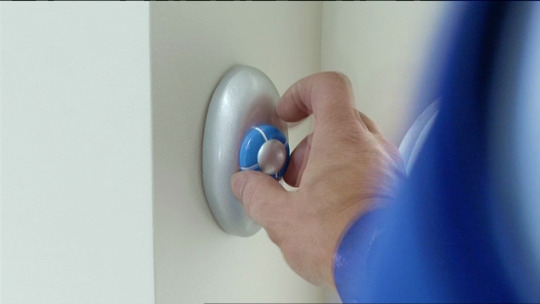
Finally, once it opens, he ties his feet to a white rope, then attaches the piece of metal to it on the magnet of his airship's door. He then dives off, catches the letter, and pulls himself back up. Then he signs his name.

Then he throws it back out. Now it's time for another energy boost. Meanwhile, a recycled scene from Ziggy's Alien - Robbie tries to sleep but is awaken by the sound of a kid yelling for help. In this case it's recycled from 'New Superhero' and Ziggy is falling. Then a recycled scene from 'Sports candy festival' where Sportacus' Club Special is consumed by Sportacus. I have complained about this so many times - but that is a plain lettuce and tomato sandwich.

The crystal beeps. Sportacus says before he saves someone he tries locating the problem, which he almost never does. Liar. So, he rides into the town and saves Ziggy with a skateboard and a comically long scarf.

The crystal beeps again - this time a recycled rescue from the VERY FIRST EPISODE involving Trixie being a moron, Stingy being a moron, Stingy flying in the air, and a seesaw.

Then a recycled rescue combining clips from both 'Sportscandy Festival' & the beginning of 'New superhero'. Milford is carrying a cake, he's about to walk onto a skateboard, but with the help of a carrot, he doesn't. Then a recycled scene from 'Sportscandy Festival' - Steph wants an apple, Sportacus throws a ball at the tree, Steph has an apple.

Then Energy is performed. Sportacus goes back to the airship using the sky-chaser. Robbie who has been looking through his periscope pushes it back of anger, then it comes rolling back and he makes a dive for it.

XD! So, Sportacus flips into his bed, day turns to night, and a recycled ending from the VERY FIRST EPISODE plays! Except this time there's an extra two seconds of Robbie's pained expression after lifting his arm.

3/10 - This episode was a bit boring as it was a lazy attempt to finish the season with recycled clips. The push-up and super spinner sequences really saved it for me, if those scenes were absent I wouldn't have liked this episode AT ALL.
youtube
#Youtube#youtube#lazyrants#Magnus Scheving#lazytown#sportacus#nickelodeon#stephanie#robbie rotten#magnusscheving#magnus scheving#stefan karl#nick jr#nickelodeon jr#spongebob#comedy#humor#reviews#tv shows#stefankarl#juliannarose#juliannarosemauriello#latibaer#glanni glaepur#glanni glæpur í latabæ#afram latibaer#lazy town#latibær#cartoonito#cartoon network
6 notes
·
View notes
Text
i can tell my gifs aren't 100% the right speed and it's driving me insane!!!! mpv is the easiest program to screenshot media with on mac bc i was using vlc but i had to go through frame by frame, one at a time, and screenshot manually for it to work seamlessly. which would mean it would take me literal hours to make a decently sized gif set.
#hanna talks#it's so frustrating#like i just wanna make hd gifs again without having to work super hard to screenshot but the new mac update has made it impossible#maybe it's just me and most people won't notice that the speed is a little off on my gifs but i'm a perfectionist and I NOTICE
2 notes
·
View notes
Text
Oi! Welcome to hell
I’m DG! I like video games, going to the woods and drawing from time to time.
This blog will be a bit of everything honestly, sometimes just thoughts that come to mind, sometimes its just screenshots from games I am currently playing or have played, sometimes its just low effort doodles
and every once in a while ill write a review or ramble about a piece of media ive checked out recently.
Dont have alot to say honestly, its just my daily garbage
All 3DS screenshots are done on real hardware thanks to luma 3DS (CFW)(400x240 BMP converted into PNG)
Every other console is emulated
Flipnote doodles are sometimes done through emulation and sometimes it’s from my actual 2DS. When its from my 2DS its exported using the built in exporting tool, when it comes to emulation I screenshot my doodles as to get a less blurry image.
(If possible ill attempt to transfer my real hardware doodles to citra through artic base)
Show/Movie screenshots are done through Impr Pant (1080p monitor) and VLC's built in screenshot feature (Shift + S)
I apologise if I ever come off as annoying
Have a lovely day
6 notes
·
View notes
Note
how do you make gifs?
i hate to just shunt you off to a guide anon, but smarter and less silly people on this website have made a lovely guide here
but the basic process is:
get the frames for your gifs
bring those frames into a program that can put them into one animation
edit that animation so it reads well on smaller screens
???
profit
my personal set-up, so to speak: i have gone through hell and high water to get blu-rays to play on my computer and use vlc player to painstakingly take individual screenshots with key commands because i've never gotten any of the automatic scripts to work. it's irritating but mindless work. i make the gifs themselves in photoshop cc. i'm on an ancient (read: 2013 model) macbook pro and doing this for years hasn't melted my motherboard yet, somehow
in my experience physical media is always going to give you the crispiest gifs, since there's less chance of compression. however digital piracy is always morally correct and, in fact, a vital part of tumblr culture. pirate everything i've mentioned above
tbh once you have the tools to make gifs it's not a hard process, just incredibly tedious and specialized. 90% of the learning curve is learning the software and making it work for you. the other 10% is patience when your computer inevitably starts to crash the instant it realizes what you're doing
#i am probably not the best person to ask tho. i only found out about the 10mb limit last week#not going to get into photo and light adjustment because i won't shut up if i do#replies
0 notes
Text
Wanscam ip camera utility windows

Wanscam ip camera utility windows manual#
Wanscam ip camera utility windows password#
Wanscam ip camera utility windows free#
Wanscam ip camera utility windows password#
"Įnter the same hostname, user and password that you used on DynDNS. You see it in the string below "Your current location's IP address is. Then enter your external ip address of the moment. Leave service type as Host with IP address
Wanscam ip camera utility windows free#
There, choose a hostname and any of the available free domains from the drop box, like On, log in using your account and under My Services > My Hosts, click Add host services. The purpose of using ddns is to have the router provide its current ip address to the ddns service on regular intervals which in turn associates it to a dns name of your choice. You will need mplayer program on a remote system to receive streams. You may set there a length of each recorded clip.
Wanscam ip camera utility windows manual#
Consult your MTA's manual to see what are your options to obtain sender of each message processed by script.įor example if you're going to use procmail you may want to set this environment variable by calling SENDER=`formail -xSender:` there, before calling the script.Īlso take care about URI used to connect and directory used to store clips. It is highly recommened that you'll adapt it to your needs, especially when using the same e-mail account to receive e-mails and to watch alerts from a camera. Set up some variables there, like SENDER containing sender's e-mail set in camera's panel. You will also need some script that is executed when e-mail arrives: You may want to do it in more simple way, just by adding a proper line(s) to your. In my case the Exim mailer files look like this: It is also possible to do it as user, e.g. On this machine you should add some mail alias that causes all e-mails addressed to it to be pushed to some shell script. You need 1 unix or gnu server with Exim or other mail transfer agent that allows message redirects to script through pipe. If the interface of your camera looks like any of these:Ībout recording video when alarm is triggered. On eBay, it's also a mix and if you are lucky, the seller will show some screenshots of the interface on his page. With recent feedback, it appears that the cameras sold by DealExtreme are not specifically from Foscam. This would instantly turn your device into a paperweight. Their fw cannot be flashed on Foscam and Foscam fw cannot be flashed on them. I became aware that some ip cameras exactly similar in look to the fi8908w are using a totally different firmware. + Video stream can be intercepted into VLCĪ word of caution about non-Foscam clones and firmware update: + Platform Independent, Linux friendly, Apple friendly, Mobile Phone. ipcam_url /videostream.asf?user= username &pwd= password Loading the stream into a media player such as VLC: Taking a snapshot from the camera (convenient when accessing from a mobile phone): I only started to play with the new interface today, but here are some possibilities already: The control interface is similar to the operator interface of the ActiveX version presented earlier (no visitor section, so, no sound control and no multi-device support), but this time, it's platform independent! After that update, the login page presented an additional login section for the non-ActiveX browsers (Server Push Mode).
1 note
·
View note
Note
How do you make gifs? Care to share your process? o3o
oooh yes i can!!! i tried not to get too detailed with it since im interpreting this as just asking for my process rather than an actual tutorial sudhf.
the general tools i use are photoshop (i pay $10 a month T_T), vlc media player, and one of my various video downloading sites. i don't torrent or anything bc that scares me and i dont understand it. plus, since i almost exclusively gif kdramas the video uploads are generally in pretty decent quality and dont get scrubbed from the web the way western shows do.
so once i have the video downloaded i open it with vlc media player. I use a really inefficient method to extract frames but it works well enough that i don't really care to change it. plus i cant really figure out another way? they say that certain video programs can capture frames for you but none of the ones ive tried seem to have that feature. there's also supposedly another method to do it in vlc media player but it's never worked for me. anyway.
so to extract frames in vlc i find the moment i want to capture and then use the "e" hotkey to skip to the next frame and click the little screenshot button to capture it.

i do this over and over at lightning speed until I get all the frames i want. yes this does often lead to accidentally skipping frames (which can make the gif a little choppy) so sometimes i redo it, but sometimes i don't bother.
after i've captured the frames, i copy them from my pictures folder (not entirely sure why they end up there but im not going to mess with the pathway) to a specific folder ive created for that gif or gifset.
then I'll go through and make sure there are no duplicate or missing frames. after that, i edit them down to about 70 frames per gif, then select them all and rename them so that they're in numbered order (photoshop loads them out of order if i don't).
I do 70 frames mostly bc my sharpening action on photoshop doesnt go past 70 frames and i haven't bothered to fix it lol. also it's comfortable length for a gif so there's not much reason to. you can usually get away with about 40-50 frames tho before it feels too short.
ok nowww i open photoshop and things get good.
first thing i do is load the files into a stack.

i have a bunch of settings in place to make life easier so i already have my sharpening action created (which sharpens all the frames for me rather than having to do it manually. gift from God), and my timeline visible. so now i just play my sharpening action
then load the frames into an animation and reverse them so they dont play backwards.
then i set the frame delay to 0.05 seconds. it's interesting bc gifs played at normal speed look kinda weird. so having it slowed down a little is ideal. not too much though or it looks choppy.
now i crop the gif. i dont have to do this here but generally i do. just helps me focus without the distraction of the tv bars on the top and bottom and just. All the other stuff going on in the background.
nowwww i color. usually start with a color adjustment curve layer. when you use the little eyedrop tool this can really deepen the image and bring it to life. you dont realize how dull tv looks until you gif lol.

that gives me the base tones i want and deepens the image.
sometimes i brighten the gif with the curves layer, but in this case adding a separate brightening layer worked better.
then i'll export the gif with tumblr dimensions and upload it into a draft.
if it is still too dark or the colors look off, i'll just mess more with the layers. in this case, i only needed the two, but a lot of gifs will need a few different adjustment layers like vibrance or selective color to look right.
And that's kinda it!
colored:
uncolored:
hopefully it makes sense lol. Like I said, im not thinking of this as a tutorial or anything but i still want ppl to know what im talking about uhsfusd
24 notes
·
View notes
Note
How long does it typically take you to create a post? What is your process?
First off, I'll watch the scene just to remind myself of the original script - and usually whilst doing that, I'll come up with lines. After that, I'll go through and grab screenshots (usually a few at a time).
First off, I'll watch the scene just to remind myself of the original script - and usually whilst doing that, I'll come up with lines. After that, I'll go through and grab screenshots (usually a few at a time). I use VLC for this as lets you move one frame at a time easily.

I then head into my image editor of choice (paint.net because I know how to make it work!) and trim off the black bars at the top and bottom because Microsoft put a weird screen ratio on the Surface Book.


There, I'll add the text on a new layer, give it an outline and save it once it's done.

Once all the panels are finished, we head back to Tumblr to upload and caption (I have done the last two or three episodes, unfortunately the ask round-ups don't have them because Tumblr sucks), then stick them into the queue and away we go! I usually make posts in bulk on my days off (Thursday and Sunday), so I'll dedicate two hours or so just to making these to fill the queue.
And with that, I'm off to make some more!
106 notes
·
View notes
Note
hiii i love the gifs you make!!!! i was wondering if you could explain how you made them? links to tutorials work too!! :D
hey yes ofc!! i’ve included some general info & links first then there’s a step by step process with screenshots of how i make gifs! ~~ this is just a basic gif tutorial, i didn’t go into colouring or adding text etc because it was already so long but if you wanted to know any of that stuff just lmk!
general info:
for drag race gifs i’ll usually screen record from wowpresentsplus but this site is great if you want to actually download the eps (they have untucked, all stars etc too)
for youtube videos the 4k video downloader is my go to
i’d highly recommend downloading vlc media player! especially if you’re making gifs from downloaded videos
i use photoshop cc 2018, but if you don’t have photoshop yet here’s a masterlist (i tried so many before finding one that worked for my laptop so don’t worry if it doesn’t work first time ^.^)
gif making:
1. if you’ve only got a short video you can skip this step! but to start off with i’ll use vlc media player to cut the video into smaller clips (this makes it easier when you’re using photoshop later but its also helpful for planning gifsets!)
- for this make sure you have advanced controls on: ‘view’ --> ‘advanced controls’
- open your video then find the scene you want, click the red record button to start recording and stop once you’ve got your clip (i recommend recording about 10 seconds before the clip you want starts as it takes a second to start recording sometimes)

photoshop time! i have a small laptop so my layout might look different to yours and if this is your first time using ps you’ll need to select all of these from ‘window’
2. click ‘file’ --> ‘import’ --> ‘video frames to layers’, open your video clip and you can either use the whole clip (select ‘from beginning to end’) or fine tune it more with the trim controls! (doesn’t have to be exact as you can delete frames later), once you’re ready click OK!

3. play the gif through then delete any frames you don’t want from the timeline. around this time i’ll also go to layers, select all the layers and group them together with the folder button. then i’ll select all the frames and adjust the speed (the little arrow at the bottom of the frames); i have 61 frames in this gif so i changed it to 0.06
4. cropping and resizing! select the crop button from the tool bar on the left, then change the ratio at the top to whatever your heart desires (i want this gif to be wide so i didn’t crop it much!) once i’ve cropped i’ll play it through to double check im happy then select all the frames and click ‘convert to video timeline’. now go to the top bar and click ‘image’ --> ‘image size’ --> and make sure its set to ‘pixels’!!!!
i changed the width to 540 as its only 1 gif but for a row of 2 gifs i tend to do 300 each and for 3 i do 178
5. sharpening! make sure the group 1 folder is selected then go to ‘filter’ --> ‘convert for smart filters’, then back to filter --> ‘sharpen’ --> ‘smart sharpen’ . these are my usual settings but i’ll adjust the radius to 0.3 for some gifs if it looks too much.
6. saving the gif! go to ‘file’ --> ‘export’ --> ‘save for web’. i keep it on ‘4up’ so i can easily compare the gif quality to other options. most of the time i’ll end up using ‘diffusion’ with dither at 100%, but sometimes i’ll swap to pattern.. its a gif by gif basis really! sometimes if the gif is close to 10mb i’ll save it with pattern as that tends to be lower then once ive done all the colouring i’ll save it with diffusion ^^ also make sure looping is set to forever! otherwise the gif will play once then stop :p
7. thats the basic gif done!! now i’d save it to my drafts to check the speed is alright before reopening it on photoshop and colouring it!

#ask#saminator#this is so long sorry i always give way too many details when explaining things!#gif tutorial
16 notes
·
View notes
Note
How do you guys get such good cartoon screenshots? I’m super jealous!
That's down to my co-host. No idea where he got them from, but I go frame-by-frame through the videos in VLC player and take screenshots through there!
1 note
·
View note
Photo

Hi! I was tagged to show my giffing process by @ljuyeon, @songmingki, @gotseventeens, and @kyeomshine – thanks!! I am going to demo through screenshots and written explanations underneath the cut because I don’t have a screen recording software and my computer is running out of hard drive space. I will be showing how I made the gif above from Seventeen’s Snap Shoot MV. I am definitely not an expert so if anyone has any suggestions on how to improve anything let me know.
Importing the Video
I have recently started using Avisynth for some of my gifs. I used to exclusively import, crop, and resize through Photoshop, but that really limited me when I was trying to use higher quality video files (.tp from Rosebay, .ts from kpopexciting and other sites, .mkv, etc.). Some of the older Avisynth tutorials that I used are here. I know that some gifmakers have updated the original packages from that link to batch this process more efficiently, but I personally don’t use Avisynth if I’m trying to gif quickly. For instance, my original Snap Shoot gifset was made entirely with Photoshop in like 5 minutes.
Anyways, I’m just going to drag and drop the video file into one of the .bat files and let Avisynth run through its scripts.

Avisynth will first prompt you to input the timestamp with which you want to work. (For .ts and .tp files, I use VLC Media Player to open the file and identify the times I want to gif). After entering the timestamp, Avisynth will fetch the video clip and open the resizer in your default. I generally use the following settings, but I also am still tinkering around. Honestly, I have not found that the slower versions of qtgmc really do much more to help the quality of the video despite taking five years to render the new avi. I will use 30 fps if I am trying to make longer gifs, but here I am using 60 fps.

Import the code in the box into the avs script that also opened separately. If you are using qtgmc, make sure to un-comment the complementparity function at the top. You can also further trim the clip using video > trim selection editor > set selection start/endpoint, which I have done here. After that’s all set up, save, close the window, and watch videodub as it generates the cropped and processed .avi file. Once videodub has finished, it will export the file to the “temp” folder, so I just move it over to my main giffing folder to make everything easier on my end.

Of course, if I don’t use avisynth, I will just import using Photoshops “Import Video Frames to Layers” function and attempt to find my timepoint manually, which can be a chore in extremely long videos (If you are determined to use Photoshop for importing longer videos, it might be helpful to use HandBrake or another software to cut the video size down to the part you actually want to gif. HandBrake can also apply basic sharpening to the video, but it takes foreverrrrr). Be careful because importing 500 frames of a 1080p video can eat up about 10 GB of temporary hard drive space and really slow Photoshop down. Also, if you directly import to Photoshop, the absolute first thing you will want to do is clean up your layers on the right panel. If you start applying resizing and crop manipulations without deleting layers (even if you delete the frames on the bottom!), Photoshop will apply it to every frame, which will take longer and also eat up more of your hard drive space. Finally, I find that is better to resize then crop in Photoshop because the cropping process basically regenerates every single layer from scratch for some reason, which eats up way more space if your video is still 1900 pixels wide. Can you tell that I should really delete some shit off my computer.
Sharpening and Processing
Once I have everything imported and resized, I just clip off any frames that I might not want and delete the layers. Afterwards, I will select the first frame and Convert to Video Timeline (see the red arrow in the top screenshot). If you don’t want to lose the last frame during the sharpening process, just duplicate it before converting to a video timeline.

Now I just select all the layers and go to Filter > Convert for Smart Filters. This will allow me to use Photoshop’s sharpening and Topaz as well. I am going to show all of my usual settings, but I do vary them depending on the video.

Filter > Sharpen > Smart Sharpen – I will use Motion Blur for Avisynth videos but Lens Blur for Photoshop imports. Lens Blur oversharpens Avisynth videos but Motion Blur can really help with videos with lots of sudden movements.
Filter > Blur > Gaussian Blur – This can help fight against oversharpening.
Filter > Topaz Labs > Topaz Clean – Of the two Topazes, this one is the one that does the least. I would not mess with the Edge box unless you know what you’re doing lol.
Filter > Topaz Labs > Topaz Denoise – This one helps a lot cleaning up anything that sharpening either screwed up or missed. Basically, it smooths out the frames, which can really help make faces look smoother… however, it can also smooth out details like tousled hair and noses. Just be careful about the Strength slider. I generally stick between 0.04 and 0.10.
Now I will just go back to the same three bar menu as before and select Convert Frames > Flatten Frames Into Clips. If you have used Topaz, this part will take a little while because Topaz is kinda slow. Smart Sharpen and Gaussian Blur on their own are not as powerful, but can finish up much faster. Personally, unless I am trying to gif super quickly, I will use Topaz. It might help to close Photoshop and reopen before flattening the frames because this will help Photoshop clear its cache before you ask it to do this computationally expensive process. It can also help to close programs like Spotify and your Internet Browser, because they eat up a lot of Memory. Once the flattening process is done, go back to the same menu and select Convert Frames > Make Frames from Clips. Click on the three square dots on the very bottom left to view the frames animation. Delete the first frame, which should be dead.
Coloring and Watermarks

The first thing I do here is make sure that everything is selected correctly. You want to select all frames on the bottom with the first frame highlighted as such so that any manipulations you make apply to all frames (this is mostly important for applying text, shapes, etc.). You also want to scroll up and select the top frames.
Everybody colors their gifs differently. I personally go for warmer colors, but my coloring style has also changed a lot over time. I color all of my gifs individually and basically never reuse .psd files, so all of these settings will adjust depending on the gif.

Levels – I generally only increase the blacks on the left from 0 to anywhere usually between 10 and 30. This will help make the gif darker. A good thing to look for is an increase in the intensity histogram – if your histogram here is more right-skewed, you will want to limit this change.
Curves – I use curves to brighten the gif if needed. Generally I move the upper-right-most dot slightly to the left. If you move it too far to the left, you will get super bright shiny spots, which can be kinda jarring. I also apply an inflection point in the middle of the plot to help darken natural skin tones more. I generally do not apply more inflection points, but I will mess around with Curves depending on the lighting in the gif.
Exposure – I am not changing this setting here, but if you have a gif with a dark background, this is a great way to make it a uniform black (by making the offset value slightly negative, i.e. -0.0020). Beware that if anybody has dark hair because this will also make their hair blend in with the background! One of the benefits of having a black background is that it dramatically reduces the size of your gifs, but it is not always possible to achieve that.
Vibrance – I generally always increase vibrance and/or saturation depending on how whitewashed the video is. Because this particular scene is not so bad, I only applied a light increase to Vibrance. For some videos – for instance, these old Seventeen videos – you may need to drastically increase both parameters to make everybody look less ghost-like.
Hue/Saturation – I usually don’t mess with Hue/Saturation, but if you’re looking to remove a particular color (like blues on a stage), this is how you would do that. Just select the dropdown menu that says “Master,” change to your color, and reduce the saturation. I know some gifmakers live and die by hue/saturation, but I personally prefer color balance and selective color.
Color Balance – Color Balance is for gif-wide corrections to the color scheme. I usually skew more toward the yellow, magentas, and cyans, as shown here.
Selective Color – I’ve recently started using selective color a lot more. It’s a really powerful tool that basically works like Color Balance but for each color channel. This is where you can make your yellows look less “yellow,” etc. Generally, I always mess around with the Neutral tones, the White tones, and sometimes Yellow/Red. Beware that in the Neutral tones, even minor changes in the percentages can drastically shift the color.
Occasionally I will apply a Brightness layer if I feel that the gif is still too dark.
The best way to learn how to color is just to mess with all the settings and to practice. It takes a lot of time and patience and I am definitely not very good. If you like a particular gifmaker’s coloring, shoot them an ask and see if they have any tips. I do not use all these adjustments all the time and obviously some of my gifs look like trash. Just try your best! Honestly, only other gifmakers are really going to notice if you’re coloring is weird lol.
The last things I do are change the gif pacing and apply a watermark or other text. To change the speed of the gif, click on the arrow underneath the frame’s picture and select or input your speed. For 60 fps, I stick to 0.03. For 30 fps, I will either do 0.04 (for faster gifs) or 0.06 (for slower gifs). I do not go above 0.06 because it will look really slow.
Lastly, I apply a text layer and position it in the corner. I select the text and go to Layer > Layer Style > Stroke, and apply an outline to the watermark. I will then right-click on the layer, selecting Blending Options, and alter the opacity to make it see-through. There are lots of different ways to do watermarks, so feel free to do whatever you want or not apply one at all.
After that I just save the .psd, save the gif, and post to Tumblr! I had to cut down on some frames because of the size of the gif, but that’s okay. Here’s a comparison between the gif I made with all of these steps versus a very basic one without any sharpening or corrections.


To keep the game going, I will tag @leechani, @adorablehoshi, @xuboowoo, @01degree, @dokyuml, and @01juyeon! Other people have used a screen recording program so that you don’t have to write an essay like I did as;dflkjas;fdka. Also, don’t feel pressured to do this if you don’t want to!
#tag game#tutorials#reference#i feel like i'm not very good at giffing but i figured i would post this anyways#hopefully this helps???
12 notes
·
View notes
Note
I'm curious. How did you get to the files of BL3 in the first place? I've been wracking my brain on how the hell to get to em but I just don't know how. Is it because i bought it on epic games? I'd like to be able to look at the files to pick through the character dialogue!
Hey I'm sorry I haven't checked my notifications in a hot second!
I got the game on epic, too! You have to use the unreal engine unpacker to extract the pak content from your Bl3 directory, wherever you installed it. They're under Oak Game and Content. Use the crypto key given by Gibbed on his Twitter (I'm on mobile and can't find it right now but it exists!) to decrypt the paks when u extract them. The audio files are paks 83 to 92 I believe! Lots of different languages- I can't remember which one is English, sorry about that. You gotta use a wem to ogg extractor to be able to play the sound with a media player. I also had to download a media player that isnt VLC Media player bc it was acting funky with the oggs, not sure why. It's a bit more complicated than I'm making it sound atm since this is a super generalized version, so if you want I can go into more detail the next time I am at my computer, with screenshots and/or videos. This is all on Windows, I'm afraid I don't have a Mac and don't know what programs work and how the file structure is set up for them. I hope that helped even a little!
16 notes
·
View notes
Note
I'm sorry asking but how you take your prints for the shows you live watch. on your computer or mobile phone?
i take screenshots on my laptop! i used to be able to do it on google chrome but it doesn’t work anymore, so i use firefox now. and there are different ways you can do it but i have a windows laptop and what i do is go windows key + G and from there, i’m able to capture images.
for s6 of my grace and frankie rewatch though, i just used my downloads and took screenshots through vlc which was easier.
1 note
·
View note
Note
henlo! can u post a gif tutorial cause your gifs are so pretty and look amazing, even on mobile which messes up with everythjng 😆
ahh anon u flatter me!! thank you for your kind words!!! i honestly have ways to go, but it means a lot that u say this thank you
so for starters i have a mac + photoshop cs5 so a lot of this tutorial will be based on what you do for that, but i’m sure u could do the same thing on pcs (actually pcs have more programs available so i highly recommend, if u have a pc, finding a tutorial that is based around pcs) and other photoshop versions too! but i think the general process is still the same, a different tutorial might just be more nuanced^^
1. Finding/downloading your video~so for normal mp4 videos on youtube i use this website. it’s pretty useful it can download from actually a wide variety of sites like naver (up till 1080p!) ~for v app videos i use this site~ts files i find on kpopexciting or kpop24hrs (u need an account for kpop24hrs i think to download video but! signing up isnt difficult and its nothing fishy. i use it a lot esp for older ts files it has a good archive, kpopexciting tends to be faster though.)~the higher quality files you find the better! i find that it tends to go mp4~honestly finding the right high quality video is a HUGE part of making gifs look nice2. Extracting your video~there are many many many ways to extract your video but I highly recommend downloading avisynth! There are ways to download it for pc! avisynth is beautiful because it doesn’t really reduce the quality of your video to the extent that photoshop does, plus it can extract 60fps from ts files. some gifs ive made through avisynth ( x x x ) if you’re interested in avisynth further, tumblr user @/brandinator is a good place to start! if you want to know more regarding how to use it and a different tutorial through that, let me know! ~now i’m not sure if there is an avisynth tutorial for mac anymore, BUT theres another great program, vapoursynth, that mac users can look into. here’s a tutorial that i’ve found~Before I got avisynth I used VLC player for ts files but I had to basically screenshot each frame individually. Some gifs I’ve made through this method ( x x x ). these gifs are 60fps only bc i found a user who uploaded the ts file in 60fps. usually you cant get 60fps w/o avisynth. but this is also me saying that if you cant get avisynth or vapoursynth, there are still ways to work around it i think! one of my fav giffers for the longest time didnt use either!! and sharpening and coloring were always on point.~I think pcs can use kmplayer? id look into that if you have a pc~for normal mp4 videos I just use photoshops ‘import video frames to layers’ option (under file in the menubar)! you can use avisynth as well, but for me it takes forever to extract what i want in avisynth (minimum like a minute ish), whereas ps can get the part of the video i want to gif in a couple of seconds. I think it’s self explanatory but basically you find the video you want to extract, find where u want ur gif to start, and for photoshop cs5, you hit the ‘shift’ key and let the part u want giffed in the video play. when youre done u lift the shift key and hit ‘ok’ (idk if it differs for different versions of ps). i extract all!!! frames!! it makes it look smoother too :)
3. Coloring/Sharpening/Cropping/Etc~now this is the step that I can’t really give a tutorial on because honestly it varies for everyone! but i feel that this is the step that a lot of ppl need guidance with (me included) because it is the hardest step, probably because it is so ‘up in the air’ for lack of a better word? there is no one right way of doing it the possibilities are literally endless but here are some tips~Coloring: ~most important rule: don’t whitewash ur gifs!! ~other than that, the world is yours. ~honestly have fun with this part! coloring is something that i haven’t fully learned yet ~i tend to play around mainly with the curves, selective color, hue/saturation, and color balance layers ~you can also download psds other ppl have made (i dont do this myself) and use those! ~also i feel that a lot of the times, the right coloring can make ur gif seem higher quality. coloring can also play a role in reducing gif size if u do it correctly. ~honestly this part is just a lot of experimentation, over the course of a gifset and over the course of time in general. some people find their coloring style easily, but i was not one of those people. ive spent a lot of time trying to figure out how to adjust what layers to get the colors that i want and i think only as of this era ive been able to execute the coloring i had pictured in my mind. so patience is a virtue!!! ~Sharpening: ~ah yes my biggest enemy: sharpening ~first things first, i sharpen my gifs using smart sharpen + topaz ~settings for my smart sharpen are 500%; 0.4 ~check the box that says ‘more accurate’ and i personally remove ‘gaussian blur’ ~some people also use topaz denoise, and/or topaz clean ~ honestly topaz is a lifesaver for me bc it smoothes out a lot of grain that can be introduced via coloring! also!!! it can reduce gif size by a lot!!!!!!!!!!! ~on topaz denoise i hit the ‘light’ setting on the side and adjust the settings accordingly ~idk how to use topaz clean even though I have it, because it refuses to work ~to apply topaz you have to hit ‘flatten frames into layers’ ~some gifs i’ve made with just topaz and no avisynth ( x x x x) ~there are ways to make it look nice without topaz but i’ve forgotten how after i got it ~id duplicate the frame then use smart sharpen and ‘gaussian blur’ under ‘blur’ ~then adjust the opacity levels in some way. ~my settings for the opacity levels aren’t good so i’ll refrain from sharing ~some gifs ive made through this method ( x x ) ~last but not least i’ll bring up avisynth again. avisynth is nice at preserving video quality ~a lot of ppl i know say they don’t even sharpen gifs out of avisynth ~here are some gifs i have made with avisynth + topaz ( x x x x x x x ) ~honestly when it comes to sharpening, im still floundering with it. my sharpening needs a lot of work but, amongst the people who i consider good sharpners, most of them use avisynth, topaz denoise and/or clean, and smart sharpen! so all the resources are here !
~Cropping: ~it’s super important to follow tumblr dimensions otherwise gifs come out looking grainy! even when they’re not ! (case in point: x in which i used 168 instead of 178 for the dimensions)~Timing: ~Timing is so important!!! I almost forgot!! Always make sure u dont have duplicate frames for starters! for 60fps source videos i use .03, for mp4s i typically use .04 but sometimes the frame rate is kinda funky so you may have to go slower accordingly! and the important thing about timing is that if u use smart object, when u save ur gif, it’ll be in a different timing? like .04 gets changed to .07 but in order to fix that, u can simply just save ur gif in the wrong timing, and then reopen the gif in ps, simply change the timing to what u want on all ur frames, and then save it again!! idk if that made any sense but laskdjf this was the biggest mystery for me for so long omg4. Saving the gif~personally the save settings I use are “Selective/Adaptive” ; “Diffusive”; Dither: 100%; 256 colors. sometimes this makes the gif super grainy so i use “pattern” instead of “diffusive” in those instances5. Pray Perseverance ~a lot of the time when you’re giffing, gifs won’t come out the way you want it (i’m sure for every gifset i’ve uploaded on tumblr, there’s a gifset that i started making and never finished because it looked really bad). idk sometimes it feels like photoshop has its own will, sharpenings wont always work the same way each time, video quality won’t be the way you want it, i’m honestly still very experimental right now I don’t have ps figured out at all. so yeah…sometimes all u can do is that when u hit that save for web button (that ruins everything alskf), pray that ps doesnt mess it up too bad ahahaha but also that even when it does, its okay and you can try again! or try something new!
this is a super generic guide! let me know if you need more information!
10 notes
·
View notes
Last Seen Blogs

thebeautytoyourbeat
Meet Me in the Afterglow

kaynzee
Kevin Sweeney


eusouonelson
Best Live Sex Cam Sites

littleweirdlittlefunny
stay weird