#hover dropdown menu
Explore tagged Tumblr posts
Visit Tumblr Blog
Explore Tumblr blogs with no restrictions, modern design and the best experience.
Last Seen Tumblr Blogs


Fun Fact
Tumblr’s website traffic is steadily declining.
Text

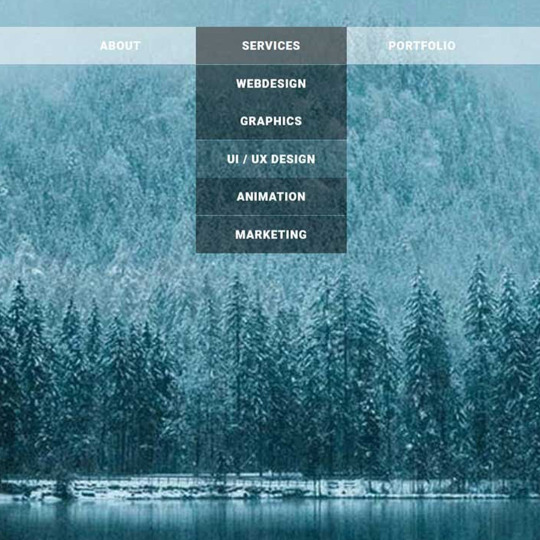
Dropdown Menu on Hover
#dropdown menu on hover#css menu#hover dropdown menu#html css#divinector#css#html#frontenddevelopment#css3#pure css dropdown menu#css dropdown menu#css tricks
3 notes
·
View notes
Text
Transparent Dropdown Menu
#transparent drop down menu#pure css dropdown menu#css dropdown menu#dropdown menu html css#html css#frontend#webdesign#learn to code#css#html#css3#frontenddevelopment#css menu#html css menu#dropdown menu hover animation
3 notes
·
View notes
Text
discords new ui is specially engineered so that when you fall asleep with your phone in hand itll send shit to people for no reason
#i was clicking off a rightclick menu too and it made me fucking SEND AN INVITE LINK TO MY FRIEND#BECAUSE I HOVERED OVER THE INVITE TO SERVER DROPDOWN FOR LESS THAN A SECOND.#.sonar
0 notes
Text
it might have taken upwards of 4 hours between yesterday and today, but I finally got toyhouse to give me functional on-hover dropdown menus <3 exciting times!
#.txt#web dev stuff#<- kinda#i got on-click bootstrap dropdowns working Fairly quickly but what I didn't realise#was that you can't use the bootstrap menus with the hover.#most bootstrap hover menus seem to use jquery or javascript and because i'm working Within toyhouse i can't do that#so that made things a little more complicated ;u;#it also made trying to figure out how other people do things VERY complicated. jesus christ. staring into the abyss.#After ALL of this i think i'm gonna make a collection of snippets. just so other people don't have to deal with this fucking bullshit.#like how to move the sidebar and stuff. because i couldn't find any one place for it and it was really frustrating.#the horrors of working within someone else's spaghetti code are very very real and working with classes and containers you didn't make feel#bad.#i don't enjoy it.#but i am nothing if not hell bent on making things more complicated than they need to be <33333 so we persist!!#this is a lot of effort for a site i don't regularly use and never enjoyed using but like. it's a fun exercise i guess
1 note
·
View note
Text
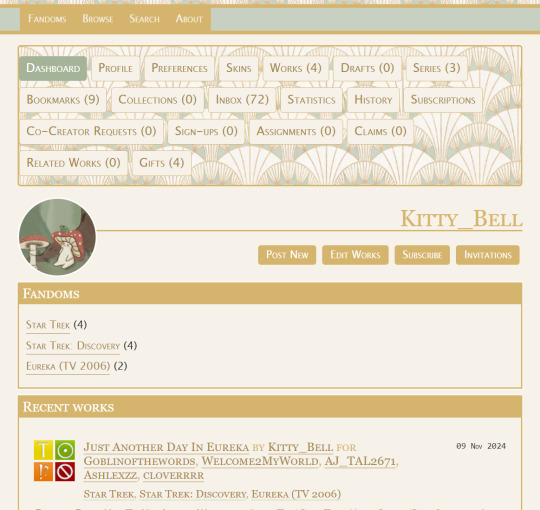
Kitty Bell's AO3 Skin!
@ivylor You asked for my AO3 skin code! I don't really know code either but I know what's vaguely happening. So I don't know where I got the main code originally but I do know that I got the stats icon code from (here). Then I think I picked bits and pieces from other places. I would like to mention I have code in there to remove buttons. This prevents me from accidentally deleting my fics. Still working on some of those pieces. If you want to delete a fic you will have to turn off the skin. Also, Ivylor you could have commented on the post, you didn't have to msg me. I thought you were a bot tbh. For next time ig. Also meant to make this earlier sorry for making you wait!
Anyways! Photos of my AO3 skin!


Code down below! WARNING THIS CODE IS VERY LONG:
Edit: If you ever need help with the skin please contact me! I will be very happy to help!
Edit Edit: SO I made a pastebin so you all can click copy so you can paste it easier in AO3! https://pastebin.com/28Ah7QMs. Again if you have troubles with the skin please don't be afraid to contact me.
div#main.profile-show.dashboard.region ul.navigation.actions li:nth-child(5) { display: none !important; }
div#main.works-edit.region ul.navigation.actions li:nth-child(2), div#main.works-edit.region ul.navigation.actions li:nth-child(3) { display: none !important; }
div#main.works-show_multiple.dashboard.region p.submit input:nth-child(2), div#main.works-show_multiple.dashboard.region p.submit input:nth-child(3) { display: none !important; }
div#main.series-show.region ul.navigation.actions li:nth-child(2) { display: none !important; }
div#main.series-show.region ul.navigation.actions li:nth-child(4) { display: none !important; }
.works-edit .navigation.actions li a[href*="orphans"] { display: none; }
.works-edit .navigation.actions li a[href*="delete"] { display: none; }
.actions a[href*="toggle_rejected"] { display: none; }
header {
background-image: url("https://i.imgur.com/MEXgrDx.png"); background-repeat: repeat; }
header .heading {
height: 12em; }
header .logo,
header h1 sup {
display: none; }
header .heading a {
padding-left: 1em; font-variant: small-caps; color: #a6894b; }
greeting .icon img {
box-shadow: none; border: 1px solid #fff; border-radius: 90%; }
greeting .dropdown .menu,
greeting .dropdown .menu a,
greeting li a {
font-variant: small-caps; color: #a6894b !important; background: #f7f2e9 !important; border: none; box-shadow: none; }
greeting .dropdown .menu a:hover,
greeting li a:hover,
a.tag:hover { background: #c8d0c1 !important; color: #fff; }
greeting .menu {
width: 12em; }
header .menu {
background: #f7f2e9; box-shadow: none; width: 20em; }
header .primary li:not(.search),
greeting li {
border: none; }
header #search {
display: none; }
header .primary {
background: #c8d0c1; box-shadow: none; border-bottom: 5px solid #d5b56e; border-top: 5px solid #d5b56e; }
header .dropdown .menu li:hover a,
header .primary li a {
font-variant: small-caps; color: #f7f2e9 !important; background: #d5b56e; border: none; box-shadow: none; }
header .dropdown:hover a,
header .primary li:not(.search) {
background: #a5b399; }
outer.wrapper {
background: #f7f2e9; }
.actions a, .action, input[type="file"], .actions input, input[type="submit"], button, .actions label,
main .actions a,
main .actions a:visited,
main .action,
main .actions input,
main input[type="submit"],
main button,
main .actions label {
background: #d5b56e; font-variant: small-caps; color: #fff; border: none; }
dashboard .actions a,
dashboard .actions a:visited {
background: #f7f2e9; border: 1px solid #d5b56e; color: #a6894b !important; font-variant: small-caps; }
.required .autocomplete, p.notice, .notice, .comment_notice, .kudos_notice, ul.notes, .caution, .error, .comment_error, .kudos_error, .alert.flash { background: #c8d0c1; }
.current,
dashboard .current,
main .current {
background: #a5b399; color: #fff; font-variant: small-caps; border: none; }
input[type="submit"]:hover, input[type="submit"]:focus,
dashboard .actions a:hover,
dashboard .actions a:focus,
main .actions a:hover,
main input[type="submit"]:hover,
main button:hover .actions label:hover,
main .action:hover {
box-shadow: none; text-shadow: none; border: none; background: #f7f2e9; color: #a5b399; font-weight: bold; }
main a {
color: #a6894b; }
main a:visited {
color: #76826c; }
a.tag:visited { color: #a6894b !important; }
h1, h2, h3, h4, h5, h6, .heading { font-variant: small-caps; color: #d5b56e; }
.splash .module h3 { color: #a5b399; font-variant: small-caps; }
.splash .favorite li:nth-of-type(odd) a { background: none; }
fieldset { background-image: url("https://i.imgur.com/MEXgrDx.png"); background-repeat: repeat; border: 2px solid #d5b56e; box-shadow: none; }
fieldset dl, fieldset fieldset { background: #f7f2e9; color: #a6894b !important; font-variant: small-caps; border: 2px solid #d5b56e; box-shadow: none; }
input, textarea { background: #f7f2e9; border: 2px solid #d5b56e; box-shadow: none; }
span.question { background: #d5b56e; color: #fff; box-shadow: none; border: none; }
form.verbose legend, .verbose form legend { background: #f7f2e9; border: 2px solid #d5b56e; color: #a6894b; font-variant: small-caps; box-shadow: none; }
select { background: #f7f2e9; border: 1px solid #d5b56e; }
modal {
border: 5px solid #d5b56e; background: #f7f2e9; color: #76826c; }
modal .footer .action.modal-closer {
background: #d5b56e; color: #fff; border: none; box-shadow: none; }
.listbox, fieldset fieldset.listbox { background: #d5b56e; border: 2px solid #d5b56e; font-variant: small-caps; }
.listbox > .heading, .listbox > .heading a { color: #fff !important; }
.listbox > .heading a:visited { color: #76826c; }
.listbox .index { background: #f7f2e9; box-shadow: none; }
.listbox li.blurb { border: none; }
li.blurb { border: 2px solid #d5b56e; }
li.relationships a, .work .relationship a.tag { background: none; }
ol.index.group { background: #f7f2e9; }
div.comment, li.comment { border: 2px solid #d5b56e; }
.comment div.icon { border: none; }
.comment h4.byline, .comment h4.byline a { background: #d5b56e; color: #fff !important; }
.unread, .thread .even, .statistics .index li:nth-of-type(2n) { background: #c8d0c1; }
span.unread { background: #f7f2e9; color: #a6894b; border: 2px solid #d5b56e; }
.comment .icon .anonymous, .comment .icon .visitor, .index .skins .icon, .skins .primary .icon, .index .mystery .icon, .index .tag .icon, .index .tagset .icon, .abbreviated .icon .anonymous, .abbreviated .icon .visitor { background: url("https://i.imgur.com/rdqdtqz.png"); background-repeat: no-repeat; background-size: contain; border: 1px solid #d5b56e; }
a img { border-radius: 95%; border: 2px solid #fff; }
p.kudos { background: url("https://i.imgur.com/7wX03zP.png") no-repeat; }
p.kudos { color: #a6894b !important; }
dashboard.own {
background-image: url("https://i.imgur.com/MEXgrDx.png"); border: 2px solid #d5b56e; }
dashboard ul {
border: none; }
main.errors,
main.error-502,
main.error-503-maintenance {
background: url("https://i.imgur.com/FxUVd04.png") center right no-repeat; }
footer {
border-top: 5px solid #d5b56e; }
footer.region {
background: #c8d0c1; }
footer h4.heading {
color: #fff; font-variant: small-caps; font-size: 120%; }
footer,
footer a {
color: #fff; }
footer a:hover {
color: #fff; background: #d5b56e; }
dl.stats dt { display: none; }
.skins .header dl.stats dt { display: inline-block; }
dl.stats dd:nth-of-type(1)::before { background: url(https://64.media.tumblr.com/db492b00dffe5c3059151bf531bac9ea/270ee5afe68cadd6-46/s500x750/a6bc3e5d57023d005da4a1f3d11c383db8dd7df6.png); }
dl.stats dd:nth-of-type(2)::before { background: url(https://64.media.tumblr.com/f835b437a474b4b672a8d4ebe61402b8/8979adde76f2ff05-fb/s100x200/8f86556b6896e96427f5a4a54f0de7be38ddba75.png); }
dl.stats dd.language::before { display: none !important; }
dl.stats dd.kudos::before { background: url(https://64.media.tumblr.com/23a3c6f134a96386f50fb8982a353590/8b704f26c7323545-01/s100x200/31e25f0be03646918168c4d49bd2ee9733b2cd59.png); }
dl.stats dd.words::before { background: url(https://64.media.tumblr.com/fff96d500a04ddf12517a48d83b228d2/b2e751421a20aa0c-a7/s100x200/c848a67de8f463ccdafa5b60948c61a172d5fe24.png); }
dl.stats dd.chapters::before { background: url(https://64.media.tumblr.com/a8ca48310f24581ae539336583690b26/b2e751421a20aa0c-5c/s100x200/a51b914598b64c3ddf6f705b278f11a68301d443.png); }
dl.stats dd.comments::before { background: url(https://64.media.tumblr.com/7172c0bbe03a0eef7b236014dc78c905/8b704f26c7323545-78/s250x400/f37ba1ff69b5ef2ad7e5fe66b61fd748badc00d1.png); }
dl.stats dd.bookmarks::before, dl.stats dd a[href$=bookmarks]::before { background: url(https://64.media.tumblr.com/9b95d189a57699762d2262536e922ece/b2e751421a20aa0c-2a/s100x200/1aabb2ad7b90746f0469aefaa39af5b83728f8b9.png); }
dl.stats dd.hits::before { background: url(https://64.media.tumblr.com/b2b8862a356132ac1aa41e9e9f0ddd1d/b2e751421a20aa0c-9e/s100x200/dcd2bcb1adbbb8f9e1844b61aee3dd3a653531e3.png); }
dl.stats dd.collections::before { background: url(https://64.media.tumblr.com/ae825c2ad8071426c298c5b52970e294/b2e751421a20aa0c-18/s100x200/d1eb5dd259e2db588cda2100057c2c8fd9efaaf0.png); }
dl.work dl.stats dd.published::before { background: url(https://64.media.tumblr.com/7e13419071a7eeb35f48a76c7aa0ba36/b2e751421a20aa0c-5d/s250x400/7f351f60793ad683e4a9dc4de55e4ee4d625f9d2.png); }
dl.work dl.stats dd.status::before { background: url(https://64.media.tumblr.com/0ef9349a36cf808783e9488a97b64678/b2e751421a20aa0c-10/s250x400/8df1d3da298f875381822968f8e71ed4d7bcae31.png); }
ul.statistics dl.stats dd.subscriptions::before { background: url(https://64.media.tumblr.com/64db76a65209eff79515dfc23842eb54/fd0b10e0262ddb71-14/s250x400/921de73c3d5bb819f4e3c58c7c45bd4c6edfe55f.png); }
dl.stats dd.published::before, dl.stats dd.status::before { width: 0px; margin-right: 0px; }
li.collection dl.stats dd a[href$=collections]::before { background: url(https://64.media.tumblr.com/ae825c2ad8071426c298c5b52970e294/b2e751421a20aa0c-18/s100x200/d1eb5dd259e2db588cda2100057c2c8fd9efaaf0.png); }
li.collection dl.stats dd a[href$=works]::before { background: url(https://64.media.tumblr.com/f835b437a474b4b672a8d4ebe61402b8/8979adde76f2ff05-fb/s100x200/8f86556b6896e96427f5a4a54f0de7be38ddba75.png); }
li.collection dl.stats dd a[href$=bookmarks]::before { background: url(https://64.media.tumblr.com/9b95d189a57699762d2262536e922ece/b2e751421a20aa0c-2a/s100x200/1aabb2ad7b90746f0469aefaa39af5b83728f8b9.png); }
li.collection dl.stats dd a[href$=fandoms]::before { background: url(https://64.media.tumblr.com/0a2f3d28fb850907a859726916e04e6f/8979adde76f2ff05-48/s250x400/926b1499363f66438d02fdc8bbea5ce610a75395.png); }
ul.statistics dl.stats dd::before, li.work dl.stats dd::before, li.bookmark dl.stats dd::before, dl.work dl.stats dd::before, .collection dl.stats dd a[href$=collections]::before, li.collection dl.stats dd a[href$=works]::before, li.collection dl.stats dd a[href$=bookmarks]::before, li.collection dl.stats dd a[href$=fandoms]::before, li.series dl.stats dd:not(.language):not(.words):not(.chapters):not(.collections):not(.comments):not(.kudos):not(.bookmarks):not(.hits):not(.published):not(.subscriptions):nth-of-type(1)::before, li:not(.collection) dl.stats dd:not(.language):not(.words):not(.chapters):not(.collections):not(.comments):not(.kudos):not(.bookmarks):not(.hits):not(.published):not(.subscriptions):nth-of-type(2)::before, dl.stats dd:not(.bookmarks) a[href$=bookmarks]::before { display: inline-block; width: 14px; height: 14px; content: " "; background-size: 14px 14px !important; margin-right: 5px; }
#adiraofthetals ao3 skins#ao3 skins#ao3 site skin#ao3 code#ccs#ccs code#ao3 ccs#ao3#archive of our own
373 notes
·
View notes
Note
hello and happy new year! ceci, do you happen to have or could you please make a tutorial on creating teeth if it's not a big hassle? i wanted to make a very particulat teeth shape for my sim, but apparently i do something wrong because the result morphs the whole face in a weird way
gurl the "happy new year" is beating my ass rn, not this exposing the state of my inbox...... 😭😭😭
but ok more seriously, I'll get on with the tutorial 😳
Step 1
first, we're going to use s4studio to create our package. we're going to clone the EA teeth to use as our base.

open s4studio and select "create 3D mesh" under "CAS"
click the blue "CAS" button
Step 2

select "Face" from the Part Type dropdown menu. this will make only the teeth files show up.
we're interested in both "yuTeeth" and "yuTeeth_Snaggle", but select yuTeeth first! (you can hover over each picture to see the names too)
click next, and save your package file as whatever you want.
Step 3

zoom in close to the model with mouse wheel until you can see the teeth, to make sure everything is correct, then go to the "meshes" tab on the right side
export your mesh and save it where you can find it.
note: if you've never used s4s or blender before, make sure your blender location is set up correctly in the s4s settings. otherwise, the sims4studio tools won't show up in blender & we won't be able to edit our cut numbers later.
Step 4
now that we have our mesh, we need to edit it in blender. I'm currently using version 4.2. the controls are different in different versions, so feel free to ask me about it if you're using another version and something isn't working right.

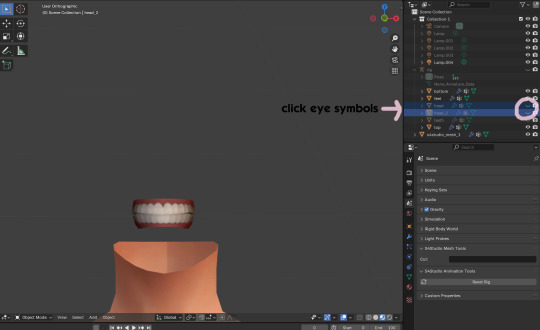
open your mesh in blender. press the N key to get rid of the side panel and Numpad 5 to make the view better/less disorienting. you can zoom in and out with the mouse wheel, and move around by holding the mouse wheel and moving the mouse.
look to the right panel where "rig" is listed. click the arrow to expand the list so you can see all parts of the rig.
click the eye symbols next to "head" and "head_2" to make them invisible so you can easily see the teeth!
Step 5
there are many ways of editing teeth, of course, but what i'm going to show you is basically how to frankenmesh them. this is a good way of creating subtle variety in MM style, without it being overly difficult! we're going to combine the regular and snaggle teeth as an example.
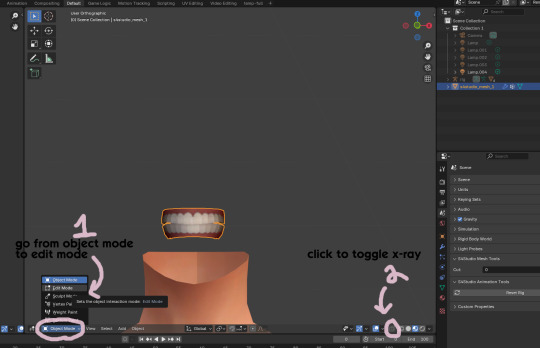
go from object mode to edit mode by clicking the menu at the bottom and selecting "edit mode"
afterwards, click the symbol on the bottom right to toggle "x-ray" so you can see all your vertices when editing.
Step 6

left click in the gray space to deselect all. there will be no orange left anywhere on the mesh.
then, hover over the top teeth and press the "L" key over a vertice (the small black dots) to start selecting the top half only. you should only have to select a couple vertices until everything on the top half is highlighted orange. you can change your view by holding down the mouse wheel and moving the mouse.
Step 7

now, press "X" key to bring up the delete menu.
click "vertices" to delete the parts of the mesh we've highlighted. only the bottom half of the teeth will be left behind. if there's any floating parts left over, highlight those with L and delete them the same way.
Now, repeat Steps 1-3 with "yuTeeth_Snaggle". when you have that mesh exported and saved where you can find it, continue to the next step.
Step 8

go back into object mode. you must be in object mode to append meshes.
go to file -> append to bring up another window

double click your snaggle mesh you just exported
double click "object"
double click "s4studio_mesh_1"
click "append" (if the window didn't close already) and the snaggle mesh will be added to your current mesh!
Step 9
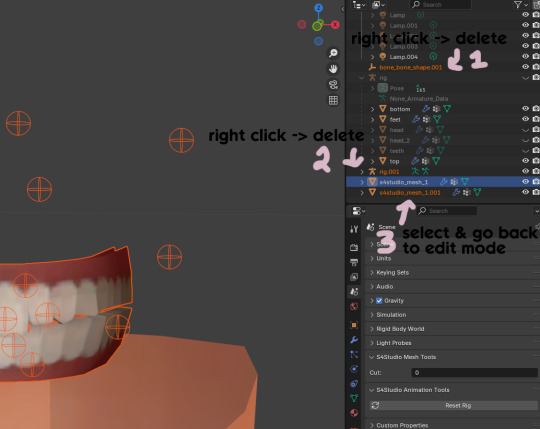
you will see several new mesh parts in the list on the right. right click over "bone_bone_shape.001" and click delete to remove it, since it's just a duplicate.
do the same thing with "rig.001" to delete it as well
select the mesh part you just appended- which is "s4studio_mesh_1.001" to select it and go back to object mode (you can also rename it now by double clicking it if you want)
Step 10

repeat what we did in Steps 6-7 to remove the bottom teeth of the snaggle mesh. you may need to be more careful since these teeth are less straight & overlap more. take your time, and if you make a mistake, you can press CTRL+ Z to undo. you can also click the eye icon next to our first mesh part to hide it so you can see better.
when you're done deleting, unhide the first mesh part to see how it looks together. you now have the top teeth from yuTeethSnaggle and the bottom teeth from yuTeeth on the same mesh! you can mix and match many teeth parts this way.

I decided to rename my mesh parts to top & bottom to keep them organized. you can click the eye symbols to hide either one and see how each part looks. when you're ready, select the top teeth mesh part and return to edit mode.
Step 11
some of EA's meshes have very few polys, so they can be hard to edit, especially if you want to move individual teeth. but, teeth are so small that they don't need/shouldn't have too high of a poly count. having every single tooth be super detailed is overkill, so it's a good idea to only increase polys in the specific areas you want to edit. for this example, i'm going to mainly focus on the front teeth.

select the front teeth by right clicking + dragging over the area you want to select, and it will highlight orange.
go to "edge -> subdivide" to increase the polys in the selected area only, which will give you more to work with. DO NOT SUBDIVIDE TOO MUCH! once should be plenty for this.
Step 12
now for the fun part- actually editing the teeth to be unique! you don't have to do this if you only want to mix & match EA parts, but it's neat to toy around with, even if you just do tiny edits. there's a variety of ways to do this, and I like to do a mixture, but for this example I'm going to use proportional editing.
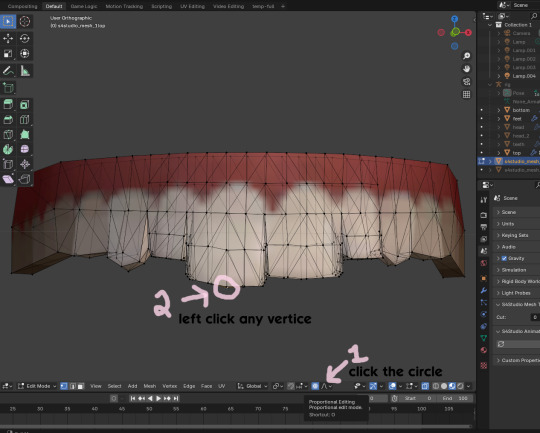
click the circle button to turn on proportional editing
left click any vertice you'd like to edit
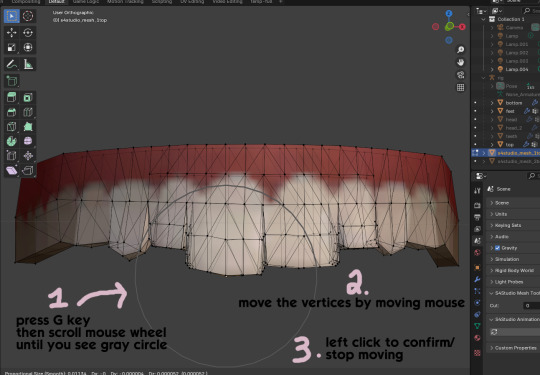
press the G key (move tool) and scroll the mouse wheel forward until the gray circle appears on your screen. this circle represents the influence of editing- the bigger the circle, the wider range of vertices will be moved around that point. the smaller the circle, the smaller/more detailed the change.
move the vertices around by moving your mouse. you'll see right away how it moves. play around with it by using a combination of scrolling the wheel back and forth and moving the mouse.
left click to confirm/stop moving the vertices. you can undo using CTRL + Z if you need to. keep repeating this step by selecting vertices, pressing G, and moving them around how you want. you can also use proportional editing with the S key (scale tool) to make areas bigger or smaller. in blender 4.2, you can also click the tools on the top left side of the window if you want to mostly use your mouse, but I usually use the keyboard.
when you're done editing your mesh and you're ready to test it out, save your file before moving to the next step. keep a copy to the side so you have something to come back to later if you want to change anything!
Step 13
now we're going to prepare our mesh to be game-ready. some of the most important aspects of that is ensuring a) the mesh part is correctly named and b) the "cut" number is correct. if these things are off, the game won't know how to read it, and we'll get odd bugs like missing heads or our mesh just not showing up at all. we currently have two mesh parts and teeth only need one, so we'll fix that first.
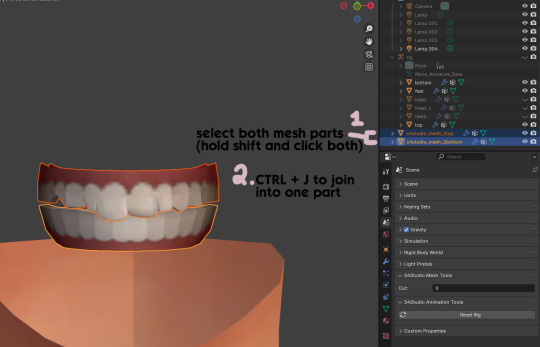
first, go to object mode and select both mesh parts by holding shift and clicking each one.
press CTRL + J to join them together into one part.
Step 14
another thing we need to do is remove doubles so our mesh doesn't look weird or have any odd shadows in-game. in blender 4, it's "merge by distance", but in earlier versions it's just "remove doubles". you should do this when you're done editing, because it'll be difficult to edit after this step. I always do it after I merge all my mesh parts & am about to import for testing. I also double check the cut numbers after this to be sure they're right.
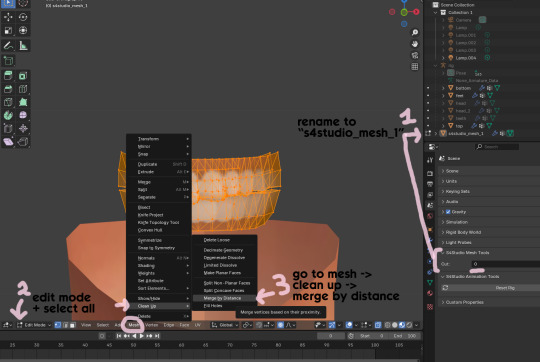
rename your combined mesh part to "s4studio_mesh_1" and ensure the cut number is 0.
go to edit mode and select all by pressing the A key
go to mesh -> clean up -> merge by distance
unhide the "head" and "head_2" parts of the rig you hid in Step 4
save your mesh as a new file name so you don't overwrite your working mesh, in case you want to go back and change something
Step 15
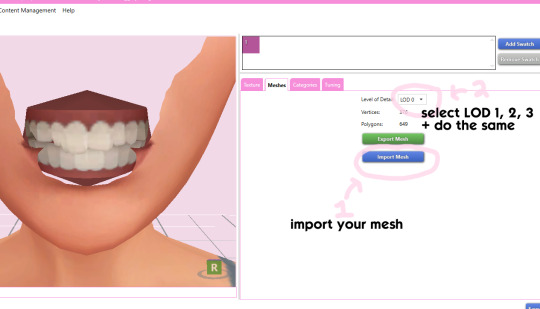
go back into your package in s4studio and import your new mesh
if you like how it looks & are done editing, select LODs 1, 2, and 3 in the dropdown menu and import your mesh there too. these are normally different meshes, but since EA based teeth are so insanely low poly, there isn't much point making individual LODs for them. but it's not that difficult to make them if you want to- if anyone wants a quick tutorial for that, let me know!
Step 16
you can stop here if you want- the teeth will take on the texture of your defaults if you used the yuTeeth package as a base. however, since we've used the Snaggle teeth on top, I think an adjusted texture might look better. I always use the textures by @ice-creamforbreakfast for my teeth, so head over there and grab their defaults if you haven't already! then grab the "uneven teeth" package file and open it in s4s.
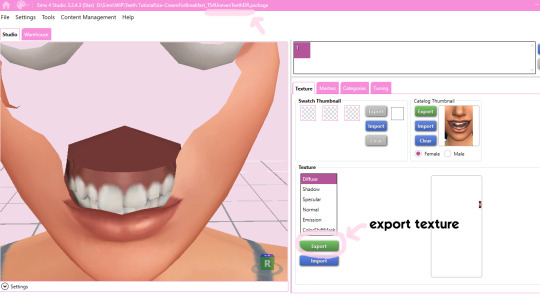
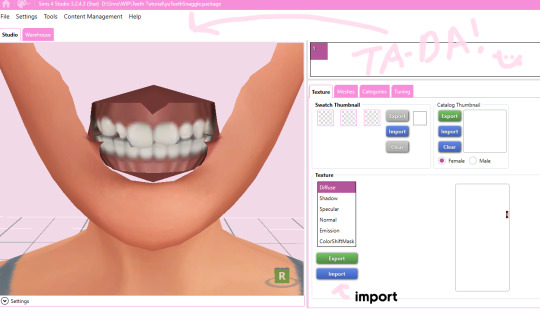
export the texture from the uneven teeth package file as dds
go back to your package file and import it! (and don't forget to credit ice-cream if you post your teeth publicly ;3)
Step 17
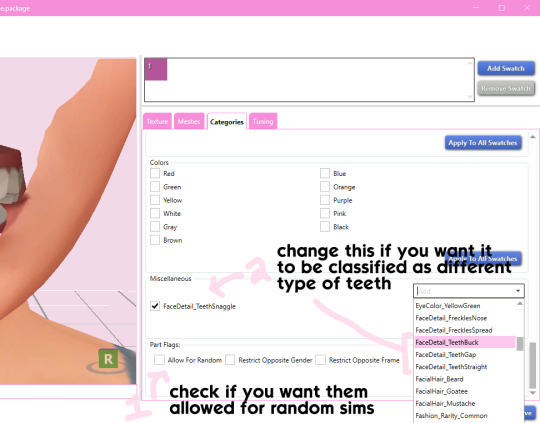
lastly, go to categories tab and scroll to the bottom. if you want your teeth to be enabled for random sims, check the box
if you want the teeth to be considered a certain type (like buck teeth), change the miscellaneous to that type. if it doesn't matter or you're not sure, just keep it as TeethStraight.
Finally, save your package and you're done! :)
#asks#adelarsims#ceci speaks#tutorial#reference#phewph!#long post#i don't think i missed anything#let me know of any questions!
65 notes
·
View notes
Text
How to Add 3D Models to TS4
Required Applications:
S4Studio - https://sims4studio.com/
Blender - https://www.blender.org/download/releases/4-3/
Note: Make sure the blender path is set up in your S4Studio settings
*This tutorial assumes you know your way around blender*
Step 1: Open S4Studio
Step 2: Under Object, select Create 3D Mesh
Step 3: Check 'Show Debug Items', change 'Mesh Groups' to 1 and search for arch. Choose the following object:
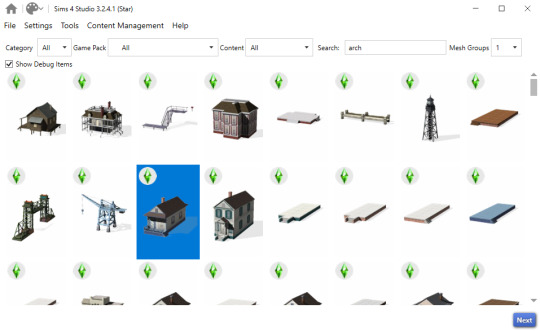
Step 3: Click next, name your package and hit save.
Step 4: Name your object. I suggest adding your creator name or initials in the front so that you can search for it in the catalog faster (ex. creatorname_objectname)
Step 5: Import your textures. The diffuse will be the main texture and the material_lighttex will be what will be illuminated on the mesh. If you don't want an illumination map, just import a plain black image or choose a different object to clone that doesn't have one (eg. the wooden slab/pole??) Ex:
Step 6: Go to the meshes tab and export LOD 0.
Step 7: Open the LODs .blend file.
Step 8: Tab into edit mode and delete the object. Do not delete it in object mode or else you'll lose all the mesh data and S4Studio will throw you an error. Tab out of edit mode.
Step 9: Import your object.
Step 10: Under the object's scene properties, you will see a tab that reads 'S4Studio Mesh Tools'. Add the number 0 to the blank space beside 'Cut'.

Step 11: Go to the data properties and change the UVMap's name to uv_0
Step 12: In the side panel where it displays the name of the objects in your scene, click on the object and then ctrl click on 's4studio_mesh_0'. Make sure your mouse is hovering over the 3D viewport window and hold ctrl+j to join the objects together. The name of your object should now be s4studio_mesh_0.
Step 13: In the modifiers tab add the 'Edge Split' modifier and then apply it. Before I do this, I tend to go into edit mode, select all vertices, click m and merge by distance just to make sure there are no double vertices. Note: If you do not add the modifier, the object will look weird in game, trust me.
Step 14: Save your blend file as 'objectname'_mesh
Step 15: Once you have saved it, go to the data properties again and change the UV from uv_0 to uv_1, this will be the shadow mesh.
Step 16: Save file as 'objectname'_shadowmesh. Choose save as and not save because it will overwrite your main mesh blend file.
Step 17: Back in S4Studio import your main mesh into LOD 0. Once that has loaded in, click on the dropdown and choose the Shadow LOD 0. Import your shadow mesh.
Step 18: Under the tags tab you can change where you'd like your object to show up in the catalog. If you leave it as is, your object will show up in the debug menu, which will have to have the debug/live edit cheat to be able to see. If you'd like it to show up as a decor object instead, uncheck world object, scroll down until you see the 'Decorative' drop down menu and choose where you'd like it to show up. I suggest the Decoration (misc) option.
Step 19: Save your package and test in game
I use this same process for all world/decor objects I make/convert. Let me know if you have any questions.
21 notes
·
View notes
Text
ts4 in hq | tutorial
this tutorial is for nvidia graphics card users only.
download & install geforce experience
open the geforce app and hover over the sims 4 in the games & apps panel. select the details option.
click the wrench icon beside the optimize button in order to customize your resolution settings.
from the resolution dropdown menu, select your desired resolution. mine is set to the highest dynamic super resolution of 3840x2160. be kind to your rig when making a selection and don't push too far if you don't think your computer can handle it.
from the display mode dropdown menu, select windowed borderless. i use this setting because i'm able to alt+tab out of ts4 to my desktop or other windows i may have open.
click apply and you're good to go. next time you launch your game it will open with these settings. should you change the resolution settings in your game for whatever reason, you'll need close the game and start from step #2 again for the game to display properly with these settings.
134 notes
·
View notes
Text
Blender Guide: Editing TF2 Merc Textures with Transitions
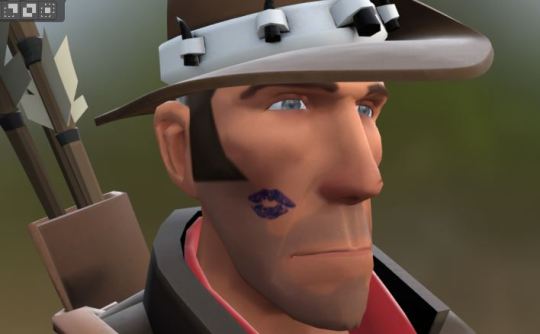


This is a guide on adding edits to the mercs' textures in such a way that the edit can fade in (for animation shots where a merc is given an injury, or blushes, gets marked by paint, etc). We'll be working on the face as an example, but this methodology can be applied to the clothes and other textures.
Making an edited texture
First, we need to make the textures.
Since we're editing the head textures, we'll want to save a copy of the head texture. Select the merc's face mesh. In the Material Properties tab, select the material slot for the merc's face texture you want to edit (example: sniper_head_red). Switch to the Shading tab at the top to see the Shader Editor. In the Shader Editor, select the Image Texture node for the merc's head (in this case, sniper_head.png). It should now appear in the Image Editor panel (if it isn't, you can select the png from the dropdown button at the top of the Image Editor). In this panel, select the three line menu button > Image > Save a Copy… In the new window, save the image.
Open an image editing program (example: GIMP is a free art program). Open the saved image. In a new layer, create the texture you want to place over the merc's face.
For bruises, I recommend using the TF2 cosmetic Beaten and Bruised (style 2) as reference: https://wiki.teamfortress.com/wiki/Beaten_and_Bruised You can grab its texture by spawning it in Blender using the TF2 Trifecta Blender addon and saving the texture as a png the same way you did for the merc texture.
Once you have it the way you want it, hide the merc's head texture and save the resulting image as a png. If you made your texture so that it's meant to be blended over the merc's head (examples: multiply or soft light), don't worry, there's a way to apply the blend mode in Blender.
Edit the Shader Material
In Blender, select the merc's face mesh. In the Shader Editor, select Add > Texture > Image Texture. In the newly added node, press the Open button and select the texture you made. Then add another node with Add > Color > Mix Color, adding a Mix Color node. Add in another Mix Color node so you have two.
Plug the Image node's Color to the Mix node's B. Plug the Image node's Alpha to the Mix node's Factor. Plug the Mix node's Result to the second Mix node's B. Set the node's Factor to 1.0.
Find the Image node for sniper_head.png already in the shader and plug in its Color output to both Mix nodes' A. Then plug the rightmost Mix node's Result to the Facemix group node's Color1 plug, replacing sniper_head.png's connection to it. You should now see the merc with the texture changes.

Depending on the texture you made, you may need to include some more steps here:
If your texture is meant to be given a blend mode (meaning, you used a blend mode in the art editing program earlier), you can left-most Mix node (the Mix node directly connected to the Image node) and change the Mix property to the blend mode you want (Multiply, Soft Light, etc.) in the drop-down menu.


If the texture still looks too dark/light, you can add a Gamma node (Add > Color > Gamma) and another Mix node between the first and second Mix nodes you already have. Then adjust the Gamma's value until the texture looks right.

Animating the texture
The rightmost Mix node's Factor can be keyframed on and off (with 0.0 being 0% off). To do so, hover your cursor over the number value and press your Add Keyframe hotkey (or right-clicking the value and selecting Insert Keyframe). The value should now be yellow. Yellow means the value had a keyframe on the frame you are currently on. Green means the value has a keyframe somewhere else on the timeline. Adding two keyframes of different values creates the transition.

Depending on your needs, you can make the transition instant (a merc getting kissed with a lipstick mark), or gradual over multiple frames (a merc blushing from embarrassment).
I am also including the pngs of the four example textures I used. Feel free to use them.


10 notes
·
View notes
Text
stim gifs in photopea
[PT: Stim gifs in photopea /End PT]
Hello! This is my (lengthy) tutorial for how I make GIFs for stimblr using Photopea. It's not going to be as extensive as how I make for shows, celebrities, etc, because I have different processes for both, however I'm still aiming to cover everything I think necessary!
It'll be split into multiple sections with headers, so feel free to skip whatever you want if you don't find it necessary :•] Reblogs appreciated if you found it useful, but no pressure obviously!
Sections:
Getting your video
Importing into Photopea
Making the GIF
Sharpening the GIF
Coloring
Exporting & Optimization (in EZGIF)
End results, and misc tips and comments
1. Getting your video
[PT: 1. Getting your video /End PT]
Short section! These are the ways I download and source videos for use
Youtube - yt-dlp (installation instructions)
Instagram
Tiktok (Allows without watermark)
Pexels
For yt-dlp, check out this basic list of commands I made solely for downloading material to GIF! If you have further questions, either send me an ask or refer to the github page.
2. Importing into Photopea
[PT: 2. Importing into Photopea /End PT]
There are two ways to import into Photopea, the first is importing footage directly, and the second is screencapping (which I won't cover in detail, but this tutorial is for installing the program I use on mac & how to use it, and this is for installing on windows)
Option 1: Importing footage directly (see end for comments)
On the home page of Photopea, you'll want to click "Open from computer", and select your clip, upon selecting you'll be presented with a popup like below

All that really matters here is where you see "30 FPS", that's the videos native frame rate. I always put whatever that number is as my frame rate because I find it to be the best, but you can use different presets (Like ezgif, which gives you 12, 20, etc). The less frames you have, the chopper it will be. If you plan to slow it down later, I'd also recommend having more frames so it looks smoother after slowing.
Now you just have to wait for it to load all the frames, then you're set!
Option 2: Importing screencaps
This is my personal way of doing things, so this is assuming you've installed a screencapping program and already have your frames ready.
For this, when you click "open from computer", select the first frame and open it by itself. Once that's loaded, look in the top left at the "File" tab, select "Open & Place", then ctrl + shift to select the rest of your frames. Once they've all loaded in, you can either rasterize them now, or wait until after cropping and resizing (goes faster then).
What's important though, is use the shift key to select all your layers, in the top left open the "Layer" tab, hover over "Animation" at the bottom to expand it, and select "Make frames". With your frames still selected, hit the folder button in the bottom left.

Without this, Photopea won't recognize this as an animation, therefore you'll be unable to export it as a GIF.
3. Making the GIF
[PT: 3. Making the GIF /End PT]
3A. Cropping
To begin with cropping, select the crop tool, which is the fifth one down on the left bar (if you hover over, it will say the name), or the "C" key on the keyboard.
Along the top now, you should have some new options. The dropdown menu that says "Free" is going to be how you select an aspect ratio or fixed size, and I always set to 1:1 since most people on stimblr use square GIFs, but you can do whatever works for you! Make sure to leave "Delete uncropped pixels" unchecked, because that lets you move stuff around later without having to recrop.
Crop your animation down as you see fit, then either hit the enter key, or the check button along the top bar. If you're unhappy with the placement, you can undo it OR, select all your layers, then use the move tool (First icon on the left, or the "V" key) and drag it around as you see fit.
3B. Resizing
With all your layers selected still, open the "Image" tab in the top left, towards the bottom select "Image Size", then select what you want to resize to.
Tumblr's exact GIF sizing
1 per row: 540px
2 per row: 268px
3 per row: 177px
HOWEVER. For stim GIFs, I find the quality difference so negligible, you can resize to what you want. It's also better for it to be bigger and scale down, then smaller and scale up. For this reason, I typically do 268px no matter what, or 300px.
As far as resampling goes, leave it turned on, and I personally leave it on bilinear, but the different options vary slightly, so experiment and see what works for you!
If you're happy at this step, go ahead and skip down to exporting! But when doing this way, I do recommend sharpening for better quality at smaller size.
4. Sharpening the GIF
[PT: 4. Sharpening the GIF /End PT]
The fun thing about this section is you get to experiment and find what works for you! I'll give you my personal method, but you can play around, add and remove bits, etc until you get something you're happy with!
4A. High pass
High pass is my personal favorite way to sharpen GIFs, and for stim GIFs I'll often use only this.
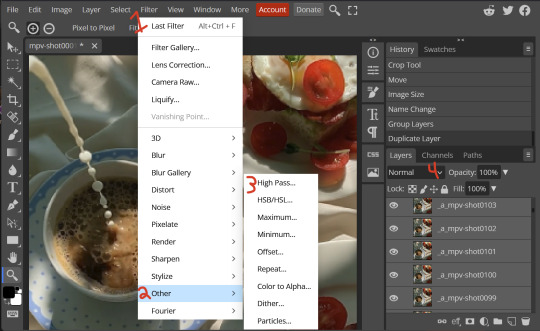
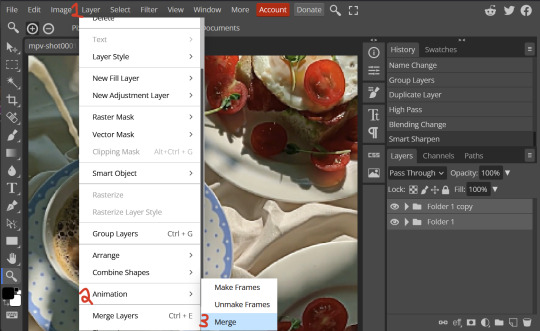
(Steps 1-3 in image) To do, start by right clicking the *Folder* all your frames are in, and select "Duplicate Layer". Select all the frames in Only the folder on top, then go to the "Filter" tab along the top left, hover over "Other", and select "High Pass". The grey look is entirely normal! I normally set my high pass at 2-4, but play around with this step and find something you like!
Select the *Folder* all your high pass frames are in, and change the blending mode (fourth step in image) to "Soft Light", it should be on "Pass Through" initially. With that done, you've used high pass on your GIFs! If you're content here, skip the next section about smart sharpening, and see about merging animation folders under it.
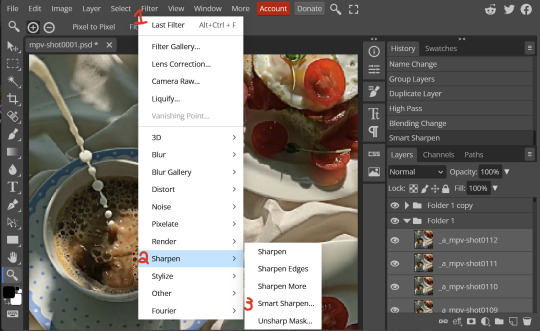
4B. Smart Sharpen
Note: I recommend testing your sharpening settings on one layer BEFORE applying them to all layers, as it will be easier on your computer.
I utilize this in addition to high pass usually, but you can do it all by itself as well! To begin, select all the frames in your folder (if you used high pass, select the frames in the *Bottom* folder). Open the "Filter" tab on the top left, hover over "Sharpen", and select "Smart Sharpen". Now find what you like!
For stim GIFs, if I used high pass, I'll go for 75-110% amount, and a .1 radius. I personally don't like the look of an over sharpened GIF, so I only use smart sharpen if I want to enhance some small details high pass didn't touch enough, which is why I use so little. If you don't like high pass, you might use more here!
4C. Combining animation folders
If you used high pass, you'll notice you have two animation folders. To fix this, select both folders using ctrl + shift, open the "Layer" tab, hover over "Animation", and select "Merge". It will give you a popup to confirm, and you can go ahead and accept!
If you don't merge these, Photopea will think they're two GIFs in one document, rather than only one, which is why this step is so important.
As a note, once you merge these folders, you can no longer shift the frames around to change where they are in the crop like you could earlier.
5. Coloring (Image Heavy)
[PT: 5. Coloring (Image Heavy) /End PT]
This section is going to be less of a tutorial and more a basic rundown of the adjustment layers and what they do. Coloring will change from GIF to GIF, and you can do light or intense coloring, so this is just a guide to begin with, but really just play around and find what you like!
To access the adjustment layer menu, in the bottom right where "New Folder" was, the one directly next to it that looks like a circle made of two half-circles, will bring up your adjustment layers.
As a note, I always group my adjustment layers in a folder above my animation, for ease of hiding to compare with and without.
5A. Levels
Levels is one I almost *Always* use on a GIF because it makes it look cleaner to me. In the first box, sliding the black square on the left *increases* the blacks, sliding the white square on the right *increases* the whites, and the one in the center changes the general brightness up or down.
Sliding the black box on the bottom bar *decreases* the blacks, sliding the white box *decreases* the whites.
If you change the channel from RGB to another option, you can change the balance of reds/cyans, greens/magentas, or blue/yellows, I personally don't touch this for stim GIFs. In the RGB channel, I set the top black box at ~10, and the top white box at ~245 usually.

5B. Curves
This is another way of adjusting brightness, blacks and whites, or color balance. By adjusting the dot in the bottom corner you adjust blacks, the top corner adjusts whites, and if you make a dot in the center, it adjusts general brightness! You can also make multiple dots to separately adjust some values. By changing the channels, you adjust color channels rather than white/black.

5C. Exposure
This is another way of adjusting the lights and darks of the GIF. Sliding the exposure up and down will add/take away light from the lighter parts of your images. Adjusting the gamma correction up and down will add/take away shadow from the darker parts of your image. Offset increases/decreases the brightness of the whole thing but I almost never use it.

5D. Vibrance
Vibrance is what I like to think of as a "softer" way to increase intensity of colors, instead of using a Hue/Saturation layer. It affects warmer colours more intensely than cooler colours, whether you use the vibrance or saturation slider. The saturation slider here is more intense than the vibrance one, but less intense than saturation in a Hue/Saturation layer.

5E. Hue/Saturation
This one is simple! Sliding the hue slider changes the colour, sliding the saturation slider increases/decreases saturation, and sliding the lightness is basically like directly adding black/white to a color. I use lightness only sparingly.
What's cool here, is you can adjust the range to target a specific batch of colours! If you find your reds are too bright compared to everything else, you can target the saturation of them specifically.

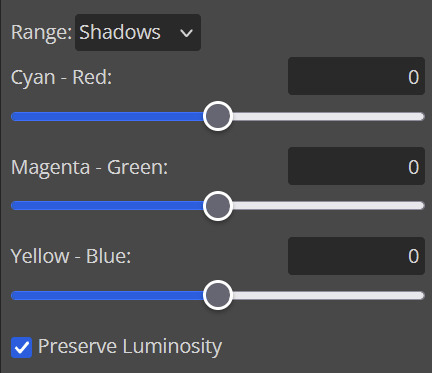
5F. Color balance
This is a simple way to adjust the base colors of an image, by changing it to be more cyan or red, magenta or green, or yellow and blue. This can be useful for making a GIF appear warmer or cooler!
I almost only touch the shadows & midtones, and highlights sparingly. "Preserve Luminosity" preserves the highlights and shadows of the image, so by unchecking it, you can achieve some more intense results.
5G. Black & White
The black and white layer is useful because you can change exactly how light or dark a color appears after making it black and white. For that reason, I prefer it over a gradient map if I need to make something black and white.
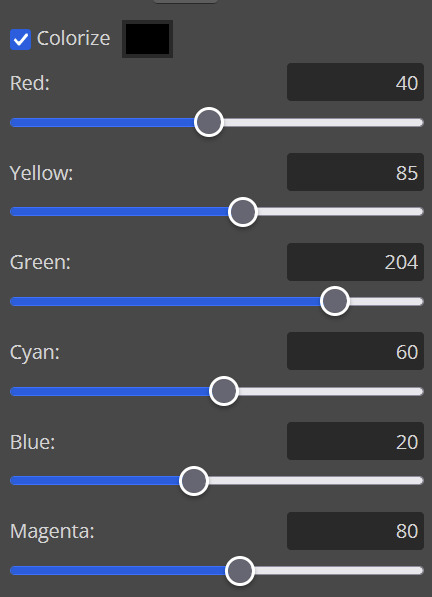
5H. Photo filter
Photo filter is a simple way to add a color filter over the entire image, and adjust how strong or weak it is. "Preserve luminosity" once again just keeps the darks and whites of the original GIF.

5I. Channel mixer
I couldn’t even begin to cover channel mixer here, but this is for very intense color edits (I typically use it when I'm trying to make a GIF fit a board). However, here's another tutorial solely about channel mixer if you're interested in taking a crack at it!
5J. Selective color
Finally, selective color allows you to adjust the amounts of color or lightness/darkness of a specific batch of color.
By changing the color channel, you can affect different batches of color. The cyan slider controls cyan/red, the magenta slider controls magenta/green, the yellow slider controls yellow/blue, and the black slider controls black/white.
Checking the "absolute" is essentially like "Preserve Luminosity" in the other layers. With absolute, it's like shifting the color one way or the other, and without absolute, it's like adding to the pre-existing color.

6. Exporting and Optimization
[PT: Exporting and Optimization /End PT]
6A. Exporting
With all that done, we're ready to finish it up! To finish your GIF, open the "File" tab in the top left, go to "Export As", and select GIF!
Here you can rename, adjust the size (WILL ruin the sharpening you did), the quality (I leave at 100%), and the speed.
Another important thing to note is the "Dither". If you leave dither off, you can potentially encounter color banding, which is where (typically gradients) with look like strips of color, rather than smooth. This is because GIFs only have 256 colors they can render, so if something has too many, it bands.
By checking dither, it can get rid of color banding, at the cost of dots on the image (around where the worst color banding is usually). Sometimes the dots aren't noticeable and this is the better option, however it will Also increase your file size. It's up to you if you want to use it!

6B. Optimization
This is technically an optional step, as tumblr's GIF size limit is 10mb, so as long as you're under that, you can post, however, smaller GIFs load faster and I personally find are better for use in stimboards where you're loading a lot of GIFs! So to help this, let's head on over to the optimize section of ezgif. My personal goal is UNDER 4.5MB, ideally under 4MB.
The two main things I recommend are Lossy GIF, or removing frames, and I always start with Lossy GIF. I do anywhere from 5-15, and usually this will bring down GIFs a lot if you made them in Photopea! My example GIF was 6.7 MB to begin with, and afterwards it was 4.2MB.
However if you find that to be not enough, you can remove frames. When you remove frames, it speeds the GIF up, so I also recommend slowing it down (this is why I set my frames high in the beginning as well). I typically do "Remove every 4th frame" and slow it down to 75%-85%.
7. End results, and misc tips and comments
[PT: 7. End results, and misc tips and comments /End PT]
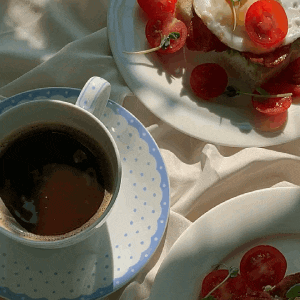


(source) The first GIF is without sharpening/colouring, the second is with sharpening but no colouring, and the third is with sharpening and colouring. I didn't color it much besides making it slightly warmer, but I hardly ever do much anyways!
As for misc comments:
In firefox, when you import footage directly, sometimes it glitches and tries to load 4000 blank frames, which is extremely resource intensive on a computer. The solution is import the footage in chrome, save as PSD, then open the PSD in firefox. (Or work in chrome but why do that /half silly). The other solution is screencap which I do since I do this often, but both work fine.
In firefox, sometimes you're unable to slow the GIF down upon export and it will export faster than it actually is. Slowing the video down to 50% restores it to native speed I've found, and you can do this in ezgif before other optimization.
When colouring, my number one tip is slide something all the way up first, then adjust down! By seeing it at max, you have a better idea of what's getting adjusted.
If you have any questions, drop me an ask :•]
And that concludes our tutorial! My apologies for the length, but I wanted to cover every possible thing here. It definitely seems like a lot, much more than working in ezgif, but when you get used to what you're doing, it goes extremely fast (even if you spend extra time screencapping). I personally find it worth it for the ability to sharpen GIFs alone, but as well as more detailed coloring opportunities.
Thank you for reading, I hope this has been useful!
#i did it :•]#not stim#stimblr#gif tutorial#photopea#big thanks to talos for proofreading this :3 🖤💚🖤💚🖤💚🖤
78 notes
·
View notes
Text
"DON'T DO IT!!!" my mind screams at me, as my cursor hovers over the "new blog" option on my Tumblr account dropdown menu. the urge to create a Sonic roleplay blog overwhelms me. I mustnt. I have too many blogs already. but... 😈
5 notes
·
View notes
Text

Drop Down Menu On Hover
#dropdown menu on hover#html css dropdown menu#html css#divinectorweb#css#html#frontenddevelopment#css3#html5#css dropdown menu#drop down menu css#dropdown list#pure css dropdown menu#webdesign#learn to code#css snippets
5 notes
·
View notes
Note
hi so i was playing around with my codes and the link color does not work ? the hover , active , and visited does but the actual link itself will not change the color or text decoration. also wayfarer works pretty well on mobile nested nicely on screen. what code did you use because the code i am using makes it all squished thanks !
The CSS for the hover is separate from the CSS for the link.
Here's the CSS from the default Sugarcube UI. The element a (anchor, which creates links) controls your link styling. a:hover controls the styling for when the cursor hovers over it. a[disabled] controls a disabled/visited link. You can see how they have different colours and text decorations.
a { cursor: pointer; color: #68d; text-decoration: none; transition-duration: 200ms; } a:hover { color: #8af; text-decoration: underline; }
a[disabled], span.link-disabled { color: #aaa; cursor: not-allowed !important; text-decoration: none; }
Making your game responsive isn't a one-size fits all scenario. It depends on the dimensions of your UI and a number of other unique factors. You can use media queries to change what your game looks like on different viewport sizes.
If you open your game in a browser, right click and hit Inspect, you can test what it looks like with different resolutions. Switch it to mobile mode and there will be a dropdown menu with the dimensions for different common phones and tablets.

You can switch through them to see how your media queries are working with each size; usually you will have to fiddle with things to get it to fit right.
10 notes
·
View notes
Text
The first line of Claudia Goldin’s Nobel Lecture notes, “Women are now at the center of the world’s economies.” Indeed, labor force participation rates for prime-age women in the U.S. have grown significantly over time, and, earlier this year, prime-age women exceeded their highest labor force participation rate ever: Since January 2024, about 78 percent of women between the ages of 25 and 54 have participated in the labor force (figure 1). These prime-age women make up 30 percent of the civilian labor force, relative to 34 percent for prime-age men. And, over the past five years, prime-age women have driven much of the increase in the overall labor force participation rate.

While prime-age women all together reached their highest labor force participation in recent months, the participation rates vary greatly for prime-age women in different demographic groups. Figure 2 shows the labor force participation rate for prime-age women over the last decade by various breakdowns: race and ethnicity (A), educational attainment (B), marital status (C), nativity (D), and disability status (E). The gray line in each panel shows the overall labor force participation rate for prime-age women over this period. Use the dropdown menu above the figure to navigate between the panels.


All-time peak labor force participation rates have occurred in the past year for prime-age women overall as well as for most of the demographic groups shown in the data interactive. As of May 2024, the labor force participation rate for each demographic group of prime-age women shown in figures 2 and 3 is higher than it was in May 2019. Even for groups that have not reached their peak in this recent period, labor force participation rates have gotten very close in recent months or continue to be on the upswing. Labor force participation growth has thus been quite widespread among groups of prime-age women. We note that increases in propensity to participate have been quite large among foreign-born prime-age women, prime-age mothers of young children (especially those with at least a bachelor’s degree), and prime-age women with disabilities.
There is emerging evidence, however, that the remarkable post-pandemic increase in labor force participation among prime-age mothers with young children has stalled out in the past several months. Figure 3 shows the labor force participation rate over the last 10 years for prime-age women by the age of their youngest child in the household. Among mothers with children under five, the post-2020 increase in participation peaked in September 2023 and has fallen somewhat since then.
This plateau in participation among prime-age mothers with young children in recent months is most evident when we decompose the net change in the total labor force participation rate over various periods. In figure 4, we show the contribution of changing labor force participation rates within different demographic groups to the total change in the labor force participation rate in recent years, holding the size of each group constant. Consistent with the approach in Bauer et al. 2023, we pool together two months of data for each period (April and May) because these months marked the nadir of participation in 2020. We break the net change from April–May 2019 to April–May 2024 into three periods: the labor market collapse (April–May 2019 to April–May 2020), the first three years of recovery (April–May 2020 to April–May 2023), and the most recent year (April–May 2023 to April–May 2024). Figure 4’s legend goes in order of the top series, from left to right. Hover or click to highlight a group.

Over the five years between April–May 2019 and April–May 2024, there was a reduction in the overall labor force participation rate of 0.48 percentage points. The increase in the propensity to participate (0.08 percentage points) did not offset the decrease related to changes in the composition of the population (0.56 percentage points). Prime-age women, however, have contributed the most to the growth in aggregate participation: 0.57 percentage points. As of last year, within this group, those with young children (youngest child under 5) had experienced the largest growth in participation relative to April–May 2019, but this is no longer the case. In the past year, participation growth among prime-age women is again contributing by far the most to net gains in the aggregate labor force participation rate (one-tenth of a percentage point), but mothers with young children are less likely to be participating now relative to April–May 2023.
While some have argued that participation growth may be peaking, so far this seems to be more true among prime-age men than women. Given the contours of women’s work-related challenges during the pandemic—a service-sector-led recession, caregiving challenges related to school closures and childcare funding, and concerns about scarring—it is notable that prime-age women have powered, and continue to power, the recent labor force recovery.
7 notes
·
View notes
Text
finally my paup* search is complete :) it's been a while since i used this program, i remember there is a bug where if i hover over a certain dropdown menu the whole program will crash so let's be careful! [immediately hovers over the exact thing that causes shutdown]
4 notes
·
View notes
Note
Hi Alby, I loved the update & can’t wait to see where your story goes! 💖 I saw you mentioned wanting feedback, so would it be possible to streamline the character creator? I found the number of options overwhelming, and I didn’t know what a lot of them were (like cardinal, goldenrod, cordovan, bole) or the differences between some of the options. I don’t know if this would be too complicated to code, but is there a way to just give basic options at first (i.e. eyes: brown, black, green, blue, grey) and then when you’ve picked it will open a menu to specify further (i.e. green eyes: jade, emerald, sea green)? Basically a way so you’re not presented with every colour variation off the bat?
Also for the first page (gender options), could there be a quick way to choose an overall default for everything (i.e. female + she/her + set all titles to feminine), alongside the more granular current approach where each one is chosen separately. I’m guessing most players would probably choose one of the defaults anyway and would want to get into your awesome story as soon as possible.
Thank you for the suggestions! I have an idea for how to implement your suggestion for the eye colors so the first thing you'll is a list that says "shades of red", "shades of orange", "shades of yellow", "shades of green", "shades of blue", "shades of violet", "shades of brown", "shades of black", so I can definitely do that! I'll see if I can also implement a hover effect that can show the html color codes for each color so it would be easier to envision the base color? for the complexion, i'll probably do the same and group them as "dark", "medium", and "light". For the gender options, I'll have to get back to you on that cause I'll need to figure it out first 😅
UPDATE: I've implemented dropdown things for the eye colors and complexions and added some images as well for the color palettes of each group of shades to help with visualizing the different colors! As for the gender options, I've decided not to implement an option for defaults since the time it would save wouldn't really be that significant.
17 notes
·
View notes