#html select option
Explore tagged Tumblr posts
Note
Follow-up: I have actually decided to do something different so it will work on mobile too sorry lol
lmao glad you figured something out? i assume you’re messing around with css so good luck!
4 notes
·
View notes
Text
Listen to your elders
So last week I posted abut the importance of downloading your fic. And then three days later AO3 went down for 24 hours. No one was more weirded out by this than I was. But while y’all were acting like the library at Alexandria was on fire I was reading my download fic and editing chapter eight of Buck, Rogers, and the 21st Century. And also thinking about what I could do to be helpful when the crisis was actually over.
So first off, I’m going to repeat that if you’re going to bookmark a fic, you really need to also download the fic and back it up in a safe place. I just do it automatically now and it’s a good habit to get into.
But let’s talk about some other scenarios. Last October I lost power for over a week after hurricane Ian. Apart from not having internet or A/C I did find plenty to do, I collect books so I had plenty to read, but maybe, unlike me, your favorite comfort reads aren’t sitting on a bookshelf. So let’s do something about that, shall we?
In olden times many long years ago around 1995 we printed off a lot of fic. It was mostly SOP to print a fic you planned to reread and stick it in a three ring binder. And that’s totally valid today too, but you can also make a very nice paperback with a minimum amount of skill and materials.
Let’s start with the download; Go to Ao3 and select your fic, we’ll be working with one of mine. This method works best with one shots, long fic tends to need a more complicated approach. Get yourself an HTML download

Open up the HTML download and select all then copy paste into any word processor. Set the page to landscape and two columns, then change the font to something you find easy to read, this is your book, no judgement. This is all you have to do for layout but I like to play a little bit. I move all the meta, summary, notes to the end and pick out a fun font for the title:
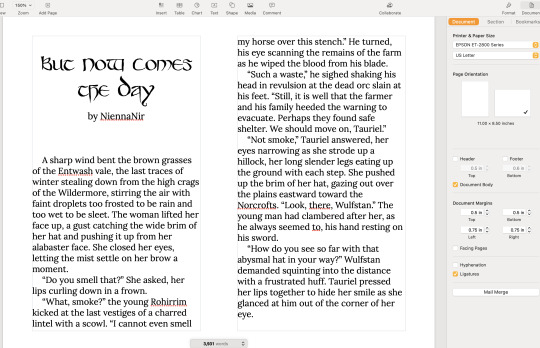
No time like the present to do a quick proofread. Congratulations, you’ve just created your first typeset. On to the fun part.
Now you’re going to need some materials: 8.5x11in paper ruler one sheet of 12x12 medium card stock (60-80lb) scissors pencil pen or fine tip marker sheet of wax paper white glue two binder clips 2 heavy books or 1 brick butter knife
You’ll also need a printer, if you’re in the US there is almost a 100% chance your local library has a printer you can use if you don’t have your own. None of these materials are expensive and you can literally use cheap copy paper and Elmers glue.
Print your text block, one page per side. Fold the first page in half so that the blank side is inside and the printed side out:
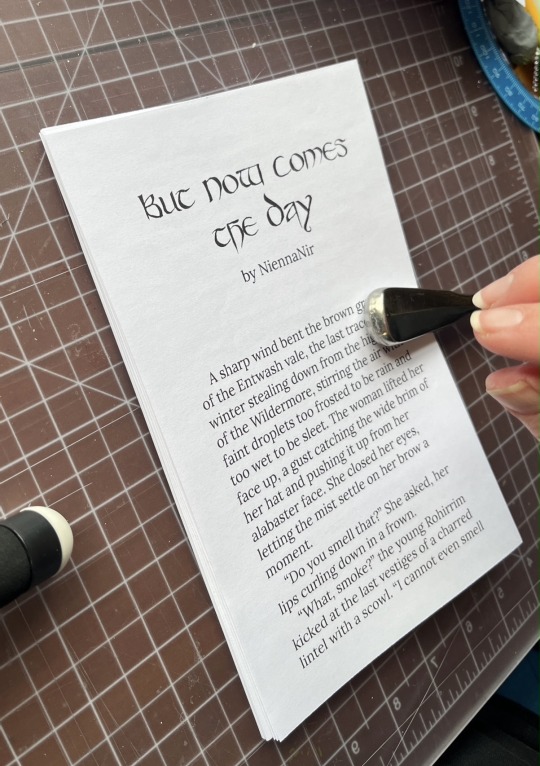
use the butter knife to crease the edge. Repeat on all the sheets. When you’ve finished, stack them up with the raw edge on the left and the folded edge on the right. I used standard copy paper, because you’re only printing on one side there’s no bleed to worry about. Take the text block and line everything up. Use the binder clips to hold the raw edge in place.
Wrap the text block in the wax paper so that the raw edge and binder clips are facing out. I’m going to use my home built book press but you don’t need one, a brick or a couple of books or anything else heavy will work fine.
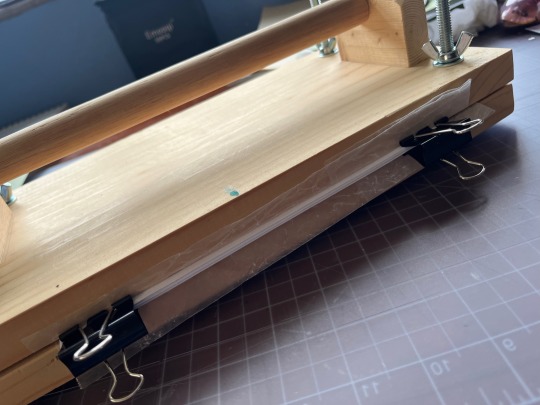
Once the text block is anchored down, take off he binder clips and get out the glue.
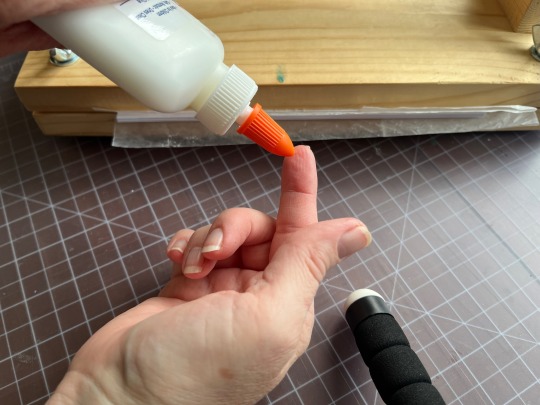
You can use a brush but you don’t need one, smear some glue on that raw edge.
Go make a margarita, watch The Mandalorian, call your mother. Don’t come back for at least an hour
In an hour smear some more glue on there and shift your brick forward so that the whole book is covered. This keeps the paper from warping. While glue part 2 is drying we’ll do the cover. Get out your 12x12 cardstock
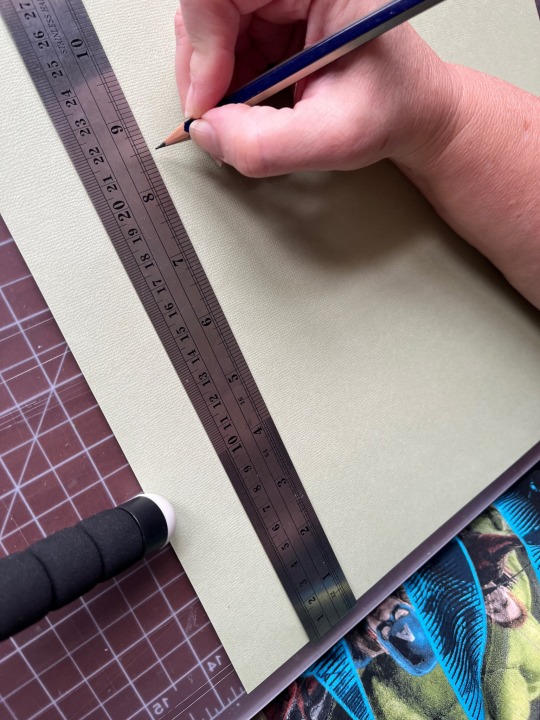
Mark the cardstock off at 8.5 inches and cut it. Measure in 5.5 inches from the left and put in a score line with the butter knife (the back edge not the sharp edge)
Carefully fold the score line, this is your front cover. You have some options for the cover title, you can use a cutting machine like a cricut if you have one, you can print out a title on the computer and use carbon paper to transfer the text to the cardstock. I was in a mood so I just freehanded that beoch. Pencil first then in pen.
Take your text block out from under your brick. Line it up against the score mark and mark the second score on the other side of the spine
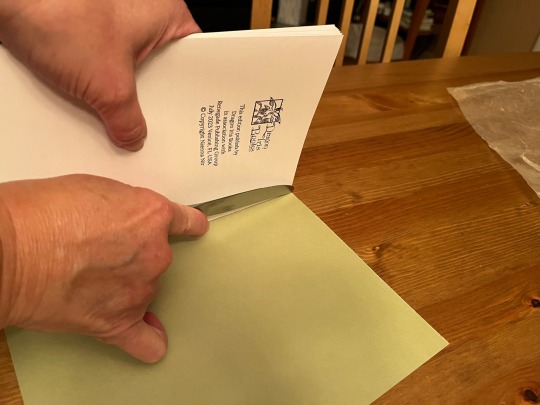
Fold the score and glue the textblock into the cover at the spine. Once the glue dries up mark the back cover with the pencil and then trim the back cover to fit with your scissors.
Voila:
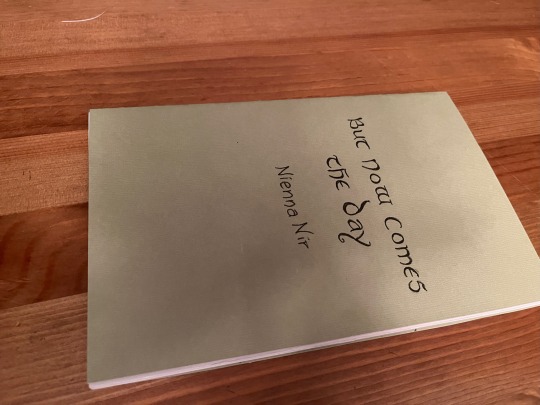
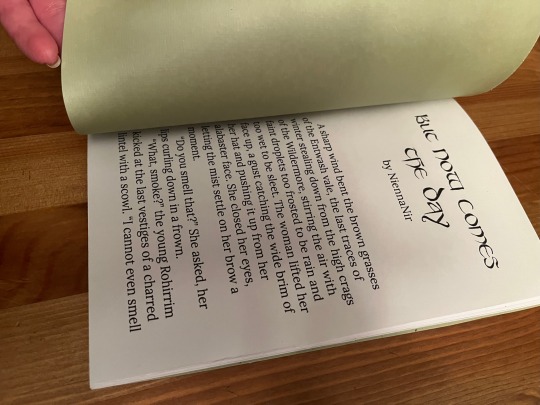
I’m going to put this baby on the shelf next to the Silmarillion.
The whole process, not counting drying time, took less than an hour.
If you want to make a book of a longer fic, I recommend Renegade Publishing, they have a ton of resources for fan-binders.
22K notes
·
View notes
Text
A Brief Guide on Uploading ChoiceScript Demos to Itch.io
Since Dashingdon is shutting down, and there will be a lot of folks wanting to host their ChoiceScript demos elsewhere, I thought it'd be a good idea to provide a brief guide on how to do so for itch.io.
This is for Windows in the folder actions, but it shouldn't be too difficult for folks to translate for Mac. This also assumes you haven't changed any of the files within your game folder other than those found under 'scenes'.
Within your game folder, locate the 'web' subfolder, right click it and select 'Send to' then 'Compressed (zipped) folder. Name your newly compressed file something sensible, and I recommend moving it to a new folder outside of your game files, just to keep everything neat and tidy.

2. Assuming you already have an itch.io account, navigate to your dashboard, and click the 'Create New Project' button.

3. Name your project as you like, and under 'Kind of project', select the 'HTML' option.

4. Set the 'Pricing' to 'No Payments', you cannot use ChoiceScript for profit unless it is with the Choice of Games or Hosted Games publishing labels. No one wants to get in trouble unnecessarily here.
5. In the Uploads section, upload your newly zipped file we made in step one. After it's finished uploading, you'll be given one drop down and two tick boxes. You need to tick the 'This file will be played in the browser' option.

6. I've found so far that 'Viewport dimensions' work quite well for desktop at 1080 x 640. Either use these numbers or experiment and find what works best for you.
7. You must tick the 'Enable scrollbars' option for your game to display properly, otherwise options, text and buttons can be clipped off the bottom of the viewport.

8. Continue filling out the rest of the form, or skip it for now and scroll all the way to the bottom to the 'Visibility & access' section. Here make sure you have 'Draft' selected. This prevents others from finding your game until you're ready, and I always recommend play testing things before you make your work public.
9. Finally, hit the 'Save' button, then go and have a look at your creation by hitting the 'View page' link. And there you go! When you're ready for public release, just change the option in section 8 to 'Public'.
---
A few things to bear in mind about hosting on itch.io:
There isn't currently any way for your readers to save their game. I'm sure someone could write in a plugin similar to Dashingdon's at some point, but as for right now, this isn't available. See addition/edit below.
Make sure you properly tag your game with the 'choicescript' and 'interactive-fiction' tags. There are an awful lot of games on itch.io and it's easy to get lost in the crowd. Make sure folks can find you by having the right tags.
I hope this brief guide was useful to folks.
Best of luck to you with your writing!
---
Addition/Edit:
Thanks to @hpowellsmith for bringing this to my attention. You can add save functionality to your game by using this addon:
The ChoiceScript Save Plugin
Just tried it out on my own game and it works perfectly.
Rather than run through the addon author's own tutorial here, I'll just forward you to the Readme on their Github page.
One small note I would add is when it asks you to make the two small additions to your index file, make sure you right click the file and open it with your coding program, don't double-click it as this will just open it in an internet browser, and it won't give you the access to what you need to change.
715 notes
·
View notes
Text
Tumblr Backup Options: None of them do everything
Cheeky but true. I'll go through what's good and bad about each option though so you can decide which balances out for you.
Covered: native export, WordPress (kinda), TumblThree, tumblr-utils (kinda)
Native Export
If you go to "https://www.tumblr.com/settings/blog/yourblogname", at the bottom of the page is an export option

Once you hit the button to start the request, it will start processing. Feel free to log off, this is going to to take a few hours. You don't need to keep it open. ~22k posts took roughly a day for me. If you have a small number of posts and get stuck, you're probably broken.
When it's done processing, you can hit that download backup button and then wait some more as you wait for the zip file to download. Mine failed the first time after like twenty minutes, and then I had to start over. I think it took 1-2 hour(s) and I'm almost certain that was on Tumblr and not my internet. And that was the zip file! So make sure your computer can be on for a while before getting this started.
So what do you get?
A media folder, conversations folder, and posts folder
Media folder: Every single photo, gif, and video that has ever been on your blog or in your DMs. There is no context data attached (except for dm images which do say which conversation they're from at least), but they seem to be in chronological order because they seem to be titled by the post's ID (the string of numbers in the address bar after "/post/"). They look like "100868498227", "100868498228_0", "100868498228_1"
When you see something end with "_0" and up that means the photos are in the same post, so _0 represents the first image in the post, _1 represents the second, etc (at least, I think).
Conversations folder: HTML export files of every DM history you have on your blog. These are actually pretty well formatted, see example here.
Posts folder: html subfolder and posts_index.html file
posts_index.html: File listing every single post on your blog by post ID on its own line with no other context. Example of a line: "Post: 780053389730037760". The ID number will link to the post in the html folder
html subfolder: contains a submissions subfolder and stripped html file versions of every post on your blog. See below first what the post looks like on Tumblr, and second what the post looks like in the html folder


The way you seem to be intended to use this is to open the file index, select a post ID, and be jumped to where that post is saved as an html file, but I don't know why you would bother when the index doesn't provide any information about the posts inside it. The posts all have extremely minimal formatting. See a reblog chain below.

Notice I said ALL posts on your blog. Photo posts without a caption will just have a broken image icon and then the date and tags. Theoretically, it might be that if you unzip the entire export folder that allows it to automatically link to the image saved in your media folder. I have no fucking idea, unzipping the folder was estimated to take two hours so I didn't do it. Let me know if you do though so I can update this post!
The submissions folder is such a rabbithole I made a post just on it but long story short it's asks you haven't replied to
What do I see as the main reasons to opt for this option? 1) you don't want to download any programs or files from the internet just to backup your blog, 2) your blog is relatively small, so digging through the ID files isn't a big deal, 3) you mostly just want to download either the images (which will be browsable via thumbnail previews in the media folder if you unzip it) or conversation history, which are fairly well formatted, 4) you don't need to update your export often/ever, because you'd have to request it from the start and download the entire thing all over again, 5) you want to be able to read your text posts clearly and don't care about preserving the full formatting, and/or 6) you don't plan to reupload this information elsewhere (say on... a WordPress blog)
WordPress Automatic Ex/Import
Move your post's from Matt's right hand to his left! WordPress (another product of Automattic) has a native Tumblr importer found under your WP Admin dashboard for your site under Tools > Import > Tumblr.
How does this work? No idea! I hit import 2 days ago and it has done nothing. Maybe I'm stuck, maybe it's permanently broken. It says to contact support if it's been over 24 hours but they don't make that easy. I disconnected from Tumblr (you can only port over a blog you have the login of) and reconnected and it still said it was importing. I don't think it's ever going to do anything.
Presumably it's supposed to 1:1 import every post on your blog onto the WordPress site, which will result in a whole lot of stolen art because there's no way to select just your original posts. Also, you'd need enough storage on your webhost to house all the posts (this honestly might be my problem, but I was planning to delete all the non-original posts once it imported.... anything and backfill what it didn't get to). The one thing I'll say about this option is that it's the only one I've seen so far that exports drafts and queues as well.
I mean, if it exported anything. If this ever does anything I'll update this post, but either my blog is too large or this tool isn't totally functional anymore.
TumblThree
(previously TumblTwo, etc)
TumblThree is an all-in-one program requiring no extra downloads beyond the main Zip, and was last updated fairly recently at the time of this post. In order to run it, unzip it into one folder and run the main .exe. It has a full UI interface with lots of very descriptive helper text to help you select the right options for you without looking at the wiki. I think it's user-friendly for non-tech people.
There are a lot of options in TumblThree to change what output it gives you, but I'm going to start with the largely universal parts first:
Everything from one blog will be exported to one folder, no subfolders or sorting. As a result, the output is very messy and difficult to wade through, but post metadata and the photos are named in the same way so you can scroll, see an image preview, and then click on the metadata txt for that post and read the caption.
Depending on your settings, you can export all photos, videos, text posts, etc as their own files or exclude them from the export entirely. For the different types of media posts, you can independently select if you what to download just the media, just the metadata for it (everything that surrounds the post when you see it on Tumblr, such as the caption, OP, tags, etc), or both.
Master txt file: For every type of media metadata you export, a correspondingly named txt file will be created (images.txt, answers.txt, etc) that contains the text/metadata of every post of that type in one txt file. This is also the default behavior for exporting text posts.
Note: for text posts (which includes asks/answers), it only creates a master txt file if you do not select "Save texts as individual files", in which case it will only save each text as an individual txt file and not make a master file.
The formatting on these files is so brutal I won't even give examples, but they're unreadable. Being a .txt file, there is no native formatting, so it exports in html formatting.
Example: instead of a post that says "I want to go swimming", it exports: "I want to go < b >swimming< / b >" (minus the spaces around the b) as the post body, which is a big part of what makes it unreadable, because there are a lot of hyperlinks in all the header information listed below.
Each post in the master txt exports with: Post ID, date, post URL, slug, reblog key (no idea what that is), reblog URL, reblog name, title, [the text/caption itself], and tags.
Theoretically this means you could ctrl+f "cybertrucks" in the master txt file and then browse all your posts making fun of Tesla owners by tabbing through the returns. This is not possible with any of the previous options, and only is possible because it's all in one file, as ridiculous as it is, which is why getting that master file is so important.
For the trick to get both the individual text posts and master text.txt & answers.txt file, as well as my recommended settings and details on how updating backups works, see the read more at the end of this post.
The images.txt includes all the information listed above, but with the following additions: photo url (NOTE: this is the url on Tumblr, not a link to where it is in your folder), photo set URLs, photo caption, and "downloaded files" (NOTE: this is the name of the file it has downloaded)
The video.txt is similar to the above
The use case for this would be similar to what I described for text posts above: search keywords from captions, tags, etc and when you find what you think is what you want, copy the name from "downloaded files" and search your folder to find the actual image
I really hated TumblThree's output the first time I looked at it and then I realized the single file is the only way to make browsing tags workable, because otherwise you would have to have a folder for every tag, and posts with multiple tags would have to be duplicated between them. I'm not pressed on finding a txt to HTML converter right now but it could be an option in the future if you wanted to make things more readable.
Okay, let's get into the non-universal stuff you can customize in settings, because it's like, everything:
File names: We've already established you can search with the downloaded file name for images, but what will that be? Whatever you fucking want. Post date, reblogger name, post ID, post title, original file name, you can make it any and all of these in any order you want! You can have actually useful file names! Personally I like %e_%p_%q_%i_%x which exports as DateTime_PostTitle_BlogOriginName_PostID_IteratingNumber (note: you need some kind of unique iterator to be valid so two files don't have the same name, such as multiple photos from one post). Look how much searchable information that gives me, in chronological order! It decreases your need for the master txt file.
Tip I wish I thought of before doing my massive export: make one of the unique headers from the master txt file part of the exported file name so it's easy to search for it after identifying it in the master file.
Files scanned: this is the only method I've found that lets you back everything up, remember what it backed up, and then lets you add any new posts since that date without having to download the whole thing again. That's a game changer, but see the read more below for limitations.
You also have the option to rescan the entire thing if you want.
Post type: T3 (I'm abbreviating it now) also lets you export just your original posts, just reblogs, etc - again, giving you the most control of any options. It also lets you export replies. I, uh, would not do this because if you have any popular post on your blog it might have hundreds, or thousands of replies but hey, you can do it!
You also have the option to only download posts with a certain tag.
Blog options: You can export literally any blog you have the URL of. In fact, if you copy a blog URL while it's open, it will automatically add that blog to its UI and create an empty folder for it. It makes it easy, no private key required. I do have mixed feelings about the concept of exporting someone else's blog... but I'm also planning to do it to some of Crew-ra's blogs so... my digital horde must grow.
You can also queue blogs up and leave it to run through a lot of them. It is a lot faster than Tumblr's native export, I started this import well after I started typing this post and it took a few hours, probably not all that much longer than just downloading Tumblr's export took (and that's while running it alongside other data copy operations because I'm backing up a lot of stuff right now).
I do recommend doing a test export with a sideblog, I was able to use wild-bitchofthenorthwoods as a test import since it only has one post and it has media, so it was super quick.
(I do want to note, I think the number of downloadable items starts out matching the number of posts on your blog without scanning them until you start the export - but if you choose to export everything as its own file, you're going to end up with way more than that because a post with three images would be multiple files)
Things T3 cannot export:
Since in its simplest form it's just accessing the public upload of your blog, it cannot export your drafts, queue, or conversations
It cannot export posts as HTML files, and thus cannot export them with readable formatting natively
What do I see as the main reasons to opt for this option? 1) you don't care about exporting your DMs/conversations, 2) you want the ability to export only certain kinds of posts (original, photos, using a tag, etc), 3) you want to control the titles of the exported files 4) you don't mind wading through massive folders, 5) you want the ability to search tags (using the txt files), 6) you want the ability to update your export without starting over from the beginning, 7) you either don't want to reupload this information somewhere else, or you want to upload it somewhere that supports automatic HTML conversion (for instance, you can switch a Tumblr post from a rich text format to HTML, same with AO3, so you can put it in as HTML and then hit post to see it turn into a rich format. This techically makes T3 the most versatile/useful export option if you're planning to do anything with it other than browse your own files).
tumblr-utils
Full disclosure: haven't tried this one. But others have! tumblr-utils is a no-UI, python-based backup software. This means in order to use it you have to type commands into the terminal. If you don't know what I just said, don't use this one.
If you do, you'll need to separately download python and youtube-dl just to get this one running. You'll also need to give it your personal Tumblr API key and feed it commands deciphered from the wiki page I linked. Here are two different guides people have written on how to use it. Output:
Obviously I'm guessing based on the documentation, but one thing that is nice is this tool allows you to save each post in its own folder. Presumably each post is multiple files like we saw with T3, so this would make it easy to group them, but it also means you'd have to look in every single folder to find anything.
It seems to break posts up into timestamp folders by month, again, helping with management to narrow down where you have to search
It allows you to save only certain kinds of posts at a time like T3
It allows you to backup posts only from a certain time period (so if you keep a little .txt note of the last time you backed up, you can easily add only the new posts into your backup without having to start over from the beginning)
It allows you to only save posts under a certain tag like T3
It allows you to save only original posts
It's the only one I've found that lets you back up your liked posts
What do I see as the main reasons to opt for this option? 1) you don't care about exporting your DMs/conversations, 2) you want the ability to export only certain kinds of posts (original, photos, using a tag, etc), (okay now we get to the points that aren't also covered by T3), 3) you want posts to export already broken into folders, whether by post or by month, 4) you want to back up your likes, 5) you don't care what file names look like, 6) you're comfortable with the command line/coding and don't need a UI.
Summary:
None of these options are ideal for reuploading your files anywhere (except WordPress), but I do think TumblThree is the best of the options because of the written HTML formatting in the txt files being useful for websites that support automatic conversion (or require HTML input).
For starting another blog, WordPress wins. If it works. I'm trying to be generous here.
For searchability, T3 wins again.
For versatility... yeah you know it's T3, but tumblr-utils has a lot of the same features, too!
For sentimentality (aka conversations), it has to be the native export. There literally is not any other option.
For queues and drafts, the only theoretical option is WordPress. If it works.
For likes, the only option is tumblr-utils.
Every option does something the others don't, so theoretically to cover everything, you have to do all four options. Actually I would say do the native export if you don't have a lot of posts and aren't a freak like me, check it out, and if it doesn't work (I know it's finnicky) or you don't like the export, go with TumblThree. This also means you'll at least have your conversations even if you don't end up using the native export any other way.
And I wish it could go without saying, but don't repost people's shit, y'all. I'm backing up everything for my records only and it will never be shared with anyone else, or even browsed as long as using Tumblr instead is an option.
TumblThree adding to old backup quirks, recommended settings, & master file backup solution:
Adding to backup quirks:
From my tests, when you scan a blog you've already backed up to just add new posts to it, it does not update the master file, so if you want to update it, you'll have to do the steps I list at the end of this post. It might be possible it does update if you force rescan, but I highly doubt it.
If you scan a blog you previously backed up under more restrictive settings - say you only backed up original text posts as one file before and now you've selected to back up absolutely everything - it will only download up until the time you last backed up that blog. It will not blow past where you last downloaded to download all the photos and videos it didn't get before just because they're selected now. This is great for doing after using the master file solution I'm showing below, but if you do need to download everything after doing a more restrictive scan, you can once again follow the first few steps below to do so.
Recommended settings:
This will obviously vary by what you're trying to do, but one or two things weren't immediately obvious to me and I did say I think this was the best solution for less technical users, so I want give my personal recommendations. Settings can obviously be found under the settings button at the bottom of the screen (you may need to use the scrollbar on the UI for, which is separate from the scrollbar on the blogs panel), but when you click on a blog, when you click "Details" in the right sidebar, you can also see your most important settings at a glance and adjust them to whatever you want them to be "per blog". I believe TumblThree remembers what you last used for the blog and applies the things in settings only to new/other blogs.
The thing that is going to vary the most is how many different types of posts you want to back up (text, video, reblogs included, etc), so I'll leave that up to you. If you're going to export a media type, though, I generally recommend exporting the metadata too.
I already gave my preferred file names above and again that's going to be something that varies a lot by people. Hover over the "Filename template" box and it will give you all the options in the legend you can combine via underscores.
Leave "Skip .gif files" off unless you're hurting for hard drive space. This removes all the gifs from your download, and the reason this is provided as a separate setting is because gifs have relatively massive files (at least compared to a text file)
I'll be honest I haven't seen a difference between turning on and off "Group photo sets". Because of the way file names work, most conventions will naturally lead to photos from the same post all being in a row.
"Save texts as individual files": if you only want texts to be saved as their master text.txt and answers.txt files, uncheck this. If you want the individual files I highly recommend you also download the master file for searching purposes, in which case my recommendation is this:
1) Select to export texts only, leaving off all media options, and uncheck the "Save texts as individual files" option. 2) Export the blog. This will only result in two files, answers.txt and texts.txt. 3) Move these files elsewhere on the computer to save them. 4) With T3 closed, delete the folder for the blog and the blog's Indexes (see instructions at the end of this post for finding these). 5) Reopen T3, which shouldn't remember it ever saw the blog and create a new folder for it. Turn on the "Save texts as individual files", as well as any other media posts you want to download. 6) Export the entire blog again. 7) Move the texts.txt and answers.txt file back into the blog's folder.
I leave all other options on the Details tab off, except for:
"Force rescan" scans past the point it last backed up and searches the whole blog again. If you have a big blog, this is going to burn time. This is needed for the number of downloaded items in the panel to be accurate but I don't know why you would care or turn this on unless it lets you skip steps 3-4 above, but my blog is too big to burn through testing that, so if you try it, let me know and I'll update this post!
Master file backup solution:
See my 7 steps from above to skip having to do this, but if you accidentally do things out of order and then realize you still need the master files for texts post after backing everything else up, here's how you get it with minimal pain:
T3 will make an "Index" folder in both the main folder for the program where the exe is located and the destination folder where you have your blogs backing up (note: these were two very different places for me, if you just have it back up to the automatic Blogs folder within T3's folder, it might not create a second Index folder).
To make T3 "forget" what it has backed up previously so it goes through to the beginning and makes a master file that includes everything, all you have to do is remove the Index file(s) for the blog while it's closed so it doesn't remember it anymore. I backed my index up in another folder.
Check off for it to only download text posts, and then uncheck the "Save texts in individual files" option. This will cause it to only create the master answers.txt and texts.txt file on the rescan.
The combination of only going for one post type and only downloading one file for it means this rescan is relatively fast. When you look at your Blogs folder, you'll find a new folder has been created for your blog name (in my case, there was "n7punk" and "n7punk_2) and your output is in the new folder. I just moved it over to the original folder.
At this point you can restore the indexes, though I've only gotten it to half recognize them. I can get it to recognize my original n7punk folder so everything can stay there, but the total downloaded items is stuck at what it was when I did just the text posts. I don't really care, it was mainly the folder thing I wanted to fix. If you have lag between your last full backup and your master-only backup, this might cause some issues? I don't know because I made sure there wasn't lag, so I recommend doing another backup to add any missing items before doing this method.
You can also use this technique if you want to download only your original posts and then download everything else to a second folder. Adjust the setting to only download original posts, download the whole blog, close T3 and delete the indexes, rename the folder to whatever you want ("n7punk_original", etc), and then reopen T3 and set it to download everything and run it again from the start.
#tumblr#automattic#words and things#tumblr hacks#resource#tumblr-utils#tumblthree#100#posts that haunt me#in a good way back up your shit yall lol
436 notes
·
View notes
Text


Shop Sign Wall Lights - UPDATED 15 May 2025
I put together a few sets of shop sign wall lights. But there are instructions. I kept some swatches as a default white color so that you could pick which color you want the light to be while in live mode. This saved on the file size of the package file because the more textures a file has, the more bloated the file size is.
I had some fun with some shop names although I mainly included generic titles in both English and Simlish.
DOWNLOAD for FREE: SFS
OR at Patreon*
*You must be over 18 to access my Patreon page.
INSTRUCTIONS ON CHANGING LIGHT COLORS
Once you place the light in build mode, then go to live mode. Click on the light and you will get the following pie menu.

Select SET COLOR AND INTENSITY and then choose THIS LIGHT. The color options will then appear so you can select which color you want.

If you use the name signs along with the Awning Lights, make sure to place the name on top of the awning so when you select the color picker, the correct sign changes colors. The other option is to place the name separate from the awning, go to live mode and change the color, then go back to build mode and add the awning light you want.
Enable the bb.moveobjects on cheat and then you can make adjustments to location and size of objects. You can adjust the position of the light on the wall by depressing the Alt key while placing the sign (on PC). You can adjust the size of the item by depressing the Shift key and either [ (for smaller) or ] (for bigger) (on PC).
CREDITS
Awning Shop Lights - 19 swatches of various awning wall lights. 18 are pre-colored and one is white so you can change the color yourself in game.
Candy Shop Lights - 20 swatches
Pottery Shop Lights - 25 swatches
Tattoo Shop Lights - 21 swatches
Enjoy!
Creations by SexyIrish7
These cc objects are new 3d meshes created using Blender and Sims 4 Studio.
Polygon Count: 6
All CC have:
*Ability to search catalog using search terms: sexyirish7 and si7
*Customized thumbnail
*******
CREDITS:
Software credits:
Sims 4 Studio v. 3.2.4.1 (Star): https://sims4studio.com
Blender 4.0: https://www.blender.org/download/
GIMP v. 2.10.34: https://www.gimp.org/
Inkscape v. 1.2: https://inkscape.org/
Thank you to the creators and moderators producing tutorials and answering questions!
*******
Model and Image credits:
Mesh created by me.
Simlish font credit to Franzilla: https://modthesims.info/
Image credits:
Awning Lights Image credits: Modified image from Adobe Stock
Candy Shop Image credits:
Swatches 1-3: Image by pch.vector on Freepik https://www.freepik.com/free-vector/christmas-candies-symbols-set-neon-style_11241813.htm#fromView=search&page=1&position=26&uuid=8b541325-0e62-4e37-9468-6bacd30f8963&query=neon+lollipop+candy
Swatches 4-8: Image by gstudioimagen on Freepik https://www.freepik.com/free-vector/sweet-candy-neon-seamless-pattern_5595774.htm#fromView=search&page=2&position=30&uuid=e2259de5-014d-4d04-af87-1198ee0f35e2&query=%40gstudioimagen+neon
https://www.freepik.com/free-vector/sweet-candy-neon-seamless-pattern_5595775.htm#fromView=search&page=1&position=27&uuid=e2259de5-014d-4d04-af87-1198ee0f35e2&query=%40gstudioimagen+neon
Swatches 9-10: Image by openclipart.org https://all-free-download.com/free-vector/download/peppermint_candy_clip_art_13182.html
https://all-free-download.com/free-vector/download/round_candy_with_stick_card_on_pink_background_6823183.html
Swatch 11: Image by All-free-download.com https://all-free-download.com/free-vector/download/round_candy_with_stick_card_on_pink_background_6823183.html
Swatches 12: Image by katemangostar on Freepik https://www.freepik.com/free-vector/ice-cream-cart-neon-sign_3238564.htm#fromView=search&page=8&position=42&uuid=2f82b4d1-5ca8-449c-ae22-4573861ebcb0&query=neon+sign+retail
Pottery Shop Image credits:
Swatch 1: Crafting icons created by andinur - Flaticon https://www.flaticon.com/free-icon/pottery_17392031
Swatch 2: Image by katemangostar via Freepik https://www.freepik.com/free-vector/aquarius-neon-sign_5561944.htm#fromView=search&page=2&position=5&uuid=c55e5e21-0550-46f0-b9be-cfa85ff38796&query=Ceramic+Neon
Swatch 3-4: Pottery icons created by Smashicons - Flaticon https://www.flaticon.com/free-icon/vase_3760867
https://www.flaticon.com/free-icon/vase_3760970
Swatch 5: Icon by istar_design_bureau via Freepik https://www.freepik.com/icon/pottery_1958438#fromView=search&page=2&position=20&uuid=096084ae-13fe-429c-a419-e6e13ccd37b9
Swatch 6:Icons by Eucalyp - Flaticon https://www.flaticon.com/free-icon/pottery_6552610
Swatch 7: Icon by berkahicon via Freepik https://www.freepik.com/icon/spin_13785816#fromView=search&page=2&position=0&uuid=096084ae-13fe-429c-a419-e6e13ccd37b9
Swatches 8-11: Icons by Freepik https://www.freepik.com/icon/pottery_8540816#fromView=search&page=3&position=43&uuid=096084ae-13fe-429c-a419-e6e13ccd37b9
https://www.flaticon.com/free-icon/machine_9200546
https://www.flaticon.com/free-icon/vase_8838322
https://www.flaticon.com/free-icon/pottery_3305262
Tattoo Shop Image credits:
Swatch 1: Modified Image by katemangostar on Freepik https://www.freepik.com/free-vector/tattoo-salon-neon-text-with-tattoo-machine-neon-sign-night-bright-advertisement_2438198.htm?log-in=email
Swatch 2: Image by Nippy Custom https://www.nippycustom.com/products/tattoo-neon-sign
Swatches 3-5: Image by bohlam via Vecteezy https://www.vecteezy.com/vector-art/2185717-tattoo-studio-neon-signs-style-text-vector
https://www.vecteezy.com/vector-art/34210463-neon-sign-tattoo-studio-with-brick-wall-background-vector
*******
TOU:
Do not re-upload and claim as your own
Do not re-upload and hide behind a paywall
*******
Changelog:
15.05.2025
*Updated swatches for compatibility with slotted signs.
*Added wall deco slot so that signs can be stacked on slotted signs for Awning Signs
*Added swatches with inverted images for Candy, Pottery, and Tattoo Shop Signs.
#the sims 4 cc#ts4cc#sims 4 cc#the sims 4#wall decor#sims 4#ts4#lights#wall lights#signs#shop signs#retail#pottery#ceramics#tattoo#ink#candy#lollipop#sweets#sugar#light tutorial#sexyirish7#updated cc#featured
305 notes
·
View notes
Note
literally how are you doing the gradient text thing. i need to know.
✨ Snappy's Gradient Text Tutorial
You might have seen me use gradient text in a few of my artworks, and it is a great tool to make a posts tand out! I learned from this post, but find some of the information outdated, so I am making a tutorial of my own!
To my knowledge, this is only possible via desktop mode* (mobile method at end), but not the app, as access to the HTML function is necessary. Alongside that, you need access to a text color fader! There's a few options out there, but I use:
Patorjik's Text Color Fader
Let's get to the tutorial!
Have the text you want to turn into a gradient ready and copy it to your clipboard.

2. Open the text color fader and paste your text into the box labeled "your message".
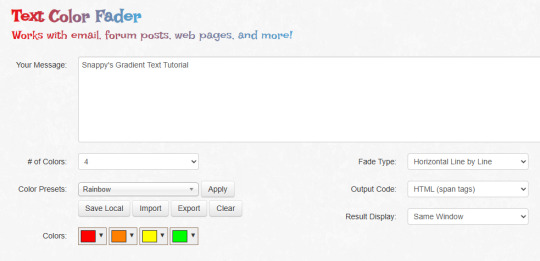
3. For the most basic gradients, you may ignore the boxes on the right. The leftmost boxes allow you to choose between preset colors or making your own colors.
Tip: if you are making a gradient for something such as art, I reccoment grabbing a few hex codes from the image to use for your gradient. This allows you to have control over your colors. You may also save a pallet if you want to use it again

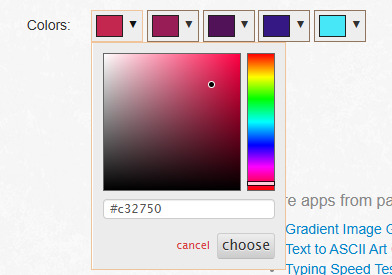

4. When you are happy with your colors, generate your text.

5. You will be brought to this page. If you are happy with the colors, click "select all" and copy the HTML to your clipboard.
TIP: check your text against both a dark and light background to ensure it will be readable to viewers on dark and light mode. If it is not you can tweak the colors by choosing "create new fade".

6. Open Tumblr again and open your post. At the top right there is a grear icon. Click the icon and scroll down to the text editor. Change the setting from "rich text" to "HTML"


7. When you move to HTML, your post will look very different! In the HTML, your goal is to find the text you want to replace in the code.
TIP: If you can't find it, use "Ctrl + F" to open the keword search function and it will highlight your word.
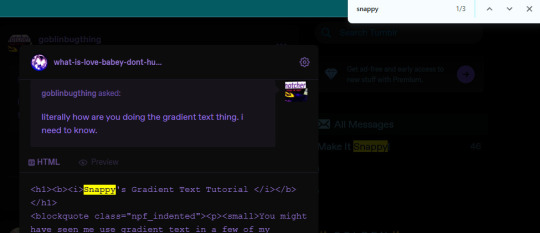
8. Highlight your plain text, right click it, and paste your HTML from Patorjik into the space.
TIP: The HTML is a confusing mess to look at. Click the "preview" tab to check if your code worked


9. You should see a gradient when you swicth modes!

If the HTML broke your formatting, you can edit it in the preview mode. Once you have done a gradient a couple of times this process is very easy and takes LESS than two minutes. It looks intimidating but after you get the hang it is very achievable! I believe in you guys being able to do it. Happy gradient texting for you guys!
*EDIT: It is possible via mobile through the method of entering your account on a web browser and putting it on computer mode, then following the same process. Reportedly it is less comfortable but it works, thank you to chocokeyboard for letting me know!
#sent to snappy#asks#snappy speaks#web resources#tumblr resources#gradient text#tumblr tutorial#gradient text tutorial#loveee doing this for my posts it adds so much#if anyone DOES know if it can be done on mobile let me know! I will edit this post to include it#EDIT: mobile method found! to my knowledge not app compatable but if anyone knows how to do it via app let me know and I will include it!
213 notes
·
View notes
Text
shared from Click's subreddit:
Trump actually cheated and there's time for a recount but we need to act NOW!
https://www.reddit.com/r/TheClickOwO/s/KTdyrF1AdD
idk how accurate any of this is but if even some is true I really hope something can be done
(post text is below the cut)
Not enough people are talking about this and there's still time.
Trump did actually cheat and someone compiled all the evidence on twitter: https://x.com/Espaking2/status/1854287198331515005
Edit:
If you don't have twitter, this will show most of the thread but may not have the entire thing: https://threadreaderapp.com/thread/1854287198331515005.html
People are reposting and saving it because from what I saw in the comments, Elon has been deleting any evidence against trump tampering the election.
- Trump said a few weeks back that he didn't need anymore votes, that he had more than enough.
- Trump also said he had a 'trick up his sleeve' to win.
- A bomb scare was called into areas where voting was taking place, so people would flee the areas and not vote.
- Ballot boxes were then set on fire by trump supporters.
-20 MILLION Ballots went missing. People only just got emails today about their ballots going missing, their signatures suddenly not being accepted, or some outright being destroyed if they didn't vote for trump.
- Trump has a long history of lying, cheating, blackmailing and bribing people to get what he wants.
Kamala was in the lead to win but literally after these ballots were lost and after the russian bomb scare, somehow trump ended up with the highest republican vote in over 20+ years.
- Russian software used for rigging elections was found being used.
All of the evidence is in that tweet but I've also saved a copy of everything in case Elon attacks that post too. There's a link to contact the white house and to (politely) demand a refund due to the evidence of trump cheating:
https://www.whitehouse.gov/contact/
Submit directly to the president.
Click the first option, select your reasoning as election security.
State these pieces of information as a paragraph:
-32 fake bomb threats were called into democratic leaning poll places, rendering polls to be closed for at least an hour
- a lot of people reporting their ballots weren't counted for various reasons that are not very sound seeming (signature invalidation, information that vote counter could not have had)
This all occured in swing states (PA, Nevada, Georigia, ETC.)
- This is all too coincidental that these things happen and swing in his favor after months of hinting of foul play
- Directly state that an investigation for tampering/fraud is required, not just a recount
Again, there is not much time, please, please, please make this spread like wildfire, there's still time to do this!
(trigger warning, SA
(trump is not a good person. Aside from a history of the above and dodgy legal activities, he also has a long history of SA towards women and children. Trump is a convicted p*dophile and project 2025 will strip away the rights from anyone who isn't a cis white man.
Please, please, please spread this information, read through the twitter evidence thread and share it. There's still time to demand an investigation but we have to act NOW
308 notes
·
View notes
Text
How to credit GIFs
I know there are other posts around this hellsite of how to do this, but because @khaotunq made this amazing post, I wanted to remind some of you of how to include a GIF that credits the original post/creator even if the GIF does not appear in the GIF options.
Option #1:
Step #1 - If you know which GIF you want to use, find the post its from, and click the three little dots to bring up the menu. Click "Copy Link"
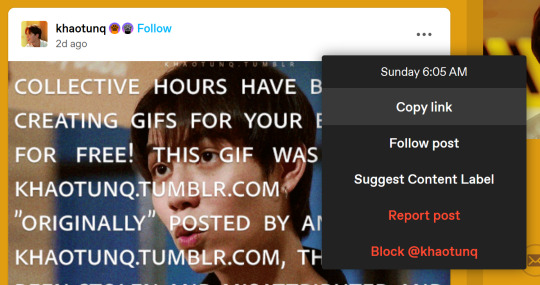
Now, in your own post, click the "GIF" button

Step #2 - When the next box appears, paste the link you just copied in it.

Step #3 - The GIF should appear, so click it, and it will insert the GIF with credit to the original post and creator.

HOWEVER, it will only insert the first GIF in the post, so if you want a different GIF in the post, you have to make a small change.
Option #2:
Step #1 - Do everything in Option #1. EVERYTHING! Now, once you have inserted the GIF into your post, it will be the first GIF in the original post as stated in Option #1.
Step #2 - Click the wheel at the top of your post

Step #3 - Once you do that a menu box will appear, and where it says "Text Editor," switch from "Rich text" to "HTML"

Step #4 - It might look scary now, but have no fear! Hit "Ctrl +F" to find what you need! Type "attribution" and it will locate the GIF for you.
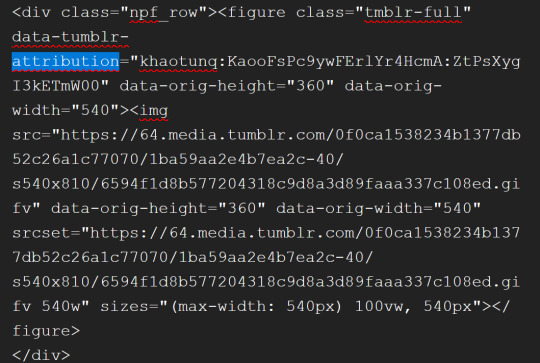
Step #5 - After "attribution" is the GIF's link that you copied earlier in quotes. Look for it!

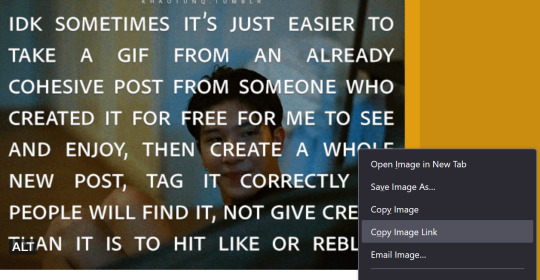
Step #6 - Now, in another window, go back to the original post with all the GIFs and find the GIF you want. Once you see it, right-click on the GIF, and when the menu pops up, select "Copy Image Link"
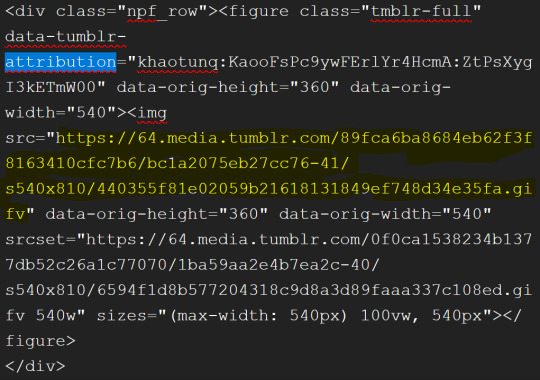
Step #7 - You will paste that new link into your post in the same spot the other link was within the quotes. In other words, replace the highlighted yellow part with the new link.
Step #8 - Click the little wheel at the top again and select "Rich text" to switch back to your normal viewing mode.

The new GIF will appear!

It seems overwhelming, but once you get the hang of it, it's easy peasy. And if you think this process is too time-consuming, remember that this is nothing compared to how much work GIF makers put into creating these GIFs for us.
Tumblr is actually very user-friendly with some practice, so do our community a favor and be friendly to the people who put in the effort.
#bl things#myspace taught a lot of us how to be tiny little code changers#bl community#be kind and attribute
326 notes
·
View notes
Text
Buck's Guide to Making Fake Dash Posts
The general format of a "post" is
😀 emoji for the profile pic
regular text for url/username with maybe dashes or underscores or a -deactivated[numbers that indicate a date]
optional Follow text with the blue colored text option (if there isnt a follow its implied the reader of the fake dash post is already following them
contents of post
bold text for notes count
post divider image (see below)
example:
😀 fakestoftumblrinas Follow
ummm im new to tumblr this is my first post
3 notes
the ways to make it cooler:
there is an image between this line and the next which is a skinny rectangle thats a fake post divider (works best on people using dark mode but gets the point across regardless)

^^ feel free to save the image ^^ (as you can see adding an image also adds a blank line above it you prob wanna delete)
i've seen some people put a ♻️ before a users emoji if they are a reblog comment on a post
example:

🤡 clowncarboy
knock knock
♻️🎭 myharlequinromance
who's there?
2 notes

tags:
tags on a normal posts have hashtags before each tag and spaces between the tags and are regular sized but grey (or other alt color per color theme) you can make text grey using HTML but that's likely overkill
#example #tags
some people have been using tiny text for tags (on mobile you highlight text then select the button that says <s>)
example tags
you can also use, chat mode, text
or [this type of, thing]
personally i used chat mode as a pretend version of screenshotting tags
go forth! have fun! also tag your posts with at least "fake dash" if not also "unreality" so folks don't get unnecessarily freaked out :)
1K notes
·
View notes
Text
why do I keep getting surprised when I learn that people don't know about the "Share" button on the top of AO3 fics that will create a tumblr post (or a tweet) with all of the relevant information about the fic (ship, characters, rating, tags, word count, summary, etc) and add a link all neatly formatted for you?*
*the Share button is at the top of every fic unless the author has selected the "Hide the share buttons on my work." option enabled in their privacy setting, so you can use to promote your own writing, or even recommend a fic to your followers.
I mean, look how easy this is:
step 1: find a story you want to share and click the "Share" button at the top:
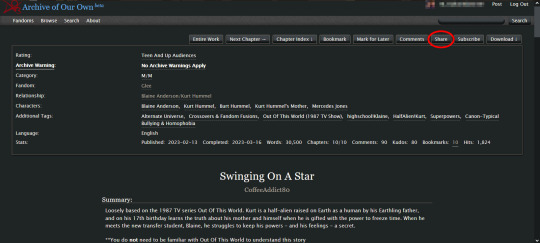
clicking that button will create a pop-up that looks like this:
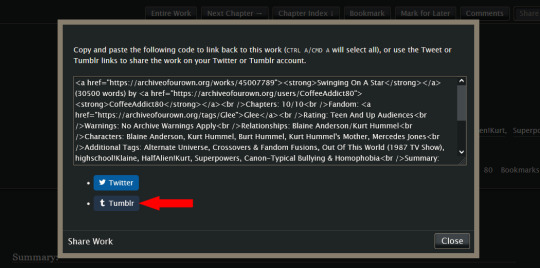
step 2: you can ignore the html in the text box; you don't need it for this. instead, click the "Tumblr" button, and (if you are logged in to your tumblr account) it will create a tumblr post that looks like this: (*this auto-generated post will automatically use tumblr's default color palette for the preview regardless of what you have your preferences set to*)
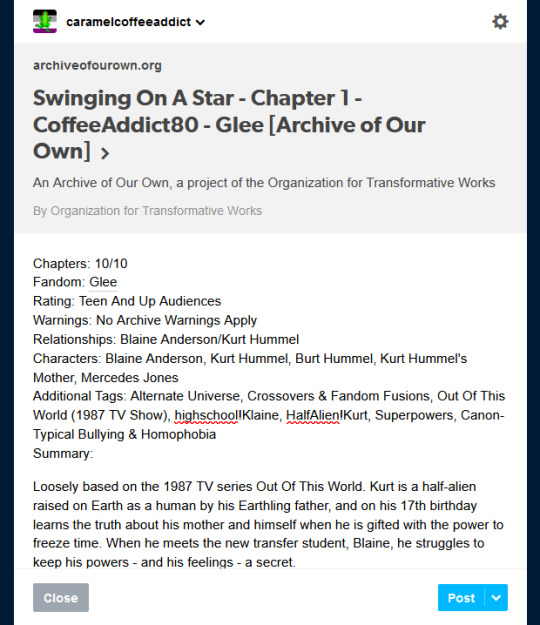
step 3: if you like the way the post looks, just click "Post". (*if you have more than one blog, make sure to double check that you are posting to the correct blog before you post it!*) or if you want, you can add an author's note to the post, maybe add a photo or a teaser of the story, or make other edits to it before clicking the "Post" button. the choice is yours.
it's so simple, and only takes a few seconds to do. it's literally just three button clicks: "Share" -> "Tumblr" -> "Post". you don't have to worry about forgetting to add important info about a story in your tumblr post; or rack your brain trying to figure out which information you should include; or even figure out how to format the post to make it look neat and easy to read.
one thing to note: if you (or the author you are recommending) have your fics locked for AO3 users only, the link at the top of the tumblr post will look like this instead:

other than that, the rest of the post will look the same as above with all of the relevant story information, minus the fic title and author name which are normally displayed in the link preview. you can manually add that missing information to the post yourself before sharing, so your followers will know what story they are clicking on.
463 notes
·
View notes
Note
Oughhhthe new update is SO good, thank you so much for everything you do!! I’m really sorry to be a bother but for some reason I can no longer create saves? It says all storage is full even though I don’t have any saves 😭 is there anything I could do to fix that?
Here's something shared on the COG forum by a super kind soul:
It’s in the settings of your browser. The storage is a space which is shared by all websites you visit, and not something cogdemos specific. If you e.g. play some .html games and save their states (or they autosave which is pretty common) this also eats in your browser’s storage. For this reason it’s generally better to choose the option to “save to disk” where possible.
And if you need more help deleting:
try this: open any game at cogdemos in your browser, and then press Ctrl+Shift+i to access developer tools. Click the “Application” button and then “Local storage”. You should get a list of data stored by various games:

You can then select and delete them individually, hopefully freeing enough space
53 notes
·
View notes
Note
Hey how do you do the color gradient thing for your dialog tags?
Assuming you mean these things, I've actually been meaning to make a guide of my own for a while lol.
For one, you can only do this on computer/the website of Tumblr! There's no option to select this stuff on the app.

STEP 1: CREATE A NEW DOC / GO TO SETTINGS

It opens a dropdown menu/whole screen full of options!
From there, select the "text editor" dropdown, which starts as displaying "rich text".

Select "HTML"

And it should change how the entire post looks!

STEP TWO: CHEAT
Yeeeeeaaaaah, so I use a website for this lol

I inserted my colors for faeries (#30853C) and Cloud (#6DC1B4) for my example of "these things" earlier. To make this easier, I most often have two windows open at a time while working on uploading my scripts to Tumblr.

To get colours to insert into the Text Colorizer website, you can use any kind of hex color picker or even this one website I've used to yoink "thematic" colors from photos!


Personally, I've developed a massive library of colors over time for this exact purpose lol. Using my old colors as a "base", I can change it accordingly to the kind of "new color" that I want for a specific character or thing!


(I'll use the website to also make gradients for "in-between" colors lol)
STEP 3: INSERT TEXT / DESIRED COLORS
To make Nova's gradient, I start with #A600D9, my color for Magic, and end with #F56745—their individual color. However, being as it's short, I'll use a quote from them instead lol.

Once you've inserted your text and colors, you will click in the text box I highlighted in red, ctrl+a and ctrl+c to copy it all, and go back over to your new tumblr post tab!
From there, you'll ctrl+v to paste the entirety into the HTML area, which pastes the code into your post!

AND VOILA!

You have gorgeous gradient text!
However, I want to give a fair warning and a bit of advice! If you didn't notice wayyyyyyy back when...

Tumblr warns that this all can break your formatting!
It doesn't do it too often, but take it from someone who does an obscene amount of formatting... it's 100% true.
STEP 4: CHEAT SOME MORE!
For this reason, I personally have a whole separate draft post full of my characters' colors (and names lol) that I use to copy-paste them in from rather than using the "html" text editor on every post!
I mentioned earlier I often have multiple windows open while editing? Here's what that looks like!

Additionally, I'll use a separate tab off on the left (my "current wip post" side) with the "html editor" enabled for me to copy-paste stuff!
(Also here's yet another example of how many colors I have)

Once again, you can ctrl+c these things to paste them into another tumblr post with the correct colors!
And it's ONLY possible to do on the website!!!

EXTRA INFO!
WARNING:
Tumblr will only allow each "paragraph's html to be so many characters long, so you can't have too big of anything in a gradient!

And by "anything"... I mean you really can't have that big of a gradient in general. RIP lol.
It straight-up won't save the post so long as you have that "overflow" in the character block! MAKE SURE YOU'VE FIXED IT, OR YOU CAN AND WILL LOSE ALL PROGRESS ON YOUR POST!
SINGLE-COLOR TIP:
You don't need the website for a single color! If you'd like, you can just change the "color code" within the html editor to change specific colors!

MAKE SURE COLORS CAN WORK ON DIFFERENT BACKGROUNDS!
On desktop, you can use shift+p while not on any sort of textbox to change the color pallet! I always do tests to see which colors work best before settling on any!

(Tho, the blue background SPECIFICALLY is nightmarish to work around. So if that's the ONLY thing I can't make work, I often ignore it and let you guys who use it suffer lmao)

(Hopefully this'll give you guys some respect for me and how much I do to make my posts aesthetic af lol)
Also hopefully this all helps???
divider by @cafekitsune
73 notes
·
View notes
Text
embedding images on ao3 (or at least how i do it)
step one - create a work skin
this is step is optional, technically, but it'll make for better viewing across different devices. go to your ao3 dash, and on the left menu (or the top menu if you're on mobile) you're going to click on 'skins'. click on 'my work skins', and then click on 'create work skin'. make sure that the type says work skin, and then put in a title. this is just for you, so it doesn't really matter what it is. then in the css box, you're going to copy and paste this exactly:
#workskin img {
max-width: 100%;
height: auto;
}
save it.
step two: host your image
you can't actually host images on ao3, and i don't recommend hosting them on tumblr either. you need a static link for the image and tumblr's are always subject to change. ive never been able to get drive to work for this either but that might just be user error, idk. when i need something hosted for ao3, i use dropbox personally. from here, the instructions are going to be with that in mind, other image hosters might be different.
upload your image and copy the permanent link.
step three: put your image in your wip
in your ao3 wip, scroll down to 'select work skin' and click on the skin that you made earlier
in the text editor itself, make sure that you have it set to rich text rather than html. place your cursor within the editor where you want the image to go and then click on insert/edit image. in the menu that comes up, you're going to paste your image link. if you're using dropbox to host, you have to change the dl=0 at the end of the link to raw=1. i'm not sure if this applies with other image hosters.
if you want to adjust the size of your image in this menu, make sure that the proportions are locked. there will be a little lock icon next to the width and height boxes. i usually size mine at around 750 to 800 on the longest/widest side but this piece is totally up to you. you can also click and drag the image size within the text editor itself, but if the image is very big this may be more difficult.
step four: profit
(for legal reasons this is a joke. thou shalt not profit from fanworks lest ip holders decide to get litigious)
#i was asked for some guidance on how to do this and this seemed like the easiest way to do it#i hope this is helpful#tutorial#how to
50 notes
·
View notes
Note
my lovely sweet angel victoria, i need to know how you do custom text colours for your fics im so sick of this ugly ass pink especially when it doesn’t match the rest of my blog 😭
— mira ^_^
okay i’m going to use this ask as an opportunity to give a step by step tutorial on how i do this <3 (on mobile is the only way i know how to do it, but i don’t think it’s much different from desktop). i get a lot of questions about this so i’ll try to break it down as easily as i could!
1.) in order to have your text a certain color besides the ones tumblr gives you, you have to do it on a browser, since you can’t do it in-app. all this means, is that you have to be logged into tumblr on safari, google chrome, or any online browser of your choice.
2.) once you’re logged in, you’re going to go to this website and type the text that you want to be colored in the text margin.
3.) once you type in your text, you’re going to choose the first colored box and you can either make your own custom color using the slider (i recommend copying the hex code and pasting it in your notes so you don’t lose that specific color), or you can choose from the default settings.
4.) if you want to make a gradient text, then you’ll choose the color you want the first color you chose to fade into. but if you just want the word, sentence, or paragraph to be all one color, then you’ll copy and paste the previous color code into the second box.
5.) once you have your text and your color, or colors selected, you’re going to press ‘generate’.
6.) after you do that, you’ll scroll down and see a whole bunch of coding (it’s usually in a grey box).
7.) you’re going to tap it and press ‘copy’.
8.) now, go to the window where you’re logged into tumblr, and press the pencil icon so you can make a post.
9.) before you paste anything, you’re going to press the setting icon in the upper right corner, and find the box where it says ‘rich text’.
10.) once you find it, you’re going to press it, and choose the option that says ‘HTML’
11.) after you choose that option, now you can paste the coding from the website.
12.) it’s going to look like a lot, but once you save it as a draft, it’ll be your text in your desired color.
i hope this was clear and helpful! if you have existing posts that you want to edit and make with a different color, you’re going to edit it on browser, choose the ‘HTML’ option and repeat. once you save the post, you can edit it and move the text around where you want it IN the tumblr app <3
66 notes
·
View notes
Text
custom font colors tutorial
note: this is for my bb @tobaccosunbxrst but also just wanted to post it to public for anyone curious on how to do custom fonts w html on tumblr. i originally made this tutorial privately for my mutual @certainlysyko so apologies for the silly choice of example text that i used lol. anyways.
so as we know, tumblr only has the following default color options for text:
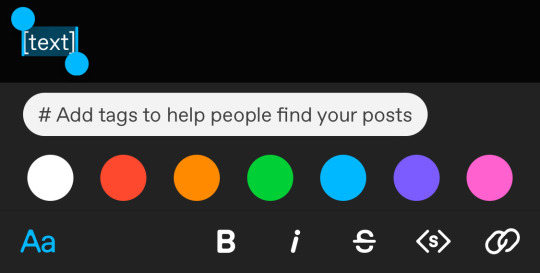
but what if we want some other cool colors like coral pink or cerulean blue or barf green?
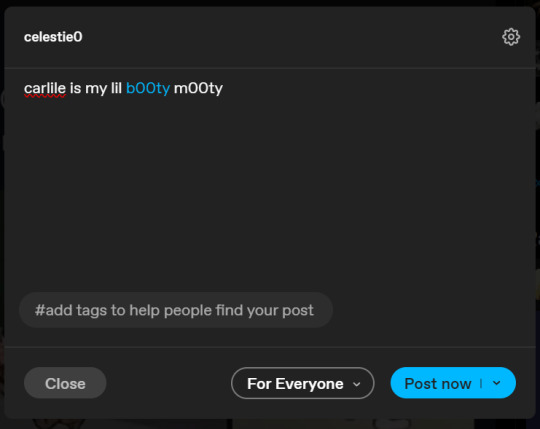
to do custom fonts, it’s very simple, but it needs to be done on pc/laptop (cannot be done on app). we are going to start with a post:
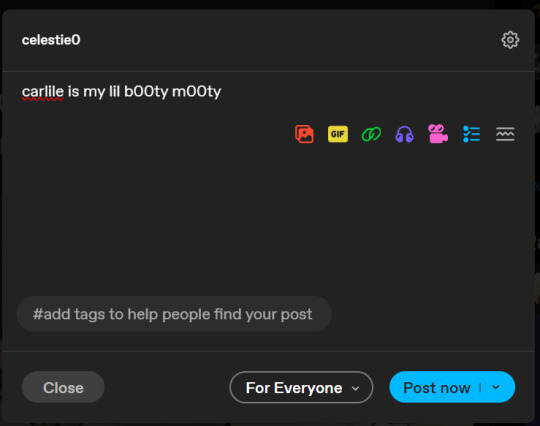
then, you’re just gonna change whatever word that you want the custom color for into one of the tumblr defaults. you do this by just selecting the text with your cursor and then tumblr’s default colors pop up. you can change into any of them, this just establishes the code in the html and makes it easy to spot
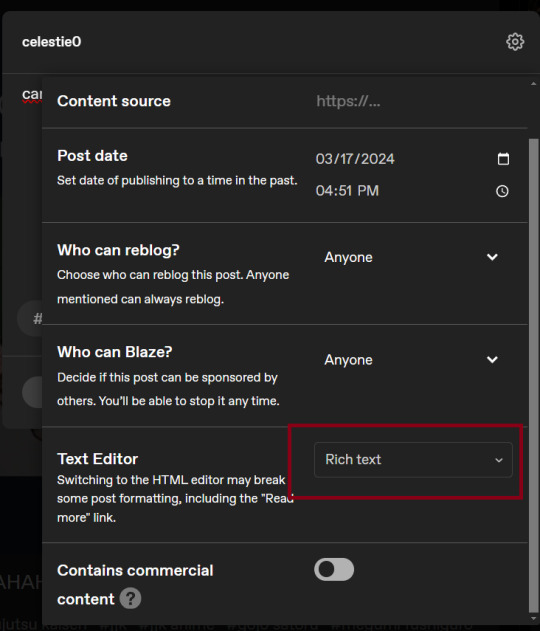
then you're going to go to the little settings thingy at the top right of the post (the settings wheel) and click on this drop down, then click on "html" which will switch it to html
now it's in html. this looks very simple bc there is only one statement here. i’ll touch on how to deal with more lengthier blocks of html code later. but for now, note this section only:
<span class="npf_color_rachel">
this is ALL we need to work with in the code
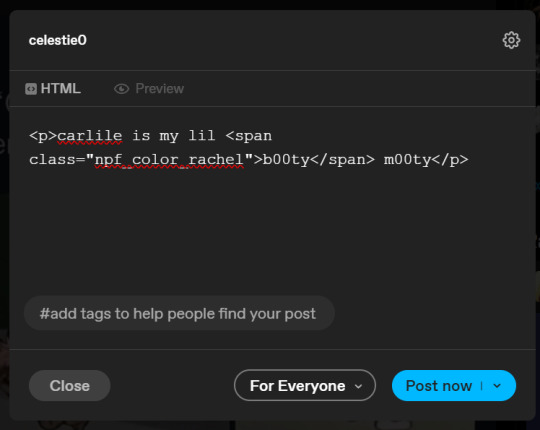
we're going to change it from
<span class="npf_color_rachel">
to
<span style="color: #[hex code]">
so, for example, something like
<span style="color: #81b7ce">
note. you can also just copy paste the lines above so you don’t have to type it out
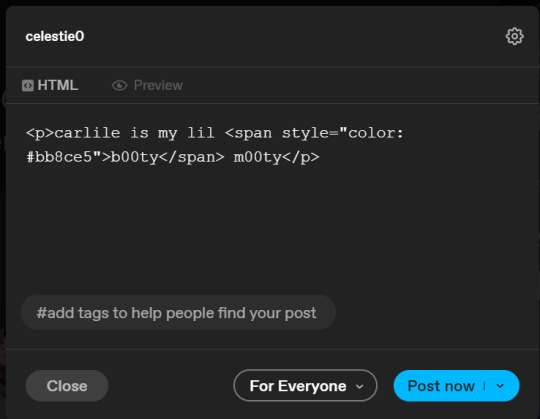
soooo all we did was delete the class=npf_color_rachel part and just replaced it with style=“color: #[hex code]
and here's the preview! all done :)
this is the website i use to find the hex codes. a hex code is basically those codes after the hashtag so like #81AACE (don't forget to input the hashtag)
now, for those lengthier posts i mentioned, you can use ctrl+f and search the word "color". it will show up any place on the post where you have a colored font (so do this after you’ve already changed all the places you want custom colors into default tumblr colors, like in the 1st step)
this way, you can easily find the places with <span blah blah> that you need to edit
here is an example of that in one of my posts:
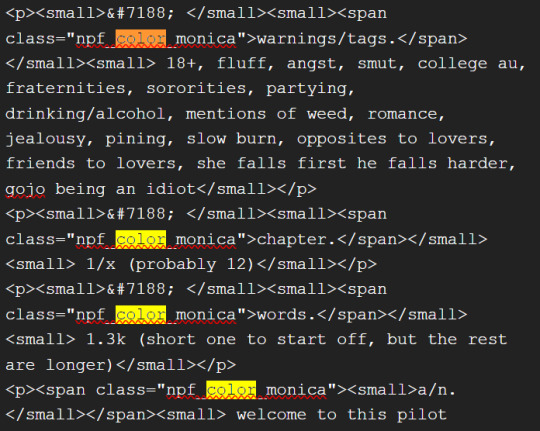
and yeah! that’s basically it. disclaimer, i’m not a software engineer nor so i know much about tech haha, this is just for tumblr aesthetics
alright peace out! 🧚♀️✨ hope this is helpful
#tumblr#tumblr tips#tumblr html#tumblr hacks#tumblr colors#html#tumblr custom colors#tumblr girls#custom colors#tumblr tutorial#custom colors tutorial#html tutorial#hacks
233 notes
·
View notes
Text
So. You once believed tumblr to be your safe space, your archive, your goldmine. Instead, thanks to "unforseen" circumstances (fuck you dorna), you now fear for the safety and integrity of your blog and you want to know if there's a quick way to download a lot of posts without having to do it manually (I spent half an hour yesterday doing it. Do not recommend)
Fret not my child, and welcome to
How to save the posts under a whole tag in five easy steps!
Needed preface: while this method works great for images, videos, and gifs, the same thing cannot be said for text post, which will be saved in unreadable html. I mean, you can always feed the file to a compiler, I guess. Or painstakingly copy paste everything on word. Maybe it could work on ao3 too, actually, I should check.
ANYWAYS.
Step 1: go here, and download the zip file. Once you've done it, extract it, open it, and run the program, that inside the folder will look like

this. (the one in the centre. so that we're all on the same page)
Step 2: once you've done it, you'll run to me saying "cate anitalianfrie, this graphic interface looks like a relic from the nineties!" to which I'll answer, yes, but it works and that's all that matters. Then, you'll open the settings (gear on the botton right of the page) , go to the page named "blog" and where you see the option "tags" put the tag you want to download the content from.
(it's located in the bottom right section of the page)

the space will be blank. put the tag without the "#", and with the spaces.
if you want to download from more than one tag at a time, you can! just beware that it's not an intersection of the two tags (aka: not downloading the post that have both tags) but a union (aka: WILL download posts with one, the other or both tags). if that's still fine by you, put a "," between a tag and the other (ex: "my gif, cate.txt").
SAVE BEFORE CLOSING THE SETTINGS
Step 3(optional): the program automatically saves in the folder blog inside the folder your program is in. if you wish to change this, go to the "general" page of the setting. at the top, you'll see this:

go to browse and select the floder you want to put your posts in. (ps. obviously your download location will be different than mine. i've already changed it. the standard would have been C:\User\your_username\wherever_you_extracted_the_zip\Blogs)
SAVE BEFORE CLOSING THE SETTINGS
Step 4: past the link of your blog as https://www.your_blog_name.tumblr.com or https://www.tumblr.com/your_blog_name (ex: https://www.anitalianfrie.tumblr.com, https://www.tumblr.com/anitalianfrie) in the little space down on the left,

and press "add blog" on its right
Step 5: click two times on the blog (it now should be at the top of the page) and click "download"
And voilà you're all set! Wait for the machine to finish the crawl and enjoy your newly downloaded content
58 notes
·
View notes