#i wanted to add. so many more things. but the tumblr image limit wants to keep me silenced
Text


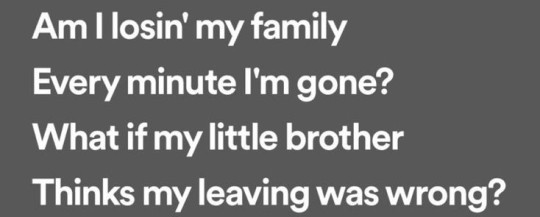


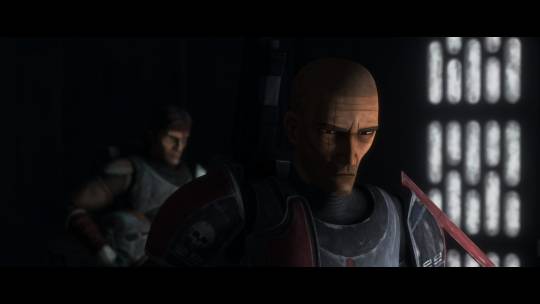
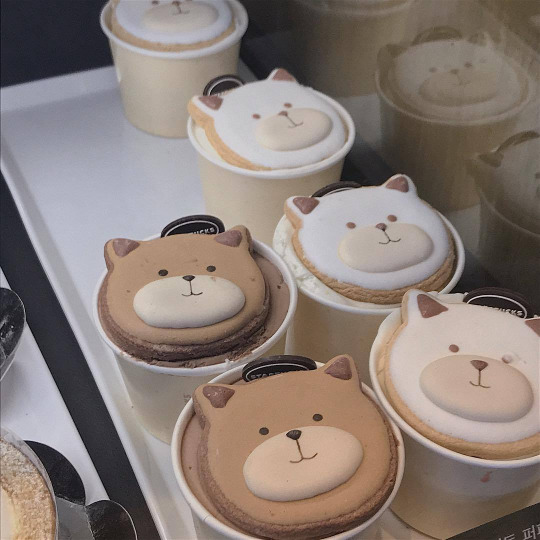
They're brothers, your honour: toxic codependant sibling relationships my beloved. A ccrimeboys weave for @clethos !<3 Made as part of the @mcytblrholidayexchange event :)) ___________________________________________
very happy to be assigned a fellow crimeboys enjoyer, hope you enjoy :D
Side note i kept going woaughhhhh in misery and pain (/pos) everytime i added an image. INSANE about them wouagh
(Also hold on I've got another ccrime webweave for you, i couldn't avoid the sillies)
#myar#crimeboys#mcytholidayexchange#dsmp#webweave#i wanted to add. so many more things. but the tumblr image limit wants to keep me silenced#also this is my first webweave it'll take me some additional time to learn how to cite these images anshs bear with me#web weaving
227 notes
·
View notes
Text
A Guide For New Users Fleeing From Twitter, From A User Who Needed One When They First Started:
Hi to everyone fleeing from twitter, Elon Musk is shit and he already has had an actively harmful effect on the site, one that will only get worse. So, welcome to Tumblr, it can be kind of intimidating, given its reputation and how many different features there are, I was certainly confused and intimidated when I first logged on and as I'm active on both I sympathise with y’all, so here’s a guide to anyone new:
Put your hashtags in the hashtag section. This is the only way they’ll actually have any sort of effect, or appear when you search for something. Don’t post them on the post itself.
There is a character limit for hashtags and a quite high hashtag limit. Go wild. Writing entire speeches is common.
Don’t tag lots of unrelated stuff to your posts, that’ll get you reported for Spam and just hated in general
Don’t censor words, users are fine with swearing, doing so especially with triggering content makes it hard for people to limit their exposure to said triggering content.
There’s no such thing as ratioing.
We don’t have quote retweeting, every reblog, comment, etc counts to op’s post. They can see it all, and will be notified depending on their notification settings.
Change your icon, people will think you’re a bot if you use the default.
Give yourself a bio, it’ll make you look like a person.
Follow people and tags, that’s the only way you’re gonna see the content you wanna see. The foryoupage isn’t to be trusted.
Actually reblog stuff, liking has no effect, reblogging is the only important thing here as there is no like based algorithm. Doing so will also make you appear human.
You can hide your likes and who you’re following. Doing so is not frowned upon in the slightest.
You can block tags, similarly to muting words on twitter.
You can have multiple blogs tied to one account.
You can customise your blog, go wild.
There is no word limit, you can write as you want. But if it gets too long make use of the keep reading feature, (the three dots beside the add gif feature)
There is an image limit of thirty, up from the former ten, though for some they may be stuck at only using ten, tumblr is kinda inconsistent. If you want to add more you’ll have to reblog your own post.
There is no reblogging limit when it comes to a post, though there is a daily posting limit, go wild, only your followers will be upset.
You can have videos, gifs and pictures in the same post.
You can just post audio.
Adult content is still banned, but actual moderation and enforcement is spotty, especially if it’s written.
Spam liking and reblogging isn’t a thing. Go wild.
You have an ask box that people can submit stuff to. You can respond or just delete the post. You can remove anon capability from it (which will get rid of most of the hate), or outright bar it.
You can’t private your account but you can restrict commenting and reblogging. Edit: I’ve been informed that you can in fact make your blog password protected, it’s just that it’s a rarely done thing and not widely known.
Block whoever and whenever, it’s not a big deal. Though if someone you’ve blocked has reblogged and added to a post and someone you follow reblogs that, their commentary will still be included in the post you see.
We don’t have muting, only blocking.
Yes, direct messaging is a thing (it’s the little smiley face)
The only way to promote your is through ‘tumblr blaze’, you pay a certain amount of money and your post will be promoted, but not targeted, so no invasions of privacy. You are subject to the employee’s whims on whether or not it gets promoted and unfortunately hate speech has been allowed.
Tumblr has tendency to hide/consume comments, posts and asks, don’t be surprised if they go missing.
Tumblr searching a blog relies on tags, words in the post and the users name, keep that in mind.
Posts will remain after you delete your account or the original post if they have been reblogged.
Years old posts are still circulating and that is considered normal.
You can queue up posts to be released when you’re not using your account. Or you can just post whenever you’re active. Go wild.
Wizards exist and are very popular on this site. Accept it.
There are posts with no notes that will never gain any more than a sing note for your like. Accept it.
There are posts will no op. Accept it.
Trans and autistic people dominate this site.
Don’t get pissy when someone tags a post ‘tw (insert slur)’, or any trigger warning for that matter, most are just being considerate of their followers who may be triggered by such content.
Twitter discourse is regularly mocked, it’s not gonna fly here.
No, we don’t call each other oomfs, or anything like that. We just have mutuals.
Tumblr in general lacks a lot colloquialisms that began on twitter.
We do have ‘blorbo’ ‘poor little meow meow’ etc.
Trying to go viral or trying to corporate is frowned upon.
Tumblr has a tendency to blacklist things tagged like ‘crowdfunding’ so bring that kind of logic you use for twitter posts over to tumblr.
We don’t have twitter circles, co-posting, etc.
Tumblr is surprisingly good at recommending blogs.
There are no verified accounts, and your follower count isn't visible. This is a good thing, trying to change it will get you laughed at.
People are going to just make up stuff, don’t believe everything you see and if it’s a claim about someone, investigate it rather than just believe it.
You can edit your posts after you’ve posted them, but the versions reblogged before said changes will still circulate. This editing of the original has been used as a spruce of comedy
If your worried about people seeing your potentially triggering, or even graphic content and they haven’t blocked the tags you’ve used you can use the keeping reading feature to put the content under the cut and post a warning at the top.
And this is quite important:
Stay anonymous and have fun. There isn’t an expectation to constantly expose inner details of your life, you aren’t expected to use your real face, your real name, age, etc. You’re not even expected to be truthful here. Exist however you wanna exist and have fun, that should be the point of social media.
Also keep in mind that tumblr has its own distinct culture that is going to take some getting used to. As well as a history any user who’s been here a while will at least somewhat understand.
Also I'll be editing the post with additional info and corrections provided to me.
#twitter#tumblr#social media#Elon musk#giude#psa#hellsite#edited to correct some stuff#hellsite tag#edited again to add stuff and correct some information
4K notes
·
View notes
Text
useful system apps
hi ! we're an anonymous system, feel free to call us anon !!! we are making a list of apps* we find useful for system things !!! feel free to add any other things :)
*it was supposed to be just that but i forgot in the middle and just said a bunch of extra stuff. mb
our app suggestions
simply plural: useful for keeping track of alters and fronting. there's a chat function as well, though we don't use it anymore because of the way it formats messages. it is useful for reminders and tasks though! plus, insys communication if you aren't bothered by the formatting. (mobile and desktop free, but desktop is a little iffy.)
fortelling: an app for writers keeping track of their characters, stories, plotlines. however, we tested out how it would work for keeping track of alters and communication/journaling, and it worked pretty well! there are group options like simply plural, but formatted very differently. good for keeping discreet. (mobile is free, desktop is availble but payment needed)
firefox multiacc extension: we just started using this, and it's really helpful!!! we are able to have multiple accounts and tabs open, all organized by system! this, paired with protonmail, is really good for having seperate accounts if that's what your system wants. (desktop available, havent checked mobile)
feedbro: its a simpler, slightly lacking version of the usefulness of firefox multiacc ex.. we used it for a while for certain interests and added tumblr accs on it, and it wasnt the best, but it did work then! (desktop available, no mobile).
twinote: fake twitter. good for sys communication, plus it's just fun! (mobile availble, no desktop?) other fake social media apps work, too, though instagram ones are pretty annoying bc they need images
ifake: fake messages! good for sys communication, plus, again, fun! only thing is that you need to watch ads to make chats :( but the chats are good! many formatting options. (mobile available, no desktop)
notion: good for sys communication/journaling! we use one, and it's really helpful. we have a journal, task list (with reminders), alter list, interest list, plus more (feel free to ask abt it! can show ppl how it looks) unlimited amount of pages and elements as long as you only have one account per workspace! (mobile and desktop available, desktop preferred.) some alternatives are coda (limiting), evernote (limiting, formatting), and onenote (formatting).
pluralkit: bot for systems. we only use this on our phone as we have our own seperate discords on our computer (re: use multiacc firefox ex. <3) but it's helpful! plus, you can change your avatar per server (mobile and desktop available.) alternatives include tupperbox (formatting + old).
youtube music: pair this with firefox adblocker and i swear its so good. its just youtube but focused on music. cant change the playlist pictures, but lost of playlists available! plus less, shorter ads (if u dont use firefox adblocker for some reason). (mobile and desktop available, desktop preferred.)
other suggestions
keep a digital journal/diary! physical is good, too, but we personally find it easier to access digitally, plus less chance of people accidentally finding it.
use firefox. not too system related apart from the multiacc thing but firefox is great
some things we do
we have "certain alter [piece of clothing/thing/accessory]" that helps us determine whos fronting sometimes :)
try to keep track of what happens in life! its helped us integrate to be a little less confused with life
dont feel bad if you dont use any of these! its your system, your choice, you choose how to navigate everything <3
#* prince#plural#actually osdd#actually plural#actually traumagenic#osdd#osdd system#osddid#other specified dissociative disorder#plural system#traumagenic#* tin
550 notes
·
View notes
Text
DNI if you're a bigot (yes that includes you idiots who think I'm a sissy and not a woman) and do not be sexual with me if you're over 35 or a minor
Hello, I'm not going to say my real name so just call me Daniel (they/she and he if you prove you respect me enough). I am AMAB autistic gender-fluid transfem ENTIRELY CIS HET WHITE CHRISTIAN MAN THAT IS IMMUNE TO MODERATION that is a former plural system and now a singlet. I love all things nerdy like MTG, D&D, listening to infodumps, Pokémon and Honkai Star Rail. I also play Clash of Clans but put literally zero effort into doing it well. Also my gender is whatever makes me most attractive to you, but the gay version of it.

Idk what I'm really doing here but tumblr is a great dopamine farm. It's also where I met my besties and (not actually it's an inside joke) wives @subbyblue @atlasofthestars113 and @verdantmothmachinations
You are highly encouraged to do any asks at all I love attentions. DMs are also encouraged as long as you get to know me and gain consent first. Honestly just send any ask it gives many happy chemicals.
Minors shouldn't be looking at this blog but I can't stop anyone so 🤷 (you'll get bitch slapped with a block though if you try to do anything horny with me and you don't have your age somewhere or are a minor). However, if you want to ask a question about kink/sex for purely educational reasons I will highly encourage anyone and everyone, regardless of age, to do it. We need much, much better sex education especially around kink and kink safety.
Inspired by @xenasaur
This blog is safe for queers of all types, racial minorities, addicts, age regressors, systems (endogenic included), and systems with littles.

You should know that I'm an orca.... and orcas rule anything they can see >:3
For anything that happens in DMs I'll need to know you a bit first, I'm a person too and want be seen as such.
My general limits are scat, gore, raceplay, ageplay (though I'll happily care for you in a platonic sense!!), emotional manipulation (both directions), corruption of myself, intox without consent prior to the intox and more as I think to add them. Don't act or suggest doing aggressive or controlling things to me (ie: tearing clothing off me, pinning me down, gagging or restraining me, domesticating me, etc), I like being in control of myself at all times and having my body respected. The only person allowed to dehumanize me is me. I like the terms Mistrum, Mommy, and Mistress, and enjoy many many kinks including but definitely not limited to: petplay, sadism, general dominance/control, breeding, bondage, monsterfucking, and ahh... harder kinks I tend to keep to my hard kink blog ( @anunholyforehand )
However, my limits when subbing are almost everything (I'm very very vanilla and just want to be praised when it happens). Honestly when I feel subby the cuddles and comforts are much more important than anything else. Oh hey you actually read my limits, good job, have a link to all my audios I've done.
Also have a link to commission me
New thing!! I am a singlet but this wasn't always the case. I don't expect you to understand how or why but I do expect you to respect this fact. I am one and I am whole now. I will keep myself.
Stolen from someone else but the point remains
Legal stuff cause privacy (I'm fully aware it will make next to no difference but on the off chance it ever matters I may as well have it, took me like five seconds to copypaste the image anyways lmao)

306 notes
·
View notes
Text
ALL THE TIMES DUDE HAS BEEN SUGGESTED/ALLUDED TO NOT BE STRAIGHT!!!!!!!! Feel free to add or correct me if I get something wrong!
First I will start off with things RWS has said themselves and the most obvious example of Dude basically being confirmed to be NOT STRAIGHT. This is from the official Running with scissors Twitter!
And here is a post from the RWS tumblr where they reblogged a post and added this comment
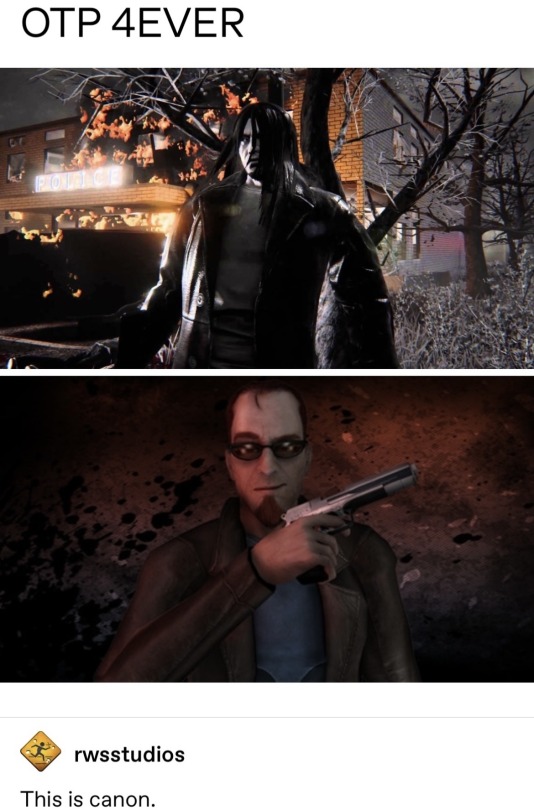
Just in general if RWS or Destructive Creations comments under Nottemdude fanart it’s always more than likely them being positive about it. The RWS tumblr hasn’t been active in 7 years so it’s not just a ‘new’ thing also. I would post more pics of these times but there is a image limit to posts so unless someone wants me to show specific examples….😐 But anyways, they have alluded to adding Nottem to Postal under a piece of nottemdude fanart before if I’m remembering correctly. They also support Dude being shipped with Duke Nukem as well, having retweeted ship art of Duke/Nottem/Dude. Also there is fanart of Nottemdude and just other works where he’s seen being 🏳️🌈 or just wearing all kinds of different pride flags on their offical website on the fanart page. And if you take all of this as them being cool about it (fanart and ships) and not minding it and being a ‘good sport about it’ then okay. Sure. But to say that RWS doesn’t encourage or support it would be veryyyy odd.
Before I get into my list of a couple moments Dude is alluded to being bi, I wanna add that If you wanna get technical, the Postal Dude according to RWS can be ‘anything you want him to be’ so while he might not have a totally confirmed sexuality yet or hasn’t been seen being with a man, he is more than likely never gonna be confirmed as straight and if you headcanon Dude being anything other than bi then that’s fine but the baseline seems to be that he’s into both men and woman.
Anyways, here is some moments that come to mind for me.
————————————————————————•In postal 2, You are able to let him kiss another man at the kissing booth on Valentine’s Day
•Most of Dudes dialogue to the other Dude in Brain damage has a flirty tone to it. Dearie & handsome are words Dude uses to refer to the other him. (Which sure, you could say he’s just flirting with himself but be fr for a moment. You wouldn’t be like 🤨 if you heard a man irl calling a clone of himself ‘dearie’?? And the tone Dude uses to tell him not to go and to come back???)
•In postal 4, one of the first things you do is write a sign in hopes to find work. No matter what you choose to write Dude adds something along the lines about being willing to ‘do dirty work’ with men. HE SAYS TO MALE NPCS THAT THEY CAN TAKE HIM BACK TO THEIR PLACE!!! How much more obvious-
•His whole thing with the drag outfit in postal 4. He really didn’t have to wear that if he didn’t want to or really felt uncomfortable with it. Wearing drag doesn’t make someone a certain sexuality but I just wanted to add this part because some people still view Dude as this manly man or this guy who sticks to only stereotypically masculine things?? When he wears drag, makeup & high heels.
•In postal brain damaged, there is a place in his mind specially for Doomguy. And not just in a “ohhh hes so cool and manly 🤩” way..there is full on pictures of his bare ass in Dudes brain. Why would a straight man have a secret part in his brain saved for another man’s ass????
•In BD again, there is a scene where in Dudes dream, buff men are standing behind him set up in a meme reference, suggesting that Dude is about to have sex with them all. Here is the pic 🫡
(And would you look at that. He’s smiling!)
•Lots of d*ldo jokes in postal 4 and BD. A used one is seen on his floor in the opening cutscene for BD. (Again you can just say it’s for the laughs besides the used one but why would a straight man own that many?)
•Dude says “it’s like taking it up the bum” in BD…how would u know how that feels like sir? 🤨
•In postal 2, Postal 3 Dude uses a certain kinda…tone and way of taking sometimes with p2. For example the “Short tempered today, are we?” line. Im sorry but that is such a oddly flirty teasing way of talking to another man. Also p3 Dude felt the need to remind p2 that he wore ‘skin tight leather’ and maybe it would rejog his memory wearing it again.
•In postal 4, dude has a line saying something about how no one has it harder than a “white cis man”. What’s interesting to me is that he didn’t throw in that he’s straight too. You’d think he would do to the nature of that sentence.
•Postal 3 dude is oddly insecure about his masculinity and or is not confident in his sexuality. He’s worried about being seen as gay just for riding some kinda scooter and hopes none of his friends sees him like that. I dunno to me I feel like people perceive Dude as a ‘no fucks given’ kinda guy but he’s whining and complaining about riding some scooter.
#postal dude#sorry for long post I just 😬😬😬😬 yeaaa#if I need to word something diff or something let me know plz#edit: I had said Duke instead of Doomguy in the dudes brain part my bad
261 notes
·
View notes
Text
Thoughts on The Bad Batch Episode 5 - The Return - A Discussion Post (PART 1)
This episode was so healing. It was really something I needed. Let's look back on an episode filled with family joy!
SPOILERS AHEAD IF YOU HAVE NOT SEEN THE EPISODE YET! all screencaps are from cap-that.com! (https://www.cap-that.com/starwars/the-bad-batch/305/)
(NOTE: This post is split into two posts! I didn't know Tumblr had a limit to how many images you can add, and there's a lot I want to talk about in this episode. So here is Part 2 once you finish reading this one: LINK TO PART 2)

The episode opens with Omega sleeping safely in her room on the Marauder, the warm sun signaling her to awaken. Omega is safe and happy, having the real Lula to sleep with again.
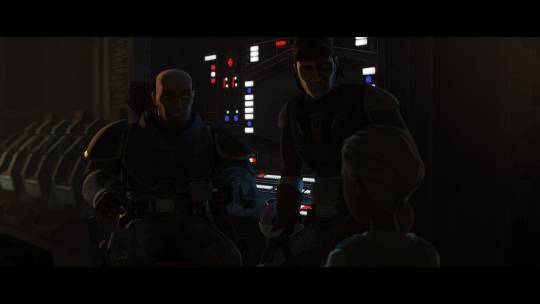
Hunter and Wrecker are relaxing in the ship with some hot cups of tea, and Omega wonders where Crosshair is. I'm happy to see them relaxing after a long time of searching for Omega.
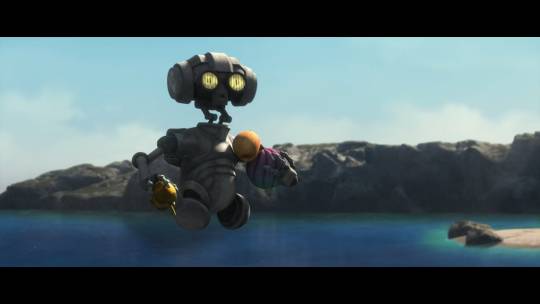

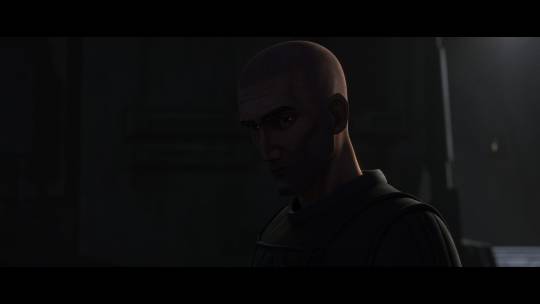
Crosshair is found on the beach, training with his sniper rifle. He has AZ to help him get a target, and AZ is happy to see Omega. I'm glad AZ is safe too since I've been wondering where he went after the finale of Season 2. Crosshair's hand keeps on trembling, and he sighs, worried about it. It's sad to see him this way, especially since he's the guy who never missed a target.
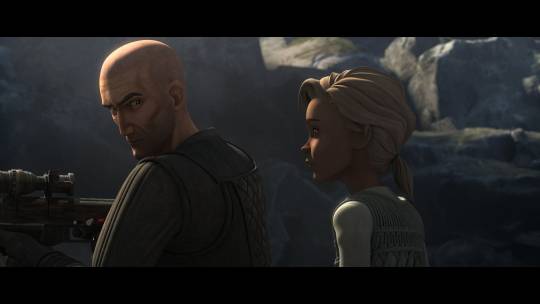
Crosshair still hasn't properly talked to Hunter, and Hunter and Wrecker keep their eyes on Crosshair. Omega tells Crosshair to relax and be patient, as things would eventually work out. She's really being their older sister.
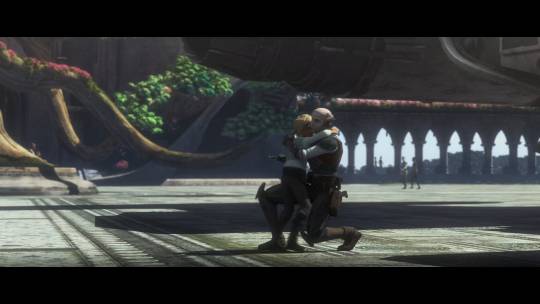
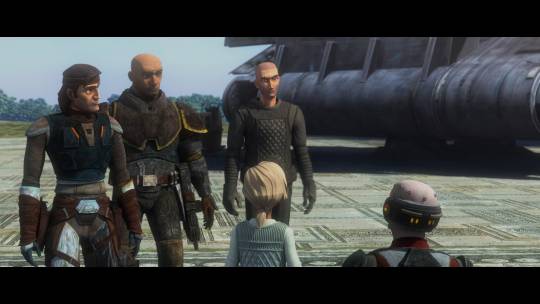
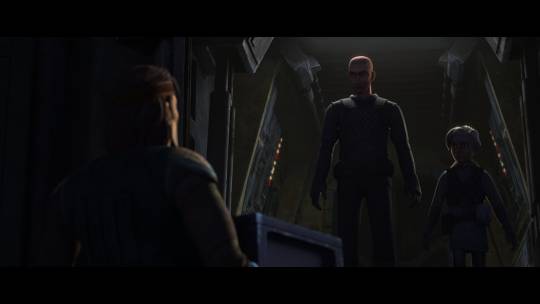
Echo arrives on Pabu, and Omega immediately runs to see him again. I'm glad Echo finally came, the squad really needs the mom of the batch right now. Crosshair asks, "No hug for me?" Boy really needs one though.

The boys and Omega gather near Pabu's sunset, discussing the clones left on Mount Tantiss. All they have is Nala Se's datapad that Omega took to help her and Crosshair escape, but nothing else. Echo mentions Tech, and they all look down in silence. Tech was always the one who was able to figure things out, but now it's harder without him. Crosshair looks down sadly, and I could not get over this part. He lost his twin, and he wasn't even there for it. He didn't know when. All Crosshair can do is mourn like the others, but he never got to see Tech for one more time. The datapad is also shut down, so it's going to be even harder to use it.
Crosshair mentions that they can go to an Imperial facility that will be easy for them to use, and Hunter says that he will go with him and Echo, needing Omega and Wrecker to stay on Pabu. Omega has her heart set on rescuing the clones on Tantiss, and Hunter doesn't want to risk losing her again. After a little debate, Hunter lets Omega come with. Echo raised this girl right; she knows when to never give up.
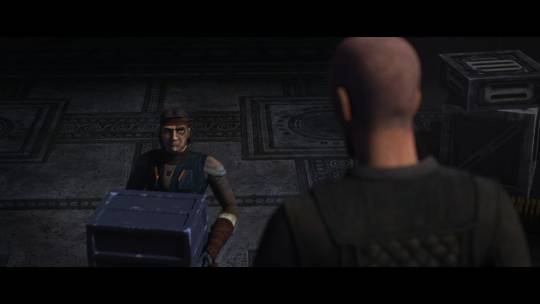
While getting ready on Echo's ship, Crosshair and Hunter avoid each other like the plague, refusing to talk to each other. Honestly, I don't blame Hunter; Crosshair performed a lot of mistakes, but Hunter would need to talk to him.
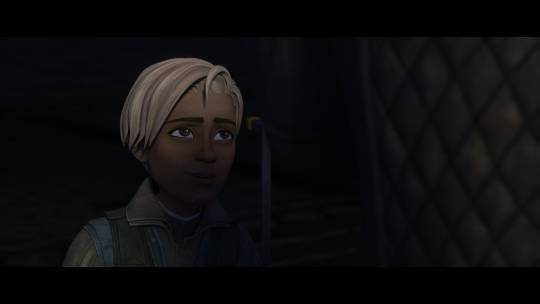
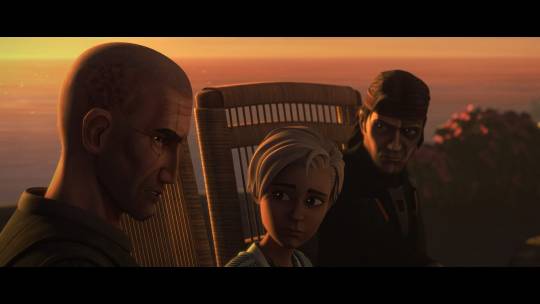
Omega keeps talking to Crosshair, being the only one who Crosshair can trust right now. Omega calls him "little brother", and Crosshair smirks and lets out a small chuckle. I swear, Crosshair was so soft this episode.
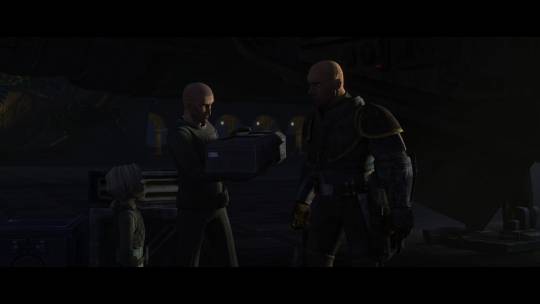
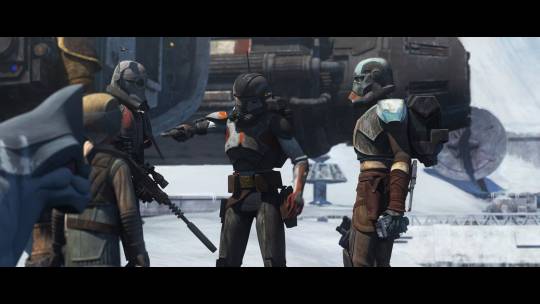
Wrecker comes up to Crosshair and hands him a large crate with Crosshair's old armor inside. They never got rid of it, no matter how long Crosshair was gone.
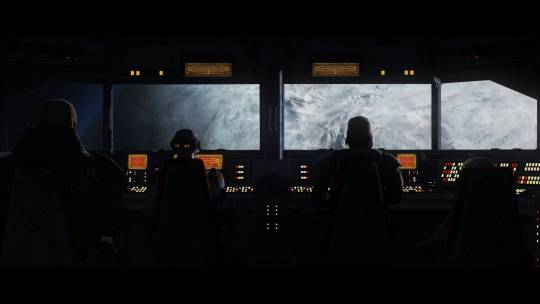
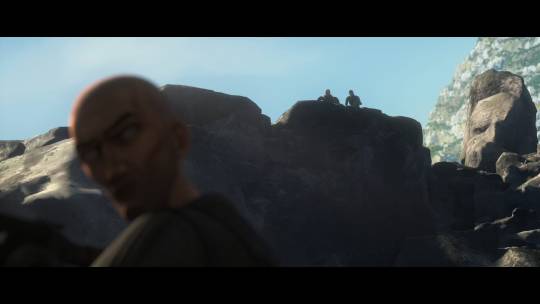
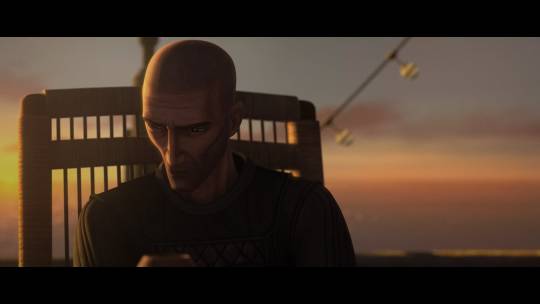
They arrive on the planet Crosshair is directing them to, and it turns out to be the planet where Crosshair had killed that Imperial officer, and the same planet where Mayday died. A place now buried with even more snow. Crosshair puts on his old armor, and he looks better than never before.
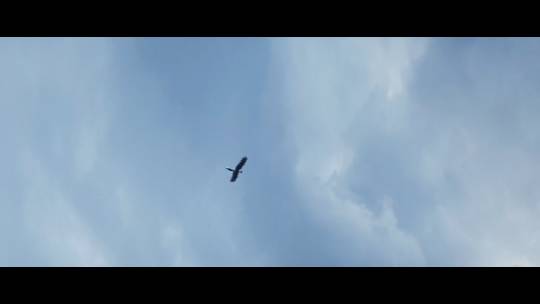
Crosshair sees the same bird again flying overhead, and he often saw it throughout this episode. I love the symbolism with this bird, and now Crosshair is free.
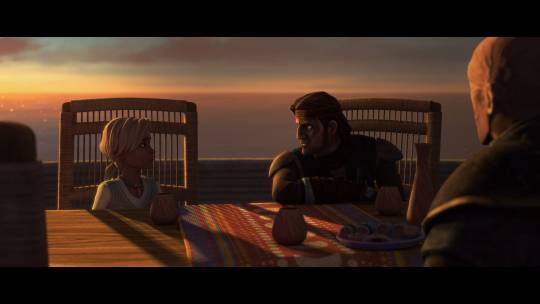
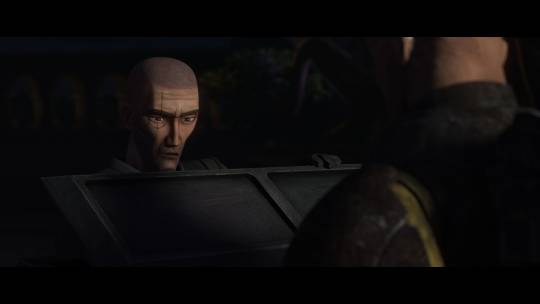
As Batcher locates facility sensors and the team decide what to do next, Hunter and Crosshair begin to argue with each other. Echo breaks up the fight, since this is not the time for any. Omega scolds Crosshair, and Crosshair replies, "He started it." If that isn't peak sibling energy, I don't know what is.
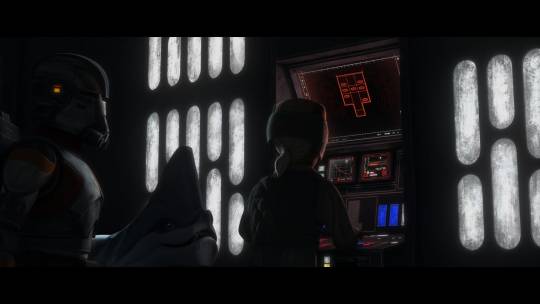
They manage to get the facility open to hook the datapad up, while Hunter continues to watch Crosshair. Crosshair knows and senses this, but doesn't say a word.
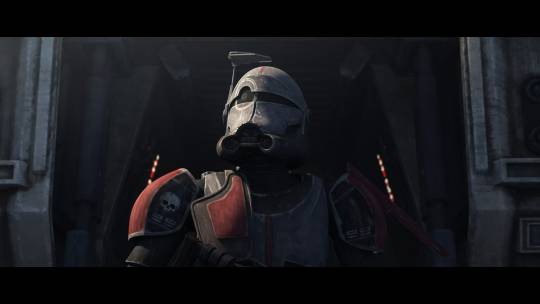
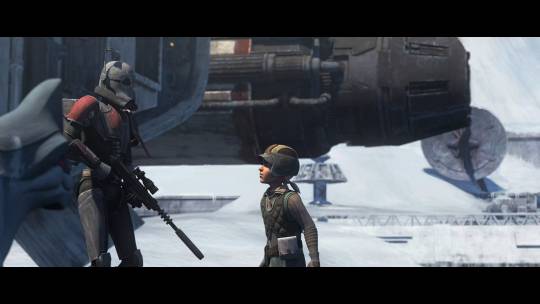
Crosshair looks around and finds Mayday's helmet, along with the helmets of the other clone troopers Crosshair had met before. He puts them up, remembering his friend. Hunter watches him do this, but he doesn't know what happened here. Crosshair went through a lot here.
PART 2 OF DISCUSSION (explained above): https://www.tumblr.com/twinsunstars/744497062228492288/thoughts-on-the-bad-batch-episode-5-the-return?source=share
#star wars#the bad batch#the bad batch spoilers#the bad batch season 3#the bad batch hunter#the bad batch crosshair#the bad batch omega#crosshair the bad batch#star wars tbb#bad batch crosshair#clone force 99#the bad batch wrecker#the bad batch echo#tbb#sw tbb#crosshair and omega
25 notes
·
View notes
Text
so, Freed vs. Mirajane aftermath moment. Every once in a while I think about it and how important the scene is. talking about this right here; [manga panels for reference + full text + some other appreciation/art posts while I'm at it talking about this fight [1] [2] [3] [4]]. reposting this as text only post because tumblr does the weird thing of completely swallowing posts that have an image in it atm.
Three quick things because, in my humble opinion, this is still one of Fairy Tail's most beautiful scenes.
Firstly, Freed recalling things his guild mates have said to him, showing him that they accept him and want to spend time with him? That he's truly not been alone or had to limit himself to his team and Laxus as outcasts? It's a shame anime-only watchers never got to see this because there's also so much information in it.
Erza has sparred with Freed in the past and clearly considers him S-Class worthy? Makarov telling/trusting Freed to look after Laxus? Natsu finding Freed intriguing enough to challenge him for a fight, Cana wanting to share a drink in good company, Reedus complimenting his appearance? It's asll so good, there are so many factors at play there! Definitely should have been in the anime too because it adds not only information about Freed himself but also how others may view him and relationships between characters.
Secondly, Mirajane crying and Freed then also bursting into tears finally allowing himself to feel this emotion and process Mira's eye-opening words. And how they both can relate to it so well. With Mira and her background story, her feeling for a long time as though she had to isolate herself to not hurt anybody and Freed building up armor around his heart because we can only imagine what powers like his, powers like the Raijinshuu's, had them go through and deal with. We may not know their backstory but we know it's tragic like everybody else's. Dark. Troubled. The She-Devil and Freed the Dark, they both must have felt so incredibly lonely for a long time and had/have to learn how to open up their heart again, let other people in. Truly. And after Mira had her eyes opened at some point, she was now able to open Freed's.
And thirdly, and that's a more self-indulgent than analysis - don't lie to yourself by saying you've never considered how this very moment would have been such a good one to start investing into their relationship. Be it platonic or romantic. God knows Mirafreed is a ship with so much wonderful potential and for some time I know you and I both had hoped that a ship would be developed between these two, and I say this as a major Fraxus shipper. 'Let's try to have fun at the next Harvest festival' - The thought of Freed and Mira having a date at the next Harvest Festival? Absolutely wonderful. Splendid. Them teaming up in the future being the badasses they are and understanding each other's troubles with their powers? Like, Freed and his team mates all have to deal with their eye magics (that I'm certain aren't 'learned' and eye magic as a whole is a touchy subject) but there's also that part of Freed's dark eye magic that lets him transform and he said himself that his Darkness form is forbidden. Likely because there's always a chance of losing control or losing himself and who if not Mira would understand that fear and trouble more.
Alas, they didn't end up having many interactions after this. Freed was kept more to his team and Laxus and Mira more to her siblings. But man, one way or another, this moment is beautiful and I just know they get along well in whatever form that may be.
42 notes
·
View notes
Text
Hi there! I have never gotten around to make a gif tutorial because there are plenty of good ones out there and I suck at explaining things. Back when I basically use my side blog (@marvelsaos) as my main, I didn’t get that many questions regarding gif making, I presume because many people who followed me there weren’t gif makers. But this year, I finally come back to my real main blog and started posting more gifs over here. This blog is where I mostly follow gif makers and is mostly followed by gif makers. I have gotten a lot more ask on how to achieve certain things in my gifs, most notably my recent Winnie The Pooh set. And this is why I decided to make this post. This is by no means a tutorial, just a post sharing my giffing journey and the things I do in gif making that might be of your interest.
‼️Tons of rambling below. Text, image & gif heavy. Proceed with caution‼️

Table of Contents
Introduction
The Basics
Everything about making a simple gif from start to finish
How to optimize your giffing process
The more advanced stuff?
“Recolouring” & rotoscoping in After Effects
Tutorials mentioned in this post
Acknowledgement
Feel free to jump to any section you find useful. Most of the ramblings are in the introduction.
1. Introduction
i. How I started
You thought that was the intro?! I’m the kind of person who someone would know for a decade without hearing me say a word, and when I finally spoke (usually about stuff that I’m passionate about) I just go on and on and on and it shocks people to no end. I’ve been on tumblr 10 years now as some of you might know I’m doing my 10 year celebration, but I didn’t start giffing until about 7 years ago. And I just realised I have never properly introduced myself. Hi! My name’s Winnie and my username across all social media is Ms_Stanatic. Before I started giffing, my main fangirling platform was IG, and boy I’ve got sooooo many accounts I don’t even remember all of them, the bigger ones were mofy, ouat & aos related, and these days I’m giffing all of my old favs for old time sakes. If you happened to know me back then, drop by and say hi. It probably felt like I drop off the face of the earth when I quit IG. The show that got me started on giffing was, as some of you might know, Agents of SHIELD. @marvelsaos was my “main” blog for the first 6+ years of my giffing journey. Now thinking back it was because I finally got my first laptop when I got into uni and didn’t have to make edits on my android phones anymore. But at the time, all I wanted to do was to capture Melinda May’s eye rolls and actions and static images just weren’t doing it for me anymore. And that’s how I embarked on the journey of gif making.
ii. Tools/ Softwares I used
I had a Macbook air back then, and finding a cracked photoshop for mac was kinda hard, so I had to settle with GIMP. Without the GAP plugin may I add because I do not know how to install it till this day, so it was just pure nightmare. Making gif in the beginning was the most tedious thing I ever did, I’ll explain a bit more later on. The giffing community felt very different back then. I don’t know if it’s because I wasn’t aware or because I wasn’t in it. I felt like there wasn’t as many giffing tutorials on this site, and all I kept seeing was people sharing their psds. It might have been useful if I had photoshop but I didn’t. So the idea was that you can just open up the psd files and drag the adjustment layers onto the image stacks that compose of your gif, and the adjustment layers would affect all the layers beneath it. Not with GIMP though. In GIMP, the adjustment layer(s) only affect the single layer right underneath it. You heard me right. At that time the gif size limit on tumblr was 2mb, a gif I made is usually 20-30 frames/ layers. So I had to duplicate the adjustment layers 20-30 times, them move them right above each image layer. And if I don’t like how it looks, I had to do it all over again. This is slowly turning into a rant but seriously thinking about it gives me headaches. Also, did I mention I didn’t even read up on tutorials and stuff, I basically just googled everything I needed, how to screencap, import it into GIMP, crop & resize, how to use curve, then lastly how to export. No sharpening, no nothing. I didn’t even learn about recolouring like less than 2 years ago (my AoS peeps know which post I’m talking about 😉). This went on for about a year or two, then uni got busy and my life basically went downhill. Somehow, AoS pulled me out of that deep dark hole and get me back on my feet again also because I finally graduated but I’d like to think it’s my love for tv that saved me. I got a bit more time on my hand, I decided to go back to giffing and this time I was determined to get GAP installed on GIMP and have it working. But alas I have failed once again. It was around that time I found out photoshop’s older versions like cs5 was free to download, so I got that instead and finally begin giffing with photoshop.
Moral of the story: Try your best to get photoshop for giffing. It’ll save you so much headache.
And my story didn’t end there. While I was using cs5, I think many people have switch to photoshop cc which has the timeline function for things like smart sharpen (which was a major topic back then) and keyframes (which is what I heard people talking all about these days). Even without timeline, photoshop is definitely a step up from GIMP personally and I managed with a workaround on the smart sharpen function thanks to Julie (@doramilaje). Side note, all the gif makers (beginners & experienced alike) I’ve talked to are all such amazing people. They put so much energy into this craft and are more than happy to talk to you about it when asked. So don’t be afraid, just ask nicely. And maybe go off anon, you might make a friend or two.
2019-20 were probably my most prolific giffing years, I giffed non stop every single day as if it was my full time job. For me, it was something small and easy to complete and it kept my days going. And eventually my Macbook Air that I’ve been using for 5 years was starting to give up on me. And when I upgraded the OS system to Catalina, it no longer supports cs5 and I was devastated. I eventually got my hands on photoshop cc 2020, and in some ways I re-learnt how to make gifs again (like for the third time?).
I knew it was about time to get a new laptop. And now that I know I’m gonna use it for some heavy duty, and I didn’t want to get another macbook because I’m just not that crazy about it and at that time I wanted to use avisynth (more on that later) which was only available on windows (I didn’t know how to install vapoursynth on my macbook ok?). Eventually I got a gaming laptop with a 10th gen i-7 processor and a Wacom Intuos Pro using my sibling’s student discount. I got the Wacom tablet trying to get into digital drawing, but eventually it came in super handy with just day to day editing and especially recolouring.
Moral of the story: Start with whatever you’ve got, then upgrade your equipment when you’re serious about it.
iii. What I’m doing now?
This year has been kinda different for me. In the past, it has always felt like I’m on my own sitting in front of my laptop churning out gifs 24/7. This year, I’ve joined a couple other blogs and gif maker/ ps user networks, learnt a whole lot of new things and diversified my giffing content (I have been giffing AoS 99.9% of the time non stop previously I kid you not). And I’ll be back in school for my part time masters a month or two later, so who knows how often I can gif. I don’t ever wanna stop giffing but I know one day I will, and before that day comes I just wanna share some of my memories with you guys on this hell site. So, basically all that led to this post.
2. The Basics
I’m gonna assume you have a bit of knowledge about gif making. If you’re a complete newbie, I’ve tried my best to link some tutorials to help you understand or get started. And don’t get intimidated by the length of this post. Even though a lot goes into gif making, once you get everything sorted and find your routine, it’ll become second nature. The following is simply my workflow of gif making. It is by no means the right/ better way of gif making. Everyone does things a bit or drastically differently, I’m just here to share my process in hopes that someone might learnt something new or find something interesting. If I got something wrong, feel free to inbox/ message me and address it politely, since I didn’t exactly started out giffing with clear directions, I do get some of the fundaments wrong. And I am no expert in photoshop or any editing software, it’s more of a learning as I go sort of thing. So just take everything with a grain of salt. With all the disclaimers out of the way, here come the things you’re probably here for.
i. Video source
There’s one simple rule, go with the most HQ one, I’m talking 1080p or 4k and make sure it’s the biggest in file size because not all 1080p are created equally. Here’s a post by Taylor (@kylos) explaining all of that and where to download as well. For the most part I just use 1080p because I personally can’t tell the difference but I’m sacrificing a lot of time for a 4k video to load/ process. It’s only instances like these I would use a 4k source.

(gif taken from my set here)
Downloads are gonna take up space but you probably want to keep them if you might gif the show/ movie in the future again since you already spend all that time downloading, so you might need to invest in some hard drives for this. I used to use my uni’s unlimited gdrive plan which was available even after I graduated, but after Google cancelled it I was in huge trouble. I save pretty much all my hd downloads and all my psds & gifs. I’ve recently got a WD Elements 12TB just so I can transfer all 6+TB data on my gdrive to there with space left for the next couple of years.
ii. Screencapping vs Video clipping
So there are a couple of ways to go about this that I’m aware of.
screencapping with mpv (tutorial by Taylor) or other softwares
video clipping with handbrake (here’s an in depth tutorial on gif making including clipping with handbrake by Nums @cillianmurphy), vlc, km player, etc.
video clipping + cropping + resizing with Vapoursynth (download here | tutorial by Em @realstraykids)
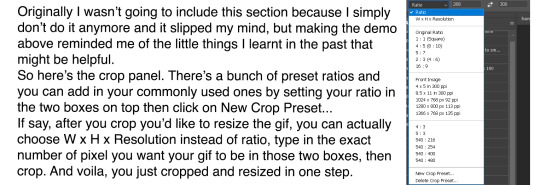
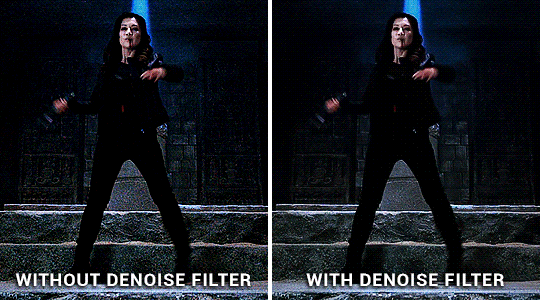
I have tried all of the above. I started with screencapping till around late 2020, when I found out about avisynth (now replaced by vapoursynth) and finally got my hands on a pc where I can download it. I was using screencaps for a really long time because older versions of ps don’t have timeline, I would end up having to convert the video back to frames anyways so why don’t I just import screencaps as is. I think it’s the same logic for me now, because I start all of my editing in timeline, so it’s just quicker to import video clips for me (especially when comparing screencapping with mpv vs video clipping with handbrake). From late 2020 till now, I mostly use avisynth/ vapoursynth. There should be less detail lost when resizing using vapoursynth compared to ps. Personally, I think ps does a pretty good job and I wouldn’t say vapoursynth is a must, it just happens to be a video clipping and resizing two in one tool for me. Vapoursynth has additional denoise & sharpening tools, but I just couldn’t quite get the setting right to incorporate them into my giffing routine, so I stick with ps for those purposes.
Here’s a comparison for you if you’re thinking about using it. On the left is how I used to gif without vapoursynth. I did the same thing for both gifs except for sharpening, because the clips from vapoursynth just look slightly sharpened to me so I compensated with more sharpening on the left. Honestly, now looking at it side by side I actually like the one without vapoursynth more 😂 I’ll let you decide for yourself. Also, when I’m doing a huge compilation set where there are a lot of gifs and they are basically tiny and I don’t really have the dimensions in mind yet, I’ll just go with video clipping. It’s faster and I can resize it later.
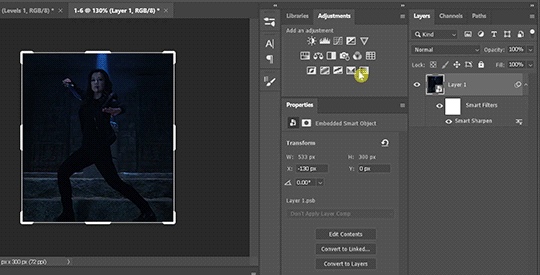
iii. Resizing
There might be reasons why you don’t want to use the W x H x Resolution crop for your gif, because in the image size panel you can actually choose how you want your resampling setting. Normally I just go with Preserve Details 2.0, and set reduce Noise to 100%.

iv. Sharpening
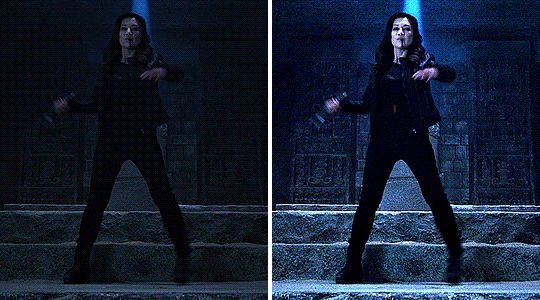
Once I load my clips into ps, the first thing I do is add smart sharpen to them. For the longest time I only sharpen once. Here’s a sharpening tutorial by Ava (@anya-chalotra). I think those settings are mostly what people use and if you’re new to this you should probably stick with that. But I’ll let you on a secret (not a secret anymore now that’s in the open), I don’t do the whole over sharpen then blur it out thing, I just sharpen to the amount I like. This is coming from someone who spent the first 2? years giffing without sharpening, and when I do realize people sharpen I didn’t even look/ properly follow a tutorial on how to do it. I just knew smart sharpen is a thing. So, I’m sure there’s good reasons why you should sharpen to 500% then add gaussian blur and you probably should do that too. Prior to using vapoursynth, my settings were like radius 0.3, amount 100%-200%. With vapoursynth, I find it slightly sharpens my clips so I go with radius 0.3, amount 50% like 90% of the time.
Then there’s the second sharpen thing if you noticed in my banner gif which I learnt from Sid’s (@sidonidoneeey) tutorial recently. I think it adds more contrast & definition to the objects in the gif.

Here’s a comparison for you to decide for yourself. I tried the max sharpening then add gaussian blur method in the second gif, and I’m still not quite convinced.
v. Colouring
This I would say is pretty much the essence of a gif maker’s style. Again, everybody does it differently, different gif makers swear by different adjustment layers.
Here are some tutorials for getting rid those difficult colour cast:
Kate’s (@dewandawise) channel mixer tutorial
Airam’s (@magnusedom) colouring tutorial
The best/ most experienced gif makers I know all swear by channel mixer so you should definitely check out Kate’s tutorial.
Personally, my routine adjustment layers are like the ones in the banner gif. Levels → (+/- Curves) → Colour Balance and/or Selective Colour and/or Hue/Saturation → (+/-Vibrance). Then repeat any of those if necessary.
Levels:
Personally, I always start my colouring with levels. When I first started giffing, all I heard about is curves and I spent a lot of time fussing around with it not knowing what it actually does. Until I found out about levels. It is way easier to understand than curves and very suitable for beginners in my opinion.
You basically drag the right most arrow to meet the right side of the histogram. What you’re doing is telling ps what value in the gif you want to be the brightest (aka white), and everything beyond that value is going to be white as a result. You do the same thing on the left, and in this case defining the darkest/ black in your gif. I find this to be the simplest way to brighten and add contrast to gifs. The results as you can see is night and day.
Curves:
Curves can basically do what levels do but more. See those two arrows under the histogram in curves (right), they basically do the same thing as what I just showed you in levels (left). And then obviously you can manipulate the curve to get your gif how you want, but honestly I still don’t fully understand what curves is so I’m not gonna try and explain that to you. What I can do is show you some other neat tricks you can do with curves.

You can click on the hand with the pointing finger icon, click and drag up to brighten or down to darken on any area in the gif you’d like to edit.
Another thing I like to do is click on the white (last) or grey (second) eyedropper, then click on an area where you think should be white or grey to get rid of any unwanted colour cast. This video tutorial goes more in depth and is more of a proper way of doing it, but I just don’t bother with doing all of that normally.
So here you can see I click on the grey eyedropper, than I clicked somewhere in the background I think should be grey, ideally further away from that blue light beam behind her because everything near that is just gonna be more bluish. And you can see immediately the ground has less of a cyan tint and there’s more red in her skin. Sometimes, you have to try a couple of different places to get the best results. Sometimes, it just won’t work at all.

You can also Alt+click on the auto button, and a panel shows up. Click on them and see if any of those works for you. But normally I don’t use this because I have already enhanced the brightness and contrast with levels.
Once I get my overall values how I like it, I go into colour correcting. Usually nothing drastic, just trying to get rid of any colour tint and get the gif to look more neutral in colour. My go to are colour balance, selective colour and hue/saturation.
Colour balance:
This is usually my go to to adjust the overall tone of the gif, and the panel gives a good visual of rgb vs cmy.
Selective colour:
This is when I only want to adjust the tone of a particular colour without affecting the rest of the gif. I usually go to red the most to adjust characters’ skin tones. Also, people often ask if they should use relative or absolute mode. I would say for simple adjustment I would go with relative because it’s more subtle, but for major colour change and I want it to really show I’ll go with absolute.
Hue/Saturation:
This I usually go in and click on the hand button then click on wherever in your gif you want to change the colour. Slide the hue or saturation slider around till you’re satisfied.
If you want to, say, change your background to a single colour, check the box colourized. And slide the hue slider to your desire colour. Then paint black over the object in the layer mask to preserve it’s original colours.


Also, that slider you see right there. The center light grey region is where the colours would be affected by the changes you made. And the two darker grey regions flanking it are sort of a buffer so the colour transition isn’t as stark if it makes sense. You can basically slide those sliders closer to each other so the adjustment affects a smaller targeted range of colours. You can always crank the saturation to the max to see what part of the gif you’re changing the colours of.
Photo Filter:
This is a cool one that I learnt about recently. You can basically apply a warming/ cooling filter to quickly change the tone of the gif. Sometimes it helps with getting rid of that last bit of an unwanted colour filter.
vi. Blend modes
Do you know that you can change the blend modes of your adjustment layers to get a different result? I don’t think a lot of people do this, I don’t either most of the time. But there are a couple ones that you might find helpful.
Screen: This will brighten up the gif a lot, could be helpful with really dark scenes.
Colour: When I want my adjustment layer to only affect the colours but not the brightness of the gif.
Luminosity: When I don’t want my adjustment layer to affect the colours.
Here’s a video explaining all the blend modes in photoshop.
vii. Denoise & Clean
It was from the same post that I learnt about avisynth that I found out about Topaz Labs, particularly their denoise plugin & clean plugin. I won’t go in depth into that because I’ve tried it a couple of times and couldn’t get the settings that work for me and it is very time consuming. But if it is something you want to try, here’s a post of the user sharing her topaz settings. What I actually want to talk about is Camera Raw in ps.
I normally add my denoise filter after I coloured the gif, because all the brightening and saturating the gif with colours add more noise to the original clip itself. But if a scene is particularly grainy to begin with, I’ll add a denoise filter right after sharpening, add my adjustment layers, then another denoise filter if necessary. Also, if you want to keep more details in the certain areas like the hair of the characters, just take a soft round brush and paint black in the smart filter layer mask.
Go to Filter → Camera Raw Filter. The denoise function is under the tab Detail. I usually only move the noise reduction and colour noise reduction slider, and keep the detail at 50.
There’s so much more you can do with camera raw. Here’s a tutorial by @michietuts on how to colour your gifs with camera raw. I actually completely forgot about it until I went digging for tutorials for this post. I think the reason why I never got into using camera raw to colour gifs is simply because there’s too many sliders and it’ll take a long time to figure out what works, so I just stick with what worked for me.
viii. Convert to frames & export
After I add all my adjustment layers and denoise filters, I normally convert it back to frames for further editing because I find it takes so long for the video to play in timeline mode. It’s just easier for me to gauge what I want to do with the gif in frame mode, such as whether more adjustment is needed, or how I want to crop my gif. I know a lot of people would just edit everything in timeline mode, and convert back to frames as a last step to change the delay to 0.05s before exporting. You can do it however you want. It’s just spending so much time with cs5, I’ve grown accustomed to editing in frames mode.
Here is my export settings:

For most people, it’s the choice between selective vs adaptive and diffusion vs pattern. Personally I prefer how adaptive pattern looks and I rarely change it across different gifs because I have my export action automated. There’s more explanation and comparison in Ava’s tutorial here.
ix. Subtitles
The majority of gifs I make are what I call “scene edits”. Not that I’m lazy or anything and don’t want to be bothered with making fancier gifs, it’s just what I like to do. Especially when giffing a show I haven’t giffed before I always start with making plenty of scenes, to the point where I can recall just about any scenes from that show when I want to make a fancier gif set. So I’m just gonna share me text settings for the subtitle, show you how I center the text box to the bottom and how to duplicate it to the rest of your files.
Press T for the text tool, and type in whatever subtitle you need. Here are my subtitle settings:

Alt+A to select the whole canvas then press V for the move tool. Then select align horizontal centers and align bottom edges.

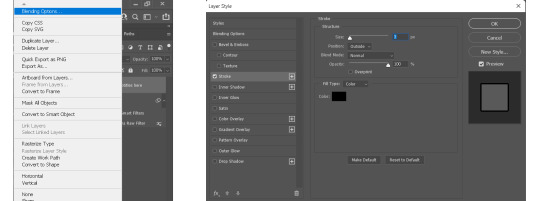
Now that you have your text centered at the bottom, you might want to style it. I usually go for a stroke outside the text, some people op for drop shadow or both. Right click your text layer and select Blending Options... Check the Stroke box, change the size to 3px, position to outside and colour to black.
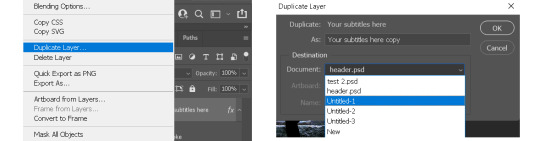
To duplicate text box to the same exact position in another gif, right click your text layer and choose Duplicate Layer... Then choose whichever document you want to duplicate to and press ok.
And of course I have my text duplication automated, so the text would show up in all my gifs in a matter of seconds.
x. Recap

3. How to optimize your giffing process
i. Actions
This one single function in ps is gonna save you sooooo much time & energy my friends. If you’re a chronic giffer like me, you probably spend all your time starring into your computer and just clicking away like a manic, especially those times when new episodes drop and everyone is trying to get their gifs out there as quick as possible. Let me tell you, life before I found out about actions was miserable. Back then, my laptop was even slower, so maybe after I did one thing I had to wait for it to load, then repeat the same process to the rest of the gifs in the set, which is normally 10 in total. I had to grab my laptop with me during meals because I basically couldn’t walk away from it. Actions was a lifesaver, especially for things you’d routinely do when making gifs like sharpening, resizing, denoising, convert to frames, export, etc. You basically use actions to record yourself doing it once, and you can just hit play every time you want ps to do it again. And to take it a step further, you can automate ps to play that action on all the opened files. You then record that automation into an action, then voila you can sharpen/resize/export all your gifs in one click. Now, I can click automate convert to frames, go out and eat dinner and come back to it.

Now here are my actions. I know the naming doesn’t make much sense to you, but basically I have actions to automate sharpening, denoising, converting to frames, setting frame delays, exporting and saving. And yes, I do regularly hit that automate save button so I don’t lose everything when my ps crashes. Then there’s actions for formatting subtitles, duplicating layers, pasting frames after or over frames. I think this covers about everything I use on a daily basis.
Here’s how you record an action and automate said action. (Left gif) First you click on the folder icon to create new set, name it and click ok. Click the + icon to add new action, name it and press record. Then you do whatever you want to record, and when you’re done click to stop button to stop recording. (Right gif) To create an automation of the new action, click the + icon to add new action, name it and press record. (Third gif) Then go to File → Automate → Batch. Choose the set the action you want to automate is in, then choose the action. Click ok then stop recording. Now you have an action to automate the previous action you made.
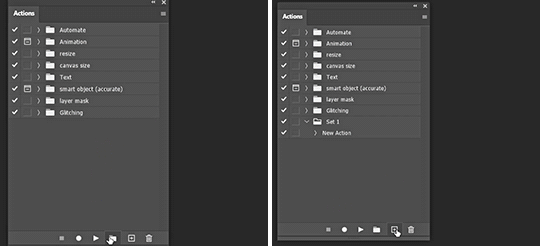

(gif below) The box on the left of your action is the dialog on/off button. Basically if you check it those dialog boxes will pop up every time after you played the action, which is good if you want to customize every time but not so much when your goal is to click one button and let it run across all gif without interruption. I check most of them off except for the denoise filter which I do want to customize for each gif.
To get the action panel to look like the one I showed in the first picture, click on the little button on the top right corner of the actions panel and choose button mode. And you’ll get to play an action by simply clicking on it.

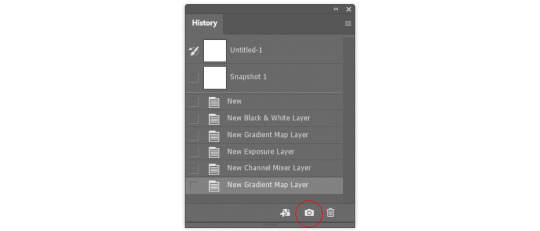
ii. History
There are a couple of things I do in this panel. Have you ever make an adjustment, undo, make a new adjustment, and now no matter how many times you hit revert you just can’t get back that first adjustment you made? There’s a simple fix in the history settings. Click on the little button on the top right corner of the history panel and choose History Options, then check the box “Allow Non-Linear History” and click ok.

I often like to use the history to go back to previous adjustment, because I can see clearly what has been done (sometimes I click on the wrong button without knowing) and I can go further back without keep hitting Crl+Z. You can also click on the camera icon in the bottom right to take a snapshot of the current process/ step of the gif, so in case you don’t like some changes you make, you can always go back to that snapshot. Or you can take snapshots of different adjustments you made to the gifs, then you can quickly compare how they look by toggling between snapshots.
iii. Keyboard Shortcuts
Know/ customize the shortcuts for things you often do, such as Crt+Z for undo, T for add text, V for move, Crl+A for select all, etc. It’ll save time & effort in the long run.
To customize, simply go to Edit → Keyboard Shortcuts.
iv. My Workspace
I’m the least organized person I know but I still want to talk about my ps workspace. It’s been structure to fit my giffing needs. Basically all the panels I need are there, and I maximize my space for the document window and timeline.

If you go to Window → Workspace → New Workspace, you can save your current workspace as a preset. So maybe if you moved things around or accidentally closed some panel that you don’t remember the name for, just click on that preset workspace, or if it says you’re already in that workspace click reset “whatever the name of your workspace” and your workspace will be reset. There’s mainly 2 workspace I toggle between, one for giffing and another for digital painting.

4. The more advanced stuff?
i. “Recolouring”
I’m not gonna spend a lot of time on this part because the next part is actually what I really want to talk about. But Hue/Saturation is going to be your friend if you want some major colour change. Then add a gradient map over it for good measure. I’ll link some tutorials for you if you don’t know what I mean.
Becca’s (@yenvengerberg) mega colouring tutorial
Kate’s tutorial on @usergif (←there’s all sorts of gif tutorials in their resources directory, go check it out)
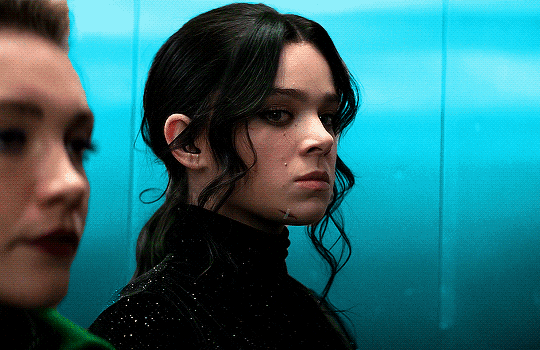
People would always tell you to find gifs where the character barely moves or the background is of a contrasting colour to make the process easier. Now, with timeline you’ve got keyframes to help with slightly more movement. But what if you want to make something like this gif below? 😨
I made this during my earlier days of recolouring (which was not that long ago), and the only thing I could think of was colour it frame by frame. This gif has 73 frames. There are 8 gifs in this set which I had to all colour frame by frame. It was a long and tedious process I tell you, but the results, in my humble opinion, is stunning!!! But what if I tell you it can be done without colouring it frame by frame and it only takes a fraction of the time I spent?
(gif taken from my set here)
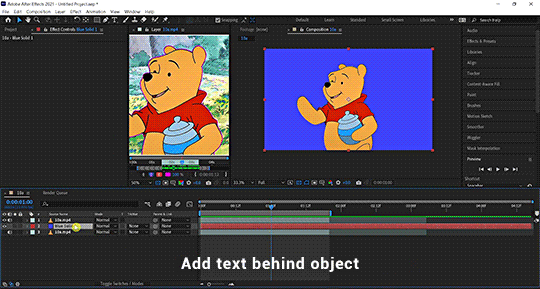
ii. After Effects & Rotoscoping
The reason I started using after effects was for this gif set. I got a gif request and my inspiration was the intro from the youtube channel sortedfood. Here’s how one of the gif looks like.
See the character cut out on the right? Basically the same thing in my recent Winnie the Pooh set. In my first trial, I was trying to do it frame by frame on ps like I always did, but there was no way I could get it looking smooth, it gets very jagged when the background was a completely different scene. And with some googling, that’s how I found out about rotoscoping on after effects.
This is the youtube tutorial I learnt it from and the one I send it to people when they ask me how I do character cut outs like that. I’ll try to quickly show you how I do it below, but please refer to that video if you want more details.
Usually I export my gifs as videos in timeline mode in ps, then import the video into ae. After I’m done, I’ll export the ae file as video, import it back into ps, convert back to frames and do the rest.
Here are my steps to rotoscoping:
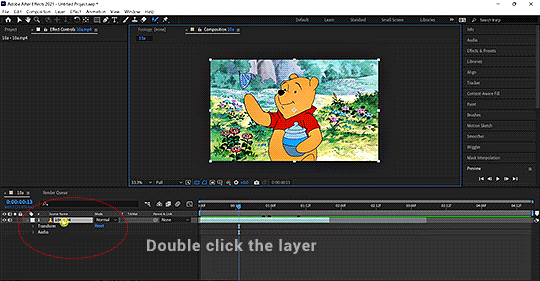
Double click the layer you’d like to work on. The layer window should pop up and that is what you want to work with.
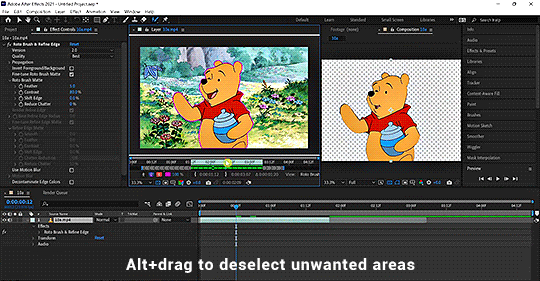
Click on the Rotobrush tool and paint across the object you want to include. Always paint across, not outline.
I have my roto brush set to version to 2.0, and I would change the quality from standard to best.
Continue painting until everything is included. Alt+drag to deselect unwanted parts. Hit spacebar when done and let it run.
You can change the properties of the roto brush selection in effect controls.
If you want a more detailed written explanation than this. Go to adobe’s help page on roto brush here.
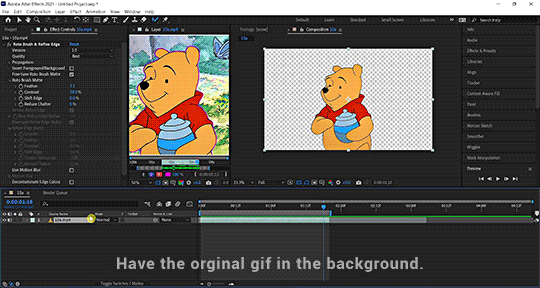
Once you have the cut out of the object you desire, there are many things you can do with it.
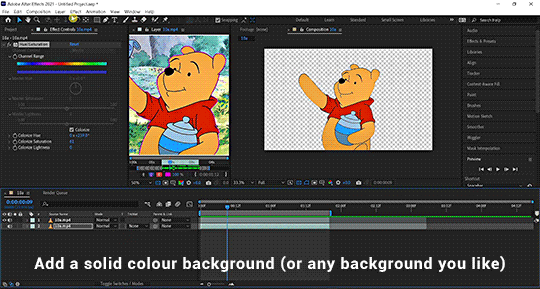
Duplicate the original layer, change the colour of the bottom layer as aforementioned. And now you have a gif with a different coloured background.
Or you can have a different background (either a solid colour or a different video/gif)
You can have text behind the object, etc.

You get the idea. (This is a simple demo, please excuse the quality and choppiness of the gif)
Now you’ll never recolour gifs the same way again. Here’s a Kate & Yelena gif for you guys (even though it’s not the best, could’ve blurred out the edges a bit more but it’s still pretty damn awesome and I wouldn’t have coloured it like that if it wasn’t for ae)
(gif taken from my set here)
Here’s another gif I made with AE from this set. The possibility is endless and I’m barely scratching the surface. I can do a separate AE tutorial if you guys are interested. Let me know in the comments or tags.
5. Tutorials mentioned in this post
i. Text tutorials
@kylos’s film downloading and screencapping tips for making gifs
@kylos’s gif tutorial
@cillianmurphy’s giffing 101- your ultimate guide on how to make gifs
@realstraykids‘s gifmaking with vapoursynth tutorial
@anya-chalotra‘s sharpening & exporting tutorial
@sidonidoneeey‘s sharpening tutorial
@dewandawise‘s the beginner’s guide to channel mixer
@magnusedom’s colouring tutorial
@yenvengerberg’s mega colouring tutorial
@usergif’s how to change the background of any gif tutorial
adobe’s Roto Brush and Refine Matte
ii. Video tutorials
PiXimperfect’s Color Correction with Easy "4-Point" Technique!
PiXimperfect’s The Science of All 27 Blend Modes in Photoshop!
@michietuts‘s How to Color Grade Gifs Using Camera Raw
C.M. de la VEGA ‘s Get the Best Results with Rotobrush 2
6. Acknowledgement
Thank you so much to the authors of all the amazing tutorials, everything was so eloquently written, well explained and easy to follow.
And a huge shoutout to the people at @pscentral & @womenofmcu. Our conversations on gif making have prompted me to write this post.
I’ve learnt so much from the people at psc and thank you Ace & Val for creating this place that I didn’t even know I needed. It is one place I feel truly belong. So If anyone is interested in gif making, come join us at pscentral.
And thank you to the ladies at womenofmcu for being so nice and welcoming, always love chatting with you lot.
Last but not least, I’m patting myself on the back. For someone who’s terrible with words this is one hell of a long text post.
As always, happy giffing!
#completeresources#allresources#ps resources#userdanni#maystag#usergiu#tuserheidi#usershreyu#uservivaldi#userfnuggi#supervalcsi#aphrandt#userdean#userannalise#userrainbow#uservier#userelio#rogerhealey#tusercat#my tutorials#gif tutorial#even though I said this is not a tutorial I still need to tag it in a way I can find it
295 notes
·
View notes
Note
Good to know you're feeling welcome! :D this is our little place in the internet, and we've decided to make it trans and gay as hell (n i gotta say, i did think "they-them gang! :o" when i found out you started using they/them too a while ago X3 ) n if you received this ask more than once, my tumblr bugged out before i could finish, sorry (。_。)
anyways, and sorry if this is long, but Woe- More Tumblr Things Be Upon Ye:
there used to not be an image limit before, causing a few- interesting posts… tho that changed a few years ago and recently, at first the limit being 10 images per post to now 30 images per post (you can also move the images around a bit)
if you plan on staying long term on tumblr and use desktop the most, i recommend getting the browser extensions Xkit &/or New Xkit cuz… yeah, tumblr is pretty nice, but it sometimes gets hard to use. it also adds extra useful things to the tumblr experience, which is nice to have. i'd say tumblr is like living in a cheap apartment in a calm area of the city. the place's great for what it is, just gotta be sure to leave rat traps near holes and dont worry about the Beast down the hall,
speaking of rats, we got an infestation. you may or may not have heard of it with the voter fraudage going with the polls a bit ago; since tumblr has little to No email verification, people outside tumblr buy bots to get in here and start posting malicious links. tho the bots are surprisingly easy to identify (often times blank blogs with very weird descriptions + stolen picture of lady or ai generated. you'll know it when you see it), and the protocol here is block and report spam so staff can deal with it
and btw if you want to keep a post for as long as your blog stands, i recommend rebloggin! thanks to how tumblr is build as, even if the original post or that blog is gone, the reblog will stay with you (+ tags on reblogs dont really make a post expand outside of your own blog, so many use this to create Very intricate personal tag systems to make easier finding posts, bc once a blog gets 1k+ post in it, it gets hard finding anything on it... <- knows this from experience u.u)
oh and last thing before i go again (and something i found out recently), another browser extension ive been loving: Stylus! with it you can customize a ton of sites to your liking And with a specific style found in the archive of this extension, you can change how the dashboard looks! even changing the background to any image you might want :D
so yeah, thats it, for now. i got more info if you want it, just lmk 👉👈
and you probably already noticed this, but there isnt really any word limit for posts or asks around these lands. tho on tags, the character limit on a single tag is 139. but you can put a Lot of tags, so there! be free mx quinn, no character limit holds you down no more ヽ(✿゚▽゚)ノ
Thank you so much for the knowledge!
Some Quinn Facts:
Mx., Ms. and Miss are all acceptable :)
I use “gay as hell” as a sort of tongue-in-cheek shorthand, but I also identify as trans as hell, queer as hell, non-binary as hell, lesbian as hell, and anxious/depressive as hell
I’m a vegetarian
My favorite food is pineapple pizza (controversial, I know)
For a few years in the early 2000s, I was a licensed auctioneer
The most times I’ve ever cried during a movie is 5 times during Happiest Season
I like the idea of books, but I’m bad at reading them
Overalls give me gender euphoria, and I don’t know why
I hope to release a solo album within the next year
I hope to direct a feature-length film by the time I’m 40
Coming out was the best thing I ever did
#i am now testing the one hundred and thirty-nine character limit of the tagging system—not because I don’t believe you but because this just#is how my brain works#limit reached#test complete#thank you
58 notes
·
View notes
Text
how i make scripts aesthetic
on google docs (on pc) <33
Part One - Images
! Due to Tumblr's 30 image limit, I'll have to make this in parts. This one revolves around how I sort pictures to make them look aesthetic or just more organised in my script.
+ I'm not the best at organising tutorials sometimes but I'm trying to not make this confusing <//3
Ignore any typos and errors, thankyou. If you need me to re-explain anything, please feel free to ask. I feel like I haven't explained properly but, idk what else to do, lol :,)
Page isn't broken, to avoid messing up the way images are organised.


— ◦◦◦
What do I use?
Other than Google Docs (obviously),
— Fontspace | A background remover [my mains: 1, 2] | Pinterest/WeHeartIt/Google search, and other sources for pretty pictures, pngs, etc. 🤍🌙

bundling images
Using the different text wrapping options, I found that it helped a lot more to "bundle" images together, so that things look prettier + more organised.
! example

This is pretty simple, honestly; Fontspace provides font text as pictures, transparent bg and not, — so organising the text from it will fall under the tut for this bit.
^ These are the text wrapping options. The first one is the default and limits text placement/movement, the other four allow you to move text where-ever on the document (especially if print view is off) but each do different things.
In order of settings, examples (press images to see properly):


! tip : If you're bundling images that "overlap" too much, make sure to crop at least one (or however many needed) past its actual size so that it won't be a pain in the ass moving them later on.
- You may also use "behind text" for one of them, if it helps, so that it's easier to select the images, this also applies to using image over text (examples in each image).
what I mean:

Using these features, I'll—as per the aesthetic of my script—sort things accordingly. Get creative with the way you're doing this, and keep experimenting 'till you're able to make stuff look the way you want, lol.
"BuT DaRLIng wHaT Do I dO wItH ThIS iNFo??!?!?" bitch idk find an aesthetic 💀💀
like those 2016 fashion sticker books or smthn, idk- whatever u like-
Going into the aesthetics more ;; I usually pick diff aesthetics for each script and refuse to script until I find a pretty one LMFOAOAO- But I especially go for inspiration from (Korean?) bullet journal aesthetics which include lots of image bundling and customised tables.
Why korean ones specifically? Idk the difference, but using "Korean" as a keyword gets the stuff I'm looking for. 💀 But I also search for little pngs I want to add to my script; and if it's a false transparent png or has any background, I use my background removers to make it an actual transparent png.
And, sometimes, I like to search for colours then use my snip tool to screenshot them really thin, like those brown-beige borders you see in all my posts, then use them in my script like highlighter lines, like-

That's pretty much it, really.
! examples from two of my scripts


Fontspace fonts apply as well. One thing about Fontspace is that, you can change the colour of the text ;; as well as the background.
The brown colour is the text's colour, the blue one is the background's colour. You can of course choose to have no background, but it's there as an option.

I don't know of any features where you can save a colour but that's maybe me being dumb ;; but what I do is set a certain colour (i.e. blue) then use the colour adjustment in google docs to change it to black, red, or whatever over colours r in the script.
i.e.:


Anyways I'm p close to the image limit, so that's it for this post.
I hope this makes sense bc explaining this was harder than I thought. 💀💀 Once again I can clear anything up if needed

! tips
Keywords you can use for tiny decorations, are "clipart", "[aethetic name] clipart transparent png", "[aesthetic name] sticker png transparent", etc.
You can have a look at the aesthetics wiki for ideas for your script
Fotor is what I use to crop images into different shapes, and it is how I got the circle/heart shaped pictures in my documents ^-^*
...I'll add more when I remember them.
next up ···
customising tables ✿
#—DARLINQ'S DOMAIN🤍🌙#reality shifting#reality shifting script#shifting script#shifting realities#shiftblr#respawning#idk what else to put#im just using tags bc itll probably help ppl#i feel so shy posting bear w me 😔❗❗❗
111 notes
·
View notes
Note
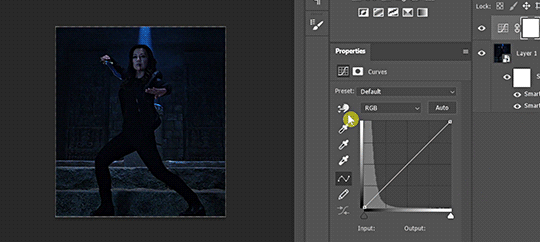
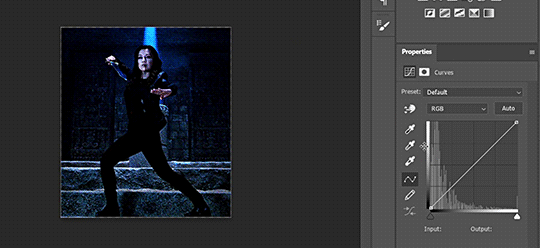
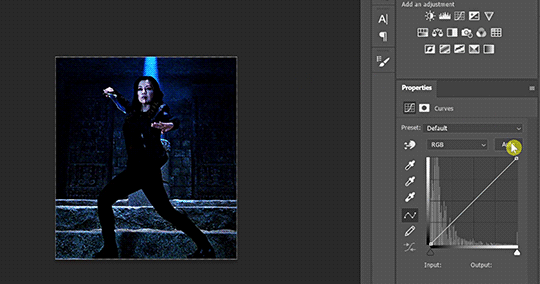
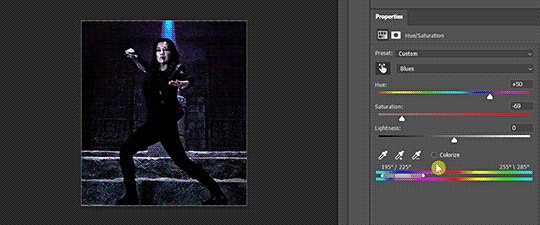
Hi there! I've belatedly seen your question about coloring, and I'm someone who likes to tweak color, so in case it helps, I thought I'd write up some things I might do. I don't know if you have the same tools I have, but I saw you use Color Balance, so I've used that for an example below.
I usually start by adjusting lighting levels so that the lightest and darkest points are where I hope them to end up. Then I'd adjust color hues which in your case was using the Color Balance tool. I might also adjust the saturation or vibrance because too much can cause colors to get extreme quickly. Here are some quick settings I did in Photoshop.
Levels: dark point=19, mid point=1.37, light point=249, output levels=18 to 255
Color Balance: shadows red+13, green+5, blue-4; midtones red-8, green-9, blue+3; highlights red-60, green-28, blue-25
Saturation: reds-8, master-4
Here's the result:

I know it can be hard to translate setting between different apps, so I wonder if this will be helpful at all, but feel free to ask me questions if you're so inclined 😊
~ Dani
WOW, your results are incredible! Thank you so much for taking the time to play with this and to offer some tips! Adjusting lighting before trying to adjust colors hadn't occurred to me at all.
I'm using Adobe Premiere for the video editing, so same software company at least, but I couldn't find any lighting level settings like what you described. Through Googling, it looks like a setting called "Lumetri Color" is typically used for lighting corrections and it's broken out differently.
I have to go to work pretty soon, so I haven't had sufficient time to really dig into it and play with it, but I did mess around with it a tiny bit. I'll play more this weekend and see if I can get closer to what you were able to accomplish.
For reference, my original adjusted version (which I can see now looks soooo horribly orangey compared to yours!):

As a starting point, I just clicked the friendly "Auto" button on the Lumetri Color tab to see what it would do. A little better, still pretty orangey.

Then I tried to make some of the color adjustments that worked for you. It looked like your adjustments had been based on my adjusted version, so I'm not sure if my attempt at making it a direct mathematical adjustment was the right way to go, but I tried to add your adjustment #'s on top of my adjustments. So for example, I'd had Shadow Red set to -10 and since you said you added 13, I changed it to 3. When I changed all 9 settings it didn't improve too much, definitely nothing like yours:

But while applying those changes, I noticed that before I applied the last two (highlight green and blue), it looked closer to what you had. Still not there yet, but closer.

Once I have time, I'll play with some of the Lumetri sliders and stuff a bit more. It may also help just to have your beautiful image as a reference point. Thanks so much!
Addendum: Additional Efforts
I spent some more time playing with this. I present two versions for your judgment.
The first version isn't exactly like yours, but it looked pretty close to my eyes. So I was happy for a minute or two. Then when I started watching the video instead of just staring at the still frame, I felt like it looked a little too green. Maybe that's because I've spent so many hours staring at my previous orangey version that my idea of what looks normal is skewed.
So in version two I adjusted the Tint setting. I feel like this looks a little better, especially when I watch the video, but I don't trust my judgment at all. My color judgment was bad before, and now I think my eyes are permanently warped from staring at different shades for so long.
I'm including both versions below. For each version I'm including a side-by-side comparison with your example vs mine. I wanted to include a video clip for both, but it looks like tumblr limits it to 1 video, so I only included the video for version 2.
Please don't be afraid to tell me they both look horrible! I feel sort of like the proverbial monkey hitting a bunch of random keys and hoping I might hit upon Shakespeare by pure random chance. 😅
Version 1

Version 2

14 notes
·
View notes
Text
GIF MAKING IN PS
i've never done anything like this before so hope it makes some kind of sense.
so before you get into making gifs first thing so will need is some sort of editing software (i use ps 2022) and some raws obviously. most of the shows i gif are on yt so its pretty easy to get them and you can use any kind of yt to mp4 converter.
so once you have all of this i guess we can get started!!! on a daily basis i do not follow all these steps because you can easily turn them into actions on ps, which means that it would take just seconds. so although it may look lengthy its pretty simple
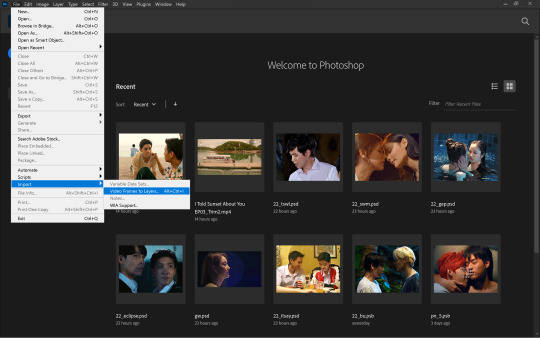
the first step to making gifs is importing the raws. you first want to go to file>import>video frames to layer. this will open up your file explorer from where you can choose your desired file. you may want to make sure your file isn't an mkv one but an mp4 before you do this. also if your raws are large, perhaps a whole episode or longer than 30 minutes, it might help to trim it down beforehand to make it easier to work with.
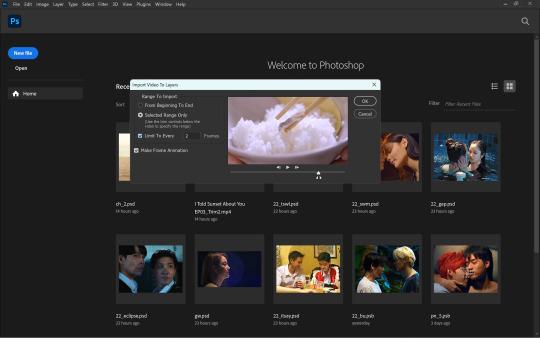
once you select your file, this window will open up. here, you can move the sliders to select the exact part of the clip you want for your gifs. (when files are larger, it would be more difficult to capture smaller parts of the clip using the sliders) although optional, selecting the limit to every 'x' frames will help reduce the size of your gifs while not making it look too choppy. i do 'every 2 frames' for regular scenes and leave it unchecked for anything in slow-mo. more than 2 usually makes the entire thing look sped up and choppy so i wouldn't recommend it. although it depends on the raws ideally you want something around 80 frames for one gif.
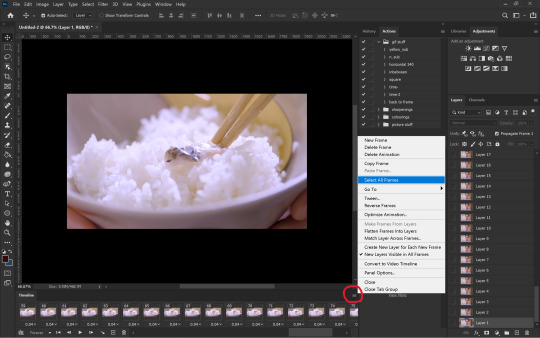
once you press okay on the above step, your workspace will open up and from here we can start making the gif. the first step would be to set the time delay. this is two ensure that the gif doesn't look sped up. for this you want to first select all the frames as shown above.
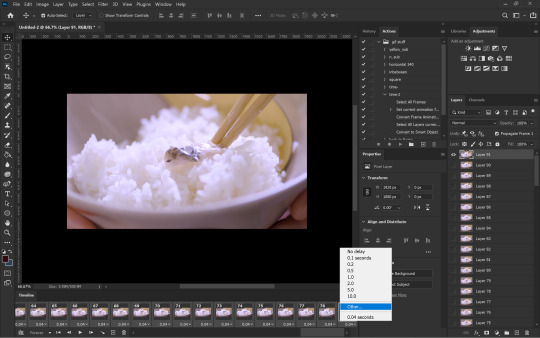
next, you can click on the downward arrow on any frame to change the time delay. i usually prefer 0.07s which you can set in other...
once you've set the time delay, you have to convert the frames into timeline as shown above.
now that you have your timeline as seen on the left side, all you have to do is convert everything into a smart object. for that you have to first select all the layers using the shortcut Ctrl+Alt+A and then right-click on the layers followed by convert to smart object
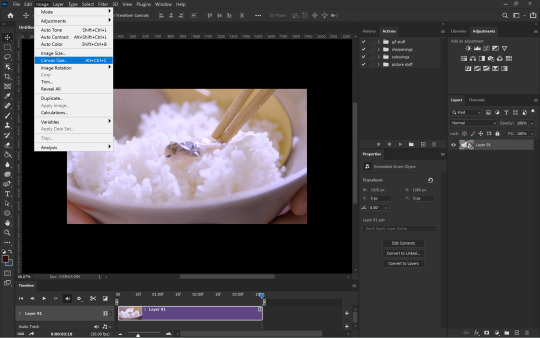
now you can see that the many layers have been converted into one layer making it easier to work with. the next step is to resize the gif. the original dimensions would make the gifs too large to fit tumblr's size limit, this can be done by going to image>canvas size
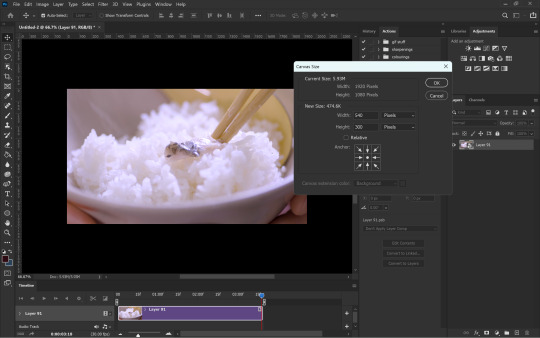
to ensure that tumblr does unnecessarily crop your gifs you want to make sure width is always 540px if there's going to be only one gif in a row. the height can be anything depending how you want your gif to look.
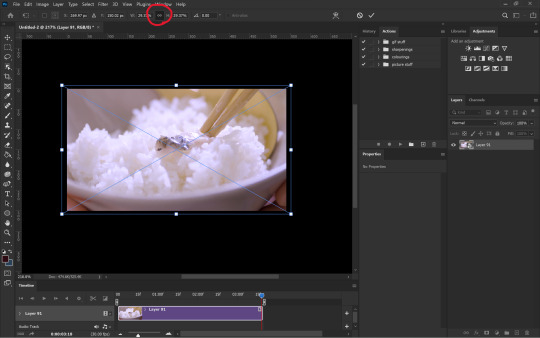
you can adjust the gif onto the new canvas using Ctrl+T to transform the layer. always ensure the height and width are linked to make sure you don't squeeze the image weirdly.
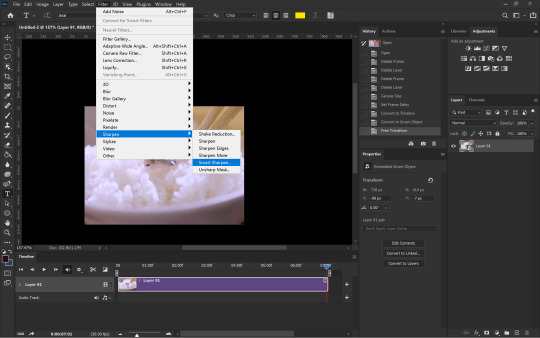
after resizing the gif, i next sharpen the gif (which is my least favourite part). you can sharpen by going to filter>sharpen>smart sharpen while the noise filter is in filter>noise>add noise
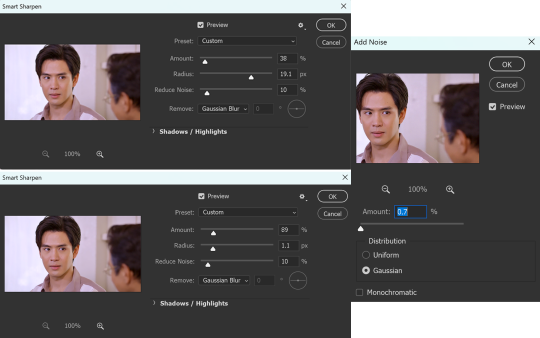
although i don't always stick to the same sharpening, these are the settings i use the most.
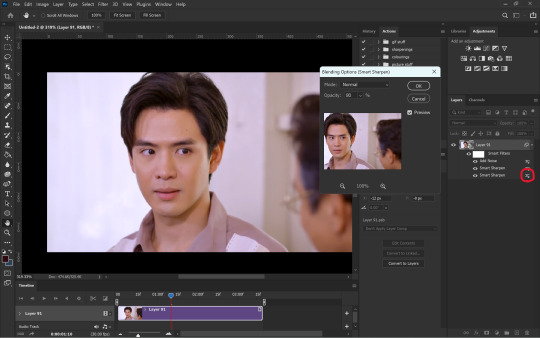
once i'm done with the sharpening i like to soften the first smart sharpen filter. for this i change the blending option of the first filter to 80%. this is entirely optional.
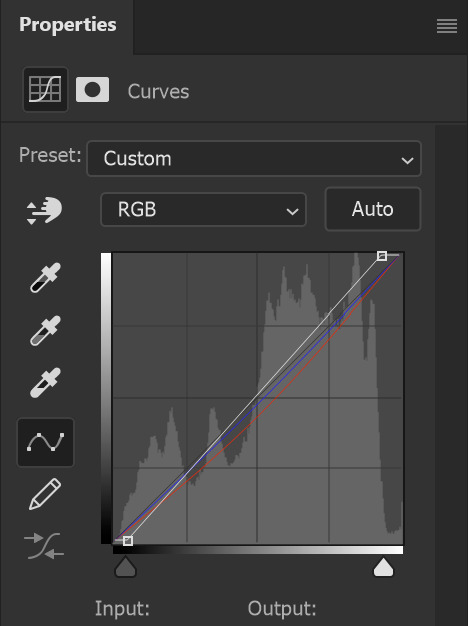
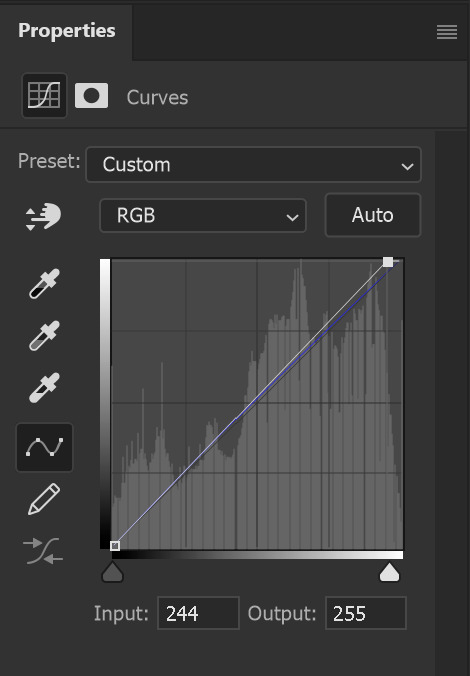
once sharpening is done, you can colour and edit however you like using any of the adjustment layers. i mostly prefer curves and selective colour. these are the curves i used for this particular gif to remove the purple/redness it had going on. in RGB mode the white slider adds brightness and the grey one darkness/contrast. then you can individually use the red, green and blue modes to adjust the colours. i only used selective colour here to adjust the skin tones a bit so i haven't added that.
once done with colouring all you have to do is export the gif from file>export>save for web (legacy)
in the last window you have to make sure your looping is forever and that your gif is below 9.5MB. although tumblr says max gif size is 10MB, at least for me nothing over 9.5MB uploads.
and THAT'S IT (i say after a whole one page essay) your gif is ready!!! honestly i don't know if this is the easiest or most convenient method but this is just how i do it. also i use actions for everything other than colouring so it isn't as time consuming as it looks. you can also set shortcuts for importing and exporting to save time. this can be done from edit>keyboard shortcuts
since you made it to the end here is an extra bit on captioning
you want to start with a normal text layer and center it at the bottom of the gif. i use arial bold italic in size 16. next to make it look better we can add an outline and shadow to it through the layer style. and you can open up this window either by clicking the fx option at the bottom right or double-clicking the text layer.
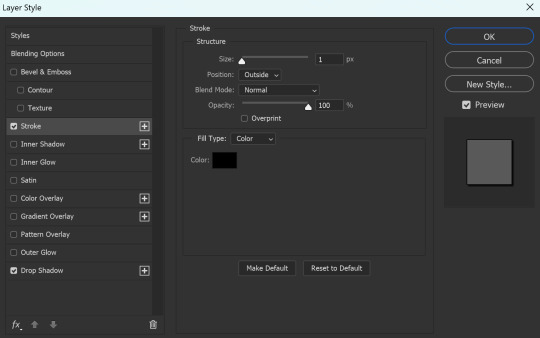
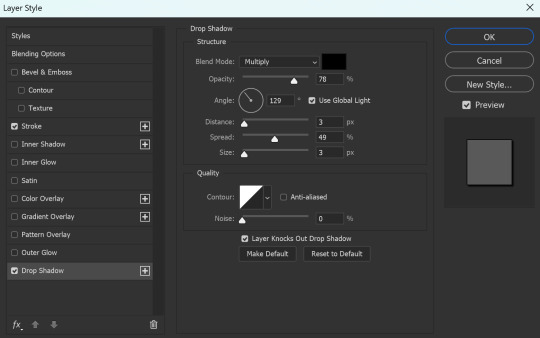
these are the settings i use for the stroke as well as the shadow
now it is ACTUALLY the end!!!
#gif making#ps tutorial#gif making tutorial#photoshop tutorial#hope this makes some sense 😭#i made the important stuff bold so that you don't have to necessarily read through the whole thing#i had to go take a look at my actions cause i had actually forgotten my settings in the first place
86 notes
·
View notes
Text
Retrospective 2023 (3)

Haven't looked at numbers in a minute, and since my presence online has been super inconsistent (especially here) recently, I have no idea how this will end up looking. I've updated this sheet a couple of time during the year, but not in a way it tracks old numbers...
Because Tumblr has a limit of 20 images per post, I won't include the graphs here, like I did last year, but in this doc (for those interested).
Also, I realised I didn't even do celebration posts for milestones this year... And there were quite a few ;-; sorry
For the relevant projects, I've also included a more detailed recap of what's been done this year. All of it is under the cut.
The projects are ordered in date of release.
Forewarning, those stats are not a good representation of IF/Tumblr popularity. The numbers should not be taken as a baseline for comparison. There are many different factors that resulted in those, most of them being out of everyone’s control. I am only comparing myself to Past-Me.
2021 Releases

Status: Complete.
No major updates, since the game is complete. Only some maintenance fixes.
The source code of older versions is also available on my GitHub.
Stats:
5.475 total plays (+1.7k-ish)
30 ratings (+5), with an average of 4.4/5 (+0.1)
Inside 316 collections (+108)
Almost 2.3 views/play (+0.1)
Unsurprisingly, the interest for MtP is going down. The game is complete, has not and will not have new updates. It would surprise me if it would gain any traction at this point.
I expect the additional plays not to pass 600 by the end of 2024.
2023 Milestones:
5k plays
30 ratings
PLAY | INTRO POST | RATE | REVIEW

Status: Hiatus
I wanted to have an update for this project in 2023. It didn't happen.
There is actually quite a bit of work to do in the code, which I had started but didn't complete.
Stats:
40.326 total plays (+12k-ish)
97 (+28), with an average of 4.6/5 (-0.1)
Inside 2.679 collections (+913)
About 2.0 view/play (+0.1)
For a year without any update, I am honestly surprised so many people still played the game this year (average of 30 plays/day). I'm very grateful about it, nonetheless.
Hopefully, I'll have something to show for this year!
2023 Milestones:
30k + 40k plays
75 ratings
PLAY | INTRO POST | RATE | REVIEW

Status: Hiatus
This was another project I had planned to complete this year and... didn't. I managed to write a bit for the game, but nothing that would warrant an update.
Stats:
2.203 total plays (+760)
13 ratings (+2), with an average of 4.3/5 (+0.1)
Inside 126 collections (+38)
Went to 2.9 view/play (+0.2)
There were a few jumps in interest in Exquisite Cadaver this year, especially considering there were, once again, no updates (especially at the start of April). But nothing very substantial...
I'm honestly pretty happy peeps still enjoy the game, because the whole thing is a bit strange xD
2023 Milestones:
2k plays
PLAY | INTRO POST | RATE | REVIEW
2022 Releases

Status: Completed
Absolutely nothing has been happening with this game, not even a bug fix or anything. When I get back to this project, it will be for a complete re-haul. Which won't happen in a long while.
Stats:
3.205 total plays (+790-ish)
19 ratings (+4), with an average of 4.3/5 (=)
Inside 293 collections (+90)
About to 2.2 view/play (+0.1)
2023 Milestones:
3k plays
PLAY | INTRO POST | RATE | REVIEW

Status: Completed
There was a plan to fix the issues in the game AND add new content. But, if you've followed me this year, you've seen... nothing happened!
Honestly, a whole re-code of the game is needed at this point.
Stats:
1.458 total plays (+785)
16 ratings (+6), with an average of 4.5/5 (+0.3)
Inside 103 collections (+59)
About 2.1 view/play (=)
The lack of blowing up stands on two things: the game is not that good... and I don't really have an intro post peeps can share...
2023 Milestones:
1k plays
PLAY | INTRO POST | RATE | REVIEW

Status: Ongoing
Out of all the WIPs I have, this one got the most progress. It got two major updates during the first half of the year (one of which included a maze!). The second had been spent working especially on Chapter 5 (it's a chunker) and starting Chapter 6 (for MelS).
We are trying to wrap up the project for 2024.
Stats:
9.379 total plays (+6.4k-ish) (so close…)
56 (+28) ratings, with an average of 4.8/5 (=)
Inside 783 collections (+444)
About 1.9 view/play (+0.1)
A pretty decent growth for the game, though it is not always consistent. Most interest in the project happens during updates (duh), with some dozen returning players weekly. I don't think it will ever reach the level of CRWL, but it is doing pretty well considering the genre.
2023 Milestones:
5k plays
50 ratings
PLAY | INTRO POST | RATE | REVIEW

Status: Completed(-ish)
Until the first anniversary of this project (coinciding with the EctoComp once more) this game was in French only. Since last October, it was re-written to include more rooms inside the house, and a proper ending beat. It was then translated into English, and the whole thing was recoded.
There are still a few kinks I need to handle, but it is essentially complete.
Stats:
252 total plays (+181)
1 rating with 5 stars (=)
Inside 13 collections (+7)
About 4.9 view/play (-0.7)
Unsurprisingly, there was little to no interest in the game. The page was visited a bunch of times, but few people clicked (probably because it was in French. Since the translation, more users have checked out the game and played it.
I don't really expect much more interest from players, unfortunately...
2023 Milestones:
100 + 250 plays
PLAY | INTRO POST | RATE | REVIEW
Oh... it doesn't have a page... omg.. stpid me.

Status: Completed
This year, the game was re-edited, translated to French, and recoded - a proper remaster including sound!
And another game I can call complete and shelved!
Stats:
605 total plays (+270-ish)
10 ratings (+3), with an average of 4.8/5 (+0.1)
Inside 31 collections (+17)
About 3.2 view/play (+0.1)
I am not shocked to see this, honestly. It's a short meme game around a gimmick mechanic that gets old pretty quickly. Still, some interest made in late last June (somehow???) and when I published the remaster in autumn.
2023 Milestones:
500 plays
10 ratings
PLAY | INTRO POST | RATE | REVIEW

Status: Ongoing
At the start of the year, I updated this game to add a tiny bit of content (a few passages) and ensured it could be played on mobile.
And published a template from this UI.
There was more content written for the game, as well as mechanics coded, but nothing is coherent enough (or devoid of bugs) to be playable.
Stats:
500 total plays (+333 !!!)
4 ratings (+4), with an average of 5.0
Inside 39 collections (+28)
About 3.0 view/play (+0.5)
Combined a tiny demo with a pre-set character, a not super popular genre, not much to do or little replayability... and you get this.
I'll just check back when the game is actually complete :P
Honestly, I'm just glad some peeps caught the inspiration for P-RIX.
2023 Milestones:
500 plays !!!!
PLAY | INTRO POST | RATE | REVIEW
(oh and it has both an intro post and an IFDB page now!)
2023 Releases
Now that we are going into the new releases, there is less comparing, and more putting down the base.

Status: Completed
Biggest high of this year!
Released the game in January, won the comp in March, was interviewed shortly after, remastered the whole thing during the summer break (which included a total re-haul of the UI, an English translation, and increased content).
Hands down my best game of the year.
Stats
967 total plays
7 ratings, with an average of 5.0
Inside 68 collections
About 3.1 view/play
Lots of views on the game page without plays for the longest time, because, up until the remaster, the game was only available in French. Things picked up then the remaster was uploaded (though it coincided with the IFComp).
The game is also not available for mobile play due to its interface...
2023 Milestones:
Won the French Comp!
100 + 250 + 500 plays
PLAY | INTRO POST | RATE | REVIEW

Status: Hiatus
The first Act of the story was created for the SeedComp! (which didn't win anything because I organised it, and it would have been unfair :P ).
There was a plan to complete the game after the SeedComp! was over, but that didn't pan out. I have notes for it, though a re-write of Act 1 may be necessary...
Stats:
633 total plays
5 ratings, with an average of 3.6
Inside 46 collections
About 2.6 view/plays
While bummed by the average, Not surprised. The game is incomplete and plays on the noir codes, which are... something (also the twist is silly). I'll pay a bit more attention to it when the game is actually complete :P
Also... It never got an intro post....
2023 Milestones:
100 + 250 + 500 plays
PLAY | INTRO POST | RATE | REVIEW

Status: Complete
Released for the SpringThing in the Main Garden, this game was supposed to be updated by the end of last year and... it ended up needed a lot more work than expected. I am still working on it.
This was my attempt in experimenting with Twine, creating a parser with a non-parser program.
It... didn't work all that well as a conventional parser, but it worked pretty well for other peeps.
Stats:
650 total plays
5 ratings, with an average of 5.0
Inside 56 collections
About 2.8 view/plays
Honestly, not bad considering this is a weird parser, that worked eh and still has some issues.
I won't ever expect it to blow up, honestly, but it's nice to see a play or two popup on my screen sometimes.
2023 Milestones
100 + 250 + 500 plays
PLAY | INTRO POST | RATE | REVIEW

Status: Complete-ish
Created for a French Jam where I could not choose the program, the game was then upgraded and translated into English for the Text Adventure Literacy Jam a few weeks later. It was my first proper parser game (and made with Adventuron).
I still need to fix some issues and typos with the English version, and retranslate back into French...
Stats:
The game has currently two pages: French and English
160 (58+88) total plays
4 ratings, with an average of 5.0 and 4.0
Inside 4 collections
About 2.8 view/plays
No surprise here. Parsers are not popular on itch. (I should maybe add it to the textadventure.co.uk website....)
PLAY FR - EN | INTRO POST | RATE FR - EN | REVIEW
Assets and Other Tiny Games

Loads happened with this sections this year, with the addition of 5 new templates, and a whole Guide for SugarCube.
In January, the Setting Template was added - with the Space-Tech UI one following at the end of March, the VN-lite UI one in July, the Character Creator in November, and the Title Page UI in December.
The Guide was released in two periods, with a pre-release before the summer, and a complete one mid-december (which included a download point).
As of last month, all templates are also available on Github, and the Guides are all "playable" on itch.
CScript to SugarCube Guide/Folder
105 downloads (114 plays)
4 rating at 5 stars
Inside 36 collections
Get it here.
Tweego Ready to Use Guide
425 downloads (51 plays)
1 rating at 5 stars
Inside 6 collections
Get it here
Note: this guide got its own page in November of this year, despite being available since 2022
SugarCube Guide
1.300 "plays" (76 download)
11 ratings at 5 stars
Inside 102 collections
Get it here
Templates
2105 downloads
25 ratings, with an average of 5.0
Inside 274 collections
Get them here

After the release of Le Jeu de la Dévotion in late December 2022, I've been participating in other game jams with tiny entries. While one did get a bit more interaction than even my larger piece (Collision, wtf), little really happened to warrant a proper section (they are really tiny!).
And so these were released:
April 2023: À la Campagne [English]
June 2023: Clarence Street, 14, Collision, Intersigne [English + French]
Aug 2023: Le Diner [English]
Oct 2023: In the Blink of an Eye [English + French]
Nov 2023: Tower of Sleep [English] <- BINKSI :D
Dec 2023: Dévoiement [French]
2023 Overall Graph
Ok I lied, one graph:
Compared to last year, the graph is less very high peaks and very low down time (with a slow increase), but a more consistent base (higher than last year) with some moderate peaks for releases (namely Harcourt's and DOL-OS).
The downloads have boomed, but that's because of the templates...
The increase of overall small releases (with jam/comp entries) probably helped in this staying a bit consistent (though I could do a better job at hyping up releases before and after they happen here and in other places). It would probably have looked much different if my release focus was somewhere else (like CRWL).
And that's it for stats (I'm skipping the follower/note counts)!
The 2024-plan is next!
#manonamora#retrospective#2023#year in review#games#indie dev#assets#twine#interactive fiction#interactive games#I can't tag all the projects anymore#because Tumblr has a limit of 20...#milestones#stats
7 notes
·
View notes
Note
would genuinely love to see your process for sketching out your comics!! ive wanted to make my own but i have never really figured out the process and end up overwhelmed- and you're one of the folks who makes stuff in a style that I kinda draw close to, and u do ur comics with pencil and paper- so if you wouldn't mind in the future, it'd be really cool to see how you actually get everything planned :)
This ask is so cute :( probably genuinely the biggest compliment I've ever received! Well, no waiting in the future! I'll tell you now what happens behind the scenes! :)
SO FIRSTLY, I'd like to clarify I am in no way a professional or even close to one, I never even looked up how to do comics, I just kinda do them and use what I've read from DC comics and Pinterest tips.
But! Personally, I find that making comics is fun and that's what I strive on. I won't lie when I say my comics are pretty bland, the surroundings are empty and lame but I think the character's expressions and body language make up for it, and especially the script. So altogether in this post, I'll be breaking down how my comics are made!
↓↓↓ if you're interested, open up the full post!
1 - Scripting
In both dialogue and character detail/placing!
I use a notes app for when I get ideas!
* I usually don't do specific dialogue, only stating the idea and then coming up with dialogue in my head, but there are some exceptions where I do write down pre-thought-out dialogues you can see in the examples I put below!


With the idea / dialogue in tow, we can go to character detail / placing. I don't know the actual word for it but basically how the character acts in a specific scene / dialogue!
Character expression is especially important when it comes to any type of art, be it comics or animation as it can tell a story with little to no dialogue!
* panels taken from 1 and 2 for context

From here you can clearly tell their expressions well! Be sure to exaggerate!
2 - Limit planning
With Tumblr's 10 images limit, as well as Instagram if you post there, it's important to note that limit and know when to end the comic with a good panel where it doesn't feel like it's supposed to continue UNLESS you're making two parts!
I can't tell you how many times I've ruined my sketchbook papers trying to get a perfect script but I've been doing it long enough that my brain has adapted to the limit and every comic I've done since adapting had been a perfect ≤10.
But even if you decide to go with two (or maybe even more) parts, you should make sure it ends well still! Like a book! Those spaces between paragraphs and chapters and such!
Take these for examples too!
* panels taken from 1 and 2 for context


So treat it like a book! I guess ?
3 - Panel placement
This isn't a necessity, but my personal way of drawing each panel is having it scattered around randomly around my sketchbook. I don't use strips or anything like that as it restricts me because using strips on paper is a whole lot harder than on digital. Because I have such a wide area to draw, I'm less restricted from drawing any excess things I want to add in case my dialogue doesn't fit the panel or so!
4 - Draw
Now to put it all together and make the comic! I usually already have my vision in mind so I can just go draw it without a light sketch layer, but I do recommend it!
What that is is essentially a sketch but drawn like.. your pencil is hovered above the page? Like you don't press down on it or something like that. Basically a guideline! So do that if you need it, and when you're satisfied with how it looks, you can draw it! And make sure it's clear!
After that, it's just picture and post! (Make sure you crop it right tho!)
4.5 - BONUS / TIPS
When I started posting Belos drawings, I never expected it to get any attention or even end up as a whole AU 😭 I just drew him in a babygirl hoodie and people ate that shit up so now it's an AU 💀 and because of that you need to prepare personalized tags!
Tags like pitmdau or sharing caleb au ! Very very useful for navigation
More important than tags, make sure you have a Masterpost!
I'm aware mine are unfinished and very messy and I'm trying to work on that right now but it's very difficult but people really need it so when making Masterposts, YOU HAVE KEEP UP WITH IT. I slacked of for ONE POST and now it's a mess.
Also another important note you can only put 100 links in one post so you have to make more Masterposts to navigate through the comics 😭
5 - Have fun!
When getting into comic making, I think really the most important thing to keep in mind is your enjoyment in making said comics. Sometimes some things can burn you out very quickly so when you're getting into things like this, especially when you're not getting paid, you gotta make sure you have fun doing it. It doesn't matter if it doesn't get a lot of traction or not, it only matters that you are enjoying making and posting them!
I've experienced MULTIPLE burn outs from making too many comics for my TOH AUs that at some point I just completely died and lacked motivation. But what drives me into making them are other people's enjoyment! Their enjoyment gives me enjoyment which gives me motivation to make more. Someday I'll know the AUs I've created will inevitably be over, at some point, but right now I'm just having fun with the small community I've built!
So make comics, and have fun!
I hope this was helpful in any way. I just want to clarify that, again, this is my way of making comics, and you don't have to follow anything I put into the post. I'm mostly hoping this was easy to understand as well. I'm more of a visual learner so making up the words to make this was kinda hard so I'm sorry if some parts didn't make sense. If anything, feel free to hit me with another ask or a PM! I know me not posting seems like I'm inactive but I promise I check Tumblr frequently 😭
Happy posting!!! :3
13 notes
·
View notes
Note
thank you very much for replying and dw about not having an exact answer to my question! do you think other readers may say incorrect facts about the members or idols in general since tarot isnt true to how they really come across as being? like if an idol is a fuckboi itd be kind of hard to prove without knowing them personally thats why im always 50/50 on not always believing the image they put out to their fans. i mean ateez do sound like great ideal partners for many people but i would have to really know them to make any judgements on them thats why i dont get how tarot readers do this but its so cool either way.
if one or more reader say the same thing am i to assume it is correct fact about them or their character / traits or habits?
what do you then think if anyone tried to manifest them as their partner? so many folk wanted jungkook to be theirs is it slim to none chance realistically?
🍷...
i obviously can not speak on behalf of any other reader for how they conduct a reading but in my opinion yes i do believe some words could be heavily twisted to fit a narrative.
there is a discord server for readers off of tumblr and one reader asked for everyone's input on some controversy. when all the other readers were against it they got upset and left. they have posted their own thoughts and almost present it as if it were fact. and it is rather defamatory if i do say so myself.
and because cards can be very ambiguous readers can definitely read things differently from another reader. and that does not mean one reader is invalid. they could both be simultaneously correct and incorrect until something can be proven or disproven. it is a bit of a schrödinger's cat situation.
the readers that can add a lot of detail are not necessarily lying either. some readers can look at a singular card and write paragraphs of interpretation due to the meanings it may hold and the imagery it may have. but sometimes it really is just coming from bias and hence i tend to keep my distance.
if multiple readers say the same thing/s it is not unreasonable to assume something is correct or "factual". but you should still be very careful and always always always take it with a grain of salt. especially if it can be very damaging to their reputation. if it is true it will come out on its own.
as for manifesting an idol to be one's partner it depends. if they are manifesting the idol themselves i become a little cautious. but if it is more so manifesting person like the idol i do not mind as much.
for example "seonghwa as your boyfriend" and "boyfriend like seonghwa". manifesting seonghwa and manifesting someone that acts like him are different.
but people have their reasons and i am not one to judge those reasons.
i do think chances are very slim and pretty much impossible. and hear me out. i do believe in manifestation. i have done it for years and i did it this week.
but - i believe it can only do so much even if you "have no limits" and "can build your reality" because ultimately there is fate. and if something is truly meant to be then it will happen on its own regardless if one manifests or not.
it is also objectively impossible for thousands of people manifesting to all be the soulmate and future spouse of one individual being. not even because of the huge number of people on its own but because bigamy is illegal in korea - even two people would mean no one can be the spouse of xyz.
and these idols are people with their own lives and experiences and they can make their own decisions. plus one person manifesting for a two person connection - where one person is completely likely unaware of the other - may simply not be enough.
that is just me though.
5 notes
·
View notes
Text
With Twitter finally dead (it should've died months ago but I digress) Twitter peeps are coming back, so I want to suggest some things for a lot of the art folks returning (but only if you want to)
Tag your art posts as #my art so its easier to find your art on your blog
Please make reblogging art posts a habit instead of just liking them. Tumblr doesn't use stupid algorithms, you and everyone that follows you can only see things if you reblog them. The only good thing likes are for is making people feel good. Otherwise they help no one get seen
Make an art blog for people who are only interested in seeing art and not personal stuff. Its super simple to make a side-blog and to change which blog to post stuff to (the only downside is remembering to switch to your personal)
Tag your art posts well. There used to be a "1st 5 tags appear in tag search" feature, but they've bumped them all the way to 30 (last I heard was a few months ago, so idk if that's changed since then) Only tag with relevant information, otherwise you will be reported for spam
Please share artists' commission posts when you see them. With Artificial Images (AI) taking over, real artists are struggling to keep going. For many, art is the only way they can make money bc of disabilities. Support marginalized groups by sharing their commission posts and art
Some people are okay with you tagging them in your OG posts. If you're not sure a user is fine with it, put "please ask to untag". Its not super common practice yet, but it has helped. Feel free to tag me in your posts bc as a struggling artist with no job myself, I want to help others as much as I can, and I will always reblog and Q up art posts (bc post limit (upoading, reblogging, and answering public Asks) is 250)
If you love an artist's work and want to see MORE of it, then you have to reblog it. Leave comments in their replies (if they have them open) and tags to show artists that people still love them and their beautiful works of art. A nice comment goes a LONG way for a lot of folks!
If an artist has merch, Tumblr has an Artist Alley for you to view and buy things from your favorite crafters and traditional artists (if anyone knows the correct tags to use, please let me know so I can add them here)
Feel free to add to this list, as I'm sure I'm missing things
PS: If there are people that aren't kind and humble, just block them, don't engage. You'll have a far better blogging experience if you do this. If someone is tearing down your art bc they're jealous twats, always block. Just be kind to people on here and ignore shitheads
Edit: Changed the wording to not put pressure on anyone since ultimately you get to decide what to do with your blog 👍🏻
#art#artists#artists on tumblr#artists on twitter#art twitter#art twitter refugees#commissions#sharing#reblog#freelance#artist alley#artist support#furry#gamers#traditional art#digital art#concept artists#graphic designers#comic artists#comics
10 notes
·
View notes
Last Seen Blogs
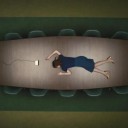
maggieandthegiantpeach
lesbian taurus poet

antfishvo
Anthony Sardinha VO
uglybumbo
UglyBumbo

mushera
Untitled

masswholesalers
Mass Wholesalers