#i was gonna do a gif set but I still don’t have photoshop so keep an eye out I guess 😭
Text
GIF Coloring Guide: An Introduction to Adjustment Layers in Photoshop
This is going to be a super basic guide meant to show you the power of Adjustment Layers in Photoshop. It’s not going to be a step-by-step tutorial, though, in which I dictate what exactly you should do because it will always be different for every gif.
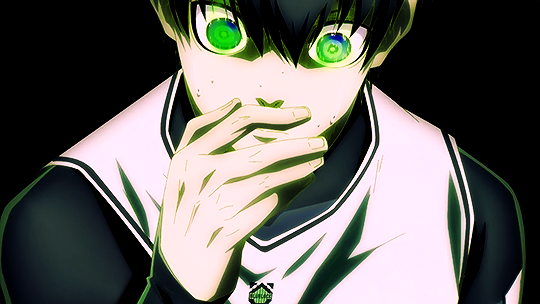
I’ll be turning this Isagi gif:

into this:
What you need:
Adobe Photoshop (any version should be fine. I use CC v23)
Basic gif-making knowledge using Photoshop
Basic Photoshop knowledge in general
What this guide is good for: A simple gif where the brightness and colors of each frame are about the same.
I’m writing this guide for those who already know how to make a gif in Photoshop. You’ve imported your frames, deleted the ones you don’t need, and you know how to save it as a gif. I will only be teaching you how to color, so I’m not gonna walk you all through the Photoshop basics. You can google that yourself.
Now, first things first, I want you to keep in mind that the GIF file format can hold only up to 256 colors. Thus, when coloring gifs, I try to “reduce” the colors by making the blacks blacker, the whites whiter, removing color noise, and de-emphasizing colors that are not essential to the overall scene. Otherwise, the final image will just look noisy or muddy because of the gif trying to compensate for all those extra colors—which is not bad in itself, by the way, if that’s the look you’re aiming for. I just prefer my GIFs to look HD.
And from what I’ve noticed, noisy and muddy gifs will also have a larger file size. The uncolored gif above, for example, is at 6.69mb. Meanwhile, the colored gif is at 4.96mb. Both were exported using the same settings. Although we have a 10mb file size limit for gifs here on Tumblr, I still like to keep the file size down as much as I can.
Now, with that out of the way, let’s get to the actual guide—
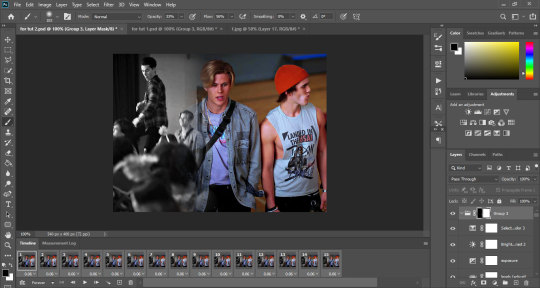
In the Isagi gif I’m using as an example, I made him look like he’s glowing in the dark and also partly blended him into the background. Here’s a screenshot of all the adjustment layers I used to achieve this effect:

All these layers should be on the very top of your gif layers. I grouped them together for convenience in toggling all changes on and off, allowing me to quickly check the “before and after” of the gif.
Before I explain what those layers do, I just want you to know that the order of those layers matter. I purposely put one Selective Color at the bottom, and that second Selective Color is no mistake. More on this later.
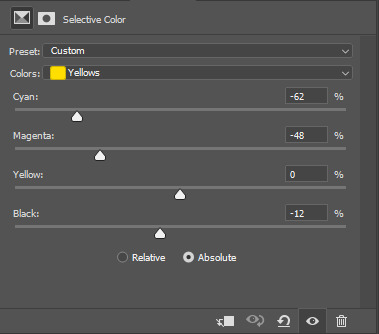
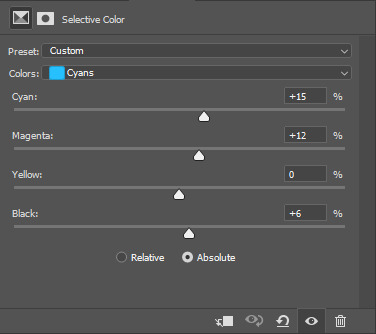
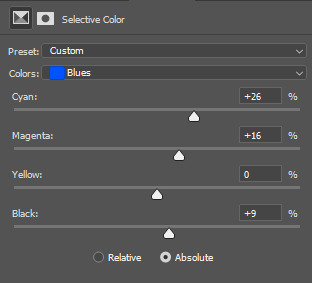
Selective Color 1
Selective Color is my favorite, and it’s also the most important. It lets me fine-tune individual colors without affecting the other colors much. It’s also usually the first thing I add as it lets me pick which colors to emphasize and which to de-emphasize.
Now, let’s look at our unedited Isagi:
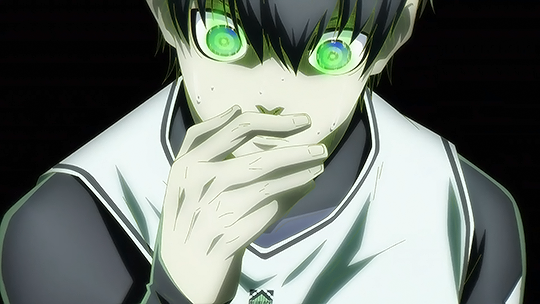
(Above is a still image and not a gif. From hereon, I’ll be using still images coz the gif looks about the same in each frame anyway)
The colors on Isagi look too gray and cold to me. I want to make the black of his suit darker, remove a bit of that green tinge on his skin, make the blue of his eyes bluer, and just give him an overall warmer look.
Here are my settings for Selective Color 1:

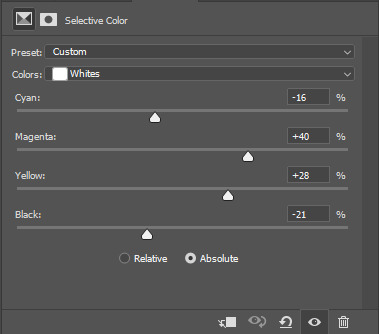


Unedited vs Selective Color 1:

Although I said I wanted to remove the green tinge on his skin, I did not touch the “Greens” at all in my Selective Color 1 layer. That’s because doing so would also reduce the greens in Isagi’s eyes, and I didn’t want that. Instead, I tried to counter the green on his skin by adding some Magenta and Yellow on the “Whites” to make it appear warmer and more reddish instead.
Of course, I didn’t come up with the final settings above in one go. As I added more adjustment layers on top, I would go back to Selective Color 1 and play around with the different sliders until I was satisfied. Gif coloring doesn’t have to be a one-way process. With adjustment layers, you aren’t affecting the pixels of the image itself, so you can always go back and tweak your settings.
Dragging the slider to the right for positive values would return darker colors, while dragging it to the left for negative values would return lighter colors.
I want my Isagi gif to be vivid and for Isagi to look like he’s glowing in the dark, so I dragged the sliders in “Blacks” up to the positives. Then in “Whites,” I dragged the black slider down to the negatives.
However, if you want a more muted look like this Isagi gif 2:

...You can slide the black slider under “Blacks” to the negative values instead.
Curves
Curves, along with Levels, is usually the first thing a gif-maker learns to use. It’s good for quickly getting some nice brightness and contrast on your image. I’ve seen some gif-makers refer to Curves as the better version of Levels, but I disagree. Curves and Levels, though both affect contrast in an image, go about it differently and achieve very different effects.
In my Isagi gif, I used both Curves and Levels. But in some of my other gifs, I used only one of them.
Curves is what I usually add in the beginning stages of coloring (i.e. the layer is placed lower) when doing complex coloring. Although I never make Curves the bottom-most adjustment layer, sometimes I add it first just to give the image a burst of brightness or to quickly darken an image that may be too bright. I would then put a Selective Color underneath to make necessary adjustments.
Our Isagi gif, on top of being still muddy, is now also too reddish. I had only added those reds to get some warm undertones in our gif, and now that we have that, it’s time to reduce those reds. We’re not gonna do this via adjusting Selective Color 1 because doing so would only bring back the greens we wanted out. Instead, we’re gonna subtly bring in some whites to the gif by making it brighter with Curves. And while doing so, we can also enhance the contrast on the image.
Here are my settings:
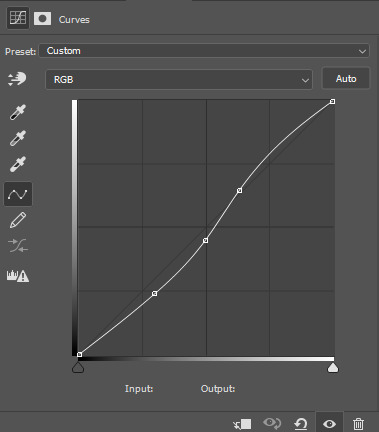
The more S-shaped that curve is, the more contrast and saturation you’ll get. I just want a subtle change, so the curve is nearly flat.
Unedited vs Selective Color 1 vs Selective Color 1 + Curves

See the difference? Now there are darker blacks and less green on Isagi’s skin. The colors are also starting to pop, and the gif looks less muddy.
If you want colors to look muted instead, like in Isagi gif 2, you can do a reverse S curve instead. Well, actually, feel free to play around with Curves. It doesn’t have to be S or reverse S. You can add as many points there as you like and form whatever curve you want.
Selective Color 2
Remember when I said that the order of adjustment layers is not random? I’m now going to explain why.
When we added Selective Color 1, the image that layer is editing would be our unedited Isagi with all those greens and grays.
However, when we added Curves on top of Selective Color 1, the image we were editing was no longer the original Isagi but the Isagi + Selective Color 1.
Layers build on top of each other. It’s like when you’re painting. If you add red paint and then put blue above it, you get violet. If you want to put another color on top, you’ll have to work with the violet and not the red that’s no longer there.
That said, our Selective Color 2 here is not going to be redundant. Selective Color 1 was coloring the unedited Isagi, but Selective Color 2 will be coloring the version that has Selective Color 1 + Curves.
Now, I intend to use Selective Color 2 to enhance Isagi’s green aura as well as the blue of his eyes. We weren’t able to increase the “Greens” in Selective Color 1 because doing so would also make Isagi’s skin green. But now that Isagi’s skin is more red than green, we can play with the “Greens” of his aura safely.
Here are my settings:
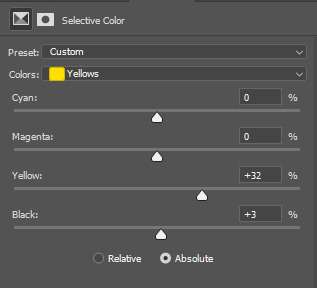

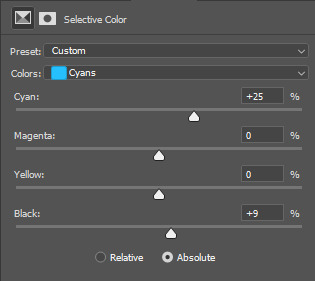
Unedited vs SC 1 + Curves + SC 2:

Levels
Now, time to make our gif bright and vivid. You can use another Curves layer here or a basic Brightness & Contrast layer, but since the colors of our Isagi gif are predominantly black and white, I’m gonna go with Levels since it works really well with black and white images.
Here are my settings:
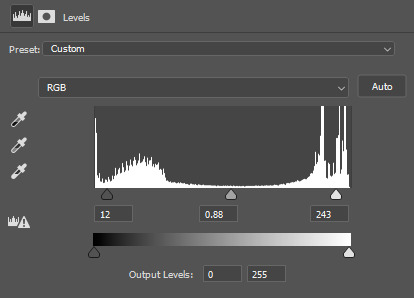
See those 3 sliders under that graph? From left to right, those are sliders for Shadows, Midtones, and Highlights. If you slide them to the right, said shadows, midtones, and highlights would turn darker. Slide them to the left, and they become lighter.
I often get carried away the first time I add Levels, resulting in extra vivid/saturated images which I later have to adjust. So yeah, try not to overdo it. It’s like vanilla extract. A little goes a long way ;)
Unedited vs SC 1 + Curves + SC 2 + Levels:
Beautiful ✨
The image is no longer muddy, but we’re not done yet!
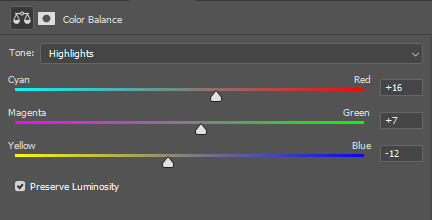
Color Balance
I haven’t used Color Balance much in my gifs because Selective Color often does bulk of the job for me. However, the Isagi we have right now hasn’t quite yet achieved that glow in the dark effect I wanted. I also want to give Isagi that techy Matrix vibe by really emphasizing his green aura, so for that, we’re gonna add Color Balance for the finishing touches.
I think the midtones of the image look okay, so I’ll just tweak with the shadows and highlights. Here are my settings:

....And with that, we are done!
Before and after:
Compared to pre-coloring, the gif is now more vivid and not at all muddy. We also made his green aura brighter without making him look like Shrek uwu.
I actually also went to all of the 104 frames of this gif and manually reduced the noise for each one so we can have a more HD-looking gif. That’s outside the scope of coloring, though, so I won’t be including it in this guide. I’ve also reached the 30-image limit for posts, so I couldn’t include it even if I wanted to 😩
Anyways, I hoped this guide helped! There are many more Adjustment Layers that were not covered in this guide, but they should be easy to learn once you get the hang of working with multiple adjustment layers. You’ll probably never even need to use every single Adjustment Layer out there, anyway. The ones I mentioned in this post are often more than enough.
Now tagging the mutuals who may be interested in this: @usagi-yoichi and @gachagon
#gif tutorial#gif making#gif coloring tutorial#gif coloring guide#blue lock#isagi yoichi#dailyresources#allresources#photoshop tutorial#coloring tutorial#completeresources#photoshop resources#photoshop adjustment layers#usergif#tutorial#resource#photoshop#miyamiwu.tut#lznkgifs#miyamiwu.src
71 notes
·
View notes
Note
Hey I have a question? How do you produce such high-quality gifs. It's so cool and I've been trying but it usually just doesn't come out well
Thanks! I’ve been making gifs for about 2 years, so I’m by no means a pro. Sometimes it feels like I’m just throwing things at the video until it looks the way I want it to look.
I didn’t use any guides, so it took a lot of trial and error to learn. Just to compare, here’s the first gif I ever made!
My advice for starting to get into gif-making is, you gotta really choose a media or character you love because the process is time consuming and it can be frustrating if it doesn't end up the way you wanted right away. Plus, you’re gonna stare at the same picture for like a loooong time. Over time, I’ve gotten a lot faster at making sets. Like that killua x start over gifset only took me an hour to make, but I barely edited that one. I normally spend a few days on each set.
I still don’t completely get photoshop, so I don’t feel like I can give a tutorial for it. But I do make a lot of gifs on my phone so here’s a more in depth look at that.
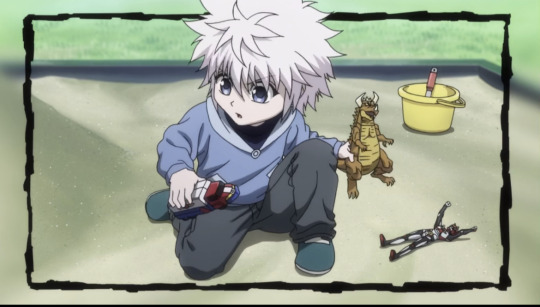
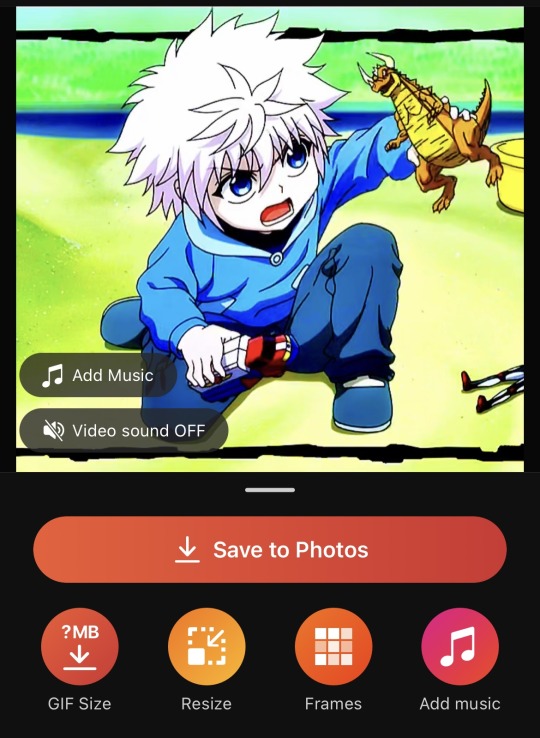
For starters, I always get video footage in 1080P. Either download or record the footage you want to turn into gifs. I’m gonna use Killua as an example. Here’s a picture of what the clip looks like before I’ve done anything.
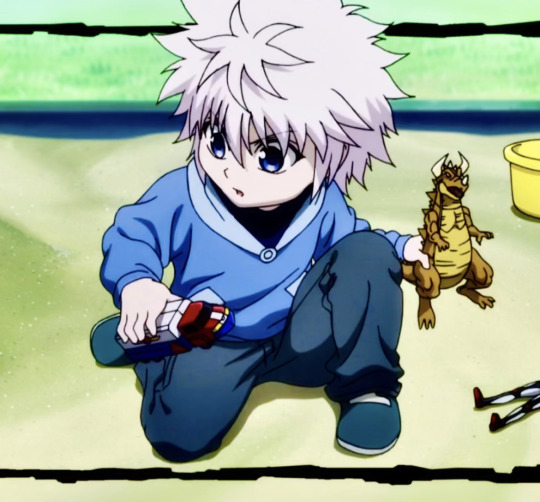
I find that the shorter the clip, the easier it is to make it smooth and crisp. This clip is only 5 seconds long. I try to keep my clips 5 seconds or shorter. I can do longer clips, but then I’d have to shorten the frames used and the speed of the gif (frames per second), which I don’t like doing. Next, I crop it. You want to crop before you start editing.

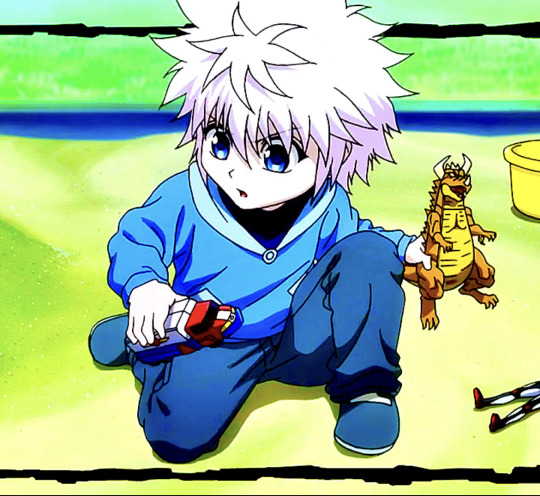
After that, I can start recoloring. There’s a couple good apps I like using for this. VideoDay and InShot are pretty good, but they’re pay to use. The free one Apple provides in the photos app is good, too. I’ve got a different coloring style for most of my sets. But I mainly focus on making dark colors darker, making colors more saturated so they pop, and brightening the video. On VideoDay & Inshot you can find this setting under Filter. Then go to Adjust. This is what it looks like after boosting up the contrast, saturation, brightness, shadows, and definition. Mess around with different settings until you come up with something you like.
Now, I recolor it a second time with filters. Sometimes I use Inshot or VideoDay, but I mostly use the app ImgPlay. ImgPlay is what I’ll be using to actually turn this video into a gif. I use different filters depending on what colors I want to stand out. CL2 and HW3 are a couple favorites. For this set I use HW3. Then I added more contrast, saturation, and sharpened it as high as it could go.
Now that it looks pretty, time to make it move smoothly. Through a lot of trial and error, I’ve found that these settings work okay. I have it set to 90 frames for this clip. For frames, I usually try to keep it within 80-90 frames (or 30-80 if it’s a shorter clip). If I push it past that, like say 100 frames, it’ll start to look blurry once I condense it.
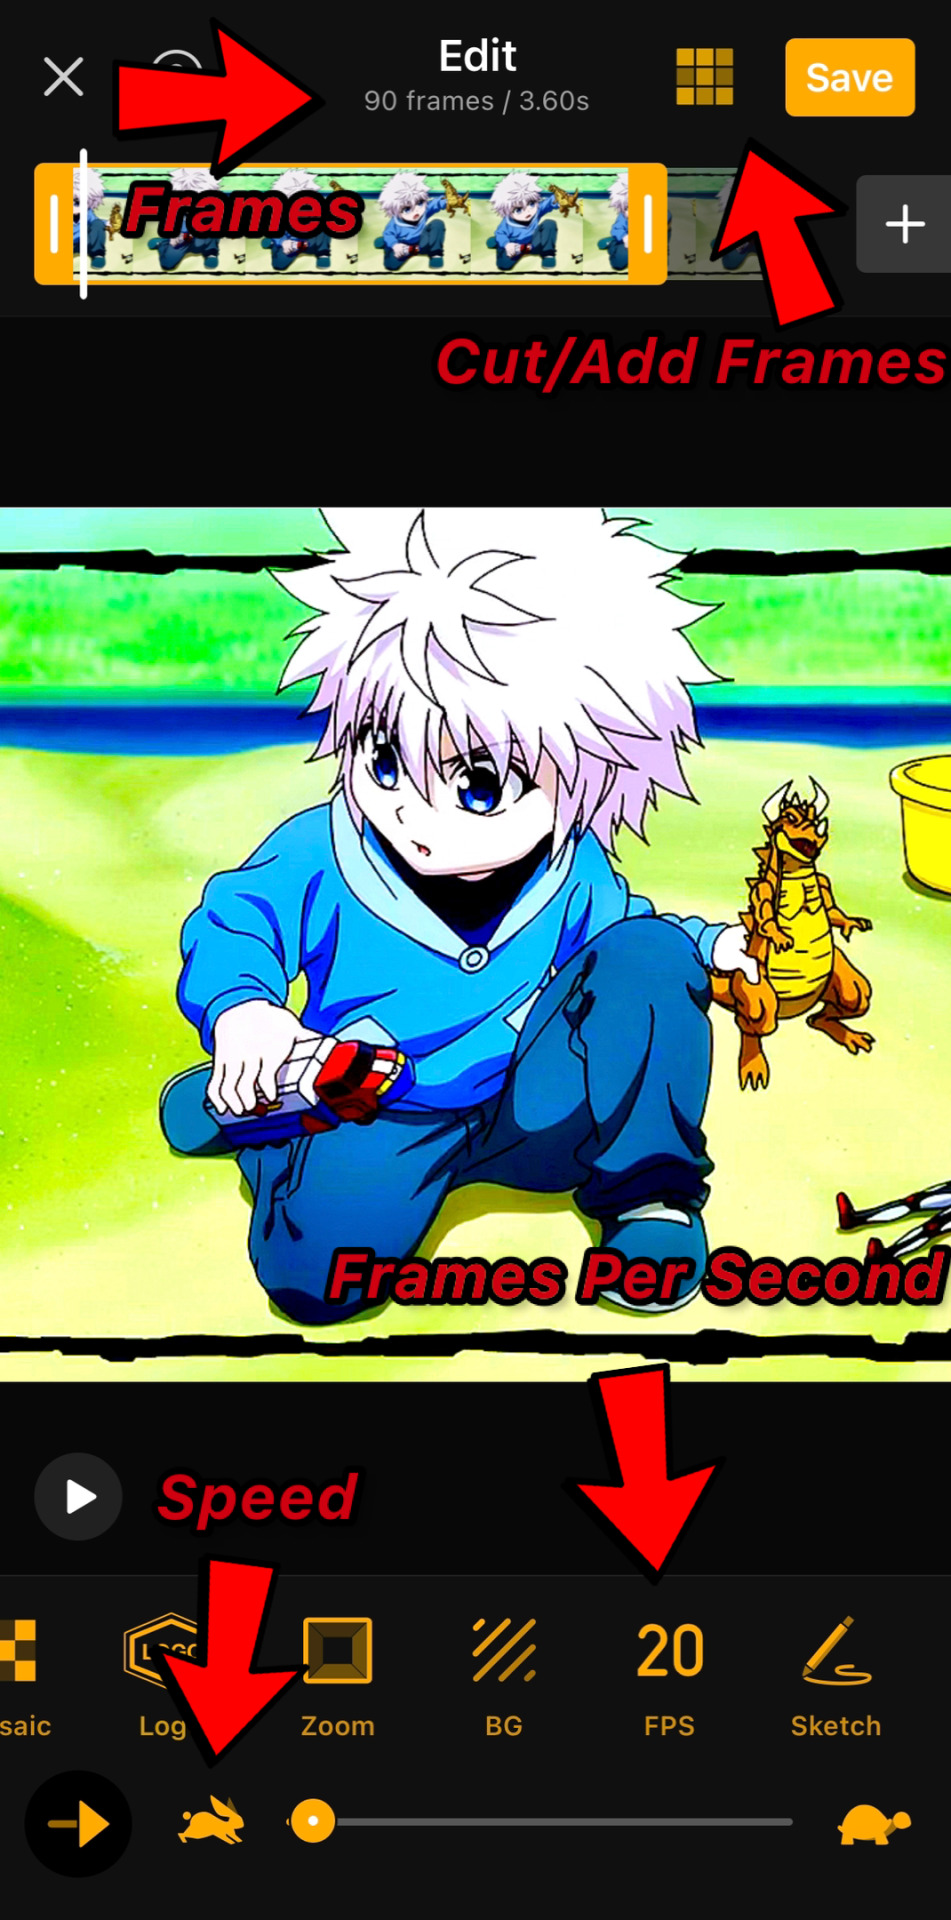
For speed, I either use .04 seconds or .05 seconds. For frames per second, I always go with 20 FPS at least. This will push up the frame count, so you’ll need to make the clip shorter. You can do that by using the slide bar or that little area with 9 squares in the top right corner.
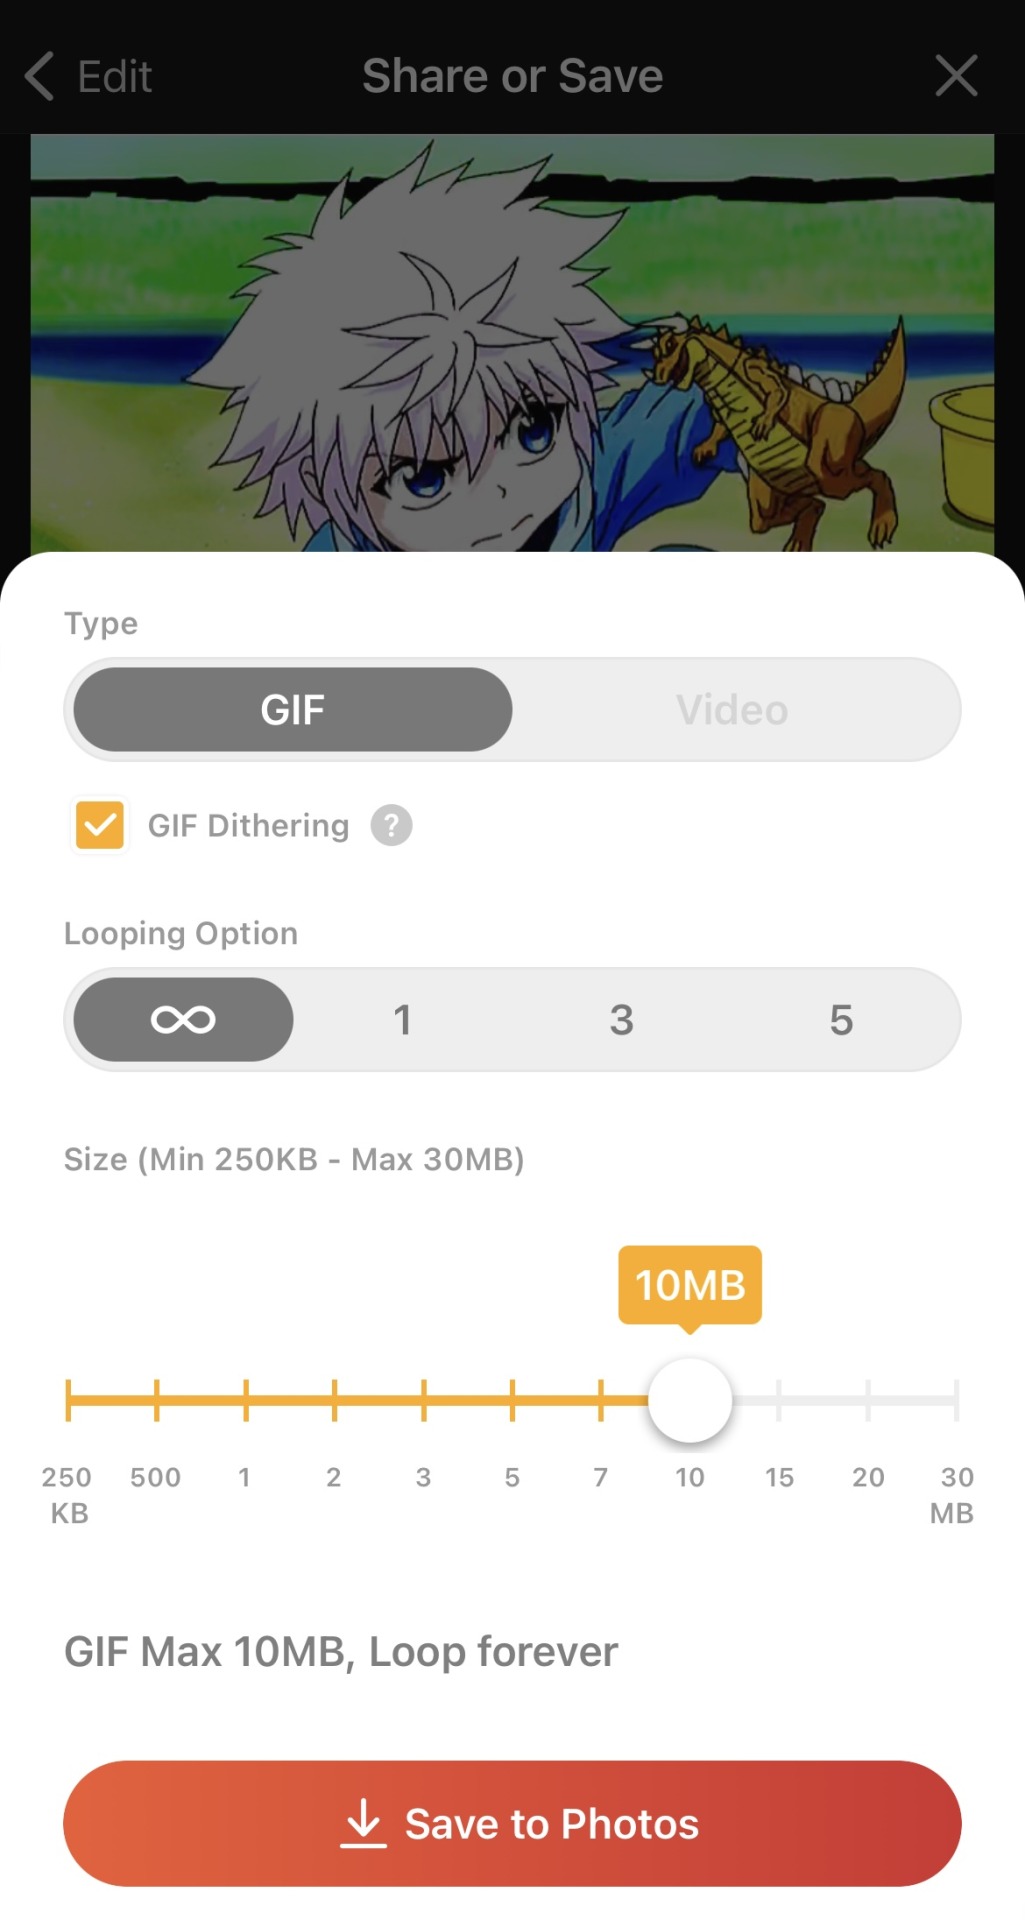
Now it’s time to export! Just click on save and GIF size. Set the loop to infinity and size to 10 MB. Tumblr has a limit on GIF size, so it needs to be 10MB or under. You can also click on GIF dithering to make the colors blend a bit more.
And we’re done! Hope it wasn’t too confusing and that I explained myself clearly! There’s a lot more cool effects you can do once you get the hang of video editing. This is by no means a strict guide or anything! Heck, even I don’t follow this exactly and I try changing things around, seeing what works and what doesn’t. Gif-making can be super fun, so I hope you keep at it! 😊💖
#asks#lucy answers#hope this made sense!#i tried to explain myself as best as i could 😅#now you all know how long my process is (and why i get so angry when someone reposts my stuff acting like they made it)#i don’t follow these rules exactly like i have a whole different setup for live action gifs#plus i try different settings all the time#but this is the gist of it 😊#flashing tw#flashing
11 notes
·
View notes
Photo

HOW TO —
blend GIFS and create that ‘double exposure’ effect.
this is an effect that has been pretty popular with content creators recently, especially among film and tv creators (as you can see in examples 1 / 2 / 3 ). there are several ways to do it but i thought i’d share my favourite method!
this is an image heavy tutorial!
you will need
○ photoshop with the timeline
○ two clips and preferably one with some darkness in it (this makes the blending easier)
i used isa’s scenes from the run2u music video
○ knowledge to make basic gifs / as well as colouring + sharpening (optional)
i’m placing the rest of the tutorial under the cut but please like and reblog if you find this tutorial useful!
ONE.
first, you want to have your canvas ready with your base gif. your base gif should have a central point (this is the part of the gif that will peek through the overlay gif) and it should also have some dark parts on it (in this case, it’s isa’s hair).

i made this gif on a 540px canvas and it’s a fairly common dimension for these sorts of gifs but any dimension should work as long as it fits into the tumblr gif size limit :D and at this point, there isn’t any sharpening or colouring on it.
TWO.
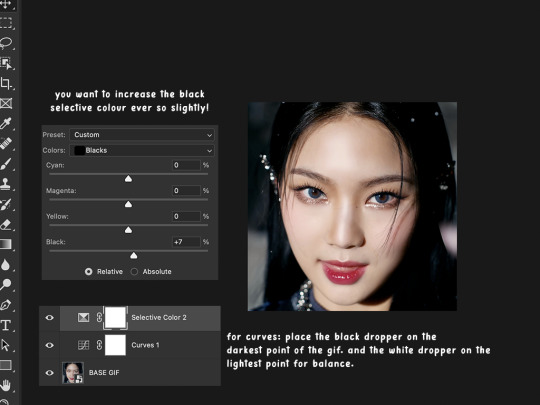
now this is the colouring for the base gif. i added some basic curves to balance the light out and decrease the slight washed out look of the original gif.
then i increased the black in selective colouring and the darker the better, as it allows the overlay gif to be more visible when we reach that stage!
it’s often useful to keep your layers organised in folders. the original gif and the adjustments for it can go into a folder and you can call it whatever you want. i called mine ‘BASE GIF’ - short and sweet.
THREE.
well, now we’ve reached the overlay gif. i’ve added it onto the SAME canvas and i’m adding my colouring onto it. the same colouring as last time - so a curves layer and i’m increasing the black in the selective colour. you can also tweak around with the neutral selective colour and drag the slider slightly to the right (+3 or +4).

FOUR.
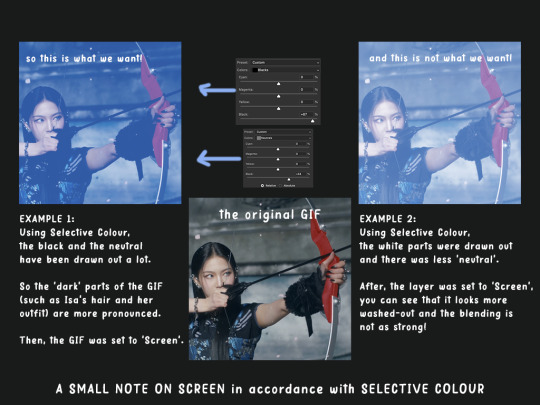
now this is not a part of the tutorial but it is very useful is understanding why the selective colour can matter so much in this process of blending gifs.
i’ve set two examples of the same overlay gif. one of the gifs has had its black and neutral increased in the selective colour while example two has had the opposite (i decreased neutral and increased white).
then i placed the gifs on a solid colour and set the gifs to screen. as you can see, the gif WITH more black and neutral creates a better and clearer image than the one WITHOUT the black and neutral. personally, i don’t prefer the washy-looking gif on the right.
FIVE.
now, we are still working with our overlay gif that is placed on top of our base gif. i’ve added a black and white layer onto the overlay gif (you can use a clipping mask). this will make our monochrome colour pop out better and prevent weird colour mixtures like a weird blue-orange-green if i placed a blue solid fill onto the gif.

SIX.
so basically, we have our BASE layer underneath and our OVERLAY layer on top. the overlay layer has a solid colour layer on it but it’s worth mentioning that this step is not always needed! some people forgo the solid colour layer but in this case, we’re gonna add some blue onto the overlay gif.

SEVEN.
as i’ve stated in the image, go to the dropdown for the coloured rectangle and go to multiply (you can do other settings as well and i will show those settings in the next few steps) but i chose multiply for that slightly darker look. i’ve placed all the adjustment layers in the folder titled OVERLAY GIF.

EIGHT.
so this isn’t a part of the tutorial either but it’s for reference! these are all different settings you can do on the solid colour that’s on top of your overlay gif. they all produce different results which i will add in the last step! this part is all personal preference and they will vary on the colour that you choose.

NINE.
now here is the final and arguably the most crucial step. you’ve got your base layers and adjustments in one folder. you’ve got your overlay gif and its adjustments as well as its colour layer in another folder. now both folders are closed.
for the overlay folder, click SCREEN. and this should give you your blended gifs. you can always tweak the final product (by playing with the selective colours and curves and so on) and in the previous step, i mentioned different settings for the colour fill and they are included at the bottom of this image.

TEN.
now just add your sharpening and any final touches to the gif and you’ll end up with your final product!

i hope that this tutorial was useful and if you want some clarification on anything, feel free to hop into my askbox and inquire further because i can get a bit all over the place when explaining 😭
#usergif#completeresources#ps help#photoshop tutorial#gif tutorial#blending gif tutorial#allresources#dailyresources#useranusia#userkale#tusercelia#userjoanna#cheytermelon#usercchuu#userjuju#kpop resources#tutorial: blending#mine
117 notes
·
View notes
Photo

a tutorial
some of you have asked me how i made this gifset, so the tutorial for it is posted under the cut! keep in mind that this set was inspired by this one. i’m generally terrible at explaining all this, so feel free to reach out if you’re confused with anything :)
So, this is assuming you already know how to make gifs and use photoshop (if not, there are plenty of easy tutorials you can find on Tumblr.
An important thing to note is that when you make your gifs, they all need to have the same time length. For example, if one gif is 1:02 seconds, then the rest of the gifs on that same exact canvas also have to be 1:02 seconds.
First, make your gifs separately (crop, frame delay, sharpen, etc.). After you’ve made and decided how many gifs you want on a canvas, open a new document to create a blank canvas. For this one, I’ve set the size to 540 as the width and 564 as the height:

I wanted the background color to be black, so I clicked the Layers -> New Fill Layer -> Solid Color and set it to black:

Shapes:
Now we’re gonna do shapes. Go to the Shape tool on the left panel of photoshop and select Rectangle Tool:

Hold and drag over the canvas to make your shape. The size is up to you and you can adjust it here on the panel on the right side of photoshop:

So now my canvas looks like this:

Next, add the rest of your shapes. Since I wanted this canvas to have five gifs, we have to add four more rectangle boxes. I chose the placement of the rest of the boxes to look like this for this particular canvas:

To give it that comic-book feel, we’re going to add a thick border to all these boxes. Right click on any rectangle layer tab and click on Blending Options:


Click on Stroke. Below are my settings for stroke. I set the size for 4 (you can go bigger than that if you want) and the color to black:

Do this for the rest of your shapes. It should now look like this:

Adding Your Gifs:
Okay, so we’re gonna put our gifs into these shapes. The gifs that you made earlier should be on separate psds. For one of the gifs, drag your gif psd onto the canvas and place it on top of the rectangle you want it to be in:

So now the gif’s on the canvas, but it’s not in the box:

To put into the box, hold the alt key on your keyboard to change your cursor into a little arrow that points down. Place it in between the gif layer and the rectangle layer and left click.

Once you do that, your gif will automatically be placed in the box like so:

Repeat this process with all your other gifs and other shapes. With all your gifs dragged over and embedded into the shapes, it should now look like this:

Coloring:
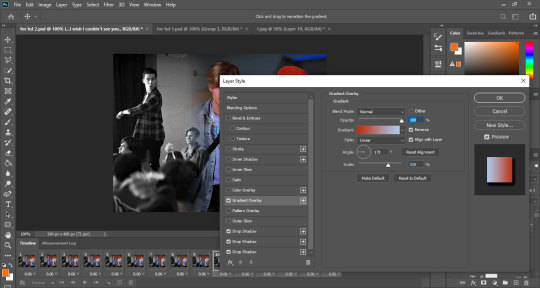
What I did is that I colored these gifs individually. For this entire gifset, I only wanted the colors to be blue and orange. To do that, I added gradient layers to the gifs.
These are my settings for the gradient and gradient editor (double click on the gradient bar to go into the gradient editor):


So with the gradient layer still selected, I changed the blending mode to Hue to get it that blue color:

So before coloring, my top gif looked like this:

With the gradient layers and changing the blending mode to Hue, it now looks like this:

Next, I added Curves and Selected Color to adjust the blues:

Since you’re coloring these gifs individually, it’s important for all the editing layers to be assigned to that one box. This way, the editing layers don’t affect the other gifs on your canvas. To do that, all you have to do is hold the alt key and click in between the layers until it looks like this:

To get that orange color, you’d do the same thing with the gradient layers — only pick orange colors in the gradient editor instead of blue.
After coloring your gifs, it should now look like this:

The way you color in general is really up to you. The fun part is experimenting will all kinds of colors, layers and blending modes.
It’s also important to note that in your Timeline, all the bars have to be the same length. If they are not the same length, it will mess up your gifset.

And you’re basically done! With this gifset, all the canvases were different, but the way you place your shapes on each canvas is up to you. I really hope this all makes sense lol.
78 notes
·
View notes
Note
Hi Mandy 💖💖 If you have the time I was wondering if you can make a tutorial for how you make gifs since you've mentioned that you use mac and don't have photoshop (I'm in a similar position myself 😅😅). So, I'm not sure where to start. Thank you for your time. 💖💖💖
Oh hi nonnie! I don't think I'm the best person to ask because I usually just fuck around a bit until it looks ok?? But I can give it a shot.

Below are the tools I use to make my gifs:
Photopea: it’s basically a replica of Photoshop, it’s completely free and you can find it here.
iMovie: Since I’m on Mac I use iMovie to edit my clips and download them.
Step 1: Load your video onto iMovie and using the Split Clip Command (⌘B) create the clip you want to gif and download it onto your mac in a Mp4 file.

Step 2: Open Photopea click on file > open and then select the clip you previously downloaded, when you try to open your clip a tab will show up asking you to set your FPS (basically frame rate), I usually stick with the default and keep at 10 but you change it if you wish. Once your clip is loaded it is going to be in a folder in frames and your window should look something like this.

Step 3: Now we can start coloring the frames. I usually use selective color and saturation to color my gifs but there are other ways to do it! First you’re gonna click on “New Adjustment Layer” and from there scroll and select “Selective Color”

Step 4: Once you’ve opened the selective color layer, click on properties and start coloring the individual shades in your frames (some times there are colors that won’t appear in your frames so you won’t need to color them, in my case, there is no green color in this frame so I don’t need to color it). Remember to make sure that your selective color layer is above your folder of frames. Now click on “New Adjustment Layer” again and open a “Hue/Saturation” layer, click on properties and mess around with the hue/saturation/lightness and find what works best for you.

Step 5: Once you’ve colored your gifs you can start to sharpen them. Press and hold the Shift key to select multiple layers and select all your frames them click on Filter > Sharpen and mess around a bit until you’ve sharpened your gifs like you want. You can mess around with your filters a bit more I usually blur my gifs a little too so they don’t come out too grainy.

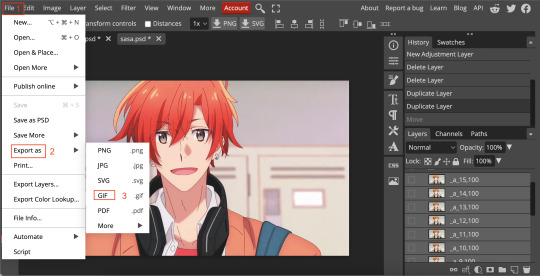
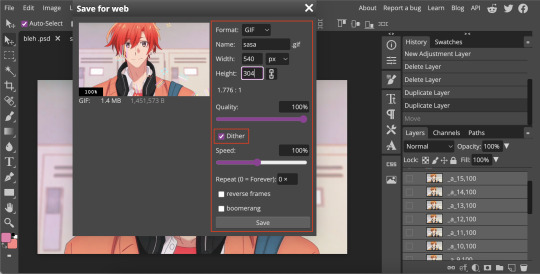
Step 6: Now the last step is to export your gif. Click File > Export As > Gif. Once you do that a tab will pop up asking for gif size and other things. Make sure to resize your gif so it has the width of 540 px, however for different photo formats you’re gonna need different sizes (if you google tumblr photo dimensions you’ll probably find it!). I usually also dither my gifs for better quality but sometimes dithering can make it worse so it depends on your gif!
And here is the final product!
I’m still fairly new at gif-making so this probably not the best tutorial djkbgdjh. But I hope this helps! Happy gif-making <3
16 notes
·
View notes
Text
Tutorial - Blending + Gradually Appearing Text
Okay so I got a request from Mary (@princess-seaweed) to make a tutorial for blending and gradually appearing text, like this gif:
I still don’t know if I’m any good at tutorials, so this might be confusing/vague, in which case please hmu and I’ll try to make it as clear as possible.
Also, please know that most things I’ve learned on photoshop are through tutorials/tinkering with photoshop until I get an effect I like, so there might be easier/quicker ways to get these effects, but this is how I do it.
This is an advanced tutorial that requires basic gif making skills and basic text adding knowledge. If you need help learning how to do that, I can whip up another tutorial or find something online.
The first part of the tutorial will be about creating the blending, the second part about the text.
I’m using Photoshop 2020.
So, let’s start. Okay, so, as I said, this is an advanced tutorial that supposes that you already know how to create gifs, so the first thing you wanna do is make the two gifs you wanna blend separately, (resize, sharpen, add adjustment layers and whatever else you want to add), and then save the psd files (you don’t have to actually save if you have them open, but this is a precaution in case anything happens).
Make sure that the gifs have the same number of frames, so that they overlap perfectly when you blend.
Once you’re satisfied with the gifs, open your animation timeline bar to the frames animation mode.
I’m using these two gifs, both sized 540x400px and each one with 15 frames:
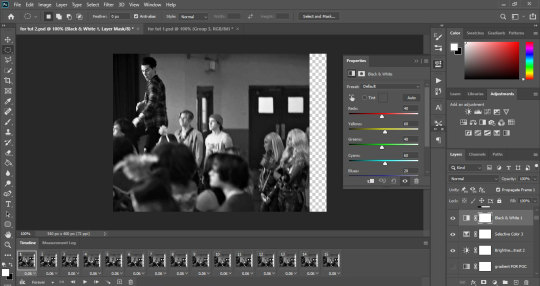

you’ll notice they don’t exactly fit the size of my whole gif, but it doesn’t matter because once we layer them over one another, they’ll align to hide the transparent sections.
I’m using the similar sizes for the gifs because I’m blending them side by side, but if you wanna, say, blend one within the other, you can use different sizes.
Now, the next step is very easy. You’re gonna copy one gif on top of the other. To do that, you go to whichever gif you want to layer on top, and select all the frames. In my case, I’m layer the gif with charlie and owen on top:

Now you’re going to click on the small menu on the right side of the animation bar, and select copy frames:

Now, you’re going to go to the second gif, select all the layers, open the small menu in the right corner of the animation bar and choose paste frames:

A window will pop up, asking what the paste method is. Make sure paste over selection is checked and click ok:
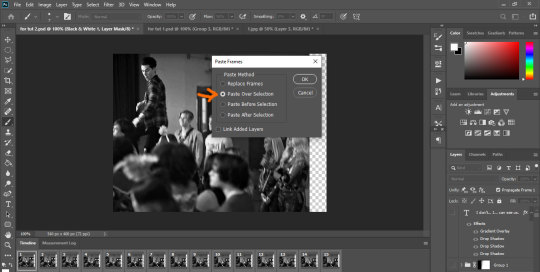
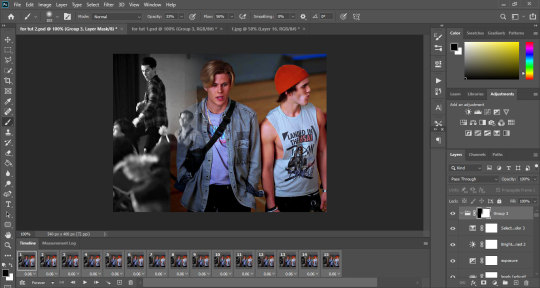
Your psd will now look something like this:

Notice how the coloring from the top gif is now also covering the bottom gif? The first thing we’re gonna do is the get rid of that, so that the coloring only applies to owen and charlie and jeremy gets to keep his own adjustments.
So to do that, you’re gonna select all the layers of the top gif which are now in the layer tray on the side, and group them by click on the folder icon in the bottom bar:

Now that your layers are grouped, expand the group, scroll down in the layers tray, select the first image layer in the top gif and choose the selection tool:

Right click anywhere on the gif and choose load selection from the menu:

Your top gif should now be selected. Go back to the top, select the group layer and add a mask to it by clicking on the mask icon in the bottom bar:

Now your group will have a small black and white window next to it, and the bottom gif should have its original coloring back, as below:

Now it’s time to blend. To do that, we’re gonna use the same layer mask we created. Click on the layer mask in the group layer (the small black and white rectangle), and then select the brush tool. Your colors should automatically appear as black and white.

Basically, what’s gonna be happening here is we’re gonna be using the brush to hide part of the top gif. If the top color is black, then using the brush will make part of the top gif disappear. If the top color is white, then using the brush will make part of the top gif appear.
So, you’re going to bring the black color to the front. I’m gonna use a soft round brush, size 183px, opacity at 33. The brush you use and how you use it really depends on the effect you want to get. For now, we’re gonna do a basic soft blending:

Make sure the layer mask is selected, and use the brush to hide the sharp edge of the top gif by dragging the brush to the gif and clicking on it. Since we’re using low opacity, you’re gonna click multiple times on it to get whatever effect you want:

And that’s it! Your gif should now be blended and look something like this:

Now we get to part 2, which is adding the text. I’ve already done a tutorial on gradually appearing text here, so check out that link to figure it out.
For this gif, my text is in “The Bold Font” set to bold, size 18. I’m using 3 shadow effects, all set to multiply and at 100% opacity, and a gradient effect (I’ll add images of the text effects below).
Text shadow effect:

Text gradient effect:
Once you’ve followed the instructions of the gradually appearing text tutorial (this takes a fair bit of time), save your gif and it should look something like this:

I know the text part is a little rushed, but I’ve already explained it in the other tutorial, so if you follow that, you should be fine. And just hit me up if you got any other questions!
#tutorials#resources#photoshop 2020#photoshop tutorials#gif tutorials#my edits#kinda#tuts*#princess-seaweed
104 notes
·
View notes
Text
When doing this post I showed both versions, original and colour-adjusted of a Santana gif which was actually very quick and low effort in terms of colouring. Now I genuinely don’t think I’ve gotten the hang of colouring just yet, it’s definitely an area I’m working on but I also think it can be sooo fun to see the final version compared with the original. So I thought I’d make a quick little post demonstrating what even just a few adjustment layers can do through my latest Brittany and bi colours set.
To start us off, this is how the first gif looks if the right side is the original footage and the left side the final version:

Granted, I did use more layers than usual and there was the solid fill pink element to it to make the bg reflect the first colour of the bi flag, but this was a relatively low-effort set. And like I said in the post I linked to at the beginning, brightness/contrast is still doing a lot of the heavy-lifting here. Since this is just an unprompted post I’m not gonna go into the detail of the individual layers but just to note, selective colour was also key with these gifs.

This second one was easier to work with because the scene just had better colours to begin with but you can still see how dark it is compared to the final version. Used to be that saturation and brightness were even more prominent on gifs on tumblr in general; not so much nowadays from what I can tell but gifmakers still do a lot make the scenes pop more. And Glee isn’t even particularly badly lit compared to, say, some fantasy shows.
For the last gif, I actually have three versions to share with you. First, I kept most of the adjustment layers but cut the right half of the blue colouring to give you an idea of how that works:

That actually doesn’t look hald bad on its own haha. Now let’s do the opposite, keep the blue but cut everything underneath so Brittany is the same as she was originally:

The blue itself is also more muted without all that adjustment doing the work.
And finally, like with the first two, deleting the right half of every layer on top of the original gif:

I’ve gotten into the habit of doing this sometimes just to have an idea of the work that’s been done. Like I said colouring is really not my strong suit in photoshop and the giffing process but like with every aspect of gifmaking we can only aim to improve and, most importantly, make it fun! And doing these side-by-sides is how I make colouring fun for myself haha.
#gif things#not an ask not really a tutorial lol#but this just to say: photoshop is cool!#and you can do cool things even if you don't *really* know what you're doing#like me
3 notes
·
View notes
Text
Requests (5/23/2021)
Hi lovelies! I’ve been getting so many requests & I’m working hard to get all of them in the queue. Thanks for sending them my way! I’m writing to let you know that the queue is now full until the end of June. I was able to get every requests from my May 8th post in there except for a few. Requests from May 8th for captions featuring Katy Perry, Jenna Fischer, Marisol Nichols, Addison Rae, Ariana Grande, Erin Kellyman, Taylor Swift, Billie Eilish, Jhene Aiko, & Kirstin Maldonado will be posted in early July.
But there have been an absolute ton of requests since then too, yay! So I’m listing all the requests that I haven’t gotten to below. If you made a request but don’t see it below that might be for a few reasons. 1) I’ve written it already and it will be posted in June. 2) It’s one of the requests I posted on May 8th so I won’t talk about it here. 3) I considered it a demand not a request (for example, I received two that said “Anything with,” that wasn’t really a request just telling me to do it. Sorry if this bothers some of you but it is an issue with me so make sure you word your requests AS requests). Either way, thanks for the love, lovelies! :D
Anonymous said:
Could you do one with either Kelley O’hara or Alex Morgan from the USWNT about a guy soccer player watching the US win the world cup and then want to be them or something like that?
I actually know who both those are (shockingly enough, I don’t really follow sports) so sure thing!
Anonymous said:
Could you do lorengrey captions? She’s so hot
Sorry sweetie, don’t know who that is. :(
Anonymous said:
Hi I just had an idea for a game you could do. It could be where someone has to say as a boy what they’re like physically in stages. So first stage is hair color for example, second stage could be height, third stage could be body type, etc. An example would be if I was a black hair, short height, thick body type, I would match up with someone like Nicki Minaj. Just an idea which you could extend on. Hopefully it makes sense. I appreciate you!
I actually have a game like this mapped out called “Build a Sissy” where you choose age, hair color, and bra size, but it would take a LOT of work to make so I haven’t written it yet. Maybe some day though. :)
Anonymous said:
I would love to see a Tori Kelly caption. Her hair and body are not typical but beautiful for a white girl. I say that last sentence respectfully. I think having a caption with her would be great
Sure thing! Tori Kelly is a cutie. :)
Anonymous said:
Ok I'm not sure if u'll know these 2 cuz even I had to look them up for the names but anne dudek and maitland ward theyre the 2 blonde sisters from white chicks not sure if uve seen it but if u can could u make a caption for them please?
I DO know who they are! I’ve been thinking about doing a White Chicks caps because there’s a lot of cute looks in that movie (especially for Busy Phillips who I just love) so sure thing!

Anonymous said:
Could u do Yvette nicole brown from community? Id like to see some big girl love
Sure thing!
Anonymous said:
I already know that this request is probably gonna be a No but I still have to ask whats the ruling on GCI enhanced celebrities like Taylor swift from Cats? Or is that too much like "Furry" stuff. Now I'm Feeling this will be a No for multiple reasons
So it is not an issue with CGI “enhanced” celebrities but for Cats it is because I do not have a Furry fetish and I get uncomfortable thinking about writing caps for it. But I write caps with “manips” all the time (photoshopped images of celebs) so I’m not ruling out CGI enhanced celebs all together.
Anonymous said:
Can you do one of Lindsey stirling? And for the story can it be a guy trying to learn Violin but he cant seem to focus he even tried hot female teachers but it didnt work then he gets a male teacher than he starts focusing and wanting to please the teacher he becomes a sissy sorry its a long request
Sounds fun, sure thing!
Anonymous said:
Hi big fan and I think you’ve been doing amazing work. Is there anyway you could do a story about a guy who loses a bet to sorority girl and is forced to get his nails painted and turned into a girl? I love the idea of having a boys nails painted against his will. I’d love one with Selena Gomez but if you think another celeb would be better I leave that cumpletely to you.
Totally! This sounds fun. :D
Anonymous said:
Can you do thelma and Louise?
I’m assuming you mean Geena Davis & Susan Sarandon from Thelma & Louise so yes. Yes I can. :)
Anonymous said:
Can you do a caption from the movie bridesmaids? Like when theyre all trying on dressess or something?
I haven’t seen Bridesmaids (I know I know) but I can try something. :)
Anonymous said:
it would be super cool if you could do some more games! They’re my fav
Glad you like them! As long as I’m not on hiatus, games will be posted every second Saturday. I’ve already got two set for June. :)
Anonymous said:
Hey huge fan of your recent work and super excited about new caps!! Do you think you could do one about a college guy who drops out in pursuit of being a stand up comedian, but the comedy club needs a female comic so they turn him into a girl? I was thinking maybe Nikki Glaser, she so funny and sexy. Thanks can’t wait to see all your new stuff!!
Oooo, Nikki Glaser is great. Sure thing!

Anonymous said:
Can you make a caption about a guy who makes fun of curvy and thicc women, where the women get their revenge and turn the guy into Nia Jax?
You got it!
Anonymous said:
Hi Me again on the topic of the assembly line worker caption sequel if you do it i just an idea for the story like before depicting the sissies "first time" but you can have it be that the coworker doesnt know and is telling everyone about the chick he slept with last night and the sissy is just thinking "if only they knew"idk i thought it was good anyways thank u again
So this message is in reference to a sequel caption that was requested & that I did write and will be posted in June. I’m sharing it here to let the anon know that I wrote the cap BEFORE I got this second request so there will be a followup but the story will be different. I hope that’s ok.
Anonymous said:
Hi idk if u watch wrestling or not I see u have some captions of wwe womens wrestlers but im not sure have far ur knowledge of it is? Could u do a caption of Rhea Ripley if u know her?
I have never seen a single episode of WWE, I do not watch wrestling, and yet somehow every time someone requests a wrestler I know who she is. Don’t ask me how because I do not know. Anyways, yeah I can do a Rhea Ripley one. :)
Anonymous said:
Could you do a caption about a janitor for sissy co. That finds out the strange goings on at work and tries to blow the whistle on the whole operation but is caught and turned into a sissy maid for the sissy co. Corporate office abit specific I know but ive been thinking on that awhile however u do it will be perfect thanks
You got it!
Anonymous said:
Could you do katheryn Hahn from wandavision specifically the 80s look with the Big hair and aerobics outfit
Oooo, sounds nice. I’ll type that up for sure. :)
Anonymous said:
Hi big fan of your caps!! Do you think you could do a cap where a football player wants to go to the NFL but gets hurt, so they turn him into a female commentator, maybe Lauren Rutledge? If you don’t know her, she’s been a college football reporter for awhile and was also a former Miss Florida. Anyways I just think any guy would be lucky to be turned into her and I love your caps keep up the great work!!
Me: *googles Lauren Rutledge to see if it’s who I’m thinking of* How do I know who this is? Anyways, yes I can write this. :)
...for some reason there are no GIFs of her though so I’m just gonna move on.
Anonymous said:
Hi I'm the one that requested the LONG list of celebs I'm still really sorry about that I didnt realize how many it actually was till I looked back so I wanna retract some for your sake tell ya what if you havent done any already just do the ones that are specifically marked (as in the ones detailed by movie or show theyre in) the ones that are just names you can leave out i knoe its still alot but hopefully that takes some weight off of ya sorry again
You don’t have to be sorry! Like I said, in the future I’d ask that folks limit requests to no more than 3 celebs at a time but you didn’t know that. I’d never said that before. I typed up every celebrity and they’re going to be sprinkled in during June. Hope you like them! :)
Anonymous said:
Hello ^^ I love your work. Can u make a caption with the name "jules" and Ariana Grande please? Thank you
Sure thing!
Anonymous said:
Hey, not really an ask, but something I needed to share
I'm the one that asked for the Stephanie Beatriz caption from a whole back, and I absolutely loved how it turned out. Each time you roll out a new caption is like a small thrill to me and I read them right as they're released.
Now this wouldn't be an ask if I wasn't asking something, right? Well, next month sees the release of the "In the Heights" movie, and there's an opportunity there to do a series of captions using stephanie Beatriz from that same movie.
In conclusion, I love your captions so much, you're amazing!
Awww, this is such a sweet message. Thank you! And YAAASSSSS! Ever since the first trailer for In the Heights dropped I was like, “I must write a caption with her in this!” So you can imagine how fun it’s been waiting this entire time. *eye twitches*. We’ll have to wait until the movie comes out for me to be sure I can find a good image but this IS a caption I want to write. :)

Anonymous said:
Hi I just recently came across your blog and fell in love with it!! The caption with the football player being turned into Bella Thorne is one of my favorites!! I’d love so much if you could do a sequel or something to that cap it was so amazing and I need to know what else happens to “her”. I’m not sure if this is possible or if you even do sequels but this cap was great and I look forward to all the others!!!
Glad you like it! I’m always looking for sequel captions to write on Throwback Thursday so you’ll get this for sure. :)

Anonymous said:
Hey big fan! Do you think you could do a caption where a short guy gets made fun of by all his girl friends for how short he is? Ariana Grande is fairly short and I think a caption of her (of age of course) would be awesome
You got it!
Anonymous said:
Can you do one with the bella twins as two guys who fought over the same girl then the girl turns them both into look alikes of her but then they start fighting over the same guy
Yep!

Anonymous said:
Do you know suzy berhow? Or angie Griffin? If so would love a caption of either of them please
Sorry sweetie, I don’t know who those are. :(
Anonymous said:
Would appreciate more Sia captions please when u get the chance
I will remember that. :)
Anonymous said:
Can make some Winnie Harlow caption please? I adore her style
Sorry lovely, I don’t know who that is. :(
Anonymous said:
How about instead of removing the captions with Demi in them ,the images of Demi were just replaced with another celeb and if Demi is mentioned by name in the caption then that could be edited to mention a different celeb. I respect Demi's decision I do but lets not lose some well made captions. Also if you could please make a caption where Amy Adams feminises a fan and raises them as her daughter and Kristen Stewart makes you her submissive wife that would be appreciated. I'm a fan of them.
So about the Demi Lovato captions: I understand your feelings but I’m still going to delete the original captions. Because of how my captions are made I can’t just go back in & swap out an image or edit the text, I have to remake it from the ground up. I am hoping to do that with some (maybe all) of the Demi Lovato captions & re-publish them, but I’m still going to delete the originals.
I can do the Kristen Stewart one for sure and I’ll TRY to do the Amy Adams one I just am not 100% sure I can find a pic for that but we’ll see. :)
Anonymous said:
If it’s possible before your summer hiatus could you do a caption with Amanda Crew (silicon valley, sex drive)?
I will do one with Amanda Crew but I can’t commit to doing it before the hiatus.
About the hiatus: I don’t know when it’s going to be. I want to TRY to make it to at least July 18th because I have a specific game in mind I want to post for 5 years of Celebrity TG Captions games, but after that I have no idea. I’ve been writing caps for a longer stretch of time since normal since I’ve switched to a part-time blog so I might burn out at any second but for right now I’ve still got some juice.
23 notes
·
View notes
Photo

So, a very nice anon asked me how I make my gifs (a few of you guys were also interested as well) and I’m here to try and teach you guys how I make my gifs for Tumblr as easy and pain free as possible while still trying to be as detailed as possible! I personally use Photoshop 2020, but any Photoshop will do here. So, here we go! (I’m sorry for my bad explanation at some points. I am absolutely terrible at explaining things and I just talk way too much, so I’m very sorry for how long this is.)
Downloading the Video:
So, to download my video, I use one of two programs: 4k Video Downloader and/or Clipgrab for Mac or for Windows. Both are very simple to use and are free to download onto your computer! Definitely try and download the highest quality as possible as well!
Loading Video Into Photoshop/Making Layers:
Alright, so you have your video downloaded. Now, it’s onto actually making the gif(s) of the particular parts of the video you would like! So, first things first, make sure your timeline is open in Photoshop at the bottom. It’s this bad boy right here:

If you don’t see that, go to Window > Timeline and it should pop up. Make sure it says “Create Frame Animation” If it says “Create Video Timeline” just hit the little arrow in the center to change it.
So, to actually load the video into Photoshop, you’re gonna want to go to File > Import > Video Frames to Layers. Your downloads folder will pop up and you just select what video you would like and hit OK. Something like this will show up:

So, you see the tiny two arrow things at the bottom? Those are what you’re going to move to actually select the part of the video which you would like to gif. The left one is the start and the right one is the end. The play button is also there for you to play your selection and you can adjust accordingly if you don’t like it. So, once your selection is made and you’re happy with it, just hit the OK button. Then you’ll have something like this:

Cropping Your Gif:
So, first thing I do once I have that part done is I crop the gif and resize them using the crop tool on the tools panel on the left. It’s this little guy right here:

So, Tumblr’s post dimensions are 540 pixels wide, so if it’s just one single gif that’s what you’re gonna want to have it as. For two column gifsets, I usually put it at 250 pixels wide. So, to change the width and height, when you select the crop tool, in the top select “ratio” and change the dimensions to what you would like them to be. So, if I want a 540 gif, I usually change it to 540 by 270, and that’s what I would set it as in the aspect ratio box right beside the drop down menu at the top and it will do the ratio for me and you can adjust accordingly. Once you are happy with the selection, either hit the Enter/Return key on your computer or the little checkmark at the top. Congratulations you have a gif and now all you have to do is set the timing, color and sharpen it and you’ll be good to go!
Gif Timing:
So, next thing I do, is I set my gif timing so it’s not too fast, but not too slow. So, in your timeline panel at the bottom, firstly, make sure your looping option says “Forever” at the bottom left corner. Next, select all your frames in the timeline panel by clicking the first frame and while holding down the Shift key hitting the last frame and change your gif timing which is the little numbers on every layer in the timeline panel by clicking the arrow right beside the timing number. The lower the number, the faster your gif will move. So, if you have it set at 0 seconds/No Delay, it will move very fast. If you have it set at 1 second, it’s gonna move pretty slow. I usually have my gifs set at anywhere from 0.5-0.9 seconds depending on how many layers I have in a gif. Totally up to you.
Coloring Your Gif:
This is the fun part and the part that everyone loves to do. It’s coloring your gif to make it look better. You can make your own coloring using the adjustments panel on the right above your layers panel right here:

and messing around with that or you can use what is called a PSD. PSD’s are essentially colorings that are made for you and all you really have to do is drag and drop the folder coloring onto your gif (Make sure all your frames are selected in the timeline!). You can find them on any Photoshop resource blog and they are just super convenient and there for you to use and you can also adjust those accordingly as well by clicking the arrow right beside the folder and turning off and on the different settings by clicking the little eye right beside it.
Gif Captions (Optional):
If you want text on your gif/a gif caption, that’s easy too! So, you wanna click the Text Tool (it’s the “T” on the left hand Tools Panel). At the top, select your font from the drop down menu. I personally use Arial for my gif captions, but I know some people use Calibri/Myriad Pro/etc. Totally up to you. Right beside the font selection, you’re gonna want to select your style. I use Bold Italic personally. Adjust your text size to your liking and type what you want (Again, make sure all your timeline frames are selected.) and then hit the move tool at the top of your Tools panel on the left and adjust the text layer to your liking. If it’s a gif caption, try and keep it centered at the bottom as much as possible. Then, you’re gonna want to add what is called a Layer Style, specifically Stroke and Drop Shadow, to make them look better. So, in the layers panel at the bottom right, double click on your text layer and something like this will pop up:

Checkmark the Stroke box on the left. Here are my settings for Stroke:

Also, checkmark the box right besides the Drop Shadow. Here are my settings for that:

Then, you hit OK in the top corner. Congrats! You have a gif caption!
Sharpening Your Gif:
Last thing I do before I save my gif(s) is I sharpen them. Sharpening your gifs basically makes them look less “grainy” and just more HD and better in general. The easiest way to go about doing this is what is called Smart Sharpen. So, you’re gonna want to select all your timeline frames and your layers in the layers panel (You don’t have to select your coloring layers and/or your text layers in the layers panel. Just the gif layers.) and you’re gonna want to hit the three lines at the top right of the layers panel and select “Convert to Video Timeline” firstly. Your timeline should look something like this:

Next, you’re gonna want to go to Filter > Convert for Smart Filters. There will be a popup that basically says that the selected layer will be converted to a smart object, just hit OK. The layers panel should now have your gif layers like this:

Then, you’re gonna want to go to Filter > Sharpen > Smart Sharpen. These are my settings for it personally:

Hit OK and then you’re done!
Saving Your Gif:
Last but not least, you’re gonna have to save your gif, of course. So to save your gif, you’re gonna go to File > Export > Save For Web. Something like this will pop up Personally, this is where I change my gif image size to the 540 by 270 or whatever I want my image size to be by typing it in below where it says “Image Size” at the bottom. Also, near the bottom left, you’re gonna see a number right below where it says GIF like this:

You’re gonna want to make sure that that MB number is below 8 MB for Tumblr, no more, no less as that is the gif upload limit. If it is above 8 MB, your gif will not move and then you’ll have to delete some frames and nobody wants that. Preview your gif by clicking “Preview...” in the bottom left corner and if you’re satisfied, click Save, name your gif, select the folder you’d like to save it to and you’re all done!

Let me know if you guys have any questions and thanks for reading!
#my chemical romance#mcr#frank iero#gif tutorial#photoshop tutorial#gif making tutorial#completeresources#itsphotoshop#Not sure what else to this ha.#Only three anons asked for this but I was just like 'Say no more.'#Kind of scared that a content creator is just gonna be like 'Uh... That is definitely NOT what you do.' once they read this.#Please don't come for my head. This is just how I make them personally.#*tag this#You can reblog if you want or not.
178 notes
·
View notes
Photo
but before i go looking in the tags, let’s talk about my latest gifsets!
what a worker bee i was both yesterday and today with prodigal son AND loki <3 never have i created so many gifs in a short amount of time it’s a damn miracle that my photoshop didn’t straight up cough up blood and keel over. alas, us bitches are stronger than that! if this post gets flagged because of the scenes i included....that would just mean that i made the right decision to exclude those scenes ajsdksajkldsa
malcolm stabbing martin
when the episode finally downloaded, i took a peek at the ending before it aired to see how it all ends (just in case it doesn’t get renewed </3). GOSH, was i just in a TIZZY when i saw this happen and i couldn’t tell my dad what i saw because we were straight up watching the show as it aired. anyways, keeping my secret knowledge, i got to work on making this gifset. i missed a huge chunk of the episode bc it took me over TWO hours to make the six gif set. i was really torn on the “artistic” approach aka which scene to gif and which to leave out. because i saw the ending before anything else, i couldn’t play it out loud and i didn’t have my headphones to listen so i was like FREE FORMING THE SUBTITLES. plus the captions weren’t synced up so it was really hard to decipher what was being said :(
i really thought i would be able to create the set before 9 but i was running into unforeseen issues such as the subtitle problem, which on top of that, like i said earlier, my photoshop is c/racked and janky so....you catch my drift. i was actually going to gif the bisexual moment in the cafe which i think would’ve been MUCH easier but i jumped the gun and wanted to make the gifs of the shocking ending. funny part about that is the shocking part wasn’t even included in my set (malcolm driving the knife into martin) because i felt like the scene was too short...anyways, let’s talk about the positives:
i really do like the coloring of this one. i used a psd that i’ve used before and luckily it’s meant for outdoor scenes with greenery so the gif really popped. sharpening, buddy ole pal, love you sm. the caption was kinda last minute but i hoped to save it with the gradient. cropping was a bitch because for some reason, it takes forever when you’ve made multiple gifs beforehand (cache innit) pero we pulled through! i actually started not saving the psd files to try and save time which is very unusual for me pero i was getting frustrated with photoshop so i was like y’know what....so i just gave up entirely and stopped saving. i do save when i’m taking my time but jeez, it’s a bad habit. i like saving the psd file because i never know if there is a mistake i missed in post and when i go to publish it, it’s blatant and it needs to be fixed. please, save your psd files idc if it takes up space u can just delete them later. IT HELPS !! TRUST ME!!
first & “last” appearance
i actually premade gifs for this gifset! unfortunately, i didn’t realize that three of the five gifs were the wrong size (pictured above) because i flipped the ratio. instead of 268 x 250, i made them 250 x 268. i don’t know HOW i managed to fuck that up but luckily i saved the psd files (wink, wink) so the coloring was still intact. i think i had to restart photoshop or it was getting too late so i picked it back up in the morning. sucks that i had to remake the entire gif from scratch but we will take some wins xx
coloring is the same with the previous gifset (listen....it’s a good coloring) and i actually did have an alternative coloring that was very warm pero i didn’t end up using it. almost melted the two with the “last” appearance of gil but ultimately didn’t go through with it. also i was thinking of using baby malcolm as the first appearance because technically, that IS his first appearance in the show but i was like...just use adult malcolm lol. also i know that scene of dani isn’t the “first” but the first scene she has goes really quick and she is planked by gil so there isn’t much of a solo (even though this scene isn’t much of a solo either pero it’s better than the former). the lighting is weird in this episode and my coloring tried their best :/ i know gifmakers make each gif a diff coloring pero i’m lazy okay and looking to be time effiencent. another slight tangent is that i actually queued the post for the morning but since i woke up to a storm, i was like, i’m here so i’ll publish it myself.
other than that...i didn’t run into any other problem. i was actually hesitant to make the caption that because i wasn’t sure how to really describe the team. i have poor memory so if there was ever an official name, i do not remember it. i did a quick google search pero it turned up nothing. i stuck with “dream team” because, well, that’s what they are. plus i didn’t want to tarnish the gifset with any mentions of p/olice (i was thinking about putting sumn along the lines of ‘the nypd team’) so DREAM TEAM IT IS because it’s true! you cannot have the show without these five! also, i should’ve used quotations on “last” because there is a bunch of talk about a renewal pero...just in case... sorry y’all :/
odinson brothers parallels
this was made in the spur of the moment. i saw that the teaser trailer with shirtless loki dropped in hd, i came A-RUNNING! it was posted like 47 minutes after the fact and i was like...somebody probably already made a gifset of the scene so i was like...gosh, to make the gifset or not all the while i was trying to download the video. trying because again, this was in the middle of a storm so my wifi was acting up and wasn’t at its strongest (whatever that may be). so i was getting frustrated because neither cc nor 4kdownloader was downloading this small one minute clip. that’s when i knew i was gonna be too late to make the loki gifset so i was like whatever ig...
then i had an idea.
i love parallels so luckily it hit me that this paralleled with thor and how his hair got chopped off. so, i knew i had ragnarok downloaded and got to work <3 wasn’t sure what dimensions to use so i went with 268 x 268 to make perfect squares. because the loki scene was short, i could only make three so i was like..okay, i can work with this. three for loki, three for thor, they’re brothers and they share! i wasn’t planning to add subtitles but i had written them down for the plain gifset so i was like alright, we’re going all in. i didn’t take that long to make since again, they’re small gifs and i did have a coloring in mind that i always use for ragnarok (it’s my fave for non-marvel edits as well). there was a slight adjustment to the final loki gif because i realized the gif had that dark fade into the scene which i didn’t know if it was an artistic choice for the show itself or was added for the trailer only (it happens when companies cut a bunch of scenes together and it’s not at all how it actually plays out). i didn’t want to take any chances so i cut those parts out. i know the gifs are short on the loki side pero...that’s just how it is in show business.
thank you so much for listening and hearing me out! i like discussing my work and i try to have pride in them even if the numbers don’t reflect what i hope they would. either way, still learning, still growing, still thinking about buying p.s. like deadass this shit is RIDICULOUS -_- imagine opening up ps and like...it opens up in less than two minutes...shivers
#read more is because i typed up a lot hehe#i mean to me it doesn't look like a lot pero i don't want to clog y'all's tl
2 notes
·
View notes
Photo

✧・゚: *✧・゚:* CPTAINSROGERS PHOTOSHOP TUTORIALS *:・゚✧*:・゚✧
hi hello everyone! as usual, i’m back with another tutorial that was requested by an anon to recreate a couple of posters of mine! if you find this helpful, please give this post a like and/or reblog. and if you ever want a tutorial of something, feel free to request!
how to create these↴

note: this is how i learned how to do this and it’s the easiest way for me. feel free to add/change my steps as you use this tutorial.
LEFT POSTER TUTORIAL ↴
okay so we’re gonna start off super simple. all you have to do is find an image of the person you want. keep it serious, as close to a side profile as you can, and make sure it’s dark. unfortunately, jessica alba didn’t have many pictures of what i was looking for so i ended up settling for this image.

she had the exact look i wanted so i ended up using it. so i cropped the picture down to just capture her face. the crop settings i use for all of my posters are 512x800. and when i readjust the size, i put the top portion as 900x1405 or whatever it automatically adjusts to. the first part is def 900 bc it’s a safe number quality in my opinion.
anyways, since the background is too light, i decided to add a black background and place it underneath the layer of jessica. after that i add a vector mask on jessica’s image and i carefully erase the background with a soft brush and i lower the opacity when i get to her hair so it blends in more smoothly.

then i added some brightness/contrast layers to darken/bright areas and make it all seem more seamless blending if that makes sense. this step is more optional and based on preference tbh.

after that, i slap on a couple of psds and play around with the settings and opacities to find the right combo im looking for. if you’re wondering what psds i used, all can be found in my psds tag which is here. i also added a selective color on top to add more purple tones as well. you can do that by changing the blue and cyan hues.
[ if you still don’t understand selective color, i made a tutorial on that already right here! ]

once you found the right coloring, you can add the text of “avenge the fallen” right on top. since im a lazy hoe, i actually googled for a png of the text and just erased the excess parts i didn’t want.

and then viola! that’s it. you can add/change anything you want to make it suit you more.

RIGHT POSTER TUTORIAL ↴
okay this is definitely something you HAVE to play around and be patient with.
for starters, find a good png of your faceclaim. since, again, im a lazy hoe, i used the same png of jessica i’ve used three times already, but do i care??? not really. anyways, once you got your png, find posters of the endgame promos. and as mentioned before in the left poster, i used the crop sizes 512x800 and readjust the image size as 900x1405.
i used three different ones for this particular edit: bruce, nebula, and okoye. i start off with having bruce as my main background and added the png of jessica on top of it.

i used free transform to resize jessica and added a vector mask to erase any unwanted parts. i carefully erased away jessica to show the avengers endgame promo and the cinema date thingy bc i thought it would look better than to get red of it tbh.
once i erase what you wanted, i added the other two posters underneath jessica’s png and played around with the eraser tool to make sure it just showed jessica and no one else. make sure to add a vector mask for every image you’re erasing so that if you accidentally mess up, you can just use the paint brush and fix your mistake.

so here’s what my poster looks like after i do that.

after that, i added so many adjustment layers such as selective coloring, brightness/contrast, hue/saturation, and even used the paint brush a little bit to get the right coloring i wanted. personally, i wish i colored jessica a bit more so it could match the canon posters a bit more but it is what it is and i’m still proud of it.

and tadaaa, you finished and here’s the final product!

i hope this helped anyone who is struggling with photoshop or just helped someone in general! let me know if any of you have any questions or requests for another tutorial!
#photoshop help#photoshop tips#photoshop tutorial#cpt#edit tutorial#poster tutorial#manip tutorial#resources#tutorials#ps tutorials#cptainsrogers tutorials#mine#ps help#i think imma make a new gif for every tutorial#also im sorry this tutorial kinda sucks and feels rushed#i hope it made sense
57 notes
·
View notes
Photo

I got asked a while ago how I make my gifs and I didn’t have time to make a tutorial until now. So here’s how I make my gifs.
What you need:
-video in 720p or 1080p for good quality
-video player that has a screencapping option like kmplayer or gomplayer (there are also some others, check this post)
-photoshop (I use cs5 portable but any version should work), you can find links to download it here
This is gonna be very detailed and long tutorial so let’s start.
1. Screencapping
I use GOMplayer for taking screencaps, it’s really easy and fast. Here is the link to download it if you want to use it.
Open your video in the player. Find the scene you want to gif. Then with a right click on the mouse a menu will show up. Go to Video > Advanced Screen Capture

or simply press CTRL + G on your keyboard. When you do that, this will show up

these are my settings. You can always change the number of frames you want to capture. I like to capture more and then delete the ones I don’t need later. Also, when you’re choosing the folder to save your captured images, make sure that you make a folder for every gif because later it will be easier to import in photoshop.
So basically what you’re gonna do now is play the video, start at the beginning of your scene and having the advanced screen capture settings still on, you’re gonna press burst capture as soon as you start playing your scene.

Then you’re just gonna wait a bit til it’s done capturing, don’t press anything. You’ll see when it’s done.
Now go to the folder where you’ve saved your screencaps and delete all the pictures you don’t need. Leave 50 max in the folder.
I know this might seem complicated but once you get the hang of it, it will be so easy.
2. Importing screencaps into photoshop
Now that you have your screencaps ready, open photoshop and in the top left corner click on File > Scripts > Load Multiple DICOM files

Find your folder, click on it and press OK.

When all the layers have been loaded, it’s time to make a gif.
3. Making the gif
First, you’re gonna go to Window > Animation and you’re gonna get this

Before converting to frame animation, select the very first layer.

Then click on this

and then Convert to Frame Animation

Or you can simply press this button

and it will convert to frame animation.
Once you’ve done that, you’re gonna press the little button in the top right corner again and select Make Frames From Layers

And you will get your layers.
Now you’re gonna click on that little button once again and then Select All Frames

On the first layer click on that little arrow next to the time and select other.

You’re gonna get this little pop-up window where you’re gonna put the time of your frames.

I always put 0,06 but that varies from person to person. Most common I believe are 0,04-0,07.
Also, one note:
when you’re deleting the frames in photoshop, always, and I mean always delete it from animation window.

Because if you delete it from the layers in the bottom right corner, you’ll have a gif with blank layers. When you delete it in animation and later when you convert to timeline you’ll get this

and then just delete those layers and your gif’s gonna be fine.
One tip: when you’re selecting either layers or somethig else to delete or move, the easiest way to do it is by selecting the first layer and then while holding SHIFT on your keyboard, clicking on the last one (as I’ve done in the gif).
Okay so back to the gif.
Now we are going to crop. Depending on what kind of a gifset you’re making, you’re gonna need certain dimensions. Here are the dimensions for most common gifsets. You don’t have to strictly follow these, but you should use the size of the width stated there and change the height if you want to change dimensions.
Make sure that all of your frames are selected before you crop. When the gif is cropped, keep all the layers selected and convert to timeline

or just press this button

You’ve converted to timeline and what you’re going to do now is click on your first layer with the right click on your mouse and then Select Similar Layers

Once you’ve done that, you’re gonna go to Filter > Convert for Smart Filters

Now is the time to sharpen your gif. There are tons of actions you can use (here are some), I use this action by @selenapastel (I started using it lately cause I wanted to change my gifs a bit but this the one I used before).
4. Coloring the gif
Well, we’ve come to the coloring. What I like to do here is just use one of my psds instead of creating a new one everytime (tho I end up making a new psd quite frequently). Anyway, if you don’t feel like making a new psd, here’s tons of psds from other people who shared them for other people to use. You can also check them here, here and here. But if you wanna make your own and don’t know what exactly to do, here’s a lot of coloring tutorials so make sure to check them out.
Also, another note: every resource that you download, make sure to like or reblog the post where you found it. Don’t claim any of those resources as your own. People who share their resources have worked on them and spent time on them and are kind enough to share them for everyone to use so please give credit.
When the psd is added and you don’t really like the result, you can always adjust layers in the psd or what I like to do – put a selective color layer under the psd and adjust colors and especially neutrals and blacks.
Now make sure that the gif is the right size aka the size you’ve cropped it, go to Image > Image Size

Here is my finished gif.

5. Saving the gif
And now we’re going to save the gif. Go to File> Save for Web & Devices

These are my settings

Maximum gif size is 3mb so keep an eye on that because if it’s bigger, the gif won’t move. Also always, and I mean always make sure that the looping is on forever.
And there it is. I didn’t include how I put the text on or how I make colorings because this tutorial is already really long so if you want another tutorial on adding text and making psds, just let me know. I hope this helped, and if it did, please like or reblog this post. Also, English isn’t my first langauge so I apologize for some repetitive words or mistakes.
Also, I’ve already said it but I’m gonna say it again: I’ve put the links to posts of the resources so if you download any of those I’ve mentioned in this tutorial, please please like or reblog that post and please don’t claim it as your own.
#tutorial#gif tutorial#photoshop tutorial#itsphotoshop#yeahps#completeresources#photoshop help#*tutorial
206 notes
·
View notes
Photo
JayTim Week Day 7: Space AU.
Or Secretly Dating AU. Or for the free prompt day, Historical AU. Leave it to me to give myself three opportunities to post, but really know that it was totally going to be on the last day possible.
Guess how many other responsibilities that I have shirked today? 😃 (But nothing that can’t be fixed tomorrow. Because, honestly, it’s gonna have to be fixed tomorrow, oh boy).
Apologies for the quality - I have really got to work in smaller image sizes - please full view for crisp (ish) lines! Also any tips for making large files smaller would be very helpful (in Photoshop).
Read more for ramblings, because let’s face it, I love deconstructing my work (which is an open invitation for someone to dialogue with me, hey hey 😉).
Watch out, I didn’t mean for this to be 1000ish words long, but here we are anyway…
First up, I visited Houston uuuuh, two months ago ish, and went to see Space Center Houston, got some tours around NASA, listened to some people really excited about space and the history of space exploration, and what do you know, I was enthralled.
I’ve always really loved space, and stars, and that movie Apollo 13 with Tom Hanks in it, but I’d never really gotten a full understanding of what the “Space Race” really meant, against the Russians and everything. 1960’s America poured literally everything in to go to the moon, spending what would have been trillions today to make that 1969 moonwalk happen.
A few people died to do this because space travel is dangerous, and I was low key going to put Jason in Apollo 1, which, ahem, was the one that suffocated it’s crew due to a fire that broke out in the capsule one the landing pad – the fire was put out quickly I believe, but because the Velcro in there had melted, the fumes made the air toxic – but I didn’t really want to do that just because we all know Jason dies.
So I decided to put Jason in Apollo 10 – Apollo 8 was a milestone in that it was the first time humans had orbited the moon, and Apollo 11 was the “Eagle has landed” (first man on the moon) and also too much of a milestone to touch by clumsily inserting in DC characters. I’ve set this in like an alternate history very similar to our own, so Apollo 10 – the mission that was a trial run for walking on the moon – seemed like a good compromise. That’s why Tim’s saying “Don’t go into the [Lunar Module]” – not because they didn’t fill it with enough fuel to get back off the surface of the moon, but because they didn’t want any fame-happy astronauts walking on the moon (or being on the surface on the moon via the LM) before NASA was ready (what if something goes wrong?).
I think that also captures, to me, Tim – definitely willing to lie to the person he loves to keep them safe. Tim here is Capcom, capsule communication – I’m pretty sure I got his desk position correct. He would be the main guy in the astronauts ears throughout the mission (it’s easier to listen to one person giving you instructions that a roomful) – so he’s got his oracle-like role like fanon likes to have him – so that’s why he’s telling Jason he’s going to bring him home, because he’s going to be the one to lead them in what they need to do. NASA liked to have other astronauts as Capcom, mostly because they’d use the same ‘language’ and be understood easier as they’ve trained together, so I like the idea that Tim is probably slated for Apollo 12 in this AU.
(I wrote LEM on there for Lunar Module – I liked LEM because that’s how it’s pronounced, but wasn’t sure whether to keep it upper-case – LEM stands for Lunar Excursion Module, and I can’t think off the top of my head whether LEM was first, or LM was first in terms of terminology).
The other guy there is in the PR position, publicity or something. I’m not sure who it is, might just be some rando, but I put a blonde head there because I like Gar (Beastboy) and his aspiration to be an actor. 😊
Also, like the thing I’m most proud of in this mini comic is Jason’s right hand. He’s placed it on the console because he wants to casually lean, but he also really wanted to touch Tim but stopped himself just in time because what a scandal it would be if it were found out that one of America’s top hopes, an astronaut, were gay (again, I don’t know much about the climate with homophobia in 1960s so I’m just supposing). So Jason just is kind of flexing his hand in panels 2 and 3 waiting for the other guy to leave. Then the hand indicates that Jason’s stepping forward, he’s ready to reach out to Tim, but tentative at the same time. Tim isn’t shy at all, and comes straight up to place his hand on the Apollo 11 patch, thus giving Jay to confidence to finally pull Tim in, in such a public place.
Uh, yeah, this is set the night before Apollo 11 launch, May 18th 1969, honestly I have no idea what they would be doing to prepare for the launch the night before, so this was my best bet.
Most of the rest is that I just ran out of time for anything else – the consoles in the background should all have monitors and buttons and shading on them, but I didn’t draw them in my traditional-medium inking phase, and I literally spent 2 hours on word bubbles and 4 hours on photoshop washing and shading in the past two days so, I’m just happy it’s finished. : D (I’d done the sketching and inking for like 30 min bursts in like 2 weeks, back a month ago when I had tiiiiiiiime…..they still came out derpy though omg).
Also like to point out what a learning experience this was – I’ve done a few comic layouts before, but never cleaned them up to this extent, and it was so different cause I had to keep in mind Tumblr’s scrolling system – I didn’t want to put up a layout that was 8 panels in one picture and impossible to read, so I hadn’t ever done that before. Still not convinced I have great linking action or anything, but I am confident that it gets the point across. (Maybe not so confident considering the length of this ramble, but thank you so much if you’ve stuck with me this far XD).
#jaytimweek#jaytimweek2018#Tim Drake#Jason Todd#myart#Space AU#Historical mission control#digital art#comic panels#mini comic#this took too long to write#why did I do that to myself#I did enjoy the drawing process though#I know all the positions are static and not all that great#but small steps to action scenes okay#spaaaaaaaaaaaaaaaaace
86 notes
·
View notes
Photo
I got a request to explain how to apply a doodle gif texture, and since I couldn’t find a tutorial, I decided to make one myself! I will be explaining (with lots of pictures) how to apply the hearts gif shown in the banner. I used the hearts gif from this doodle pack.
What you will need: photoshop. I use cc 2015.
Difficulty level: ★★☆☆☆
1. It’s best to have your background and text all set before you apply the gif. You can still add and move stuff afterwards, but it can get messy if you make a small mistake — like not selecting all the frames before moving something.
right now, my banner looks like this

and the layer panel looks like this

2. Find your doodle and open it. When you do that, make sure your timeline is visible (windows → timeline).
3. Select all the layers (control + alt + a) (or simply select the first layer, hold on to shift, and select the last layer). Right click on one of the layers (make sure all are still selected) and select group from layers.

now type in a name for it. I named mine hearts. the layer panel looks like this

basically, this caused all the doodle layers to be in one folder, and it’s much easier to work with now.
4. Now, these next couple steps are a little tricky to explain. Look at the amount of frames the gif has. You can do that by scrolling to the side of the panel to see the number of the last frame.

the hearts gif I’m using has 39 frames.
5. Go to your banner canvas, and select create frame animation. you can find that exactly where the frames can be found.

when you click on it, a frame should come up

6. now, remember the number of frames the doodle gif has? create that many frames on your banner canvas. on the above screenshot, do you see that little paper icon that’s folded in the corner, next to the trash can? click on that until you have the same amount of frames the doodle gif has.

7. On your banner canvas, select all the frames. You can do that by selecting the first frame, holding down the shift key, and then selecting the last frame. On the doodle gif, do the same exact thing; select all the frames.
8. On your doodle gif, once all the frames are selected, click on the little icon that has four lines and a small arrow pointing down beside it.

then select, copy frames

9. Go back to your banner canvas, and make sure all your frames are selected. Click on the four lines and arrow icon again. This time, select paste frames.

a pop up box should come up. from the options, select paste over selection and click ok.

10. now the layer panel looks like this

my banner looks like this

11. can’t really see anything, right? that’s because I’m on the first frame and right now, the doodle hasn’t been drawn yet. so, click on the last frame. now it looks like this

12. Since you’re on the last frame, hold down the shift key, and then select the first frame. Make sure you do that!!! If you don’t and reposition the gif, the gif will not reposition on the frames you’ve not selected and that’s a mess because when your gif plays, the hearts will be moving all around the canvas.
13. Over on the layer panel, select the group for the gif. Right now, the hearts are black, but I want them to be white. So, I click on the layer options and select divide.

now my canvas looks like this

14. I don’t really like the current size and the position of the hearts so I’m gonna change it. Make sure all the frames are selected. it’s best to be on the last frame so you can see the entire doodle. make sure in the layer panel, the hearts group is selected.
to change the size click, edit → transform → scale. a border around the gif should come up.

click on one of the corners, and while holding down the shift key, use your mouse to either make the gif bigger of smaller. to whatever size you prefer. mine now looks like this.

click enter and the border should go away.
15. to reposition (again, make sure that all the frames are selected, and the hearts group is selected in the layer panel), simply click and drag the gif to where you want it.
now it looks like this

16. On the bottom of your frames panel, you’ll see an option to change the amount of loops the gif will have. make sure it’s on forever.

17. Play the gif. you’ll see a play button on the bottom of the panel, close to the ‘forever’ option you just used. you can see the play button on the right corner of the above screenshot. this is the result. [[for some reason, this gif is actually playing slower on my screen on tumblr compared to on photoshop. so please just trust me that this gif is suuuper fast and not looking very aesthetic looking]]

18. the hearts are playing at a faster speed than I want. At the bottom of each frame, you’ll see a little time mentioned. it’s currently at 0 sec. select all the frames again, and click on of those times. this will come up

I then selected 0.1 seconds and played. this is the speed.

[[I know it looks the exact same as the one above with 0 sec but it’s not, I promise]] this is the speed I like, so I’m keeping this.
19. If you see after playing the gif, there’s something you want to change (size or the position of the gif, the text, background color), you can do so, but, make sure all the frames are selected when you do!
20. Optional step. when the doodle is complete, I want there to be a delay before it restarts playing, so the hearts will stay for a bit. to do that, I select the last frame, and change the delay time on it. I set it to 0.2 sec, but thought that was too fast, and then changed it to 0.4 sec which I like. this is the result

21. Now it’s time to save the gif. file → export → save for web. make sure when you’re saving it, the loop is set on forever!
And that’s it! That wasn’t too hard, yea? I really hope this helps out!! If you any questions, feel free to ask xx
#yeahps#itsphotoshop#doodle tutorial#tutorial#hpcreatorsnetwork#hppositivitynet#lilyflowernet#photoshop tutorial#jwxngs#i'm sorry the theme i'm using squished the pics a bit
4K notes
·
View notes
Photo
*tears guaranteed but it’s ok i’m here for u
Hello and welcome to my tutorial! I made one awhile ago but it’s outdated and I have better methods now. The first part is gonna be how to get your clips, the software I use and how to load your frames into photoshop. I don’t use KM player. If you already know how to do that skip to part two! I will also go over coloring in part three!
You will need photoshop Cs6 or CC. There is minimal difference between the two when it comes to making gifs. I do not have the download links for it but honestly torrented versions always died on me so :( Anyways! The rest is under a readmore. Have fun and welcome to photoshop purgatory.
We are going from here:

To here:
I use ps cs6, so if the layout is different than what I show in my screenshots, google “how to ____ in CC” and it should show you the other navigation in CC. ^^
PART ONE. GETTING READY.
1.Get this handy dandy program. It’s so much easier to use than KM player in my opinion. With this you can download any youtube video in any quality that you desire. Just copy and paste the URL. I believe it has steps for you and it’s a very simple program so we will move on into how to get your “gif” into photoshop!
DON’T download clips longer than ten minutes. The longer they are the more space they take up on your computer and the harder it is to select your frames. DO keep track of your video files by keeping them in a folder with all other photoshop related files. 720p or 1080p is a fine quality for making gifs. Make sure your video is at least 720p or you will have ugly gifs srry.
2.Loading your frames into a single document. The top bar of photoshop is your friend. Particularly FILE and IMAGE.

To load your frames, go to FILE >> IMPORT >> VIDEO FRAMES TO LAYERS. Select the video of choice. Your screen should look like this:

The two little sliders at the bottom are your best friends. Move them to select the part of the clip that you would like to gif. Once you do that it should switch to “selected range only”. DON’T limit to every ____ frames. Make sure “make frame animation” is checked off.
Remember that gifs are usually anywhere from 30-80 frames so when you are selecting what you want to gif, if it says you have selected over 500 frames narrow down what you want to gif. That is too many frames. Put some of them back. Pls.
3. Making sure window settings are correct. After you hit OK you should now have a document open! Does it look like this?

If you don’t have the bottom part or the side part, go to WINDOW >> WORKSPACE >> ESSENTIALS. If you still don’t see the side part or the bottom part go to WINDOWS >> ADJUSTMENTS & TIMELINE. You really need both of those.
PART TWO. TECHNICALITIES.
1. Fixing the amount of frames you have. If you are looking at the sidebar and it says over 100 then you have too many frames. For the sake of this tutorial, cut them down to a smaller amount. Bringing it down to 60 is a safe number.
In order to do this, you have to shift+click to highlight more than one frame/layer. First go to TIMELINE (bottom thumbnails) and remove ones you don’t like/need by highlighting them and then hitting the trash can icon underneath. You probably got some frames from a different clip so get rid of those first. The side thumbnails will not change accordingly and that’s fine. Make sure the frames in TIMELINE only go to 60.
*At the end depending on the coloring and sizing you may have to go back and change the amount of frames because it changes the file size and tumblr only allows for 3MB gifs. This will be explained later but just remember how to get rid of frames.
2.The speed of the frames. The actual movement of the gif nine times out of ten is too fast! You have to slow them down so they aren’t nauseating to look at. Don’t worry though! It’s easy.
Shift+click and highlight all of the frames in TIMELINE and then, on ant of the frames hit the little arrow next to the numbers that look like 0.04 (they might say something else) and then click on OTHER and enter 0.06
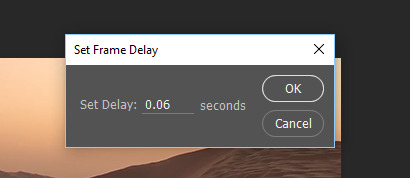
*Later when you go to save you might need to change the speed again, but 0.06, especially when it said 0.02-0.04 before hand is a good speed.
You can also hit the little play button at the bottom to see what your gif looks like, however they will probably play slower than how it will actually look after saving.
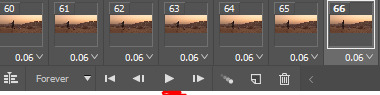
3. Cropping and resizing your gif. On your left is the bar called TOOLBOX.
To Crop: All you have to do is click this icon, drag the grid on the frame around and hit enter and crop as you please! (It will crop all of the frames the exact same.)

To Resize: The dimensions of tumblr posts are 540px wide, so if you are doing two columns of gifs (side by side gifs) the dimensions are 268px x 268px. The smaller the actual size of the gif, the more frames you can have and still be under the 3MB file size limit.
So go to the top bar, click IMAGE >> IMAGE SIZE and enter the dimensions you want.
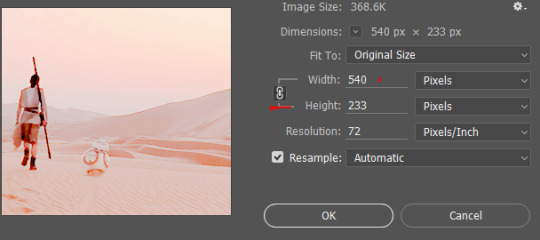
Height doesn’t matter, only width. Make sure that chain icon is there otherwise when you change the width it will make your gif look weird.
PART THREE. COLORING.
Now comes the fun part!
The right side of your screen, the ADJUSTMENTS is now coming into play. For this I’m going to show you how to add a PSD and be done with the coloring AND how some coloring tips of my own.
1. How to load a PSD (coloring). First of all, search “PSD” on tumblr, find one that you like, and follow that person’s steps for download.
Go to FILE >> OPEN >> and select the PSD. It will open as it’s own photoshop document. All you have to do now is drag the document so it’s not sitting with the other tab (like using google chrome) and shift clicking all the coloring layers on the ADJUSTMENTS bar and then dragging them onto your gif’s ADJUSTMENTS bar.
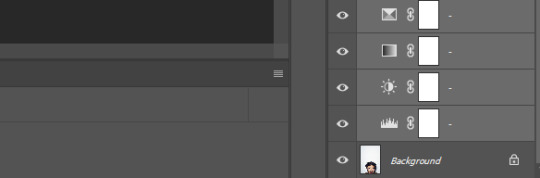
*Make sure when you drag them that they land at the very top of your adjustments (above the last frame layer- probably layer 60 in your case). COLORING AND ADJUSTMENTS affect all the layers below it, which is something to keep in mind.
ALWAYS put all your coloring at the top of the adjustment layers.
Now, if you like the way that looks skip to part four.
If you want to change something about the coloring, you can click the eyes next to the PSD layers to see what it looks like without that adjustment layer OR YOU CAN
2. Color on your own. I will go over some of my favorite tools and ways to color things. I’ll be making a masterpost soon of my favorite ways to color and PSDs and tips etc.
Here is a tutorial on how to make vibrant gifs. Here is another general coloring tutorial.
I recommend for awhile just playing around and messing with all the different sliders which are any of the following:

Vibrancy and Saturation: The more you mess with those two the grainier the gifs can get. Turn it up a little at a time. When you save a gif there can only be up to 250 colors, so adding more doesn’t mean the gif will be prettier. You can do selective saturation with the square icon under the sun. It will let you make certain colors more saturated. The upside down triangle allows you turn up vibrancy.
Adding value and shadows: The first three top icons are great to lighten/darken a gif.
The first one adds contrast and can brighten your gif. The second one messes with three different levels- the dark tones, the light tones and the medium tones. The third messes with curves, which can smooth out tones and shadows. I love these three.
Here is a PSD for my coloring for my gif of Rey. If you want, open it as you would another PSD. As you can see there are a lot of layers so take some time to click the eye icons on and off to see what changes what. Coloring takes practice and lots of different layers, so go check out some other tutorials and practice.
PART 4. SAVING YOUR GIF.
I know you’re thinking why does this need it’s own part. Well,
1. To save your gif go to FILE >> EXPORT >> SAVE FOR WEB*
*Saving for web is the key part of this whole operation.
You should get a window like this. Make sure everything red matches on your screen.
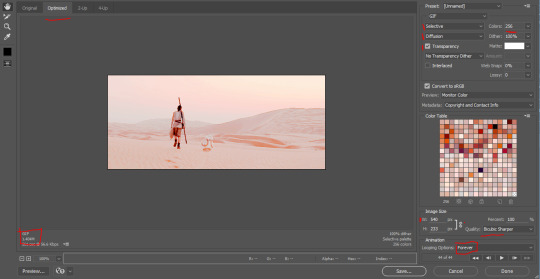
The square in the bottom left is your file size. If it says anything more than 3.00 MB then the gif will NOT load on tumblr. Double check your width size, make sure it says 540px. Make sure under color it says 256. And to make sure the gif plays correctly hit the play button.
Does it look good? Is it under 3 MB? Then hit save and upload it to tumblr! Congrats! You made your first gif!
To correct file size: click cancel and then in TIMELINE delete a few frames. Go to SAVE FOR WEB again and check the file size. Keep doing this until it is under or exactly at 3 MB.
If you have any other errors with your gif shoot me an ask! I’m happy to help! It’s probably something very easy to fix, photoshop is just VERY touchy.
Thank you for reading! If you have any questions, requests, anger, or want to throw your jar of tears of frustration at me my inbox and submit is always open!
Stay tuned for some masterposts for PSDs and overlays etc. and a tutorial on my general way to make graphics.
306 notes
·
View notes
Photo
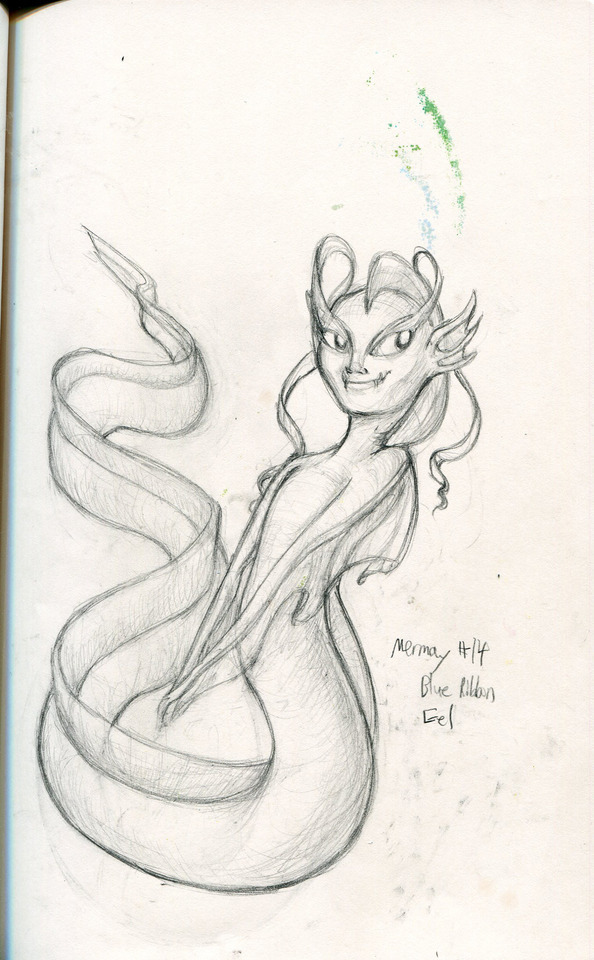
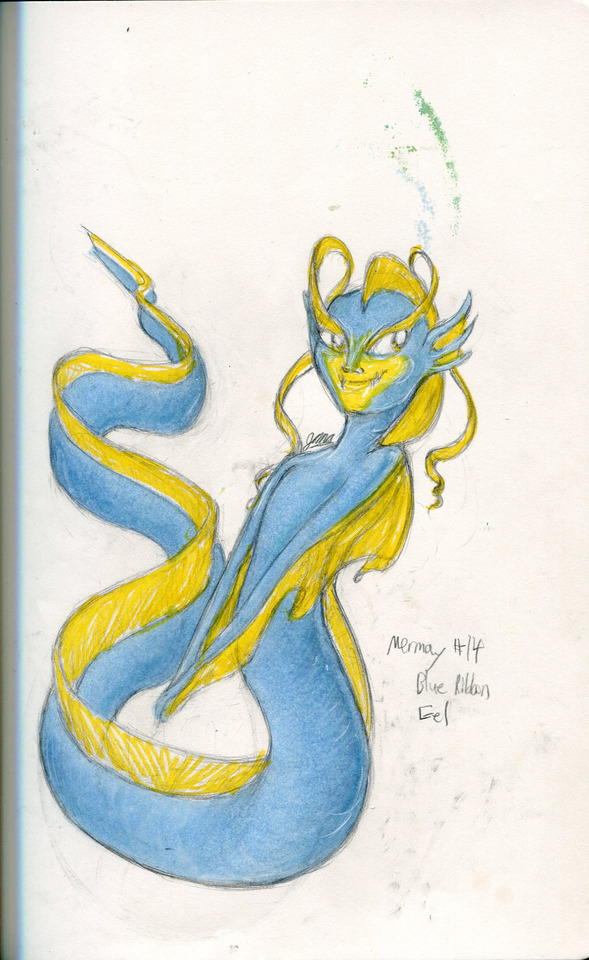
Mermay #14 - Blue Ribbon Eel Mer
Sooo I really went all out with this one. I think I shopped it too much even... XD But uh. Yeah. And I decided too to upload a bunch of other junk with it. Like a process gif (seen those here on tumblr and thought it was a great idea XD), a line, color and final version of it kinda show the progression better. Was thinking about how portfolio people like to see your process and I thought maybe tumblr people might like to see my process too so... why not? XD So yeah I usually don’t edit this much in Photoshop when I’m working traditional but I got carried away and really rendered this one out XD; It’s still got heavy traces of the traditional like that tail bit I forgot to fill in... looked nice on paper but horrible in digital. XD But what was I going to say... Right blue ribbon eels are fun. Did the generator again and after a couple dozen tries it gave me ribbon eel and though I’d sworn off eels after it gave me three in a row, the blue ribbon eel mer was way too cool to pass up. I had to change up the tail from the very early WIP (yeah, the blurry photo that’ll take you almost a minute to see for 5 seconds in the process gif if you missed it) because the way it was configured had it backwards, but I managed to get it so I could keep the pose and not have the tail be as weird... Frankly it still looks kinda wonky if I compare it to the first WIP picture and I do like the silhouette just a little bit better from that one. Was clearer and more fluid and a little less squashed-looking at the bottom. But what was I gonna say... Oh yeah and I apologize if some of the process shots in the gif are kinda blinding... I really pumped up the colors way too much at first and kept trying to downplay it. Even now it looks tolerable but before yeah it was kinda blinding XD; Anyways uh yeah. Sooo that’s the deal. I think I was going to say something else but I don’t remember and it’s late. I think I’m just gonna submit this and call it good... I think I was going to try to explain my process more instead of just babbling on... Don’t know if I accomplished that, but I guess it’s pretty straightforward. Sketch, line with pencil, sometimes I render it a bit with pencil too, then I color it which can be more finished and polished from traditional or less so like in this one where it’s nearly a flat color. Then I use photoshop to adjust colors, fix mistakes, erase smudges or color bleeds from previous pages, maybe fix spacing issues with the eyes, etc etc and to heighten the contrast between my light and shadow areas. Usually it’s minor if I’ve already rendered it out well traditionally, but this time I was pretty heavy-handed with PS because I don’t trust my blue markers that much to give me the right color... My baby blue copic is sometimes the only one that works reliably, so I worked exclusively with my baby blue copic and a cheap crayola yellow marker to produce the traditional color draft. I started out small working in photoshop, just darkening my shadows and lightening my highlights, but then I got carried away because it didn’t look like the proper shade of blue... And that’s when chaos ensued. XD It took me practically the whole day to do this pic and hours in photoshop to get the final product. I would have worked longer on it probably too if it wasn’t super late. But anyways. Sooo that’s the deal. I could probably go into more detail about the use of color balance, adjustments, brush settings and yada yada yada but it’s really late and I keep rambling. So before I type anything else that probably won’t even be read by the casual tumblr scroller I’m just gonna submit this already, put in my tags and get it over with. Or well tags first, then the submitting... You get the point. XP
#blue ribbon eel#mer#mermaid#fish mer#art#traditional#digital#mixed media#photoshop cs6#copic#baby blue#crayola#yellow#super tips#old marker#what else was I gonna say...#oh yeah#mechanical pencil#I think I got em all now#lol#paper#oh actually#I did use a teeny bit of deco blue too#prismacolor marker#just a teeny bit though#it was still mostly copic baby blue#muh baybeh#mermay2017#mermay#artist on tumblr
13 notes
·
View notes
Last Seen Blogs

santeifff
I love mature названия

wlaspaper-blog
walspapersfree

loadingscoop254
loadingscoop

baldandbonkersnetwork
Bald and Bonkers Network

quas9310518
Untitled