#import export data with importer name
Explore tagged Tumblr posts
Visit Tumblr Blog
Explore Tumblr blogs with no restrictions, modern design and the best experience.
Last Seen Tumblr Blogs


Fun Fact
Tumblr’s reach among the 26-to-35-year-olds in the US is 11%.
Text
Discover essential strategies for maximizing the benefits of import export data providers in our latest Eximpedia article. From optimizing market research to enhancing supply chain efficiency, unlock valuable insights and practical tips to streamline your international trade operations. Stay ahead of the competition and harness the full potential of import-export data with expert guidance from Eximpedia.
#import export data with importer name#free import export data online#import export data online#import export data provider#exim data#export import data provider
0 notes
Text
Import Export Data with Importer Name
ExportImportData is a leading provider of online, reliable, free import export data with importer name and cost-effective worldwide export import trade data from over 100 countries that can be used by consultants and advisers to effectively raise awareness among target markets and potential customers.

0 notes
Text
CC Creation Tutorial: Smooth Seams in Blender

In this tutorial, I will show you how to make your mesh seams smooth inside Blender (no Milkshape required!) and walk you through the process step by step. We will make a perfectly smooth mesh and transfer the normal data from that mesh to our main mesh using the Data Transfer modifier.
I am using Blender 3.6 in this tutorial (though you should be able to follow along using other versions as well)
You do not need to have much previous knowledge to follow this tutorial, but I assume you know some basics in Blender like how to select, things, navigate around, etc, and know how to import the meshes and put them into Blender.
For this tutorial, I exported the Sims 3 afbodyEP4DressPromBigBow mesh with TSR Workshop. You can use any clothing mesh you like though, and works on any meshes, not just Sims 3 ones.

This is our mesh. You can already tell that it has the dreaded seams on the neck and the rest of the body.

First, we need to make a copy of the mesh (in Object mode, select the mesh and hit Ctrl+D Shift+D to duplicate it, then hit Esc to stop it from moving around).
Rename the mesh (I added Seamless to the mesh name).
Make sure the original mesh is hidden (click the eye symbol) and select the Seamless mesh.
Press the Tab key to go into Edit Mode.

Now we select the parts that we want to have smooth seams. Let's select everything that is skin (you can select a litte piece of the mesh and then press Ctrl+L to select the entire piece)!

Now, press M and in the menu, choose By Distance. (in older versions, this is called Remove Doubles).
This will remove all double vertices at the seams on the selection we made.

It will show you how many vertices it removed. The skin looks nice and smooth!
Let's switch back to our original mesh: Make sure you deactivate the eye on the Seamless mesh and activate the eye again on the main mesh. Then, select the main mesh.

Now, let's add a data modifier to our main mesh. Click the blue wrench icon in the vertical list of the properties panel and then onto Add Modifier, then choose Data Transfer from the list.

As the source, we choose our Seamless mesh.

Also toggle on Face Corner Data and click the Custom Normals button.
Hold on, there is a message saying that we should enable Auto Smooth in Object Data Properties. Let's do that next! (if the message does not appear for you, maybe Auto Smooth is already on).

Click the green inverted triangle button and in the Normals section, toggle on Auto Smooth.

Now we can switch back to the modifier tab by clicking the blue wrench icon again.
But hang on, what happened to our mesh? There are now black spots over the dress and shadows on the legs!

This is due to the Data transfer modifier's Mapping setting. If we change it to Topology, our mesh goes back to normal again. Phew!

Now that the normals look good, we can start the transfer of our new smooth normals from the seamless mesh to our main mesh. To do that, we hit the Generate Data Layers button. This button works destructively, so you cannot undo what it did, just FYI.

Note: On newer versions of Blender, Generate Data Layers may not be enough to transfer the normals and you may need to apply the modifier instead.
You can toggle the modifier's visuals on and off with the little screen icon to see the results after you click Generate Data Layers to see if it stuck. If it did not (and you see the seams of your base mesh when toggling it off), try to apply it instead.

I switched from textured to solid shading because the differences are just more noticeable in this mode. This is how our mesh looks now with the modifier turned off.
Because we clicked the transfer button, the normals have been permanently applied to our mesh. The skin is smooth now, and so is the dress (even though we did not smooth that one, hmm...)

If we toggle the modifier back on, suddenly the dress has seams again! What's going on there? I'm not exactly sure why, but Auto Smooth seems to be doing some smoothing on the dress mesh as well.
I am not sure if this is normal behavior or not, but let's pretend that this did not happen and the modifier in fact did not smooth the dress.
Maybe we just forgot to smooth some areas on the Seamless mesh that we noticed only later on. That's no problem. We simply modify our Seamless mesh again!

So let's swap back to the seamless mesh and select it (remember to click the eye icons so only the Seamless mesh is visible).

Let's select the main dress parts and press M -> merge by distance on them. We cannot smooth the whole dress all at once, because then that would remove some seams that we want (like those for the backfaces and the middle section of the dress where the bow is attached).
If we remove the wrong seams, we ruin our normals and will have black splotches.

Now, let's select the backfaces and areas we left out before and repeat this process: M -> merge by distance.

Look at how perfect our Seamless mesh is looking now! Now, let's transfer those beautiful normals to our main mesh.
Select the main mesh and toggle the eye icons again, to hide our Seamless mesh and reveal our main mesh.

Once again, we will use the Generate Data Layers button in our Data Transfer modifier. If you have previously applied the modifier, just add the modifier again to the main mesh and use the settings shown here.
And that's it, you are done! You have a perfectly smoothed mesh that you can export now.

Final Note: it is best to transfer the normals at the very end of your meshing process because any action that recalculates the normals can reset our custom-made smooth normals again.
Of course, you can simply use the Generate Data Layers button again to re-add them, but it saves you time to only do this step at the end.
I almost forgot to say: You still have to use Mesh Toolkit to fix the seams on the edges of your mesh and do the usual shenanigans.
181 notes
·
View notes
Text
Why Project Special K is unlikely to get anywhere:
Something is holding me back from continuing the OpenGL tutorial.
I can export models and convert them to something I might be able to use, but I can't get animations to import right.
Various other such hurdles I can see on the road ahead.
Why I should continue plodding along:
I'm learning C++ from it.
I'm learning game design from it.
Learning how ACNH works and how it stores its data may help ACNH modders, e.g. how to change a villager's name tag color.
Why you should send in original villager characters:
It breeds creativity if nothing else.
274 notes
·
View notes
Text

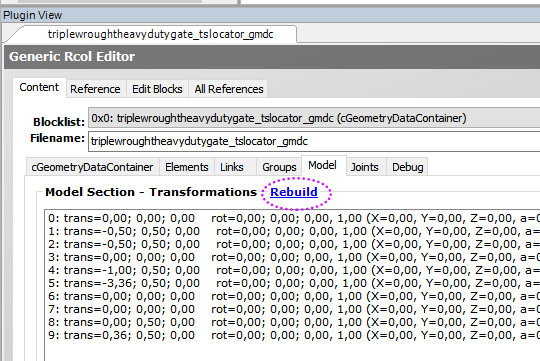
Tutorial: How to adjust joint position (in TS2 object skeleton)
This tut is NOT meant for beginners because I don't explain how to use SimPe or Milkshape. But actual process is very basic: you change joint coordinates and do GMDC model rebuild. The tricky part is to get coordinates right.
If you don't know much about joint assignments, start with this tutorial: "Retaining object animations in your new package" by Bluetexasbonnie @ MTS2, which explains how to add joint assignments to custom stuff cloned from functional objects (to make parts of the mesh move when Sims interact with it).
The pic above: SimPe GMDC skeleton preview. You can click on each joint name to see which part is assigned to it. Gate is here.
This will work for simple object skeletons without IK Bones.
There are no plugins that would allow us to properly import TS2 CRES skeleton data with IK bones - like sims, pets and more - to any 3D program
If object has IK Bones - you'll find out when importing CRES to Milkshape. If it displays a notification "joints with rotation values found...", IK Bones are present and there's a high risk that skeleton: A. will not be imported. B. if it's imported, it will get mangled. C. will be mangled after using model rebuild option.
I've experimented with car skeletons (those have IK Bones), managed to edit car door joints but it required removing wheel bone assignments - because wheel movement becomes wonky after doing model rebuild
/FYI: steps 1 - 5 are optional, you can edit CRES joint coordinates right away if you know the right values - which is usually not the case/.
Export GMDC with your custom mesh
Export CRES (if you wish to preview entire skeleton and/or joint names)
Import GMDC to Milkshape
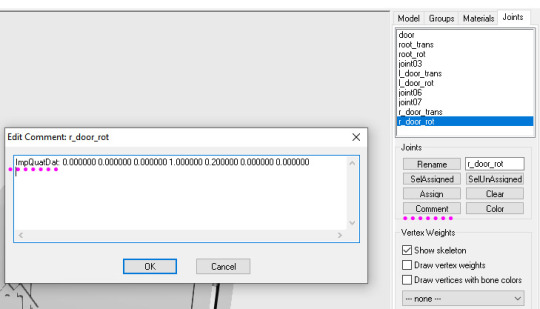
Import CRES (if you need it. Plugin is called: Sims2 AniMesh CRES Skeleton Import. Click 'yes' to 'replace all bones?'). You should be able to see entire skeleton imported. Note that Milkshape won't let you export a GMDC after you imported CRES skeleton unless you change joint comments (point 7.)
Measure how much you need to move the joint. You can create a box as ruler substitute, then check the distance with extended manual edit plugin. If you're not sure where to place your joint, you can move it and test if object animations look alright (import CRES again to reset joint position).

tip: when working on GMDC in Milkshape you can rename the model parts in model list (door right, door left etc). Only names inside the model comments actually get exported.
6. Go back to SimPe, open CRES resource. Remember TS2 is using flipped coordinates: X = -X, -X = X, Y = Z, Z = Y. Edit joint Translation data, commit, save.
Optional: you can export CRES skeleton again and import to Milkshape to test if joint has moved to the right position.
7. Go to GMDC, Model tab - hit rebuild, commit, save.
if you have the edited object placed on a lot, it's gonna look weird when you load the game. You need to re-buy it from catalogue to see results.
If for some reason you'd like to export entire GMDC with your imported CRES skeleton, Milkshape won't let you do that. You'll get "ERR: No quaternion values stored" error. You need to go to Joints tab and edit each Joint comment to ImpQuatDat: (that's imp, with capital i )
Notes:
if you go to GMDC Joints tab, there's also a rebuild option to update single joint - but I've tried it on car door joints and it didn't work.
If you edit joint coordinates in CRES, for example- move the car door forward, and preview skeleton in GMDC viewer, your model is gonna look fine. But in the game every vertex assigned to that joint will also be moved forward. That's why you need to use model rebuild option. In theory, if you'd like to skip rebuild, you could import GMDC to milkshape and move the door backwards to compensate for joint adjustments? I haven't tried that (yet).
74 notes
·
View notes
Text


PLANET: ILUM Astronavigation Data: Ilum system, 7G sector, Unkonwn Regions Orbital Metrics: 1,078 days per year/66 hours per day Goverment: None Population: 5,200 (support crew 45%, temporary researchers 30%, military 20%, other 5%) Languages: None Terrain: Frozen lakes, mountains, ice steppes Major Cities: None Areas of Interest: Holenesh Canyon, Jedi Temple, excavation sites, various ruins Major Exports: Ilum crystals [Source: Star Wars - Force and Destiny - Nexus of Power - Force Worlds] BACKGROUND: Ilum is a small, obscure world located far out in the Unknown Regions. The fifth planet of the Ilum system, it orbits an exceedingly bright blue dwarf star called “Asar.” Surveys of the system by ancient Jedi scouts show a handful of uninhabited, inhospitable worlds that are either heavily irradiated, completely covered in ice, or both. The rest of the system is largely empty, with no asteroid belt and few navigation hazards. Due to its location in the Unknown Regions and its isolation from charted hyperspace lanes, nothing was known of the Ilum system until a wandering Jedi discovered it in the earliest days of the Republic.
Roughly equidistant from Asar and the system’s cometary cloud, Ilum is the only world in the system that can support life. “Support” may be too strong a word for the relationship between Ilum and its flora and fauna, however. It is a large, terrestrial world orbited by two small moons and encircled by a wide set of rings made mostly of ice crystals. It is a land of broad continents, towering mountain ranges, and shallow seas locked in a perpetual ice age. Huge glaciers scour the planet’s face, slowly grinding the land flat. Where the glaciers have passed, deep snows or sheets of ice dozens of meters thick entomb the surface, making agriculture impossible. Ilum's few seas are shallow and broad, their waters choked with great floating ice mountains and thick sheets of drift ice. In addition to its frozen, snowbound landscape, Ilum has an atmosphere that is a near-constantly churning vortex of storms. High winds, sleet, thick snow, and freezing rain are to Ilum what gentle winds and soft rains are to Naboo.
Life, where it can survive, does so primarily along Ilum's equatorial region. Here, at least, the temperatures are only in the double digits below freezing, which has allowed a small number of native plants and animals to evolve. A few eke out an existence on the planet’s frozen surface, but most live either in the icy seas or deep beneath the ground in the uncounted thousands of kilometers of caverns and tunnels that worm through the planet’s crust. Savage gorgodons, cunning asharl panthers, and the terrifying razhak call Ilum home, along with hardy species of small rodents, birds, and worms. Alongside these are tough plants and fungi adapted to sub-zero temperatures, many of them completely undocumented.
LIFE ON ILUM: To date, no evidence has been found to suggest that sentient life ever evolved on Ilum. There are no ruins, nothing in the fossil record, and nothing recorded in the galaxy’s various ancient databases to suggest that Ilum was ever anything more than an obscure, uninhabited frozen rock. Indeed, the planet would have stayed that way until Asar burned itself out if the Jedi hadn’t come along and stumbled onto a discovery that would make it one of the most important places in the galaxy to that ancient order.
ILUM'S HISTORY: Ilum's recorded history begins tens of thousands of years ago with its discovery by a Jedi scout whose name is lost to history, performing Force-assisted hyperspace navigation. As the scout moved through the hyperspace lanes, she was drawn to the Unknown Regions by a particularly powerful resonance in the Force. Following the siren call of the Force resonance, the scout eventually discovered a lonely, hitherto uncharted system in the far reaches of the Unknown Regions, centered around a bright, blue-white star. The Force was strong throughout the system, but there was something powerful, something special, on the fifth planet, and that's where the Jedi scout focused her attentions.
The first scout's initial reports, as well as those from sub sequent survey teams, reported a barren, windswept world of tall, jagged mountains and shallow, frozen seas locked away beneath dozens of meters of ice. No settlements or ancient ruins were discovered, and all evidence pointed to the world being devoid of sentient life. What the teams did find was a world that, despite its inhospitable environment, managed to support some plant and animal life. Packs of large felinoids stalked the planet's steppelands; huge, slow moving aquatic mammals thrived in the icy seas; powerful and aggressive humanoid reptiles haunted the many mountain chains; and plants and fungi clung to life in sheltered spots away from the constant wind. These animals and plants didn't explain the planet's strong Force shadow, however. Its presence in the Force was enormous, a fact that the surveyors could not explain until one team was chased into a mountain cavern by dangerous creatures and discovered Ilum's real wealth.
Beneath Ilum's ice sheets and permafrost, the planet's crust is honeycombed by countless kilometers of interlocking cave systems. Within these caves, the escaping survey team discovered a motherlode of pontite, mephite, and other kyber crystals—the heart of a Jedi's lightsaber. The discovery of Ilum's mineral wealth quickly changed the char acter of Ilum's exploration from one of curiosity to one of grave importance to the Jedi Council. Upon receipt of the news that Ilum possessed an incredible wealth of kyber crystals, the Council immediately dispatched teams of scholars, artisans, and warriors to secure the world and to further study its natural wealth and importance to the Force. To pro tect the crystals, the Council made a decision to keep Ilum's existence a secret from the galaxy at large, and a number of steps were taken to ensure that it stayed that way. Hyperspace surveyors mapped out an uninterrupted, dedicated hyperspace lane from Metellos, a world in the Core region, straight to Ilum's orbit. The navigation of this route was so complex that a ship’s pilot needed to be at least sensitive to the Force, if not a fully trained Jedi Master, to even attempt it. In addition, all references to Ilum in official reports were quashed, and the world was even kept from local, sector wide, and galaxy star charts.
DARK LEGENDS: For thousands of years, the Jedi Order kept Ilum and its bounty secret and safe from harm. Generations of Jedi, from the greenest Padawans to the most ancient masters, traveled from all across the galaxy to search for crystals, study the planet and its connection to the Force, and enjoy the mental quiet of the uninhabited world. There is a nearly forgotten legend that speaks of a dark and violent time in the planet’s past, however. Ancient sources suggest that the Sith may have laid siege to the world, eventually taking possession of it for a time.
ENTWINED WITH THE JEDI: With Ilum secure, the exploration of the world and its connection to the Force was begun in earnest. Numerous settle ments were founded over the subsequent decades, typically near the sites of important scientific or Force-related discoveries. At places with a particularly powerful connection to the Force, the Jedi erected temples that served as training centers or pilgrimage sites where members of the order could go to meditate and heal. In addition, thanks to the abundance of kyber crystals on the planet, the Jedi Council established a massive, baroque temple over the entrance to the largest and richest cavern complex the survey teams had discovered. Once it was completed, the council began sending Padawans to Ilum to harvest the crystal for their lightsaber and to undergo the important training rituals associated with lightsaber construction.
Countless Jedi over the millennia traveled there to build their first lightsaber or to find crystals to build new ones. Eventually, as other sources of kyber crystals were exhaust ed or became otherwise unavailable, Ilum became the Jedi’s sole source of these precious crystals. While the planet remained a place of great importance, the Jedi Council recalled those members who were living on Ilum and shuttered all their settlements and temples save for the main temple used for lightsaber construction. With the world’s inhabitants gone, its glaciers and ice sheets quickly consumed the Jedi settlements and research sites, burying them beneath dozens or hundreds of meters of ice. By the beginning of the Clone Wars, there were no permanent residents on Ilum, nor any real evidence that there ever had been, and the main temple stood empty, save for the occasional Jedi pilgrim there to find a new kyber crystal.
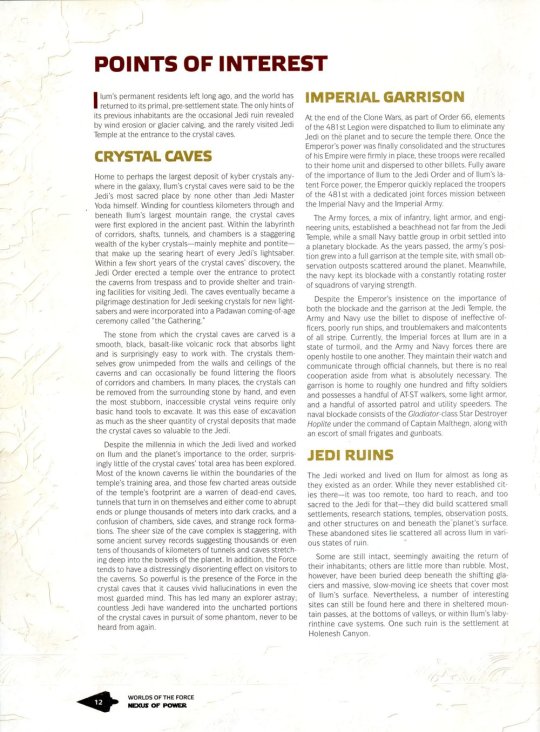
CRYSTAL CAVES: Home to perhaps the largest deposit of kyber crystals any where in the galaxy, Ilum’s crystal caves were said to be the Jedi’s most sacred place by none other than Jedi Master Yoda himself. Winding for countless kilometers through and beneath Ilum’s largest mountain range, the crystal caves were first explored in the ancient past. Within the labyrinth of corridors, shafts, tunnels, and chambers is a staggering wealth of the kyber crystals—mainly mephite and pontite— that make up the searing heart of every Jedi’s lightsaber. Within a few short years of the crystal caves’ discovery, the Jedi Order erected a temple over the entrance to protect the caverns from trespass and to provide shelter and training facilities for visiting Jedi. The caves eventually became a pilgrimage destination for Jedi seeking crystals for new lightsabers and were incorporated into a Padawan coming-of-age ceremony called “the Gathering.”
The stone from which the crystal caves are carved is a smooth, black, basalt-like volcanic rock that absorbs light and is surprisingly easy to work with. The crystals themselves grow unimpeded from the walls and ceilings of the caverns and can occasionally be found littering the floors of corridors and chambers. In many places, the crystals can be removed from the surrounding stone by hand, and even the most stubborn, inaccessible crystal veins require only basic hand tools to excavate. It was this ease of excavation as much as the sheer quantity of crystal deposits that made the crystal caves so valuable to the Jedi.
Despite the millennia in which the Jedi lived and worked on Ilum and the planet’s importance to the order, surprisingly little of the crystal caves’ total area has been explored. Most of the known caverns lie within the boundaries of the temple’s training area, and those few charted areas outside of the temple’s footprint are a warren of dead-end caves, tunnels that turn in on themselves and either come to abrupt ends or plunge thousands of meters into dark cracks, and a confusion of chambers, side caves, and strange rock formations. The sheer size of the cave complex is staggering, with some ancient survey records suggesting thousands or even tens of thousands of kilometers of tunnels and caves stretching deep into the bowels of the planet. In addition, the Force tends to have a distressingly disorienting effect on visitors to the caverns. So powerful is the presence of the Force in the crystal caves that it causes vivid hallucinations in even the most guarded mind. This has led many an explorer astray; countless Jedi have wandered into the uncharted portions of the crystal caves in pursuit of some phantom, never to be heard from again.
JEDI RUINS: The Jedi worked and lived on Ilum for almost as long as they existed as an order. While they never established cities there—it was too remote, too hard to reach, and too sacred to the Jedi for that—they did build scattered small settlements, research stations, temples, observation posts, and other structures on and beneath the planet’s surface. These abandoned sites lie scattered all across Ilum in various states of ruin.
Some are still intact, seemingly awaiting the return of their inhabitants; others are little more than rubble. Most, however, have been buried deep beneath the shifting glaciers and massive, slow-moving ice sheets that cover most of Ilum’s surface. Nevertheless, a number of interesting sites can still be found here and there in sheltered mountain passes, at the bottoms of valleys, or within Ilum’s labyrinthine cave systems. One such ruin is the settlement at Holenesh Canyon.
HOLENESH CANYON: Located some five hundred kilometers from the main Jedi Temple at the mouth of the crystal caves, Holenesh Canyon is a deep, sheer-sided cleft in the planet’s surface over a kilometer deep that runs for roughly ten kilometers through one of Ilum's vast mountain ranges. The settlement, once home to around one hundred sentients, was built near the canyon’s end in the shadow of the mountain range’s highest peaks. It was established millennia ago to study a strange fluctuation in the Force that seemed to occur only once every few hundred years. Named for the Jedi who first recorded the anomaly, this small, isolated outpost stood for centuries before being destroyed in an avalanche triggered by a massive groundquake coinciding with the reappearance of the Force anomaly. Many of the settlement’s inhabitants were killed as they slept, but some managed to escape with little more than the clothes on their backs or what they could grab in their flight. Further seismic disturbances, combined with freak storms, prevented the mounting of a proper rescue mission, and by the time the Jedi were able to return to the canyon, the settlement was completely covered in snow and countless tons of fallen stone.
In the millennia since the destruction of the settlement, parts of it have been exposed through erosion and seismic activity. While the buildings are barely recognizable as such, their contents were surprisingly well preserved. Thanks to the remoteness of the ruined settlement and the difficulty of reaching it, precious little has been removed from the site. Anyone possessing the skills and courage to excavate the site might unearth any number of ancient Jedi relics.
CREATURES AND CHALLENGES: Ilum's climate is exceptionally harsh. Its land and most of its surface water are locked away beneath glaciers and permanent sheets of ice. Temperatures, even in what are usually considered temperate or tropical zones on other worlds, can sink to dozens of degrees below freezing. These temperatures are typically accompanied by howling gales and blizzards full of driving snow and ice shards. Few creatures, and even fewer plants, live on Ilum. To survive in these brutal conditions, Ilum's creatures and plants are both extremely hardy and extremely dangerous.
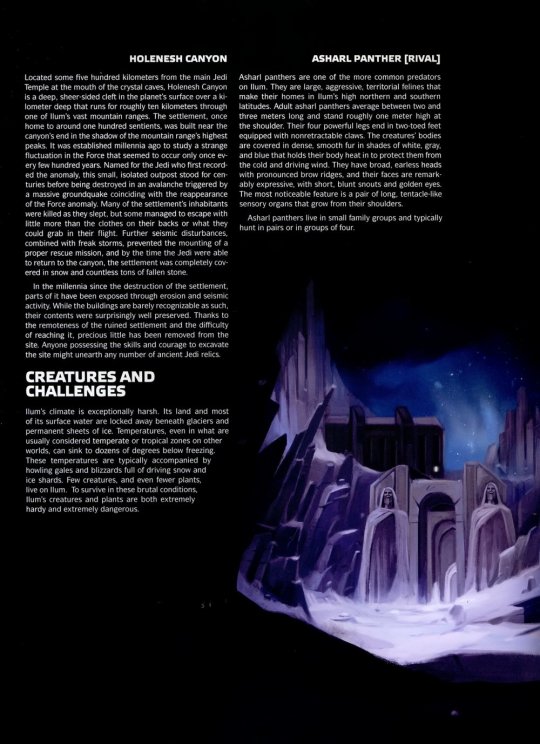
ASHARL PANTHER [RIVAL]: Asharl panthers are one of the more common predators on Ilum. They are large, aggressive, territorial felines that make their homes in Ilum's high northern and southern latitudes. Adult asharl panthers average between two and three meters long and stand roughly one meter high at the shoulder. Their four powerful legs end in two-toed feet equipped with nonretractable claws. The creatures’ bodies are covered in dense, smooth fur in shades of white, gray, and blue that holds their body heat in to protect them from the cold and driving wind. They have broad, earless heads with pronounced brow ridges, and their faces are remark ably expressive, with short, blunt snouts and golden eyes. The most noticeable feature is a pair of long, tentacle-like sensory organs that grow from their shoulders. Asharl panthers live in small family groups and typically hunt in pairs or in groups of four.
BLISMAL [MINION]: Blismal are small, furry, inoffensive rodents who live in the tunnels and caverns deep beneath Ilum's surface. About the size of a grown human’s hand, blismal have four legs; sharp featured faces with small black eyes, round ears, and long snouts; and short, hairless tails. Their bodies are covered in thick, luxurious, silvery fur that keeps them warm and sheds water and dirt. They feed mostly on cave fungus and insects, and they are happy to be left alone in the dark to live out their lives.
Like the harmless snowfeathers, which live on the surface, blismal have few natural predators. This is largely due to their speed and cautious natures, although they do have a frighteningly effective defense mechanism. When frightened, blismal make a shrill, painful, and sustained shrieking noise to ward off attackers and call for assistance from other blismal. When three or more blismal join in, they create a howl loud enough to shatter crystals and cause cave-ins, an ability that Jedi experienced firsthand long ago. The Jedi attributed this ability to the blismal’s close connection to the Force, and were able to counter the effects of the shrieking by manipulating the Force around the creatures. In doing so, Jedi exploring Ilum's cavern system were able to capture blismal, which turned out to be relatively easy to domesticate.
GORGODON [RIVAL]: Gorgodons are, perhaps, the most famous creatures to live on frozen Ilum. They are massive, non-sentient, thick-skinned reptilian creatures with long, powerful arms, short legs, and an axe-shaped head. A thick, shaggy coat of dark gray fur covers them from their shoulders to their feet, leaving only their head, which is a sickly orange color, bare to the elements. Gorgodons are incredibly strong and can with stand almost any punishment. It is said that they can even shrug off blaster bolts. They are a dangerous combination of dumb, aggressive, and brutal, and are one of the few animals that attack for no good reason. When the Jedi first arrived on Ilum, the gorgodons were the creatures that gave them the most trouble. Throughout the Jedi Order, the name of this creature was used in threats and curses, such as “thick as a gorgodon” or “as angry as a gorgodon’s mother.”
RAZHAK [NEMESIS]: Among the most fearsome predators on Ilum, these massive creatures are as agile as they are deadly. Averaging around eight meters in length, razhak-are armored, segmented, wormlike creatures that propel themselves using rippling muscle ridges. Their bodies are broad and flat, covered with thick, chitinous plates in shades of white and blue. While they have no apparent eyes, their heads are topped with long, segmented antennae that serve as sensory organs. Their huge mouths feature multiple rows of serrated teeth.
Aggressive and solitary, razhak live in the endless tunnel systems beneath Ilum's surface. They are deceptively fast and, when they attack, they rear up like a serpent and at tempt to swallow prey whole. Anything they can’t eat in one bite they tear into pieces by grasping it in their mouth and shaking it violently. In addition to possessing great speed and a savage demeanor, razhak also can generate intense heat strong enough to rapidly melt solid ice and cause serious burns to exposed flesh. This ability allows them to tunnel through ice as though it were soft sand. Razhak usually build their nests inside of ice walls or densely packed snow, typically leaving the nest only to eat or mate.
Thankfully, while they are terrifying to behold and extremely dangerous, razhak are also easily distracted and creatures of minimal intelligence. Keeping this in mind, a clever opponent can easily outflank them, lead them into traps, or make them lose interest in attacking altogether.
SNOWFEATHER [MINION]: Snowfeathers are small, clever, flightless birds native to Ilum. Their bodies are covered in a dense layer of oily, white feathers that protects them from Ilum's bone-chilling cold and vicious weather. Relatively harmless creatures, they live in nesting colonies built into ice shelves or cliff faces.
Despite their inoffensive nature and inability to fly, snowfeathers have few natural predators, for two reasons. First, their meat tastes terrible and is mildly poisonous, causing painful cramps, bloating, and loosening of the bowels in those unfortunate enough to eat them. Second, they have a connection to the Force that gives them the ability to project an illusion that makes them seem larger and more formidable than they really are. These characteristics have allowed them to survive and even thrive on an inhospitable planet full of savage creatures like gorgodons and asharl panthers.
143 notes
·
View notes
Text
On Spain, Palestine, and socialdemocracy
I'm sorry to my spanish-speaking friends but this post is mostly meant for the various people who aren't that familiar with Spanish politics so they fully understand the context of Spain's recognition of Palestine, so it'll be written in English instead of Spanish.
Ever since the Spanish government decided to recognize Palestine, amongst other events, I've seen many friends celebrating. This is normal, of course, but the over-enthusiasm makes me think some of you are lacking context.
First, the arms trade. At least since 1995, Spain has sold arms, munitions, explosives, and vehicles to Israel, according to the government's own sources. The total value of arms and munitions exports since 1995 amounts to 36,616,066.21€ ($39,730,901) and 800,417.6kg (1,764,616.6 pounds). The total of "airships and spatial vehicles" amounts to 233,622,074.13€ ($253,495,704.46). Officials have repeatedly stated that, since Oct 7 2023, there have been no arms sales to Israel. However, in November of 2023, this website shows an arms export worth 987,000€ ($1,070,961.56) in the subcategory of "bombs, grenades, torpedoes, missiles". In December of 2023 there is another export with the same category as the last one worth 125,240€ ($135,893.85). The government has stated that the November export was made up of "medium caliber munitions without explosives" (which is weird that it was classified under bombs, grenades, torpedoes and missiles but whatever) and that it had already been agreed upon before Oct 7th. I'm sure that the Palestinians appreciate the munitions they are being killed with do not explode, and that the 552kg (1,216.95 pounds) of "gunpowder and explosives" exported in 2023 will also go very well with those non-explosive munitions. And, regardless, we all know that the Palestinian genocide did not start last October. This is also just the publicly available data, but I think we can trust them to be honest :)
For some context on the political situation. In July of 2023 we had general elections in which a coalition government was formed. The biggest party in this coalition is the PSOE, the president's (Pedro Sánchez) party, a socialdemocratic party that has governed on-and-off since the establishment of the current liberal democracy in 1978, this will be important later. The other member of this coalition is Sumar, a further-left socialdemocratic party that is itself a broader coalition of almost all parliamentarty "leftist" groups, such as IU (United Left) and the PCE (Spanish Communist Party, don't get too caught up on the name because their eurocommunist turn in the 60s has rendered then just another socdem party). The election was very closed and the coalition was almost not formed, and in the end PSOE had to reach an agreement with the pro-Catalan independence parties. All of this means that it has been a weak government without much cohesion, which in turns means every member of the coalition has been doing everything they can to reinforce their position. One example of this was Pedro Sánchez's letter contemplating resigning because of the verbal attacks he and his wife had been recueveing from the opposition. That letter forced every entity in the parliamentary and even some in the extra-parliamentary left to express support for Sánchez, and after announcing he would not be resigning, polling shows support for his government increased, though this is disputed by some and I'm suspicious of it myself.
Anyhow, this is important because the parties that make up the government are being very conscious about their support, more than usual. The decision to finally recognize Palestine (and I'm not even getting into the Palestinian National Authority, which is what they're actually recognizing) comes in this context of insecurity regarding their support, and comes after weeks of encampments and other protests in universities across the entire country. The continued arms exports, the delay in taking the decision and the context of the decision makes it quite obviously an opportunistic move to garner support. But is the recognition actually meaningful for Palestinians suffering a genocide? Barely. It might pave the way for Palestine's inclusion in the UN (the US will veto anyway) (and it's not like the UN can do more than stern condemnations). What does not change is the continuous arms exports since at least when export data was first published, and the commercial relations the government and Spanish monopolies have with Israel, all of which allow Israel to carry out genocide. And even if Spain had never sold even a grain of gunpowder to Israel, and even if no economic relations had ever been established, Spain is an important member of NATO and the EU.
A few days ago it was 43 years since Spain officially joined NATO in 1982 without a referendum, since polling showed only 18% supported joining NATO, and 52% outright opposed it. It was only 4 years later, in 1986, when PSOE carried out a referendum on remaining in NATO (note: the PSOE had gone from fully opposing NATO membership when they were in the opposition to defending it after winning the elections). The question was "Do you consider Spain remaining in the Atlantic Alliance under the terms agreed upon by the Nation's Government to be convenient". This question did not actually say "NATO" (OTAN in Spanish) and it did not make clear what people were actually voting on. 52.24% voted yes. One of the unwritten prerequisites for joining the EU in 1985 was to also be a member of NATO.
NATO is an imperialist alliance that has always defended the continuity of Israel, and its member states have always supplied it with the resources necessary to displace, opress, and kill the Palestinian people. The economic benefits of this fact permeates the economy of every NATO member state. The same goes for the EU, which is one of the most significant trade partners of Israel. And the increase of intensity in the genocide Israel commits is happening parallel to the EU's turn towards a military economy. For example, the European Stability Mechanism, founded in 2011, has given the EU member states 400,000,000,000€ ($434,059,923,120) to invest in the "defense" industry and the "green transition". The European Commissioner Thierry Breton said in early April of this year that "we need to change the paradigm and transition to the mode of war production", amongst other warmongering statements by European leaders. Denmark, Sweden, the Netherlands and Germany have already expanded military service. This is all, of course, driven by the interimperialist war in Ukraine, but the investment in the war industry will undoubtedly continue to fuel Israel's occupation.
There is no group within the Spanish parliament (and very few outside the parliament) that even begins to question NATO and EU membership. The government can get away with this apparent pro-Palestine (more like two-state solution but that's beyond the point) posturing because regardless of Spain's own exports and positions, its membership in NATO and the EU will be the most relevant factor in its ties with Israel. Recognition of a nation as a "legitimate" country does not have a material effect on the Palestinians' situation, and the unquestioned participation in these imperialist alliances does. PSOE's slogan for next week's European elections is "More Europe". Do not let empty actions distract you from the real facts of Spain's unbroken complicitness in this genocide
76 notes
·
View notes
Text


Sodie Snakification Modifications!
Buckle up because I have a LOT to tell y'all about the making of this one.
From the beginning I knew I wanted the new Sodie snakifications to be based more on the liquid drink itself rather than the straws and can it comes in. I knew that would involve some playing around with new materials, but I had no idea the ordeal I was in for.
Initially I had dedicated a very small unused area of the Sodies' texture maps to a transparent colour that would be used for the 'liquid' parts. I first tested it on a placeholder head part and it worked just fine. But when I went to use it for the limbs, there was no longer any transparency. This confused me.
And so began a several days long search for the solution to this, which involved custom materials, testing different geometry, and even messing with xml and irrlicht files. Unfortunately nothing worked. I knew my textures and materials were not the problem because transparency worked on the head part, but for reasons I couldn't fathom it only worked on the head part. And I knew transparency was possible on limb parts because the Hunnabee parts use it.
Eventually, I got an answer from the Young Horses developer Kevin on the official Young Horses Discord server. Apparently, all I needed to do was copy a line of XML from the Hunnabee definition file to the definition file of my Bugsnax of choice. Honestly I'm not sure how I'd missed that in all my previous efforts. The name of the value I needed was "InventoryHasTransparency", maybe the "inventory" part threw me off? Anyway, I have to give my greatest thanks to Kevin for once again saving my mod (the first instance was right at the beginning)
So I had working transparency on the limbs, but at that point the limbs were just flat-coloured without any bump/normal detail. The space the limbs occupied in the UV layout was far too small to put any meaningful detail in.
The thing with Bugsnak UVs is that the eye UVs take up (in my opinion) a lot more space than they need to. One could optimise the texture space significantly by overlapping identical eyelid, pupil, and eye UV islands. I could do this easily, except the animated models of the bugs themselves us .X (DirectX) files instead of .obj files. I have had zero(0) luck with working with DirectX files in Blender. The importer breaks animations, and every exporting option breaks them further.
However, I had a cheeky solution. You see, DirectX files can be opened in Notepad++ and have semi-comprehensible blocks of text data. This includes texture/UV layout data. So if I could import the Sodie's DirectX file, ignore the broken animations, change the UVs, and re-export it (once again ignoring the broken animations), I could theoretically just copy the modified texture layout data from one to the other.
The only problem was that I was exporting as an obj or fbx file and then using FragMotion to convert it to a DirectX file, and Fragmotion insists on triangulating any tetragonal polygons. This, for some reason, absolutely breaks the result of my attempted data transfer. Thankfully I found an online converter that converts fbx files into non-triangulated DirectX files, and my convoluted UV data transfer plan ended up working perfectly.
With that, I had plenty of space to put a much nicer bubbly liquid texture, and use that for the limbs. Anyway, I'm running short on time today, so thanks for attending my TEDtalk.
81 notes
·
View notes
Text
How to make a child model in Anam/Ktisis!
Disclaimer: I am NOT an expert in the use of these mods! I'm still very new and learning the ins and outs of them! This method worked for me, and maybe there are better ways to do it, but I'm just explaining how I created my baby Shiun. If you know of a better way, or have any tips and tricks, please feel free to comment or reblog with your advice for the sake of other gpose newbies! :D Link to Ktisis's download page | Link to Anam's download page Guide and Tips/Warnings below the cut! Hope this helps <3

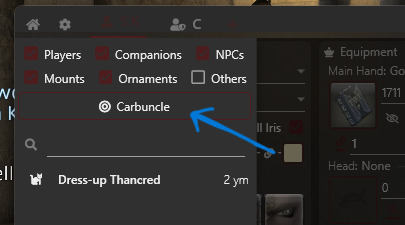
Summon your partner in crime. So first off, I equipped my summoner job stone and summoned my trusty companion, Carbie.
2. Add your Carbie to your actors. Open up Anam and add your carbie to your list of actors, by clicking the plus sign at the top of the menu next to your character's name (remember that with Anam, you can only edit appearances OUTSIDE of gpose). Click on the little button labeled "Carbuncle" to add them.
3. Turn your Carbie into a person. With your Cabie selected, go to the "Import NPC" at the bottom right and pull up the list. Find an NPC that is the same race as your desired character and select it. In this example, I just chose the first au ra NPC I saw in the list. (You can also directly choose your desired race in the customize menu and start from scratch, but I just do it the Import way, lol) ⚠️As far as I've experienced, it's a 50/50 chance on whether or not you can alter the age of your character's actor directly. Every time I've tried this, it breaks the model and never works the way it should. For simplicity's sake, I've always just used my friend Carbie.


4. Change the age of your new actor. Now if you look at the top left of the Anam window, there's a series of dropdowns next to "Race."

What you want is the bottom right menu. Click it and you'll see "Old," "Normal," and "Young." Clicking "Young" will turn your carbie into the child version of the race it's currently disguised as!
5. Customize and boot up gpose! Now you can customize them to be the adorable mini version of your beloved WoL/OC!! The bones are compatible with Ktisis and should be as easy to manipulate and pose as adult models. If you use the Carbie method as I have in this explanation, you can simply hide your main model in the default Gpose menu for pictures.
Some things to keep in mind! ----
⚠️Not every race has a child model. The only races that have child models are:
au ra - male & female
hyur - male & female
elezen - male & female
miqo'te - female only
⚠️It is very likely that the models will break or look a little funky when you first spawn them. They have a very limited number of faces, and a limited number of available hairstyles. If you choose an option the game does not have, it will create some... interesting results. Most other customizations beyond skin color, hair color, and eye color will also likely not work (tail type/length, jaw type, etc.).
Left: invalid face selected --- Right: invalid hairstyle selected
Usually, faces 1 & 2 are the only viable options, and hairstyles 1-5 are okay. (Note: the pictures of the hairstyle icons will NOT match the hairstyle on the model.)
⚠️Clothing is also fairly limited! I'm not sure what dictates what child models can and cannot wear, so as far as I know, it's just a game of trial and error. You'll know immediately if an article of clothing isn't compatible lmaoo. Hats... rarely ever work...
✨Don't forget that you can save your model's data! When your model is customized to your liking, click "Export" at the bottom right of the menu to save the data to Anam. That way, you can load the appearance immediately without rebuilding it every time!
It's a mixed bag of what will and won't work on the model. My best advice is to experiment and play around with it! It took me a little bit to figure all of this out, so hopefully this silly little explanation helps out all the other new gposers out there :)
If you have any questions, please don't hesitate to reach out and ask! I'll do my best to help! I may edit this as I go to correct things and/or add onto it!
#ffxiv#ff14#final fantasy xiv#ffxiv gpose#ffxiv resources#ktisis#anamnesis#hope this little guide is useful :)#make sure to read the comments/reblogs for extra info!!
153 notes
·
View notes
Text
YOUTUBE EXODUS MASTERPOST
fuck youtube and fuck their anti-ad blocker policy. aside from advertisements being a capitalist nuisance where we are the actual product being sold, ads which contain flashing lights or otherwise triggering material can and do harm people, and youtube's decision to ban ad blockers will impact these folks the most. here I'm gonna talk about what I use to mitigate this bullshit!!!
DESKTOP - FREETUBE
Ublock and Youtube are basically in an arms race right now, and the instability and inconsistency of FF working with ad blockers isn't great. Today, I can't watch anything on desktop, it's totally blocked for me as long as I'm logged into my account.
I would recommend switching to Freetube, which is a client for youtube that runs on your computer, ad-free. You're able to import your subscriptions and search history, and a proper playlist function is in the works.
In order to export this stuff for Freetube, you'll need to log in to youtube and click on your icon. In the list that pops up, click "In order to export this stuff for Freetube, you'll need to log in to youtube and click on your icon. In the list that pops up, click "Your data in Youtube".

From here, click on "Download Youtube data" on the dashboard card. You might have to click "see more" for this option.

This is where we get particular. First, hit the button that says "All youtube data included"

In the list that pops up, deselect everything except for history, subscriptions, and playlists. Then click okay, which will return you to that ^ page above. You then need to click "multiple formats", scroll down to history, and change the format to JSON.

Once you've done that, you can click "next step" and decide if you'd like for the data to be emailed to you or put in your dropbox or whatever. all the files will be in a .zip folder, so extract them somewhere convenient, and if you plan on using Newpipe for your mobile device, KEEP THAT .ZIP FILE!
Once you've installed Freetube, go to settings -> data settings and import your subs. the file for this will be nested in a folder named "subscriptions" in the .zip file you extracted. Do the same thing with importing your history, but make sure to select the file that's named watch_history. importing playlists is not yet a feature for freetube, but I recommend downloading yours anyway.
From there, you're free to watch desktop Youtube, addless as God intended.
MOBILE - NEWPIPE
I've used newpipe for years now, and it's a game changer. You can download as audio or video files, play in the background with your phone locked, and still have your subs and playlists. it's lightweight and has a great UI.
The great thing about importing your subs and other info to Newpipe is that it's less fiddly. Go to your subs, and then tap the three dots in the right upper corner. Then tap import from, and select Youtube. Select the .zip file from earlier (you saved it, right?) and it should import all your stuff. If this doesn't work, Newpipe provides instructions on alternative ways to import your subs/playlists/etc on-screen.
Don't subject yourself to advertisements. You deserve better. Get Freetube, Get Newpipe, and if other people have suggestions, feel free to add it to this post!
142 notes
·
View notes
Text

Step up your export game with Eximpedia, your gateway to invaluable Indian exporter data. Use our extensive database to navigate global markets with accuracy, access key insights, and build successful partnerships. Stay ahead in international trade by harnessing the power of accurate and updated export data from India.
#import export data with importer name#exim data bank#import export data provider#indian Exporter data
0 notes
Note
Hi Anna, I know you mentioned a while ago that you had made your own lighting mod so I was wondering if you have a tutorial for how to go about that?
there used to be a great in-depth tutorial for this by lunar-nelfean (which is how i learned to do it, so all credit for the discovery to them), but since they've deactivated their blog i'll make a quick one. for posterity. and google results
Sims 4 Edit World Lighting Tutorial
Navigate to Program Files (x86)\Origin Games\The Sims 4. If you want to change the lighting for an expansion pack world, go to the Delta folder and choose an EP folder. If you want to change the Base Game lighting, go to Data\Shared\Worlds\Areas. BGEngagement 0-3 is Newcrest, all worlds with a GD prefix are Willow Creek and SO prefix is Oasis Springs.
Copy the .world files you want to edit, as you can't save files in your game folder. I recommend saving a backup of the original EA ones too, just in case you don't like your edits and want a clean slate, or want to go back to EA lighting without having to repair your game.
2. Open "World Color Timeline" and click Edit Items.
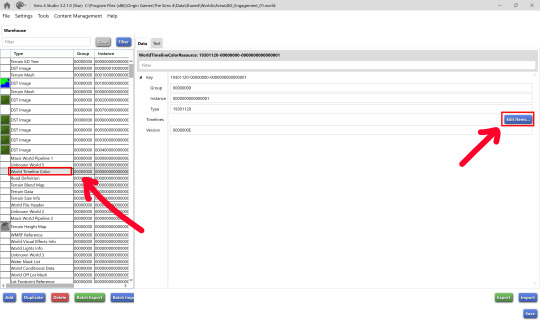
3. From there, you're off to the races. Change any values you like. The names are mostly are self-explanatory as to what they change. Sometimes you notice a huge difference on changing values, and other times you might not. Some effects (like bloom) are only visible when you have Post Processing Effects on in your settings. You just have to experiment!
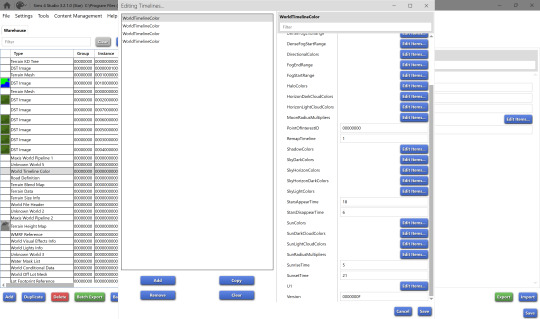
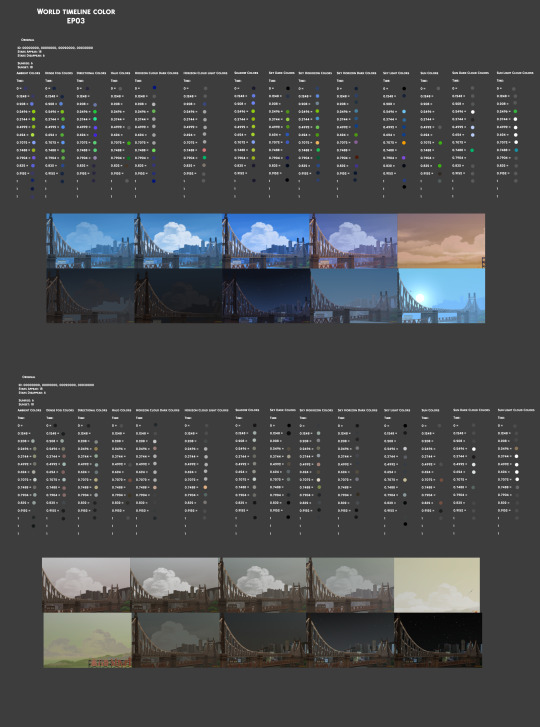
It's a bit difficult to visualize what each one of those colors is going to look like in game, so back when I was still planning to make a lighting mod, I spent way too much time making a sheet to help visualize what each color looks like at each time of day for certain values. The top colors are EA's original for San Myshuno, and the bottom is basically a recolor I made by just changing the hue/saturation (I used the eyedropper in Photoshop to get the RGB and changed the values in S4S to match). Hopefully this can help you get a rough idea of what decimal number corresponds to what time of day.
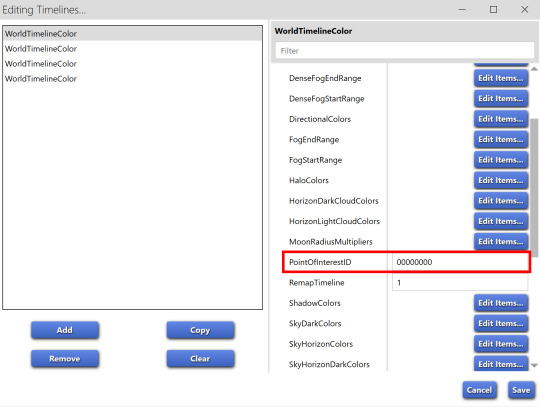
4. Each 'World Timeline Color' represents a season, hence the 4 entries in the box. When you're done editing, if you want the same values for each season, delete the bottom 3 World Timeline Color entries, then copy your edited one 3 times. Change the PointofInterestID. Make sure you have 00000000, 00010000, 00020000 and 00030000. When you're ready, save!
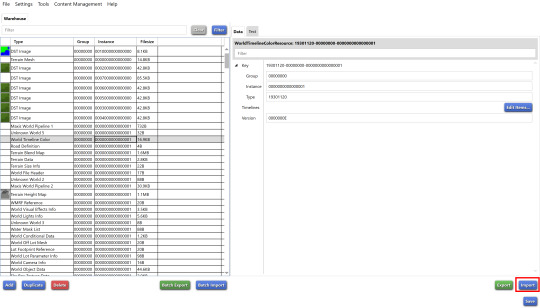
5. To quickly copy your custom lighting to the other neighborhood files for the world, batch export the World Timeline Color file.

Open another neighborhood, click on World Timeline Color and click Import.
6. Save, repeat for the rest of the neighborhood files, and you're done! Drag your edited files into your Sims 4 game folder, replace the existing ones, and go in game to see your changes :D
i hope this was easy to follow. if you have any questions I'll do my best to answer them, just shoot me a message!
258 notes
·
View notes
Text
This article contains spoilers from the Season 2 finale of “Severance.”
For the second season in a row, Severance ended on an epic cliffhanger. After some tricky coordination between Mark Scout (Adam Scott) and his severed “innie” self, Mark S., the Marks were able to successfully free Mark Scout’s wife, Gemma Scout (Dichen Lachman), from her surreal imprisonment on Lumon Industries’ Testing Floor and get her out of the building through the mysterious Exports Hall. However, at the last moment, Mark S. decides not to follow Gemma to freedom. Instead, he stays inside Lumon with his fellow “innie” and work girlfriend, Helly R. (Britt Lower).
It feels like a bittersweet moment for Gemma. She appears to be liberated from the unreasonable torture viewers saw her undergo in the mind-blowing episode “Chikhai Bardo” earlier this season. However, once again, Gemma finds herself separated from her husband. Lachman, for her part, enjoyed finally being part of the show's main action after being cordoned off from the rest of the cast for so long.
“It felt cathartic actually to be present on the show,” Lachman tells Gold Derby about the Season 2 finale. “Obviously, Gemma is ever-present throughout the whole first and second seasons because she is what Mark is grieving for, but this was being present in the actual physical sense — to be able to be there and work with these extraordinary people who I so look up to, and to challenge myself by doing things that honestly I'd never had to do before. Some of those transitions from Cold Harbor to Gemma and then Ms. Casey were challenges that I really pushed myself to get through, and it felt great.”
“Cold Harbor” has mysteriously hung over all of Severance Season 2. It was first given as the name of a secretive but critical project on which Mark S. was working. Then, it appeared on a door on the testing floor that Gemma was being escorted around. In the season finale, Ms. Cobel (Patricia Arquette) confirmed the connection between Mark S., Cold Harbor, and the experiments on Gemma. It turns out that all of the projects Mark S. has completed while working in Lumon’s Macro-Data Refinery department have been creating different “innie” personalities for Gemma to test the full capabilities of severance technology. “Cold Harbor” (the title of the Season 2 finale) is the ultimate test and the final one. Cobel warned the Marks that they had to save Gemma immediately after the completion of Cold Harbor, or she would die — for real this time.
But what exactly is Cold Harbor, and why is it so important? Lachman understood it as being tied to the miscarriage that Gemma endured during her marriage to Mark. When Gemma finally enters the Cold Harbor room, she is instructed to disassemble a baby crib identical to the one Mark tearfully disassembled after the couple finally gave up on their dream of having a baby together.
“The room is set up there with the crib to see if that painful moment, as painful as it was, is strong enough to break through the barrier,” Lachman says. “In terms of why it's called ‘Cold Harbor,’ I guess maybe because it's on the box of the crib when he buys her the crib in episode seven. And in terms of what's going to happen after, there are ways to interpret it to mean her death, but ‘death’ on our show can mean different things.”
For instance, earlier in season 2, Mark S.’s MDR coworker Irving B. (John Turturro) was “terminated” after physically assaulting Helena Eagan, the “outie” personality of Helly R. and the heir to the Lumon fortune, on a work trip. Irving’s “innie” personality was seemingly erased from existence, though subsequent episodes revealed that Irving’s “outie” was still alive and well. Would Gemma have undergone a similar process, or would she have been actually physically murdered? Lachman doesn’t know for sure.
“There's still a lot of mystery for me around how she arrived there [at Lumon] and her understanding of this process,” Lachman says. “She is definitely a prisoner for sure, but I just leaned into its ambiguity because [Severance creator] Dan Erickson has such a brilliant mind. I have no idea what he's going to be exploring next, but I really believe if he thought I needed to know something important for my performance, he would tell me.”
14 notes
·
View notes
Text
Cybernetics with Chinese Characteristics & why we suck at the real Grand Strategy Game
Part 2 - The Quickening
Back in 2023, I wrote this more blog-like post about the mid 20th century McCarthyite purges of the Jet Propulsion Laboratory and the knock on effects that had - Namely the inception of the Chinese nuclear program, one-child policy and Chinese computing scene.
Since nothing is new under the sun, we have recently witnessed yet another example of America shooting itself in the foot, yet again, due to it's McCarthyite style purge of Chinese technology.
The release of the Chinese created AI system DeepSeek R1 last week has lead to the largest US stock market loss in history with NVIDIA stock decimated.
A record $465 Billion was wiped off its valuation in a single day. In 2024, the government of Turkey spent this much in a year on it's responsibilities?
Why did this happen?

As always, a lot can be put down to US foreign policy, and the in-intended implications of seemingly positive actions.
Do you want to start a trade war?
Back in the relatively uncontroversial days of the first Trump Presidency (Yes it does feel odd saying that) there were scandals with hardware provided by Chinese company Huawei. This led to the National Defense Authorization Act for Fiscal Year 2019 which explicitly banned Huawei and ZTE's hardware from use in US Government institutions. It also meant the US had to authorise US component manufacturer purchases by these companies.
Crucially this had a 27 month window. This allowed both companies to switch suppliers, and production to domestic suppliers. This actually led to Chinese chip advances. Following on from this came the 2022 move by the US Department of Commerce: "Commerce Implements New Export Controls on Advanced Computing and Semiconductor Manufacturing Items to the People’s Republic of China (PRC) ". This further limited the supply of semiconductor, supercomputer, and similar hardware to the PRC and associated countries.
Ok, well so far this is fairly dry stuff. You might think it would hamper Chinese development and, to some extent, it did.
It also proved to be the main catalyst for one financial quant.
Meet the Quant

Meet Liang Wenfeng (梁文锋). Educated to masters level, Liang was keen to apply machine learning methods to various field, but couldn't get a break. Finally, in the mid 2000's, he settled on a career investigating quantitative trading using machine learning techniques.
He became successful, founding several trading firms based around using machine learning methods, but his interest in base AI never seemed to cease. It was in 2021 that he started purchasing multiple NVIDIA GPUs to create a side project, leading to the creation of DeepSeek in 2023.
Now, due to import limitations, there were limitations on computation. This, however, did not stop DeepSeek's programming team.
Instead they used it as their strength.
Constrains Breed Innovation

For many years, the Western model of AI releases have focussed on making ever larger and larger models.
Why?
Let's break this down from an evolutionary point of view. Modern Western technology companies are largely monopolistic and monolithic. Many of these companies have previously hired staff at higher salaries not to fill roles, but to deny their competitors, and middle market firms, high-flying staff.
They also closely guard trade secrets. What's the training data? What algorithms were used in construction? Guess you'd better chat up some Silicon Valley bros at parties to find out.
For these kinds of firms, having control over large models, housed in data centres makes perfect sense. Controlling model deployment on their own computing systems, and not using local machines, means that they can not only control their systems more carefully, it also means that they can gatekeep access.
If your business model is to allow people to access your models on your servers, and your employees are focussed on making the biggest, best, models, there is no impetus to innovate more efficient, smaller models.
Companies such as OpenAI therefore have the following traits:
Research/Model focus on size over efficiency
Profit driven culture, with emphasis on closed source code
OpenAI's initial focus was as a non-for-profit developing Artificial General Intelligence. This became a for-profit driven company over time. - “I personally chose the price and thought we would make some money.” - Sam Altman
Staff working within paradigm they set in the early 2020's with established code libraries and direct contact with hardware companies creating chips
Significant capital investment - Upwards of several $ billions
DeepSeek, in comparison, is slightly different
For DeepSeek, necessity made innovation necessary. In order to create similar, or better models, than their counterparts, they needed to significantly optimise their code. This requires significantly more work to create, and write, libraries compared to OpenAI.
DeepSeek was started by financial quants, with backgrounds in mainly mathematics and AI. With a focus on mathematics and research, the main drive of many in the company has been exploration of the research space over concerns about profitability.
DeepSeek has also done what OpenAI stopped years ago: actually releasing the code and data for their models. Not only can these models therefore be run via their own gated servers, anyone can replicate their work and make their own system.
For DeepSeek, their traits were:
Research/Model focus on both efficiency and accuracy
Research driven culture, with open nature - “Basic science research rarely offers high returns on investment” - Liang Wenfeng
Strong mathematical background of staff, with ability to work around software, and hardware, constraints
Low capital investment of around $5.5 million

From an evolutionary point of view, DeepSeek's traits have outcompeted those of OpenAI.
More efficient models cost less to run. They also more portable to local machines.
The strong ability of DeepSeek's research focussed staff allowed them to innovate around hardware constraints
Opening up the code to everyone allows anyone (still with the right hardware) to make their own version.
To top it off, the cost to make, and run, DeepSeek R1 is a fraction of the cost of OpenAI's model
House of Cards

Now we can return to today. NVIDIA has lost significant market value. It's not just limited to NVIDIA, but to the entire US technology sector with the most AI adjacent companies losing from 10% to 30% of their valuation in a single day.
The culture, and business model, of OpenAI isn't just limited to OpenAI, but to the entire US technology ecosystem. The US model has been to create rentier-style financial instruments at sky-high valuations.
US tech stocks have been one of the only success stories for America over the past few decades, ever since the offshoring of many manufacturing industries. Like a lost long-unemployed Detroit auto-worker the US has been mainlining technology like Fentanyl, ignoring the anti-trust doctors advice, injecting pure deregulated substances into its veins.
The new AI boom? A new stronger hit, ready for Wall Street, and Private Equity to tie the tourniquet around its arm and pump it right into the arteries.
Like Prometheus, DeepSeek has delved deep and retrieved fire from the algorithmic gods, and shown it's creation to the world. The stock market is on fire, as the traders are coming off of their high, realising they still live in the ruin of barren, decrepit, warehouses and manufactories. The corporate heads, and company leaders reigning over the wreckage like feudal lords, collecting tithes from the serfs working their domain.
A Tale of Two Cities

The rise of DeepSeek isn't just a one-off story of derring-do in the AI world: It's a symbolic representation of the changing world order. DeepSeek is but one company among many who are outcompeting the US, and the world, in innovation.
Where once US free-markets led the world in manufacturing, technology and military capability, now the US is a country devoid of coherent state regulated free-market principles - its place as the singular world power decimated by destroying the very systems which made it great.
"Our merchants and master-manufacturers complain much of the bad effects of high wages in raising the price, and thereby lessening the sale of their goods both at home and abroad. They say nothing concerning the bad effects of high profits. They are silent with regard to the pernicious effects of their own gains. They complain only of those of other people." - Adam Smith, The Wealth of Nations
By selling the jobs of working class communities to overseas businesses, destroying unions and creating rentier based business models without significant anti-trust measures, US business and political elites have sealed the present fate of the country.
The CCP led, but strongly anti-trust enforcing, China has been able to innovate, ironically, using the free-market principles of Adam Smith to rise up and create some of the world's best innovations. The factories, opened by Western business leaders to avoid union/worker labour costs in their own countries, have led Shenzhen, and similar cities, to become hubs of technological innovation - compounding their ability to determine the future of technologies across the world.

Will America be able to regain its position on top? It's too early to say, but the innovative, talented, people who made America in the 20th century can certainly do it again.
As Franklin D. Roosevelt once said: “The liberty of a democracy is not safe if the people tolerated the growth of private power to a point where it becomes stronger than the democratic state itself...
We know now that Government by organized money is just as dangerous as Government by organized mob.
Never before in all our history have these forces been so united against one candidate as they stand today. They are unanimous in their hate for me—and I welcome their hatred.”

Until then, here's a farewell to the American Century 在那之前, 再见美国世纪
#cybernetics#cybernetic#ai#artificial intelligence#DeepSeek#OpenAI#ai technology#long reads#politics#us politics
14 notes
·
View notes
Text
Guide on making custom coat presets. (Allows for better quality custom coats)
31/08/2023: The guide has been updated to reflect a step I missed - when exporting your custom textures, make sure to select "generate mipmaps", the step is reflected in more detail under the appropriate part. Ctrl+f and enter "mipmaps" to skip to it.
16/10/2023: Updated to add more info re: generating hash ID's.
Okay, I decided to throw this together. There's some things I can't figure out still, but oh well, we're just getting through this as we go.
To clarify what I mean - this is not a stencil or a brush.
This will appear here:
To preface this guide though, I cannot, for the life of me, figure out how to make it appear as an individual option in-game, so, these are considered SWATCHES of the original coats.
Okay, with that out of the way.
Things you'll need:
Sims 4 Studio
GIMP
Probably Notepad, but it's optional on how easy it is for you to track things.
Guide:
These are the tools we'll be using in S4S.
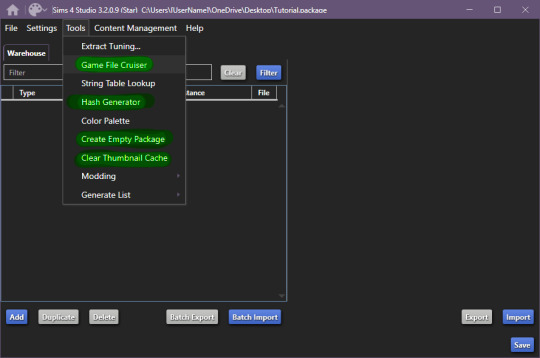
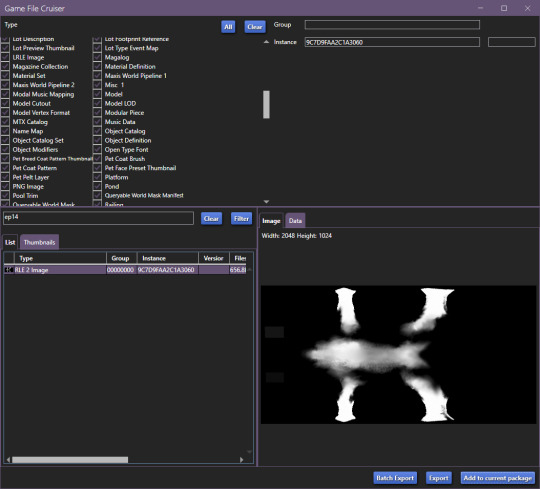
Start by creating your empty package, once you're done, open up Game File Cruiser:
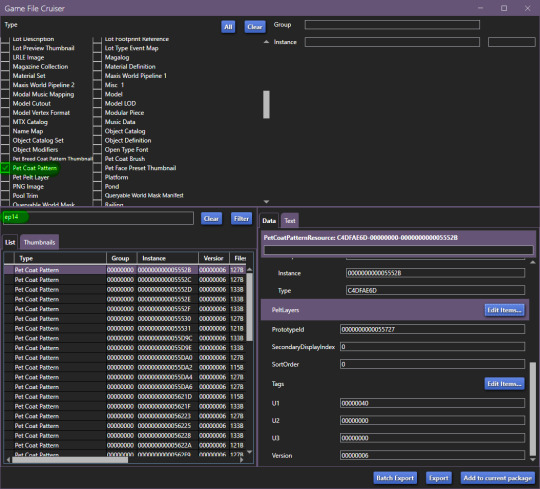
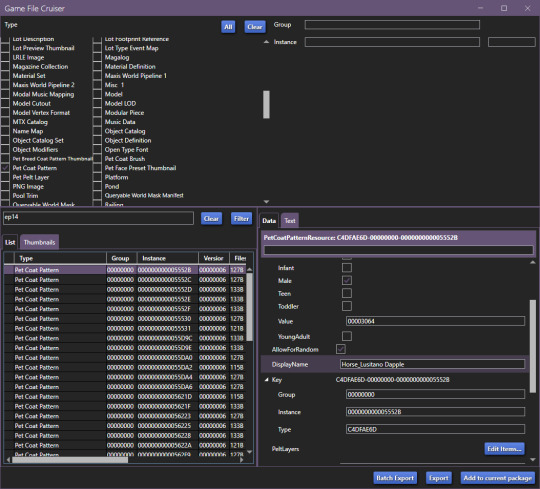
before you do ANYTHING, make absolutely sure that the search bar below the file list has "EP14" in it, otherwise you will 100% end up editing a cat or a dog coat pattern and that's now what we want, at all.
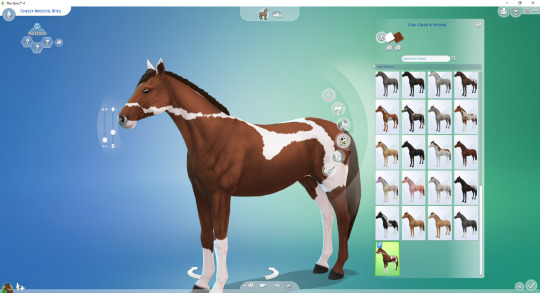
Add the first horse file to your package
In our case, it's the Lusitano Dapple coat, don't worry, if you're making a breed-specific coat, you can change this later.
Now that it's been added to our package file, it should look like this:

We now have two options, I'll explain this to those who don't care about creating a game-generated thumbnail and want to find it easier.
To make your "test" thumbnail, you'll want to copy the instance ID of the file we just added to our package:
It should look like this, the instance ID should be in 2nd from the top search bar, then, select all and click filter (it just makes life easier than finding the specific file type).

These are the current, in-game CAS thumbnails. We'll add both of them to the package, they're for ponies and adult horses.
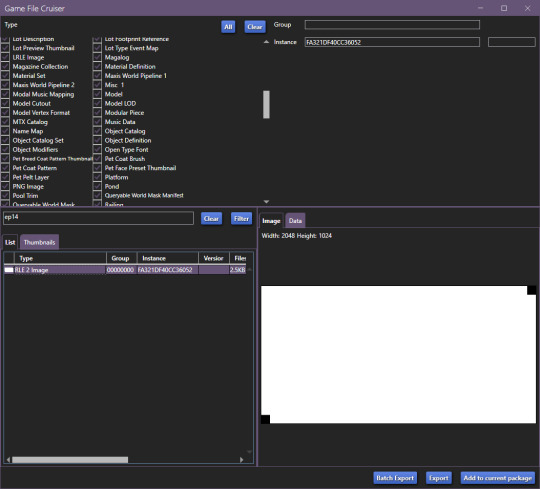
Now you can export these two pictures (They need to be saved as .png's), edit them as you'd like and then import them back into the package.
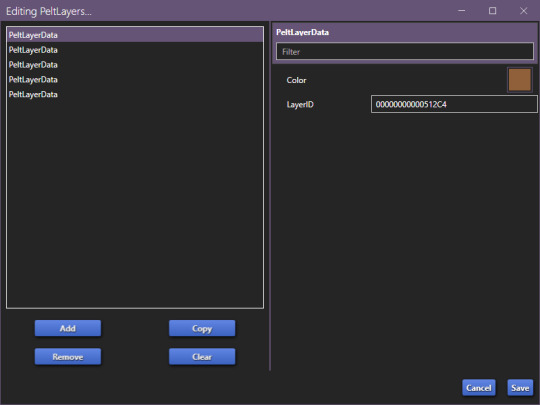
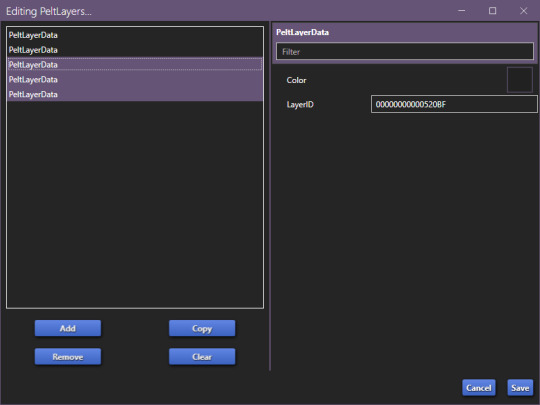
Now, you CAN add up to 5 different pelt layers that can be easily recoloured in-game, however, we'll only be working with two pelt layers in this tutorial, because it's a tutorial and you'll learn how to make more of them anyway.
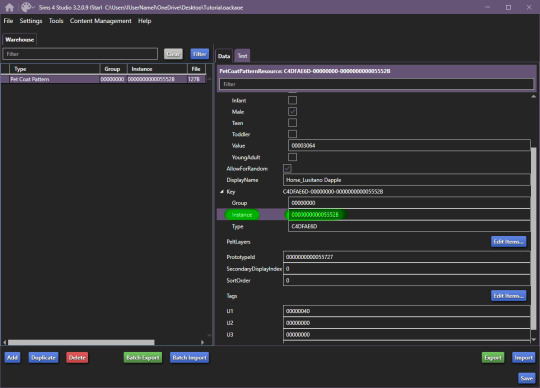
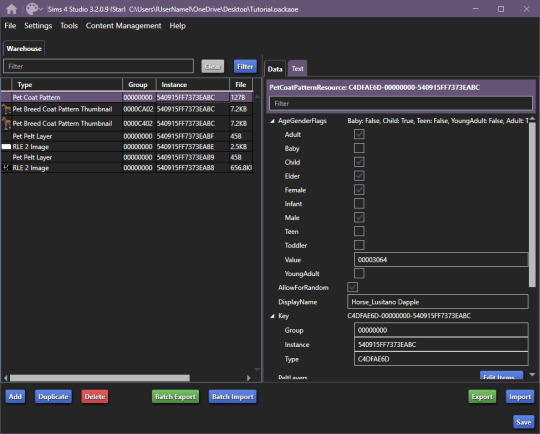
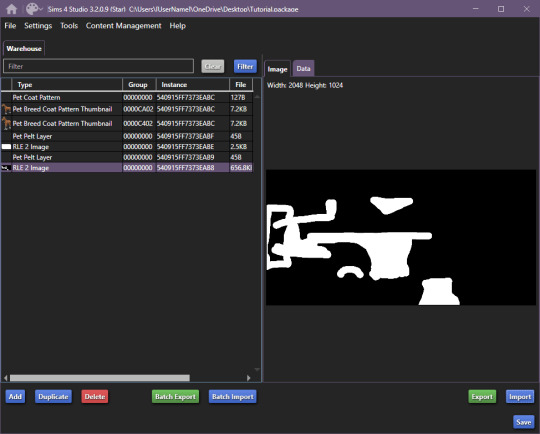
Click on "Pet Coat Pattern" and then look over the data:

From there, Click on "PetPeltLayers":
The first pelt layer is ALWAYS a solid colour, we'll begin by copying the LayerID (Instance ID) and going back to game file cruiser.
Just like previously, you should keep EP14 in the search bar and just use the instance ID bar to find things, as that's all we'll be doing.

Add the Pet Pelt Layer to your package file, then, copy the "texture key" from the Pet Pelt Layer:
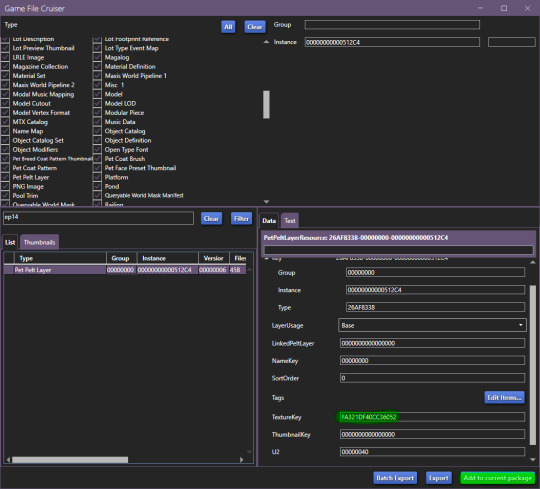
Then find the Texture Key:
This is the solid colour layer, it HAS to be there as this is what will help you edit your base colour. Add this to your package file.
Now, our package file will look like this:
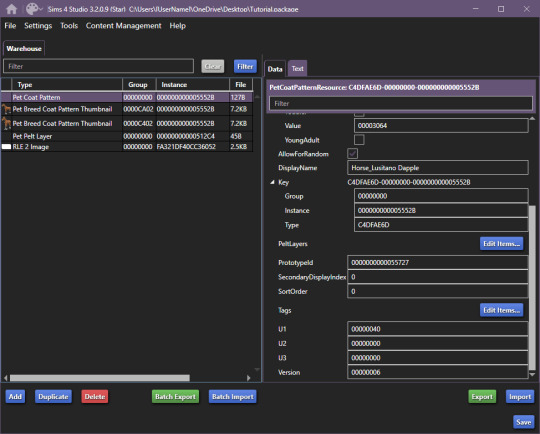
Unfortunately, we're not done, just yet, we'll want to grab at least the second PetPeltLayer:

Just like before, we're going to copy the ID and find the Pet Pelt Layer + the Texture for this layer:

Now, our package file will look like this:
You can now go ahead and close the Game File Cruiser, we won't be using it anymore.
Right now, this is our package file and we need to do some cleanup first.
We'll be opening up the PetPeltLayers once more and we'll remove the last 3 entries:
You should be left with only two entries, as that is what we'll be editing (leaving the other 3 will break the preset).
Now, we'll start generating new hash codes for everything:
Edited 16/10/2023: When generating your hash ID's, please use your creator name ie.: "[YourCreatorName/Blogname]TutorialPetBreedCoatPattern11", this will give you a more unique hash code than hoping to be as descriptive as possible when generating the hashes (in this case instance ID's).
Thanks to Mizore Yukii for this advice, from Creator's Musings discord.
As in my previous guides, be descriptive with what you're typing there and then just change the last number.
The process is annoying and slow, so bear with the images, and follow along.

The TextureKey coloured in red is the 3rd ID you'll generate, it's what links the texture to the Pet Pelt Layer, which links it to the Pattern we're creating. (Sorry for the squished thumbnail, open it in your browser, I was running out of picture space for the rest of the tutorial lol).
And now we repeat this for the second Pet Pelt Layer.
Now, if you want the game to just generate the thumbnail for you, you can skip this step, if you want to make a custom thumbnail, then copy the Pet Coat Pattern Instance ID into the two Thumbnails we've added to our package file:
This is what the package file has to look like at this point.
Now is the relatively easy part, editing the second RLE 2 Image. We won't touch the base, because it's not necessary.
I recommend using the Horse Diffuse Map as a base when you're drawing your pattern. It'll be easier to see what you're doing. You can download it here: Horse Diffuse Map.
Remember, that your pattern HAS to be white, black space is IGNORED by the game and considered a "transparent" layer, so that you can see the layer beneath the you're working on.
This is my quick, and lazy test one I've made, I use a PNG of the Diffuse Map as a base and on a separate layer I draw with white coloured brushes:
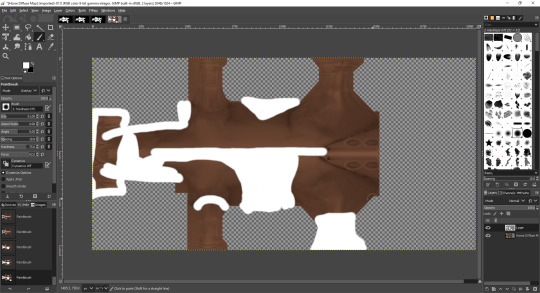
You may notice the very straight lines on the diffuse map - make sure to colour OVER them as if you do not, it will appear in-game because those are the seams where the mesh "meets"
Once you're satisfied with your pattern, you can go to export, just make sure that the white pattern is on a separate layer to the diffuse map. At this point you can add a black background underneath the white and export.
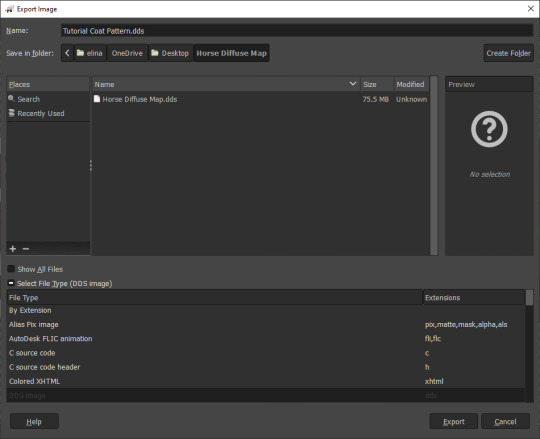
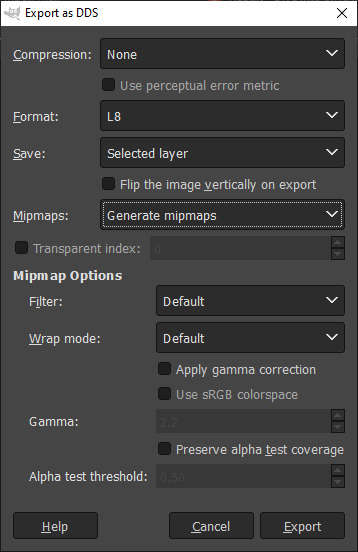
All you have to do is export the RLE2 Image you've edited as a DDS image in the L8 format and (edited 31/08/2023) select "Generate mipmaps" otherwise you will experience a glitch in-game where the coat disappears. You can leave the mipmap options as default, it should work correctly.
Then, we're going to import it into our package and save our package:
Remember to not touch the completely white base coat!
Now that this is over, we'll go back to Pet Coat Pattern and edit some settings.
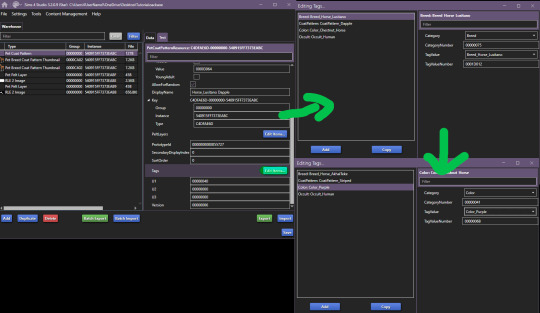
The first three settings is what I recommend changing around. The first setting changes the breed, the second setting changes how the coat pattern is labeled and the third setting changes the colour it's tagged under.
Only change "TagValue" - it will give you a dropdown menu, don't change anything else. The TagValueNumber changes automatically, so don't worry about it.
EDITED TO ADD:
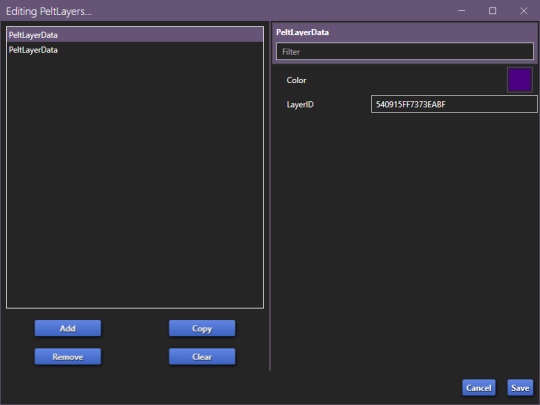
Additionally, don't forget to go into "PetPeltLayer" and change the colours, this is what will show up as "base" colour that you can change in-game. You can change them for every PeltLayerData file you have.
Now, save and go test it out in game:

Bada bing, bada boom we've got our "custom" coat preset.
If I've forgotten anything, let me know. This took me 2 hours to write, so forgive my typos. If anything is unclear, let me know. I ran into a struggle with the picture limit on Tumblr (found out that it's 30, I should move my guides somewhere else, but where?)
#The Sims 4#Sims 4#The Sims 4 Horses#The Sims 4 Pets#the sims 4 horse ranch#the sims 4 guide#sims 4 guide#sims 4 custom content guide#sims 4 horses guide
146 notes
·
View notes
Text
Finding Files using Telltale Inspector
Some people who have had success with swapping may have noticed the trend where you have all the files with your swap character’s name on it – but there are clearly some files not there. Maybe they don’t have any ptables, or maybe you’ve done your swap and parts of your character are just missing. You can’t find any files you missed and you’re wondering where they must be if you don’t have them already.
And the reason this happens is because your swap character normally uses reused assets. They don’t have their own ptables because they are using someone else’s, or they don’t have unique textures for their eyes because they share a file with other characters.
You can trial and error your way into finding which assets they are using, or you could try using the Telltale Inspector Tool created by Lucas in the Telltale Modding Group. (massive brain on this bloke – if you want to donate to him for his major efforts, it would definitely be appreciated) The readme and information on the tools can be found >>here<< and the most current release can be found >>here<<.
At the time of making this mini-tutorial, the most current version is ALPHA 1.0.2 – the information I’m presenting here and the screenshots used relate to this release, things may look or work differently in future.
The tool itself is capable of a lot more than I’m making note of here, and can be used to edit the information within the files if you know what you’re doing… I’m only giving a very layman’s explanation of one use of it to look at file information. Below you will find a very simple set of directions on using the Inspector tool to open props to find a character’s ptables, and then opening a character mesh to find the associated textures.
=====
Ptables and Animations
For example, let’s say we want to figure out what ptables Carley uses in season 1, and we notice that she doesn’t have any ptables in any of the data archives. We therefore have to find out whose ptables she is using if we want her to have an animated face during swaps.
First of all, we want to use Telltale Explorer to export out her prop file (save it somewhere handy so you can find it again later), and from there we can use Lucas’ Telltale Inspector to look at it properly.
1. Run the TelltaleInspector.exe, and click the [Open] drop down menu and select [Open Prop]

2. There will be another drop down menu that says [Select], we want to select the game where this prop file came from – in this case we need to select [The Walking Dead: Definitive Series]

3. Press the [Select] button to confirm you have selected the correct game

4. You should now have the interface for prop files from that game, but to look at the specific file we have previously exported using the Telltale Explorer, we need to click on [Import Property Set]

This should open up an explorer window where you need to direct the Inspector to the prop file you want to open.
5. Once you have successfully loaded the prop file, you need to click on the [>Properties] sub menu to expand the information shown at the bottom of the window. The information about phonemes is right near the bottom of the list as shown here when hovered over:

Click on the [Modify Handle Value] on the right column next to where the phoneme information was shown. A new window should open, and here we can see the name of the phoneme file that her default state is drawing from. In this case, we can see Carley is using Lilly’s ptables.

However, I will note that in other seasons of the game, this same information can be seen in a different location but with the same 5 steps leading up to it… for example, in A New Frontier, if you wanted to know which ptables and animation files are used on Javier’s father when he appears in flashbacks near the end of the game, you could look into the sk61_salvador305.prop.

Here we can see that his “Skeleton Face” is wd300GM – this means he uses the ptables and animations with this name. I assume the name implies “Walking Dead, Season 3, Generic Male”, I don’t know if that’s accurate, but what matters is that you now know it’s these generic files that he uses.
And if you want to look for a minor character in The Final Season, like the rancher who was taking care of baby AJ, the same situation applies here.

Her skeleton face is the same as Lilly’s in season 4, and therefore when Rancher Helen doesn’t have her own files to load, she is loading Lilly’s ptables and animations.
=====
Meshes and Textures
Let’s say we have tried to do a swap, but for some reason part of the swapped character isn’t loading. A common one that can happen is characters having missing eyes, but it could be something like missing hands or missing hair if it turns out we are swapping a character who uses a texture that is not named in the same manner as their mesh.
Since it has been a problem I’ve seen a few times, let’s use Kenny in season 2 as an example. If you try swapping him into another season without knowing what files he uses which are not named with “kenny202” at the start, he won’t have eyes or hands. And since Kenny in season 2 is one mesh called “sk54_kenny202.d3dmesh”, we can use the Telltale Inspector tool to see what textures we are missing.
1. Run the TelltaleInspector.exe, and click the [Open] drop down menu and select [Open D3DMesh]

2. There will be another drop down menu that says [Select], we want to select the game where this prop file came from – in this case we need to select [The Walking Dead: Definitive Series]

3. From here we need to click on [Open File] and an explorer window will open – we need to direct it to the mesh we want to look at.

4. And now we should have all the relevant information about the selected mesh.

What we are particularly interested in is the list of “Mesh Textures” shown at the bottom. Here we can clearly see the texture files that aren’t named consistently, and what we likely would miss without prior experience or knowledge of the character files. Aaaaand because I have the opportunity to share this little titbit, if you have tried editing textures, or simply swapping textures to see the results – you may encounter some instances where you simply wonder “I thought this would have changed? Why didn’t it?”, or alternatively “I changed this, why did this also change?” Here’s my contribution to fun trivia that I found myself quite some time ago, but now I can show it with the Inspector.

Aasim and Violet share a hair texture.
#twdg#twdg talk#tutorial#model swaps#texture edits#twdg mods#tech support#edit - i made a woopsie and mixed up images when uploading#should be fixed now#it just needed some rearranging
11 notes
·
View notes