#install mongodb in ec2
Explore tagged Tumblr posts
Visit Tumblr Blog
Explore Tumblr blogs with no restrictions, modern design and the best experience.
Last Seen Tumblr Blogs


Fun Fact
Tumblr posted its first advertisements in May 2012 and subsequently earned $13M in revenue.
Text
#youtube#video#codeonedigest#microservices#aws#aws ec2 server#aws ec2 instance#aws ec2 service#ec2#aws ec2#mongodb configuration#mongodb docker install#spring boot mongodb#mongodb compass#mongodb java#mongodb
0 notes
Text
A Guide to Creating APIs for Web Applications

APIs (Application Programming Interfaces) are the backbone of modern web applications, enabling communication between frontend and backend systems, third-party services, and databases. In this guide, we’ll explore how to create APIs, best practices, and tools to use.
1. Understanding APIs in Web Applications
An API allows different software applications to communicate using defined rules. Web APIs specifically enable interaction between a client (frontend) and a server (backend) using protocols like REST, GraphQL, or gRPC.
Types of APIs
RESTful APIs — Uses HTTP methods (GET, POST, PUT, DELETE) to perform operations on resources.
GraphQL APIs — Allows clients to request only the data they need, reducing over-fetching.
gRPC APIs — Uses protocol buffers for high-performance communication, suitable for microservices.
2. Setting Up a REST API: Step-by-Step
Step 1: Choose a Framework
Node.js (Express.js) — Lightweight and popular for JavaScript applications.
Python (Flask/Django) — Flask is simple, while Django provides built-in features.
Java (Spring Boot) — Enterprise-level framework for Java-based APIs.
Step 2: Create a Basic API
Here’s an example of a simple REST API using Express.js (Node.js):javascriptconst express = require('express'); const app = express(); app.use(express.json());let users = [{ id: 1, name: "John Doe" }];app.get('/users', (req, res) => { res.json(users); });app.post('/users', (req, res) => { const user = { id: users.length + 1, name: req.body.name }; users.push(user); res.status(201).json(user); });app.listen(3000, () => console.log('API running on port 3000'));
Step 3: Connect to a Database
APIs often need a database to store and retrieve data. Popular databases include:
SQL Databases (PostgreSQL, MySQL) — Structured data storage.
NoSQL Databases (MongoDB, Firebase) — Unstructured or flexible data storage.
Example of integrating MongoDB using Mongoose in Node.js:javascriptconst mongoose = require('mongoose'); mongoose.connect('mongodb://localhost:27017/mydb', { useNewUrlParser: true, useUnifiedTopology: true });const UserSchema = new mongoose.Schema({ name: String }); const User = mongoose.model('User', UserSchema);app.post('/users', async (req, res) => { const user = new User({ name: req.body.name }); await user.save(); res.status(201).json(user); });
3. Best Practices for API Development
🔹 Use Proper HTTP Methods:
GET – Retrieve data
POST – Create new data
PUT/PATCH – Update existing data
DELETE – Remove data
🔹 Implement Authentication & Authorization
Use JWT (JSON Web Token) or OAuth for securing APIs.
Example of JWT authentication in Express.js:
javascript
const jwt = require('jsonwebtoken'); const token = jwt.sign({ userId: 1 }, 'secretKey', { expiresIn: '1h' });
🔹 Handle Errors Gracefully
Return appropriate status codes (400 for bad requests, 404 for not found, 500 for server errors).
Example:
javascript
app.use((err, req, res, next) => { res.status(500).json({ error: err.message }); });
🔹 Use API Documentation Tools
Swagger or Postman to document and test APIs.
4. Deploying Your API
Once your API is built, deploy it using:
Cloud Platforms: AWS (Lambda, EC2), Google Cloud, Azure.
Serverless Functions: AWS Lambda, Vercel, Firebase Functions.
Containerization: Deploy APIs using Docker and Kubernetes.
Example: Deploying with DockerdockerfileFROM node:14 WORKDIR /app COPY package.json ./ RUN npm install COPY . . CMD ["node", "server.js"] EXPOSE 3000
5. API Testing and Monitoring
Use Postman or Insomnia for testing API requests.
Monitor API Performance with tools like Prometheus, New Relic, or Datadog.
Final Thoughts
Creating APIs for web applications involves careful planning, development, and deployment. Following best practices ensures security, scalability, and efficiency.
WEBSITE: https://www.ficusoft.in/python-training-in-chennai/
0 notes
Text
What Is Amazon EBS? Features Of Amazon EBS And Pricing

Amazon Elastic Block Store: High-performance, user-friendly block storage at any size
What is Amazon EBS?
Amazon Elastic Block Store provides high-performance, scalable block storage with Amazon EC2 instances. AWS Elastic Block Store can create and manage several block storage resources:
Amazon EBS volumes: Amazon EC2 instances can use Amazon EBS volumes. A volume associated to an instance can be used to install software and store files like a local hard disk.
Amazon EBS snapshots: Amazon EBS snapshots are long-lasting backups of Amazon EBS volumes. You can snapshot Amazon EBS volumes to backup data. Afterwards, you can always restore new volumes from those snapshots.
Advantages of the Amazon Elastic Block Store
Quickly scale
For your most demanding, high-performance workloads, including mission-critical programs like Microsoft, SAP, and Oracle, scale quickly.
Outstanding performance
With high availability features like replication within Availability Zones (AZs) and io2 Block Express volumes’ 99.999% durability, you can guard against failures.
Optimize cost and storage
Decide which storage option best suits your workload. From economical dollar-per-GB to high performance with the best IOPS and throughput, volumes vary widely.
Safeguard
You may encrypt your block storage resources without having to create, manage, and safeguard your own key management system. Set locks on data backups and limit public access to prevent unwanted access to your data.
Easy data security
Amazon EBS Snapshots, a point-in-time copy that can be used to allow disaster recovery, move data across regions and accounts, and enhance backup compliance, can be used to protect block data storage both on-site and in the cloud. With its integration with Amazon Data Lifecycle Manager, AWS further streamlines snapshot lifecycle management by enabling you to establish policies that automate various processes, such as snapshot creation, deletion, retention, and sharing.
How it functions
A high-performance, scalable, and user-friendly block storage solution, Amazon Elastic Block Store was created for Amazon Elastic Compute Cloud (Amazon EC2).Image credit to AWS
Use cases
Create your cloud-based, I/O-intensive, mission-critical apps
Switch to the cloud for mid-range, on-premises storage area network (SAN) applications. Attach block storage that is both high-performance and high-availability for applications that are essential to the mission.
Utilize relational or NoSQL databases
Install and expand the databases of your choosing, such as Oracle, Microsoft SQL Server, PostgreSQL, MySQL, Cassandra, MongoDB, and SAP HANA.
Appropriately scale your big data analytics engines
Detach and reattach volumes effortlessly, and scale clusters for big data analytics engines like Hadoop and Spark with ease.
Features of Amazon EBS
It offers the following features:
Several volume kinds: Amazon EBS offers a variety of volume types that let you maximize storage efficiency and affordability for a wide range of uses. There are two main sorts of volume types: HDD-backed storage for workloads requiring high throughput and SSD-backed storage for transactional workloads.
Scalability: You can build Amazon EBS volumes with the performance and capacity requirements you want. You may adjust performance or dynamically expand capacity using Elastic Volumes operations as your needs change, all without any downtime.
Recovery and backup: Back up the data on your disks using Amazon EBS snapshots. Those snapshots can subsequently be used to transfer data between AWS accounts, AWS Regions, or Availability Zones or to restore volumes instantaneously.
Data protection: Encrypt your Amazon EBS volumes and snapshots using Amazon EBS encryption. To secure data-at-rest and data-in-transit between an instance and its connected volume and subsequent snapshots, encryption procedures are carried out on the servers that house Amazon EC2 instances.
Data availability and durability: io2 Block Express volumes have an annual failure rate of 0.001% and a durability of 99.999%. With a 0.1% to 0.2% yearly failure rate, other volume types offer endurance of 99.8% to 99.9%. To further guard against data loss due to a single component failure, volume data is automatically replicated across several servers in an Availability Zone.
Data archiving: EBS Snapshots Archive provides an affordable storage tier for storing full, point-in-time copies of EBS Snapshots, which you must maintain for a minimum of ninety days in order to comply with regulations. and regulatory purposes, or for upcoming project releases.
Related services
These services are compatible with Amazon EBS:
In the AWS Cloud, Amazon Elastic Compute Cloud lets you start and control virtual machines, or EC2 instances. Like hard drives, EBS volumes may store data and install software.
You can produce and maintain cryptographic keys with AWS Key Management Service, a managed service. Data saved on your Amazon EBS volumes and in your Amazon EBS snapshots can be encrypted using AWS KMS cryptographic keys.
EBS snapshots and AMIs supported by EBS are automatically created, stored, and deleted with Amazon Data Lifecycle Manager, a managed service. Backups of your Amazon EC2 instances and Amazon EBS volumes can be automated with Amazon Data Lifecycle Manager.
EBS direct APIs: These services let you take EBS snapshots, write data to them directly, read data from them, and determine how two snapshots differ or change from one another.
Recycle Bin is a data recovery solution that lets you recover EBS-backed AMIs and mistakenly erased EBS snapshots.
Accessing Amazon EBS
The following interfaces are used to build and manage your Amazon EBS resources:
Amazon EC2 console
A web interface for managing and creating snapshots and volumes.
AWS Command Line Interface
A command-line utility that enables you to use commands in your command-line shell to control Amazon EBS resources. Linux, Mac, and Windows are all compatible.
AWS Tools for PowerShell
A set of PowerShell modules for scripting Amazon EBS resource activities from the command line.
Amazon CloudFormation
It’s a fully managed AWS service that allows you describe your AWS resources using reusable JSON or YAML templates, and then it will provision and setup those resources for you.
Amazon EC2 Query API
The HTTP verbs GET or POST and a query parameter called Action are used in HTTP or HTTPS requests made through the Amazon EC2 Query API.
Amazon SDKs
APIs tailored to particular languages that let you create apps that interface with AWS services. Numerous well-known programming languages have AWS SDKs available.
Amazon EBS Pricing
You just pay for what you provision using Amazon EBS. See Amazon EBS pricing for further details.
Read more on Govindhtech.com
#AmazonEBS#ElasticBlockStore#AmazonEC2#EBSvolumes#EC2instances#EBSSnapshots#News#Technews#Technology#Technologynews#Technologytrends#Govindhtech
0 notes
Text
Install MongoDB on AWS EC2 Instances.
Install MongoDB on AWS EC2 Instances.
We will see how to install MongoDB on AWS ec2 Instances, amazon Linux 2 or we can install MongoDB of any version on the AWS Linux 2 server in this article. The Amazon Linux 2 server is the RPM-based server with the 5 years Long Term Support by AWS. (Amazon Web Services). MongoDB is a No-SQL database which is written in C++, It uses a JSON like structure. MongoDB is a cross-platform and…

View On WordPress
#aws mongodb service#install mongo shell on amazon linux#install mongodb#install mongodb centos 7#install mongodb centos 8#install MongoDB in AWS ec2 instance#install MongoDB in AWS linux.#install MongoDB on amazon ec2#install MongoDB on amazon linux#install MongoDB on amazon linux AMI#install mongodb on aws#install MongoDB on AWS server#install MongoDB shell amazon linux#mongodb install linux
0 notes
Link
If the software you have is for PC computers and you want to Install Mongodb Linux, you purchase it on DevOps. This is a software program that essentially allows you to use a PC's operating system right on the Mac. This way, you can run any PC program that you have! You should get a PC operating system to accompany it. https://www.devopscheetah.com/install-mongodb-on-amazon-linux/
0 notes
Text

I will deploy reactjs,nodejs application on AWS ec2 or vps server
Do you need help deploying a ReactJS and NodeJS application on AWS EC2 or VPS server? Then I'm the right person for you!
As a full-stack web developer with 2+ years of experience in web development and can help you deploy your ReactJS and NodeJS application on AWS EC2 or VPS servers.
I have experience in deploying web applications on different cloud platforms like AWS, Azure, and DigitalOcean. My technical skills include HTML, CSS, JavaScript, ReactJS, NodeJS, PHP, MySQL, MongoDB, and more. I'm also familiar with DevOps tools such as Docker
My services include:
- Installing and Configuring AWS EC2 or VPS server
- Setting up the necessary software and environment
- Setting up the web application on the server
- Testing the application and making sure it's running properly
- Deploying the application for production
- Monitoring the application performance
- Troubleshooting and resolving any issues
If you are looking for an experienced professional to help you deploy your ReactJS and NodeJS application on the AWS EC2 or VPS server, then I am the perfect candidate for the job.
Please contact me before placing an order and get a 5% discount
#react#nodejs#vps#amazon web services#digital ocean#vps server#nextjs#ubuntu#centos#vultr#debian#google cloud
0 notes
Text
Big Data Hadoop Training
About Big Data Hadoop Training Certification Training Course
It is an all-inclusive Hadoop Big Data Training Course premeditated by industry specialists considering present industry job necessities to offers exhaustive learning on big data and Hadoop modules. This is an industry recognized Big Data Certification Training course that is known as combination of the training courses in Hadoop developer, Hadoop testing, analytics and Hadoop administrator. This Cloudera Hadoop training will prepare you to clear big data certification.
Big data Hadoop online training program not only prepare applicant with the important and best concepts of Hadoop, but also give the required work experience in Big Data and Hadoop by execution of actual time business projects.
Big Data Hadoop Live Online Classes are being conducted by using professional grade IT Conferencing System from Citrix. All the student canintermingle with the faculty in real-time during the class by having chat and voice. There student need to install a light- weight IT application on their device that could be desktop, laptop, mobile and tablet.
So, whether you are planning to start your career, or you need to leap ahead by mastering advanced software, this course covers all things that is expected of expert Big Data professional. Learn skills that will distinguish you instantly from other Big Data Job seekers with exhaustive coverage of Strom, MongoDB, Spark and Cassandra. Quickly join the institution that is well-known worldwide for its course content, hands-on experience, delivery and market- readiness.
Know about the chief points of our Big Data Hadoop Training Online
The Big Data Hadoop Certification course is specially designed to provide you deep knowledge of the Big Data framework by using the Hadoop and Spark, including HDFS, YARN, and MapReduce. You will come to know how to use Pig, Impala to procedure and analyse large datasets stored in the HDFS, and usage Sqoop and Flume for data absorption along with our big Data training.
With our big data course, you will also able to learn the multiple interactive algorithms in Spark and use Spark SQL for creating, transforming and querying data forms. This is guarantee that you will become master real- time data processing by using Spark, including functional programming in Spark, implementing Spark application, using Spark RDD optimization techniques and understanding parallel processing in Spark.
As a part of big data course, you will be needed to produce real- life business- based projects by using CloudLab in the domains of banking, social media, insurance, telecommuting and e-commerce. This big data Hadoop training course will prepare you for the Cloudera CCA1775 big data certification.
What expertise you will learn with this Big Data Hadoop Training?
Big data Hadoop training will permit you to master the perceptions of the Hadoop framework and its deployment in cluster environment. You would learn to:
Let’s understand the dissimilar components/ features of Hadoop ecosystem such as - HBase, Sqoop, MapReduce, Pig, Hadoop 2.7, Yarn, Hive, Impala, Flume and Apache Spark with this Hadoop course.
· Be prepared to clear the Big Data Hadoop certification
· Work with Avro data formats
· Practice real- life projects by using Hadoop and Apache Spark
· Facility to make you learn Spark, Spark RDD, Graphx, MLlib writing Spark applications
· Detailed understanding of Big data analytics
· Master Hadoop administration activities like cluster,monitoring,managing,troubleshooting and administration
· Master HDFS, MapReduce, Hive, Pig, Oozie, Sqoop, Flume, Zookeeper, HBase
Setting up Pseudo node and Multi node cluster on Amazon EC2
Master fundamentals of Hadoop 2.7 and YARN and write applications using them
Configuring ETL tools like Pentaho/Talend to work with MapReduce, Hive, Pig, etc
Hadoop testing applications using MR Unit and other automation tools.

1 note
·
View note
Text
Bitnami mean stack for ruby on rails

#BITNAMI MEAN STACK FOR RUBY ON RAILS FOR FREE#
#BITNAMI MEAN STACK FOR RUBY ON RAILS INSTALL#
#BITNAMI MEAN STACK FOR RUBY ON RAILS UPGRADE#
#BITNAMI MEAN STACK FOR RUBY ON RAILS FULL#
Invented by David Heinemeier Hanss, Ruby On Rails has been developed as an open-source project, with distributions available through. Bitnami DevPack is a comprehensive web stack with all the major back-end development languages. Dotnik Studio Company is a Dedicated Research, Design, and Development Company for next-gen SaaS startups, businesses, and. It comprises of Python as the programming language, with Windows or Linux as the operating system, Apache as the server, MySQL or MongoDB as the database software. Dotnik Studio is a full-service Digital Product Design and Development Studio delivering delightful brands, products, and user experiences.
#BITNAMI MEAN STACK FOR RUBY ON RAILS FULL#
Rails is also an MVC (model, view, controller) framework where all layers are provided by Rails, as opposed to reliance on other, additional frameworks to achieve full MVC support. Django is the Python stack for web development. The framework also supports MySQL, PostgreSQL, SQLite, SQL Server, DB2 and Oracle. Rails can run on most Web servers that support CGI.
Prototype, an implementer of drag and drop and Ajax functionality.
Any ideas Any Full 'Ruby Stack' AMI on EC2 How do I get ruby to print a full backtrace instead of a truncated one Get current stack trace in Ruby without raising an exception Ruby 2.
Action pack, a manager of controller and view functions Rails 3.0 & Ruby 1.9.2rc: Rake commands return already initialized constant & stack level too deep errors.
Active record, an object-relational mapping layer.
Rails is made up of several components, beyond Ruby itself, including: In a blog posting, Geary predicted that Rails would be widely adopted in the near future. According to David Geary, a Java expert, the Ruby-based framework is five to 10 times faster than comparable Java-based frameworks. Changes made to applications are immediately applied, avoiding the time consuming steps normally associated with the web development cycle. Bitnami Kubernetes Sandbox provides a complete, easy to deploy development environment for containerized apps. The principle difference between Ruby on Rails and other frameworks for development lies in the speed and ease of use that developers working within the environment enjoy. You should also have a new command line shortcut in your start menu that is called Use Bitnami Ruby Stack. Once that is done, you should have a new directory that contains all of the components that Bitnami installed. Ruby on Rails, sometimes known as "RoR" or just "Rails," is an open source framework for Web development in Ruby, an object-oriented programming (OOP) language similar to Perl and Python. First of all, go to the Bitnami Ruby stack page and download and run the local installer. This allows you to have multiple instances of the same stack, without them interfering with each other.īitNami RubyStack greatly simplifies the.
BitNami Stacks can be installed in any directory.
By the time you click the 'finish' button on the installer, the whole stack will be integrated, configured and ready to go.
#BITNAMI MEAN STACK FOR RUBY ON RAILS UPGRADE#
For example, you can upgrade your system's MySQL or Apache without fear of 'breaking' your BitNami Stack.
BitNami Stacks are completely self-contained, and therefore do not interfere with any software already installed on your system.
Our installers completely automate the process of installing and configuring all of the software included in each Stack, so you can have everything up and running in just a few clicks.
#BITNAMI MEAN STACK FOR RUBY ON RAILS INSTALL#
BitNami Stacks are built with one goal in mind: to make it as easy as possible to install open source software.It lets you write beautiful code by favoring convention over configuration. Ruby on Rails is a full-stack MVC framework for database-backed web applications that is optimized for programmer happiness and sustainable productivity.
#BITNAMI MEAN STACK FOR RUBY ON RAILS FOR FREE#
BitNami RubyStack is distributed for free under the Apache 2.0 license. It can be deployed using a native installer, as a virtual machine or in the cloud. It includes ready-to-run versions of Apache, MySQL, Ruby and Rails and required dependencies. Ruby on Rails is a full-stack MVC framework for database-backed web applications that is. BitNami RubyStack greatly simplifies the development and deployment of Ruby on Rails applications. BitNami RubyStack is distributed for free under the Apache 2.0 license.
0 notes
Text
1 and 1 bitnami mean ssl

1 AND 1 BITNAMI MEAN SSL HOW TO
1 AND 1 BITNAMI MEAN SSL INSTALL
1 AND 1 BITNAMI MEAN SSL UPDATE
Im also looking forward to branching out and trying the Wordpress, Ghost, and Magento stacks as well. 0 5 1 /home/bitnami/letsencrypt/letsencrypt-auto renew sudo /opt/bitnami/ctlscript.sh restart.
1 AND 1 BITNAMI MEAN SSL INSTALL
Do you have any favorite stacks/apps So far, Ive had great success with the Bitnami MEAN stack in AWS. Install Letsencrypt SSL to your Lightsail WordPress.
1 AND 1 BITNAMI MEAN SSL UPDATE
When any security threat or update is identified, Bitnami automatically repackages the applications and pushes the latest versions to the cloud marketplaces. The Bitnami MEAN stack came super handy, because it offered a one-stop solution for deploying my app onto Amazon EC2. The respective trademarks mentioned in the offering are owned by the respective companies, and use of them does not imply any affiliation or endorsement.īitnami certified images are always up-to-date, secure, and built to work right out of the box.īitnami packages applications following industry standards, and continuously monitors all components and libraries for vulnerabilities and application updates. 12 5 1 cd /opt/bitnami/letsencrypt & sudo. Trademarks: This software listing is packaged by Bitnami. I have also set up a cron job with the following (based on your article) added to the crontab. Once inside your Compute Engine, click on the SSH button to connect to your WordPress installation. SSLProtocol all -SSLv2 -SSLv3 -TLSv1 -TLSv1.1. i tried to edit this /opt/bitnami/apache2/conf/bitnami/nf. how can i disable TLS v1.0 and v1.1 and force v1.2 and 1.3. Go to your Compute Engine, then to VM instances to access your WordPress installation. Description: we are using canvas bitnami lms ec2 instance version 2020.12.16.47-1. If your application fulfill these requirements you will be able to deploy several instances of your application working behind a LoadBalancer and with a shared filesystem in just a few minutes. Go to your Google Compute homepage and click the hamburger menu in the upper left-hand corner.
1 AND 1 BITNAMI MEAN SSL HOW TO
For deployment issues, reach out our support team at, it will try to answer any question they receive within 24 hours on working days. This application is an example of how to deploy Node.js applications in high availability mode in the Azure cloud. Learn how to install, configure, and manage it at. This solution is free, ready-to-run, and open source software packaged by Bitnami. It also includes common components and libraries that help to develop modern server applications such as Apache web server, PHP, RockMongo, and Git. It includes SSL auto-configuration with Let's Encrypt certificates, and the latest releases of Javascript components: MongoDB, Express, Angular, and Node.js. Steaming your favorite TV shows, movies or sporting events with MyGica excellent. This image is configured for production environments. 1 Beta 1 Crack & Activator SheetCAM TNG 7. According to the Register: 'Apple said: 'Complete support will be removed from Safari in updates to Apple iOS and macOS beginning in March 2020.' Google has said it will remove support for TLS 1.0 and 1.1 in Chrome 81 (expected on March 17). MEAN gives you the abilty to start building dynamic web applications by providing a complete framework to write your app code. Just another reason to make the switch to TLS 1.2 or 1.3, if you haven't already.
1 note
·
View note
Text
Robo 3t free version

#ROBO 3T FREE VERSION INSTALL#
#ROBO 3T FREE VERSION UPDATE#
Run the script to start the installation process: sudo bash studio-3t-linux-圆4.shĪs you run the script, a GUI Setup will open.
#ROBO 3T FREE VERSION INSTALL#
Now, to see whether the downloaded file is there or not use: lsĪs you are confirmed, the Studio 3T free file is there, extract it first: tar -xvf studio-3t-linux-圆4.tar.gzĪfter extracting the Tar archived file we have downloaded, you will have a script to install Studio 3T free on Ubuntu 22.04 system. Because whatever we download using the browser goes into that. Once you have downloaded the Robot 3T now known as a Studio 3T Free, go to the Downloads directory. Therefore, we have to download it manually from its website. Unfortunately, Studio 3T free version is not available to install using the standard repository of Ubuntu 22.04.
#ROBO 3T FREE VERSION UPDATE#
Open your terminal and run: sudo apt update & sudo apt upgrade This will also rebuild the system’s APT package index. Let’s execute the given command to install the latest available security updates for our system. The steps given here can be used for other versions of Ubuntu such as 20.04 or 18.04 including on Linux such as Debian, Linux Mint, and more… Update Ubuntu 22.04 Steps to install Robo 3T or Studio 3T free on Ubuntu 22.04 Studio 3T free Interface on Ubuntu 22.04.Steps to install Robo 3T or Studio 3T free on Ubuntu 22.04.⇒ Supported cloud platforms are MongoDB Atlas, Compose, mLab, ObjectRocket, ScaleGrid, Amazon EC2 ⇒ Support for SCRAM-SHA-256 auth mechanism ⇒ Support for importing from MongoDB SRV connection strings ⇒ Visual tool helping you manage Database ⇒ Native and cross-platform MongoDB manager It allows CSV, JSON, SQL, and BSON import/export, MongoDB task scheduling, data masking for protection, data schema exploration, real-time code auto-completion, and more. On one hand, the Studio 3T is a paid tool, whereas the Studio 3T Free is a free version with users can build queries using drag and drop functionality, generate driver code in seven languages, break down aggregation queries, plus more. It is also a cross-platform MongoDB GUI management tool available for Windows, macOS, and Linux. Formerly, Robo 3T is known as Robomongo, and now Studio 3T Free. Robo 3T offer MongoDB a GUI interface tool that is maintained and provided by the developers of MongoDB client Studio 3T (paid one with 30 days trial). Tutorial to install Robot 3T or Studio 3T free on Ubuntu 22.04 LTS Jammy JellyFish using the command line to get a Graphical user interfaces for managing your Mongo DB server instance.
0 notes
Video
youtube
AWS EC2 Instance Setup and Run MongoDB in EC2 | Install MongoDB in EC2 S...
Hello friends, a new #video on #awsec2 #server setup #mongodb installation in #ec2 instance is published on #codeonedigest #youtube channel. Learn #aws #ec2 #mongodb #programming #coding with codeonedigest.
#awsec2 #awsec2instance #awsec2interviewquestionsandanswers #awsec2instancecreation #awsec2deploymenttutorial #awsec2connect #awsec2statuschecks #awsec2project #awsec2full #awsec2createinstance #awsec2interviewquestionsandanswersforfreshers #awsec2instancedeployment #awsec2 #awsec2serialconsole #awsec2consolewindows #awsec2serverrefusedourkey #awsec2serialconsolepassword #awsec2serviceinterviewquestions #awsec2serialconsoleaccess #awsec2serialrefusedourkeyputty #awsec2serverconfiguration #awsec2serialconnect #awsec2 #awsec2instance #awsec2instancecreation #awsec2instanceconnect #awsec2instancedeployment #awsec2instancelinux #awsec2instancelaunch #awsec2instanceconnectnotworking #awsec2instanceinterviewquestions #awsec2instancecreationubuntu #awstutorial #awsec2tutorial #ec2tutorial #mongodbcompass #mongodbinstallation #monogodbtutorial #mongodbtutorialforbeginners #mongodbinaws #mongodbinec2 #awsec2mongodb #mongodbinstallationinaws #mongodbsetupinec2
#youtube#aws#ec2#aws ec2#aws ec2 mongodb#aws ec2 setup#aws ec2 instance#ec2 instance#install mongodb in ec2#nosql database#mongodb installation#database setup in aws ec2#aws ec2 instance setup#aws ec2 creation#aws ec2 instance creation
1 note
·
View note
Text
How to Deploy Your Full Stack Application: A Beginner’s Guide

Deploying a full stack application involves setting up your frontend, backend, and database on a live server so users can access it over the internet. This guide covers deployment strategies, hosting services, and best practices.
1. Choosing a Deployment Platform
Popular options include:
Cloud Platforms: AWS, Google Cloud, Azure
PaaS Providers: Heroku, Vercel, Netlify
Containerized Deployment: Docker, Kubernetes
Traditional Hosting: VPS (DigitalOcean, Linode)
2. Deploying the Backend
Option 1: Deploy with a Cloud Server (e.g., AWS EC2, DigitalOcean)
Set Up a Virtual Machine (VM)
bash
ssh user@your-server-ip
Install Dependencies
Node.js (sudo apt install nodejs npm)
Python (sudo apt install python3-pip)
Database (MySQL, PostgreSQL, MongoDB)
Run the Server
bash
nohup node server.js & # For Node.js apps gunicorn app:app --daemon # For Python Flask/Django apps
Option 2: Serverless Deployment (AWS Lambda, Firebase Functions)
Pros: No server maintenance, auto-scaling
Cons: Limited control over infrastructure
3. Deploying the Frontend
Option 1: Static Site Hosting (Vercel, Netlify, GitHub Pages)
Push Code to GitHub
Connect GitHub Repo to Netlify/Vercel
Set Build Command (e.g., npm run build)
Deploy and Get Live URL
Option 2: Deploy with Nginx on a Cloud Server
Install Nginx
bash
sudo apt install nginx
Configure Nginx for React/Vue/Angular
nginx
server { listen 80; root /var/www/html; index index.html; location / { try_files $uri /index.html; } }
Restart Nginx
bash
sudo systemctl restart nginx
4. Connecting Frontend and Backend
Use CORS middleware to allow cross-origin requests
Set up reverse proxy with Nginx
Secure API with authentication tokens (JWT, OAuth)
5. Database Setup
Cloud Databases: AWS RDS, Firebase, MongoDB Atlas
Self-Hosted Databases: PostgreSQL, MySQL on a VPS
bash# Example: Run PostgreSQL on DigitalOcean sudo apt install postgresql sudo systemctl start postgresql
6. Security & Optimization
✅ SSL Certificate: Secure site with HTTPS (Let’s Encrypt) ✅ Load Balancing: Use AWS ALB, Nginx reverse proxy ✅ Scaling: Auto-scale with Kubernetes or cloud functions ✅ Logging & Monitoring: Use Datadog, New Relic, AWS CloudWatch
7. CI/CD for Automated Deployment
GitHub Actions: Automate builds and deployment
Jenkins/GitLab CI/CD: Custom pipelines for complex deployments
Docker & Kubernetes: Containerized deployment for scalability
Final Thoughts
Deploying a full stack app requires setting up hosting, configuring the backend, deploying the frontend, and securing the application.
Cloud platforms like AWS, Heroku, and Vercel simplify the process, while advanced setups use Kubernetes and Docker for scalability.
WEBSITE: https://www.ficusoft.in/full-stack-developer-course-in-chennai/
0 notes
Text
Migrate an application from using GridFS to using Amazon S3 and Amazon DocumentDB (with MongoDB compatibility)
In many database applications there arises a need to store large objects, such as files, along with application data. A common approach is to store these files inside the database itself, despite the fact that a database isn’t the architecturally best choice for storing large objects. Primarily, because file system APIs are relatively basic (such as list, get, put, and delete), a fully-featured database management system, with its complex query operators, is overkill for this use case. Additionally, large objects compete for resources in an OLTP system, which can negatively impact query workloads. Moreover, purpose-built file systems are often far more cost-effective for this use case than using a database, in terms of storage costs as well as computing costs to support the file system. The natural alternative to storing files in a database is on a purpose-built file system or object store, such as Amazon Simple Storage Service (Amazon S3). You can use Amazon S3 as the location to store files or binary objects (such as PDF files, image files, and large XML documents) that are stored and retrieved as a whole. Amazon S3 provides a serverless service with built-in durability, scalability, and security. You can pair this with a database that stores the metadata for the object along with the Amazon S3 reference. This way, you can query the metadata via the database APIs, and retrieve the file via the Amazon S3 reference stored along with the metadata. Using Amazon S3 and Amazon DocumentDB (with MongoDB compatibility) in this fashion is a common pattern. GridFS is a file system that has been implemented on top of the MongoDB NoSQL database. In this post, I demonstrate how to replace the GridFS file system with Amazon S3. GridFS provides some nonstandard extensions to the typical file system (such as adding searchable metadata for the files) with MongoDB-like APIs, and I further demonstrate how to use Amazon S3 and Amazon DocumentDB to handle these additional use cases. Solution overview For this post, I start with some basic operations against a GridFS file system set up on a MongoDB instance. I demonstrate operations using the Python driver, pymongo, but the same operations exist in other MongoDB client drivers. I use an Amazon Elastic Compute Cloud (Amazon EC2) instance that has MongoDB installed; I log in to this instance and use Python to connect locally. To demonstrate how this can be done with AWS services, I use Amazon S3 and an Amazon DocumentDB cluster for the more advanced use cases. I also use AWS Secrets Manager to store the credentials for logging into Amazon DocumentDB. An AWS CloudFormation template is provided to provision the necessary components. It deploys the following resources: A VPC with three private and one public subnets An Amazon DocumentDB cluster An EC2 instance with the MongoDB tools installed and running A secret in Secrets Manager to store the database credentials Security groups to allow the EC2 instance to communicate with the Amazon DocumentDB cluster The only prerequisite for this template is an EC2 key pair for logging into the EC2 instance. For more information, see Create or import a key pair. The following diagram illustrates the components in the template. This CloudFormation template incurs costs, and you should consult the relevant pricing pages before launching it. Initial setup First, launch the CloudFormation stack using the template. For more information on how to do this via the AWS CloudFormation console or the AWS Command Line Interface (AWS CLI), see Working with stacks. Provide the following inputs for the CloudFormation template: Stack name Instance type for the Amazon DocumentDB cluster (default is db.r5.large) Master username for the Amazon DocumentDB cluster Master password for the Amazon DocumentDB cluster EC2 instance type for the MongoDB database and the machine to use for this example (default: m5.large) EC2 key pair to use to access the EC2 instance SSH location to allow access to the EC2 instance Username to use with MongoDB Password to use with MongoDB After the stack has completed provisioning, I log in to the EC2 instance using my key pair. The hostname for the EC2 instance is reported in the ClientEC2InstancePublicDNS output from the CloudFormation stack. For more information, see Connect to your Linux instance. I use a few simple files for these examples. After I log in to the EC2 instance, I create five sample files as follows: cd /home/ec2-user echo Hello World! > /home/ec2-user/hello.txt echo Bye World! > /home/ec2-user/bye.txt echo Goodbye World! > /home/ec2-user/goodbye.txt echo Bye Bye World! > /home/ec2-user/byebye.txt echo So Long World! > /home/ec2-user/solong.txt Basic operations with GridFS In this section, I walk through some basic operations using GridFS against the MongoDB database running on the EC2 instance. All the following commands for this demonstration are available in a single Python script. Before using it, make sure to replace the username and password to access the MongoDB database with the ones you provided when launching the CloudFormation stack. I use the Python shell. To start the Python shell, run the following code: $ python3 Python 3.7.9 (default, Aug 27 2020, 21:59:41) [GCC 7.3.1 20180712 (Red Hat 7.3.1-9)] on linux Type "help", "copyright", "credits" or "license" for more information. >>> Next, we import a few packages we need: >>> import pymongo >>> import gridfs Next, we connect to the local MongoDB database and create the GridFS object. The CloudFormation template created a MongoDB username and password based on the parameters entered when launching the stack. For this example, I use labdb for the username and labdbpwd for the password, but you should replace those with the parameter values you provided. We use the gridfs database to store the GridFS data and metadata: >>> mongo_client = pymongo.MongoClient(host="localhost") >>> mongo_client["admin"].authenticate(name="labdb", password="labdbpwd") Now that we have connected to MongoDB, we create a few objects. The first, db, represents the MongoDB database we use for our GridFS, namely gridfs. Next, we create a GridFS file system object, fs, that we use to perform GridFS operations. This GridFS object takes as an argument the MongoDB database object that was just created. >>> db = mongo_client.gridfs >>> fs = gridfs.GridFS(db) Now that this setup is complete, list the files in the GridFS file system: >>> print(fs.list()) [] We can see that there are no files in the file system. Next, insert one of the files we created earlier: >>> h = fs.put(open("/home/ec2-user/hello.txt", "rb").read(), filename="hello.txt") This put command returns an ObjectId that identifies the file that was just inserted. I save this ObjectID in the variable h. We can show the value of h as follows: >>> h ObjectId('601b1da5fd4a6815e34d65f5') Now when you list the files, you see the file we just inserted: >>> print(fs.list()) ['hello.txt'] Insert another file that you created earlier and list the files: >>> b = fs.put(open("/home/ec2-user/bye.txt", "rb").read(), filename="bye.txt") >>> print(fs.list()) ['bye.txt', 'hello.txt'] Read the first file you inserted. One way to read the file is by the ObjectId: >>> print(fs.get(h).read()) b'Hello World!n' GridFS also allows searching for files, for example by filename: >>> res = fs.find({"filename": "hello.txt"}) >>> print(res.count()) 1 We can see one file with the name hello.txt. The result is a cursor to iterate over the files that were returned. To get the first file, call the next() method: >>> res0 = res.next() >>> res0.read() b'Hello World!n' Next, delete the hello.txt file. To do this, use the ObjectId of the res0 file object, which is accessible via the _id field: >>> fs.delete(res0._id) >>> print(fs.list()) ['bye.txt'] Only one file is now in the file system. Next, overwrite the bye.txt file with different data, in this case the goodbye.txt file contents: >>> hb = fs.put(open("/home/ec2-user/goodbye.txt", "rb").read(), filename="bye.txt") >>> print(fs.list()) ['bye.txt'] This overwrite doesn’t actually delete the previous version. GridFS is a versioned file system and keeps older versions unless you specifically delete them. So, when we find the files based on the bye.txt, we see two files: >>> res = fs.find({"filename": "bye.txt"}) >>> print(res.count()) 2 GridFS allows us to get specific versions of the file, via the get_version() method. By default, this returns the most recent version. Versions are numbered in a one-up counted way, starting at 0. So we can access the original version by specifying version 0. We can also access the most recent version by specifying version -1. First, the default, most recent version: >>> x = fs.get_version(filename="bye.txt") >>> print(x.read()) b'Goodbye World!n' Next, the first version: >>> x0 = fs.get_version(filename="bye.txt", version=0) >>> print(x0.read()) b'Bye World!n' The following code is the second version: >>> x1 = fs.get_version(filename="bye.txt", version=1) >>> print(x1.read()) b'Goodbye World!n' The following code is the latest version, which is the same as not providing a version, as we saw earlier: >>> xlatest = fs.get_version(filename="bye.txt", version=-1) >>> print(xlatest.read()) b'Goodbye World!n' An interesting feature of GridFS is the ability to attach metadata to the files. The API allows for adding any keys and values as part of the put() operation. In the following code, we add a key-value pair with the key somekey and the value somevalue: >>> bb = fs.put(open("/home/ec2-user/byebye.txt", "rb").read(), filename="bye.txt", somekey="somevalue") >>> c = fs.get_version(filename="bye.txt") >>> print(c.read()) b'Bye Bye World!n' We can access the custom metadata as a field of the file: >>> print(c.somekey) somevalue Now that we have the metadata attached to the file, we can search for files with specific metadata: >>> sk0 = fs.find({"somekey": "somevalue"}).next() We can retrieve the value for the key somekey from the following result: >>> print(sk0.somekey) somevalue We can also return multiple documents via this approach. In the following code, we insert another file with the somekey attribute, and then we can see that two files have the somekey attribute defined: >>> h = fs.put(open("/home/ec2-user/solong.txt", "rb").read(), filename="solong.txt", somekey="someothervalue", key2="value2") >>> print(fs.find({"somekey": {"$exists": True}}).count()) 2 Basic operations with Amazon S3 In this section, I show how to get the equivalent functionality of GridFS using Amazon S3. There are some subtle differences in terms of unique identifiers and the shape of the returned objects, so it’s not a drop-in replacement for GridFS. However, the major functionality of GridFS is covered by the Amazon S3 APIs. I walk through the same operations as in the previous section, except using Amazon S3 instead of GridFs. First, we create an S3 bucket to store the files. For this example, I use the bucket named blog-gridfs. You need to choose a different name for your bucket, because bucket names are globally unique. For this demonstration, we want to also enable versioning for this bucket. This allows Amazon S3 to behave similarly as GridFS with respect to versioning files. As with the previous section, the following commands are included in a single Python script, but I walk through these commands one by one. Before using the script, make sure to replace the secret name with the one created by the CloudFormation stack, as well as the Region you’re using, and the S3 bucket you created. First, we import a few packages we need: >>> import boto3 Next, we connect to Amazon S3 and create the S3 client: session = boto3.Session() s3_client = session.client('s3') It’s convenient to store the name of the bucket we created in a variable. Set the bucket variable appropriately: >>> bucket = "blog-gridfs" Now that this setup is complete, we list the files in the S3 bucket: >>> s3_client.list_objects(Bucket=bucket) {'ResponseMetadata': {'RequestId': '031B62AE7E916762', 'HostId': 'UO/3dOVHYUVYxyrEPfWgVYyc3us4+0NRQICA/mix//ZAshlAwDK5hCnZ+/wA736x5k80gVcyZ/w=', 'HTTPStatusCode': 200, 'HTTPHeaders': {'x-amz-id-2': 'UO/3dOVHYUVYxyrEPfWgVYyc3us4+0NRQICA/mix//ZAshlAwDK5hCnZ+/wA736x5k80gVcyZ/w=', 'x-amz-request-id': '031B62AE7E916762', 'date': 'Wed, 03 Feb 2021 22:37:12 GMT', 'x-amz-bucket-region': 'us-east-1', 'content-type': 'application/xml', 'transfer-encoding': 'chunked', 'server': 'AmazonS3'}, 'RetryAttempts': 0}, 'IsTruncated': False, 'Marker': '', 'Name': 'blog-gridfs', 'Prefix': '', 'MaxKeys': 1000, 'EncodingType': 'url'} The output is more verbose, but we’re most interested in the Contents field, which is an array of objects. In this example, it’s absent, denoting an empty bucket. Next, insert one of the files we created earlier: >>> h = s3_client.put_object(Body=open("/home/ec2-user/hello.txt", "rb").read(), Bucket=bucket, Key="hello.txt") This put_object command takes three parameters: Body – The bytes to write Bucket – The name of the bucket to upload to Key – The file name The key can be more than just a file name, but can also include subdirectories, such as subdir/hello.txt. The put_object command returns information acknowledging the successful insertion of the file, including the VersionId: >>> h {'ResponseMetadata': {'RequestId': 'EDFD20568177DD45', 'HostId': 'sg8q9KNxa0J+4eQUMVe6Qg2XsLiTANjcA3ElYeUiJ9KGyjsOe3QWJgTwr7T3GsUHi3jmskbnw9E=', 'HTTPStatusCode': 200, 'HTTPHeaders': {'x-amz-id-2': 'sg8q9KNxa0J+4eQUMVe6Qg2XsLiTANjcA3ElYeUiJ9KGyjsOe3QWJgTwr7T3GsUHi3jmskbnw9E=', 'x-amz-request-id': 'EDFD20568177DD45', 'date': 'Wed, 03 Feb 2021 22:39:19 GMT', 'x-amz-version-id': 'ADuqSQDju6BJHkw86XvBgIPKWalQMDab', 'etag': '"8ddd8be4b179a529afa5f2ffae4b9858"', 'content-length': '0', 'server': 'AmazonS3'}, 'RetryAttempts': 0}, 'ETag': '"8ddd8be4b179a529afa5f2ffae4b9858"', 'VersionId': 'ADuqSQDju6BJHkw86XvBgIPKWalQMDab'} Now if we list the files, we see the file we just inserted: >>> list = s3_client.list_objects(Bucket=bucket) >>> print([i["Key"] for i in list["Contents"]]) ['hello.txt'] Next, insert the other file we created earlier and list the files: >>> b = s3_client.put_object(Body=open("/home/ec2-user/bye.txt", "rb").read(), Bucket=bucket, Key="bye.txt") >>> print([i["Key"] for i in s3_client.list_objects(Bucket=bucket)["Contents"]]) ['bye.txt', 'hello.txt'] Read the first file. In Amazon S3, use the bucket and key to get the object. The Body field is a streaming object that can be read to retrieve the contents of the object: >>> s3_client.get_object(Bucket=bucket, Key="hello.txt")["Body"].read() b'Hello World!n' Similar to GridFS, Amazon S3 also allows you to search for files by file name. In the Amazon S3 API, you can specify a prefix that is used to match against the key for the objects: >>> print([i["Key"] for i in s3_client.list_objects(Bucket=bucket, Prefix="hello.txt")["Contents"]]) ['hello.txt'] We can see one file with the name hello.txt. Next, delete the hello.txt file. To do this, we use the bucket and file name, or key: >>> s3_client.delete_object(Bucket=bucket, Key="hello.txt") {'ResponseMetadata': {'RequestId': '56C082A6A85F5036', 'HostId': '3fXy+s1ZP7Slw5LF7oju5dl7NQZ1uXnl2lUo1xHywrhdB3tJhOaPTWNGP+hZq5571c3H02RZ8To=', 'HTTPStatusCode': 204, 'HTTPHeaders': {'x-amz-id-2': '3fXy+s1ZP7Slw5LF7oju5dl7NQZ1uXnl2lUo1xHywrhdB3tJhOaPTWNGP+hZq5571c3H02RZ8To=', 'x-amz-request-id': '56C082A6A85F5036', 'date': 'Wed, 03 Feb 2021 22:45:57 GMT', 'x-amz-version-id': 'rVpCtGLillMIc.I1Qz0PC9pomMrhEBGd', 'x-amz-delete-marker': 'true', 'server': 'AmazonS3'}, 'RetryAttempts': 0}, 'DeleteMarker': True, 'VersionId': 'rVpCtGLillMIc.I1Qz0PC9pomMrhEBGd'} >>> print([i["Key"] for i in s3_client.list_objects(Bucket=bucket)["Contents"]]) ['bye.txt'] The bucket now only contains one file. Let’s overwrite the bye.txt file with different data, in this case the goodbye.txt file contents: >>> hb = s3_client.put_object(Body=open("/home/ec2-user/goodbye.txt", "rb").read(), Bucket=bucket, Key="bye.txt") >>> print([i["Key"] for i in s3_client.list_objects(Bucket=bucket)["Contents"]]) ['bye.txt'] Similar to GridFS, with versioning turned on in Amazon S3, an overwrite doesn’t actually delete the previous version. Amazon S3 keeps older versions unless you specifically delete them. So, when we list the versions of the bye.txt object, we see two files: >>> y = s3_client.list_object_versions(Bucket=bucket, Prefix="bye.txt") >>> versions = sorted([(i["Key"],i["VersionId"],i["LastModified"]) for i in y["Versions"]], key=lambda y: y[2]) >>> print(len(versions)) 2 As with GridFS, Amazon S3 allows us to get specific versions of the file, via the get_object() method. By default, this returns the most recent version. Unlike GridFS, versions in Amazon S3 are identified with a unique identifier, VersionId, not a counter. We can get the versions of the object and sort them based on their LastModified field. We can access the original version by specifying the VersionId of the first element in the sorted list. We can also access the most recent version by not specifying a VersionId: >>> x0 = s3_client.get_object(Bucket=bucket, Key="bye.txt", VersionId=versions[0][1]) >>> print(x0["Body"].read()) b'Bye World!n' >>> x1 = s3_client.get_object(Bucket=bucket, Key="bye.txt", VersionId=versions[1][1]) >>> print(x1["Body"].read()) b'Goodbye World!n' >>> xlatest = s3_client.get_object(Bucket=bucket, Key="bye.txt") >>> print(xlatest["Body"].read()) b'Goodbye World!n' Similar to GridFS, Amazon S3 provides the ability to attach metadata to the files. The API allows for adding any keys and values as part of the Metadata field in the put_object() operation. In the following code, we add a key-value pair with the key somekey and the value somevalue: >>> bb = s3_client.put_object(Body=open("/home/ec2-user/byebye.txt", "rb").read(), Bucket=bucket, Key="bye.txt", Metadata={"somekey": "somevalue"}) >>> c = s3_client.get_object(Bucket=bucket, Key="bye.txt") We can access the custom metadata via the Metadata field: >>> print(c["Metadata"]["somekey"]) somevalue We can also print the contents of the file: >>> print(c["Body"].read()) b'Bye Bye World!n' One limitation with Amazon S3 versus GridFS is that you can’t search for objects based on the metadata. To accomplish this use case, we employ Amazon DocumentDB. Use cases with Amazon S3 and Amazon DocumentDB Some use cases may require you to find objects or files based on the metadata, beyond just the file name. For example, in an asset management use case, we may want to record the author or a list of keywords. To do this, we can use Amazon S3 and Amazon DocumentDB to provide a very similar developer experience, but leveraging the power of a purpose-built document database and a purpose-built object store. In this section, I walk through how to use these two services to cover the additional use case of needing to find files based on the metadata. First, we import a few packages: >>> import json >>> import pymongo >>> import boto3 We use the credentials that we created when we launched the CloudFormation stack. These credentials were stored in Secrets Manager. The name of the secret is the name of the stack that you used to create the stack (for this post, docdb-mongo), with -DocDBSecret appended to docdb-mongo-DocDBSecret. We assign this to a variable. You should use the appropriate Secrets Manager secret name for your stack: >>> secret_name = 'docdb-mongo-DocDBSecret' Next, we create a Secrets Manager client and retrieve the secret. Make sure to set the Region variable with the Region in which you deployed the stack: >>> secret_client = session.client(service_name='secretsmanager', region_name=region) >>> secret = json.loads(secret_client.get_secret_value(SecretId=secret_name)['SecretString']) This secret contains the four pieces of information that we need to connect to the Amazon DocumentDB cluster: Cluster endpoint Port Username Password Next we connect to the Amazon DocumentDB cluster: >>> docdb_client = pymongo.MongoClient(host=secret["host"], port=secret["port"], ssl=True, ssl_ca_certs="/home/ec2-user/rds-combined-ca-bundle.pem", replicaSet='rs0', connect = True) >>> docdb_client["admin"].authenticate(name=secret["username"], password=secret["password"]) True We use the database fs and the collection files to store our file metadata: >>> docdb_db = docdb_client["fs"] >>> docdb_coll = docdb_db["files"] Because we already have data in the S3 bucket, we create entries in the Amazon DocumentDB collection for those files. The information we store is analogous to the information in the GridFS fs.files collection, namely the following: bucket – The S3 bucket filename – The S3 key version – The S3 VersionId length – The file length in bytes uploadDate – The S3 LastModified date Additionally, any metadata that was stored with the objects in Amazon S3 is also added to the document in Amazon DocumentDB: >>> for ver in s3_client.list_object_versions(Bucket=bucket)["Versions"]: ... obj = s3_client.get_object(Bucket=bucket, Key=ver["Key"], VersionId=ver["VersionId"]) ... to_insert = {"bucket": bucket, "filename": ver["Key"], "version": ver["VersionId"], "length": obj["ContentLength"], "uploadDate": obj["LastModified"]} ... to_insert.update(obj["Metadata"]) ... docdb_coll.insert_one(to_insert) ... Now we can find files by their metadata: >>> sk0 = docdb_coll.find({"somekey": "somevalue"}).next() >>> print(sk0["somekey"]) somevalue To read the file itself, we can use the bucket, file name, and version to retrieve the object from Amazon S3: >>> print(s3_client.get_object(Bucket=sk0["bucket"], Key=sk0["filename"], VersionId=sk0["version"])["Body"].read()) b'Bye Bye World!n' Now we can put another file with additional metadata. To do this, we write the file to Amazon S3 and insert the metadata into Amazon DocumentDB: >>> h = s3_client.put_object(Body=open("/home/ec2-user/solong.txt", "rb").read(), Bucket=bucket, Key="solong.txt") >>> docdb_coll.insert_one({"bucket": bucket, "filename": "solong.txt", "version": h["VersionId"], "somekey": "someothervalue", "key2": "value2"}) Finally, we can search for files with somekey defined, as we did with GridFS, and see that two files match: >>> print(docdb_coll.find({"somekey": {"$exists": True}}).count()) 2 Clean up You can delete the resources created in this post by deleting the stack via the AWS CloudFormation console or the AWS CLI. Conclusion Storing large objects inside a database is typically not the best architectural choice. Instead, coupling a distributed object store, such as Amazon S3, with the database provides a more architecturally sound solution. Storing the metadata in the database and a reference to the location of the object in the object store allows for efficient query and retrieval operations, while reducing the strain on the database for serving object storage operations. In this post, I demonstrated how to use Amazon S3 and Amazon DocumentDB in place of MongoDB’s GridFS. I leveraged Amazon S3’s purpose-built object store and Amazon DocumentDB, a fast, scalable, highly available, and fully managed document database service that supports MongoDB workloads. For more information about recent launches and blog posts, see Amazon DocumentDB (with MongoDB compatibility) resources. About the author Brian Hess is a Senior Solution Architect Specialist for Amazon DocumentDB (with MongoDB compatibility) at AWS. He has been in the data and analytics space for over 20 years and has extensive experience with relational and NoSQL databases. https://aws.amazon.com/blogs/database/migrate-an-application-from-using-gridfs-to-using-amazon-s3-and-amazon-documentdb-with-mongodb-compatibility/
0 notes
Text
Install Docker on Linux and run a MongoDB Container.
Install Docker on Linux and run a MongoDB Container.
Hi hope you are doing well, lets learn about “How to Setup and Install Docker on Linux and Run a MongoDB Container”, the Docker is the fastest growing technology in the IT market. Many industries are moving towards docker from the normal EC2 instances. Docker is the container technology. It is PAAS (Platform as a Service), which uses a OS virtualisation to deliver software in packages called…

View On WordPress
0 notes
Text
How to Install MongoDB in Ubuntu

In this article we are going to see how to install mongodb in ubuntu. MongoDB is an open source database management platform based on document which stores data in JSON-like formats. It is a Non-relational database, or ‘ NoSQL ‘database which is highly scalable, modular and distributed.
Read: How to Launch AWS EC2 Instance
How to Install MongoDB in Ubuntu
To Install mongodb in…
View On WordPress
0 notes
Text
Continuous Integration at Coinbase: How we optimized CircleCI for speed & cut our build times by…
Continuous Integration at Coinbase: How we optimized CircleCI for speed and cut our build times by 75%
Tuning a continuous integration server presents an interesting challenge — infrastructure engineers need to balance build speed, cost, and queue times on a system that many developers do not have extensive experience managing at scale. The results, when done right, can be a major benefit to your company as illustrated by the recent journey we took to improve our CI setup.
Continuous Integration at Coinbase
As Coinbase has grown, keeping our developers happy with our internal tools has been a high priority. For most of Coinbase’s history we have used CircleCI server, which has been a performant and low-maintenance tool. As the company and our codebase have grown, however, the demands on our CI server have increased as well. Prior to the optimizations described here, builds for the monorail application that runs Coinbase.com had increased significantly in length (doubling or tripling the previous average build times) and developers commonly complained about lengthy or non-finishing builds.
Our CI builds were no longer meeting our expectations, and it was with the previous issues in mind that we decided to embark on a campaign to get our setup back into shape.
It’s worth sharing here that Coinbase specifically uses the on-premise server version of CircleCI rather than their cloud offering — hosting our own infrastructure is important to us for security reasons, and these concepts specifically apply to self-managed CI clusters.
The Four Golden Signals
We found the first key to optimizing any CI system to be observability, as without a way to measure the effects of your tweaks and changes it’s impossible to truly know whether or not you actually made an improvement. In our case, server-hosted CircleCI uses a nomad cluster for builds, and at the time did not provide any method of monitoring your cluster or the nodes within. We had to build systems of our own, and we decided a good approach would be using the framework of the four golden signals, Latency, Traffic, Errors, and Saturation.
Latency
Latency is the total amount of time it takes to service a request. In a CI system, this can be considered to be the total amount of time a build takes to run from start to finish. Latency is better measured on a per-repo or even per-build basis as build length can vary hugely based on the project.
To measure this, we built a small application that queried CircleCI’s API regularly for build lengths, and then shipped over that information to Datadog to allow us to build graphs and visualizations of average build times. This allowed us to chart the results of our improvement experiments empirically and automatically rather than relying on anecdotal or manually curated results as we had done previously.

CircleCI API results
Traffic
Traffic is the amount of demand being placed on your system at any one time. In a CI system, this can be represented by the total number of concurrently running builds.
We were able to measure this by using the same system we built to measure latency metrics. This came in handy when determining the upper and lower bounds for the use of our build resources as it allowed us to see exactly how many jobs were running at any one time.
Errors
Errors are the total amount of requests or calls that fail. In a CI system this can be represented by the total number of builds that fail due to infrastructural reasons. It’s important here to make a distinction between builds that fail correctly, due to tests, linting, code errors, etc. rather than builds that fail due to platform issues.
One issue we encountered was that occasionally AWS would give us “bad” instances when spinning up new builders that would run much slower than a normal “good” instance. Adding error detection into our builder startup scripts allowed us to terminate these and spin up new nodes before they could slow down our running builds.
Saturation
Saturation is how “full” your service is, or how much of your system resources are being used. In a CI system, this is fairly straightforward — how much I/O, CPU, and memory are the builders under load using.
To measure saturation for our setup we were able to tap into cluster metrics by installing a Datadog Agent on each of our builders, which allowed us to get a view into system stats across the cluster.
Datadog job statistics
Identifying the Root Cause
Once your monitoring setup is in place it becomes easier to dig into the root cause of build slowdowns. One of the difficulties in diagnosing CI problems without cluster-wide monitoring is that it can be hard to identify which builders are experiencing load at any one time or how that load affects your builds. Latency monitoring can allow you to figure out which builds are taking the longest, and saturation monitoring can allow you to identify the nodes running those builds for closer investigation.
For us, the new latency measuring we added allowed us to quickly confirm what we had previously guessed: not every build was equal. Some builds ran at the quick speeds we had previously been experiencing but other builds would drag on for far longer than we expected.
In our case this discovery was the big breakthrough — once we could quickly identify builds with increased latency and find the saturated nodes the problem quickly revealed itself: resource contention between starting builds! Due to the large number of tests for our larger builds we use CircleCI’s parallelization feature to split up our tests and run them across the fleet in separate docker containers. Each test container also requires another set of support containers (Redis, MongoDB, etc.) in order to replicate the production environment. Starting all of the necessary containers for each build is a resource-intensive operation, requiring significant amounts of I/O and CPU. Since Nomad uses bin-packing for job distributions our builders would sometimes launch up to 5 different sets of these containers at once, causing massive slow-downs before tests could even start running.
Build Experimentation
Setting up a development environment is key to debugging CI problems once found as it allows you to push your system to its limits while ensuring that none of your testing affects productivity in production. Coinbase maintains a development cluster for CircleCI that we use to test out new versions before pushing them out to production, but in order to investigate our options we turned the cluster into a smaller replica of our production instance, allowing us to effectively load test CircleCI builders. Keeping your development cluster as close as possible to production can help ensure any solutions you find are reflective of what can actually help in a real environment.
Once we had identified why our builds were encountering issues, and we’d set up an environment to run experiments in, we could start developing a solution. We repeatedly ran the same large builds that were causing the problems on our production cluster on different sizes and types of EC2 instances in order to figure out which was the most time and cost-effective options to use.

EC2 instance type comparison
While we previously had been using smaller numbers of large instances to run our builds it turns out the optimal setup for our cluster was actually a very large number of smaller instances (m5.larges in our case) — small enough that CircleCI would only ship one parallelized build container to each instance, preventing the build trampling issues that were the cause of the slow downs. A nice side effect of identifying the correct instance types was that it actually allowed us to reduce our server cost footprint significantly as we were able to size our cluster more closely to its usage.
Problem? Solved!
Applying your changes to a production environment is the final step. Determining whether the effects of the tuning worked can be done the same way the problems were identified — with the four golden signals.
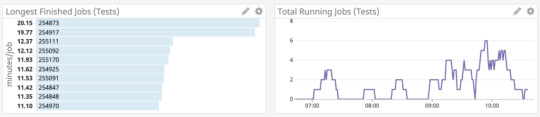
After we had identified what worked best on our development cluster we quickly implemented the new builder sizing in production. The results? A 75% decrease in build time for our largest builds, significant cost savings due to the right-sizing of our cluster, and most important of all: happy developers!

Builds, before and after
This website may contain links to third-party websites or other content for information purposes only (“Third-Party Sites”). The Third-Party Sites are not under the control of Coinbase, Inc., and its affiliates (“Coinbase”), and Coinbase is not responsible for the content of any Third-Party Site, including without limitation any link contained in a Third-Party Site, or any changes or updates to a Third-Party Site. Coinbase is not responsible for webcasting or any other form of transmission received from any Third-Party Site. Coinbase is providing these links to you only as a convenience, and the inclusion of any link does not imply endorsement, approval or recommendation by Coinbase of the site or any association with its operators.
Unless otherwise noted, all images provided herein are by Coinbase.
Continuous Integration at Coinbase: How we optimized CircleCI for speed & cut our build times by… was originally published in The Coinbase Blog on Medium, where people are continuing the conversation by highlighting and responding to this story.
from Money 101 https://blog.coinbase.com/continuous-integration-at-coinbase-how-we-optimized-circleci-for-speed-cut-our-build-times-by-378c8b1d7161?source=rss----c114225aeaf7---4 via http://www.rssmix.com/
0 notes