#install node js
Explore tagged Tumblr posts
Visit Tumblr Blog
Explore Tumblr blogs with no restrictions, modern design and the best experience.
Last Seen Tumblr Blogs


Fun Fact
69% of Tumblr users are millennials.
Text
Know the step-by-step process of installing Node.js on cPanel effortlessly and elevate your web development experience with this comprehensive guide.
0 notes
Text
Access Environment Variable in Nodejs JavaScript Application | Reading ENV Variable Example
Full Video Link https://youtu.be/dxrNopL1sbQ Hello friends, new #video on #reading #accessing #environmentvariables in #nodejs #projeect #application #tutorial #examples is published on #codeonedigest #youtube channel. @java #java #aws #a
In this video, we will read the environment variable in nodejs javascript project. We will learn what “dotenv” module in nodejs javascript. How to use “dotenv” package in our nodejs javascript project. ** Important Nodejs Javascript Packages or Modules ** Dotenv – DotEnv is a lightweight npm package that automatically loads environment variables from a .env file into the process.env object. To…

View On WordPress
#dotenv#dotenv example#dotenv in node js#dotenv module#dotenv module in node js#dotenv module not found#dotenv nodejs#dotenv package#dotenv package install#dotenv package nodejs#dotenv package.json#dotenv tutorial#dotenv tutorial nodejs#environment variable#environment variables#javascript environment variable#linux environment variables#node js javascript#node js javascript tutorial#nodejs#python environment variables#set environment variables
0 notes
Note
Hi!! I wanted to say that I loved reading about your journey of creating a personal website. I'm still unsure between Vercel and Netlify. I have a small question to ask. See, one of the reasons I want to make a website is to archive drawings and journal/sketchbook. Would you have any tips for creating an area on my website just for the diary/journal, which has tags, files for each entry, etc.?
Bello!

Really happy to hear about your interest in websites! I want everyone to make their own site so I don't have to log into social media and get instant tummyaches ♥
Vercel vs Netlify: I think I settled on Vercel for absolutely no reason whatsoever. I just made a site on Netlify, then tested on Vercel, and now I have like 5 websites on Vercel so I just kept using it LOL. I'm sure a more tech-savvy person would know the difference - I think they have certain integrations with specific programs.
Creating a diary or journal with tags:
There's a couple of different ways you can do that, with different levels of work needed.
you got me yapping again:
This sadgrl tutorial might be outdated and may or may not work, but explains the process better than I can.
Easiest: make a journal on Dreamwidth, or another blogging site (wordpress??) that allows easy tags and RSS feed, and embed that RSS feed onto your site.
This requires almost no HTML set-up, and the easiest to organize tags, but you don't truly have the data on your own site since it's just embedded.
When I snuck into a web design class at college, this was one of the methods that the professor used for a blog within a portfolio site LOL.
Shit like wordpress is what a LOT of ~professional~ sites do for their blog section. They code it separately from the main site haha. It's the most popular thing, but not necessarily the best. And wait til you read on what the CEO of wordpress has been having meltdowns about... he owns tumblr too!
It's made with a tutorial for Neocities if that's what you use.
Medium: Set up zonelets.
It will require some HTML and JS editing, but will help automate making headers/footers for each page of a blog.
I've never used it myself, but I see other people speak highly of it.
HARD FOR ME CUZ I'M A GORILLA: I believe a lot of professional web devs will slap your face with their coding cock until you use a static site generator (SSG) to make your site.
You will need some coding knowledge to set up the tagging system since it doesn't come with it enabled by default. But it's made explicitly to be an alternative to big Static Site Generators which are...
It requires some more intimidating knowledge, because it's a lot of scripts that turn files that are not HTML/CSS/JS into plain HTML.
Also you have to use the command line, and that doesn't come with buttons that tell you what you can do. You have to copy/paste all that shit or memorize the code to 'dev build astro' and it all looks silly.
I've used Eleventy, and now am using Astro. Other people use Hugo or Jekyll or some other stuff with crazy names like Glup Shitto. I hate all these sites cuz none of the words mean anything to me. This is a common theme for me and tech. I don't know what NODES or CONTENT or ISLANDS are!!!
I had the most success attempting to learn how to use a SSG by downloading a template and altering it with github + VScodium. Here's the template page for Astro. You click on a theme you like, and it takes you to its github page. (If you don't want to use evil Microsoft stuff sorry. Skip this entire section.) Follow the instructions on the page for "forking" the glup shitto. When it tells you to run commands, I run those commands through the terminal window in VScodium. These tutorials never tell you what these commands do cuz they assume you already know. Usually those commands automatically install the files you need onto your computer, and create the final files.
You can see my wip here for a "tag system" that SHOULD show members of a web listing haha but I don't know what I'm doing and I have a reading disorder AND don't know cumputer good.
THEORETICALLY this will be the simplest and easiest way to maintain tags and files, because after you set it up you just have to write the "content" of the blog page. And you don't have to set up the header/footer ever again. I see the vision, and potential, but I am not there yet when it takes me 5 hours a day to figure out what any of the words in the documentation mean and I don't want to ask an actual tech person cuz they will be like 'obviously just press the Blip on the Repository and then Suck My Ass in the command line".
(side note I haven't updated fujofans in like a year cuz I'm struggling with this part to make updating easier).
Con: the final HTML/CSS code is really ugly if it's "minified", and a lot of themes use """"""professional"""""" CSS libraries like Bootstrap and Tailwind that I honestly think are ugly cuz that's what every fuckin' tech website uses to style their pages and make them look Professional and Minimalist with stupid code like style="500-w dark-gray-balls D-cup-bra" on every single element. Even Toyhouse uses Bootstrap. Eugh!
But maybe you're smarter than me and can wrangle these things better!
That was really long. Woops. I hope you can slug through this wall of text and find something helpful. Feel free to email me if you have any more specific questions. I may or may not be helpful.
If someone else sees this and has better suggestions for making BLOGS, please chime in. I'm begging you.
64 notes
·
View notes
Text
i want to keep tumblr because i like aesthetics
aesthetic aggregation is important because it allows for intimate relationships to develop outside of life-long domesticated-servile contracts
you transfer
love energy,
actually, when you share your aesthetic, and merge, like that
however
i don't think its possible to make organic relationships the same way it was a decade ago, no, entirely too sanitized
i highly doubt, since the algorithm that i'll ever oganically run into; actually its absurd to even finish that sentence
luckily, i became a sysadmin / programmer, in the interem period, and can actually build the tools this time around
i have an idea for an aesthetic aggregator portal place that combines dump.fm & tumblr with cellular automata, like a living pool you gaze into and everything's a ripple on a wave, man, that's like connected, woah
and i'm schemeing on it, i love lisp, when i go looking everything i want to do is available to me like channeling a spell... somebody already wrote scheme to wasm, that really shouldn't be too hard... still looking for alternate ways to chat :D hmu on xmpp it's exactly like AIM
i've tried node/npm, python, package managers... the best most satisfying one if you're going to go and install a big library, blob thing like that, is probably some flavor of emacs... for me, this is a personal preference, the fact that you 'can' do anything that rust/python/go/js can do in LISP... is enough for me, because, it is elegant, it is more pleasant to look at and easier to read, idk. loving my time with it recently and have been knocking it out of the park most days recently... the past 7 years i've been working on a top secret project, which will have a working alpha demo of the basic features by the end of next week :D
the best os rn is a freeBSD jail with guixSD GNU/linux-libre there's also hyperbola/BSD in the works you want to try to phase out the linux kernel because of all the google/microsoft shenanigans creeping in, you don't need unix/linux any more you can do all your daily driver stuff on an embedded, low power risc soc that costs under a hundo you need less overhead for embedded systems, there's microkernels like genome, and platforms like zephyr, its ok to move away idk one thing i learned its good to take a step back and look at the scope of what you're trying to achieve, try to strip away all the unneccessary parts... a mhz is 1,000,000 calculations a microsecond or whatever, when you sit down and write a piece of code how many calculations exactly do you need to do to do your business, honestly.
^these are the 3 am ramblings of a minimalist
i'm trying to find peers here on my site that's connected to the internet that's why i'm sending messages to it about my interests, pardon me, sir please send $1 to this address
3 notes
·
View notes
Text
React JS
Component-Based Architecture:
React applications are built using components, which are reusable, self-contained pieces of the UI. Components can be nested, managed, and handled independently, leading to better maintainability and scalability.
JSX (JavaScript XML):
React uses JSX, a syntax extension that allows HTML to be written within JavaScript. This makes the code more readable and easier to write.
Virtual DOM:
React maintains a virtual DOM, an in-memory representation of the actual DOM. When the state of an object changes, React updates the virtual DOM and efficiently determines the minimal set of changes needed to update the real DOM, leading to performance improvements.
One-Way Data Binding:
Data flows in one direction, from parent to child components, which makes the data flow and logic easier to understand and debug.
State Management:
React components can maintain internal state, making it easy to build dynamic and interactive UIs. For more complex state management, libraries like Redux or Context API can be used.
Advantages of Using React
Performance:
Due to the virtual DOM, React minimizes direct manipulation of the DOM, resulting in better performance for dynamic applications.
Reusable Components:
Components can be reused across different parts of an application, reducing the amount of code and enhancing consistency.
Strong Community and Ecosystem:
A large community and a rich ecosystem of tools and libraries support React, making it easier to find solutions, get support, and integrate with other technologies.
SEO Friendly:
React can be rendered on the server using Node.js, making web pages more SEO-friendly compared to traditional client-side rendering.
Getting Started with React
To start building applications with React, you need to have Node.js and npm (Node Package Manager) installed. Here’s a basic setup to create a new React application:
Install Node.js and npm:
Download and install from Node.js website.
Create a New React Application:
You can use Create React App, an officially supported way to create single-page React applications with no configuration required:
npx create-react-app my-app cd my-app npm start
import React from 'react';
function Welcome(props) { return
Hello, {props.name}
; }
export default Welcome;
#React JS#Front end Developer#Advanced JavaScript#coding#html css#htmlcoding#html#css#php#website#html5 css3#software#React Training
5 notes
·
View notes
Text
🚨 Day 14 of 100 Days, 100 Innovations!
💥 Stop Writing the Same Validation Code Again & Again!
⚡ Introducing: Atikin Universal Validator
A blazing-fast, zero-dependency JS/TS validator that works EVERYWHERE:
✅ Frontend (React, Vue, Svelte…) ✅ Backend (Node, Express, NestJS…) ✅ Fully typed – built with TypeScript
✨ Example: validate({ email: ["[email protected]", "isEmail"], password: ["Strong@123", "isStrongPassword"] });
🎯 Validate in ONE LINE.
📦 Install now: npm i atikin-universal-validator
🔗 Live on NPM → https://www.npmjs.com/package/atikin-universal-validator
Made with ❤️ by : Atikin Verse
#atikinverse#100Days100Innovations#javascript#typescript#npm#npmtools#DevCommunity#opensource#webdev#nodejs#frontend#backend#atikin
0 notes
Text
The ways to develop a website

You can approach various ways to developer website but depending on your goals, technical skill, and also resources. Below is an overview of the primary methods to develop a website:
1. Using website builders
Website builders are allow you to create website without calling knowledge and it is user friendly platform also. They offer pre designed templates and drag and drop interfaces.
• Popular tools: wordpress. com, shopify for eCommerce, wix, squarespace etc.
• How it works:
° You can choose the template that you want.
° Customize the design, layout and also content with using visual editor of the platform.
° You can also add forms, eCommerce, or blogs to plugins or also in built tools.
° Then publish the site with hosting that provided by the platform.
• Pros:
° No coding required and it is beginner friendly.
° Fast setup and development.
° Hosting, security and also updates are included.
• Cons:
°Compared to coding it have limited customisation.
° Monthly subscription costs.
° Migrating can be challenging because of platform dependency.
2. Content management system(CMS)
It require minimal coding and it allows you to manage website content efficiently with the customizable themes and plugins.
• Popular tools: wordpress. org, Joomla, drupal
• How it works:
° Install the CMS on a web server.
° With the basic coding or in built tool, you can select a theme and customize.
° To add functionality you can use plugins.
° Then you can manage content through dashboard.
• Pros:
° It is flexible and scalable and also it have thousands of themes and plugins.
° Provide community support and resources.
° It is useful for portfolios or blogs and also Complex sites.
• Cons:
° You should require some technical knowledge for the set up and maintenance.
° It have hosting and domain cost.
° It need security updates as also backups.
3. Coding from scratch (custom development)
Build a website with the raw code, it can give you complete control over design and functionality.
• Technologies:
° Frontend: HTML, CSS, JavaScript.
° Backend: python, PHP, Ruby, and node. JS
° Database: MySQL, mongoDB,postgreSQL.
° Tools: code editor, hosting, version control.
• How it works:
° You can design the site structure and visuals by using HTML/ CSS/ or JavaScript.
° For dynamic features build back end logic.
° You can connect to a database for data storage.
• Pros:
° Offers full customisation and flexibility.
° Unique functionality and also optimized performance.
° No platform restrictions.
• Cons:
° It requires coding expertise.
° Costly and also time intensive.
° Require ongoing maintenance such as security, updates.
4. Static site generator
It can create fast, and also secure website by pre rendering HTML files. It is useful for Blogs, or portfolios.
• Popular tools: Hugo, Jekyll, Next. js.
• How it works:
° You can write content in markdown or also similar format.
° Use template to generate static HTML, CSS, or JavaScript files.
° Use hosting platform like netlify,or vercel.
• Pros:
° It is fast and Secure and no server side processing.
° It provide free or low cost hosting.
° Easy to scale.
• Cons:
° It has Limited functionality.
° It required some technical knowledge.
5. Headless CMS with frontend frameworks
A headless CMS can provide a backend for content management with the conctent frontend for flexibility.
• Popular tools:
° Headless CMS: Strapy, contentful etc.
° Frontend framework: React, Vue. js etc
• How it works:
° To manage content via APIs, use headless CMS.
° With JavaScript framework built a custom frontend.
° To display the dynamic content connect both via APIs.
• Pros:
° Very much flexible and scalable.
° Allowing reuse across platforms such as web, mobile.
° Modern and also performant.
• Cons:
° It require coding skill and also familiarity with APIs.
° The setup can be complex.
6. Hiring a developer or agency
If you don't have time or lack of Technical skill, you can you can hire developer or agency.
• How it work:
° For custom development you can higher freelancers or agencies.
° They can provide your requirement such as design , features, and budget.
° In collaborate on design and functionality then launch the website.
• Pros:
° They provide professional result with your needs.
° Save time.
• Cons:
° Cost can be higher.
° Depend on third parties for maintenance.
7. Low code platforms
Low code platforms fill the gap between no code Builders and custom coding. And they offering visual development with the coding flexibility.
• Popular tools: bubble, Adalo, Outsystems.
• How it works:
° To design and configure the site, use Visual interface.
° And some custom code for specific features.
° Use built in or external hosting.
• Pros:
° It is faster than coding from scratch.
° You can offer more customizable than website Builders.
• Cons:
° Learning curve for advanced features.
° Require subscription or hosting cost.
Choosing the right method
• Beginners: if you are a beginner you can start the with the website Builders or wordpress.
• Budget conscious: if you are conscious about your budget you can use static site generators or also free CMS options.
• Developers: opt for custom coding or headless CMS for whole control.
• Businesses: for businesses, it is good to consider hiring professionals or using scalable CMS platform.
If you are looking for a website development with design, it is smart to work with an experienced agency. HollyMinds Technologies is a great choice, because they are the best website development company in Pune, and they make websites that are perfectly coded and structured to stand the test of time. The algorithms are set to bring visitors from across the globe. A structured website with right content, can bring more visitors to your business.
1 note
·
View note
Text
Start Coding Today: Learn React JS for Beginners

Start Coding Today: Learn React JS for Beginners”—will give you a solid foundation and guide you step by step toward becoming a confident React developer.
React JS, developed by Facebook, is an open-source JavaScript library used to build user interfaces, especially for single-page applications (SPAs). Unlike traditional JavaScript or jQuery, React follows a component-based architecture, making the code easier to manage, scale, and debug. With React, you can break complex UIs into small, reusable pieces called components.
Why Learn React JS?
Before diving into the how-to, let’s understand why learning React JS is a smart choice for beginners:
High Demand: React developers are in high demand in tech companies worldwide.
Easy to Learn: If you know basic HTML, CSS, and JavaScript, you can quickly get started with React.
Reusable Components: Build and reuse UI blocks easily across your project.
Strong Community Support: Tons of tutorials, open-source tools, and documentation are available.
Backed by Facebook: React is regularly updated and widely used in real-world applications (Facebook, Instagram, Netflix, Airbnb).
Prerequisites Before You Start
React is based on JavaScript, so a beginner should have:
Basic knowledge of HTML and CSS
Familiarity with JavaScript fundamentals such as variables, functions, arrays, and objects
Understanding of ES6+ features like let, const, arrow functions, destructuring, and modules
Don’t worry if you’re not perfect at JavaScript yet. You can still start learning React and improve your skills as you go.
Setting Up the React Development Environment
There are a few ways to set up your React project, but the easiest way for beginners is using Create React App, a boilerplate provided by the React team.
Step 1: Install Node.js and npm
Download and install Node.js from https://nodejs.org. npm (Node Package Manager) comes bundled with it.
Step 2: Install Create React App
Open your terminal or command prompt and run:
create-react-app my-first-react-app
This command creates a new folder with all the necessary files and dependencies.
Step 3: Start the Development Server
Navigate to your app folder:
my-first-react-app
Then start the app:
Your first React application will launch in your browser at http://localhost:3000.
Understanding the Basics of React
Now that you have your environment set up, let’s understand key React concepts:
1. Components
React apps are made up of components. Each component is a JavaScript function or class that returns HTML (JSX).
function Welcome() { return <h1>Hello, React Beginner!</h1>; }
2. JSX (JavaScript XML)
JSX lets you write HTML inside JavaScript. It’s not mandatory, but it makes code easier to write and understand.
const element = <h1>Hello, World!</h1>;
3. Props
Props (short for properties) allow you to pass data from one component to another.
function Welcome(props) { return <h1>Hello, {props.name}</h1>; }
4. State
State lets you track and manage data within a component.
import React, { useState } from 'react'; function Counter() { const [count, setCount] = useState(0); return ( <div> <p>You clicked {count} times.</p> <button onClick={() => setCount(count + 1)}>Click me</button> </div> ); }
Building Your First React App
Let’s create a simple React app — a counter.
Open the App.js file.
Replace the existing code with the following:
import React, { useState } from 'react'; function App() { const [count, setCount] = useState(0); return ( <div style={{ textAlign: 'center', marginTop: '50px' }}> <h1>Simple Counter App</h1> <p>You clicked {count} times</p> <button onClick={() => setCount(count + 1)}>Click Me</button> </div> ); } export default App;
Save the file, and see your app live on the browser.
Congratulations—you’ve just built your first interactive React app!
Where to Go Next?
After mastering the basics, explore the following:
React Router: For navigation between pages
useEffect Hook: For side effects like API calls
Forms and Input Handling
API Integration using fetch or axios
Styling (CSS Modules, Styled Components, Tailwind CSS)
Context API or Redux for state management
Deploying your app on platforms like Netlify or Vercel
Practice Projects for Beginners
Here are some simple projects to strengthen your skills:
Todo App
Weather App using an API
Digital Clock
Calculator
Random Quote Generator
These will help you apply the concepts you've learned and build your portfolio.
Final Thoughts
This “Start Coding Today: Learn React JS for Beginners” guide is your entry point into the world of modern web development. React is beginner-friendly yet powerful enough to build complex applications. With practice, patience, and curiosity, you'll move from writing your first “Hello, World!” to deploying full-featured web apps.
Remember, the best way to learn is by doing. Start small, build projects, read documentation, and keep experimenting. The world of React is vast and exciting—start coding today, and you’ll be amazed by what you can create!
0 notes
Text
Socket.IO setup

Building Real-Time Applications with Socket.IO setup: Step-by-Step Tutorial
Socket.IO setup. In today's interconnected world, real-time applications are becoming increasingly essential. Whether it's for live chat applications, collaborative tools, or gaming, real-time communication enhances user engagement and makes interactions more dynamic. One powerful tool for building real-time applications is Socket.IO. In this tutorial, we will guide you through the process of building a real-time application using Socket.IO, focusing on key concepts and practical implementation. What is Socket.IO? Socket.IO is a JavaScript library that enables real-time, bidirectional communication between web clients (like browsers) and servers. Unlike traditional HTTP requests, which follow a request-response model, Socket.IO provides a persistent connection, enabling instant data exchange between the client and server. Socket.IO works on top of WebSockets, but it provides fallback mechanisms for environments where WebSockets may not be available. This ensures that real-time communication is possible in a wide range of conditions, making it a versatile choice for building interactive web applications. Prerequisites Before we dive into the tutorial, make sure you have the following: Basic knowledge of JavaScript and Node.js Node.js installed on your machine. You can download it from nodejs.org. A code editor (like Visual Studio Code or Sublime Text). Step 1: Setting Up the Project Start by setting up a basic Node.js project. Create a new directory for your project: bash mkdir real-time-app cd real-time-app Initialize a new Node.js project: bash npm init -y Install Express and Socket.IO: bash npm install express socket.io Express is a lightweight web framework for Node.js that simplifies the creation of web servers. Socket.IO will handle real-time communication between the server and the client. Step 2: Create the Server Now that we've set up the dependencies, let's create a simple server. Create a file called server.js in the project root: js const express = require('express'); const http = require('http'); const socketIo = require('socket.io');// Create an instance of Express app const app = express();// Create an HTTP server const server = http.createServer(app); // Initialize Socket.IO with the HTTP server const io = socketIo(server); // Serve static files (like HTML, CSS, JS) app.use(express.static('public')); // Handle socket connection io.on('connection', (socket) => { console.log('a user connected'); // Handle message from client socket.on('chat message', (msg) => { io.emit('chat message', msg); // Emit the message to all clients }); // Handle disconnect socket.on('disconnect', () => { console.log('user disconnected'); }); }); // Start the server server.listen(3000, () => { console.log('Server is running on http://localhost:3000'); }); Step 3: Create the Client-Side Next, we need to create the client-side code that will connect to the server and send/receive messages in real time. Create a public folder inside the project directory. In the public folder, create an index.html file: html Real-Time Chat Real-Time Chat Application Send const socket = io(); // Connect to the server// Listen for messages from the server socket.on('chat message', function(msg){ const li = document.createElement('li'); li.textContent = msg; document.getElementById('messages').appendChild(li); }); // Handle form submission const form = document.getElementById('form'); form.addEventListener('submit', function(event){ event.preventDefault(); const input = document.getElementById('input'); socket.emit('chat message', input.value); // Send the message to the server input.value = ''; // Clear the input field }); Step 4: Run the Application With the server and client code in place, it’s time to run the application! In your terminal, run the following command: bash node server.js Open your browser and go to http://localhost:3000. You should see the chat interface. Open multiple browser windows or tabs to simulate multiple users. Type a message in the input field and click "Send." You should see the message appear in real-time in all open windows/tabs. Step 5: Enhancements and Improvements Congratulations! You've built a basic real-time chat application using Socket.IO. To enhance the application, consider adding the following features: User authentication: Allow users to log in before they can send messages. Private messaging: Enable users to send messages to specific individuals. Message persistence: Use a database (e.g., MongoDB) to store chat history. Typing indicators: Show when a user is typing a message in real time. Emoji support: Allow users to send emojis and other media. Conclusion Socket.IO setup. In this tutorial, we covered the basics of building a real-time application using Socket.IO. We walked through setting up a Node.js server with Express, integrating Socket.IO for real-time communication, and creating a simple chat interface on the client side. Socket.IO makes it easy to add real-time features to your web applications, enabling more dynamic and interactive experiences for users. With this foundation, you can now start exploring more advanced real-time features and take your applications to the next level! Read the full article
#communication#CreatetheClient-Side#CreatetheServer#Enhancements#function#History#Improvements#RuntheApplication#Setting
0 notes
Text
Getting Started with Blockchain Application Development

Blockchain technology is transforming industries by providing a secure, transparent, and decentralized way to record transactions. As the demand for blockchain applications increases, developers are presented with new opportunities to create innovative solutions. In this post, we’ll explore the fundamentals of blockchain application development and how you can get started building your own dApps.
What is Blockchain?
Blockchain is a distributed ledger technology that records transactions across multiple computers in a way that ensures the security and transparency of data. Each block in the chain contains a list of transactions, and once a block is added to the chain, it cannot be altered without consensus from the network.
Key Features of Blockchain
Decentralization: No central authority; data is distributed across a network of nodes.
Transparency: All transactions are visible to participants, ensuring accountability.
Security: Cryptographic techniques secure data, making it difficult to tamper with.
Immutability: Once recorded, transactions cannot be changed or deleted.
Common Blockchain Platforms
Ethereum: The most popular platform for building decentralized applications (dApps) using smart contracts.
Hyperledger Fabric: A permissioned blockchain framework for enterprise solutions.
Binance Smart Chain: A blockchain network running smart contract-based applications.
Solana: Known for its high throughput and low transaction costs, suitable for scalable dApps.
Cardano: A blockchain platform focused on sustainability and scalability through a layered architecture.
Understanding Smart Contracts
Smart contracts are self-executing contracts with the terms directly written into code. They automatically execute actions when predefined conditions are met, eliminating the need for intermediaries. Smart contracts are primarily used on platforms like Ethereum.
Example of a Simple Smart Contract (Solidity)
pragma solidity ^0.8.0; contract SimpleStorage { uint public storedData; function set(uint x) public { storedData = x; } function get() public view returns (uint) { return storedData; } }
Building Your First dApp
Set Up Your Development Environment:
Install Node.js and npm.
Use frameworks like Truffle or Hardhat for development.
Install a wallet like MetaMask for interacting with the blockchain.
Write a Smart Contract: Use Solidity to define the contract's logic.
Deploy the Contract: Deploy to a test network (e.g., Rinkeby, Kovan) using tools like Remix.
Create a Frontend: Use libraries like web3.js or ethers.js to interact with the smart contract from a web application.
Test and Iterate: Test your dApp thoroughly on test networks before deploying to the mainnet.
Best Practices for Blockchain Development
Write modular, reusable, and easily understandable code for smart contracts.
Implement proper error handling and validation to prevent vulnerabilities.
Conduct thorough testing, including unit tests and integration tests.
Stay updated with the latest security practices and common vulnerabilities (e.g., reentrancy, overflow).
Utilize code audit tools to review your smart contracts before deployment.
Conclusion
Blockchain application development offers exciting opportunities to create decentralized solutions that can change the way we interact and transact online. By understanding the basics of blockchain, smart contracts, and development tools, you can begin your journey into this innovative field. Start small, experiment, and build your way up to more complex dApps!
0 notes
Text
Nextjs vs Nodejs: Which Backend Framework to Choose in 2025
Today, businesses rely on interactive and dynamic web applications to improve their online presence. One of the most popularly used backend technologies is JavaScript which not only creates real-time web apps but also helps developers improve their coding experience.
As of 14 June 2024, nearly 98.8% of websites use JavaScript.
63.61% of developers use JavaScript for client-side and server-side app development.
Global brands (Google, YouTube, Facebook, LinkedIn, Twitter, etc.) use JavaScript to develop compelling websites.
JavaScript offers several frameworks for efficient developer experience.
Choosing the right JavaScript framework is a strategic decision for overall success. Two popular backend JavaScript frameworks are- Next.js vs. Node.js.
However, Node.js is a runtime environment that runs JavaScript code outside the browser. And Next.js is a React-based framework for building dynamic and hybrid applications. Both offer unique benefits and are suitable for different use cases.
To build modern-age applications, developers must understand where both technologies differ and which one to choose in 2025.
What is Node.js?
GitHub- 108k+ stars, 3500+ contributors
40.8% of backend developers prefer Node.js to build high-end, dynamic, and real-time applications. Since 2009, Node.js has evolved with a strong community improving it over the years.

Source
Here are a few things that you must know about Node.js.
A runtime environment that executes JavaScript on the server side.
Built on Chrome's V8 engine, which is the main reason behind Node.js’s high-speed and efficient applications.
Can handle many concurrent connections.
Has npm (Node Package Manager)- a set of libraries and tools for extended functionalities.
Works well for data-intensive applications that need quick responses.
Supports both vertical and horizontal scaling to meet growing demand.
Easily integrates with JSON for seamless data exchange.
Supported on most platforms, including Linux, Windows, Unix, macOS, and more.
Key Features
Here are some key features of Node.js

Source
Event-driven, asynchronous, non-blocking I/O Model- allows Node.js to handle many concurrent connections efficiently. It also manages resources and I/O operations asynchronously. It means the system will process other requests without waiting for the response from a slower I/O process. It improves the app’s performance and responsiveness. It makes Node.js apps highly scalable.
Modular design- Node.js modular design allows developers to share and reuse code, significantly reducing development time and improving the developer’s experience.
Compatibility across platforms- you can use Node.js across platforms like Mac OS X, Linux, and Windows. It helps developers create a single codebase and deploy it across platforms ensuring the same functionality and responsiveness.
Built-in debugging tools- one of the most prominent features is its built-in debugging tools, allowing developers to identify and fix issues instantly.
NPM (Node Package Manager)- it comes with Nodejs installation. It is a package manager that allows developers to access millions of packages to add more functionalities to a simple app. You can simply install a package for any functionality and use it within your app without developing it from scratch.
Built on Chrome’s V8 engine- it is the reason that Node.js is extremely powerful, efficient, and fast, allowing faster execution of JS code while handling heavy applications with great ease.
Benefits of Using Node.js for Your Business
High performance- Node.js can handle multiple concurrent requests without consuming many resources, making it suitable for developing applications that require high performance and scalability. The V8 engine improves performance and response time. PayPal reduced its response time by 35% using Node.js.
Improves developer's experience- with Node.js, developers can easily use the programming language (JavaScript) to create both backend and frontend. It means developers do not have to switch to another language and frameworks. Node.js has a large ecosystem that allows developers to create a wider range of applications, improving developer’s experience.
Cost-efficient development- Node.js can save up to 58% of development costs. As it can handle many requests at the same time, it requires less resources. It lets you reuse the code, reducing time-to-market and development expenses. This is why, Node.js has become the go-to option for businesses that need cost-efficient yet powerful modern-age solutions.
Growing community- since 2009, Node.js has grown with strong community support. This community has contributed towards Node.js improvements, making it a better technology to meet modern-age development needs. As a developer, you will find packages and libraries to stay ahead by incorporating the latest trends in web app development.
Easy deployment and hosting- Node.js makes it easy to deploy applications on cloud platforms like Heroku, AWS, and Azure. These services simplify the deployment process, allowing businesses to scale their apps as their user base grows. With hosting providers tailored for Node.js, companies can install and manage their apps with minimal setup and maintenance.
Disadvantages of Node.js
Performance bottleneck- Node.js is great at handling many requests at once. But the challenge is, that it uses a single thread to process tasks, impacting performance when dealing with complex calculations. These tasks can create a "bottleneck," slowing down the entire system.
Limited support for databases- Node.js was first created to work with web apps, which meant it didn't support many databases except for MongoDB. It might find it difficult to use Node.js with other types of databases or in different kinds of applications. It limits its flexibility in some cases.
Callback hell- Node.js uses asynchronous tasks and callbacks, but this can make the code messy and hard to follow, especially in complex apps. When callbacks are nested too many times, it creates a "callback hell," that is difficult to manage.
Memory leaks- Node.js relies on a garbage collector to manage memory, but sometimes has memory leaks. It means they don't release memory properly, resulting in performance issues and making the app unstable.
Despite its challenges, top brands like LinkedIn, eBay, Netflix, GoDaddy, Groupon, Uber, NASA, and Walmart, use Node.js for seamless experiences. Today. More than 1 million websites use Node.js.

Source
What is Next.js?
GitHub- 127k stars and 3500+ contributors.
As a new technology in the market, Next.js has gained much popularity since 2017. 17.9% of developers prefer it. Unlike Node.js, Next.js is a React-based server-side rendering framework.

Source
Here are a few things you must know about Next.js.
Developed by Vercel
Open-source framework
Used for creating server-side rendered (SSR) apps and static site generation (SSG) web apps
Based on the principle of “Build once, runs everywhere”
Offers unique features like route pre-fetching and automatic code splitting
built on top of React and runs on top of Node
Offers tools and features for building high-performance, scalable, and optimized web applications.
Improves developer's experience to build fast and efficient web applications
Features of Next.js
Here are some key features of Next.js.
App Directory (New File System Routing)- The new App directory introduces a new file-based routing system, which offers better flexibility and improved server-side rendering (SSR). It allows developers to organize components and pages more efficiently and to define layouts that are shared across different pages. This feature is part of the move towards a more modular and composable approach to building applications.
Source
React Server Components (RSC)- it allows developers to render some parts of the app on the server and send only the required HTML to the client. This results in faster page loads and better SEO, as the server can handle complex logic. Server components allow for a more optimized rendering process, minimizing the amount of JavaScript sent to the client.
Automatic code splitting- Next.js automatically splits your code into smaller parts, so only the necessary CSS and JavaScript files are loaded for each page. This makes the files smaller and helps the page load faster. As a result, developers can build fast and efficient web apps with Next.js.
Edge Functions & Middleware- Edge Functions are small, fast-running server-side functions deployed closer to the user on the edge network, improving performance, especially for globally distributed applications. Middleware runs on the edgel, allowing developers to handle tasks like authentication, redirects, and A/B testing with low latency.

Source
Image Optimization Enhancements- it automatically optimizes images based on the user's device and network conditions. The latest updates have improved performance and flexibility in how images are handled, with automatic WebP conversion and better support for blur-up effects.
Hybrid Rendering- With Next.js, developers can use different types of rendering approaches- SSR (server-side rendering), SSG (static site generation), and CSR (client-side rendering) within a single app for optimizing performance, SEO, and user experience.
API Routes- Next.js allows you to create backend API endpoints directly within the project, enabling full-stack development without needing a separate server. This makes building complex applications easier by simplifying data fetching, processing, and handling.
Better SEO and Head Management- Head Management improvements in Next.js allow developers to control meta tags, titles, and other important SEO elements more efficiently. This helps in improving SEO by making the meta tags dynamic and context-specific.
Webpack 5 Support- Next.js now fully integrates Webpack 5, offering better build performance, improved caching, and support for the latest JavaScript features, resulting in faster builds and smaller bundle sizes.
Turbopack (Alpha)- Turbopack is a new bundler from the creators of Next.js, designed to replace Webpack. It's faster and more efficient, especially for large projects. Currently, in alpha, it promises significantly faster build times and hot module reloading (HMR).
Incremental Static Regeneration (ISR)- This allows developers to update static pages without rebuilding the entire app, ensuring up-to-date content without impacting the speed of static generation.
Benefits of using Next.js

Source
Improved SEO- Next.js can generate fully rendered HTML on the server using Server-Side Rendering (SSR). This means pages load faster and search engines can easily read and rank them. With Static Site Generation (SSG), pages are pre-built as static HTML during the build, making them even faster and better for SEO.
Blazing fast speed and performance- Next.js has helped streaming app Twitch to reduce its initial load time by 50%. It uses many features like SSR, SGR, and automatic code splitting to load pages quickly and offer a smooth user experience.
Accessibility- due to SSR, web apps have more accessibility. Users can use a reader screen to access the web page content easily.
Improved developer’s experience- Next.js features like a flexible and powerful routing system, an optimized build system, and a large ecosystem of resources, tools, and libraries, lead to the developer’s productivity and experience to build more robust apps.
Enhanced security- as Next.js SSG pre-generates the content and serves the static HTML file. It reduces the risk of security vulnerabilities and attacks.
Disadvantages of Next.js
Complexity- Next.js has many powerful features, but setting it up can be tricky, especially for new developers. It might take longer to get started and configure everything, which can slow down development.
Browser Compatibility- Next.js uses modern JavaScript, which may not work well with older web browsers. Developers need to make sure their app works on the browsers their users are likely to use.
Dependency on React- Next.js is built on React, so you need to understand React well to use Next.js effectively. If you're new to React, this can be challenging.
Next.js can be used to build many different types of projects, such as:
Complex Web Applications
Web Platforms
Multi-Market Solutions
Advanced eCommerce and Retail Platforms
SaaS Products
Interactive User Interfaces
This is why brands like Nike, Hulu, Binance, Twitch, TikTok, and Vercel use Next.js for better performance.
Next.js vs. Node.js: Detailed Comparision
Here is a detailed Next.js vs Node.js comparison.
1. Next.js vs Node.js performance
Web Performance is necessary to keep users engaged. About 40% of online users tend to leave a website that takes longer than three seconds to load.
Node.js is a suitable option for building fast apps as it can handle many tasks at once. It uses an event-driven system, meaning it doesn’t get “stuck” waiting for things to happen. To make your code even faster, you can write asynchronous code that lets multiple tasks run at the same time. Node.js also helps you store and retrieve data efficiently and can avoid issues like memory leaks. Tools like caching and content delivery networks (CDNs) improve load times by serving files closer to users. For high-traffic apps, load balancing spreads the work across multiple servers.
Next.js is a framework built on top of React that makes websites even faster. It has built-in tools for improving performance, like lazy loading images and loading pages in the background for smoother transitions. It also lets you control SEO elements like page metadata, helping search engines understand your content better.
For large apps, Next.js provides monitoring tools to track performance and identify issues before they cause problems. It also includes a bundle analyzer to help you reduce the size of your app and send only the necessary data to the browser. By using CDNs to serve static files, Next.js helps further speed up your site.
2. Next.js vs Node.js scalability
Scalability in web apps means making sure your app can handle many users at once without slowing down or costing too much. It’s about increasing app performance as more people use it, without using too many resources. However, scalability differs from response time—your app can handle many requests but still take longer to respond, or it can respond quickly but struggle with heavy traffic.
In Node.js, scalability challenges include serving files, scheduling tasks, and using resources effectively. To solve these:
Use a CDN (Content Delivery Network) like CloudFront to serve files faster.
For repeating tasks, use a task scheduler like Agenda.js instead of basic timers.
Use Node.js clustering to divide the work between multiple processes, improving performance without overloading.
For Next.js, scalability is achieved by:
Caching: Use CDNs for static content, server-side caching for dynamic content, and client-side caching for API calls.
Load Balancing: Spread user traffic across multiple servers to avoid overloading.
Optimizing Databases: Use techniques like indexing, query optimization, and caching to reduce database load.
Auto-Scaling: Set up your app to automatically add or remove server instances based on traffic or usage.
3. Node.js vs Next.js: Development Speed
Node.js provides a basic platform to build server-side applications using JavaScript. You have to set up a lot of things manually, like routing, handling requests, and serving static files. This means you have more flexibility, but takes more time to set up and develop the app from scratch.
Next.js: It is a framework built on top of Node.js and React. It offers many built-in features like server-side rendering (SSR), static site generation (SSG), routing, and image optimization. These features make development faster because a lot of common tasks are already handled for you. You don’t have to set up everything from scratch, so you can focus more on building the app itself.
Next.js is faster for development because it provides ready-made tools and features, while Node.js gives you more flexibility but requires more setup.
4. Node.js or Next.js for frontend
Node.js: Node.js is mainly used for backend development, meaning it runs on the server to handle things like saving data to a database, managing user logins, and processing API requests. While it can be used to build parts of the front end (like rendering web pages on the server), it's not specifically designed for that purpose.
Next.js: Next.js is a framework built on top of React and is specifically designed for front-end development. It helps you build fast websites with features like server-side rendering (SSR) and static site generation (SSG). These features make websites faster and better for SEO (search engine optimization). Next.js also makes it easier to manage routing (pages) and other common frontend tasks.
If you're building a website's frontend (what users see and interact with), Next.js is the better choice because it’s made for that. Node.js is mostly for backend work, but it can help with some frontend tasks if needed.
5. Routing
Routing is like a map for your website. When a user asks for a specific page (like by typing a URL), routing decides where the request should go and what should be shown in response. It helps direct the user's request to the right place in your application.
There are two main ways to handle routing in Node.js: with a framework or without one.
With a Framework (like Express.js): Express is the most popular framework in Node.js for routing. It makes things easier by giving you a set of tools to handle routing quickly. You can use methods to define routes (like /home or /about), and each route can have a function that runs when someone visits that page. For example, if someone goes to /home, the app will show the homepage content.
Without a Framework: If you don't use a framework, you have to build your own server and routing system. You'll manually handle the URLs and decide what happens when a user visits different pages.
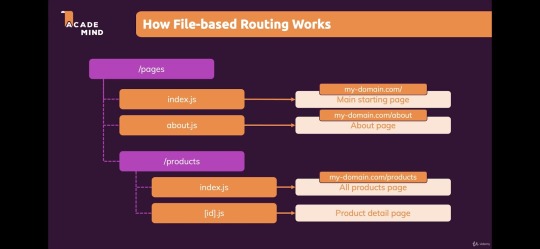
Next.js Routing: In Next.js, routing is simpler. It uses a file-based routing system. This means that every file you put in the pages folder automatically becomes a route. For example, if you create a file called about.js, Next.js will automatically link it to /about on your website. This system also handles dynamic pages, where parts of the URL can change based on data, like showing a user’s profile page based on their ID.
6. Developers experience
Developer experience (DX) is about how easy and enjoyable it is for developers to work with tools and technologies. If tools are good, developers can build things faster and with fewer problems.
Node.js and Next.js both focus on improving the developer experience in different ways:
Node.js: Node.js lets developers create anything they need, but it can be a bit complex at first. It has NPM, a huge library of tools and packages, making it easy to find solutions for problems. While it’s flexible, beginners might find it tricky until they get used to it.
Next.js: Next.js is simpler and more ready-to-use. It helps build fast websites with features like SEO-friendly pages and easy routing. It does a lot of the work for you, so you don’t have to set things up manually. It’s great for developers who want to build apps quickly without dealing with too many details.
When to Use: Next.js vs. Node.js
Use Next.js when:
E-commerce Websites: Real-time updates, fast performance, and SEO optimization.
Marketing Websites: Highly optimized for fast loading and SEO to attract visitors.
Portfolio Sites: Ideal for showcasing projects and personal portfolios with great performance.
Blogs: Use for content-heavy websites with SEO and fast page loads.
Entertainment & News Apps: Perfect for media-heavy applications with incremental static generation.
Community-driven Websites: Platforms with user-generated content (e.g., forums, social media).
Booking Apps: Websites that require fast interactions and real-time data updates.
Documentation Sites: Ideal for creating fast, SEO-friendly, and easy-to-update documentation.
Information Hubs: Centralized websites for information aggregation and display.
Auction Sites: Real-time data and quick updates, perfect for online auctions.
Minimum Viable Products (MVPs): Quickly build and deploy scalable MVPs with Next.js.
SaaS Platforms: Create fast, scalable, and SEO-friendly SaaS products.
Data Dashboards: Build real-time, data-driven dashboards with fast performance.
Web Portals: For user management, data access, and real-time updates.
Progressive Web Apps (PWAs): Build fast, offline-capable applications for mobile and desktop.
Use Node.js when:
Backend Services: Build and manage server-side applications, APIs, and databases.
Microservices: Create modular and scalable backend architectures for large applications.
APIs: Develop robust RESTful or GraphQL APIs for web and mobile apps.
Real-time Applications: Ideal for building collaborative platforms (e.g., Google Docs), message applications, streaming services, and online gaming apps.
Big Data Analytics: Handle large-scale data processing and analysis.
Wireless Connectivity: Power IoT devices and manage communication with wireless systems.
Web Scraping: Extract data from websites for analytics or aggregation.
Command Line Tools: Create custom CLI tools for automating tasks.
Single-Page Applications (SPA): Build fast and dynamic SPAs using Node.js for backend services.
Internet of Things (IoT): Use Node.js to connect and manage IoT devices and sensors efficiently.
Conclusion
As highlighted earlier, both Node.js and Next.js bring distinct advantages to web development. Next.js, built on React, stands out as a powerful alternative to Node.js for developing fast, dynamic applications. It offers a complete toolset with easy setup, routing, and an enhanced developer experience.
In contrast, Node.js serves as a runtime environment designed for building scalable, real-time applications using an event-driven, non-blocking model. When used together, Node.js and Next.js enable the creation of full-stack web applications, with JavaScript at the heart of the development process.
The choice is completely requirement-based. To build powerful Node.js web applications, connect with a leading app development company. OnGraph sets out to deliver advanced solutions by staying ahead of trends to meet modern-age requirements.
Connect with our experts to make highly performance web apps.
Content Source URL: Check Here
#Next.jsvsNode.js#Node.jsvsNext.jsperformance#Next.jscomparisonwithNode.js#Whichisbetter#Next.jsorNodeJS?#DoesNext.jsreplaceNodeJS?#Isnext.jsfrontendorbackend?#WillNodeJSbediscontinued?
0 notes
Text
Ton blockchain development guide
Blockchain is a type of technology that promotes adequate record keeping and documentation in a decentralized, transparent, and unalterable, if not tamper free, manner. Typical technologies that are based on a central system do not have this feature since the use of several nodes that validate transactions based on principals known as consensus mechanisms is employed. It is also important to mention other characteristics such as immutability, cryptographic security and decentralization, which are the reasons why such technology can be incorporated in many sectors including but not limited to finance, supply chain management, healthcare etc.
In particular, Ton Blockchain Development has been in high demand because of its growing performance with regard to speed and scalability; thus, presenting a new shift in the development foundations of blockchain applications. More specifically, blockchains may either be public (to which everyone has access), private (which are limited in access), or hybrid (which incorporates both public and private access).

Foundational Concepts
Engaging in blockchain development requires an understanding of blocks, transactions, nodes and miners whose roles are to keep and manage the operations in the chain, and validate the entries on the created ledger. The term ‘cryptography' may be simple, it`s applied for security purposes by use of public and private keys, along with hashing. To safeguard vehicle damage in case of an accident, insurors usually put systems in place or make use of techniques such as Pulling Damage and Loss management.
Blockchain Development Tools and Environments
For a number of blockchain projects, developers use different platforms. As expected, the most common platform alongside hyperledger for enterprise solutions and high speed operations, such as binance smart chain and solana, would be Ethereum thanks to its versatility and powerful smart contract functionality. Development frameworks such as Truffle, Hardhat and Remix offer full basing structures for the development and testing of Decentralised Applications (DApps). When it comes to programming smart contracts, Solidity – Ethereum based and Rust – Solana based, are the most common languages.
Setting Up a Development Environment
The process of developing blockchain solutions begins with the establishment of a sound environment. This often involves the downloading and installation of Node.js and package managers like NPM or Yarn. MetaMask is used to store your cryptocurrencies and enables the use of various applications built on the blockchain technology; it is a crypto wallet and dApp interface. Ganache, on the other hand, provides users with the capability to run a blockchain to create and test their applications in a simulated environment. IDEs such as Visual Studio Code, which come with additional support for coders writing smart contract languages, facilitate the writing of code and the debugging process.
Creating Your First Smart Contract
Smart contracts are programs contained within the small scripts stored on the blockchain which automatically initiate and perform actions when certain stated conditions are met. A beginner project usually consists in the design of a straightforward payload – often a token creation – using a programming language called Solidity. Using tools such as Remix in this scenario, one can write, compile and deploy their contract, before users can interact using the web3.js or ethers.js libraries.
Blockchain Security Considerations
The importance of security in blockchain development cannot be overstated. The most common attack vectors are reentrancy, integer overflow/underflow attacks, and inadequate access control. The developers must observe some acceptable minimum standards, which include, among others, proper input cleaning and the use of current relevant security compliant libraries. Use of auditing tools like Mythril and automated analysis helps safeguard the integrity of the contracts drafted before they are deployed.
Decentralized Applications (dApps)
Decentralized applications integrate, on the back end, smart contracts with a user-facing front end. Although similar to traditional apps, they are based on distributed networks. Typically, the developers use JavaScript libraries, for instance, web3.js, to enable interaction between the front end and the blockchain functions. Creating dApps may involve developing a distributed e-commerce platform, where transactions are carried out using smart contracts without the need of third-party intermediaries.
Deploying on Public Testnets/Mainnets
In particular, one shouldn't rush to introduce a blockchain project based on Mainnets (for example, Ethereum) before going through public testnets like Rinkeby or Ropsten. These are said to be the test nets that do not carry any risk but reproduce the working environment in the mainnet to the exact shade. It is here that the developers place contracts, work on their relationships, and fine-tune the gas prices.
Exploring New Trends
The world of Blockchain is ever-changing and dynamic, hence the innovations we see such as NFTs (Non-Fungible Tokens) that make digital Arts more marketable than ever, DeFi (Decentralized Finance) platforms that operate contrary to the pre-existing financial system, and Layer-2 scaling solutions such as Polygon that make transactions faster. Another up-and-coming broad area within Blockchain technologies has to do with designs and implementations of cross-chain interoperability solutions including bridges between chains.
Resources and Communities for Further Learning
There are a lot of educational prospects present in the blockchain domain. The developers can use the help of online resources, stack exchange, git hubs, specific courses and certifications on blockchain technology. Development is equally encouraged by communities and meetups, where one meets and networks with relevant people in the industry.
Conclusion
The demand for blockchain technologies and consequently for blockchain developers is on the rise nowadays. It could be as simple as knowing the principles of decentralization and cryptography or developing and deploying dApps. The path entails utilizing several tools, languages, and security techniques. The multifaceted nature, be it smart contracts, nfts platforms, or DeFi allows developers to venture into thrilling areas and come up with solutions. As the situation goes on changing with innovations coming in the market, up to date with such changes relevance to your work, participating in the relevant community and seeking for improvement would be necessary aspects of this line of work. Finally, if it seems such expert assistance would be helpful, feel free to cooperate with a Ton Blockchain Development Company in order to receive specialized assistance crucial for effective and solid development of solutions on the Ton blockchain. Blockchain does not only present an avenue for decentralized applications. It also maintains the potential to serve as a disruptive platform for the coming generations.
0 notes
Text
Optimizing Your Drupal Website For Better Search Engine Visibility

Drupal Search Engine Optimization (SEO)
Drupal is a powerful content management system (CMS) known for its flexibility and robust features. However, to ensure that your Drupal site ranks well in search engine results, it’s crucial to implement effective search engine optimization (SEO) strategies. This guide covers the essential SEO techniques and best practices for optimizing your Drupal website.
1. SEO-Friendly URLs
Clean and descriptive URLs are important for both search engines and users. Drupal allows you to create SEO-friendly URLs by enabling the Path module, which is included in the core installation. Additionally, the Pathauto module can automatically generate URL aliases based on your content’s title, making your URLs more readable and keyword-rich.
Steps:
Enable the Path and Pathauto modules.
Configure Pathauto to generate URL aliases automatically based on predefined patterns.
2. Meta Tags Management
Meta tags provide search engines with information about your page content. The MetaTag module in Drupal allows you to add and manage meta tags for your website easily.
Steps:
Install and enable the MetaTag module.
Configure global settings for meta tags and customize them for individual content types and nodes.
3. XML Sitemap
An XML sitemap helps search engines index your site more efficiently by listing all your site’s URLs. The Simple XML Sitemap module generates an XML sitemap automatically, which you can submit to search engines like Google and Bing.
Steps:
Install and enable the Simple XML Sitemap module.
Configure the module to include the content types and taxonomy terms you want to be indexed.
4. Mobile Optimization
With the increasing number of mobile users, ensuring your Drupal site is mobile-friendly is critical. Use responsive themes and modules like the Responsive Images module to optimize your site for mobile devices.
Steps:
Choose a responsive theme for your Drupal site.
Enable and configure the Responsive Images module to serve different image sizes based on the user’s device.
5. Site Speed Optimization
Page load speed is a significant factor in SEO rankings. Drupal provides several modules and configurations to enhance site performance.
Steps:
Enable caching using the core Performance settings.
Use the Advanced CSS/JS Aggregation module to optimize and compress CSS and JavaScript files.
Implement a content delivery network (CDN) to serve static files more quickly.
6. Structured Data
Adding structured data to your content helps search engines understand your site’s information better. The Schema.org Metatag module allows you to add structured data in JSON-LD format.
Steps:
Install and enable the Schema.org Metatag module.
Configure the module to add appropriate schema types to your content.
7. Internal Linking
Internal links help search engines crawl your site and understand the relationship between different pages. Use Drupal’s built-in linking tools to add internal links within your content.
Best Practices:
Link to relevant content within your site to improve navigation and SEO.
Use descriptive anchor text that includes keywords.
8. Content Optimization
High-quality, relevant content is crucial for SEO. Ensure your content is well-written, includes relevant keywords, and provides value to your audience.
Best Practices:
Conduct keyword research to identify relevant terms for your content.
Write engaging titles and headings that include keywords.
Optimize images with descriptive file names and alt text.
9. Analytics and Monitoring
Tracking your site’s performance is essential to understanding the effectiveness of your SEO efforts. Use tools like Google Analytics and Google Search Console to monitor your site’s traffic, keywords, and overall performance.
Steps:
Install the Google Analytics module to integrate Google Analytics with your Drupal site.
Verify your site with Google Search Console and submit your XML sitemap.
Conclusion
Optimizing your Drupal site for search engines involves a combination of technical configurations and content strategies. By implementing these Drupal search engine optimization best practices, you can improve your site’s visibility in search engine results, attract more organic traffic, and enhance the overall user experience. Keep your site updated with the latest Drupal modules and continuously monitor your SEO performance to stay ahead of the competition.
0 notes
Text
How to Learn Angular: A Step-by-Step Guide for Beginners
Angular, a robust and powerful front-end framework developed by Google, is widely used to build dynamic, single-page web applications (SPAs). Whether you're a beginner or an experienced developer, learning Angular can significantly enhance your skill set and boost your career in web development. If you're in Pune and want to excel in this popular technology, enrolling in an Angular course in Pune is a smart move. This guide will walk you through the key steps to effectively learn Angular and become proficient in building high-quality, interactive applications.
Why Learn Angular?
Before diving into the learning process, it's important to understand why Angular is such a popular choice for developers:
Modular Architecture: Angular’s modularity allows developers to break down applications into smaller, manageable parts, making it easier to maintain and scale.
Two-Way Data Binding: With Angular’s two-way data binding, changes made in the model immediately reflect in the view and vice versa, creating seamless real-time updates.
Large Ecosystem: Angular boasts a large ecosystem with a plethora of libraries, extensions, and third-party tools to aid in development.
Cross-Platform: You can use Angular to build web, mobile, and desktop applications, ensuring versatility.
Step-by-Step Guide to Learning Angular
Here’s a structured approach to learning Angular from scratch:
1. Master the Basics of Web Development
Before you start learning Angular, it's important to have a solid understanding of web development fundamentals. Ensure you are comfortable with:
HTML and CSS: The building blocks of web design.
JavaScript: Angular is built on top of JavaScript, so a strong command of JS is essential.
TypeScript: Angular is developed using TypeScript, which is a superset of JavaScript. Understanding TypeScript basics like types, classes, and interfaces will ease your Angular learning journey.
2. Understand Angular’s Core Concepts
Angular has several core concepts that form the foundation of the framework. Begin by familiarizing yourself with the following:
Modules: Angular apps are divided into modules, each responsible for a different part of the application.
Components: Components are the building blocks of Angular applications. They define the view (HTML) and the logic (TypeScript).
Templates: Angular uses templates to define the layout and structure of the application.
Services: Services in Angular provide functionality that can be reused across multiple components.
Dependency Injection: This powerful feature allows for the efficient handling of services and other dependencies.
3. Set Up Your Development Environment
To start coding in Angular, you'll need the right development tools. Here's what you need:
Node.js and npm: Angular requires Node.js to install dependencies and manage packages. Download and install Node.js, which comes with npm (Node Package Manager).
Angular CLI (Command Line Interface): Install the Angular CLI by running the command npm install -g @angular/cli. The CLI simplifies the development process by providing useful commands for creating components, services, and modules.
Text Editor/IDE: Use a text editor like Visual Studio Code or WebStorm for writing and managing your code efficiently.
4. Start with Basic Angular Projects
Once your environment is set up, it's time to create your first Angular project. Use the Angular CLI to generate a new project:
bash
Copy code
ng new my-first-app cd my-first-app ng serve
This command will create a new Angular application and start a development server. Visit http://localhost:4200 to see your project in action. Experiment with the default setup and try making simple modifications to the code to get a feel for how Angular works.
5. Learn Angular Routing
Routing is essential for building single-page applications. Angular’s router enables developers to navigate between different pages without refreshing the entire page. Learn how to:
Define routes in your application.
Set up links between different views.
Use route parameters to pass data between components.
6. Build Interactive User Interfaces
Angular provides several tools to build dynamic and responsive UIs. Focus on these key areas:
Forms: Learn how to create both template-driven and reactive forms to handle user inputs.
Directives: Directives like *ngIf, *ngFor, and ngClass allow you to manipulate the DOM dynamically.
Two-Way Data Binding: This core Angular feature synchronizes data between the view and the model in real-time.
7. Explore Angular Services and Dependency Injection
To build scalable applications, you'll need to understand services and how Angular implements Dependency Injection (DI). Services allow you to share logic across components, while DI provides a clean way to manage those services without manual instantiation.
8. Work with APIs and HTTP Requests
Most modern web applications require communication with back-end servers. Angular’s HTTP client allows developers to make API calls to retrieve or send data. Learn how to:
Use HttpClientModule to handle API requests.
Implement GET, POST, PUT, and DELETE methods.
Handle responses and errors using RxJS observables.
9. Testing in Angular
Angular provides built-in tools for testing components and services. Learn how to write unit tests with Karma and Jasmine to ensure your code is robust and bug-free.
10. Create a Real-World Application
Once you’ve grasped the basics, build a full-fledged real-world application. This could be anything from a simple to-do list app to a more complex e-commerce site. This hands-on project will reinforce your learning and help you apply theoretical concepts in a practical scenario.
Recommended Resources for Learning Angular
Official Angular Documentation: The Angular Docs provide a detailed explanation of every aspect of the framework.
YouTube Tutorials: Channels like Academind, Traversy Media, and Programming with Mosh offer comprehensive video tutorials.
Courses on Platforms Like Udemy, Coursera, and Pluralsight: Many of these platforms offer structured Angular courses with hands-on projects.
Angular GitHub Repositories: Check out open-source Angular projects on GitHub to learn best practices and see how experienced developers structure their applications.
Conclusion
Learning Angular can seem intimidating at first, but with a structured approach, you can master it in no time. Start by understanding the basics of web development, then dive into Angular’s core concepts like components, services, and routing. Practice by building small projects, and gradually move on to more complex applications.
By following the steps in this guide and staying committed, you'll become proficient in Angular and be well on your way to building dynamic, scalable web applications. Whether you’re aiming for a career in front-end development or want to expand your full-stack skills, Angular is a valuable tool to have in your developer toolkit.
Ready to take your Angular skills to the next level? If you're based in Pune, consider joining ITView’s Angular course in Pune to get hands-on training from industry experts. Our comprehensive curriculum covers everything from Angular fundamentals to advanced concepts, ensuring you're ready for real-world projects. Enroll today and fast-track your career in web development!
0 notes
Text
Node JS and Databases
Steps to Build a Blog Application
1. Project Setup
First, you create a new Node.js project on your computer.
You also install necessary tools like Express (for creating a web server) and Mongoose or MySQL (for interacting with the database).
Nodemon can be used during development to restart the server automatically when code changes.
2. Folder Structure
Organize your project files so that everything is easy to manage.
Models: This folder will store database schemas (like the blog post structure).
Routes: These handle requests to different parts of your blog (e.g., showing all posts or creating new ones).
Views: These are the templates used to render your pages (like home, post details).
Public: A place for static files (CSS stylesheets, images).
3. Setting Up the Database
You can use either MongoDB (a NoSQL database) or MySQL (a relational database) to store your blog posts.
MongoDB is easier for beginners because you don't need to define strict tables.
You create a "Blog" model, which defines the structure of each blog post (e.g., it should have a title, content, and a timestamp).
The database connection is established at the beginning so the app can interact with it throughout.
4. Handling HTTP Requests with Express
The Express framework helps manage the flow of the app:
When a user visits the home page, the server sends a list of all blog posts.
When they click on a specific post, it shows the details of that post.
There is also a form where users can create new posts by submitting titles and content.
You create routes to manage these requests. Each route corresponds to a specific URL (e.g., / for the home page, /post/:id to view a post).
5. Creating Views (Templates)
To make your pages dynamic, you use EJS (or another templating engine like Handlebars). Templates allow you to display different content based on the data from the database.
For example:
The home page lists all available blog posts with links to view them individually.
The post page shows the title, content, and date of a single post.
There can also be a form on the home page that lets users submit new posts.
6. Routing and User Interaction
When users visit the homepage, the server pulls data from the database and shows a list of posts.
Clicking on a post’s link takes them to a detailed view of that post.
Users can also add a new post by submitting a form. When they do, the app saves the new post in the database and refreshes the list.
7. Starting the App
You need to make sure both the database server and Node.js app are running.
MongoDB needs to be started separately (if using it).
The Node.js server listens for requests and responds based on the routes you’ve created.
The server is accessible via http://localhost:3000. You can open this in a browser to test the blog app.
8. Testing the Blog API (Optional)
To make sure everything works correctly, you can use tools like Postman to test your routes:
Test retrieving all posts by making a GET request.
Test creating a new post by sending a POST request with sample data.
You can also build error handling to manage invalid inputs.
9. Future Improvements
After setting up the basic blog, you can add advanced features:
User Authentication: Allow users to log in and manage their own posts.
Comments: Add a comment section for each post.
Pagination: Break long lists of posts into pages for better readability.
CSS Styling: Make the blog look more attractive with a custom stylesheet.
Summary
This blog app involves setting up a Node.js server, connecting it to a database to store posts, and using templates to render pages. When users visit the blog, they can view, create, or manage posts, all of which are stored in the database. Express routes manage the requests, and the views ensure everything is displayed neatly.
This project gives you hands-on experience with backend development using Node.js, along with frontend templates, and a solid understanding of working with databases.
Fullstack Seekho is launching a new full stack training in Pune 100% job Guarantee Course. Below are the list of Full Stack Developer Course in Pune:
1. Full Stack Web Development Course in Pune and MERN Stack Course in Pune
2. Full Stack Python Developer Course in Pune
3. full stack Java course in Pune And Java full stack developer course with placement
4. Full Stack Developer Course with Placement Guarantee
Visit the website and fill the form and our counsellors will connect you!
0 notes
Video
youtube
How to Install Node JS on Windows 10/11 #React #ExpressJS #Angular #npm...
0 notes