#like just show me how to make the thing with just html and javascript
Explore tagged Tumblr posts
Visit Tumblr Blog
Explore Tumblr blogs with no restrictions, modern design and the best experience.
Last Seen Tumblr Blogs


Fun Fact
Tumblr has a 66 index score for customer satisfaction in the US.
Text

okay so im back in navbar hell (when i thought i escaped...!!!) but ive managed to get this set up today :D
#my issue is that im trying to make the navbar properly responsive and have a toggle option once the screen gets too small#if u look on my blog i had it on my last attempt at this because i was using bootstrap but i was like okay i gotta make a new project!#cause i wanted to use nextjs#and not have to worry about backend stuff as much#okay so like..... i know im being kinda stubborn here lol#i could just slap bootstrap on and copy my old code but i dont wanna#i already have tailwind on here and i dont want to confuse myself anymore#so ive been looking for navbar tutorials using tailwind to help and omg#i thought i found a good one and then i realized it used a specific js package which i cant use cause im using typescript...#and i cant find a ts version#so now im just set on doing it without any outside stuff#like just show me how to make the thing with just html and javascript#at least that way i can just translate the the js to ts on my own!!!#anyways lol i found a video that should help...pls#ill watch it later....#but today im tired#webdev#codeblr#wip#this site will happen i swear I SWEAR#AHHH#there so many things to help but after a certain point its like...i dont even know whats happening and now im confused#and god forbid things start conflicting with each other#so i just want something that will spell it out clearly#but yea if u see this and think im confused (which i might be)#im always open to links to videos
5 notes
·
View notes
Text
Working on my javascript for my web page. Turns out I have the perfect kind of setup to accomplish some of the project requirements, specifically with even handlers and user interactions
My website, conceptually, will load a different employee details page depending on what employee name is clicked on. But I need to load it dynamically (instead of hard-coding it) so that the user can add or delete employees & it'll be able to still load the relevant shit.
So! Only one employee details page, but depending on how it's loaded, it'll load a different employee's information. Still working on getting down Exactly how to do it (I'm thinking using URL parameters that'll read a different object depending on what ID is used)
It's entirely doable. In fact, it's probably extremely common to do in web pages. No one wants to hard-code information for every new object. Of course not. And thus the usefulness of dynamic javascript stuff.
I can do this. I can very much do this.
#speculation nation#i wasnt very good when i got home and i read fanfic for a while#then took a nap. and now im up again and Getting To Work.#i dont have to have this 100% perfect for final submission just yet. bc final submission isnt today.#but i need to have my final presentation over my thing done by noon (11 hours from now)#and im presenting TODAY. and part of that will be giving a live demo of my project website#so. i need to have all of the core functionality of my website down at the Very Least#might not be perfect yet. but by god if im gonna show up to my presentation with my website not working.#i need to have the employee list lead to employee details with personalized information displayed per employee#i need to create an add employee field that will Actually add an employee. using a form.#and that employee will need to show up on the list and have a new id and everything. the works.#need to set it up so that employees can be deleted. shouldnt be too much extra.#and it would be . interesting. to give an actual 'login' pop-up when someone clicks on the login button#with some kind of basic info as the login parameters. this cant be that hard to code.#the project requirements are: implement 5 distinct user interactions using javascript. at least 3 different eventhandlers#at least 5 different elements with which interaction will trigger an event handler. page modification & addition of new elements to pages#3 different ways of selecting elements. one selection returning collection of html elements with customized operations on each...#hm. customized operations on each... the example given is a todo list with different styles based on if an item is overdue or not#i wonder if my personalized detail page loading would count for this... i also have some extra info displayed for each#but i specifically want the employees to be displayed in the list uniformly. that's kinda like. The Thing.#actually im poking around on my web pages i made previously and i do quite enjoy what i set up before.#need to modify the CSS for the statistics page and employee details to make it in line with what i actually wanted for it#maybe put a background behind the footer text... i tried it before & it was iffy in how it displayed...#but it looks weird when it overlaps with a page's content. idk that's just me being particular again.#theres also data interchange as a requirement. but that should be easy if i set an initial employee list as a json file#good god im going to have to think of so much extra bullshit for these 10 made up employees#wah. this is going to be a lot of work. but. im going to do it. i just wont get very much sleep tonight.#that's ok tho. ive presented under worse conditions (cough my all nighter when i read 3gun vol 10 and cried my eyes out)#and this is going to be the last night like this of my schooling career. the very last one.#just gotta stay strong for one more night 💪💪💪
6 notes
·
View notes
Text
YOU MUST MAKE A WEBSITE
Oh wow, look at that! YET ANOTHER post urging you to make a webbed site! What a completely new thing that people haven't made a thousand masterposts for already!!
• Making a website might look scary. It is Not.
At first, I too thought making a website was too much work. It really isn't! It turns out that all you need is
an HTML file,
a web hosting service and
w3schools tutorials,
and that's about it!
This post will point you towards these resources, and others I found useful while figuring out how to make a website.
• VERY QUICK EXPLANATIONS:
What's HTML and CSS?
HTML is the content of your webpage, the skeleton of it. What shows up in a webpage is what's written in the HTML file!
CSS is the way the HTML is styled; the colour of the background and the letters, the size of elements, the font, all that!
Do I absolutely NEED JavaScript for a website?
Not at all! You don't need to worry about learning it before getting started.
• What do I make a website for? What do I put in there?
ANYTHING AND ALMOST EVERYTHING. Here's some ideas for pages from a post of mine were I was very normal about websites:
You can make a page that's only pictures of your pets.
You can make an interactive adventure.
You can make your own academic blog full of your own essays or articles.
You can just post a ton of art or make a full music page.
You can make a blog and infodump eternally, give book reccs and reviews. You can host a thousand virtual pets and nothing else.
Upload entire books in a single html file. Make a wikipedia for your ocs. Make a fake site for a random fictional place (restaurant, hotel, whatever). You can make a thousand fanpages/shrines about your favorite media. You can upload your own webcomic and make it all like a fancy website and shit.
I could keep going but, for the sake of "brevity", I won't.
• WEBSITE EXAMPLES!
If I started listing the websites I know, this post would be bottomless. Here's only seven:
https://publictransit.neocities.org/ - A webbed site, for sure
https://ribo.zone/ - A personal site
https://leusyth.neocities.org/ - An art archive
https://solaria.neocities.org/ - Personal website with A Lot of stuff (it'll come up in a bit, because it offers web making resources)
https://hog.neocities.org/ - The Hogsite
https://thegardenofmadeline.neocities.org/ - Another personal site! It also has a web resources page and has made another masterpost like this one (but better)
https://spiders.neocities.org/ - My own website, which must be weird to see in mobile . sorry
• You've convinced me. I want a webbed site. Where do I start?
https://neocities.org/
FIRST OF ALL: Neocities. It is a free web hosting service, and it's the one I and the sites I linked use!
When I first started, my website was a black page with red letters and a drawing, and nothing else! It was like that for a month, till i started picking up on how to do things.
Here's what helped me get an idea of how to make things work:
https://sadgrl.online/learn/articles/beginners-guide-neocities
An absolute beginners guide to neocities -- while when you make an account there you get a tutorial page from the site, this one's extra support for that.
https://www.w3schools.com/
Learn HTML, CSS, JavaScript and MANY other coding things for free. All the tutorial/reference pages have live testing windows for you to mess with!! helped me a LOT while figuring this stuff out!
https://htmlcheatsheet.com/
https://htmlcheatsheet.com/css/
Cheatsheets for HTML and CSS, respectively. It includes a JavaScript one too!
https://sadgrl.online/webmastery/
Sadgrl's webmastery resources! Also includes the next resource listed here:
https://sadgrl.online/projects/layout-builder/
Sadgrl's layout builder; not a lot of customization at a first glance, but I've seen wildly different websites all using it as a base, plus it works using CSS Flexbox, so it generates a responsive layout!
(basically, a responsive layout is one that translates well in different sized screens)
https://www.tumblr.com/fysa/728086939730919424/wikitable-code?source=share
Tumblr user fysa made this layout imitating a wiki page!
https://brackets.io/
At some point, you might want to do things outside the Neocities code editor and get one outside the site. I recommend Brackets, because my old as fuck computer can run that and absolutely nothing else apparently, and it works wonderfully! Though I recommend either turning off the code autocomplete or using it after a good while of already using the Neocities code editor, so you get used to coding on your own.
http://www.unit-conversion.info/texttools/text-to-html/
Turn your text into HTML code! i use this kind of pages for my lengthy blog entries that I don't feel like formatting myself.
https://imagecompressor.com/
COMPRESS YOUR IMAGES.
The heavier an image is, the more your site weighs and the more time your page will spend loading. You don't want that, specially if your site is heavy on graphics. This might help!
https://solaria.neocities.org/guides
Some CSS, JavaScript and Accessibility guides! Worth checking out!
https://eloquentjavascript.net/
This is a free, interactive book for learning JavaScript! NOTE: It is very intuitive, but JavaScript is HARD!! I still haven't learned much of it, and my website does fine without so don't worry if you end up not doing much with it. It's still useful + the exercises are fun.
And now, accessories!
• Silly stuff for your page :]
https://gifypet.neocities.org/
Make a virtual pet, copy the code and paste it in your HTML file! You'll get a little guy in your webbed site :]
https://www.wikplayer.com/
Music player for your website!
http://www.mf2fm.com/rv/
JavaScript silly effects for your site :]
https://blinkies.neocities.org/geoblinkies
Blinkie search engine!
https://www.cbox.ws/
Add a chatbox to your site!!
https://momg.neocities.org/
Infinite gallery of gifs. i've spent hours in there looking at moving pictures and out of them all, the ONLY gif i actually ended up using on my site was a rotating tomato slice. it is still there. trapped.
https://wrender.neocities.org/tarotinstructions
A widget that gives you a random tarot card!
https://www.websudoku.com/widget.php
Sudoku widget!
That's about it for now! I don't know how to end this!!! Remember to have fun and google everything you don't know :]
657 notes
·
View notes
Note
@uvher | Salty Munday meme: ♥, ☀, ☢, ❥, ❦, ❧, ✖, ❣
// i want allllllll the salt and Tea
the salty af munday meme
♥ What's the WORST thing that has happened to you rp wise?
That is a long ass story from like ten years ago. But basically, I was modding an rpg, decided I couldn't do it anymore due to some family stuff and my recent adhd diagnosis and wanting to get stuff together with that. The admin didn't want to keep the rpg going without me so we announced we were shutting it down with us running it, but other people could still play their characters (it was on tumblr) and THIS ONE PERSON GOT SO BITCHY (they'd been a bit bitchy and manipulative for a while tbqh) about it and basically made it seem like all we wanted was the attention (when they were, uh, the same, and would try to circumvent rules to make their muses super...special?) and then had it be an us vs them but they had a higher charisma than we did because I was too tired to deal with it so lost a few people from that but then found out a year later, a lot of people realized how fucked up they were about things and their group had fallen apart.
☀ What's your rp pet peeve?
Lack of accessibility. Definitely a big one. I have astigmatisms, I have bad eyes. When someone has a dark background and light thin font, I can't read your rules and information. I should not have to copy and paste shit to read your stuff!! Also links that aren't clear?? Also bad take. Then there's the general RP aesthetic with the weird ass use of threshold and that, overly busy textures on the graphics instead of leading the eye to different places. But that's mainly it for that one.
☢ What fads/trends are you so over?
Oh perfect lead into. Please look at RP pet peeve for that. The fucking aesthetic thank you.
❥ Has someone ever ruined an FC or character for you?
Person from first answer ruined Ben Bar.nes for me. Which sucks because he's a great actor and faceclaim but I just can't anymore. It's an extra ick for me when it's a werewolf OC because...They had a werewolf OC. My apologies to the one person who followed me once with a werewolf OC with a Ben Bar.nes FC that I never followed back I couldn't do it.
❦ Has someone been jealous of you?
Probably?? I don't know I don't pay attention to that. I wouldn't be surprised if someone was secretly jealous of my friendship with Law but you know. It is what it is?
❧ Have you ever been jealous of anyone?
I'm human. It happens. But usually I talk sense into myself about how that's silly to be jealous and move on.
✖ How has Tumblr RP changed since you started?
I have been rping on tumblr for ten+ years. It would take too long for me to discuss that. But rules were on blogs, people weren't tied to their rp blogs by their phones and that. Gifs were used, not icons, then it was icons, then gifcons, then banners. Now there's carrds, docs, sites, and it's just...wild. Prefer to be mobile with links to stuff because the tumblr app is crap about showing links on blogs. People used to know html and javascript to make their blogs. Also the aesthetic change is...Something, that's for sure.
3 notes
·
View notes
Text
if my goal with this project was just "make a website" I would just slap together some html, css, and maybe a little bit of javascript for flair and call it a day. I'd probably be done in 2-3 days tops. but instead I have to practice and make myself "employable" and that means smashing together as many languages and frameworks and technologies as possible to show employers that I'm capable of everything they want and more. so I'm developing apis in java that fetch data from a postgres database using spring boot with authentication from spring security, while coding the front end in typescript via an angular project served by nginx with https support and cloudflare protection, with all of these microservices running in their own docker containers.
basically what that means is I get to spend very little time actually programming and a whole lot of time figuring out how the hell to make all these things play nice together - and let me tell you, they do NOT fucking want to.
but on the bright side, I do actually feel like I'm learning a lot by doing this, and hopefully by the time I'm done, I'll have something really cool that I can show off
8 notes
·
View notes
Text
A dark mode without JavaScript
I’ve by now been warned that the reason I had issue with a previous tumblr account may have been because I put some JavaScript onto my page. I knew Tumblr didn’t let us put JavaScript onto custom pages—I didn’t know why, but the alert came up if you tried—but there was no warning or anything when I added it to my main theme.
The JavaScript I added was just a function for a checkbox. It added a class to the body element, thus enabling some CSS for a ‘dark mode’ reader. But it doesn’t matter what the function did, you’re just not supposed to be using JavaScript at all. But Tumblr can’t just have a strict thing on their database that says “if page contains javascript, deny”, because there’s literally scripts in their own default theme. So I don’t know how this works. The detection must be less straightforward.
Weeks ago, not knowing why I couldn’t use messages and didn’t show up in search even for people following me, I made a new account, copied my custom theme onto it, started posting, and within a few hours I realized it was shadowbanned again, already. It’s possible I just instantly re-triggered whatever system they have in place by putting on the same script I was already using. It was only then I started trying to figure out what I did wrong, and after realizing it could’ve been the JavaScript the whole time, I made this account, did all the HTML and CSS changes I wanted, but haven’t added a line of JavaScript.
And so far, I’m good. This isn’t an airtight proof—it could still be a coincidence—but that does really make it seem like JavaScript was the issue. And if it was, then what the fuck? It’s effectively a secret rule, not indicated to me anywhere, and which punished me quietly without notifying me that was the issue? I know people make fun of this place for not being run well at times, but god damn.
It’s possible to implement a dark mode just using CSS. It just might not be as obvious how, and it’s a bit trickier because you need the element that triggers it to be in a specific spot in your DOM, i.e. next to an element that either is or contains everything you want to manipulate. Then you can use a sibling selector to apply rules only to things that appear next to the trigger (a checkbox is easiest).
Where that checkbox appears on-screen can then be manipulated by setting its position to absolute or fixed; it just needs to be a sibling of the container in the DOM structure.
So here’s what I did. Put a checkbox right before the “posts” container in your theme.

Then that checkbox can be made invisible. Just give it display:none. The element still ‘exists’ in a magical sense, but it doesn’t get rendered in the document. Then put a label somewhere on the page that links to this checkbox. I put mine in my nav. Unlike the checkbox, the label can be anywhere.

This isn’t a link, meaning it doesn’t highlight when you hover or click it, but you can just put it in an empty link element if you want it to look like one.

Then you just make whatever changes you want this checkbox to be activating by applying it to the posts container after the checkbox when it has the :checked pseudo-class.

#tumblr#javascript#technology#development#webdev#css#seriously why does tumblr punish you for using javascript#so sad#I mean I get it js is dangerous
2 notes
·
View notes
Text
What Is Vibe Coding In AI And Why It’s Gaining Attention

Imagine changing a tiny decision from your past — sending that message, saying the right thing, or investing in Bitcoin back in 2009. It wouldn’t take much to reshape your present.
The 2004 movie The Butterfly Effect explored this concept — small tweaks to key moments altered reality. Now, imagine software development worked the same way. You wouldn’t start with lines of code but with intent:
“Build me a customer dashboard with login, charts, and alerts.”
That simple prompt could set everything into motion, with AI handling the rest. Sounds futuristic? Welcome to 2025, where AI-driven development is all about setting the vibe.
What Is Vibe Coding?
Vibe Coding is a conversational, AI-powered approach to software development. You describe what you want in plain language, and AI writes the code. No technical jargon, no manual syntax struggles — just intent turned into working software.
The term was introduced by AI expert Andrej Karpathy in early 2025, reflecting how AI tools have evolved. Early coding assistants merely suggested edits — now, LLMs like GPT, Claude, and tools like Cursor and Superwhisper can generate entire systems.
For a deeper dive, check out TechDogs’ full article: What Is Vibe Coding In AI And Why It’s Gaining Attention In 2025.
How Does It Work?
The process is simple:
Prompt the AI: Say, “Make a landing page with a welcome banner.”
AI Builds the Code: HTML, CSS, and JavaScript generated instantly.
You Review and Refine: Guide changes through conversation.
Tools like Replit, Bolt, and Superwhisper are making this workflow mainstream, transforming how developers — and even non-developers — build software.
Why It Matters
The Perks:
Faster development — weeks reduced to hours.
More accessibility — no coding background needed.
Greater creativity — less time on repetitive tasks.
Studies show AI-assisted developers work up to 55% faster.
The Challenges:
AI code can have bugs — human oversight is essential.
It’s not foolproof — skilled developers still play a key role.
Misuse risks — understanding the tool is critical.
Real-World Impact
Startups, hobbyists, and educators are already embracing Vibe Coding:
Startups prototype faster, cutting time to market.
Designers customize websites or apps without needing developers.
Students learn coding by focusing on logic, not syntax.
The future? AI won’t replace coders — it will amplify them. But developers need AI literacy and prompt engineering skills to fully leverage this new way of building.
Wrapping Up
Vibe Coding makes software development feel more intuitive, creative, and accessible — like setting the right vibe instead of getting lost in code. It’s not perfect, but it’s reshaping how we build software, one prompt at a time.
0 notes
Text
So I work as a programmer, and the languages I use and the manner I use them in get kind of weird:
- I use python, but only to program the one robot that internally runs python. The dev environment is “here’s a box you can put text, see if you get runtime errors”. If you want a proper dev environment, you can copy-paste code from the robot program into an editor of your choice. They do have a top-level graphical interface if you want each line of code to take up 10% of your screen.
- There’s a language that’s not quite C++ that we use for a different control box. That one’s dev environment will tell you if you made an error when you try to download. Specifically it tells you the first error, and you have to fix it and try to download again to get the second error. The download process takes 20 seconds. If you try to compile offline you get separate errors.
- On the more normal side of things, we have an SQL/ajax/javascript/html thing for handling some of our internal processes. As a change of pace my problems for this one are self-inflicted, because I never figured out how to set up a proper dev environment and just edit everything in notepad++. Someone else finally showed me how to do local environment testing so I no longer take our internal website down if I miss a close bracket.
- We do a ton of stuff in .NET framework, because 20 years ago my work was using VB6 and we never bothered to migrate to C#. I actually have a real dev environment for this one with autocomplete and syntax checking, so of course it’s my favorite. My boss wants to switch this all over to javascript so we can do android/linux deployment.
- A different robot has an internal language that’s not quite python. This one also has a graphical interface that I won’t use because I want more information to fit on my screen. This one also only tells you about syntax errors during runtime, but the most noteworthy thing about it is that the command to move the robot in a straight line is bugged. I think they fixed it to the point where you can’t reboot the controller by telling it to move in a straight line, but you can make it slowly drift off into space until it faults.
- The ladder logic we use is actually normal (for AB, not Seimen’s), but I did add basically a secondary control layer built out of function blocks to handle sequencing. It is very well-documented, a fact that no one cares about when they ask what the heck I am doing with so many function blocks.
- The ladder logic was a little too normal (expensive) so they also make us use the budget version. It’s very similar except there are no keyboard shortcuts, everything takes more clicks, and instead of changing code live you have to reboot everything and wait about 30 seconds if you want to change something.
- There’s a language we use for one of our internal products that I created over about three days because I didn’t want to worry about malicious external code or figuring out a compiler. The parser is just squashed into an entirely different program so that program can control stuff in the background. It does not have arrays or loops, and I didn’t give it string handling for about a year. There’s no dev environment because it’s not a real language. Something like a quarter of the stuff we sell now uses it.
- One of the robots requires programming via menus. If you want to add an if statement, the menu shortcut is F1 -> 4 -> 8. The end if is F1 -> 4 -> 0 -> 1. The program to let you type is a paid add-on. Exponents and absolute values are also paid add-ons. You get 200 numerical memory registers and can’t have local variables. There is no else if.
#hi I’m Kate#I have had arguments with engineers at three major robot companies#please don’t be too mean about the notepad++ thing#you can be mean about the internal programming language thing#but this post is me bragging#my work is cool and weird and nonsense#I will bite the next time someone advertises their robot as no programming required
1 note
·
View note
Text
can't be bothered to make the hypothetical full version of this post but
they say you become an expert at something after roughly 10000 hours of doing it, right. the interesting scenario I'm in is that I have thousands of hours using javascript/typescript (and css/html) to, in sense, solve problems. and also have, extremely optimistically, tens(?) of hours using those technologies to Actually Just Build A Website.
(here's where I would do a thing I was thinking about, which is to break down—possibly in a voiceover video; that could be fun—everything that this PR does, to a hypothetical vaguely-interested layperson audience, and use it as an example of a specific problem that was fun to solve and uses in a vague sense the same technologies one would use to just implement the feature into the site itself but very meaningfully uses mostly different skills. not really motivated to unless it would serve an actual purpose, though, and given that I don't have a solid plan for doing so that I think has a good chance of resulting in a work I'm proud of.)
and isn't that the thing, you know? the fact that I'm not motivated to do pet projects with no audience and whose results would be bad is why I only have experience doing half of what the languages I know can do: I've run into a few audiences of people with interesting problems I can solve... none of which are best solved by me making a website*. like, I'm so completely turned off from the typical web developer impulse to collect one's favorite group of sexy technology stack components and build a slick personal website, then have absolutely fuck all to post on it. if it's just to prove you can do it, sure, go for it, but... I dunno, it doesn't seem to me to ultimately prove your ability to—find a problem and solve it, I guess! the point of a website is to facilitate communication; once you have something to communicate your design and engineering decisions would be based on the specifics of that thing—I dunno, is this silly? do you see what I'm trying to get at?
maybe this comes from or correlates to being a math person, originally. that idea, you know, of: it's satisfying to get it right, to have your work possess a logical throughline. this, because this, because this, because this, because of the question we started out with. I only know how to work on a project if there's a "why"—it can be an important one or a made-up or arbitrary or stupid one, but there has to be one. but I don't have one for, like... I dunno. anything I could put in a portfolio, or just. show someone curious about what I can make.
-
*except for the time that my collaborator sunk hundreds of hours into making the website without consulting me, at which point it was obviously a waste to do anything other than use the result.
0 notes
Text
How to Build a Strong Portfolio as a Web Developer
If you're stepping into the world of web development, one of the most important things you can do is create a portfolio that showcases your skills and expertise. A well-crafted portfolio not only helps you stand out but also serves as a tangible way for potential clients or employers to evaluate your capabilities. Whether you’re an aspiring developer or someone looking to switch careers, this guide will help you build a portfolio that reflects your best work. For inspiration, take cues from professionals at a leading web design company in Odisha to see how they present their projects.
Why a Portfolio Matters
In the competitive field of web development, your portfolio is your calling card. It’s not just a collection of projects; it’s a visual representation of your journey, creativity, and problem-solving abilities. A strong portfolio can:
Highlight your technical and design skills.
Provide evidence of your ability to deliver real-world solutions.
Demonstrate your understanding of user experience and design principles.
Attract clients or secure a job.
Steps to Build an Impressive Portfolio
1. Start with the Basics
Before diving into portfolio projects, ensure you have the necessary tools and knowledge. If you’re new, work on foundational skills like HTML, CSS, JavaScript, and frameworks like React or Angular. Employers and clients often look for a solid understanding of these basics.
2. Select Your Best Work
Your portfolio should include a mix of personal, freelance, and academic projects that showcase your strengths. Focus on quality over quantity—it’s better to present a few outstanding projects than a large number of average ones. For example, if you’ve designed a responsive e-commerce site, highlight it by explaining your process and the tools you used.
3. Build Real-World Projects
If you’re just starting out, create projects that mimic real-world applications. Consider redesigning an existing website or developing a small application for a fictional client. These projects will give potential clients an idea of how you approach problem-solving and user needs.
4. Add Context to Each Project
For every project in your portfolio, provide a brief explanation that includes:
The problem you were solving.
Your role in the project.
The tools and technologies you used.
The outcome or result.
This context helps viewers understand your thought process and the value you bring to a project.
5. Focus on Design and Usability
Your portfolio should reflect your skills as a web developer, so design it with care. Ensure it’s visually appealing, easy to navigate, and responsive. If you’re unsure where to start, consider looking at portfolios created by a reputed web design company in Odisha for inspiration.
6. Include a Personal Touch
Your portfolio is also a chance to let your personality shine. Add an “About Me” section where you briefly talk about your background, interests, and what drives your passion for web development. Keep it professional but relatable.
7. Showcase Your Code
Employers and clients often want to see how you code. Include links to your GitHub profile or embed code snippets directly into your portfolio. Highlight clean, organized, and well-documented code to demonstrate your proficiency.
8. Make it Interactive
If possible, allow visitors to interact with your projects. This could include live demos or interactive elements that showcase your development skills. An interactive portfolio leaves a lasting impression and shows that you understand user engagement.
9. Gather Testimonials
If you’ve worked with clients or on team projects, ask for testimonials. Positive feedback adds credibility to your portfolio and reassures potential clients or employers of your reliability.
10. Keep Updating
Your portfolio isn’t a one-and-done project. Regularly update it with new projects, skills, or certifications. This shows that you’re actively growing and staying current in your field.
Common Mistakes to Avoid
Overloading your portfolio with too many projects.
Ignoring the importance of mobile responsiveness.
Failing to proofread for typos and errors.
Using overly complex designs that distract from the content.
Neglecting to include contact information.
Conclusion
A well-designed portfolio is your ticket to landing dream projects or jobs as a web developer. It’s a platform to showcase your skills, creativity, and ability to solve real-world problems. By following the steps outlined above and staying consistent with updates, you can create a portfolio that not only impresses but also opens doors to exciting opportunities. Take inspiration from a professional web design company in Odisha to ensure your portfolio stands out in the competitive landscape.
#web design company in odisha#best web development agencies india#website development company in india#performance marketing agency#digital marketing agency in bhubaneswar
0 notes
Note
how did you make the faq? it's so pretty !!!
hiii, tysm <33 it's the FAQ page that matches my theme, lowlife!! - this are the tag page and about page in case you want them 💕 and since hot girls don't gatekeep, here's is a tutorial in case you know literally zero stuff about codes :) - more tutorials.
remember that you must do it from a computer and you need to have the "custom theme" activated (see this if you don't know how). im gonna do this tutorial in a random sideblog from scratch btw.
disclaimer: don't change anything else but what i mention here, especially if you don't know anything about html and css because, in the codes, any mistake can make the whole code not work. don't touch anything else but what is involved in the design!
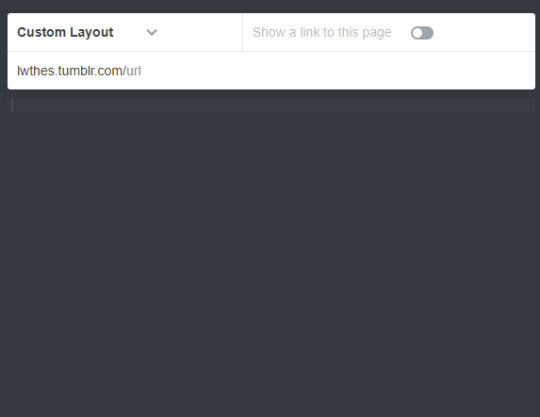
as you asked for a tutorial on the FAQ, i will do it specifically for that page, but this applies to the others, as this is how to install pages in general. first, go to the bottom of the "edit theme" until you see "add a page", add one and change "standard layout" to "custom layout". fill in the url with what you want the web address to be (i used "faq" like most people but you can use something else ofc) and you will notice that there's an option that says "show a link to this page" - if you turn that on, this page will be accessible from your homepage and will be next to your askbox, archive, etc. otherwise, it will just show through the link. you can leave it unchecked if you don't want a link to this page next to your ask or archive, but remember to add it manually to your main theme otherwise no one will be able to see it!


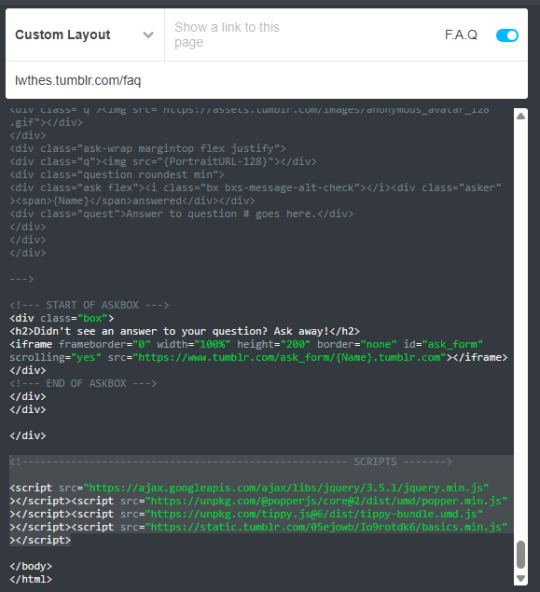
now, in another window, go to the installation page and copy all the code and paste it into the tumblr page. with "update preview" you will see how it is displayed without the need to save it (if you're still editing - remember to save it at the end lol).
now you're going to be faced with a situation: tumblr doesn't let you use javascript by default and these pages have javascript. i have two solutions for you. one is to follow this tutorial to ask tumblr for permission to use javascript, and the other is to remove it in case they deny it - which is not usually the case anyway - or take too long, etc. (the only thing that will happen is that you will no longer have the dynamism that the base code has, on these pages not much happens if you remove it, but on others you will need to ask for permission).
to do this, remove the scripts tags: in the second and third picture i pointed out with the mouse which ones they are. JUST remove that and save it to check that the page is visible and everything else is in order.


the page should already be installed and working correctly, now let's make it pretty!!!!! for this part, i highly recommend googling at least the basics of html and css, but i'll explain it from scratch anyway. but you can ask me everything you need hehe.
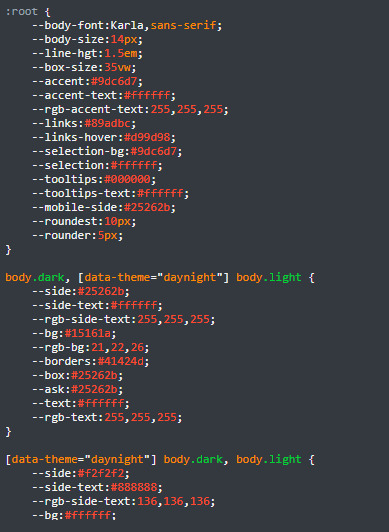
changing the colours: this is done with the hex codes. if you have a profile picture or header, upload it to this website to see what colours it has if you want them to match.
once you have those colours, you will go to the page and change the hex code for them. the choice of colours is up to you, play with them, change them and see what colour is altered in case you don't understand what is what, but the tags are quite understandable (background, body, accent, etc). remember that if you took out the javascript the "night mode" will not work, so in the next two to "root" (which identify day and night mode) you can change them but leave them the same as each other.

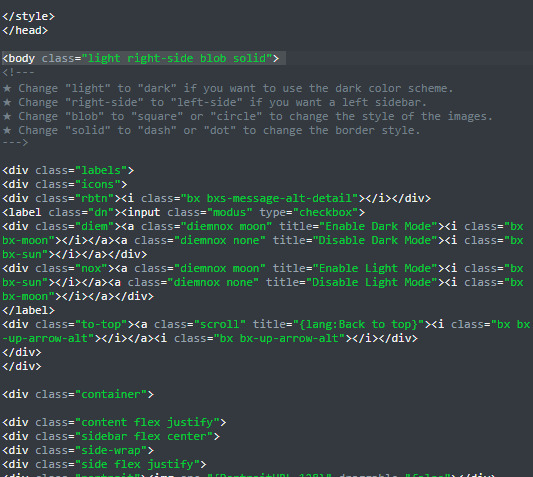
once you have the colour palette, scroll down to the body. there where i pointed out, you can change the shape of the profile picture, the defalut mode if you left the javascript on, whether you want the sidebar to be left or right and whether you want the borders to be solid, or with dashes or dots. as the code itself says, depending on what you want, just change the word that is already there for the change you need.
where it says F.A.Q and "a short description can be pasted here" would be your sidebar (the profile picture changes itself automatically in this one, but in others you have to change it manually with a link) - if you want to match all your pages to your main theme, just paste the description you already have.


you can put a link in your bio, just copy that and change the word "don't" to whatever you want the link to be and change the link.
ask guidelines, as well as within the questions themselves, you can use html tags. <b> and </b> it's bold, <i> and </i> it's italics, <small> and </small> its to make it smaller, or <strike> and </strike> it's to "strike out" the word. remember to put the start tag where you want it to start and the end tag where you want it to end (the end tags are the same but with a /). paragraphs are separated by <p> and </p>, and as the code explains, you can put bullet lists and blockquotes or literally any htlm tag (to change colour, ordered lists, etc). you can also add links (same format as explained in the description)!!!

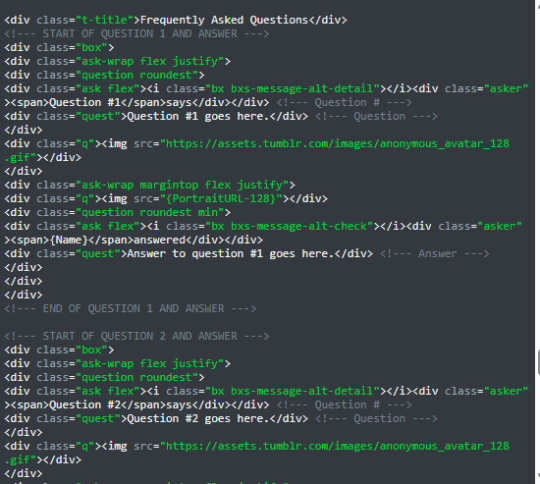

for the questions and answers, change the first five where it says "question #X goes here" and "answer to question #X goes here", leave the rest the same. if you want more than five questions, at the end you will see something to copy-paste or you can use question #2 through #5 (NOT #1) to copy and paste it under #5 and change the numbers, as well as the questions and answers.
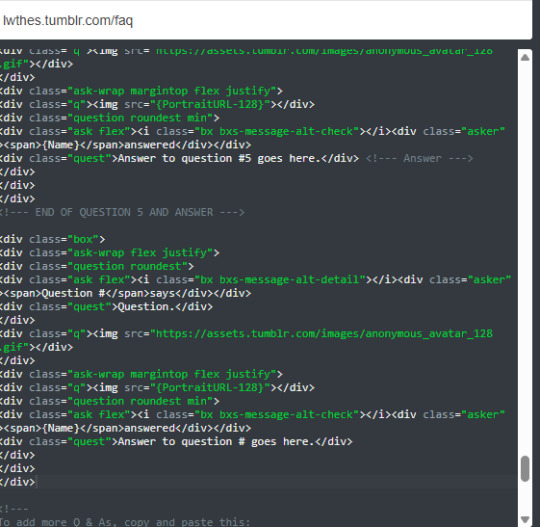

for example, here you should add the number 6 after the #'s and the questions and answers. finally, you can change the sentence that appears at the end of the askbox, you can match it with the one you already have or make it a custom one from the FAQ.
save everything and you have your faq page! hope you found the tutorial useful :) <3
#i have to redo my tags and my faq lol in doing this i realised that some things stopped working. but basically this is it!!!!#how to use tumblr#ask#my tutorials
9 notes
·
View notes
Text
HTML Web Components Make Progressive Enhancement and CSS Encapsulation Easier!
New Post has been published on https://thedigitalinsider.com/html-web-components-make-progressive-enhancement-and-css-encapsulation-easier/
HTML Web Components Make Progressive Enhancement and CSS Encapsulation Easier!
I have to thank Jeremy Keith and his wonderfully insightful article from late last year that introduced me to the concept of HTML Web Components. This was the “a-ha!” moment for me:
When you wrap some existing markup in a custom element and then apply some new behaviour with JavaScript, technically you’re not doing anything you couldn’t have done before with some DOM traversal and event handling. But it’s less fragile to do it with a web component. It’s portable. It obeys the single responsibility principle. It only does one thing but it does it well.
Until then, I’d been under the false assumption that all web components rely solely on the presence of JavaScript in conjunction with the rather scary-sounding Shadow DOM. While it is indeed possible to author web components this way, there is yet another way. A better way, perhaps? Especially if you, like me, advocate for progressive enhancement. HTML Web Components are, after all, just HTML.
While it’s outside the exact scope of what we’re discussing here, Any Bell has a recent write-up that offers his (excellent) take on what progressive enhancement means.
Let’s look at three specific examples that show off what I think are the key features of HTML Web Components — CSS style encapsulation and opportunities for progressive enhancement — without being forced to depend on JavaScript to work out of the box. We will most definitely use JavaScript, but the components ought to work without it.
The examples can all be found in my Web UI Boilerplate component library (built using Storybook), along with the associated source code in GitHub.
Example 1: <webui-disclosure>
Live demo
I really like how Chris Ferdinandi teaches building a web component from scratch, using a disclosure (show/hide) pattern as an example. This first example extends his demo.
Let’s start with the first-class citizen, HTML. Web components allow us to establish custom elements with our own naming, which is the case in this example with a <webui-disclosure> tag we’re using to hold a <button> designed to show/hide a block of text and a <div> that holds the <p> of text we want to show and hide.
<webui-disclosure data-bind-escape-key data-bind-click-outside > <button type="button" class="button button--text" data-trigger hidden > Show / Hide </button> <div data-content> <p>Content to be shown/hidden.</p> </div> </webui-disclosure>
If JavaScript is disabled or doesn’t execute (for any number of possible reasons), the button is hidden by default — thanks to the hidden attribute on it— and the content inside of the div is simply displayed by default.
Nice. That’s a really simple example of progressive enhancement at work. A visitor can view the content with or without the <button>.
I mentioned that this example extends Chris Ferdinandi’s initial demo. The key difference is that you can close the element either by clicking the keyboard’s ESC key or clicking anywhere outside the element. That’s what the two [data-attribute]s on the <webui-disclosure tag are for.
We start by defining the custom element so that the browser knows what to do with our made-up tag name:
customElements.define('webui-disclosure', WebUIDisclosure);
Custom elements must be named with a dashed-ident, such as <my-pizza> or whatever, but as Jim Neilsen notes, by way of Scott Jehl, that doesn’t exactly mean that the dash has to go between two words.
I typically prefer using TypeScript for writing JavaScript to help eliminate stupid errors and enforce some degree of “defensive” programming. But for the sake of simplicity, the structure of the web component’s ES Module looks like this in plain JavaScript:
default class WebUIDisclosure extends HTMLElement constructor() super(); this.trigger = this.querySelector('[data-trigger]'); this.content = this.querySelector('[data-content]'); this.bindEscapeKey = this.hasAttribute('data-bind-escape-key'); this.bindClickOutside = this.hasAttribute('data-bind-click-outside'); if (!this.trigger setupA11y() // Add ARIA props/state to button. // Handle constructor() event listeners. handleEvent(e) // 1. Toggle visibility of content. // 2. Toggle ARIA expanded state on button. // Handle event listeners which are not part of this Web Component. connectedCallback() document.addEventListener('keyup', (e) => // Handle ESC key. ); document.addEventListener('click', (e) => // Handle clicking outside. ); disconnectedCallback() // Remove event listeners.
Are you wondering about those event listeners? The first one is defined in the constructor() function, while the rest are in the connectedCallback() function. Hawk Ticehurst explains the rationale much more eloquently than I can.
This JavaScript isn’t required for the web component to “work” but it does sprinkle in some nice functionality, not to mention accessibility considerations, to help with the progressive enhancement that allows the <button> to show and hide the content. For example, JavaScript injects the appropriate aria-expanded and aria-controls attributes enabling those who rely on screen readers to understand the button’s purpose.
That’s the progressive enhancement piece to this example.
For simplicity, I have not written any additional CSS for this component. The styling you see is simply inherited from existing global scope or component styles (e.g., typography and button).
However, the next example does have some extra scoped CSS.
Example 2: <webui-tabs>
That first example lays out the progressive enhancement benefits of HTML Web Components. Another benefit we get is that CSS styles are encapsulated, which is a fancy way of saying the CSS doesn’t leak out of the component. The styles are scoped purely to the web component and those styles will not conflict with other styles applied to the current page.
Let’s turn to a second example, this time demonstrating the style encapsulating powers of web components and how they support progressive enhancement in user experiences. We’ll be using a tabbed component for organizing content in “panels” that are revealed when a panel’s corresponding tab is clicked — the same sort of thing you’ll find in many component libraries.
Live demo
Starting with the HTML structure:
<webui-tabs> <div data-tablist> <a href="#tab1" data-tab>Tab 1</a> <a href="#tab2" data-tab>Tab 2</a> <a href="#tab3" data-tab>Tab 3</a> </div> <div id="tab1" data-tabpanel> <p>1 - Lorem ipsum dolor sit amet consectetur.</p> </div> <div id="tab2" data-tabpanel> <p>2 - Lorem ipsum dolor sit amet consectetur.</p> </div> <div id="tab3" data-tabpanel> <p>3 - Lorem ipsum dolor sit amet consectetur.</p> </div> </webui-tabs>
You get the idea: three links styled as tabs that, when clicked, open a tab panel holding content. Note that each [data-tab] in the tab list targets an anchor link matching a tab panel ID, e.g., #tab1, #tab2, etc.
We’ll look at the style encapsulation stuff first since we didn’t go there in the last example. Let’s say the CSS is organized like this:
webui-tabs [data-tablist] /* Default styles without JavaScript */ [data-tab] /* Default styles without JavaScript */ [role='tablist'] /* Style role added by JavaScript */ [role='tab'] /* Style role added by JavaScript */ [role='tabpanel'] /* Style role added by JavaScript */
See what’s happening here? We have two style rules — [data-tablist] and [data-tab] — that contain the web component’s default styles. In other words, these styles are there regardless of whether JavaScript loads or not. Meanwhile, the other three style rules are selectors that are injected into the component as long as JavaScript is enabled and supported. This way, the last three style rules are only applied if JavaScript plops the **role** attribute on those elements in the HTML. Right there, we’re already supplying a touch of progressive enhancement by setting styles only when JavasScript is needed.
All these styles are fully encapsulated, or scoped, to the <webui-tabs> web component. There is no “leakage” so to speak that would bleed into the styles of other web components, or even to anything else on the page within the global scope. We can even choose to forego classnames, complex selectors, and methodologies like BEM in favour of simple descendent selectors for the component’s children, allowing us to write styles more declaratively on semantic elements.
Quickly: “Light” DOM versus Shadow DOM
For most web projects, I generally prefer to bundle CSS (including the web component Sass partials) into a single CSS file so that the component’s default styles are available in the global scope, even if the JavaScript doesn’t execute.
However, it is possible to import a stylesheet via JavaScript that is only consumed by this web component if JavaScript is available:
import styles from './styles.css'; class WebUITabs extends HTMLElement constructor() super(); this.adoptedStyleSheets = [styles]; customElements.define('webui-tabs', WebUITabs);
Alternatively, we could inject a <style> tag containing the component’s styles instead:
class WebUITabs extends HTMLElement connectedCallback() this.attachShadow( mode: 'open' ); // Required for JavaScript access this.shadowRoot.innerHTML = ` <style> <!-- styles go here --> </style> // etc. `; customElements.define('webui-tabs', WebUITabs);
Whichever method you choose, these styles are scoped directly to the web component, preventing component styles from leaking out, but allowing global styles to be inherited.
Now consider this simple example. Everything we write in between the component’s opening and closing tags is considered part of the “Light” DOM.
<my-web-component> <!-- This is Light DOM --> <div> <p>Some content... styles are inherited from the global scope</p> </div> ----------- Shadow DOM Boundary ------------- | <!-- Anything injected by JavaScript --> | --------------------------------------------- </my-web-component>
Dave Rupert has an excellent write-up that makes it really easy to see how external styles are able to “pierce” the Shadow DOM and select an element in the Light DOM. Notice how the <button> element that is written in between the custom element’s tags receives the button selector’s styles in the global CSS, while the <button> injected via JavaScript is left untouched.
If we want to style the Shadow DOM <button> we’d have to do that with internal styles like the examples above for importing a stylesheet or injecting an inline <style> block.
That doesn’t mean that all CSS style properties are blocked by the Shadow DOM. In fact, Dave outlines 37 properties that web components inherit, mostly along the lines of text, list, and table formatting.
Progressively enhance the tabbed component with JavaScript
Even though this second example is more about style encapsulation, it’s still a good opportunity to see the progressive enhancement we get practically for free from web components. Let’s step into the JavaScript now so we can see how we can support progressive enhancement. The full code is quite lengthy, so I’ve abbreviated things a bit to help make the points a little clearer.
default class WebUITabs extends HTMLElement constructor() this.tabpanels.length === 0 createTabs() // 1. Hide all tabpanels initially. // 2. Add ARIA props/state to tabs & tabpanels. bindClickEvent(e) e.preventDefault(); // Show clicked tab and update ARIA props/state. bindKeyboardEvent(e, index) e.preventDefault(); // Handle keyboard ARROW/HOME/END keys. customElements.define('webui-tabs', WebUITabs);
The JavaScript injects ARIA roles, states, and props to the tabs and content blocks for screen reader users, as well as extra keyboard bindings so we can navigate between tabs with the keyboard; for example, the TAB key is reserved for accessing the component’s active tab and any focusable content inside the active tabpanel, and the tabs can be traversed with the ARROW keys. So, if JavaScript fails to load, the default experience is still an accessible one where the tabs still anchor link to their respective panels, and those panels naturally stack vertically, one on top of the other.
And if JavaScript is enabled and supported? We get an enhanced experience, complete with updated accessibility considerations.
Example 3: <webui-ajax-loader>
Live demo
This final example differs from the previous two in that it is entirely generated by JavaScript, and uses the Shadow DOM. This is because it is only used to indicate a “loading” state for Ajax requests, and is therefore only needed when JavaScript is enabled.
The HTML markup is just the opening and closing component tags:
<webui-ajax-loader></webui-ajax-loader>
The simplified JavaScript structure:
default class WebUIAjaxLoader extends HTMLElement constructor() super(); const shadow = this.attachShadow( mode: 'open' ); shadow.innerHTML = ` <svg role="img" part="svg"> <title>loading</title> <circle cx="50" cy="50" r="47" /> </svg> `; customElements.define('webui-ajax-loader',WebUIAjaxLoader);
Notice right out of the gate that everything in between the <webui-ajax-loader> tags is injected with JavaScript, meaning it’s all in the Shadow DOM, encapsulated from other scripts and styles not directly bundled with the component.
But also notice the part attribute that’s set on the <svg> element. Here’s where we’ll zoom in:
<svg role="img" part="svg"> <!-- etc. --> </svg>
That’s yet another way we have to style the custom element: named parts. Now we can style that SVG from outside of the template literal we used to establish the element. There’s a ::part pseudo-selector to make that happen:
webui-ajax-loader::part(svg) // Shadow DOM styles for the SVG...
And here’s something cool: that selector can access CSS custom properties, whether they are scoped globally or locally to the element.
webui-ajax-loader --fill: orangered; webui-ajax-loader::part(svg) fill: var(--fill);
As far as progressive enhancement goes, JavaScript supplies all of the HTML. That means the loader is only rendered if JavaScript is enabled and supported. And when it is, the SVG is added, complete with an accessible title and all.
Wrapping up
That’s it for the examples! What I hope is that you now have the same sort of epiphany that I had when reading Jeremy Keith’s post: HTML Web Components are an HTML-first feature.
Of course, JavaScript does play a big role, but only as big as needed. Need more encapsulation? Want to sprinkle in some UX goodness when a visitor’s browser supports it? That’s what JavaScript is for and that’s what makes HTML Web Components such a great addition to the web platform — they rely on vanilla web languages to do what they were designed to do all along, and without leaning too heavily on one or the other.
#Accessibility#ADD#amp#aria#Article#Articles#author#bem#box#browser#Building#bundle#cascade#Children#code#Conflict#content#course#CSS#custom elements#custom properties#data#easy#Features#Full#GATE#github#Global#global scope#how
0 notes
Text
Saturday Morning Coffee
Good morning from Charlottesville, Virginia! ☕️

It’s been a fun week at work. I’ve been fixing bugs here and there. For some reason I enjoy this type of work. I spent a decent amount of time looking at memory graphs for object retentions problems and fixed a couple of good ones this week. That always feels great!
As for Stream for Mac, I started off the week in a bit of a funk but thanks to some amazing Mac devs I was put back on the right path. Stream for Mac development is moving forward once again. Fingers crossed I can keep up the momentum. 🤞🏼
Nikita Prokopov A.K.A. Tonsky
So all this time I was living under impression that, for example, if the average web page size is 3 MB, then JavaScript bundle should be around 1 MB. Surely content should still take the majority, no?
Some of the examples Nikita gives seem ridiculous. It makes me wonder if backend processing that spits out pure HTML will ever become a thing again?
Harry Cheadle • Eater, Seattle
But Tony Delivers doesn’t need to be anything bigger than it already is, which is one guy on a bike showing up to deliver food, probably smiling, probably asking how you’re doing, a bolt of disarming kindness in a city that even before we all got addicted to screens was known for being standoffish. That seems worth $5.
Tony has become a Seattle hero! I can’t believe he’s able to survive on $5 deliveries but bravo for making your own little niche!
Nish Tahir
I’ve been learning more about common attacks that appear in my Nginx logs to learn more about what happens beyond the log entries.
Nish is geekin’ out again. I wish I had his brain. The things I could accomplish! 🧠
Gunnar Anzinger
Also, do not worry at this time about acquiring the resources to build the house itself. Your first priority is to develop detailed plans and specifications. Once I approve these plans, however, I would expect the house to be under roof within 48 hours.
This piece is ridiculous in all the best ways. The paragraph I chose to feature really hit home. Yes, yes, take your time. We need it in two days. 🤣
Claire Elise Thompson • grist
If you like the idea of a perpetual three-day weekend, you might be one of a growing cadre that supports the concept of degrowth: a school of thought aimed at shrinking economies and moving away from GDP growth as a metric of success, while instead emphasizing universal basic services and social well-being.
With the rise of AI companies believe they can replace us with software for many types of work.
I think that’s cool! Let’s replace workers and figure out a way to allow folks to do whatever they want and still receive a paycheck. Like, perhaps, Universal Basic Income, Single Payer health care, and free university for everyone! Of course the rich people won’t like that idea.
Trust me when I say I could find plenty of things to work on.
Michael Szczepanik
It’s time for the NATIVE mobile development to end.
I don’t agree. I’ve been working on a project that involves React Native and I see the value in it, but that doesn’t mean native development should go away. Your mileage may vary. For me it’s native or bust for my personal projects.
Mike Elgan • Computerworld
More to the point: Most companies cannot show actual monetary benefits from RTO mandates. But most employees can show actual and significant monetary costs from RTO mandates.
This is an interesting take on the cost to employees to return to work. I’ve never thought about it in those terms. For me it’s always been about the flexibility working remotely gives me. I save between 40-60 minutes a day by not commuting, I can have afternoon coffee with my wife, and if I need to work late it’s so much easier to stomach because I’m already home.
If WillowTree asked us all to return to the office full time, I would. I just prefer working from home.
Jacob Phillips • Evening Standard
The Kremlin has said it will use its “entire strategic arsenal” and fire nuclear missiles at London, Washington, Berlin and Kyiv if it is made to give up the areas of Ukraine it has invaded.
We need to get our act together and get more aid to Ukraine. The GOP loves their orange American Dictator who, in turn, loves Putin so they’re keeping aid from Ukraine. What happened to all those Patriotic Republicans with their flags and love of all things military? They’re too cowardly to stand up to Trump. It’s really shameful.
Chris Evangelista • /Film
Stephen King Hates The Only Movie He Ever Directed

I liked Maximum Overdrive for what it was. It’s a popcorn movie. Get your popcorn, soda, find your seat, and sit back to watch the mayhem unfold. It delivered and I had no idea Stephen King directed it.

0 notes
Text
[ad_1] Reactive X has revolutionized the way modern developers think about building apps it allows us to treat all data as a stream as it unfolds through the dimension of time in this lesson I'm going to cover about 25 different ways you can use our XJS so you have a solid Foundation to use it in your own projects for this tutorial I've just created a basic HTML page and imported the rxjs script from a CDN in the head of that page then we'll write all of our custom code in this lesson J's file and import that in the body of the page then Inside lesson Jas I'm creating a helper function that will just append the results from an observable to the browser on the right side here so when you see me use the print function it's to add the values to the browser here on the right the first thing we're going to Talk about is the observable and I think the easiest way to think about it is just an array that gets built over time and you can loop over this array in the dimension of time by subscribing to it the first thing we're gonna do is create an observable from scratch We do this by calling our X dot observable create and then create takes a observer function where we can define what the observable sends to the subscriber to send values you call observer next with the value you want to send and that value can be anything it Could be a string and object or whatever you want then to make the observable start emitting values you call subscribe on it in this case we'll take each value and just print it to the screen if we refresh our page you can see we get hello world print it to the screen so That's pretty cool but we don't normally need to create observables manually like this let's say we wanted to create an observable from click events in the Dom we can call observable from event pass at the document and the event we want to observe in this case clicks so just like Before we subscribe to it but at this time we'll console.log it just to show the full event object each time we click the page we get the mouse event logged along with all of its associated data if you work with asynchronous JavaScript you're probably used to working with Promises and we can convert a promise directly into an observable so here we're just creating a promise with a timeout that resolves after one second the idea here is to simulate an API call or some other asynchronous operation to convert this promise to an observable we just call observable from promise and Pass it the promise this is extremely useful when you're working with a JavaScript library that's built on promises you can also convert the observable back to a promise by calling to promise on it so when we subscribe to this observable we get a one-second delay and then it prints Resolved on the page we can also create a timer by calling observable timer with the amount of milliseconds we want to wind it up for to start the timer we just call subscribe on it and then it will emit a value once the timer runs out so we refresh the page and one Second later our timer runs out if we want a timer that keeps repeating we can use an interval which emits a value after the specified time frame so every 1000 milliseconds we'll get a new value emitted in this case here we'll print out a date with the number of seconds in The minute to show how this works we reload the page and then every second we get a new value emitted from the observable now I'm going to show you one last way to create an observable there's actually more ways than this but I think this covers the basics for now so we'll Do observable of which allows us to pass any static value we want to be observable so we'll go ahead and pass it a string and array a number a boolean and an object this example shows how any type of data can be a stream which is an Important concept to keep in mind when building reactive software the next concept will look at is hot versus cold observables a cold observable is basically just an
observable where the data is created inside of it so this means it won't actually create the underlying data until something subscribes to it inside this observable I'm just generating a random number and then I'll create two different subscribers and you might intuitively think that they should get the same value but what happens is the random number gets generated once the subscription starts so each subscriber gets a different number that's how you know you're working with a cold Observable but you can make an observable hot by simply building that value outside of the observable itself so here we set the random number outside the observable and then pass it in as a variable reload the page and then we'll see both subscribers get the same random number that technically makes our Observable hot but there is a way to do this without decoupling the data from the observable itself so we'll put the random number back in the observable then will create a new hot observable by calling publish on the cold observable this tells it only to emit data once we Called a corresponding connect method on it so we'll build the subscriptions and at this point nothing will happen then call connect on the hot observable and that will trigger these subscriptions to emit data and this time it'll be shared between the two of them and we can Verify this by reloading the page and they should get the same random number the next thing you should know is how to complete an observable when the observable has reached the end of its life cycle it will send a completed signal we can see this with a timer Using the finally operator which will run the code once the observable is completed in this case it will be completed after one second so we subscribe and then we get the all done signal back however there are other observables that won't complete automatically and in some cases this can Result in memory leaks if it's a very data-intensive stream here we have an interval which doesn't complete on its own so what we do is subscribe to it first then set a timeout for three seconds and call unsubscribe this manually forces the observable to send the complete signal there's also more Clever ways to do this which we're going to see a little bit later in the lesson now we're going to look at a whole bunch of rxjs operators starting with map map allows you to transform the emitted value based on some underlying logic in this case we created an observable of Some numbers and we're going to transform them to their logarithm so when we subscribe instead of getting the actual numbers we get the log of that number a more practical example for app developers is when you send an API request that responds in JSON you need to convert the JSON string to JavaScript So what you can do is use the map operator to run json.parse on that string from the API then the observable will you met JavaScript objects that you can actually use in your app the next operator we're going to look at is do this will allow us to execute code Without affecting the underlying observable so we create observable of a couple strings and then we'll print out their names as they first appear then we'll transform them to uppercase and then we'll print them again when we actually run this code you can see that it gives us a glimpse into the Observable data at any given point in time so here we see the value and the upper case value now let's take a look at filter this does pretty much what you'd expect you give it a condition and only values meeting that condition make it through so here we Have an observable of a bunch of positive and negative numbers and we'll filter it to only show the positive numbers so only value is greater than or equal to zero will be displayed and we reload the page and we only see the positive numbers if we flip greater than To less than then we get only the negative numbers displayed using this same example I'm going to show you the first and last
operator the first operator will just take the very first element from the observable in this case the first element is negative three so That's what we see here on the screen we can also do the inverse of this with the last operator and negative two is the last element so we'll see it updated to negative two now let's take a look at D balance and throttle these two operators Allow you to deal with events that you met way more values than you actually need the mousemove event is a perfect example in the Dom so we'll subscribe to the mouse event and then we'll print the type of event here on the screen let's first do this without any throttling or Debouncing you can see it only takes about two seconds to get hundreds of events printed here on the screen we can use throttle to get the very first event and then set a delay before it starts emitting any other events in this case we'll use the throttle time helper and Pass it 1000 milliseconds so now if we mouse over the screen we'll get the first event and then it will wait at least one second before sending any additional events debounce does almost the same exact thing but instead of giving us the first event it gives us The last event so first we mouse over and there's a delay then after that delay it will emit the most recent event debounce is especially useful when you want to make sure the user is stopped doing something such as typing in an autocomplete form or something similar Now we're going to move on to the scan operator this one seems confusing at first but it's actually very simple we're going to do this in the context of a video game so first we're gonna subscribe to the click events in the browser and then for each click we're Gonna assign a random number that's going to represent the score for that click then we'll use the do operator to print that score on the screen and then will you scan to keep a running total of the high score which is just the combined score up all the clicks so scan is just Keeping a running total of each emitted value from the observable it works just like the array reduced function and vanilla JavaScript so we'll go ahead and print out the high score here and we should see it get increasingly larger with each additional click so on that First click the high score and the click score are the same and then the high score gets increasingly larger with each additional click now let's move on to switch map this operator is especially useful when you have one observable that you need a value from before you can get A second observable in this example we have an observable of clicks but we actually don't care about the click data we want to start an interval timer after each click so on the first click the interval should start and then when we get a new click it'll reset the interval back to zero So we'll go ahead and click the page and then we'll let the interval count up to 6 and then click again and it'll reset back to zero switch map is commonly used in app development when you have an observable of say a user ID and then you need that User ID first before querying a database for that users data the next operator is take until this one allows us to complete an observable based on the value of another observable so here we have an interval and a timer the interval is going to emit values every 500 milliseconds until the timer runs Out after 2 seconds this is a clever way to unsubscribe from data without actually having to call unsubscribe on the observable itself so here we get the first few emitted values then the timer runs out and so it logs complete a closely related operator is take while This one will tell the observable to emit values until a certain condition turns true in this example we have a collection of names and we want to stop the observable once it reaches the name of dugg in other words we want it to take values while the name does not Equal done then we'll use the finally operator to verify that
the observable completed successfully so when we run this in the browser we can see we only get the values that came before Doug now let's look at a few ways we can can observables starting with zip zip is Something that might be useful if you have two observables that are the same length and connected in some kind of way so here we have observables yin and yang and we're going to combine them with zip which will combine them into arrays based on their index position in the Observable so peanut butter will be matched with jelly wine with cheese rainbows with unicorns another way to merge observables is with fork join this one will wait for both of the observables to complete and then it will combine the last two values together so I'm going to put a delay on the yang Observable then we'll use the fork join operator to combine them just like zip but at this time we should see a two-second delay and then only the last two values rainbows and unicorns should be emitted this operator is useful if you have a bunch of related API calls And you want to wait for all of them to resolve before sending any data through to the UI now we're going to look at catch for handling errors in this example I create a new observable from scratch but in the middle of it I throw An error when we get errors in the real world we want to be able to catch them and then do some error handling in this case we'll use the catch operator to complete the observable and just print out the error so notice that we get the first three values in the observable but The very last one doesn't get emitted overall the idea is very similar to how promises work in JavaScript we also have a useful retry operator that will rerun the observable as many times as we want when an error is occurred so right after catch we can add retry and in this case We'll retry it twice when we run it this time we'll get the same sequence of events but they'll happen three times the initial run plus the two retries so that's all the operators I'm gonna cover for today there's tons more in rxjs but I think these are some of the most Useful and powerful ones that you'll find we just have one more topic to cover and that's the rxjs subject a subject is just an observable with a few extra bonus features it has the ability to emit new data to its subscribers by acting as a proxy to some other data Source this will make more sense after the next couple samples so here we have a plain observable and we're going to convert it to a subject when we subscribe to it it emits the values just like a normal observable would but the real benefit of Subject is to be able to call next on it so what we do is create a new subject and then we'll create us a couple of subscriptions to it and then we can just call subject next with some value that's not something you can do on a normal Observable then we'll set another next call inside of a timeout so the main benefit of a subject is being able to broadcast new values to subscribers without having to rely on some source data to build on this topic we're gonna look at one last thing and that's Multicast it's used to send values to multiple subscribers but not any related side effects so we create a data source that is the click events happening in the DOM and then we use the do operator to print do one time this is an example of a side effect imagine we had a Hundred subscribers it would run this code for every single one a bomb so if you had a hundred clicks and a hundred subscribers this code would run 10,000 times well we actually want is for it to only run on the 100 clicks coming from the source observable we can do this by Calling multicast on the original observable and have it return a new subject then we can add a couple of subscriptions to the subject then lastly we need to call connect on that subject when we start clicking in the Dom we'll see that we get the values sent to the Subscribers and the side effect only runs once
even though there's multiple subscribers this could be highly beneficial if you have multiple subscribers to a single data source that is running some sort of side effect that's it for my rxjs QuickStart if this video helped you please like and Subscribe and if you want to get the full source code and additional commentary head over to angular firebase com thanks for watching and I'll see you next time [ad_2] #RxJS #Quick #Start #Practical #Examples For More Interesting Article Visit : https://mycyberbase.com/
0 notes
Note
ok, look, I'm not your personal infosec oracle. this is the last question I'm gonna answer along these lines. I am going to give you a general explanation of how to think about computer security, which you can research further if you want to know more.
here's the short answer: no.
here's the long answer: a guide to how to think about security.
the best way to think about security is to, in the immortal words of Kyrie Ushiromiya, flip the chessboard. what is the attacker trying to do? what is stopping them?
here's some jargon: suppose you are an attacker, meaning you want to do something with someone's computer/data against their wishes. the 'attack surface' is all the stuff you can interact with. the attacker looks for a vulnerability (aka 'vuln') in the attack surface - a mistake made by the creators which lets the attacker do something they're not supposed to be able to do. if they find such a vulnerability, an attacker can create an exploit - some manipulation which gets them closer to their goal, like giving them access to more systems. an attack may involve just one exploit, or a series of them.
an idea of what the attacker might be trying to accomplish is called a threat model.
a worked example
let's say I want to crack someone's Tumblr account and use it to post links to my shady porn site. I can send data to Tumblr's servers, which tumblr will process. one thing I could do is send a message that is addressed to that person's Tumblr account. if I do this, Tumblr stores the message in some form.
the user comes along and connects to Tumblr's servers. what this means is that they send a message which says 'here are my login credentials, show me my messages'. Tumblr then generates a web page containing the message which I sent. the target uses their web browser to display the message.
the user then reads the message and acts on the information they are presented.
so now we have three attack surfaces. the first is Tumblr's servers. the second is the web browser. the third is the person reading the message. let's imagine what the attacker would do against each of these.
attack against tumblr's servers
an attack against Tumblr's web servers would for example try to get admin credentials and download user data such as passwords or stored bank account details, by sending data to one of Tumblr's public APIs. that's not something we can do very much about, we just have to trust that Tumblr's engineers are doing things properly - and if we don't trust that, don't send them any information we wouldn't want to leak.
in general, big websites like Tumblr tend to have pretty robust security. when they don't, it makes the news.
websites generally store user data in an encrypted form, so that even if an attacker gets access to the data, they can't do very much with it. even so, I strongly recommend never using the same password on multiple websites, so if your user data does get leaked, the attacker can't use the same credentials to access other accounts. you can check haveibeenpwned to see if your data has appeared in known, public data breaches.
an attack against Tumblr's website using the messaging system would look like sending message data which causes the code which processes messages to break down. but that kind of attack isn't actually relevant to you, because it's between the attacker and Tumblr.
so let's move on to the next attack surface...
attack against your web browser
an attack against the web browser would involve sending data that, when your web browser displays it, tries to make it do something it's not supposed to do.
the typical way this would be done is to run malicious JavaScript code. JavaScript is a programming language that runs in web browsers. since new features are constantly added to web browsers, and JavaScript has loads of capabilities, it's one of the largest attack surfaces and something of a perpetual security headache.
however, Tumblr - and all other social media sites - removes dangerous HTML such as script tags from your message. moreover, web browsers nowadays have a lot of security features which limit what an attacker can do even with javascript execution. (for example, the same-origin policy). this doesn't mean browsers are invulnerable, indeed new vulnerabilities are found and patched frequently - but it is two layers of security that the attacker must find their way past in order to do anything.
since they can't easily run their malicious code inside Tumblr's web pages, the attacker will probably want to lead you to a web page which they control, which gives them a lot more ways to attack you when the web browser loads the page. that's a 'one-click attack': you first have to click on the link to load the dangerous web page.
if your web browser is up to date, and especially if you are running security extensions such as NoScript, you are a lot less vulnerable to attacks against your browser. the most ironclad security is to never ever run JavaScript, but that would break most websites, including Tumblr. you can also block scripts by default and enable them on a website by website basis (that's what NoScript does), with the drawback that most websites will be broken until you find the right script to make them work. it's a tradeoff: security vs convenience.
that said, it's probably impossible for an attacker to run JavaScript from a Tumblr message, since Tumblr thoroughly strips any HTML and converts the message into an internal representation called the Neue Post Format, which is used to generate entirely new HTML when the page is rendered. what that means in short is that only certain things are allowed through, and scripts aren't.
attack against you
this just leaves tricking you. for example, an attacker could link you to a website that is designed to mimic the Tumblr login page, and hope that you don't realise you're not on Tumblr anymore and enter your login details. the attacker can then use the login details to compromise your account. this type of attack is known as phishing.
note that this attack is much easier than anything else I've described so far: they just have to make a website that looks like Tumblr. the reward for the attacker is pretty small (they're just trying to boost search engine rankings in general), so they're not going to spend a lot of effort here. a phishing attack is easy to set up and the reward is complete access to your account.
defences against phishing: enabling two-factor authentication makes it harder for a successful phishing attack to actually get into your account. otherwise, be careful to look at URLs and make sure they are what you think they are. web browsers have also started maintaining lists of known phishing websites and warning people if they go on them.
real attacks against Tumblr
we can look at the CVE website to see some real vulnerabilities discovered by security researches involving Tumblr.
most of them are very old. the most recent was in 2023, and involved attacking a widget on OSX, which wasn't properly sanitising data, allowing you to load HTML there and do the sort of thing we talked about above.
the next two don't actually involve Tumblr, but Tumblr links on other websites.
the final one is so old it's from 2013. back then, they didn't encrypt login credentials on the OSX app. that's terrible, but it's basically dinosaur bones now.
does this mean there are not other vulnerabilities on Tumblr? no. Tumblr operates its own bug bounty program, which they described elsewhere as 'amazingly successful', so there's no doubt been other stuff reported privately and fixed by them. however, it's also a good sign they're taking security seriously and doing the right things.
which means...
we've considered the three attack surfaces that someone could use to try to access your account by sending a malicious Tumblr message.
the upshot: it's extraordinarily unlikely that someone has discovered a zero-day vulnerability in Tumblr and your web browser which would let them directly attack your web browser when you load a message.
if you don't open the message in your web browser, the data sent by the attacker is just sitting on Tumblr's servers, not doing anything to anyone.
instead, the most likely type of attack that would be used on Tumblr is a phishing attack.
if you have a phishing message sitting in your inbox, just delete it! stop worrying! it isn't some kind of curse, it's just some text written by someone trying to trick you. it is about as threatening as a letter written on paper.
but more importantly...
if you learn how computers work, and you know what an attacker is likely to be aiming to do, then you can reason about what methods they're likely to try - and how likely it is to work. so if you are worried about hacking, learn about it! it's a fun subject!
it's also a very broad subject of course, but everything I've written above just relies on basic knowledge of how the web works. if you're interested in computer security, there's lots of places to learn about it. I personally like LiveOverflow - his videos are generally on the very technical side, but there's some good introductions to hacking on there.
but security is not actually as hard as all that. i took the time to write a detailed explanation because you seem to be really worried (you've sent me three messages now!), but really you don't need to give things this much thought most of the time. getting pwned sucks but it's generally unlikely, whereas making your life needlessly difficult because you're getting too anxious about security is pretty much guaranteed to be detrimental right now.
yes, there are strange and esoteric attacks out there, but most attacks are really boring phishing attacks. basic precautions will keep you safe from most of it. so please don't worry. you are almost certainly completely fine.
Can you get a virus/malware by viewing a link, but not clicking on it?
short answer: no.
long answer: what you're talking about is a zero-click exploit, which is an attack that works without user interaction (such as clicking on a link). an example of a zero-click exploit is the 2013 FORCEDENTRY exploit, which involved sending someone a file disguised as a gif on iMessage, and when iMessage automatically processed this file to display the gif, it would compromise their device. (don't worry about that one, it's been fixed for a decade).
i'm assuming you're talking about being sent a link on a messenging service/social media/etc.? in general, if an attack involves sending you a link that you can see, then it probably depends on you clicking on the link. if you don't click on the link, it's very unlikely to be able to execute code.
zero-click exploits are thankfully pretty damn rare, and require a lot of technical knowledge to design; when they're found, they tend to be fixed urgently. but I should caveat this by saying I don't know every exploit that exists out there. there have been Discord zero-day exploits in the past (for example in 2022). the main defence against this is standard security stuff: keep your software up to date, make sure your device requires credentials to do admin shit, encrypt your passwords and don't reuse them, etc. etc.
if someone sent you a link to malware and you didn't click on it, don't worry about it too much, I wouldn't expect trouble.
114 notes
·
View notes
Text
beginner’s guide to the indie web
“i miss the old internet” “we’ll never have websites like the ones from the 90s and early 2000s ever again” “i’m tired of social media but there’s nowhere to go”
HOLD ON!
personal websites and indie web development still very much exist! it may be out of the way to access and may not be the default internet experience anymore, but if you want to look and read through someone’s personally crafted site, or even make your own, you can still do it! here’s how:
use NEOCITIES! neocities has a built in search and browse tools to let you discover websites, and most importantly, lets you build your own website from scratch for free! (there are other ways to host websites for free, but neocities is a really good hub for beginners!)
need help getting started with coding your website? sadgrl online has a section on her website dedicated to providing resources for newbie webmasters!
HTML (HyperText Markup Language) and CSS (Cascading Style Sheets) are the core of what all websites are built on. many websites also use JS (JavaScript) to add interactive elements to their pages. w3schools is a useful directory of quick reference for pretty much every HTML/CSS/JS topic you can think of.
there is also this well written and lengthy guide on dragonfly cave that will put you step by step through the basics of HTML/CSS (what webpages are made from), if that’s your sort of thing!
stack overflow is every programmer’s hub for asking questions and getting help, so if you’re struggling with getting something to look how you want or can’t fix a bug, you may be able to get your answer here! you can even ask if no one’s asked the same question before.
websites like codepen and jsfiddle let you test HTML/CSS/JS in your browser as you tinker with small edits and bugfixing.
want to find indie websites outside the scope of neocities? use the search engine marginalia to find results you actually want that google won’t show you!
you can also use directory sites like yesterweb’s link section to find websites in all sorts of places.
if you are going to browse the indie web or make your own website, i also have some more personal tips as a webmaster myself (i am not an expert and i am just a small hobbyist, so take me with a grain of salt!)
if you are making your own site:
get expressive! truly make whatever you want! customize your corner of the internet to your heart’s content! you have left the constrains of social media where every page looks the same. you have no character limit, image limit, or design limit. want to make an entire page or even a whole website dedicated to your one niche interest that no one seems to be into but you? go for it! want to keep a public journal where you can express your thoughts without worry? do it! want to keep an art gallery that looks exactly how you want? heck yeah! you are free now! you will enjoy the indie web so much more if you actually use it for the things you can’t do on websites like twitter, instead of just using it as a carrd bio alternative or a place to dump nostalgic geocities gifs.
don’t overwhelm yourself! if you’ve never worked with HTML/CSS or JS before, it may look really intimidating. start slow, use some guides, and don’t bite off more than you can chew. even if your site doesn’t look how you want quite yet, be proud of your work! you’re learning a skill that most people don’t have or care to have, and that’s pretty cool.
keep a personal copy of your website downloaded to your computer and don’t just edit it on neocities (or your host of choice) and call it a day. if for some reason your host were to ever go down, you would lose all your hard work! and besides, by editing locally and offline, you can use editors like vscode (very robust) or notepad++ (on the simpler side), which have more features and is more intuitive than editing a site in-browser.
you can use ctrl+shift+i on most browsers to inspect the HTML/CSS and other components of the website you’re currently viewing. it’ll even notify you of errors! this is useful for bugfixing your own site if you have a problem, as well as looking at the code of sites you like and learning from it. don’t use this to steal other people’s code! it would be like art theft to just copy/paste an entire website layout. learn, don’t steal.
don’t hotlink images from other sites, unless the resource you’re taking from says it’s okay! it’s common courtesy to download images and host them on your own site instead of linking to someone else’s site to display them. by hotlinking, every time someone views your site, you’re taking up someone else’s bandwidth.
if you want to make your website easily editable in the future (or even for it to have multiple themes), you will find it useful to not use inline CSS (putting CSS in your HTML document, which holds your website’s content) and instead put it in a separate CSS file. this way, you can also use the same theme for multiple pages on your site by simply linking the CSS file to it. if this sounds overwhelming or foreign to you, don’t sweat it, but if you are interested in the difference between inline CSS and using separate stylesheets, w3schools has a useful, quick guide on the subject.
visit other people’s sites sometimes! you may gain new ideas or find links to more cool websites or resources just by browsing.
if you are browsing sites:
if the page you’re viewing has a guestbook or cbox and you enjoyed looking at the site, leave a comment! there is nothing better as a webmaster than for someone to take the time to even just say “love your site” in their guestbook.
that being said, if there’s something on a website you don’t like, simply move on to something else and don’t leave hate comments. this should be self explanatory, but it is really not the norm to start discourse in indie web spaces, and you will likely not even be responded to. it’s not worth it when you could be spending your time on stuff you love somewhere else.
take your time! indie web doesn’t prioritize fast content consumption the way social media does. you’ll get a lot more out of indie websites if you really read what’s in front of you, or take a little while to notice the details in someone’s art gallery instead of just moving on to the next thing. the person who put labor into presenting this information to you would also love to know that someone is truly looking and listening.
explore! by clicking links on a website, it’s easy to go down rabbitholes of more and more websites that you can get lost in for hours.
seeking out fansites or pages for the stuff you love is great and fulfilling, but reading someone’s site about a topic you’ve never even heard of before can be fun, too. i encourage you to branch out and really look for all the indie web has to offer.
i hope this post helps you get started with using and browsing the indie web! feel free to shoot me an ask if you have any questions or want any advice. <3
#webcore#old web#nostalgia#geocities#neocities#internet nostalgia#indie web#90s#early 2000s#y2k#guide#masterpost#html#css#javascript#internetcore#hope all these tags are appropriate for outreach!#wasn't quite sure#ayano was here#long post#i didn't want to advertise in this guide but if you're reading this my website is classicpokemonguide by the way!
24K notes
·
View notes