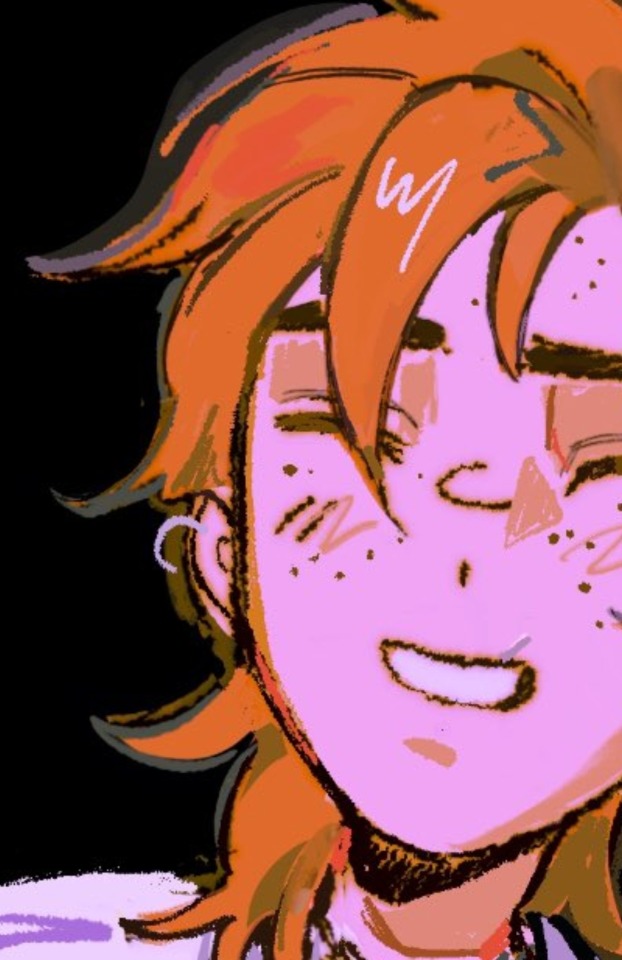
#maybe I'll make a tutorial if i make some more
Explore tagged Tumblr posts
Visit Tumblr Blog
Explore Tumblr blogs with no restrictions, modern design and the best experience.
Last Seen Tumblr Blogs


Fun Fact
The total number of visits Tumblr.com received during January 2021 is 327 million.
Text
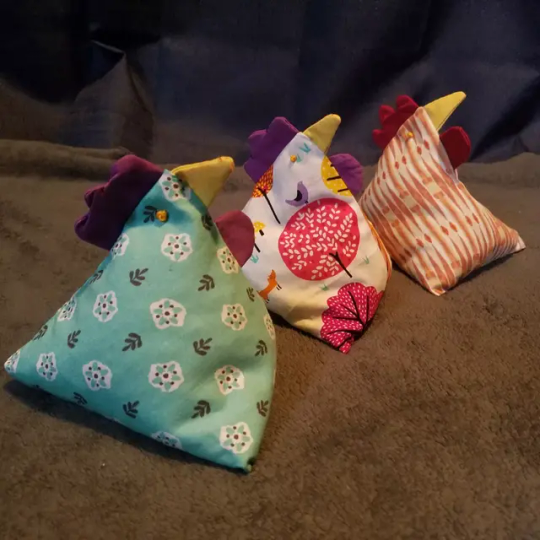

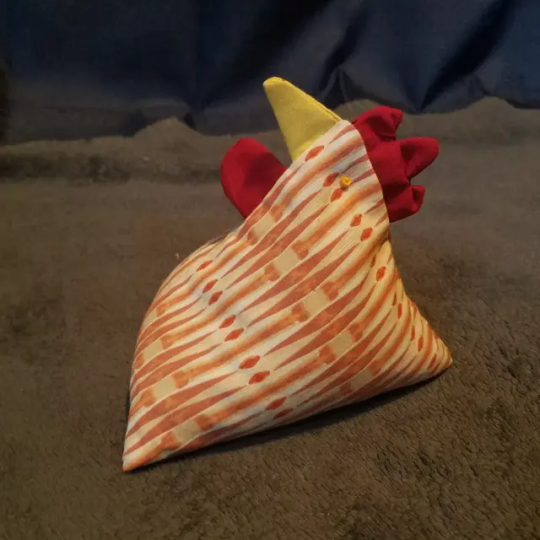
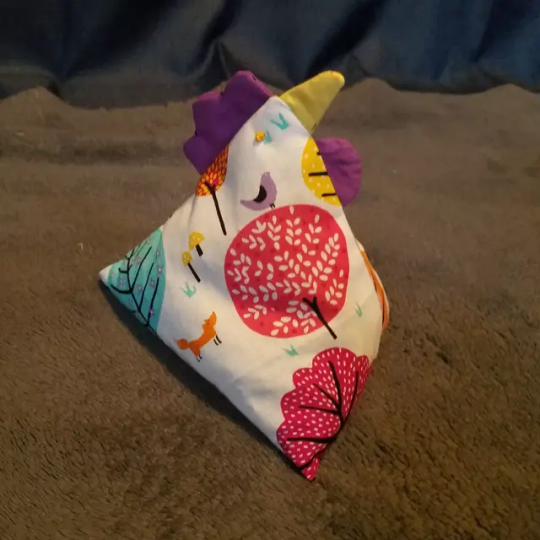
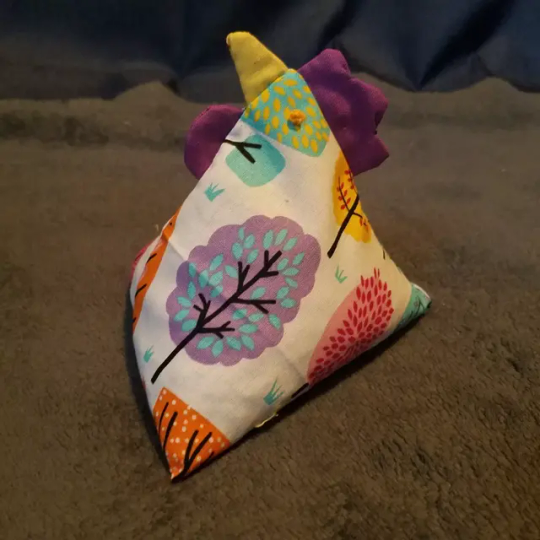
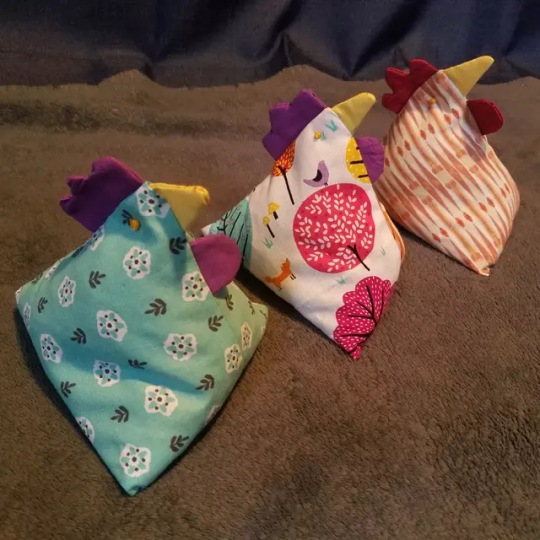
Forgot to post these simple little chicken hacky sacks/heat packs i made for my siblings for christmas. 100% cotton and filled with sunflower seeds (the chickens did NOT appreciate me borrowing from their stash but i was out of rice) so they can be heated up for hand warmers or to ease aches and pains
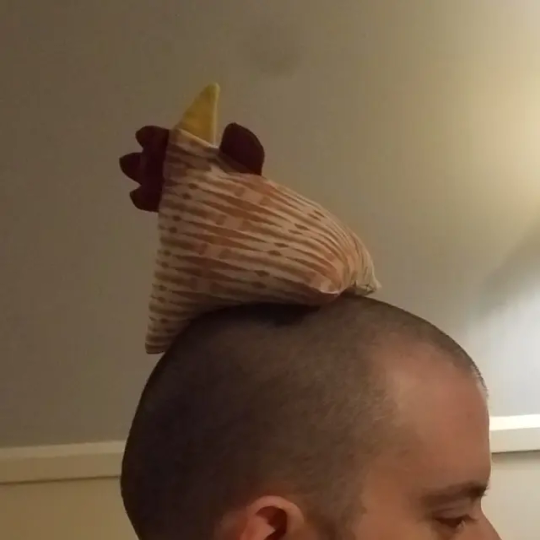
(or for balancing it on your head i guess)
#brother why#chickens#tiny fluffy dinosaurs#the BEST animals#chickenblr#sewing#hacky sacks#they are so easy to make#maybe I'll make a tutorial if i make some more#arts and crafts#textiles#makenna made a thing
1K notes
·
View notes
Text


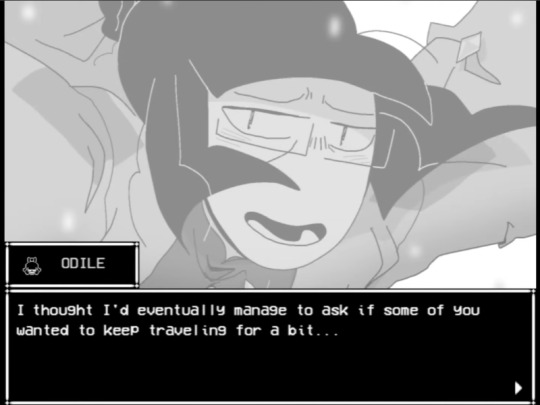
Top three insane and concerning Odile dialogues to me. Like the obvious reading here is that her problems will be solved because the King is going to kill her. And I do wonder if, aside from being pessimistic/trying to be realistic, she was straight up prepared to sacrifice herself.
As soon as she joins the party she expresses that she doesn't like the idea of leaving the fate of the country up to Mirabelle and Isabeau because they're younger than her. She says she's willing to do horrible things to protect the party on a family quest route. She learns some kind of craft that stops Siffrin from looping in Act 5. I don't think it's straight up Time Craft, which - as a reminder - could kill the user, but I can imagine it's still dangerous seeing as it's powerful enough to interact with Time Craft. And in the tutorial event, she puts herself between Siffrin and the rest of the party.
I don't think her potentially expecting to die against the King is her just throwing the towel either. She keeps emphasizing how the party has to be prepared and in top condition for the battle. It's more of a "if someone has to die, I'll take the bullet" kinda scenario.
That being said there's still the "One way or another part." which makes me wonder. Assuming she lives, her problems still extend beyond just the party splitting up. But going throught her friend quest, I guess she kinda accepted that trying to find closure in Vaugarde isn't going to be as fulfilling as she hoped and trying to make sense of her ties to it and how it informs her sense of self is going to be more complex than she expected.
But then, maybe the reason she expected her problems to be solved "one way or another" soon is because she expected she'd finally have the courage to ask the party to keep traveling together without worrying about the King?

The game keeps bringing up how the party has only known each other for a short time but a few months is long enough to get attached, especially if you've been by yourself for a long time like Siffrin or never quite found your place in your usual life like Mirabelle.
Maybe Odile doesn't even have that much to go back to in Ka Bue. Before it's revealed that everyone would like to stay together, Mirabelle seems content to stay on Dormont despite feeling insecure about her percieved lack of progress living in the House. Odile says once everything's over maybe she'll go back to Ka Bue but she isn't neccessarily eager to. Isabeau is the only one who really expresses wanting a change in his life once the King's defeated but even then it's kinda assumed he goes back to his town.


Bonnie is a little bit of an outlier here because of course they'd want to go back to their sister, but they still prefer that she comes along with them once they party makes it to Bambouche.
Maybe all Odile really wants right now is to not be left behind again.
#oh god this post wasnt supposed to be long#isat spoilers#stars n time#i guess ill tag this yeah#isat#in stars and time#odile
1K notes
·
View notes
Text
TITLE: I JUST GOT THE BAD ENDING!!! AND I DECODED SOME OF THE TEXT THAT APPEARED!!
Tried to decode this binary text that appeared in day 4

It was hard to read some of the text since it was glitching but this is what I got:
Erro 01101000 01101001 01101000 01101001 or 00100000 critical 01100001 ero 01101110 oror 01100111 e:/rror 01100101 01101100 unkno
The numbers only would be like this: (it's in binary)
01101000 01101001 01101000 01101001 00100000 01100001 01101110 01100111 01100101 01101100
Literally just translates to "hi hi angel" or "hihi angel"
Erro H I H I or (SPACE ?) critical A ero N oror G e:/rror E L unknown (?)
I thought I'm gonna get some useful lore and information in here game theory makes me overthink 🤑😭😭
Plz give me more stuff to solve I love puzzles like this..
Edit:
I just got here and I got hit with another line of binary, time to work this bitch's education

"ERROR I SEE YOU..."
BRUH DID I JUST FREAKING DIE JWHRBWNBFJNWNFND
Omg when do attempts of staying the night with him he chats to me and it's kinda hot like he is attracted to the actual player and not the person in the game, it's so cool.
My head hurts, what the hell is this?


I can't go any further than this .. and my title screen is all messed up now..
I'll be making a second post because this is too long, I'll be decodint whatever the heck this is if I can.. please help me y'all...
Sorry this is literally my first post and it's so messy..
I will tryta translate the text that appeared in this: I will maybe give a tutorial on how to get the bad ending tomorrow too if I remember. Remind me please!
#14 days with you#hours spent well (?)#bruh i spent so many minutes getting a migraine#thank everything that i had a class about computer#cuz if not i wouldve spent more time on this#yaaay day 5 is out and i just creamed#i cannot express on how much im happy to play this again#when emo ren [redacted] comes out#im gonna come too#attractive weirdos that r like this are so hooot#ilyyyaaaaaaaalll#dude i just decoded all that to just die#bruh#what the hell#sigh starting from whatever save i last remembered.
494 notes
·
View notes
Text
I saw that post about what to do if you're homeless again (the one that starts by telling you to spend all of your money on motel rooms lmao) anyway, here's a few thoughts, specifically for trans girls, cuz I don't really care otherwise tbh:
1) plan ahead, most trans girls are in precarious housing situations, you will have a much easier time when it falls apart if you already have a pack with most of the gear you need in it. Also, if you find yourself in a situation where you cant make rent, dont pay part of it, spend that money on gear, pocket the rest and leave, youll have a much nicer time. Look up your local eviction laws, you have plenty of time. (Gear list at the end)
2) travel! If you're in Arizona in May, leave. it's about to be hot as hell. If you're in Michigan in October, leave. It's about to be cold as hell. If you're in a big city, leave. It's way easier to be homeless pretty much anywhere else. Amtrak is cheaper and more comfortable than greyhound, hitchhiking is free and easy, if you're alone it's not that much slower than the previous two, and it's more fun, and sometimes people buy you food or whatever or give you money. I promise it's not scary and you're entirely capable of doing it, no matter who you are. 95+% of people who will pick you up are very nice. All you have to do is take the bus out of town, as far down the highway you can, to an exit with a truck stop if possible, then just stand on the side of the road with your thumb out until someone picks you up. You can stand at the bottom of the ramp(on the highway) near where the merge lane ends or at the top of the ramp(where there's usually a traffic light), the former is more likely to lead to cop interactions but will maybe get you a ride faster, check on hitchwiki for how the cops are in the area. don't be afraid to take a commuter bus or Amtrak to get out of a shitty cop area
3) skip shelters if you can (they are very occasionally a decent place to get stuff from) and encampments, good places to sleep include the trees near railroad tracks or highways, wooded areas behind shopping centers, sections of parks without paths, overgrown empty lots. Hang a tarp above you if there's an appreciable chance of rain, there's tons of YouTube tutorials on how to do this, maybe I'll make a post about what I usually do some day. There are many habits more fun than motel rooms, save your money for them lmao.
4) get on food stamps. This is easier in some places than others, but it makes the whole thing a lot easier. Just tell them you're homeless, if they don't give you a card the same day, you can probably ask to pick it up from that office, alternatively some drop in centers/day shelters can receive mail for you, or you can have it sent to general delivery(USPS service, look it up)
7) libraries are great for charging your phone and using wifi, but also keep an eye out, plenty of random outlets on the outsides of buildings are also powered
5) dumpster. sidewalk trash cans, Aldi, Einstein's, trader Joe's, pizza places, etc. You need to develop a bit of a sense for it but it's an easy way to get cooked food or travelling food or expensive food without spending resources. Also it's fun.
6) water is free, go into the bathroom of any gas station or grocery store in America(offer not valid in most big cities or on the west coast, but in that case just go to the library) and fill up your water bottle
8) hygiene notes: truckers get free showers from chain truck stops(loves, pilot/flying j) go there and ask them. convenient if you're hitchhiking, also you don't need to shower 3 times a day, really, you'll survive. Ditto with deodorant. Take care of your teeth though. Take your socks off every. day. Change them consistently. Safety razors give a good shave, work well without adequate water pressure, and the replacement blades are very stealable, they're kind of heavy though. Walmart makes these electric razors for women that take AA batteries and are pretty light but give a worse shave, also they kinda go through batteries, pick whatever works for you(cartridge razors suck)
9) traveling food notes: peanut butter is great, tortillas and bagels travel pretty well, tuna packets are pretty good protein for traveling(the ones with rice and beans or whatever are nice since theyre often the same price as the regular), condiment packets are free, hot sauce makes everything better, and mayo goes well with tuna and has a bunch of calories in it, salad dressing packets are free from truck stops and work well turning the Walmart shredded vegetable packages (labeled for making into slaw, next to the bagged salads) into a salad with real vegetables(not iceberg lettuce) in it or mixing in with tuna packets for even more calories than mayo
Gear world:
Necessary items(in order of importance): a gallon of water carrying capacity(an Arizona jug or other twist top jug is conventional, but a bladder+arizona bottles also works), a tarp(larger than 6'x9', not brightly colored), a hank of parachord, a sleeping bag (20° rated, synthetic insulation), a backpack with a padded hip belt(at least 50L, no more than 75), rain gear(a rain poncho might cover your pack too, a rain jacket can help with wind when its cold, a trash bag inside or outside your pack can keep it dry, a plan to watch the weather and not get caught also works), a z-fold foam sleeping pad, three pairs of socks, two pairs of underwear (at least one pair of boxer breifs strongly recommended if you arent incredibly skinny), a decent pair of shoes with good arch support, a functional jacket(skip if you got a rain jacket before), a base layer(wool or poly, absolutely no cotton)
Convenient items: a sleeping bag liner(cotton free, keeps you warm in winter and cool in summer), gallon zip locks to pack your stuff in(helps keep it dry and organized), no more than one change of clothes(as light as possible), a multi-tool(can opener, pliers, wire cutter), lighter(burning rope ends etc), spoon, floss and needles for patching
#anyway#not all encompassing or whatever#feel free to add your own tips but ill make fun of you if theyre stupid
4K notes
·
View notes
Note
can u maybe show some behind the scenes how u sketch out muzzles? or just heads in general? im trying to draw a dog specifically but really any animal would help lol
im currently in the middle of figuring out my style again, and im struggling with muzzles, myself :') i might make a tutorial once i get my bearings again, but in the mean time i can point you in the direction of one of my favourite reference tools!
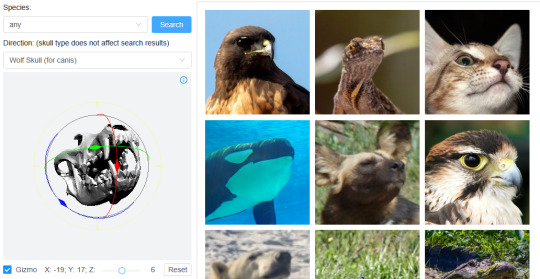
you can pose the skull at any angle and change the search to be specific species and it'll pull up images from google of animal's heads in that angle! LINK
i wish i had a more specific answer right now, i'll try to revisit this in the future <3
243 notes
·
View notes
Text
Luo Binghe Shimeji (Extended Version!)
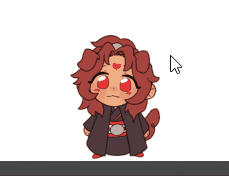


a couple years ago, riladoo created an adorable binghe shime! he could be picked up and tossed around your computer screens, climb around on all your windows, multiply, and all the other cute things that come in the standard base shimeji set.
more recently, i reached out to riladoo with a commission request - more action sets for binghe! over the past couple months, riladoo has worked hard to make some adorable binghe art, and i've updated all the source code and config files to accommodate the new actions! 🎉
the extended action set includes: - a 'sit and eat' idle action - two 'head patting' actions when the mouse hovers over him - a 'fall and cry' action for when he falls from tall heights - a 'land nicely' action for when you place him down gently
the original binghe shime listing on riladoo's gumroad has been updated to have all these new actions, so go grab him now!! he's free / pay what you want! 🥰
i've put more details about the new action sets + general shimeji setup tips below the cut, but otherwise -- LET THE BINGHE COMPUTER INFECTION COMMENCE !!
**these extended actions only work on windows, not mac. sorry ;w; the original shime set has a mac version, though!
Extended Action Set Details
when you download the files from riladoo, you're looking for the .zip file labeled "Updated Shime code" !

sit and eat this is an idle action that will trigger randomly the same as any other idle action. if you want to trigger it manually, you can right click the shime -> 'set behavior' -> 'sit and eat'
head pats these are 'stay' actions that will trigger automatically when you hover your mouse over the shime. i recommend hovering your mouse over his head for maximum head-pat-effectiveness! unfortunately, this action won't play if the shime is actively climbing a wall/ceiling - maybe in the future this can be extended further, but for now there are only head patting actions for sitting and standing poses :>
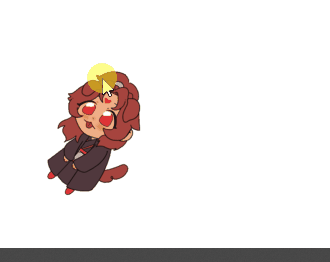
falling variations (crying / default / land nicely) there are now a total of 3 'falling' actions. to see the 'fall and cry' action, allow binghe to fall from the top half of your monitor. to see the standard/original 'fall and trip' action, allow binghe to fall from the low-mid range portion of your monitor. to see the 'land nicely' action, gently place binghe down at the bottom of your monitor. this means you're rewarded for catching binghe when he falls off a window - if you catch him and set him down, he lands nicely, but if you let him fall normally, he'll start crying!! 🥰
Shimeji Installation Tips
if you've never had a shimeji before - don't worry, they're super easy to install! i recommend following this video tutorial created by the person who originally created the source code for shimeji. you can skip the parts about downloading the shimeji itself - you'll get that from riladoo's website :>
if you install everything but opening the shimeji executable does nothing, download jarfix to resolve this issue.
if you follow the tutorial and update the 'interactive windows' but the shime still doesn't stand/climb on the specified windows, restart your computer to resolve this issue. alternatively, make sure you don't have any 'unexpected' monitors plugged in - a friend of mine had their shime constantly falling down through their monitor onto their screen drawpad, which was confusing until it got figured out!
if you are on mac instead of windows.... i am so sorry i actually have no idea how to help 🙇♂️ the original/default binghe shimeji set DOES have a mac os folder in with the downloads, but i've never tested it (don't use mac), and even if it works, it won't include the extended actions (i didn't build an executable for mac with the new code).
More Questions???
feel free to hit me up! in the replies of this post / through DMs / send an ask - whatever is best for you. i'll tag any asks i get about the shime with #binghe shime chronicles so they get archived nicely. i got very familiar with all the source code / config files to get this lil guy set up with his extended actions, so hopefully i can answer any questions you have! 💪😤
that's all!! i am so happy w how the new actions turned out - the art riladoo did for them is SO cute! - and i hope y'all will be, too!
489 notes
·
View notes
Text

Beginner's Guide to SMAUs
How Reign makes SMAUs!
༯ I use my own text messages. By this I mean, I text my own number and it'll send back to me my messages, then I hold one text to click the option of editing the conversation by tapping 'More' so I can delete repeat messages and come out with a final product like so:


༯ Other creators have their preferred platform or app, unfortunately I am not familiar with them so I can't advise you on how to use those. Your best bet will be asking a creator you like for a recommendation and for a tutorial
༯ I also crop the pictures to remove the time stamp and battery percentage at the top and the bottom line toggle to minimise distractions
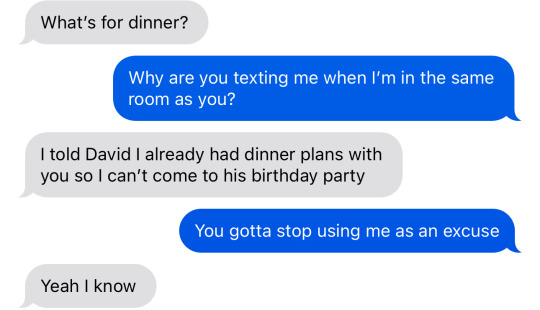
How to make convincing conversations!
༯ This is something I see some creators struggle with, and indeed, I struggle too from time to time. You need to remember that this isn't like writing full fics -- you have to write like the characters are actually texting. Sometimes people write as if the characters are conversing face to face but it's just formatted via text messages, which can take away from the immersion
༯ One question to ask yourself: would the character be having this conversation on text?
༯ Sometimes a creator sets the scene out as if the characters are in close proximity so it doesn't make sense that they'd be texting when they could just talk to each other
༯ To avoid this error, you could do two things.
1. Don't write about scenarios that can't happen on text. 2. Write something in to make it seem like they have a reason to text as shown below:
༯ You should also be talking the way one would on text. Sometimes it can be revealing for character exploration if a character abbreviates a lot, or uses emojis often (Inumaki), or maybe is very formal (like Nanami) so explore your preferences
༯ Definitely don't text like you're in a telenovela. It's unrealistic.
Other Do's!
༯ Do be consistent -- try to stick to a set layout. Since starting my smau writing journey, I've decided that all characters will either have one pic conversations, or two, or three and so on. Apart from my old smaus, you'll no longer find inconsistencies where Gojo has two messages, most other characters have one but then Sukuna gets three.
༯ Do minimise typos -- they can really take someone out of the immersion. Typos happen often, they really can't be helped sometimes so they're not this big, terrible, shameful thing. If they happen and you spot them and you can afford to fix it, then do so. My rule of thumb is, if the typo is egregious or makes the conversation suddenly confusing, then I'll change it. If they're tiny, then I don't.
༯ Typos can also be utilised -- I like to use typos to show that a character is in an out-of-the-ordinary state like, they're drunk or they're panicking, they're crying etc. This is another reason why typos should be minimised. So that when they are in your conversations, your followers will know that it serves a purpose and it isn't a messy thing you missed
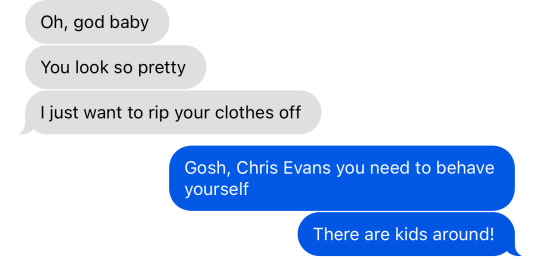
༯ Do get rid of the Read stamp -- they aren't a big deal either. But I always add an extra message at the end so that the blue message isn't pushed up. It's hard being able to fit everything you want to fit into one screenshot so utilising all the space possible is very important. Let me show you what I mean:


This also makes things cleaner AND you can maintain the illusion of whatever time of day the conversation is happening. You don't want to be texting like it's at night but then the time stamp reveals it's actually 11am for you.
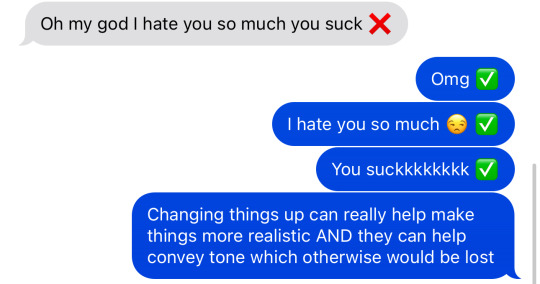
༯ Do utilise the reactions -- I use the reactions for a couple different reasons
1. To fill up space 2. To make sense of the conversation when I've had to delete a text to make room for everything important I want said 3. To highlight a lighthearted tone
༯ You do just have to take a pic before the grey copy pops up or if you want the grey person to react, then delete the blue reaction once the grey one has appeared. You'll know what I mean if you try it out yourself.
Now the Don't's!
༯ Don't use too many abbreviations -- they can be hard to understand for many people, for example, people whose first language isn't English (or whatever language the smau is in)
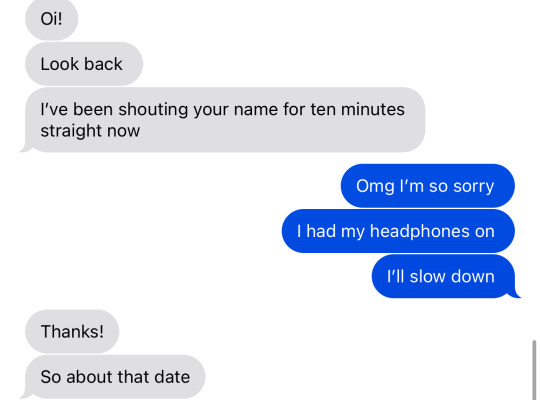
༯ Don't cut off messages mid sentence just because you don't have enough space -- it might be a little messy but of course, if you must, that's not a big problem, just make sure it's still easily read
༯ Don't just have one or two messages for the next pic -- if you need to use two or more pics to continue the conversation, then make sure it's two pics worth of texts and not just one single message. Again, utilise the space available
༯ Don't feel pressured to use real pictures -- simply saying [Sent 1 image] is enough and pictures take up a lot of space
༯ Don't send emojis on their own -- they come out large and then you're just wasting space
༯ Don't use the app when uploading more than 10 pics -- the app doesn't let you but the website allows up to 30
༯ Don't make each row one pic -- it makes your post annoyingly long. You should instead put three each unless you're trying to indicate that there's only 1 or 2 pics per character
How to tag!
༯ When you begin, it's best if you have all the tags you could possibly need already listed in your notes app or something so you can just copy and paste instead of writing it up again and again
༯ Or just copy a creator's tags (minus any personal ones they use ofc)
༯ Be sure to tag correctly though -- if something is purely smut, don't tag it fluff. Many people like to read only fluff because they don't want to read 18+ works so be respectful of that...remember minors are around us
༯ Also do not tag characters who aren't in your story for the sake of maximising notes -- it's annoying and you'll inevitably have someone complain lol
Most importantly: have fun!
༯ These are just my advice and how I do things
༯ There's no right or wrong way to write smaus so don't let anyone tell you otherwise.
༯ Have fun and don't take it too seriously
204 notes
·
View notes
Text
With a youtuber s/o
Pairing: idol Lee Know × cover dancer Gn!reader
Genre: fluff, headcanons, established relationship
Request: Can you make Minho w a YouTuber partner 😔
Warnings: straight up delulu, not proofread.
A/n: had fun doing this one so I'll probably make youtuber reader with some other members as well! | Daily click

for context, you'd be a dancer
and you'd post shorts on YouTube covering K-pop songs
some videos on those "public K-pop"
and maybe even tutorials
you'd be relatively famous in this type of field (kinda like innah bee yk)
and one day, one of your shorts reaches Minho
we saw Minho's reaction to boy's planet, we know he's gonna judge����
so when he saw a video of you dancing god's menu he was like "not this again"
but it turned out to be pretty good??
very good actually
and the set was kinda cute and you were even dressed up on the MV theme
there was a clear dedication put into the work you were doing
so he might've clicked in your channel to see your other videos
and he watched all your videos
really, all of them
the improvement was so good to watch
then he proceeds to watch your longer videos and to follow you on insta and tiktok
and just like that you became a sort of celebrity crush to him
he even started to watch your tutorials to learn other idol's choreos
yes he is a professional dancer and he could learn it by just watching the dance practice a few times
but what's the fun of it?
so he would watch your 40 minutes tutorials happily
but one day ! he finds out that you were invited to perform at KCon and lmao, guess who pestered jyp staff just so he could go there as well
yeah you got it right
besides finally seeing you in real life (and why were you so gorgeous??), he got the opportunity to see you backstage
and maybe even talk to you for a bit
maybe film a challenge with you
maybe even get your number
who knows?
the thing is, you guys got to know each other after that day
you guys would talk pretty much everyday
and he would often invite you to the practice room just so you guys could dance a bit together
two dancers in love must be something so cute to witness
he would also help you with some choreos
especially the stray kids ones
would be extremely offended if you delayed one of skz choreos to film another cover first
and would be more than happy to teach you everything you want to know
will probably make excuses to be way too close to you when teaching you
also helps in your videos
to film, to make the scenario, to help with the lighting...
sometimes he lends you pieces of the outfit he wore in the MV and the comments are always like "oh my God, this looks so much like what Lee Know wore!"
haha funny story...
anyways
he's your #1 supporter and you can be sure he will always be the first one to like your videos
and will share every. single. video with the boys
like "look at my partner!! So talented!! Why can't you all be like that"
but they can also tease him a lot because of that, as Minho always gives the most soft smile ever whenever he sees you uploaded a new video
as I said, your biggest fan indeed
Masterlist | you'll probably like: Fri(end)s
Reminder that this is all fiction, this does not represent the members in real life!
Thank you for reading <3
Taglist (open!): @yuyubeans @dandelions-143 @sleepyleeji
Dividers by @cafekitsune | images 1 2 3
#celi headcanons#stray kids#stray kids fluff#skz fluff#skz#stray kids soft hours#stray kids soft thoughts#skz x reader#skz x you#skz x y/n#skz fics#skz fanfics#skz fic#stray kids imagines#stray kids headcanons#stray kids scenarios#stray kids lee know#lee minho#lee know fluff#lee know imagines#lee know x reader#lee know x you#lee know x y/n#lee know headcanons#lee know scenarios#lee know#minho
477 notes
·
View notes
Text
What's That Brush For?
Pairing: Lando Norris x reader Requested: Yes Summary: Lando is fascinated by your morning makeup routine :) Words: 765
Please do not repost, thank you, and leave some feedback :)

Lando stood in the doorway, his eyes wide with fascination as you meticulously applied your makeup. The morning sun streamed through the window, casting a warm glow that made the whole process feel even more intimate. The Brit had been standing there for a good five minutes, observing you while you were pulling your hair into a high ponytail, without saying a single word.
As you had moved on to doing your makeup for the day he just kept watching, mesmerized, as you skillfully blended foundation and brushed on eyeshadow with precise movements.
“Wow,” he said, leaning in closer, his voice tinged with awe. “I never realized how much goes into this. What’s that brush for?”
You watched as he picked up the little tool and looked at it wide-eyed, bopping its soft bristles with his index finger before bringing it up to his eyes and inspecting it closely.
You glanced up to your boyfriend. “This is a blending brush. It helps smooth out the eyeshadow so there are no harsh lines in between the colors.”
Lando nodded, clearly enthralled by the whole situation. “Can I try? I mean, I probably won’t get it right, but it looks like fun.”
You smiled at him, amused by his enthusiasm. “Sure, give it a go. Just be gentle and please don’t poke my eye out, I kind of still need it.”
“Shut up, you muppet, as if I was that clumsy…” he gave you a sour look and you chuckled, remembering some moments he definitely had been that clumsy.
As he carefully tried his hand at blending the different powders on your eyelid he asked, “Does it always take this long? I feel like I’m messing it up.”
“Practice makes perfect,” you reassured him, watching as his concentration intensified, his tongue now poking out of his mouth making him way more adorable than should be allowed. “It takes time to get the hang of it. And don’t worry, you’re doing fine,” you ensured him after a quick glance into the mirror.
He looked at the result and grinned, a mixture of pride and humor in his expression. “This is really cool. I had no idea it was such an art form. How did you learn all this?”
You laughed softly, appreciating his genuine interest which is something you never would have expected. But then again, this was Lando and he always was full of surprises. “A lot of trial and error, plus some tutorials online. It’s like anything else, practice and patience.”
Lando’s eyes twinkled with enthusiasm. “Maybe I should start learning more. Who knows, I might end up being a makeup artist on the side.”
You chuckled at the boy next to you. “You never know. It could be a fun skill to have. But don’t quit your day job just yet.”
He grinned, returning to his spot by the door, crossing his arms in front of his chest and leaning against the frame. “Fair enough. But if you ever need an assistant, I’m your guy,” Lando announced proudly, pointing at himself with his two thumbs.
“Thanks, Lan. I might just take you up on that offer someday. You know,” you said, applying a bit of highlighter with a deft hand, “makeup can be a lot like racing in a way. It’s all about precision, timing, and a bit of creativity.”
Lando raised an eyebrow, intrigued. “Really? I never thought of it that way.”
“Yeah,” you explained, smiling as you looked at him. “Just like in racing, you need to have good technique and an eye for detail. And there’s always room to experiment and improve.”
He nodded thoughtfully, clearly processing the comparison. “I guess it makes sense. And I suppose the same principles apply, practice makes perfect.”
“Exactly,” you agreed. “And it’s all about having fun with it, too.”
Lando’s grin widened. “Well, I definitely had fun. Thanks for letting me try it out. Maybe next time we can swap skills, I'll give you a few racing tips if you show me more about makeup.”
“Deal,” you said, laughing. “Looking forward to it. But how about a cup of coffee first?”
“That can be arranged,” Lando smiled and gave you a quick kiss before he headed out into the direction of the kitchen.
As the door clicked shut behind him, you tidied up the bathroom counter, feeling a small bit of excitement about what had just happened. It was one of those small moments that made you appreciate Lando just that much more and perhaps you soon would learn something new about his world too!
#ln4 x reader#lando imagine#lando norris x reader#lando norris imagine#lando x reader#lando norris#lando fluff#lando fic#lando x y/n#lando norris x y/n#landonorris#f1 fanfic#f1 fic
608 notes
·
View notes
Text
This is just a post of me collecting previous tutorials and things I've written, because I'm going to use them again in a future review.
So here's my EGL/lolita fashion resources from across some time
Fabric selection:
Picking quilt prints to use in lolita fashion
Spoonflower sample pack: This has a lot of detailed shots about why different fabrics do and don't work super well for lolita
Uncommon fabric choices
The original guide to prints, photographed with a potato and shouting out a long-gone lolita resource that predates lolibrary
Lace:
The original 20dollarlolita lace post
Close up pictures of lace on lolita fashion garments, part 1, part 2, part 3
How little details change lolta vs loliable
How to research on lolibrary
I say a lot about mood boards because I believe that, when it comes to handmade lolita, being able to research trends and articulate your thoughts to other people is more important to making good lolita than, like, having a sewing machine is.
Adapting cosplay concepts into lolita Some more stuff on lolita and cosplay, and adapting drawings into lolita when you don't have a foundation to know how to construct lolita.
Few thoughts about getting started wearing lolita few thoughts about getting started sewing lolita
Why you should copy an existing lolita garment's construction for your first (and maybe many) pieces (I still do that quilte a bit)
How to actually do that copying
It's getting late and I'm tired and maybe I'll add to this later. If anyone out there thinks I've missed something in error, please let me know. I will not be going back to fix the formatting of this post and this time and I do not suspect that I will ever do that ever.
154 notes
·
View notes
Text
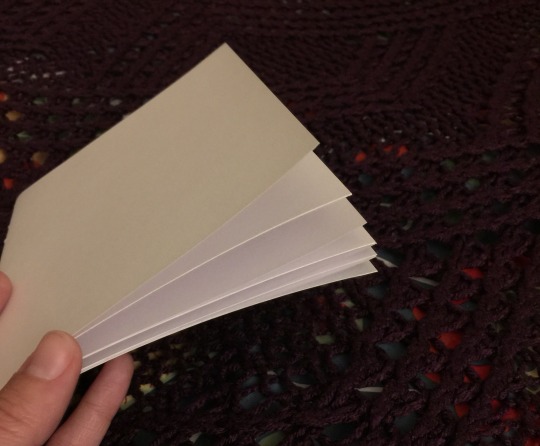
I've always wanted to learn bookbinding, ever since I was a wee little nerd, but there are a lot of things I've always wanted to learn, and this one has both a daunting upfront materials cost and a daunting upfront research cost. however, my sister is a jewel among siblings and gave me for christmas last year a handy dandy bookbinding manual, a block of good paper, and a little bag of tools.
but I still didn't have a suitable workspace, nor any of the many important tools and materials that she didn't include in her gift. so I just read the manual and pined. until maybe a month ago I got fed up with pining, flattened a cardboard box for a cutting mat, and went to town.
and I'm real proud of myself, so here's me rambling, plus photos!
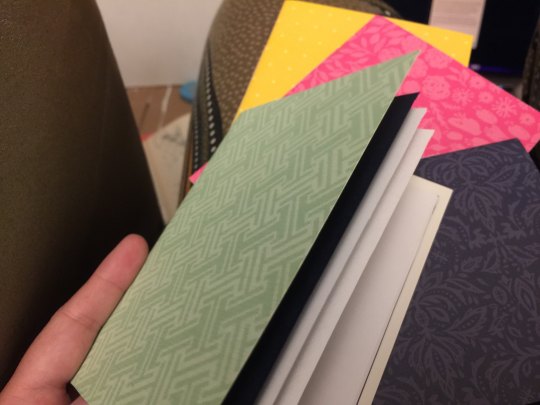
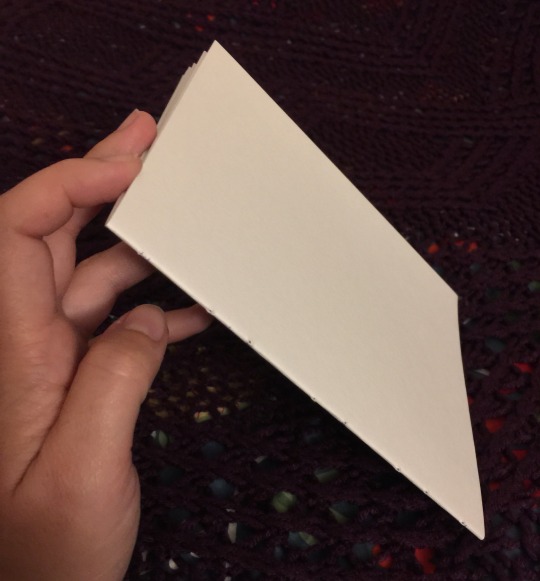
I went to the thrift store and got glue + some fabric to bind the cover, went to Michaels for a paintbrush (and later went back for a metal ruler lmao it's amazing how useful it is to have a straightedge for cutting the paper), and...could not find material for the cover boards. so I went home and pined some more. but the urges were too strong, so after a couple hours of moping I got a stack of printer paper at the grocery store (I could not bring myself to use the good paper for my first, inevitably weak attempts, I just couldn't do it) and started making a little booklet. which was a great idea, it turned out, since it makes for good practice with cutting the paper, measuring things, punching holes in the signatures, etc.
I have a big box of greeting cards from Michaels, which I used for the covers. it didn't feel like I was making a Real Book, so I got some colored paper from the stationery store and used that for end papers.
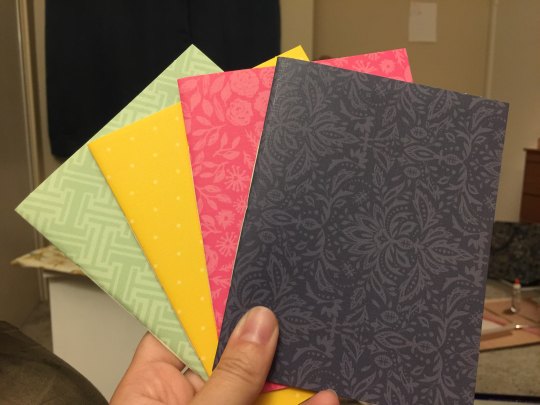
so fancy~
galvanized by this success, I ordered a stack of chipboard online to use for cover boards; and once I was confident that I could cut paper without making it look too stupid (getting that straightedge ruler sure helped lol), I made signatures out of the good paper, left them under some heavy books overnight since I don't have a book press, and then punched holes in them! (huzzah for this nice video on getting the holes right)
my sister's gift included good linen thread. it's unwaxed, but after some poking around on r/bookbinding it looks like that just means I'll have to be more careful to avoid tangles and keep good tension. I am fine with this. I can be extra attentive. (I considered just running it over a beeswax candle, but one commenter said if your wax has paraffin in it, it could melt in a hot car, ruining the spine. I can't guarantee my candle is 100% beeswax, I didn't make it, so maybe we just move on.)
I don't have good linen fabric to use for the tapes, but the important part there is that the fabric be thin, sturdy, and not stretchy. the probably-cotton I got from the thrift store fits the bill, so it'll do!

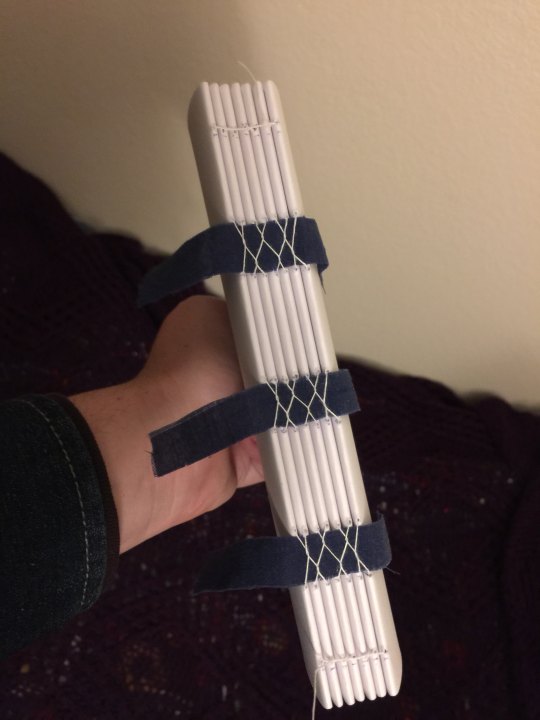
this is a french link stitch, which I got from this exceedingly good tutorial. apparently it's strong enough on its own that for a book of this size, I don't actually need tapes, but I'd already cut the things so eh here we are. and tapes plus french link will make it a stronger binding still (according to a friendly redditor on r/bookbinding), so we carry on.
specifically we carry on to the gluing step. now as I mentioned, I do not have a book press, and you....kinda need one for this step. you need to hold the book block in place with the signatures facing upwards, pressed together hard enough that the glue won't run down between them and stick the pages together (though you do want the glue to get between them just a little, just for like a 16th of an inch). you at least need some clamps and a couple boards to sandwich the book block with.
but you know what? I'm not a professional, this is my first ever book, if it's a little bit off it'll be fine. so we grab all the heaviest books off the bookshelf and improvise.
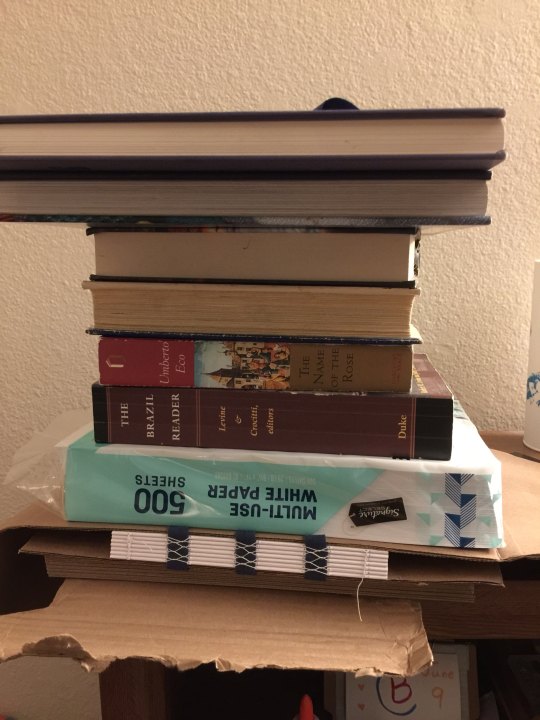
it's fine! I'm sure it's fine! and just in case it's not, I've tucked a bit of cardboard underneath to catch any glue that drips down so it won't land on the floor. see? I'm prepared! I'm acing this.
and actually, it really was fine. I used clear elmer's glue, applied with a flat paintbrush from the art supplies aisle at Michael's, and frankly I liked the way the flat paintbrush let me slip glue in between the signatures. I did poke around on a couple bookbinding sites to see what kind of glue I should use, and the gist is that although there are better options than this, elmer's glue is perfectly serviceable, and the main downside is it's not archival grade. but I don't need my first bookbinding attempts to last 200 years, that's fine.
the next step is to add the mull. mull is a specific type of fabric – extremely loose-weave linen – and the idea is to paste it down over the spine to essentially hold the tapes and signatures all in place in relation to each other.
but I don't have mull! so I'm using more of the thrift store probably-cotton, because it's thin enough and not really stretchy at all. I'm sure this will be fine too. I painted a layer of glue onto the spine, then left it to dry a bit while I measured and cut the fabric, then painted a generous stripe of glue down the center, where it'll affix onto the spine. then I added a bit more glue to the spine, just to be sure, and pressed the mull into place, rubbing it thoroughly to make sure it's firmly affixed to every signature, with no creases in the fabric or air bubbles beneath it.
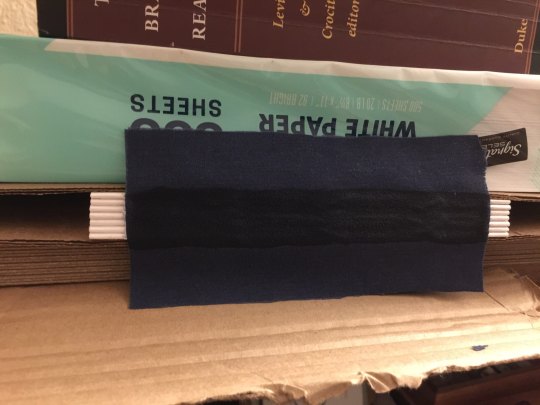
honestly I might have overdone it on the glue. I've never done this before, I don't know! I think it's okay, though – I tried not to ever let it become a thick layer, just a slight coating, since the danger of too much glue is that it might crack once dry and weaken the spine.
and now we leave it in the press overnight to dry, and pick up the next step in the morning!
#finx rambles#bookbinding#finx makes stuff#technically this is the second hardcover book I've made#but it's the first I'm making using Approved Techniques™#instead of watching a handful of half-relevant youtube videos and making up the rest#which was fun!#but did mean that once I was done I didn't know where to go from there#and at the time I couldn't find better resources#(I really wanted better youtube videos! just didn't know how to find them idk)#(it was 2020 I was unwell. as I'm sure we all understand)#but now I have an abundance of good sources#and I'm determined
586 notes
·
View notes
Text
Sims 4 Render Lighting Tutorial

"Environmental Lighting" won my most recent poll, so let's get right into it!
A few notes before we begin:
I render exclusively in cycles!
This tutorial assumes some basic knowledge of blender
Though this tutorial covers the basics, HDRIs can be used in conjunction with any scene/your built scenes
I decided to focus on environmental and other lighting in this tutorial, since they all kind of go hand in hand.
For this tutorial, I'll be using my recent Cupid Sim. Here's a render of her with no additional lighting:

1. Base lighting
In any full body, single sim render (like lookbooks, for example), I really like to use a glowing base. It grounds the sim a bit and casts some interesting lighting on them.
To do this, I add a circle under their feet by pressing shift+A and selecting circle.

An empty circle will appear, but we need it to be a solid disk, so go into Edit mode (by pressing tab while the circle is selected) then hitting F on the keyboard to fill it.


After that, you can go into the Materials tab and add in color and glow.
Mine is adjusted like this:

And gives this rendered result:

2. HDRIs
HDRIs (High Dynamic Range images) are extremely useful when it comes to environmental lighting, I always use them now to add better/more dynamic lighting to my renders.
HDRIs are 3D/panoramic, which makes them extremely useful.
You can find/download HDRIs online in a few diff places: PolyHaven, AmbientCO, and Blender Market.
There are also several available for FREE using BlenderKit (my preferred method).
So how do you use an HDRI?
We can add HDRIs to our render by navigating to the world tab and changing the color to "environment texture".


I chose this vaporware HDRI from BlenderKit, & here it is with no adjustments, but it's looking a little rough so let's adjust it.

By adding vector nodes, we can adjust how the HDRI behaves. Here I mostly use the Z rotation and the background strength:


Here's the same render with the Z-rotation set to 50, 150, 200, & 250.


You can put in any value for the Z-rotation, this is just an example of how the HDRI turns. This is maybe not the best example of the rotation, but putting her in a forest just didn't feel right lmfaooo, hopefully you can see how the light changes on her depending on the rotation.
You can also adjust the strength of the HDRI. Here's the HDRI (rotated to 150) set at .5 and 1.5 strength:


For this tutorial, my favorite lighting is the HDRI set to 150, and the strength set to .5, like this (this is a rendered image):

3. Transparent HDRIs + Point Lights
But I'm not fully happy with the lighting. I don't love how the HDRI is a bit blurry, so I'm going to set it to be transparent.
To do this, go to the Render Tab, scroll down to the Film option, and check Transparent:


The lighting effect from the HDRI will stay the same, but the background will be transparent.
From here, you can add a background (when I do this, I like adding a plane, & moving/shading it until I'm happy (kinda like this):


NOTE that you have to put the plane far enough behind your sim so it doesn't affect the HDRI lighting too much.
SECOND NOTE You can use this same method to use HDRIs in conjunction with scenes. They can provide the perfect backdrop!
This is still really dark, so I'm going to add three point lights: -Two on either side of her head/shoulders that will be smaller (in radius) and brighter -One in front of her to add actual light (so details aren't lost)

Here's how I set up my lights.


The pink light settings are for the two point lights on the sides The white light setting is for the light in front of her
For a basic render, this is almost good enough for me, but I really like the glowing effect I get in my renders.
To achieve this, we have to go to the compositing tab:
4. Compositing
Full disclosure, my compositing tab is set to glow by default (that's how much I love it), so all of the renders in this tutorial have it turned on.
I use the glare node and set it to fog glow.
Here's my preferred setting:

I prefer the fog glow effect, but bloom, ghost, streaks and star are also options.
Here's a guide to the glare node!
Tbh, I never use any of the other settings, so I'll leave this tutorial here for today.
Here's the final result (with no additional editing):

If you have any questions, please don't hesitate to send an ask, message or join my discord (no minors pls) for help! <3
#ts4 render tutorial#ts4 blender tutorial#sims 4 render tutorial#sims 4 blender tutorial#sims render tutorial#sims blender tutorial#salemsims tutorial#render school tutorial#blender
193 notes
·
View notes
Note
what kind/style of endbands do you usually do? they look so good 👀
hi!! sorry for taking a while to answer, I wanted to make sure I could give you my best answer.
I usually do what's called a "double core" endband. I use double core endbands over the "bead on front" method because bead on front style is not great for uneven distributions of color, irregular patterns, or using more than three colors. Functionally it works by having your extra threads wrapped up inside the thread that is showing, forming the smaller secondary core. Ultimately you are doing figure 8s around the main core & then your secondary core of thread. This keeps things pretty neat & tidy. The tutorial I first used was this one by DAS Bookbinding, though I don't think his endband tutorials are his best ones. Another binder I've spoken with endbands about a lot is maleeka, who recently did an endband tutorial herself.
maybe I should do one... but it takes a lot for me to get enough motivation to make videos. I'll take this opportunity to write up some tips I've shared when people ask instead:
1. Endband core material is the MOST IMPORTANT component. You need a core that is stiff but flexible - it should NOT be floppy because it wiggles everywhere under the tension of the thread, but still needs to flex with the opening & closing of the book. You want something that doesn't compress, to reduce tension shifts in thread creating a lumpy endband. Have a smooth core is less critical but helps to avoid snagging threads & allows you some leeway on sliding threads around for adjustments. My personal choice is smooth leather jewelers cord (link is just an example, I get mine from a local craft store).
2. Thread size. All your threads need to be the same size; it will be visible if you are using two different sizes, and mess with your front core. Additionally, I know lots of people will use larger twists of multiple strands of embroidery thread, which can work, but is more likely to compress & alter its size in unexpected ways. A single strand is preferable. If you want something thicker you can find some thread weights that are heavier twists intended to be used in a single strand, not pulled apart. I prefer smaller sizes because it works better for the gradient designs I like.
3. Silk thread is your friend (if you can spend the money on it). It reduces fuzz (no fuzz like you get with cotton/DMC embroidery thread), it's usually easier to manage, has a more compact twist, and a higher shine. I use Japanese silk hand sewing thread in size #9 (9号). There's multiple brands (Tire, Daruma, KNK/kanagawa, etc). Here's a wholesale listing (minimum 20,000¥ for international). A non-Japanese brand is Guterman silk (German brand). Both the Japanese & German threads come in a heavier weight (Japanese is #16, Guterman is buttonhole).
4. Thread tension is the most important part of the actual technique. You need to ensure the threads currently wrapped in the secondary core keep tension when you are working the thread around them.
5. Working on a curve. This is only really relevant if you're doing an endband on a rounded book, but the circumference of the curve means there's more real estate on the outside vs inside of the curve. Sometimes this can cause bunching on the secondary core. My own solution to this is that sometimes I wrap the primary core but drop a wrap here or there around the secondary core (only between two wraps of the same color I'm dropping). I uh... don't know of anyone currently recommending this besides myself so I can't point to any pro endorsement for this method, it's just what works for me. Forgive my terrible writing:
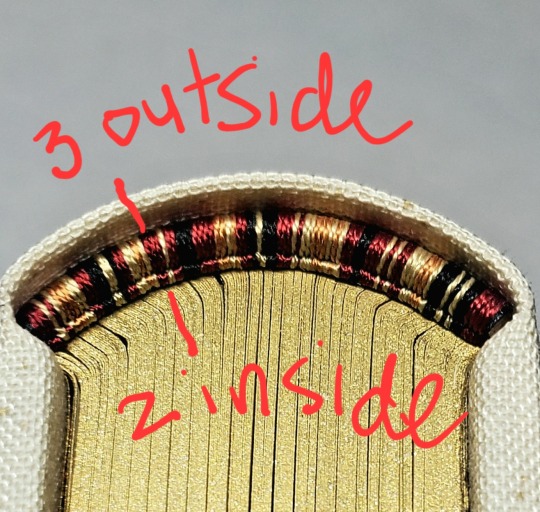
6. Pattern management. I... don't really plan much how my patterns sit on the spine, which is not very helpful. HOWEVER you can do some pattern management on the fly, if you really want your pattern to end at a certain place. Thread can be packed more or less densely on the core, resulting in some pattern compression; you could also strategically drop wraps in less noticeable locations. An unintended example: I was replicating the pattern on this endband (left) when I realize I wasn't packing the thread as densely as I had the first time around (right), which resulted in the overall pattern taking up more space. You can do this on purpose, if you need to.
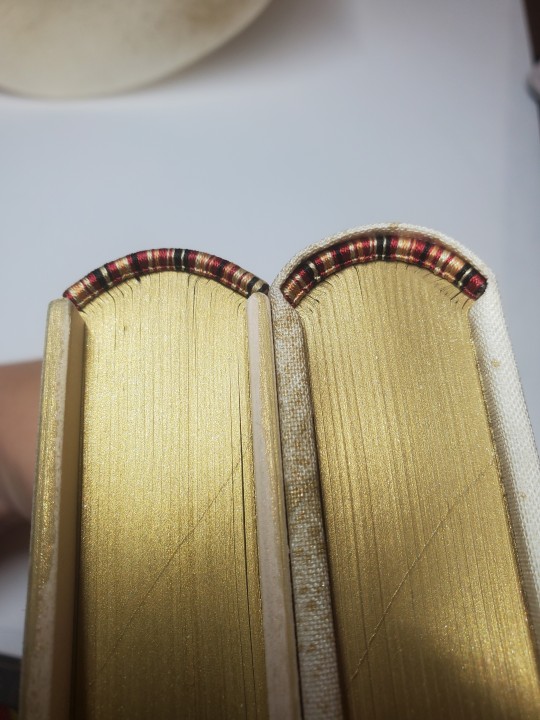
this was way more than you asked but it gave me a chance to put all this in one spot. Best of luck in vanquishing the dreaded EndWyrms.
#fanbinding#bookbinding#celestial sphere press#in progress review#ask des#i tend to shock ppl a big when i say i don't actually enjoy sewing endbands#i merely Tolerate it#all of this knowledge is 100% spite driven to reduce my own frustration
380 notes
·
View notes
Text
Ruggie Bucchi Shared Lines

Tutorial: You'll miss out if you just stick around here. Hurry, let's go.
Level Up 1 / Buddy Level Up: Sheeheehee, ain't this nice!
Level Up 2: What a weirdo, tryin' to take care of me like this...
Level Up 3: Guess I'll try ta get even stronger.
Level Max: Right now, I feel like I can do anythin'. Guess it ain't a bad thing to put in a little effort once in a while. Hehehe.
Vignette Level Up: Ain't you a good-natured sucker~ It ain't my problem if it all backfires on ya. Well, maybe I can help ya depending on what it is.
Spell Level Up: I always thought my magic'd never amount to nothin' good... Looks like I can get by.
Friendship Level Up: You wanna know if I’ll come back again? Hey, ’s long as it’s free, I’ll come anytime! And hey, if I get some snacks out of coming here too, that’d be even better. Shishishi.
Friendship Level Max: I gotta make sure to thank ya for always invitin’ me. Oh right, let me know if any of your furniture breaks. Not sayin’ I’ll do it for free, but I can give you a friend’s discount to fix it.
Uncapped: Looks like I'm still maturin'. Guess I gotta keep ya around a little longer, huh.
Groovification: See, only crafty folk can survive in this world. It'll be good for you to stick around me, too.
Lesson Select 1: There ain't a class on hagglin'? Guess I shouldn't've expected that from some hoity-toity mage school.
Lesson Select 2: You don't gotta put too much thought into it. Ain'tcha super diligent.
Lesson Select 3: Which one're you pickin'? I'm def gonna pick out somethin' that'll be useful for survival.
Lesson Start: Let's go, time to study!
Lesson Finish: Whew, gotta make sure I don't get left behind.
Battle Start: This is my territory!
Battle Won: Seems like I’ll be having some delicious dinner!
Trouble 1: C'mon, I totally was gonna end it at just the right moment~
Trouble 2: I woulda been fine if we kept goin’ for a little longer, though?
GIFT CALENDAR 2023: “How will you be spending the day?” Obviously, I’m gonna be workin’! Today, I’m at a cake shop, and tomorrow I’m waitin’ tables at a restaurant… The holidays are coming up, so 'tis the season for a ton of high-payin’ temp jobs to fill my pockets, too! Shishishi!
Birthday Login Message 1: Today's the day I've been waiting for: my birthday! You got me a present, riiight? ...Wait, huh? You really got one for me? ...Uhhh, I really can't with how straight-forward that was. Well hey, thanks. Hehehe.
Birthday Login Message 2: Thanks for celebratin’ my birthday with me! Since it’s my big day, we should go grab some grub and… Ah! Oh noooooo, this is sooooo terrible, I forgot my wallet… I guess I can’t buy… Eh, you’ll treat me? Really? Maan, it’s really great having such a generous junior like you! C'mon, let’s go, let’s go. Shishishi~
Birthday Login Message 3: Whew, you really helped me out there, carryin’ the gifts I went n’ collected from the other students ‘round campus. Eh? You helpin’ me was your gift…? Wait, wait, wait, those are two totally different things! …Oh, you were kidding. Hey, you really hurt me just now, so you gotta give me another gift to make up for it, 'kay.
Birthday Login Message 4: Thanks for the birthday wishes! Sooo, I wonder whatcha got for mee~ Handmade donuts? Uh-huuuh. Y'know, I’m pretty particular about how my donuts taste… [chomps] Huhー this’s so good…! How’d youー!? It’s almost like it came from a… Ohhh, so these are handmade donuts from a pastry shop. That makes more sense.

Requested by Anonymous.
101 notes
·
View notes
Note
Are you taking request? If so idk if you know anything about Booster Gold but I'll give you half a sandwich to write him getting railed.
Michael Jon Carter x male reader
ficlet

I love booster gold, hes one of my favourite DC characters and I wanna keep him in my pocket. I have my own headcanons that I sprint with, and I want to crack him like a glowstick, so enjoy my headcanons for future gender and gender presentation. bread.
I really wanted to write about his butt, but somehow I didn’t. sigh, maybe another day then. no outright railing, but enjoy anyways.
I could really eat a sandwich, but make sure its dark ryebread, I don’t eat white
“Really babe? This is what you’re into?” Michael questioned as he pulled the sheer fabric up his ankles, strong calves, up his strong sculpted knees where he had to give a small jump to slide it up all the way. The skirt was short, nowhere near the type of thing you would be allowed to wear in public. It felt more like useless ruffles added on for dramatic effect.
The soft blue fabric of the panties he wore left little to the imagination. Being from the future where most people had been perfected also meant Michael was perfect down there, which resulted in the panties being filled to the brim.
The lingerie didn’t make much sense to Michael, well, some of it did. But the lip-gloss and makeup made it all a little more confusing. The past was strange, gendering literally everything to the point where it was a kink to see fit muscular men like him being feminine. But hey, Michael liked it when you spat in his mouth and treated him like dirt, so who was he to judge.
At least Michael knew how to do his makeup, even if he had to look up some tutorials for it to fit the current year’s standards. Some blush here, some contour and highlighter there, a little bit of this, and a little bit of that. As dumb as people thought he was, Michael knew how to do his research, even if he had Skeets help him look it up.
Michael could almost hear your shaky breathing through the bathroom door, where he was standing, adjusting the cups of the bralette attached to the lingerie. It did stroke his ego so much. Michael knew he was hot by the year’s standards, even if he was just average in his time. It still made blood rush south knowing he was so yearned after, even with all the embarrassing things he did trying to be a hero.
Being told he was charming and endearing was new, which was how you had caught Michael’s attention the first time. He was used to being called hot, but endearing? After he had just crashed right into you because of something dumb he did? Oh, did his heart start racing. One thing led to another, and now here he was, reapplying his lip-gloss one last time to make sure his lips really popped.
Dressing feminine by the pasts standards didn’t do much to Michael, since clothes weren’t gendered the same way in his time. There were still gendered things obviously, but it wasn’t as extreme as the past. It did still make him feel pretty and vulnerable, so there was that.
“You ready babe?” he cooed, stepping into the heels that had been specially ordered to fit him, since they apparently didn’t make heels in his size in the past. Michael swore he could hear you gulp through the door, before you panted out a breathless “God, yes”.
The bathroom door opened with a creak, Michael grinning like the minx he was as he sauntered you like a cat. You were dressed up in a button-up, tie and slacks, it was part of the fantasy. Something about a husband working long hours and his wife greeting him when he came back home. It was an ancient scenario, something Michael only knew from old movies and novels they had to read in school.
Seeing your pupils blow wide as your hands trembled made Michael suppress a needy noise of his own. “There he is, my hardworking husband” he purred, lashes drooping and making him as alluring as a succubus.
Michael still didn’t really get it as he crawled into your lap, how the whole gender dynamic thing could be so exciting for you, but it was fun to pretty himself up and be borderline worshipped. He didn’t even mind being called a girl or wife, it wasn’t like Michael preferred one pronoun over the other, and he loved how you kissed him like you wanted to devour him, leaving him gasping for air.
And so what if he started enjoying the feeling of lace, and started wearing it most days? It made him feel hot and desirable. And the time his suit was shredded during a fight, Ted was the one who made it weird, it’s just clothes. Clothes that make his boyfriend hard as a rock, but clothes nonetheless.
#male reader#michael jon carter#booster gold#dc#justice league#michael jon carter x male reader#michael jon carter x reader#michael jon carter imagine#michael jon carter headcanon#booster gold x male reader#booster gold x reader#booster gold imagine#booster gold headcanon#dc imagine#dc headcanon#dc x male reader#dc x reader#justice league international#justice league imagine#justice league x male reader#justice league headcanon#justice league x reader
123 notes
·
View notes
Note
could you share how you paint hair and skin? your art is so nice to look at
thank you so much!
maybe one day I'll make a more detailed post with screenshots as I render... but honestly my painting process is really pretty simple. I usually use a textured brush or something with hue jitter turned up 1-2% to put down base colours, and then I go in with a medium hard airbrush for shadows and for adding warmer colours where blood flows (nose, ears, cheek, around mouth sometimes, eyes).
after that i merge all my layers and basically draw on top of everything. bunch of refining details and texture and LOTS of cross hatching. hatching is a really good way to transition between colours i find!!
(another tip I use for skin rendering is adding gradients within shadows, anddd ofc I add hatching when I do that too)
I wish I could offer more technical advice but I really don't know what I'm doing in the slightest I just throw colours on there and hope for the best😭 I guess other good things to keep in mind for skin are the planes of the face (im rly bad at this one, but basically just look up planes of the face on pinterest and use that as a guide for shadows and form) as well as hard vs soft shadows!!
im also. Not good at this one. So don't take my word for it but i guess it's good to have a variety of shadows that end harshly vs shadows that are softer and blend in more? if that makes sense? you just need to think about 1. what is casting my shadow 2. what is it being cast on (or idk maybe its not. that's just kinda what I do) and render from there!
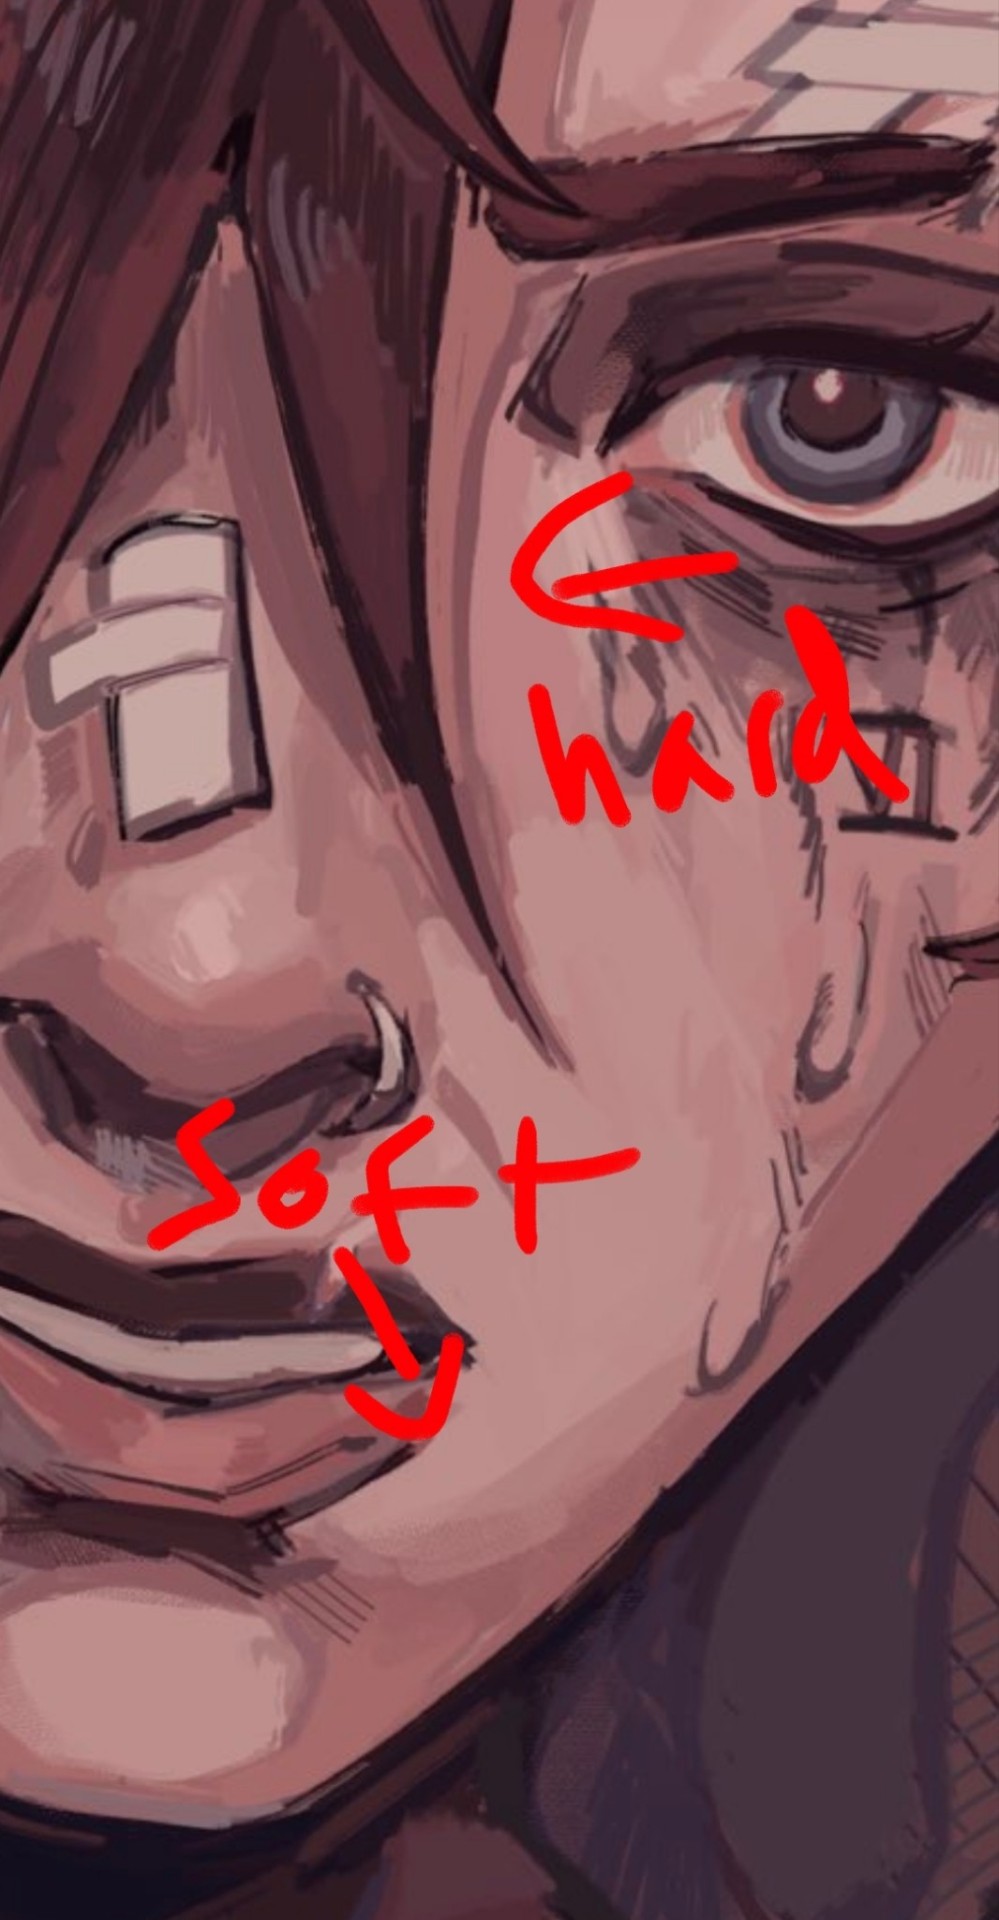
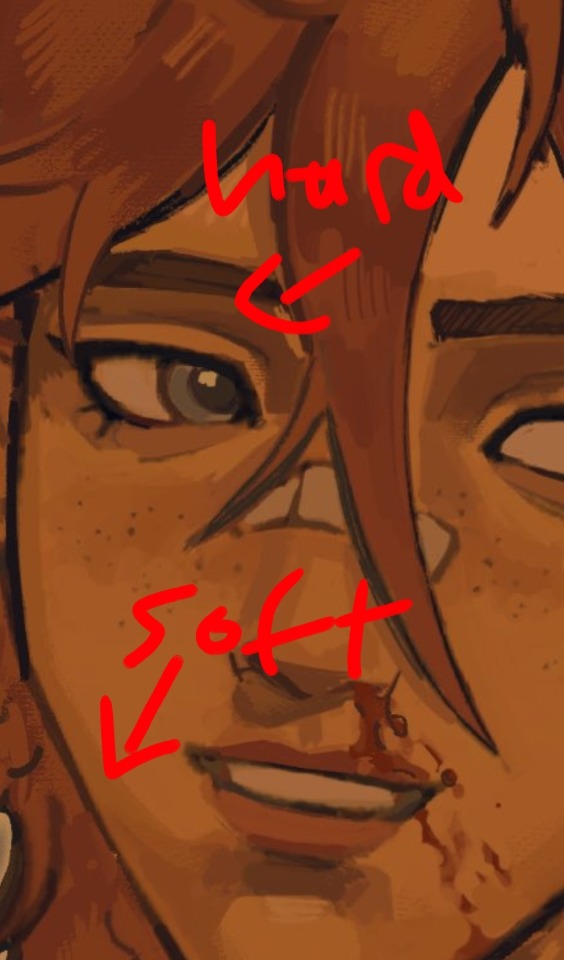
I like to outline my harsher shadows but thats rly just cause I love to outline everything. OOH THATS ANOTHER THING. use harmonious colours and outline shit it looks soooo good.
i do that shit all the time.Like don't be shy about grabbing colours that don't make sense being in your drawing. it's a drawing who gaf if vi arcane's hair is outlined in turquoise. NOBODY! and it looks fire!
for hair I just bullshit it and add hatching I really don't have a clue how to draw hair. I guess figure out where the hair strands are coming from and then draw them coming out from there (This is some real expert advice here damn) and then add shadows underneath the hair tuft clump things ?? no clue. someone make a tutorial for me im kinda the one that needs it in this situation.
uh I hope that helped at all!! Please watch YouTube videos and stuff by actual professionals take everything I say with a grain of salt because seriously I don't know how to do any of this I probably should study art more but I am LAZY
#art#digital art#art tutorial#painting tips#digital painting#art tips#tutorial#artist#ask#art advice
117 notes
·
View notes