#moveright
Explore tagged Tumblr posts
Visit Tumblr Blog
Explore Tumblr blogs with no restrictions, modern design and the best experience.
Last Seen Tumblr Blogs


Fun Fact
Tumblr has 16.74 million mobile monthly users in the US.
Text
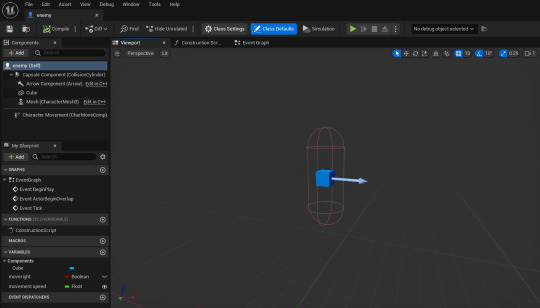
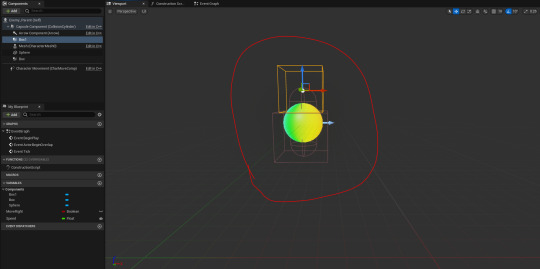
Enemies
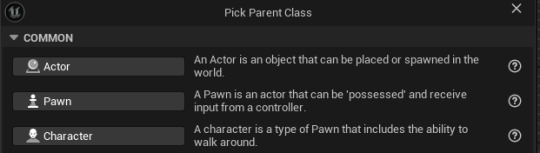
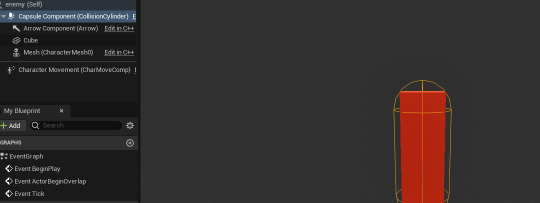
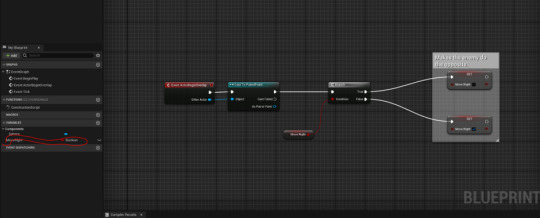
I will start with the enemy. Firstly, we need a character pawn, I mean it is an enemy and we kind of want it to move.

Now what this does it that it moves, put simply,
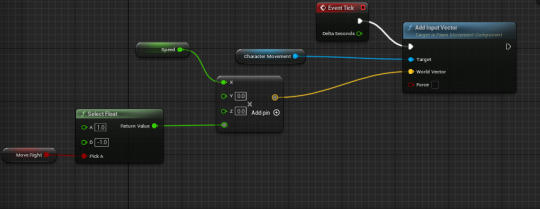

This cube every tick moves to a speed we can set. So for this enemy it moves 0.2 on the x axis every tick.

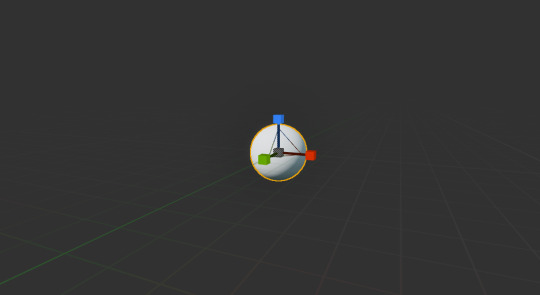
What the float does is when a condition is hit, for in this instance it will hit something that the player can't see, it multiplies by -1 to change the direction of the cube and moves it the opposite way. What we need next though, is somewhere to put these variable and something the enemy can hit to trigger the variable. So I made another blueprint, an actor. For the actor I made it a sphere, and made it bright pink, so its easier to see (not by the player tho).
As I said before I need variables for the float to be set off, so take a guess what to do here. I now have two little variables called 'jump' and 'ChangeDirection'. I went back the enemy and started making the conditions.
The first condition I made was the jump, and its pretty simple.
When the enemy touches the sphere, it jumps, if I make it a jump sphere, so I can turn it on and off when I put the actor in game. However if they do or not jump they,

Turn around, before it just made it move backwards but with this it still moves backwards but rotates with it. The condition with this branch is when I tick a box this will or not activate, and what it does when ticked is it sets the 'moveright' variable on, and when it hits again it turns back off, this is possible because of the NOT node (I think) What it does is that it makes the variable be able to turn of and on again as if this wasn't here it would turn on but not off as its already been set on. Then it changes the actors rotation depending on if the variable as been hit or not, that is what the select does anyway. And that is pretty much it for the enemies. An easier way/ just using branches instead, could have been a way to do this but its kind of just annoying to have branches very where, I already have enough of those.
0 notes
Text
making enemies
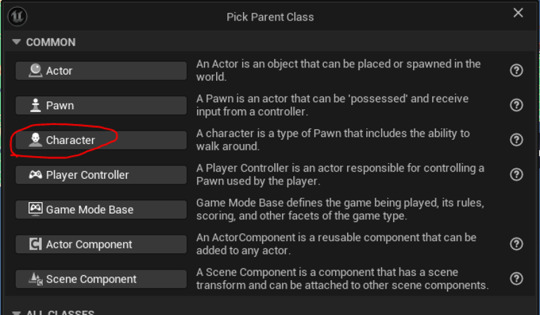
Firstly, we started off by adding a new blueprint ands setting its class yo character. I then called this blueprint 'enemy'. I also added another blueprint in the actor class called 'patrol point. These would act as stoppers to stop the enemy from walking all over the place, instead being set to a set spot.
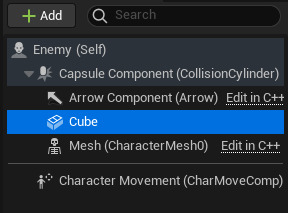
Then, because we haven't made enemy sprites in photoshop very, we added in a cube to be the placeholder for our character for now. I made my cube blue to show that its very dangerous.
I then needed to add some code to my enemy so it would move around in a set position. To do this, I first of all had to go back to my blueprints for my 'patrol point'. I had to do this so that my enemies would be locked into a fixed area. I made my actor a sphere, which would act as my patrol points. That was all i really needed to do at that point, so i went back to my 'enemy' blueprint.

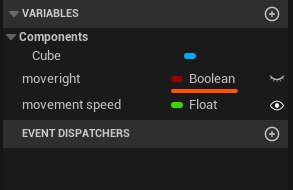
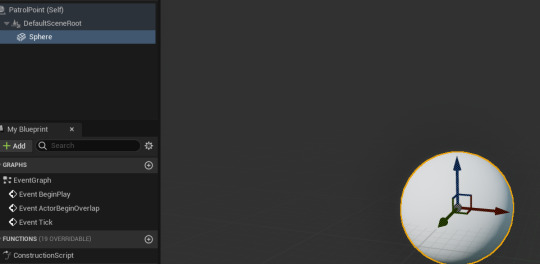
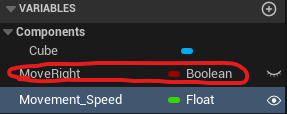
Now that we had made our actors for the 'patrol point', the next step was to add a component variable. I did this by pressing the little plus button, naming my new variable 'moveright'. I then made this new variable a 'Boolean'
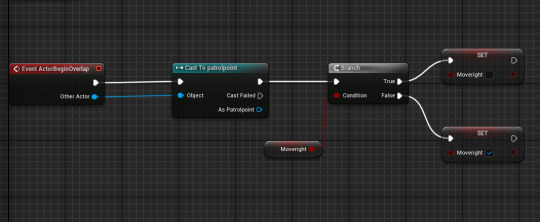
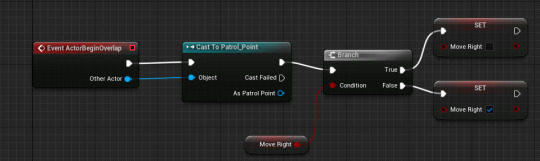
We then had to make it so when the patrol point is collided with, the enemy will change direction, whilst staying in the restricted zone. We did this by casting (sending information) to the previously made patrol point, which then leads to a branch. The branch contains two nodes which state either true or false. If it is true that the enemy is moving right, then the patrol point will not turn it away. If it it false, however, then the code will activate and make the character turn right.
Next was adding the movement speed and
0 notes
Text
NPCs and Patrolling

I made sprites for an NPC who walks back and forth
2:I then created a blueprint class and selected character. I then added a flipbook and rotated it 90 degrees to that it was facing the camera.
3: I then created a new actor blueprint and called it "PatrolPoint" I will place 2 of these into the world so that when the new character collides with it, it turns around. So it will walk around forever.
4: In the event graph for the NPC (not the PatrolPoint), I added a new variable called MoveRight and I set the default to true.
5: I made new variable called Stop so that my NPC will stop before turning and continuing walking and I will use it in the next part of code. I can customize the delay before the Set Stop to change how long the character stands still for before turning around
6: Here is the code I used to make the character turn around when they hit the PatrolPoint.


0 notes
Text
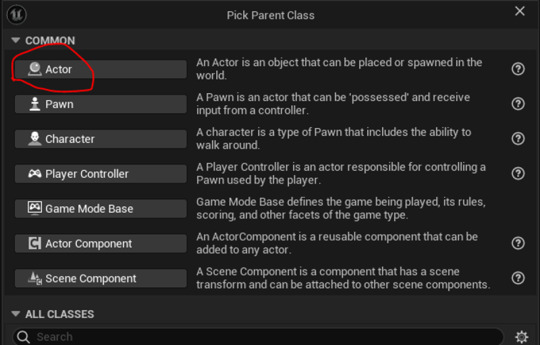
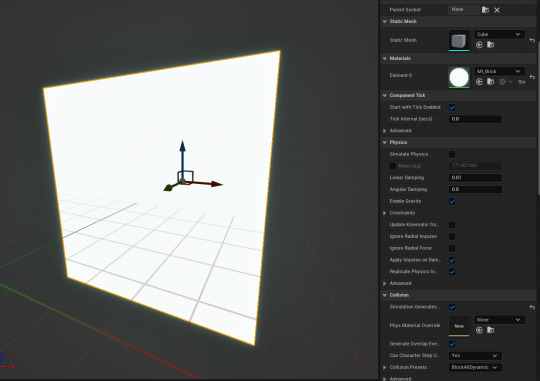
Creating an Enemy
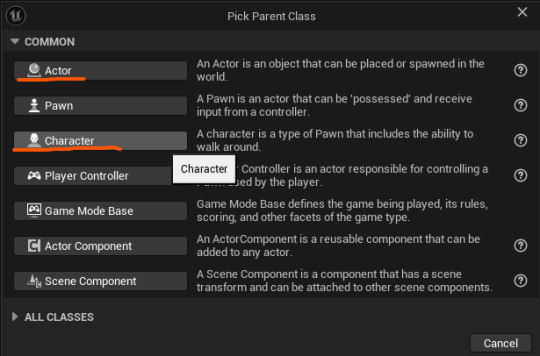
Because my enemy needs to be able to move around, I need to use a character blueprint rather than an actor blueprint.
Once the blueprint is created, I need to add a placeholder for my enemy so that I can see the enemy in game. (this placeholder needs to be set to have no collision).
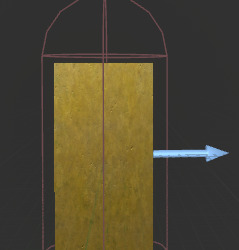
Now before we code the enemy's movement, a control point blueprint needs to be created. A control point is used as the boundaries of where the enemy will be allowed to go so that they don't fall off of ledges. This can be created using an actor blueprint. This only needs to be a sphere so we can see it in the editor and does not need collision.

Placing two of these means that the enemy will have to walk between them.
For the enemy's code, there are two main parts. The first is setting it so that the control points are what change the enemy's direction. This starts by making a Boolean called 'MoveRight'.

The full code for the first part is:
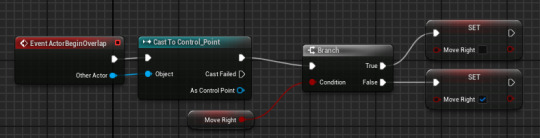
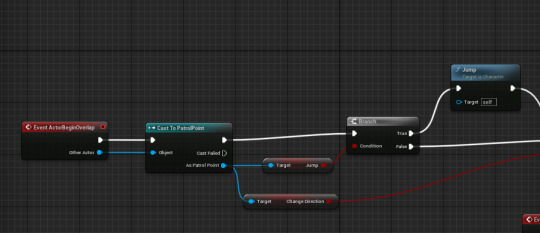
Event ActorBeginOverlap + Cast To Control_Point - The even begins when the enemy overlaps with the control point.
Branch + MoveRight condition + Set MoveRight - This means that, if the MoveRight Boolean is ticked, it will be unticked by the point and, if its not ticked, it will be ticked by the point.
The second part is the movement of the enemy itself. It requires another new Float variable called 'MovementSpeed'. Set the default number to '20'. This variable should be exposed so that each instance of an enemy can have a different movement speed if required.

The full code looks like this:
The branch and the condition work the same way as before but, instead of changing the Boolean, it changes the character's movement and rotation.
The movement and the rotation should be the opposite on the 'False' options to the 'True' options.
The event tick means that the character's movement will occur with each frame (Delta Second). This is added to a multiply event that's connected to the character movement variable which means that the movement speed is multiplied by the frames. This means that, if a frame is missed due to lag, the enemy will speed up to compensate. The outcome to the multiplication is then connected to the scale value of the movement input.
0 notes
Text
Enemy movement & patrol
To make the enemy you need to create a blueprint, then select character

After opening up the enemy blueprint, I added a cube inside just so the I can see where the enemy is during testing
Then we set up a patrol point by creating a blueprint -> actor
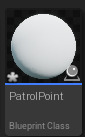
A collision box wasn't necessary, and I added a sphere just so I can see where the patrol point is.
In the details tab, we set the collision preset to OverlapAllDynamic, so the player and the enemy won't get stuck on the sphere

To make our enemy follow the patrol points, we must first create 2 variables, a boolean called "MoveRight" and a float value called "MovementSpeed"
Using the event tick we created a branch. The true and the false both lead to an Add Movement Input, however they have different X values. This is for moving left and right
I made the MovementSpeed public so I could then edit its default value of movement speed in the details tab. Otherwise the blueprint wouldn't function

0 notes
Text
Making an enemy and Patrol route.
First we had to create a new blueprint and select character which gives the ability to make a pawn move, then we need to open it up and put a place holder in there, I have chosen a cube. After, we then just need to turn off collision for it in the details panel to the right.
Moving on to make the patrol point we need to create a new blueprint and create a new actor, which can be placed and spawned in the world. Then add a placeholder, I have added a sphere. After, make the collision "overlapAll". Then we add the patrol points we just made into the level by drag and dropping.

Then we need to go back to the enemy blueprint and go to the event graph. First make a boolean variable called "MoveRight".

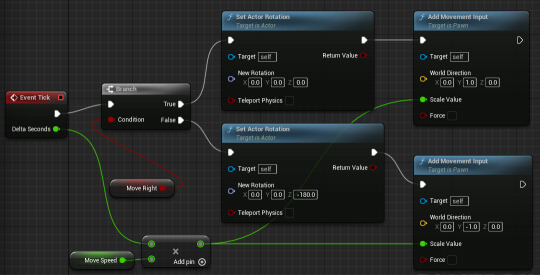
then we need to cast from event actor begin overlap which means begin the sequence when the actor overlaps with something. then cast this to cast patrol point which means now when something overlaps the patrol point it starts the loop. Then we need to make a yes no statement so we use a branch and add the boolean we made to the condition. Finally then Add the boolean twice after the branch and after dragging it use the set option. We then tick the move right boolean connected to the false part of the branch.
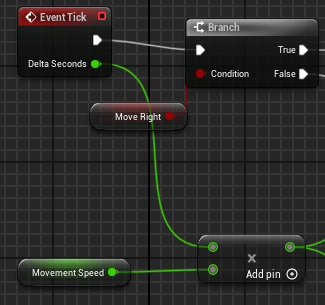
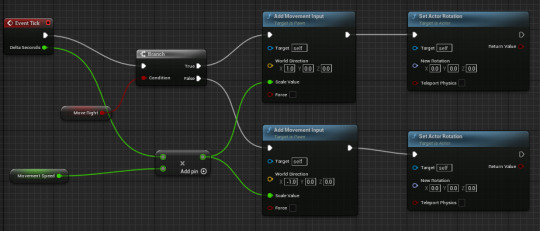
Next we need to use the event tick and branch off of it with the move right boolean as the condition, this time we add movement input to both parts of the branch and the target is self so it actually effects the enemy. We then need to add a new variable called movement speed and we need to make it a float so it can deal with not whole numbers.

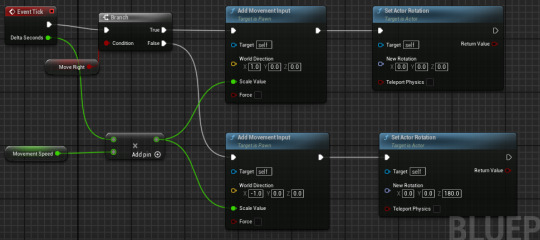
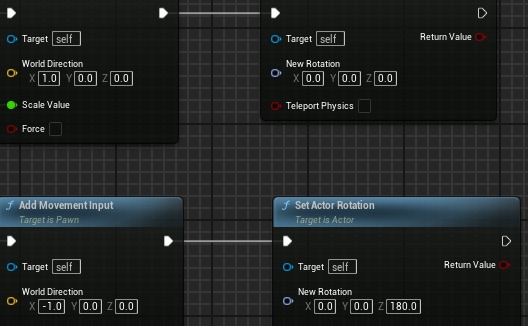
After, off of the event tick delta seconds add a times and then as its condition add the movement speed float. Then cast from the times to the scale value on both parts of the add movement input. Finally cast from both add movement inputs and add set actor rotation and change the false one to 180 on the z axis.
Finally we just constrain it to the plane by going into the enemy and searching constrain in the details panel, then tick constrain to plane and make sure it is the right axis or it will not move.

0 notes
Text
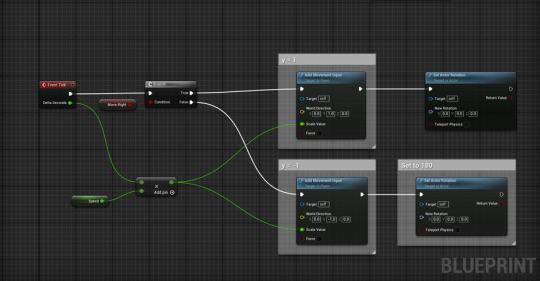
Patrolling enemies
I created patrolling enemies for my game so its harder and more challenging.
I made a new blueprint and selected character and added a cube inside the collision capsule so I could test it.
I made another new blueprint and selected actor and added a sphere and scaled it down so I could see it.
I then created a Boolean variable and named it MoveRight and set the default move right value to true.
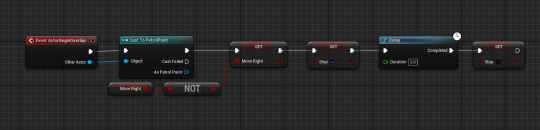
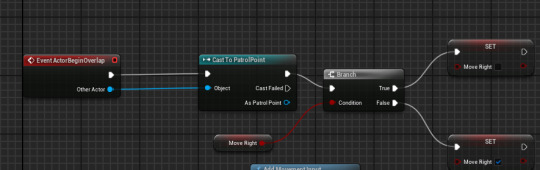
Then from event actorbeginoverlap I cast to patrol point and added a branch to get move right then from the branch if move right is true I set it to false and if move right is false I set it to true.

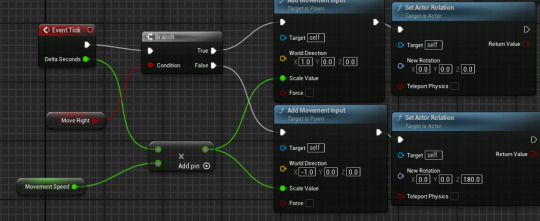
Then from event tick I did another check with a branch for move right from true I added a movement input node and set the world direction Y to 1 I repeated this for false but instead set it to -1. I then created a new Float variable and named it Movement Speed and set its default movement speed value to 10 and made it public. Then I added a set actor rotation node to each of the add movement input nodes I left the one from Right as it is and on the one from Left I set the Z rotation to 180. Then from the event tick delta seconds I dragged off and multiplied by the movementspeed node. Then I connected this to the scale value on each of the add movement Input nodes.
A problem I did have was that the enemies would slightly float off the floor but I did fix this by changing the size of the collision capsule and moving the flipbook inside it slightly lower.
0 notes
Text
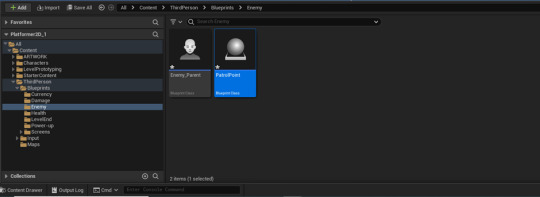
Making an Enemy and a Patrol point:
Firstly, I made a character.
Next, I made an actor.
I then renamed the character ‘Enemy_Parent’ and the actor ‘PatrolPoint’.
Here, I added a sphere and gave it a texture to make it visible until I replace it with a flipbook.
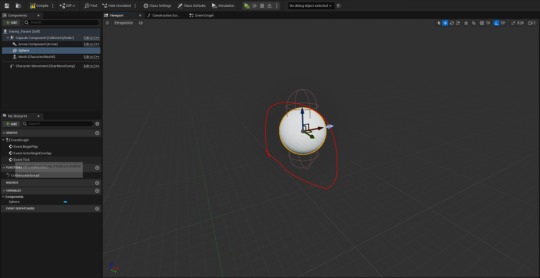

I did the same for the patrol point.
Here, I made a Boolean variable and named it ‘MoveRight’ as there is no such thing as 'Left' in a game.
Next, I added a Float variable that I named ‘Speed’. I clicked on the visibility icon to make it public.
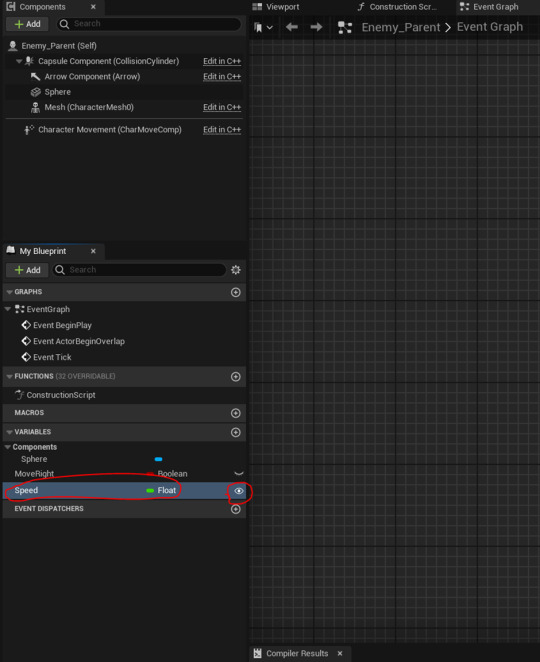
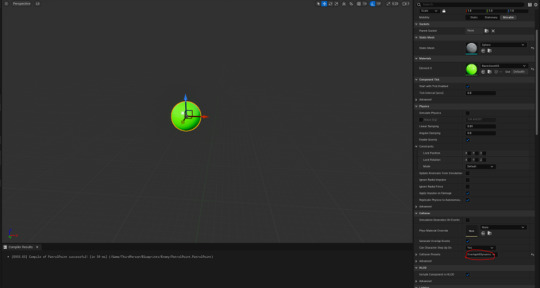
Here, I enabled the enemy's movement.
I then added the enemy with two patrol points for it walk between. In order to get the enemy to move, I set their speed to 1.
In the viewport, I unticked the ‘Visible’ box to make it so that the player cannot see the patrol points.

I found that the enemy moves too slowly, so I changed its speed to 50.

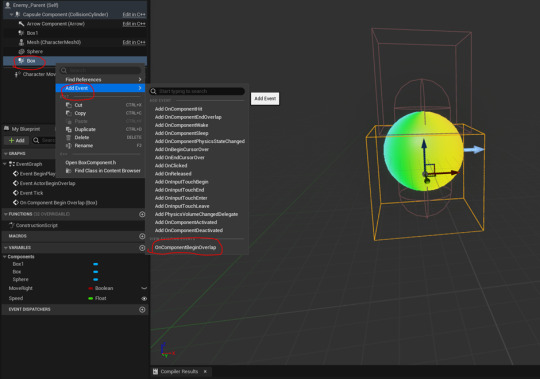
Next, I added two collision boxes. The bottom one will be used to cause damage to the player. The top one will kill the enemy.
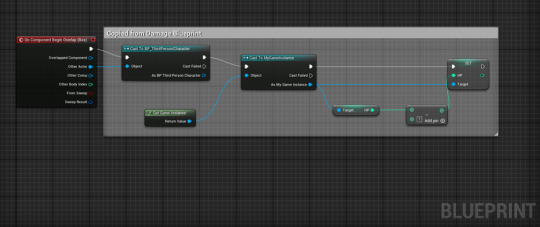
To make the bottom box cause damage, I created an event for that specific box by right clicking on ‘Box’, ‘Add Event’ & ‘OnComponentBeginOverlap’.
I then copied a piece of code from the damage blueprint and connected it up.
0 notes
Text
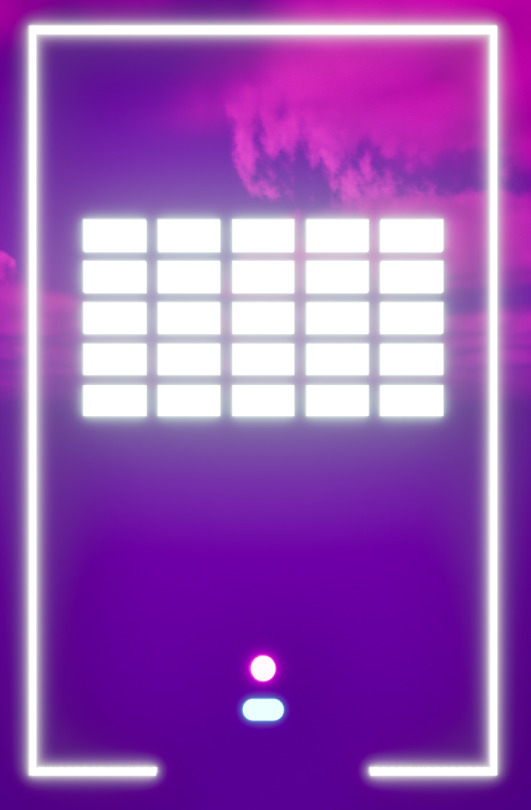
Creating a Brick Breaker Game (1)
Setting up the Project

This is just a new blank project that I've created a new level in and changed the colour of the level and its lighting.

This is the material I'll be using for the object in the brick breaker, for example the ball.

The material instances come off the original material I previously made and are the colours of each object that'll be in the game; the bricks have remained white as they'll eventually have a colour change to show when how many times they've been hit before they break.
Creating The Bat
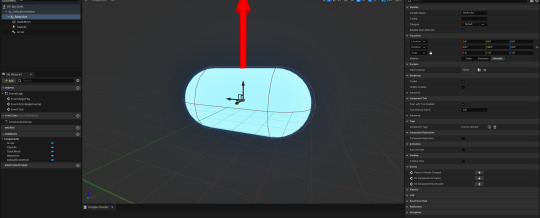

Added a capsule collision to act as the bat, along with the material I made for it and set the rotation on the Y-axis to 90 degrees. That was the arrow is pointing up which is the the right way we want our ball to travel.
Adding Movement

I used a timeline node and added a float track and used it to put in the starting position of the Bat in order to control the the Bat's location along the spline component.

finished product^^
Input Setup

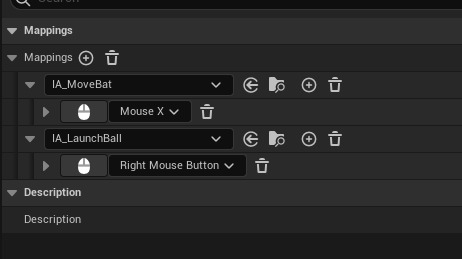
I created an input mapping along with two input actions in order to be able to add controls for the bat to move along with launching the ball.


The reason we are using Custom Events for this rather than connecting them directly is because we are also going to set up some logic to adjust the sensitivity of the mouse and this will make that process easier.


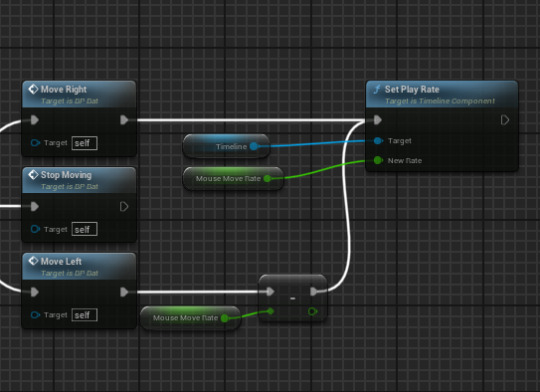
This will work but only for MoveRight, for MoveLeft to work I had to add a negate node and connect that to the set play rate. Now the bat should move left to right.

When I tried testing the movement, the bat didn't move at all so I went back to see what had gone wrong.

I then realized that I hadn't set my Mapping context to the right one, so after I did that it ended up working and moving.
The Ball

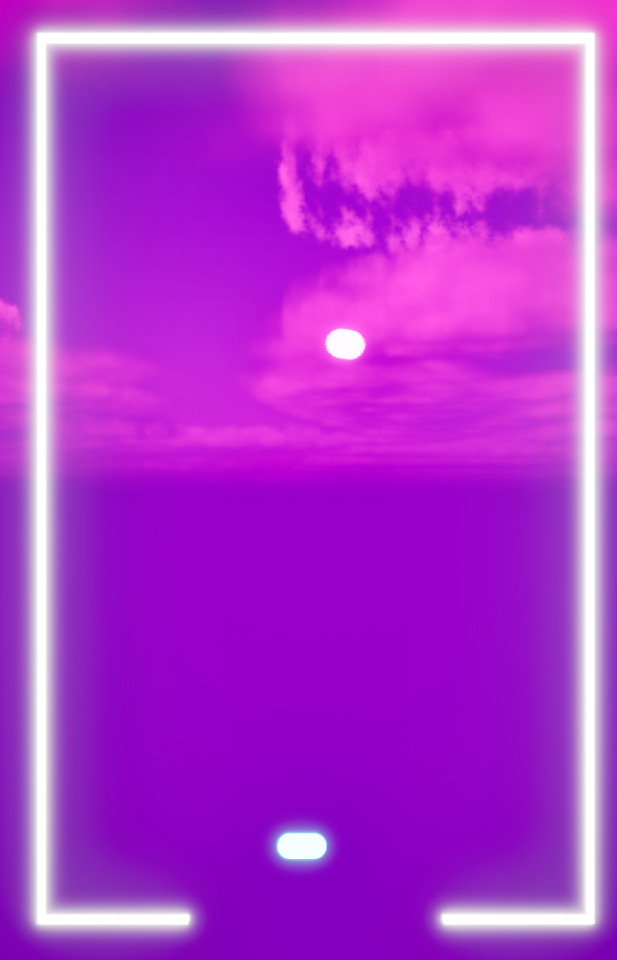
Before making the ball I first added the arena^^

To give the player a clear view of where the ball would launch from I added a sphere onto the Bat actor (shown in image above). I then set it's scale and the material to match the ball actor along with setting the collision to no collision so that it wouldn't effect anything, like the ball moving.
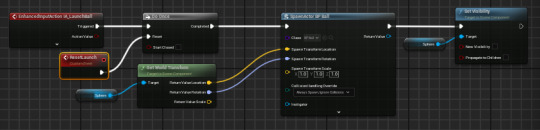
Once that's done I got another reference to the sphere component and placed it after the spawn actor node, dragged of sphere reference and search for set visibility and unchecked it. That way once the ball is launched the sphere set to the Bat actor would disappear.

This code allows the ball to reset and the sphere to become visible upon resetting.
Death Box

The top code sequence allows the game to reset without needing to also resetting the entire map with it and the bottom one makes the ball reset once its entered into the death box below the gap, making the game reset.

Death box place under the gap where the ball can potentially fall through, I've placed it very close to the opening so that the player doesn't have a problem with delay of resetting and it instead instantly resets; meaning the player can carry on with the game straight away.
The Bricks
Making the bricks, along with adding the material for them.

This code means that the blocks are destroyed once they're hit by the ball.
0 notes
Text
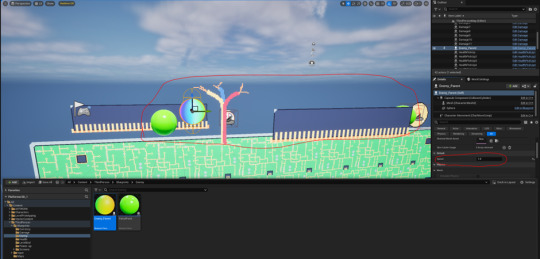
A simple enemy with patrol points
From the content drawer, I made a Character Blueprint and gave it a simple walking flipbook animation. I also made an Actor Blueprint called PatrolPoint. I made it into a sphere and ticked a box to have it appear in the editor, but not in game.
In the enemy's event graph I gave it two variables- MoveRight and MoveSpeed.

This code tells the enemy to change directions when it collides with a patrol point.
This code rotates the enemy and tells it to move at the speed defined by MoveSpeed either left or right, depending on the value of MoveRight.
This is the final result. I am happy with it, although I don't think I'll be adding an enemy like this into my game. I could however, repurpose this patrol point code into a moving platform or something like that.
0 notes
Photo
TRIPLE 🔛 #renault #renaultsport #renaultclio #renaultmegane #renaultrs #rsrenault #rsmegane #rsclio #cliosport #meganesport #meganers #cliors #cliorstrophy #meganers225 #megane225 #cliorscup #lagodialserio #wideloadsquad #moveright #turbo #belluxproduction #renaultsports #renaultsportclio #renaultsportmegane #renaultsportcommunity #renaultsportowners #renaultclub #renaultgram #sundaymeet #sundaymeeting (presso Lago di Alserio) https://www.instagram.com/p/B0GAdPcIVFj/?igshid=1vbv46e2guk0n
#renault#renaultsport#renaultclio#renaultmegane#renaultrs#rsrenault#rsmegane#rsclio#cliosport#meganesport#meganers#cliors#cliorstrophy#meganers225#megane225#cliorscup#lagodialserio#wideloadsquad#moveright#turbo#belluxproduction#renaultsports#renaultsportclio#renaultsportmegane#renaultsportcommunity#renaultsportowners#renaultclub#renaultgram#sundaymeet#sundaymeeting
0 notes
Photo

(I.M.G) KiddyLoso, L,Dallas, Banditt - #MoveRight Official Video Out Now @youtube Must Watch‼️ #independent2 @independentworldwide . . . . . . #newvideo #visuals #action #lights #camera #cinematography #active #moretocome #watchout #inependent #artist #wave #hiphop #rap @independentworldwide https://www.instagram.com/p/Bu39fQ_nhgr/?utm_source=ig_tumblr_share&igshid=103zjn6uasmy3
#moveright#independent2#newvideo#visuals#action#lights#camera#cinematography#active#moretocome#watchout#inependent#artist#wave#hiphop#rap
0 notes
Photo
Lookout... #eafphotography #ernestosmanifesto #flikflik #colors #biggang #lookout #moveright #bacon #vsco #500px #beautyeverywhere #canon #fuji
#lookout#fuji#500px#canon#eafphotography#bacon#beautyeverywhere#biggang#colors#flikflik#moveright#ernestosmanifesto#vsco
1 note
·
View note
Photo
I been the same person since day one. The man in the mirror is ME. I dont do religions. I just #MoveRighteous. Something alot of people need to do. Im a gangster but prefer to move like I'm not #Fit4It Keeps the trouble away. Dont never violate me and mines. This is when you see i actually am #Fit4It besides that. I move humble. In good spirits. With Positive energy. I can make you laugh the same way i can make you cry if neccessary. #KnowTheRightSideOfMe or keep it pushing #ToTheLeft #AskAboutMe #IAmBlackHistory #YaBlackPhilKackson #Talk2Me The conversation right maybe you can #WalkWitMe #ImOver #iMoveDifferent #ImTellinUThis #HowToLive #THC (at Time Square Manathan) https://www.instagram.com/p/B8ozpDzFU9R/?igshid=1cbvqq9anpfnm
#moverighteous#fit4it#knowtherightsideofme#totheleft#askaboutme#iamblackhistory#yablackphilkackson#talk2me#walkwitme#imover#imovedifferent#imtellinuthis#howtolive#thc
0 notes
Text
so lightheaded you cant walk struahigt or think check!!!!!!!!!!!!!!! me! sure wish my body was normalll!!!!!!!! FUCK
whates worse is that it started on the bus ride to school so i did nt brink my cane. KILEL me /nsrs im in a betterr place mentally i jsut hate not beign abel to funcktin or moveright
srry about thw typos i do tnot have the energy to fix them andf my fingers are numbs so i will do it later or i will forget i wrote this
#cursing tw#all caps#chronic ills l ess vent#personal vent#vent tag#chronically ill#pots syndrome#postural orthostatic tachycardia syndrome#actually chronically ill
2 notes
·
View notes
Text
Download: Lil Tjay - Move Right

Lil Tjay - Move Right
Lil Tjay dropped off his latest single, "Move Right" earlier today. The release of his new song comes less than a month after he dropped off his remix to Lil Durk's "No Auto Tune." Tjay's child-like voice is laced in auto-tune as he flexes his melodic delivery while speaking about his rise from the bottom. It's another single that proves why Lil Tjay is preparing for a big year ahead. Download: Lil Tjay - Move Right mp3 download below Read the full article
#downloadLilTjayMoveRightmp3#downloadmp3LilTjayMoveRight#LilTjay-MoveRight#LilTjayMoveRightdownloadmp3#LilTjayMoveRightmp3download#mp3downloadLilTjayMoveRight#mp3LilTjayMoveRightdownload
0 notes