#notspon
Text
It’s new drawing tablet time bb!

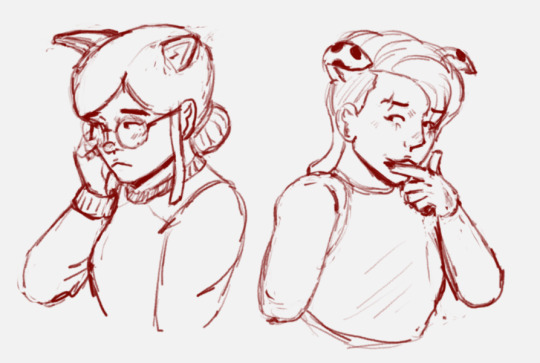
I got a new tablet (ostensibly for drawing). I got it because, despite my adoration for my XP Pen 12 Pro, it isn’t what one would call... portable. My laptop in of itself is a backbreaker, so even if I could find all the power outlets I’d need in a public space, it’s not practical!
But for ages now, despite my casual love for paper sketching, I’ve wanted a way to draw digitally on the go. So I got the cheapest tablet I could find that I wouldn’t have to corrupt into the hell dimension to get Krita working on.
Enter stage right; the Surface Go 3! I’m gonna say immediately (and more than anything so you know this isn’t an ad) that the Go 3 sucks, and I do not recommend it. It overheats, it’s gotta a smaller display size than my XP Pen, it has middling battery life, and the pen and drawing support is very, very questionable.
However, for me? As someone who only wants it to sketch with, to use essentially as a mobile, digital sketch book? It’s poifect! It’s small and portable but workable, and I’ve been using janky computers my entire life; at this point, I’m stubborn enough to get through most fucky moments if it means I can have drawing on the go.
I’m really excited to use this more and get some fun sketching done. And cos it’s all connected by OneDrive and it’s all done in Krita native files, if I like a sketch, I can easily “finish it” at home :)
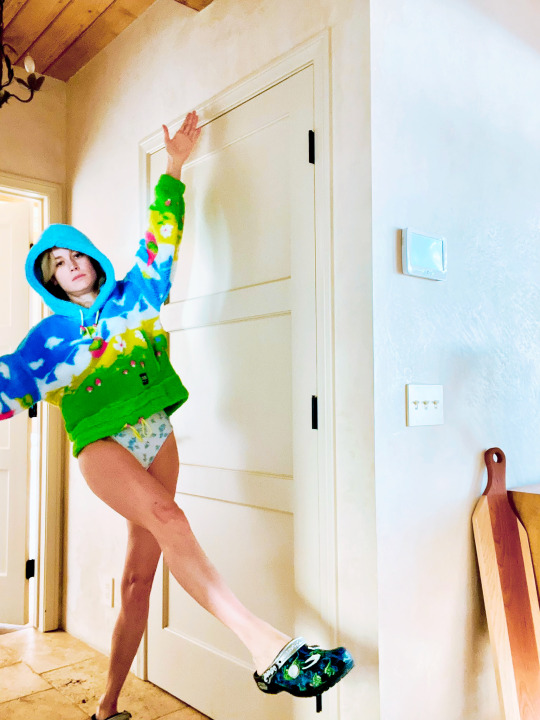
Naturally to test out my new tablet I had to draw the scrunks, I’ve missed them...
#tablet#drawing tablet#drawing#sketching#sketches#sketch tests#testing#review#tablet review#surface go 3#surface go#notspon#queer#lgbtq#queer art#wlws#sapphic art#sapphics#they'll be canon eventually y'all I promise#Katana#katanashipping#trans rights#LGBTQ art
2 notes
·
View notes
Note
DO YOU HAVE THE LINK TO THAT TAPESTRY
it was a gift, but with a bit of digging I found it!
also btw it doesn't have any rings or loops or anything to hang it from so be ready to get creative! you can kinda see it in the post, but I stuck him to the wall with a ton of sewing straightpins like he's a taxidermy beetle. hope you enjoy!
#notspon#lotsa folks also have excellent taste and were asking so I'll put it in a post reply on the original too!#my posts#bibble tapestry#asks#ask
2 notes
·
View notes
Text
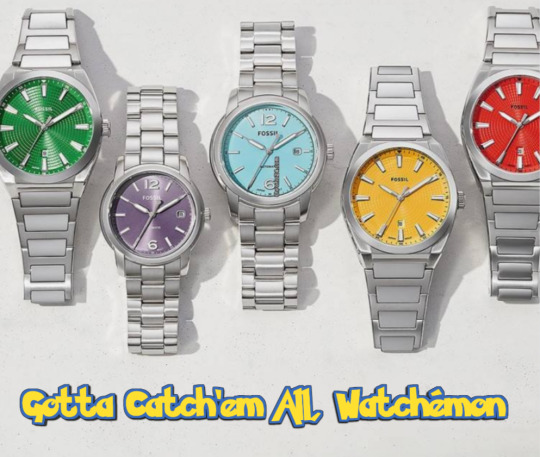
I know it's not a copywriting meme, but it is a meme. And I'll take one of each, please.
-The Convivial Copywriter
#watchmemes#pokemon#memes#watchporn#FosillWatches#not mine#Imadethismeme#watchperson#notspon#copywritingmemes
0 notes
Text

Never breathed a bigger sigh of relief in my life than I did seeing the steering wheel and getting confirmation that they’re not actually using Tesla in this episode
#iasip#sunnys super sweet 16#dtamhd#like ok it would be funny to shit on it#like righteous gemstones had a funny ass tesla bit#but bleh elon musk#no thanks just keep him and all his shit AWAY#hashtag NOTSPON#oc
62 notes
·
View notes
Text
game recs:
pumpkin panic: a cute and different farming game where you play as a little pumpkin lad. beware of deer. solo dev i think so be respectful.
fallout: the first title in the iconic series. currently 75% off!
tormented souls: different indie puzzler inspired by classic survival titles like silent hill and resident evil. i think its moreso inspired by res, but there's some silent hill influences in there too.
cultist simulator: from the creator of fallen london, i think. it's a card game where you build your own cult. i was obsessed with this game in 2018.
darkwood: this is not going to be for everyone but it was for me. an indie title from eastern europe which really stuck with me after i finished it. i think the main thing for me is the forest being so encompassing. im from northern europe so it really did feel like just hitting up the gorcery store on the way home from work for a pack of cigs or whatever
sunless sea: idk if anybody has played this one but i love it. the dlc is so good too. if the story is confusing for anyone the summary is so basically a bunch of bats dragged london underground and now everything is kind of silly.
remothered: tormented fathers: an indie giallo-style title that is unlike anything else i've ever played. it's like if an italian played clocktower and was like. you know what. this needed to be even more yellow. which is probably exactly what happened. ps. the sequel is broken as hell but the first one is still good
martha is dead: another italian produced indie game from the devs of the town of light, set during world war 2 on the tuscany countryside. you know a horror game is going to go crazy when it has a laundry list of trigger warnings and "self harm" is like the least extreme of them.
maid of sker: welsh inspired lovecraftian horror game that is actually so good. warning this one has a dog in it so you spend like 90% of the game with an elevated heart rate just because of that. if i could ban any feature from horror games its including pets without knowing whether or not they're just going to die.
faith: the unholy trinity: i FINALLY. played this game. i know i know. she was a dust bunny for a while but i worked it off this weekend. i deserve an award. maybe laziest person of the year? person-most-likely-to-put-off-things-they'll like-because-for-no-reason award?
BONUS REC: sanitarium: a classic jacobs ladder-but-oh-its-lovecraft inspired story that is actually really interesting.
#notspons but i recommend the gog version of remothered because the steam one has weird issues with performance from the comments#i recommend gog in general cus its drm free and always has a bunch of fixes included and a staff that actually responds to emails#sam.txt
1 note
·
View note
Photo


✈ || skip3d
Support the artist by buying the avatar base!
#obligatory notspon i just love this artists work sm#stim#stims#stimming#stimmy#sensory#blue#dark blue#navy#white#black#green#yellow#beige#multicoloured#games#vrchat#vrchat avatars#furry#dragons#what do i...tag this as in terms of hands#hands free#??#my gifs#favs
39 notes
·
View notes
Text


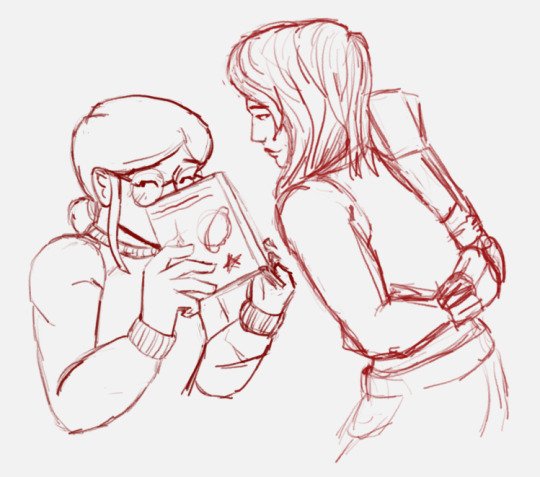
Anyone who reads ROTTMNT/2012!TMNT fanfic, go read Rotten Reflections by @nicoforlifetrue on Ao3! Not only is its worldbuilding fascinating, it also doesn't bash 2012 or Rise and genuinely explores their dynamics as siblings, which I really appreciate. (#notspon or whatever, I just really like it.)
This is a snippet from Ch. 8, one of my favorites. >:)
#art#my art#clover's art#comic#rotten reflections#rottmnt#rottmnt fanart#rotten reflections fanart#leonardo hamato#donatello hamato#rottmnt donnie#rottmnt leo#fanart#fanfic#fanfic recommendation#fanfic rec
1K notes
·
View notes
Text
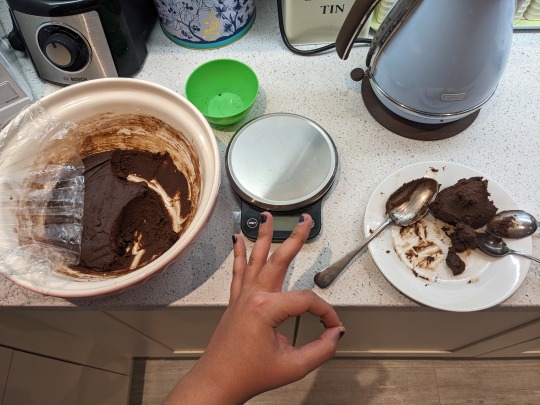
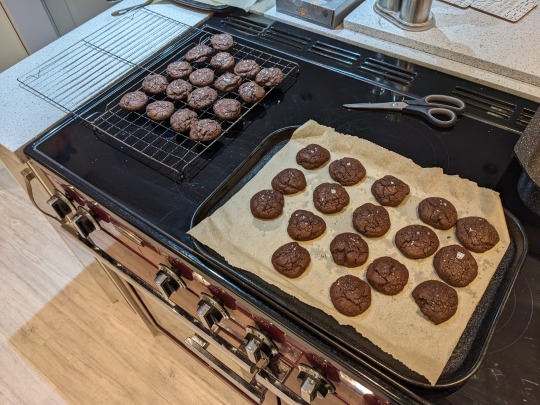
Vegan & Gluten Free Brownie Cookies
by Rachel (sort of)
Adapted myself from the ingredients of my favourite vegan & gluten free brownies, and my favourite brownie cookies. Credits at the end.

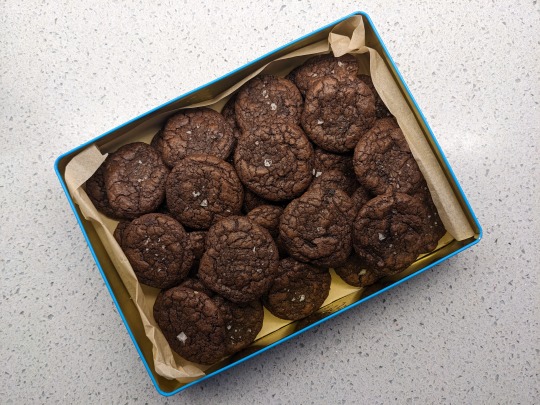
Ingredients (makes 35-40 21g cookies)
262g gluten free flour (I use Doves Farm/Freee brand, #notspon)
187g golden or light brown sugar
32g cocoa powder
¾ teaspoon baking powder
¼ teaspoon salt (a small pinch)
150g dark chocolate (I use dark cooking chocolate from Tesco that is soy based and dairy-free)
112ml vegetable oil
112ml vegan “buttermilk” (15 parts soy milk + 1 part lemon juice, details below)
Coarse/flaky salt for sprinkling (optional, so damn good)
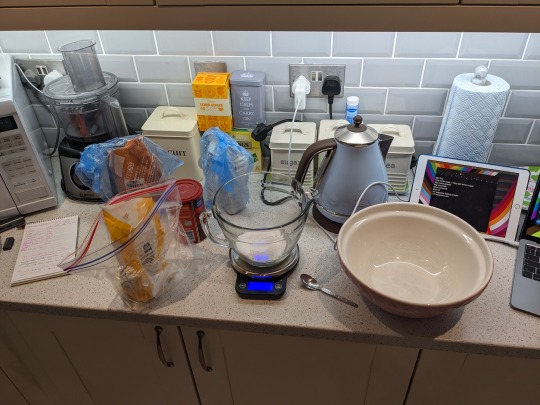
Tools (and I don’t mean the one writing this)
Large mixing bowl
Medium bowl for dry ingredients
Smaller bowl for melting chocolate
A saucepan of similar size to your small bowl if melting chocolate on the hob
Wooden spoon (or if you have one of those fancy silicone spatulas, they’re perfect)
Dinner plate
Baking tray + baking paper
A few teaspoons for scoopin’
Measuring spoons (optional but very helpful for accuracy)
Recipe
So when I was a lad… just kidding. I do have stories about how I learned to bake, but this is my own recipe, so those stories are pretty irrelevant here.
Step 0: Don’t preheat your oven.
I usually don’t preheat my oven until shortly before I’m ready to bake, I don’t know why recipes always start with that.
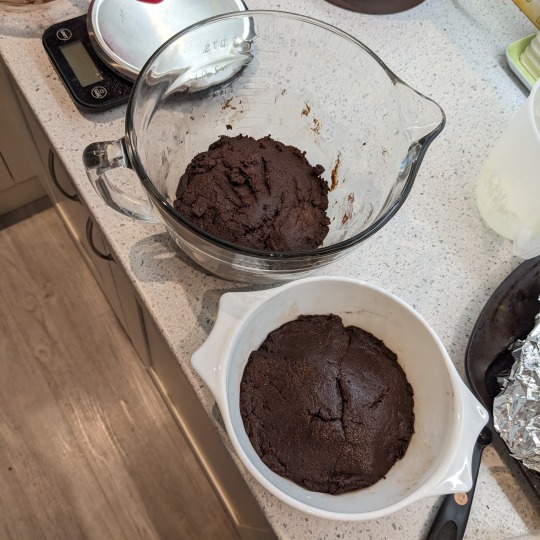
We will not be baking anything for at least an hour, as the cookie dough requires chilling for at least 45 minutes once mixed, ideally longer. This helps prevent spread on the baking tray, and makes it easier to form into dough balls.
Step 1: Measure your dry ingredients.
I am very inclined to forget one as I go, so here’s a checklist:
Flour: 262g
Cocoa: 32g
Sugar: 187g
Salt: ¼ teaspoon
Baking powder: ¾ teaspoon
Add all the dry ingredients, except the sugar, to the medium bowl. Pop the sugar into the large bowl.
Step 2: Vegan buttermilk. Wait, that’s not an instruction!
We’re going to curdle some ‘milk’, for chemistry reasons I don’t really understand. Add 105ml of soy milk to the large bowl, then add 7ml (approx. 1 teaspoon) of lemon juice. I know, these measurements are pants. Don’t stress too much over the precision. The milk should ‘split’, and look gross! If it doesn’t, that’s fine too.
Add the vegetable oil, and observe hydrophobicity in action.
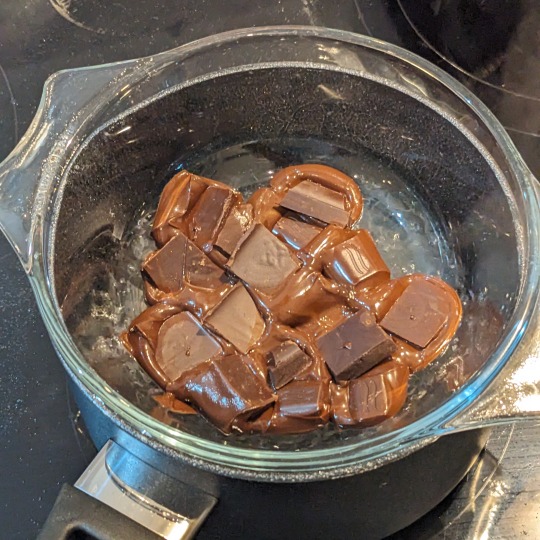
Step 3: Melt the chocolate.
I like to do this in a ‘double boiler’, which is a fancy way to say melting it in a bowl over a pan of simmering water. Feel free to do this in a microwave. If you do, be careful not to overheat it, do it in bursts until the chocolate has a silky consistency.
It’s harder to get wrong with the double boiler, for physics reasons, but it should only take a few minutes with a steady simmer. Once a knife can be pushed through the chocolate with no resistance, turn the heat off and stir the chocolate to ensure it has melted all the way through.
Add the melted chocolate to the large bowl, and stir until combined.
Note: This is the one time before baking that we are adding heat to the mix. Before baking, I highly recommend the dough is cooled completely, so the hotter the chocolate is at this stage, the longer the mixture will need to cool.
Step 4: Add the dry ingredients and mix.
Shake or spoon in the dry ingredients gradually, stirring a couple times between each addition to avoid making a dust cloud. Once you’ve added them in, stir to combine, taking pains to scrape down the sides of the mixing bowl and incorporate large lumps of flour/cocoa powder. Small lumps (smaller than a pea) will bake out, so don’t worry about those. Your dough should be smooth, firm, and probably looking the way the cookies will look a day after you eat them. Sorry.
Step 5: Chill out.
Cover the bowl and stick it in the fridge. 45 minutes is the absolute minimum I would suggest, but if you can give it an hour or two, or overnight, even better. The next step is to scoop the dough into little balls, and that will be less messy and less of a f***ing nightmare if you just chill it for a while.
Pro tip: Put your dinner plate in the fridge with the bowl. I wished I had done this every single time.
Step 6: Okay, I lied to you. The next step is actually to preheat the oven.
180°C conventional, 160°C fan. I don’t know what that is for gas ovens, sorry.
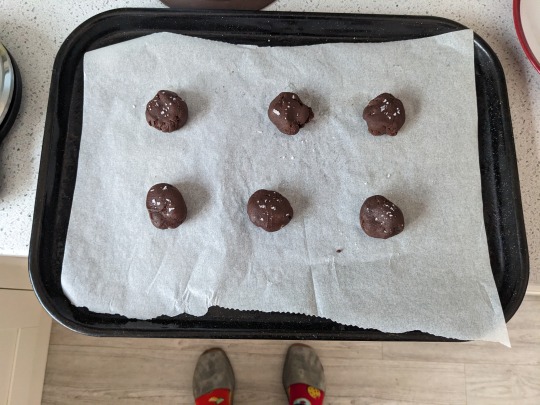
Step 7: Balls.
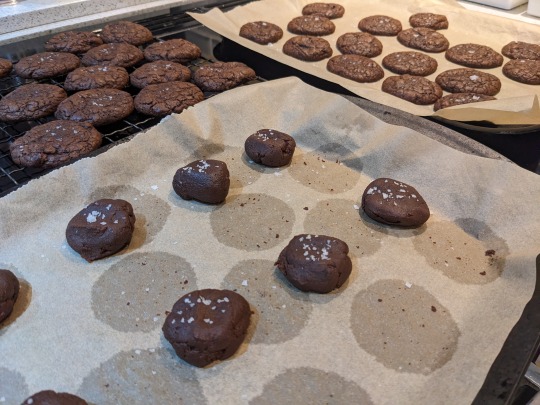
Using a spoon, maybe two, and your hands (unless you’re a magic space wizard who can do this with just the spoons), scoop a lump of the cookie dough out of the bowl and weigh it. My control weight for this recipe is 21g, but you could go larger if you wanted to.
This makes a cookie of approximately- where’s my ruler? 5.5 cm diameter. I weighed each ball, because I’m a really fun person, but you can just weigh one and make the rest about the same size. Or weigh none of them, and guess the baking time adjustment! You feeling lucky, punk?
If it’s taking you a while to get through this, and it probably will, I suggest covering the balls and returning them to the fridge for a few minutes before baking, as they’ve probably warmed considerably from being handled. Tee-hee.
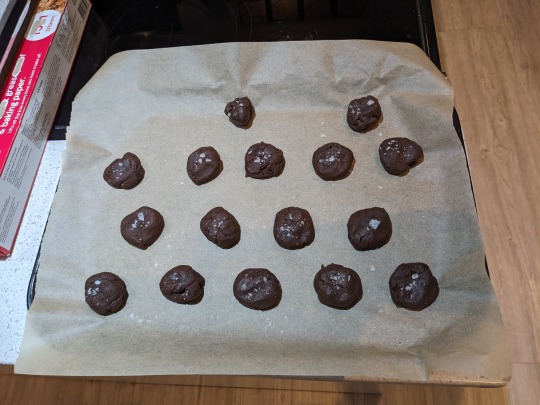
Step 8: Prepare for baking.
Cover your baking tray with parchment. Put your balls on the tray, spaced 3-4 cm apart to avoid creating a colossal, all-consuming cookie mon- uh, beast. Unless you want that. I did this by mistake once, and don’t recommend it. Squish the balls down slightly into pucks, maybe 1.5 cm tall but I didn’t measure, this just makes it easier to sprinkle some coarse, crunchy salt flakes on top. Yum yum!
I don’t know if I need to say this, but don’t overcrowd your tray. If you have more balls than you can fit on the tray, use another tray or wait until the first batch are baked and reuse this one.
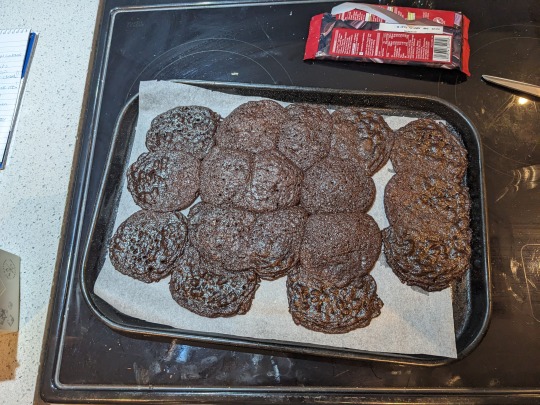
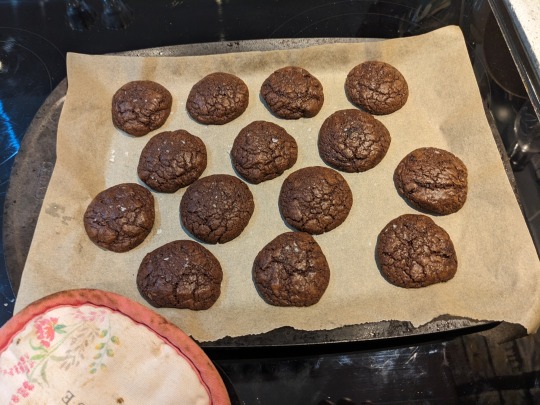
Step 9: Bake.
Stick that mofo in the oven, for 8 minutes if you made them 21g like I said, or longer if you made them bigger. They’re done when they’ve spread out and the tops have dried up and cracked, revealing a darker, cakey interior. I’m drooling right now.
If you poke them at this stage (careful, they’re hot, duh), they should give with little to no resistance. This is good! If they’re completely solid straight out of the oven they’re overcooked, and will be rocks by the time they have cooled down. I’m sorry if this happened to you! Take the next batch out just a little bit sooner.
Let the cookies cool on the tray until the tray is cool enough to touch. This will take longer if your tray is thicker, but I promise you it’s worth the wait. Once the tray is warm but not hot, the cookies should be solid enough to transfer to a cooling rack. If you’re nervous, use a metal fish slice or a fork, slid underneath each cookie to avoid breaking them up.
Step 10: There were no more steps. This is the end.
You can eat them now! Alternatively, allow to cool and eat within… okay I don’t know what the shelf life is, but they’re cookies, they shouldn’t last very long. Anecdotally, when I did my last batch, I had some in the tin from three months ago, and they tasted fine, but I don’t recommend eating three-month-old baked goods!
And now: pictures.
Captions (and alt text) in the alt text.
Credits
Do recipes have credits? Not in my experience. This recipe however borrows heavily from:
Alison Andrews at Loving It Vegan: https://lovingitvegan.com/vegan-gluten-free-brownies
Janine Ratcliffe at Olive Magazine: https://www.olivemagazine.com/recipes/baking-and-desserts/classic-chocolate-brownies
/u/dundundah at reddit dot com: https://reddit.com/r/Baking/comments/97ag96/brownie_cookies/e46zinq
I’m Rachel. That’s as much detail as you’re going to get about me. K bye!
6 notes
·
View notes
Photo
brielarson: Are we surprised? #notspon but @crocs it could be 😉
#brie larson#blarsonedit#brielarsonedit#marvelcastedit#mcucastedit#marvelladiesdaily#mcuwomen#femalestunning#dailywomen#**#by amy#social media#userelysia#usermandie#userleah#usercroft#usercharr#tuserlanie#userauden#userpegs#captspaceface#usertreena#tusercourtney#userquel
63 notes
·
View notes
Text
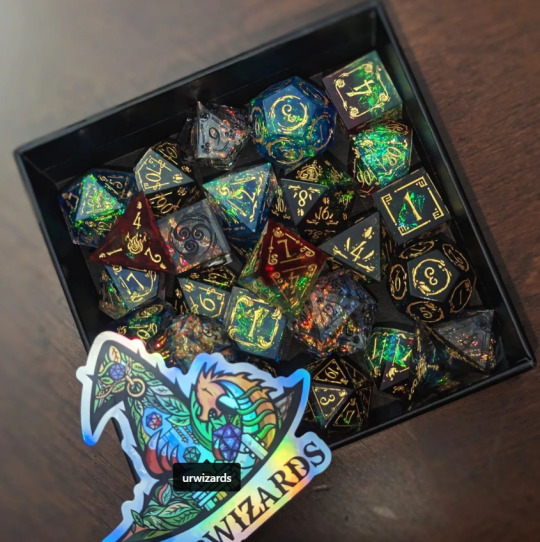
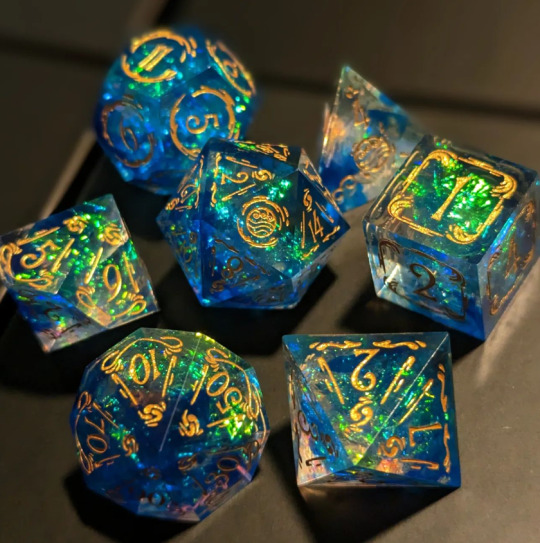
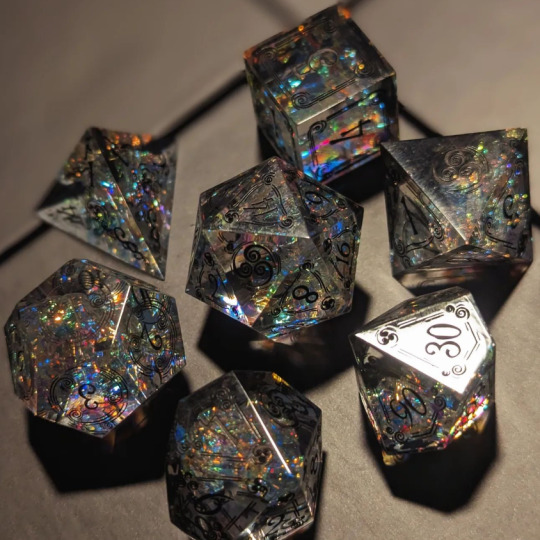
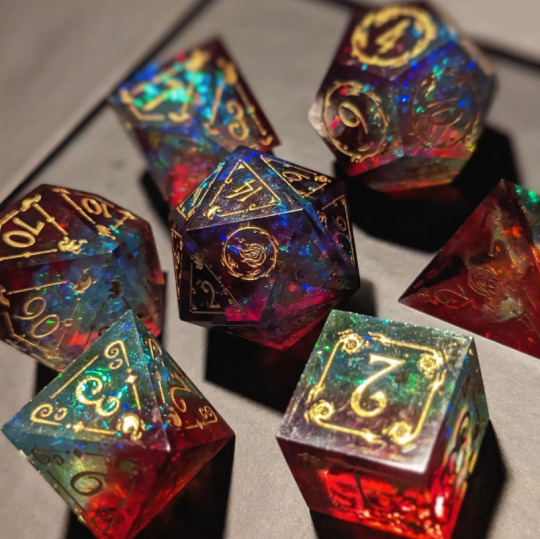
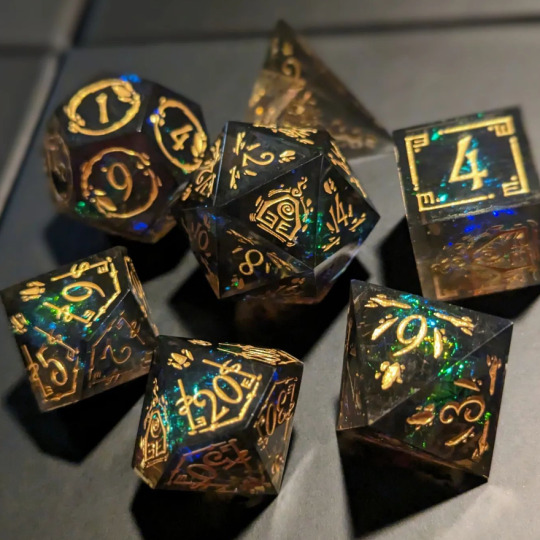
I wasn't feeling the best the last few weeks, so I thought I'd treat myself to some new dice! These are absolutely gorgeous. Not too keen on the clear set, but the green and red dice look so pretty!! 😭
from our Instagram customer
Thank you sooo much, beautiful pics, beautiful you! ❤️ Feel the Rhythms of Nature with 4 Elemental Dice🌍💧🔥🍃
#dnd #dice #dnddice #urwizards #notspon
#dice#polyhedral#dungeonsanddragons#dungeonsdragons#gemstone#diceset#gemstonedice#dnd#handmadedice#dnddice
8 notes
·
View notes
Text
#notspons but the workout plan i’ve been doing for a little over a month now fixed my posture in like. a week :|
#txt#tried a lot of stuff and this is the only thing that worked i can’t believe it was that quick tho#like my back is strong now
6 notes
·
View notes
Text
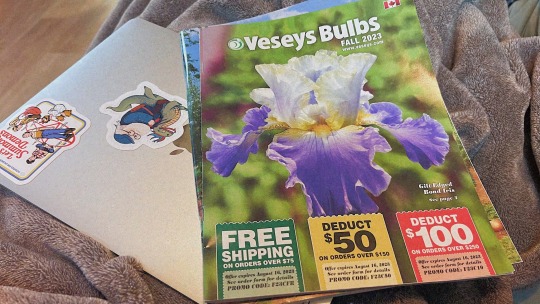
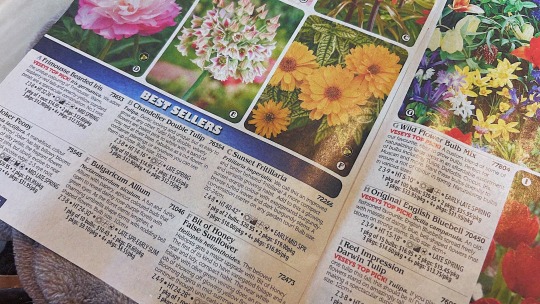
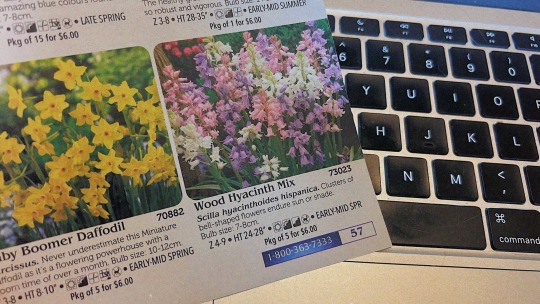
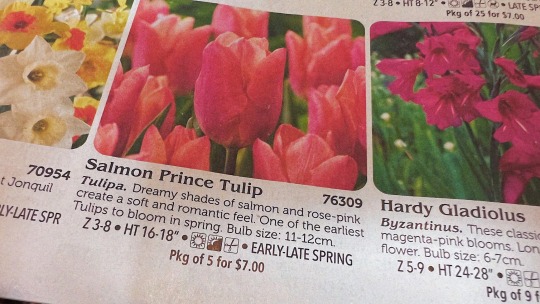
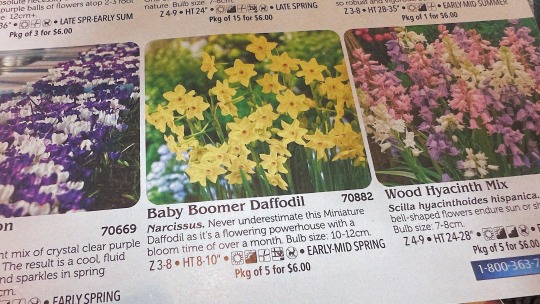

Here I am acting like it's the 1900s and ordering my fall bulbs from a catalogue 🤣 I know it's not environmentally friendly but it's so much more fun and easier than going through their website (or any website for that matter). I only gave myself $100 budget to experiment with since I do not have any experience with bulbs. I mostly ordered pinks and yellows coz I want my spring garden to look extremely gae 🏳️🌈 So exciting!
For my fellow Canadians out there who want to buy some fall bulbs, Veseys coupons are available till August 16th. Notspon.
14-Aug-2023
19 notes
·
View notes
Note
Spotify ask game- 1, 3, 6, 12, 13, 16, 19
1. how many playlists have you made?
answered here :)
3. how many liked songs do you have?
1,255
6. which playlist do you frequent the most?
answered here :)
12. how many songs are on your shortest playlist?
one lol
13. how many songs are on your longest playlist?
my phone apparently has a limit of 1,000 songs max per playlist so 1,000 lol
16. what kind of headphones do you prefer?
#notspons but I legitimately am obsessed with my Raycon earbuds, they're the actual best headphones I've ever owned (but runners up are my purple light up cat ear headphones and a pair of wired earbuds that have elf ears attached)
19. do you have any disliked songs?
I have very few songs I actively dislike actually lol
3 notes
·
View notes
Text

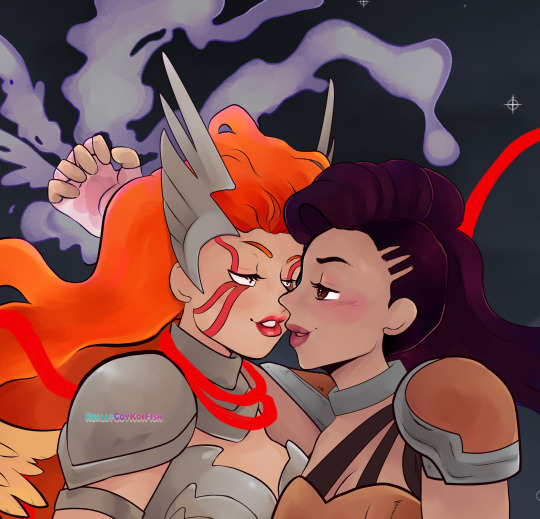
“Queens of Hel”
Yeah its more Angela fan art. So sue me. Wait don’t do that. So subscribe to my patreon why don’t ya. Yeah thats it.
I can’t stop playing Marvel Snap #notspon
It’s a problem. Someone help.
Totally don’t go to my tictok where I post devastating, devious, wins.
In seriousness, I love the relationship between Angela and Sera and wanted to do some art of them on this most special lovers day.
#digitalart#comicart#sword#MarvelSnap#Redhair#artistoninsta#artistoninstagram#angelaqueenofhel#drawing#characterdesign#sera#queensofhel#angel#lovers#magic#reallycoykoifish#manga#cute#anime#art
10 notes
·
View notes
Text
The Truth: My Welch’s Fruit Snack Addiction #notspons
5 notes
·
View notes
Note
do you have any advice for growing your writeblr?
i don't know how qualified i am to answer this, but here are some of the most helpful things i've learned over the past 3+ years of being on writeblr 🫡
engage with other writeblrs
if you see someone rb an ask game, send an ask ! if you see a tag game with an open tag, do it ! if you see a post actively asking for wips like yours, rb it ! it might seem a little hard to put yourself out there at first, but when people are offering a chance at engagement you should take it. if you find yourself drawn to certain people (and maybe even become mutuals 😳) ask them if they'd like to become critique partners or even just a friend to bounce ideas off of in the dms.
if that still seems a too extreme, here is loml maddie @veneritia's posts on starting your writeblr & writeblr etiquette, as well as hottie @helioselene's crash course for navigating writeblr.
post consistently
by my standards that could mean bimonthly (twice a month or once every other month) but yes, consistent content for consistent projects is the place to start. even if i'm working on multiple projects simultaneously, i only ever post about 1-2 at a time to keep things less confusing. it's also generally a green flag to your taglist that the thing they are interested in is being actively worked on.
post quality
"it's writeblr, not graphicblr" iykyk 😮💨 i'm not saying you have to immediately learn graphic design, digital art, etc. in fact, when i started out, i literally had no idea how to make any fancy graphics. a good moodboard can do just as much, but imho presentation matters. there can be a bit of a learning curve though, so i'll link some of the free resources i use:
photopea - it's like photoshop but on desktop
canva - has a bunch of free assets, fonts, & templates without watermarks. very beginner friendly 💞
unsplash - high quality, free-to-use photos
dafont - tons of free fonts
psds - i've linked @cavalierfou's resource navigation page, since they have a lot of free, beginner friendly templates to help you get started !
but quality content isn't all smoke and mirrors. make sure it has substance to it as well. if i post a last line tag, i am not going to ping my entire taglist just so they can look at three out-of-context lines. if i make a character moodboard on a whim, i'll be sure to add a relevant, decently-sized piece of writing/information to go with it. not every post has to be a party, but it's super important to not abuse your taglist 😤
make friends !!!
yeah ik, my intp ass hates having to say this, but it's really the most important point on this list. join discord servers ! join @welcometowriteblr ! (#notspons) slide into those dms (respectfully) ! it can be hard, it can take time, it can even seem impossible, but having a creative, supportive, & super hot friend group to hype and get hyped by really makes all the difference.
aight, that's all i've got for now. best of luck to you anon 🪄
8 notes
·
View notes
Last Seen Blogs


pokemon-amourshipping
Pokemon

shippertw-blog
Фикрайтер

lexanne
Lexanne Keulemans

silkapxl
commissions open ✨