#pic tutorial
Note
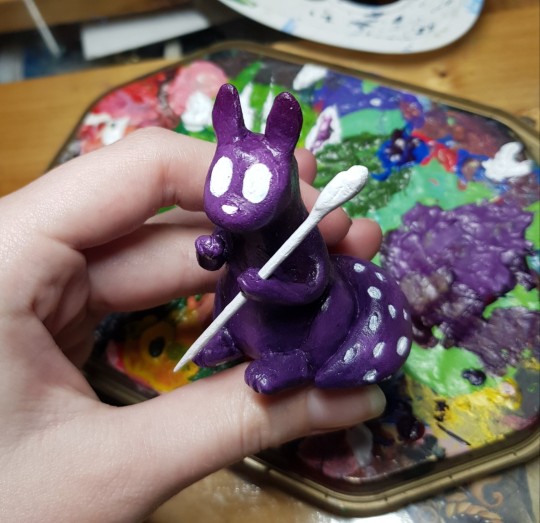
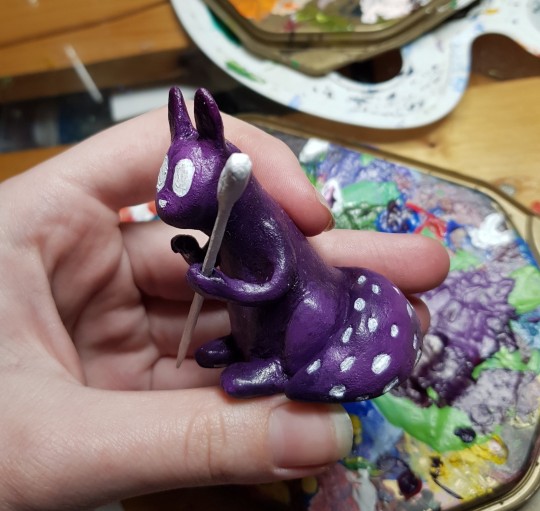
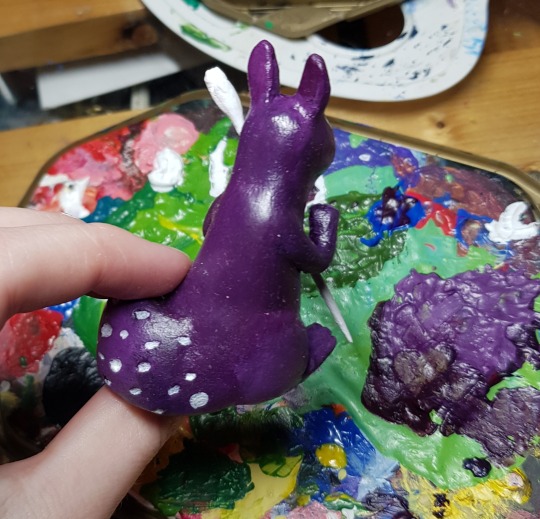
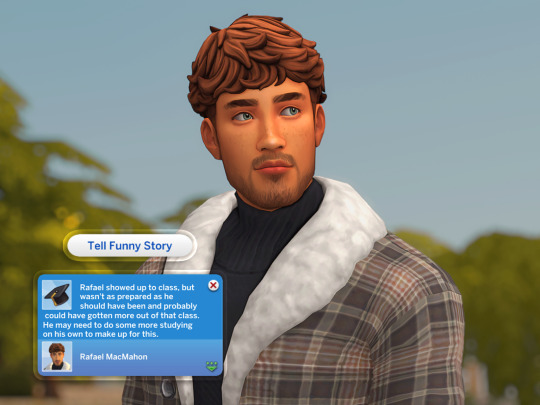
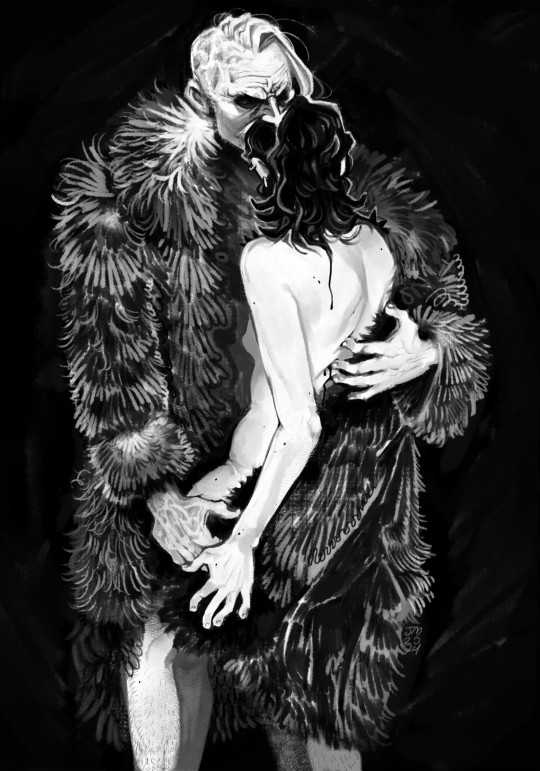
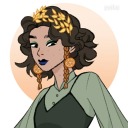
how could u put 4 v at same time?
a V and 3 NPV (V as NPC), a lot of time and a bit of pain ♥
But as i don't know if it answers to the question or not, i will talk about the process :
I changed Vanessa's locomotion for Judy, she could sit ! And for both Val, they use generic female one, i needed to find an long anim to have two potential poses. And Kou uses V photomode
I spawned the NPVs, tried some expressions and that they look on the same direction (Vanessa didn't want, she prefered look the wall ...), played with lights, open photomode, Kou needed to look the camera too, hotsampling, took a pic and ... crashed the game !
I'm not totally happy with the group pic because i love taking multiple shoots to be sure. I turn on the game again just for the portrait, i was short on time to redo another group pic !
4 notes
·
View notes
Text
spearmaster is here too!
#he heh I made another one#sol makes things#spearmaster#rain world spearmaster#rw spearmaster#rain world downpour#rw downpour#slugcat#rain world#sculpture#art#my art#this figurine gave me a lot of trouble#the arm that holds the spear fell off when I was sanding#but overall I think spearmaster turned out decently#but seriously#it was not easy#i'll take better pics tomorrow#let me know if anyone wants a clay scug tutorial#rain world art#rw art#rw fanart#rain world fanart#spearmaster slugcat#spearmaster fanart
247 notes
·
View notes
Text

tutorial contents:
1 ‣ gshade & photoshop actions
2 ‣ template or cropping & colouring
3 ‣ notifs & pop-ups
okay hi! i have a really old editing tutorial from back in january that i've been linking people to, but it's pretty outdated by now. i also keep getting anons asking about the same things, which is fine, but i always have to go searching for the post explaining it, so having it all in one place will be a lot more convenient lol
i use a ☠ copy of photoshop cc 2017 to edit my screenshots, however the majority of everything i'm doing also works on photopea
photopea is an online version of photoshop that's 100% free and works very well! i can't recommend it enough, it's fantastic
first things first, you're going to need some screenshots to edit. for the sake of this tutorial i'll be working with this one of raffy:
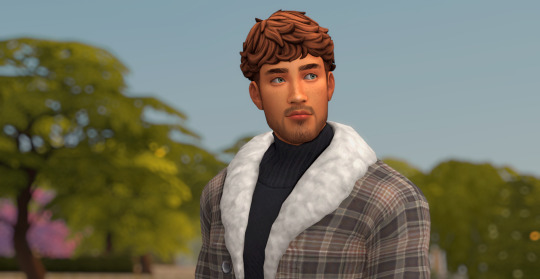
in all honesty, gshade will do most of the work for you. of course it's not needed, but i definitely don't think i could live without it! in this screenshot i used sunset n' vinyl by nesurii
when opening the screenshot, the first thing i do is run it through 2 photoshop actions:
butter action by early-grape
smooth sharp (no topaz) by poolbrop
to add actions in photoshop go:
windows > actions > the 4 lines at the upper right corner of the newly opened window > load actions > your downloads folder > open up the .atn files!
if you're using photopea, as far as i'm aware you can't use photoshop actions, but i've found that 'filter > stylize > oil paint' and 'filter > sharpen > smart sharpen' have a very similar effect when using the right settings. try these:
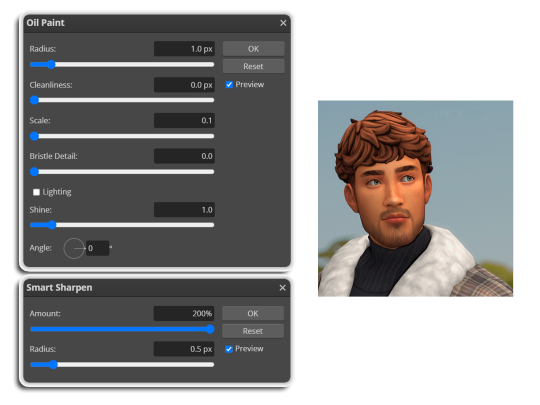
i like these two actions because they smooth everything out nicely, but keep it sharp at the same time! i always run butter before i run smooth sharp, however butter may leave you with 2 layers. make sure to merge these layers before running smooth sharp to achieve the full effect.
here's a before and after (of the photoshop action):

from here you can move on to step 2
before anything else i want to share the template that i use to make editing a lot faster. you don't need to use it but it's definitely made things a lot easier for me! it's a .psd file and will work perfectly in photopea
download (simfileshare)
if you're using the template you can skip right on to the next section, as it's already cropped to the right size and has the colouring folder included. just drag your screenshot into it and resize to fit the height.
if you're not using it, crop your edited screenshot to:
1707 width x 1280 height
then adjust the colours to your liking. it always varies slightly depending on the picture but my regular process for each screenshot would be:
up the saturation by 8%
up the lightness by 3%
up the contrast by 12%
all of this can be done by looking in the 'images > adjustments' tab
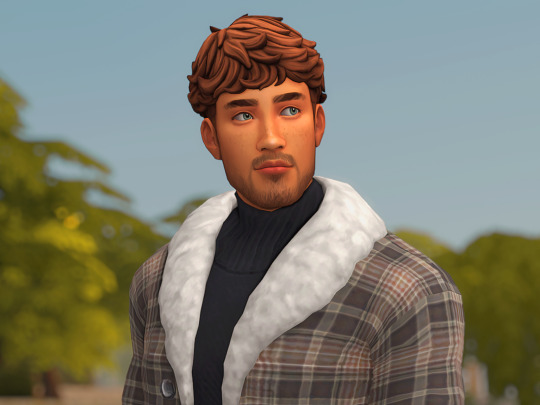
you should end up with something similar to this!
if you want to add a moodlet or social interaction or anything similar, it's all the same process. what you'll need is a screenshot of it straight from the game. i just press the 'c' key to capture them! i'll be working with these two:
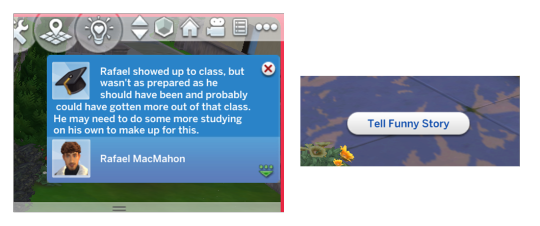
for the blue notification i'm going to select it using the box select tool. try to get it as exact as possible. one you have it selected
for photoshop users:
click on the 'select and mask...' option located at the top
adjust the global refinements at the side as follows:
smooth: 70
feather: 0.0px
contrast: 50%
shift edge: 0%
for photopea users:
go to select > modify > smooth
set it to 15
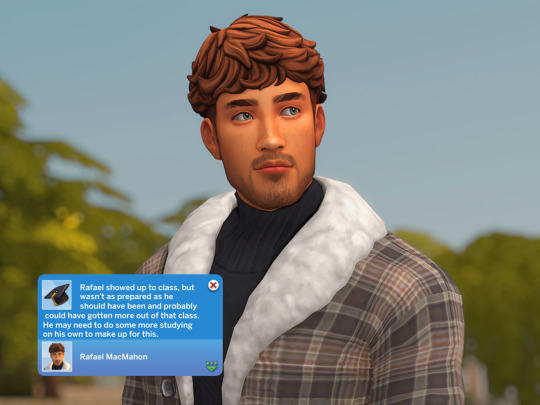
select 'ok' and press 'ctrl + c' to copy it, then 'ctrl + v' to paste it into your screenshot. adjust the size and position and you should end up with something like this:
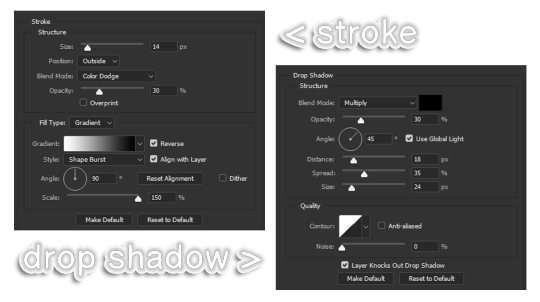
next you want to add the transparent border around the notification. if you're using my editing template, right click on the reference notif in the layers tab and select 'copy layer style' (photopea > 'layer style > copy'). from there you can paste that layer style onto your own notif through the layers tab.
if you're not using the template, here's how to set it up on photoshop:
right click your notification layer and select 'blending options'
under styles, tick the checkboxes for stroke and drop shadow
input these settings:
on photopea, it should be more or less the same. repeat the exact same process with the social menu option, but instead of selecting it with the box select tool, use the magic select tool. in the end you should end out with this!
from here you're finished! thanks for reading! go to file and export as png
if you've got questions never hesitate to ask, just make sure to read the faq in my pinned. i might edit this post soon to include the gen intro traits and aspirations bit, but this is all for now. hope it helps, my editing process post has been in need of a revamp for a very long time. i haven't proof-read this so apologies for any mistakes!
#ts4#sims 4#ts4 tutorial#5 anons in my inbox asking the same question after not reading my faq#this ones for you#3 anons in my inbox asking about cas pics#ones coming for you soon#okay maybe not soon but sometime#all my free time has been eaten up#i signed up for extra saturday morning classes and not having a lie in is sucking the life out of me lmao#when i'm busy i just wanna play video games and when i get the chance#to play games i just wanna sleep#its a vicious cycle#i'm currently playing resident evil biohazard tho#enjoying it very very much#i've only got 2 and 3 left to play and i've played every mainstream re game 💪💪#it was a very fun journey! i played them all within this year#long post
1K notes
·
View notes
Text
messing around in realistic paint studio again. this is just an initial sketch, but i think he looks cute :>

#(points at the century old man) babygirl.#fallout 4#fo4#fallout#nick valentine#rochedotpng#will be using the full pic for that watercolour tutorial i have a method#it is not a good method necessarily but it is A method
1K notes
·
View notes
Note
how did you make those holy shit!!!
jfjskdk okay I'll take any excuse I get to talk abt this more
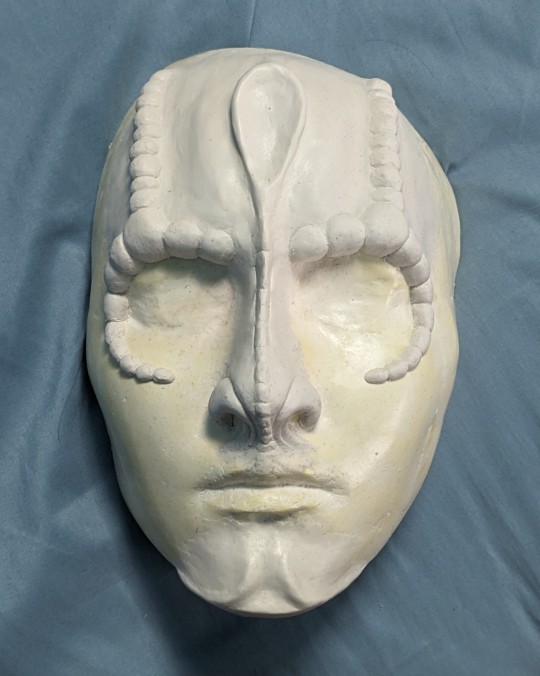
How I made my Cardassian prosthetics
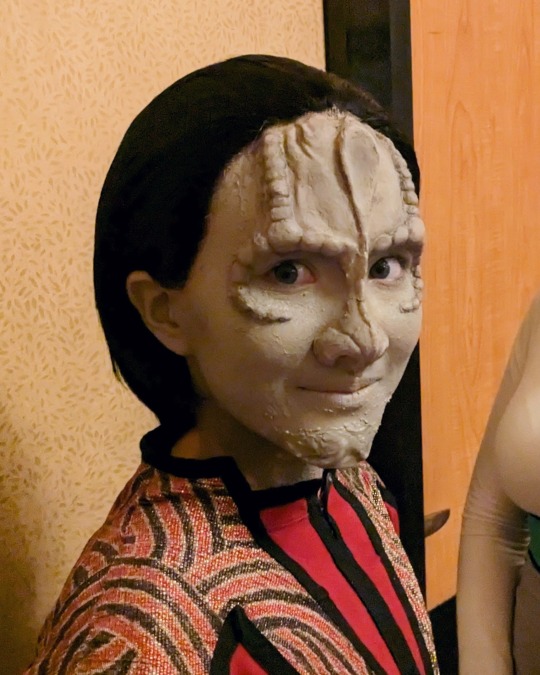
Disclaimer: I'm no expert, it's my first time doing this!! All the resources I used can be found online. In fact, here's a playlist of all the youtube videos I followed, in case you don't want to read the whole post. You can pretty much make any facial prosthetics following these steps, not just Cardassian ones.
What you'll need:

Plaster bandages, plaster of Paris (a lot more than is pictured here), modeling clay, and liquid latex. You'll also need some things you probably already have around the house, like vaseline (or cooking oil), plastic wrap, wood glue, rubbing alcohol, q-tips, cotton balls, and setting powder (or baby powder).
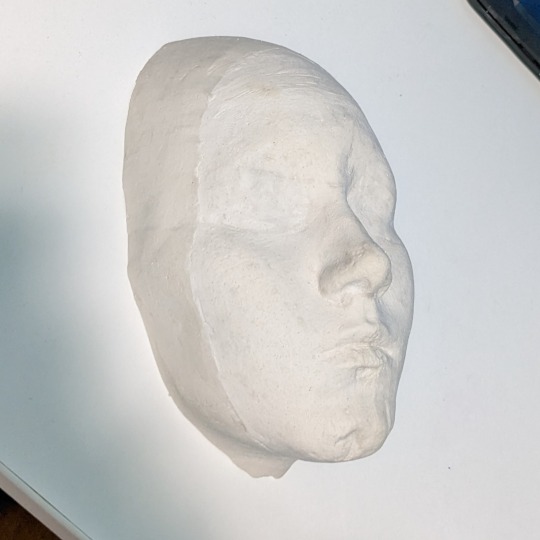
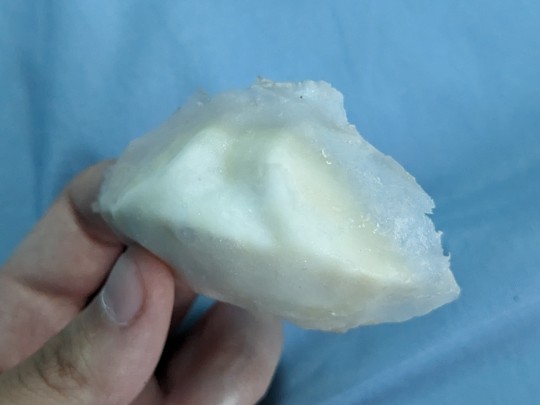
Step 1: Face cast
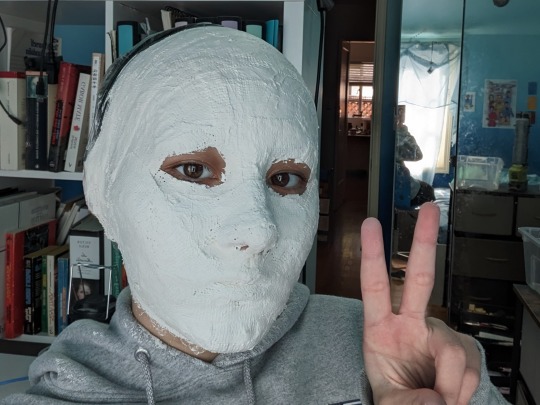
The goal here is to make a plaster copy of your face that you can sculpt your prosthetics on, by covering your face with plaster bandages and then casting that in plaster of Paris. This is the video tutorial I followed for this step. There are many methods, and you'll find tutorials for all of them on youtube, but this is the easiest way if you're doing it by yourself, and it results in a perfectly useable face cast for our purposes. And, if you're cosplaying Garak like me, it's a great way to get into character by experiencing claustrophobia for the first time in your life!! (Jk it's not actually that bad. I lived.)
The video explains the process better than I could, but here's some tips I learned from doing it! Wear a shirt that you don't mind ruining. Go a bit closer to your eyes than I did here. When you're propping up your mask in a bowl, make sure you're not squishing any parts of it or tilting it! I ended up with a dent in the chin of my face cast because I accidentally dented the mask while I was casting it. And make sure you have enough plaster of Paris! I probably used 2-3 pounds for this part. Here's what I ended up with, before sanding or sealing it with wood glue:
Step 2: Sculpting
This is pretty self explanatory, but also probably the hardest part. Just use lots and lots of reference photos. I've got a pretty good stash for Garak, if anyone's interested hdjkfhk. I found that gifs made better references than still photos, since they give you a better sense of the 3D shape. You want to make sure you're using modeling clay that doesn't dry. You don't need any fancy sculpting tools! I used my trusty palette knife to get the small details, but you could probably accomplish the same thing with, like, a spoon and a toothpick. It depends on what kind of clay you're using, but you can dip your finger in a solvent to smooth out the surface of the clay and blend the edges into the face cast. I used rubbing alcohol, but I also heard people recommend acetone. Once you're happy with your sculpt, you can move onto the next step!
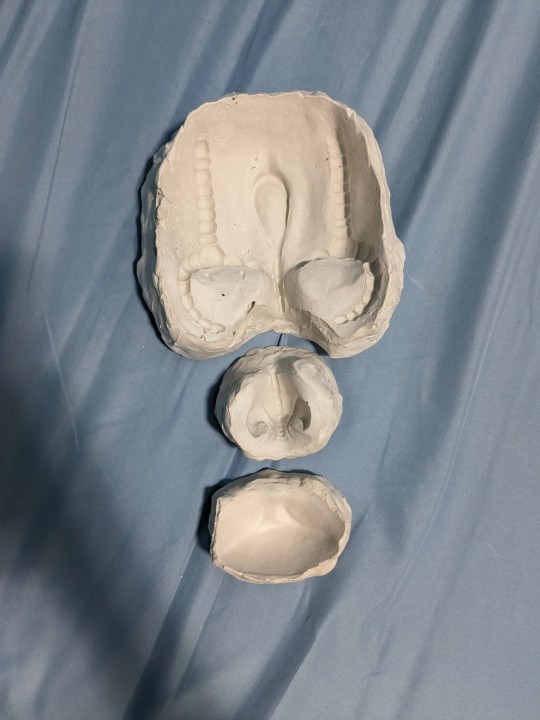
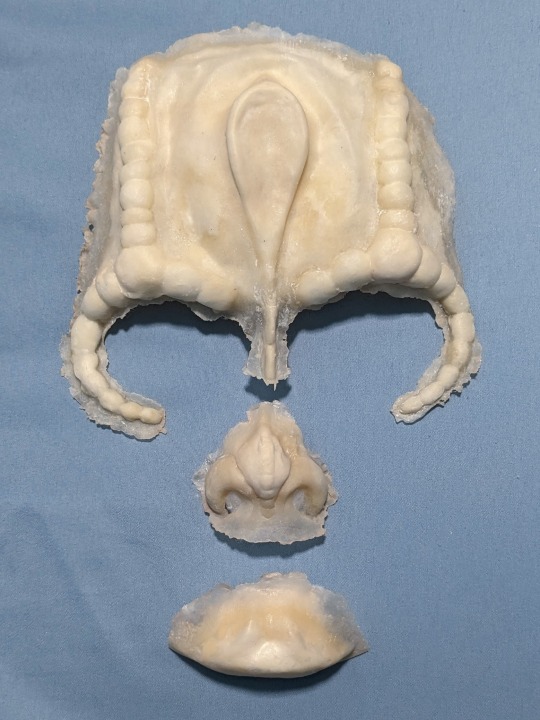
Step 3: Casting negatives
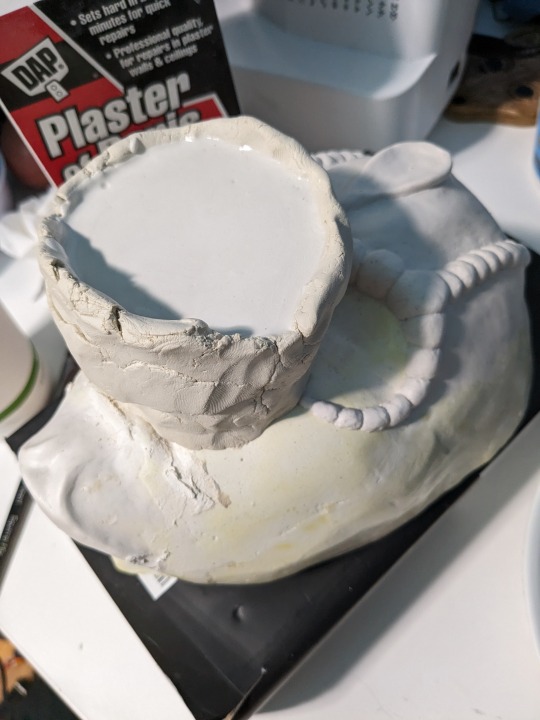
This step is technically optional. The video I followed also outlines an easier way that skips this step, by simply building your prosthetics directly on the sculpt. But casting negatives allows you to get a lot more fine detail, and a smoother finish on the final prosthetics, so that's what I chose to do. Basically, you pour plaster of Paris over your sculpt, and it hardens into a mold you can use to build your prosthetics on.
Again, the video explains it better, but some tips! If it's possible with your sculpt, do it in small pieces instead of the whole face at once. I did the chin, nose, and forehead separately. If you try to do the whole face, there's a greater chance of it getting stuck or breaking. Of course, if you were doing, say, Odo, then it might not be possible to do it in multiple pieces. Another thing to watch out for:

If your underlying face cast has any "undercuts," or places where it's, like, concave, then if plaster gets into those areas and hardens, your face cast and your negatives will lock together, and you won't be able to use either of them. For me I was worried about the sides of my nose and under my bottom lip. As long as those parts are filled in with clay, then you should be fine. It's okay if your clay sculpt has undercuts! You can see in the (shamelessly stolen) diagram that their sculpt has a lot of undercuts, but that's okay because the clay is soft and won't lock with the plaster, it'll just come off. The video I got the diagram from was also pretty helpful, even if it's meant for casting with different materials than I used. Here are the completed negatives:
Step 4: Making the prosthetics!
Now you have negatives! Your sculpt may or may not be intact, but if your negatives turned out okay then that's fine. This step is also covered in the video for step 3. Using a stippling sponge, foam brush, or q-tip, stipple thin layers of liquid latex onto your negatives. I found that a q-tip worked best, even if it took longer to cover larger areas. Make sure the edges are very thin, so you can blend them into your skin when you apply the prosthetics. Wait for a layer to dry before adding more latex on top of it, or you'll end up with fucked up results like I had:
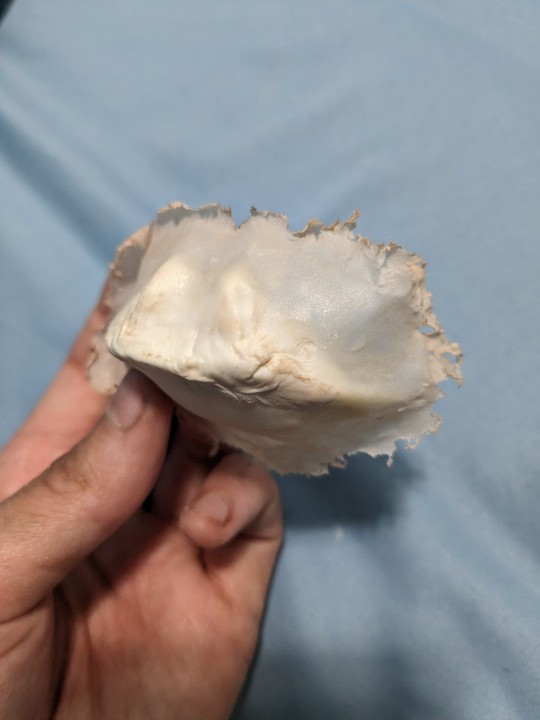
(Left: first draft, where I didn't let it dry enough before layering more. Right: second draft. Much better!)
Build up bulky areas with pieces of cotton balls, then cover the cotton with a thin layer of latex. Emphasis on thin! It'll take forever to dry if you saturate your cotton with too much latex. This step mostly involves a LOT of waiting. When the latex is fully dry, brush everything with a liberal amount of setting powder or baby powder to prevent the latex from sticking to itself as you peel it out of the mold.
And now you have your prosthetics! You can tear away some of the excess latex at the edges to make it fit your face better. I ended up tearing away almost all of the edges around the eye ridges, so it would blend better and I wouldn't have to get adhesive so close to my eyes. Tear, don't cut! It'll result in a more natural edge that's easier to blend. This video shows how to apply prosthetics. Use whatever prosthetic adhesive you want! I used spirit gum because it's what I had on hand.
Now you can go forth and live out your lizard alien dreams!!
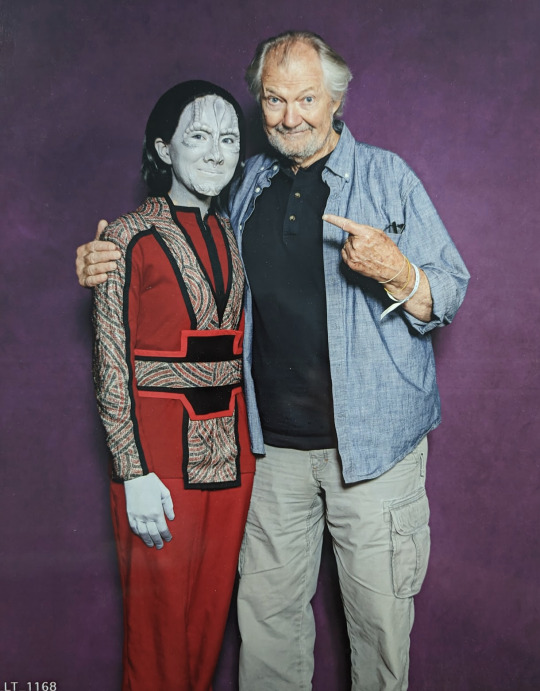
#IDs in alt text#garak prosthetics tutorial is finally here :))#u guys better not let this flop. this is more effort than I put into my entire high school career (which is a low bar tbh)#sorry to my friend I cropped out of the first pic 😭😭 I rly didn't get any good solo shots jdlkjhf#narcissus's echoes#narcissus plays dress up#ds9#elim garak#star trek#garashir#andy robinson#cardassians#star trek ds9#star trek cosplay#deep space nine#star trek deep space 9#garak cosplay
341 notes
·
View notes
Note
im absolutely in love with the way you paint your art !! Do you have any tips as to how you pic your colors? (If it's fine ofc!)
THIS HAS SAT IN MY DRAFTS FOR A WHILE. been busy and am sorry but here I am- (and thank youuuu you’re sweet)
Istg I’ve thought about how to answer this for a while, bc I assumed you’re asking how I color, which god save me- I have no clue what I’m doing. But when it comes to color picking it easier skdjs so I’ll try…
To put it simply, I’ve been using the colors i currently use for a while, so it basically just became this instinct when it comes to picking colors, but here’s a horribly-put explanation. I’ve tired.
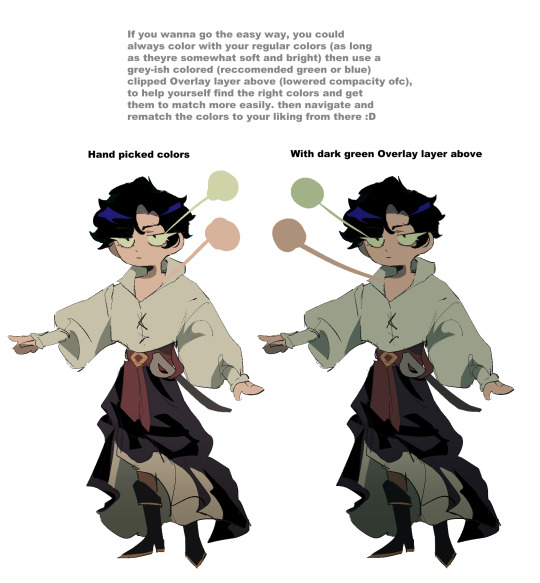

Also it’s super late over here and I just made this so if there’s any typos or it seems like I was high when writing this. Then yeah, hope this helps in any way :D
#i totally ddint just find an excuse to include a bunch of my obsesssion sources bitiches in one image in the second pic oh jsjsjs silly me#tutorial
203 notes
·
View notes
Text
every so often i get an idea and then obsessively work on it for hours and hours and sometimes it turns out good.
anyway the other day @follivora made a post with joker out as mucha art and that sparked this:

#joker out#jan peteh#songbird arts#i might do the rest of them too but my hands are tired and i have some other projects to do first#i have a nice reference pic of nace saved#i am SO proud of this i was using a vector tutorial for the style and working in raster graphics and still managed#definitely could have been more efficient but i was learning and learning is important
107 notes
·
View notes
Text

She's back to destroy the organization...!!
#my captain o7#i watched a tutorial abt blurs can you tell? xcmvnbcx#she has so many cool pics i couldnt decide which to start with#so i'll definitely do something again for her <3#claymore#miria#phantom miria#mp#anime poster#manga poster#poster design#manga edit
59 notes
·
View notes
Text
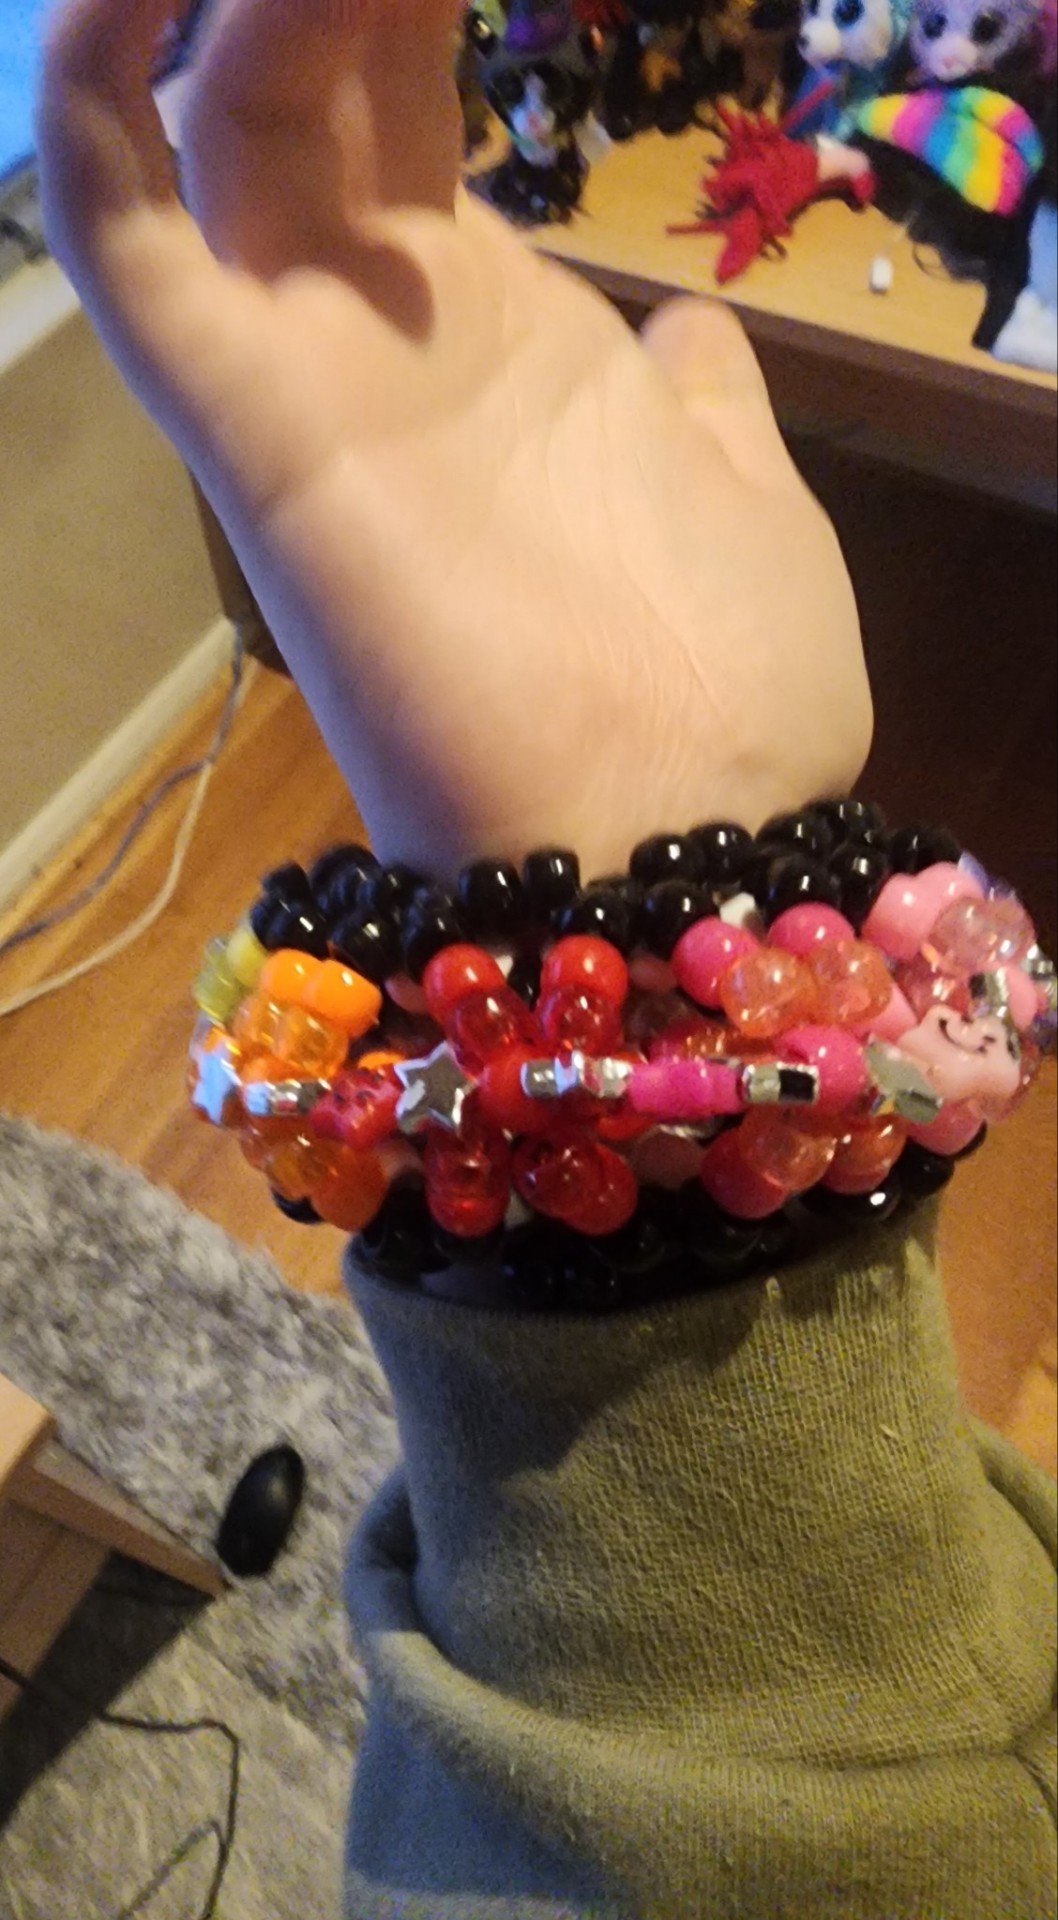


Wait I realised you people on this blog would like this so hai
#kandi#kandi aesthetic#kandi cuff#rainbow kandi#ufo cuff#also i dont know the name for the other one. lol#i THINK what i made in the first and second pic is a ufo cuff. thats what the tutorial said. lol.
127 notes
·
View notes
Text

#funny#lol#funny post#lolol#hilarious#comedy#funny pics#funny images#meme#dank memes#oh no#send help#ummmm#tutorial#fail
139 notes
·
View notes
Text
Making up fake cd covers for fake bands 👍
#mati draws#mockup#was trying out some phoshothop tutorials i had saved#fun!#pic was scanned by yours truly from a 70's magazine#no idea who they are :(
28 notes
·
View notes
Text

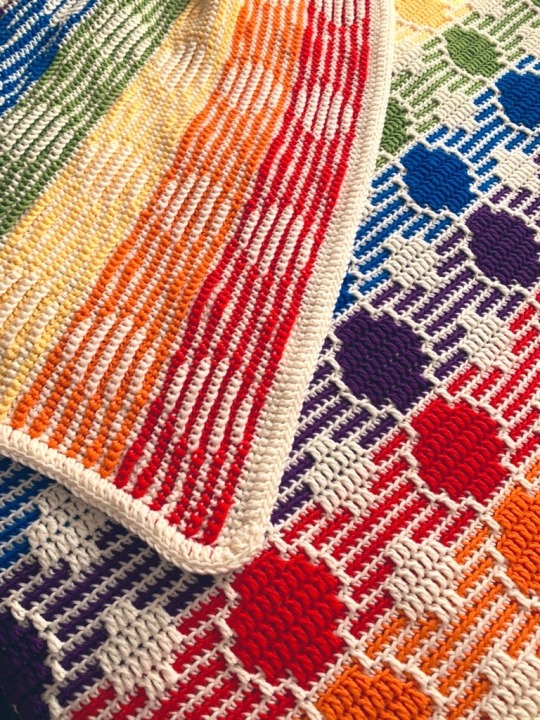
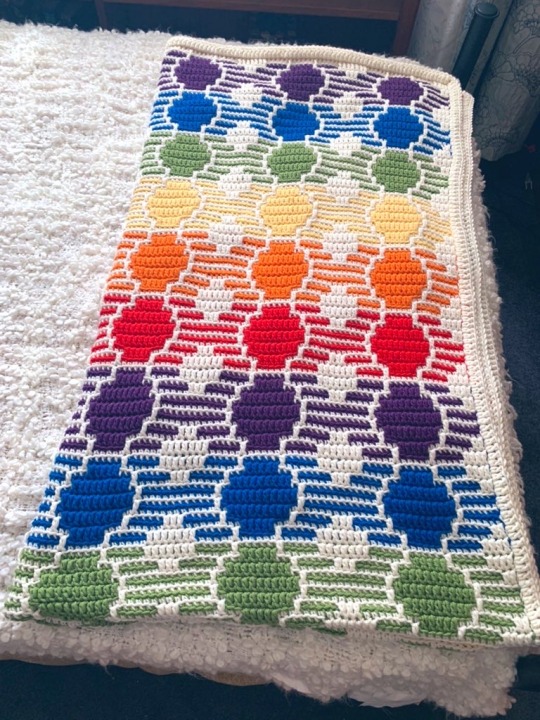
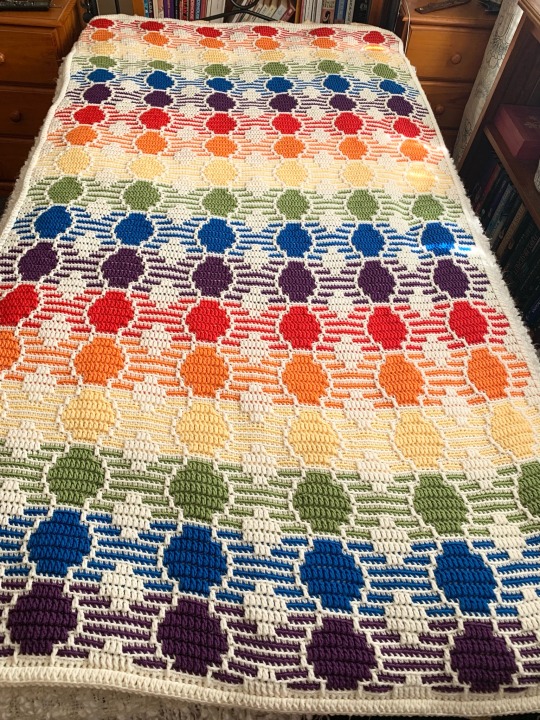
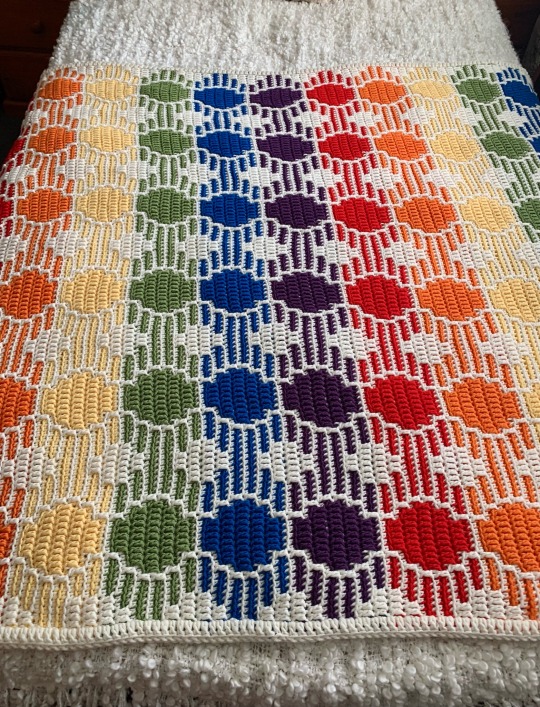
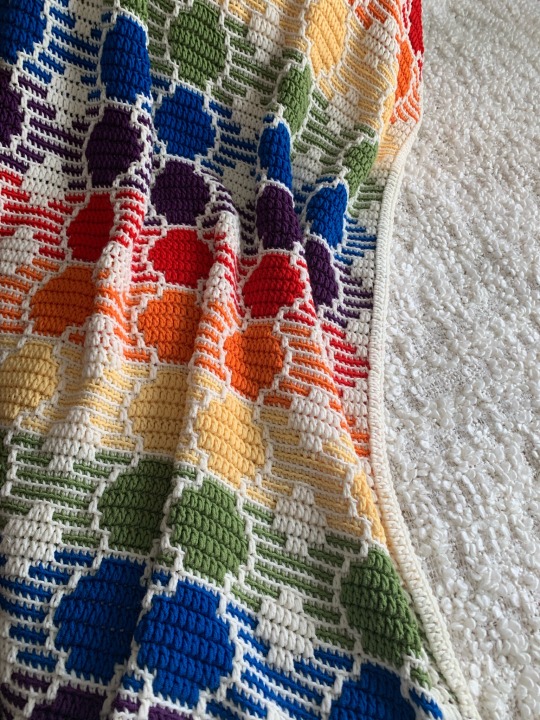
Rainbow [Bubbles] Blankie with a modified envelope border
#crochet#crochet blanket#crochet throw#rainbow#blanket#throw#my crochet#completed works#i might do a pic tutorial#for the envelope border#if only for my own reference#on the next blankie
359 notes
·
View notes
Text

The sketch, blocking, and full rendered black n white version of the most recent painting
#i should post progress pics more#i pretty much always work off a reference image or photo collage to block in shapes#i cant eyeball proportions and remember anatomy that well#so i just dont!#im most happy rendering so i put my effort in there instead :)#art#illustration#black and white#drawing#artists on tumblr#digital art#ocs#sketchbook#dungeons and dragons#dnd#art tutorial
49 notes
·
View notes
Text
ATTENTION LAZY ARTISTS 📢‼️ if you want to make a 'grounded' interior or exterior scene with perspective, just make a barebones mockup in the sims first and trace them. just the furniture and the room itself are the important part, add the decor when you redraw it!
#artists on tumblr#pixel art#art tutorial#art tips#interiors#the sims#the sims 4#the sims 3#perspective#if this helps yall i can make a full tutorial with pics
115 notes
·
View notes
Note
hiii joseph. If this is annoying or a bother, please tell me to stfu, but I was wondering if you have any tips for drawing blood? I know you've done it on a couple of your edits and it always looks so good, and I'm in a position now where I need to for an edit, and I have no idea where to start. Thanks!! 💖
hii im so sorry iw as like waiting for an opportunity to make this a whole tutorial but then i forgot about it RIP i'll just talk at u if thats ok. i might add actual process pictures later
so firstly when drawing blood u have to consider three things:
how much blood is there/where did the blood come from
how long has the blood been there/has it been smudged or altered in some way
what material is the blood currently on
the answer to these questions informs how the blood is going to look. a fresh arterial spray on skin and clothes is going to look a LOT different than a pool of it thats been on a hardwood floor for a few hours/days. i would recommend looking up references if u have the stomach for it but if not u can still watch like shows/movies so its not actually for real. if thats still too much then idk u dont have any business trying to make a bloody edit at all sorry SFDGHJK. google images will do u a world of good but uhhhh im gonna be real i have a login to a website that stockpiles real crime scene photos for forensic and crime (??) students which i usually head to but im not comfortable sharing that LMAO. i swear google images is still fine though
i usually just copy almost exactly what im seeing on the screen so the method varies a lot but its mostly various shades of dull red drawn on several multiply layers. erasing using a low opacity brush helps for like ?? layering?? blood doesn't dry uniformly, some parts will be darker than others etc. in a lot of lightings blood will just look straight up black. if thats the case i usually manually add a bit of solid red to act like a highlight. also u dont have to get too precise with it a bit of a suggested smudge can go a long way
i have a few examples of some of my drawings of blood here im going to just explain in the alt text what caused the blood/affected the blood so it looks the way it does
blood drawn on fabric:

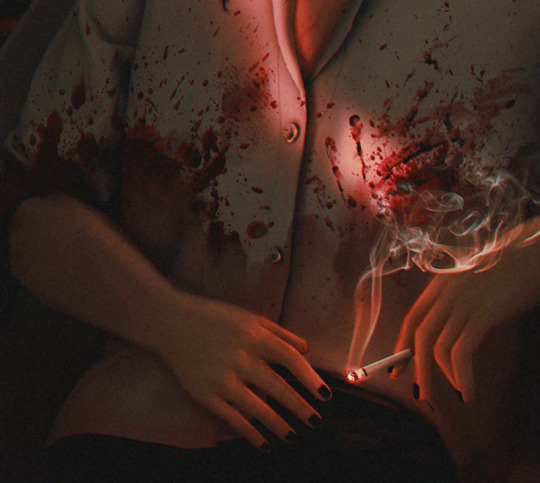

blood drawn on solid surfaces:


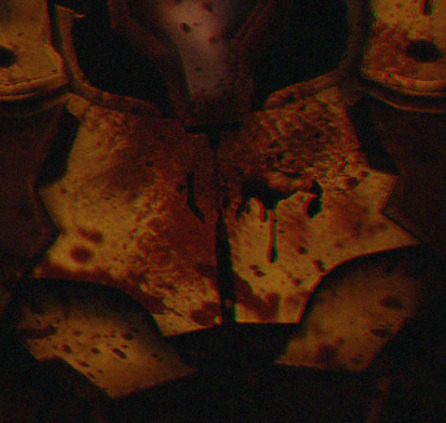

blood drawn on skin:
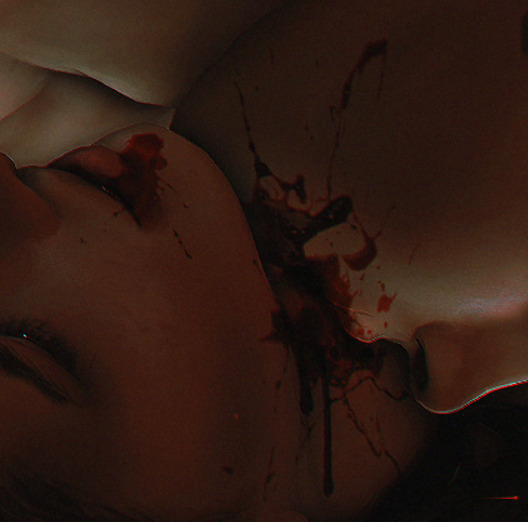
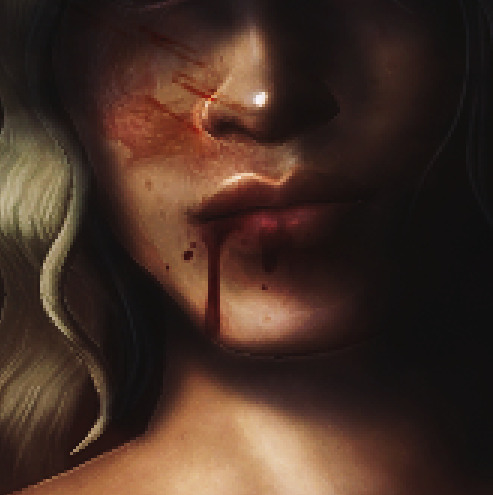
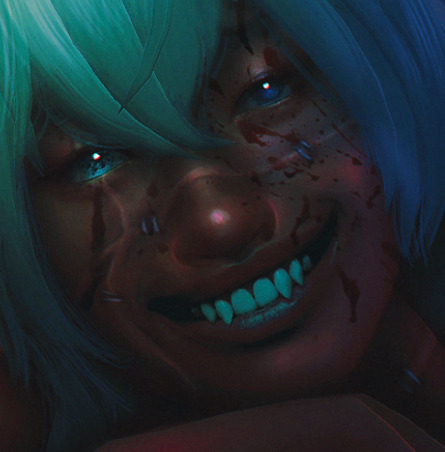
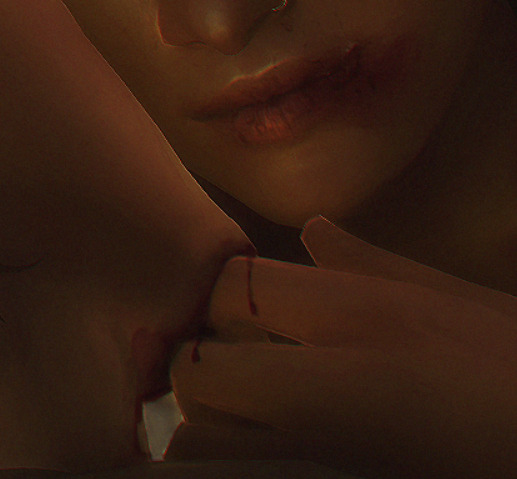

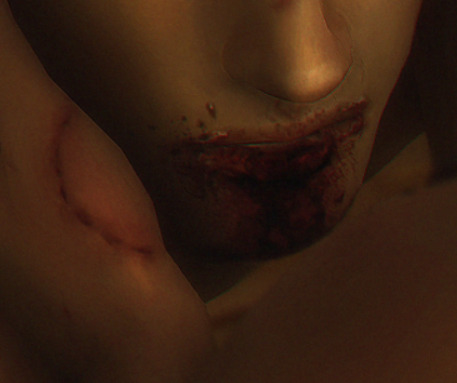
i also use these blood overlays (only some of them will show over clothes rip): 1 2 3
#bloodtw#while getting example pics i realised i use blood like. a LOT. sue me if its not the sexiest bodily fluid like-#ask#reply#morrigan-sims#tutorial
16 notes
·
View notes
Text
How many farmers here would post their progress on the internet?
And how many would post the really weird stuff they encounter on it? Like livestreaming a trip to the mines or something.
#i was thinking of thad using a few accounts to terrorize everyone#posting normal stuff like pics of crops or crafting tutorials#but also new magical experiments he does or general magical stuff the ministry doesnt want discussed with everyone#gossip from the adventuring community and trash talking joja#or detailed instructions on what plants and mushrooms can be used as drugs and how to find them in the wild#and generally posting too much and answering any question a little too honestly
22 notes
·
View notes
Last Seen Blogs
padabana
Hi :)
withjoyshelaughs
liv salzman
doorjamb
some shit

devanby
DEVANEIOS

incorrect-goldfinch
The Goldfinch