#pico raspberry pi
Explore tagged Tumblr posts
Visit Tumblr Blog
Explore Tumblr blogs with no restrictions, modern design and the best experience.
Last Seen Tumblr Blogs


Fun Fact
Average visit duration of Tumblr.com is 10 mins and 25 secs.
Text
clockwork PicoCalc
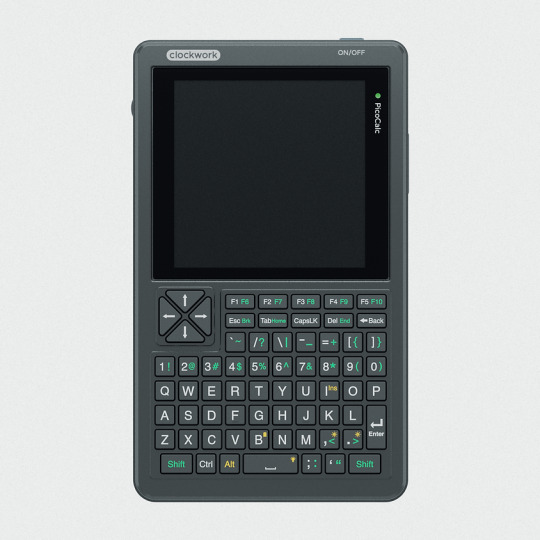


clockwork PicoCalc Back to Basics, rediscover the Golden Age of Computing
Code in BASIC, explore the magic of Lisp, taste the elegance of Unix, play retro games and digital music all in just 260KB memory. Infinite possibilities, inspired by the genius in you!
ClockworkPi v2.0 mainboard
Raspberry Pi Pico 1 H Core module (ARM32-bit Dual-core Cortex M0+, 264KB RAM, 2MB flash)
320x320 4-inch IPS screen (SPI interface)
Ultra-portable QWERTY Backlit keyboard on board (I2C interface)
Dual speaker
ABS plastic shell & 2.5mm Hex key
Tempered glass cover
32GB high-speed SD-card with optimized BASIC firmware
source: clockworkpi.com
7 notes
·
View notes
Text
#Built-in Wi-Fi for Raspberry Pi Pico#IoT development board#Raspberry Pi for IoT projects#Wi-Fi-enabled microcontroller#DIY electronics with Raspberry Pi#Robotics with Raspberry Pi Pico#Home automation with Raspberry Pi
3 notes
·
View notes
Note
Hi, I just got into tech (actually 1 year in but I still feel like I don't know anything).
I learnt python, R, SQL, Tableau and concepts in Data Structures, Algorithms.
[Just the Basic level of the listed.]
But I can't write my own programs on python or create anything.
I was hella impressed by your microprocessor project, and when I took up tech (ai and data science) I assumed I would do something like that or at least code.
Now, I am just venting but where do I start, how do I make projects what are some interesting projects, what should I learn? A lot of my seniors tell me to have a wide range of knowledge like focus on one thing by depth but add other things. For example: you can study data analytics in depth but have some knowledge in ethical hacking and web development etc. Like an all rounder.
Wow ok a lot to unpack here, I'll get started
Lots of places recommend that you start with Arduino, as there are a lot of good tutorials out there. I somewhat disagree
I think that raspberry pi is better because it's usually a lot cheaper to buy the stuff you want to play around with
But an even cooler way to do it, go to wokwi.com and start a project on a Raspberry Pi Pico (make sure it's the micropython version) and then you can get started there
Google something like "Blink led with Pi Pico micropython" and there will be a tutorial or two
Then, once you've played around for a while you can buy a Pi Pico for very little money and see your stuff work irl!
If you need any more help or have any questions, feel free to DM me and I'll see what I can do
#micropython#coding#python#raspberry pi#raspberry pi pico#programming#microprocessors#microcontroller#microcontrollers
6 notes
·
View notes
Text
LED control system in progress!!!
12 notes
·
View notes
Text

think i fucked up my pico
#pico#raspberry pi#raspberry pi pico#i have no mouth and i must scream#the AM hate monologue has become an inside joke between me and a friend#we keep quoting it at minor inconveniences
5 notes
·
View notes
Text
PSA
If you want to use a Raspberry Pi Pico as a debug probe to program another Raspberry Pi Pico without the annoying BOOTSEL dance, make sure that when you run CMake on the debugprobe firmware (in the picoprobe repository), you pass DEBUG_ON_PICO=ON as option. As in,
cmake -DDEBUG_ON_PICO=ON ..
This flag is described in the Readme of that repository (also note that the repository and tool have been renamed debugprobe from picoprobe), but it's notably missing from Appendix A of the Getting started with Raspberry Pi Pico guide. That guide is probably older, before the firmware was split and renamed like that, and nobody has bothered to update it yet.
If you don't do that, the firmware will expect the SWDIO and SWCLK data on different pins than what the instructions say, and you will find yourself spending hours checking the cable connections because you keep getting "Error: Failed to connect multidrop rp2040.dap0" errors in openocd. Ask me how I know.
(Also, fuck Raspberry Pi for making so much of their otherwise really good documentation PDFs. There are several places where you need to cross-reference things, and if it were HTML, the navigation between the sections would be so much easier.)
Other tip, while we're here: Install ninja (with brew install or apt install), then when doing the cmake generating step, pass "-G Ninja" in addition. Then build by just typing "ninja" instead of "make -j4" or whatever. It's a little extra typing but it is faster and better at utilising many cores on your host computer.
2 notes
·
View notes
Text
Project isn't working
Connect oscilloscope to check if it's generating the signal you expect
See a signal that makes absolutely no sense
Now you're even more confused than before
2 notes
·
View notes
Text
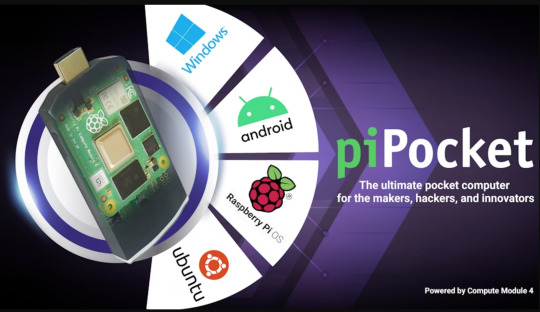
The Ultimate Pocket Computer For Innovators, Coders, Hackers
piPocket is a revolutionary new pocket computer that is perfect for innovators, coders, hackers, and anyone else who wants to create and build amazing things. piPocket is small enough to fit in your pocket, but it is powerful enough to run a wide range of software, including coding environments, development tools, and even full-blown operating systems.
Features
piPocket is packed with features that make it the perfect pocket computer for innovators and creators. Some of the key features of piPocket include:
Powerful processor: piPocket features a powerful quad-core ARM processor that can run even the most demanding applications.
Large memory: piPocket comes with 4GB of RAM and up to 128GB of storage, giving you plenty of space to store your code and projects.
Versatile I/O: piPocket features a variety of I/O ports, including USB-C, HDMI, and micro SD. This allows you to connect piPocket to a variety of devices, including displays, keyboards, and sensors.
Long battery life: piPocket has a long battery life, so you can work on your projects all day long without having to worry about running out of power.
Use Cases
piPocket is perfect for a wide range of use cases, including:
Coding and development: piPocket is the perfect platform for coding and developing software. It comes pre-loaded with a variety of coding environments and development tools, and it is powerful enough to run even the most demanding applications.
Prototyping and testing: piPocket is also a great tool for prototyping and testing new ideas. It is small and portable, so you can take it with you wherever you go, and it is powerful enough to handle even the most complex prototypes.
IoT and embedded systems: piPocket is also a great platform for IoT and embedded systems development. It is small and low-power, making it ideal for battery-powered devices. It also comes with a variety of I/O ports, so you can connect piPocket to a variety of sensors and actuators.
Conclusion
piPocket is the ultimate pocket computer for innovators, coders, hackers, and anyone else who wants to create and build amazing things. It is small, powerful, and versatile, making it the perfect platform for a wide range of use cases.
Check out piPocket on Kickstarter today and learn more about this amazing new product!
2 notes
·
View notes
Text
A Color LCD (part 1)
Many years ago, I pulled an LCD out of a GPS unit from the days before cars and smartphones having navigation features. This LCD is a color LCD with a backlight. It’s a very different technology, and much more challenging to interface to. I can’t even find a proper datasheet for the module.
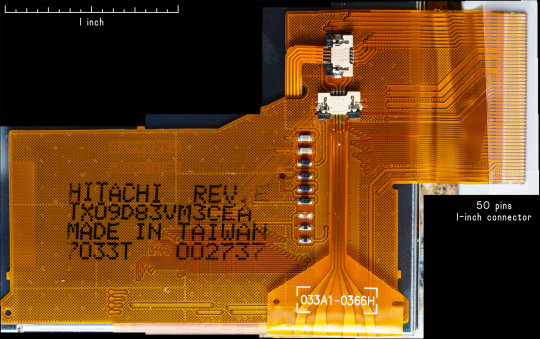
There are datasheets available for modules with similar part numbers. Based on the circuitry in the above picture, this looks like the closest pinout:
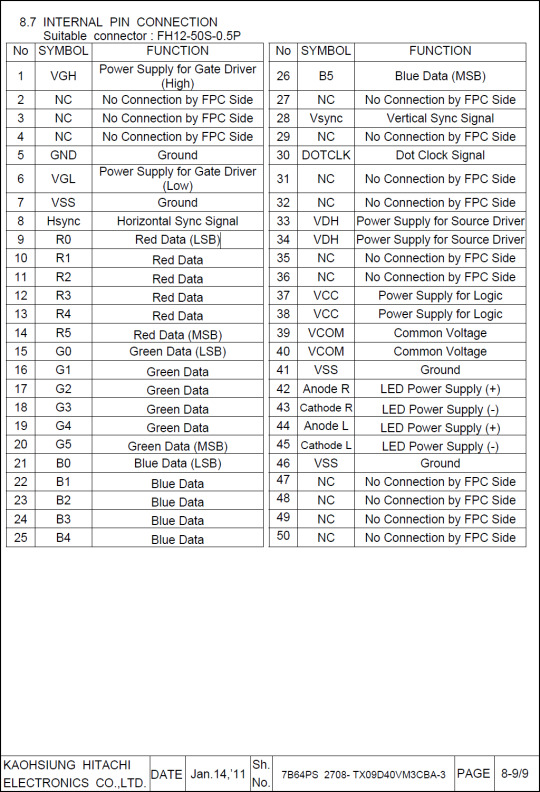
B&W LCD modules usually have a built-in charge pump to generate their needed voltages. Unfortunately, the datasheet also says this module needs those voltages supplied externally, and they’re a bit weird.
VDH: +8.3–+8.7 V @ 3.3 mA
VGH: +16.2–+17.0 V @ 0.23 mA
VGL: −8.35–−8.0 V @ 0.17 mA
VCC: +2.5–+3.3 V @ 0.22 mA (this is actually a normal voltage)
Fortunately, I don’t have to design and build a boost circuit myself; you can Just Buy voltage boost modules easily from many places. Getting a module to generate that negative voltage, however, is a lot harder. But it turns out that charge pump chips are A Thing you can Just Buy on Digikey. Sadly, charge pump chips tend to have fairly low output current capability, so while charge pumps could produce the high voltage for the backlight, it would require several and be kind of awkward.

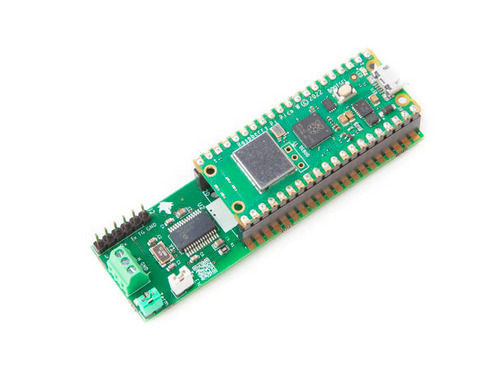
So last week and this week, I finally sat down and learned enough about PIO on the Pi Pico to produce suitable timing signals for the module.

Great! I have a power circuit, I have logic signals, I have a suitable connector, now to see if I can display a picture. Well, one problem: I haven’t built something to hold the LCD. I don’t have a 3D printer, nor any CAD skills, so tonight’s project is to design in Adobe Illustrator a case for the module made of cardstock.
3 notes
·
View notes
Text
Combining CAN Bus and Microcontroller Power: The CANPico V2 by Copperhill Technologies
Discover the CANPico V2 from Copperhill Technologies – a powerful Raspberry Pi Pico WH board with built-in CAN Bus support for automotive, industrial, and IoT applications. Compact, reliable, and easy to use.
0 notes
Text
シンセ開発ログ 2025-01-20: ラズパイPico用シンセPRA32-U v3.1をリリース/ラズパイPico 2用シンセPRA32-U2の開発スタート
ラズパイPico用シンセPRA32-U v3.1をリリース
PRA32-Uは、Raspberry Pi Pico(RP2040)を使った、誰でも自由に作れるシンセサイザー(USB MIDI音源)です。
今回のv3.1では、ポリモードでの空きボイス割り当て方法についてのオプション追加(リリースが効果的になるモードがデフォルトに)、簡易FM音源(サイン波の位相変調)の仕様変更、などを行いました。
これでPRA32-Uのメンテナンスは一区切りにして、これからは新作PRA32-U2の開発を進めていく予定です。
作り方:https://fabble.cc/risgk/digital-synth-pra32-u
PRA32-U v3.1での主な変更内容:
Voice Assign Mode [1|2] パラメータの追加(旧バージョンはモード2と同じ)
サイン波の位相変調(簡易FM音源):周波数比の単位を0.25から0.5に変更、周波数比を滑らかに変化
Osc 2 Pitchの範囲を拡張(-5~+7 → -12~+12半音)
EG Osc AmtとLFO Osc AmtのPitchモジュレーション範囲を拡大(-24〜+24 → -30〜+30半音)
PRA32-U with Panel:USB MIDI経由でMIDIクロック���コマンドを送信しない(USB MIDIの送受信を同時に行うとフリーズする問題を回避するため)
PRA32-U with Panel:EGページにもFilter EG Amtパラメータを追加、パラメータ名Seq PatternをSeq Modeに変更
PRA32-U with Panel:メモリ使用量の削減(一部のコンパイルオプションでエミュレートされたEEPROMが動作しない問題を修正)
Arduino-Picoバージョン4.4.1でテスト(147.6MHzの代わりに、153.6MHzにオーバークロック)
ラズパイPico 2用シンセPRA32-U2の開発スタート
PRA32-U2は、Raspberry Pi Pico 2(RP2350)を使った、誰でも自由に作れるシンセサイザー(USB MIDI音源)です。
開発をスタートし、PRA32-U v3.1.0を移植したものをv0.1(プロトタイプ)としてリリースしました。ただし、RP2350-E9 Erratumを回避するため、PRA32-U2 with Panelでは回路を変更してINPUT_PULLUPを使用しています。
CPUやRAMの使用率はPRA32-Uの半分くらいで、リソース的にはかなり余裕がありそうです。とりあえずMulti Saw(Super Saw)を導入予定ですが、他の機能は未定です(ネタは色々あります)。ゆっくり進化させていくつもりです。


0 notes
Text
#raspberry pi#Raspberry Pi Pico 2#Raspberry Pi Pico 2 Wi-Fi#Pico 2 Wi-Fi board#RP2040 microcontroller#IoT development board#DIY electronics
0 notes
Video
youtube
Rakshak - An IoT Based Wearable Device for Women Safety with Raspberry Pi PICO | GSM | GPS | ESP32-CAM | Smart wearable device for women safety using IoT- GSM GPS ESP32CAM Email Photo | Child
#youtube#Rakshak - An IoT Based Wearable Device for Women Safety with Raspberry Pi PICO | GSM | GPS | ESP32-CAM | Smart wearable device for women saf
0 notes
Text
The programming and wiring is finished!!
Now I just have to make a box
4 notes
·
View notes
Text

Raspberry Pi Pico Expansion Shield
Unlock the full potential of your Raspberry Pi Pico with the Expansion Shield. This versatile accessory offers a seamless way to connect various sensors, displays, and peripherals to your Pico board, making it a powerful tool for your projects.
0 notes