#postgres configure replication
Explore tagged Tumblr posts
Visit Tumblr Blog
Explore Tumblr blogs with no restrictions, modern design and the best experience.
Last Seen Tumblr Blogs


Fun Fact
1,644 Tumblr posts in 1 second.
Text
Cloud Database and DBaaS Market in the United States entering an era of unstoppable scalability
Cloud Database And DBaaS Market was valued at USD 17.51 billion in 2023 and is expected to reach USD 77.65 billion by 2032, growing at a CAGR of 18.07% from 2024-2032.
Cloud Database and DBaaS Market is experiencing robust expansion as enterprises prioritize scalability, real-time access, and cost-efficiency in data management. Organizations across industries are shifting from traditional databases to cloud-native environments to streamline operations and enhance agility, creating substantial growth opportunities for vendors in the USA and beyond.
U.S. Market Sees High Demand for Scalable, Secure Cloud Database Solutions
Cloud Database and DBaaS Market continues to evolve with increasing demand for managed services, driven by the proliferation of data-intensive applications, remote work trends, and the need for zero-downtime infrastructures. As digital transformation accelerates, businesses are choosing DBaaS platforms for seamless deployment, integrated security, and faster time to market.
Get Sample Copy of This Report: https://www.snsinsider.com/sample-request/6586
Market Keyplayers:
Google LLC (Cloud SQL, BigQuery)
Nutanix (Era, Nutanix Database Service)
Oracle Corporation (Autonomous Database, Exadata Cloud Service)
IBM Corporation (Db2 on Cloud, Cloudant)
SAP SE (HANA Cloud, Data Intelligence)
Amazon Web Services, Inc. (RDS, Aurora)
Alibaba Cloud (ApsaraDB for RDS, ApsaraDB for MongoDB)
MongoDB, Inc. (Atlas, Enterprise Advanced)
Microsoft Corporation (Azure SQL Database, Cosmos DB)
Teradata (VantageCloud, ClearScape Analytics)
Ninox (Cloud Database, App Builder)
DataStax (Astra DB, Enterprise)
EnterpriseDB Corporation (Postgres Cloud Database, BigAnimal)
Rackspace Technology, Inc. (Managed Database Services, Cloud Databases for MySQL)
DigitalOcean, Inc. (Managed Databases, App Platform)
IDEMIA (IDway Cloud Services, Digital Identity Platform)
NEC Corporation (Cloud IaaS, the WISE Data Platform)
Thales Group (CipherTrust Cloud Key Manager, Data Protection on Demand)
Market Analysis
The Cloud Database and DBaaS Market is being shaped by rising enterprise adoption of hybrid and multi-cloud strategies, growing volumes of unstructured data, and the rising need for flexible storage models. The shift toward as-a-service platforms enables organizations to offload infrastructure management while maintaining high availability and disaster recovery capabilities.
Key players in the U.S. are focusing on vertical-specific offerings and tighter integrations with AI/ML tools to remain competitive. In parallel, European markets are adopting DBaaS solutions with a strong emphasis on data residency, GDPR compliance, and open-source compatibility.
Market Trends
Growing adoption of NoSQL and multi-model databases for unstructured data
Integration with AI and analytics platforms for enhanced decision-making
Surge in demand for Kubernetes-native databases and serverless DBaaS
Heightened focus on security, encryption, and data governance
Open-source DBaaS gaining traction for cost control and flexibility
Vendor competition intensifying with new pricing and performance models
Rise in usage across fintech, healthcare, and e-commerce verticals
Market Scope
The Cloud Database and DBaaS Market offers broad utility across organizations seeking flexibility, resilience, and performance in data infrastructure. From real-time applications to large-scale analytics, the scope of adoption is wide and growing.
Simplified provisioning and automated scaling
Cross-region replication and backup
High-availability architecture with minimal downtime
Customizable storage and compute configurations
Built-in compliance with regional data laws
Suitable for startups to large enterprises
Forecast Outlook
The market is poised for strong and sustained growth as enterprises increasingly value agility, automation, and intelligent data management. Continued investment in cloud-native applications and data-intensive use cases like AI, IoT, and real-time analytics will drive broader DBaaS adoption. Both U.S. and European markets are expected to lead in innovation, with enhanced support for multicloud deployments and industry-specific use cases pushing the market forward.
Access Complete Report: https://www.snsinsider.com/reports/cloud-database-and-dbaas-market-6586
Conclusion
The future of enterprise data lies in the cloud, and the Cloud Database and DBaaS Market is at the heart of this transformation. As organizations demand faster, smarter, and more secure ways to manage data, DBaaS is becoming a strategic enabler of digital success. With the convergence of scalability, automation, and compliance, the market promises exciting opportunities for providers and unmatched value for businesses navigating a data-driven world.
Related reports:
U.S.A leads the surge in advanced IoT Integration Market innovations across industries
U.S.A drives secure online authentication across the Certificate Authority Market
U.S.A drives innovation with rapid adoption of graph database technologies
About Us:
SNS Insider is one of the leading market research and consulting agencies that dominates the market research industry globally. Our company's aim is to give clients the knowledge they require in order to function in changing circumstances. In order to give you current, accurate market data, consumer insights, and opinions so that you can make decisions with confidence, we employ a variety of techniques, including surveys, video talks, and focus groups around the world.
Contact Us:
Jagney Dave - Vice President of Client Engagement
Phone: +1-315 636 4242 (US) | +44- 20 3290 5010 (UK)
Mail us: [email protected]
#Cloud Database and DBaaS Market#Cloud Database and DBaaS Market Growth#Cloud Database and DBaaS Market Scope
0 notes
Text
Using Docker for Full Stack Development and Deployment

1. Introduction to Docker
What is Docker? Docker is an open-source platform that automates the deployment, scaling, and management of applications inside containers. A container packages your application and its dependencies, ensuring it runs consistently across different computing environments.
Containers vs Virtual Machines (VMs)
Containers are lightweight and use fewer resources than VMs because they share the host operating system’s kernel, while VMs simulate an entire operating system. Containers are more efficient and easier to deploy.
Docker containers provide faster startup times, less overhead, and portability across development, staging, and production environments.
Benefits of Docker in Full Stack Development
Portability: Docker ensures that your application runs the same way regardless of the environment (dev, test, or production).
Consistency: Developers can share Dockerfiles to create identical environments for different developers.
Scalability: Docker containers can be quickly replicated, allowing your application to scale horizontally without a lot of overhead.
Isolation: Docker containers provide isolated environments for each part of your application, ensuring that dependencies don’t conflict.
2. Setting Up Docker for Full Stack Applications
Installing Docker and Docker Compose
Docker can be installed on any system (Windows, macOS, Linux). Provide steps for installing Docker and Docker Compose (which simplifies multi-container management).
Commands:
docker --version to check the installed Docker version.
docker-compose --version to check the Docker Compose version.
Setting Up Project Structure
Organize your project into different directories (e.g., /frontend, /backend, /db).
Each service will have its own Dockerfile and configuration file for Docker Compose.
3. Creating Dockerfiles for Frontend and Backend
Dockerfile for the Frontend:
For a React/Angular app:
Dockerfile
FROM node:14 WORKDIR /app COPY package*.json ./ RUN npm install COPY . . EXPOSE 3000 CMD ["npm", "start"]
This Dockerfile installs Node.js dependencies, copies the application, exposes the appropriate port, and starts the server.
Dockerfile for the Backend:
For a Python Flask app
Dockerfile
FROM python:3.9 WORKDIR /app COPY requirements.txt . RUN pip install -r requirements.txt COPY . . EXPOSE 5000 CMD ["python", "app.py"]
For a Java Spring Boot app:
Dockerfile
FROM openjdk:11 WORKDIR /app COPY target/my-app.jar my-app.jar EXPOSE 8080 CMD ["java", "-jar", "my-app.jar"]
This Dockerfile installs the necessary dependencies, copies the code, exposes the necessary port, and runs the app.
4. Docker Compose for Multi-Container Applications
What is Docker Compose? Docker Compose is a tool for defining and running multi-container Docker applications. With a docker-compose.yml file, you can configure services, networks, and volumes.
docker-compose.yml Example:
yaml
version: "3" services: frontend: build: context: ./frontend ports: - "3000:3000" backend: build: context: ./backend ports: - "5000:5000" depends_on: - db db: image: postgres environment: POSTGRES_USER: user POSTGRES_PASSWORD: password POSTGRES_DB: mydb
This YAML file defines three services: frontend, backend, and a PostgreSQL database. It also sets up networking and environment variables.
5. Building and Running Docker Containers
Building Docker Images:
Use docker build -t <image_name> <path> to build images.
For example:
bash
docker build -t frontend ./frontend docker build -t backend ./backend
Running Containers:
You can run individual containers using docker run or use Docker Compose to start all services:
bash
docker-compose up
Use docker ps to list running containers, and docker logs <container_id> to check logs.
Stopping and Removing Containers:
Use docker stop <container_id> and docker rm <container_id> to stop and remove containers.
With Docker Compose: docker-compose down to stop and remove all services.
6. Dockerizing Databases
Running Databases in Docker:
You can easily run databases like PostgreSQL, MySQL, or MongoDB as Docker containers.
Example for PostgreSQL in docker-compose.yml:
yaml
db: image: postgres environment: POSTGRES_USER: user POSTGRES_PASSWORD: password POSTGRES_DB: mydb
Persistent Storage with Docker Volumes:
Use Docker volumes to persist database data even when containers are stopped or removed:
yaml
volumes: - db_data:/var/lib/postgresql/data
Define the volume at the bottom of the file:
yaml
volumes: db_data:
Connecting Backend to Databases:
Your backend services can access databases via Docker networking. In the backend service, refer to the database by its service name (e.g., db).
7. Continuous Integration and Deployment (CI/CD) with Docker
Setting Up a CI/CD Pipeline:
Use Docker in CI/CD pipelines to ensure consistency across environments.
Example: GitHub Actions or Jenkins pipeline using Docker to build and push images.
Example .github/workflows/docker.yml:
yaml
name: CI/CD Pipeline on: [push] jobs: build: runs-on: ubuntu-latest steps: - name: Checkout Code uses: actions/checkout@v2 - name: Build Docker Image run: docker build -t myapp . - name: Push Docker Image run: docker push myapp
Automating Deployment:
Once images are built and pushed to a Docker registry (e.g., Docker Hub, Amazon ECR), they can be pulled into your production or staging environment.
8. Scaling Applications with Docker
Docker Swarm for Orchestration:
Docker Swarm is a native clustering and orchestration tool for Docker. You can scale your services by specifying the number of replicas.
Example:
bash
docker service scale myapp=5
Kubernetes for Advanced Orchestration:
Kubernetes (K8s) is more complex but offers greater scalability and fault tolerance. It can manage Docker containers at scale.
Load Balancing and Service Discovery:
Use Docker Swarm or Kubernetes to automatically load balance traffic to different container replicas.
9. Best Practices
Optimizing Docker Images:
Use smaller base images (e.g., alpine images) to reduce image size.
Use multi-stage builds to avoid unnecessary dependencies in the final image.
Environment Variables and Secrets Management:
Store sensitive data like API keys or database credentials in Docker secrets or environment variables rather than hardcoding them.
Logging and Monitoring:
Use tools like Docker’s built-in logging drivers, or integrate with ELK stack (Elasticsearch, Logstash, Kibana) for advanced logging.
For monitoring, tools like Prometheus and Grafana can be used to track Docker container metrics.
10. Conclusion
Why Use Docker in Full Stack Development? Docker simplifies the management of complex full-stack applications by ensuring consistent environments across all stages of development. It also offers significant performance benefits and scalability options.
Recommendations:
Encourage users to integrate Docker with CI/CD pipelines for automated builds and deployment.
Mention the use of Docker for microservices architecture, enabling easy scaling and management of individual services.
WEBSITE: https://www.ficusoft.in/full-stack-developer-course-in-chennai/
0 notes
Text
Google Regional Persistent Disk: VMs Multi-Zone Storage

Google Regional Persistent Disk
Are you seeking for a natively Google Compute Engine solution that offers 0% RPO, is production-ready, and provides high availability for your mission-critical workloads? You only need to look at Google Regional Persistent Disk. This blog post from Google Cloud explores how you can provide resilience, ease of management, and continuous protection for your most critical and demanding applications by utilizing Regional PD’s cross-zone synchronous replication capabilities.
Regional Persistent Disks Regional PD: A mission well suited for it-important tasks Workloads that are crucial to the daily operations of every modern firm are mission-critical. These are the systems that the company needs to function, thus any interruption to their workloads could have a big effect on the company.
Because of this, companies require highly available infrastructure, which includes highly available storage capable of:
Replicate data seamlessly while maximising performance for certain kinds of tasks. Be extremely robust against a variety of problems that could impact availability. Be really easy to assemble and operate For many of the mission-critical high availability storage requirements of Google Cloud customers, Regional PD is a strong fit and meets all of these criteria.
Incredibly effective for your workloads that are mission-critical Google Cloud customers use Regional PD for MySQL, Postgres, SQL Server, Jupyterlab, Kafka, Druid, Redis, Solr, EventStoreDB, Elasticsearch, MongoDB, and other workloads due to its write and read performance of 1000MB/s and 80K IOPS per volume, respectively.
Extremely reliable and resilient to failure With regional PD, synchronous replication between zones is continuous and has an RPO of zero in the event that one zone goes down. Regional PD prioritizes availability and automatically reroutes I/O to the last available storage replica in the event of a zonal outage. Regional PD self-heals and brings the unavailable replica back online to continue RPO=0 replication later, once the unavailable zone has recovered. To ensure workload availability, a virtual machine (VM) can be tied to the regional PD if it needs to be recovered in the second zone.
For your mission-critical applications, full replication means that all the data required to maintain the high availability of your compute instance is replicated. This includes not just data disc replication but also boot disc replication for virtual machine instances. When Virtual Machines (VMs) employ Regional PD as its boot disc, users are shielded against potential storage problems that could prevent the VM from booting and from data loss from VMs that rely on the boot disc for data, such as Windows VMs.
Easy to set up and maintain Configuring Regional PD for mission-critical workloads is really simple. It only takes a few minutes to add a new Regional PD disc whether starting a new virtual machine or updating an existing one. Using the Google Cloud console, gcloud, Terraform, and REST APIs, you can add Regional PDs. Once configured, your workload can start serving reads and writes to the Google Regional Persistent Disk in the same way as it would with any other block storage, with the exception that all writes will automatically use synchronization replication to replicate to another replica on a secondary zone.
High Availability Regional PD in Google Cloud services with high availability A number of Google Cloud services, including as GKE Stateful High Availability (HA) Controller, Cloud SQL HA configuration, and Cloud Shell, leverage Regional PD in addition to Compute Engine workload deployments.
The completely managed database service offered by Google Cloud for MySQL, PostgreSQL, and SQL Server is called Google Cloud SQL. When enabled, as soon as a Cloud SQL database instance is created, the configuration immediately configures it to use Regional PD as the primary storage and replicates writes to a secondary zone. When necessary, failover is a straightforward one-step command that switches all networking, compute, and client applications to the secondary zone’s alternate instance.
The terminal window on Google Cloud called Cloud Shell gives you command line access to virtual machines (VMs) in your projects. Users get 5GB of Regional PD disk storage for their terminal’s home directory with each Cloud Shell terminal session. In the event that there are issues with the zone housing the home directory storage, this helps guarantee that the home directory is highly available. The Cloud Shell service automatically uses the extra Regional PD replica in the event of a zonal issue, ensuring uninterrupted access to home directory data.
Final reflections This blog post from Google Cloud explains how Google Regional Persistent Disk was designed with the goal of maximizing availability for your mission-critical workloads in Google Cloud while also delivering ease in management, performance, and resilience. Furthermore, Google Cloud talked about how users have implemented Regional PD in expansive production settings and how it offers storage availability across a number of core Google Cloud services.
Concerning the local persistent disk You can use Compute Engine’s Regional Persistent Disk storage option to create high availability (HA) services. Google Regional Persistent Disk provides high availability (HA) for disk data for up to one zonal failure by synchronously replicating data between two zones within the same region.
Workloads with a reduced Recovery Point Objective (RPO) and Recovery Time Objective (RTO) are intended for use with Regional Persistent Disk volumes.
Replication of zones on discs for local persistent discs Regional Persistent Disk volumes hold disc data in primary and secondary zones. For disc attachment, the primary zone is the same as the VM instance. A secondary zone is a different area inside the same region of your choice. In each of these zones, Compute Engine keeps copies of your local persistent disk volume. To guarantee HA, Compute Engine synchronously duplicates data you write to your disc to the disc replicas in both zones. To ensure longevity, the data of each zonal replica is distributed among several physical machines in the zone. Zone replicas guard against brief disruptions in one of the disk zones and guarantee that the Persistent Disk volume’s data is always accessible.
Read more on Govindhtech.com
0 notes
Text
Spring Boot Microservice Project with Postgres DB Tutorial with Java Example for Beginners
Full Video Link: https://youtu.be/iw4wO9gEb50 Hi, a new #video on #springboot #microservices with #postgres #database is published on #codeonedigest #youtube channel. Complete guide for #spring boot microservices with #postgressql. Learn #programming #
In this video, we will learn, how to download, install postgres database, how to integrate Postgres database with a Spring Boot Microservice Application and perform different CRUD operations i.e. Create, Read, Update, and Delete operations on the Customer entity. Spring Boot is built on the top of the spring and contains all the features of spring. And is becoming a favorite of developers these…

View On WordPress
#database#microservices#microservices postgres#postgres#postgres and pgadmin install#postgres and pgadmin install mac os#postgres and pgadmin install ubuntu#postgres and pgadmin install windows#postgres and pgadmin install windows 10#postgres and pgadmin install windows11#postgres config file location#postgres config file max#postgres config file ubuntu#postgres config file windows#postgres configuration#postgres configuration file#postgres configuration in spring boot#postgres configuration parameters#postgres configuration settings#postgres configure replication#postgres connection command line#postgres connection in java#postgres connection to server#postgres database#postgres database configuration#postgres database setup#postgres db#postgres docker#postgres installation#postgres installation error
0 notes
Text
PostgreSQL is an open-source relational database that offers dependability and resilience. It extends the SQL language by providing many features that store and scale the most complicated workloads. This database system dates back to 1986, introduced as part of the Postgres project at the University of California at Berkeley. Ever since, there has been 30 years of active development on the core platform to gain the current reputation of reliability, data integrity, robust feature set, extensibility e.t.c One of the amazing features offered by PostgreSQL is data replication. Streaming replication, a feature added to PostgreSQL 9.0 offers the capability to ship and apply the WAL XLOG records. It offers several functions that include: Log-shipping where XLOG records generated in the primary are periodically shipped to the standby via the network. Continuous recovery– XLOG records shipped are replayed as soon as possible without waiting until the XLOG file has been filled Connection settings and authentication – it allows users to configure similar settings as a normal connection to a connection for SR for example keepalive, pg_hba.conf Progress report – The primary and standby report the progress of log-shipping in the PS display. Multiple standbys – Multiple standbys can establish a connection to the primary for SR. Graceful shutdown – when shutdowns are executed, the primary waits until the XLOG records up to the shutdown checkpoint record have been sent to standby. Activation – standby can keep waiting for activation as long as required by the user. This guide provides an in-depth illustration of how to configure the PostgreSQL Replication on Rocky Linux 8|AlmaLinux 8. Step 1 – Install PostgreSQL on All Rocky Linux 8|AlmaLinux 8 Nodes For streaming replication to occur, you need to have PostgreSQL installed on all the nodes. This can be done using the steps below: List the available versions available in the default Rocky Linux 8|AlmaLinux 8 repositories. $ dnf module list postgresql .... Name Stream Profiles Summary postgresql 9.6 client, server [d] PostgreSQL server and client module postgresql 10 [d] client, server [d] PostgreSQL server and client module postgresql 12 client, server [d] PostgreSQL server and client module postgresql 13 client, server [d] PostgreSQL server and client module Hint: [d]efault, [e]nabled, [x]disabled, [i]nstalled For PostgreSQL 13 From the provided lists, you can install a preferred version say PostgreSQL 13. sudo dnf -qy module enable postgresql:13 sudo dnf install postgresql-server postgresql13-contrib For PostgreSQL 14 For this guide, we will use PostgreSQL 14, installed by adding an extra repository. sudo dnf install -y https://download.postgresql.org/pub/repos/yum/reporpms/EL-8-x86_64/pgdg-redhat-repo-latest.noarch.rpm To avoid conflicts disable the default repository, sudo dnf -qy module disable postgresql Install PostgreSQL 14 on Rocky Linux 8|AlmaLinux 8 with the command: sudo dnf install -y postgresql14-server postgresql14-contrib Once enabled, initialize your PostgreSQL database with the command: sudo /usr/pgsql-13/bin/postgresql-14-setup initdb ##OR sudo /usr/pgsql-14/bin/postgresql-14-setup initdb Start and enable the service with the command: sudo systemctl start postgresql-14 sudo systemctl enable postgresql-14 Verify that the service is running: $ systemctl status postgresql-14 ● postgresql-14.service - PostgreSQL 14 database server Loaded: loaded (/usr/lib/systemd/system/postgresql-14.service; enabled; vendor preset: disabled)
Active: active (running) since Thu 2022-06-16 07:35:42 EDT; 15s ago Docs: https://www.postgresql.org/docs/14/static/ Main PID: 6914 (postmaster) Tasks: 8 (limit: 23544) Memory: 16.7M CGroup: /system.slice/postgresql-14.service ├─6914 /usr/pgsql-14/bin/postmaster -D /var/lib/pgsql/14/data/ ├─6916 postgres: logger ├─6918 postgres: checkpointer ├─6919 postgres: background writer ├─6920 postgres: walwriter ├─6921 postgres: autovacuum launcher ├─6922 postgres: stats collector └─6923 postgres: logical replication launcher Allow the service through the firewall. sudo firewall-cmd --add-port=5432/tcp --permanent sudo firewall-cmd --reload Step 2 – Configure the PostgreSQL Primary Host Now proceed and make the below configuration to the primary host. sudo vim /var/lib/pgsql/14/data/postgresql.conf Make the below adjustments. # line 60 : uncomment and change listen_addresses = '*' # line 205 : uncomment wal_level = replica # line 210 : uncomment synchronous_commit = on # line 298 : uncomment (max number of concurrent connections from streaming clients) max_wal_senders = 10 # line 302 : uncomment and change (minimum number of past log file segments) wal_keep_segments = 10 # line 312 : uncomment and change synchronous_standby_names = '*' Also, open the below file for editing. sudo vim /var/lib/pgsql/14/data/pg_hba.conf Make the below changes. # end line : comment out existing lines and all new lines # host replication [replication user] [allowed network] [authentication method] #local replication all peer #host replication all 127.0.0.1/32 scram-sha-256 #host replication all ::1/128 scram-sha-256 host replication rep_user 192.168.205.2/32 md5 host replication rep_user 192.168.205.3/32 md5 Remember to replace the IP Addresses for the primary and replica hosts. Save the file and restart the service: sudo systemctl restart postgresql-14 Now save the changes and create a replication user. sudo su - postgres createuser --replication -P rep_user Provide a desired password and exit. exit Step 3 – Configure the PostgreSQL Replica Host Now proceed and make configurations to the replica host. Begin by stopping the PostgreSQL service: sudo systemctl stop postgresql-14 Remove the existing data. sudo rm -rf /var/lib/pgsql/14/data/* Now obtain backup from the primary host(192.168.205.2 for this case) sudo su - postgres pg_basebackup -R -h 192.168.205.2 -U rep_user -D /var/lib/pgsql/14/data/ -P Provide the password for the replication user created on the primary host to obtain the backup Password: 27205/27205 kB (100%), 1/1 tablespace Once complete as shown above, exit. exit Edit the PostgreSQL configuration. sudo vim /var/lib/pgsql/14/data/postgresql.conf Make the below changes. # line 60 : uncomment and change listen_addresses = '*' # line 325 : uncomment hot_standby = on Also, edit the hba.conf file. sudo vim /var/lib/pgsql/14/data/pg_hba.conf Edit the file as shown. # end line : comment out existing lines and all new lines # host replication [replication user] [allowed network] [authentication method] #local replication all peer #host replication all 127.0.0.1/32 scram-sha-256 #host replication all ::1/128 scram-sha-256 host replication rep_user 192.168.205.2/32 md5 host replication rep_user 192.168.205.3/32 md5 The lines above already exist since the files have been copied from the primary host. Save the file and start the PostgreSQL service. sudo systemctl start postgresql-14 Step 4 – Test Streaming Replication on Rocky Linux 8|AlmaLinux 8
Once the above configurations have been made, we now proceed and validate if the replication is happening. sudo su - postgres psql -c "select usename, application_name, client_addr, state, sync_priority, sync_state from pg_stat_replication;" Sample Output: To do this, we will create a database on the primary host and check if it appears on the replica host. Access the PostgreSQL shell on the primary host psql Create a test database. # CREATE DATABASE testdb; CREATE DATABASE Now on the replica hosts, check if it exists: $ sudo -u postgres psql psql (14.3) Type "help" for help. postgres=# \l Sample Output: Final Thoughts That is it! We have PostgreSQL Replication on Rocky Linux 8|AlmaLinux 8 configured and running as expected. I hope this added value to you.
0 notes
Text
Using pg chameleon to Migrate Data from MySQL to openGauss
Introduction to pg_chameleon
pg_chameleon is a real-time replication tool compiled in Python 3 for migrating data from MySQL to PostgreSQL. The tool uses the mysql-replication library to extract row images from MySQL. The row images are stored in PostgreSQL in JSONB format.
A pl/pgsql function in PostgreSQL is executed to decode row images in JSONB format and replay the changes to PostgreSQL. In addition, the tool uses the read-only mode to pull full data from MySQL to PostgreSQL through initial configuration. In this way, the tool provides the function of copying the initial full data and subsequent incremental data online in real time.
pg_chameleon has the following features:
Provides online real-time replication by reading the MySQL BinLog.
Supports reading data from multiple MySQL schemas and restoring the data to the target PostgreSQL database. The source schemas and target schemas can use different names.
Implements real-time replication through a daemon. The daemon consists of two subprocesses. One is responsible for reading logs from MySQL, and the other is responsible for replaying changes to PostgreSQL.
openGauss is compatible with PostgreSQL communication protocols and most syntaxes. For this reason, you can use pg_chameleon to migrate data from MySQL to openGauss. In addition, the real-time replication capabilities of pg_chameleon greatly reduce the service interruption duration during database switchover.
pg_chameleon Issues in openGauss
pg_chameleon depends on the psycopg2 driver, and the psycopg2 driver uses the pg_config tool to check the PostgreSQL version and restricts PostgreSQL of earlier versions from using this driver. The pg_config tool of openGauss returns the version of openGauss (the current version is openGauss 2.0.0). As a result, the driver reports a version error “ Psycopg requires PostgreSQL client library (libpq) >= 9.1”. You need to use psycopg2 through source code compilation and remove related restrictions in the source header file psycopg/psycopg.h.
pg_chameleon sets the GUC parameter LOCK_TIMEOUT to limit the timeout for waiting for locks in PostgreSQL. openGauss does not support this parameter. (openGauss supports the GUC parameter lockwait_timeout, which needs to be set by the administrator.) You need to delete related settings from the source code of pg_chameleon.
pg_chameleon uses the syntax of the UPSERT statement to specify the replacement operation when a constraint is violated. The function and syntax of the UPSERT statement supported by openGauss is different from those supported by PostgreSQL. openGauss uses the ON DUPLICATE KEY UPDATE { column_name = { expression | DEFAULT } } [, …] syntax, while PostgreSQL uses the ON CONFLICT [ conflict_target ] DO UPDATE SET { column_name = { expression | DEFAULT } } syntax. Therefore, these two databases differ slightly in functions and syntaxes. You need to modify the related UPSERT statement in the source code of pg_chameleon.
pg_chameleon uses the CREATE SCHEMA IF NOT EXISTS and CREATE INDEX IF NOT EXISTS syntaxes. openGauss does not support the IF NOT EXISTS option of schemas and indexes. You need to modify the logic so that the system checks whether the schemas and indexes exist before creating them.
To select the array range, openGauss runs column_name[start, end], while PostgreSQL runs column_name[start:end]. You need to modify the array range selection mode in the source code of pg_chameleon.
pg_chameleon uses the INHERITS function, but openGauss does not support inherited tables. You need to modify the SQL statements and tables that use inherited tables.
Next, use pg_chameleon to migrate data from MySQL to openGauss.
Configuring pg_chameleon
pg_chameleon uses the config-example.yaml configuration file in ~/.pg_chameleon/configuration to define configurations during migration. The configuration file consists of four parts: global settings, type_override, postgres destination connection, and sources. global settings is used to set the log file path, log level, and others. type_override allows users to customize type conversion rules and overwrite existing default conversion rules. postgres destination connection is used to configure the parameters for connecting to openGauss. sources is used to define the parameters for connecting to MySQL and other configurable items during replication.
For more details about the configuration items, see the official website:
https://pgchameleon.org/documents_v2/configuration_file.html
The following is an example of the configuration file:# global settings pid_dir: '~/.pg_chameleon/pid/' log_dir: '~/.pg_chameleon/logs/' log_dest: file log_level: info log_days_keep: 10 rollbar_key: '' rollbar_env: '' # type_override allows the user to override the default type conversion # into a different one. type_override: "tinyint(1)": override_to: boolean override_tables: - "*" # postgres destination connection pg_conn: host: "1.1.1.1" port: "5432" user: "opengauss_test" password: "password_123" database: "opengauss_database" charset: "utf8" sources: mysql: db_conn: host: "1.1.1.1" port: "3306" user: "mysql_test" password: "password123" charset: 'utf8' connect_timeout: 10 schema_mappings: mysql_database:sch_mysql_database limit_tables: skip_tables: grant_select_to: - usr_migration lock_timeout: "120s" my_server_id: 1 replica_batch_size: 10000 replay_max_rows: 10000 batch_retention: '1 day' copy_max_memory: "300M" copy_mode: 'file' out_dir: /tmp sleep_loop: 1 on_error_replay: continue on_error_read: continue auto_maintenance: "disabled" gtid_enable: false type: mysql keep_existing_schema: No
The preceding configuration file indicates that the username and password for connecting to MySQL are mysql_test and password123 respectively during data migration. The IP address and port number of the MySQL server are 1.1.1.1 and 3306, respectively. The source database is mysql_database.
The username and password for connecting to openGauss are opengauss_test and password_123, respectively. The IP address and port number of the openGauss server are 1.1.1.1 and 5432, respectively. The target database is opengauss_database. The sch_mysql_database schema is created in opengauss_database, and all tables to be migrated are in this schema.
Note that the user must have the permission to remotely connect to MySQL and openGauss as well as the read and write permissions on the corresponding databases. For openGauss, the host where pg_chameleon runs must be in the remote access whitelist of openGauss. For MySQL, the user must have the RELOAD, REPLICATION CLIENT, and REPLICATION SLAVE permissions.
The following describes the migration procedure.
Creating Users and Databases
The following shows how to create the users and databases in openGauss required for migration.
The following shows how to create the users in MySQL required for migration and grant related permissions to the users.
Enabling the Replication Function of MySQL
Modify the MySQL configuration file. Generally, the configuration file is /etc/my.cnf or the cnf configuration file in the /etc/my.cnf.d/ folder. Modify the following configurations in the [mysqld] configuration block (if the [mysqld] configuration block does not exist, add it):[mysqld] binlog_format= ROW log_bin = mysql-bin server_id = 1 binlog_row_image=FULL expire_logs_days = 10
After the modification, restart MySQL for the configurations to take effect.
Runing pg_chameleon to Migrate Data
Create and activate a virtual Python environment.
python3 -m venv venv
source venv/bin/activate
Download and install psycopg2 and pg_chameleon.
Run the pip install pip –upgrade command to upgrade pip.
Add the folder where the pg_config tool of openGauss is located to the $PATH environment variable. Example:
export PATH={openGauss-server}/dest/bin:$PATH
Download the source code of psycopg2 at https://github.com/psycopg/psycopg2, remove the restriction of checking the PostgreSQL version, and run the python setup.py install command to compile the source code and install the tool.
Download the source code of pg_chameleon at https://github.com/the4thdoctor/pg_chameleon, solve the preceding issues in openGauss, and run the python setup.py install command to compile the source code and install the tool.
Create the configuration file directory of pg_chameleon.
chameleon set_configuration_files
Modify the configuration file of pg_chameleon.
cd ~/.pg_chameleon/configuration
cp config-example.yml default.yml
Modify the default.yml file as required. Modify the connection configuration information, user information, database information, and schema mapping specified by pg_conn and mysql. An example of the configuration file is provided for reference.
Initialize the replication stream.
chameleon create_replica_schema –config default
chameleon add_source –config default –source mysql
In this step, an auxiliary schema and table are created for the replication process in openGauss.
Copy basic data.
chameleon init_replica –config default –source mysql
After this step is complete, the current full data in MySQL is copied to openGauss.
You can view the replication result in openGauss.
Enable online real-time replication.
chameleon start_replica –config default –source mysql
After real-time replication is enabled, insert a data record into MySQL.
View the data in the test_decimal table in openGauss.
The newly inserted data record is successfully copied to openGauss.
Disable online replication.
chameleon stop_replica –config default –source mysql
chameleon detach_replica –config default –source mysql
chameleon drop_replica_schema –config default
0 notes
Text
How we scaled data streaming at Coinbase using AWS MSK

By: Dan Moore, Eric Sun, LV Lu, Xinyu Liu
Tl;dr: Coinbase is leveraging AWS’ Managed Streaming for Kafka (MSK) for ultra low latency, seamless service-to-service communication, data ETLs, and database Change Data Capture (CDC). Engineers from our Data Platform team will further present this work at AWS’ November 2021 Re:Invent conference.
Abstract
At Coinbase, we ingest billions of events daily from user, application, and crypto sources across our products. Clickstream data is collected via web and mobile clients and ingested into Kafka using a home-grown Ruby and Golang SDK. In addition, Change Data Capture (CDC) streams from a variety of databases are powered via Kafka Connect. One major consumer of these Kafka messages is our data ETL pipeline, which transmits data to our data warehouse (Snowflake) for further analysis by our Data Science and Data Analyst teams. Moreover, internal services across the company (like our Prime Brokerage and real time Inventory Drift products) rely on our Kafka cluster for running mission-critical, low-latency (sub 10 msec) applications.
With AWS-managed Kafka (MSK), our team has mitigated the day-to-day Kafka operational overhead of broker maintenance and recovery, allowing us to concentrate our engineering time on core business demands. We have found scaling up/out Kafka clusters and upgrading brokers to the latest Kafka version simple and safe with MSK. This post outlines our core architecture and the complete tooling ecosystem we’ve developed around MSK.

Configuration and Benefits of MSK
Config:
TLS authenticated cluster
30 broker nodes across multiple AZs to protect against full AZ outage
Multi-cluster support
~17TB storage/broker
99.9% monthly uptime SLA from AWS
Benefits:
Since MSK is AWS managed, one of the biggest benefits is that we’re able to avoid having internal engineers actively maintain ZooKeeper / broker nodes. This has saved us 100+ hours of engineering work as AWS handles all broker security patch updates, node recovery, and Kafka version upgrades in a seamless manner. All broker updates are done in a rolling fashion (one broker node is updated at a time), so no user read/write operations are impacted.
Moreover, MSK offers flexible networking configurations. Our cluster has tight security group ingress rules around which services can communicate directly with ZooKeeper or MSK broker node ports. Integration with Terraform allows for seamless broker addition, disk space increases, configuration updates to our cluster without any downtime.
Finally, AWS has offered excellent MSK Enterprise support, meeting with us on several occasions to answer thorny networking and cluster auth questions.
Performance:
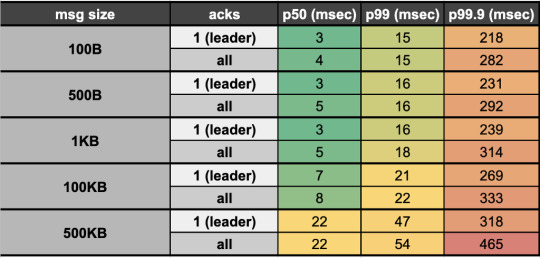
We reduced our end-to-end (e2e) latency (time taken to produce, store, and consume an event) by ~95% when switching from Kinesis (~200 msec e2e latency) to Kafka (<10msec e2e latency). Our Kafka stack’s p50 e2e latency for payloads up to 100KB averages <10 msec (in-line with LinkedIn as a benchmark, the company originally behind Kafka). This opens doors for ultra low latency applications like our Prime Brokerage service. Full latency breakdown from stress tests on our prod cluster, by payload size, presented below:
Proprietary Kafka Security Service (KSS)
What is it?
Our Kafka Security Service (KSS) houses all topic Access Control Lists (ACLs). On deploy, it automatically syncs all topic read/write ACL changes with MSK’s ZooKeeper nodes; effectively, this is how we’re able to control read/write access to individual Kafka topics at the service level.
KSS also signs Certificate Signing Requests (CSRs) using the AWS ACM API. To do this, we leverage our internal Service-to-Service authentication (S2S) framework, which gives us a trustworthy service_id from the client; We then use that service_id and add it as the Distinguished Name in the signed certificate we return to the user.
With a signed certificate, having the Distinguished Name matching one’s service_id, MSK can easily detect via TLS auth whether a given service should be allowed to read/write from a particular topic. If the service is not allowed (according to our acl.yml file and ACLs set in ZooKeeper) to perform a given action, an error will occur on the client side and no Kafka read/write operations will occur.
Also Required
Parallel to KSS, we built a custom Kafka sidecar Docker container that: 1) Plugs simply into one’s existing docker-compose file 2) Auto-generates CSRs on bootup and calls KSS to get signed certs, and 3) Stores credentials in a Docker shared volume on user’s service, which can be used when instantiating a Kafka producer / consumer client so TLS auth can occur.
Rich Data Stream Tooling
We’ve extended our core Kafka cluster with the following powerful tools:
Kafka Connect
This is a distributed cluster of EC2 nodes (AWS autoscaling group) that performs Change Data Capture (CDC) on a variety of database systems. Currently, we’re leveraging the MongoDB, Snowflake, S3, and Postgres source/sink connectors. Many other connectors are available open-source through Confluent here
Kafdrop
We’re leveraging the open-source Kafdrop product for first-class topic/partition offset monitoring and inspecting user consumer lags: source code here
Cruise Control
This is another open-source project, which provides automatic partition rebalancing to keep our cluster load / disk space even across all broker nodes: source code here
Confluent Schema Registry
We use Confluent’s open-source Schema Registry to store versioned proto definitions (widely used along Coinbase gRPC): source code here
Internal Kafka SDK
Critical to our streaming stack is a custom Golang Kafka SDK developed internally, based on the segmentio/kafka release. The internal SDK is integrated with our Schema Registry so that proto definitions are automatically registered / updated on producer writes. Moreover, the SDK gives users the following benefits out of the box:
Consumer can automatically deserialize based on magic byte and matching SR record
Message provenance headers (such as service_id, event_time, event_type) which help conduct end-to-end audits of event stream completeness and latency metrics
These headers also accelerate message filtering and routing by avoiding the penalty of deserializing the entire payload

Streaming SDK
Beyond Kafka, we may still need to make use of other streaming solutions, including Kinesis, SNS, and SQS. We introduced a unified Streaming-SDK to address the following requirements:
Delivering a single event to multiple destinations, often described as ‘fanout’ or ‘mirroring’. For instance, sending the same message simultaneously to a Kafka topic and an SQS queue
Receiving messages from one Kafka topic, emitting new messages to another topic or even a Kinesis stream as the result of data processing
Supporting dynamic message routing, for example, messages can failover across multiple Kafka clusters or AWS regions
Offering optimized configurations for each streaming platform to minimize human mistakes, maximize throughput and performance, and alert users of misconfigurations
Upcoming
On the horizon is integration with our Delta Lake which will fuel more performant, timely data ETLs for our data analyst and data science teams. Beyond that, we have the capacity to 3x the number of broker nodes in our prod cluster (30 -> 90 nodes) as internal demand increases — that is a soft limit which can be increased via an AWS support ticket.
Takeaways
Overall, we’ve been quite pleased with AWS MSK. The automatic broker recovery during security patches, maintenance, and Kafka version upgrades along with the advanced broker / topic level monitoring metrics around disk space usage / broker CPU, have saved us hundreds of hours provisioning and maintaining broker and ZooKeeper nodes on our own. Integration with Terraform has made initial cluster configuration, deployment, and configuration updates relatively painless (use 3AZs for your cluster to make it more resilient and prevent impact from a full-AZ outage).
Performance has exceeded expectations, with sub 10msec latencies opening doors for ultra high-speed applications. Uptime of the cluster has been sound, surpassing the 99.9% SLA given by AWS. Moreover, when any security patches take place, it’s always done in a rolling broker fashion, so no read/write operations are impacted (set default topic replication factor to 3, so that min in-sync replicas is 2 even with node failure).
We’ve found building on top of MSK highly extensible having integrated Kafka Connect, Confluent Schema Registry, Kafdrop, Cruise Control, and more without issue. Ultimately, MSK has been beneficial for both our engineers maintaining the system (less overhead maintaining nodes) and unlocking our internal users and services with the power of ultra-low latency data streaming.
If you’re excited about designing and building highly-scalable data platform systems or working with cutting-edge blockchain data sets (data science, data analytics, ML), come join us on our mission building the world’s open financial system: careers page.
How we scaled data streaming at Coinbase using AWS MSK was originally published in The Coinbase Blog on Medium, where people are continuing the conversation by highlighting and responding to this story.
from Money 101 https://blog.coinbase.com/how-we-scaled-data-streaming-at-coinbase-using-aws-msk-4595f171266c?source=rss----c114225aeaf7---4 via http://www.rssmix.com/
0 notes
Text
Is Amazon RDS for PostgreSQL or Amazon Aurora PostgreSQL a better choice for me?
If you’re planning to move your self-managed PostgreSQL database or refactoring your commercial databases to PostgreSQL on AWS, you have to decide which database service best suits your needs. Amazon Relational Database Service (Amazon RDS) supports two types of Postgres databases: Amazon RDS for PostgreSQL and Amazon Aurora PostgreSQL-Compatible Edition. In this post, we discuss how to determine the best option between Amazon RDS for PostgreSQL and Aurora PostgreSQL for your workloads and business requirements. We analyze the differences in performance, scalability, failover, storage, high availability, backup, and database versions. Overview Amazon RDS for PostgreSQL and Aurora PostgreSQL are fully managed open-source PostgreSQL database services. They both offer provisioning various types of database instances, multiple PostgreSQL versions, managing backups, point-in-time recovery (PITR), replication, monitoring, Multi-AZ support, and Storage Auto Scaling. Amazon RDS for PostgreSQL supports up to 64 TiB of storage and recent PostgreSQL versions. DB instances for Amazon RDS for PostgreSQL use Amazon Elastic Block Store (Amazon EBS) volumes for database and log storage. Aurora PostgreSQL uses a high-performance storage subsystem customized to take advantage of fast distributed storage. The underlying storage grows automatically in chunks of 10 GiB, up to 128 TiB. Aurora improves upon PostgreSQL for massive throughput and highly concurrent workloads. The combination of PostgreSQL compatibility with Aurora enterprise database capabilities provides an ideal target for commercial database migrations. The following diagram illustrates the differences between the Multi-AZ solutions for Amazon RDS for PostgreSQL and Aurora PostgreSQL. The following sections discuss some of the key components to compare Amazon RDS for PostgreSQL and Aurora PostgreSQL. Scalability Amazon RDS read replicas help reduce the load on the primary DB instance by offloading your read workloads to the read replica DB instances. It makes it easy to scale out beyond the capacity constraints of a single DB instance for read-heavy database workloads. With Amazon RDS for PostgreSQL, you can create up to five replicas of a given source DB instance and serve high-volume application read traffic from multiple copies of your data, thereby increasing aggregate read throughput. You can also promote read replicas when needed to become standalone DB instances. It also supports five cross-Region read replicas. Replicas are synced with the source instance using PostgreSQL streaming replication. PostgreSQL records any modifications in data in write-ahead log (WAL) files. Streaming replication continuously ships and applies the WAL records to replicas in order to keep them current. This asynchronous replication is based on transactional logs, so high write activity at source instance, storage type mismatch, and instance class mismatch can cause high replication lag. This lag can be up to several minutes. With optimal configurations and workload, in Amazon RDS for PostgreSQL the replica lag is typically a few seconds. Aurora PostgreSQL supports up to 15 readers for scaling out read workloads and high availability within a single Region. Aurora provides this by scaling storage across three Availability Zones in the Region. It writes the log records to six copies in three Availability Zones. Unlike Amazon RDS for PostgreSQL, where high write workloads can severely impact replication, Aurora uses shared storage for writer and readers. As a result, all Aurora replicas are synced with the writer instance with minimal replica lag. The lag can be different for different replicas. Usually, this replica lag is a few hundred milliseconds. In some cases, this lag could go up to 30 seconds, and automatically restarts the reader so the lag doesn’t get higher. If the read workload can’t afford high replication lag and requires more than five read replicas, Aurora PostgreSQL is a better choice. If replication lag is acceptable from seconds to minutes and up to five replicas are enough for your read workload, Amazon RDS for PostgreSQL is a better choice. Crash recovery In Amazon RDS for PostgreSQL, during crash recovery, it replays the transaction logs since the last checkpoint. A checkpoint flushes the current in-memory modified database blocks and WAL information from memory to disk, which provides durability in case the database crashes for obvious reasons. When the database crashes and needs to perform crash recovery, the transaction logs are replayed so that the database is brought up to date. By default, checkpoints are 5 minutes apart. During checkpoint, it writes all the dirty pages from the memory to storage. If checkpoints occur frequently, crash recovery time is reduced. The downside is checkpoints can slow down the database performance because it’s an I/O intensive operation. Aurora PostgreSQL doesn’t perform checkpoints because the storage system takes the log records it receives from the database node and applies them to the database pages in the storage nodes. This means performing checkpoints isn’t done in the database node—it’s done in the storage nodes. Aurora performs crash recovery asynchronously using parallel threads to quickly make the database available after a crash. If your business requirements need quick database crash recovery, Aurora PostgreSQL is a better choice. If crash recovery time isn’t a major concern, Amazon RDS for PostgreSQL is a viable choice. Failover Amazon RDS for PostgreSQL handles failover automatically so that applications can resume database operations as quickly as possible. The failover time is typically around 60–120 seconds. This consists of failure detection, DNS propagation, and crash recovery. The failover time mainly depends on how long it takes to perform crash recovery. In Aurora PostgreSQL, the failover time is typically within 30 seconds, which consists of failure detection, DNS propagation, and recovery. Failure detection takes nearly 15–20 seconds to confirm the node failure. DNS propagation and recovery happens in parallel. DNS propagation takes around 10–15 seconds, whereas recovery time is fast, typically 3–10 seconds. If applications can’t tolerate longer failover times, Aurora is a better choice. If applications can accept more than 60 seconds of downtime during failover, Amazon RDS for PostgreSQL is a viable solution. Storage Amazon RDS for PostgreSQL supports Amazon EBS solid state drive (SSD)-based storage types: General Purpose SSD and Provisioned IOPS. General Purpose SSD storage delivers a consistent baseline of 3 IOPS per provisioned GB and can burst up to 3,000 IOPS. The baseline IOPS limit for General Purpose SSD is 16,000 IOPS. Provisioned IOPS SSD delivers IOPS in the 1,000–80,000 range. Amazon RDS for PostgreSQL supports Storage Auto Scaling. This feature automatically increases instance storage size in chunks of 5 GiB, or 10% of the currently allocated storage. Aurora PostgreSQL uses a single, virtual cluster volume that uses SSDs. A cluster volume consists of copies of the data across multiple Availability Zones in a single Region. Aurora storage automatically increases the size of the database volume as the database storage grows. The storage volume grows in increments of 10 GiB up to a maximum of 128 TiB. Because the data is automatically replicated across three Availability Zones, data is highly available and durable. Although there is no IOPS limitation based on the storage size, you may need to scale up your instance to support workloads requiring higher IOPS. The following image shows the Aurora PostgreSQL storage architecture with shared storage volume and nodes. If your database workload reaches the Amazon RDS max limit of 80,000 IOPS, and it requires additional IOPS, Aurora PostgreSQL is the preferred database solution. If database workload requires less than 80,000 IOPS, you can choose either Amazon RDS for PostgreSQL or Aurora PostgreSQL based on supported features. High availability and disaster recovery Amazon RDS for PostgreSQL provides high availability and disaster recovery (DR) features by using Multi-AZ deployments, read replicas, and sharing snapshots. Multi-AZ configuration synchronously replicates data to a standby instance in a different Availability Zone. Automated backups are taken from the standby instance. Incidents such as primary instance failure, storage failure, instance scale-up, and network failure trigger failover to make the secondary instance a new primary instance. Amazon RDS for PostgreSQL also supports replicas in the same Region as well as cross-Region. This replication is based on database transaction logs, and replication lag can increase depending on the workload at the source instance. You can copy and share Amazon RDS snapshots across AWS accounts and Regions for DR purposes. Aurora PostgreSQL also supports Multi-AZ deployment. It synchronously sends the data across Availability Zones to six storage nodes associated with the cluster volume. This synchronization occurs at the storage level, resulting in a lag typically in milliseconds. All instances are active and automated backups are taken from the shared storage layer. Aurora promotes one of the readers when a problem is detected on the primary instance or storage layer. If a failure occurs and no Aurora replica has been provisioned, it attempts to create a new database instance automatically. Amazon Aurora Global Database offers cross-Region replication. The typical cross-Region replication latency is below 1 second. You can also copy and share Aurora cluster snapshots across AWS accounts and Regions for DR purposes. If you fulfil the high availability requirement of your data by replicating in two Availability Zones, and cross-Region replication lag is acceptable, Amazon RDS for PostgreSQL should meet your requirements. For higher data availability and to design a DR solution with minimal Recovery Point Objective (RPO) and Recovery Time Objective (RTO), Aurora PostgreSQL is the preferred choice. Backup Amazon RDS automatically takes daily backups of PostgreSQL instances during a backup window. There is a slight performance impact when the backup initiates for single Availability Zone deployments. In addition, it also backs up transaction logs (WALs). For PITR, the full backup is restored first, followed up by replaying WALs until the desired time. In write-intensive RDS for PostgreSQL instances, replaying transaction logs may take a long time. Frequently taking manual backups can reduce PITR duration. Aurora PostgreSQL backs up cluster volume automatically and retains backups for the length of the defined retention period. Aurora backups are incremental, so it can be quickly restored to a point within the backup retention period. There is no performance impact or interruption of database service during backups. For PITR, a new copy of the database cluster is created from the backup of the database at any point in time within the backup retention period. The continuous and incremental nature of backup improves the PITR restore time. If you’re looking for a database solution with lower RPO and RTO, and if your workloads are sensitive to performance degradation during backups, Aurora PostgreSQL is a better solution. If momentary performance degradation in a single Availability Zone configuration during backup and higher RPO and RTO aren’t business critical, Amazon RDS for PostgreSQL can meet your requirements. In Amazon RDS for PostgreSQL, you can modify the automated backup window to avoid performance degradation during peak hours.In Multi-AZ configuration, the backups are taken from the standby instance. Database instance classes Amazon RDS for PostgreSQL supports several instance classes, including general purpose T2, T3, M3, M4, M5 instances, and memory optimized R3, R4, R5 instances. Aurora PostgreSQL supports limited instance classes, including T3, R4, and R5 instances. In many Regions, Amazon RDS for PostgreSQL and Aurora PostgreSQL support AWS Graviton2 based instances. Graviton2 processors are custom built by AWS using 64-bit Arm Neoverse cores to deliver the best price performance for your workloads. Amazon RDS for PostgreSQL offers more instance types so you can choose the appropriate size for your workload. If your database workload requires a smaller instance class that isn’t available with Aurora PostgreSQL, Amazon RDS for PostgreSQL is a better choice. Additional features Some of the additional features Aurora PostgreSQL supports are fast database cloning, query plan management, cluster cache management, serverless, and a global database. With database cloning, you can quickly create clones of all databases in the cluster. This is faster than restoring Amazon RDS for PostgreSQL from a snapshot. With query plan management for Aurora PostgreSQL, you can control how and when query plans change. In Amazon RDS for PostgreSQL, you don’t have similar control. The cluster cache management feature improves the performance of the new writer instance after failover. You can designate a specific replica as the failover target. With cluster cache management, data in the designated replica cache is synchronized with the cache in the writer instance. In Amazon RDS for PostgreSQL, after failover, the buffer is built from scratch. This degrades the performance because the database instance has to read the data from the disk instead of buffer cache. Aurora Serverless DB cluster deployment automatically starts, scales, and shuts down an Aurora database based on application needs. It’s a suitable option for infrequent, intermittent, or unpredictable workloads. As of this writing, Amazon RDS for PostgreSQL doesn’t support a serverless feature. With Aurora Global Database, a single Aurora database can span across multiple Regions to enable fast local reads and quick disaster recovery. Global Database uses storage-based replication to replicate a database across multiple Regions with typical latency of less than 1 second. Amazon RDS for PostgreSQL supports cross-Region replication that can have higher replication lag. If your requirements include quicker database refresh or modern database innovations such as query plan management, cluster cache management, serverless databases, or least replication lag across Regions, Aurora PostgreSQL is better choice. Conclusion Amazon RDS for PostgreSQL and Amazon Aurora PostgreSQL-Compatible Edition both have their own use cases and optimization techniques, and require application optimization accordingly. It should be carefully determined whether Amazon RDS for PostgreSQL or Aurora PostgreSQL is best suited for your business requirements. Amazon RDS for PostgreSQL is ideal when you have a small-to-medium intense workload. It works best when you have limited concurrent connections to your database. If you’re moving from commercial database engines such as Oracle or Microsoft SQL Server, Aurora PostgreSQL is a better choice because it provides matching performance with a lower price. For more information about migrating to Amazon RDS for PostgreSQL or Aurora PostgreSQL, see the following resources: Migrate an on-premises PostgreSQL database to Amazon RDS for PostgreSQL Migrating data to Amazon Aurora with PostgreSQL compatibility If you have any questions or suggestions about this post, leave a comment. About the authors Vivek Singh is a Senior Database Specialist with AWS focusing on Amazon RDS/Aurora PostgreSQL engines. He works with enterprise customers providing technical assistance on PostgreSQL operational performance and sharing database best practices. Sagar Patel is a Senior Database Specialty Architect with the Professional Services team at Amazon Web Services. He works as a database migration specialist to provide technical guidance and help Amazon customers to migrate their on-premises databases to AWS. https://aws.amazon.com/blogs/database/is-amazon-rds-for-postgresql-or-amazon-aurora-postgresql-a-better-choice-for-me/
0 notes
Text
Cara Replikasi PostgreSQL

Berikut ini diagram jaringan untuk pengaturan replikasi Master / Slave PostgreSQL. Di sini saya memiliki dua server, pg-master adalah server Master PostgreSQL dan pg-slave adalah server Slave PostgreSQL. Tentu saja, Anda dapat memiliki lebih banyak server Slave, tetapi demi kesederhanaan saya akan memiliki satu server Slave. Server Master PostgreSQL Master pg-master saya memiliki alamat IP 192.168.199.137 dan server PostgreSQL Slave pg-master memiliki alamat IP 192.168.199.138. Ingat ini dan buat perubahan jika perlu untuk pengaturan Anda.

Installing PostgreSQL: Saya menggunakan server Ubuntu 18.04 LTS. Anda dapat menggunakan distribusi Linux apa pun yang Anda inginkan. Hanya perintahnya yang sedikit berbeda. Anda harus menginstal PostgreSQL di semua server yang akan menjadi bagian dari pengaturan replikasi. Dalam kasus saya, dua server pg-master, dan pg-slave. Saya akan menunjukkan kepada Anda cara menginstal PostgreSQL pada mesin pg-master. Langkah-langkahnya sama juga untuk mesin pg-slave. Di server pg-master: Pertama, Anda harus jalankan peritnah berikut :

menambahkan repositori paket PostgreSQL di mesin Ubuntu Anda, ingat saya menggunakan Ubuntu 18.04. Silahkan baca di sini jika versi Linux anda beda. silahkan anda buat file berikut : $ nano/etc/apt/sources.list.d/pgdg.list Dan tambahkan baris perintah berikut : deb http://apt.postgresql.org/pub/repos/apt/ bionic-pgdg main Import Repositori Key dan Update paket : $ wget --quiet -O - https://www.postgresql.org/media/keys/ACCC4CF8.asc | sudo apt-key add - Key GPG seharusnya ditambahkan.

Sekarang perbarui cache repositori paket APT dengan perintah berikut: $ sudo apt update

Cache repositori paket APT harus diperbarui.

Sekarang instal server database PostgreSQL dengan perintah berikut: Untuk PostgreSQL 10 (Latest Stable): $ sudo apt install postgresql-10 Catatan : saya replikasi menggunakan PostgreSQL 10 masih mengalami error. Untuk PostgreSQL 11 (masih versi Beta): $ sudo apt -y install postgresql-11 Tekan y dan tekan untuk melanjutkan.

PostgreSQL telah terinstall.

Seting kata sandi untuk user postgres dengan perintah berikut: $ sudo passwd postgres

Sekarang masukkan kata sandi. Password seharusnya sudah terseting.

JANGAN LUPA untuk melakukan hal yang sama ke server pg-slave sebelum Anda melanjutkan. Setting di Server Master PostgreSQL: Sekarang login sebagai pengguna postgres: $ su - postgres

Buat user replication: $ psql -c "CREATE USER replication REPLICATION LOGIN CONNECTION LIMIT 1 ENCRYPTED PASSWORD 'PASSWORD_ANDA';"

buka file /etc/postgresqk/11/main/pg_hba.conf : $ nano /etc/postgresqk/11/main/pg_hba.conf

tambahkan kode berikut : host replication replication 192.168.199.138/24 md5

kemudian edit juga: $ nano /etc/postgresqk/11/main/postgresql.conf

Sekarang temukan dan ubah pengaturan berikut (hapus #) : listen_addresses = 'localhost,192.168.199.137' wal_level = replica max_wal_senders = 10 wal_keep_segments = 64 Sekarang restart PostgreSQL server di server pg-master : $ systemctl restart postgresql

Seting di Slave Server: Silahkan anda login postgres user di server pg-slave : $ su - postgres

Stop layanan PostgreSQL di server pg-slave: $ systemctl stop postgresql

Sekarang edit /etc/postgresqk/11/main/pg_hba.conf : $ nano /etc/postgresqk/11/main/pg_hba.conf

Tambahan kode berikut di server pg-master : host replication replication 192.168.199.137/24 md5

Silahkan buka file PostgreSQL configuration : $ nano /etc/postgresqk/11/main/postgresql.conf

Cari baris berikut, uncomment (#). listen_addresses = 'localhost,192.168.199.138' wal_level = replica max_wal_senders = 10 wal_keep_segments = 64 hot_standby = on Silahkan anda ke data_directory: $ cd /var/lib/postgresql/11/main

Hapus seluruh isi direktori : $ rm -rfv *


Silahkan anda copy data dari server pg-master ke server pg-slave di folder data_directory: $ pg_basebackup -h 192.168.199.137 -D /var/lib/postgresql/11/main/ -P -U replication --wal-method=fetch

Isikan password postgres anda dari pg-master dan tekan .

Sekarang buat file recovery.conf di folder data_directory : $ nano recovery.conf

tambahkan baris kode berikut: standby_mode = 'on' primary_conninfo = 'host=192.168.199.137 port=5432 user=replication password=123' trigger_file = '/tmp/MasterNow'

Start kembali server PostgreSQL Slave : $ systemctl start postgresql

Kita Uji Coba Tes Replication: Silahkan buka server pg-master, anda dapat melihat server Slave terdeteksi.

Contoh Lakukan hal berikut : Buat users table: CREATE TABLE users ( name VARCHAR(30), country VARCHAR(2) );

Lakukan insert dummy data ke table users : INSERT INTO users VALUES('Shahriar', 'BD'); INSERT INTO users VALUES('Shovon', 'BD'); INSERT INTO users VALUES('Kelly', 'US'); INSERT INTO users VALUES('Nina', 'IN'); INSERT INTO users VALUES('Kesha', 'CA');

Sekarang anda lihat, data telah masuk di Master server pg-master: # \x off # select * from users;

Sekarang anda ke Slave server pg-slave, login ke concole PostgreSQL : $ psql

Coba anda cek data yang baru saja dimasukkan di MASTER: $ select * from users; huraaa...berhasil....data tampil di server Slave. Replication berhasil....

Generating SSH Keys (ini tidak wajib anda lakukan, suka2 anda aja hehehe): Anda dapat masuk ke server Master dari server Slave dan sebaliknya tanpa kata sandi jika Anda membuat dan menyalin kunci SSH ke server yang berlawanan. Ini berguna untuk keperluan administrasi. Saya hanya menunjukkan kepada Anda bagaimana melakukannya di server Master. Prosedurnya sama. Hasilkan kunci SSH pada server Master dan Slave saat login sebagai pengguna postgres. $ ssh-keygen

Tetap tekan tombol . SSH key telah ter-generated.

Dari server pg-master, copy SSH key ke server pg-slave : $ ssh-copy-id 192.168.199.138 Dari server pg-slave, copy SSH key ke server pg-master : $ ssh-copy-id 192.168.199.137 Tekan yes dan tekan .

Sekarang ketikkan kata sandi untuk server yang Anda sambungkan untuk pengguna postgres dan tekan .

Begitulah cara Anda mengkonfigurasi replikasi Master / Slave di PostgreSQL 11. Terima kasih telah membaca artikel ini. Source: 1. https://www.postgresql.org/ 2. https://linuxhint.com/setup_postgresql_replication/ Read the full article
0 notes
Text
SQL DBA
Job Title: SQL DBA III Location: Jacksonville, Florida Contract: 1-year possibilities of extension US Citizen or GC holders with excellent communication skills only. Must have LinkedIn Profile ? with professional experience, picture, and name. ?No LinkedIn, No Submission? REQUIRED: · 5 or more years professional experience as a Postgres (EnterpriseDB ASE) database Administrator with strong working knowledge of Operational/Systems DBA to setup and support EnterpriseDB-Postgres. · Bachelors degree in an IT related field or equivalent work experience. · In depth knowledge of the PostgreSQL architecture · Experienced in installing, configuring and upgrading EnterpriseDB/Postgres databases and clusters. · Experience in configuring and supporting Enterprise Manager. · Setting up users tools for administration. · Experience in deploying EnterpriseDB in Linux on Power environment and good understanding of operating system concepts of Linux (RHEL). · Good knowledge of capacity planning and architecture design for database server deployment. · Proven experience in working in a mission critical environment in a multi-terabyte database platforms. · Working knowledge of architecting, configuring, setting up Enterprise Fail over manager for HA solution. · Experience in setting up EnterpriseDB Replication. · Working Knowledge of connection poolers (pgPool and pgBouncer) · Perform routine maintenance on several database environments including application of updates, patches, and hotfixes · Installation/configuration and implementation of PEM, BART, xDB/EFM, Performance Dashboard. · Creating databases, migrating database objects from non-production to production environment. · Designing and building data models, schemas, views, and tables to support application requirements · Working knowledge of Database Security mechanism, data encryption, obfuscation, auditing using tools such as Guardium. · Extensive experience designing and executing backup and recovery concepts and procedures · Measure database performance and troubleshoot complex database issues, I/O bottlenecks, SQL Tuning/ · Experience in using Splunk, Nimsoft for Availability and performance. · Good understanding of licensing options and optimization. · Experience in scripting languages (shell or python or Perl) for automating DBA administrative tasks. · Experience with automation tools such as Control-M. · Experience in implementing Postgres STIG implementation, testing, and other vulnerability remediation. · In-depth knowledge of IT industry database technologies and processes and business applications integrated with database technologies. · Provide 24 x 7 Support to Critical production systems. · Knowledge of Project Management Methodologies · Experience in working closely with the application development teams to resolve any performance related issues and provide application support. PREFERRED: · Enterprise DB Postgres Database Administration Certification. · Added advantage of knowledge of administration of MongoDB, LDAP, MySQL. · Health care industry related experience. Reference : SQL DBA jobs Source: http://jobrealtime.com/jobs/technology/sql-dba_i3162
0 notes
Text
Notes from Root Conf Day 2 - 2017
On day 2, I spent a considerable amount of time networking and attend only four sessions.
Spotswap: running production APIs on Spot instance
Amazon EC2 spot instances are cheaper than on-demand server costs. Spot instances run when the bid price is greater than market/spot instance price.
Mapbox API server uses spot instances which are part of auto-scaling server
Auto scaling group is configured with min, desired, max parameters.
Latency should be low and cost effective
EC2 has three types of instances: On demand, reserved and spot. The spot instance comes from unused space and unstable pricing.
Spot market starts with bid price and market price.
In winter 2015 traffic increased and price also increased increased
To spin up a new machine with code takes almost two minutes
Our machine fleet encompasses of spot and on-demand instances
When one spot machine from the fleet goes down, and auto scaling group spins up an on-demand machine.
Race condition: several instances go down at same time.
Aggressive spin up in on-demand machines when market is volatile.
Tag EC2 machines going down and then spin up AWS lambda. When spot instance returns shit down a lambda or on-demand instance. Auto Scaling group can take care of this.
Savings 50% to 80%
Source code: https://github.com/mapbox/spotswap
No latency because over-provisioned
Set bid price as on-demand price.
Didn't try to increase spot instance before going on-demand
Cfconfig to deploy and Cloud formation template from AWS
Adventures with Postgres
Speaker: I’m an Accidental DBA
The talk is a story of a Postgres debugging.
Our services include Real-time monitoring, on demand business reporting to e-commerce players. 4000 stores and 10 million events per day. Thousands of customers in a single database.
Postgres 9.4, M4.xlarge,16GB, 750 GB disk space with Extensive monitoring
Reads don't block writes, Multi-Version Concurrency Model.
Two Clients A, B read X value as 3. When B updates the value X to 4, A reads the X value and gets back as 3. A reads the X value as 4 when B’s transaction succeeds.
Every transaction has a unique ID - XID.
XID - 32 bit, max transaction id is 4 billion.
After 2 billion no transaction happens.
All writes stop and server shutdown. Restarts in single user mode,
Read replicas work without any issue.
Our server reached 1 billion ids. 600k transaction per hour, so in 40 days transaction id will hit the maximum limit.
How to prevent?
Promote standby to master? But XID is also replicated.
Estimate the damage - txid_current - Current Transaction ID
Every insert and update is wrapped inside a transaction
Now add begin and commit for a group of statements, this bought some time.
With current rate, 60 days is left to hit max transaction limit.
TOAST - The Oversized Attribute Storage Technique
Aggressive maintenance. Config tweaks: autovacuum_workers, maintenance_work_mem, autovaccum_nap_time - knife to gun fight. Didn’t help
rds_superuser prevented from modifying pg system tables
Never thought about rds_superuser can be an issue.
VACUUM -- garbage-collect and optionally analyze a database
vacuum freeze (*) worked. Yay!
What may have caused issues - DB had a large number of tables. Thousands of tables
Better shard per customer
Understand the schema better
Configuration tweaks - max_workers, nap_time, cost_limit, maintenance_work_mem
Keep an eye out XID; Long-lived transactions are problem
Parallel vacuum introduced in 9.5
pg_visibility improvements in 9.6
Similar problem faced other companies like GetSentry
MySQL troubleshooting
Step 1 - Define the problem, know what is normal, read the manual
Step 2: collect diagnostics data (OS, MySQL). pt_stalk tool to collect diagnostics error
Lookup MySQL error log when DB misbehaves.
Check OOM killer
General performance issues - show global variables, show global status, show indexes, profile the query
Table corruption InnoDB, system can't startup. Worst strategy force recovery and start from backup.
Log message for table corruption is marked as crashed
Replication issues - show master status, my.cnf/my.ini, show global variables, show slave status
OTR Session - Micro Service
OTR - Off The Record session is a group discussion. Few folks come together and moderate the session. Ramya, Venkat, Ankit and Anand C where key in answering and moderating the session.
What is service and micro service? Micro is independent, self-contained and owned by the single team. Growing code base is unmanageable, and the number of deploys increases. So break them at small scale. Ease of coupling with other teams. No clear boundary
Advantages of Microservices - team size, easy to understand, scale it. Security aspects. Two pizza team, eight-member team. Able to pick up right tools for the job, and change the data store to experiment, fix perf issues.
How to verify your app needs micro service?
Functional boundary, behavior which is clear. Check out and Delivery
PDF/Document parsing is a good candidate for Micro Service, and parsing is CPU intensive. Don't create nano-service :-)
Failure is inevitable. Have logic for handling failures on another service. Say when MS 1 fails MS2 code base should handle gracefully.
Message queue Vs Simple REST service architecture. Sync Vs Async.The choice depends on the needs and functionality.
Service discovery? Service registry and discover from them.
Use swagger for API
Overwhelming tooling - you can start simple and add as per requirements
Good have to think from beginnings - how you deploy, build pipelines.
Auth for internal services - internal auth say Service level auth and user token for certain services. Convert monolithic to modular and then micro level.
API gateway to maintain different versions and rate limiting When to use role-based access and where does scope originate? Hard and no correct way. Experiment with one and move on.
Debugging in monolithic and micro service is different.
When you use vendor-specific software use mock service to test them. Also, use someone else micro service. Integration test for microservices are hard.
Use continuous delivery and don't make large number of service deployment in one release.
The discussion went on far for 2 hours! I moved out after an hour. Very exhaustive discussion on the topic.
1 note
·
View note
Text
How to Choose a Dedicated Server!
You have come a long way from your own fledgling internet site that just got two hundred strikes per month. You now have a 300 site monster coming to finding countless hits per month. New York Dedicated Server a greater hosting approach than you had before. A much better hosting plan.
Positive, your provided hosting program worked great in the past. Ok, effectively, not counting these irregular down-times and oh yeh, that different time when someone (one of your opponents, maybe, but probably an ex-girlfriend) figured out your consideration code and erased your whole website. But that only won't do for the site because it is now. You've spent too much time and income into this challenge and their finally beginning to produce some results. There's simply no question about any of it: you need to locate and evaluation committed server plans and pick the correct one quickly!
A passionate server is it self, the physical little bit of hardware that your hosting company rents to you. It's its own model, difficult drives(s), Arbitrary Entry Storage (RAM) and bandwidth capability. Your internet site and its associated pc software is going to be hosted entirely with this committed server's hard drives. Specific machines permit you to deploy and run just about any program. They furthermore let other users, whom you have provided access, the ability to connect to your devoted hosting machine and use those same applications at the same time you do. It has produced committed hosts very popular amongst internet gamers. Committed gaming servers provide yet features of standard committed hosting hosts but they're created for less serious pursuits.
Modification: Many specific host hosting plans permit you to completely customize or build your own committed server. You are able to thus pick and pay for just the functions that you may require. You frequently will get your choice of os computer software (Windows Host Version & Linux Redhat being the most used options). Picking a such computer software should be educated by contemplating which program your web programs may work most readily useful on. A major feature with specific hosting ideas can also be which get a handle on section to use. Plesk and Cpanel control panels are typically the most popular choices. Both allows the hosting of numerous domains and sites but Plesk control panels have proven very popular largely for their simplicity and their ability to facilitate event management, Postgre SQL, Help Ticketing Systems, various Language Packs and sophisticated specific game host hosting.
Stability: Since your website or request is hosted solely on this dedicated machine, you do not run the chance of the server being congested by demands for other people's sites or applications. On a shared hosting program, the rate at which your online program masses is dependent upon just how much traffic other websites which are for a passing fancy distributed hosting machine are getting. This causes gradual loading instances for high traffic sites and different websites that share a host with them. Focused machine hosting avoids all this by giving your web software exceptional bandwidth. Shared hosting is also risky when you do not know who's adding what things to the exact same machine that you're managed on. David in Nantucket could be publishing a website application comprising an up to now unidentified virus that deletes everything it touches. If your site lives on the same machine as John's, then, to place it theoretically, you're screwed. Focused hosting prevents all of this and allows you to rest only a little easier at night.
Distinctive IP Address: All committed machines have their very own special IP handle and so the IP address of your domain details simply to your website. Distributed hosting programs designate 1 IP handle to every domain and site published on that one server. Internet site traffic is then focused by host-header-reading application installed on the server. This technique is usually really fast but can be slowed down on a congested provided server. Your devoted machine can have its own unique IP handle which could only point out your web site or internet application. Number header-reading computer software is necessary to slow down the launching process (unless you decide to sponsor numerous websites).
Updates, Improvements!: Undoubtedly, your site will carry on to grow and so can your budget. Whenever throughout your focused machine hosting you can add more bandwidth, RAM and boost your processor speed. Though some hosting suppliers enables you to modify os's this is generally maybe not recommended. Make the mind up initially and stick to 1 OS. This could save you several hours of tedious pc software conversions and'inexplicable'downtimes.
e Hard Get Arrangement: When you yourself have elected to own two hard disks on your own committed machine then you can certainly arrange them in 1 of 2 ways: Raid 1 or Raid 2. Raid 1 or disk mirroring, lets you pick one hard disk drive as your primary'work from'hard disk while the other drive provides being an correct replicate of the primary drive. This is essential if your online program will contain highly sensitive knowledge relating to your customers or any other unique information. If you're perhaps not particularly worried about this kind of back-up utility you might choose for a Raid 2 configuration in which there's a principal hard disk with the extra drive used when the primary storage becomes full. The Raid hard disk drive agreements produce dedicated host hosting often more reliable than typical low dedicated host hosting.
0 notes
Text
This guide will walk you through the steps required to Install PostgreSQL 11 on Debian 11 / Debian 10. PostgreSQL is a powerful, highly-extensible database server written in C. It is the World’s most advanced relational database system with over 30 years of active development that has earned it a strong reputation for reliability, feature robustness, and performance. The first release of PostgreSQL 11 was on 2018-10-18 and you can check more details on the release page. Follow the few steps below to install PostgreSQL 11 on Debian 11 / Debian 10. Step 1: Add PostgreSQL Repository Start by ensuring everything is updated on your Debian 11 / Debian 10 system. sudo apt update [ -f /var/run/reboot-required ] && sudo reboot -f Then Import the repository signing key: sudo apt update sudo apt install vim curl gpg gnupg2 software-properties-common apt-transport-https lsb-release ca-certificates curl -fsSL https://www.postgresql.org/media/keys/ACCC4CF8.asc|sudo gpg --dearmor -o /etc/apt/trusted.gpg.d/postgresql.gpg Add the repository: echo "deb http://apt.postgresql.org/pub/repos/apt/ `lsb_release -cs`-pgdg main" |sudo tee /etc/apt/sources.list.d/pgdg.list Step 2: Install PostgreSQL 11 on Debian 11 / Debian 10 Now install PostgreSQL 11 on Debian 11 / Debian 10 by running the command below. sudo apt update sudo apt install postgresql-11 The service is usually started after installation. $ systemctl status [email protected] ● [email protected] - PostgreSQL Cluster 11-main Loaded: loaded (/lib/systemd/system/[email protected]; enabled-runtime; vendor preset: enabled) Active: active (running) since Wed 2022-05-18 20:12:39 UTC; 35s ago Process: 1070613 ExecStart=/usr/bin/pg_ctlcluster --skip-systemctl-redirect 11-main start (code=exited, status=0/SUCCESS) Main PID: 1070618 (postgres) Tasks: 7 (limit: 2340) Memory: 16.8M CPU: 124ms CGroup: /system.slice/system-postgresql.slice/[email protected] ├─1070618 /usr/lib/postgresql/11/bin/postgres -D /var/lib/postgresql/11/main -c config_file=/etc/postgresql/11/main/postgresql.conf ├─1070620 postgres: 11/main: checkpointer ├─1070621 postgres: 11/main: background writer ├─1070622 postgres: 11/main: walwriter ├─1070623 postgres: 11/main: autovacuum launcher ├─1070624 postgres: 11/main: stats collector └─1070625 postgres: 11/main: logical replication launcher May 18 20:12:36 postgresql.cloudlabske.io systemd[1]: Starting PostgreSQL Cluster 11-main... May 18 20:12:39 postgresql.cloudlabske.io systemd[1]: Started PostgreSQL Cluster 11-main. We need to set PostgreSQL admin user Password: $ sudo su - postgres postgres@deb10:~$ psql -c "alter user postgres with password 'StrongDBPassword'" ALTER ROLE postgres@deb10:~$ exit Step 3: Enable remote access (Optional) By default, access to PostgreSQL database server is only from localhost. $ ss -tunelp | grep 5432 tcp LISTEN 0 128 127.0.0.1:5432 0.0.0.0:* users:(("postgres",pid=15785,fd=3)) uid:111 ino:42331 sk:6 Edit PostgreSQL 11 configuration file if you want to change listening address: sudo vim /etc/postgresql/11/main/postgresql.conf Add below line under CONNECTIONS AND AUTHENTICATION section. listen_addresses = '*' # Don't do this if your server is on public network You can also specify server IP Address listen_addresses = '10.10.0.2' # Recommended for LAN connections to DB Server Restart postgresql after making a change sudo systemctl restart postgresql Confirm $ ss -tunelp | grep 5432 tcp LISTEN 0 128 0.0.0.0:5432 0.0.0.0:* uid:108 ino:74999 sk:a tcp LISTEN 0 128 [::]:5432 [::]:* uid:108 ino:75000 sk:b v6only:1 If you have an active UFW firewall, allow port 5432 for network connections.
sudo ufw allow 5432/tcp Step 4: Test PostgreSQL Installation Add a test database user: $ sudo su - postgres postgres@deb10:~$ createuser test_user1 Add the test database and grant ownership to test_user1: postgres@deb10:~$ createdb test_db -O test_user1 Set user password: postgres@deb10:~$ psql psql (11.16 (Debian 11.16-1.pgdg110+1)) Type "help" for help. postgres=# alter user test_user1 with password 'DBUserPassword'; ALTER ROLE postgres=# exit Login to test_db database: postgres@deb10:~$ psql -l | grep test_db test_db | test_user1 | UTF8 | en_US.UTF-8 | en_US.UTF-8 | postgres@deb10:~$ psql test_db psql (11.16 (Debian 11.16-1.pgdg110+1)) Type "help" for help. test_db=# Create a table and add some dummy data: test_db=# create table test_table ( id int,first_name text, last_name text ); CREATE TABLE test_db=# insert into test_table (id,first_name,last_name) values (1,'John','Doe'); INSERT 0 1 Show table data: test_db=# select * from test_table; id | first_name | last_name ----+------------+----------- 1 | John | Doe (1 row) test_db=# exit Let’s drop our test database to retain clean installation. postgres@deb10:~$ dropdb test_db That’s all. You have successfully installed PostgreSQL 11 on Debian 11 / Debian 10. Visit PostgreSQL official Documentation page for further reading.
0 notes
Text
[Full-time] SQL DBA at yaduvansi0871
Location: Florida URL: http://www.jobisite.com Description: Job Title: SQL DBA III Location: Jacksonville, Florida Contract: 1-year possibilities of extension US Citizen or GC holders with excellent communication skills only. Must have LinkedIn Profile ? with professional experience, picture, and name. ?No LinkedIn, No Submission? REQUIRED: · 5 or more years professional experience as a Postgres (EnterpriseDB ASE) database Administrator with strong working knowledge of Operational/Systems DBA to setup and support EnterpriseDB-Postgres. · Bachelors degree in an IT related field or equivalent work experience. · In depth knowledge of the PostgreSQL architecture · Experienced in installing, configuring and upgrading EnterpriseDB/Postgres databases and clusters. · Experience in configuring and supporting Enterprise Manager. · Setting up users tools for administration. · Experience in deploying EnterpriseDB in Linux on Power environment and good understanding of operating system concepts of Linux (RHEL). · Good knowledge of capacity planning and architecture design for database server deployment. · Proven experience in working in a mission critical environment in a multi-terabyte database platforms. · Working knowledge of architecting, configuring, setting up Enterprise Fail over manager for HA solution. · Experience in setting up EnterpriseDB Replication. · Working Knowledge of connection poolers (pgPool and pgBouncer) · Perform routine maintenance on several database environments including application of updates, patches, and hotfixes · Installation/configuration and implementation of PEM, BART, xDB/EFM, Performance Dashboard. · Creating databases, migrating database objects from non-production to production environment. · Designing and building data models, schemas, views, and tables to support application requirements · Working knowledge of Database Security mechanism, data encryption, obfuscation, auditing using tools such as Guardium. · Extensive experience designing and executing backup and recovery concepts and procedures · Measure database performance and troubleshoot complex database issues, I/O bottlenecks, SQL Tuning/ · Experience in using Splunk, Nimsoft for Availability and performance. · Good understanding of licensing options and optimization. · Experience in scripting languages (shell or python or Perl) for automating DBA administrative tasks. · Experience with automation tools such as Control-M. · Experience in implementing Postgres STIG implementation, testing, and other vulnerability remediation. · In-depth knowledge of IT industry database technologies and processes and business applications integrated with database technologies. · Provide 24 x 7 Support to Critical production systems. · Knowledge of Project Management Methodologies · Experience in working closely with the application development teams to resolve any performance related issues and provide application support. PREFERRED: · Enterprise DB Postgres Database Administration Certification. · Added advantage of knowledge of administration of MongoDB, LDAP, MySQL. · Health care industry related experience. Reference : SQL DBA jobs Apply to this job source http://www.america-jobs.net/job/14476/sql-dba-at-yaduvansi0871/
0 notes
Link
Lightning Web Components is our open source UI framework to build enterprise-scale apps that run on Salesforce, Heroku, Google Cloud Platform, or anywhere else. When running these apps on these different platforms, you can choose your own backend stack and data source, or you may want surface data from Salesforce in them. In this blog post, we will explore some options and considerations when using Salesforce as the data source. Authentication Salesforce provides a comprehensive set of REST and SOAP APIs that can be used to access its data and services from a client or server. The first step before accessing the APIs, is to establish a session with Salesforce. You can either use a username and password, or any of the OAuth flows listed here. Depending on your use case, these flows can be executed by client-side or server-side JavaScript. You can either build this logic from scratch or use external libraries like JSforce. Here are some considerations when deciding on an Authentication Flow for your app. Client Side Authentication You can use the OAuth User-Agent Flow to execute the handshake process using client side JavaScript alone. It involves a simple redirection to the /oauth2/authorize endpoint and takes in the Consumer Key of a Connected App as a parameter. Once the authorization is successful, the access token is encoded in the redirection URL. When you run client-side JavaScript, all the code is executed on the user’s device, so sensitive data like passwords and client secrets are accessible and exploitable. For this reason, this flow doesn’t use the client secret. However, the access token is encoded into the redirection URL which is exposed to the user and other apps on the device. Hence, care must be taken to remove callbacks from browser history. You can call window.location.replace(); to remove the callback from the browser’s history. It is best to use this type of Auth flow when building Lightning Web Components for desktop or mobile apps that have an embedded browser. Once you have the access token, you can pass it in the header of any HTTP requests to access Salesforce APIs. Building and sending a request from client-side JavaScript poses a risk, because the access token becomes available to the client and can be exploited. Therefore, sensitive business logic involving access tokens, usernames and passwords must never be written in client side JavaScript, because they are inadvertently exposed. To increase security and provide a better level of abstraction between your custom application and the APIs, you should use a middleware like Express, MuleSoft or any other ESB of your choice. Server Side Authentication You can use the Web server flow or the JWT Bearer flow to execute the handshake process using server side JavaScript like Node JS or any other stack of your choice. In case of Lightning Web Components, the create-lwc-app tool provides an option to create and use an Express server as a backend. You can choose an OAuth flow that suits your requirements. For instance, you can use the JWT Bearer flow when you want to use a single integration user to access data on behalf of all users. Use cases include showing read-only data (e.g. product catalog) to unauthenticated users. The web-server flow on the other hand can be used for per-user authorization. Use cases include websites where data relevant to the logged in user is shown (e.g. cart, order history etc.). You can also refer to this Trailhead Module that talks in detail about the use cases for different OAuth flows. When running authentication flows on a server, it is expected that the server protects and securely stores all the secrets. In the case of Web Server flow, the client secret that prevents a spoofing server must be stored securely. In the case of JWT Bearer flow, an X509 Certificate that corresponds to the private key of the app must be created and stored in a keystore. These secrets and certificate aliases also have to be configurable (generally using Environment Variables) and should never be hardcoded into your codebase. This also allows you to change them without rebuilding the app and to deploy instances of your app in different environments with ease. When developing locally, for example with Node.js, these are stored in a .env file, which can then be accessed in your code by using libraries like dotenv, saving you the trouble of setting them manually every time. You should exclude sensitive configuration files like .env from version control by referencing them in specific files like .gitignore for git. Data Residency Securing access to Salesforce data doesn’t stop with authentication. Data must be stored and transmitted securely as well. Data on the Salesforce Platform is secured with its core security capabilities like Sharing Model, Object and Field Level Security and optionally Salesforce Shield for encryption and high compliance. Using Salesforce APIs allows you real time access to data without making a copy of it. The data returned by the API is bound by the permissions of the user accessing the API. Depending on your use case, you might want to replicate Salesforce data into a local/managed database. Since you can deploy Lightning Web Components Open Source (LWC OSS) apps on any platform, there are different options that each platform provides for data storage and replication. For example, Heroku Connect is an add-on by Heroku that provides a data synchronization service between Salesforce and Heroku Postgres databases. Add-Ons/Connectors like these are built to securely store tokens, and establish a session with Salesforce when needed. It is important to remember that once data is replicated locally, it is not bound by the same Sharing Model that is present in Salesforce. It is therefore necessary to implement your own access control mechanism. Also, never write the logic that queries for data or filters data based on access controls on the client side, because it can be easily tampered with. In the screenshot below, an if condition is being used by the component to only show the data relevant to the logged in user. This statement can be easily removed using browser tools which would then give the logged in user access to all the data that is being returned by the server. As a best practice, you should always use a middleware to abstract sensitive logic from the client-side and make sure that the middleware returns only the data that’s relevant to the user and nothing more. Summary In this blog post, you’ve learned about different approaches to authenticate to Salesforce from an app built with LWC OSS and what factors determine the approach you take. You’ve seen drawbacks of accessing data from the client side, and how a server can help you secure your implementation. You’ve also seen how the responsibility of data security varies with choice of data residency. However, it is also important to note that this blog post doesn’t exhaustively list all of the options available for secure Salesforce data access, but instead provides general indication patterns and principles that are used. Now it’s time to get hands-on! Below are a few resources to help you get started. Sample Code Lightning Web Components OSS foundation and documentation Trailhead Project: Access Salesforce Data with Lightning Web Components Open Source Trailhead Module: Connected App Basics About the Author Aditya Naag Topalli is a 13x Certified Senior Developer Evangelist at Salesforce. He focuses on Lightning Web Components, Einstein Platform Services, and integrations. He writes technical content and speaks frequently at webinars and conferences around the world. Follow him on Twitter @adityanaag.
0 notes
Text
SQL DBA
Job Title: SQL DBA III Location: Jacksonville, Florida Contract: 1-year possibilities of extension US Citizen or GC holders with excellent communication skills only. Must have LinkedIn Profile ? with professional experience, picture, and name. ?No LinkedIn, No Submission? REQUIRED: · 5 or more years professional experience as a Postgres (EnterpriseDB ASE) database Administrator with strong working knowledge of Operational/Systems DBA to setup and support EnterpriseDB-Postgres. · Bachelors degree in an IT related field or equivalent work experience. · In depth knowledge of the PostgreSQL architecture · Experienced in installing, configuring and upgrading EnterpriseDB/Postgres databases and clusters. · Experience in configuring and supporting Enterprise Manager. · Setting up users tools for administration. · Experience in deploying EnterpriseDB in Linux on Power environment and good understanding of operating system concepts of Linux (RHEL). · Good knowledge of capacity planning and architecture design for database server deployment. · Proven experience in working in a mission critical environment in a multi-terabyte database platforms. · Working knowledge of architecting, configuring, setting up Enterprise Fail over manager for HA solution. · Experience in setting up EnterpriseDB Replication. · Working Knowledge of connection poolers (pgPool and pgBouncer) · Perform routine maintenance on several database environments including application of updates, patches, and hotfixes · Installation/configuration and implementation of PEM, BART, xDB/EFM, Performance Dashboard. · Creating databases, migrating database objects from non-production to production environment. · Designing and building data models, schemas, views, and tables to support application requirements · Working knowledge of Database Security mechanism, data encryption, obfuscation, auditing using tools such as Guardium. · Extensive experience designing and executing backup and recovery concepts and procedures · Measure database performance and troubleshoot complex database issues, I/O bottlenecks, SQL Tuning/ · Experience in using Splunk, Nimsoft for Availability and performance. · Good understanding of licensing options and optimization. · Experience in scripting languages (shell or python or Perl) for automating DBA administrative tasks. · Experience with automation tools such as Control-M. · Experience in implementing Postgres STIG implementation, testing, and other vulnerability remediation. · In-depth knowledge of IT industry database technologies and processes and business applications integrated with database technologies. · Provide 24 x 7 Support to Critical production systems. · Knowledge of Project Management Methodologies · Experience in working closely with the application development teams to resolve any performance related issues and provide application support. PREFERRED: · Enterprise DB Postgres Database Administration Certification. · Added advantage of knowledge of administration of MongoDB, LDAP, MySQL. · Health care industry related experience. Reference : SQL DBA jobs Source: http://jobsaggregation.com/jobs/technology/sql-dba_i3162
0 notes