#powershell tutorial
Explore tagged Tumblr posts
Visit Tumblr Blog
Explore Tumblr blogs with no restrictions, modern design and the best experience.
Last Seen Tumblr Blogs


Fun Fact
Tumblr was created by web developers David Karp and Marco Arment.
Text
How to check Website status on the Linux Server
#everyone
0 notes
Text

Uses of PowerShell
Windows PowerShell is a command-line shell and associated scripting language created by Microsoft. PowerShell is both a scripting language and a command-line Shell. It can interact with a different number of technologies.
#besttraininginstitute#onlinetraining#traininginstitute#online#training#education#tutorial#coding#programming#powershell#powershellscript#powershellscripting#powershellscripts#powershellcommand#learnpowershell#powershelltutorial#technology#tech#use
1 note
·
View note
Text
[TIL] Thêm alias trên Window PowerShell
Đợt này chuyển qua làm việc trên Window nhiều, lại đang dùng quen Oh my zsh lên Linux nên mình thấy khá bất tiện khi thiếu đi vài command alias trên Mac. Thử hỏi ChatGPT thì có cách làm để set alias trên Window PowerShell thế này: Continue reading Untitled

View On WordPress
0 notes
Text
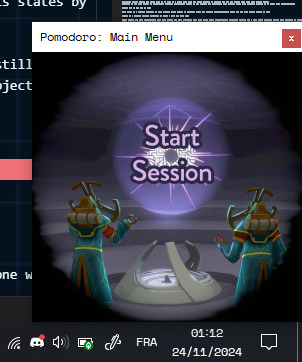
I have an issue with constantly getting distracted, so I got distracted from working by making a 100% customizable Pomodoro App to keep my future self from getting distracted. Have a Google Drive download link.
The Pomodoro technique, if you don't know it, is a discipline method for keeping track of when you are working and when you are taking breaks, notably through the use of a timer.
There are tons of apps centered around this, and yet after looking at so many of them, I somehow could not find one that would do the most basic thing I'd like to have for a study companion: change the background of the app so that yes, I do have a timer telling me to work harder, but I also have an image of my choice to cheer me up along with it.
So what did I do? Did I take the rational, reasonable path, to just suck it up and stick to one of the already existing apps even though it would mean saying no to having my adorable Hearthian OC sleep in a corner of my screen?
Or did I go the hyperfocused insane route of utter procrastination and learn a whole new programmation language from scratch just in order to get my frikkin baby to comfort me while I work?

Yeah, who could have guessed.
So! The Google Drive link I shared will let you download everything you need in order to run your own version of this little app, including a tutorial on how to customize it to suit your needs.
The first thing you will see after unzipping the archive is this:
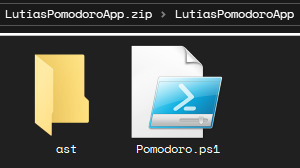
The "ast" folder (standing for "assets") contains every image used by the app -- which means that you can change them as you please! I even gave you transparent versions of the buttons in the "Asset Creation Help" subfolder, in case you like the shapes but want to change the backgrounds.
You think that's cool? Oh, but the image assets are far from being the only thing you can change for this app's behavior! You can change EVERYTHING that this app is doing (which isn't much because it's literally just three different types of timers, and even then there are some trickier details with more coding than others (but I still give tips on how to handle those), but shush. Everything this app can do, you can customize to your heart's content).
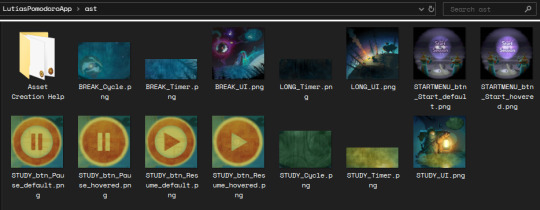
How do you do that? Well, this is what you get when you right-click on the "Pomodoro.ps1" file:
The Pomodoro.ps1 file is the "app" itself, written in PowerShell code that I made as legible as I could make it. There is a whole tutorial in there, made easier to read if you right-click on this file's icon and choose the "Edit" option. Have a preview!
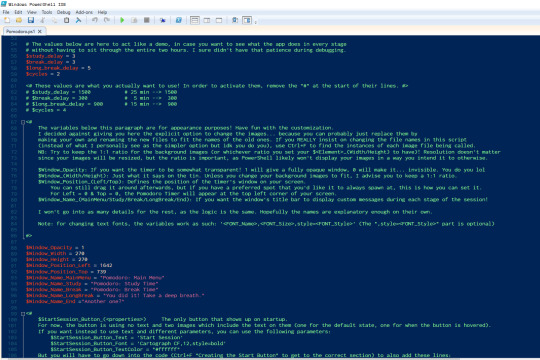
Through editing this file, you can then run a Pomodoro app from which you can have the window's appearance customized, from its size, opacity (if you want to still half-see what's sitting behind it), and start position on your screen (the window can be dragged around, but if you have a preferred position you can tell the app to always load it in that preferred spot right from the get go), to stuff like the custom messages you get whenever the timer progresses:
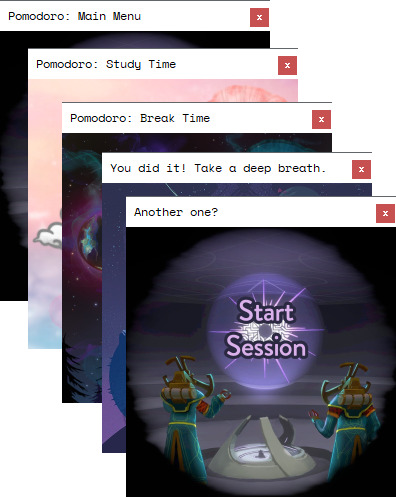
So, yeah. I made a little app meant to help with productivity. One out of many already out there, sure, and it's probably not as cool as many others (but I'll just remind you that three days ago I knew absolutely nothing about PowerShell as a whole, so- I guess that would be still a little impressive that I was able to make a working app like that at all? xD), but as far as I've looked, it's the only one that will let you have your favorite images keep you company while you use it.
I don't know whether anyone other than me will like it enough to use it, but just in case, it's here! Hope it's as easy(-ish) to customize as I made it out to be, or at least close enough.
PS: The version I use for my own personal choices uses some slightly different assets compared to the version I share in the .zip file on my Google Drive. This is because the version I share online solely uses official Outer Wilds art (while the version I made for myself notably uses one piece of OW fanart that I did not make myself, and it didn't sit right with me to share that piece uncredited, even in an edited form. If you are curious, this is the artwork in question).
41 notes
·
View notes
Text
I tried an ElevenForum tutorial to delete Copilot. Pro-AI nonsense aside (and all over a GPT reskin)... this is just me rambling.
I was really dumb and didn't look up any way to disable it, only went by one tech support post here and that's it. I already disabled Copilot (also within the built-in search feature) so it doesn't show up when I try to uninstall it. Tried deleting it with PowerShell. Pasted a command twice. Pressed Enter twice. Checked Taskbar settings, icon didn't show up. I think it does work, but anyhow...
I didn't look into ways to uninstall it, and I thought it was built-in (thank god it's not part of Microsoft Edge, too). Edit: It is part of Edge, it does not come as its own .exe file and I don't know if uninstalling Edge means other stuff will stop working, so disabling is the best I'll do for now.
Anyhow...
COPILOT IS GONE 🦀🦀🦀🦀
#microsoft windows#windows#copilot#anti-ai#anti ai art#anti ai#i don't know what to tag this#but whatever#glad that it's so easy to get rid of it#i just was very dumb
9 notes
·
View notes
Text
Street Fighter V Modding Guide and Tutorial Archived Links
People are actually still interested in modding SFV. Since Modderbase is down, here's some SFV modding links from archive.org. If you don't see images or spoiler boxes in the thread, click on the Way Back Machine search bar where you see the link url address and hit 'Enter' again. FYI this may load quite slowly. Also, If you need to download a tool from these archived links, copy the url of the tool and paste it on the browser's address bar, erase the archive.org parts and then hit enter on the actual link address. Example, copy the address from the hyperlink (https://web.archive.org/web/20240316160336/https://fluffyquack.com/tools/REtool.zip), delete the web.archive stuff, and then it should be ( https://fluffyquack.com/tools/REtool.zip ) and then hit Enter on the address bar.
Anyway, here are the tutorial links:
Unreal Engine Version : Unreal Engine 4.7.6
AES Key : _aS4mfZK8M5s5KWC2Lz2VsFnGKI7azgl
---SFV Modding Tutorial for Beginners---
https://web.archive.org/web/20230227205009/http://modderbase.com/showthread.php?tid=445
https://web.archive.org/web/20170920143910/http://modderbase.com/showthread.php?tid=97
---Tools List---
https://web.archive.org/web/20230619234458/http://modderbase.com/showthread.php?tid=18
---SFV Character Codes---
https://web.archive.org/web/20201028055311/http://modderbase.com/showthread.php?tid=60
https://web.archive.org/web/20240324163507/http://modderbase.com/showthread.php?pid=20364&tid=1000#pid20364
---Character Resource Pack---
https://web.archive.org/web/20201029015331/http://modderbase.com/showthread.php?tid=20
---Texture Guide---
https://web.archive.org/web/20230306152351/http://modderbase.com/showthread.php?tid=274
https://web.archive.org/web/20230117144443/http://modderbase.com/showthread.php?tid=1878
---Injecting Texture into UASSET file---
https://web.archive.org/web/20231013070905/http://modderbase.com/showthread.php?tid=57
https://web.archive.org/web/20220906234610/http://modderbase.com/showthread.php?tid=1448
---Color Editing---
https://web.archive.org/web/20170920143734/http://modderbase.com/showthread.php?tid=39
---Sound Modding---
https://web.archive.org/web/20210321104439/http://www.modderbase.com/showthread.php?tid=77
---Camera and Posing via Cheat Engine---
https://web.archive.org/web/20240316171311/http://modderbase.com/showthread.php?pid=23177&tid=89#pid23177
https://web.archive.org/web/20240316172307/http://modderbase.com/showthread.php?tid=89
---Hiding Some Costume Parts & Easter Eggs ---
https://web.archive.org/web/20200130095243/http://modderbase.com/showthread.php?tid=269
https://web.archive.org/web/20240324163506/http://modderbase.com/showthread.php?pid=25521&tid=1732#pid25521
---Swap A character to another Character Slot---
https://web.archive.org/web/20240303200429/http://modderbase.com/showthread.php?tid=53
https://web.archive.org/web/20220623143544/http://modderbase.com/showthread.php?tid=1000
https://web.archive.org/web/20240316164750/http://modderbase.com/showthread.php?tid=811
https://web.archive.org/web/20200926055244/http://modderbase.com/showthread.php?tid=576
---Swapping Movesets---
https://web.archive.org/web/20201030162142/http://modderbase.com/showthread.php?tid=1099&pid=22087#pid22087
---How to Pack a Mod into a Pak file---
https://web.archive.org/web/20230619231455/http://modderbase.com/showthread.php?tid=122
---Creating Physics Assets in UE4---
https://web.archive.org/web/20200130095618/http://modderbase.com/showthread.php?tid=37
---Custom Animations---
https://web.archive.org/web/20201224123539/http://modderbase.com/showthread.php?tid=873
---VFX Modding and Tips---
https://web.archive.org/web/20210825014646/http://modderbase.com/showthread.php?tid=1470
---Packing mod Powershell way if you have Windows 10---
https://web.archive.org/web/20230619231456/http://modderbase.com/showthread.php?tid=122&pid=3943#pid3943
---Hex Editing Files to be Larger---
https://web.archive.org/web/20240324163507/http://modderbase.com/showthread.php?tid=1900
Good luck!
8 notes
·
View notes
Text
@powershell-official Any recommendations for resources, tutorials, introductions to PowerShell?
4 notes
·
View notes
Text

Do you wanna join me (@scoobydoodean) in trying to make gifs of the highest quality possible using only free tools, with workflows as painless as possible??? Here you can find gif-making tutorials, software tests, and comparison and example sets of gifs made using free tools!
Navigation
Very very basic "How a Gif Works"
Best Practices for Quality/Best Visual Result When Uploading Gifs to Tumblr (regardless of gif-making method)
How To Reduce The File Size of A Gif
Sourcing Video Files
Full tool list on Google Sheets with filters

TUTORIAL 1 | RECOLORED GIFS
Making GIFs with DaVinci Resolve and FFmpeg or Gifski
LINK | EXAMPLE SETS
This is how I usually make my gifs. I find it to be the most efficient and most versatile (in terms of coloring, captioning, clipping) of all the methods I've tried for making quality gif sets. This method also does not require the traditional process of screencapping a scene frame by frame which to me is a huge bonus.
Operating systems: Mac, Windows, and Linux. DaVinci Resolve is a pretty high power software though and it does have hardware minimum requirements.
Needed software: DaVinci Resolve and either FFmpeg or Gifski (GUI or CLI version).
Difficulty: Moderate
Time: 🐢🐢 _ _ _ (example set took me 17 minutes)
Input: video files
Competencies: Some general familiarity with video editors and using your computer's shell helps but isn't required. Mac and Windows users: There is a workaround that allows you to avoid the command line. Familiarity with recoloring tools is great but not required.

TUTORIAL 2 | NON-RECOLORED GIFS
Giphy Capture and Gifski
LINK | EXAMPLE SETS
If you are on Mac and just getting into Gif-Making, this is a great way to learn the ropes with what is probably the most intuitive gif-making tool I have ever used. I would just recommend giffing scenes that take place outdoors or in well-lit rooms since you can't make color adjustments.
Operating systems: Mac
Needed software: Giphy Capture and Gifski (GUI version)
Quality potential: High for non-recolored sets! Watch out for odd frame rate effects.
Difficulty: Easy AF
Time: 🐢 _ _ _ _
Input: Any video you can play on your screen that doesn't have screencapture protections in place.
Competencies: None. Very very beginner friendly.

TUTORIAL 3 | RECOLORED GIFS
Pure FFmpeg: Making GIFs with Command Line Scripts
LINK | EXAMPLE SETS
If you love command lines, this one might be fun to you—and YES—you do get visuals. Command line haters: check out Tutorial 4 for a similar process but in a GUI tool.
Operating systems: Mac, Windows, and Linux
Software needed: FFmpeg
Difficulty: Advanced as far as gif-making, but this is actually a good first shell scripting project in my opinion if you've ever wanted to learn how. (I learned a lot about how my command line works while making this tutorial!) For people familiar with bash scripts, I think this will probably be easy!
Time: 🐢🐢🐢🐢🐢
Input: Video files OR frame by frame screencaps if you have them already.
Competencies: General familiarity with your computer's shell (Powershell on Windows, Terminal on Mac) helps a lot! I will try to make it as easy as possible to follow.
NOTE (for Command Line Aficionados): If you are interested in expanding on/improving this tutorial, or making a video -> GIFs version instead of videos -> frames -> GIFs, this is very possible to do. There is also a wealth of troubleshooting help and community-based example scripts for FFmpeg available online through r/FFMPEG and Stack Exchange, and almost all visual filter and complex filter options can be used on any input/output combination in FFmpeg.

TUTORIAL 4 | RECOLORED GIFS
Making Gifs for Free With PhotoScape X
LINK | EXAMPLE SETS
I really like this method as far as the quality you can achieve, and it's pretty easy to use. I plan to try to make more sets with this method later.
Operating systems: Mac and Windows
Quality potential: High
Software needed: PhotoScape X; a frame by frame screencapoing method (See FRAME BY FRAME SCREENCAPPING METHODS/TOOLS section below for a list of methods for this that I've catalogued).
Difficulty: Moderate.
Time: 🐢🐢🐢 _ _
Input: Frame by frame screencaps.
Competencies: General familiarity with photo editors helps but is not required to follow this tutorial.

TUTORIAL 5 | RECOLORED GIFS
Making Quality Gifs For Free On iOS and Android
LINK
If you don't have a computer, just an Android or iOS device, you can still make GIFs! This ones for you!
Operating systems: iOS and Android
Software needed: VITA and a video-to-gif utility or app (ezgif.com or Better Gif Maker shortcut (iOS only))
Time: 🐢🐢 _ _ _
Input: Video files
Difficulty: Moderate.
Requirements: General familiarity with photo editors helps but is not required to follow this tutorial.

EXTERNAL TUTORIAL 1 | NON-RECOLORED GIFS
u/ChemicalOle's "GIMP Gifs 101"
LINK | EXAMPLE SETS
This tutorial is 8 years old. See External Tutorial 2 for a newer tutorial or see NOTE 1 below.
Operating systems: Mac*, Windows, and Linux
Needed software: GIMP with AnimStack; FFmpeg; VLC Media Player
Quality potential: Untested (tutorial needs to be updated)
Difficulty: Untested (largely—I haven't tested captioning with AnimStack yet)
Time: 🐢🐢🐢 _ _
Input: Frame by frame screencaps.
Competencies: Some general familiarity with GIMP and your computer's shell helps but isn't required to follow the tutorial.
LIMITATIONS: 1) Frame by Frame gif-making methods can take up a lot of space on your drive in the interim. 2) A community-contributed GIMP plugin called AnimStack is required. Plugins could break after a GIMP update or developers could simply abandon them at any time.
____
NOTE 1: If you want to try this tutorial, note that 1) There is no longer any need to install GAP separately. It is now part of your regular GIMP install. 2) Filters > Animation > Optimize (for GIF) can be used in place of the color index step. 3) *Author states the tutorial is Linux and Windows, but I see no reason here in 2023 that you can't also follow this tutorial on Mac.
NOTE 2, for Mac users: You may not have to do this, but I had to manually create the scripts folder on Mac to place animstack.scm there. If you need to make the scripts folder, you should place it within the Library/Application Support/GIMP/2.10 folder.
EXTERNAL TUTORIAL 2 | RECOLORED GIFS
DekaythePunk's "How to Make Gifs On GIMP"
LINK
Dekaythepunk has made many tutorials on using GIMP to make gifs and graphics using special coloring techniques and edits. You can find all of their tutorials here.
Operating systems: Windows, Mac*, and Linux.
Needed software: GIMP with AnimStack, G'MIC-QT or McGIMP*, and Layers Effects plugins; a way to screencap frame by frame.
Difficulty: Untested (I'm working on it :D).
Time: 🐢🐢🐢 _ _
Input: Frame by frame screencaps.
Competencies: Some general familiarity with GIMP is helpful but isn't required to follow the tutorial.
LIMITATIONS: 1) Frame by frame gif-making methods can take up a lot of space on your drive in the interim. 2) Community-contributed GIMP plugins are required. These plugins could break after a GIMP update or developers could simply abandon them at any time. (Mac users: also see NOTE 1).
*NOTES (for Mac users):
A G'MIC-QT installer is no longer officially supported for Mac by the makers of the plugin. However, you should be able to install McGIMP on Mac which includes G'MIC, and will also find and use your AnimStack scripts from regular GIMP (McGIMP page | Homebrew install).
You may not have to do this, but I had to manually create the scripts folder on Mac to place animstack.scm there. If you need to make the scripts folder, you place it within the Library/Application Support/GIMP/2.10 folder.
I installed GIMP, then added my AnimStack scripts to GIMP and ensured they worked, then installed XQuartz, then installed McGIMP via Homebrew (you can also just use the provided installer).

EXTERNAL TUTORIAL 3 | RECOLORED GIFS
Lacebird's "How to Make A GIF With Photopea"
LINK
Theoretically, you should be able to use this tutorial to make nice GIFs even on a Chromebook.
Operating systems: Any. Photopea is a browser-based GUI. However, if your device has a very small amount of RAM or you are using certain browsers, you may have issues with the page reloading. You may also need to test with different browsers to see which internet browser manages your available RAM best (I used Brave to test this tutorial out).
Needed software: A good internet browser; whatever software you use to screencap. (See FRAME BY FRAME SCREENCAPPING METHODS/TOOLS section below for a list of frame by frame screencapping methods I've catalogued).
Difficulty: Moderate.
Time: 🐢🐢🐢 _ _
Input: Frame by frame screencaps.
Competencies: Helps to have some familiarity with photo editors or drawing softwares with layer panes.
LIMITATIONS: 1) Frame by frame gif-making methods can take up a lot of space on your drive in the interim. 2) You need a good internet connection to run this smoothly. 3) If your computer doesn't have a lot of RAM or you use certain internet browsers, you may have issues with the page reloading. You can backup your project as a PSD repeatedly in the event of a page reload.

VIDEO/GIF -> OPTIMIZED GIF TOOLS
These are tools that receive a video input or a large GIF and output an optimized/compressed GIF for the web.

FFMPEG
The linked scripts below receive video clips you've already cut to length and captioned (for example, in DaVinci Resolve—see Tutorial 1) and render them into optimized GIFs.
SCRIPT 1 TUTORIAL | SCRIPT 2 TUTORIAL
Interface type: Command Line (CLI).
Difficulty: Moderate.
Operating Systems: Mac, Windows, and Linux.
Input: Video files.
GIFSKI
Gifski was made purely for compressing videos into quality, optimized GIFs and absolutely nothing else. It is meant to be combined with other tools and it is very, VERY good at what it does.
GUI AND CLI SCRIPT TUTORIAL
Interface type: Graphic User (GUI) and Command Line (CLI).
Difficulty: Easy (GUI); Moderate (CLI).
Operating Systems: Mac, Windows, and Linux (CLI only).
Input: Video files (MP4).
EZGIF.COM OPTIMIZE PANE
The Ezgif Optimize tab will receive video files, existing GIFs, or a collection of image files to render into a GIF, and optimize them for upload in other tools.
Interface type: Web-based GUI.
Difficulty: Easy to Moderate.
Operating Systems: Any. You just need a web browser.
Input: Image files (GIF, JPG, PNG, APNG, HEIC, MNG, FLIF, AVIF, WebP) or Videos files (MP4, WebM, AVI, MPEG, FLV, MOV, 3GP).
FRAME BY FRAME SCREENCAPPING METHODS/TOOLS
You can get screencaps of videos frame by frame in several different media players, with various levels of clunkiness/tediousness. I am cataloguing various methods in this section. If there is a method you use and like that is not listed here, please let me know.
FFMPEG
This is my preferred method for grabbing caps. If you aren't scared of the idea of opening your command line, this is absolutely the most efficient and versatile way to get source-resolution quality frame by frame screencaps.
TOOL TUTORIAL 4
Operating Systems: Mac, Windows, and Linux
Interface type: Command Line (CLI).
Difficulty: Even if it's your first ever script, I think you can do it! I have a template for you and an example in the linked tutorial and I believe in you! :D
Input: Video files of any extension.
SCREENTOGIF
If you're on Windows, this is a nice, intuitive way to get frame by frame caps. However, note that the resolution of your caps will be limited by the resolution of your computer screen.
Operating Systems: Windows
Interface type: Graphic User (GUI)
Difficulty: Easy (for batch capping)
Input: Any video you can open and screencapture.
VLC MEDIA PLAYER
VLC has a function that can automate frame by frame screencapping, but to be honest, I have had difficulties getting it to work properly. However, you can also screencap manually frame by frame in VLC with hot keys.
EXTERNAL TUTORIAL
Operating Systems: Windows, Mac, and many popular Linux distros (Debian, Ubuntu, Mint, ArchLinux, and more).
Interface type: Graphic User (GUI)
Difficulty: Easy (for batch capping)
Input: Any video you can open and screencapture.
NOTE for mac users: If you want to try the automated method, there is no section called "Preferences" in the Mac app. To reach the proper menus, in the top menu in VLC, click "VLC Media Player" > Settings > Video, then click the Show All button in the bottom left corner.
EZGIF.COM
Ezgif.com is a web-based GUI, so it can only accept a video file so large and is limited to a 20 FPS capture for 10 seconds at a time. However, if you have short clips or maybe a Youtube video you've downloaded, this is a good option.
TOOL TUTORIAL 5
Interface type: Web-Based Graphic User Interface (GUI)
Difficulty: Easy.
Operating Systems: Any. This is a free online tool.
Input: Any video clip under 100 MB. If you have a whole episode of TV, you'll have to clip to just the scene you want first to make your video file small enough to upload.

This section is for partial tutorials with one or more hurdles to being posted as a full tutorial (ex: not able to crop, not able to apply the same action to multiple frames at a time with ease, etc). If you want to pick up where I left off to troubleshoot/come up with workarounds (or maybe use the utilities that are available in a given tool to cover gaps in others) you're welcome to give it a whirl—and let me know if you make any headway!
UNFINISHED WORKFLOW 1 | LINK
Making GIFS with Autodesk Sketchbook
Operating systems: Mac and Windows
Needed software: Autodesk Sketchbook
Quality potential: High for non-recolored sets, but has various limitations to implementing coloring (even though some coloring options are supported) and also cropping.
Difficulty: Easy
Competencies: None.
ISSUES:
Can't crop frames in Flipbooks (you could crop externally with FFmpeg, GIMP, ezgif.com, Photoscape X).
Native text captioning options don't support outlining your text and have very limited drop shadow settings.
Limited FPS export options.
If you wanted to recolor your set, you'd have to do it one frame at a time in a very tedious way.

Let me know of any tools you think I should look into that aren't on this list!
✅ Tools I have tried + shared at least one tutorial.
🔄 Tools I am in the process of testing or have finished testing but have not shared a tutorial for yet.
☑️ Tools I am aware of but haven't tested yet.
GRAPHIC USER INTERFACE (GUI) TOOLS
DOWNLOADABLES
✅ DaVinci Resolve
✅ Gifski
✅ Giphy Capture
🔄 ScreenToGif | No tutorials yet
✅ Photoscape X
🔄 GIMP | WIP Testing | External tutorials available
✅ Autodesk Sketchbook | Unfinished Workflow
☑️ Blender
BROWSER-BASED
✅ Photopea.com
✅ Ezgif.com
COMMAND LINE (CLI) TOOLS
✅ FFmpeg
✅ Gifski
☑️ Image Magick
☑️ Gifsicle
39 notes
·
View notes
Text
TS4 CC not working despite installing correctly? Make sure Windows unblocked the file!
I've seen this a lot on some CC creators Patreons, where the person can't seem to get the CC working despite installing it correctly. If you're using Windows 10 or 11, it could be that Windows is blocking your downloads.
This is a security feature by Windows and AFAIK, you can't disable it but you can fix your downloads (including things you've already installed!). Though this is tedious, you only have to do this once per folder.
If you have CC that's in a zip/rar/compressed file, you can just do the first few steps on the zip/rar/compressed file and it was unblock everything within the zip file but ONLY if that file has the "unblock" notification seen in my screenshots.
You can't make things faster by tossing all of your CC into a zip/rar/compressed file and then unblocking it - you would have to use the Powershell command that's in part two of this.
A quick note: I'm using Windows 10 and a custom theme with custom-made cursors as well as custom-made taskbar and desktop icons, so my UI might look different than yours.
Read on, I have you covered in this super short tutorial.
PART ONE: UNBLOCKING SINGLE FILES.
When I download CC, I put my .package files into a folder on my desktop and name it Creator Name - Date, so that if I'm having trouble with my game being weird, I can do back and see what I last installed by looking for the date in the folder name. After I know this CC won't cause trouble, I'll just remove the date sometimes but usually I just leave it.
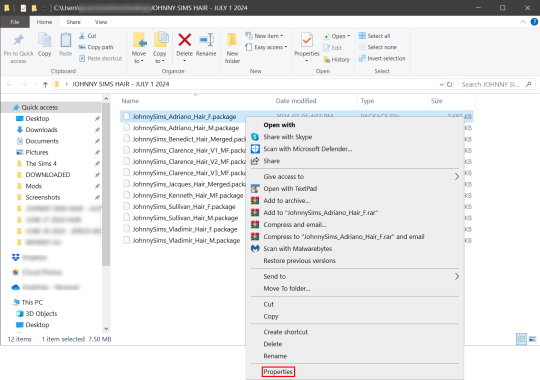
For this tutorial, we're going to assume your CC is in a folder like mine:

So, you can see I have a few Johnny Sims hair I've downloaded today. It's ready to go into my CC folder but first I need to 'unblock' it. Let's right-click the first file, "JohnnySims_Adriano_Hair_F.package" and left-click "properties".
Now you're going to have a new window come up with a message:
This file came from another computer and might be blocked to help protect this computer.
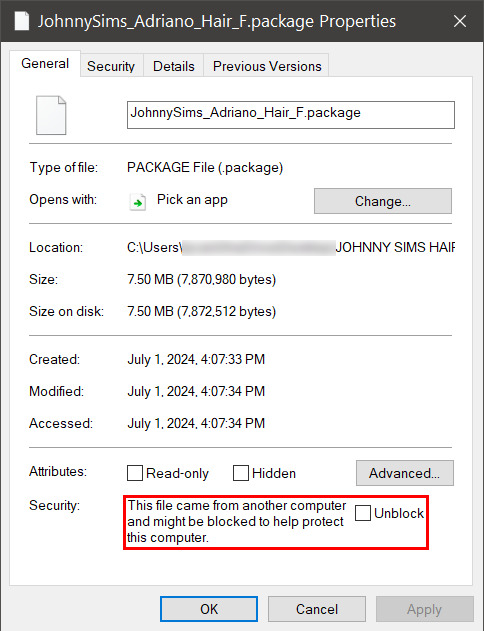
Click the checkbox (the square) next to the word Unblock that is to the right of the message, and then click "apply" and "okay". This window will now close. Do this for each of your .package files.
That's it! You're done and can now move your CC into your mods folder. You will have to do this each time you download new CC as Windows has this security feature on by default and it's not a good idea to disable it unless you really know what you are doing. It protects your computer from allowing harmful malware to run.
There is a command to use to unblock an entire folder in one go if you're wanting a quick means to do this, so read on for that.
PART TWO: UNBLOCKING AN ENTIRE FOLDER WITH WINDOWS POWERSHELL
If you want to unblock an entire CC folder, the easiest way is with a Windows PowerShell command. This requires you to be on an administrator account on your Windows machine, otherwise you will have to enter the administrator password or have some other means to bypass UAC.
I would recommend making a backup/copy of your mods folder and making a backup before doing this, as well, moving your mods folder to your desktop and executing this command there, rather than doing so within the Sims 4 folder.
You'll want to click "file" up on the top left of your CC folder, then hover over "Open Windows PowerShell":
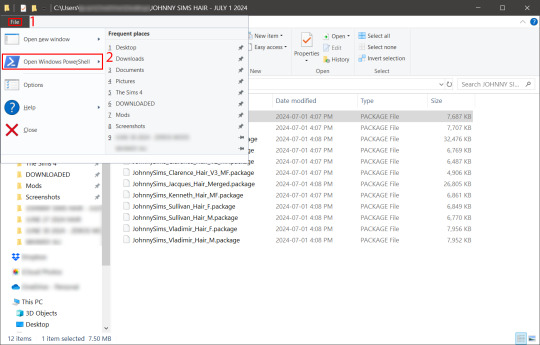
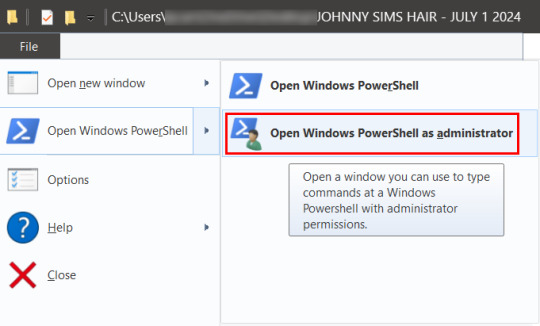
From there, a second menu should come out that gives two options: "Open Windows PowerShell" and "Open Windows PowerShell as administrator".
We want to click "Open Windows PowerShell as administrator":
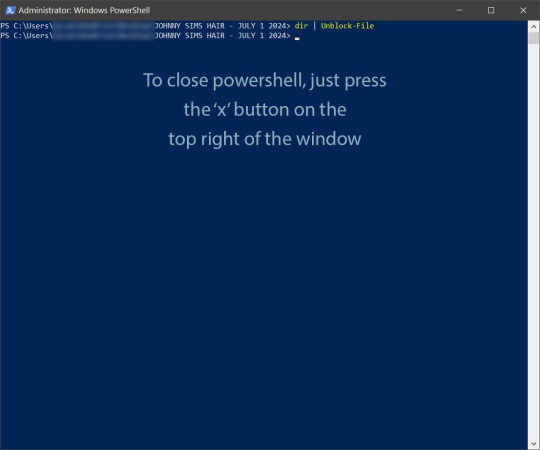
You'll have a command prompt-looking window pop up then. Mine is blue, yours may be a different color depending on if you have a different Windows theme or dark mode enabled (I do not have dark mode).
With this window open, you'll see that the directory listed is the one for your CC folder we were just in. Click at the end of the directory where the > is, and type: dir | Unblock-File (capitalization is important here, and for QWERTY keyboards, the | button is above the 'enter' key, you just have to use the 'shift' key while pressing it, otherwise you'll get a backslash):

Now hit 'enter'. You won't get any sort of message telling you the command has worked. If you get an error message, you typed something wrong. Just type correctly on the next line and hit 'enter' again.
If your user directory shows up like mine with a flashing cursor, that means Windows PowerShell is waiting for another command and you did it correctly. Close out of this window by clicking the 'x' on the top right of the window.
Check your CC by right-clicking any of the .package files as we did at the start, going to 'properties' and then making sure that message is gone:

See how it is blank under 'attributes'? The message is gone, meaning our CC is unblocked. Now we can move it into our mods folder and it should show up in the game.
If you have any questions, feel free to send me a message/ask and I'll do my best to help!
2 notes
·
View notes
Text
Exception Handling – Try Catch with Custom Error Message in PowerShell
1 note
·
View note
Text

Uses of PowerShell
Windows PowerShell is a command-line shell and associated scripting language created by Microsoft. PowerShell is both a scripting language and a command-line Shell. It can interact with a different number of technologies.
#powershell#powershellscript#powershellscripting#powershellscripts#powershellcommand#learnpowershell#powershelltutorial#tutorial#training#online#technology#tech#use#besttraininginstitute#traininginstitute#onlinetraining#coding#education#programming
0 notes
Text
For search results free of AI you can use startpage.com (which gives you Google results without sharing your data with Google and omits the AI answer at the top). You can also go into your internet settings and make startpage your "default search engine" so that you don't use Google.
Alteratively, you can install Firefox and then open the Firefox settings (top right of your screen opens a menu, go to "Add-ons and themes" and in the search bar type "uBlock origin". Ublock not only stops data tracking, it also has a feature that lets you block any field on a website you don't like permanently. That includes removing the AI results from Google (or from DuckDuckGo, who unfortunately are now giving AI results. AI results that I hide with uBlock).
---
When it comes to art, you will have to either find websites that block AI art (filter it out) like artstation or try your luck with tutorials online that teach you how to remove AI from your search results. Although again, if you are using Google Chrome, I recommend switching to Firefox and installing uBlock because Google harvests all your data and from that data they can learn how to circumvent your attempts at excising AI from your life.
---
When it comes to a desire not to train AI models, I assume you have 1 (or maybe 2?) accounts with Microsoft through which you access Word, Excel, PowerPoint, that kind of software. If you don't want to switch to alternatives (like LibreOffice, which can replace Word for some people), you can go to the top left corner of Word/Excel/PowerPoint and click "File" > then "Options" at the bottom > "Trust Center" (also at the bottom left) > "Trust Center Settings" > Privacy Options > Privacy Settings > make sure there is NO checkmark in "Turn on optional connected experiences" (this is what trains Microsoft's AI models with your data) > now click the "OK" button at the bottom until you close all the open windows.
Now restart any Office programs you might have open and it will permanently(!) apply that policy to your Microsoft account across all programs (although you may want to check it every time you reinstall the software or use it on a different computer, just in case and you definitely have to do it for every account you have with Microsoft).
Once you have Firefox, uBlock and Startpage (or DuckDuckGo), you can also look up guides for how to disable Microsoft Copilot using PowerShell. This will not only disable that AI permanently on your computer, but it also prevents Microsoft from making a copy of every moment you spend on your PC (including when your banking passwords are visible on screen).
---
As for job applications being screened via AI, the reality is that I can't fix that. I am unfortunately not an all-powerful deity. I guess we can organize protests and political pressure to stop businesses from doing this, but barring that I have nothing.
---
Hope this has been helpful in detoxifying your web experience and feel free to ask questions if something's unclear. All the best. :3 <3
I wish there was a way to completely OPT OUT of AI. Like you could set your ENTIRE Internet browser to NOT shove it down your throat.
When social media was getting big, you could just NOT get a Facebook or a Twitter. It was simple as that. You can't do that with AI.
Trying to find a job? It goes straight to an AI filter. Trying to look at art? Here's 100+ ai shit. Trying to look up who was in what movie from the 1980s? GOOGLE GEMINI IS HERE WITH THE COMPLETELY WRONG ANSWER!
Someone PLEASE create a way to allow people to get AI the FUCK OUT of our lives if we DO NOT WANT IT!
55K notes
·
View notes
Text
Certified DevSecOps Professional: Career Path, Salary & Skills
Introduction
As the demand for secure, agile software development continues to rise, the role of a Certified DevSecOps Professional has become critical in modern IT environments. Organizations today are rapidly adopting DevSecOps to shift security left in the software development lifecycle. This shift means security is no longer an afterthought—it is integrated from the beginning. Whether you're just exploring the DevSecOps tutorial for beginners or looking to level up with a professional certification, understanding the career landscape, salary potential, and required skills can help you plan your next move.
This comprehensive guide explores the journey of becoming a Certified DevSecOps Professional, the skills you'll need, the career opportunities available, and the average salary you can expect. Let’s dive into the practical and professional aspects that make DevSecOps one of the most in-demand IT specialties in 2025 and beyond.
What Is DevSecOps?
Integrating Security into DevOps
DevSecOps is the practice of integrating security into every phase of the DevOps pipeline. Traditional security processes often occur at the end of development, leading to delays and vulnerabilities. DevSecOps introduces security checks early in development, making applications more secure and compliant from the start.
The Goal of DevSecOps
The ultimate goal is to create a culture where development, security, and operations teams collaborate to deliver secure and high-quality software faster. DevSecOps emphasizes automation, continuous integration, continuous delivery (CI/CD), and proactive risk management.
Why Choose a Career as a Certified DevSecOps Professional?
High Demand and Job Security
The need for DevSecOps professionals is growing fast. According to a Cybersecurity Ventures report, there will be 3.5 million unfilled cybersecurity jobs globally by 2025. Many of these roles demand DevSecOps expertise.
Lucrative Salary Packages
Because of the specialized skill set required, DevSecOps professionals are among the highest-paid tech roles. Salaries can range from $110,000 to $180,000 annually depending on experience, location, and industry.
Career Versatility
This role opens up diverse paths such as:
Application Security Engineer
DevSecOps Architect
Cloud Security Engineer
Security Automation Engineer
Roles and Responsibilities of a DevSecOps Professional
Core Responsibilities
Integrate security tools and practices into CI/CD pipelines
Perform threat modeling and vulnerability scanning
Automate compliance and security policies
Conduct security code reviews
Monitor runtime environments for suspicious activities
Collaboration
A Certified DevSecOps Professional acts as a bridge between development, operations, and security teams. Strong communication skills are crucial to ensure secure, efficient, and fast software delivery.
Skills Required to Become a Certified DevSecOps Professional
Technical Skills
Scripting Languages: Bash, Python, or PowerShell
Configuration Management: Ansible, Chef, or Puppet
CI/CD Tools: Jenkins, GitLab CI, CircleCI
Containerization: Docker, Kubernetes
Security Tools: SonarQube, Checkmarx, OWASP ZAP, Aqua Security
Cloud Platforms: AWS, Azure, Google Cloud
Soft Skills
Problem-solving
Collaboration
Communication
Time Management
DevSecOps Tutorial for Beginners: A Step-by-Step Guide
Step 1: Understand the Basics of DevOps
Before diving into DevSecOps, make sure you're clear on DevOps principles, including CI/CD, infrastructure as code, and agile development.
Step 2: Learn Security Fundamentals
Study foundational cybersecurity concepts like threat modeling, encryption, authentication, and access control.
Step 3: Get Hands-On With Tools
Use open-source tools to practice integrating security into DevOps pipelines:
# Example: Running a static analysis scan with SonarQube
sonar-scanner \
-Dsonar.projectKey=myapp \
-Dsonar.sources=. \
-Dsonar.host.url=http://localhost:9000 \
-Dsonar.login=your_token
Step 4: Build Your Own Secure CI/CD Pipeline
Practice creating pipelines with Jenkins or GitLab CI that include steps for:
Static Code Analysis
Dependency Checking
Container Image Scanning
Step 5: Monitor and Respond
Set up tools like Prometheus and Grafana to monitor your applications and detect anomalies.
Certification Paths for DevSecOps
Popular Certifications
Certified DevSecOps Professional
Certified Kubernetes Security Specialist (CKS)
AWS Certified Security - Specialty
GIAC Cloud Security Automation (GCSA)
Exam Topics Typically Include:
Security in CI/CD
Secure Infrastructure as Code
Cloud-native Security Practices
Secure Coding Practices
Salary Outlook for DevSecOps Professionals
Salary by Experience
Entry-Level: $95,000 - $115,000
Mid-Level: $120,000 - $140,000
Senior-Level: $145,000 - $180,000+
Salary by Location
USA: Highest average salaries, especially in tech hubs like San Francisco, Austin, and New York.
India: ₹9 LPA to ₹30+ LPA depending on experience.
Europe: €70,000 - €120,000 depending on country.
Real-World Example: How Companies Use DevSecOps
Case Study: DevSecOps at a Fintech Startup
A fintech company integrated DevSecOps tools like Snyk, Jenkins, and Kubernetes to secure their microservices architecture. They reduced vulnerabilities by 60% in just three months while speeding up deployments by 40%.
Key Takeaways
Early threat detection saves time and cost
Automated pipelines improve consistency and compliance
Developers take ownership of code security
Challenges in DevSecOps and How to Overcome Them
Cultural Resistance
Solution: Conduct training and workshops to foster collaboration between teams.
Tool Integration
Solution: Choose tools that support REST APIs and offer strong documentation.
Skill Gaps
Solution: Continuous learning and upskilling through real-world projects and sandbox environments.
Career Roadmap: From Beginner to Expert
Beginner Level
Understand DevSecOps concepts
Explore basic tools and scripting
Start with a DevSecOps tutorial for beginners
Intermediate Level
Build and manage secure CI/CD pipelines
Gain practical experience with container security and cloud security
Advanced Level
Architect secure cloud infrastructure
Lead DevSecOps adoption in organizations
Mentor junior engineers
Conclusion
The future of software development is secure, agile, and automated—and that means DevSecOps. Becoming a Certified DevSecOps Professional offers not only job security and high salaries but also the chance to play a vital role in creating safer digital ecosystems. Whether you’re following a DevSecOps tutorial for beginners or advancing into certification prep, this career path is both rewarding and future-proof.
Take the first step today: Start learning, start practicing, and aim for certification!
1 note
·
View note
Text
Microsoft Copilot Tutorial: Introduction to Copilot for Microsoft 365
youtube
In this YouTube video, Tarik Rukab introduces Microsoft Copilot, an AI tool integrated into Microsoft products. Copilot is available through Bing or via copilot.microsoft.com, offering a free version for everyday tasks like planning or recipe suggestions.
For enterprise use, it’s embedded into Microsoft 365, requiring a subscription to enhance productivity apps such as automating formula calculations in Excel and presentation creation in PowerPoint. Copilot is also integrated into Windows and various Microsoft security and analytics tools. Different versions of Copilot are accessed through specific URLs. Tarik provides a brief overview and hints at a demonstration of its capabilities.
The speaker then delves into Copilot’s functionalities, highlighting its ability to assist with tasks like creating images, planning vacations, and aiding in cooking or fitness routines. The demonstration focuses on deploying a virtual machine scale set on Azure, showcasing auto-scaling features that adjust web servers based on demand. The speaker details configurations such as resource groups, virtual networks, and security settings, emphasizing Copilot’s efficiency in automating script writing rather than manual coding, thus simplifying cloud management.
Next, the speaker demonstrates using Copilot to create a Powershell script for deploying an Azure virtual machine scale set with Windows Server 2022. Copilot generates the script syntax and prompts the user to replace placeholder values, streamlining the script creation process. Despite Copilot’s automation, the speaker stresses the importance of testing and debugging the scripts. Overall, the session highlights Copilot’s potential to simplify complex scripting tasks and improve productivity while allowing user customization.
1 note
·
View note
Text
As someone who works as IT in the real world, I cannot tell you how bloated Windows 10/11 are.
My recommendation for anyone who wants to improve their system and feels comfortable about it to run Windows 10 Debloater Powershell script that cleans up, disables, simplest, and stops all the crap, trackers, and memory hogs in the OS.
It does take a few steps to get going but the tutorial is pretty straight forward. Hit me up if you got questions.
i thought my laptop was on its last leg because it was running at six billion degrees and using 100% disk space* at all times and then i turned off shadows and some other windows effects and it was immediately cured. i just did the same to my roommate's computer and its performance issues were also immediately cured. okay. i guess.
so i guess if you have creaky freezy windows 10/11 try searching "advanced system settings", go to performance settings, and uncheck "show shadows under windows" and anything else you don't want. hope that helps someone else.
*yes sorry i mean usage i posted this before bed :( i do not mean the hard drive is full aaaaghhhh
224K notes
·
View notes
Text
Welcome to PowerShell Mastery!
Hello and welcome to my PowerShell blog! If you're here, chances are you're looking to dive into the world of automation, system administration, or just curious about PowerShell. You've come to the right place!
PowerShell is one of the most powerful tools available to system administrators, IT professionals, and anyone looking to automate repetitive tasks or manage their systems more efficiently. Whether you're a seasoned pro or just starting out, there’s always something new to learn with PowerShell.
What to Expect:
Here, you'll find a variety of content:
PowerShell Tips & Tricks – Quick and effective ways to get the most out of your PowerShell experience.
Scripts & Automation – Practical scripts to automate common tasks.
Troubleshooting & Best Practices – Insights into overcoming common PowerShell challenges and using best practices for clean, efficient code.
Learning Resources – Tutorials for beginners and intermediate users alike.
My Goal:
To provide easy-to-follow guides, scripts, and tips that will help you harness the full potential of PowerShell, whether you're managing servers, automating workflows, or exploring its versatility for the first time.
Let’s Get Started:
In my next post, I'll share a beginner-friendly script that you can use to automate a simple task – turning off inactive Windows user accounts. Stay tuned, and don’t forget to follow for more PowerShell magic! 💻✨
1 note
·
View note