#preprocessor
Explore tagged Tumblr posts
Visit Tumblr Blog
Explore Tumblr blogs with no restrictions, modern design and the best experience.
Last Seen Tumblr Blogs


Fun Fact
US Tumblr user growth rate is estimated to slow down to 4.1%.
Text
C++ / preprocessor
Hoy les traigo un tema heredado de C que nos permite pre procesar algunos temas antes de compilarlo. Espero les sea de utilidad y buen finde!
Bienvenidos sean a este post, hoy veremos un tema heredado de C. Los preprocessor son una serie de rutinas pensadas en dejar lista para ser compilados. Estos trabajan mediante directivas de preprocessor. Algunas ya las hemos visto: #include, #define, #pragma once. Si bien estas no representan instrucciones de programas, si son comandos para el preprocessor para indicarle que hacer con el codigo…
0 notes
Text
youtube
ESP32 project for beginners with esp32-s2 native usb as Virtual COM port (VCP) serial cdc class usb device preprocessor assing & check or filter max value of new usb vid pid with macros ESP32 Arduino Core: Create Custom USB VID & PID for CDC Serial VCP Class Device
#programming#how to#arduino#tutorials#esp32-s2#USB VID#CDC Serial#beginners#Virtual COM port#preprocessor#Youtube
0 notes
Text
C Preprocessor: Forcing More Scans
The basic idea of how the C preprocessor works is that it scans the token list for macros to expand, and after every expansion, it re-scans the result to see if anything else needs to be expanded.
Many of the more advanced C preprocessor tricks rely on this either implicitly, or explicitly force extra scans. Here's a simple brute force example of the latter:
#define SCAN1(...) __VA_ARGS__ #define SCAN4(...) SCAN1(SCAN1(SCAN1(SCAN1(__VA_ARGS__)))) #define SCAN16(...) SCAN4(SCAN4(SCAN4(SCAN4(__VA_ARGS__)))) #define SCAN64(...) SCAN16(SCAN16(SCAN16(SCAN16(__VA_ARGS__)))) #define SCAN256(...) SCAN64(SCAN64(SCAN64(SCAN64(__VA_ARGS__))))
If the preprocessor just sees "FOO", it will look for a macro named "FOO" and if so, it will replace it and then resume scanning from the beginning of the replacement - "re-scanning" the result of expanding FOO.
If it sees "SCAN1(FOO)", it will first try to expand FOO. Let's say FOO is a macro, so it's expanded and rescanned. So far the same. Then it will try to expand "SCAN1" with the result of expanding (and re-scanning) FOO. And then it will rescan everything starting from the result of replacing SCAN1, which includes the already replaced and re-scanned result of FOO. So it adds one more scan over the result of FOO.
Now what happens if the preprocessor sees SCAN1(SCAN1(FOO))? Well, it will try to expand the argument list of the outer SCAN1, which requires expanding the argument list of the inner SCAN1, so it expands FOO, and again if FOO was a macro then the result is rescanned, then it expands the inner SCAN1, then it resumes scanning from the start of the result of the inner SCAN1, then finally it expands the outer SCAN1, and again it resumes scanning from where the result of the outer SCAN1 starts.
So "SCAN256(X())" will force the preprocessor to scan and try expanding the result of "X()" 256 extra times.
To be clear, that's not enough by itself to recursively expand macros - if X() expands to "... X() ...", there is a separate protection involved that prevents the "X" token from expanding again, because it was the result of expanding a macro with the same name. (Online this is sometimes referred to as "X" being "painted blue", but I've never seen that terminology in the C standards themselves.) But forcing extra scans is part of how we trick the preprocessor into doing "recursive" macros, and the number of scans is what sets the upper limit on how many times our "recursive" macros can expand.
Personally, I dislike forcing more scans than needed, and I don't like being capped to some number of scans. Throwing a hard-coded "large enough" quantity at a problem where the actual need is variable is pretty crude engineering. But this is the simplest technique to get started with, and it's the best we have if we want to keep C-style argument list syntax, because the only way to automatically get just the number of scans needed also forces changing calls from "MY_MACRO(foo, bar, qux)" to "MY_MACRO((foo)(bar)(qux))".
4 notes
·
View notes
Text


This is one of the many presets born from me trying to make one to be my main one. So expect many more, I'll be sharing them all!
BIGGER BEFORE & AFTERS: O1 • O2 • O3
You'll find the download below the cut at the end of the post, some mandatory stuff is listed before.
Pictures taken on @theneighborhoodsave

1 — I'm using — Sunblind by @softerhaze and Even Better In-game Lighting Mod (Bright) by @northernsiberiawinds 2 — MANDATORY DOWNLOAD: The Moods MultiLUT by @pictureamoebae (Tbh a must even if you don't use my preset!)
To install amoebae's MultiLUT just open your GShade Control Panel > Installs > Open Custom Shaders & Textures Folder.
DO NOT copy the "reshade-shaders" from MultiLUT download. Instead open it and merge the "Shaders" and "Textures" folders from inside it with the ones from GShade's. — Here's a gyazo video showing what I mean!
You won't need to download Prod80's Framework as stated by amoebae, GShade already comes with all Prod80's shaders.
ADD THESE TO YOUR PREPROCESSOR DEFINITIONS:
SHORTCUTS LIST: (on/off is for what it is by default)
(on) Adaptative Fog — Numpad /
(off) Ambient Light — Alt + Numpad 7
(on) Bloom & Lens Flares — Numpad 7
(on) MXAO (Immerse) — Alt + Numpad 9
(off) More MXAOs (make it stronger) — Numpad 9
(off) Cinematic DOF (focus w/ mouse) — Alt + Numpad 8
(on) ADOF (auto-focus) — Numpad 8
(off) ReLight (if you have it...) — F6
PRO TIP: I always adjust the "BloomAndLensFlares" shader to my needs, which is where the magic of this preset lies. The settings I'm uploading it with may be too strong or too light for some cases, so it really depends on your shot. Just mess with the "fBloomThreshold" slider a bit and see what I mean and, if you're feeling confident, mess with the "fBloomAmount" altogether.
DOWNLOAD: PATREON (FREE)
#s4cc#s4gshade#s4reshade#sims 4#the sims 4#the sims 4 gshade#ts4cc#the sims 4 cc#cc finds#x#gshade#sims 4 cc#s4mm#ts4mm
1K notes
·
View notes
Text
57/100 Days of Code
Log 1
Finished up Custom Variables Properties in CSS. Now onto Browser Compatibility and then...procrastinating the Form section perhaps for many hours.. Perhaps not! I don't like forms. They are initially why I avoided the JS track in the first place. Validation, you scary!!
Log 2
Browser Compatibility done (thank you to Can I Use), and I fell down a rabbit hole on the guy's blog bc a photo he took of a Nasa Warehouse got used in Iron Man 1, lmao.
Taking a break before reading the articles assigned on Frameworks & Preprocessors. Those are a little dense for me right now. It's break time! 52% Done with Intermediate CSS & HTML!
Log 3
Just finished reading all the recommended articles on Preprocessors. I don't know that Odin will teach me SASS or LESS later, or Bootstrap or any of these other environments/tools, but I supremely hope that they will, since I already know a lot of CSS Fundamentals. For now, this entire section feels like they are dangling a carrot in front of me which I will never reach... Until I learn entirely on my own post-curriculum!!
56% Done and onto my least favorite thing in the world: Linking Forms up in order to correctly transmit their data!! I think I will pause for the day and look into getting a new video game. :)
0 notes
Text


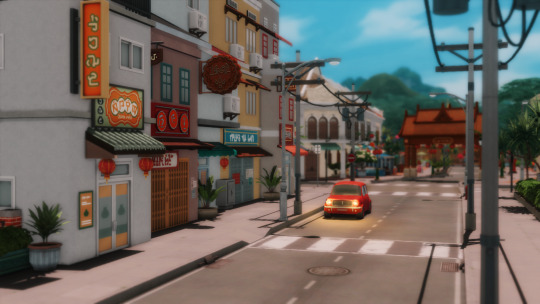


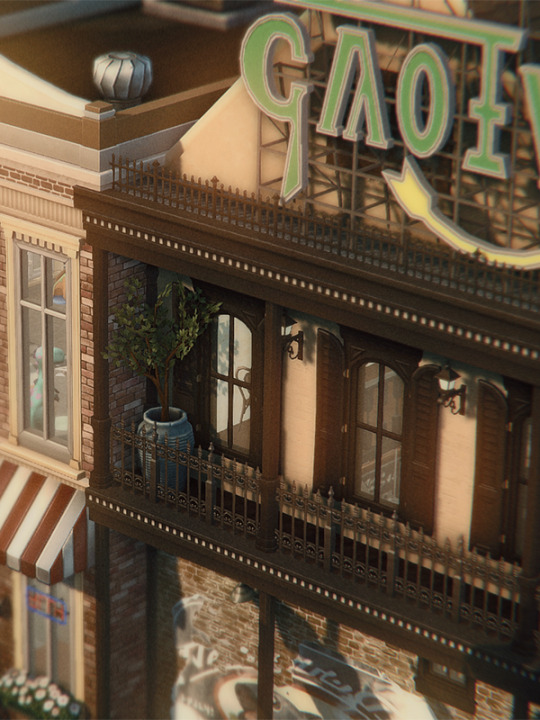
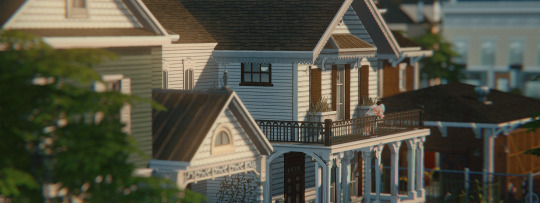
~urban haze~ reshade preset!
I've been using this preset on my twitch for a bit now, and i've finally gotten around to releasing it!! I'm very happy with it and I currently use it for everything😅
Urban haze has a focus on realistic lighting with a slight hazy and warm feel. Less blue in shadows, darker nights, deeper afternoon shadows, saturated sunsets, balanced greenery. Use it in any world, I've tested them all :)
__________________________________________
How to download:
♥ Download Reshade: (I use reshade 5.7.0, I can't say how this preset will behave with other versions of reshade, or G-shade.)
♥ During Reshade Installation, select The Sims 4, choose DirectX9 as the rendering API.
♥ Effect Packages to install: standard effects, sweetFX by CeeJay, qUINT by Marty McFly, color effects by prod80, and Legacy effects.
♥ Download urban haze below, drop it in your Sims 4 installation's "Bin" Folder
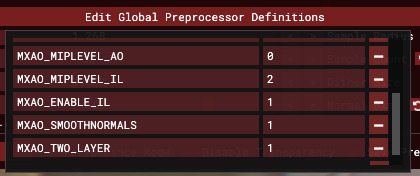
♥ Open the Sims 4, Disable edge-smoothing in your graphics settings if it's not already, In the reshade menu, set RESHADE_DEPTH_INPUT_IS_REVERSED= to 0 in global preprocessor definitions if it's not, and MXAO_TWO_LAYER= and MXAO_SMOOTHNORMALS= both to 1 in qUINT_mxao's preprocessor's definitions.
♥ If you're struggling with installation, I suggest you check out @kindlespice's installation tutorial! It was made for reshade 4.9.0 but the instructions remain the same.
__________________________________________
Notes:
♥ Both Depth of field shaders are off by default, you can enable them using their shortcuts: ctrl + Q (MagicDOF), ctrl + W (MartyMcFlyDOF) or enable them manually.
♥ MXAO.fx also has a shortcut (ctrl + R) bc sometimes the DOF blur makes the shadows weird, most of the time it's fine!
♥ Could potentially be gameplay friendly, depending on your GPU! The MXAO and DOF shaders will be the most performance heavy, feel free to adjust to your liking.
♥ The pictures above were taken with this preset and no further editing, but I do use a few lighting mods that will affect how my game looks:
♥ NoBlu by Luumia
♥ NoGlo by Luumia
♥ twinkle toes by softerhaze
URBAN HAZE RESHADE PRESET ↠ download on sim file share!
Follow me on twitch!
Support me on patreon!
TOU: do not redistribute, reupload, or claim my cc/CAS rooms/presets as your own! recolour/convert/otherwise alter for personal use OR upload with credit. (no paywalls)
1K notes
·
View notes
Text
re: prev post a few folks asked why i don't use a javascript preprocessor or compiler for my games and it's for several reasons! a big one is that i am not a professionally trained programmer so i didn't look into those (or have a need for them) until much later, and by that point my workflow and codebase were basically set! i'm also not a fan of what preprocessors spit out; i'm sure the code works fine but on my longer scripts it comes out all kinds of mangled with some odd things sprinkled here and there. my code is often atypical and tools of that sort have always had nasty surprises for me. i would much rather do it all by hand! another reason is that i'm very fond of the idea that you can just view my game's source and read the code exactly as i wrote it, which from what i can tell has been very handy for people wanting to mod the game or learn from the source code
490 notes
·
View notes
Text
just use c and get an over the barrel preprocessor experience you've never imagined
i don't wanna build a goddamn preprocessor pipeline i wanna get fucked in the ass until i see white is that so much to ask for
20 notes
·
View notes
Note
Opinions on Bython, Python with braces? It's a preprocessor that translates curly braces into whitespace.
https://pypi.org/project/Bython/
Or just properly indent your fucking code you godless piece of shit
297 notes
·
View notes
Text


senshi reshade 4.0 PATREON/FREE ALT DOWNLOAD/SFS
Hi everyone! I'm back with another version of my reshade preset! This is pretty much a super toned-down version of my previous presets, with only one version that should work perfectly in cas and in regular gameplay! There are toggles to disable/enable certain effects: - f9 disables comic/outline effect - f10 disables mxao/shadows - f11 enables adof/blur (I only use adof when taking screenshots in game, it should automatically be off when the preset is launched; otherwise, it will blur your game and cause lag) You can watch a tutorial on how to download this preset here! (This was for my previous preset but it should work the exact same way) FIXES FOR COMMON ISSUES WITH THE PRESET: If the outline effect isn't working - make sure you have edge smoothing disabled in the sims graphics settings. If the preset looks dark - make sure that the RESHADE_DEPTH_INPUT_IS_REVERSED is set to 0 in the global preprocessor defenitions on the reshade menu. If you have any questions please comment them down below and I'll try and awnser them asap for you! <;3 (THIS FILE IS COMPLETELY SAFE, IT MAY TELL YOUR COMPUTER THAT IT COULD BE HARMFUL BUT IT'S NOT!)
#sims 4#sims 4 cc#sims 4 reshade#ts4 reshade#reshade#reshade preset#ts4 reshade preset#the sims 4#ts4 gshade#sims 4 gshade#simsenshi#senshi reshade#sims4cc#ts4cc
2K notes
·
View notes
Text

Unaffected UI - ReShade
REST ini for TS3 (REST 32x v1.2.3)
What this does? This edited ini file from REST allows the UI in the game to be viewable while using ReShade presets.
I will be leaving this as is for now until REST has better compatibility with dxvk with a x32 version that shows up in the addons (if it does in the future), since dxvk is essential for ts3 in a way.


Installation:
Install ReShade normally for TS3, at least making sure it is 5.8+ in order to use REST (you may need to select TS3W.exe, dunno if it makes a difference vs selecting TS3.exe though).
Important!! - When selecting ReShade's addons, don't select ReshadeEffectShaderToggle as it won't work on 32x nicely. Download the specified version of REST from the creators github instead, which will be linked in the step below. This will save you some frustration.
2. Then download ReshadeEffectShaderToggle v1.2.3 (release.zip file, Important!!), placing the content inside (step 3) it in the games bin folder. (There are other versions that work nicely with 32x version of ReShade but this one plays more nicely with shaders in the game. I will test to see at later dates to find one that works nicer if possible. [I don't think the version you use matters too much but v1.3.0 works I believe as well])
3. Place only the file "ReshadeEffectShaderToggler.addon32" in your games bin folder where you downloaded ReShade to. If you are on GShade and it's ReShade v5.0+ Equivalent (5.8+ required for REST v1.2.3), place it into your addons folder.
4. Download the addon .ini file here that's edited for ts3
sfs <- download
5. Then place "ReshadeEffectShaderToggler.ini" (The file from this post/sfs) into the same place as "ReshadeEffectShaderToggler.addon32"
This version of GShade v3.5 doesn't work with REST unless a version is made by someone for it (This goes for the regular GShade equivalent and older version of GShades). I don't recommend using official verions of GShade, especially the newer ones.
In-Game:
Make sure that anti-aliasing/edge smoothing is disabled in the in-game setting or Reshade effects will turn off with the REST ini after loading a save ( most likely the REST toggle shader I enabled is tied to the anti-aliasing shader of ts3).
Setting Up ReShade Properly & Enabling REST:
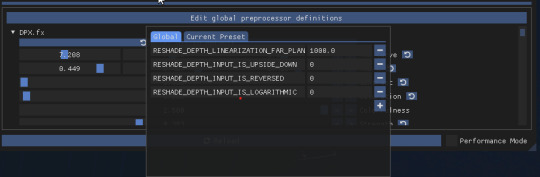
In the global preprocessor definitions, set it to look exactly like this in order to get ambient occlusion and etc. working properly. vvv
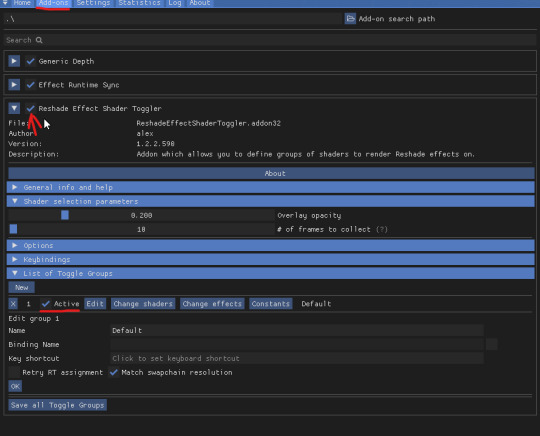
2. go into the "Add-ons" tab of ReShade, ticking ReShade Effect Shader Toggler on and then making sure the Toggle Group 1 or "TS3 Pixel Shaders" on the left, is activated.
Something Neat:
When hiding the UI with "F10" the shader toggle group doesn't affect that part of the game and your ReShade/GShade preset should be back to normal. (Tested on REST v1.3.0 I believe)
Downsides (Not REST's fault):
Existing Presets will need to be tweaked back to original form.
Some shaders may not work properly (maybe more than some dunno).
If you want to use existing presets without them looking wrong, you can disable the Toggle Group at anytime (one you activated in above picture).
Compatibility:
REST doesn't work properly with dxvk. It could also be the latest version of REST I tested which doesn't show up in the addons in-game, or the specific version in their github I linked to, which isn't working properly (shaders do show up in toggle groups though but that's as far as it works correctly).
References Used:
Clear UI by vyxated
Tutorial by Redronn
More by Me:
FO4 Version by me
Credits:
4lex4nder for creating ReShadeEffectShaderToggler
Frans Bouma for creating ShaderToggler
ReShade & ReShade Community
Clear UI by vyxated as reference
Tutorial by Redronn as reference
Affinity Photo & Designer for Title & Text Images
242 notes
·
View notes
Text
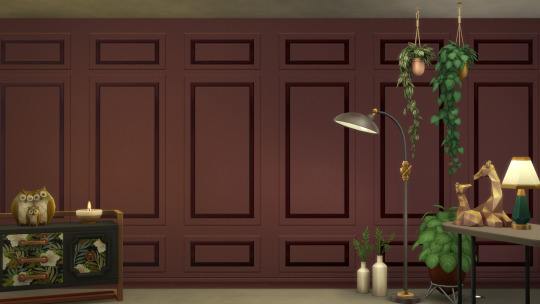

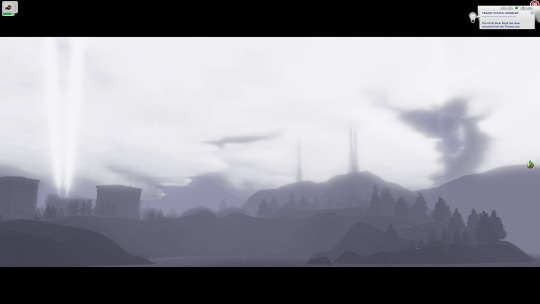
L = no ReShade; R = ReShade inc. ReLight
Quick little shader highlight for you.
You've maybe heard me talk about the Nice Guy Lamps shader before, which lets you add spotlights and create shadows. It's a nifty little shader but it's not very precise, and the shadows suffer from jitter and noise.
Enter ReLight by Marty McFly. ReLight is a fancy and more polished alternative to NG Lamps. The shadows are far better quality, and the lights are easier to position and edit. You can theoretically add as many as you want by editing the preprocessor definitions, but to begin with there are (iirc) two for you to play with. I've set it to four, and haven't felt like I've needed more than that so far.
In the picture on the right I've used three lights, each by the light sources in the room to simulate actual light being emitted from them. The two lamps on the right have a warm neutral light, and the candle on the left has a warm orange light. I positioned them so they sat exactly where the source would be. So, for example, for the floor lamp I positioned the light right up inside the dome of the shade, and you can see shadows being cast by the shade and light only coming down where it would physically be able to fall.
You can also use ReLight to add lights to portraits, making them really dramatic with different colours on each side of the face, or just to brighten the character so you can see their features more clearly. Below is a screenshot I took in Baldur's Gate 3 where I added blue light to the left and warmer light to the right.

It's such a handy little shader that can help add both realism and a hefty dose of drama to a scene. You need to feel confident tweaking shader settings to use it, and have to edit it for every single shot because the lights stay static in relation to the screen coordinates, so you'll have to move them where you want them each time. It's easy to do though, and lots of fun.
ReLight is one of Marty's premium shaders, which means you'd need to subscribe to his Patreon to get access to it. It's not currently listed in any of his tiers because he stopped working on it in favour of other things, but it works well and is probably my favourite shader at the moment. I'm yet to set up a shot that can't benefit from it in one way or another. If you are interested in using ReLight, you need to sub to the Path Tracers tier. You can cancel your subscription once you've grabbed it from his discord server, but you won't get access to any updates until you resub (it hasn't been updated in a long time though, so I wouldn't worry too much about that).
Paying for shaders is something that doesn't sit well with some people, and that's fair. I would only recommend getting this if you're enough of an enthusiast that spending 30 minutes setting up one shot is your idea of fun (not that ReLight takes that long, it can take just seconds sometimes).
369 notes
·
View notes
Note
Trick or treat!!
Hi Julia! :) For you I have this snippet of C++ preprocessor directives I wrote sometime in 2018

42 notes
·
View notes
Text
Tailwind’s @apply Feature is Better Than it Sounds
New Post has been published on https://thedigitalinsider.com/tailwinds-apply-feature-is-better-than-it-sounds/
Tailwind’s @apply Feature is Better Than it Sounds

By this point, it’s not a secret to most people that I like Tailwind.
But, unknown to many people (who often jump to conclusions when you mention Tailwind), I don’t like vanilla Tailwind. In fact, I find most of it horrible and I shall refrain from saying further unkind words about it.
But I recognize and see that Tailwind’s methodology has merits — lots of them, in fact — and they go a long way to making your styles more maintainable and performant.
Today, I want to explore one of these merit-producing features that has been severely undersold — Tailwind’s @apply feature.
What @apply does
Tailwind’s @apply features lets you “apply” (or simply put, copy-and-paste) a Tailwind utility into your CSS.
Most of the time, people showcase Tailwind’s @apply feature with one of Tailwind’s single-property utilities (which changes a single CSS declaration). When showcased this way, @apply doesn’t sound promising at all. It sounds downright stupid. So obviously, nobody wants to use it.
/* Input */ .selector @apply p-4; /* Output */ .selector padding: 1rem;
To make it worse, Adam Wathan recommends against using @apply, so the uptake couldn’t be worse.
Confession: The `apply` feature in Tailwind basically only exists to trick people who are put off by long lists of classes into trying the framework.
You should almost never use it 😬
Reuse your utility-littered HTML instead.https://t.co/x6y4ksDwrt
— Adam Wathan (@adamwathan) February 9, 2020
Personally, I think Tailwind’s @apply feature is better than described.
Tailwind’s @apply is like Sass’s @includes
If you have been around during the time where Sass is the dominant CSS processing tool, you’ve probably heard of Sass mixins. They are blocks of code that you can make — in advance — to copy-paste into the rest of your code.
To create a mixin, you use @mixin
To use a mixin, you use @includes
// Defining the mixin @mixin some-mixin() color: red; background: blue; // Using the mixin .selector @include some-mixin(); /* Output */ .selector color: red; background: blue;
Tailwind’s @apply feature works the same way. You can define Tailwind utilities in advance and use them later in your code.
/* Defining the utility */ @utility some-utility color: red; background: blue; /* Applying the utility */ .selector @apply some-utility; /* Output */ .selector color: red; background: blue;
Tailwind utilities are much better than Sass mixins
Tailwind’s utilities can be used directly in the HTML, so you don’t have to write a CSS rule for it to work.
@utility some-utility color: red; background: blue;
<div class="some-utility">...</div>
On the contrary, for Sass mixins, you need to create an extra selector to house your @includes before using them in the HTML. That’s one extra step. Many of these extra steps add up to a lot.
@mixin some-mixin() color: red; background: blue; .selector @include some-mixin(); /* Output */ .selector color: red; background: blue;
<div class="selector">...</div>
Tailwind’s utilities can also be used with their responsive variants. This unlocks media queries straight in the HTML and can be a superpower for creating responsive layouts.
<div class="utility1 md:utility2">…</div>
A simple and practical example
One of my favorite — and most easily understood — examples of all time is a combination of two utilities that I’ve built for Splendid Layouts (a part of Splendid Labz):
vertical: makes a vertical layout
horizontal: makes a horizontal layout
Defining these two utilities is easy.
For vertical, we can use flexbox with flex-direction set to column.
For horizontal, we use flexbox with flex-direction set to row.
@utility horizontal display: flex; flex-direction: row; gap: 1rem; @utility vertical display: flex; flex-direction: column; gap: 1rem;
After defining these utilities, we can use them directly inside the HTML. So, if we want to create a vertical layout on mobile and a horizontal one on tablet or desktop, we can use the following classes:
<div class="vertical sm:horizontal">...</div>
For those who are new to Tailwind, sm: here is a breakpoint variant that tells Tailwind to activate a class when it goes beyond a certain breakpoint. By default, sm is set to 640px, so the above HTML produces a vertical layout on mobile, then switches to a horizontal layout at 640px.
If you prefer traditional CSS over composing classes like the example above, you can treat @apply like Sass @includes and use them directly in your CSS.
<div class="your-layout">...</div>
.your-layout @apply vertical; @media (width >= 640px) @apply horizontal;
The beautiful part about both of these approaches is you can immediately see what’s happening with your layout — in plain English — without parsing code through a CSS lens. This means faster recognition and more maintainable code in the long run.
Tailwind’s utilities are a little less powerful compared to Sass mixins
Sass mixins are more powerful than Tailwind utilities because:
They let you use multiple variables.
They let you use other Sass features like @if and @for loops.
@mixin avatar($size, $circle: false) width: $size; height: $size; @if $circle border-radius: math.div($size, 2);
On the other hand, Tailwind utilities don’t have these powers. At the very maximum, Tailwind can let you take in one variable through their functional utilities.
/* Tailwind Functional Utility */ @utility tab-* tab-size: --value(--tab-size-*);
Fortunately, we’re not affected by this “lack of power” much because we can take advantage of all modern CSS improvements — including CSS variables. This gives you a ton of room to create very useful utilities.
Let’s go through another example
A second example I often like to showcase is the grid-simple utility that lets you create grids with CSS Grid easily.
We can declare a simple example here:
@utility grid-simple display: grid; grid-template-columns: repeat(var(--cols), minmax(0, 1fr)); gap: var(--gap, 1rem);
By doing this, we have effectively created a reusable CSS grid (and we no longer have to manually declare minmax everywhere).
After we have defined this utility, we can use Tailwind’s arbitrary properties to adjust the number of columns on the fly.
<div class="grid-simple [--cols:3]"> <div class="item">...</div> <div class="item">...</div> <div class="item">...</div> </div>
To make the grid responsive, we can add Tailwind’s responsive variants with arbitrary properties so we only set --cols:3 on a larger breakpoint.
<div class="grid-simple sm:[--cols:3]"> <div class="item">...</div> <div class="item">...</div> <div class="item">...</div> </div>
This makes your layouts very declarative. You can immediately tell what’s going on when you read the HTML.
Now, on the other hand, if you’re uncomfortable with too much Tailwind magic, you can always use @apply to copy-paste the utility into your CSS. This way, you don’t have to bother writing repeat and minmax declarations every time you need a grid that grid-simple can create.
.your-layout @apply grid-simple; @media (width >= 640px) --cols: 3;
<div class="your-layout"> ... </div>
By the way, using @apply this way is surprisingly useful for creating complex layouts! But that seems out of scope for this article so I’ll be happy to show you an example another day.
Wrapping up
Tailwind’s utilities are very powerful by themselves, but they’re even more powerful if you allow yourself to use @apply (and allow yourself to detach from traditional Tailwind advice). By doing this, you gain access to Tailwind as a tool instead of it being a dogmatic approach.
To make Tailwind’s utilities even more powerful, you might want to consider building utilities that can help you create layouts and nice visual effects quickly and easily.
I’ve built a handful of these utilities for Splendid Labz and I’m happy to share them with you if you’re interested! Just check out Splendid Layouts to see a subset of the utilities I’ve prepared.
By the way, the utilities I showed you above are watered-down versions of the actual ones I’m using in Splendid Labz.
One more note: When writing this, Splendid Layouts work with Tailwind 3, not Tailwind 4. I’m working on a release soon, so sign up for updates if you’re interested!
#ADD#Advice#approach#Article#Articles#avatar#background#Blue#border#border-radius#Building#classes#code#Color#columns#CSS#CSS Grid#css preprocessors#desktop#direction#display#easy#effects#English#Features#framework#gap#grid#grid-template-columns#grids
0 notes
Text

Avisynth Basics - Resizing and Sharpening for Gifs
Prerequisites
Avisynth (Wikipedia)
How to Use Avisynth For Gif Making by MichieTuts
Installing Avisynth by brandinator
Tumblr Dashboard Image Display Sizes by Unwrapping Tumblr
This post details my process for using Avisynth to resize a video file. The video file can then be edited and converted to a gif.
I learned how to use Avisynth through the posts linked above. I highly recommend reading through them; they're very detailed and easy to follow. By comparison, this is a basic guide as it only offers one method for using Avisynth.
In this post, I cover the following:
Why use Avisynth?
Using Avisynth to resize a video clip
This post assumes that you've already installed Avisynth.

💡 Why use Avisynth?
Avisynth is a frameserver that takes a video file as input and resizes it for editing. The width of a Tumblr post is 540 pixels (px); with Avisynth, we can resize video files so that they fit that criteria. (For context, a 1080p (HD) YouTube video is 1920 x 1080 px.)
While Photoshop is able to resize images (Image > Image Size), it's not as accurate as Avisynth is.
Here are two gifs that have been resized through different software:


The difference is subtle, but the left gif (Avisynth) appears more detailed to me!
However, please note that I didn't run any Photoshop sharpening on the right gif. When learning how to resize and sharpen gifs in Photoshop, I followed rubyredwisp's Gif Sharpening Tutorial.
🎥 Using Avisynth to resize a video clip
The following steps detail how I use Avisynth to resize videos. The final product, an .avi file, can be imported into your editor (eg. Photoshop) and edited there.
① Choose a video file that you'd like to gif.
For the purpose of this tutorial, I work with a screenrecording that I took of Dragon Age 2.

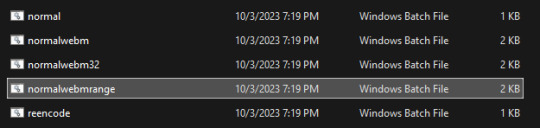
② Navigate to your Avisynth folder and locate the normalwebmrange script.
This may differ depending on how you installed Avisynth, but my Avisynth folder is located at \This PC\Windows (:C)\video.
normalwebmrange is a Windows batch file (.bat). I use this particular script because it allows you to clip out a few seconds of the video by specifying the start and end timestamps. These timestamps specify the video clip that will become your gif(s).
I recommend working with video clips that are 4-8 seconds long.
ⓘ This means that you may need to load your video file back into normalwebmrange to make a gif in a new timestamp range. While inconvenient, I recommend working with smaller video clips so that you're asking Avisynth to process multiple small videos rather than one large video. A larger video is more likely to crash the software.
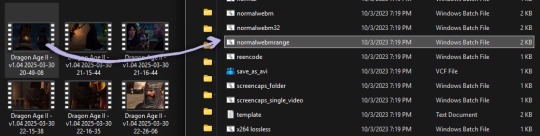
③ Load the video file into normalwebmrange.
To do so, select and drag your video file into normalwebmrange.
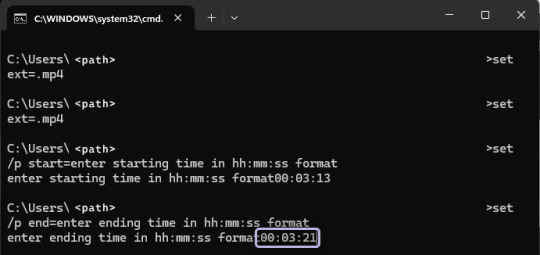
④ Enter the timestamps of the portion of the video you want to clip out.
A pop-up window will appear that asks you for the "starting time in hh:mm:ss format."
For this example, I want my gif to start at about 3 minutes and 13 seconds into my video file. My start timestamp is therefore 00:03:13.
Enter this information, then hit the Enter key.
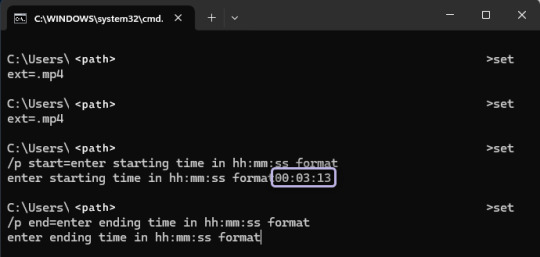
Next, enter the "ending time in hh:mm:ss format." (For this example, my end timestamp is 00:03:21.) Hit the Enter key.
normalwebmrange will then generate a bunch of log lines. After, it will automatically open two things:
A tab in your computer's default web browser.
An Avisynth window.
⑤ Specify the resizing details for your gif.
Navigate to the browser tab that normalwebmrange opened. There are several fields for you to fill out here.

GIF Size - This is the width and height of your gif. For more details on Tumblr post sizes, see Tumblr Dashboard Image Display Sizes. After filling this out, you may have to adjust your video clip in the preview box (below the white textbox).
Opacity - Leave this value at 100.
Preprocessor - I always use qtgmc 30 slow for the framerate and debilinear sharpening. "30" refers to how many frames per second (fps) you want your gif to display; I find that the alternative, 60 fps, is overkill for Tumblr gifs. "Slow" means that Avisynth will take longer to process your video, but this results in better quality.
Extra Sharpening - I don't use this field, but feel free to experiment!
After filling out all of the fields, copy all of the text in the white textbox.
⑥ Enter the resizing information in Avisynth.
Navigate to the Avisynth window that normalwebmrange opened.
Paste the text you just copied on line 17:
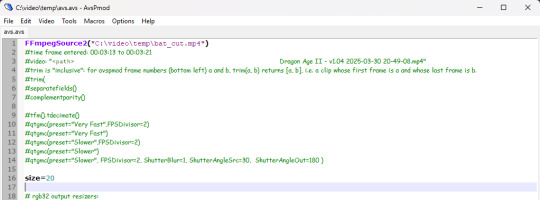
Your Avisynth window should now look something like this:

Select File > Save Script.
Close the Avisynth window.
This automatically launches another Avisynth window called VirtualDub. Here, you can watch Avisynth resize and sharpen your video clip in real time!
Once the VirtualDub window automatically closes, you'll know that your video clip has been fully processed and is now ready for editing.
? Where did my video clip save to? If you go back to your Avisynth folder (\This PC\Windows (:C)\video), open the \temp folder. The .avi file named "video" is your resized and sharpened video clip!
17 notes
·
View notes
Note
Hello, not the person who sent the origonal ask, but, PHP is a programming language
It used to stand for "Personal HomePage", which was bad, but got changed to the recursive initialism "PHP: Hypertext Preprocessor", which is worse
Its mascot is a elephant
biochemists are bad at naming things, and once i heard someone joke that the day we run out of 3-letter acronyms we will simply have to stop studying biochem. i think this name may be worse than most – if not all – biochemistry acronyms.
letter sequence in this ask matching protein-coding amino acids:
HellntthepersnwhsenttherignalasktPHPisaprgramminglangageItsedtstandfrPersnalHmePagewhichwasadtgtchangedttherecrsiveinitialismPHPHypertetPreprcessrwhichiswrseItsmasctisaelephant
protein guy analysis:
there are some interesting attempts at secondary structure here. now of course, interesting doesn't mean good, and the confidence of this structure is consistently bad throughout, but they are weird to look at. there are a few half-hearted attempts at alpha helices that don't even make a full turn. much more exciting to see though is a beta sheet, even if it is small, since those are much more rare on this page. it does look weirdly squiggly, but since this isn't real anyways i think we can just decide that it adds some whimsy. finally, there is a long hydrophilic tail at the back of the image, which i think is about exactly as expected.
predicted protein structure:

#science#biochemistry#biology#chemistry#stem#proteins#protein structure#science side of tumblr#protein asks#php
34 notes
·
View notes