#raspberry-pi
Explore tagged Tumblr posts
Visit Tumblr Blog
Explore Tumblr blogs with no restrictions, modern design and the best experience.
Last Seen Tumblr Blogs


Fun Fact
Tumblr.com is the 103rd most visited website in the world.
Text
PiMiga4 by Chris Edwards - How to install
Here is a cleaned-up and step-by-step guide for using the **PiMiga** image, based on the original notes by **Dr. Chris Edwards**, a well-known Amiga enthusiast and YouTuber. This version provides clear instructions for beginners while keeping the original project goals intact. — 🔧 How to Install and Use PiMiga **A modern Amiga experience on Raspberry Pi 4/400 or PC** — ## 📘 Introduction **What…
0 notes
Text
RN42 Bluetooth Module: A Comprehensive Guide
The RN42 Bluetooth module was developed by Microchip Technology. It’s designed to provide Bluetooth connectivity to devices and is commonly used in various applications, including wireless communication between devices.
Features Of RN42 Bluetooth Module
The RN42 Bluetooth module comes with several key features that make it suitable for various wireless communication applications. Here are the key features of the RN42 module:
Bluetooth Version:
The RN42 module is based on Bluetooth version 2.1 + EDR (Enhanced Data Rate).
Profiles:
Supports a range of Bluetooth profiles including Serial Port Profile (SPP), Human Interface Device (HID), Audio Gateway (AG), and others. The availability of profiles makes it versatile for different types of applications.
Frequency Range:
Operates in the 2.4 GHz ISM (Industrial, Scientific, and Medical) band, the standard frequency range for Bluetooth communication.
Data Rates:
Offers data rates of up to 3 Mbps, providing a balance between speed and power consumption.
Power Supply Voltage:
Operates with a power supply voltage in the range of 3.3V to 6V, making it compatible with a variety of power sources.
Low Power Consumption:
Designed for low power consumption, making it suitable for battery-powered applications and energy-efficient designs.
Antenna Options:
Provides options for both internal and external antennas, offering flexibility in design based on the specific requirements of the application.
Interface:
Utilizes a UART (Universal Asynchronous Receiver-Transmitter) interface for serial communication, facilitating easy integration with microcontrollers and other embedded systems.
Security Features:
Implements authentication and encryption mechanisms to ensure secure wireless communication.
Read More: RN42 Bluetooth Module
#rn42-bluetooth-module#bluetooth-module#rn42#bluetooth-low-energy#ble#microcontroller#arduino#raspberry-pi#embedded-systems#IoT#internet-of-things#wireless-communication#data-transmission#sensor-networking#wearable-technology#mobile-devices#smart-homes#industrial-automation#healthcare#automotive#aerospace#telecommunications#networking#security#software-development#hardware-engineering#electronics#electrical-engineering#computer-science#engineering
0 notes
Text


the computer blade | source
#i do not know enough about pi clusters to write ids for this post. apologies#talos gifs#stim gifs#stim#tech stim#technology#techcore#computers#raspberry pi#circuit boards#wires#cables#blinking lights#glow#plastic#black#gray#purple#pink#blue#green#cyberpunk#robotcore#robot stim
4K notes
·
View notes
Text

Happy Pi Day!!
#some pi-day themed bkdk art for all the fellow nerds and pie-lovers#bakudeku#bkdk#pi day#pi day 2025#mha#bnha#my hero academia#izuku midoriya#bakugo katsuki#btw it's probably raspberry for Deku's pie and peaches for Bakugo's pie#keefstars-mha
153 notes
·
View notes
Text

Homemade Mixed Berry Pop Tarts
#homemade#berries#poptarts#food#kids#dessert#pastry#hand pies#pie#purple#icing#recipe#sprinkles#stufed#fruit#baking#raspberry#breakfast#blueberry#blackberry#color#summer#girlversusdough
248 notes
·
View notes
Text

Clockwork uConsole CM4
#clockwork#raspberry#raspberry pi#coding#y2k#y2k aesthetic#y2k moodboard#tech#tech blog#cyberdeck#uConsole#cm4#clockwork uConsole
244 notes
·
View notes
Text


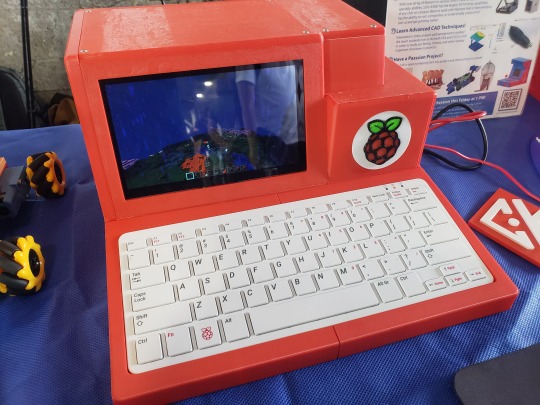
"The next time I design something, I'll leave extra room for wiring.", I lied to myself the last time I designed something.
Just a few more components to jam into my new handheld computer before I can wire it!
I call it the 'Grenade', because it looks a bit like a Grenade when you're holding it.
159 notes
·
View notes

Text

In 2016, a Comcast user frustrated with slow internet used a Raspberry Pi to tweet Comcast every hour. The bot checked speeds, and if they dropped below what was promised, it sent an automated tweet showing the results directly to Comcast.
100 notes
·
View notes
Text
Abandoned project to create a little mini theater using an old HP plotter and electromagnet connected to a raspberry pi. (Old Guy does stuff but doesn't always finish them.)
421 notes
·
View notes
Text
[Video Description: hands typing on a rainbow-lit clicky clacky keyboard, resting on the bottom half of an open black faux-leather clutch, the top half of which has a 4 inch-ish white e-paper screen and a Raspberry Pi module plugged into it. The keys clack and flash as they're typed, and the camera zooms in on the screen where it says "hello happy pi day!!! :D", as an excited and silly-deep voice offscreen says "It works!" End V.D]
I finally have q new-fangled typing machine! A ZeroWriter RasPi compiled together in a freebie handbag that one could say...came thru in a clutch...?
#😎#zerowriter#e-paper#e-ink#eink#writerdeck#raspberry pi#fun fun fun#writing#pi day#i need a new battery pack mine goes the wrong way so this is just plugged into a usb c outlet#and a much smaller keyboard#but it works!!#flashing warning
63 notes
·
View notes
Text
440 notes
·
View notes
Text
A4988 Pinout: A Comprehensive Guide
Discover the functionality and versatility of the Stepper Motor Driver Module A4988 Pinout, a crucial component in the world of robotics and automation. Let’s delve into the key details, with a specific focus on the A4988 pinout for a clearer understanding.
Stepper Motor Driver Module A4988
The A4988 is a stepper motor driver module that plays a pivotal role in controlling the precise movements of stepper motors. Whether you’re working on a 3D printer, CNC machine, or any other project requiring accurate motor control, the A4988 is a go-to choice.
A4988 Pinout Configuration
Understanding the A4988 pinout configuration is essential for effectively integrating the A4988 into your projects. Here’s a breakdown of the key pins:
MS1, MS2, MS3 (Microstep Resolution): These pins determine the microstep resolution, allowing you to set the stepping mode for the stepper motor. Configuring these pins enables fine-tuning of motor movement.
VMOT (Motor Power Supply Voltage): Connect this pin to the motor power supply voltage (typically 8V to 35V) to ensure the proper functioning of the stepper motor.
GND (Ground): Establish the ground connection by linking this pin to the ground of your power supply or microcontroller.
VDD (Logic Power Supply Voltage): Provide the logic power supply voltage (typically 3V to 5.5V) to this pin to power the internal logic circuitry of the A4988.
DIR (Direction Input): Control the direction of the stepper motor by connecting this pin to a digital output on your microcontroller.
STEP (Step Input): Trigger individual steps of the stepper motor by connecting this pin to another digital output on your microcontroller.
RESET (Reset Input): This pin resets the internal translator circuit, and it is optional to use.
SLEEP (Sleep Input): Putting the A4988 into sleep mode is achieved by connecting this pin to a digital high signal.
Read More: A4988 Pinout
#A4988#stepper-motor#microcontroller#Arduino#Raspberry-Pi#electronics#pinout#wiring#tutorial#DIY#project#hardware#software#programming#electronics-projects#microcontroller-projects#Arduino-projects#Raspberry-Pi-projects#open-source#maker#fabrication#prototyping#engineering#technology#innovation#learning#education
0 notes
Text
oh to have two girls stacked on top of you
51 notes
·
View notes
Text
i think its a failure of society and pc culture that "oh your computer just isnt powerful enough" is an acceptable answer to why someone cant run a game.
#teggxtpost#AND TO BE CLEAR!! IM SAYING THIS AS SOMEONE WITH A DECENT PC!!!!#EVERY GAME SHOULD BE ABLE TO RUN OFF A FUCKING RASPBERRY PI AND IM NOT JOKING.
49 notes
·
View notes
Text

Raspberry Champagne Pop-Tarts
#homemade#raspberry#champagne#poptarts#food#hand pies#pastry#pie#recipe#valentines day#new years#tw alcohol#berries#fruit#jam#glaze#thewoodandspoon
191 notes
·
View notes