#reshade help and some tips
Explore tagged Tumblr posts
Visit Tumblr Blog
Explore Tumblr blogs with no restrictions, modern design and the best experience.
Last Seen Tumblr Blogs


Fun Fact
Kazakhstan’s Minister of Communications and Informatics has blocked the Tumblr site because it contained 60 sites of terrorism, extremism, and pornography in 2015.
Note
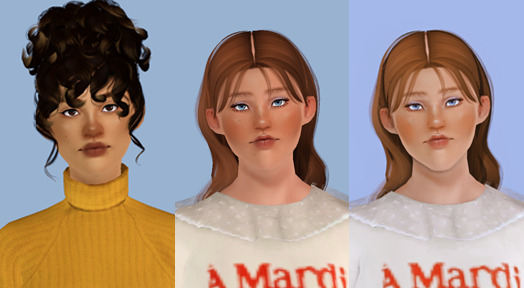
Hello!
Your game is absolutely beautiful. I was wondering if you use reshade or gshade? And if you do if you wouldn't mind sharing what preset you use.
Hi and thanks ❤
Here are some tips from me, reshade I use and some tips to get good photo. Also, I just learn how to use reshade recently and all my tips are "what's work" for my gameplay post.
Re-shade I use: Bojana Sims - Boho Reshade Preset
*they also explain how to use their reshade if u are beginner like me and also they already set the same setting that I use below and I just copy & tweak or play test the setting if needed.
Setting *(I'm using DX11)
I'm not only using reshade preset, I also using below to get the reshade work well. + my game graphic setting, I don't use ultra for graphic quality, I just use Custom and turn Edge smoothing to off.
IN GAME LIGHTING (NOGLO V2) ୨୧ (NOBLU V2)
MILK THISTLE BY SOFTERHAZE (HERE)
MIIKO CLOUD REPLACEMENT (HERE)
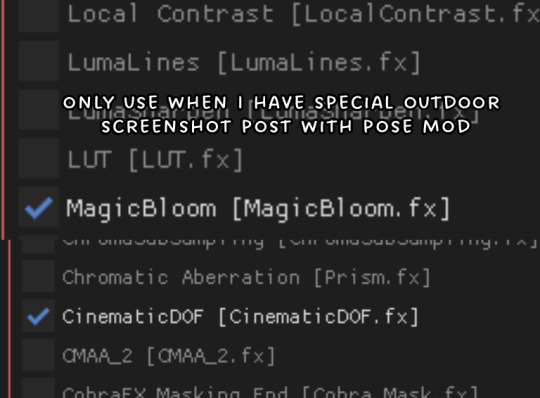
and last tips for taking good screenshot, indoor or outdoor using reshade or not (usually outdoor I use this method) :
For indoor (house or any lots) : I don't use yellow/orange light in my house or lots for lighting setting but for outdoor its just ok for me. I always use clear white light and use minimal lighting in my sims house. That why u will not seeing any chandelier or fancy lighting in sims house. and 1 more things since the rain in the house still a bug in the game, I use UI cheat to clear sky and wait until there's no rain happen. ( i did the same things for outdoor too)
For outdoor: I use to take my screenshot at a random sims time, sometime morning (its around 10 a.m), afternoon (2 p.m) or night (10 p.m. or 2 a.m) but I will make sure no rain by that time cause I just don't like it. Or If I don't have patience, I just cheat the time using UI.
and I don't really edit my gameplay post accept special post. All post are taken with reshade and here are my resource page for u to check what other stuff I use for my game other then reshade.
I'm still beginner and I don't really adjust my setting or changing my reshade and sometime I do ask my mutual for their tips. So if u need help or tips, feel free to ask. and keep in mind, everyone had their own preference of reshade or gshade preset, setting and not all of the setting work in your game but feel free to play around with difference preset until u found your love :)
that it's from me, and hope this tips help u and thanks a lot :)
#wcif#reshade help and some tips#thanks for the ask!#ask answered#the last tips are just extra from me in case u wonder how i get the screenshot look beautiful and clean#wcif tips
16 notes
·
View notes
Text

I was working on Gpose Tips, Tricks, and Resources before DT was released, but with DT came a lot of questions and little tutorials scattered around various social media sites. I've gathered what I can and put them into one spreadsheet! This resource has tutorials and tips on how to do various things in gpose (vanilla and modded), some general photography tutorials that can be applied to posing, and templates you've probably seen people use on social media :)
Of course, this list isn't all-inclusive, so if there is something you think needs to be added, feel free to message me here or on Bluesky. As a note, I try not to add Twitter links unless there's no other choice, because people are consistently taking their accounts down/making them private, making the tutorials unavailable.
Reshade shaders and mod links are very minimal on this, btw! Only because it's a slippery slope with keeping track and trying to figure out what to add. Searching the various mod sites will generally be more fruitful anyway :) (Reshade tips and tricks are not limited, just links to shaders themselves)
I will keep this updated as I see new stuff that will help!
494 notes
·
View notes
Text
How to take screenshots and edit (when it's just not your thing)

Alright-y!
So, I have over the years learned how to use reshade and to edit my pictures. I am really not a natural on these things, so this is very much to help others who are as aesthetically challenged as I am. I have to have certain "rules" to follow, because I can rarely just see if a picture will turn out well or not.
We all need to realize where I started. We're talking using FRAPS to take screenshots and then running holy colours batman! to get some sort of effect.
Now, I'm not one to buy fancy stuff and to pirate certain programs isn't really my thing either. So we mend and make do!
Also, I am by far very good at taking screenshots and edit, but I have learned things and hope that it might be useful for someone!
A word on light
One thing I've learned is to work with is light. Where the light is is where the focus will go. This doesn't mean that a person has to be in the spotlight, but if they aren't - try to make that a more conscious choice. I am no pro at this, but I have to say that some of my favorite screenshots are where the light is just good. It focuses the eye or it just give a vibe.


(and yes, for some reason all of my faves are of Agnes, which is a bit annoying since Amanda is my fav-character, lol)
This is also where reLight comes in handy. Yes, it's behind a paywall but there are ways that you will have to figure out yourself.
Great tutorial here on reLight by @pictureamoebae! (if you want to really understand reshade, do check out their tumblr. So many helpful tips and tricks!)


Posing
Posing is fun! I don't fully story-tell with my sims, most of it is gameplay. But I do like to pose for family pictures or to enhance something that is going on.
What you need is Andrew's Pose Player and Teleport Any Sim or Wicked Whims.
Now, I haven't figured out how to use WW for children and younger to pose, so I use both. And I like @ts4-poses to find poses. Eventually, you'll find your favorite creators and can follow them directly.


Angles and vibes
Here's a trick. Work with angles. I am a master of pictures with zero vibe, just a face. Those can be ok, and sometimes that's what you have - but try to angle your shot a little.
Or add clutter, focus on that and let something out of focus happen in the background.
Or just go higher, take the screenshot from above.
Or don't focus on your sim at all, focus on something else that adds to the story/post.


Take the screenshot
The light is good, the angle great, the poses are in place and now, we need to take the actual screenshots.
I am a huge fan of reshade, I use version 4.9.1 because that works for me and the presets I use. No need to update reshade unless it becomes too old.
It can be really difficult to to find a preset that you like. I mostly use birdie by @monasims, tawhay by @windslar and paperbacks by @literalite. But I have tried many.
I like this youtube-tutorial on how to make your own preset, which also helps if you wish to modify one that you've downloaded. I do always recommend learning how to use ADOF and CinematicDOF to help focus the image on what you want to capture. I also strongly recommend @pictureamoebae's Foundation.
To take pictures, use the tab-key to leave the UI behind and use Q and E to go down/up in your game and then the mouse to angle. I use print-screen to take my screenshot, but that's something you set up when installing reshade so that's different for everyone.
And now you have your screenshot and it's time to open an editing program. Cheap as I am, I open GIMP.
Let's edit!
I don't use many steps. Since I can't use fancy photoshop actions I have to make all the steps by myself and well - I am human and therefor lazy.
Resize and start to think of a post
First things first. I cut my pictures to work for the tumblr ratio. I actually don't resize them smaller anymore - because when I change layout on my tumblr I just feel as if it messes it up. Now, I don't have a huge screen and my screenshots aren't massive, so it's not necessary either.
My images will be 1017x1017, 1525 x 1017 or 678 x 1017.
Once this is done, I also try to look at how they will go together. If I want a post of just squares I need to have an even number of images. Sometimes I want a landscape image as a sort of heading, or one in the middle with squares around it. It depends on what I want to convey.
This is by no means something that comes natural to me - I am aesthetically challenged after all. Sometimes, I just have 5 images and have to make do.

Resized
Topaz Clean
Yup, it's awesome. No, it doesn't come with GIMP. Yes, there are ways to work around this. You will have to find those ways on your own.
But I have to say, it does makes wonder for the images. I have completely stolen @sojutrait 's settings because I really like her style and therefor - I copy. I have added a bit more sharpening, but otherwise it's completely hers.

Topaz Clean:ed
Curves
Curves my beloved! I use curves for two things! Take out the yellow (aka increase the blue) and to brighten/darken the image!
I do sometimes matte the image too and here's a good tutorial for GIMP users on how to use curves in GIMP (for a matte look)

Less yellow/more blue

Brighten the brights (but I did not brighten the darker parts)
Layers, curves and increase the light where needed
Now, remember that we need light? Sometimes, a screenshot just doesn't have the right light. So I duplicate the layer, use the free marking tool around what I wish was brighter and put that on a new layer.
Then I use curves to lighten the layer with what I want to brighten and to make darker the layer with what I want to put less focus on (here's an ok youtube video on the subject).
Below, you can see the effect on my images.


Sharpen
Pretty basic. I subtly sharpen the image again. Even if I use the sharpening in topaz clean I do like to add an extra touch before it's time to save and move on.

So sharp!
PSD and UI
I do like to use psd's now and then. I mainly use @windslar's psd-collections and @deathbypufferfish's Build-a-Sim Icon Pack.
It's mostly to help give some info about the post or when my sims age up and I want to show their traits.
I do use the UI-info sometimes. If I do, I go into Game Options in the game > Accessibility > UI-scale and just drag that up a bit. Then I copy/paste that part onto the image I'm using.


Done!
That's pretty much it. Thing is, to post good edits you have to actually take good screenshots. As annoying as it is, it's like cooking: it all comes down to the ingredients. I hate cooking Yes, editing does help but I think my main journey has been to learn to take better screenshots from the start.
The picture below is from resized to done.
Hope this might help someone! I will probably learn more and more as I continue to post, but this is where I am so far in my journey!
153 notes
·
View notes
Note
Hey! Hope you're having a lovely day! I was wondering if you could share how you take your in-game pictures? (or maybe if you have some tips on how to...) They always look really good!
Hey! Thank you! Hope you too :3
I think I could share some basis 🤔
1) Ultra settings only!
2) SRWE – is your best friend if you want to take high quality screenshots. Without it in-game screenshots are pretty blurry on the distance 😔
Here is the YouTube tutorial.
3) HQ mod? You don’t actually need it, SRWE and ultra settings are enough (especially for maxis match and maxis mix style).
4) You totally need to check out better in-game lighting mod by northernsiberiawinds! It’s really awesome! Escpecially for outdoor screenshots 🌻
5) ReShade and GShade are your friends too! I regret I ignored it before 😅 For now I'm using GShade.
Here is the YouTube tutorial.
6) For making outdoors screenshots I normally put my sims in the shadow areas. The lighting there is less bright and more smooth. I add shadows in the scene by just putting random tree with tool by tmex.

7) For in-door screenshots I highly recommend to use the achino lamps (only recently discovered that they are free now). They also make lighting much smoother and cooler.
srwe + ghade + achino lamps (click picture for better quality)
no srwe + no gshade / srwe + gshade (click pictures to feel the difference)

8) And don't hesitate to use diffents shadows, reflections for your sims to avoid adding them in photoshop or any editing program you use.
Here is some links: 1 | 2 | 3 | 4 | 5 | 6
Hope it helps 🤗
150 notes
·
View notes
Text
Some dumb sims 3 updates/stuf
Or, how to develop severe brain damage in 10 easy steps.

Sooo… This is going to be more of a blog post than anything of any real substance, more of a whinge with maybe a few teasers for some stuff I may or may not release (probably not). Feel free to skip if you're after hot tips or coherent writing.
Stutter "fixer"
Sooooo…. The sims 3 has some stutter issueeesss… Incredible discovery, I know! I started looking at remedying them with settings, found some hidden settings that help reduce some of the issues but that can only do so much when the game was made in 2009 for 2009 computers.
So I had a looky at some things I thought could be causing it, mainly WinAPI functions because that's the easier route (h-haha…), and started to try to "optimize" some of the more common ones:
ReadFile: Was the first, and looking at the sheer volume of like 12783972198 calls a milisecond every time you move the camera, I thought surely I can speed it up a little r-right. Not really. I tried all sorts of… interesting things, file caching in memory, implementing the overlapped flag (took ages), etc. Oh and the performance increase? Literally nothing. It's called weirdly from wherever it's called and so we must suffer.
Threads: So, I had a look at other areas that were potential targets for speedup, ran an actual profile and it showed a problem areas namely threads and some other stuff I don't remember. ZwWaitForMultipleObjects and WaitForSingleObject take up a lot of time, so I very poorly attempted to optimize them, adding some timeout optimizations (and a bunch of other failed attempts). Despite being the most insane, this actually worked, and I got like a 40% speed increase in a very very niche metric that did not noticeably effect the game one single bit. I plan to combine all my failures into a single script eventually, maybe once combined they'll do something…
Actual insanity - Memory IPC: Then I had an idea, everyone hates e12, why don't we shove the games memory into another process and that'll fix it. No brain moment. No clue what past me was thinking, for some reason I thought you could like, access another processes memory if it was spawned from it, but uhh.. no, that's not how things work… I tried a few other things in a similar vein but it just crashed and crashed, so for now I'm just gunna work on:
Alloc/free mee - Current insanity: Currently, I'm still working on VirtualAlloc and VirtualFree (which is what I was redirecting to another process), but more from an optimizing memory usage standpoint than a… whatever the IPC thing was. There's a lot of things to try, and I've had some luck in some areas and some abysmal failures in others. There's a few promising functions calling VirtualAlloc/Free that seem to be potentially pointing towards memory leaks (004e54d0), but I'm too dumb to investigate that. At the moment, I'm going mostly just gathering more logs which takes forever and hurts my brain real bad.. On testing there's like 180 allocs that we could probably yeet no problem, which is like 750mb saved… Maybe idk.
I have plenty of ideas for deduplication, memory pool implementations to reduce churn/fragmentation, shoving things aggressively into pagefiles if they're not being used, etc. etc. Basically, there's a lot of avenues to explore, and I feel like there's potential… though I've definitely said that before and been dead wrong so…
Anyway, rambling over. I plan to release a dumb little renderer settings mod maybe-soon-ish that'll let you do dumb stuff that might be useful for reshade like turn shadows/drop shadows off and post processing off and on. I guess I could add max lots and other settings eventually too since they're static values.... Might also do a mythbusting post for some performance "tweak" stuff I see thrown around that isn't super accurate but I also don't want people to be angry at me so maybe not.
Sorry to whoever read all this, but also thanks :)
322 notes
·
View notes
Text
Some tips for The Sims 3 Buy/Build
Install LazyDuchess’ Smooth Patch to alleviate lag, esp in Buy/Build and CAS.
Keep your CC merged and organized, esp your patterns, this will also alleviate a lotta lag across all modes.
When building on community lots, or any lot rlly, avoid going to the edit world menu, and just put testingcheats enabled into the cheat window, then shift+click the ground of the lot to enter Buy/Build mode. This makes leaving it to save a lot easier, with less “preparing” screens to possibly get hung up in.
Lower your settings, you don’t need any adjacent lots loaded, and you certainly don’t need super water on either. You can always switch these back on when you’re done.
While you’re at it, remove your HQ mod, and turn off your Reshade/Gshade preset, or at least turn off your depth shaders. I only ever turn on my depth shaders when I’m taking screenshots for better fps while playing. The DoF shader esp requires a lotta resources your game could be using to simulate all those 78 townie sims instead.
Save as… vs Save, I Save as… at least every third save. It’s also just good habit to keep backups.
When using the CASt tool, set down everything you plan to CASt first, then switch to a category like the wall tool to avoid eventual lag and drag when using it a lot. Love yourself. You don’t have to suffer using CASt tool in an overpopulated category like misc deco.
Utilize the clone option through testing cheats to duplicate already CASted objects, it’ll keep your design just like the dropper tool, but it’s a lot less time consuming, I promise.
Don’t be afraid to use the swatch save tool for objects you use often, esp community lot objects, as it helps to keep your aesthetic consistent. I also keep all of my favorite streetlamps, benches, and public trash bins etc in a convenient custom collection folder to speed up the process of doing multiple lots in one sitting. These handy tools are there, use them.
The issue with custom counters. They mess up sometimes, if you can’t recolor it suddenly, here’s how to fix that. Now if you can’t place down a cupboard suddenly, even though nothing’s in the way, and you’ve got moveobjects on activated, try putting it on the wall a tile over, and then try adding it to your desired spot again. Lastly if you set down counters or cupboards at a corner, and it messes up the textures, but you can still recolor it, you could do what the video I linked above does, or you could simply pull out the CASt tool, and switch it back to any of its original swatches and click the check, then feel free to recolor it as you want.
Railings will also do the “can’t recolor” trick too, but this is a simple fix, just delete it, and replace it, and you’re good.
“Oh no, I switched between buy and build mode, and now my catalogue won’t load, and I can’t click on anything at all!” Don’t panic, hit F2 and/or F3 on your keyboard, these are shortcuts for switching between them, and if you’re lucky it’ll load properly again. Should you get the bug where you load a category and it’s somehow empty, don’t fret, just click on a different category and this should fix it. Then if you get the bug where all the objects you put down disappear suddenly, sorry your game is haunted. Call an exorcist, or just reload, they might reappear if you do.
Tbh, if you run into any kind of major bugs, it’s likely a sign to either save immediately or just restart your game. These only ever show up when you’ve been at it a while ( at least for me ), therefore starting fresh wouldn’t hurt. Probably also wouldn’t hurt to check whether you might’ve installed something the game didn’t agree with by running Dashboard, or put it through the ol’ Save Cleaner.
Honorable Mention: Keep an eye on the texture sizes and poly counts of objects. I know it’s tempting to build these ultra hyperrealistic lots with clutter at every inch, but unless you’re just doing it for screenshots, or for your story, or using it very sparingly, it is not by any means recommended purely for gameplay. This is just the truth when it comes to any Sims game. You don’t want lag, or max memory crashes, or save errors? The Sims 3 is a 32bit game, that’s almost old enough to drive, be easy on it.
484 notes
·
View notes
Text

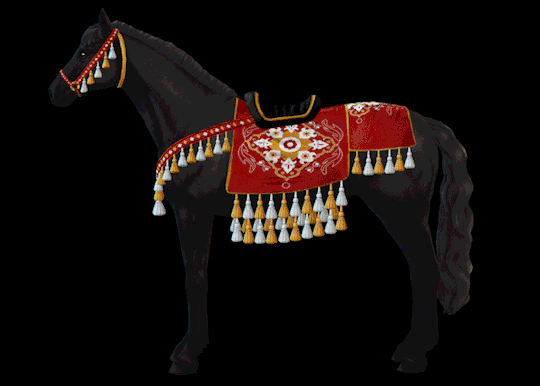
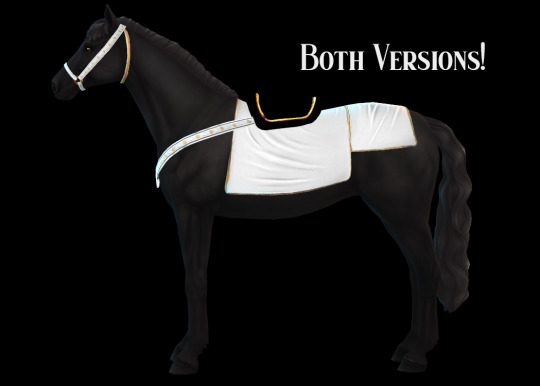
All the King's Horses - a recolor set
There's a decided lack of non-modern horse cc in the community, so when I saw @objuct's Traditional Arabain Set, I knew I needed to make some recolors.
Info: - Requires the meshes - Both versions included (tassels + no tassels) - Saddles have 25 swatches each, halters have 19 each. (There's a matching halter for every saddle, though!) - First few swatches are modifications of Objuct's swatches. The rest are all mine. - Previews are unedited, no reshade.
TOU: - Respect the original creator's TOU - Don't reupload behind a paywall or claim as your own - Basically, don't be an asshole
DOWNLOAD (patreon, free, no ads) | DOWNLOAD (google drive, no ads)
I'm never going to charge for my poses or cc, but if you'd like to help out an unemployed student, you can leave a tip at my ko-fi.
@ts4medieval
#ts4#the sims 4#ts4cc#sims 4 cc#ts4 horses#ts4 horse cc#ts4 recolor#sims 4 horses#sims 4 recolor#my dls#ts4 fantasy#sims 4 fantasy#ts4 fantasy cc#sims 4 fantasy cc#ts4 medieval#sims 4 medieval#hmm... now imagine if I made a matching recolor of some armor and named it ''all the king's men''#that would be something wouldn't it?
844 notes
·
View notes
Note
Do you have any recommendations for starting a story? Yours is so good and it really inspires me to try and make one of my own but idk where to start
Hmmm a tough question! I think we all just kinda start and learn as we go? It's the best way tbh.. if you look back at the beginning of most simblr stories they've usually come a long way! Here's a couple tips that I think might be handy tho...
Maybe we could start a thread and everyone could reblog this with their own tips?! 🤩
Decide if you want to build your own lots/sets or not. If you do you'll probs wanna start off with the main places you'll use that're full of personality, like a main characters house or place of work etc. you can always download some neat lots and edit them to your liking if you're not a builder, or maybe even download a whole save file!
Start a character page (or make an intro post for em if you can't be arsed with the technicalities) - not essential but useful for you and the readers to keep track of who's who and maybe state a few facts about them etc.
Start collecting some poses and ideally rename them so they're easy to find! I personally like to add smth like [PETS] or [KISSING] etc to mine (in s4s) in conjunction with twistedmexi's pose finder to make things easier to grab.
If you use reshade/gshade, taking the time to find or create a nice preset will save you a bunch of time editing.
For the love of god if you're gonna make a bunch of extras, try and dress them in maxis clothes/hair.. I'm so SICK of having to redress everyone every time I clear out a bunch of cc skjdksj 🙈 you can always give em an extra, fancy cc outfit for specific scenes on the day but yeah, do yourself a solid where possible to save time/pain in the future. Same goes for lots you don't use often, try and limit the cc you use!
Figure out if you're a planner or not! If you can't manage without a plan it's okay to take some time before starting to figure everything out and get a detailed outline going. If you're more of a pantser (like me!) you can always just get going with a rough idea in mind and see what happens!
If you're gonna go with the flow I'd still recommend creating at least a rough outline, you don't have to stick to it like glue but it'll probs help you stay on track and I wish I'd have done this in the beginning, esp if you're gonna have a plot heavy story.
Characters > plot.. (imo!) like.. you could have a super interesting plot in mind but if no one really knows or cares about your characters it's gonna have a limited impact/amount of interest. They don't even have to be likable lmao
Give your characters some flaws! It's fun and it makes them more relatable.
Start with a small cast - not a complete must but it'll be probably be easier for people to get to know your pixels if they're aren't a million of them right off the bat. You can always add more later.
Try not to shoehorn your characters into situations they wouldn't end up in just to further the plot.. a hard one to explain and mostly based on intuition but if a scene feels boring, out of place or forced, it probably is! aka.. be willing to kill your darlings. Maybe you've already established that your character is poor or smth but have this fun idea of a road trip montage or whatever.. like you can't just give them a car and the money to drive a million miles just cos you HAVE to see that scene y'know? Maybe they're gonna have to hitch hike, get the bus, or take out a loan? Probs a bad example but hopefully you get the idea! It can sometimes be more fun to force your characters into a different situation than you imagined anyway, like maybe they meet someone really neat on the bus and they join the trip, or maybe whoever they borrowed money from gets all pissy when they can't pay em back quick enough etc etc.
Let your characters guide you - sometimes characters talk to us! You could've had a whole storyline planned for them, or a romance of whatever, but when it comes down to it, it just doesn't feel right and that's okay! Let them lead you in a different direction now n' then.
Write for you! (ugh becca stfu with this shit) I know, I know but really.. if you're not having fun, what's the point? Don't write what you think other people want and learn to be okay with cutting ideas/scenes/characters/whatever! that you aren't excited about anymore. It should never feel like a chore to create, and if it starts to feel that way, take a break or change it up!
I feel like this is super rambly and I've missed a million obvious things but my brain is mashed potato rn lmao.. pls feel free to add your own tips in a reblog or a comment - everyone has a different take on things! I think it's really important just to start and see what feels natural tho 🤸♀️🧡
#ranswers#<3333333#story tips#??#idk how to tag this#my bio says it all u kno.. we're winging it here n have been from the start weeeeeee#i just daydream my sims into ✨situations✨ and then create them like 9/10 times#lmaoo
64 notes
·
View notes
Text
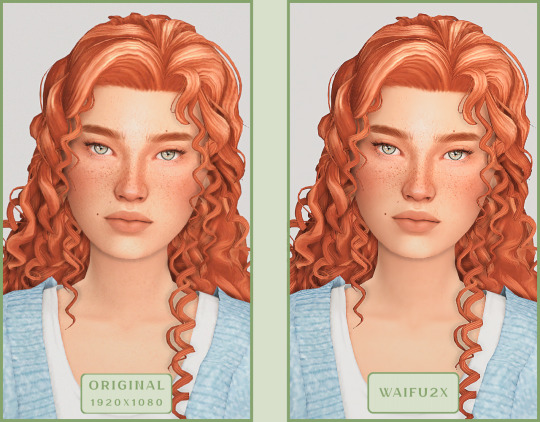
SRWE or AI? Best Ways to Upscale Sims 4 Screenshots
Are you also tired of seeing social media mercilessly crush your The Sims 4 screenshots? We’ve tried every trick in the book to keep our pics crisp – SRWE, AI upscalers, you name it – and now we’re ready to break down how to save your favorite sim’s photos from pixelation, quick and easy. In this article, we’ll explain (no tech jargon, promise!) what actually works, plus share our hands-on experience and top tips.
Your upscaling method depends heavily on the source image and the look you’re going for. We all have different ideas of what makes a sims beautiful – some love natural textures, even slight skin imperfections, while others prefer flawlessly smooth, hyper-sharp results.
We’ve tested different upscaling tools to help boost your screenshot quality. But to find your perfect match – the one that makes your shots look just right (by your standards!) – we recommend trying a few yourself.
You can enhance screenshots both before and after saving them! We’ve covered both approaches, so pick whichever suits you best.
Before Saving the Screenshot: SRWE (Simple Runtime Window Editor)
This tool is well-known in The Sims 4 community – there are tons of YouTube tutorials covering it. When it comes to improving image quality before taking a screenshot, SRWE is one of the first solutions that comes to mind.
It works by bypassing Windows' DPI scaling, allowing you to capture screenshots at a higher resolution without blurring.
Pros:
— A fantastic tool: it delivers the exact same image but in much better quality.
— No conflicts with GShade/ReShade: your presets will look exactly as intended.
— Free and easy to install, no hidden costs or complicated setup.
— No post-processing needed, preserves original texture and UI quality.
— No extra plugins or presets required, works right out of the box.
— Great performance even on low-end PCs. If your computer can run GShade, SRWE will work just fine.
Cons:
— Limited functionality.
— Some users find SRWE a bit tricky to set up (though we personally disagree).
Now, let’s break down how to use it and what results to expect.
If you prefer a video guide, check out this link for a detailed walkthrough by Chii.
Step 1
First things first – you'll need to download the program itself. It's available for free on GitHub – you can grab it here.
There's no real benefit to getting the version with pre-configured profiles, so just download the standard version without profiles.
Step 2
Extract the files from the archive.
It doesn’t matter where you store them on your computer – it won’t affect how the program works.
Step 3
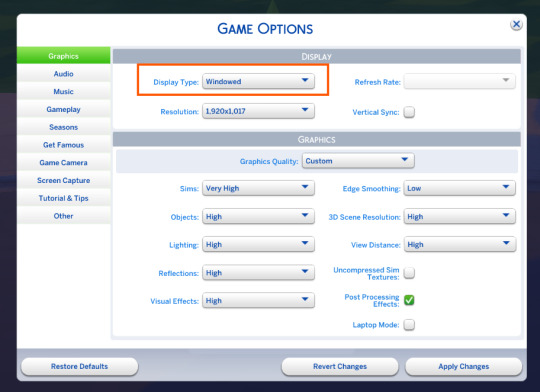
Now it’s time to launch the game and switch from fullscreen to windowed mode in the settings. You can also do this with the Alt+Enter shortcut.
Step 4
Set up your shot exactly how you want it. Open the location, pose your sims, apply any presets if needed. At this point, you can take a regular screenshot (for comparison) using your usual method.
Step 5
1. Go back to the SRWE folder.
There are only two files inside – one of them launches the program (no installation needed).

2. In the window that opens, select The Sims 4 from the list.
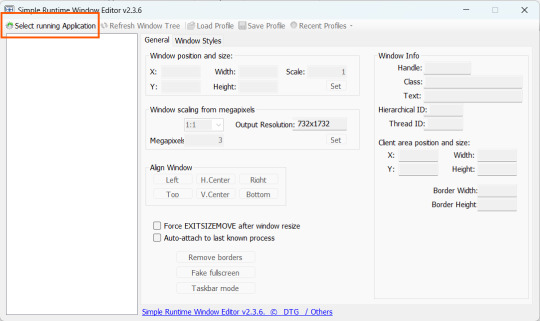
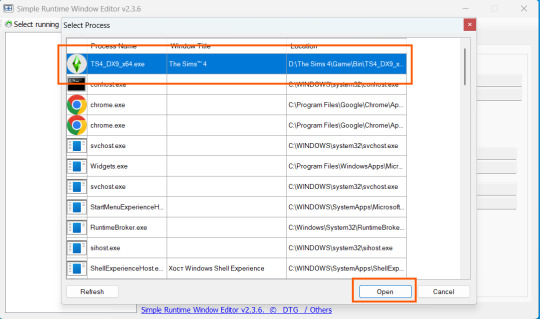
3. Check all the boxes.
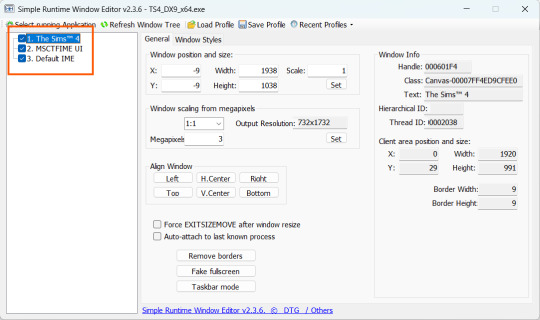
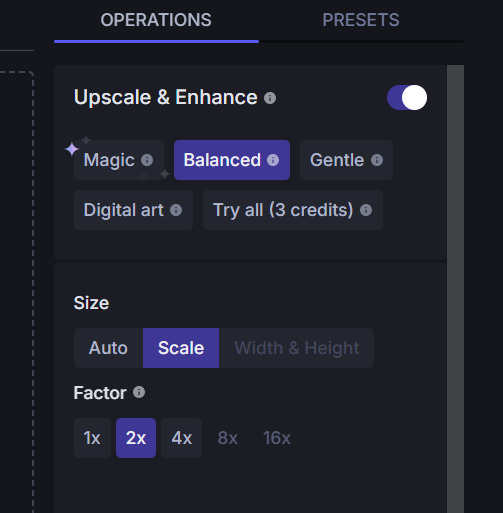
4. Image Size
You can set your screenshot size in a few different ways:
— The easiest method: Multiply your current resolution by the desired factor. For example, to upscale 1080p to 4K, multiply by 2. Tap Set.
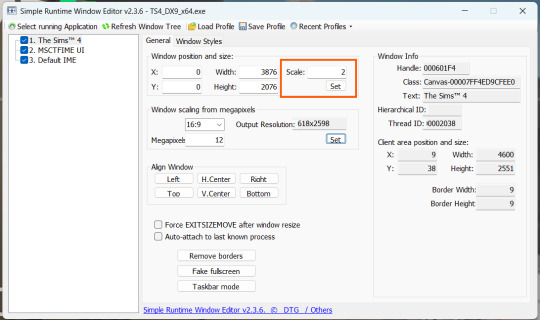
— Manual input: Enter your preferred pixel dimensions. Tap Set.
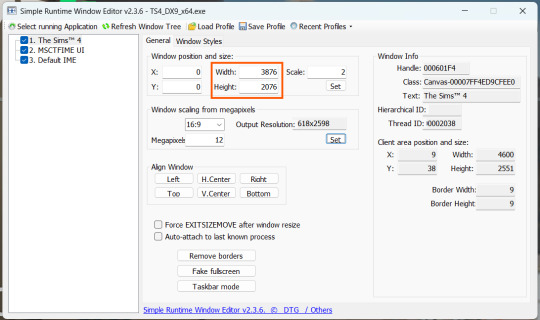
— Aspect ratio mode: Choose a format (1:1, 16:9, 4:3, etc.) and set your target megapixels. The program will automatically calculate the dimensions. Tap Set.
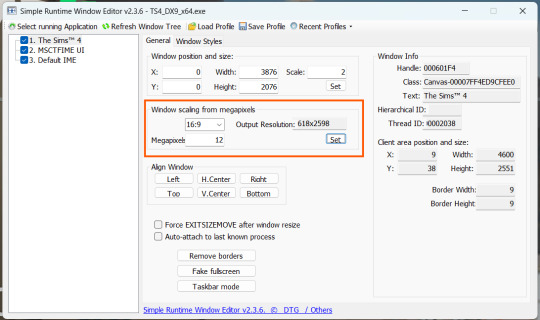
Honestly, you can experiment with any size. During our tests, even a weak PC handled an 8K screenshot without issues – though realistically, 4K is more than enough for most purposes.
Plus, if you're capturing in-game scenes (not just CAS), your screenshots will already be pretty large in file size. You probably won’t want them taking up even more space unnecessarily.
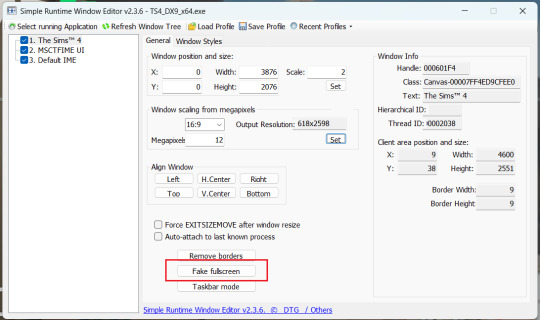
Step 6
Now when you return to the game, you'll notice the image has become significantly larger and no longer fits your screen resolution – you're only seeing a part of it.
Don't panic! Just wait for your preset to fully load (if you're using one), then take your screenshot as you normally would.
Step 7
Once you've captured your planned screenshot, head back to SRWE and click "Fake Fullscreen" to return to the original resolution.
Now let's compare our results.
Gameplay Scenes
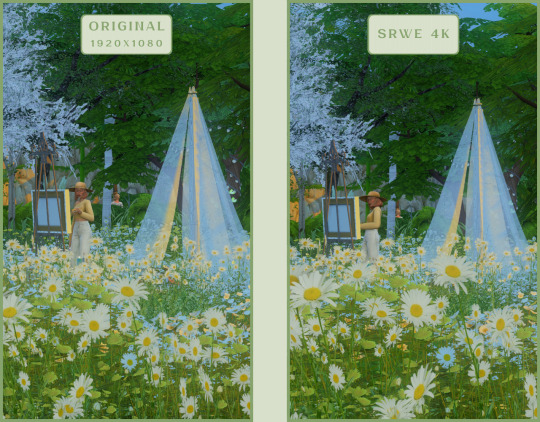
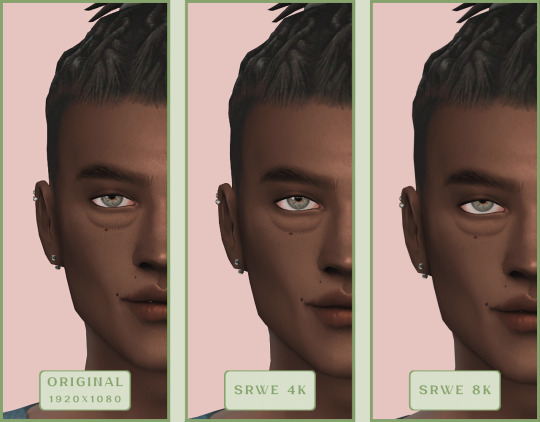
CAS
For in-game screenshots, this method works much better if you have at least a moderately powerful PC. After upscaling, navigation can become tricky due to lag. That said, it's still completely doable since we've prepared our scene in advance.
Post-Processing Screenshots
We've tested several post-processing programs: two paid options and several free ones.
Let's start with the paid options – Topaz Gigapixel AI and Let's Enhance.
Topaz Gigapixel AI
A specialized tool from Topaz Labs designed specifically for AI-powered image upscaling.
It doesn’t include extra features like noise reduction or face correction, but it delivers more precise upscaling, which is especially useful for The Sims 4 screenshots.
Pros:
— Upscale up to 600% (6x) without losing detail.
— Preserves texture clarity (hair, clothing, patterns).
— Automatically restores lost details (e.g., small decor items).
— Supports batch processing (multiple screenshots at once).
Cons:
— $99 price tag.
— Requires a powerful PC for 4K upscaling.
— Limited functionality (just upscaling, no additional edits).
— Trial version doesn’t allow exports.
Example:

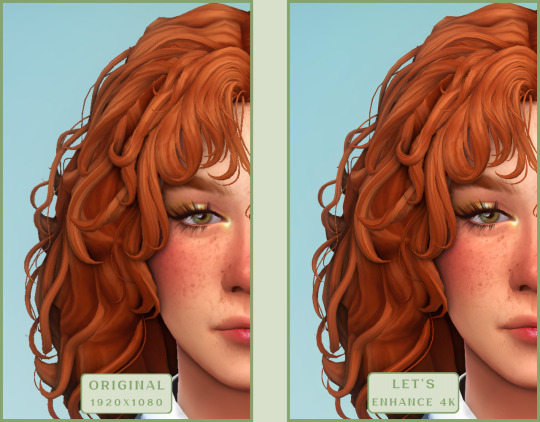
Let's Enhance
A convenient online AI-powered tool for enhancing screenshots. No downloads required – just head to https://letsenhance.io/boost and you're good to go.
Pros:
— Automatic upscaling up to 16K, boosts resolution without losing detail (hair and clothing textures become sharper).
— Dead simple to use: just upload your screenshot, pick a model, and download the result.
— AI doesn't just upscale, it subtly "beautifies" images too (though this is subjective, of course).
Cons:
— Free version limits you to 10 images/month (watermarked downloads; subscription starts at $9/month).
— Internet connection required (no offline mode).
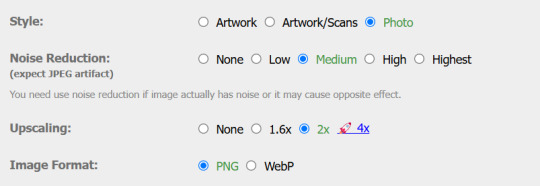
We found these settings work best for Sims screenshots:
Now, let's see the results:
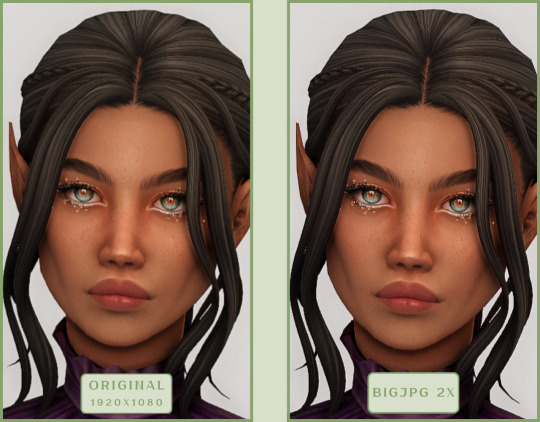
Free Upscaling Tools: Upscayl (with detailed usage guide), Bigjpg, and Waifu2x.
Bigjpg
A handy tool for basic image upscaling tasks, though the free version has limitations on processing speed and number of images.
Pros:
— Solid baseline results: boosts resolution effectively, making images noticeably sharper with genuine quality improvement.
— Free 2x/4x upscaling with watermark-free downloads.
Cons:
— Free version restricts image quantity, size, and processing speed.
— Lacks advanced parameter fine-tuning.
Our recommended settings combo:

The 4x upscale delivers noticeably weaker results.
Sample Bigjpg output:
Waifu2x
A free neural network-based tool. Originally created for upscaling anime images, but works perfectly for The Sims 4 as well.
Pros:
— Upscales images 1.5x–2x without noticeable distortion.
— Preserves art style, doesn't turn pixel art into a "blurry mess" (unlike some other upscalers).
— Available in both online and offline versions.
— Offline version supports batch processing of screenshots.
— Free 2x upscaling with no watermarks.
— No powerful PC required.
Cons:
— Free online version has a 5MB file size limit.
— Maximum 2x scale (no higher options).
— Lacks advanced parameter tuning.
Our recommended settings:
Waifu2x results:
Upscayl
A free, open-source program that uses neural networks to upscale images without quality loss.
Pros:
— Upscales images without distortion.
— Enhances fine details.
— Supports multiple AI models for different screenshot styles.
— Offline version handles batch processing.
— Free 4x upscaling with no watermarks.
— Doesn't require a powerful PC for 2x upscaling.
— Works offline, no internet needed after installation.
Cons:
— Requires a powerful PC for 4x upscaling.
— Minimalist interface – fewer beginner-friendly guides.
— Lacks advanced parameter tuning.
Given Upscayl's minimalist interface and lack of detailed tutorials, we decided to provide a more thorough walkthrough.
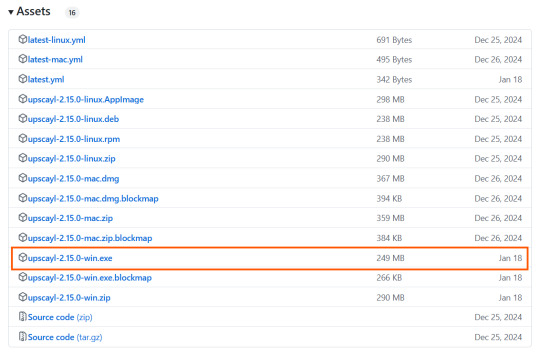
Step 1
First, download the program from its GitHub page. It's completely free and open-source.
Multiple versions are available – choose the one matching your system. For standard Windows, download the file highlighted in the screenshot below.
Step 2
Run the installer as administrator.
Install location doesn't matter – it won't affect performance. Select the destination folder. Click "Install".
Step 3
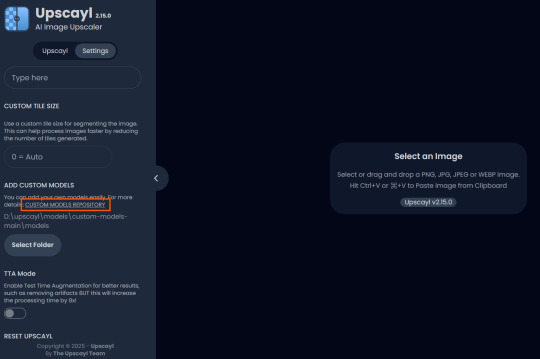
Upscayl includes several built-in AI models (good for testing), but we strongly recommend downloading custom models for better results:
1. Download the custom models pack here (also accessible via Settings → Add Custom Models in-app).
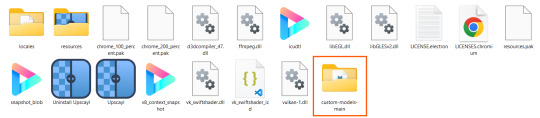
2. Extract the archive.
3. Navigate to custom-models-main → custom-models-main.
Move this folder to your Upscayl installation directory (optional: rename it).
Your Upscayl folder should now look like this:
4. Add Custom Models:
— Launch Upscayl.
— Go to Settings and click Select Folder.
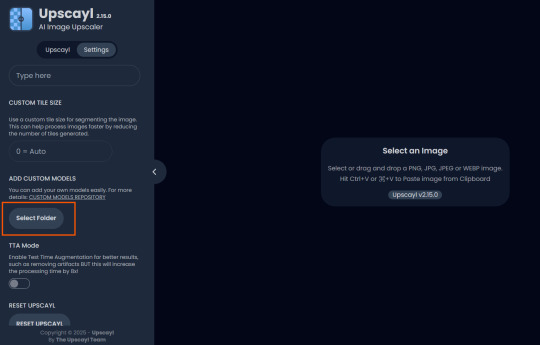
— Navigate to Upscayl → custom-models-main → models
Critical: The folder must be named "models" – don't rename it.
Step 4
Now that you have both the default and custom models loaded, it's time to start enhancing your screenshots.
1. Click Select Image or simply drag and drop your file into the processing area.
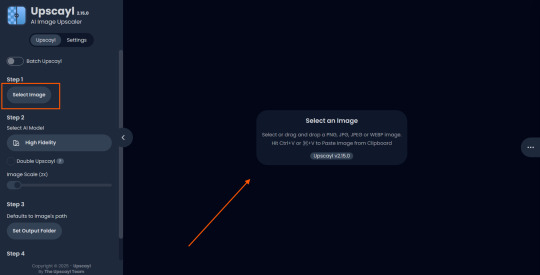
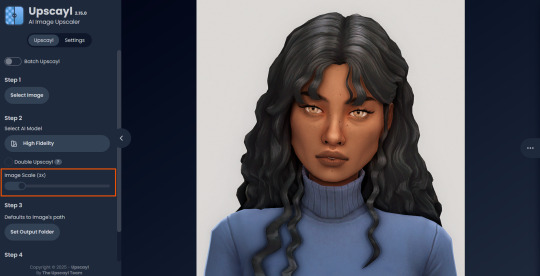
2. Choose Upscale Factor.
While Upscayl supports up to 16x magnification, it warns that anything above 5x may severely strain your system.
For optimal results, stick with 2x to 4x.
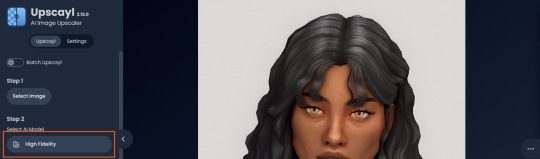
3. Select AI Model.
Click the Select AI Model dropdown: default models show before/after previews, custom models appear as a text list.
4. Experiment! Try different models on the same screenshot. Test various scales (2x, 3x, 4x) – sometimes better results come from modest scaling, while 4x might degrade quality.
For this demo, we'll use the first default model.
5. Click to begin enhancement.
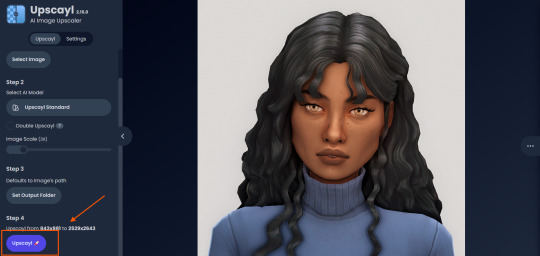
6. Processing time duration depends on original image quality, selected parameters and your PC's power (may complete quickly or take several minutes).
After processing, you'll see a clear side-by-side comparison of the changes.
7. Click the three-dot menu (⋮) for advanced viewing options.
Magnifying lens compares original vs. enhanced versions side-by-side.
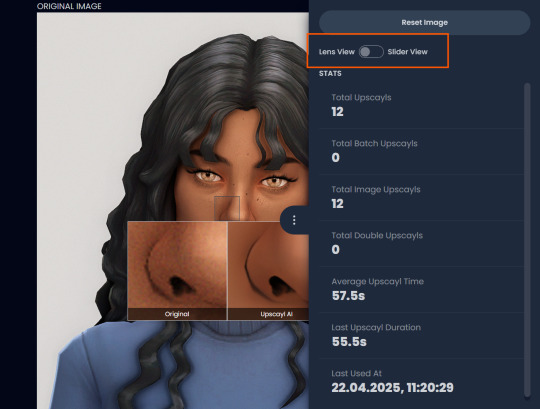
Also you may reset to original and revert all changes instantly.
8. Save your image.
By default, Upscayl saves to the source image's folder. To change this click Set Output Folder.

9. After this, use the Ctrl+S keyboard shortcut, and the new image will be saved. The original filename will be appended with the name of the AI model used and the upscaling scale applied.
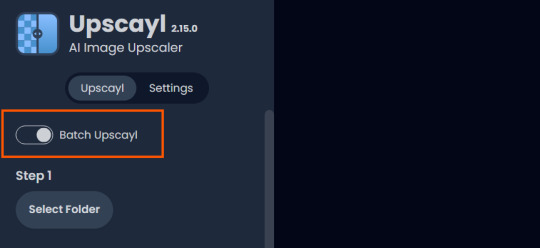
You can also use batch processing. Before loading images, you simply need to enable batch loading.
In the settings, there are different format options for saving processed images: PNG, JPG, WEBP. To preserve the best quality, we recommend choosing PNG.
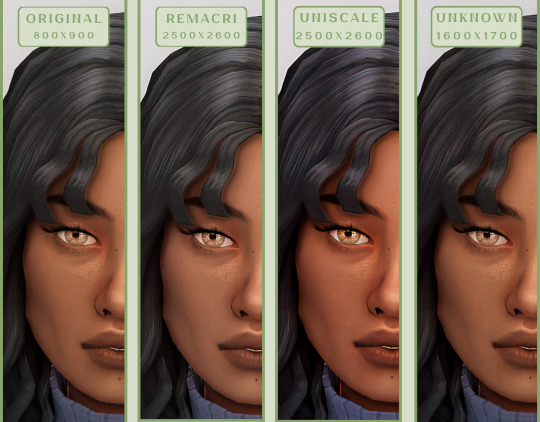
Finally, we're sharing the AI model options we liked best for processing Sims screenshots:
— Remacri (default model)
— Uniscale Restore (custom model)
— Unknown-2.0.1 (custom model)
🌱 Create your family tree with TheSimsTree
❓ Support 🌸 Our Blog
#TheSimsTree#simslegacy#legacychallenge#sims4#sims2#sims3#simsfamily#simstree#sims#sims4legacy#sims4roleplay#sims4stories#sims4couple#thesims4#ts4#ts4cc#plumtreeapp#simsta#simstagram#sims proposal#sims ideas#inzoi
38 notes
·
View notes
Text
re: gatekeeping
i've seen this argument come up again and again across multiple blogs and i feel like it's doing such a disservice to the creative community of this fandom and is worth speaking about (especially considering that some people expressed their reluctance to create in response to the recent events)
and i just wanted to say that YES. no one owns specific scenes. YES. people are allowed to gif the same characters. hell, as far as i've seen this community is incredibly creative and generous, sharing their mods and reshade presets and scenic locations.
to me PERSONALLY, the line is crossed when there's no transparency. when it's a repeated behavior. when there's no respect or regard to your fellow creators or their wishes.
i want to be very clear that this was all brought up in regards to a VERY specific case. a very nuanced case with a lot of context and i don't think it should be used to view the community as a whole.
outside of it and on the bigger scale, this community is full of incredibly skilled and creative individuals. helpful individuals. ones that WANT to inspire and encourage others to create. that share and help and give tips. that support each other. that put a new, exciting spin on 'the same old' game with its limited scenes.
and while, surely, everyone is entitled to their own opinion, i feel like there have been some really thick brushstrokes applied when talking about the bg3 fandom creatives as a whole. and it just doesn't sit right with me.
#life#like.. i understand. no one's happy in this situation and people now feel anxious#and that was never ever my intention#i try to help when i can i made a whole community trying to bring creative people together#but i also believe it was the right thing to do to bring this issue up#so at the very least people can know and make their own conclusions at the end of the day#because yes.. while i personally tend to follow a certain 'code' when it comes to crediting inspiration#and maybe hold myself and others up to a higher standard#i am also realizing that not everyone shares the same sentiment#and i understand that#but i also wish to clarify some of the things being thrown around
46 notes
·
View notes
Note
Hi !!! I hope youre doing well !!! I wanted to ask about photo taking ! How do you find the perfect background shot and the lighting ? Your photos are soo amazing! Any tips will be great if you mind sharing of course!!! Thank Youuuuuuu
Hi gorgeous, I hope you are doing amazing as well! And thank you for this question, it's actually such a good one!
So when it comes to my photo taking process, 90% of the time I already have a vision set in my head. I don't like going in "blind" and hoping for the best, although it may work for others, it certainly doesn't for me. So I'll give you some tips that apply to my photo taking process!
Define the energy you want. I.E. How do you want the photo to make others feel? For reference, Molly at the concert. I wanted to try my best to make it have the energy of a concert considering how limited we are with the sims game in general. So, I used deco sims and moody lighting to set the tone.
Be creative with angles. Anything that is usually head on will give more a photoshoot vibe, at least in my opinion. So, experiment with angles. I am a photographer IRL so I may have more ease with that, but I think changing that up can really make photos more interesting!
Use Relight! It is a an add-on to GShade (I think Reshade too but don't quote me), and it is a GAME CHANGER for photo taking, especially if you want darker set photos. I'm able to keep light on my sims face while making everything else darker around them, creating focal points. An example of this is again, Molly at the concert, and also recently Mila on the train because I had all the lights off besides the candles and used relight to highlight her face!
As for backgrounds itself, it all circulates around what I want the photo to give, so it has to be cohesive. And usually, it has to do with the vision I have. So my best advice with that would be that anything is possible when it comes to the background as long as you try to find what you're looking for or do it yourself. Don't be afraid to use other peoples builds, and obviously one of my favorites to use is Rheya28's who is Applez on the gallery if you need a recommendation!
Let me know if this helped at all and if you have any other questions! I really enjoy getting to share my process and answering questions like this, so please don't be shy!
50 notes
·
View notes
Note
i'm sorry to bother you, i just came across your blog and i'm so shocked with how amazing your sims look. i play sims 3 but my sims look pretty average and my screenshots don't look great, can you please if it's possible explain how your sims look so beautiful like this? (specifically this post hiddenspriings/742135415348330496) like, how do your sims look that good? is that a default skin? and how do they have those shadows on their faces etc, is that editing or reshade? can you please explain deeply? i'm sorry i'm asking for many things, i'm just a noob and i really get confused looking at these beautiful posts wondering how to make my sims look cool like that too!!
I don't even know where to start asdfghjkl 😅 developing a sim style is honestly a journey and when I joined simblr my sims looked like potatoes too, it takes time and effort to actively work on that 'skill' if I might call it that. With that often comes the dissatisfaction of your progress and how your sims look, and sometimes you just have to stop yourself and enjoy the ride, without looking around at what others are doing. Anyways, into actual 'tips':
I think you need to figure out where you stand when it comes to cc (it's not really a need but it's gonna help I guess). I like the look of very simple maxis match skins (I have those linked on my resources page) and very often alpha makeup cc layered on top. I personally don't really like how alpha skins look like on my sims (they usually have much more depth to them but since I’m not into that I can’t recommend anything) so everything you see on them - highlights, blushes, shadows etc. is just makeup cc. For those I recommend: blushes 1 2 3 4 shadows & highlights 1(!) 2(!) 3 4 5 6 7 8 9 (+ tifa’s stuff here). Add them on top of each other and bam! suddenly your sim isn’t so flat faced anymore (little note here, I often use ‘blushes’ as shadows as well depending on their placement ;)
If you are interested in what I personally use as defaults check my resources page. I also have all the skins and eyes cc I use linked there. My advice would be to also check other simblrs’ resources as well, there are some well hidden gems there that otherwise I wouldn’t be able to find on my own.
But If you are new to sims 3 you might ask: hey, how do you layer cc if you can only apply one for the category in cas? Well...Get yourself nraas master controller if you haven't already. With that mod you can increase the number of sliders which give you freedom of creating more diverse looking sims and assign multiple makeup per location. I won't explain how to do it here as there are multiple guides online, just google your question :) - I even saw great guides on youtube! It might seem like a lot at first but believe me, nraas along with its many modules will save you a lot of time and hussle.
Lastly, part of the posting process here on simblr is editing and I cannot lie that my sims don’t benefit on that. I use reshade with mxao which enhance colors and shadows (check my f.a.q page for links) and smooth out pictures further with photoshop tools.
Now I’m gonna expose myself a little, this is from left to right: the oldest sim in my folder currently (I’d say this is my late 2022 style), my newest sim and my newest sim with reshade on (but no further editing).
It’s a shame I don’t have access to my very first sims in sims 3 to really compare them but I think even here you can see the difference. So do not get discouraged, it will take a time and dedication like any other hobby but you’ll get where you want to be eventually :)
41 notes
·
View notes
Note
Hi, you are more than welcome to ignore especially if you have answered before and I missed it/it's elsewhere on your blog but can I please just ask how you get your CAS photos to look so incredibly clean? Especially around the edges, they're so smooth it's incredible. Thank you in advance, I really appreciate it! You inspire me so much tbh, everything you post is so beautiful. (Also also also the eyebags you released recently are my new gold standard and I use them for everything now tysm for sharing them) 🖤
thank you!
ok so here are a few tips, you don’t need to follow all of them, but if you like exactly my cas style, maybe some of them will help
1. edge smoothing. sorry for being obvious, but use either in-game anti-aliasing, or a smaa shader if you’re a reshade/gshade user, or you’ll get a pixelated staircase for the edges that will be hard to fix. if your PC doesn’t handle high graphics well and you play without edge smoothing, you can toggle it on temporarily just for taking a few good cas pictures and then turn it back off.
2. use MXAO. if you use reshades, use mxao shader for pictures, it's really a life changer. though i don't use it during the regular gameplay and only turn it on when i take pictures, because moving a lot with it slows down your game and is a visual overload for me.
3. but don’t overdo it with MXAO. seriously, don’t go all out with mxao. for a cleaner look shadows need to be delicate, just to overline shapes and give your sim more dimension. every time i tweaked my reshade presets, i made mxao even more thin and gentle and realized that it only got better.
4. background makes a huge difference. solid colors. in my personal opinion, grey gives the "cleanest" look (i said while still using my old dirty yellowish that i'm too lazy to find a replacement for). also, if i want to use black or white background, i make it a little darker than white and a little lighter than black, they look pretty much the same but will attack your eyes less (especially the white one).
5. CAS lighting makes a huge difference. maxis light isn't that bad, but cc lighting definitely give you more clean, crisp image. my personal favorite neutral one that i use by default is v2 by helgatisha. sometimes i use lightings with side highlights for more “rendered” look, but they aren’t always comfortable for everyday use and i only use them for specific pictures and then get back to my default neutral one.
6. shadow overlays. i mean cc that imitates shadows on sim's face, it gives sim's face so much dimension. there are spotlight v1 and v2 by simandy and lighting overlay v1 and v2 by joshseoh. i'd say josh's overlays are for fancy portrait pictures (they imitate a very strong light source from different angles, very cool for sim photographers but not for regular gameplay), and simandy's are more neutral and are very gameplay-friendly on lower opacity. personally, i only use v2 by simandy now, it's my holy grail and i don't take sim's pictures without it.
7. SRWE. it's a program that emulates having a bigger display resolution than your monitor can afford, meaning much better screenshot quality and cleanliness for small details. srwe can be a bit of a hassle to use for a lot of pics and most of the time i’m too lazy to use it and just take my regular small pixelated screenshots, but sometimes i want just one, but extra clean picture.
8. Topaz Clean 3 (photoshop). i don't usually edit my pictures and just drop them like whatever, mostly because i don't know how to do it, but sometimes i make them sharper and cleaner with a gentle touch of topaz on very low strength.
60 notes
·
View notes
Note
hi! i'm trying to work up the courage to post the sims i've made but even though my in-game graphics settings are set to highest, i still feel like my screenshots make my poor pixel guys look like potatoes (especially when zooming in or trying to see details). i was wondering if you had any tips for crisper quality screenshots? i'm on a mac and not very technology-versed but i thought i'd ask anyway. please feel free to ignore if you're not in the mood and keep being rad <3
I mostly just use custom CAS lighting and Gshade/Reshade, then do some minor editing afterward (upping contrast and color vibrancy, sometimes sharpness). GIMP and Photopea are some pretty decent free editing programs. My screenshots aren't super high quality, though... 😅
I know there are ways to get crisper screenshots: SRWE seems to be popular, although I haven't used it myself. This might also be helpful, but I think it depends on your graphics card.
But even without all that--you should still post your Sims! Potatoe or not! I sure posted potatoes when I first started, and now it's kinda fun to go back and compare. You gotta start somewhere--don't wait until it feels perfect! Post those Sims!!!

9 notes
·
View notes
Text
Okay, I need some help from the simmer community! Does anyone have any tips or tutorials on how to get the indoor lighting in screenshots to look SOOO good?! I’m talkin’ like @moonwoodhollow and @peonypyxels and @simmerlou 😭
They’re so hazy and glowy and cozy!
I’ve got my exterior shots exactly how I want them, but I can NEVER get my interior shots to look better. They feel so flat. I’ve messed around with my reshade settings so many times, I use relight, nothing ever looks so good. Is it editing? Is there a reshade effect I don’t know about? 😭 halp!
My interior shots for reference:
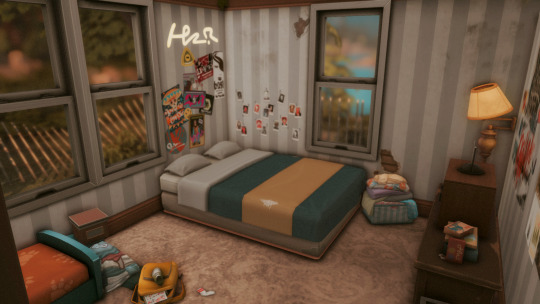

They’re not TERRIBLE. But I feel like they’re not good either lmao 😢😢
13 notes
·
View notes
Note
Hi! I was wondering if you could help me with an issue I'm having with a reshade I'm using. Do you by any chance know how to get rid of this weird gap I have when taking a SS with a reshade on? It's with the effect where it blurs the background, but instead of it blurring all the way up to my Sim, it leaves this weird gap where there is no blur (if that makes sense). I'm using the Tawhay reshade.
Hey anon,
A few things to check:
which ReShade version are you using? The most recent (6.3.1) has a texture bug which affects DoF and stops it from working correctly. idk if that's the issue here but if so, roll back to a previous version (6.2 was fine)
do you have an edited graphicsrules.sgr file? If so, try removing it and going back to the vanilla version and see if that fixes it. If it does, copy over your old edits to the newer vanilla sgr file. There may be some new things in there that mess with something if missed out in the old file. (This is a good tip for any weird graphical issues you might have after an update.)
turn off Edge Smoothing in the graphics options just in case that's interfering with anything.
if none of those things work, go to the addons tab in the reshade menu and look under the generic depth addon. Try selecting different options in there and see if it makes any difference. It's hard to know what to suggest you try without having that issue myself to test. It's trial and error really.
13 notes
·
View notes