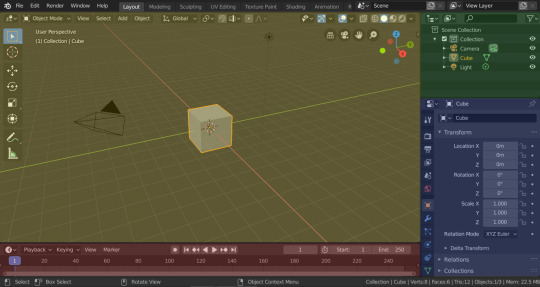
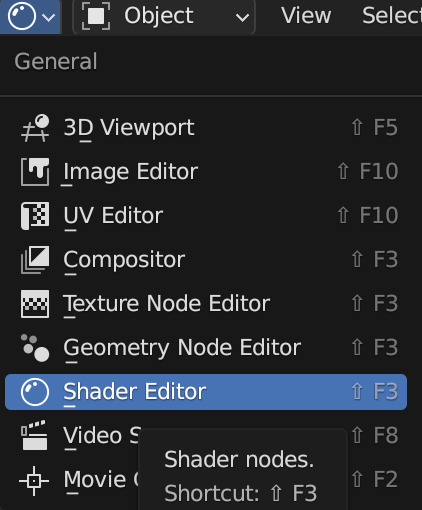
#salemsims tutorials
Explore tagged Tumblr posts
Visit Tumblr Blog
Explore Tumblr blogs with no restrictions, modern design and the best experience.
Last Seen Tumblr Blogs


Fun Fact
Tumblr has a 66 index score for customer satisfaction in the US.
Note
hellooooooooo i love all of your renders and posts you're so talented oml. may i ask for a tut on how you did the smoke in this post? tysm ily :D
Hey, thank you so much ahhh!!! That means so much to me!! ILY! 😘
In truth, my method for smoke is not sophisticated at all... It's actually laughable how simple/easy my process is for this, I'll admit 😅
There is a way to do it right in blender, but for this particular trick I don't use blender (mostly because I've never been able to get it to work right, user error I'm sure haha). But if that's what you're looking for, there's an (untested) tutorial here!
I personally use photoshop for my smoke, and, I admit, brushes!
This tutorial assumes you have a basic knowledge of photoshop, but if you don't or if any of this is confusing feel free to send me an ask and I'll be glad to help!
A while back I scoured the internet for free cigarette smoke brushes and amassed a small collection of them. Unfortunately none of mine are marked with a name or anything so I can't link to specific ones, but here are a few I've found for this tut:
Click with caution! I use ad blockers and these sites are fine for me but as always be careful!
Brusheezy free smoke brushes 15
Brusheezy free smoke brushes 12
Resource boy 200+ free smoke brushes
If you're using photoshop, make sure the brushes are in .abr format!
Once downloaded (& unzipped), if you double click the .abr file it should automatically install and open your photoshop if it's not open already.
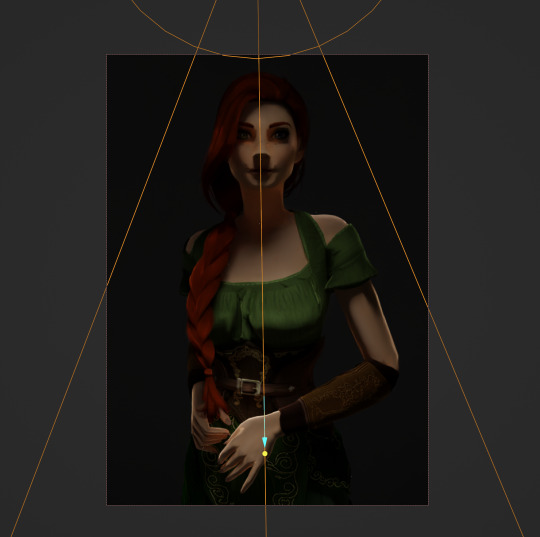
I've pulled one of my renders of Ariss (pre-smoke) into photoshop, so let's make some smoke.

Step 1: Create a new Layer!
Make sure you are working on a new, empty layer! This will be important in later steps!

Step 2: Add smoke using your smoke brushes
On the new layer, select the smoke brush you want to use, and make sure your color is set to white/off white/grey.
Hover over your image and select where you want your smoke to be. I was unable to take a screenshot of this process, but I put my smoke here:

Step 3: Adjust opacity/shading

You should have a layer for your smoke now. Double click it and the layer style window should pop up.

In this step... honestly go ham. If you follow exactly what I'm doing, it won't look the same because of differences in our base image (color, brightness, saturation, etc). But I usually adjust:
Blend mode
Opacity
Color overlay
Outer glow
If your smoke isn't on a separate layer, any adjustment you make here will be on the main layer, which we don't want!
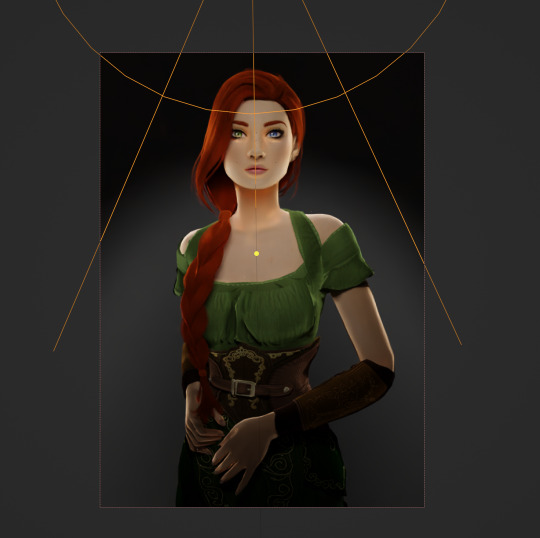
I've adjusted mine, & ended up with this:


Step 4: Move & adjust your smoke
Because your smoke is on a separate layer, now you can move and adjust it.

This is all up to your preference! I typically just move, adjust, and edit the layer style until I get something I want.
Sometimes I'll also blur the smoke, which you can do by selecting filter -> blur -> gaussian blur, just make sure you're on your smoke layer!

You'll know you did it right when you get this window showing the transparency instead of your image, & if the smoke blurs when you adjust the radius!

& that's it!
There's a way to also use the standard brush tool and "path blur", which I've used before but don't usually like the result of it.
But if you'd prefer to try that, here's a tutorial for it!
#thank you so much for the ask and the love!#ts4 tutorial#ts4 edit tutorial#sims 4 tutorial#sims 4 edit tutorial#sims tutorial#sims edit tutorial#ts4#sims 4#sims#ts4 editing tips#sims 4 editing tips#sims editing tips#salemsims tutorials#I hope this helps#if not lmk!#& I'll try to clarify
26 notes
·
View notes
Text
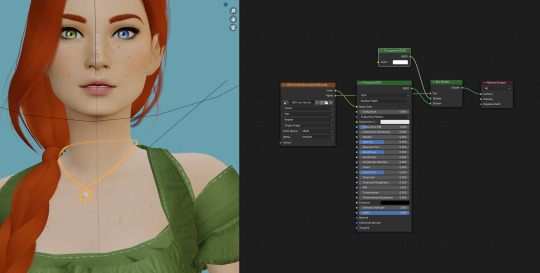
Sims 4 Render Lighting Tutorial

"Environmental Lighting" won my most recent poll, so let's get right into it!
A few notes before we begin:
I render exclusively in cycles!
This tutorial assumes some basic knowledge of blender
Though this tutorial covers the basics, HDRIs can be used in conjunction with any scene/your built scenes
I decided to focus on environmental and other lighting in this tutorial, since they all kind of go hand in hand.
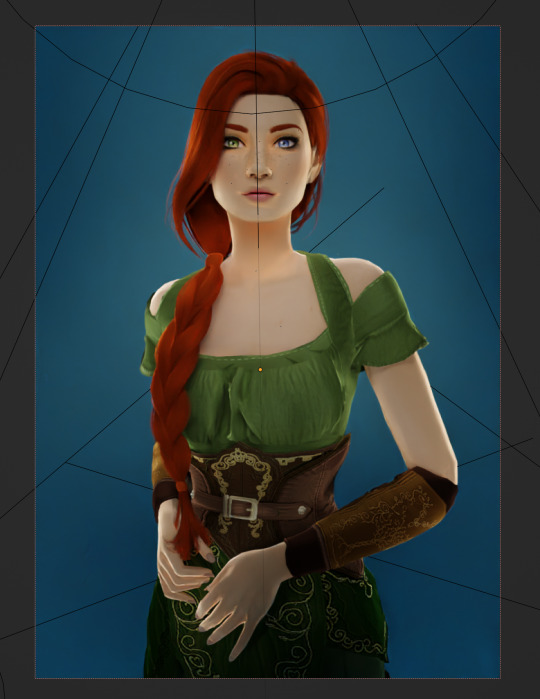
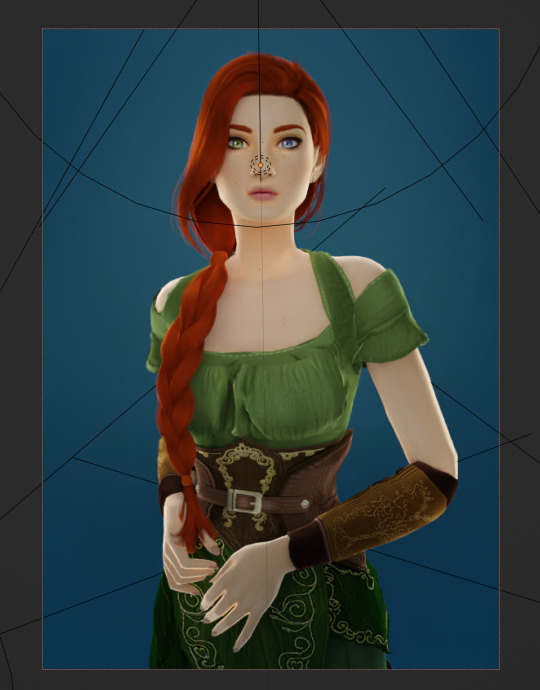
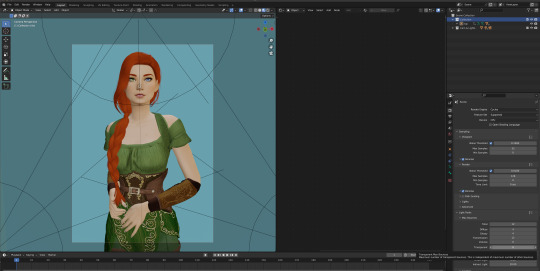
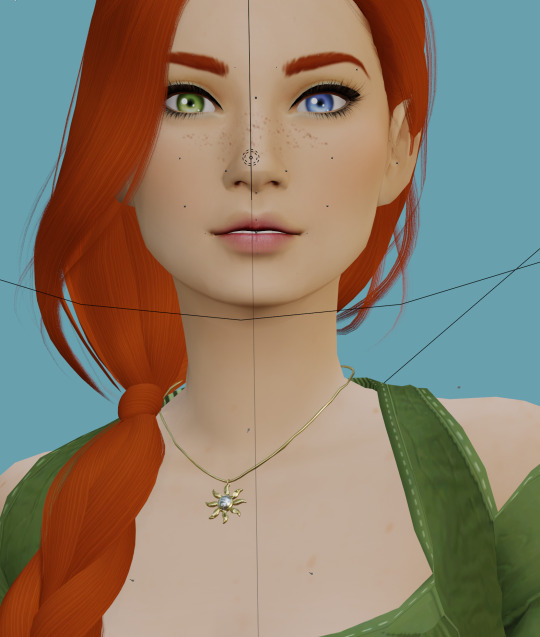
For this tutorial, I'll be using my recent Cupid Sim. Here's a render of her with no additional lighting:

1. Base lighting
In any full body, single sim render (like lookbooks, for example), I really like to use a glowing base. It grounds the sim a bit and casts some interesting lighting on them.
To do this, I add a circle under their feet by pressing shift+A and selecting circle.

An empty circle will appear, but we need it to be a solid disk, so go into Edit mode (by pressing tab while the circle is selected) then hitting F on the keyboard to fill it.


After that, you can go into the Materials tab and add in color and glow.
Mine is adjusted like this:

And gives this rendered result:

2. HDRIs
HDRIs (High Dynamic Range images) are extremely useful when it comes to environmental lighting, I always use them now to add better/more dynamic lighting to my renders.
HDRIs are 3D/panoramic, which makes them extremely useful.
You can find/download HDRIs online in a few diff places: PolyHaven, AmbientCO, and Blender Market.
There are also several available for FREE using BlenderKit (my preferred method).
So how do you use an HDRI?
We can add HDRIs to our render by navigating to the world tab and changing the color to "environment texture".


I chose this vaporware HDRI from BlenderKit, & here it is with no adjustments, but it's looking a little rough so let's adjust it.

By adding vector nodes, we can adjust how the HDRI behaves. Here I mostly use the Z rotation and the background strength:


Here's the same render with the Z-rotation set to 50, 150, 200, & 250.


You can put in any value for the Z-rotation, this is just an example of how the HDRI turns. This is maybe not the best example of the rotation, but putting her in a forest just didn't feel right lmfaooo, hopefully you can see how the light changes on her depending on the rotation.
You can also adjust the strength of the HDRI. Here's the HDRI (rotated to 150) set at .5 and 1.5 strength:


For this tutorial, my favorite lighting is the HDRI set to 150, and the strength set to .5, like this (this is a rendered image):

3. Transparent HDRIs + Point Lights
But I'm not fully happy with the lighting. I don't love how the HDRI is a bit blurry, so I'm going to set it to be transparent.
To do this, go to the Render Tab, scroll down to the Film option, and check Transparent:


The lighting effect from the HDRI will stay the same, but the background will be transparent.
From here, you can add a background (when I do this, I like adding a plane, & moving/shading it until I'm happy (kinda like this):


NOTE that you have to put the plane far enough behind your sim so it doesn't affect the HDRI lighting too much.
SECOND NOTE You can use this same method to use HDRIs in conjunction with scenes. They can provide the perfect backdrop!
This is still really dark, so I'm going to add three point lights: -Two on either side of her head/shoulders that will be smaller (in radius) and brighter -One in front of her to add actual light (so details aren't lost)

Here's how I set up my lights.


The pink light settings are for the two point lights on the sides The white light setting is for the light in front of her
For a basic render, this is almost good enough for me, but I really like the glowing effect I get in my renders.
To achieve this, we have to go to the compositing tab:
4. Compositing
Full disclosure, my compositing tab is set to glow by default (that's how much I love it), so all of the renders in this tutorial have it turned on.
I use the glare node and set it to fog glow.
Here's my preferred setting:

I prefer the fog glow effect, but bloom, ghost, streaks and star are also options.
Here's a guide to the glare node!
Tbh, I never use any of the other settings, so I'll leave this tutorial here for today.
Here's the final result (with no additional editing):

If you have any questions, please don't hesitate to send an ask, message or join my discord (no minors pls) for help! <3
#ts4 render tutorial#ts4 blender tutorial#sims 4 render tutorial#sims 4 blender tutorial#sims render tutorial#sims blender tutorial#salemsims tutorial#render school tutorial#blender
209 notes
·
View notes
Text
Guess who downloaded Blender
guess who also kept getting turned around in Blender lmao
No but for real I really wanted to try my hand at it, so I used the Youkai Inuyasha from one of the save files and a Helgatisha pose and followed this tutorial by SalemSims. And then spent twenty minutes wondering why the render was only showing the red background...just to realize the camera was behind him.
It's not terrible for a first try, especially cause I've never used Blender before. It'll be a fun thing to tinker with though.
#inuyasha#sims 4#sims 4 blender#and if I ever get used to where stuff is I *will* be insufferable lol
15 notes
·
View notes
Text

So you want to make a sims render: a beginner's guide
But what does that even mean? What do you need to start?
To get started with sims renders, you'll need the following programs:
Blender 3.6 - to render your sims
Blender 2.7 - to export poses, accessories and objects from s4s
Sims Ripper - to rip your sims to prepare them for blender
Sims 4 Studio - to export poses, accessories and objects for your renders
All of these programs are FREE to download and use!
Blender outputs fantastic renders depending on your settings, but you'll probably want to edit them after the fact.
For editing, I recommend:
Photoshop
GIMP
Photopea
I'll be posting editing tutorials in Photoshop, but any of these programs will get the job done.
Stay tuned for in-depth tutorials on using Blender, Sims ripper and Sims 4 Studio!
#salemsims tutorial#render school tutorial#sims 4 render tutorial#sims 4 blender tutorial#blender#sims ripper#sims 4 studio#resources#ts4#sims 4#sims
333 notes
·
View notes
Text

Mini Blender Tutorial: Appending Hair & Clothes onto Posed Sims
I'm so sorry this has taken me so long.
Quite a while ago, @baobeisims requested this tutorial, and I'm sorry it's taken an age but I'm in the final stretch of planning before my wedding and it's got me stressed up to my eyeballs.
But without further ado, let's go!
Step 1: Import your sim into blender and pose
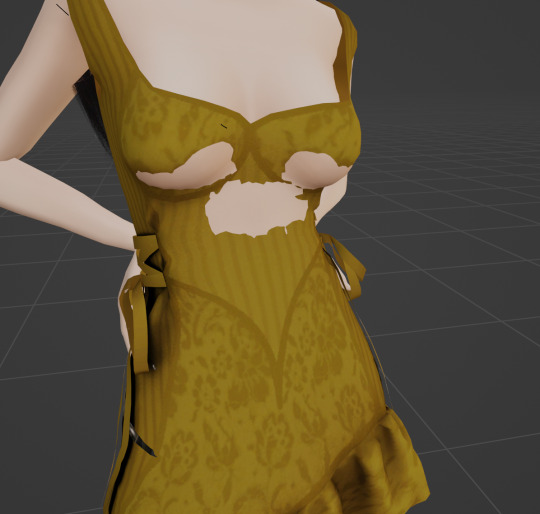
For this tutorial, I'm going to use my lovely Lilith! When appending clothing, it's best to use a mostly naked/fully naked sim. It can be hella weird having nude ripped sims on your computer but trust me, it'll make this process SO MUCH EASIER and your end results better if you don't have clothing on your sims. Why is this? Any clothing applied to your sim in game is permanently attached to their mesh in blender. Meaning you cannot delete off any piece of clothing that's already there. Because of this, I recommend fully nude sims free of any clothing, jewelry or other accessories. However, fully nude sims aren't Tumblr friendly so I'm using a topless, underwear-d Lilith 🤣
Here's Lilith, imported, nodes adjusted, and posed. I won't cover how to do this here, as I already have in THIS TUTORIAL (3 parts, all linked). So let's get on to the fun
Step Two: Adding Hair
Adding hair and clothing works the exact same way as appending a prop to your sim, with a few additional steps. Like with props, export the mesh and texture for your hair, then append them in blender. For this tutorial, I'm using Lamz' Katrina hair. Just like with anything else, append all of the studio meshes:

Once you import them, it'll look a bit messy.

But that's ok we're going to fix it! Like with any appended object, delete the bone_bone_shape and the rig, so. you're only left with your sim and the studio meshes. Add in your texture nodes and adjust like we do with any object. It should look like this:

Link the materials and join the meshes into one, and you should have something like this:
But as you can see, the hair isn't aligned. To fix this, navigate to the Modifiers tab (like we did with jewelry/props) and set the object to your sim, like this:
Now her hair should be... actually on her head! 😂
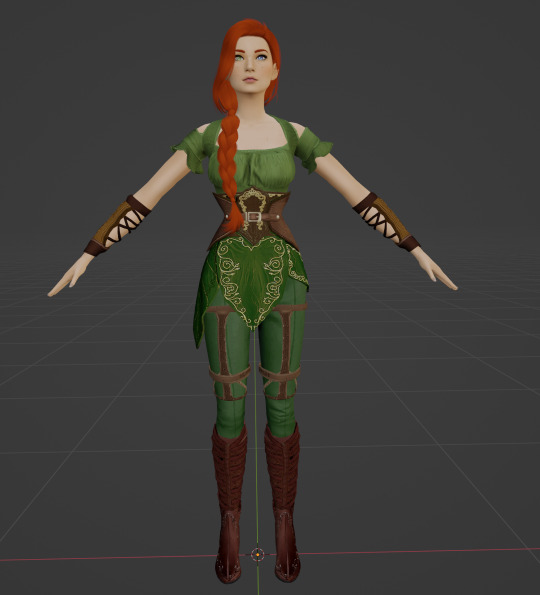
Let's add some clothing then I'll show you some handy tricks I use to achieve more realism in my renders. I'm going to use the same dress I used in her render here to keep things simple. It's Evellsims' Trapped Dress.
Step Three: Adding Clothing
We'll follow the exact same steps we did with the hair. Export the mesh and texture from Sims 4 Studio and append in blender.

Just like before, it's not in line and needs the nodes adjusted. Follow the same exact steps, adjust the nodes, link materials, join, and append. After following all those steps you should have something like this:

You might be wondering why I still have a censor bar here... That's because appending clothing doesn't automatically take the same shape as your sim's body like it does in cas. (I can't show it cause Tumblr but... her tits are out 🤣 just trust me) Different framed sims will require more or less work depending on their body shape. Curvy sims will require a lot, whereas petite ones like Lilith may only require a little bit of manipulation. Additionally, some poses and clothing aren't as compatible as you'd hope. Fabric can do some weird things, so sometimes you'll have to do more or less manipulation and it's a bit of a tossup. This makes appending clothing in blender a massive job, but for certain projects it works way better than dressing your sim in cas, particularly when you want to manipulate the clothing in some way (by mimicking a breeze, or gravity, etc) or if you're a masochist like me and you want to always do more work.
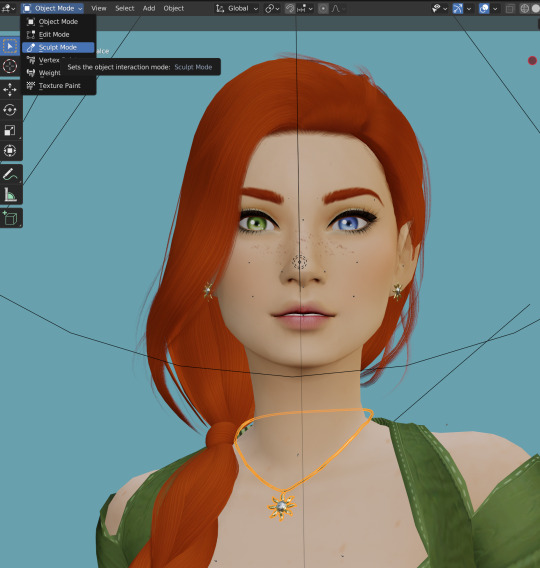
Step Four: Sculpting Hair & Clothes
By far my favorite part of the render process (even though it's tedious as fuck and takes an age) is sculpting. I use sculpting to fix clothing and hair and mimic gravity and weather. Here are a few examples of what sculpting can do (other than simply making clothes fit):


To use the sculpt tool, select from this dropdown:
From the new sidebar tools, select Elastic Deform, here:

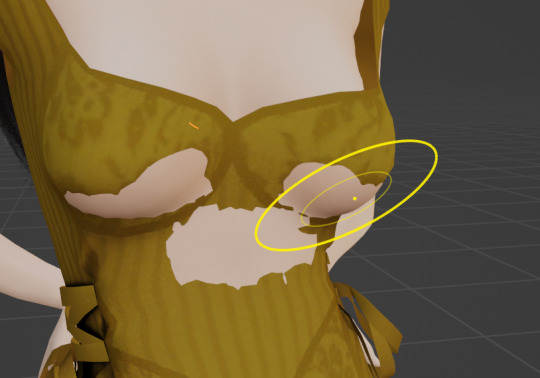
I've covered the Tumblr-sensitive bits so you can see what you'll be working with. It's not unusual to have gaps in the clothing that need filling or adjusting, like this:
Using the sculpting tool set to elastic deform, you just have to click and drag the fabric to where you want it. Be sure you're editing the clothing mesh and not your sims body! Always select the mesh you want to sculpt from your outliner panel so you don't accidentally click and drag your sims skin! Here's a before and after, make sure you're putting your cursor against the right angles.
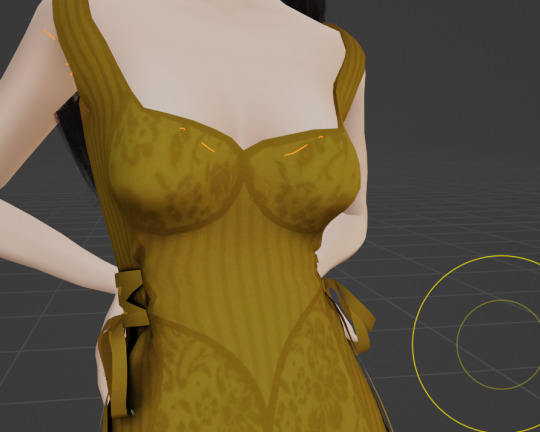
There are a few gaps on the back of her dress too. Here they are before and after sculpting:

It takes some time and practice to get good at this, but once you do there's no limit to what you can accomplish! There are other methods that yield similar results (like shrink-wrap, but I've never gotten it to work for me) but this is my favorite and what I'm most used to. You can sculpt any mesh, so go wild!
That's all I have for today.
Homework:
Your homework is to append hair and clothing in blender and post the final result! Tag me in it too I'd love to see! & As always if you have any questions please feel free to send them through to me either with an ask or the help desk!
#salemsims tutorial#render school tutorial#sims 4 render tutorial#sims 4 blender tutorial#render tutorial#blender tutorial#tutorial
67 notes
·
View notes
Text

Beginner Blender Tutorial Basic Render: Part One (Importing a Sim and Adjusting Textures)
To learn the basics, we'll begin with a super simple render: one sim, one pose, one background.
But first, the anatomy of blender.
(image & list courtesy of Blender's online manual)
Yellow - 3D viewport (workspace) The 3D Viewport is used to interact with the 3D scene for a variety of purposes, such as modeling, animating, texture painting, etc.
Green - Outliner The Outliner is a list that organizes data in the blend-file, i.e. the scene data, Video Sequencer data, or anything that gets stored in a blend-file.
Blue - Properties The Properties shows and allows editing of many active data, including the active scene and object.
Red - Timeline The Timeline editor, identified by a clock icon, is used for manipulating keyframes and scrubbing the Playhead.
The tools I use most I've highlighted below:
I won't outline their uses just now, but we'll be going over them as we use them.
Different creators like to split their blender window up in different ways, but this is my preferred setup when I'm working:
I use the yellow half of the screen as a render preview/3D workspace
I use the blue half for shader editing, posing, etc.
You can set yours up like mine or find what's comfortable for you.
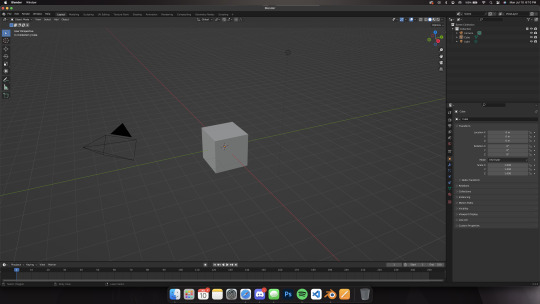
When you first open blender, you'll be greeted by the default cube, lamp, and camera.
Delete them! You can do this two ways:
Click and drag your mouse over all 3 and delete or Select all 3 in the side menu and hit x on your keyboard
Step 1: Importing our Sim
After deleting the default items, we'll import our sim. This tutorial assumes you've already ripped your sim (if you haven't, check here for how to do so!)
Now, let's import.
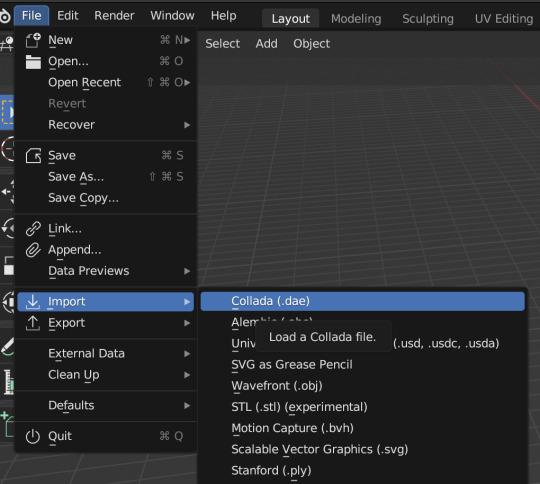
Click file -> import -> collada (dae) Select your DAE and click "import"
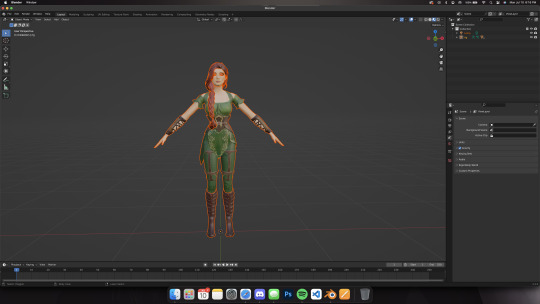
Your sim will look a little... off (thick eyelashes and a weird shine), but that's okay we're going to fix it! Your sim might also look solid white. If that's the case, make sure you're in the right mode. You can adjust modes by clicking on one of the four circles in the top right of the screen.

These are your viewport modes.
Wireframe (far left) - good for mesh editing Solid (middle left) - good for posing Material Preview (middle right) - what we work in most, shows everything with textures (color) Rendered (far right) - this shows your render preview We'll be working mostly in Material Preview
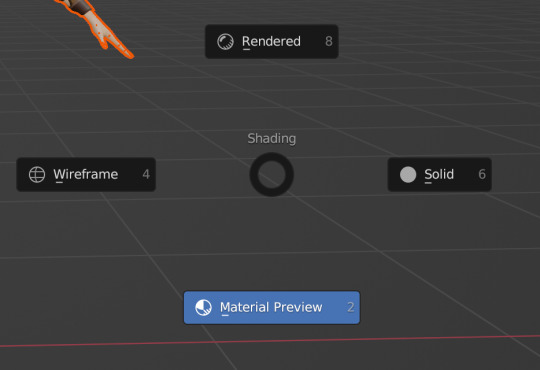
You can also switch between modes by hitting z on your keyboard then selecting which one you want I'll be using mostly keyboard shortcuts but I'll show you how to do both as we go along
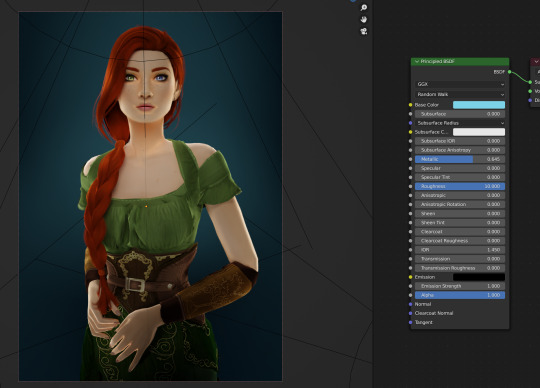
Step 2: Adjusting Our Sim's Textures
Let's fix our sim's textures.
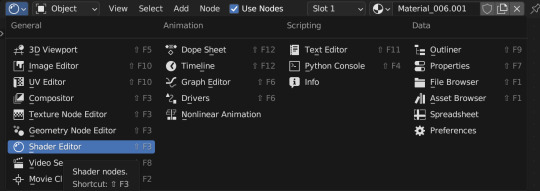
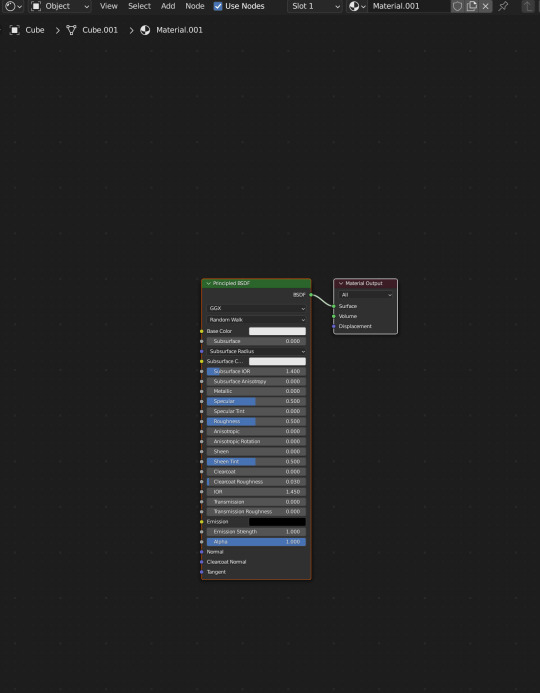
First. set up your workspace. Separate your workspace into two windows (as shown in the picture above with a yellow half and a blue half) and select "shader editor" in your right-side window. Like this:
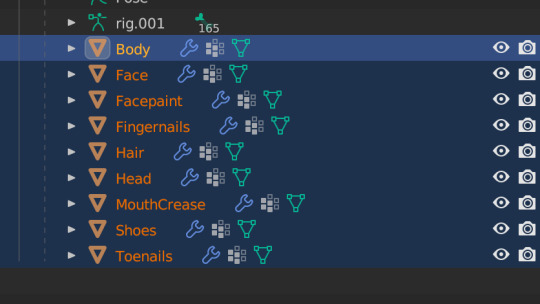
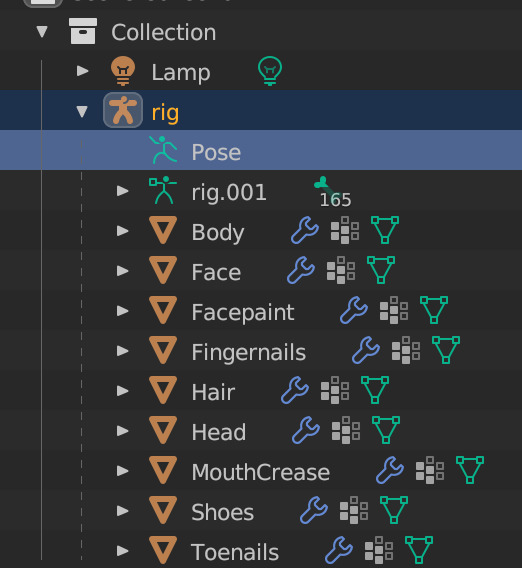
Next, navigate to your Outliner and click the little dropdown beside "rig"

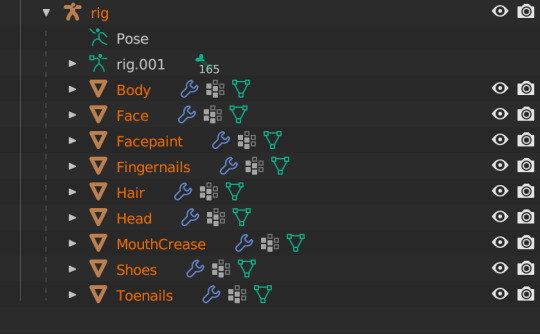
Under "rig" you'll see your sim's body parts listed. We're going to select "Body" When we click "Body", these colored blocks will appear in our shader editor window.

These are called Nodes. We use Nodes to adjust textures for various items in blender (sims, walls, furniture, etc). To add a new Node, you can select "add" in the top bar, or hit Shift+A on your keyboard and add in the node you need.


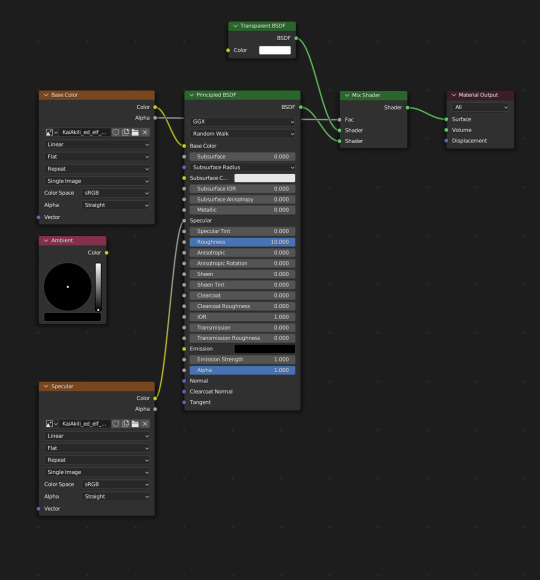
We're going to add in a Mix Shader and a Transparent Shader (both found under the Shader tab) and adjust our nodes this way:

Snug the Mix Shader between the Principled BSDF and the Material Output. Now we have to connect our Nodes and adjust our Principled BSDF. For the sake of this tutorial, I'll show the basic Node & Shader adjustments, but we'll go into each of them in a later tutorial.
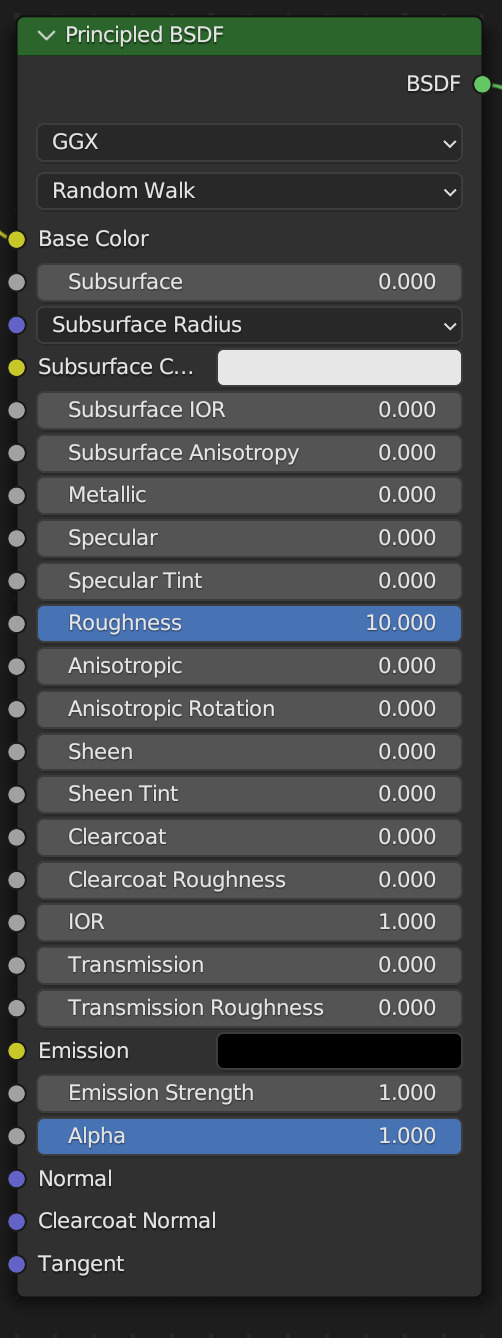
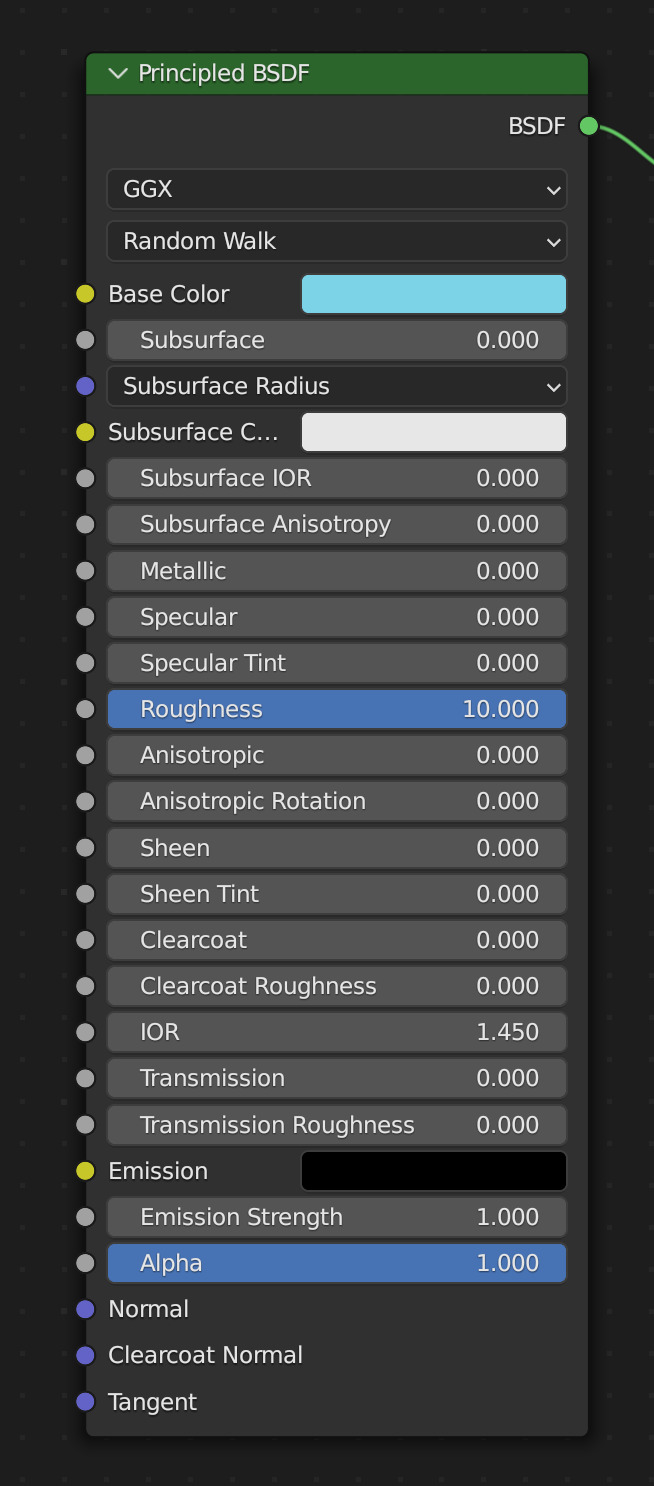
Adjust your Principled BSDF like this, then connect your Node lines exactly like this:
You'll see that our SIm's body looks a bit different from her head, hair and shoes. That's good! Now we need to duplicate that texture to the rest of our sim.
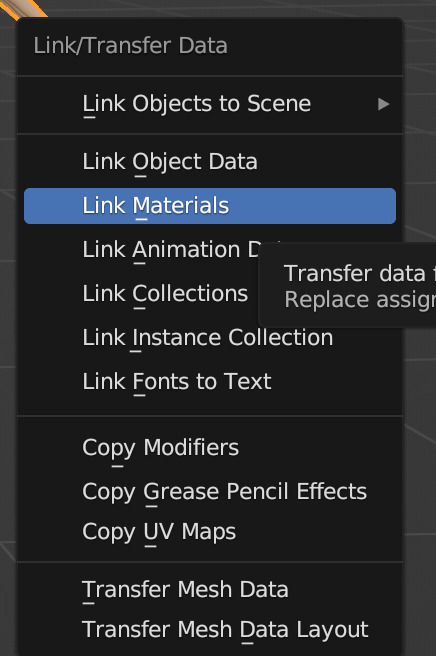
Navigate to your Outliner again, and use Shift+Click to select the rest of the body parts in the list Don't select pose or rig.001 and make sure the Body is selected first EDIT: You'll only see "body" if your sim has a full body outfit on! If they have a shirt and pants, you'll have "Bottom" and "Top" instead! In this case, select "bottom"!
Now, hover your cursor over your sim/the 3D viewport window, and press Ctrl+L on your keyboard. This brings up the Link/Transfer data window. Select "Link Materials"
Our sim is looking better, but her eyelashes are still dark, let's fix that now.
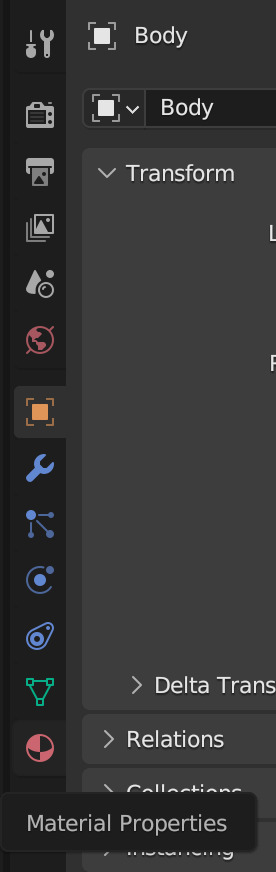
In your Properties area, navigate to Material Properties (the little red ball)
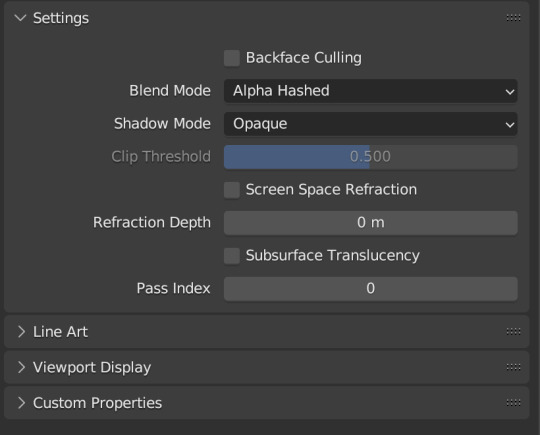
Change your Blend Mode to Alpha Hashed We will always set Blend Mode to Alpha Hashed
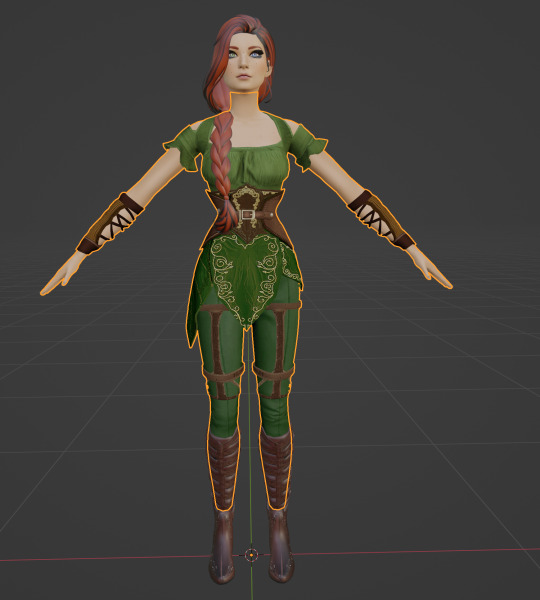
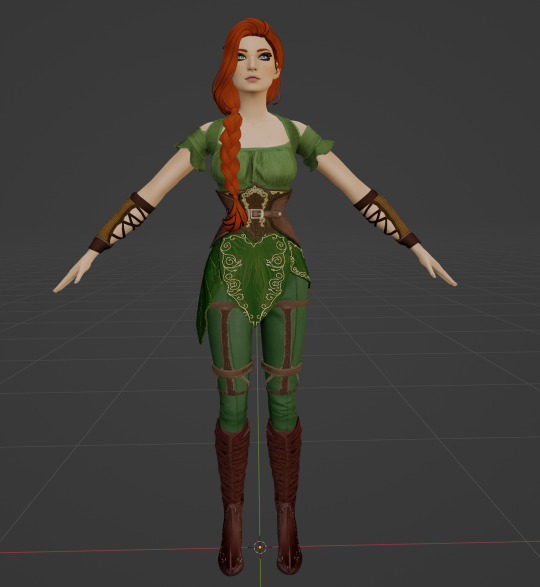
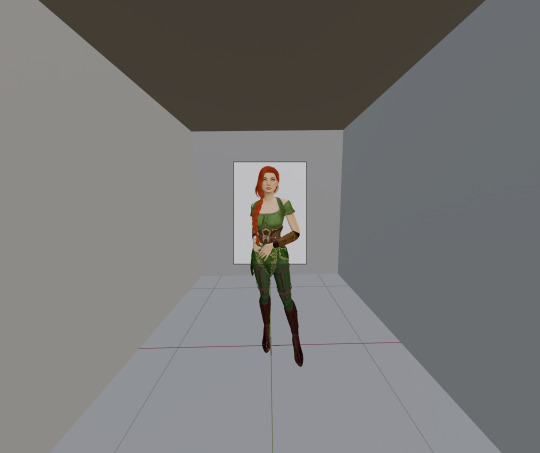
Now our sim looks right!
In Part Two, we'll pose her, set up the scene, and run the render!
#salemsims tutorial#render school tutorial#sims 4 render tutorial#sims 4 blender tutorial#blender#render tutorial#sims render tutorial
163 notes
·
View notes
Text

Blender Tutorial: Building a Scene Part 1: Importing Furniture from Sims 4
Building a scene from scratch is no mean feat, so this will likely be a multi-part tutorial.
In this tutorial I'll be going over the basics on building a scene. This will be the barebones necessities to get a room with a moose and some nice lighting to place your sims in for a render.
There are, of course, more in-depth and complicated ways of doing this, but these are the basics and the easiest (in my opinion!) way to get a nice little scene without too much work.
With that all said, let's get started!
Let's start by adding furniture into our scene. Usually I'd build a room first but I know many of your were asking how to do this so I'll cover this first!
Step 1: Exporting Meshes and Textures from S4S
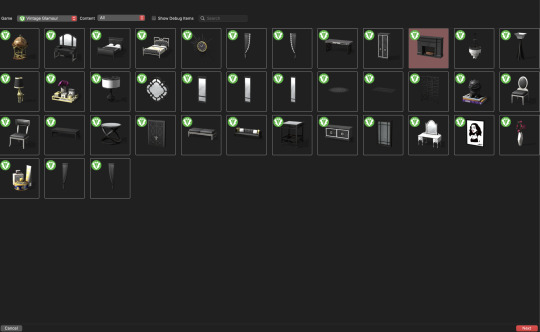
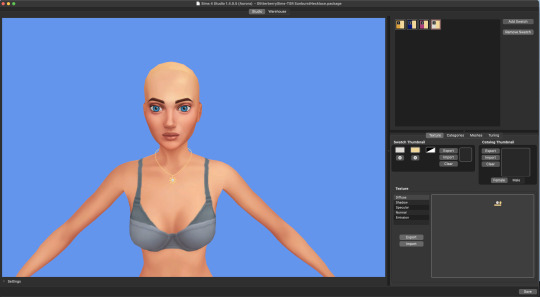
Appending furniture and decor to a scene works the same way as appending jewelry to a sim. First we have to prepare it for blender in Sims 4 Studio. If you're using a piece of furniture from the game, select "Object" in Sims 4 Studio. It may load slowly so be patient!

Then you'll see the game's full catalogue:

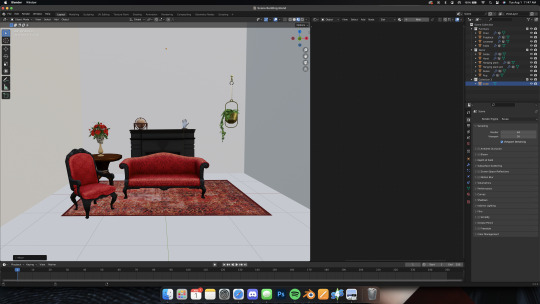
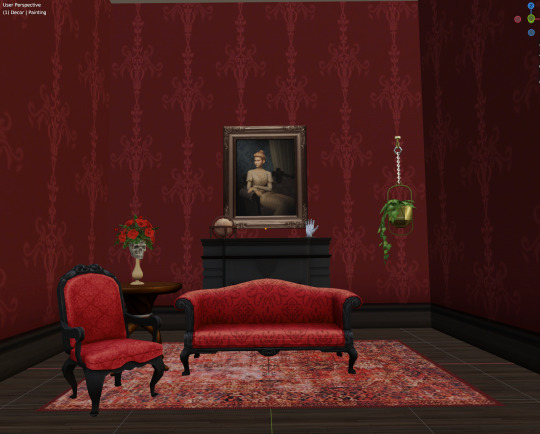
Filter and sort as needed to find what you're looking for. For this tutorial I'm going to remake (and revamp) one of the first blender scenes I've ever made, which looked like this:

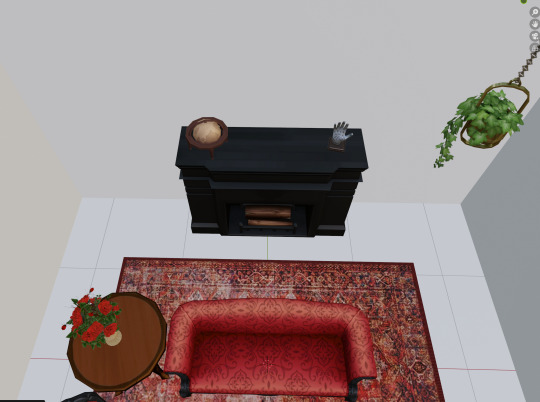
So I'll export the fireplace first. It's from Vintage Glamour, so I'll filter my S4S by Vintage Glamour, and here it is:
Highlight the fireplace then click "Next" Name the package anything, but make it easy to remember. If you need another swatch in the future you can always open the fireplace directly in S4S instead of searching for it each time. Save it somewhere easy to find! Once opened, you'll see this:

To render furniture, we need to export the Mesh and Texture files. I'm in the habit of exporting my mesh first, so we'll do it that way. Click the "mesh" tab and you'll see this:

Click "Export Mesh" and save the .blend file somewhere easy to find! I typically keep the .package, .mesh, and .png (texture) files all in the same place. I find it easier while working in blender. Do whatever makes sense to you just make sure to stay organized! After saving the mesh, navigate to the Texture tab and do the same thing:

Export the texture and save it somewhere easy to find. Repeat this process for all the furniture you'll need for your scene.
Step Two: Appending Furniture Items into Blender & Applying Textures
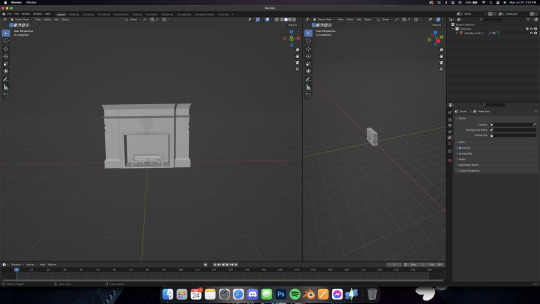
Now let's go into blender. As always, delete the default cube, lamp, and camera, then set up your workspace in whatever way is comfortable for you. I like to set mine up like this:

Now, just like with jewelry, let's append our fireplace in. Go to File -> Append and locate your fireplace .blend file. Open the file, then the Object folder, then select all "studio_mesh" files you see:


You should then have something like this:

Delete the bone_bone and rig as always, then also delete the footprint, which for me was the first studio_mesh in my Outliner list.

Then you'll have the fireplace by itself:
Navigate to the Shader Editor in your preferred workspace, then to the "Material Properties" tab.


Click the minus beside the diffuse texture to get rid of it. Then click the "New" button that appears once the diffuse is gone.


Nodes will appear in your shader tab!

Like we did with jewelry, add in an Image Texture node, a Mix Shader, and a Transparent BSDF. Connect and arrange them exactly like I have here:

Make sure you add in your texture file in the Image Texture node (click open, then navigate to your .png file we exported from S4S). Change the blend mode to Alpha Hashed in your properties window, like this:

And make sure you're in Material Preview mode (I wasn't) by pressing Z on your keyboard and selecting "Material preview"

Now you should have something like this!

In Part Two, we'll add in the walls of the room and maybe a window!
Some notes before I leave you:
Using CC works the same way, you can add it into the custom content folder in S4S OR you can double-click the package file and open it in S4S that way.
Some objects, like trees, have more than one texture. I'll do a separate mini tutorial on that if yall need but basically you'll export both texture files and then apply them to the proper parts of the object (for a tree, for example, the leaves and trunk are often separate texture files)
Please let me know if yall have any questions! And stay tuned for Part Two!
#salemsims tutorial#render school tutorial#sims 4 render tutorial#sims 4 blender tutorial#render tutorial#blender tutorial#tutorial
57 notes
·
View notes
Text

Beginner Blender Tutorial Basic Render: Part Three (Adjusting Render Settings, Adding Lights, and Rendering!)
(Continuing from Part Two)
Step 1: Adjusting Render Settings
I exclusively render in Cycles, and though I'll be doing some Eevee runs for the sake of tutorials, I'm going to share what I know today and show you how to set up a Cycles render the way I do
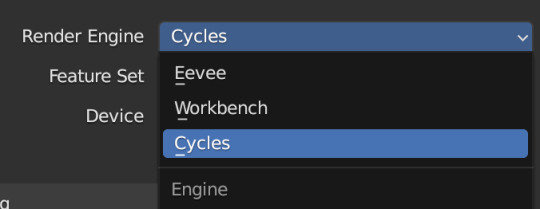
Navigate to Render Properties and select "Cycles" in the Render Engine dropdown

If you have an older system, leave CPU selected If you have a newer or beefier computer, select GPU complete I render on a MacBook Pro, so I'll select GPU
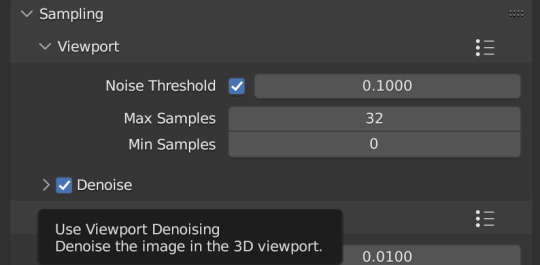
Under Sampling -> Viewport, make sure you click on the Denoise, this will clean up our render preview so we can more easily see what the final result will look like

Under the same Sampling tab, adjust your Max Samples to match mine (32 in the viewport and 128 in the render window, this will speed up your render time)
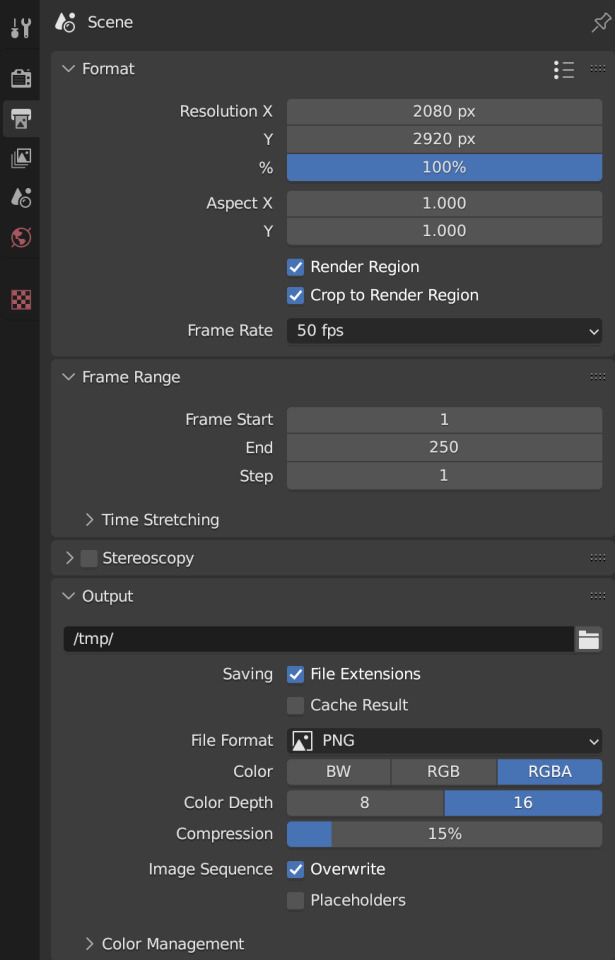
Click into Output Properties and select "Render Region" and "Crop to Render Region", and change the frame rate to 50fps In the Output tab, change the Color Depth to 16 Nothing will change in our 3D Viewport, but the settings are ready to go
Step 2: Adding Lights
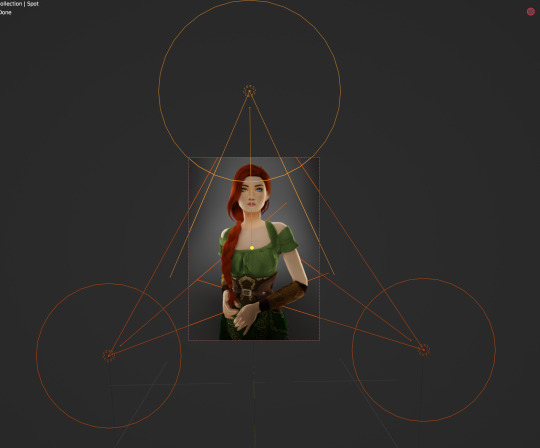
Right now, if we were to change our mode to Rendered, we'd have nothing but a black box. This is because our sim is in a cube with no light source Let's add some lights! For portraits, I like to use a combination of Spot and Point lights You add in lights the same way you add in the camera and the cube, either by clicking "Add" in the top menu or with Shift+A on your keyboard and selecting Light -> Spot or Point I'm going to add a Spotlight first I like to add in lights in Rendered view, but be careful using rendered view as it ups the chances that your Blender will crash

I added in a spotlight but it appears that nothing happened Objects are added into Blender at the Cursor point. I never adjusted mine so it's at the center of the axis, meaning below my sim's feet and outside of the box Using G and X,Y,Z, I'm going to move my spotlight up
Now the light is above her, but I want it shining on her, so I'm going to rotate it forward Rotate objects using the R key and X,Y,Z directions on your keyboard
That's not bad, but I want more dynamic light. I'm going to add two more spotlights for 3 point lighting
This is looking better, and you can see where my lights are and how they're oriented Now let's adjust the background Select your cube in the Outliner panel and navigate to Material Properties Click "new" in the bar Then navigate to your Shader Editor window and you'll see a Principled BSDF Node is here
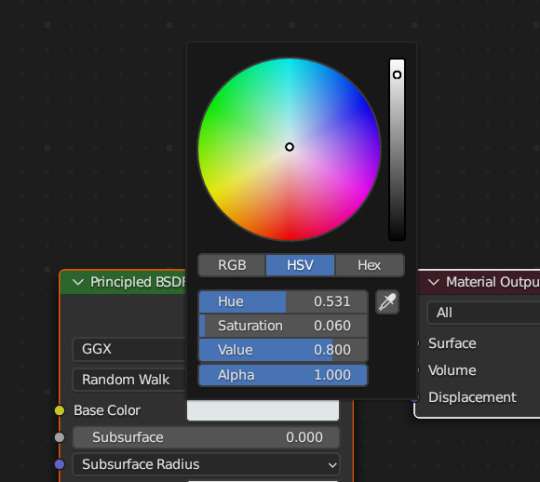
We're not going to do anything too fancy here, just change the color of the cube and some aspects of how it looks Change the color of your box using the color wheel then adjust your nodes to everything is set to zero except roughness
You should have something like this (of course use whatever color compliments your sim best)
I don't want the background to be super flat, so I'm going to adjust the Metallic value on mine Now I have this:
I like the lighting but I think it might be a little too bright Let's adjust it a little In your Outliner panel, select one of the spotlights then go to "Object Data Properties" (the little lightbulb)
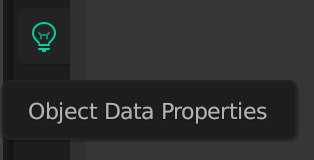
I'm going to adjust the Power to 5 and click off multiple importance and click on shadow caustics, like this:
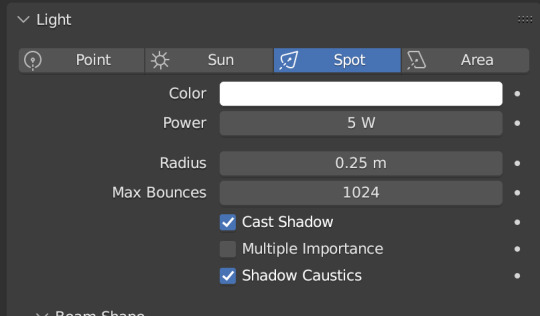
Do the same for all three spotlights and you should have something like this:
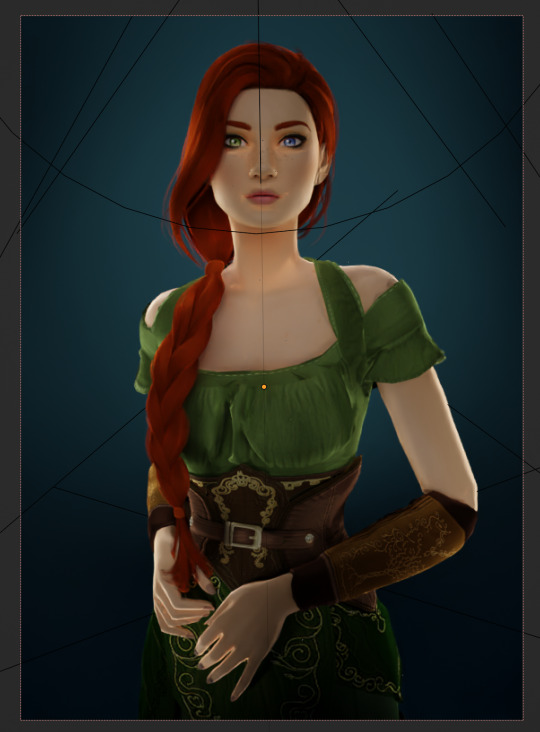
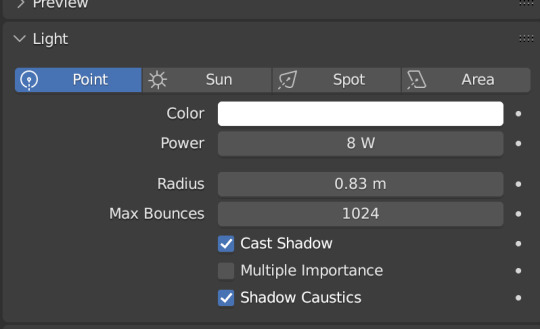
That's better, but let's draw attention to her face with a Point light Add in a point light the same way as a spot (shift+A, light -> point) or Add in the top bar) and move it in front of her face
This is obviously way too bright, so let's adjust it like we did for the spotlights I've changed the radius and adjusted the power to 8, as shown here:
Here's the result:
That's much better! Normally at this point I would probably change her hair and add in jewelry and make minor adjustments to this and that, but for the sake of this super simple beginner render, we're ready to go! Before you run your render, save this file somewhere easy to find. I'll be using the same file for future tutorials!
Step 3: Rendering!
Once you've done all the setup, rendering is actually super easy Make sure you switch your 3D viewport back to Material Preview (rendering while in rendered mode has a tendency to make blender crash) Then go up to the navigation bar and select Render -> Render Image
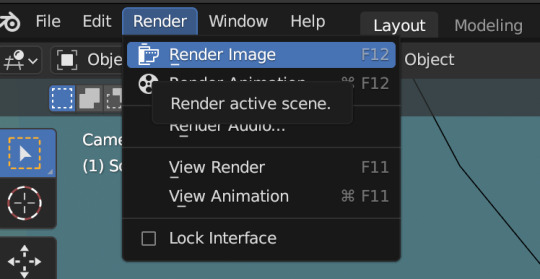
A new window will pop up, and your render will begin!
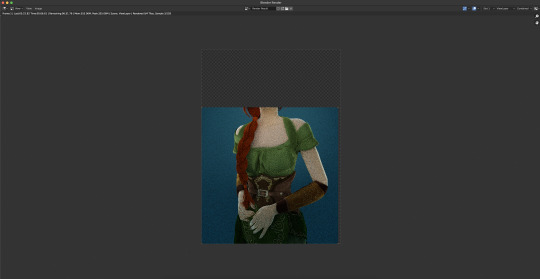
Rendering time will depend on how complex your scene is and how many assets you've added in. Ours is very simple so mine says it'll take about 6 minutes
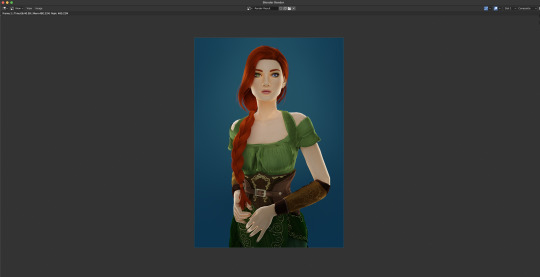
And it's done! Save your render and either post it or edit it in your favorite photo editor!
UPDATE 7/17/23
As you can see, my render was looking very glowy. I didn't know why (there was no glare node in the compositing settings or anything that would cause this, or so I thought), until I adjusted the roughness values on my sim.
Now it looks like this:
So if yours is looking glowy, adjust the roughness to 0, then back up to 10 and that should fix it!
Homework:
Your Render School homework is to create a simple portrait render using these tutorials and tag me in it! I can't wait to see what yall make!
Please leave any questions in the comments below or send an ask and I'll help as best I can!
Happy Rendering!
#salemsims tutorial#render school tutorial#sims 4 render#tutorial#sims 4 blender tutorial#blender#render tutorial#sims render tutorial
64 notes
·
View notes
Note
Hello ! I hope you are well . I was wanting to ask a question if you do answer questions and are abke to help me . I am trying to import hair into blender along with the scalp base png , the hair is from DarkPink sims 4. I can get the hair in and shaded with no issue but i am having trouble figuring out how to add the png scalp base image to my sim model. You can could show me a tutorial or explain it to me that would be great
Hey! I'm doing well! I hope you are too! :) The solution to this is a super neat trick I plan to do an in-depth tutorial on at some point (my wedding is in two weeks so I've been gogogo with last minute prep and rendering as a stress reliever lmao) but basically you just have to add the texture to your sim just like you would to the object itself (hair, clothes, objects, etc)
I know that's confusing because there's already a texture on your sim, but there's a quick and easy way to do it.
I'll use my Rory as an example, because I had to add a hairline to her just like you're having to do.

Here she is without the hairline added, all normal nodes
What you're going to want to do is add another texture node, like this:
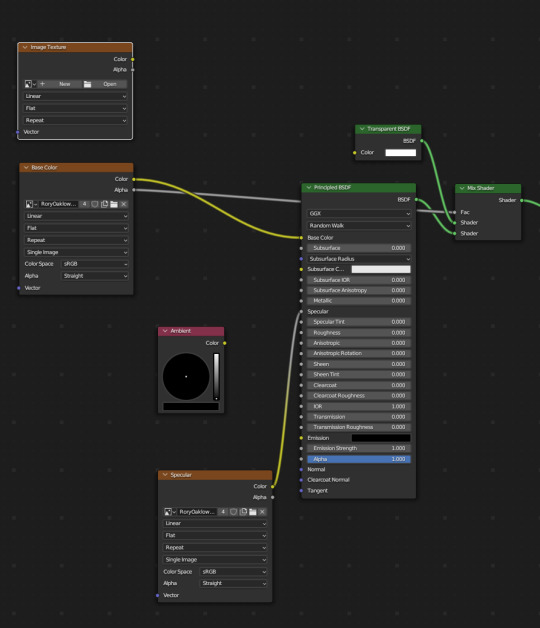
Just right on top, but to connect it to the other texture node and the principled BSDF, we'll also need to add a Mix Color node
And snug it right on that yellow line that connects to Base Color, like this:

Your sim will look a bit odd, that's okay
Rory looks like this at this stage:

In our new texture node, add in the .png for your hair file, and connect it like so:

Connect Color from your hair texture to B and Alpha from your hair texture to Factor
Once you do this, your sim should now have the hairline! Like so:
A FEW IMPORTANT NOTES:
If you ripped your sim as all separate meshes, one texture, be sure to select and change only the head, sometimes this can make other parts of the body/clothing look wrong/wacky so only change the head/whatever part you need
Note that you can only add one additional texture node with this method, but there are other methods out there involving UV maps that I think work a bit differently (I'm not well versed in those but a google search will get you there). There's a workaround for this that I'll show in my longer, more in-depth tutorial on this method
I hope this helps! If you have any other questions please let me know!
Happy Rendering! ♥️
#replied#answered asks#tutorial requests#help#salemsims tutorial#render school tutorial#sims 4 render tutorial#render tutorial#blender tutorial#tutorial
30 notes
·
View notes
Text
@gildedgaiety submitted:
more than one sim in blender hi hi! this may be a silly question with a simple answer that i just cant see but i cant for the life of me figure out how to work couple poses in blender, i try adding the pose and it gives them both the same one and i just dont know enough to figure out how to fix it-
It's not a silly question at all and I'm sorry it's taken me a few days to reply to this!
I'll include a link to Part Two of my Basic Render Tutorial that covers posting HERE, but otherwise, let me jump right in to a mini tut:
Here I have my sims in blender, unposed and stacked in a very creepy way lmao:

I haven't yet set them up for posing, so let's do that now.


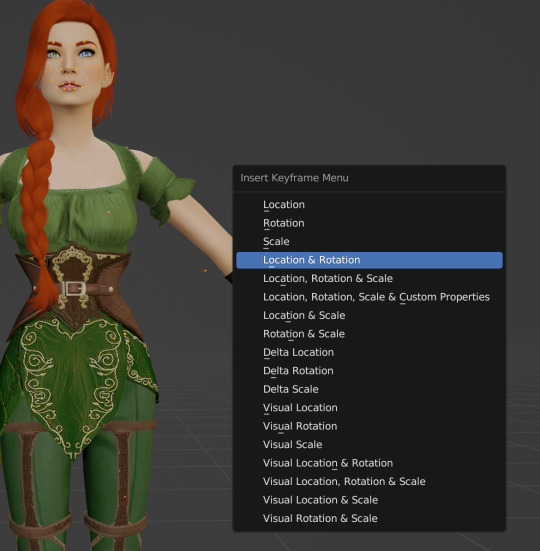
To do this, select the "pose" option in your outliner under ONE of your sims, then in your layout view, hit "i" on your keyboard and select "location and rotation"
Then you'll see that sim's track show up in your nonlinear animation window.
Do the same for your second sim! Then you should have this:

Now we need to append our poses! Follow the instructions in that basic render tutorial I linked above and export both of the posses.
MAKE SURE YOU EXPORT THE POSES WITH THE PROPER RIGS, I.e. if you're doing a couple pose like I am, make sure you export the female pose on the female rig and the male pose on the male rig.
Like this:

Once your poses are appended in blender, go to the nonlinear animation tab.

If I had to guess, the reason you're posing both at the same time is because you have both tracks selected (as in, both of them are highlighted like this at once).
We want to highlight ONLY ONE, I'm going to pose Ariss first.
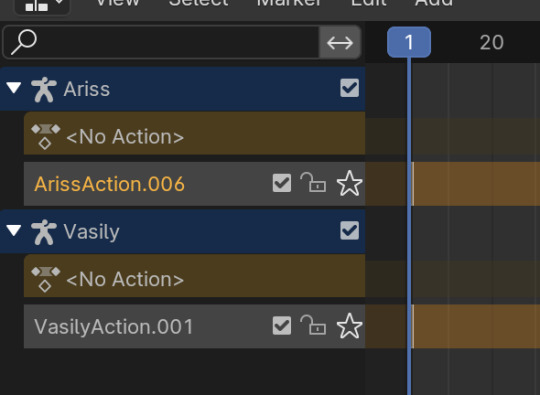
So I'll select her track (see how only hers is highlighted?) then Add the pose.

You can see, very creepily lmfao, that Ariss is the only one posed now!

Do the same for your other sim, selecting only their track, and voila:

They're both posed now!
I hope this helps! Please send any more questions my way! & I HAVE A DISCORD NOW!
Feel free to join (I'd love to have you!) with any other render questions and to share your work!
#salemsims tutorial#salemsims render tutorial#ts4 render tutorial#ts4 blender tutorial#sims 4 render tutorial#sims 4 blender tutorial#sims render tutorial#sims blender tutorial#ts4#sims 4#sims#help#replies
7 notes
·
View notes
Text

Beginner Blender Tutorial Basic Render: Part Two (Posing Our Sim, & Setting up a Scene)
(Continued from Part One)
Welcome back!
In this tutorial, we'll be posing our sim & setting up our scene!
For this tutorial, you'll need Sims 4 Studio, which you can download here!
Step 1: Exporting Poses for Blender
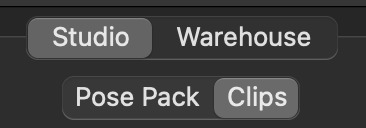
Before we can pose our sim in blender, we need to prepare the pose. I'll be using this pose set by @roselipaofficial for this render! Download your pose and open it in Sims 4 Studio. Click "Clips" at the top
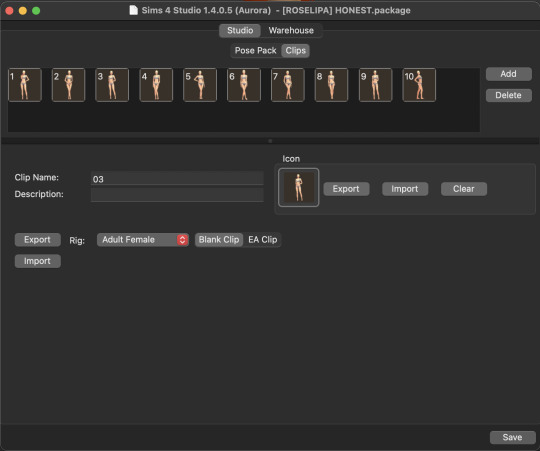
For my render, I'm going to use Pose #3 When you select your pose, the Clip Name will change (Each creator names their poses differently) Before we export, make sure you're set to the right rig! Blender does terrifying things if you export to the wrong rig. I'm posing an Adult Female sim, so we're good to go! Export the pose and save it somewhere that's easy to find! Now let's go back to Blender
Step 2: Posing Our Sim
In Blender, click on "Pose" in your Outliner Then hover over your sim/3D viewport area and hit I on your keyboard (not L) to open the Keyframe menu Select "Location & Rotation"
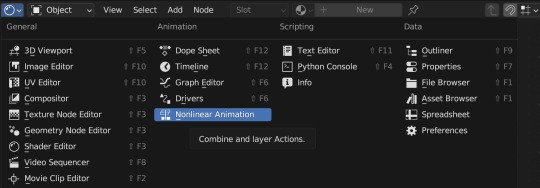
In your right-side workspace, change your editor type (window) to Nonlinear Animation This is where we'll pose our sim!
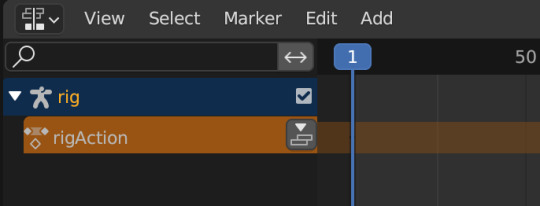
You'll see rig and rigAction. Click the little dropdown arrow next to rigAction, then you'll see a highlighted orange track

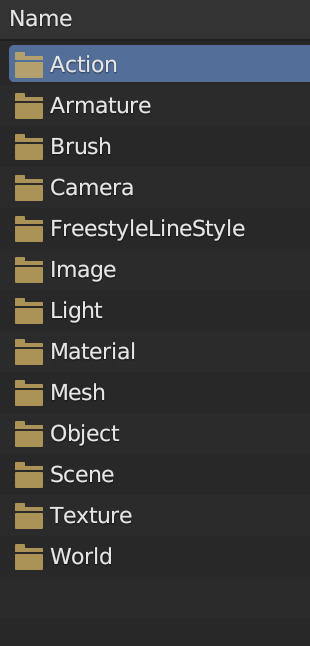
Now let's add in our pose Click File -> Append and navigate to where you saved your pose Double click your pose file, then elect the "Action" folder Double-click the file that comes up under "Action," that's your pose
It'll appear as though nothing happened... but it did! In your Nonlinear Animation window, click "Add" and select "Add Action Strip" Make sure your rigAction line is highlighted orange like mine is!
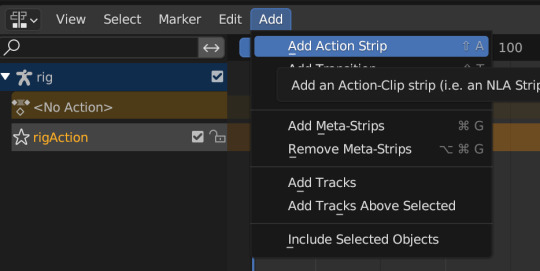

Select the Roselipa pose we added from the list, and TA DA! Our sim is posed!

Step 3: Setting up our Scene
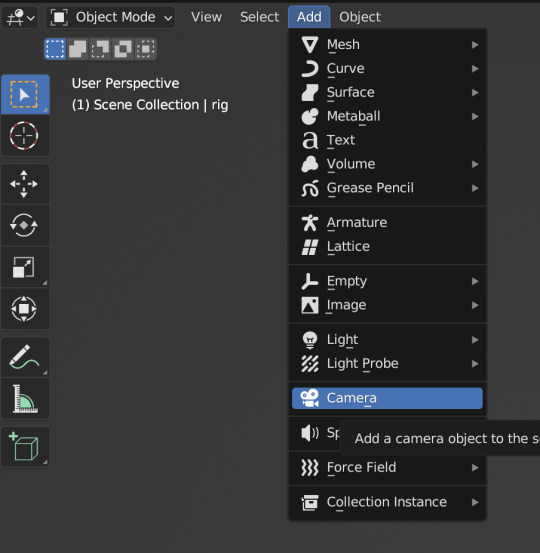
I always add in my camera before doing anything else, that way I can adjust as necessary based on what I want the final render to look like. To add in a camera, you can either select "Add" in the top bar of your 3D viewport window, or hit Shift+A on your keyboard and select "camera"

You'll see that a camera has been added to our Outliner, and we can see it in our 3D Viewport (If you still have a lamp in your Outliner like I do, go ahead and delete it now, we don't need it)


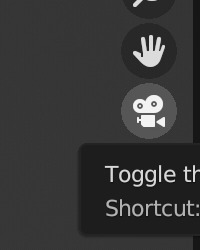
I personally like to move my camera around in real time so I know where it's going. To switch to camera view, click the little camera icon in the right toolbar of your 3D Viewport You'll see that our camera is in a weird spot, but that's ok we're going to fix it
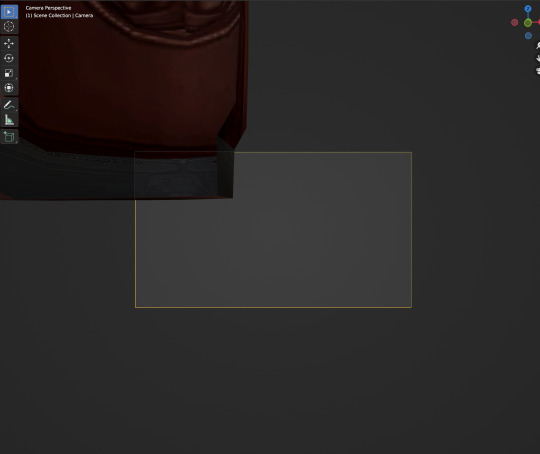
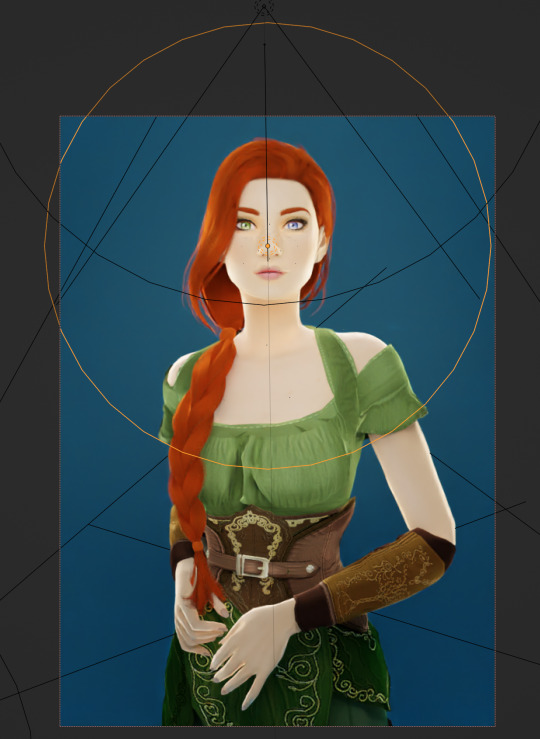
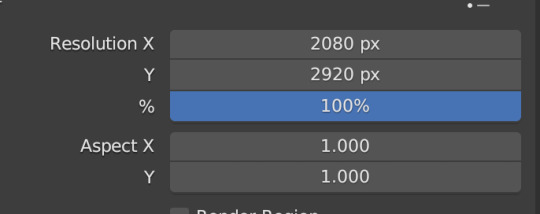
I want a portrait, so I'm going to switch the resolution settings. To do this, go to Output Properties and change the resolution values. The default is 1920x1080, but I like higher resolution renders personally, so I'm changing mine to 2080x2920. Only go up in resolution if your computer can handle it!
Now let's move our camera I like to use the Axis directions on my keyboard to get the camera where I want it Select your camera in the Outliner, then hover your mouse over the 3D Viewport Using the "G" key (the shortcut for move), combine G and "X, Y, or Z" on your keyboard to move the camera where you want it This will be fiddly at first but you'll get better with practice! I've set my camera up like this:
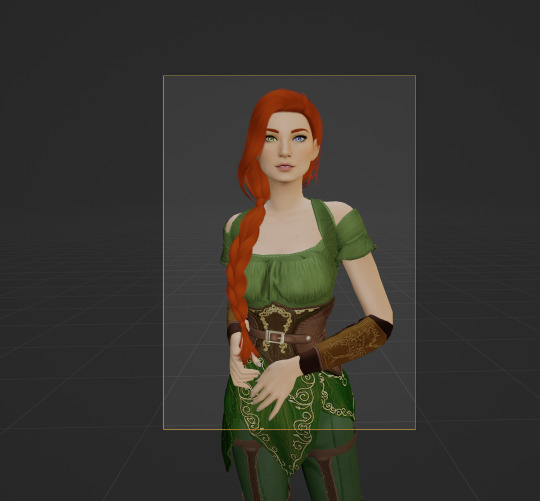
For basic portrait renders, I like to just use lights and a simple cube Remember the default cube we deleted in the beginning, we're going to bring it back now Add it in the same way as the camera, either by selecting "Add" in the top menu and choosing Mesh -> Cube, or by pressing Shift+A on your keyboard and selecting Mesh -> Cube I use keyboard shortcuts, so I'll add mine with Shfit+A like so:

You'll probably have something like this, your sim floating in a box
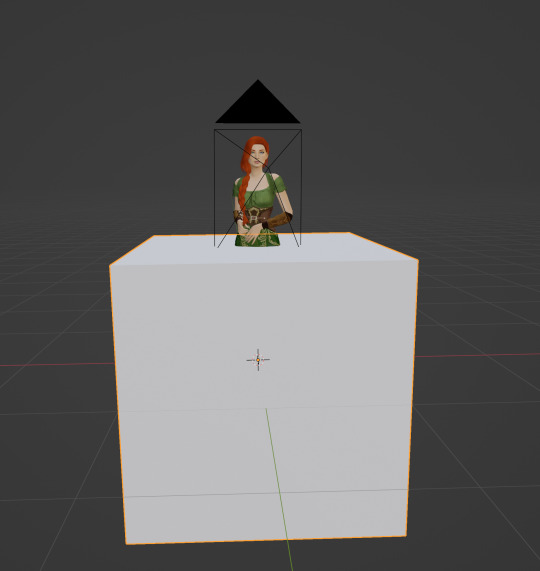
Use the same method you did to move the camera ("G" plus axis directions (X,Y,Z) to move it up and use "S" on your keyboard to scale it up To scale up, hit "S" then move your mouse outward Then center the box over your sim We want to have something like this:

Click into Camera view (click the camera on the right) and you should have something like this:
In Part 3, we'll adjust our render settings, add lights, and render!
I'd wanted to include those in part two, but Tumblr is yelling at me about my photo limit.
If you have any questions, please leave a comment below and I'll help as best I can!
#salemsims tutorial#render school tutorial#sims 4 render tutorial#sims 4 blender tutorial#blender render tutorial#blender#blender tutorial#sims render tutorial
42 notes
·
View notes
Text

So You Want to Make a Sims Render: A SimsRipper Tutorial
In order to import your sims into blender, you'll first have to convert them into a file type that blender will recognize.
This process is done by using SimsRipper, a free software that'll do all the heavy lifting for you!
A few tips before you open SimsRipper:
Create a new save and name it something memorable
Delete all townies and unused sims out of this save
Only use this save for render sims
Create your sim in CAS, save them to your library, then save and quit your game
The more sims you have in your render save, the slower the ripper will load, so try to keep your sim count low!
Some presets will transfer in weird ways to blender, so be aware of that when creating your sim
SimsRipper steps:
Download and unzip Sims Ripper
Put the Sims Ripper folder somewhere easy to find (I have mine on my desktop)
Open the folder and select the "Application" file

The Ripper may take quite some time to open - be patient!
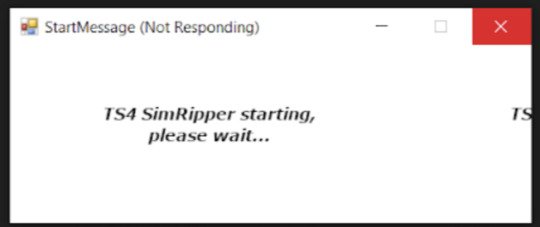
Once it opens, you'll see this screen:
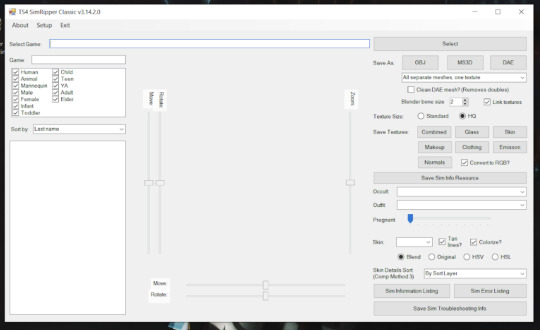
This is SimsRipper without a save file selected. We need to select our save file.
To select your save file, click "select" in the top right and navigate to your most recent save (your render save)
Once your save file loads, you'll see a list of sim names on the left:
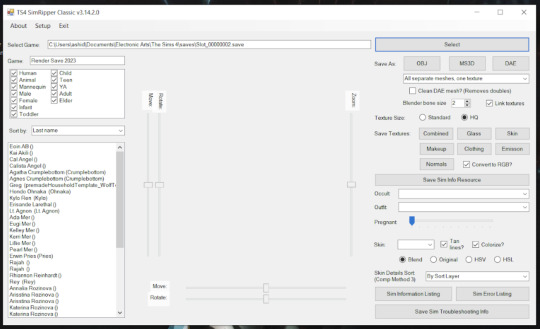
Select the sim you want to rip from the left sidebar, then WAIT - it will take some time to load!
Your sim will show in the center once it's loaded:
This is the extent of the steps, but you do have a few options, I'll go into those quickly.
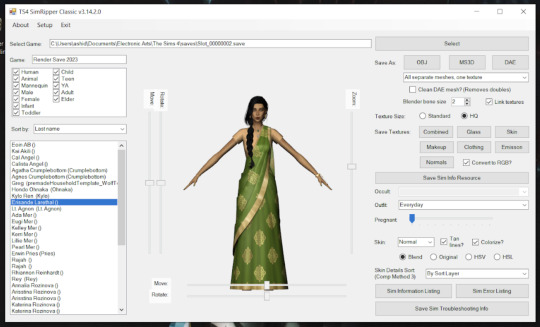
Your sim will load with their every day outfit, but you can select other outfits from the dropdown on the right:
Note: switching between outfits will take time so be patient!

You can also select whether they have taglines or are burned
If you have an occult sim, you can select which form to rip
Saving your rig:
Before you save your ripped sim, make sure your settings match these:

Having all separate meshes with one texture will benefit us later. (: & of course we want HQ!
When you're ready, click the DAE button to save your sim.
A few tips:
Save your sims in a place that's easy to find & tidy
The cleaner you keep your files the easier your life will be
Choose a permanent place for your ripped sims, as moving them will cause annoying problems later on
It's perfectly fine to dress your sims in game and rip them dressed, but if you want to save yourself the headache of doing this process (like I do), you can also rip a sim in their underwear (lmao) and dress them in blender (I'll post a separate tutorial on how to do this - it's my typical process)
Be sure your settings are right before saving as a .dae! It's such a headache to find out later they were wrong.
I hope this helps! Please feel free to leave questions in the comments or send an ask if anything is unclear!
Next, we move on to blender.
49 notes
·
View notes
Text

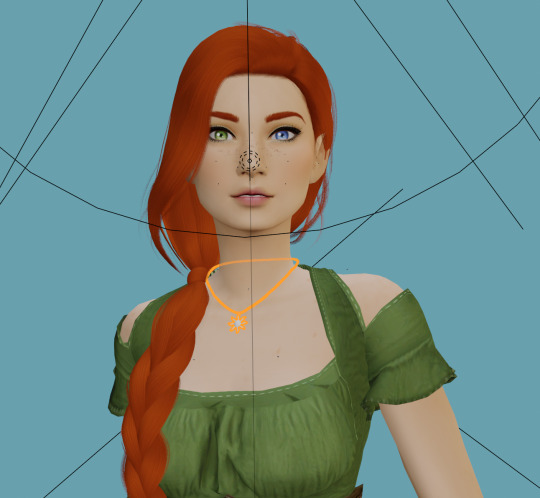
Blender Mini Tutorial: Appending Jewelry
This tutorial was requested by @ch1llxsimz!
Let's get into it under the cut!
I often build my full scene in blender, staring with a sim in their under wear. Meaning I have to add in clothes, accessories (jewelry), etc. It's super easy let me show you how to do it! I'm going to start with my tutorial file. You can follow along with the tutorial here. We're staring with this:
She's cute but she's lacking some jewelry no? I'll be using this necklace and these earrings (TSR warning).
Step 1: Exporting the Jewelry from Sims 4 Studio
Download your jewelry files and open them in Sims 4 Studio.
You should have something like this (I zoomed in and selected the swatch I want) Once you have your swatch selected, switch to the Mesh tab and click Export - this will export your mesh as a .blend file!

Then move to the texture tab and click export on the texture, this will export a .png file!
Save both .blend and .png files somewhere easy to find! Do the same for your earrings (or whatever else you want to add) Now let's go back to blender!
Step 2: Adding the Jewelry to Blender
In our blender file, we're going to select File -> Append and find our jewelry file

Double click the jewelry file and you'll see a list of folders, select Object

Under object there'll be a list of items, select the Studio_mesh (there may be more than one, select all of them!)
Click append and it'll show up in our blender file. This is what we have now:


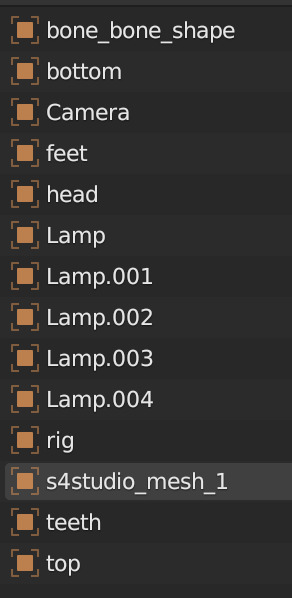
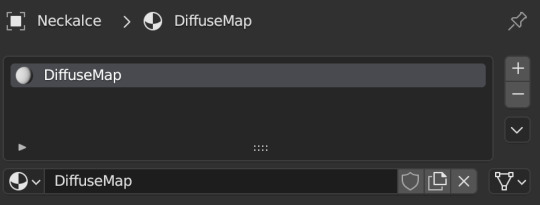
It *looks* to be in line with my sim because of the nature of this pose, but if you have different poses it'll be wildly out of line The necklace isn't attached to the sim yet, it's just in the blender file. So let's attach it First, delete the bone_bone_shape and the rig from your outliner, we don't need either of those Now you should have something like this (I renamed the studio_mesh to Necklace to keep my Outliner tidy and I recommend you do the same!)

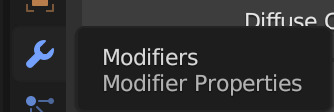
Now we're going to append the necklace to our sim Navigate to the Modifier panel (the little blue wrench in your properties area)
You'll see this window:
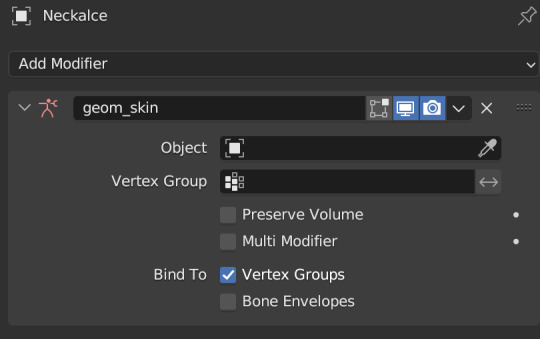
In the Object line, we're going to click that box and select our sim, like so:
You can see that the necklace moved to match her pose:
But it doesn't have a texture, so let's fix that now
Step 3: Adjusting Textures
Go to your material properties editor
You'll see that there's a diffuse map there already
Click the minus button on the right to get rid of it Then press "new"

Now we have nodes!

We're going to add Mix and Transparent shaders again like we did for our sim, but we're also going to add an Image Texture node Don't forget to set it to Alpha Hashed! Like this:
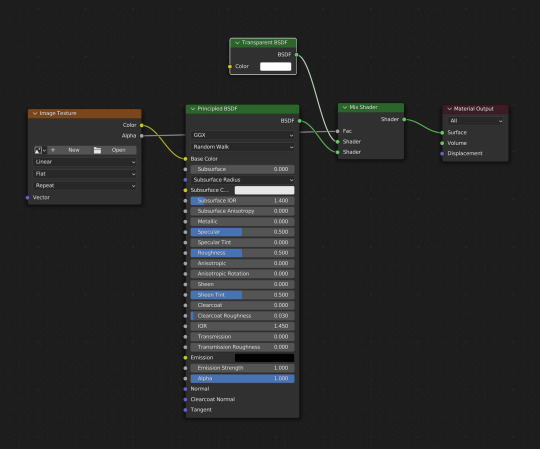

Match your nodes to mine & you'll see that the necklace disappeared, that's because we have to add in the .png we saved from Sims 4 Studio! Click "Open" on your Image Texture node and add in your .png file

Now our texture shows up! You should have something like this:
But I want mine to look like metal, so I'm going to adjust my nodes like this:

And now her necklace looks like metal:
I followed the same steps to add her earrings and now I have this:

But I don't love how her necklace is floating, so let's fix that Select the necklace so it's highlighted orange
Then use G on your keyboard and then Z to move it down so it sits properly on her neck, like this:

This won't work for all jewelry, but for this it's a quick, simple fix You can also do this with sculpting (which I use to simulate gravity) but that'll be its own separate tutorial! Here's what the necklace looks like rendered:

Homework: Add Jewelry to Your Sim!
& Tag me in the results! (:
You can use this method to add in clothing, hair, accessories, etc!
Please let me know if you have any questions in the comments!
#salemsims tutorial#render school tutorial#sims 4 render tutorial#sims 4 blender tutorial#blender#blender tutorial#render tutorial#sims render#tutorial
31 notes
·
View notes
Text

Blender Quick Tip: Auto-Save
Blender is a powerful program, but it's also a little bitch finicky. It'll crash on you as often as it's able and do so with glee.
And while it's tempting to rip your hair out, set your computer on fire, and never touch it again, all hope is not lost!
If your Blender crashes or stops responding, rest assured that you don't have to start over!
Blender auto-saves periodically, and it's likely that you only lost a few seconds of work.
Next time your Blender crashes, take a deep breath and reopen it, then click File -> Recover -> Auto-save. The most recent file is your most recent auto save!

I hope this helps and happy rendering!
#salemsims tips#render school tips#sims 4 blender tutorial#sims 4 render tutorial#blender#ts4#sims 4#sims
52 notes
·
View notes
Text

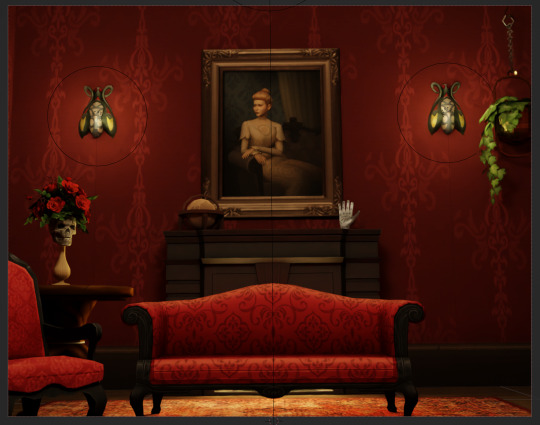
Blender Tutorial: Building a Scene Part 2: Creating the Room & Adding Lights
Welcome back!
Let's get started shall we!
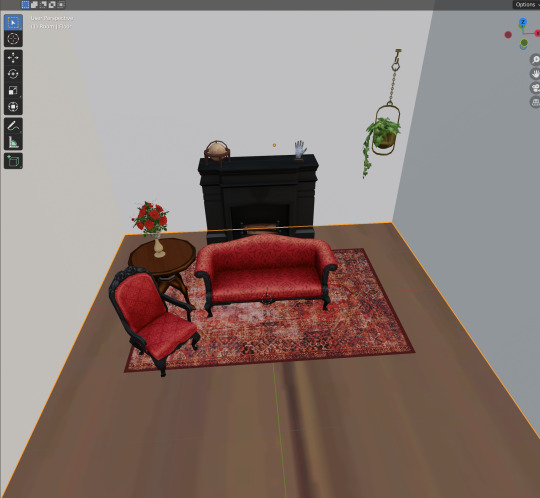
I built out my set behind the scenes using the same process as in Part One, so for Part Two I'm staring with this:

Some things will need to be moved once there are walls, but we'll cross that bridge when we come to it.
If you want to create the same scene, here's the objets/cc used:
Sofa, loveseat & small globe (base game)
Fireplace (vintage glamour)
Hand & hanging plant (paranormal stuff)
End table (realm of magic)
Rose vase by Natalia-Auditore
Crocus rug by Wondymoon
Step 1: Adding a Room
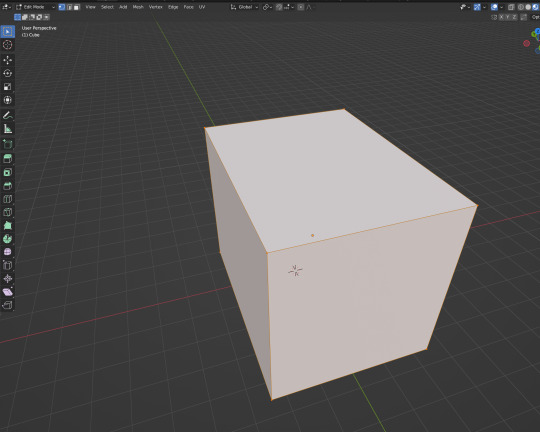
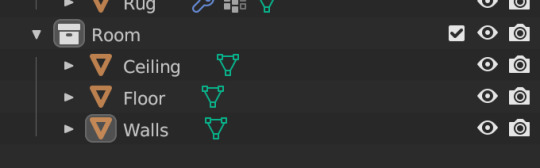
I'm sure there are "better" ways of doing this, or ways that'll result in thicker walls that more closely mimic real ones, but for my uses, this quick solution has worked really well without adding too much render time onto my work. So let's add in a room the simplest way possible, by adding a cube:
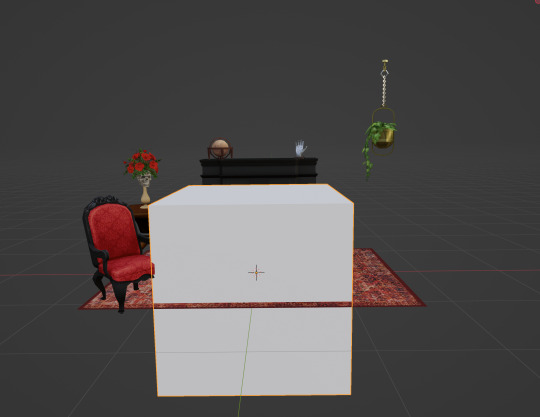
Adding it in gives us this mess, but it's ok! I'm going to size it up and move it around using the axes keys (x, y, and z) so we get this:
The shape and size of the room doesn't super matter for this specific render because there are no windows or built in bookshelves or anything like that, but that said - Make sure your floor is at 0 (on the grid) and the back wall is right behind the fireplace so you don't get any weird shadows when you render, like this:
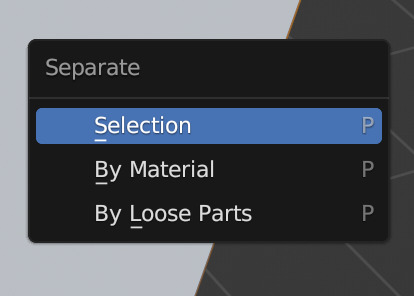
Now, adding texture to this style of room can be a little tricky, but once you learn this process it's not too bad. First, we have to separate the pieces. Scroll/zoom out until you see the whole cube and select it (it'll outline in orange), then press the Tab key to go into edit mode:
Points appear at each corner of the cube, this is what we want. Select the four points that make up the ceiling using shift+click until only the top face is highlighted orange, like this:

Then press P on your keyboard to bring up the separate menu, and select "Selection," this will separate the ceiling from the cube so you can adjust its textures independently

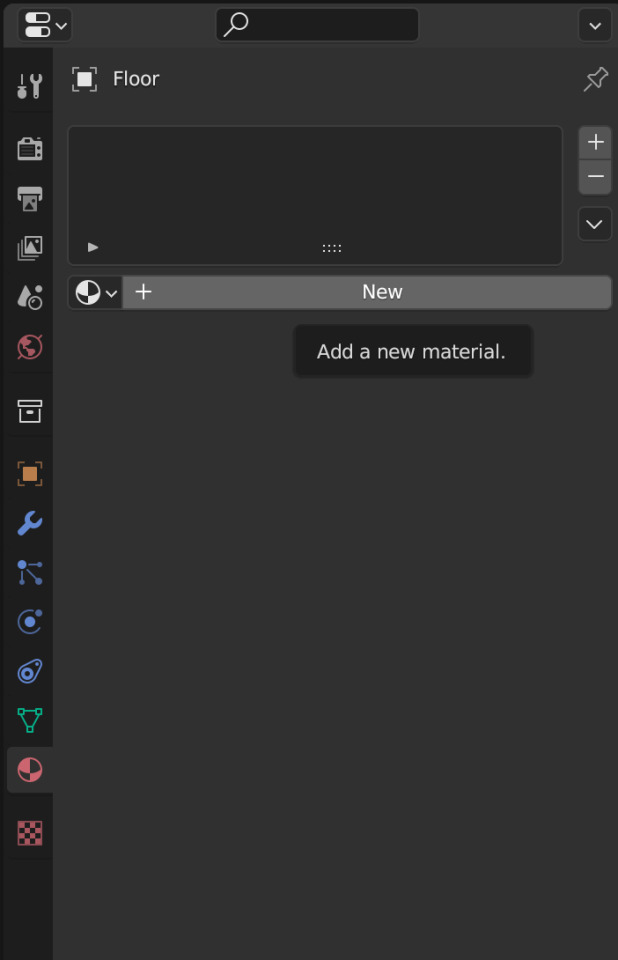
Do the same for the bottom of the cube to separate the floor. Be sure to stay organized by renaming the pieces in your outliner! Now let's add the floor texture first, select the floor We're going to follow the same process we use to texture objects, but with an additional step. So go into the materials tab and select "new"
Like with any other object, add in an image texture node, but this time we're going to use a floor texture. You can get these from Sims 4 Studio by selecting CAS from the main screen then saving down the .png files. After adding in your nodes and switching to alpha hashed, you should have something like this:
It's a floor texture alright, but it's way too big, let's fix that. I like to adjust the sizing and rotation with vector mapping, which is way easier than it sounds! In our shader editor, we're going to add in a vector map node, like this:
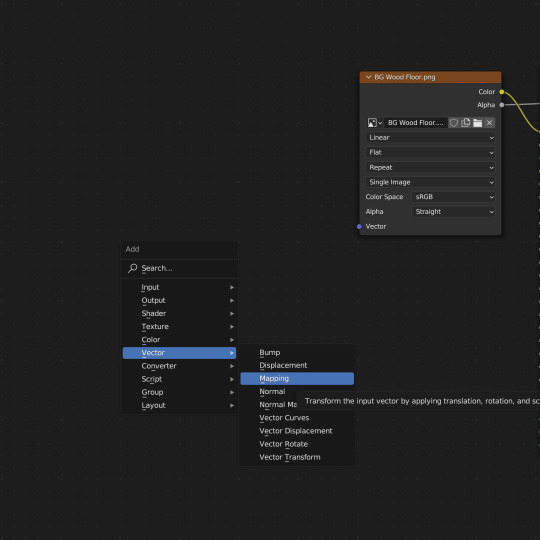
Then we're also going to need a texture coordinate node, added like so:
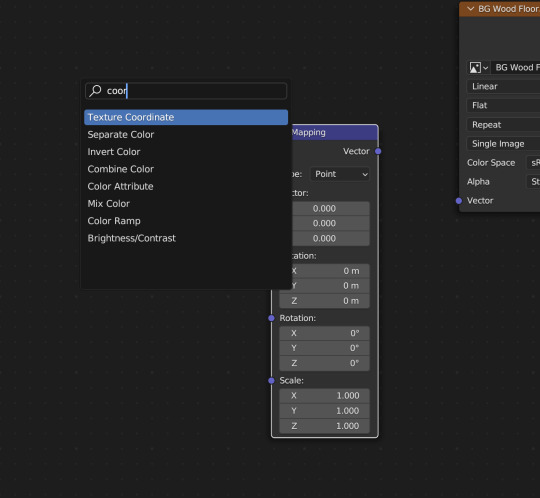
Arrange them like this:
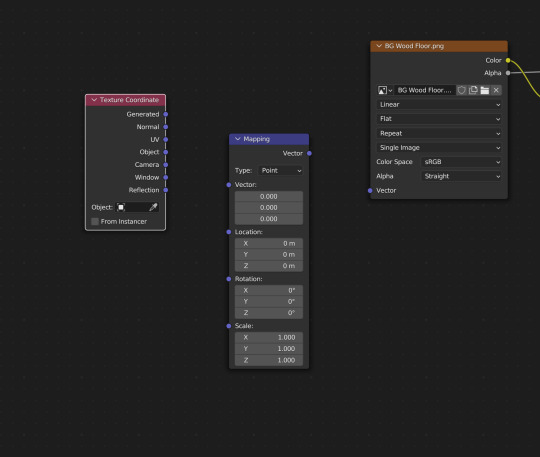
That will appear to have done nothing:
But that's because we need to adjust the values! I adjusted mine (as pictured below) and now I have this:
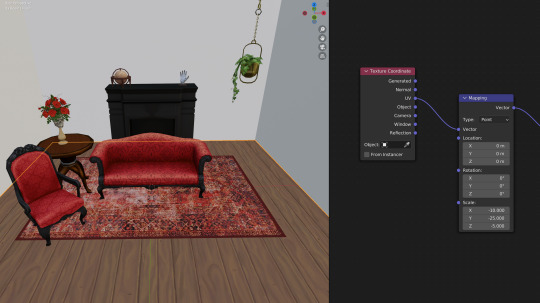
For floor textures, it's super simple because you only have to adjust the scale. For walls, it's a little more complicated, but follows the same steps. So let's add in a wall texture. I follow the same steps, and, yikes:
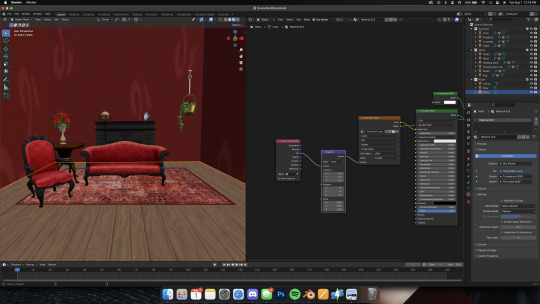
This is obviously not what we want, but we can adjust it with texture mapping! The most important step is to adjust the Z axis rotation by 90, so that the pattern is vertical instead of horizontal. After that it's a game of adjusting the scale value until it looks how you want it to, like this:
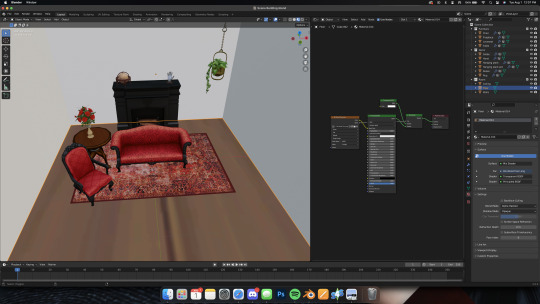
Look at that we have a scene! I'm going to change my floor texture to match and add in the painting I just realize I forgot to add, so now I have this: Now I have this:
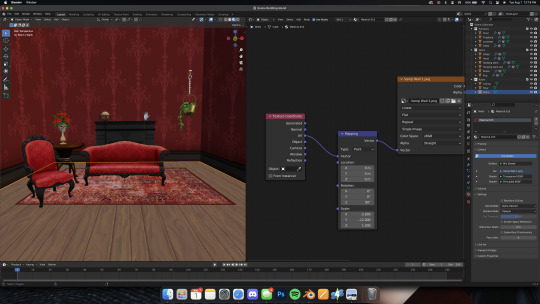
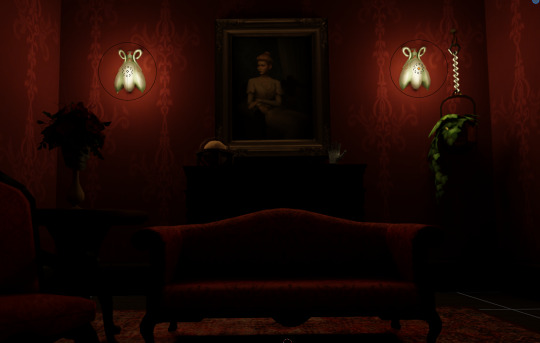
Step 2: Adding Lights
Adding physical lights (like the wall sconces in my original render) works like any other object, we just need to add in a point light to actually light the space. Usually I would fight these to make them transparent so I can put the point light inside the fixture, but for this simple scene I'm content to let the point lights hover just in front of the fixtures, like this:
I accomplished this by adding in point lights (shift+a -> light -> point) and using the axis keys to move them where I want them, then I adjusted the light values like this (please note that I'm set to Cycles):
There's a long and tedious process to add real fire (which I'll cover in a separate tutorial), but because we don't actually see the fire in the fireplace, I'm going to mimic it with area lights (which will also shorten render times) Add in an area light in the same way as a point light - Shift+A -> Light -> Area:

Then it's a matter of using the axis keys to move it inside the fireplace and rotate it
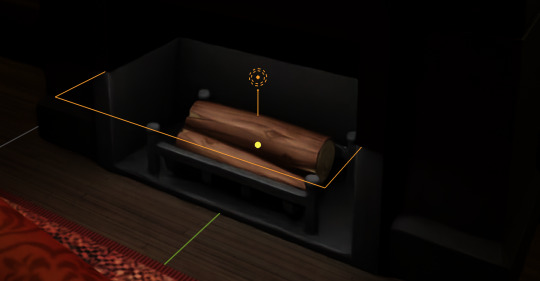
I like to rotate the lights to be facing outward and down, and I do duplicate the area light and make one more orange and the other more yellow. Then I added in a point light and placed it inside the fireplace so it all looks realistic. I ended up with this arrangement, but you'll have to play with it to find what's right for you!
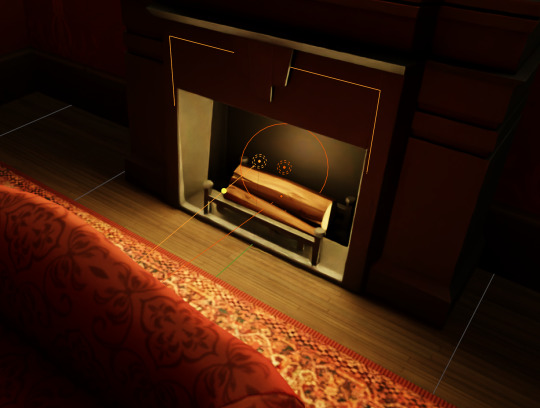
From the front (my camera view), it looks like this:
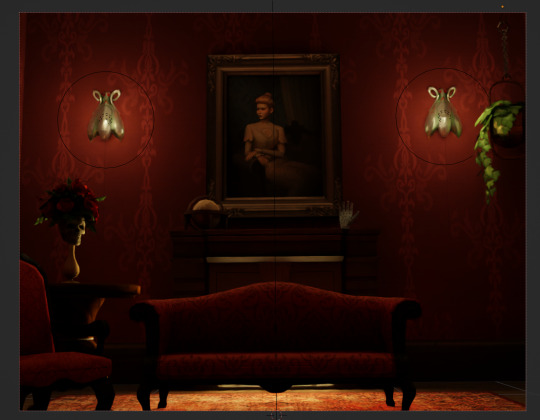
I learned early on in my render journey that using "realistic" room lighting isn't always possible, so I'm also going to add a point light and move it up closer to the ceiling, to mimic a chandelier or ceiling light Now we have a bit more even lighting:
From here, all you have to do is add your sims and run your render! I hope this helps! Please comment here or send me an ask/submission if you have any questions!
Render School Homework
Your homework, should you choose to accept it, is to build your own scene and run a render of it! You can include sims or not, but if you do it and post it please tag me so I can showcase it!
#salemsims tutorial#render school tutorial#sims 4 render tutorial#sims 4 blender tutorial#render tutorial#blender tutorial#tutorial
32 notes
·
View notes
Text

Blender Quick Tip: Purge Orphan Data
If you're anything like me, you're indecisive.
I often dress my sims in blender and try different poses and lighting and sets and accessories before I'm fully satisfied. This process tends to clog up my blender file and slows it down over time.
Lag makes it much harder to set the scene exactly how I want it, but luckily there's a fix for Blender lag!
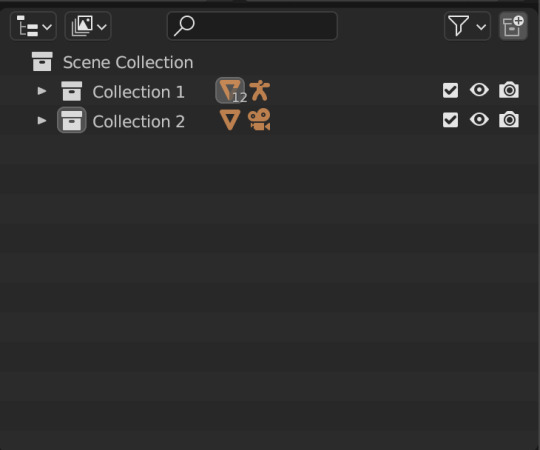
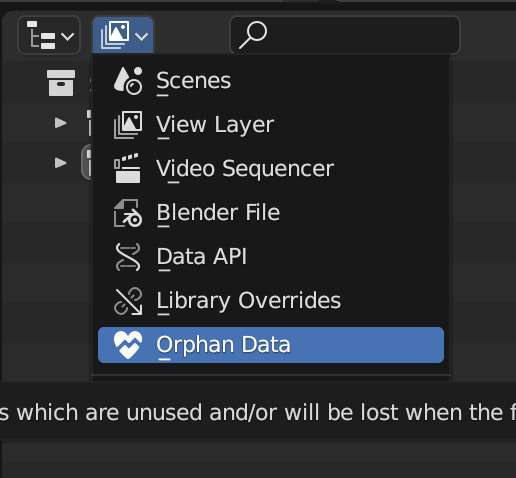
Navigate to your Outliner and click the dropdown, select "Orphan Data"
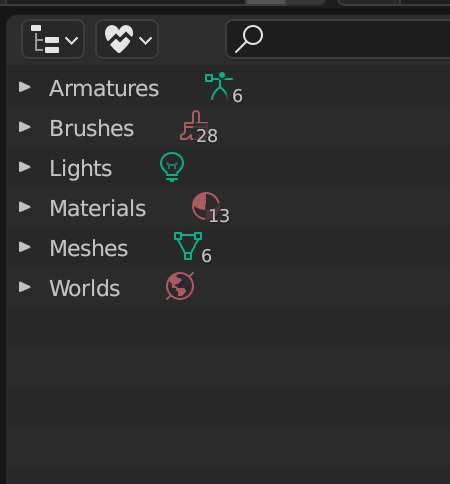
This will show all the items you're not using! These are safe to delete.
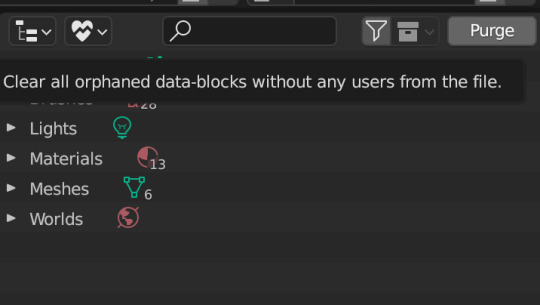

Click "Purge", then click the section I have highlighted in blue.
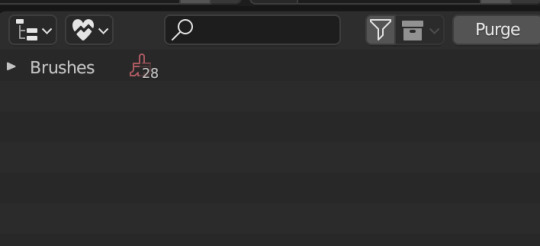
You'll be left with only brushes, which is fine (I think Blender requires these to be present)
I hope this helps & happy rendering!
36 notes
·
View notes