#sims edit tutorial
Explore tagged Tumblr posts
Visit Tumblr Blog
Explore Tumblr blogs with no restrictions, modern design and the best experience.
Last Seen Tumblr Blogs


Fun Fact
In 2020, 44% of users from Denmark used Tumblr daily.
Note
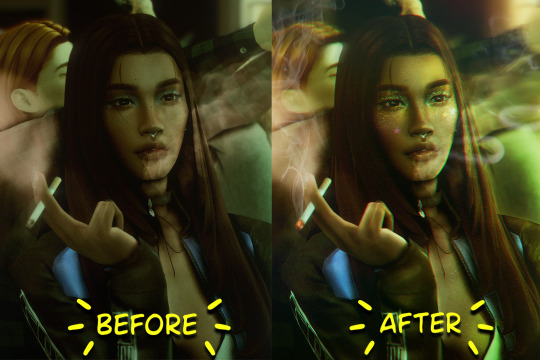
hellooooooooo i love all of your renders and posts you're so talented oml. may i ask for a tut on how you did the smoke in this post? tysm ily :D
Hey, thank you so much ahhh!!! That means so much to me!! ILY! 😘
In truth, my method for smoke is not sophisticated at all... It's actually laughable how simple/easy my process is for this, I'll admit 😅
There is a way to do it right in blender, but for this particular trick I don't use blender (mostly because I've never been able to get it to work right, user error I'm sure haha). But if that's what you're looking for, there's an (untested) tutorial here!
I personally use photoshop for my smoke, and, I admit, brushes!
This tutorial assumes you have a basic knowledge of photoshop, but if you don't or if any of this is confusing feel free to send me an ask and I'll be glad to help!
A while back I scoured the internet for free cigarette smoke brushes and amassed a small collection of them. Unfortunately none of mine are marked with a name or anything so I can't link to specific ones, but here are a few I've found for this tut:
Click with caution! I use ad blockers and these sites are fine for me but as always be careful!
Brusheezy free smoke brushes 15
Brusheezy free smoke brushes 12
Resource boy 200+ free smoke brushes
If you're using photoshop, make sure the brushes are in .abr format!
Once downloaded (& unzipped), if you double click the .abr file it should automatically install and open your photoshop if it's not open already.
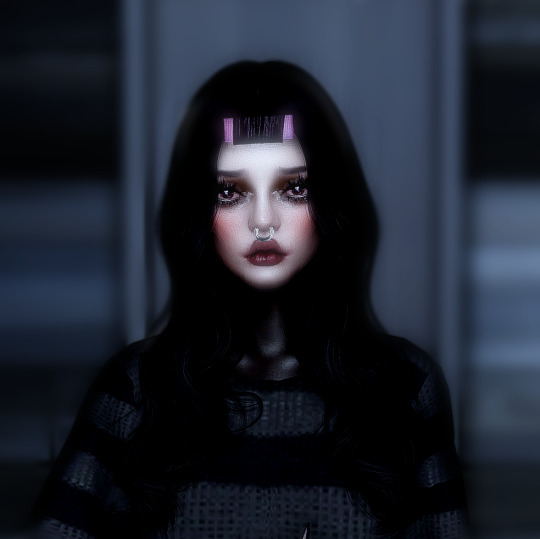
I've pulled one of my renders of Ariss (pre-smoke) into photoshop, so let's make some smoke.

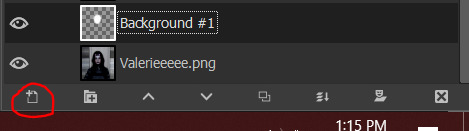
Step 1: Create a new Layer!
Make sure you are working on a new, empty layer! This will be important in later steps!

Step 2: Add smoke using your smoke brushes
On the new layer, select the smoke brush you want to use, and make sure your color is set to white/off white/grey.
Hover over your image and select where you want your smoke to be. I was unable to take a screenshot of this process, but I put my smoke here:

Step 3: Adjust opacity/shading

You should have a layer for your smoke now. Double click it and the layer style window should pop up.

In this step... honestly go ham. If you follow exactly what I'm doing, it won't look the same because of differences in our base image (color, brightness, saturation, etc). But I usually adjust:
Blend mode
Opacity
Color overlay
Outer glow
If your smoke isn't on a separate layer, any adjustment you make here will be on the main layer, which we don't want!
I've adjusted mine, & ended up with this:


Step 4: Move & adjust your smoke
Because your smoke is on a separate layer, now you can move and adjust it.

This is all up to your preference! I typically just move, adjust, and edit the layer style until I get something I want.
Sometimes I'll also blur the smoke, which you can do by selecting filter -> blur -> gaussian blur, just make sure you're on your smoke layer!

You'll know you did it right when you get this window showing the transparency instead of your image, & if the smoke blurs when you adjust the radius!

& that's it!
There's a way to also use the standard brush tool and "path blur", which I've used before but don't usually like the result of it.
But if you'd prefer to try that, here's a tutorial for it!
#thank you so much for the ask and the love!#ts4 tutorial#ts4 edit tutorial#sims 4 tutorial#sims 4 edit tutorial#sims tutorial#sims edit tutorial#ts4#sims 4#sims#ts4 editing tips#sims 4 editing tips#sims editing tips#salemsims tutorials#I hope this helps#if not lmk!#& I'll try to clarify
23 notes
·
View notes
Text
Subtitling Tutorial
This one goes out to you @weirdosalike 🙌🏾
As a disclaimer, my program of choice is Photopea, but this is so simplistic it definitely works for Adobe Photoshop as well. The first thing to do, of course, is find the cap you want to place subtitles on.
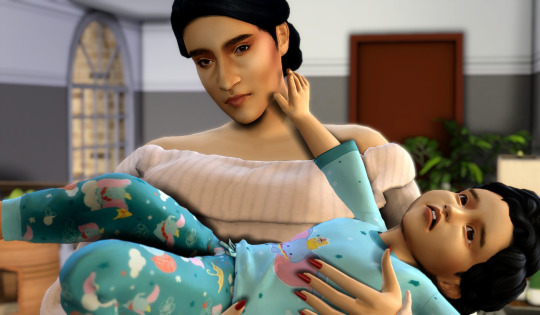
My caps are huge, so the size you want your subtitles to be is ultimately dependent on what you think corresponds with your image size the best. However, readability is everything. So, you want them large, but at the same time you don't want them to be overly big especially if you plan to have other characters speaking in the caption. (Enormous text is only what I do when I'm having characters really scream or be in an emotional state, it shows emphasis.)

Generally, my setting for text look like this. The bold thickens the text and the size works well for my images. Usually, I use white and golden colors for my speakers, but if it's a scene with numerous characters I splash color to indicate who is who.
Example:
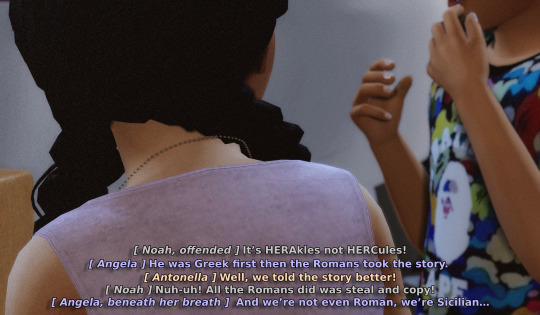
On that note, I try my hardest to choose light colors for my speakers because it can ideally show against the background well opposed to if I used darker hues. Ultimately, I don't think I'm the best at color picking so discovering what works and what doesn't work is like trial and error but for the most part? I believe that light colors are the way to go.
But let's go back to our original cap.
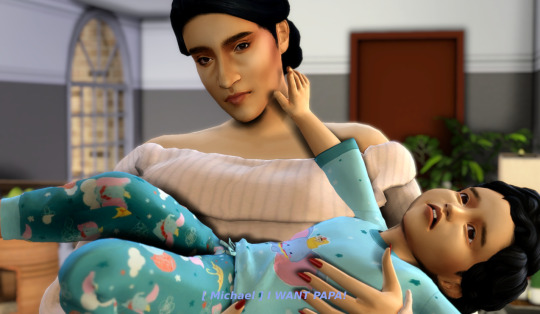
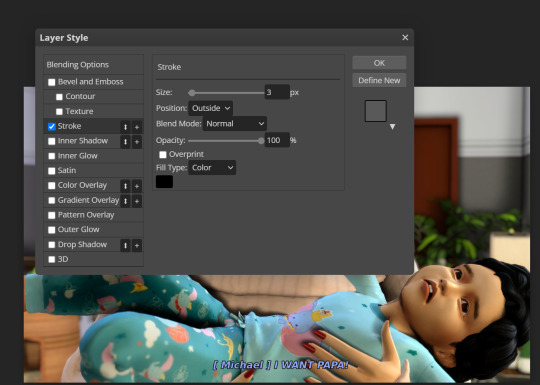
You can't read this at all! So what we're going to do is put an outline around it. By clicking the effects button you'll see this list of options
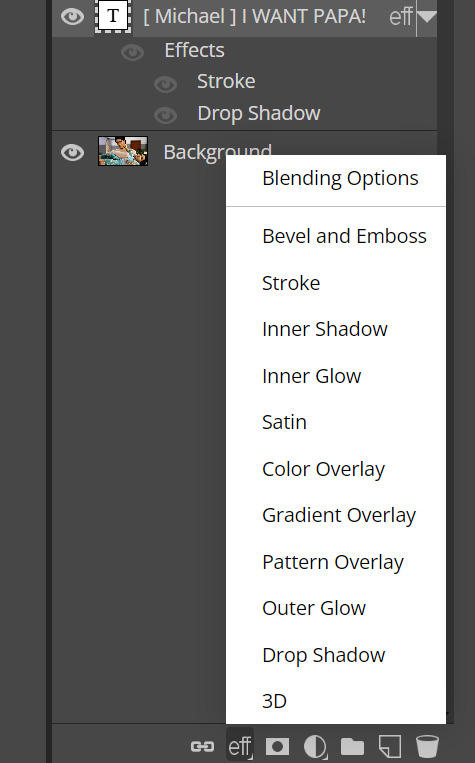
What you want to click is stroke, which will show you these settings.
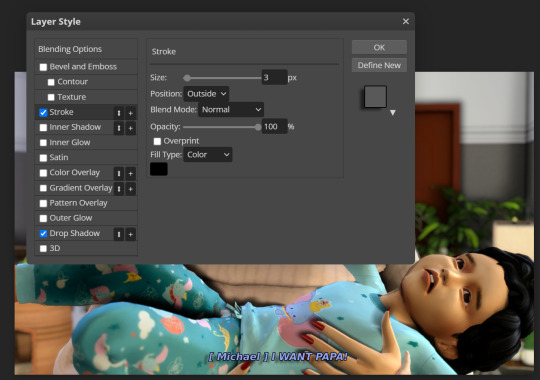
This is how the font now looks with an outline. But it's still not quite readable, so I add a drop shadow to create a contrast.
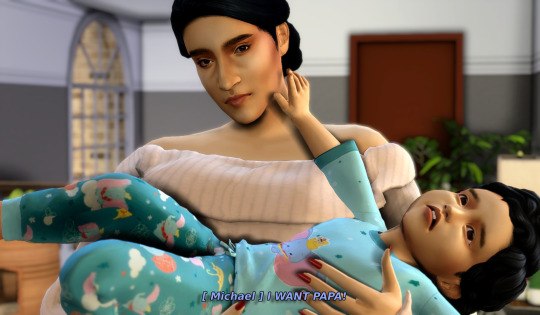
It stands out more prominently, although you may personally want the font to be a bit bigger. And after clicking okay, this is the outcome!
Sometimes I consider new forms of editing like having a faded black box behind the text, but I'm not fully committed to the concept. But this is the fun of editing; figuring out what works and what doesn't work! Hope this is helpful.
44 notes
·
View notes
Text
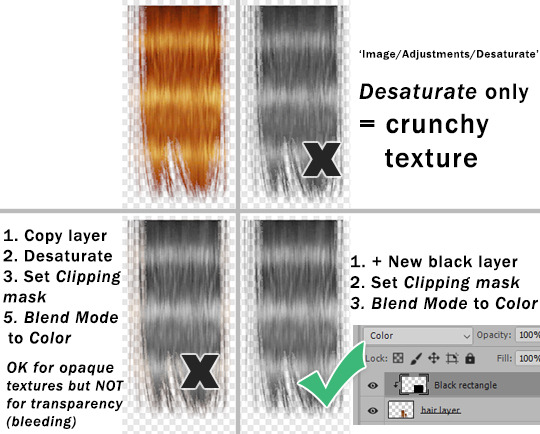
This is my response to this post by @goatskickin - a second version. That's the best way to desaturate hair texture or other stuff with alpha transparency ( thanks @paluding).
Desaturate or Hue/Saturation often makes textures crunchy.
You'll get best results if you create plain black layer and set blend mode to Color. Adjust Opacity as needed. In case of alpha stuff you also need to create Clipping mask.
When doing color actions on hair textures (or anything else) - if Hue/Saturation adjustment layer step does -83 Saturation (for example), instead you can do what I described above and set black layer Opacity to 83%.
Also, use SimPE to build textures as DXT5, do not rely on Bodyshop 'cuz it will always f*ck it up.
#sims 2#the sims 2#ts2 tutorial#I had to edit this tut cuz it wasnt suited for alpha-hair and I didnt want anybody to mess up their hair recolors because of it
415 notes
·
View notes
Text

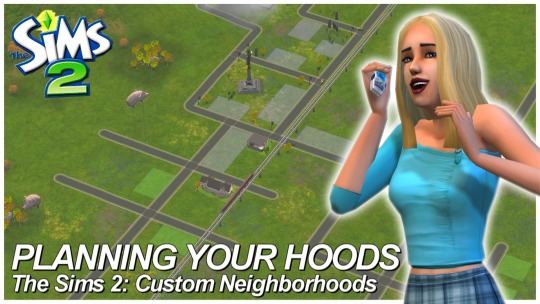
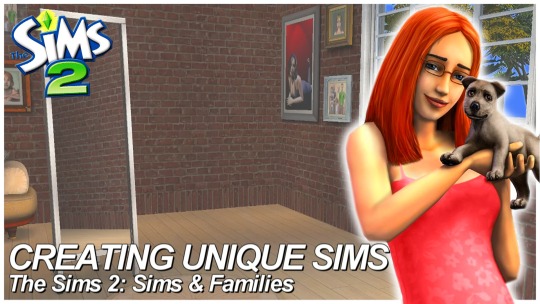
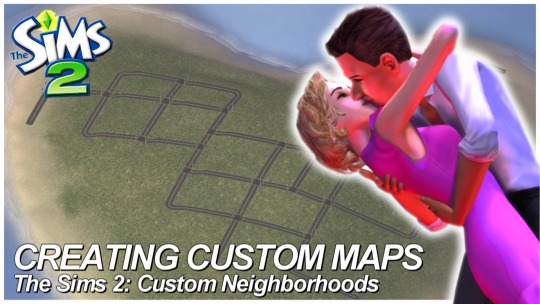
SIMS 2 • Custom Neighborhoods (4 Part Series COMPLETED)
Hey everyone! I think I forgot to share, but I finished my 4 Part Creating Custom Neighborhood series for Sims 2 on my Youtube Channel! All videos are linked below if you missed it!
I also have 2 separate tumblr posts with Map Templates and a quick Masterguide to plan 'hoods!
Best Neighborhood Templates | Links to Templates Planning Your Neighborhoods | Masterguide Creating Unique Sims Creating Custom Maps
#ts2#the sims 2#sims 2#sims 2 custom neighborhood#sims 2 custom hood#sims 2 guides#sims 2 tutorials#sims 2 youtuber#mine#edits#youtube#tutorials
385 notes
·
View notes
Text
Photoshop Tutorial #2 -
Paint Tears


This is the easiest thing in the world! You can do it in a minute. This is for anyone new to editing in Photoshop
Okay! Starting off by opening my pic in Photoshop - I'm choosing this one of a sadboy

I'll simply create 3 layers

grab a brush, set it to white,

and on the first layer, I paint some tear shaped blobs in the characters eyes - I'm just doing whatever, as long as the shapes are round and bubbly in some way, it's okay.

now, I'll set the opacity of that layer to around 25%

on the layer above, I want to draw some simple, round highlights with the same white brush

and set the opacity to around 30%
Finally, on the last (top) layer, I'm grabbing that same, white brush and making it really small - like, 2px.
Shortcut to increase & decrease brush size is [ and ]
and I'm going to paint some lines around the tears. Not all the way around, just kinda, artistically around some of the edges, and leaving other edges open.

now, I'll set the opacity to around 50%
I'm happy, so I'll flatten the image and save!
and that's it!
Here are the three layers isolated, just so that you can see.

2.

3.

and combined

Hope this was helpful!
Good luck!
#sims 4 tutorial#editing tutorial#sims editing tutorial#sims 4 edit#photoshop editing#photoshop tutorial#sims 4 community#simblr#sims 4 photoshop tutorial
141 notes
·
View notes
Text
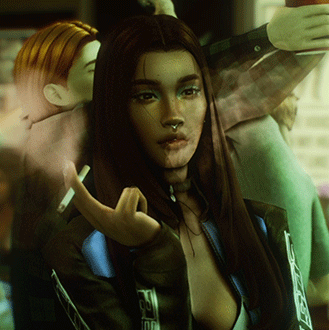
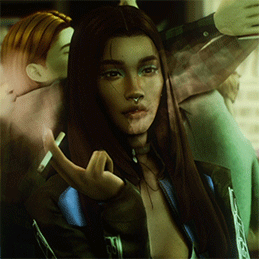
Updated: How I edit my sims 4 screenshots (night-time edition)
A more detailed editing tut so you can understand my process as it may help you, i edited this relatively quickly and usually spend about 1-2hrs editing something...so let's goo.....
Before taking screenshots:
Help yourself as much as you can in-game, I always make sure there is some sort of light source in my pictures or something interesting that I can add to enhance something already there
Understand good/bad composition and add variety by using different angles
I take LOTS of photos just to end up with 1 or 2 good ones

I'll just be using photoshop for this, but i also like to use the procreate app as i'm more confident w it.
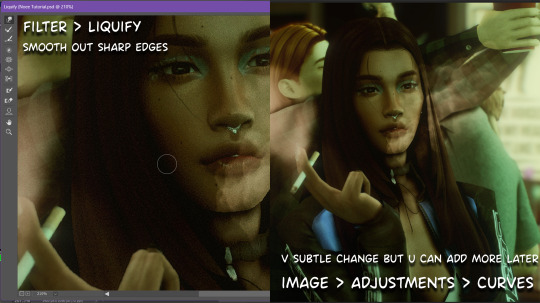
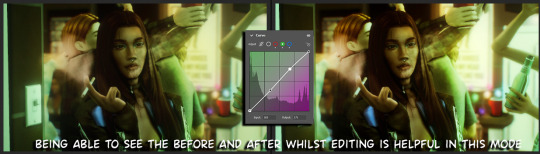
step1: I check if there are any major glitches or hard areas e.g, fingers elbows etc.. that have sharp points and pull them in liquify so they are smooth. Then use curves to change the contrast.
step2: *duplicates image* using the dodge and burn tools (keyboard shortcut: o ) i'll add emphasis to highlights and shadows (be careful with these as the dodge tool can ruin the image if used in excess) *merges image* (i duplicate and merge as i go, utilise using lots of layers so you can go back if you mess up/ want to change the opacity of an effect.)
step3: making light sources POP. *new layer* change blending mode to overlay or soft light and choose a colour you like.

step4: *new layer* draw hair strands. i just use a basic round brush in photoshop and change the hardness or i'll use a sharp caligraphy type brush depending on my sims hair type. (i try not to overdo it as i like maxis hair and don't want it to look too realistic)
step5: i would then add a new layer and set the blending mode to multiply to add more shadows, but i don't feel like i need to at this point.
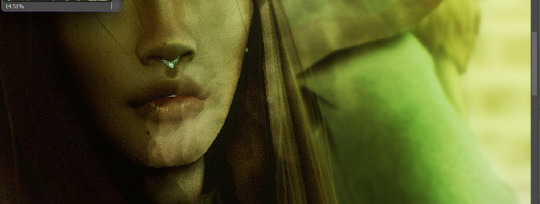
step6: *duplicates image* go to filter > camera raw filter, i change the "light" and "curve" panels, i like green tints in my screenshots especially the night ones. (this is where all the magic happens really so just adjust all the channels to your liking, lightroom is also really good to use)
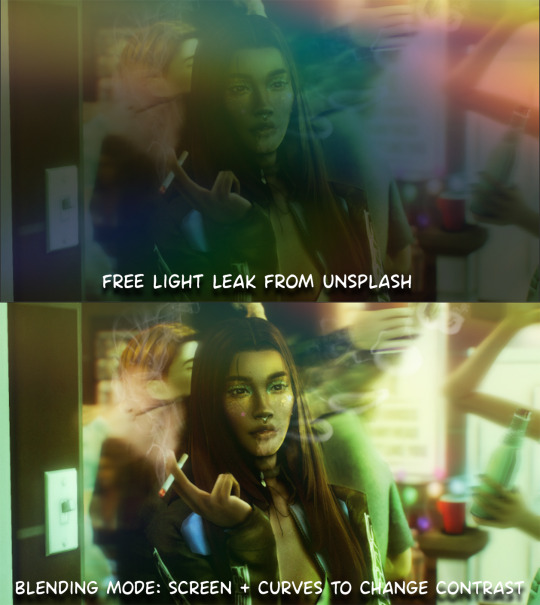
step7: *create new layer* blending mode: screen or linear dodge (add) / makeup and finishing touches! - for this look i'll get stars and glitter pngs off google or unsplash same for the smoke, though if i'm using procreate they have free brushes for that :')

step8: add light leaks as they add some fun dynamic lighting and textures to your screenshots. (i also flip my image horizantally [image > image rotation > flip canvas horizontally] whilst editing as it's like a "fresh pair of eyes" when you've been editing for a while so you can see what looks off)
final step: merge all the layers (though i do merge along the way once i'm happy with something) go to filter > sharpen > smart sharpen. I leave it as the default setting.
extra step if u want: for party pics i might add chromic abberation here is a 60 second tutorial on youtube it makes the pic look cool and trippy.
And you're done!! congrats on surviving. if you have any questions please send them in my ask box so others can see and get help too.
250 notes
·
View notes
Text
Guides, Tutorials, & Resources for the The Sims 2 | Sissy Sims
How to Create Custom Vacation Locals
Easy Way to Edit the Secret Witch Lots
How to Create Your Own Vacation Tourists
#creating sims#custom locals#custom tourists#vacation subhoods#edit secret witch lots#neighborhood creation#youtube tutorial#sissysims
34 notes
·
View notes
Text
one more medicated peaceful moment.
#ts4#the sims 4#simblr#ts4 render#show us your sims#deja senti b sides: edits#jay#from tha lighting tutorial#daddy merrik#god and his voice claim is linked.............i won't him 5ever im ngl#the vitiligo in his brow that i COMPLETELY FORGOT TO GIVE BOWIE HSKLHJHG#we're gonna pretend shes always had it
104 notes
·
View notes
Text


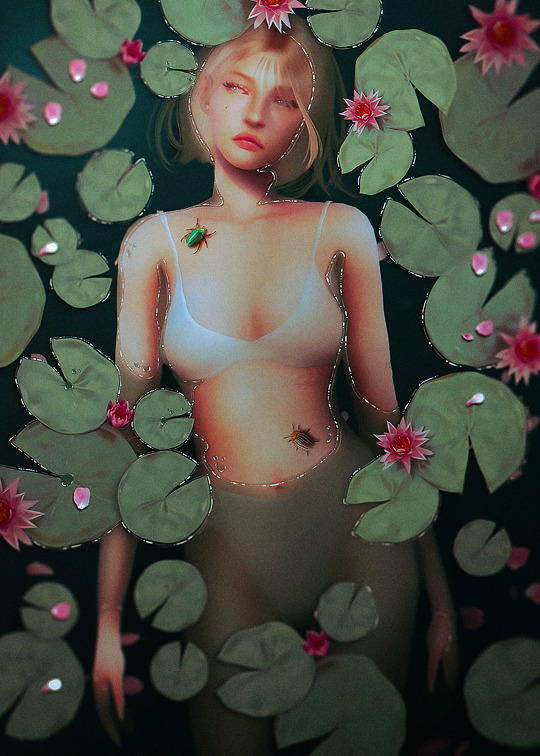
I've tried to do one of these half-submerged water edits many, many times, and I could never figure it out. I want to share what I learned with this edit because it seems a common sentiment that this concept is a little complicated. Hopefully, this info will help if you want to do an edit like this!
I painted the water with a color mask. I filled the whole canvas with medium green, lowered the opacity to about 60%, and erased where Amelia's body would peak through the water. I made the edges irregular to mimic how water pools. I used a hard brush, you want a lined edge, not a soft one. I recommend using a layer mask but you could do it with a regular layer.
The biggest concept I had to work with for this edit was depth. The highest points of Amelia's body would be about the water, but what about the deepest? I filled my canvas again with a darker green and shaded in parts where the water would be deeper; like the bend of her elbow and between her thighs. I recommend erasing with a soft brush.
Next, I outlined the edges of her whole body with a soft brush in the background color to blend Amelia's body into the pool of water. This helped her look more submerged.
This really helps it look like water: Where the body pools on top of her skin like around her armpits and on top of her belly ... I erased along the edges of my first green layer with a brush on ~35% opacity. I didn't want to erase it all but give the impression the water was thinner and more transparent.
I outlined the water on Amelia's body with a dark brown color, about 2px, on multiply, to help make the water look like it's rolling onto her body. If you go over onto the water later, don't worry it actually helps the effect.
After these steps, I continued to tweak things until I liked them. I added more shadows and some highlights.
I placed the lily pads next and added a small drop shadow under them so they looked like they were sitting on top of the water.
This step was my favorite part; I used a 1px white hard brush on 100% and drew different-sized lines along the edges of the water to create small reflections. I did it around some of the lilypads as well. This helps the water look more like water.
That is about all, I drew hair and added petals and bugs, then color grade the picture. The colorgrading really brought this picture to life!
I hope this helps anyone trying to create this kind of edit! I am always available if you have questions or if there is something I can help you with!
23 notes
·
View notes
Text
A Very Basic How to Edit a Screenshot Tutorial
I had a request by PeachPlumbobs on Bluesky about how I edit my moodlets and use them on my Sims 4 screenshots. I used this as an opportunity to brush up a little on my Photopea skills to offer a free solution to anyone editing their sims screenshots. This is a quick and dirty tutorial. There are SO MANY MORE THINGS you can do with Photopea. Its basically a free to use, browser based, Photoshop. If you've ever worked with Photoshop, you will be comfortable here.
To follow along with this tutorial you need:
A screenshot of a moodlet and a screenshot you want to put it on top of.
Open Photopea in your browser
** I play and edit on a PC. Any keyboard shortcuts I mention are for PC.

First, we're going to open Photopea. It really is browser based. You don't need to download a thing to your computer. For this basic edit tutorial, I dragged and dropped a screenshot with a moodlet and a screenshot I wanted it overlayed on.

Notice how Photopea will open each image as its own tab. That's good. The question I was asked was how I edit and add moodlets. Personally, I use exactly what the game gives me. I'm going to show you how to cut them out with rounded corners here.
*To make your life easier, feel free to use the magnifier glass tool on the left to make the area you are working on bigger. If you need to move the whole image around, use the hand selection tool on the left side.
On the left side with the tools, you will find a button for shapes, click the rectangle one. On the top bar, just below the "Edit" button, you will see a drop down box that lets you change this from a shape to a path. Make it a path. On that same bar you will see an option to edit the corner radius. I changed it to 5px.
Use this path drawing tool to draw a rectangle over the part of the moodlet you want to see. I cut out the time remaining on the moodlet when I do this. I also cut out the icon - that's optional of course!

Once you have your path drawn, look to the right side of the screen. Over there, you want to switch it from layer view to Paths. After that, on the bottom of the right side is a button that lets you make that path into a selection. Switch the view on the right side back form Paths to Layers. Use the Arrow tool on the left side and click the center of your selection to make sure it is active.

On PC, you can use the keyboard short cut "Ctrl C" to copy the selection. Or, you can go to the top and click "Edit - Copy"
Switch tabs to the image you want to place the moodlet on. The PC keyboard shortcut is "Ctrl V" to place your copied selection on a new layer of this file. Or, you can click, "Edit - Paste"
Again, this is how I edit my moodlets and you don't have to do the same thing if you don't want to! Once my moodlet is placed as a new layer, I use the square selection tool on the left side to create a box around the moodlet icon. I then use the arrow tool to move the icon on top of the moodlet box with the text. Once completed, go to the top and press "Select - Deselect"

How to add that nifty translucent outline around the moodlet. Make sure you are on the layer your moodlet is on! Go to the bottom right and click the button labeled, "eff." Go up the pop-up list until you get to "Stroke." Click on that and a layer style box will pop up. For this example, I set the width to 10px, the opacity to 40%, and the color to white. There you go, you've given that moodlet a little pop!

This is a quick tutorial, but I'd be remiss if I didn't follow through with the rest of the image editing process here. I know I plan to make this image a square when I save it, so I moved my moodlet over where the square would be. Using the rectangle select tool, you can press "Shift" while dragging the rectangle out and you will get a perfect square. Once you are happy with your selection, go to the top bar, and click "Image - Crop"

Now that I know the size of my image that I plan to post, I can adjust the size of the moodlet. Again, make sure you are on the layer with the moodlet when you try to do this! Go to the top bar and click, "Edit - Free Transform"
Free Transform is a lot of fun. You can make the moodlet larger, smaller, or rotate it! If you hold down the "Alt" button while resizing, the moodlet will keep it original aspect ratio as well. Once you are happy with the size and rotation of the moodlet, click the arrow tool on the left to exit Free Transform mode.

This screenshot was taken at night and is very dark. There is a very easy and quick way to make it a little brighter. Click the layer with your screenshot. By doing this first, the following edits to brightness will not affect the Moodlet layer. From the screenshot layer, go to the bottom right and click the half and half circle button. From the drop down list, click "Levels"
Levels brings up a bar graph looking screen. On the left is darks, on the right is lights, in the middle is midtones. Pull the slider button just below the bar graph around until you find a happy level of darks and lights. In this case, I played more with the midtones. This is a quick and dirty adjustment method! there are so many other ways to do this! But, if I'm in a hurry, I go straight to levels to adjust my screenshots.

Finally, save your final product! In my case, I'm going to file and exporting it as a .jpg or a .png. If you save it as a .PSD, you can open it and work on it again in the future if that's something you want to do. When I export the save as a PNG or JPG - it automatically saved it to my downloads folder.

There you go! One quick Photopea to edit your sims screenshots tutorial!
Have fun.
#ts4#sims 4#ts4 screenshot editing#photopea#photopea screenshot editing#photpea screenshot editing tutorial
32 notes
·
View notes
Text
Speed edit #1
Make sure to follow my Pinterest and Instagram for more content
What app did I use?
App | Procreate
What cc did I use ?
Cc | @complex-sims @xxblacksims
Heyy y’all I’ve made this page just for reblogging only but here’s a quick edit I did in December 🥲
#the black simmer#thesimmerkmamas#simblr#the sims 4#my sims#ts4 gameplay#sims 4 urban cc#sims 4 fashion#ts4 edit#simblog#procreate#my edit#urban sims#kikovanitysimmer#sims 4 poses#ts4 poses#simstagram#sims 4 help#black sims#sims blender#sims 4 editing#sims 4 tutorial
71 notes
·
View notes
Text

The making of of the loading screen for the therapy game 🎮
Pics above and below edited by imagechef

Draft from photo studio
And the screenshot edited with incollage

#incollage#photo studio#imagechef#therapy game#underwater love#sims 4#simblr#ts4#sims 4 edits#windenburg#windslar#sims 4 tutorial
48 notes
·
View notes
Text
So I recently found a way to lighten up my sims whenever I take a screenie or do a render and it’s SUPER simple. I had to share! All you need is either gimp, photoshop, etc.
Here’s my original pic:
now we gonna enter gimp!
add a new layer (make sure it’s an alpha layer)
make sure the new layer is set to “soft light”

now go into paint

select a fuzzy brush and the color of your light. I chose white.
now paint over your sim’s face and/or body then go under filters -> blur -> gaussian blur (to your liking, I tend to go pretty high) and you’re done!
final pic is doing soft light on the background (color black and another layer is blue) and also gaussian blur on the background as well with erasing my sim so she’s unaffected.
#tutorial#gimp tutorial#ts4 tutorial#sims 4 tutorial#ts4 edit#ts4 screenshot#ts4 screenshots#sims 4 gimp#sims 4 tut#sims tutorial
164 notes
·
View notes
Text

If you've been wondering why certain TS2 makeup items change the color of your Sim's eyelashes or the inside of the mouth - that's why↑ Which brings me to my question:
TS2 players, have you introduced tongues to your game?
#ts2 poll#sims 2#the sims 2#-- this is totally not a#ts2 tutorial#I've played for a long time without tongue masks but once I added it there was no going back#now seeing black cavity when sim opens their mouth makes me anxious - I've just edited ~30 bits of makeup covering tongue masks
87 notes
·
View notes
Text

#ts4 render#sims 4 render#ts4 edit#my sims#simblr#sims community#back at it w the renders again#im also rly unsatified w my renders/edits these days😭#idk i wanna change the editing style im so bored of my current but idk whattt style i wanna do#and im struggling to even figure out what direction id like to take my blog in#i want a cohesive theme but i feel like i dont rly have one#its just so random lol#also pls ignore the terrible shadow issue around the lace#idk how to fix that#and i can't find any easy tutorials to follow😭#if anyone knows a fix tell me how. i'd love u forever lol
106 notes
·
View notes
Text
Photoshop Tutorial #1 - Change Background & Add Reflections
Before & After


You will need
Photoshop
Internet Access
I was inspired to make this tutorial after facing a dilemma in my game. I wanted my sims to swim in Brindleton Bay, but, shock horror, the water there is not swimmable. Luckily, I know how to change the background of my screenshots to make it appear as though it is - and I'm going to bring you through the process of how!
Starting off, in game, I brought my sims to Tartosa and got my desired shot. Then, heading over to Brindleton Bay, I got some shots of the horizon that I wanted as a backdrop.
Here's a picture I took:

Okay! Let's open up Photoshop!
For reference, I have Photoshop 2024, but most if not all of the features I've used should be included in older versions too.

Here's our image! Now I'm selecting the Background layer in the layers panel and press CTRL J twice to create two duplicates.
I'll turn off the bottom two layers for now, (by clicking the eye button, for newbies) and go to the properties panel. this should be on the right hand side, above the layers panel, but if it isn't, simply go into window > properties to switch it on.
With the layer selected, I click remove background and voila! Photoshop has... er... done her best to remove the background (she sometimes gets it wrong, but at least it's a help)
You'll see that a layer mask has been created. (circled in image).

If you haven't used layer masks before, the only important thing to know is that black will erase and white will add.
So with my brush tool (shortcut B) selected and set to black, I can go around the image and erase all of the parts I don't want.
If you have a steady hand and a tablet/cintiq you can do the same job a little quicker with the lasso tool (shortcut L) by selecting any unwanted area and simply pressing delete
Once I've removed all that needs to be removed, I see that there's a little slice of her hair that needs to be added. I can change the brush colour to white and paint it in.
Done! Easy!

Okay, let's switch off this layer for now, and switch on the one beneath it.
This is the layer I want to make look like the Brindleton Bay sea. So I'll make sure to pull an image of the water up as reference for colour.
This time I'm going to create a layer mask using the polygonal lasso tool
It's easy.
Find the lasso tool in the tool panel on the left of screen (the third icon from the top - or by pressing L on your keyboard)
Left click & hold, and a menu will pop up. Select the polygonal lasso tool.
Click around the area you'd like to mask, in my case, the sea. Tip: if you hold down the shift key while clicking, you will be able to create perfectly straight lines.
Click on the layer mask button at the bottom of the layers panel (pictured)
Everything except the selected area should disappear!

A small thing here, but I don't want the reflection of the rock in the water in my picture. I'll select the layer (not mask), take the eyedropper tool (shortcut i) with the sample set to all layers, and use a soft brush (B) to paint it away.

Next I'm using adjustment layers to edit the colour of the water, to try and make the blue turquoise paradise look more like the horrible green bog water of the bay.
You'll find these next to the mask button in the layers panel.
For my picture, I'm using hue/saturation for the colour and levels for the light. you can fiddle around with any of the adjustment layers to find what works for you.
I've shown the adjustments I've made for my specific scene below, just for reference.
When I'm happy with the colours/lighting, I select all adjustment layers (shift + L click to select multiple), then right click and choose create clipping mask. This is to ensure that the adj layers don't affect any other parts of the image, just the area I want it to.
And there! My water is looking sludgy, just like I wanted.

Okay! I've decided that I'd like some texture in the water. It always annoys me that sims water looks so flat. So here's where Pinterest enters the story.
I like Pinterest because unlike Google, the majority of the images are not watermarked. You're also slightly less likely to find AI slop.
I wanted some water ripples, so I searched for something like Water Texture, found one I liked, and dragged and dropped it into my photoshop file.
From here, I transformed it (CTRL + T) by resizing & rotating the bounding box, then grabbing the corners while holding CTRL to create some kind of perspective that works for the image.
I didn't bother bringing it all the way to the horizon, because I intend to fade that out with a gradient anyway. I had to sacrifice the bottom of the image for the sake of correct perspective, but that's fine. I will crop that out later.
With the texture layer selected, set the blending mode to soft light. It blends nicely!

Now! Another layer mask! These are our friends
With the texture layer still selected, I create a layer mask.
This time, because I had nothing in the image selected first, the layer mask will appear white. That just means nothing has been masked yet.
With it selected, I find the gradient tool (shortcut G) if you press G and the paint bucket tool is activated, simply navigate to the tool panel on the left of the file, hold the paint bucket tool down and select gradient.
I'll change the colour to black, and make sure I have the foreground to transparent gradient selected.
Other settings are pictured.

I'll drag the gradient over the area I want to mask. In this case, the top of the water texture to make it appear as though it's fading away towards the horizon.
(Doubly make sure you've selected the mask, not the layer while performing this action.)
Looking good!
Time to drag the layer above your adjustment layers and create a clipping mask again.

Alright! Let's do the background.
I'll drag that image of Brindleton Bay that I took earlier into the file.
I want to place it below my sea layer, and above that original background layer (I am going to leave that untouched for insurance reasons)
Then, using the move tool (shortcut V) I'm simply going to move it to the correct place. Basically I just want the horizon lines to match up.
Tip: hold the shift key to drag an image in a straight line.
Enter to confirm.
You can see that the sky is now unfinished, but it's such an easy fix. I'll just select the sky colour with the eyedropper tool, then use the paint bucket tool & brush tool to fill in the sky.
Done!

Now - note that the sea doesn't quite blend in with the background. To fix this, I'm going to take my eyedropper tool (shortcut i) and select some of that dark green colour beneath the mountains.
I will create a layer (+ button on the base of the layer panel) and drag it above that sea texture layer I created earlier.
Then I'll create a layer mask to clip it to the sea.
I'm grabbing that gradient tool again (G) and creating a nice gradient on the horizon.
The horizon line is a little sharp, in my opinion, I want it more faded. So, using a soft brush (B) and that same green colour, I'm going to create a new layer & place it above that green gradient, this time I'm not clipping it.
Holding down the shift key, I'm going to draw a straight line right across the horizon. This helps to blend it all together a bit better.

Now! for Reflections!
Firstly, I'm going back to that sky layer with the Brindleton Bay mountains, and I'm going to duplicated by pressing CTRL + J
I'm dragging it above the sea layer, but below all of the other clipping masks. This will automatically create a clipping mask for the new layer.
Next, I'm going to edit > transform > flip vertical
With the move tool (V) I'm moving the image upwards so that the horizon lines meet and it looks like the lighthouse and mountains are reflecting in the sea.
Note: make sure auto select is off while using the move tool on a layer that lies beneath several others.

This leaves a little bit of a mess on the bottom on the canvas, which can be fixed by creating a layer mask & the gradient tool set to black, and dragging a gradient over the bottom of the image until it blends nicely into the sea.

With the mountains reflection done, I'm going to move onto the people.
I'll turn that top layer that I worked on earlier back on.
Then I'll duplicate it (CTRL + J)
Right click on the layer mask of the duplicate and select Apply Layer Mask from the dropdown. This simply bakes the layer mask into the image. Usually I try to edit non-destructively as much as possible, but in this case it's fine to destroy.
I'm going to rename this layer Reflection
With that new, reflection layer selected, I'll go to Edit > Transform > Flip Vertical, just like before.

I want to add a little water/shimmer effect to their faces, so I'm going to Filter > Distort > ZigZag
I'll just mess around with the settings here until I find something I like.
This is optional, obviously, I've done reflections in edits without doing any of this, but it just adds something a little extra to water scenes, I think.
Here's a time I didn't do that.

anyway, my sims are looking a bit crazy now, but it's fine, because I'm going to, you guessed it, add a layer mask and gradient.
But first, using the lasso tool (L) I'm going to draw around one of the characters and drag her into place. I can move the bounding box around a bit to make her shoulders meet in the right place.
Then I'll do the same for the other character.
Tip: Hold CTRL while moving, warping or resizing something for a smoother, more precise experience.

Now, I'm doing what I said I would, and I'm creating that layer mask. We know how to do it by now, right?
Make sure everything is deselected first by pressing CTRL + D
Create layer mask
Select Gradient (G) set to black
Drag gradient over bottom of reflection (If you ever need more precise gradients, you can select the round gradient at the top of the file. I needed it to blend the reflection on the right more, because the characters are not at an even height.)
In the Layer panel, change opacity to 20% (or whatever you like) and hit Enter to confirm

Using Crop (shortcut C) I'm going to crop my image, cut off that pesky strip at the bottom and just basically make the framing of the picture a little bit nicer.
And viola!

I could edit this image more, throw in bounced light, splashes etc etc but I'll leave it like this.
The only thing I will add in is a little lens flare to indicate sun, so again, I'm taking to Pinterest and searching for one that works.
Tip: make sure the background of a lens flare image is completely black. Otherwise it will be harder to use.
Below is the one I have chosen.
I'm simply changing the blending mode to screen, moving it and resizing it with the transform tool (T), and fiddling with the opacity until I'm happy.

That's it!
I made a video running through this whole process, with all of my shortcuts in the bottom right hand corner so that you can see exactly what is happening.
youtube
If there are other tutorials you'd like to see in future, please let me know!
And I'm more than happy to answer any questions!
Good luck <3
#sims 4 tutorial#editing tutorial#sims editing tutorial#sims 4 edit#photoshop editing#photoshop tutorial#sims 4 community#simblr#Youtube#sims 4 photoshop tutorial
187 notes
·
View notes