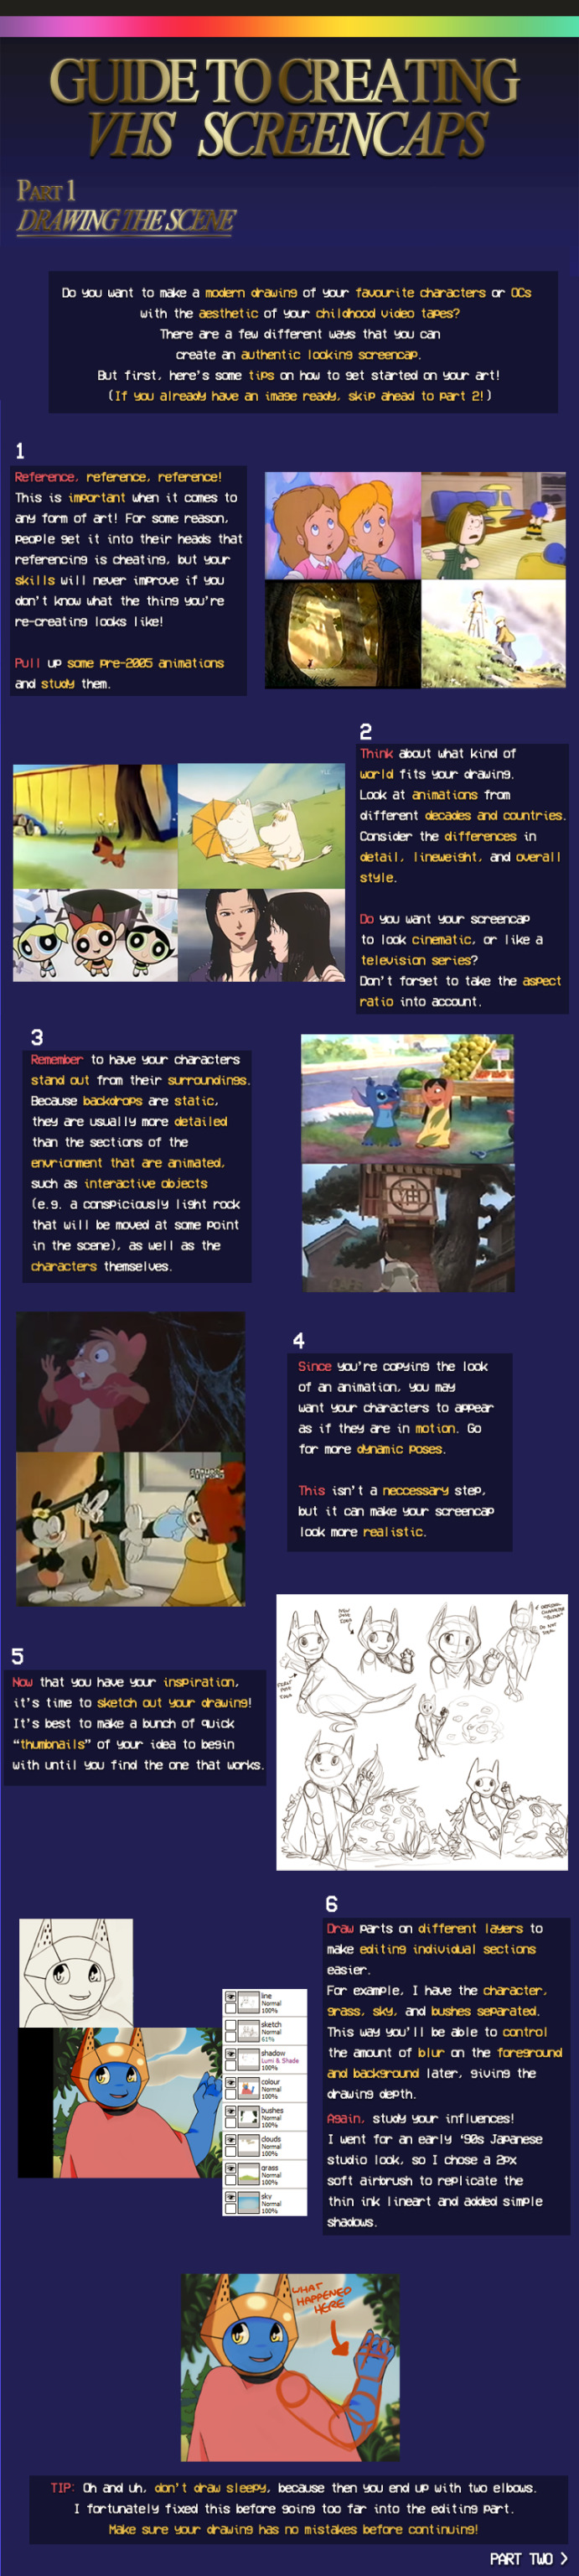
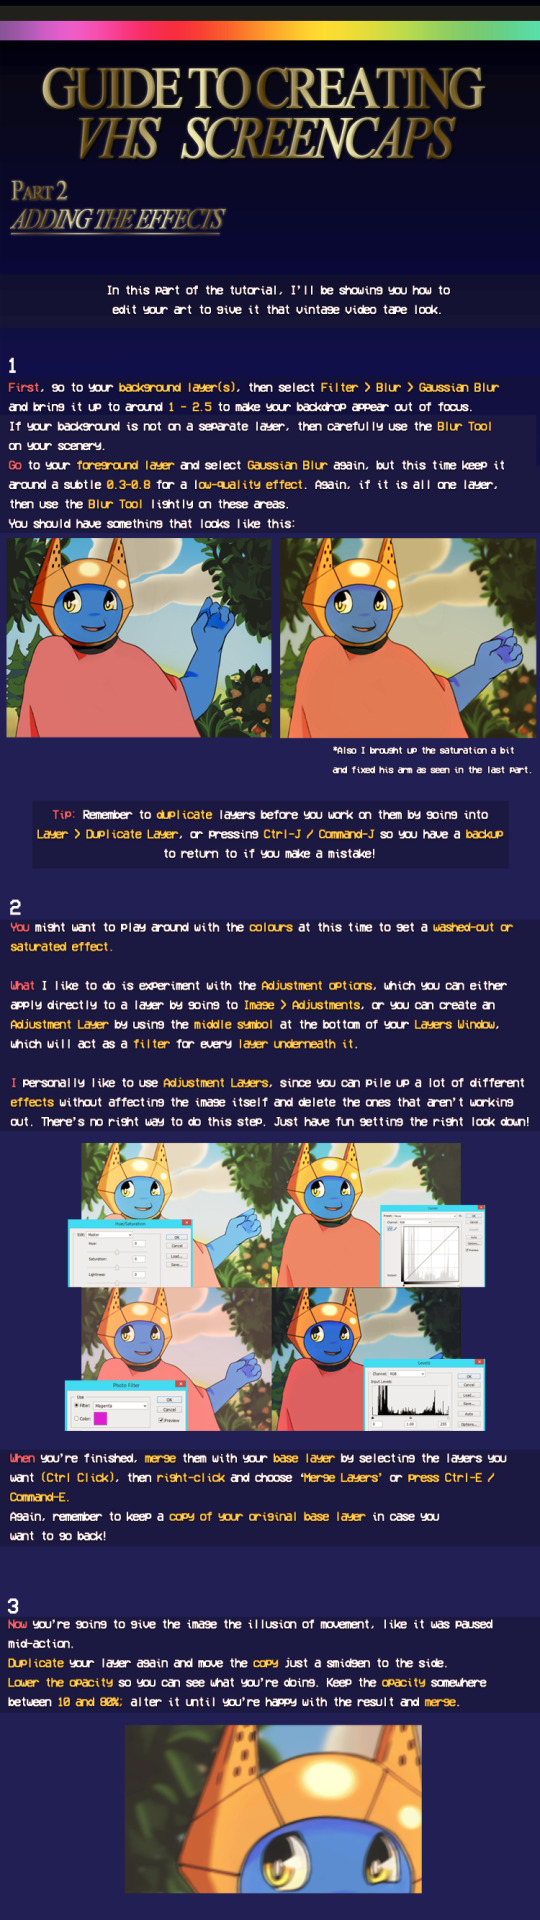
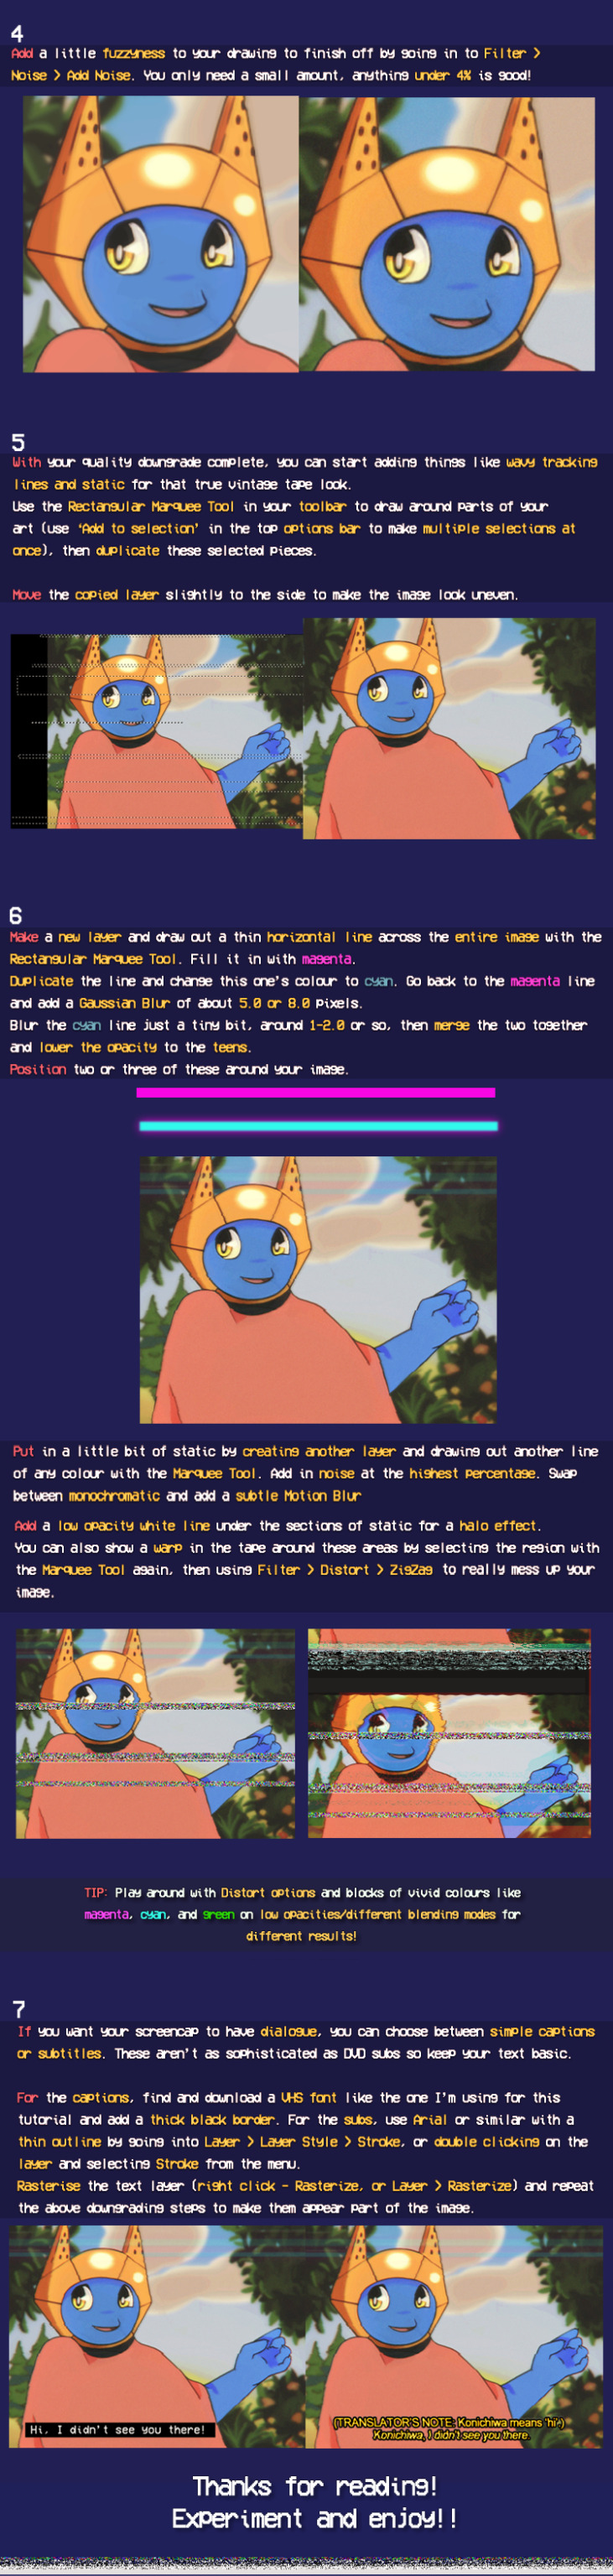
#screencapping tutorial
Explore tagged Tumblr posts
Visit Tumblr Blog
Explore Tumblr blogs with no restrictions, modern design and the best experience.
Last Seen Tumblr Blogs


Fun Fact
Tumblr has a low social media market share in South America.
Text

HOW TO SCREENCAP & POST YOUR CAPS : A MOSTLY COMPREHENSIVE GUIDE
i got an ask about this, and it felt like it was too long of an explanation to answer in an ask so i made this guide. i am definitely not the expert (as proven by the fact that my VLC tutorial is two links to better tutorials than i could ever make) , but i hope this is helpful!
TABLE OF CONTENTS - finding stuff to cap - capping 101 - storage
FINDING STUFF TO CAP the less "crime" you do while doing this the better honestly. make someone else do it for you and if you absolutely must sail the seven seas 🏴☠️ for the love of god use a good vpn and anti-virus. the safest way to find downloads is to find pages who post them for you to use - on tumblr that is hdsources ! we love hdsources here - there are also pages on instagram (and apparently the site formerly known as twitter, but i don't use those) who post downloads of stuff. my favorites on insta are megaawrld_ , logolessfiles, djatsscenes, sadisticscenes and elyse.logoless . to get into these pages you do have to have an instagram account, but once you get in you can get links to them posting shows and movies. this is significantly safer than p*racy. the next step if these pages don't have what you want is to get them yourself through other ways. if you have to do that, GET A FUCKING VPN.
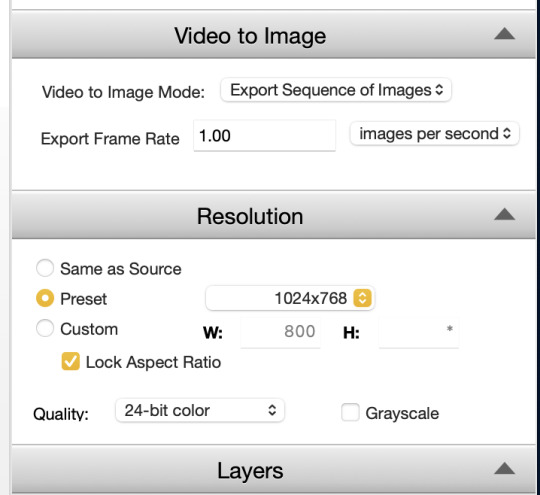
CAPPING 101 now that you have something to cap, it's time to actually make screencaps. you're gonna wanna download a program to do that. most people use VLC, i use adapter for the most part but it can be fickle so i'm learning to use VLC too.
adapter doesn't require much in depth so here's a quick tutorial: - have file and drop it into the window (it can read mp4 and mkv files) - select where you want your screencaps to end up, i make a folder for them - select your frame rate (how many images you want to generate per second of video. i tend to do 1, and anything over 5 creates so many pictures that its too much to deal with, but if you're making gifs you want more pictures) - select your file size and image quality.
i could not explain VLC to you if i tried, i am still figuring out how to use it. this tutorial & this tutorial have been very helpful though !
STORAGE
honestly this should have probably come first, but i didn't want to scare people. there are two types of storage, physical and cloud storage. to run a resource blog you need both.
physical storage comes in the form of space on a hard drive. your computer has a limited amount of space and i truly do not suggest keeping every screencap you've ever made on your computer's hard drive. screencaps take up A LOT of space. get an external hard drive and get the beefiest one you can afford. ssds (solid state drives) are fast as fuck. depending on how much content you make (and how much you can afford) get at LEAST 2 tbs but maybe get more. i like this guy cause it's fast and small!
if you just came here to learn how to screencap you can stop here unless you want to learn how to back up your files because that's really what cloud storage is for.
cloud storage is storage that is not on your actual computer. you cannot touch it but it's important if you want to make your screencaps available for other people to use.
i'm a big fan of dropbox, mega, mediafire and if you absolutely must use it google drive. (my preferences are in that order) unfortunately, cloud storage gets really expensive really fast and there's kind of no way to avoid it. compress your files when you upload them so they take up less space in whatever form of cloud storage you do get, and pray.
that's what i got for ya! if you have any questions feel free to send an ask or join my discord server!
15 notes
·
View notes
Text


#house md#lisa cuddy#james wilson#gregory house#eric foreman#screencap#featuring lupus textbook#(the stash)#s04e05 “Mirror Mirror”#people forget that cuddy drugs him too~#wilson immediately giving manipulate house tutorial#house shitting himself#and escalating#all that just bc foreman wont quit#love everything about this#develop new lifeforms in the environment so uniquely toxic#longpost#long post
80 notes
·
View notes
Note
How do you get that square frame on some of your gifs? Is it a template?
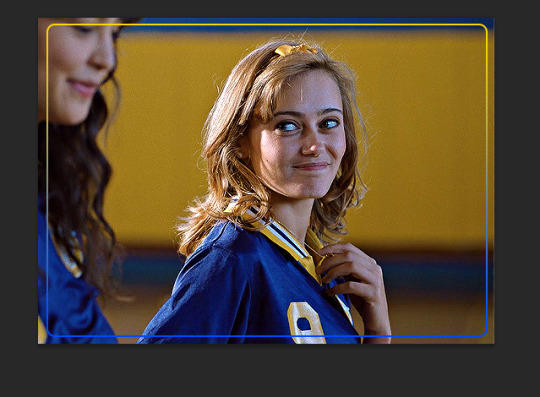
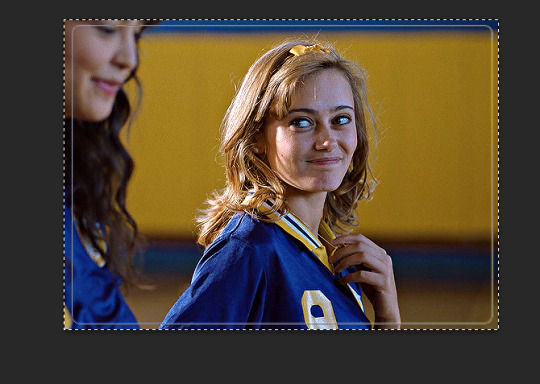
Hi I'm assuming you mean like in the first and last gifs of this set?
I don't use a template I just manually draw the rectangle/square in. It's super easy and only a few steps (see below for the cut)
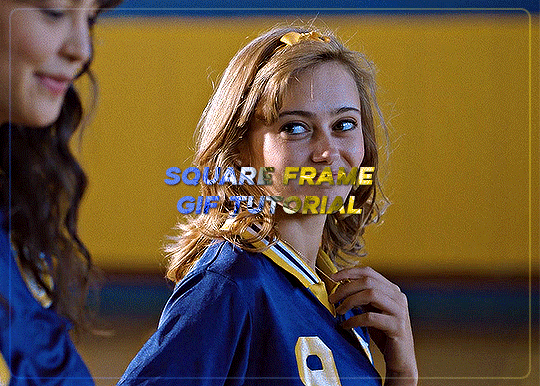
Start with your gif, colour it as you'd like for your set. For this example I'm going with a blue and yellow :)
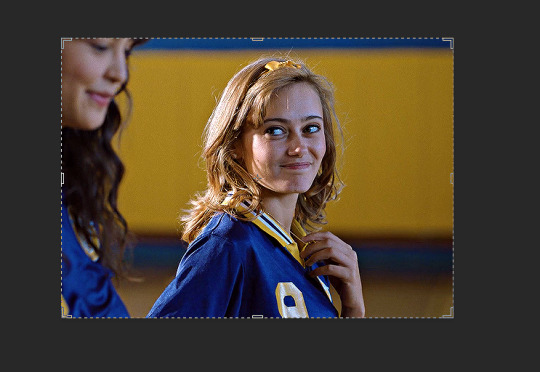

Right click on the rectangle tool and select "rounded rectangle tool" from the drop down list. (you can use the normal rectangle, but I prefer the rounded corners personally)

use the cursor to draw from the top corner to the bottom corner, you'll get an outline something like the below screencap.
When you finish drawing a rectangle will show up

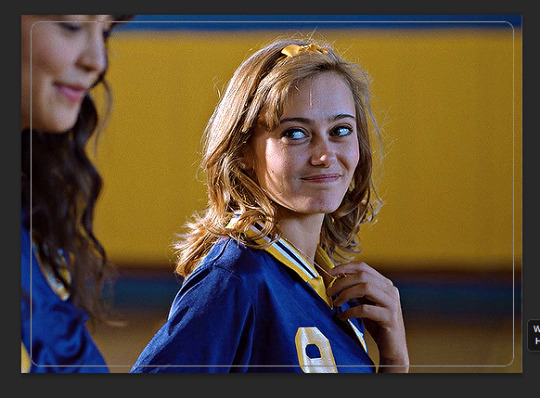
Change the settings in the above tool bar to match how you'd like your outline. Always change it so there is no fill

I have changed my stroke to be a blue and yellow gradient

This gives the below result

I think this is a little too strong, so I adjusted the stroke to 2
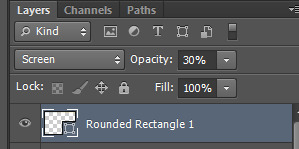
I also would like it to blend in a bit more with the gif so I changed the blend mode to screen. I also adjusted the angle of the gradient from 90 to 28
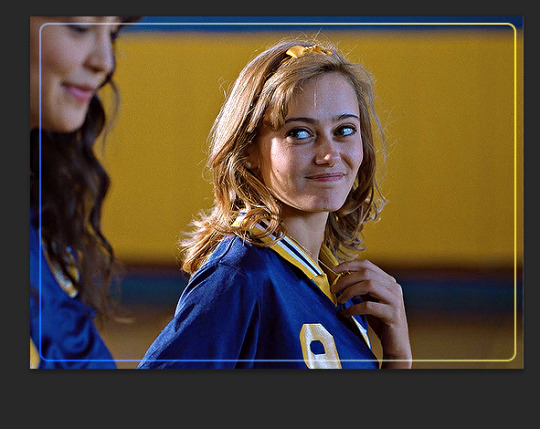
To make it a bit softer still, I'm also going to adjust the opacity of the rectange layer to about 30 which gets us the below result

One last step, is because I didn't draw it perfectly in center I align the layer to the center of the gif by pressing ctrl + a to select the whole canvas (should give the below selection lines)
then click over to the move tool

then press the highlighted option

then press this option
this just shifts the layer to be centered
press ctrl+d to clear your selection
this gives the following result

Last step is to make sure your rectangle layer is the same length as your gif. You just either drag the layer to match the bottom gif layer (or you could also just adjust the gray gif slider instead)

and now all you need to do is add text and other effects as needed :)
#asks#ps help#usergif#allresources#resources#yeahps#completeresources#resourcemarket#dailyresources#tutorials#photoshop tutorial#*mine#i hope this is what you were after#also i wanted to take some more screencaps but computer wasn't cooperating so hope it makes sense :)
30 notes
·
View notes
Text
This is not a render! How to get beautiful scene lighting with no Blender!
#sims 4#simblr#ts4#my sims#sims 4 screenshots#sims 4 tutorial#tutorial#lighting#show us your builds#sims 4 tips#sims 4 screenies#sims 4 screencaps#sims community#weird sims#the sims community#show us your sims#showusyoursims#sims4#occult sims#sims 4 story#how to#sims 4 build#ts4 build
12 notes
·
View notes
Text
Making Gifs Part 1 - Capturing Video
I am making this for @errruvande but I thought maybe others could use this guide to. This is my own personal workflow on how I make my gifs. Everyone has their own way of doing it, and there is no right or wrong way, but I have found this works best for me, with my limited tools and since I do not have photoshop.
Please note I am not an expert lol! There are people out there making far better gifs than me, and many other gifmaking resouces on Tumblr that are probably better than mine.
Keep reading below >>>
So there are two ways that I have found that work for capturing video. If you have the discs like I do, using a program like Videobyte BD-DVD Ripper works really well to grab video clips from Blu-Rays and DVD's. I recommend only using Blu-Rays if you have them. since DVD's are much lower quality.
However I have noticed the videos I captured with this program tend to be dark and have some compression artifacts, even when rip to an MKV with high quality settings. So I use a different method which I feel produces higher quality video captures.
I use Windows Screen Recorder (I have Win11 but this will work for all versions of Windows) with the quality settings set to High. In order to do this, go to Settings > Gaming > Captures and set the following:
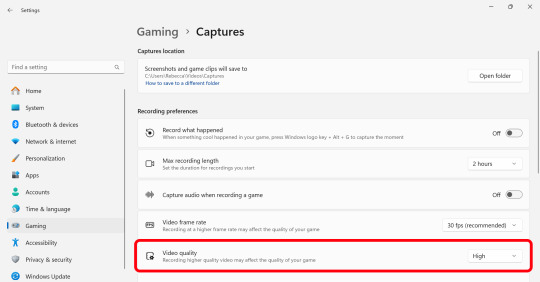
Make sure the Video Quality is set to High, set your Screenshots folder, turn off Audio (you don't need it), and keep the frame rate to 30 fps.
For Windows 11 press WIN + ALT + R to activate the screen recorder. There is usually a bit of a delay so make sure you start a few seconds before the scene you want to capture. And try to keep the length of the capture below about 90 seconds; the shorter the better.
______________________________________________________________
Capturing Sequential Caps
So, for those of you with Photoshop, you can import your video directly into the program and make your gif from there. But I found that Photopea really does not like videos, and will stall and crash if I load a video directly. So I have to capture sequential screencaps to make my gifs.
I use VLC Media Player. There are a few others out there that take sequential caps, but I have not been able to get them to work myself.
Download and install the latest version. Then go to your settings to set up the Sequential Caps function. They have a great guide on their website here but I will reiterate it in this post.
Go To Tools > Preferences and then at the bottom of the screen select the All radio button to show all settings.
Select Video from the left menu. Scroll down about halfway until you see the Snapshot section. Choose the folder where you want the caps to go.
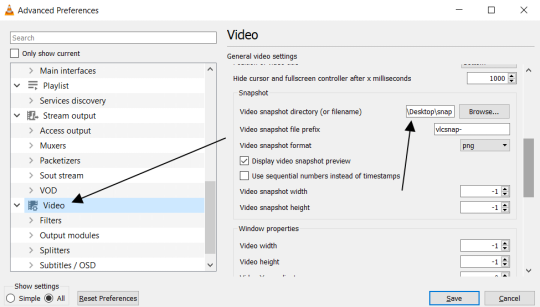
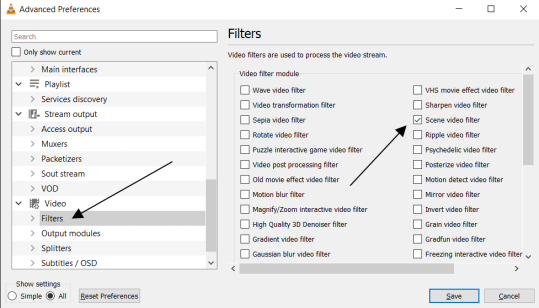
3. Then, under Video on the left, expand the Filters list.
4. Check the "Scene Video Filter" from the list.
5. Then scroll down on the left menu under Filters and click on Scene Filter. This will open up the settings for that particular filter.
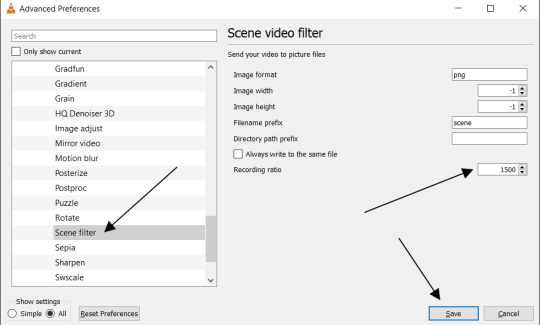
6. Set the Image Format to PNG.
7. Then for the Recording Ratio, change to "1". The Recording Ratio is the frame interval. So for example, if it was set to "300" (with a 30fps video), then it would take one cap every 10 seconds. Setting it to "1" will make it take a cap once per frame.
8. None of the other settings need to be changed.
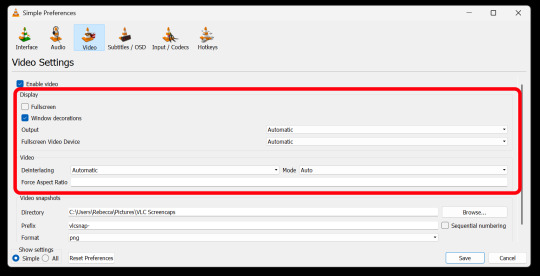
9. One more important setting, otherwise this will not work! Close the menu, and go back to Tools > Settings and leave it on Simple. Go to the Video section and MAKE SURE the output is set to "Automatic". This is important because if it is not on Automatic the Scene Filter won't work!
Then just open your video with VLC. VLC will automatically take the screencaps while the video is playing. If you pause the video, it will stop taking caps.
NOTE: For smoother gifs, change your playback speed to be slower. Go to the top menu > Playback > Speed > Slower (fine). The more you click this the slower the video will playback, and that means more caps will be taken over that time frame. I usually set it to 0.75x, but if you want even smoother gifs for really short clips, you can set it even slower than that.
Your screenshot folder will look like this:

Then we are done with this part and onto Photopea! Which I will go into detail in another post: PART 2
#gifmakers#gifmaking#gif making#gifmaking resources#gif making resources#my guides#giffing tutorial#screencapping#sequential caps#gif making tutorial
51 notes
·
View notes
Text
By Kea2lie on DeviantArt
#Tutorials & References#Art Tutorial#Fake Screenshot Tutorial#Fake Screencap Tutorial#VHS Tutorial#not my art#If the original artist wants me to take this down I will
132 notes
·
View notes
Text
youtube
I posted a short tutorial on how to level up your sims' photos in-game, especially when you want to take pics of them off-lot in front of amazing scenery on terrain!
Using TwistedMexi's tool mod and Ravasheen's full control camera!
#sims 4#the sims 4#ts4#chermibear#sims#simblr#ts4 simblr#the sims community#tool mod#ravasheen#full control camera#sims 4 cc#sims 4 mods#the sims 4 screenies#sims 4 screenshots#sims 4 screenies#sims 4 screencaps#ts4 screenies#ts4 screenshots#ts4 story#sims tutorials#sims youtube#Youtube
4 notes
·
View notes
Text
Screencap redraws and a Jackson edit to cope with bloodline because this DLC has me rolling on the floor in my own tears


Oh and I also drew Aiden onto a gingerbread ദ്ദി(•.•)


Full page + figure comparison:


#watch dogs#watch dogs legion#watch dogs legion bloodline#fanart#traditional art#doodles#watch dogs 1#watch dogs fanart#aiden pearce#Nicole Pearce#Jackson Pearce#edit#Jackson Pearce edit#can you tell I gave up with nicoles expression because I was STRUGGLING#ALSO WAS STRUGGLING WITH AIDENS EYES ON JACKSONS SCREENCAP#hats are so difficult to draw someone give me a tutorial please#also RAGHGHGHV I LOVE JACKSON SM#IDC ABOUT HIS HAIRCUT#AM I THE ONLY ONE WHO ACTUALLY LIKES HIS HAIRCUT#ITS SORT OF GROWN ON ME#AM I????#anyway yap session over
18 notes
·
View notes
Text
screencapping with ffmpeg
hey friends, long time no write! today i'm gonna explain how to get image sequences (aka screencaps) from any video files using ffmpeg in the command line.
First, if you don't have ffmpeg please go an download from HERE and install it, here's how WINDOWS / MAC and once you're good to go we can start!
i have a windows os so i'm going to explain for that but i don't think it should be more complicated for macs if you know how to work on the command line, under the read more bc i used a lot of images lol
what we need:
a video player to get the proper timestamps we need, i use mpv but any video player will help tbh
make a folder for our screencaps
okay! so i'll be taking caps from a 4k video and i find my timestamps, this is my start (i don't have 4k movies on my computer, so you'll see my kpop boy lmao)

and this is the ending
i would recommend to set the timestamps a second earlier and a second after the video ends so there isn't frames missing if you want a complete scene, deleting caps from a folder is easier than doing the whole process again lol
on the folder your video is while having it selected, click on this icon to copy its path

now i go to the folder i made! in the path bar it should be like this on windows

we click on the blank part and write cmd and hit enter

the command line should open right now
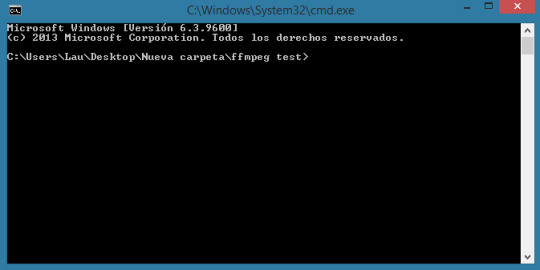
we proceed to write the following command
ffmpeg -ss hh:mm:ss -to hh:mm:ss -i [paste path to the video] -compression_level=0 output_%04d.png
hh:mm:ss is how you imput your timestamp, it's the most accurate way of doing it
output_%04d.png: name the files will have, if you're capping several timestamps from the same video i would change the name output to anything (example part1_%04d.png for scene 1, part2_%04d.png for scene 2 and so on) otherwise ffmpeg will overwrite your caps every time, i know there's probably a workaround but i haven't researched to that point yet, i'll update later!
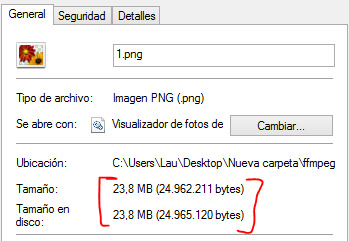
compression_level=0 : makes the png the highest quality possible, pngs are essentially lossless, but without this command i've found the file size is rather small even if the finished image doesn't have much difference. you could try not putting the command and see if there's a difference for you, the files will just be smaller
Update (240402): my ffmpeg doesn't seem to recognize the command for compression level as it's written here anymore, but fear not! If yours doesn't either it's just a matter of adding a space instead of an equal sign between the command and the 0. It works as it's supposed to!
on your command line should look like this

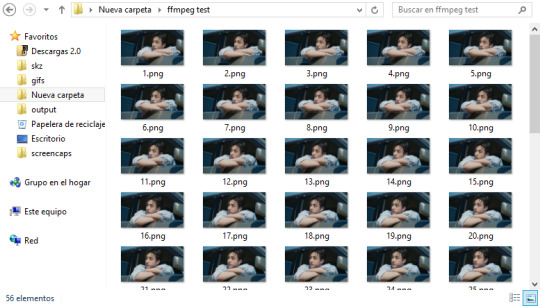
you hit enter and ffmpeg should start processing, once it's done it'll open a new line for you to keep doing things on that folder, but if you don't want to do anything else just close it. your folder should be filled now with your screencaps
to compare, i capped the same scene with mpv to see if there was any frame drop and i was pleasantly surprised that the amount of caps was basically the same (there wasn't frame dropping! just the regular more frames bc you were a little slow on stopping the process on mpv)
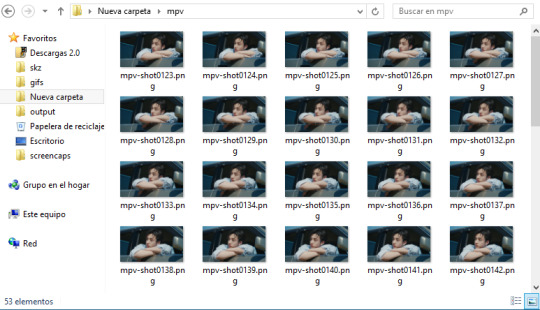
and the size is what mpv usually gives when screencapping too so it was a win for me
if you have any doubts ask me! or if you know more about ffmpeg and want to add on to the command i shared please do!
37 notes
·
View notes
Note
Omg I'm so stupid I forgot to mention the screenshots were to be made on mobile. Thank you for the post tho. But I don't have access to a computer
EZgif.com should work I suppose? Out of curiosity, what app will you run them through afterward?
I have a gif-making tutorial for phones/tablets but would be interested to have another tool/process to contribute to @goodgifswithfreetoolschallenge for users without computers.
#i haven’t worked on tutorials in a while but 👀#you can check out the photopea tutorial i have linked in the archive too#you can actually use ffmpeg on phones too there’s a dedicated app on android and on ios there’s ashell which u can run ffmpeg thru#but it’s a paired down version and idk if screencapping works specifically
3 notes
·
View notes
Text
I need help with getting screencaps so I'm hoping people on tumblr can help. I know there's a method to extract them from a website like the one linked HERE because many years ago I used to do it, but for the life of me I can't remember how to do it, and I really don't want to go through each picture individually to save it onto my computer so I can make icons
So if anyone can help I would be eternally in your debt
5 notes
·
View notes
Text
I have been at work for more than an hour and I feel like I've gotten jackshit done
#the turtle speaks#i had to type up a little baby tutorial on how to do something in word#and it took like 30 min cause i had to take screencaps and check that the numbers in my brain were right so i didn't give bad instructions#and i am literally doing everything i can to put of going outside to the company vehicles to get the mileage#so I've been doing quote folders so its not like i haven't been working on stuff#it just doesn't make me feel accomplished
7 notes
·
View notes
Note
Your gifs are always so beautiful. How do you make them so HD?
first of all, thank you 🥹 im happy you like them.
for your question, it's a combination of things i guess. idk how to answer without getting a little bit into adjustment layers in photoshop (assuming you even use photoshop). i dont think i do things that differently from others. one thing i dont do is i dont use "action", i do everything from scratch. my cropping method is probably a bit different as i crop out everything i dont want without resizing it first and only resizing them afterwards to 540x540p, my favourite dimension. idk how everyone else does it. do share if you have a good method to reduce lost of quality when resizing.
im gonna talk a bit about the 4 adjustment layers i almost always use which i'll put into quotation marks under the cut below.
1. i use "levels" a lot to adjust the lighting. some people use "curves" or "channel mixer" which i find hard to get consistent results every time. they're useful when "levels" cant get me to where i want the colouring to go.
tips:


hike up your shadow input level for RGB between 5 to 10 to add more depth to the gif. (midtone and highlight can help brighten your gifs if needed)
adjust the Red, Green and Blue shadow, midtone and highlight input level to get rid of the yellowish tone and add some reddish tone (i love adding a little red tone idk, they just look better than yellow
2. "brightness/contrast" is important too. if the gif is too dark, i sometimes change the adj layer from normal to 'screen' and adjust the shadow input in "levels" to balance them out.

3. "vibrance" - i usually go for vibrance: 50, saturation: 10
4. "selective colour" - to fix or remove too much redness (normally in skin colour due to vibrance) by adjusting the black colour level in Reds.
idk, that's it really. hopefully this is somewhat helpful to you. and always make sure to use HD sources, anything below 720p will be harder to work with.
#ask#gifmaking#idk if this is what you're looking for. i just hope it answers your question. somehow it became a tutorial of sort 😄#the PS screencaps are taken from my latest sam reid gifset
22 notes
·
View notes
Text
Twistunes Flick in Bluestacks
How to do the tap and flick in twisted wonderlands starsending twist tunes in bluestacks.

1: Open game controls

2: Click ‘Custom Editor’

3: click and drag ‘Swipe’ onto your screen. (Use ‘tap spot’ to get the normal tap)

4: Drag it to the side of the screen you need, click the direction you want to swipe in and push the button you want to use for it on your keyboard.

5: Click and drag this arrow to resize it and make it smaller, position at the side of the screen.

6: Now click the gear icon. (THIS IS IMPORTANT)

7: It will open a new window, click the FALSE setting on ‘Swipe and hold” and change it to true.


8: Now click save, and click the X at the top right to close the editor.

Remember what button you assigned because it dose not stay on the screen like the normal tap.

Now just use your normal taps for the circles, and use your new button for the arrows.
#Twst#twisted wonderland#screenshot#screencap#bluestacks#emulator#tutorial#starsending#flick#twist tune
27 notes
·
View notes
Text

Mood for the night
#i was gonna gif that new vid but photoshop said Theres No Frames In The File#and then i tried ffmpeg screencapping but it didnt work so i couldnt get the caps and gave up for the night 😇#idk none of the tutorials ever work out i always go back to my dodgy og origins lol Oh well
4 notes
·
View notes