#sewing tutorial dress
Text
youtube
#diy#fashion#sewing#handmade#youtube#dress#etsy#fabric#making#my sewing#puff sleeves#dress with sleeves#puff sleeve dress#easy sewing#ready to wear#step by step video#sewing tutorial dress#tutorial#sewing for beginners#beginners friendly tutorial#dress making#dress for little girls
1 note
·
View note
Text
This whole youtube plagiarism thing makes me very glad that my videos are basically impossible to copy in a quick & easy way.
#writing the voiceovers does take a lot of time but nobody could just copy it and put it over stock footage!#it'd make no sense without the exact same sewing footage!#nobody is EVER going to say 'wow he got 92k views by spending 371 hours making a patchwork dressing gown? I'll do that too just for views'#youtube#I've had people steal and repost my drawings but they can't take my sewing!#the button & buttonhole tutorials are relatively quick to film but you still need to have put the time in to know how to DO it
105 notes
·
View notes
Text
How to Create and Customize a Raglan Top or Dress Pattern [Beginner-Friendly]
In this post , you will learn how to self draft and hack sewing pattern for raglan dress or top.
A raglan top or dress is a garment that has sleeves that extend to the neckline, creating a diagonal seam from the underarm to the collarbone. They are flattering and comfortable styles that suit any body type.
In this post, you will learn how to create a raglan top or dress pattern from scratch.…
View On WordPress
#beginners tutorial#blouse tutorial#draft#drafting#dress tutorial#for beginners#pattern drafting#pattern hack#pattern making#raglan#raglan dress#raglan top#self draft#sewing pattern
36 notes
·
View notes
Text


Look at this cool design, isn't it infinitely superior to Teams meetings?
#I'm gonna do my work but I'm gonna complain the whole way#a talia original#talia's adventures in dressmaking#excerpts from my life#Tailored Travel Dress#yes it does have hidden zippered pockets large enough for a notebook#it's my first time using horsehair braid but so far so good#it looks nothing like the bb tutorial but that's okay#sewing progress
33 notes
·
View notes
Text
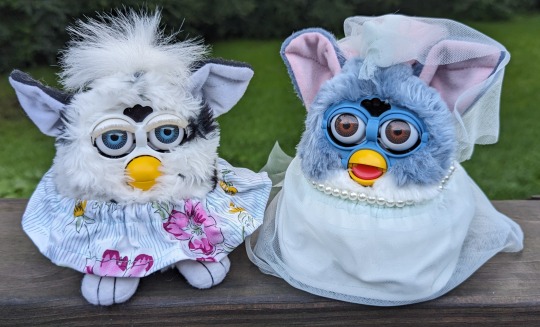

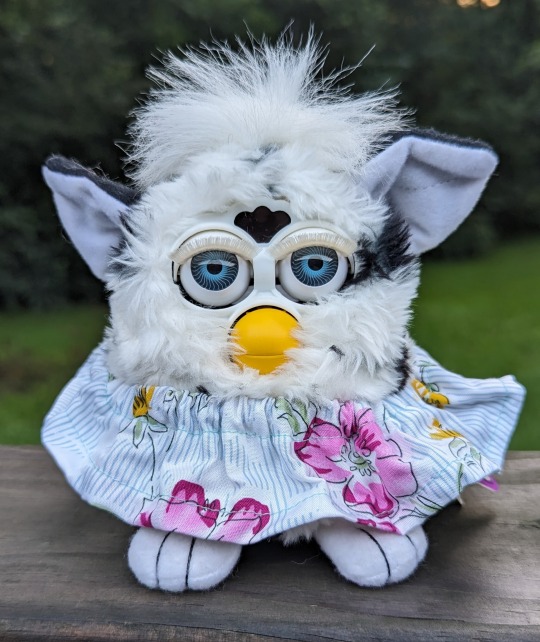

Furby Simple Summer Dress Pattern and Tutorial is out now!
You can buy this pattern for $1 on my Kofi or get access to all my patterns on my patreon for $3 a month!
Tutorial includes Image descriptions and is in Century Gothic Font to help those with dyslexia.
Other Links
#Furby#Furby Dress#Safe Furby#Pattern and Tutorial#Sewing#Trans Art#ehwesson#furby clothes#my art#Furby Wedding dress
18 notes
·
View notes
Text
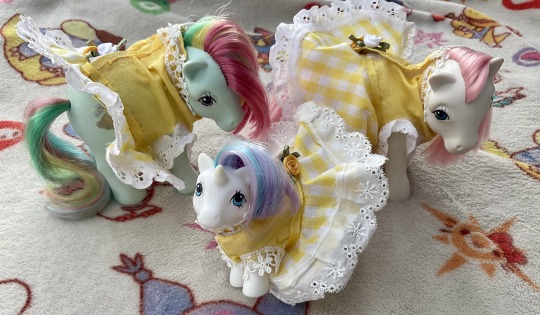
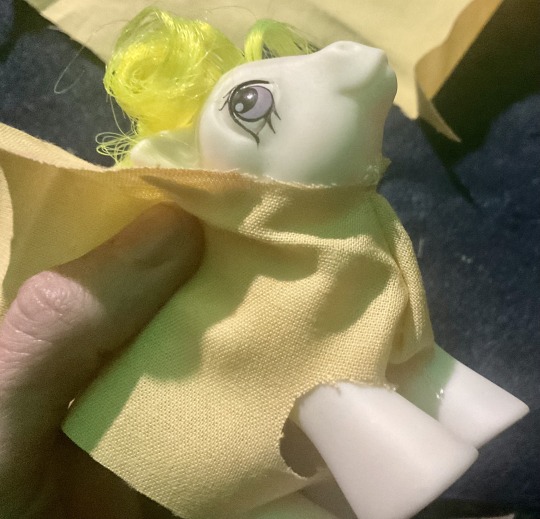
My Little Pony basic dress sewing tutorial below the cut ^^ I am not the best at sewing or pattern making but all this info is free to use! I noticed a lack of ponywear sewing tutorials so I am going to try to fill that gap!
TERMS: Pattern is free to use or modify for whatever use you’d like (I don’t even mind if you wanna sell some homemade dresses) just please give credit to me for the original pattern! I would love to see whatever you make so feel free to tag me too 💕
WHAT YOU’LL NEED:
-Basic knowledge of a basic sewing stitch (I pretty much only used backstitches for this pattern)
-Some fabric (I recommend two colors, one for the body and then one for the skirt, but you can use however many fabric colors you’d like if you’d rather only have one color or if you wanna have more fabrics for sleeves or extra layers or details)
-Velcro or a zipper (you could also maybe use buttons if you prefer but velcro or a zipper will be much easier)
-Sewing thread, needles. I recommend getting fabric glue as it will make attaching lace and velcro easier. Maybe some pins if they would help you!
-Optional: Embellishments such as ribbon, lace, buttons, sew on flowers, bows, ect. This is all up to how you want to decorate the dress!

I am sorry I don’t actually know how to make downloadable patterns but here are the hand drawn patterns I’ve made for the chest piece as a reference (the left side is the baby pattern, the right side is the adult pattern.)
You will likely have to modify these patterns slightly based on the pose of your pony, their size, if they have wings, ect. I am also sure this pattern can be modified to fit other generations, sweetheart sister ponies, ect. (Quick note here about pegasus wings: You may want to make a looser fitting dress as if it is too tight it may look lumpy due to their wings. As you will see in this tutorial I started off using baby surprise as the model, but then I switched to baby glory as she was easier to work with due to her being a unicorn. I feel like you would have better luck making a dress for an adult pegasus rather than a baby one).
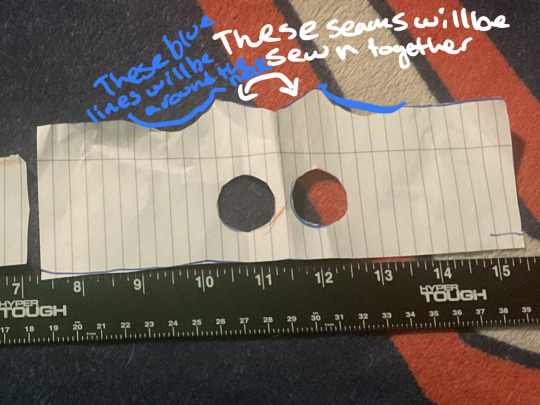
Here’s basically what the pattern is showing: there will be one seam near the chest, and the top part will end up being the neck line. The holes are for the front legs, and the sides MUST BE LONGER so that you have enough seam allowance to hem it but also this is where the velcro will go! So you will want enough length on the sides for the pattern to overlap. As you are tracing/making the pattern with paper, be sure to test it with your pony to make sure the size is right! You’ll want to be testing the size of your dress frequently to make sure that everything fits correctly!

Trace out your pattern (make sure to make everything a little bit bigger for seam allowance!) and then cut it out.
Be sure to check the size if it fits or not!

Next, you will want to fold the dress in half (good sides facing each other) and sew a seam along where this blue line is. depending on how curved you make this/how close to the legs/neck area you make this seam, the tighter or looser fitting the front of the dress will be, so you may want to adjust it a bit to your preference.
It will look something like this.
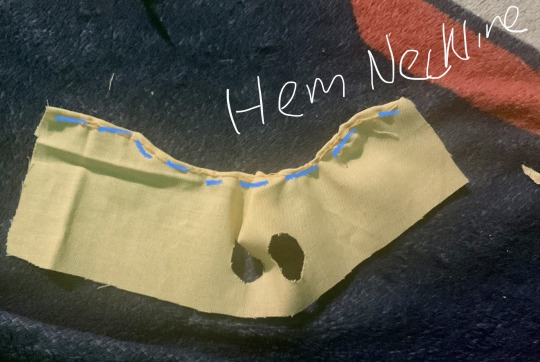
Next, we will hem the neckline.

Then, you will hem the sides (Now is a good time to test on your model pony to make sure that the sides will be long enough to overlap with a piece of velcro!
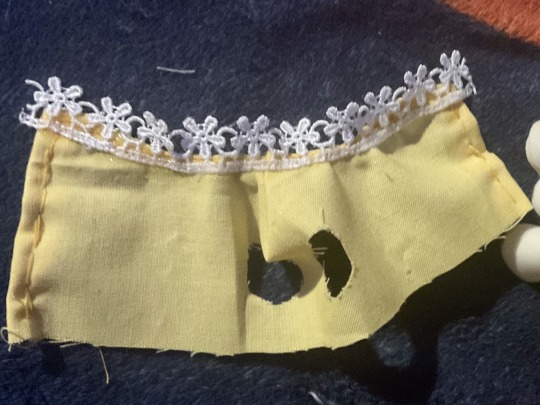
This is where I added lace to the neckline. You can sew it on or just use fabric glue. You don’t have to use lace if you don’t want to but it is very cute.
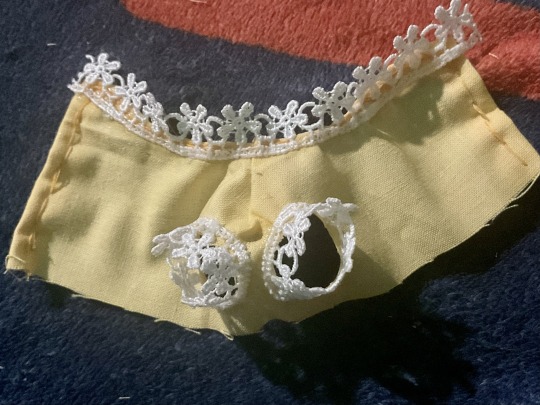
I added lace to the sleeves too. If you want long sleeves, you can modify this pattern by sewing another piece of fabric for the sleeves. If you don’t want lacey sleeves, I’d recommend hemming the sleeves or covering the edges with ribbon or something so they don’t fray (I didn’t hem them here just because they are so small it would be hard to hem!)
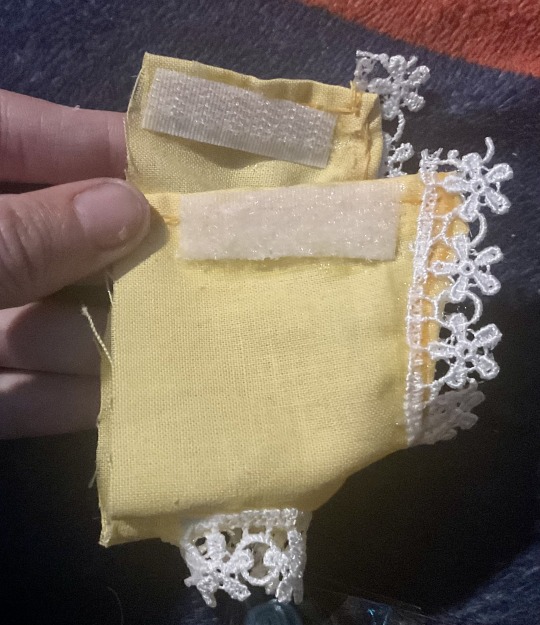
Now you will cut some pieces of velcro for the dress opening on the back. I recommend putting one piece on the outside of the dress and the other piece on the inside of the dress as shown, that way the fabric can overlap nicely. You can either sew or glue this in. You could also use a zipper, buttons, whatever else you’d like for the dress opening.

Now we make the skirt of the dress! The pattern looks something like this, it is a little hard for me to explain but I will do my best ^^ . You will have to measure and test out the waistline yourself to make sure you have the best fit for your pony, just keep adjusting it until it works. You can also decide the length of your dress. To cut it out, you will fold your fabric in half twice and line up the pattern with the folded corner, before cutting it out.
If you’d like to see a video of someone doing something like this, here is the video tutorial that I originally learned how to make skirts from!

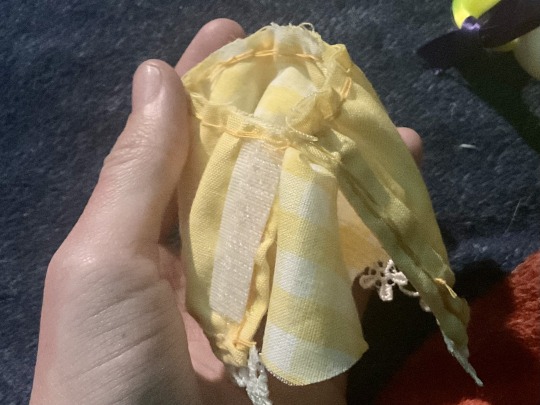
Once you have the skirt fabric piece, you can sew the skirt to the body of the dress. Make sure that you’re doing it “inside out”, and that the good sides of the fabric are touching each other.

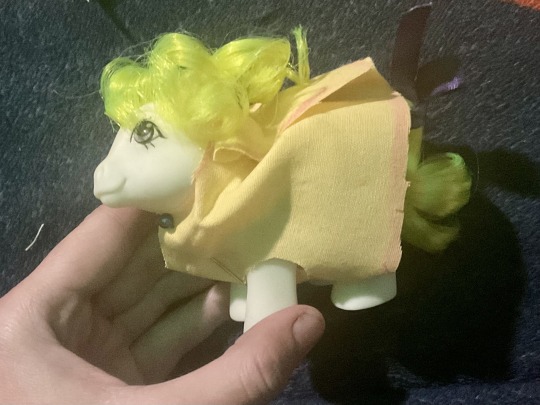
It will look something like this once you turn it inside out again! Be sure to test the dress to make sure everything fits! (If you are struggling to understand how exactly to put it on: put all your pony’s legs, their tail and butt through the dress back opening, put her back legs, tail and butt through the skirt opening and her front legs through the arm holes before fastening the back. It was a little weird to figure out at first lol.)
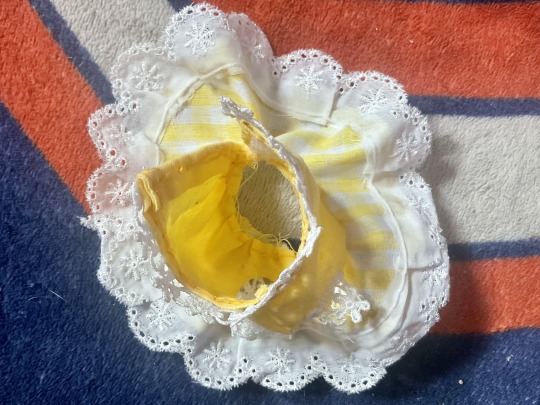
Now you will attach lace to the hem of the skirt! You can sew it or just use glue. If you don’t want lace, just hem the ends so it doesn’t fray.

Test one more time to make sure everything fits!

The final step is to decorate however you want! You could do a lot of creative things depending on what you have, buttons. more lace, ribbon, ect. For these spring yellow dresses I just added some yellow ribbon around the middle and I sewed some flowers to the back (You can find these flowers or little bows or other decorations at places like walmart).
And now you should have a completed pony dress! Thank you so much for reading and I hope that this helps someone out! If you follow this tutorial, reblog or tag me in a post with your dress because I would love to see it!! If you have any questions let me know! Thank you 💜
#mlp#my little pony#my ponies#my photos#sewing patterns#dress#pony wear#sunlight#sundance#baby glory#tutorial#g1#generation 1#gen 1#toys#resources
50 notes
·
View notes
Text
just found out there’s a regency themed ball in my area on october HRK
#oohhh I wanna go BADLY.#u need to dress up for it and they have costumes for hire but u can bring ur own#see my toxic trait is that I’m delusional enough to believe that I can do anything as long as I follow a tutorial#i AM considering on making the dress myself. no I have no sewing experience but we have a sewing machine.
10 notes
·
View notes
Text
youtube
#Angela Clayton#fashion#vintage dresses#vintage clothing#retro clothing#1980s fashion#costuming#try on video#sewing#sewing tutorial#sewing patterns#Youtube
3 notes
·
View notes
Note
Not to like eavesdrop on your tags but can I also request the sewing tutorials you have saved?
omg sorry for taking so long on this i saw the ask and promptly forgot about it ;w;!!
anyways... Yeah ^-^, I can share a couple of videos that I like!
I'll start with the most important and influential video of my sewing career- this one comes from BudgetHobby and I adore every single one of her videos so, so much.
I suggest committing the back stitch and ladder stitch to memory- I use those regularly for all sorts of sewing projects ;w;
youtube
This one is also massively, MASSIVELY important. This is a super fast way to tie off hand-stitched seams and I wish I knew it sooner lol
youtube
Here's one I was interested in for a while (but never got around to trying). This one in particular was very intriguing and I ended up using this as an inspiration for the clothing design of one of my characters...
youtube
And finally, um... Idk if I already sent it but since I enjoyed this tutorial a lot I'll send it again :).
I made a really cute orange-shaped beret with it once and I never stop getting compliments when I wear it lol. Maybe I should do a jellyfish beret next...
youtube
As a bonus, here's the video I use to tie "floppy bows" (Since I wear a lot of button-ups, this one is very important for me lol).
Making the bow itself is actually quite easy- I could make a tutorial on it myself if I wanted to lol.
youtube
#mun rambles#ask#anyways! i hope you found some of these helpful#im in no way a super good sewist but I do have some knowledge lol#I can fix up clothes and stuff but that's about it haha#I have a pattern for a cute pinafore dress I wanted to make but .... it's very hard to decipher lol#maybe one of these days I'll get to it#OMG YOU JUST REMINDED ME!! I still need to make my realistic moon jellyfish plush tutorial#the hardest part is sewing in the scallops but the pattern is so easy to make that you don't even need to print it out lol
8 notes
·
View notes
Video
youtube
Making the perfect twirling picnic dress from thrifted fabric! Fully designed and made by me.
ETSY | REDBUBBLE | SOCIETY6 | ART INSTA | YOUTUBE | TWITTER | COMMISSIONS! | AMAZON BOOKS
#sewing#seamstress#picnic dress#making a dress#sewing tutorial#fashion#princess dress#disney princess#maysoul art
5 notes
·
View notes
Text
I've got it into my head that I want to make a kilt for myself for non-formal wear. They are warm but breathable, are easy to move in (length and weight dependent), look cool, have fun/confusing gender vibes, etc.
So I've been looking for a half-decent tutorial on how to make one and so far it's tough going. Not least because every tutorial starts with a load of guff about how important it is to choose a tartan that fits your heritage. Or even that you are only permitted to wear a particular tartan if that's the case.
Listen. "Clan tartans" are nonsense. Just choose one you like the look of. Tartan patterns as they are today do not have deep roots; they were made up as a marketing tactic in the 1800s.
#it's also proving difficult to find a decent non-video tutorial#i wore a kilt to school every day for seven years (not a dress kilt but still the same idea) and i have a proper dress kilt#i know how to sew#and none of the tutorials i've seen make a bit of sense#i'll look for a video tutorial tomorrow#ah look another disjointed middle of the night ramble#scotland
3 notes
·
View notes
Text

Mastering Bodice Patterns: Unlock Your Sewing Potential
Hey there! I'm thrilled to share with you an exciting post all about mastering bodice patterns. If you've ever wanted to create stunning dresses and tops that perfectly fit your unique style, then this is the post for you.
In this comprehensive tutorial, we'll delve into the art of drafting a basic bodice dress pattern . But it doesn't stop there! I'll be guiding you through valuable techniques like hacking, altering, full bust adjustment, small bust adjustment, dart manipulation, and creating various neckline shapes. With these techniques, you'll have the power to customize your garments and achieve the perfect fit.
But wait, there's more! As a special treat, I'm offering a free PDF pattern for a beautiful wrap skirt in my next video. You won't want to miss it! This skirt is not only stylish but also a versatile addition to your wardrobe. Keep an eye out for the upcoming video, where I'll provide step-by-step instructions and valuable tips to make the sewing process a breeze.
So, if you're ready to take your sewing skills to the next level, head over to my channel and check out the full tutorial on mastering bodice patterns. Get inspired, let your creativity soar, and sew garments that make you feel confident and beautiful.
Happy sewing!
youtube
#sewing#sewing tutorial#dress pattern#sewing community#creative sewing#pdf pattern#pdf sewing pattern#free sewing pattern#sew your style#modern sewing#modern patterns#Youtube#sparrowrefashion
95 notes
·
View notes
Text
youtube
Watch how quick and easy it truly is to make those tight wrap style garments bigger with my simple tutorial!
#refashionista sheri#refashion tutorial#refashionista#refashion#upcycle#sustainable fashion#upcycled clothing#reuse#secondhand#thrift flip#sew#preloved#upsize#make clothes bigger#make a dress bigger#easy sewing#80s fashion#60s style#Youtube
3 notes
·
View notes
Note
i just love happiness on katya and hope she always has someone to confirm that she is amazing and brilliant when she is doubting herself and her ideas <3 i know its selfish but it does make me sad that her happiness is gonna include an inevitable retreat from the spotlight. so happy for her but i will miss her, if that makes sense lol.
Oh I absolutely feel the same way as you. It’s bittersweet but I really do believe going forward we’re going to see her less and less and that will probably be the best for her personally, I think she’s definitely happiest when out of the spotlight. Especially with the way they’re talking about this tour, I’ve said it feels like a last hurrah in a way. While that’s heartbreaking as a fan, I guess we can just appreciate everything she’s done so far and wish her the best in whatever she wants to do in the future. I don’t think we’re looking at a full retirement yet (but you never know she doesn’t always sound like she’s joking lol) but I guess we’ll just take what we can get every time she decides to grace us with her presence. I truly just want her to be happy, in whatever that is. She’s given that to others so I hope she can accept that for herself.
#now if she wants to talk about what she could do once she retires from drag#I have ideas lol#sewing tutorials and a limited line of dresses!#film and tv reviews!#creepy voiceover acting!#tarot card deck drawings!#Jane Fonda style workout videos!#a solo book!#all of which don’t require drag and devoted fans will love#to keep earning revenue once she hangs it up for good#i’m hoping we’ve got another 3 to 5 years but you never know I’m just mentally preparing for all scenarios
9 notes
·
View notes
Video
youtube
Another Retrofuture Dress // Pointed Peplums & Iridescent Sleeves
If you’re not watching The Closet Historian already, I’m afraid you’re missing out
#youtube#theclosethistorian#dress making#sewing#tutorial#pattern drafting#retrofuturism#futuristic#fashion#color
8 notes
·
View notes
Text
Our shop will be opening soon at wharf mall on bluewaters island.
#handmade#fashion#design#dress#sewing#diy#fashionweek#blackgirlmagic#tutorial#youtube#kidswear#blogger#easy tutorial#fabric#sew#ready to wear#dresses#littlegirlstyle#kidsfashion#designer#shoponline#womeninspiringwomen#africanwax#momlife
5 notes
·
View notes
Last Seen Blogs

blastthechaos
General Supremo De Los Ship Crossover en Español
ash-shark
☆AshShark☆

franshesca-r
One Must Be Set Free To Find Oneself

bensbean
BensBeans

petitetiddiez
Courtney's a Lesbian