#sims 4 studio tutorial
Explore tagged Tumblr posts
Visit Tumblr Blog
Explore Tumblr blogs with no restrictions, modern design and the best experience.
Last Seen Tumblr Blogs


Fun Fact
In February 2021, Tumblr had 518.6 million blog accounts.
Text
Tutorial for Simplifying Changing Warehouse Info For Multiple Swatches Simplified: Sims 4 Studio
Hi everyone!
I have some exciting news - to me anyway, and I hope for you 😁
I recently had my tutorial approved on the Sims 4 Studio website!
This is for creators who use Sims 4 Studio, and anyone else who may wish to alter existing .package files.
Changing Warehouse Info For Multiple Swatches Simplified | Sims 4 Studio
Intro:
WHY I MADE THIS TUTORIAL
The purpose of this tutorial is to help creators and simmers alike simplify and speed up how to change information in the Warehouse tab in Sims 4 Studio for multiple swatches, especially if you have more than one section that needs adjusting, like Composition Method and Sort Layer for CAS items.
So, let’s say you’ve created an entire package with 15 swatches and have saved your package. Then you realize, OMG I forgot to change something in Warehouse mode and now have to go in and change each swatch separately. (cue dramatic music)
I don’t recommend this for only a few swatches, though, because, while helpful, this is not a one shot process, but it will save time for those packages with several swatches that require fixing/changing in the Warehouse tab.
Changing Warehouse Info For Multiple Swatches Simplified | Sims 4 Studio
6 notes
·
View notes
Note
hi gloomiee! hope you’re having a great morning/evening/night, just wanted to know if you’ll ever release a tutorial on how you recoloured @awingedllama slept in bed set? i’ve tried looking for tutorials online but no luck :(. if you can’t that’s perfectly fine! i just wanted to try make some recolours for myself <3
ofc^^ you will have to download Sims4Studio to do the recolors. Once you download the bed you can
1. choose to open the file with Sims4Studio.
2. Or you drag the package file to this path, (Documents>Sims 4 Studio>Mods) There you open Sims4Studio, click object, and filter it to show custom content.
Either way when the file opens it will look like this and under texture is where you will export the texture.

From then it is a matter of putting the png into a photo editing program to cut and color the textures. Looking through the swatches in Sims4Studio gives an easy idea of what part of the png changes what. I marked which part of the texture matches.

I recommend start with this swatch for awingedllama's bed because it is already white. When recoloring it's best to set the layer to multiply so that they texture of the bed can still be seen. When your done, import your new png to see what it looks like.
If there's more you'd like to know don't be afraid to ask^^
#ts4#simblr#the sims 4#thesims4#sims 4#gloomiee#tzr#sims 4 studio#ts4 recolor#tutorial#sims 4 tutorial#ts4 tutorial
51 notes
·
View notes
Text
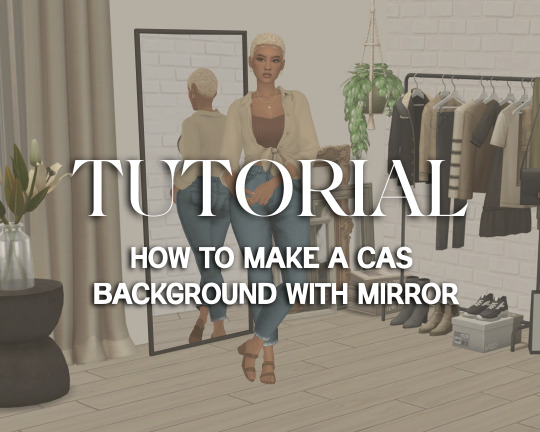
Tutorial: How to Make a CAS Background With Functional Mirror
Overview
This is something that has been highly requested so I hope this tutorial will be helpful for the sims 4 cc community!
This tutorial will have 2 parts for creating 2 different types of CAS "room" backgrounds. Part 1 (The Easy Way) uses a template I created for you to use your own 2D images/screenshots with a simple rectangular mirror. Part 2 (The 3D Room) will result in a better quality background, but it’s not a beginner friendly project so I don’t recommend trying it if you’ve never made any cc before. I will not cover the basics of cc making here, only what’s relevant to making a CAS bg using my template specifically. The Sims 4 Studio forum has a ton of great tutorials for everything else.
In my own research & experimentation, I noticed that (as far as I can tell) EVERY other CAS room with a functional mirror seems to be derived originally from LittleDica's CAS room [link] I want to acknowledge credit to LittleDica for their CAS background which I studied as a reference. But to be clear this tutorial and my templates are NOT derived from another creators' work; I created mine from scratch and it took a lot of time and effort. My version is much more simple and more compatible with Sims 4 Studio because there are no extra mesh groups or diffuse maps. I also made a great effort to make the reflection in the mirror more realistic for the size of the room. I hope you will be able to use this resource to create your own beautiful CAS backgrounds! ♥
Also in case you missed it, you can download my CAS background used in the preview [here] (it is slightly different from the template package.)
Requirements:
Sims 4 studio
Image editor (Ideally photoshop)
my templates (attached below)
—————
Part 01: The Easy Way
The easiest way to create a CAS background with mirror is to use my attached templates.
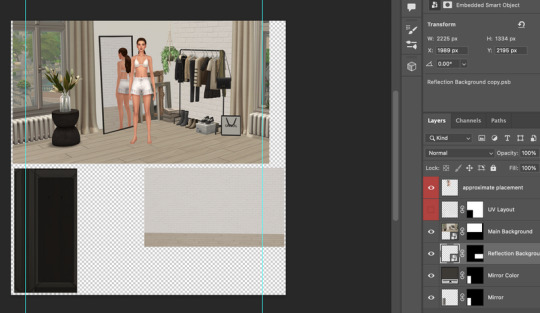
The PSD template is the best option, but for those of you that don’t have Photoshop, there is a PNG version as well.
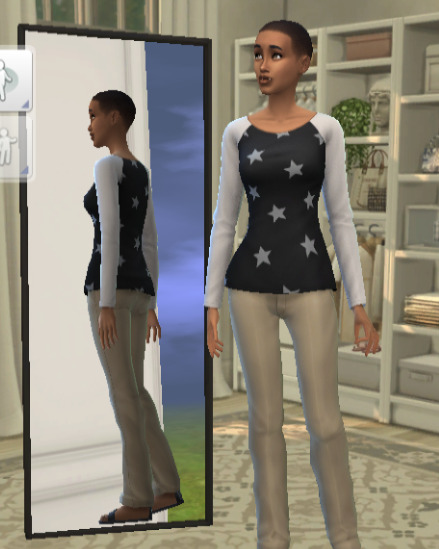
You will need 2 images; one for the main background, and one that will be reflected in the mirror. The large top area is the main background, and the smaller rectangle at the bottom is what will be reflected in the mirror behind your sim.
In the image editor, paste your images and resize them to fit into the outlined areas.
For framing your screenshots, it’s important to understand that the mirror is actually just floating in space in front of a flat background. That means you’ll have to fake the perspective a bit and that may require some trial and error to get right. I recommend taking multiple screenshots at a variety of angles so you have options to work with. Use the model sim as a guide to help you with placing your background image. (Don’t forget to hide the model sim and UV layout when you’re done!)
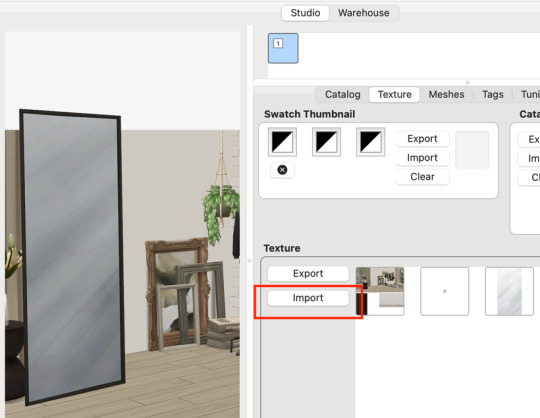
Save as .PNG or .DDS and import it into the template package in Sims 4 Studio.
That’s it! My goal was to make it super easy for you. Remember to only use one CAS background in your mods folder at a time since it's an override. Also note that it is not compatible with 'cas blob remover' since the instance for the dropshadow is now used as the mirror.
TOU — PLEASE READ:
I give permission to the Sims community to use my template files and modify them as needed to create your own CAS backgrounds. This took months of work, researching and experimenting, so please respect the effort I put into creating this resource by agreeing to these simple terms:
Don’t re-upload my files. Don’t claim my work as your own. If you use my templates for your cc, please share credit with my username (Lijoue) and link to my Patreon page. If you make any money from cc created with my templates, please consider making a donation via my Patreon. It is greatly appreciated.
download template files here
Part 02: The 3D Room
to be continued…
This part will take more time to finish because there’s a lot more steps involved in creating a 3D CAS room. In the meantime, the template should be enough of a starting point for those of you that already know how to make cc objects, since I already handled the hardest parts. Just understand that the mirror reflection is not automatically calculated, meaning that if you move the mirror in the mesh, you will need to change the Mirror Plane Normal and Mirror Plane Offset in S4Studio Warehouse to match the new angle or position. Otherwise it may look unrealistic or worse, it could reflect the eerie wasteland world that the CAS room is set in. (pictured below)
#sims 4 creator#sims 4 tutorial#the sims cc#ts4 maxis cc#maxis match cc#sims 4 maxis match#ts4 tutorial#sims 4 studio#ts4 custom content#ts4 cc#cas backgrounds#sims 4 cas
203 notes
·
View notes
Text
Tutorial: Converting all types of CAS CC to work with color sliders (+ how to disable it)
This enables CAS CC to work with Color Sliders for Hair, Clothes, & Accessories by thepancake1 and @mizoreyukii.
Since S4 Studio only let's you batch convert hairs and update makeup for compatibility, I present to you: TS4AlphaConverter_2_2_0_0 by CmarNYC.

Keep in mind that enabling CAS CC for color sliders will increase the file sizes of your .package files!
Sliders will also always affect all the texture, i.e. you can't exclude accessories like buttons or zippers, so some textures might not work well.
Also check out this tutorial: Fixing slider compatible CAS CC with broken textures

💜 Requirements:
Color Slider mod
TS4AlphaConverter_2_2_0_0
CAS CC you want to enable
Featured CC by @trillyke @daylifesims @jius-sims @magic-bot
💜How to enable CC for color sliders
1. Download the required program, mod and CC you want. This is my outfit before sliders:

2. Open up Alpha Converter
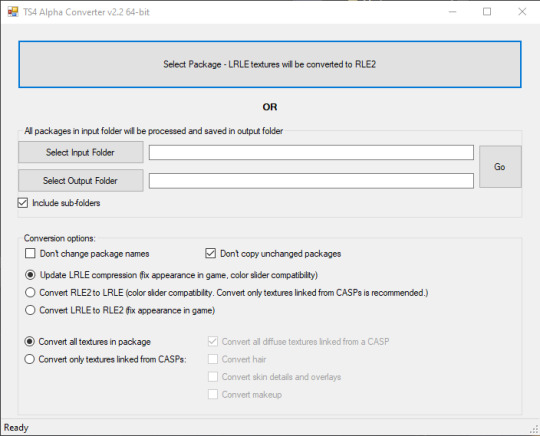
3. For enabling sliders, you can only use the folder option and not single files: Select your input folder which contains the .packages you want to enable. Then select your output folder where you want to save the new files. "Include subfolders" is handy if your CC goes into more folders inside your input folder. It will reproduce the same file structure.
4. I would recommend enabling "Don't change package names" so you can just replace your input files directly, otherwise it adds "_Fixed" at the end of the filename. I will also leave "Don't copy unchanged packages" checked.
5. Next we will select "Convert RLE2 to LRLE" to enable color sliders. I will explain the others later. It then enables "Convert only textures linked from CASPs" which is good, e.g. it will only target actual CAS CC textures then and no Build & Buy for example. Leave "Convert all diffuse textures linked from CASP" checked if you want to convert all types of CAS CC.
6. These are my finished settings:
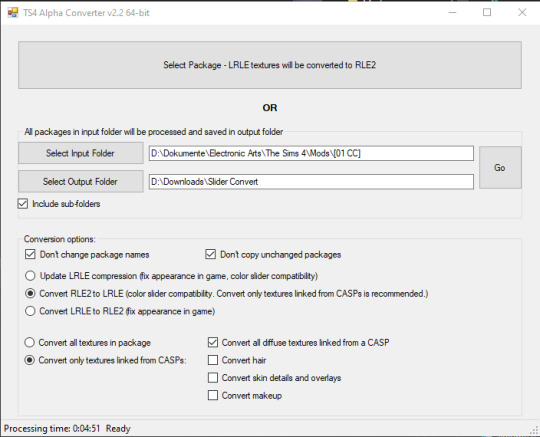
7. Press "Go". It will then take a while depending on file amount and swatches, as it will have to go through textures one by one.
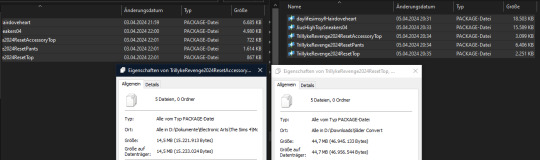
8. Check your finished files. The file size should be bigger, in this case it went up by 30 MB for only 5 files.
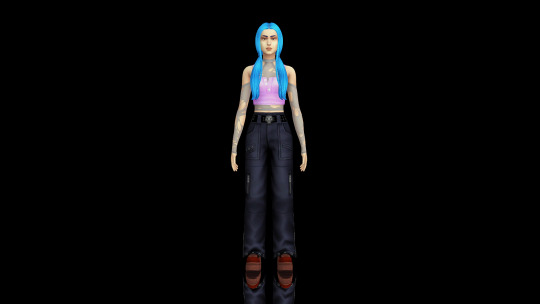
This is how the outfit looks after applying sliders to all pieces:
💜 How to disable CAS CC for color sliders
This time select "Convert LRLE to RLE2". You can leave "Convert only textures linked from CASPs".

2. Press "Go" and let it do it's thing.
3. As you can see, the file size went down again (middle), but it is not the same size as from the original file (right).
You will no longer be able to use sliders on the CAS CC piece, except transparency, which always works.
💜 Fixing slider compatible CAS CC with broken textures
If some of your CAS CC displays huge areas of missing, pixelated textures there is an issue with compression.
I don't know how and why this happens, but check out * this tutorial * on how to fix it.
@thefoxburyinstitute @maxismatchccworld @emilyccfinds @sssvitlanz
#ts4 tutorial#ts4 resources#tutorial#Sims 4 tutorial#s4 guide#ts4 guide#Sims 4 studio#Sims 4 cas#ts4 cas#color slider#cmarnyc#thepancake1#mizoreyukii#yorututorials
99 notes
·
View notes
Text

So you want to make a sims render: a beginner's guide
But what does that even mean? What do you need to start?
To get started with sims renders, you'll need the following programs:
Blender 3.6 - to render your sims
Blender 2.7 - to export poses, accessories and objects from s4s
Sims Ripper - to rip your sims to prepare them for blender
Sims 4 Studio - to export poses, accessories and objects for your renders
All of these programs are FREE to download and use!
Blender outputs fantastic renders depending on your settings, but you'll probably want to edit them after the fact.
For editing, I recommend:
Photoshop
GIMP
Photopea
I'll be posting editing tutorials in Photoshop, but any of these programs will get the job done.
Stay tuned for in-depth tutorials on using Blender, Sims ripper and Sims 4 Studio!
#salemsims tutorial#render school tutorial#sims 4 render tutorial#sims 4 blender tutorial#blender#sims ripper#sims 4 studio#resources#ts4#sims 4#sims
328 notes
·
View notes
Note
Hii, how you’re doing? Hope you’re having a great day!! Idk if you answer this type of questions but I don’t think in anyone else who could answer me this! I’m working in some world object overrides for my game. I’m talking specifically on the new train for the new ep but when I install the override, the object disappear from the catalog and I’ve tried to found the reason why but I don’t know! And since you do a lot of overrides I was wondering if you know why this is happening? 😭 like the override works but I can’t use it as objects in my own builds because the objects disappear :(
Honestly I haven’t touch anything in the package file other than importing a new texture so idk what I’m doing wrong 😭
Hello :) So I tried doing it myself (to make sure I'm answering it w/ the right answer) and turns out you have to override 2 sets of texture because: one is the debug object found in BB mode (which we'll turn into a buyable one), and the other is the VFX object that is actually the train you see moving in the world. Dw about the instance # for the VFX texture as I'll mention it later ^^
// to make the debug train object into a buyable object:
use the Override option to create your package with as it didn't give me problems with the object not showing up in the catalog and they can be placed on a lot.
go to the Warehouse tab, go to the object catalog, then change DevCategoryFlags ending with 81 (debug objects) into 80 (buyable buy object).

still in the object catalog, search for Tags and click the edit items, and add these tags so you can find them easily in the right category :)

give your object name, description, price, and other additional tags! also don't forget your texture recolor ^^
// to replace the texture for the VFX train object:
in the same package & Warehouse tab, duplicate your texture override, and when the add resource window pops out, replace the instance number to AA01864337474B06. This is the texture for the VFX train.


Save your package, and now your file should replace the textures of these 2 train objects!

If you're curious about where to find the VFX object & texture, I explained it here :)
28 notes
·
View notes
Text

The making of of the loading screen for the therapy game 🎮
Pics above and below edited by imagechef

Draft from photo studio
And the screenshot edited with incollage

#incollage#photo studio#imagechef#therapy game#underwater love#sims 4#simblr#ts4#sims 4 edits#windenburg#windslar#sims 4 tutorial
48 notes
·
View notes
Note
Hi! I've been using your Puppy Crow recolors, whether cc or the gamepacks, but I noticed some of the hairs use 'texture ref'. I've been recoloring for private but I can't find tutorials for it. How do you do it? Thank you and I wish you a good day.
Hi @moonlight-hollow 💜
There is this tutorial by @ddeathflower
I used this tutorial and created a tutorial that is a bit more detailed under the cut, I hope this helps you!
How to Texture Reference (Tex Ref)
Open both package files in Sims 4 Studio (S4S) - the main file (with textures) and the file you want to add the textures to (TEXREF).
Click on the Warehouse tab for both files.

Use the search bar to locate the DiffuseMap for both package files.

You will need to copy the DiffuseMap>Instance for each CAS Part from the hair you want the textures from and paste it into the hair that needs the textures .
i.e For the Black hair CAS Part; copy the DiffuseMap>Instance number from the file containing the textures (the main file) and paste it into the Black hair CAS Part DiffuseMap>Instance in the file which needs the textures (TEXREF file).
Repeat the process for each CAS Part.


Once you have copied the DiffuseMap>Instance for each CAS Part you will need to delete the RLE 2 Images from the TEXREF package file.

Save the file!
Checking it works
**S4S should be closed**
Copy the main file (with textures) into your S4S Mods folder

Open both package files in S4S - the main file (with textures) and the file you added the textures to (TEXREF).

You can click through each colour of the TEXREF package file to check that the DiffuseMap>Instance for each CAS Part was copied correctly and fix any mistakes.
13 notes
·
View notes
Text
youtube
How to convert toddler hair to Infant
I received a request to make a tutorial to teaches to convert of toddler to Infant hair.
This video is subtitled, if necessary you can activate the subtitles, for English or Portuguese
Tell me in the comments if you want me to make more videos like this, because your opinion is very important to me.
Please if you like click in “Like” and if you want to be aware of new videos subscribe to my channel.
Thanks! 🙂
_________________________________________________
Twitter | Facebook | YouTube | Instagram
Support my work on Patreon | Follow me on CurseForge
___________________________________________________
#sims 4#age conversion#video#video tutorials#hairstyle#blender#sims 4 studio#kiarazurk#patreon#infants#ts4 infants#infants hair#Youtube
47 notes
·
View notes
Text
TUTORIAL
How to FIX CUSTOM EYELASHES after update 1.108.349.1020 The Sims 4
YOU NEED:
Sims 4 Studio @sims4studioofficial
Blender (I use Blender 2.79)
Instruction manual:
Opening the eyelashes that need to be repaired in Sims 4 Studio

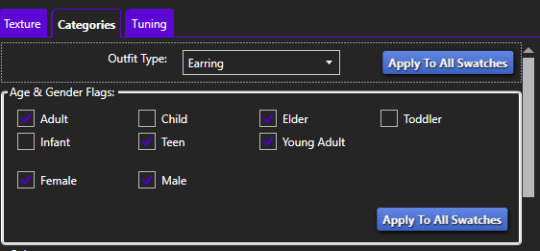
2. Go to the "Categories" section - Item "Outfit Type" - "Eyelashes"

3. Click "Apply to All Swatches" - Click "Yes"

4. Now we need to assign the correct color to the Vertex in Blender. Go to the "Mesh" category and export the eyelash mesh

5. Open the Mesh in Blender and switch to the "Vertex Paint" mode

6. Select the display mode "Wireframe" or press the "Z" key

7. If the eyelashes are broken, they will have the wrong color. Now we need to assign the correct color

8. Click on the palette icon

9. Go to the HEX item and enter the color code. Color Number: 007F3F

10. After you entered the color code. Click "Paint" - "Set Vertex Color"

11. After that, the color of the eyelashes will change. Save the file and close the Blender

12. Go back to SIms 4 Studio and import the mesh

13. Saving the package file

14. Checking the result in the game
715 notes
·
View notes
Text


Shop Sign Wall Lights - UPDATED 15 May 2025
I put together a few sets of shop sign wall lights. But there are instructions. I kept some swatches as a default white color so that you could pick which color you want the light to be while in live mode. This saved on the file size of the package file because the more textures a file has, the more bloated the file size is.
I had some fun with some shop names although I mainly included generic titles in both English and Simlish.
DOWNLOAD for FREE: SFS
OR at Patreon*
*You must be over 18 to access my Patreon page.
INSTRUCTIONS ON CHANGING LIGHT COLORS
Once you place the light in build mode, then go to live mode. Click on the light and you will get the following pie menu.

Select SET COLOR AND INTENSITY and then choose THIS LIGHT. The color options will then appear so you can select which color you want.

If you use the name signs along with the Awning Lights, make sure to place the name on top of the awning so when you select the color picker, the correct sign changes colors. The other option is to place the name separate from the awning, go to live mode and change the color, then go back to build mode and add the awning light you want.
Enable the bb.moveobjects on cheat and then you can make adjustments to location and size of objects. You can adjust the position of the light on the wall by depressing the Alt key while placing the sign (on PC). You can adjust the size of the item by depressing the Shift key and either [ (for smaller) or ] (for bigger) (on PC).
CREDITS
Awning Shop Lights - 19 swatches of various awning wall lights. 18 are pre-colored and one is white so you can change the color yourself in game.
Candy Shop Lights - 20 swatches
Pottery Shop Lights - 25 swatches
Tattoo Shop Lights - 21 swatches
Enjoy!
Creations by SexyIrish7
These cc objects are new 3d meshes created using Blender and Sims 4 Studio.
Polygon Count: 6
All CC have:
*Ability to search catalog using search terms: sexyirish7 and si7
*Customized thumbnail
*******
CREDITS:
Software credits:
Sims 4 Studio v. 3.2.4.1 (Star): https://sims4studio.com
Blender 4.0: https://www.blender.org/download/
GIMP v. 2.10.34: https://www.gimp.org/
Inkscape v. 1.2: https://inkscape.org/
Thank you to the creators and moderators producing tutorials and answering questions!
*******
Model and Image credits:
Mesh created by me.
Simlish font credit to Franzilla: https://modthesims.info/
Image credits:
Awning Lights Image credits: Modified image from Adobe Stock
Candy Shop Image credits:
Swatches 1-3: Image by pch.vector on Freepik https://www.freepik.com/free-vector/christmas-candies-symbols-set-neon-style_11241813.htm#fromView=search&page=1&position=26&uuid=8b541325-0e62-4e37-9468-6bacd30f8963&query=neon+lollipop+candy
Swatches 4-8: Image by gstudioimagen on Freepik https://www.freepik.com/free-vector/sweet-candy-neon-seamless-pattern_5595774.htm#fromView=search&page=2&position=30&uuid=e2259de5-014d-4d04-af87-1198ee0f35e2&query=%40gstudioimagen+neon
https://www.freepik.com/free-vector/sweet-candy-neon-seamless-pattern_5595775.htm#fromView=search&page=1&position=27&uuid=e2259de5-014d-4d04-af87-1198ee0f35e2&query=%40gstudioimagen+neon
Swatches 9-10: Image by openclipart.org https://all-free-download.com/free-vector/download/peppermint_candy_clip_art_13182.html
https://all-free-download.com/free-vector/download/round_candy_with_stick_card_on_pink_background_6823183.html
Swatch 11: Image by All-free-download.com https://all-free-download.com/free-vector/download/round_candy_with_stick_card_on_pink_background_6823183.html
Swatches 12: Image by katemangostar on Freepik https://www.freepik.com/free-vector/ice-cream-cart-neon-sign_3238564.htm#fromView=search&page=8&position=42&uuid=2f82b4d1-5ca8-449c-ae22-4573861ebcb0&query=neon+sign+retail
Pottery Shop Image credits:
Swatch 1: Crafting icons created by andinur - Flaticon https://www.flaticon.com/free-icon/pottery_17392031
Swatch 2: Image by katemangostar via Freepik https://www.freepik.com/free-vector/aquarius-neon-sign_5561944.htm#fromView=search&page=2&position=5&uuid=c55e5e21-0550-46f0-b9be-cfa85ff38796&query=Ceramic+Neon
Swatch 3-4: Pottery icons created by Smashicons - Flaticon https://www.flaticon.com/free-icon/vase_3760867
https://www.flaticon.com/free-icon/vase_3760970
Swatch 5: Icon by istar_design_bureau via Freepik https://www.freepik.com/icon/pottery_1958438#fromView=search&page=2&position=20&uuid=096084ae-13fe-429c-a419-e6e13ccd37b9
Swatch 6:Icons by Eucalyp - Flaticon https://www.flaticon.com/free-icon/pottery_6552610
Swatch 7: Icon by berkahicon via Freepik https://www.freepik.com/icon/spin_13785816#fromView=search&page=2&position=0&uuid=096084ae-13fe-429c-a419-e6e13ccd37b9
Swatches 8-11: Icons by Freepik https://www.freepik.com/icon/pottery_8540816#fromView=search&page=3&position=43&uuid=096084ae-13fe-429c-a419-e6e13ccd37b9
https://www.flaticon.com/free-icon/machine_9200546
https://www.flaticon.com/free-icon/vase_8838322
https://www.flaticon.com/free-icon/pottery_3305262
Tattoo Shop Image credits:
Swatch 1: Modified Image by katemangostar on Freepik https://www.freepik.com/free-vector/tattoo-salon-neon-text-with-tattoo-machine-neon-sign-night-bright-advertisement_2438198.htm?log-in=email
Swatch 2: Image by Nippy Custom https://www.nippycustom.com/products/tattoo-neon-sign
Swatches 3-5: Image by bohlam via Vecteezy https://www.vecteezy.com/vector-art/2185717-tattoo-studio-neon-signs-style-text-vector
https://www.vecteezy.com/vector-art/34210463-neon-sign-tattoo-studio-with-brick-wall-background-vector
*******
TOU:
Do not re-upload and claim as your own
Do not re-upload and hide behind a paywall
*******
Changelog:
15.05.2025
*Updated swatches for compatibility with slotted signs.
*Added wall deco slot so that signs can be stacked on slotted signs for Awning Signs
*Added swatches with inverted images for Candy, Pottery, and Tattoo Shop Signs.
#the sims 4 cc#ts4cc#sims 4 cc#the sims 4#wall decor#sims 4#ts4#lights#wall lights#signs#shop signs#retail#pottery#ceramics#tattoo#ink#candy#lollipop#sweets#sugar#light tutorial#sexyirish7#updated cc
277 notes
·
View notes
Text
A friendly reminder:
Custom content creating tutorials are free
Blender tutorials are free
Sims 4 studio tutorials are free
Access to file hosting sites are free
Need help finding any of these resources? There are plenty of creators, me included, that are more than willing to help you and/or point you in the right direction.
If a person is paywalling any of this, they do not have the best interest of you or the community in mind.
212 notes
·
View notes
Text
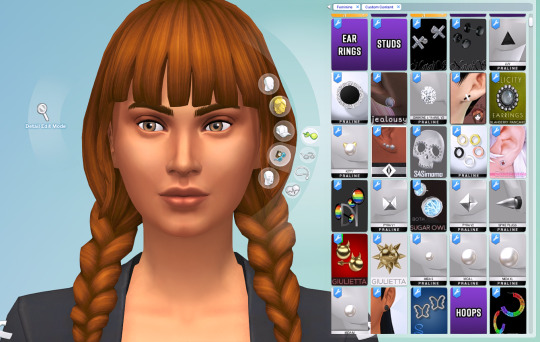
How to create visual "custom categories" with the new Sims 4 Studio Batch-Edit
As discovered by @vyxated Sims 4 Studio now supports batch-changing the Display Index number which allows you to easily sort your CC (see post here)
Using that, you can create visual "custom categories" for any existing category to sort your CC into smaller groups that share a thematic.
━━━━━━ ・❪ ☾ ❫ ・ ━━━━━━
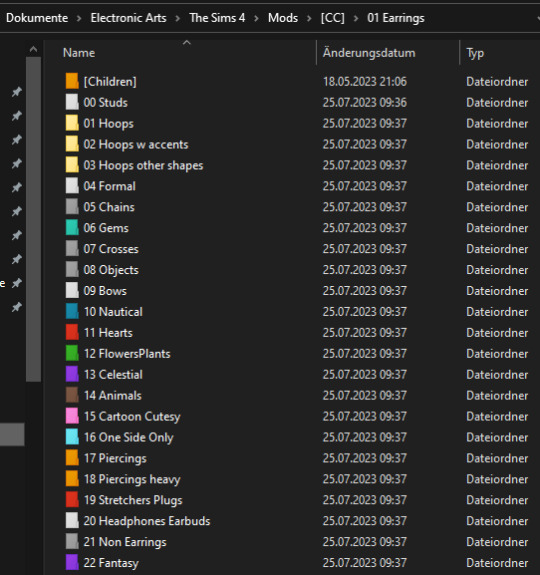
Step 1: Creating folders
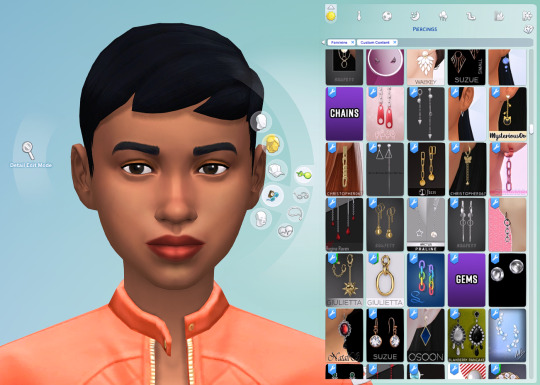
First you need to sort your CC into whatever categories you want. I am sorting my earrings.
( I use Folder Painter to get colored folders)
━━━━━━ ・❪ ☾ ❫ ・ ━━━━━━
Step 2 (Optional): Creating dividers
I highly recommend you to make some sort of divider for your categories (basically like my TidyCAS).
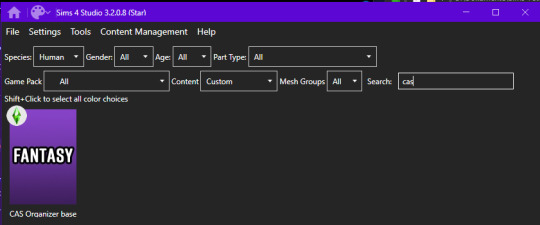
For that, in S4Studio start out by cloning any basegame CAS item.
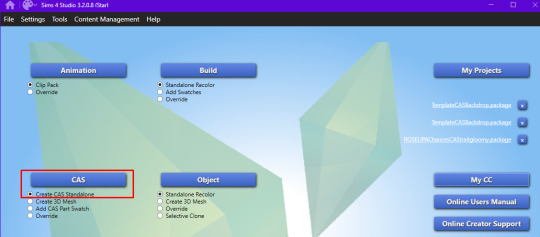
I usually always use the sunscreen facepaint, but it doesn't really matter, you shouldnt use smth with a mesh.
Or you can download this file and place it in Documents\Sims 4 Studio\Mods. It has no texture, is enabled for a lot of things and disabled for random.
IMPORTANT: For every new divider you want to create, you have to clone the CAS item from S4Studio again. You cannot simply duplicate your divider CC and simply change it.
Save it as the number and name of your category. For me it would start with "00 Studs".
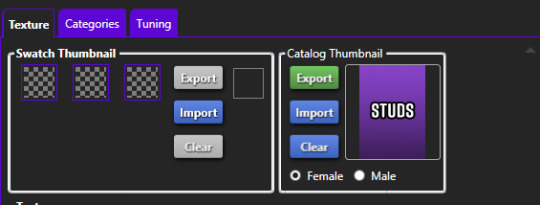
In that file, first import any type of custom thumbnail you want to use to display the category name.
Then, change the category to whatever category you are working on and enable it for all ages, genders, fashion choices & outfit types you want and disable it for random.
Now if you want, import an empty texture to get rid off the sunscreen, but since you won't apply that CC, it won't matter.
Download the empty texture here
Make sure to place the dividers OUTSIDE your sorted folders.
━━━━━━ ・❪ ☾ ❫ ・ ━━━━━━
Step 3: Batch processing in S4Studio
Now you want to batch process your folders in S4Studio.
First click on "My CC" and let it load.

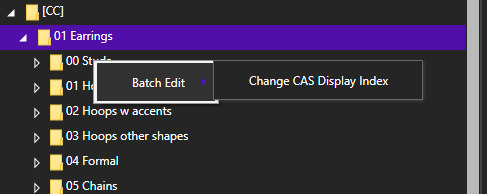
Now right click your first folder and select "Batch Edit - Change CAS Display Index"
In the next window, press "Run".
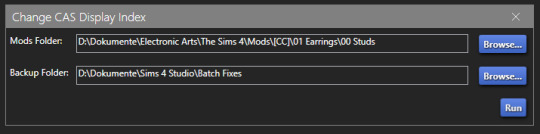
Then, enter whatever number you want to start with. The smaller the number, the higher up the content is. You can go into negatives and the limit is a veeeeeeeeeery high number.
If you just want to sort some normal CC, I recommend starting with 0 simply.
For the next folder I then always go up by 10, so 0-10-20-30-etc.

Then press "OK".
You will then get a popup with all your changed files (I sorted mine before so it's non lol)
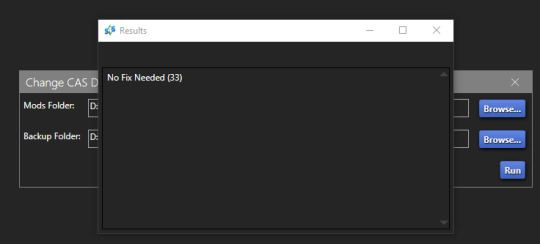
Note: Keep in mind that it does not sort your CC alphabetically. Apparently it's by last modified date.
━━━━━━ ・❪ ☾ ❫ ・ ━━━━━━
If you have done step 2:
Step 4: Sorting your dividers
Lastly you want to make sure that your dividers show up at the beginning of the custom categories.
Open up your divider in S4Studio again if you closed it.
Click on "Warehouse", select the "CAS Part" and on the right in the "Filter" field search for "display".
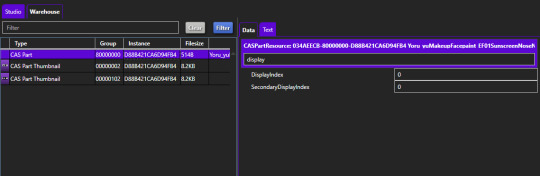
Under "DisplayIndex" you now want to input a number that's before your category.
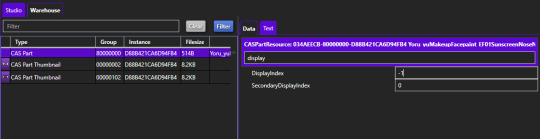
My category starts at 0, so I will change it to -1. If the category starts with 10, I input 9 and so on.
"SecondaryDisplayIndex" is swatch order, so it doesn't matter here.
Then just save it.
━━━━━━ ・❪ ☾ ❫ ・ ━━━━━━
And that's it!
@thefoxburyinstitute
#ts4 tutorial#ts4 resources#tutorial#sims 4 studio#sims 4 tutorial#s4 guide#ts4 guide#sims 4 cas#sims 4 organazation#ts4 cas#yorututorials
367 notes
·
View notes
Text
A new script mod by fantuanss12!

I got to test this mod out and it's another fun but more interactive way of buying groceries! - desiree-uk fantuanss12! mod notes:
What does this mod do:
This mod added a grocery delivery service. Shop and wait until a delivery sim come with a bag. Accept delivery and open the bag, Get the items inside it.
How to use:
There are two way to access this service: 1. Select grocery store rabbit hole --> Request Grocery Delivery Service -Combo rabbit hole will be in Grocery Store... Pie menu
2. Select cellphone or home phone --> Services... --> Call for Grocery Delivery -If there's multiple grocery stores, a dialog will pop up and ask to select one -Can't shop if there's no grocery store in the world
Shop as usual and buy items. Wait until a delivery service sim come and ring the doorbell. Accept it like pizza delivery service. Sim will be charged 30 simoleons for the service.
The grocery bag is from The Sims 4 Cottage Living.
Others:
If the delivery didn't come:
-Use MasterController to check whether there's 4 pizza delivery service sim. Two for pizza, two for grocery (Game needs time to generate sims to fill the spot)
-Since the delivery system is almost the same as pizza delivery, try to order pizza to see whether they can reach the lot.
-There's report that in worlds with no roads, service sim may not show up but the grocery bag is somewhere around the lot. Try to search around the house.
Credit: Big thanks to twinsimming for phone coding help! Simmers on Discord and tumblr for testing Battery's script mod template CmarNYC's SimOutfitter tool ILSpy Visual Studio 2022 Multiple modder's tutorial. EA for the bag
Download from MTS!
358 notes
·
View notes
Note
Hi! I have a question do you know if there a way to get vfx trains from San myshuno to work in any lot or world ? Not functional but showing up if you place like train tracks or rabbit hole train station sorry for the bad English
Hi! Well I think there's 2 ways to do it: one is to link an object with a VFX (i.e. a train track obj with added train vfx). I think BakieGaming did a lot of his animated ccs this way, tho I haven't checked the exact details.
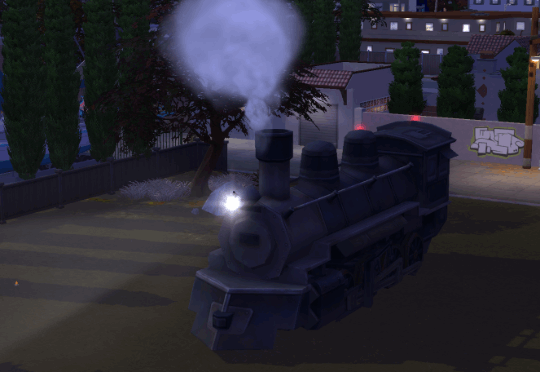
Two is by extracting the mesh and make them into a buy mode item which you can place anywhere.
Both are static in place, and while there are some that're animated, they're located pretty far away from the spawn point that idk if it's usable XD you kind of need to do some make believe with the static objs, or figure out how to move the animated ones closer to the obj it's spawning from.
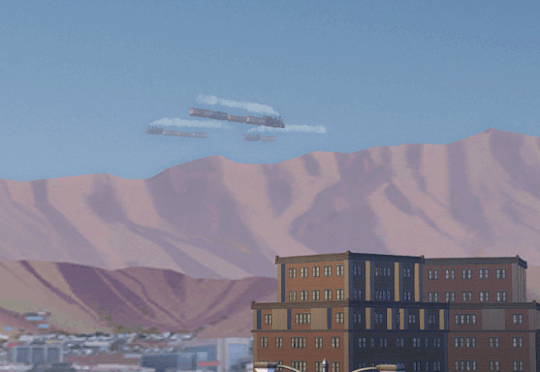
Regardless, here's a tutorial for the 2nd method since it's how I first interpreted the question haha
How to Extract VFX Meshes w/ VFX Tool
Will be going over how to find their mesh instance id w/ the VFX tool, find it in Sims 4 Studio, extract those meshes & textures, and have them buyable in-game.
Tools needed: Sims 4 Studio, VFX Tool by denton47, and Studio Effect Player mod by andrew (in-game)
All credit to denton47 for the info on how to find the mesh, I'm just relaying the info that I found there :D
VFX Tool - find mesh's instances
Install the VFX tool. Once done, select Main (1), then select Effect List (2) to get the list of all available vfx for easy viewing. This will allow you to look through the dropdown to find the VFX you need.
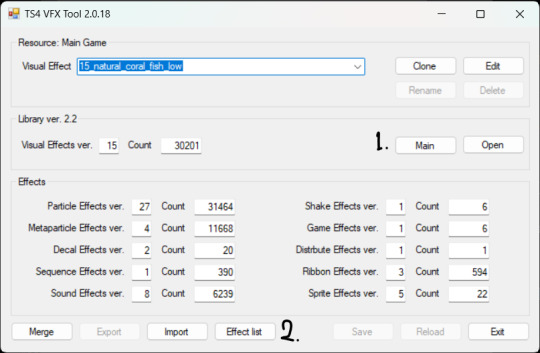
Search for the VFX you want to extract the mesh from by going over the list and use the Studio Effect Player mod to try out different keywords and see what object it's associated with (Select Effect, then paste the vfx name).


For the San Myshuno trains in particular, they are labelled as "commuter_train" and has several variations. Ones that standout/has unique variation are: commuter_train_car : on the middle w/ a middle carriage mesh spice_commuter_train_car : on the front, mesh is the same as above but w/ dirty texture uptown_commuter_train_locomotive : on the back, front/back carriage spice_commuter_train_car_locomotive : not pictured, contains 2 different meshes (front & middle/back carriage)
Once you found the VFX you need, go to Edit (1), then select Edit (2) on the first ParticleEffect. On the new window, search for the IID/instance id (3), and copy that number on notepad. Do the same for the other VFXs listed above.

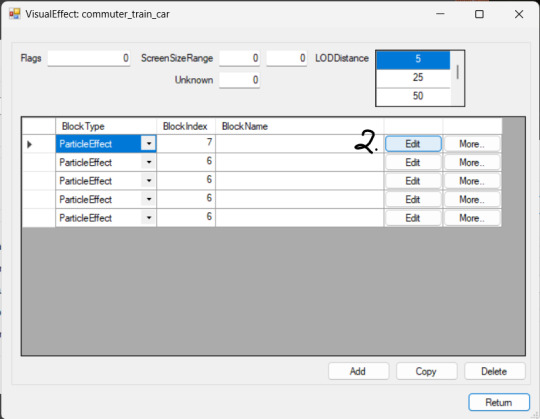
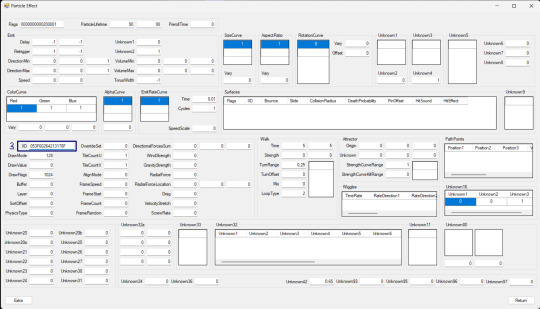
The ParticleEffect points to either a mesh or texture. The first 1 or 2 usually has the IID to the mesh while the others have IID of additional textures (e.g. headlights), which you can skip over. Here are their IID: commuter_train_car : 053F60264213178F uptown_commuter_train_locomotive : 122458A81FD85174 spice_commuter_train_car : 4F02D6E9EBE47B71 spice_commuter_train_locomotive : 973B164B6BE4933A & 562FA1E2D1E29690
S4S - find models & textures with Game File Cruiser
Open S4S > Game File Cruiser, and search for one of the IID above (will be using the commuter IID).
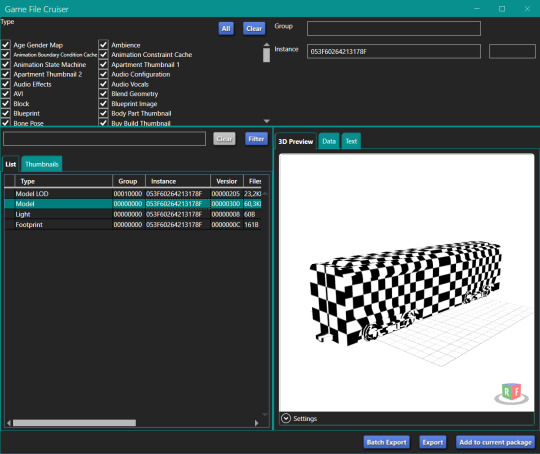
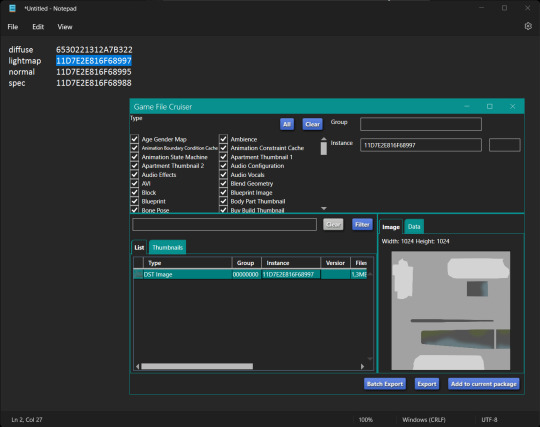
You'll notice that there's no texture. What you can do is to go to the Text tab (1) of the resource, and find the DiffuseMap IID (2), which is 6530221312A7B322.

Search for the new IID (1) in games file cruiser. This IID in particular has its own mesh and seems to have more Material information when you inspect it. So, in addition to the IIDs we found from the VFX tool, we'll also add this new mesh & resources into the package file later on.

If you plan on editing these textures, save the instance numbers of LightMapTex, NormalMap, and SpecMap onto a list, and export each of them using GFC.
Go back and keep the main GFC window open for now.
Before you continue: take note of how many Materials / mesh groups there is on the object. Since this has 1, you'll need to clone an object with 1 mesh group too.

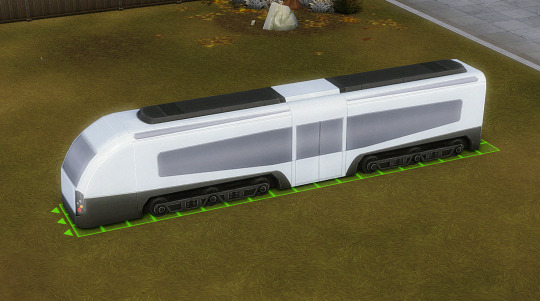
S4S - extracting mesh & making object override
Just for info, by editing the file to make it possible to extract the mesh, you'll be making this file into a buyable object that will also override EA's meshes & textures (if you choose to replace them), though you can add custom swatches that won't affect the EA obj.
Create a 3D Mesh item. Since this object only has one mesh group, search & clone an object with the same amount. Back in the GFC window, select all resources and add them to the current package.

With the 6530221312A7B322 IID copied, select Object Definition > Model > paste in the instance box.
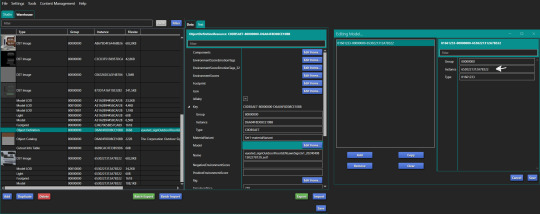
Also paste it for the Footprint resource and change the Group number to 00000000 to make sure it's linked to the right resource.

Then, select CutoutInfoTable > Entries > scroll down until you find ModelID and paste the IID you've copied.
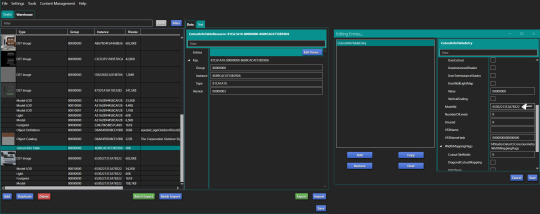
Save, reload package file, and now you can extract the mesh and textures!

Note that if you update the mesh/texture, it will also override the VFX object that goes around in San Myshuno.
Repeat the process for the other mesh variants on new package files. If you simply want to have them be buyable, getting 2 different models is fine, but if it's a texture override, then it's worth getting all the models instead.
Last note, this train object has the LargeObject shader and that seems to prevent it from lighting up at night, so you'd want to change that to Phong instead.

In-game preview:

If you want your object to have proper LODs, it'll probably be easier to clone a 3D mesh that already has that and import the train mesh you've just extracted into the cloned package file.
The train tracks are probably accessible if you look for debug/live edit objects in buy mode.
81 notes
·
View notes
Text

As storytellers, realism and continuity are important to us, and they're sometimes hard to achieve within the confines of the game. I’m personally a big fan of posing Sims in open doorways, and unless you want to be limited to the CC options that exist, you’re stuck having to make some poor Sim walk in and out and pausing at just the right moment for the desired effect. But it’s actually very easy to edit a door in Blender to make your own open version!
I initially learned about "posing" objects from surelysims' Wicked Whims posing tutorial, which I highly recommend as a whole. However, it might be a little overwhelming to learn a whole new posing system for the sake of a screenshot or two, which is where this tutorial is meant to come in. Some of my explanations might seem overly simplistic, but I wanted it to be approachable even for beginners. I am far from an authority on using Blender or making CC, and I'm sure there are flaws in this process or easier ways to achieve certain things, but it works well enough for my purposes and I hope it will work for yours too. 💗
Now, onto the tutorial...
Figure out what door or gate you want to create an open version of. If it’s from the vanilla game, all you need to do is make note of its name. If it’s CC, find the package in your mods folder, make a copy, and paste it into My Documents > Sims 4 Studio > Mods. This will allow you to find it in S4S in the next step!
Open S4S. On the main screen, make sure “Standalone Recolor” is checked under the “Object” button, then click the button.

A new window should pop up (if it’s your first time doing this, it may take a while to load). At first, it will show every single object in the game. If you know the name of the object you’re looking for, you can use the search bar to find it. You can also use the filtering options to narrow the selection down by category, game pack, and whether it’s vanilla or custom content. Here, I’ve filtered the search to only base game doors. Once I find the door I want to adjust, I click on it and hit “Next.”

This will pop up a window prompting you to save a new file. Place it somewhere you know you’ll be able to find it easily later and name it accordingly. This file will ultimately contain your mesh edit, so you don’t want to lose it! I suggest placing it in a dedicated folder, on your desktop, or in your Mods folder directly.

On the next screen, you’ll be looking at the contents of the package itself. For this tutorial, you don’t need to worry about grabbing anything but the mesh. Click on the “Meshes” tab and then “Export Mesh.” You’ll again be prompted to save.

Open the mesh file you just saved in Blender. (If the view is funky to start, I recommend hitting 1 on your keyboard’s number pad to get a forward-facing view.) [It should also be noted I’m using Blender 3.6, so my screenshots and the location of certain settings may be different than in earlier or newer versions.]
You’ll see that there are actually multiple meshes involved (and the number can vary from object to object). Right now, we’re only concerned with the “rig.” If you’re familiar with posing, you’ll know that all Sims have a rig that is used to move different parts of their bodies around. Objects also have a rig, and objects that can open will have “bones” that control their moving parts. So click on “rig” and then change “Object Mode” in the bottom corner to “Pose Mode.”


Now, if you hit A on the keyboard, it will select all bones and you can see where they’re located. As far as I can tell, all doors have two bones that control their swinging movement. They both do essentially the same thing. I tend to stick with the top bone, which is called something like “bind_doorSwing.”

Pro-tip: If you’re having trouble seeing or selecting the rig's bones, you can change the view on the right side of the screen to “dope sheet.” Then when you save the position of the bones, just like when posing a Sim, by selecting all with A then clicking I and selecting “Location & Rotation,” the list of available bones will pop up there.


Rotate the door open using this bone or bones, if it’s a double door. On double doors, I recommend rotating each side individually rather than trying to rotate them together, as you may get unexpected results. You can use the R+Z combo on the keyboard to limit the direction of movement. (You can also use this in combo with numbers to swing them more precisely. For example, if you want a 45 degree swing, you can press R+Z+45.) Specifying the Z axis allows you to only swing the doors open and closed while restricting their movement in other directions.

Once you’ve got the doors swung open to where you want them, hit A to select all bones, then hit I and select “Location & Rotation” to save the position. (If you’re a poser, this maneuver is already familiar to you - and you know how important it is! If you skip it, the new position won’t save and the doors will revert back to closed.)

That’s it! You don’t have to do anything else to the mesh. Save your file in Blender. If you want to keep it separate from the original door mesh, save as instead and name it something different. (This is why you may want a dedicated folder, since the number of files does add up!)
Reopen the package you made earlier in S4S (or simply return to it if you’ve kept it open). From the same place you exported the mesh, you will now import the edited mesh. Hit “Import Mesh,” navigate to your edited Blender file, and you should now see your edited door replace the original. Since it’s the same mesh, all the swatches will still work perfectly with it.

You’ll notice that you’ve only replaced the “LOD 0 (High)” version of the mesh. When you click the drop-down menu, you’ll see that there are also medium and low detail versions, as well as shadow meshes at all levels of detail. If you’re only making an object for personal use, you don’t have to worry too much about LODs. You can probably just import the same mesh into LOD 1 and LOD 2 and be fine (so long as your computer isn't a potato). And if this is just for you, I honestly wouldn't even touch the shadow LODs.
The only other thing you might do is go back to the “Catalog” tab and alter the object name so you can find it easily in the game catalog. You can also edit the description, price, etc. if you so desire. Hit “Save.”

Test in game! If the package isn’t already in your Mods folder, move it there. As long as you didn’t mess with any of the tags, it should still be in the door section of build mode and work perfectly as a functional door. The door swinging animation will look different, and you could probably get rid of it if you wanted, but that’s above my current skill level and I don’t think it’s really necessary for our purposes. If all you need is an open version of a very specific door for storytelling purposes, it gets the job done.


(First screenshot: doors swung open as intended, second screenshot: doors swinging in the opposite direction as they’re walked through)
These steps can also potentially be used to create open versions of other in-game objects like gates, books, chests/boxes, etc. I’m only just beginning to experiment with minor mesh edits, but once you get the hang of it they can often be faster and easier than trying to line up the best circumstances to get the perfect shot in-game. I might make more tutorials for small edits like this that help with storytelling realism and continuity in the future!
#ts4#sims 4#ts4 storytelling#ts4 tutorial#sims 4 storytelling#sims 4 tutorial#this is the first tutorial i've written so do let me know if anything's confusing!!!#*tbw
271 notes
·
View notes