#The Sims 2 Tutorial
Explore tagged Tumblr posts
Visit Tumblr Blog
Explore Tumblr blogs with no restrictions, modern design and the best experience.
Last Seen Tumblr Blogs


Fun Fact
130K people were victims of a chain letter scam that affected Tumblr in May 2011.
Text

The Sims 2 Tutorial | Building Stacked Lots
In this video tutorial I am walking you through the process of building stacked lots. This technique was first created by the amazing @threadandsandpaper back in 2014. You can still find the original tutorial right here: https://threadandsandpaper.dreamwidth.org/5129.html
(Massive thanks for this incredible tutorial, all cred goes to you 🥰)
youtube
211 notes
·
View notes
Text
Switching between save folders without renaming them
See the tutorial on Mod The Sims
131 notes
·
View notes
Text
Raw Tutorial - How to Make Custom Harvestable/Orchard Trees and Make Them Seasons Friendly.

This tutorial is somewhat raw and has no pictures. I don't see myself adding them in the foreseeable future, However, at the time, I wrote it as detailed as possible, so I won't forget. Hope it'll be helpful as it is. If not, I will make a proper edit in the future. So, if anyone's interested in that kind of thing, Head This Way:
btw, if anyone has any notes about it, I'd like to hear them.
#Tutorial#Tutorial: SimPE#Custom Harvestable Trees#Custom Orchard Trees#SimPE#BHAVS#TS2 Tutorial#Sims 2 Tutorial#The Sims 2 Tutorial#TS2#Sims 2#Sims2#the sims 2#SimPE Tutorial
49 notes
·
View notes
Text
HOW TO MAKE YOUR SIM WORK IN A FULL-TIME* JOB AND AS AN EMPLOYEE IN A BUSINESS AT THE SAME TIME
IMPORTANT: I've tested this in my game and so far I haven't had any catastrophic glitches. However, I still recommend you make a backup of your neighborhood in case anything goes wrong. Huge thanks to @bstu for helping me out with this one!
*haven't tried this with part-time jobs but I assume it works the same way. Just remember to look for the teen-elder jobs in the career tab once you get to step 4.
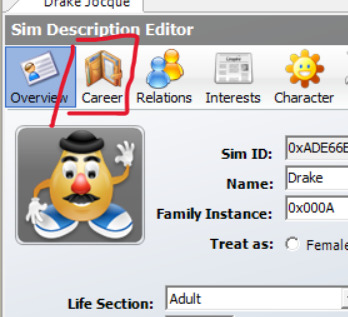
Okay for some context, my Sim (Drake Walton, now Drake Jocque) works in the Politics career as a congressperson. However, since his hobby is music and dance, I wanted him to work at Cleo O'Mackey's nightclub as a DJ at the same time for some extra money, but no matter how hard I tried, the game wouldn't let me.
As I said, @bstu came up with an idea. To do this, you absolutely need to use SimPE. This method won't work with mods like Sim Blender, Sim Manipulator or similar hacks. Why, you may ask? Because we need to avoid the pop-up that shows up when switching jobs:

That being said, let's start with the tutorial:
First of all, hire the Sim you want to work in your business as you'd normally do. When the switching jobs pop-up shows up, click on "Yes". After this, save and exit your game.
Go to SimPE, open your neighborhood under "Tools -> Neighborhood -> Neighborhood browser...", then click on "Sim Browser" and look for the Sim you want to edit, in my case Drake Jocque.
Once you do this, click on "Career", above your Sim's description:
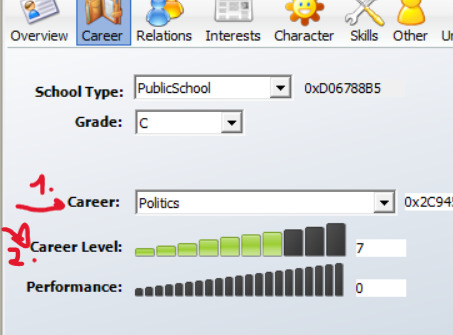
4. In here, go to the career tab, where it should say "Unknown". Change it back to your sim's previous job and career level. In my case, it was Politics, Lvl 7. Commit your changes, save and close SimPE.
5. Open your game and see if your changes got saved. If you go check your sim's job, you may encounter a glitch in which it'll display the name of the business your sim works at instead of their vacation days. Again, this is just a visual glitch and will not affect your gameplay whatsoever.

That would be pretty much it! Hope this small tutorial was of any help to anyone in here lol, I'll keep you updated in case I encounter any important glitches, but so far my game has worked as intented.
28 notes
·
View notes
Text
The Sims 2 tutorial: changing the eye color of existing pets
...Without SimPE or any mods.
You can read this tutorial on ModTheSims, or down below under "Read More".
Note: the target Pet needs to have an owner / be playable. Stray pets cannot be modified this way, unless you do use mods or cheats to temporarily add them to the household.
Tutorial under the cut:
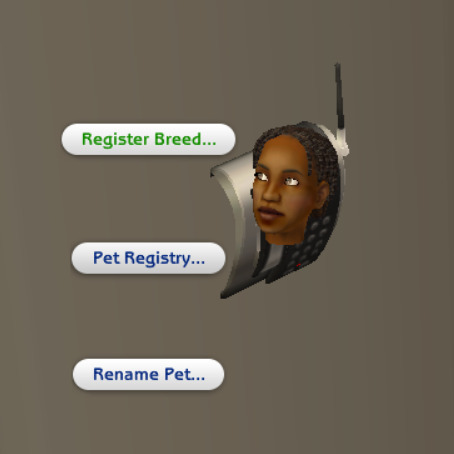
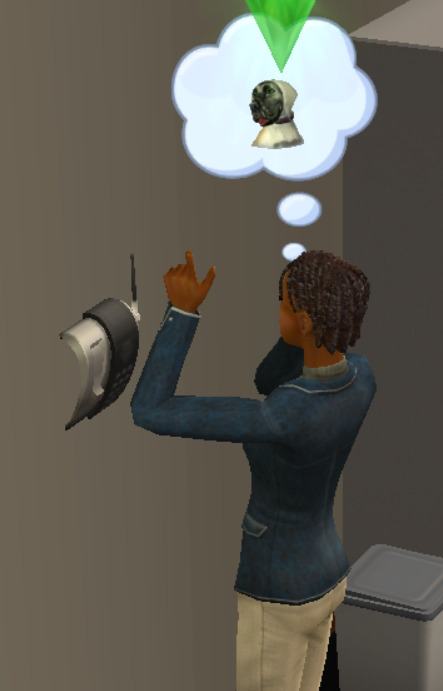
Step 1: Load the household with the target pet. Have your Sim click on their phone and select Pet Registry.../Register breed.../Your target pet.
Step 2: Save and exit the household. Enter Create-a-Sim. Create a new pet.
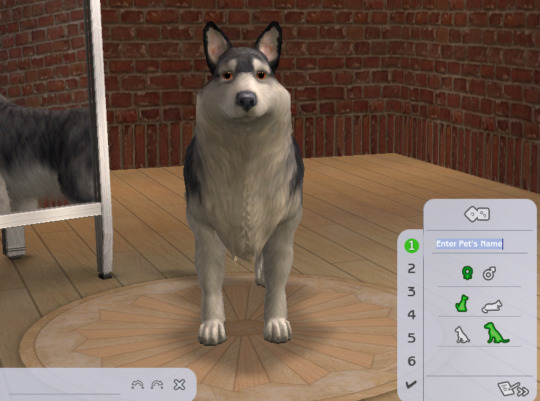
Step 3: From the breeds selection, select the breed of the target Pet that you've just registered.

Step 4: Change the pet's eye color to the desired one. At this step, you can also adjust your Pet's markings, but it's totally optional.

Step 5: Go back to the coat and markings selection. Select the "coats" button.

Step 6: Register your current coat as a new one.

Step 7: Exit Create-a-Sim and load your target household again.

Step 8: Have your Sim change the Pet's appearance in the mirror by selecting Change appearance for your pet.../Your target Pet.

Step 9: In the first screen that pops up, select the coat that you've just created. You may notice that the Pet's eye color has changed accordingly.

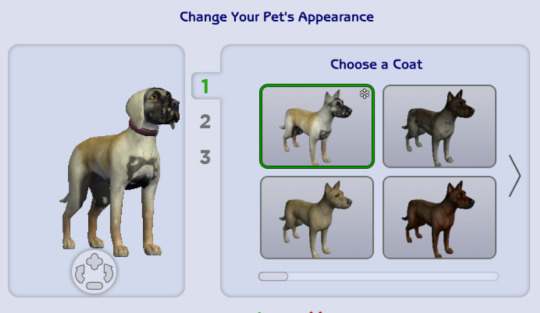
Step 10: You're done! Your Pet has a brand new eye color which is now genetic, which means that future kittens and puppies may inherit it.

#ts2#the sims 2#sims 2#sims 2 pets#the sims 2 pets#the sims 2 tutorial#sims tutorial#the sims tutorial#the sims
1 note
·
View note
Text

By popular demand (I saw two people asking) I thought I would throw together a quick guide to using the road editor tool in the newest version of SimPE! You'll see that this is a very easy tool to use, and best of all, goof-proof. If you do mess up (you probably will) it's very, very easy to correct.
Very, very, very important to make a backup of your hood before you ever do any tinkering in SimPE! I also recommend practicing on a test hood you don't actively play in to get a feel for it before you do anything to your main hoods.

We're starting with a vanilla Strangetown. I would recommend going in your game and taking a nice overhead screenshot of the hood like this first to look at for reference of where everything is situated the way that you're used to looking at it.

2. Open SimPE, go to Tools> Neighbourhood> Neighbourhood Browser and open the hood you're wanting to work on. If you're not so familiar with SimPE, opening your hood can take some time. Touch nothing until it's loaded!

3. Once it's all loaded, from the Resource Tree list pick Neighbourhood Terrain Geometry (NHTG). Then you'll see one file populate the Resource List - click that. Make sure on the bottom that you have Plugin View tab selected.

4. Now you should see this map of your hood pop up! There are different things you can toggle, I like to check the Show Lots box when I'm editing the roads. Then click the Road Editor button on the right.

5. To be able to see better, I've pulled this Plugin View window up a bit - it may rearrange the Resource List and Resource Tree windows a bit to accommodate. You can also press the Zoom 2x button to see closer, and then you'll have to use the scroll bars to move around the map and the road editor tool.

6. The road editing tools here will be placed down in the same orientation as the map. So the two parallel roads running through Strangetown from this perspective are the vertical straight road pieces (top row, second from left).
When you select a road tool, above it will indicate which tool you have selected.
Also - I recommend having Handle Stop Signs ticked.

7. Once you have the correct type of road selected for the spot you're working on, simply click on the map - it lays it down one tile at a time. If you miss a spot like shown here, just fill it in.

8. If you want to create an intersection, first delete the section of road where the intersection will go.

9. Then choose the type of junction for the intersection you're making, and add that piece in. You'll see a red circle appear (unsure if this is because it's an intersection or because you have handle stop signs selected, but I recommend you do have that selected either way).

10. Once you're done making all your changes, click Close Editor.

11. This is the part where you save your changes! First click Commit in the top right of the editor. Then, File> Save!

12. Load your game to check! Looks pretty good with all those new roads!

13. However, we have indeed made some mistakes! Which were absolutely for illustrative purposes and not truly an accident.

14. Never fear! Simply reload the hood in SimPE - I've deleted the spot where the T-junction should go and added one in, and deleted where the road just ended abruptly and added a proper end piece.
I have not experimented with what happens if you try to build a road through hood deco - if you have, please let us know in the comments how that went!
I also have barely touched the terrain editing tools, so that's outside the scope of this tutorial.
I hope this helped!
#the sims 2#sims 2#ts2#ts2 maxis match#ts2 simblr#ts2 tumblr#simblr#brightmaple#ts2 tutorial#simpe tutorial#simpe road editor
784 notes
·
View notes
Video
youtube
How to build a walkout basement in The Sims 2 🌼
I didn't think of this when I was making the video, but if you use the flowers I used, sims won't be able to water them without the water inaccessible flowers fix
Another option is to use the perfect plants mod
You can also use custom flowers that don't need watering, I recommend these & these
459 notes
·
View notes
Text
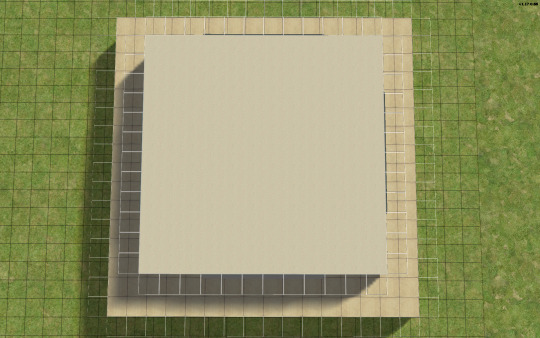
TUTORIAL: HOW TO BUILD A UFO ROOF HOUSE.
yo! one of my friends asked me how I do this, so I thought I'd put together a little tutorial and share. here's a preview of what a "ufo roof house" might look like once you're done:
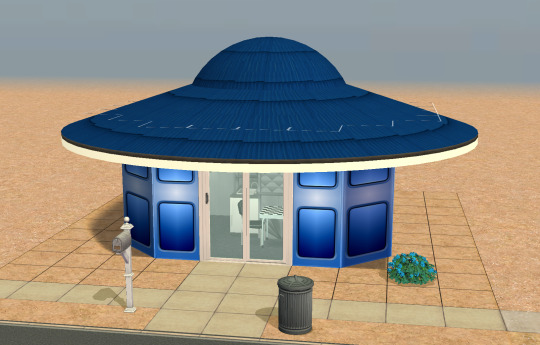
this is just a little one I built in Strangetown on a 10×10 lot, read below to learn how to do this yourself.
→ Step 1: Build your foundation (if you want one) + your first floor. The easiest way to do this is to make your walls an octagonal shape with the diagonal walls being half as many as the straight walls. As an example, you can see in the image below my straight walls are 6 units, so the diagonals are 3.
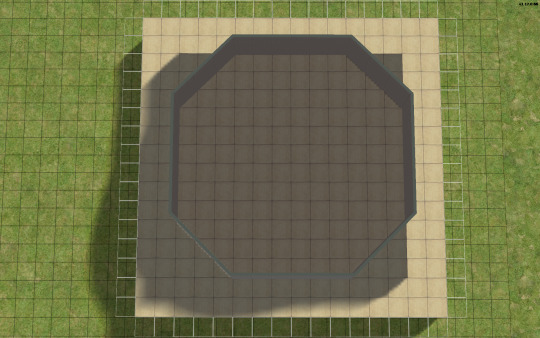
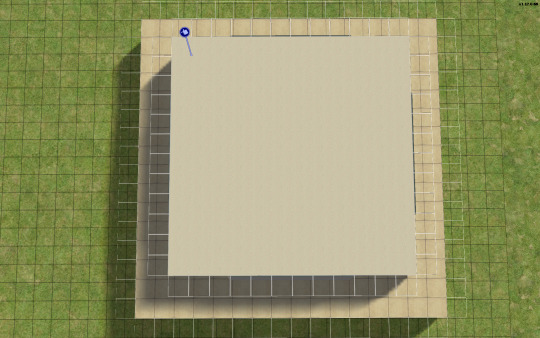
→ Step 2: Go up one level and lay a square of flooring for your roof to sit on, twice the size of your straight walls. My straight walls are 6 units, so my "roof square" will be 12×12.
→ Step 3: Using the small cone roof tool, drag from one corner of your square to the other, minus 1 unit. My square is 12×12, so the cone roof will be 11×11. You can see in the image below where to place your cursor to start:
→ When you're done with the small cone roof tool, it should look like this:
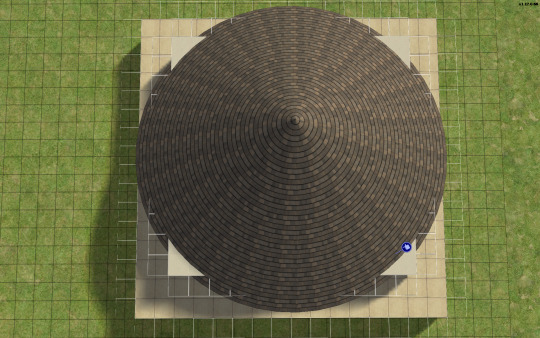
→ Step 4: Delete the excess flooring. You can press F to toggle from a full square unit to a smaller, triangular unit to trim the corners. Unfortunately, you can't click and drag to remove the corners from the diagonal walls, you can only shift click to delete one triangle at a time, but it saves you from having to put down walls or fencing you're just going to remove anyway.
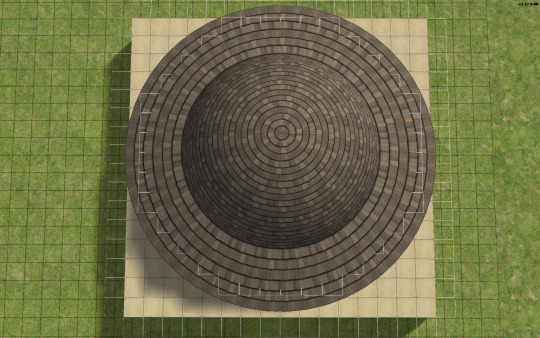
→ Step 5: Decrease your roof's angle. On my normal houses, I usually use a 25 degree angle, which in this case, looks like this:

→ Step 6: You don't want your walls sticking out like this. So, adjust your roof's angle until they're not sticking out. The lowest I could get the roof's angle on this one was 39 degrees, which looks like this:

→ Step 7: Much better! Don't worry about that spiky bit in the middle, because we're going to add a dome roof to cover it up. You can start fiddling around with the dome roof tool by using the same amount of units as your straight walls, or you can go smaller. A 6×6 dome on this house looks like this:
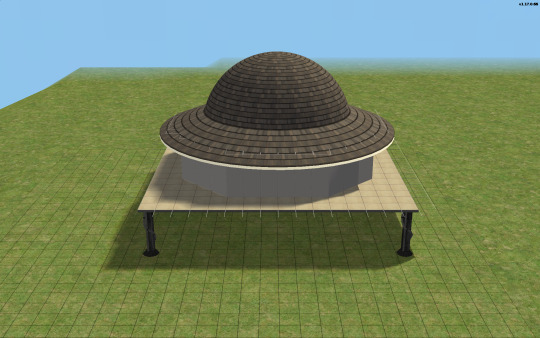
→ I like my UFO domes a little smaller, so I went with 4×4. TIP! If you have an even number of straight walls, your dome will also be even, if it's odd, your dome will also be odd. If you had 7 unit straight walls for example, your dome could be 7×7, 5×5, 3×3, etc. Here's how my 4×4 dome turned out:


→ Step 8: Nice! We're pretty much done! Decorate however you like!

→ Step 9: Enjoy your UFO roof house! All content shown on this one is maxis, except for the deck support posts, which are default replacements available HERE, thanks to @psychosim! I hope you enjoyed this tutorial. Feel free to tag me if you make a UFO roof house because of this, I'd love to see it! 👽💖 Happy Simming!
296 notes
·
View notes
Text
Because you can't save progress on them, I feel like someone should write timeloop horror for Tutorial Joe and Tutorial Jane.


#tutorial joe#tutorial jane#ts2#the sims 2#sims#idk what this is okay <3#once in a lifetime#tw glitch#flashing tw#flashing gif tw#tw flashing gif#tw flashing#tw flickering#undescribed
1K notes
·
View notes
Text

I've got a new video!
Obviously I am preaching to the choir here amongst us ts2 cc addicts, but I have a new video out with all my tips for finding sims 2 custom content. There's ads on google for the superbowl and stuff because i filmed this months ago and editing took me forever bc for some reason i was like pleasantview sims should be looking at cc on their computers dfjkdfkjsdjk
Even if you know how to find sims 2 cc, maybe you will enjoy seeing Brandi Broke browse the sims resource while Dustin gets reprimanded by the police outside!


Things I cover include: - searching on google and getting rid of those ts3 and ts4 results - using google to search specific sites and more - how to use the wayback machine - how to find/download cc from deleted tumblrs
I also share some of my favorite older, harder-to-find sites for new sims 2 cc hunters. I hope you guys like it! watch it on youtube


341 notes
·
View notes
Text
Decrease the strength of terrain paint application (in TS2)
If you are like me, you almost certainly never play around with terrain paint. It's not that I don't like to, but the application always felt too strong for me to do anything that doesn't look extreme with it.
So, the other day I was going around looking at the game's directory, and stumbled across these two values in the "Terrain.ini" file:

This file is located in: LATEST EP/TSData/Sys *The exact location depends on where you installed the game, which edition you are currently using and which is the latest EP you got installed.
This might just be common knowledge, but I personally never saw anything related to it, so I'm sharing in case it interests others.
It's fairly self-explanatory: if you change the "PaintBrushStrength" value to something between 0 and 1 (I imagine higher values are accepted but probably useless), the strength of the paint application decreases accordingly.
I've personally put the value at 0.1 – but you might find that too slow of an application. I also feel like this increases how much money is spent to paint the terrain, since weaker application = holding the mouse button longer = more money spent.

I tried to play around with the "PaintBrushApplicationInterval", increasing it to like 6000 (= 1min), but noticed no difference, so I left the default value as is.
Important note: Remember to backup the file! Alternatively, you can add a comment to any change you've made that reminds you what the default value was (I haven't changed anything else).
345 notes
·
View notes
Text
How to play TS2 with Longer Days (50% Slower Time) without going crazy
I don't think I've ever mentioned it here, but I like to play TS2 in a slow mode, to enjoy more time with my sims. This means time runs 50% slower (heavily inspired by @anibats).
But anyone who has tried playing with time at 50% slower knows there are 3 main problems: (1) time control clock in every lot, (2) need decay and (3) relatioship decay. So how do you get around this?
1. Time 50% slower
For me, the first issue is making the day slower. I'm too lazy to place a time control clock in every single household. That's why I use CJH_TimeController, the global version of the mod, that you can download here.
2. Need decay
Now that your day is 50% slower, your Sims' needs decay at the normal rate—meaning, effectively 50% faster. To prevent that, I use Lazy Duchess Motive Decay mod. You set a divider for the hood (mine is 17), and that's it! You can delete the flamingo (mod setup) and never worry about it again. Obs: this link contains the relativity mod. It would solve all our problems, but personally it never worked for me, with it the pregnancies didn't progress.
3. Relantionship decay
In an unmodded game, a Sim's relationship with another Sim drops by 2 points every afternoon. However, with longer days, the relationship drops much more—up to 12 points. Here are two alternatives:
a. For me, the solution is a mod where relationship decay only happens once a week, dropping 12 points all at once. This mod is LessRelDecay, which makes relationships decay only on Fridays.
b. Other alternative is Monique's Relationship (STR) Decay Hack. With this mod, decay is based on STR points and skips some days depending on the relationship strength. However, the total decay will still be 12 points instead of the intended 2.
Other useful mods:
Slower fitness decay
Slower fitness gain
Slower Skill and Badge Gain
Slower LTA Gain
Mods that would be very useful, but that I don't know if exists:
Slower/harder hobby enthusiasm gain (I'm aware of the mod by Tunaisafish, but I don’t notice a difference in-game)
If anyone has any more tips, please, let me know <3
286 notes
·
View notes
Text
This is a big one.
youtube
391 notes
·
View notes
Text
A Few Tips for Converting from Non Sims Games, for First Timers.

Mirror: Dreamwidth.
1. Find out the game's engine. To know what type of file the game files are archived as.
2. Look up the appropriate tool for browsing that archive.
Link - my go-to resources. Info and links under programs - general → converting. Links to tutorials for said programs are under tutorials → converting.
3. Check out how that tool saves the exports. Look up the right import/export add-on for Blender accordingly. I've noted that info in the aforementioned list.
That's it. You've got the goodies in Blender. The rest is the same as with converting from other Sims games. Links to favorite tutorials for converting from Sims games; Tutorials → Converting.
Happy Simming!
@sims2tutorials I think it counts as a tutorial?

#Tutorial#Sort of#Tips#Converting#ts2 tutorial#Ts2#the sims 2 tutorial#sims 2 tutorial#Sims2#Sims 2#The Sims 2#Tutorial: converting#Conversions
25 notes
·
View notes
Text
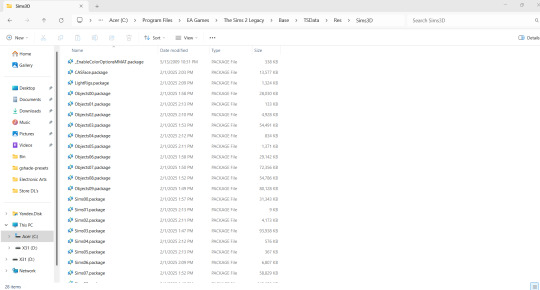
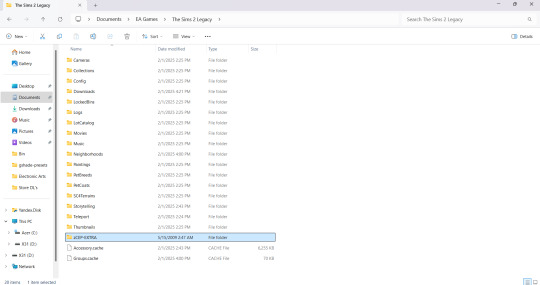
TS2 Legacy Collection CEP Extra Tutorial
Hi guys! I just wanted to make this quick tutorial on this since it's the first time a lot of players will be doing this.
Step 1: Download CEP Extra Manual installation from ModTheSims linked here (Read all instructions included if you get confused)
Step 2: Extract the Zip to a folder
Step 3: Open the folder and place the package _EnableColorOptionsMMAT into the Sims3D folder located here: Program Files > EA Games>The Sims 2 Legacy>Base>TSData>Res>Sims3D
Step 4: Place the package _EnableColorOptionsGMND into your Downloads folder located here: Documents>EA Games>The Sims 2 Legacy>Downloads **Note: You will likely have to create this folder yourself which is easy. Simply right click inside The Sims 2 Legacy folder and create a new folder named "Downloads" and place that file right inside.**

Step 5: Open the 'Extras' folder inside the Zip
Step 6: Open the folder 'MyDocuments' and place the entire zCEP-EXTRA folder inside your Sims 2 Legacy document folder located here: Documents>EA Games>The Sims 2 Legacy
Step 7: Open the folder 'ProgramFiles' and place the entire zCEP-EXTRA folder inside your Catalog folder located here: Program Files > EA Games>The Sims 2 Legacy>Base>TSData>Res>Catalog

And thats it! You should be good to go now. You can check if it's working by the start up message. If you have that setting turned off you can also check to see if it's working by going into one of the households and using the design tool on objects that were previously not recolorable or expanded objects. I believe you can also check to see if it's working by checking the skin tone range in CAS but don't quote me on that lol. Anyway I hope this helped someone 💜
EDIT: Quick reminder for those that are extremely new to the game that you need to start the game at least once first The Sims 2 Legacy folder to appear in your documents folder or you could simply create it yourself, add your folders, and then start the game after and it’ll populate around your newly added CEP and Downloads folder.
#ts2#ts2 community#ts2 tutorial#the sims 2 legacy#ts2 legacy collection#the sims 2 legacy collection#ts2 legacy collection tutorial#ts2 cep#ts2 resources#TS2 LC Tutorial
236 notes
·
View notes
Text

AAAND WE'RE DONE! 💖
thank you all so much for participating!! i'm sorry i couldn't do all of your suggestions (obviously), but i hope you still can find your faves here :)
(and if you really really want me to draw your faves you can commission me *twirls hair*)
it was super fun!
#color wheel challenge#the sims 2#pollination tech 9 smith#bella goth#tybalt capp#circe beaker#johnny smith#tutorial joe sim#delilah o'feefe#vidcund curious#lucy burb#tank grunt#jenny smith#rose greenman#dirk dreamer#pascal curious#tycho curious#juliette capp#oberon summerdream#almeric davis#natasha una#lazlo curious#hermia capp#erin beaker#brandi broke#stella terrano#yes i did tag everyone and i almost ran out of space
3K notes
·
View notes