#TS2 Tutorial
Explore tagged Tumblr posts
Visit Tumblr Blog
Explore Tumblr blogs with no restrictions, modern design and the best experience.
Last Seen Tumblr Blogs


Fun Fact
In Q3 of 2020, 31% of US users access the Tumblr app daily.
Text

By popular demand (I saw two people asking) I thought I would throw together a quick guide to using the road editor tool in the newest version of SimPE! You'll see that this is a very easy tool to use, and best of all, goof-proof. If you do mess up (you probably will) it's very, very easy to correct.
Very, very, very important to make a backup of your hood before you ever do any tinkering in SimPE! I also recommend practicing on a test hood you don't actively play in to get a feel for it before you do anything to your main hoods.

We're starting with a vanilla Strangetown. I would recommend going in your game and taking a nice overhead screenshot of the hood like this first to look at for reference of where everything is situated the way that you're used to looking at it.

2. Open SimPE, go to Tools> Neighbourhood> Neighbourhood Browser and open the hood you're wanting to work on. If you're not so familiar with SimPE, opening your hood can take some time. Touch nothing until it's loaded!

3. Once it's all loaded, from the Resource Tree list pick Neighbourhood Terrain Geometry (NHTG). Then you'll see one file populate the Resource List - click that. Make sure on the bottom that you have Plugin View tab selected.

4. Now you should see this map of your hood pop up! There are different things you can toggle, I like to check the Show Lots box when I'm editing the roads. Then click the Road Editor button on the right.

5. To be able to see better, I've pulled this Plugin View window up a bit - it may rearrange the Resource List and Resource Tree windows a bit to accommodate. You can also press the Zoom 2x button to see closer, and then you'll have to use the scroll bars to move around the map and the road editor tool.

6. The road editing tools here will be placed down in the same orientation as the map. So the two parallel roads running through Strangetown from this perspective are the vertical straight road pieces (top row, second from left).
When you select a road tool, above it will indicate which tool you have selected.
Also - I recommend having Handle Stop Signs ticked.

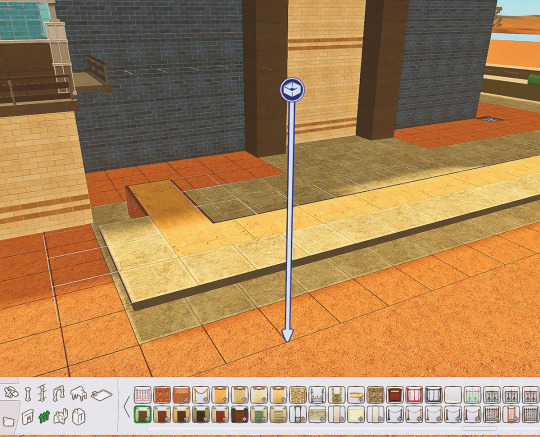
7. Once you have the correct type of road selected for the spot you're working on, simply click on the map - it lays it down one tile at a time. If you miss a spot like shown here, just fill it in.

8. If you want to create an intersection, first delete the section of road where the intersection will go.

9. Then choose the type of junction for the intersection you're making, and add that piece in. You'll see a red circle appear (unsure if this is because it's an intersection or because you have handle stop signs selected, but I recommend you do have that selected either way).

10. Once you're done making all your changes, click Close Editor.

11. This is the part where you save your changes! First click Commit in the top right of the editor. Then, File> Save!

12. Load your game to check! Looks pretty good with all those new roads!

13. However, we have indeed made some mistakes! Which were absolutely for illustrative purposes and not truly an accident.

14. Never fear! Simply reload the hood in SimPE - I've deleted the spot where the T-junction should go and added one in, and deleted where the road just ended abruptly and added a proper end piece.
I have not experimented with what happens if you try to build a road through hood deco - if you have, please let us know in the comments how that went!
I also have barely touched the terrain editing tools, so that's outside the scope of this tutorial.
I hope this helped!
#the sims 2#sims 2#ts2#ts2 maxis match#ts2 simblr#ts2 tumblr#simblr#brightmaple#ts2 tutorial#simpe tutorial#simpe road editor
783 notes
·
View notes
Text

I've got a new video!
Obviously I am preaching to the choir here amongst us ts2 cc addicts, but I have a new video out with all my tips for finding sims 2 custom content. There's ads on google for the superbowl and stuff because i filmed this months ago and editing took me forever bc for some reason i was like pleasantview sims should be looking at cc on their computers dfjkdfkjsdjk
Even if you know how to find sims 2 cc, maybe you will enjoy seeing Brandi Broke browse the sims resource while Dustin gets reprimanded by the police outside!


Things I cover include: - searching on google and getting rid of those ts3 and ts4 results - using google to search specific sites and more - how to use the wayback machine - how to find/download cc from deleted tumblrs
I also share some of my favorite older, harder-to-find sites for new sims 2 cc hunters. I hope you guys like it! watch it on youtube


340 notes
·
View notes
Text
Decrease the strength of terrain paint application (in TS2)
If you are like me, you almost certainly never play around with terrain paint. It's not that I don't like to, but the application always felt too strong for me to do anything that doesn't look extreme with it.
So, the other day I was going around looking at the game's directory, and stumbled across these two values in the "Terrain.ini" file:

This file is located in: LATEST EP/TSData/Sys *The exact location depends on where you installed the game, which edition you are currently using and which is the latest EP you got installed.
This might just be common knowledge, but I personally never saw anything related to it, so I'm sharing in case it interests others.
It's fairly self-explanatory: if you change the "PaintBrushStrength" value to something between 0 and 1 (I imagine higher values are accepted but probably useless), the strength of the paint application decreases accordingly.
I've personally put the value at 0.1 – but you might find that too slow of an application. I also feel like this increases how much money is spent to paint the terrain, since weaker application = holding the mouse button longer = more money spent.

I tried to play around with the "PaintBrushApplicationInterval", increasing it to like 6000 (= 1min), but noticed no difference, so I left the default value as is.
Important note: Remember to backup the file! Alternatively, you can add a comment to any change you've made that reminds you what the default value was (I haven't changed anything else).
345 notes
·
View notes
Text
TS2 Legacy Collection CEP Extra Tutorial
Hi guys! I just wanted to make this quick tutorial on this since it's the first time a lot of players will be doing this.
Step 1: Download CEP Extra Manual installation from ModTheSims linked here (Read all instructions included if you get confused)
Step 2: Extract the Zip to a folder
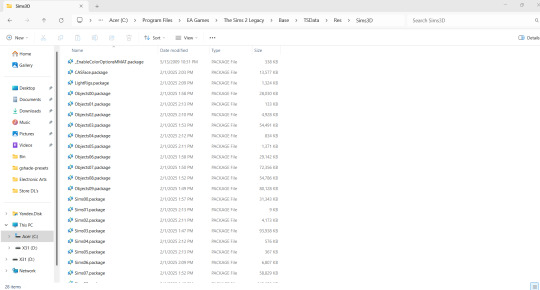
Step 3: Open the folder and place the package _EnableColorOptionsMMAT into the Sims3D folder located here: Program Files > EA Games>The Sims 2 Legacy>Base>TSData>Res>Sims3D
Step 4: Place the package _EnableColorOptionsGMND into your Downloads folder located here: Documents>EA Games>The Sims 2 Legacy>Downloads **Note: You will likely have to create this folder yourself which is easy. Simply right click inside The Sims 2 Legacy folder and create a new folder named "Downloads" and place that file right inside.**

Step 5: Open the 'Extras' folder inside the Zip
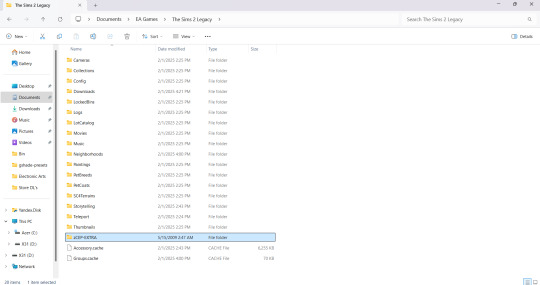
Step 6: Open the folder 'MyDocuments' and place the entire zCEP-EXTRA folder inside your Sims 2 Legacy document folder located here: Documents>EA Games>The Sims 2 Legacy
Step 7: Open the folder 'ProgramFiles' and place the entire zCEP-EXTRA folder inside your Catalog folder located here: Program Files > EA Games>The Sims 2 Legacy>Base>TSData>Res>Catalog

And thats it! You should be good to go now. You can check if it's working by the start up message. If you have that setting turned off you can also check to see if it's working by going into one of the households and using the design tool on objects that were previously not recolorable or expanded objects. I believe you can also check to see if it's working by checking the skin tone range in CAS but don't quote me on that lol. Anyway I hope this helped someone 💜
EDIT: Quick reminder for those that are extremely new to the game that you need to start the game at least once first The Sims 2 Legacy folder to appear in your documents folder or you could simply create it yourself, add your folders, and then start the game after and it’ll populate around your newly added CEP and Downloads folder.
#ts2#ts2 community#ts2 tutorial#the sims 2 legacy#ts2 legacy collection#the sims 2 legacy collection#ts2 legacy collection tutorial#ts2 cep#ts2 resources#TS2 LC Tutorial
236 notes
·
View notes
Text
SimPe tutorial: How to fix the height setting of CC chandeliers (The Sims 2)
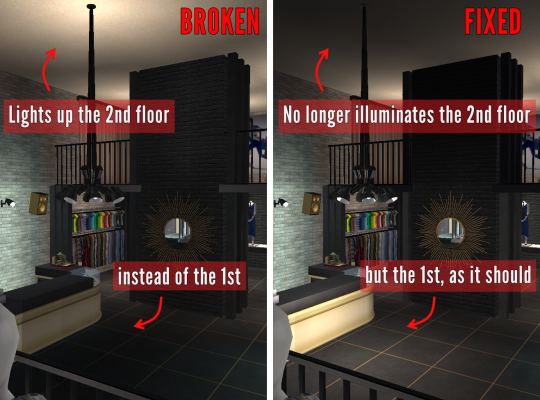
A few years ago, @hugelunatic released a fix for the chandelier added to the game with M&G. Originally, the light cast by the chandelier illuminated the floor level above the lamps, not below them. That mod, however, does not affect custom 2-story lights, which need to be adjusted individually. This is a quick, easy tutorial to do just that.

1. Open the mesh .package file in SimPe;
2. Select "Resource Node (CRES)" in the Resource Tree menu and open the item shown under Resource List;
3. Make sure "Plugin View" is enabled (bottom menu of SimPe);
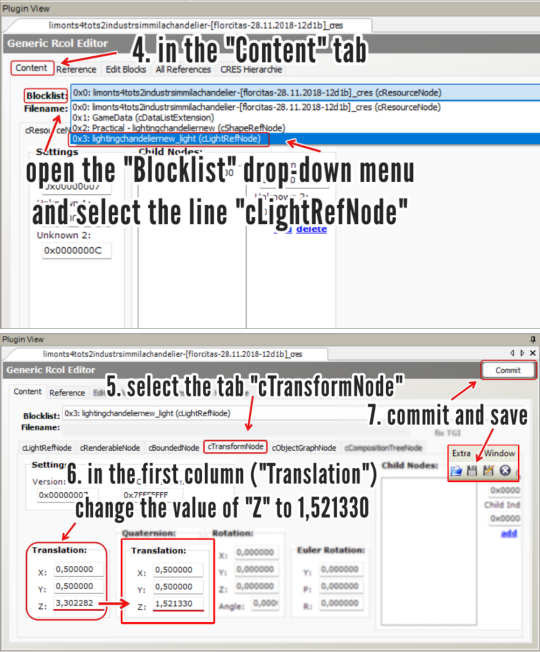
4. In the "Content" tab, open the "Blocklist" drop-down menu and select the line "cLightRefNode";
5. Select the tab "cTransformNode";
6. In the panel displayed, on the first column (named "Translation"), change the value of "Z" to a number that matches the height of the lamp mesh you're editing.
NOTE: For 2-story lights that sit on the same height as Maxis' chandelier, the value that I used was 1,521330 (taken from HugeLunatic's mod). For CC lights of a different height, you might want to try different values, according to your personal preference.
7. Click "Commit" and save.
_______________________________
For my own game, I edited two custom lights using the same height value ("Z") that HugeLunatic did for the M&G chandelier (1,521330) . I'm not sharing them here because both creators are still active, but I'm tagging them in case they wish to update their files. They are:
@lordcrumps' "Slightly Off Track Lighting", from his 4t2 Industrial Loft Kit; and
@limonaire's conversion of Industrisim's 2-story industrial chandelier.
Not needed, but RECOMMENDED: HugeLunatic's fix of Maxis' chandelier.
214 notes
·
View notes
Text
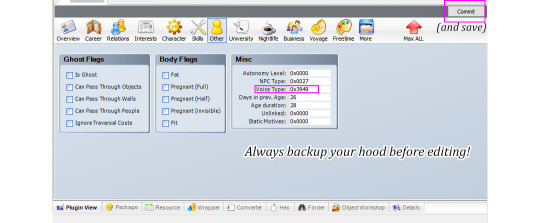
So it turns out it's quite easy to change Sim's voice in SimPe.
I had this household where all adult female Sims sounded the same and I had to do something about it xD. I've recorded a few TS2 voice types for future reference so I might as well share. Samples below the cut.
Here are examples & values for four adult female and four adult male voices.
It's NOT possible to change voice type gender or age group by editing Voice Type value
AF1 0xFD34, AF2 0xDE83, AF3 0x354A, AF4 0x3949
AM1 0xEF85, AM2 0xDCF8, AM3 0x0D95, AM4 0xE918
These samples are from phone call conversations. Second and the last male voice is by the same voice actor but it has different 'dialogs'. AM 0xE918 seems more assertive (?).
*To be honest I'm not sure if it's a different voice type or does it depend on personality? I need to look into that. TS2 only had four voice actors /for adult voices?/ but that doesn't mean there are only four voice types, right? 🤔/
*This is about The Sims 2
487 notes
·
View notes
Text


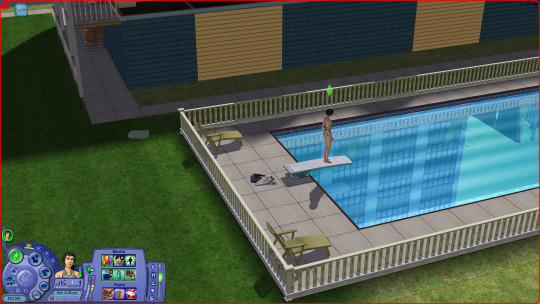
I just remembered this building trick for custom fences as I was building a library! I don't know where I learned it and how it I remembered it out of nowhere but I'm so excited to show you! Basically the steps are:
Build a foundation
Place floors on the side you want your top fence on
Build the lower fence on the ground
Build the top fence on the floor
Remove the floor and foundation
And there you go! It doesn't work with all fences but if you have enough low and shrub fences you can definitely come up with a few options.
#ts2#the sims 2#sims 2#ts2 build#ts2 build tutorial#ts2 build trick#ts2 tutorial#i hope this makes sense!
141 notes
·
View notes
Text
Switching between save folders without renaming them
See the tutorial on Mod The Sims
130 notes
·
View notes
Text
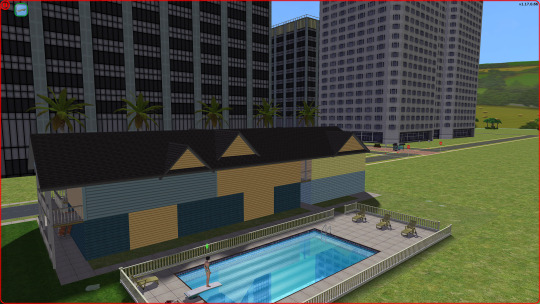
I'm a God
I fixed my world again...
So in the Sims 2, if you run dxdiag on your computer (just search it on your desktop screen) you can see how much texture memory your graphics card has room for.
I mistakenly set mine much lower with Graphics Rules Maker, which is a godsend. I increased it to just under the limit which was 8k MB.
Now I can have skyboxes, full neighborhood lot distance and fade distance off, and it looks crystal clear like it used to.


#sims 2 gameplay#sims 2#sims 2 simblr#sims 2 mods#sims community#ts2#ts2 help#ts2 graphics#ts2 resources#ts2 tutorial
66 notes
·
View notes
Text
youtube
Unlock the full potential of your Sims 2 experience by creating and editing custom aspiration rewards with SimPE. In this step-by-step tutorial, you’ll learn how to enhance your gameplay by turning custom and Maxis objects into aspiration rewards while also editing existing rewards to better suit your needs.
#Youtube#sims 2#the sims 2#ts2#sims 2 video#ts2 video#simtube#simstube#sissysims#sissy sims#sims 2 tutorial#sims 2 guide#SimPE tutorial#sims 2 aspiration rewards#sims 2 mod tutorial#sims 2 modding tutorial#ts2 tutorial#ts2 guide
78 notes
·
View notes
Text
How to EFFECTIVELY Use Empty Standby List to Reduce Flashing and Crashing
This tutorial is for TS2. Obviously. This is virtually the last "chapter" of advice for the Pink Flashing Survey Report (still forthcoming as a single readable thing but posted in bits and pieces over the last six months). PS it's a lonnnnnnng post. Ctrl+F "tldr" for the very short version once you open the cut.
"Part 1" of the Empty Standby List ("ESL") tutorial was already written comprehensively with screenshots by Digi at her wordpress. Following Digi's tutorial will get you set up with ESL as a routine automated background task your computer runs, typically every five minutes.
@gayars set up two instances of the routine, each running every five minutes, staggered two/three minutes apart. In other words, task 1 runs at 12:00, task 2 runs at 12:03, task 1 runs at 12:05, task 2 runs at 12:08, etc. However, I found that this negatively impacted the graphical performance of my game, notably by having the ESL task window flash over the game window, which I had never seen before, nor since reverting back to a single 5-minute task routine.
Anyway. Go do Digi's tutorial if you haven't already; I'll wait.

Background on Why this Matters
So, now your computer will be wiping the standby memory every five minutes. The thing is, this won't be able to have much impact on your game unless you wait to let it wipe before you do a major loading action.
Major loading actions are, in general order of strain (most to least strenuous):
Loading a full neighborhood.
Loading a large (3x4 or bigger) populated lot.
Loading a large unpopulated lot.
Loading actual CAS, if you have a lot of non-defaulted CC.
Loading a medium (3x3) populated lot.
Loading a medium unpopulated lot.
Loading a small (2x3 or smaller) populated lot.
Loading a small unpopulated lot.
Loading CAS catalogs from within a lot (e.g. using FFS clothing tool, "Change Appearance" on the mirror, shopping for clothes/trying on clothes on a community lot).
Turning up your lot view settings (generating other lots' lot imposters within your current lot)/panning the camera around.
You should already be doing at least all medium- and large-lot loading with the Lot View Settings Juggling Method, and “uint LotSkirtIncrease” removed from your userstartup.cheat - otherwise whenever you load a lot you are compounding the strain by also having the neighborhood load at the same time.
Using Resource Monitor Effectively
If you watched the Jessa Channel tutorial on flashing, she recommended downloading a third-party RAM usage monitoring software. This is unnecessary. For purposes of reducing your crashing, all you need is the native Windows program "Resource Monitor" that she also recommends.

To open it:
Click the Windows symbol/start menu.
Begin typing "Resource Monitor."
Click Resource Monitor when it shows up.

Once it is open, get to the useful information:
Click the "Memory" tab.
Make sure the "Processes" and "Physical Memory" subs are fully open, as above.
Sort by "Commit (KB)."
Each time you reopen Resource Monitor, it should restore your last view settings, so you won't have to repeat these steps.

While Resource Monitor is still open, "Pin" it to the taskbar so it will always be readily accessible.
Right-click the icon on the taskbar.
Click "Pin to taskbar."
If it says "Unpin from taskbar" you have already done this step :)

Now comes the monitoring part. You will focus on the dark-blue "Standby" block of the bar graph on Physical Memory.
Every fifth minute, when the ESL task runs, this will flash down to 0 and then pop up to about 30-75, depending on what you are doing. It will go higher faster if you are doing stuff, obviously, and hover pretty low if your computer is just sitting still. TLDR the remainder of this tutorial: only take stress actions when Standby is below 100.
As we all know too well, TS2 has a 4gb RAM limit. The problem is, TS2 seems to count the memory that is in standby, too, not just the committed/working set. Thus, before you take a major loading action (that is going to push up to 1.5gb into Standby), you need to wait for Standby to wipe so the game doesn't accidentally think it's using more memory than it is. Got it?

This is how much RAM my game is using when my neighborhood opens, pretty closely zoomed in on any particular lot. If it is zoomed out further - like a whole city block - both committed and working set are easily over 2.2gb. When I pan around the neighborhood, it continues going up. Portions of the hood that go back out of view seem to get relegated to standby, but yes, my game has crashed just from looking too much at my neighborhood from too wide an angle. Unless I slow down and let ESL run before moving on to the next section.
Six months of diligent Resource Manager monitoring has resulted in substantial reductions of crashing and flashing on my first hood view load and first lot view load. It is not 100% guaranteed, but it cuts it back to Very Playable Levels. And when I have tested the theory by purposefully not letting ESL run before a stress point, it always flashes and/or crashes within the next couple minutes.
SO! Here's what I do when I'm launching my game.
Because of overheating concerns, I always fully shut down my computer when I'm not using it for more than an hour. If I have been playing and experience a flash or crash, I will restart before trying again. @infinitesimblr, a survey Respondent who reported virtually no flashing or crashing despite a vast CC catalog, also recommends restarting between using Bodyshop or SimPE and the full game. I have found it may make a difference with Bodyshop (which I use too rarely to make a pseudoscientific claim) but that I have found basically no impact going from SimPE to the game. YMMV.
Immediately after Windows is done loading, I open Resource Monitor and wait a few minutes. Often background updates begin running and the Standby bar goes crazy - sometimes filling up the entire available RAM - and I just let it sit and do its thing. (Usually I start the computer right before my kid's bedtime so I am not actively waiting on it or anything. Go take a shower or make a sandwich or drink some water, like you did in the old days when the game itself took 20 minutes to load.)
Once the standby bar levels out and is consistently peaking no higher than about 250mb between ESL wipes, after the next ESL wipe, I will launch the game. (Usually between logging into Windowsat the beginning of storytime and checking Resource Monitor before we go do tuck-in, it is reliably hanging out below 100 unless a big TS4 or Windows update was downloading.)
Reminder: do not delete thumbnails anymore prior to launching the game. I also have turned off RPC's clear caches option and have observed faster loading times with minimal increases in crashing.
After the neighborhood selection screen comes up, wait for ESL to run again before opening your neighborhood.
If you have continue to have more than VERY sporadic hood load flashing after taking these steps, you should try launching into a subhood if you have one, then pivoting to the main hood if that's where you're playing that session after yet another ESL wipe. If that doesn't help you simply need to thin out your hood or accept the flashing. (I ended up deleting about 25% of my deco trees and 10-15 outer-lying lots that will be re-placed in a subhood.)
After the hood is loaded, navigate to the lot you want, but DO NOT actually load that lot until ESL runs yet again. Ditto for CAS - Do not select "Create New Family" until ESL has run again.
Play should be proceed as normal at this point. You probably don't need to alt-tab back to Resource Monitor again unless your sims are going traveling or you are changing play lots.
BONUS TIP #1: You can put a shortcut to the ESL routine on your desktop and push it manually (just double click the icon) if you don't feel like waiting once the game is loaded. I have had imperfect results with this vs. just waiting the five minutes, though, because the game wants to run through some stuff and flush it. But it's an option for you to experiment with.

BONUS TIP #2: If you have a really deep clothing/hair CC catalog, try to avoid using the FFS clothing tool option where you select every outfit for the sim, and their hair and makeup, at the same time. Instead, choose individual outfits by type and use the regular mirror option to change appearance (or SimBlender has it, I think, so they can do it where they already are).
241 notes
·
View notes
Text

A new Youtube video is ready to go! After getting a cosmic reminder on this topic recently, courtesy of @darkestdawn, I finally finished up this video and got it out there in the world!
Much different than my usual fare - it's less visual but hopefully has some good info for those of you who don't use collection folders much. Or those who do but might not know some of these tips and tricks!
Watch here!
#the sims 2#sims 2#ts2#ts2 maxis match#ts2 simblr#ts2 tumblr#simblr#ts2 youtube#ts2 tutorial#sort of?
209 notes
·
View notes
Text
Raw Tutorial - How to Make Custom Harvestable/Orchard Trees and Make Them Seasons Friendly.

This tutorial is somewhat raw and has no pictures. I don't see myself adding them in the foreseeable future, However, at the time, I wrote it as detailed as possible, so I won't forget. Hope it'll be helpful as it is. If not, I will make a proper edit in the future. So, if anyone's interested in that kind of thing, Head This Way:
btw, if anyone has any notes about it, I'd like to hear them.
#Tutorial#Tutorial: SimPE#Custom Harvestable Trees#Custom Orchard Trees#SimPE#BHAVS#TS2 Tutorial#Sims 2 Tutorial#The Sims 2 Tutorial#TS2#Sims 2#Sims2#the sims 2#SimPE Tutorial
49 notes
·
View notes
Text
Too many carpool drivers? Turn them into townies!
I've had an overpopulation issue with carpool drivers from when I started with Life Stories as my base game. (I didn't have anti redundancy) 42 of them to be exact. And i've never known what was safe to do with them. Till April Blacks new video about npcs! Turns out carpool drivers have complete character data and if you change their interaction table id and npc type they will become a normal sim. No idea if a tutorial exists so I thought i'd share how to do so.
This tutorial will also work on mascots graduated long ago who refuse to take their smelly cow costume off and other npcs that can be turned playable with annoying behaviors. Just skip the part where you move them into the townie bin
Firstly, !!!! ALWAYS MAKE A BACKUP OF YOUR NEIGHBORHOOD IF YOU ARE EDITING IT IN SIMPE !!!!!
What you need: Simpe and a basic knowledge of it (I use version 0.77.69 in the light installer)

Firstly, load up your neighborhood, open up sim browser and find your carpool driver you want to change.
1. Change their npc type to normal sim and press the fix guid button 2. Commit then save.
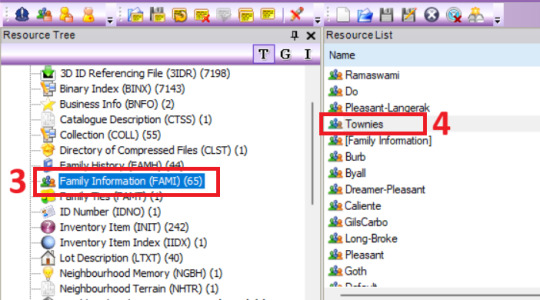
3. Go to the resource tree and click family infomation 4. Find your Townies family

5. Select your sims name from the dropdown box. 6. Press add sim. 7. Commit and save.

Go back to your sim description and go to the more tab and open their character file.

6. Go to object data in the resource tree 7. Click on the sims object data file 8. Go to the raw data tab and change it to decimal. Scroll down till you see interaction table id. Change that number from -1 to 129, 9. commit and save.
Now your carpool driver is a townie and has escaped eternal life trapped in a car!
195 notes
·
View notes
Text
Tutorial: Editing the multi-road mod
Edit 2025-05-17: Also archived at Simblr.cc.
Here are instructions for adding new tile types to the existing multi-road mod. This tutorial is applicable to unique tiles like a partly-dirt/partly-asphalt intersection, but it's equally applicable if you want to add a tertiary or quaternary road type.
However, please keep in mind that if you don't need extra tile types but only want a different kind of secondary road (like asphalt and dirt instead of asphalt and asphalt-with-sidewalks), you can skip all of this and just replace the textures inside the Textures.package file.
First things first: make sure you have textures for the new kind of tile. You'll need five versions of it, three solid (heavy/light/no snow) and two semitransparent (snowy/clear). If you open up the Textures.package file and look at the Texture Images already present, you can use existing road pieces as templates. I've uploaded what I could find of the textures I made for dirt/asphalt intersections here at SFS, but it doesn't look like I finished them; feel free to use what's there if it's helpful. (Edit: whoops, forgot to say this originally, but those textures are mashed-up versions of ones by @nimitwinklesims and @criquette-was-here.)
Second: you need a hexadecimal ID number for each new tile type. The best way to do it is to take the vanilla tile IDs (00000300, 00000f00, 00004b00, 00005700, and 00020700) and change the third digit of each one while keeping the type the same (like using 00400300 for a dead end, 00400f00 for a straight piece, etc.). In this case, I used 00205700 for a T-intersection. Be aware that the ID number will sometimes need to end with zero and sometimes with four.
When you're ready to start, open up the Textures.package file from the multi-road mod.

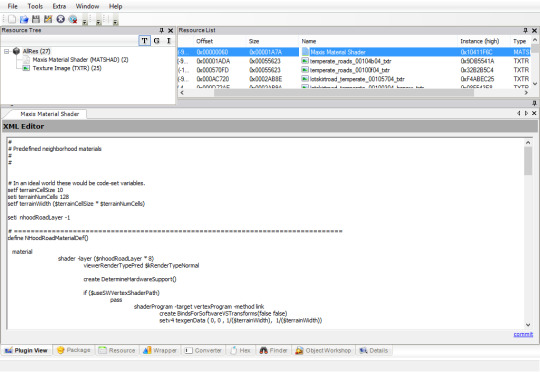
Inside the Textures.package file, click on one of the two Maxis Material Shader files in the list. You need the one that says "Shaders for lot skirt" near the top.

Once you've got that open, you'll need to scroll all the way down to the bottom and find the Temperate entries that look like this:
create LotSkirtRoadMaterialInstance(lotSkirtRoad_Temperate_00205700 lotskirtroad_temperate_00205704)
...and copy and paste that whole line at the end of it.
Then hit the little blue "commit" at the bottom right.
Next, open up the one that says "Predefined neighborhood materials" near the top, and scroll down to the end of it. The version of the mod currently up on SFS already has a line for '00205700' in it - looks like I forgot to delete that (and several others, whoops). If it weren't there, you'd paste this line in and commit:
create NHoodRoadMaterial(neighborhood-roads-Temperate-00205700 Temperate_roads_00205704)

After that, look at the Texture Image files. Go down the list one-by-one. You should find five with the number "00105704" in their names. Each time you find one, right-click on its name and choose Clone.

The five clones will be italicized in the list. For each one, click to open it, go to the Filename box and replace the "00105704" with "00205704", then click the little blue "fix TGI" just below it. Then click the "Commit" button in the top right.
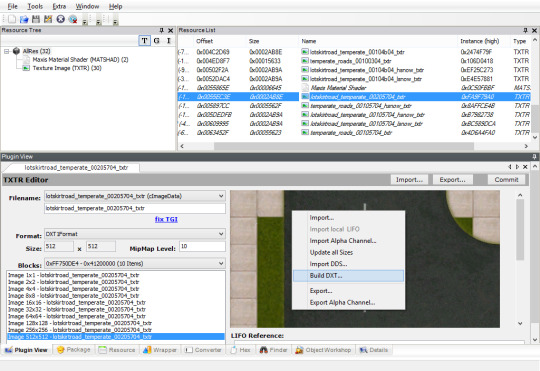
Click away to another resource and come back; this is just to make SimPE reload it. Right-click on the texture box and choose "Build DXT...". (If it's greyed out, SimPE can't find the Nvidia DDS Utilities on your computer, and you'll need to go install them and/or point SimPE to them.)

Click on the little blue "open" link and browse to the texture you created. Don't change any of the options, just open the image and hit "Build." Once the DDS tool is done doing its thing and you can see that your new texture has been imported, hit the "Commit" button again.
When you've done all of them, save the package and close. Now you'll be set up for the previous tutorial that directs your neighborhood to actually use the new tiles. You'll just be changing the ID numbers from "00005700" to "00205700" instead of "00105700" (or whatever).
59 notes
·
View notes
Text
How to repository clothes using the Repository Wizard (duh)

I wrote a tutorial on how to use the Repository Wizard for clothes. It covers the utility's basic usage, as well as providing some more "advanced" tips and explaining what the program does for you.
Hopefully this can help anyone who's been meaning to give it a try a helping hand to dive in. It's really simple to use, and it can speed up the time spent preparing all the packages, and not just when repositorying stuff (thanks to the Standalone mode).
If that interests you, here's the link to that:
@sims2tutorials could you please archive my post? 😇
I should mention that the tutorial was put together before v2.3 which added a small advance feature. Therefore the tutorial won't cover it, but I plan on updating it soon and as often as I can.
125 notes
·
View notes