#Tutorial: SimPE
Explore tagged Tumblr posts
Visit Tumblr Blog
Explore Tumblr blogs with no restrictions, modern design and the best experience.
Last Seen Tumblr Blogs


Fun Fact
69% of Tumblr users are millennials.
Text
Raw Tutorial - How to Make Custom Harvestable/Orchard Trees and Make Them Seasons Friendly.

This tutorial is somewhat raw and has no pictures. I don't see myself adding them in the foreseeable future, However, at the time, I wrote it as detailed as possible, so I won't forget. Hope it'll be helpful as it is. If not, I will make a proper edit in the future. So, if anyone's interested in that kind of thing, Head This Way:
btw, if anyone has any notes about it, I'd like to hear them.
#Tutorial#Tutorial: SimPE#Custom Harvestable Trees#Custom Orchard Trees#SimPE#BHAVS#TS2 Tutorial#Sims 2 Tutorial#The Sims 2 Tutorial#TS2#Sims 2#Sims2#the sims 2#SimPE Tutorial
49 notes
·
View notes
Text
Excuse me, Sims are 6ft tall?
I need to learn this tutorial..
TS2 Tutorial - Permanent Height Change to your Sim.
There is a way to change your sim's height with a cheat in the game (Many use that for fun, to make titan sims but it can be used for realistic height change.) If they use the cheat, the height will only last as long as we close the game or we leave the lot.
So there is a pretty easy way to change permanent the height of a sim. Here is how!
We will only need The SimPe and this chart i have down there.
Using the Cheat (Not Permanent Method) :
Select a sim and open the cheat menu (ctrl-shft-C). Type the following without the quotes: "StretchSkeleton value". The "value" is the number that you will enter to tell the game which height to make your sim. Hit "enter" and voila, you have changed your sim's height.
Using the Permanent Method :
1. Open the SimPe.
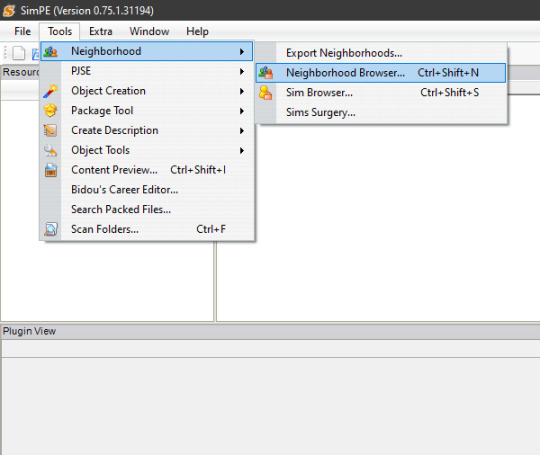
2. Go to Tools then Select then Neighborhood and Then Neighborhood Browser.
3. Select the Neighborhood that the Sim is in.

4. Then Go again at Tools then Neighborhood and then Sim Browser.
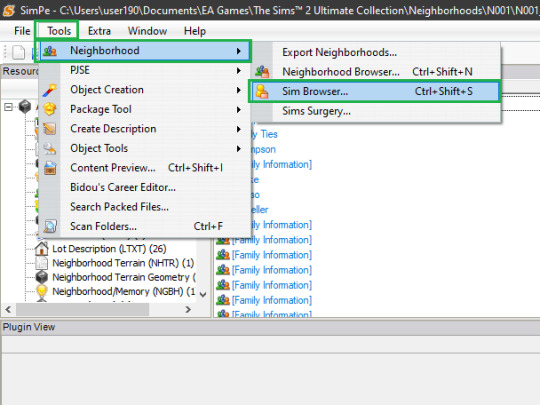
5. Select the Sim you want.

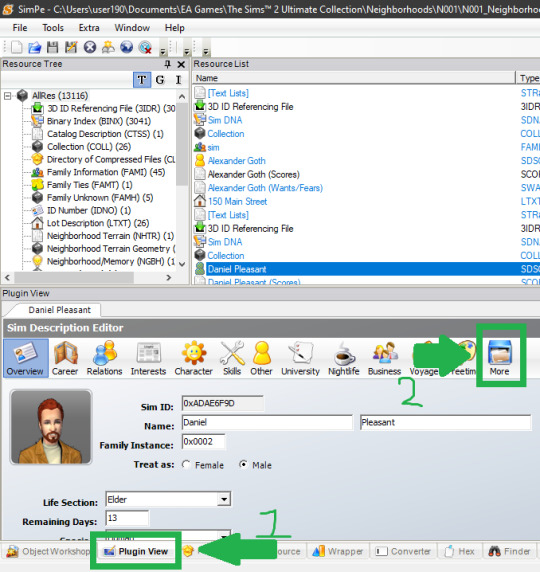
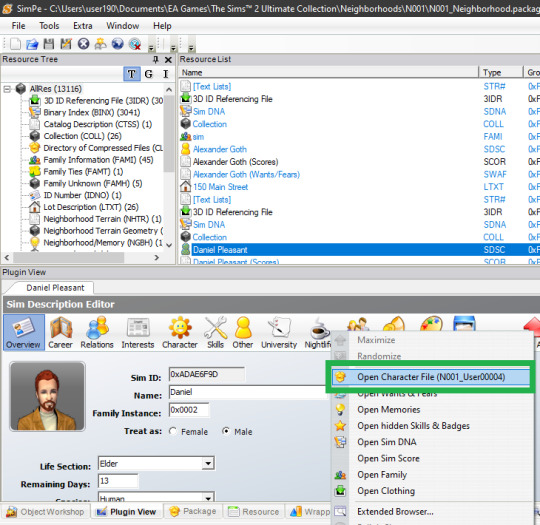
6. Make sure you are In the "Plugin View" and then Click on "More" and Then on "Open Character File"
7. In the Resource Tree You will see "Age Data" Click on it and then at the Resource List You will again see "Age Data Click on it.

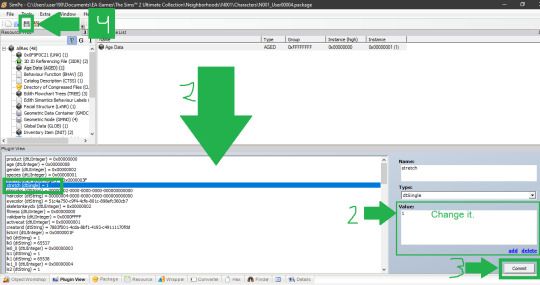
8. In the Plugin View, Search for the
"stretch (dtSingle) = 1"
Click on it and next to it there is a "Value" Box with the number 1 wrote inside. There we put the number we want for the wanted height. (Chart Wroted Down.)
9. Click "Commit."
10. Save and Done!
(FOR THE PERMANENT METHOD) Feet Stretch Skeleton Value / inches
The Value Numbers (the number(s) we put on the box is with BOLD)
4 1/2 : 0.7500 4 7/12 : 0.7639 4 2/3 : 0.7778 4 3/4 : 0.7917 4 5/6 : 0.8056 4 11/12 : 0.8194 5 : 0.8333 5 1/12 : 0.8472 5 1/6 : 0.8611 5 1/4 : 0.8750 5 1/3 : 0.8889 5 5/12 : 0.9028 5 1/2 : 0.9167 5 7/12 : 0.9306 5 2/3 : 0.9444 5 3/4 : 0.9583 (My ideal Short height (it will give you an idea) ) 5 5/6 : 0.9722 (teen height) 5 11/12 : 0.9861 6 : 1.0000 Or just 1 (elder/adult/ya height) 6 1/12 : 1.0139 6 1/6 : 1.0278 6 1/4 : 1.0417 6 1/3 : 1.0556 6 5/12 : 1.0694 (My ideal Tall height (it will give you an idea) ) 6 1/2 : 1.0833 6 7/12 : 1.0972 6 2/3 : 1.1111 6 3/4 : 1.1250 6 5/6 : 1.1389 6 11/12 : 1.1528 7 : 1.1667 7 1/12 : 1.1806
(FOR THE CHEAT METHOD) Feet Stretch Skeleton Value / inches
Matching Values to Height: Elders/Adults/YAs/Teens
(the number(s) we put on are with BOLD)
0.87 = 5'0" 0.885 = 5'1" 0.90 = 5'2" 0.915 = 5'3" 0.93 = 5'4" 0.94 = 5'5" (default teen height) 0.955 = 5'6" 0.97 = 5'7" 0.985 = 5'8" 1.0 = 5'9" (default elder/adult/ya height) 1.015 = 5'10" 1.03 = 5'11" 1.045 = 6'0" 1.06 = 6'1" 1.07 = 6'2" 1.085 = 6'3" 1.10 = 6'4" 1.115 = 6'5" 1.13 = 6'6"
366 notes
·
View notes
Text

By popular demand (I saw two people asking) I thought I would throw together a quick guide to using the road editor tool in the newest version of SimPE! You'll see that this is a very easy tool to use, and best of all, goof-proof. If you do mess up (you probably will) it's very, very easy to correct.
Very, very, very important to make a backup of your hood before you ever do any tinkering in SimPE! I also recommend practicing on a test hood you don't actively play in to get a feel for it before you do anything to your main hoods.

We're starting with a vanilla Strangetown. I would recommend going in your game and taking a nice overhead screenshot of the hood like this first to look at for reference of where everything is situated the way that you're used to looking at it.

2. Open SimPE, go to Tools> Neighbourhood> Neighbourhood Browser and open the hood you're wanting to work on. If you're not so familiar with SimPE, opening your hood can take some time. Touch nothing until it's loaded!

3. Once it's all loaded, from the Resource Tree list pick Neighbourhood Terrain Geometry (NHTG). Then you'll see one file populate the Resource List - click that. Make sure on the bottom that you have Plugin View tab selected.

4. Now you should see this map of your hood pop up! There are different things you can toggle, I like to check the Show Lots box when I'm editing the roads. Then click the Road Editor button on the right.

5. To be able to see better, I've pulled this Plugin View window up a bit - it may rearrange the Resource List and Resource Tree windows a bit to accommodate. You can also press the Zoom 2x button to see closer, and then you'll have to use the scroll bars to move around the map and the road editor tool.

6. The road editing tools here will be placed down in the same orientation as the map. So the two parallel roads running through Strangetown from this perspective are the vertical straight road pieces (top row, second from left).
When you select a road tool, above it will indicate which tool you have selected.
Also - I recommend having Handle Stop Signs ticked.

7. Once you have the correct type of road selected for the spot you're working on, simply click on the map - it lays it down one tile at a time. If you miss a spot like shown here, just fill it in.

8. If you want to create an intersection, first delete the section of road where the intersection will go.

9. Then choose the type of junction for the intersection you're making, and add that piece in. You'll see a red circle appear (unsure if this is because it's an intersection or because you have handle stop signs selected, but I recommend you do have that selected either way).

10. Once you're done making all your changes, click Close Editor.

11. This is the part where you save your changes! First click Commit in the top right of the editor. Then, File> Save!

12. Load your game to check! Looks pretty good with all those new roads!

13. However, we have indeed made some mistakes! Which were absolutely for illustrative purposes and not truly an accident.

14. Never fear! Simply reload the hood in SimPE - I've deleted the spot where the T-junction should go and added one in, and deleted where the road just ended abruptly and added a proper end piece.
I have not experimented with what happens if you try to build a road through hood deco - if you have, please let us know in the comments how that went!
I also have barely touched the terrain editing tools, so that's outside the scope of this tutorial.
I hope this helped!
#the sims 2#sims 2#ts2#ts2 maxis match#ts2 simblr#ts2 tumblr#simblr#brightmaple#ts2 tutorial#simpe tutorial#simpe road editor
783 notes
·
View notes
Text
SimPe tutorial: How to fix the height setting of CC chandeliers (The Sims 2)
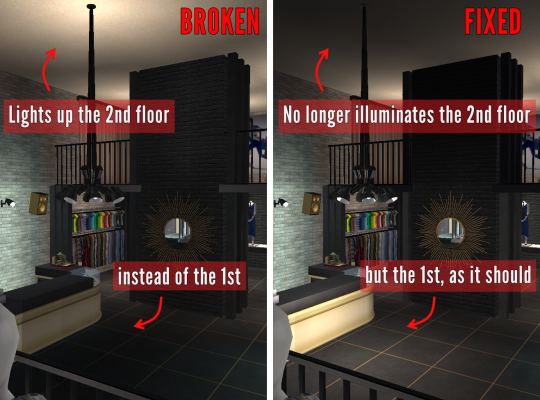
A few years ago, @hugelunatic released a fix for the chandelier added to the game with M&G. Originally, the light cast by the chandelier illuminated the floor level above the lamps, not below them. That mod, however, does not affect custom 2-story lights, which need to be adjusted individually. This is a quick, easy tutorial to do just that.

1. Open the mesh .package file in SimPe;
2. Select "Resource Node (CRES)" in the Resource Tree menu and open the item shown under Resource List;
3. Make sure "Plugin View" is enabled (bottom menu of SimPe);
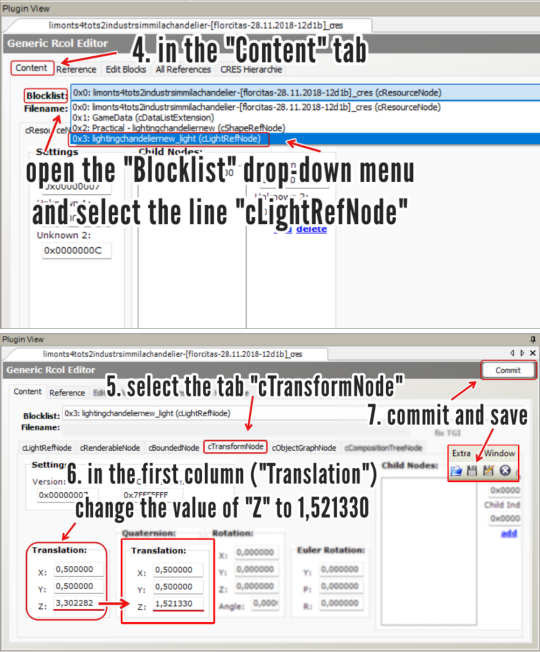
4. In the "Content" tab, open the "Blocklist" drop-down menu and select the line "cLightRefNode";
5. Select the tab "cTransformNode";
6. In the panel displayed, on the first column (named "Translation"), change the value of "Z" to a number that matches the height of the lamp mesh you're editing.
NOTE: For 2-story lights that sit on the same height as Maxis' chandelier, the value that I used was 1,521330 (taken from HugeLunatic's mod). For CC lights of a different height, you might want to try different values, according to your personal preference.
7. Click "Commit" and save.
_______________________________
For my own game, I edited two custom lights using the same height value ("Z") that HugeLunatic did for the M&G chandelier (1,521330) . I'm not sharing them here because both creators are still active, but I'm tagging them in case they wish to update their files. They are:
@lordcrumps' "Slightly Off Track Lighting", from his 4t2 Industrial Loft Kit; and
@limonaire's conversion of Industrisim's 2-story industrial chandelier.
Not needed, but RECOMMENDED: HugeLunatic's fix of Maxis' chandelier.
214 notes
·
View notes
Text
YOUR VISITOR CONTROLLER MIGHT NEED SURGERY
Hello out there!!! If you use Visitor Controller mod for the Sims 2, it might be broken. I am not sure exactly which version I have ... Midge's that allows togas or the older CrispandKerosene's version with personality options.
The personality settings may be broken because I looked at my file today and sure enough, the BHAVs are not referencing personality properly.
Go into the BHAV "Check Personality Flags" inside Visitor Controller in SimPe.
It should look like this:

The highlighted node should not reference any other value but a number higher than 100.
If you see this:

Then it is broken. Personality has to be referenced in hundreds!
You must change it with the Instruction Wizard which is on the right hand side of Plugin view to make Personality features work, as in banning Lazy Sims from a gym.

The first image shows that Sims with a Neat personality lower than 400, which is 0x0190 in hexadecimal, will be banned from the lot.
Repeat for the other personalities lower in the code.
HAPPY SIMMING!!!!
Also, if anyone is interested in a tutorial for adding custom careers to Visitor Controller, let me know!
#sims 2#sims 2 gameplay#sims 2 simblr#sims 2 mods#sims community#ts2#ts2 mods#ts2 glitch#ts2 visitor controller#visitor controller#sims#Sims mods#Sims 2#sims 2 cc#the sims 2#sims 2 screenshots#Simpe#sims 2 tutorials#sims 2 tutorial
109 notes
·
View notes
Text
thanks a lot!

TS2 Light pattern TXMT settings:
color values and tips for CC creators / SimPe users
Additive TXMT settings (stdMatAlphaBlendMode set to 'additive') allow you to create many colorful glowing variants of one gray texture (ExtRaw8Bit format). These are used first and foremost for lights - wall lamps, table lamps, neons.
Top pic features my 'Everglowing Flamingo Neon' recolors, all done with one 8bit texture and TXMT settings.
Here are some RGB values for StdMatDiffCoef + StdMatEmissiveCoef - as shown in the pic below, a combination of these two works best.

Basic colors: green / red / blue / cyan / magenta / yellow - are easy, you just pick the color from the drop-down palette in 'Categorised Properties' tab.
In case of intermediate shades, it's a bit tricky - some colors look almost the same in game - like these three:

Color chart comes in handy:

If you need less saturated shades, you can copy color value to RGB color editor of your choice and desaturate it slightly - then copy that new RGB value into StdMatEmissiveCoef field.

I don't recommend setting darker RGB color values to darken the lightpattern. Instead, you can lower stdMatAlphaMultiplier value - default is 1.000000. Setting alpha to 0.500000 will make it around half less bright.
Alternatively, you can darken the ExtRaw8Bit texture itself. I use "Curves" or "Levels" for that, since simple Brightness sliders tend to lower contrast and texture is slightly dull-looking.
Related tutorials:
How to export/import TXMT settings from one recolor to another.
#Resources#reference#Lights#txmt#materials#ts2 resources#ts2#sims 2#simpe#pineapple forest#Tutorial#Tutorial: SimPE#Tutorial: Creation#Tutorial: Materials
135 notes
·
View notes
Text
youtube
Unlock the full potential of your Sims 2 experience by creating and editing custom aspiration rewards with SimPE. In this step-by-step tutorial, you’ll learn how to enhance your gameplay by turning custom and Maxis objects into aspiration rewards while also editing existing rewards to better suit your needs.
#Youtube#sims 2#the sims 2#ts2#sims 2 video#ts2 video#simtube#simstube#sissysims#sissy sims#sims 2 tutorial#sims 2 guide#SimPE tutorial#sims 2 aspiration rewards#sims 2 mod tutorial#sims 2 modding tutorial#ts2 tutorial#ts2 guide
78 notes
·
View notes
Text
ok but hear me out........ the upcoming ts4 pack with the tattoo table......
that converted for ts2, but functional..... same animations as the bv massage table (+ the tattoo gun accessory attached to the artist-sim's hand??? they don't even need to be properly holding it imo, just having the accessory there would be cool i think). the client changes into undies instead of towel, loses comfort/energy(/hunger/hygiene? lmao) and gains fun and maybe social too? so the table advertises for those. change appearance dialog comes up (in the case of facial tattoos) but otherwise tattoos are still applied with overlays as usual (oh to have a 'buy clothes'-style dialog window for tats...... 😢). the tattoo artist gains creativity skill + arts&crafts enthusiasm as they work. custom memory for the client sim if it's their first tattoo (or a repeatable one could be cool too?) 🤔🤔🤔 functional tattoo table.....
#i love to dream up mods that i have no skills to make 💀#ts2#mine#taos rambles#mod ideas#might as well make a tag because i have hundreds of these. and a brain that bluescreens when i see all the numbers in simpe#i do intend to like. sit down and study bhav tutorials and whatnot at some point but. i have no idea if i'll be able to understand it at al
127 notes
·
View notes
Text
Snufkin quotes for the tumblrtrolls
#snufkin: melody of moominvalley#snufmin#moomins#snufkin#it's a bit of a baby game but sometimes the puzzles have more steps than “move forward interacting with each thing”#and the area maps are windey enough to feel big#teety-woo is the tutorial goblin as they deserve for being a SIMP!#they big-upped Sígur Ros' contribution but I'm not sure there's more than one or two songs from that#I'm like 2.5 hours in and maybe ⅔ done with the plot? there's mild sidequest and collection as well#i guess since I've not talked to snorkmaiden maybe I'm less than ⅔ done
285 notes
·
View notes
Text

How to make custom eyes non-dominant?
So you downloaded cool custom eyes for your Sims 2 but you wish they weren't dominant in genetics (as they usually are)? It's very simple to fix as long as you have SimPE.
Explanation: Custom eyes are dominant because their default genetic value is 0, and creators usually don't bother with changing that. Maxis genetic values are 1 and 2, so 0 dominates over both, which means custom eyes are more dominant than Maxis dominant.
And now, how to change it:
Open SimPE.
Open the eye file that you'd like to edit (you can drag it directly from the folder into SimPE).
Go to Texture Overlay XML, it will probably be named something like "uuface_eye_gray".
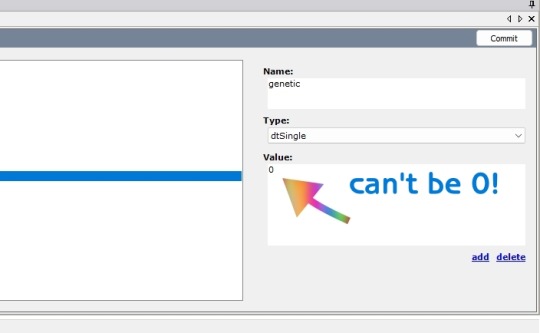
In Plugin View below, find "genetic (dtSingle)".
Now it's time to decide if you want the eyes to be dominant or recessive. 1 - Maxis dominant 2 - Maxis recessive In the window located to the right, you can edit it and type in the desired number (1 or 2, never leave it at 0!).
Commit. Save. Done!


Now you can go into the game and test it (close SimPE first!). Make two fresh Sims, one with a Maxis recessive eye color (e.g. light blue) and the other with this custom one you just edited. Then "play with genetics" and if the offspring ever gets the Maxis recessive color, it works! Sims straight from CAS are homozygous, so it wouldn't be possible for recessives to even appear if the other color was dominant.
I personally changed the value to 1 to make it the same as in the Equal Genetics mod. If you want dominant and recessive in your game, just choose which colors have which value. Unfortunately, you need to edit every single file separately.
You can also use this version of Equal Genetics for eyes to have them all set to 0 - this way no custom eyes will dominate and there's no need to edit them!
That's it! Hope this helps!
63 notes
·
View notes
Text
SimPE Material Definitions Index:
DW link for a more legible layout. Another thing I made for myself and might as well share. Definitions have links to wiki. If I made any errors feel free to let me know.
Further Reading:
Texture Mapping – Wikipedia.
Materials in general – Unity Manual.
In SimPE – PixelHate's Guide to Material Definitions [TXMT].
Definitions:
Material Type: StandardMaterial (stdMat).
alphaRefValue – (I forgot)
deprecatedStdMatInvDiffuseCoeffMultiplier (idk)
reflectivity
stdMatAlphaBlendMode – Alpha Layer Settings (Responsible for Transparency).
stdMatAlphaMultiplier
stdMatAlphaRefValue – Reflection?
stdMatAlphaTestEnabled
stdMatBaseTextureAddressingU – Base Texture Settings (The Main Texture).
stdMatBaseTextureAddressingV
stdMatBaseTextureAlphaReplicate
stdMatBaseTextureEnabled
stdMatBaseTextureName
stdMatCullMode – Backface Culling Mode.
stdMatDiffCoef">0.8,0.8,0.8< - Diffuse Reflection – Coefficient [pretty sure. Isn't that Albedo?].
stdMatEmissiveCoef">1.00000,1.00000,1.00000< - Emissivity Coefficient.
stdMatEnvCubeBlurFactor">0.000000< - Environment Cube Map Definitions.
stdMatEnvCubeCoef">0,0,0<
stdMatEnvCubeLockedToCamera>0<
stdMatEnvCubeMode>none<
stdMatEnvCubeTextureName
stdMatFillMode>solid<
stdMatLayer>0<
stdMatLightingEnabled">1<
stdMatMinLightRangeHint">4<
stdMatNormalMapTextureEnabled – Normal/Bump Map Settings.
stdMatNormalMapTextureAddressingU
stdMatNormalMapTextureAddressingV
stdMatNormalMapTextureName
stdMatSpecCoef">0.53,0.53,0.53< - Specular Reflection & Specular Map Settings.
stdMatSpecMaskTextureEnabled
stdMatSpecMaskTextureName
stdMatSpecPower">1e+002<
(Not in SimPE - Albedo Map)
stdMatTextureCoordAnimMode">none<
stdMatTextureCoordAnimNumTiles">1.000000,1.000000<
stdMatTextureCoordTfAnimOrigin">0.500000,0.500000<
stdMatTextureCoordTfAnimRotSpeed">0.000000<
stdMatTextureCoordTfAnimRotStartEnd">0.000000,1.000000<
stdMatTextureCoordTfAnimRotWaveform">triangular<
stdMatTextureCoordTfAnimScaleSpeed">0.000000<
stdMatTextureCoordTfAnimScaleStartEnd">0.000000,1.000000<
stdMatTextureCoordTfAnimScaleWaveform">triangular<
stdMatTextureCoordTfAnimTransEnd">0.000000,0.000000<
stdMatTextureCoordTfAnimTransSpeed">0.000000<
stdMatTextureCoordTfAnimTransStart">0.000000,0.000000<
stdMatTextureCoordTfAnimTransWaveform">triangular<
stdMatTextureCoordTileAnimSpeed">0.000000<
stdMatUntexturedDiffAlpha">1<
#ts2#sims 2#the sims 2#ts2 resources#sims 2 resources#the sims 2 resources#SimPE#ts2 index#text post#Index#Tutorial#Tutorial: Materials#Tutorial: SimPE
8 notes
·
View notes
Text
yk what fuck it, here's a compilation of a bunch of sonic edits i made when i was 12-13 that i found while going through my external hard drive because sharing this with the world is what little me would have wanted
#me? simping for shadow back in the day?? nahhhhh#tbh i'm surprised these look as smooth as they do since they were all made in 24fps#....since my poor laptop can't handle anything higher than that#i'm sure i could find more of these... if i do and feel cute at that moment i might post those too#also shout out to peej ent on youtube their tutorials were carrying the davinci resolve editors community back then#sonic#sonic the hedgehog#shadow the hedgehog#shadow#miles tails prower#tails the fox#tails#knuckles the echidna#knuckles#rouge the bat#rouge#maria robotnik#maria#sonic fandom#edit#fandom edit#sonic edit#shadow edit
21 notes
·
View notes
Text
So it turns out it's quite easy to change Sim's voice in SimPe.
I had this household where all adult female Sims sounded the same and I had to do something about it xD. I've recorded a few TS2 voice types for future reference so I might as well share. Samples below the cut.
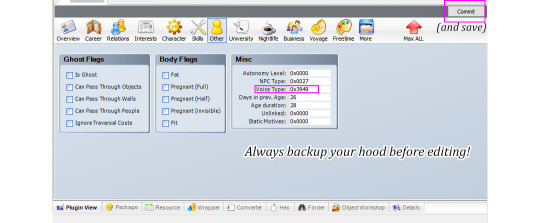
Here are examples & values for four adult female and four adult male voices.
It's NOT possible to change voice type gender or age group by editing Voice Type value
AF1 0xFD34, AF2 0xDE83, AF3 0x354A, AF4 0x3949
AM1 0xEF85, AM2 0xDCF8, AM3 0x0D95, AM4 0xE918
These samples are from phone call conversations. Second and the last male voice is by the same voice actor but it has different 'dialogs'. AM 0xE918 seems more assertive (?).
*To be honest I'm not sure if it's a different voice type or does it depend on personality? I need to look into that. TS2 only had four voice actors /for adult voices?/ but that doesn't mean there are only four voice types, right? 🤔/
*This is about The Sims 2
487 notes
·
View notes
Text
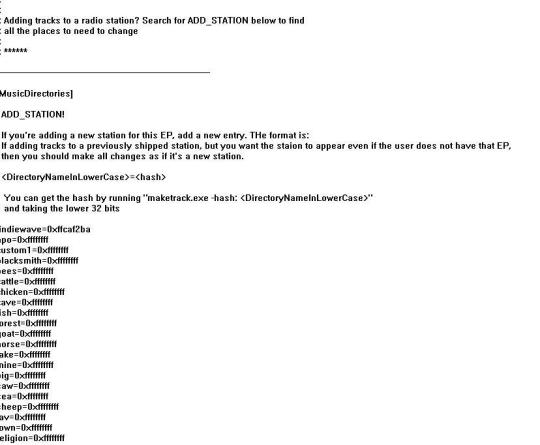
Tutorial/Download: Costum ambient music speakers
I recently came across Mortia’scustom speaker collection. I love the idea and the sounds, but I didn’t want to put the music in the game radio stations, because I already replaced those with fabulous bardcore music. So I poked at the game and found out it’s possible to make some custom radio station and matching speakers to play them. Now, this is a bit tricky, and not as easy as just putting…
View On WordPress
20 notes
·
View notes
Text
I am sick and miserable and plagued by visions (sims 2 cc i want)
Concept: Tattoo overlay box type thing, except its options are overlays linked to your default skins(s1-s4) and default eyes(ya know, blue and green and brown and such), so i can have my fae sims cast glamours on themselves to look like normal sims temporarily.
If my brain wasn't filled with goo i would attempt it myself, but i am in no state to use this goo container to learn new skills right now
#lilleproblems#someone please make this thing thank you#with bonus points for making the “box” into a lil medievalish potion or face powder or something#edit: the madness is taking me and i have made a folder of things i think i can glue together to make this happen and i am reading tutorial#i am gonna make tea and do something that doesnt require my brain to work tho because there is too many numbers in simpe
9 notes
·
View notes
Text
SimAntics and SimPe Notes
I've gather all my SImAntics and SimPe notes together for easy reference
SimAntics Notes
SimPe Notes
27 notes
·
View notes