#software per tutorial
Explore tagged Tumblr posts
Visit Tumblr Blog
Explore Tumblr blogs with no restrictions, modern design and the best experience.
Last Seen Tumblr Blogs


Fun Fact
The most popular pages on Tumblr are about Minecraft, GIFs, and David J. Peterson.
Text
Software di Registrazione Schermo della Suite Nero: Guida Completa
Se stai cercando un software efficiente per registrare lo schermo del tuo PC, il software della “suite Nero” potrebbe essere la soluzione ideale per te. Questa applicazione è progettata non solo per la registrazione dello schermo, ma offre anche molteplici funzionalità utili per chi crea contenuti video o tutorial. In questo articolo, esploreremo le caratteristiche principali di questo programma…
#installazione Nero Start Smart#registrazione 4K#registrazione schermo PC#registrazione video#software di registrazione schermo#software per tutorial#sottotitoli automatici Nero#suite Nero
0 notes
Text
Wager Listing Report
The Wager Listing report that gives bookies the ability to verify wagers and bets made by players. Reports on the wagers made by players is an essential part on becoming a bookie as it allows bookies to properly manage their players. In addition, it also gives agents real-time data on how the type of wager each player likes to make and how and what to expect from them. In the sports betting…
#Managing Wagers#Price Per Player Software#PricePerPlayer.com Pay Per Head Software Tutorial#wager listing#Wager Listings#Wager Management#Wager Reports
0 notes
Text
Disco: Iniziare la Produzione con i Giusti Consigli
La produzione di musica disco richiede conoscenze e tecniche specifiche. Questo articolo ti guida su come iniziare a produrre un disco di successo. Ti mostreremo come scegliere le giuste tracce di riferimento, il genere e il titolo, e come creare il tuo brand personale. Scoprirai i segreti e i consigli dei professionisti. Così, potrai trasformare la tua passione in una carriera di successo nella…
#Consigli per produrre musica disco#Disco anni &039;70#Produzione musica disco#Software per produzione musicale#Tecnica di mixaggio#Tutorial produzione musicale
0 notes
Text

Henkilökunnan rekrytointi
#software as a service (industry)#dance#cpagrip tutorial $1250 guaranteed for beginners#cpagrip tutorial $1250 guaranteed#behring regional center#how to start cpa marketing for beginners#eb-5 regional center#things to do in manila#make $1250 per day#ppsh in a supply drop#how to get free gems in fc mobile#later#lew later#later clips#internet marketing#lew later clips#artificial intelligence#indian cricket team#manila philippines tour#insurance
0 notes
Text
DXVK Tips and Troubleshooting: Launching The Sims 3 with DXVK
A big thank you to @heldhram for additional information from his recent DXVK/Reshade tutorial! ◀ Depending on how you launch the game to play may affect how DXVK is working.
During my usage and testing of DXVK, I noticed substantial varying of committed and working memory usage and fps rates while monitoring my game with Resource Monitor, especially when launching the game with CCMagic or S3MO compared to launching from TS3W.exe/TS3.exe.
It seems DXVK doesn't work properly - or even at all - when the game is launched with CCM/S3MO instead of TS3W.exe/TS3.exe. I don't know if this is also the case using other launchers from EA/Steam/LD and misc launchers, but it might explain why some players using DXVK don't see any improvement using it.
DXVK injects itself into the game exe, so perhaps using launchers bypasses the injection. From extensive testing, I'm inclined to think this is the case.
Someone recently asked me how do we know DXVK is really working. A very good question! lol. I thought as long as the cache showed up in the bin folder it was working, but that was no guarantee it was injected every single time at startup. Until I saw Heldhram's excellent guide to using DXVK with Reshade DX9, I relied on my gaming instincts and dodgy eyesight to determine if it was. 🤭
Using the environment variable Heldhram referred to in his guide, a DXVK Hud is added to the upper left hand corner of your game screen to show it's injected and working, showing the DXVK version, the graphics card version and driver and fps.

This led me to look further into this and was happy to see that you could add an additional line to the DXVK config file to show this and other relevant information on the HUD such as DXVK version, fps, memory usage, gpu driver and more. So if you want to make sure that DXVK is actually injected, on the config file, add the info starting with:
dxvk.hud =
After '=', add what you want to see. So 'version' (without quotes) shows the DXVK version. dxvk.hud = version

You could just add the fps by adding 'fps' instead of 'version' if you want.

The DXVK Github page lists all the information you could add to the HUD. It accepts a comma-separated list for multiple options:
devinfo: Displays the name of the GPU and the driver version.
fps: Shows the current frame rate.
frametimes: Shows a frame time graph.
submissions: Shows the number of command buffers submitted per frame.
drawcalls: Shows the number of draw calls and render passes per frame.
pipelines: Shows the total number of graphics and compute pipelines.
descriptors: Shows the number of descriptor pools and descriptor sets.
memory: Shows the amount of device memory allocated and used.
allocations: Shows detailed memory chunk suballocation info.
gpuload: Shows estimated GPU load. May be inaccurate.
version: Shows DXVK version.
api: Shows the D3D feature level used by the application.
cs: Shows worker thread statistics.
compiler: Shows shader compiler activity
samplers: Shows the current number of sampler pairs used [D3D9 Only]
ffshaders: Shows the current number of shaders generated from fixed function state [D3D9 Only]
swvp: Shows whether or not the device is running in software vertex processing mode [D3D9 Only]
scale=x: Scales the HUD by a factor of x (e.g. 1.5)
opacity=y: Adjusts the HUD opacity by a factor of y (e.g. 0.5, 1.0 being fully opaque).
Additionally, DXVK_HUD=1 has the same effect as DXVK_HUD=devinfo,fps, and DXVK_HUD=full enables all available HUD elements.
desiree-uk notes: The site is for the latest version of DXVK, so it shows the line typed as 'DXVK_HUD=devinfo,fps' with underscore and no spaces, but this didn't work for me. If it also doesn't work for you, try it in lowercase like this: dxvk.hud = version Make sure there is a space before and after the '=' If adding multiple HUD options, seperate them by a comma such as: dxvk.hud = fps,memory,api,version
The page also shows some other useful information regarding DXVK and it's cache file, it's worth a read. (https://github.com/doitsujin/dxvk)
My config file previously showed the DXVK version but I changed it to only show fps. Whatever it shows, it's telling you DXVK is working! DXVK version:


DXVK FPS:

The HUD is quite noticeable, but it's not too obstructive if you keep the info small. It's only when you enable the full HUD using this line: dxvk.hud = full you'll see it takes up practically half the screen! 😄 Whatever is shown, you can still interact with the screen and sims queue.

So while testing this out I noticed that the HUD wasn't showing up on the screen when launching the game via CCM and S3MO but would always show when clicking TS3W.exe. The results were consistent, with DXVK showing that it was running via TS3W.exe, the commited memory was low and steady, the fps didn't drop and there was no lag or stuttereing. I could spend longer in CAS and in game altogether, longer in my older larger save games and the RAM didn't spike as much when saving the game. Launching via CCM/S3MO, the results were sporadic, very high RAM spikes, stuttering and fps rates jumping up and down. There wasn't much difference from DXVK not being installed at all in my opinion.
You can test this out yourself, first with whatever launcher you use to start your game and then without it, clicking TS3.exe or TS3W.exe, making sure the game is running as admin. See if the HUD shows up or not and keep an eye on the memory usage with Resource Monitor running and you'll see the difference. You can delete the line from the config if you really can't stand the sight of it, but you can be sure DXVK is working when you launch the game straight from it's exe and you see smooth, steady memory usage as you play. Give it a try and add in the comments if it works for you or not and which launcher you use! 😊 Other DXVK information:
Make TS3 Run Smoother with DXVK ◀ - by @criisolate How to Use DXVK with Sims 3 ◀ - guide from @nornities and @desiree-uk
How to run The Sims 3 with DXVK & Reshade (Direct3D 9.0c) ◀ - by @heldhram
DXVK - Github ◀
105 notes
·
View notes
Note
As you've asked for asks!:
Do you have any quick-and-dirty book/fic binding methods a terrified-of-failure novice could use to bang something out to get over the first collywobbling step of Actually Doing The Thing? (this may be something I've been meaning to ask for ages)
yes! I absolutely do! in my opinion the best quick-and-dirty bookbinding method is a no-glue pamphlet: you don't have to mess with glue or measuring or cutting anything, all you need is your text, some paper, a needle and thread. you can use the same needle to punch holes if you don't have an awl.
this is going to be a little long but that's because I'm going to write out some fairly detailed instructions for an A5 sized pamphlet. If you don't want detailed instructions and think you can glean the necessary info from photos, just skip to the photos! I've also linked tutorials.
for preparing the text to printing, in whatever software you use (word, libreoffice, gdocs, whatever) make sure your document is set to page size A5. make it look readable. then save as/export that document as a straight-paged PDF. now go to the bookbinder JS tool (https://momijizukamori.github.io/bookbinder-js/), and upload the PDF. source manipulation: none printer paper size: A4 display unit (you can ignore, or choose cm if it gives you anxiety that it automatically displays points) printer type: select single-sided or duplex accordingly* rotate paper: ignore flip on long side: check if you are printing duplex and if your duplex printer flips the paper on the long side page layout: tick folio page scaling: original page positioning: centered ignore the rest flyfleaf: ignore signature format tick: standard signatures. in the length drop down, this depends on the type of pamphlet you are doing. for folio i generally find 4-5 pages per signature a comfortable thickness. if you have 6 whole A4 pages you can still do that as a single signature or you can split it into two signatures 3 pages each. wacky small layouts: ignore this signature info click the generate preview button to see what your PDF looks like imposed! I love this step especially when I'm doing quarto (A6) or octavo (A7) sized books generate output - click this to generate an imposed PDF
for A6 and A7 sized books the instructions are much the same, except for these you make sure the page size is A6 or A7 in your software, and then you choose quarto or octavo instead of folio. for signature length drop down I keep signature length to 1 for octavos typically and 2 for quartos, as this still refers to sheets of paper, and for octavo 1 sheet of A4 paper will turn into 4 smaller sheets in one signature once folded and cut.
*if you don't have a duplex printer you will have to manually turn the paper to print on the other side. I cannot be arsed with this so I bought a printer capable of duplex printing (I didn't have a printer anyway). if you already have a printer check what it can do as you might be surprised and go from there.
now to the pamphlets! you don't need a cover - I have one for the long stitch pamphlet but for the saddle stitch one I didn't bother and just made sure the first page had a title on it. you can always take a different piece of paper and print a cover on or or just use coloured cardstock and create a simple cover, but a cover is not necessary unless you're doing a long stitch pamphlet. all you need to do is to punch holes and start sewing. there are a few different stitch types below, I wouldn't say any of them are more difficult or easier than others, but they do look different so...pick one you like the look of and go from there?
pamphlet stitch (uneven number of holes) I haven't ever done a pamphlet stitch but here's a tutorial for how to do it: https://www.starpointestudio.com/simple-pamphlet-stitch-book-step-by-step/
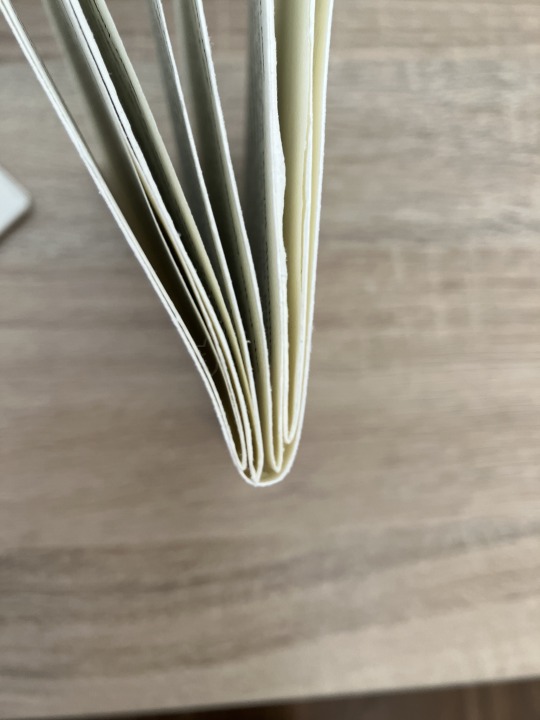
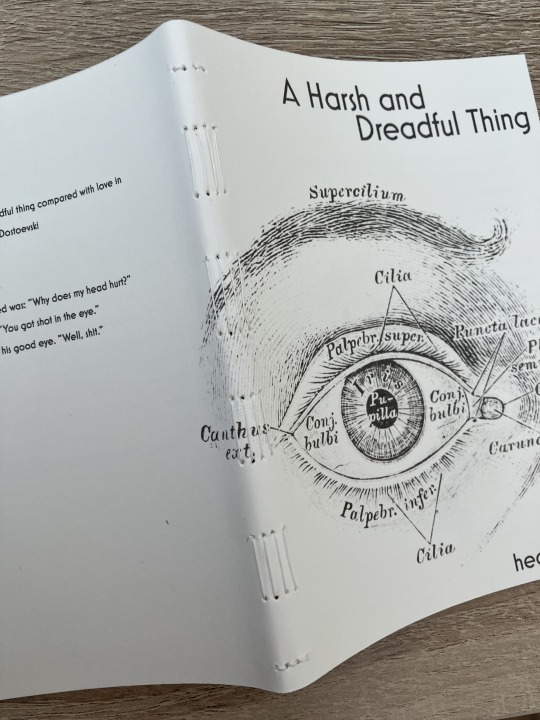
saddle stitch (uneven number of holes) I realised that what I was thinking of as a pamphlet stitch is actually saddle stitch, as in this A7 pamphlet:
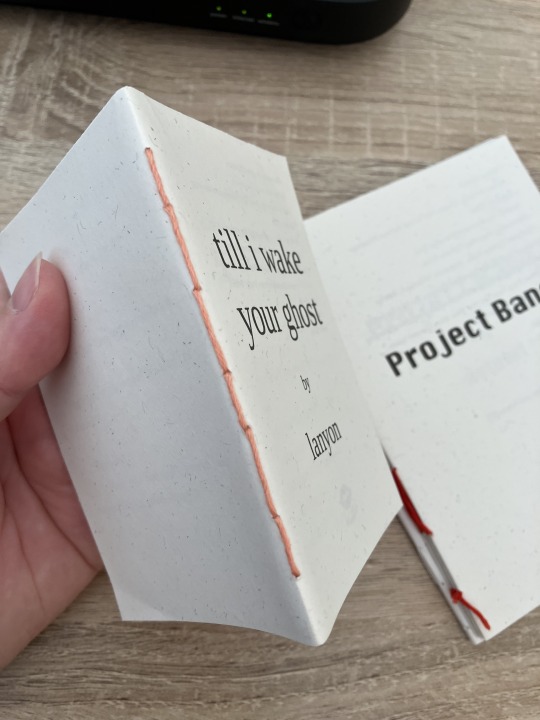
here's a tutorial for how to sew saddle stitch: https://www.bookbindingworkshopsg.com/saddle-stitch-bookbinding-tutorial/ here's a video tutorial: https://www.youtube.com/watch?v=aWHkY5jOoqM (sealemon has a lot of bookbinding tutorials and I know many people who like her videos, I used her tutorial for coptic binding way back when I first made a book but I can't otherwise vouch for the quality as I haven't used her videos)
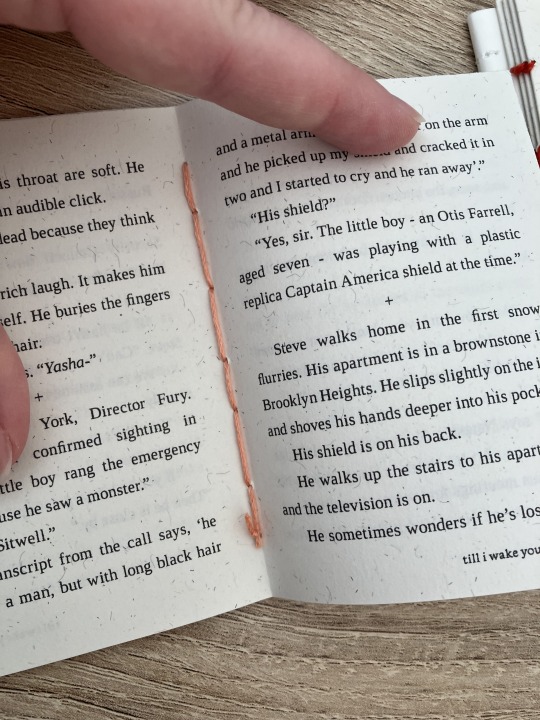
french link stitch (even number of holes) in this one I used french link stitch which I typically use for thicker textblocks that i'm not planning to use tapes with as the french link gives it some robustness, I used it here because I had never done it before and wanted to try it out. I am planning to take these stitches out and re-sew this pamphlet with a cover now that I've found a suitable piece of transformer fanart to use as a cover:
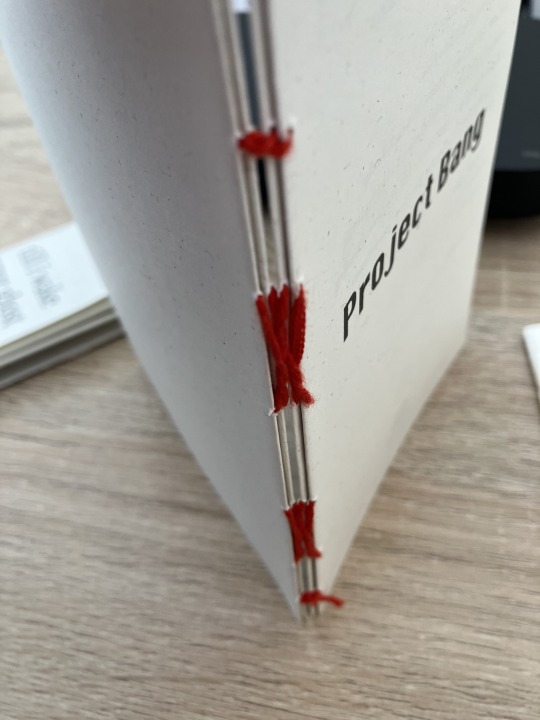
french link tutorial. it's quite long but it has a colour coded bit towards the end that shows how the thread is supposed to link which i find very helpful to visualise: https://www.handmadebooksandjournals.com/bindings/french-link-stitch-binding/
here's a video tutoral from DAS bookbinding (he is my go to for techniques and he has the most soothing Australian accent as well, though fair warning not all of his videos are for beginners): https://www.youtube.com/watch?v=O4ZPdbaM-Ws
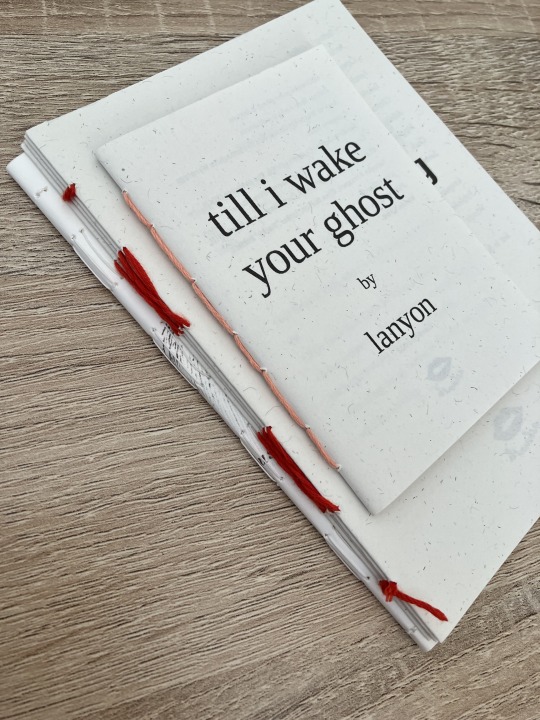
long stitch (even number of holes) for this one I used long stitch and I had a cover. this one is my favourite variation because I can make these pretty and simple covers and the stitch looks nice on the outside as well, so this one scratches the 'i want to make a book' itch for me.

here's a tutorial that also includes a how to on a cover that is different from my cover: https://lccprintmaking.myblog.arts.ac.uk/files/2020/06/Long-Stitch-Tutorial-A4.pdf DAS also has a video tutorial for long stitch but it's like three videos long, maybe watch it later :'D here's one I haven't watched but seems decent: https://www.youtube.com/watch?v=XnignTL_wDQ
you can use saddle stitch for this kind of pamphlet as well, that's what I did for dozens of ships and hundreds of souls (https://ashmouthbooks.tumblr.com/post/681587080267202560).
I hope this helped!!
2K notes
·
View notes
Text
as per a request in my local renegade server: here is my process (such as it is) for the stenciled covers i've done for my binds. obviously, huge thanks to everyone in the renegade discord for teaching me most of what i know about bookbinding. this tutorial only exists thanks to the resources they've made available and the conversations i've had there.
material list
vinyl cutter (i have a silhouette portrait 3) + mat + blade
stencil vinyl (i have this one, but have had some adherence troubles with it. unclear whether this is just The Nature Of Stencil Vinyl or whether there's a better brand out there. adhesive vinyl can also be a viable option, although i haven't personally experimented with it yet.)
transfer tape (i have this stuff. it's fine.)
weeding tools (i have this hook and a very fine tip pair of tweezers. i highly recommend getting a hook, especially if you—like me—are haunted by the specter of carpal tunnel. get an off-brand one or get one on sale, though. i only have the silhouette brand one because it was on clearance.)
acrylic medium (i have this one because it was on sale at the time i was buying acrylic medium. when i replace it, i will be replacing it with a matte one. the gloss definitely has a noticeable sheen that i don't love.)
acrylic paint (literally any paint will do. i've been mostly using the decoart extreme sheen because it's $4 at michaels. you may be noticing a theme here.)
stiff stenciling brushes (the ones i have are similar to these but cost even less. again, there's a theme here.)
an iron and some parchment paper (jury is still out on whether using heat to "set" the pattern is necessary, but i do feel like it melts the paint a bit into the bookcloth and lessens the extent to which the pattern sits above the bookcloth.)
your trusty bone folder
instructions and a truly hideous number of words under the cut.
step 0.5: discern what will make a good stencil and what will make you hate yourself, your life, and the art of bookbinding
there are a LOT of different ways to put titling on a book. you could do a paper cover with a printed design or paste paper labels onto bookcloth or foil your title onto your cover with heat activated foil. the best method depends on what kind of design you have in mind, what tools you have available to you, and what materials you're working with (for example, i've had very bad luck getting acrylic paint to adhere to Allure bookcloth, but Allure does foil like a dream).
as far as stencils are concerned, you can kind of sort cover designs into three categories:
BEST for stencils: big, bold shapes on larger format books (think letter folio or letter/legal quarto)
OKAY for stencils, but you might hate yourself: intricate detail at a large enough form factor for it to be cut well by your vinyl cutter
BAD for stencils, you will die and it will hurt the entire time you are dying: lots of intricate detail and lots of fine lines
below are examples of category 1, 2, and 3 (all designed for letter folio). to be clear, category 3 can technically be possible, depending on the design. but only undertake it with the awareness that you will die, and it will hurt the entire time you are dying.

step 1: design a thing to put on your cover
i'm not going to go too in depth on this because cover design is a HUGE can of worms. a few pointers, though:
i never start designing my cover until my text block is done. this allows me to design my cover at "full size" based on the measured size of my text block and cover boards.
i fully lay out my cover in a separate program before exporting a transparent PNG to silhouette studio (or whichever proprietary software you have to use to communicate with your particular vinyl cutter). i use affinity designer. some free options would be inkscape (if you want to work with vectors) or gimp.
i design my cover on a document with dimensions of (HEIGHT of boards + 20 mm) x (WIDTH of boards or spine + 20 mm) and 10 mm margins. the area within the margins represents the actual dimensions of the thing i'm designing, while the area outside of the margins creates a mask that prevents me from getting paint on things i don't want paint on (like the covers, if i'm creating a spine stencil).
i always outline my document with a 3 or 4pt black line. this creates the outer edge of my stencil and provides my vinyl cutter with a cut line. if you're working with a smaller vinyl cutter (like the cricut joy) there are ways to jigsaw designs together from smaller pieces of vinyl, but i'm not the person to ask about that. i specifically bought a portrait so that i didn't have to worry about that.
here's an example of one of my affinity files from a recent cover. i've exaggerated my outline to make it clearer. you can also see that i use affinity to experiment with color combinations. before i export, i turn all my elements black and make any backgrounds transparent, meaning that the PNG i import into silhouette studio looks like the one on the right.

step 2: cut and weed your stencil
again, not going to go terribly in depth here. there is a veritable army of youtubers out there with tutorials about how to use [insert propriety vinyl cutter software here]. but, again, a few pointers:
with my particular vinyl cutter and stencil vinyl, i usually cut my stencils with the material set to "washi," depth at 1, force at 13, and speed at 4. google, experiment, see what works. also, you want to put your stencil vinyl on the mat with the blue vinyl facing UP, and you don't want to mirror your design. with stencils, what you see is what you get.
i cut my vinyl a bit bigger than necessary because i'd rather waste a bit of vinyl than have to worry about a stencil falling off the edge of my vinyl because i misaligned it on the mat.
unlike HTV, you will be weeding out all the black parts of your original image. be prepared to hate the letters "e" and "a" forever, because you will have to somehow keep the little eye of them in place while you pry out the rest of it.
step 3: apply your stencil to your case
alright, now let's get into the meat of it. i always stencil after my case is finished but before i case in my book. this means that if i totally fuck it up, i can trash the case instead of the entire book.
additionally, i completely stencil my spine first (as in lay down stencil, paint, remove stencil) and then stencil my covers. i've found that it's easier when you don't have stencils overlapping and sticking to each other.
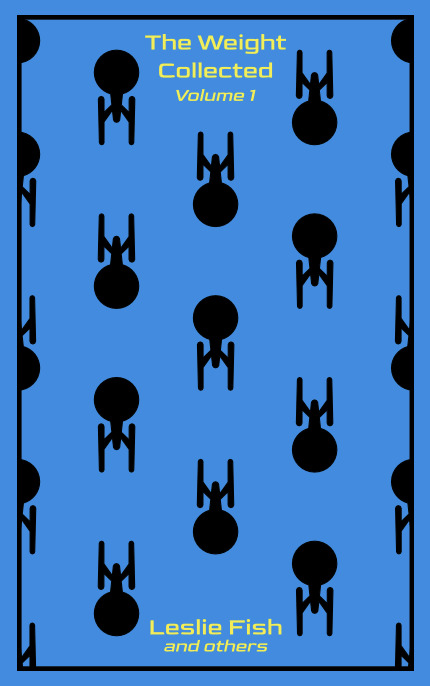
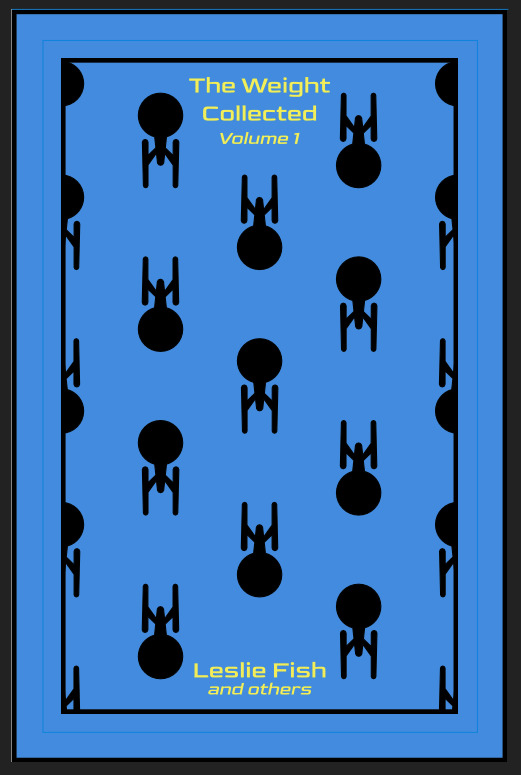
OPTIONAL STEP: mark guides onto your cover to help you position your stencil. whether or not i do this step depends on the design. a lot of the time, i just eyeball it. but for some designs, precision is key. for those projects, i use my ruler to mark out guides in white chalk for where i need certain elements of the stencil to fall. (i used guide marks for the "penguin clothbound" copies of the The Weight Collected that i've been using as an example in this post—the black rectangular boarder would've made uneven placement REALLY obvious.)
use transfer tape to remove your vinyl from its slick backing. what i've found is that you really, really don't want your transfer tape to be too sticky. you want it just barely sticky enough to pick up the stencil if you rub it down with a bone folder or your fingernail. i have a piece of transfer tape that i stuck to my jeans a bunch of times and then proceeded to use for 8 books in a row. it is, frankly, still a little bit too sticky. i have rolled it up so that i can use it for the next 8 books, at which point it will presumably be the right level of stickiness.
position your stencil. when you're happy with it, rub it firmly down with your bone folder. then do it again. then use your fingernail to score down over the titling text. then pray. in my experience, stencils prefer to stick to transfer tape rather than bookcloth. ymmv.
start at one corner of your stencil. carefully begin peeling back the transfer tape. i've found that essentially folding back the transfer tape (like, the corner that's been freed from the stencil being folded back away from the stencil) helps the tape to release. go slowly, rubbing down with the bone fold as necessary.
after you've finally manage to pry the tape off, go back and smooth down the stencil and firmly rub it down to get it to adhere to the bookcloth as thoroughly as possible with as few ripples or air bubbles as possible.
step 4: paint time!
here is a secret that the renegade discord taught me that i am now passing on to all of you: before you put any paint on your stencil, put down a layer of clear acrylic medium. the medium will finish the job of pasting down the stencil to your cover, and any leaks that happen in the process will be clear medium instead of colored paint (and will therefore be basically unnoticeable). ergo:
stipple a thin coat of acrylic medium over your stencil. you want to use an up-and-down daubing motion, not a brushing motion. brushing will get paint under your stencil. let dry.
after your medium is dry, stipple a few thin coats of your colored acrylic paint onto your stencil. let dry between coats. (i usually find that two coats is enough.) again, try to keep your coats thin. you don't want a thick layer of paint because that will create a raised surface above your bookcloth.
let your paint fully dry. i usually leave it overnight, but if i'm feeling especially impatient, i still make sure to at least give it a good three or four hours.
peel up your stencil. your weeding tools will once again come into play here to pry up little bits and pieces of stencil (like the stupid eyes of the "a"s and "e"s that were so annoying during the initial weeding stage).
step 5: optional setting stage
again, jury is still out on whether or not this is necessary, and the effects are pretty subtle. but i do it every time anyway. some tips:
use an iron on very low heat (i keep mine at the low end of the synthetic setting) and with steam turned OFF
keep a piece of parchment paper (NOT waxed paper. you want the slick paper that you put under cookies to keep them from sticking to the pan.) between the iron and your cover.
press the iron down, don't rub it like you're ironing a shirt. it's possible to smear your paint doing that (ask me how i know).
i usually lay the iron down on a section for 10-15 seconds at a time, then lift it and move it to another section.
start with less of everything (less heat, less time) and build up. always better to be conservative with this.
i usually continue until the paint is warm to the touch, then move onto another section. after it's cooled, i evaluate if i feel like it's melted into the cloth enough. if not, i repeat the process.
step 6: BOOK
congrats, you have put a design on a book cover. the world is your oyster. go forth and make books. become ungovernable.


113 notes
·
View notes
Text

I always love more variety in my game, and I love the conversion of The Sims careers to The Sims 2 by LientebollemeiS2I. I wanted to make them more integrated though, so with the permission of LientebollemeiS2I, here are my amendment's to these careers to include:
Chance cards (for every level)
Different career levels (since some of the levels match other careers)
Connection to University Majors
LifeTime wants! The only things they don't have are specific career rewards and Wants that will roll in the Wants and Fears panel.
Please see below for a list of the career levels (the first three levels are matched for Teen/Elder) and also links if you need information such as job descriptions, wages, work days and skill requirements:
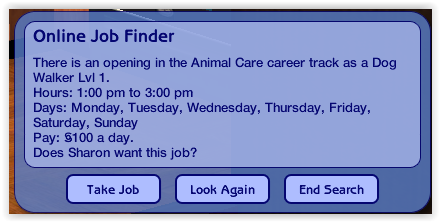
Animal Care (https://sims.fandom.com/wiki/Animal_care)
SimFileShare or MediaFire
Level 1: Dog Walker Level 2: Obedience Trainer Level 3: Sheep Custodian Level 4: Aquarium Technician Level 5: Zoo Keeper Level 6: Dolphin TRainer Level 7: Animal Acting Coach Level 8: Alligator Relocator Level 9: Veterinarian Level 10: Pet Stylist
Circus (https://sims.fandom.com/wiki/Circus)
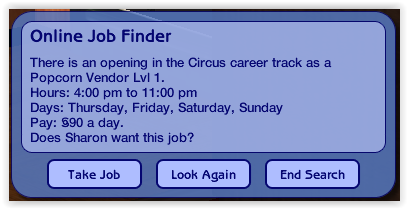
SimFileShare or MediaFire Level 1: Popcorn Vendor Level 2: Ticket Taker Level 3: Midway Carnier Level 4: Sideshow Barker Level 5: Clown Level 6: Human Cannonball Level 7: Acrobat Level 8: Trapeze Artist Level 9: Lion Tamer Level 10: Ringmaster
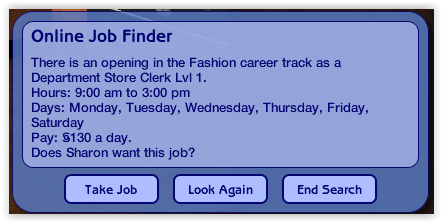
Fashion (https://sims.fandom.com/wiki/Fashion)
SimFileShare or MediaFire Level 1: Department Store Clerk Level 2: Tailor Level 3: Makeup Artist Level 4: Painter's Model Level 5: Fashion Photographer Level 6: Tradeshow Model Level 7: Runway Model Level 8: Supermodel Level 9: Fashion Columnist Level 10: Fashion Designer
Hacker (https://sims.fandom.com/wiki/Hacker)
SimFileShare or MediaFire Level 1: Beta Tester Level 2: Support Tech Level 3: Web Master Level 4: Hacker Level 5: Security Consultant Level 6: Software Designer Level 7: Internet Entrepreneur Level 8: Software CEO Level 9: Venture Capitalist Level 10: Information Overlord

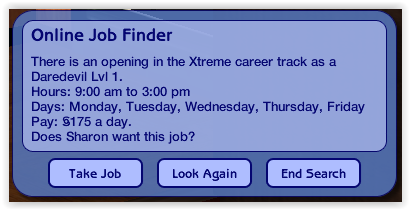
Xtreme (https://sims.fandom.com/wiki/Xtreme)
SimFileShare or MediaFire Level 1: Daredevil Level 2: Bungee Jumper Instructor Level 3: Whitewater Rafting Guide Level 4: Extreme Circuit Recruit Level 5: Bush Pilot Level 6: Mountain Climber Level 7: Photo Journalist Level 8: Treasure Hunter Level 9: Grand Prix Driver Level 10: World Surfing Champion
There are four files per career (eg. AdultCareer_AnimalCare, AdultCareer_AnimalCare_Conditions, AdultCareer_AnimalCare_LTW and TeenElderCareer_AnimalCare).
All four files are required and can just be put straight into your downloads folder.
You will notice some of the above career levels do not match the original careers. Some of the levels are already represented in other careers in the game, so I decided to swap some around and include some new jobs.
These files have new GUID numbers, so they should not conflict with other downloads, even the original versions of these careers.
The Lifetime Wants are also compatible with @lamare-sims 50 New Lifetime Wants for Sims 2: https://modthesims.info/download.php?t=669675
I'd like to thank the following members of our community for their assistance in these updates:
@sims2idea-lientebollemeis2i for creating the converted careers to begin with and providing their permission to share my amendments. Their original careers can be found here: https://s2idownloads.blogspot.com/search/label/SFS%20-%201t2%20Maxis%27%20Careers
@lamare-sims for creating the 50 New Lifetime Wants for Sims 2 mod and providing me assistance in making the Lifetime Wants compatible with their mod.
@sharlasims for her assistance and support with creating the chance cards.
@teaaddictyt For her Photoshop skills and support with converting the career icons.
@episims for their assistance troubleshooting the career outfits.
@rio-sims & @palominocorn for creating a tutorial on how to create Lifetime Wants.
I hope you enjoy my version of these careers and please do not hesitate to contact me if you run into any trouble. 06/07/2023 - EDIT: Thank you to @lamare-sims who found some errors in the files. I have fixed the LTW and Conditions files to reflect some correct instance numbers and I have reuploaded the zip files to include up the amended files. Please replace these two files for each career if you have already downloaded it. 05/08/2023 - UPDATE: @bothersomecryptid has touched up the icons and been kind enough to share them! They made them with to work better with the Clean UI. You just need to replace the images in the career file through SimPE. You can download at this link: https://drive.google.com/file/d/1q5j3AniepLh_lE_kgWgOYOkZkq9EzHNJ/view 03/09/2023 - EDIT: Thank you to @equinoxts2 and @lamare-sims for their further edits to the conditions files. I have reuploaded all files as new links, so feel free to replace the ones in your game. Children should no longer roll LTW's and you shouldn't get any errors when choosing these LTW's. 06/09/2023 - @venomander has been kind enough to create alternative icons for the careers. You can download them at these links: MediaFile 1
MediaFile 2
654 notes
·
View notes
Text
Heads up animators:
MOHO animation software (Debut) is a tiny bit of a scam.
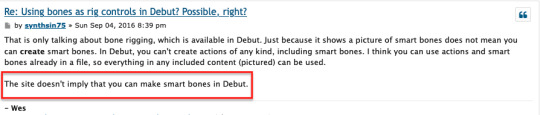
Someone recently gifted this software to me after we went through the features list because they thought it would be something I could work with when getting back into animation. I went through the list, looked at their videos, etc. and decided, yeah, I could work with this. We also decided I probably didn't need the $399.99 version as it had a bunch of features I would probably not need when I'm just getting back into animation again for the first time in years... and the fact that it's fourhundredfuckingdollars. The major deciding point of getting this, for me, was the third option on the screenshot below:
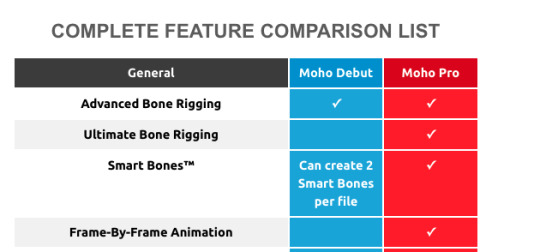
The screenshot shows features for Moho Debut and Moho Pro. The specific feature is Smart Bones, where it says "Can create 2 smart bones per file" and there is simply a check mark in the Moho Pro side. To my understanding, this was a limited version of the same feature. Much like their trial version also had limited features of the paid for versions. In fact, I tried specifically just the Moho Debut trial version to specifically to see what I'd be using and nothing outside of that scope in the pro version. When you try it, it opens up a file with something already made, animated, etc. Including Smart Bones. A shit ton of smart bones.
But, if you're a newbie and don't know what is needed to make/use Smart Bones, you might not notice that further down on the list there is a missing check mark under "Actions"
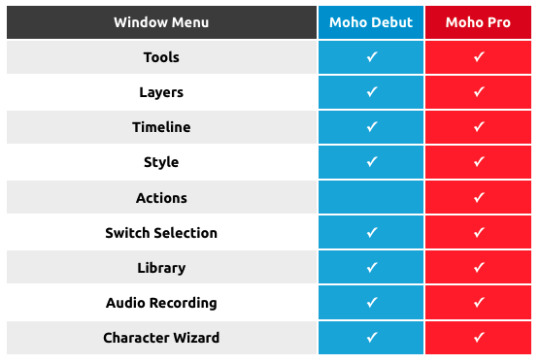
Which you need to make and use Smart Bones to animate a HUGE amount of the stuff they show you in all their tutorials and videos. Something someone new to the software could not possibly know unless they went hours into tutorials and days into program use.
I'm also not the only one to assume that you can make Smart Bones in the Debut, considering they list it right there on their website.
But, no.
And maybe the website didn't imply that you can make smart bones in Debut back in 2016, but it sure as hell does now.
But what's this?
Oh, of course. We can't rely on your own fucking website to be factual, up to date, and true. Especially not when spending $60-$400 on software. Why would you ever assume they'd be accurate about their own programs?
So, I guess the lesson is:
Spend 60 days reading every single tutorial, every single forum post, and never trust anyone who says they don't have to be honest when selling you something right there in the fine print.
#moho animation#moho debut#moho pro#PSA#I guess#animators#animation#read the fine print#for fucks sake#anyway#no one tell the person who gifted this to me#because it would piss them off so much#; u ;
27 notes
·
View notes
Text

Avisynth Basics - Resizing and Sharpening for Gifs
Prerequisites
Avisynth (Wikipedia)
How to Use Avisynth For Gif Making by MichieTuts
Installing Avisynth by brandinator
Tumblr Dashboard Image Display Sizes by Unwrapping Tumblr
This post details my process for using Avisynth to resize a video file. The video file can then be edited and converted to a gif.
I learned how to use Avisynth through the posts linked above. I highly recommend reading through them; they're very detailed and easy to follow. By comparison, this is a basic guide as it only offers one method for using Avisynth.
In this post, I cover the following:
Why use Avisynth?
Using Avisynth to resize a video clip
This post assumes that you've already installed Avisynth.

💡 Why use Avisynth?
Avisynth is a frameserver that takes a video file as input and resizes it for editing. The width of a Tumblr post is 540 pixels (px); with Avisynth, we can resize video files so that they fit that criteria. (For context, a 1080p (HD) YouTube video is 1920 x 1080 px.)
While Photoshop is able to resize images (Image > Image Size), it's not as accurate as Avisynth is.
Here are two gifs that have been resized through different software:


The difference is subtle, but the left gif (Avisynth) appears more detailed to me!
However, please note that I didn't run any Photoshop sharpening on the right gif. When learning how to resize and sharpen gifs in Photoshop, I followed rubyredwisp's Gif Sharpening Tutorial.
🎥 Using Avisynth to resize a video clip
The following steps detail how I use Avisynth to resize videos. The final product, an .avi file, can be imported into your editor (eg. Photoshop) and edited there.
① Choose a video file that you'd like to gif.
For the purpose of this tutorial, I work with a screenrecording that I took of Dragon Age 2.

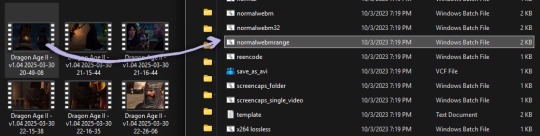
② Navigate to your Avisynth folder and locate the normalwebmrange script.
This may differ depending on how you installed Avisynth, but my Avisynth folder is located at \This PC\Windows (:C)\video.
normalwebmrange is a Windows batch file (.bat). I use this particular script because it allows you to clip out a few seconds of the video by specifying the start and end timestamps. These timestamps specify the video clip that will become your gif(s).
I recommend working with video clips that are 4-8 seconds long.
ⓘ This means that you may need to load your video file back into normalwebmrange to make a gif in a new timestamp range. While inconvenient, I recommend working with smaller video clips so that you're asking Avisynth to process multiple small videos rather than one large video. A larger video is more likely to crash the software.
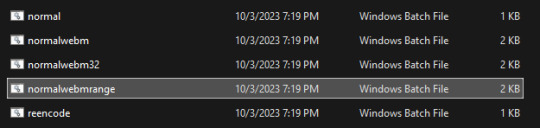
③ Load the video file into normalwebmrange.
To do so, select and drag your video file into normalwebmrange.
④ Enter the timestamps of the portion of the video you want to clip out.
A pop-up window will appear that asks you for the "starting time in hh:mm:ss format."
For this example, I want my gif to start at about 3 minutes and 13 seconds into my video file. My start timestamp is therefore 00:03:13.
Enter this information, then hit the Enter key.
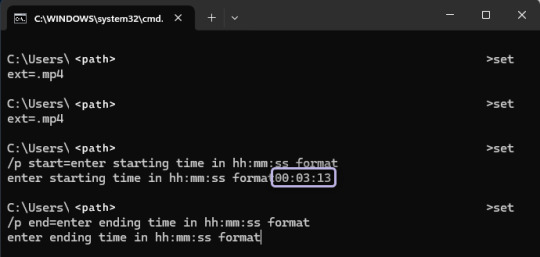
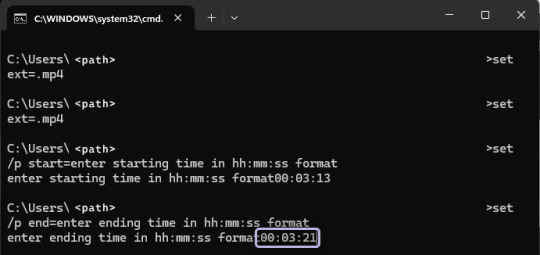
Next, enter the "ending time in hh:mm:ss format." (For this example, my end timestamp is 00:03:21.) Hit the Enter key.
normalwebmrange will then generate a bunch of log lines. After, it will automatically open two things:
A tab in your computer's default web browser.
An Avisynth window.
⑤ Specify the resizing details for your gif.
Navigate to the browser tab that normalwebmrange opened. There are several fields for you to fill out here.

GIF Size - This is the width and height of your gif. For more details on Tumblr post sizes, see Tumblr Dashboard Image Display Sizes. After filling this out, you may have to adjust your video clip in the preview box (below the white textbox).
Opacity - Leave this value at 100.
Preprocessor - I always use qtgmc 30 slow for the framerate and debilinear sharpening. "30" refers to how many frames per second (fps) you want your gif to display; I find that the alternative, 60 fps, is overkill for Tumblr gifs. "Slow" means that Avisynth will take longer to process your video, but this results in better quality.
Extra Sharpening - I don't use this field, but feel free to experiment!
After filling out all of the fields, copy all of the text in the white textbox.
⑥ Enter the resizing information in Avisynth.
Navigate to the Avisynth window that normalwebmrange opened.
Paste the text you just copied on line 17:
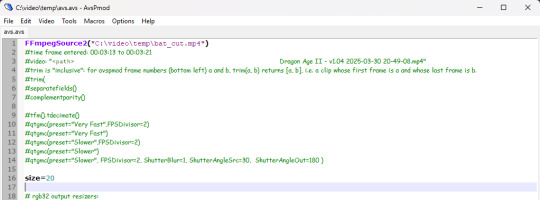
Your Avisynth window should now look something like this:

Select File > Save Script.
Close the Avisynth window.
This automatically launches another Avisynth window called VirtualDub. Here, you can watch Avisynth resize and sharpen your video clip in real time!
Once the VirtualDub window automatically closes, you'll know that your video clip has been fully processed and is now ready for editing.
? Where did my video clip save to? If you go back to your Avisynth folder (\This PC\Windows (:C)\video), open the \temp folder. The .avi file named "video" is your resized and sharpened video clip!
17 notes
·
View notes
Text


hiiii lovelies! i always use photoshop so i'm not sure about a similar software that can give the same results... and i'm sure i saw a tutorial somewhere but i don't remember which one, so i'll just try my best to show you how i do it!
after i've edited my screenshot i just choose whichever one i want, i select the necessary elements for that specific template and copy + paste it to my screenshot.
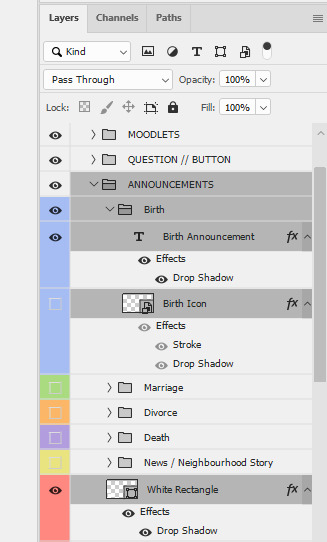
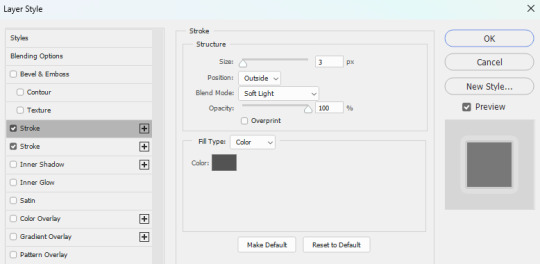
2. after i've edited the text i amend the blending options of the 'white rectangle' i've added screenshots of the specifics below, but this can change per screenshot


3. sometimes i also like to add an icon, i usually use these ones from @deathbypufferfish and i apply the same blending options to the icon.

that's it!

hi, i've just updated my resources page to include the skinoverlays i use for all life stages.

hi! it's from darte77's july 2023 cc pack.

hiii, you're SO kind! thank you!! i honestly let the game run it's course! i always randomize my sims' traits and kimi turned out to be mean, so then i just build up on that. and gameplay mods SAVE this game and that's what keeps my gameplay interesting. i just checked and i started posting on tumblr in march 2018 (omg that's 7 years ago 😭) and this was one of my first posts 💀. the main reason i started posting my gameplay pics is because of @ridgeport, ridgeport was THAT simblr back then 🤩
15 notes
·
View notes
Note
How do you glitter-ify an image? (Like what you did with the Centaurworld autism creature)
@hat-stack
YAY!!! I’VE BEEN WAITING TO TALK ABOUT THOSE GIF FOR AGES! Thank you so much for the ask!


(here are some examples of some glitter stuff I did)
First of all, I really think that knowledge is the best thing ever, so I am going to tech how to make those gifs in this post. BUT! If you don’t have the time or just don’t want to, my requests are open for glittering images. Without no further ado, let’s start!
TUTORIAL
In this post we will go through the steps of making this gif:

First thing you’ll need is the starting image. The best starting images are one with LOW TO NO COMPRESSION and flat colors (I know I used pixel art for this exemple, but glittering pixel art is hell, I only did it because the image was extremely clean).

Once you have your starting point, you need to find glitter images. Just go on google and search “X-color glitter”. Then chose the shade of glitter that best matche your reference and save them, the shade doesn’t need to be perfect, we can edit it slightly once in the editing program. Some glitter finding tips for better end result:
1) Avoid images with gradients
2) Avoid images where the glitter is in perspective or have any variation in size

Now that we have all the images that we need, we can go on to IbisPaint (or any other app or software that has clipping layers). Then, with the wand tool or the select by color tool, cut the parts that will turn into glitter in separate layers
Import your glitter images and fill the entire canvas with them, them clip them to the part

repeat for all colors
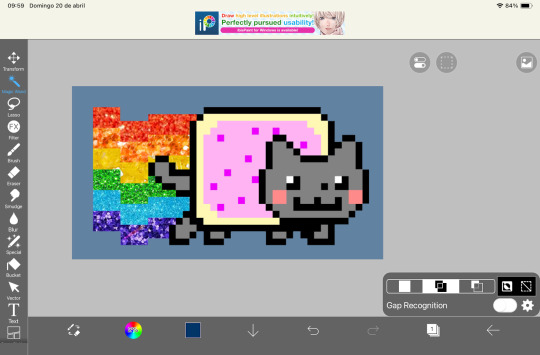
If you wnat stars:
Import the stars that you want. The amount you want in your gif can be different from mine, but have in mind that the image you import needs to have 4 times the number of stars than the amount of them you want per frame
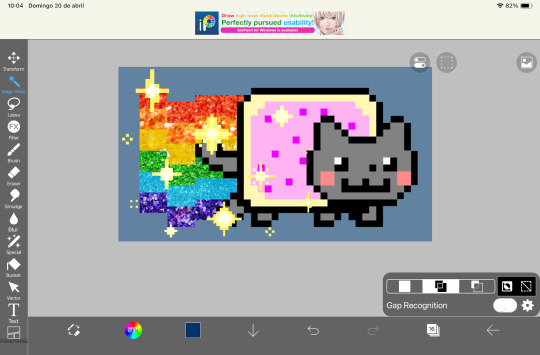
LETS START EXPORTING OUR FRAMES!!
FIRST FRAME
For the stars: Duplicate the layer. Hide one of them and in the other delete 3/4 of all of the stars
For the glitter: Nothing for now
Export
SECOND FRAME
For the stars: Invert the color of the stars from the previous frame to use them as a guide to not repeat any of the stars.
Then duplicate the origional layer, and delete 3/4 of all of the stars again, but make sure to delete the ones you marked in your guide
For the glitter: Flip all glitter layers horizontally
Export
THIRD FRAME
For the stars: Invert the color of the stars from the second frame and merge them in your guide layer. Repeat the last step
For the glitter: Flip all glitter layers vertically
Export
THIRD FRAME
For the stars: Delete all the stars that arent in the guide from the origional
For the glitter: Flip all glitter layers horizontally
Export
Here is the result I got

The FINAL STEP is assembling the gif in this site, import the images, and here are the settings I use:
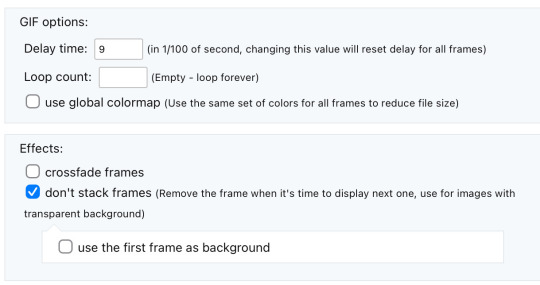
Make gif and TA-DA!!!!! ITS DONE!!!!
Hope this helped anyone out there! Happy glitter!
#glitter#blinkies#web stamps#blingees#my post#my art#sparkle#tutorial#art tutorial#gif#gifs#danganronpa
12 notes
·
View notes
Text
PricePerPlayer.com Pay Per Head Software Tutorial – Player Payments and Transactions
[et_pb_section fb_built=”1″ admin_label=”Intro Section” _builder_version=”4.24.0″ custom_margin=”1px||1px||false|false” custom_padding=”1px||1px||false|false” global_colors_info=”{}” theme_builder_area=”post_content”][et_pb_row _builder_version=”4.24.0″ background_size=”initial” background_position=”top_left” background_repeat=”repeat” global_colors_info=”{}”…

View On WordPress
#Accrual#Adjustment#Disbursement#Free Plays#PricePerPlayer.com Pay Per Head Software Tutorial#Receipt
0 notes
Text
Pop: Iniziare la Produzione con i Giusti Consigli
Vuoi fare musica pop? Questo genere può sembrare difficile all’inizio, ma con gli strumenti giusti, puoi cominciare. Ti daremo consigli utili per produrre musica pop di successo. Ti mostreremo come scegliere l’attrezzatura e imparare a comporre e registrare. Punti Chiave Scopri gli elementi essenziali per iniziare la produzione di musica pop Impara a scegliere l’hardware e il software adatti…
#Consigli per iniziare la produzione#Consulenza produzione musicale#Equipaggiamento per la produzione musicale#Produzione musicale pop#Registrazione e mixaggio pop#Software di produzione musicale#Tecniche di produzione pop#Tutorial produzione musicale
0 notes
Note
Hi dee! i know you said you hate talking about your major, but im going to college this year and I'm scared to go to architecture school 🥲 I want it really bad, but the way people talk about it makes it very unappealing 🥲
hi anon!!!!!!!!! ok ok so this probs going to be a long post, and I advise u to read every single sentencejzhsksb (under the cut)
ok so first of all, where i live, architecture school is 5 years + 2 years of internship = min of 7 years, then licensure exam. that is a VERY, VERY and i repeat VERY long time. and thats only undergrad.
architecture is a creative program, meaning u dont necessarily "study" to get by. there are a lot of theoretical courses ofc, and technically, u still need to study (and read a TON of books to know about design principles and standards and laws) but application takes up 90% of it. in archi school, u need not only to be creative, but u have to be strategic, technical, and be purposeful in everything u do bcs its a fusion of science+arts after all (im not kidding. instructors would cook u to hell when ur design is "perfectly technical" but NOT creative, but they will also stone you if it's "too pretty" but u cant provide a clear cut answer to a certain something's mechanism).
now heres the biggest con to me: in order to survive it you will genuinely have to give up a lot of time. deadlines are given to u upon deadlines. ur only lucky enough if ur prof is one of those angels from heavens above whos considerate enough, but theyre very rare (per my experience). drawing = solving problems, and in this program you NEVER stop solving problems. its very draining tbh, bcs every week is a 7-day stay in the deepest pits of hell of ✨conceptualization✨ . i know no one, and i mean no one in my program who has a regular sleeping schedule, and even the most excellent time manager will sacrifice sleep in deadline week (which is every week 🤩) you will get to miss out on hangs with friends, family vacays and the likes bcs submissions just wouldnt stop. also, college is the reason why i started drinking coffee and energy drink. its unhealthy asf but i gen cant function without it now when i have my exams season. i also discovered i can go on full 48 hrs without a wink of sleep which is. AGAIN. unhealthy as fawk. , you will really have to toughen up your heart bcs the profs will always be honest and wouldnt hesitate to tell u to revise your work, no matter how much u think it's ok enough. they will keep telling u to revise until theyre satisfied lol.
another con is that its expensive as HELL. im very lucky im getting by on scholarships and i get allowances from them BUT i literally cannot imagine spending my familys money on all the things ive lent to this program 😭 when ur in first year u will still have to go manual so if u do not have the art supplies necessary, you'll have to buy them and again. THEY ARE EXPENSIVE AS HELL. and it doesnt end there bcs scale modeling goes on forever and its no joke. the materials are hard to fine (at least here) and their prices are ridiculous. then during higher years, you'll have to invest in a high-spec laptop (like gaming laptops) that will not give up on u under heavy use nvs ull be using a lot of software (that ur prods dont even teach you to work with 🤩 theyll jsut drop an instruction saying do this project in archicad and boom ur deep on 456 youtube tutorials which makes u question their existence in the first place but ANYWAY.
on the brightside tho.... its very very fulfilling, this major. architecture plays such an important role in our daily lives and it would feel really rad if we can be a part of that #beautiful thing. seeing the end of every project also pays back by teaching u handful of things. i also enjoy it when we get the chance to explore different building types like for instance my fave project i ever did was when we designed a physical rehabilitation center. ive never been in one before that but we got to explore it thanks to the project. also, you get to know people bcs u have and u WILL want to cater to their needs and wants – and as a girlie who wished she majored in psych thats the thing i love the most about architecture!!! it all boils down to people, how they move within and around space, and how u can help shape a beautiful & nice experience for them. its just a very very very interesting field
thing is, u need to be really dedicated if u want to go to archi school and survive. u have to be passionate abt it to push thru. if ur not really that sure abt it, i advice going against it lol. its just not worth it if its not smth u actually and really want (take that from me plsssjbsjxhsjwh). but if u really want to, then go! but just be really careful with that decision anon :')
anywhoo, good luck on college!!!!!!! may u go with what's in your heart 💗💗💗
7 notes
·
View notes
Note
Hello! I am in awe of what you do and I now sometimes wonder if I chose the wrong interest to pursue as a career, ahah.
Until I've learned that Victorian sometimes did the abominable thing called crosswriting and I decided that, in the end, I chose right because deciphering this? Couldn't be me!
So, anyway, there is an ask in all this: have you ever made a post or spoken about how you go about reading and deciphiring all these letters? Any tricks to it? Is it just staring until the words start to make sense, do you use a software?
I need to know, this is driving me crazy and I am now convinced you have some alien brain because... that calligraphy would NOT get past my third grade teacher 😩. Are you human?
Love your work!
Hello! Owww thank you so much for the compliments. ❤️ I haven't done a post about palaeography, but I now want to submit a proposal to do a workshop about it at Terror Camp, in combination with talking about my Fitzjames research. Let's see if that will get accepted! Afterwards I will publish a tutorial online.
What I can say is that when I started out 3 years ago I had never read/transcribed handwritten sources before, and when seeing Fitzjames' handwriting I thought "how am I supposed to be able to read that?! 😭" I was never taught how to do this when I studied Art History, nor during my current Naval History MA.
The thing is that it takes time to get acquainted with somebody's handwriting, and after a while you'll be able to read things that you couldn't before. You start by transcribing the words you can read, and try and recognise the letters in the words you cannot. Sometimes I'll all of a sudden be able to read a word after having stared at it for years! Victory!
I never use software, because A. That feels like cheating to me. B. I tried to put a letter by William Coningham through Transkribus and all I got was gibberish so I'd better do it myself. (Even AI is like Will Con what the hell, man?) C. It feels so rewarding when you've mastered the skill of transcribing horrible handwriting. You did that, not AI! You're not dependant on AI! 👏
Cross-writing was done in the Regency era and in the early Victorian era because the recipient of your letter had to pay per sheet, so you wanted to get as much in there as possible. Nobody liked it then, but what can you do. Reading cross-written letters is easiest when you have a high quality picture of the original, or even better: the original. Like horrible handwriting, the cross-writing becomes a bit easier to read after a while. I guess the moral of all this is: invest time and you shall be rewarded. Don't be discouraged when you can't do it at first.
23 notes
·
View notes