#text animation html css
Explore tagged Tumblr posts
Visit Tumblr Blog
Explore Tumblr blogs with no restrictions, modern design and the best experience.
Last Seen Tumblr Blogs


Fun Fact
In 2020, Tumblr had 29.4 million users in the US.
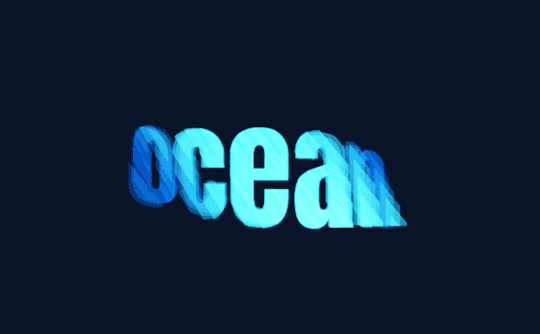
Text

Text Rotation Around a Circle
#Text Rotation Around a Circle#text animation#css text animation#css animation#css animation tutorial#html css#html#css#css3#css animation examples#text animation html css#divinector
2 notes
·
View notes
Text

Text Hover Animation CSS
#text animation css#css text animation#css animation examples#html css#learn to code#code#frontend#html#css3#css#css text effects#text animation html css#pure css animation#css animation tutorial
2 notes
·
View notes
Text

Futuristic Text Animation
#text animation css#text animation html css#css text effects#codenewbies#html css#html5 css3#css#css animation examples#pure css animation#css animation tutorial#code#css animation snippets
1 note
·
View note
Text
💥 100+ CSS Text Animations 💻✨
Looking to make your web content more dynamic and engaging? Our September 2024 update features 22 new CSS text animation examples!
Ready to add some flair to your site? 🔥 Check it out!
→ https://freefrontend.com/css-text-animations/
9 notes
·
View notes
Text

Useful websites / links for rentry , bundlrs , gfx & etc for you!
symbol sanatorium - Links to a google document with a ton of symbols , kaomojis & text layouts. I use it for pretty much all of my recent rentrys.
sozaino.site - Website that's been making its rounds on rentry as of late, useful for graphic making. Has dividers, pngs, frames ~ etc if you have the creative touch.
sozai-good - site I found recently that has a lot of pngs you can download, also has frames and borders. In japanese but isn't hard to translate. Everything is also sorted into sections.
lottie lab - Website useful for animating, can be used to move around PNGs for rentry and the like. I don't use it much myself atm, but it's pretty easy to get the hang of.
scripted.neocities - Neocities full of code you can use for bundlrs or carrd. Also useful for stuff like spacehey and other sites that use CSS / HTML
blinkies.cafe - Easily make or find blinkies here! Great for beginners who want to make some simple things.
emojicombos - Search practically anything and you'll find an emoji combo for it. Useful for finding symbol / text combos and kaomojis.
unicode character table - Has pretty much every single symbol you've seen or needed. You can find what you want pretty easily due to its sectioning. Has stuff like arrows , dingbats , brackets , etc etc..
yaytext - Make your text 𝙼𝚘𝚗𝚘𝚜𝚙𝚊𝚌𝚎! or U͟n͟d͟e͟r͟l͟i͟n͟e͟d͟!͟ easily with this website! May possibly break screenreaders in the process though so be warned.
lorem ipsum generator - Too lazy to generate a block of text to make a page look filled out, well look no longer! This site can quickly generate of block of pure gibberish to make it seem like there's actually text there! Good for newspaper / magazine gfx ~
And that's all ( for now )! I use most of all these sites and find them very useful! Hopefully one of them will prove useful to you too dear friend (❁´◡`❁)

#puerileds#text decor#text layouts#websites#sites#pngs#dividers#frames#rentry#bundlrs#carrd#gfx#gfx decor#rentry decor#bundlrs decor#carrd decor#carrd resources#rentry resources#png#divider#gif#rentry stuff#aesthetic#idea#aesthetic bio#bio#discord layout#discord decor#twitter bio#symbols
1K notes
·
View notes
Text
Pure CSS Text Wave
Here’s another nice text effect, a pure CSS text wave effect that you can customize and use in your next web project. Continue reading Untitled
View On WordPress
#Animation#Code#CSS#CSS3#HTML#HTML5#Resource#Snippets#Text Effect#Typography#Web Design#Web Development
1 note
·
View note
Text
My 2023 Projects

Wednesday 3rd January 2024
I thought it would be cool to share some of the projects I made last year that I liked and enjoyed working on! Most of them were small projects, some were projects I built straight after I learnt a new concept and a few are discontinued (I won't finish them anytime soon)!
I really hope, which I know I will because it's natural for me at this point, to make lots of more cool projects! This year, I want to make more with other people! Coding alone is cool and all but with other people I get more inspired!
Lastly = always remember to build projects that you're interested in. Projects you will have fun working on for a while. Every single one of these projects I've made, I was interested in somehow. And I had fun!!
Anyhoo, check out the projects below~! 🙋🏾♀️😊🖤

TumblrTextTint
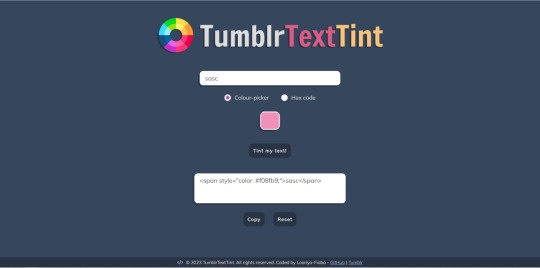
Basically a formatter for Tumblr posts by adding custom colours to your text! Even learnt how to make FireFox extensions so I could add it as an extension to my browser - link 1, link 2
Web Odyssey
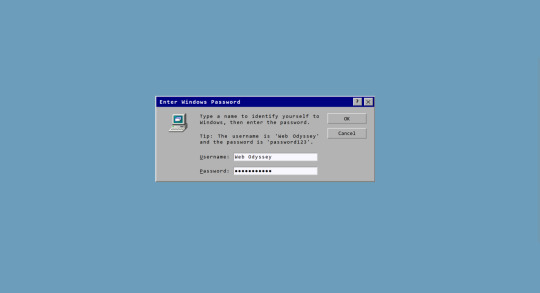
I looked at old Windows GUI on Pinterest one day and decided to recreate the GUI with HTML, CSS and JavaScript! - link 1, link 2
Cat Fact Generator
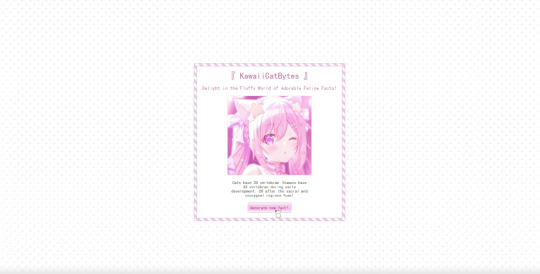
For one of the projects I did for the #3Days1Project challenge, I created a cute cat generator. Learnt how to work with APIs and a CSS library (Pattern.css) - link 1, link 2
Studyblr Valentines Gift 2023
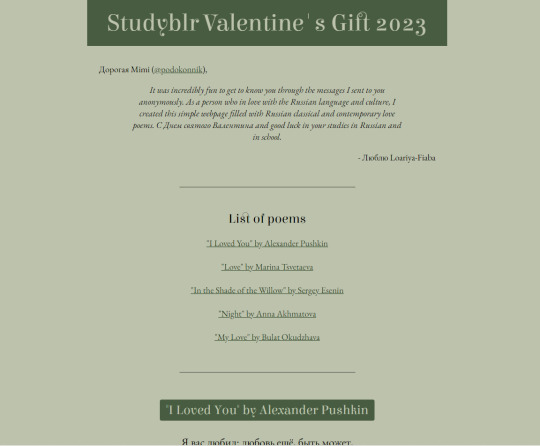
It was valentine season in the Studyblr community and I participated! I made a poem webpage for a studyblr who was learning Russian! (I don't know anything in Russian but for a couple of weeks I learnt some of the poems!) - link 1, link 2
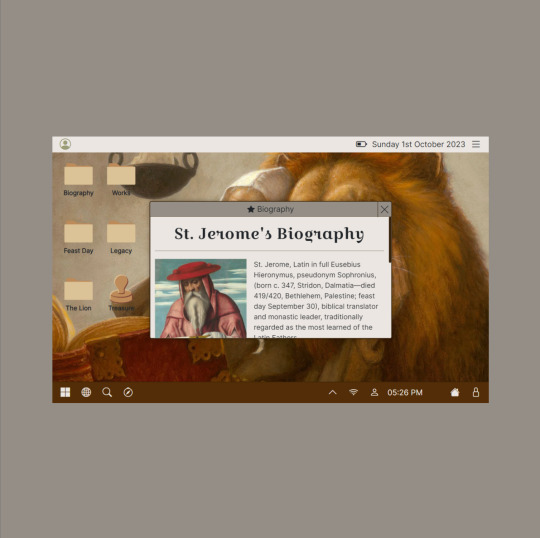
Saint Jerome Tribute Page
I made a page for my favourite patron saint, Saint Jerome, for his feast day (Sept 30)! I haven't had time to complete it fully and there's no live page for it but I did make posts about it! - link 1
Trigun Quote Generator
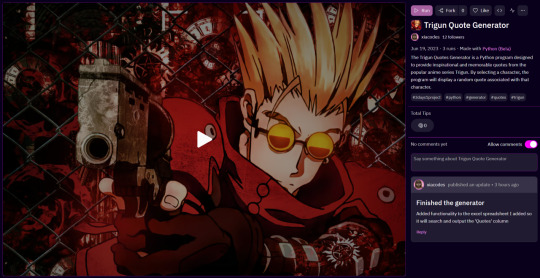
Just finished the Trigun anime series at the time so I decided to make a project for it for the #3Days1Project challenge! The anime is so good, it is my 2nd favourite (JOJO comes 1st place) - link 1, link 2
Froggie To-Do
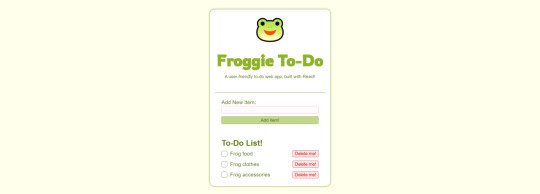
Just came from learning the absolute BASICS of React.js, so I wanted to test my skills so far so I made this project! Shared it on my blog and some people started using it for studying (which made me so happy!) and it became a mini open-source project because random people started adding mini features to the app! Very special project for me! - link 1, link 2, link 3
#codeblr#coding#progblr#programming#studyblr#studying#computer science#tech#comp sci#my projects showcase#2023 wrapped#coding projects#projects#studyblr community#computer academia
76 notes
·
View notes
Text

Day 1 - 100 Days CSS Challenge
Welcome to day 1 of the 100 Days CSS Challenge! In this challenge, we'll bring a design to life using only CSS. Our goal is to recreate the image we're provided with on the challenge page using HTML and CSS.
On the challenge page, we see:

A small preview of the design we need to replicate.
A starter HTML template.
A submission form to showcase our work alongside others who have taken on the same challenge.
Let's dive into the process step by step.
Step 1: Screenshot the Image
The first thing I always do is take a screenshot of the target design. Even if the design includes animation, having a static reference helps me focus on the basic structure and colors. Here’s the screenshot of the design we’re aiming for:
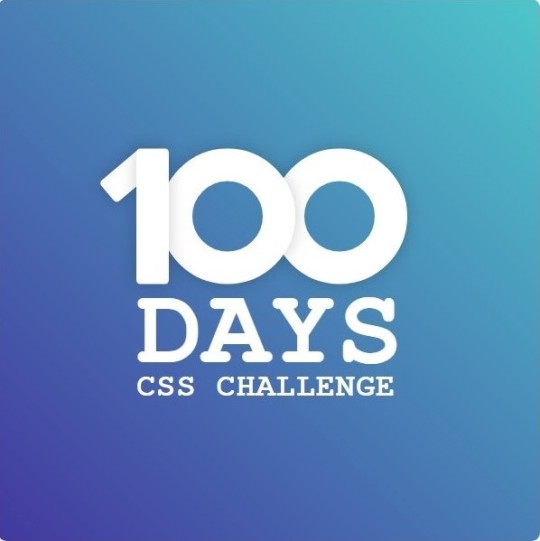
Step 2: Extract the Color Palette
Next, I identify the color palette that we'll need. This helps ensure that we maintain consistency with the original design. Here’s the color palette I’ve created:

Step 3: Identify and Create the Image Elements in HTML
Now that we know the colors, I break down the elements in the image:
Background: This is a linear gradient.
The 100 number: This is the main challenge, and it will require some work.
Text: “days css challenge,” which we’ll place to the left of the number.
Here’s the HTML structure for these elements:
<div class="frame"> <div class="center"> <div class="number"> <div class="one-one"></div> <div class="one-two"></div> <div class="zero-one"></div> <div class="zero-two"></div> </div> <p class="sentence1">days</p> <p class="sentence2">css challenge</p> </div> </div>
Now that the elements are in place, CSS will bring them to life.
Step 4: Bringing the Elements to Life with CSS
Linear Gradient
To create the background, we’ll use a linear gradient. Here’s a basic syntax:
background: linear-gradient(to <direction>, <color-stop1>, <color-stop2>, ...);
Parameter 1: Direction/Angle
This defines the starting point of the gradient. You can either specify a direction (e.g., to top, to bottom) or an angle (e.g., 90deg, 180deg).
Direction options:
to top
to bottom
to left
to right
If you want more precision, you can specify angles:
0deg: Gradient starts from the top.
90deg: From the right.
180deg: From the bottom.
270deg: From the left.
You can also combine two directions, specifying both horizontal and vertical movements, like to left top or to right bottom. This means:
The first keyword (left or right) controls the horizontal movement.
The second keyword (top or bottom) controls the vertical movement.
For example:
background: linear-gradient(to left top, red, blue);
This gradient starts at the bottom-right corner and transitions toward the top-left.
Parameter 2: Color Stops
Color stops define how the gradient transitions between colors. Each color stop specifies a point where a color starts or ends. Here's an example:
background: linear-gradient(to right, red 10%, blue 90%);
This means:
The element starts at 0% fully red.
By 10%, the transition from red begins.
Between 10% and 90%, there is a smooth blend from red to blue.
At 90%, the transition to blue is complete, and the remaining part is fully blue.

Once we understand the concept, we can apply the background we need. In our case, the gradient flows from the bottom left to the top right, so the code will look like this:
background: linear-gradient(to right top, #443DA1, #4EC3C9);
Bonus: Stacking Multiple Linear Gradients
You can also apply multiple gradients on top of each other:
background: linear-gradient(180deg, #f00, #0f0), linear-gradient(90deg, #ff0, #f0f);
Step 5: Making the "100" Number
Creating the Zeros
We start with the zeros. These are simply circles created using CSS. To make a full circle, we use border-radius set to 50%.
The white border gives it the appearance of the number zero.
.zero-one, .zero-two { position: absolute; height: 100px; width: 100px; border-radius: 50%; border: 24px solid #fff; box-shadow: 0 0 13px 0 rgba(0,0,0,0.2); }
This gives us a nice circular zero. We adjust their positions using properties like left and top, and manage the z-index to make sure the zeros stack correctly.
.zero-one { z-index: 8; left: 17px; } .zero-two { z-index: 6; left: 100px; }

Now both zeros are positioned, and they overlap in the way we want.
Creating the "1" Number
The number "1" is made of two div elements:
One-One: This part represents the slanted part of the "1".
One-Two: This is the straight vertical part of the "1".
What make the one-one element slightly slanted is
transform: rotate(50deg);)
the one-two is created simply with a little height and width nothing too particular then it is placed directly on top of the slanted part, giving us the full "1". Its z-index tho has to have a higher value than the slanted part of our 1 to ensure it stays above the slanted one.
Step 6: Adding the Text
For the two sentences “days” and “css challenge,” the styling is basic CSS. You can achieve the look with just a few font changes, some padding, and adjustments to font size. It’s as simple as:
.sentence1,.sentence2{ text-transform: uppercase; margin:0; padding:0; } .sentence1{ font-size:82px; font-weight:700; } .sentence2{ font-size:25px; font-weight:700; margin-top:-20px; }
And just like that, we’ve completed day 1 of the 100 Days CSS Challenge! Each part of the design is carefully crafted using CSS, giving us the final result.
Happy coding, and see you tomorrow for Day 2!
#100dayscssChallenge#codeblr#code#css#html#javascript#java development company#python#studyblr#progblr#programming#comp sci#web design#web developers#web development#website design#webdev#website#tech#html css#learn to code
15 notes
·
View notes
Text
we really could've had it all once industry started to officially license and release anime and manga in the west. we could've made the sequel to .ass files, or made professional standard quality software to improve the editing experience for their frankly janky-ass markup and formatting. we could've had tools to make burning styled subs to videos easier, or better yet we could've made rendering and styling subtitles more of a thing in html/css/js for browsers to maintain the flexibility of softsubbing.
but mostly, i'm thinking abt how cool it would've been for the norm in overseas anime releases to have the licensing company commission graphic designers to make custom fonts to match the subtitle styles to the texts and vibes in the anime itself.
#this post was brought to you by the fact that i was extracting fonts from mkv files and went#'ah yes. ghandi sans. again.' bc that is like THE default subtitle font for anime these days lmao#and tbh i kind of get it it's a neat font well-made and it can be good to standardize these sorts of things#some part of me just wishes that different groups had their own signature default styles#like i just find that tiny bit of individuality charming#also i'm pretty sure some groups just attach a bunch of system fonts that they DON'T EVEN USE IN THEIR RELEASES to every file by default#and i'm just like. 'BUT WHY???????????' LIKE YOU'RE JUST BLOATING YOUR FILE SIZE AT THIS POINT...#花話
5 notes
·
View notes
Text

Gradient Text Animation
#gradient text animation#gradient text css#css text animation#text animation css#text animation html css#css text effect#html css#learn css#animation
1 note
·
View note
Text

Text Rotate Animation
#text rotate animation#html css animation#css animation examples#css animation tutorial#html css#frontend#css#html#css3#frontenddevelopment#webdesign#text animation css#text animation html css#learn to code#css html
1 note
·
View note
Text

Changing Text Animation
#changing text animation#css text animation#html css#codenewbies#css animation examples#frontenddevelopment#code#css#pure css animation#html5 css3#css animation tutorial#css text effects#text animation html css
0 notes
Note
also are these from a mugen character set? (i do not go here but i am interested)
Um i actually don't know anything about mugen or fighting games so i'm not sure how to answer this so i may as well take advantage of this to just describe everything i'm doing.
Everything has been from HyperDBZ Indigo (although there's more excellent dbz mugen in the mugenarchive i'm sure). you can actually find the game on archive.org and dig through the files there if you don't want to install it (free!!!!) from their site or something. here's what the actual ingame character select looks like

and this is what the chars directory looks like under the main HyperDBZIndigo directory. they're all playable characters that i can pull sprites/animations from..!

for pretty much every character theres
/files/, which contains a bunch of meaningless binary/text files only used with the mugen engine itself or a mugen editor like Fighter Factory. in here is the sprite and animation files that is used during actual gameplay. plus like, audio
/!HyperDBZ\ Movelist\ [character name]/, which contains the html/css for the game's manual. can find some pngs of cute sprites here but i think they're redundant if i have the actual gameplay sprites
/Palettes/, which contains more readable-by-mugen-only files for recoloring sprites. sometimes these folders have normal pngs you can look through. the devs probably used regular pngs to like, brainstorm or showcase or something
and /states/ which is game config stuff. contains a bunch of random shit ! and quotes ! here's quotes for 18


#hyperdbz indigo#and then there's also backgrounds which i haven't even started looking at Which i have to do. Right now
5 notes
·
View notes
Note
Hello! I hope I don't bother you again. I have two questions for you (I think there are more). I'm writing a zosan fanfic and I came up with the idea of putting "titles" in what happens in the "chapters" separated by the divider, like the titles of anime episodes (very One Piece with spoilers about what happens in the episode), I would like to know what do you think of this idea? I have images of what these titles would look like if you want them for better visualization. 2- Is there a skin work on ao3 that imitates these "titles", as if they were chapter titles of a book (but without having to have several chapters as I want to make a oneshot)?
hello! yes, I think that sounds like a neat idea. you should go for it!!
I don't watch one piece so I hope I'm visualizing it right. if I got it wrong, feel free to send me a picture.
anyway. are you trying to do something like this?
if this is what you're going for, you can try this code out! I also created a pastebin for this one, so you can just copy paste to your own workskin.

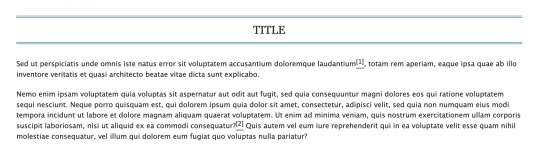
so here, we're creating the lined-title css class. you can just add it to your <p> tags in the html when you want to apply them. e.g.
<p class="lined-title">TITLE</p>
feel free to play around with border-style and the border-color (or any other attribute). you'll want border-style:solid if you just want one single line, for example.
you can also check AO3's FAQ on what colors and fonts you can use. fun fact: border-style:double is the same css they use to add those double lines in the FAQ!
note that this will span the entire width of the page. so if you have a short title, it'll look like this on desktop:
if you don't want it to span the whole page, we could try this instead (also included in the pastebin link):

which will result in this:

however, we can't manipulate the spacing between the text and the lines in this one. on the other hand, it has text-decoration-style:wavy which the first option doesn't have!
for custom scene dividers, you can also check out these guides:
How to Make Customized Page Dividers by La_Temperanza
Dividers & how to style them by skinofthesoul
Rainbow Paragraph Divider by benwvatt
bonus: inspect element
also, are you familiar with inspect element yet? if you are, great! you can just skip this. otherwise, if you're still getting the hang of working with workskins and aren't used to editing css, you can try this:
right click on the text you want to change on AO3, then click "inspect" or "inspect element" (not sure what it's called in browsers these days; on firefox, it's just "inspect"). this will bring up a bunch of developer tools and it kinda looks like this:

it might look different depending on the browser.
but here on the side, you can see the html on top and css at the bottom. as you can see in the screenshot, we are inspecting the title and we can see the different css rules for the title.
if you want to play around with the css, you can just change them from this panel and it will automatically reflect on the page. these changes are not permanent so it's a good way to test different styles without having to go through the cycle of updating the workskin and refreshing the fic page.
if this is your first time trying this out, it might look overwhelming, but it's very helpful if you get the hang of it. but of course, you don't need to learn how to do this to style your fics. :D
8 notes
·
View notes
Note
hii i tried following that one forum post for a splash screen that you mentioned before in an ask, i didnt really understand it TT could you make a version for dummies? thank you!
Hi Anon,
Do you mean this ask? about this Forum post? I'll try to make it easier then, cause it mainly is some copy-pasting and some light editing.
The Splash Screen, more explanation
The code from the post will create an element that will cover the whole page, and be triggered every time the game loads (or the tab refreshes).
So first, get on the Forum post, and copy the code in the correct places:
Stylesheet
JavaScript
---
Then you will want to edit it to customise it for your project. There is code to change in both block of code:
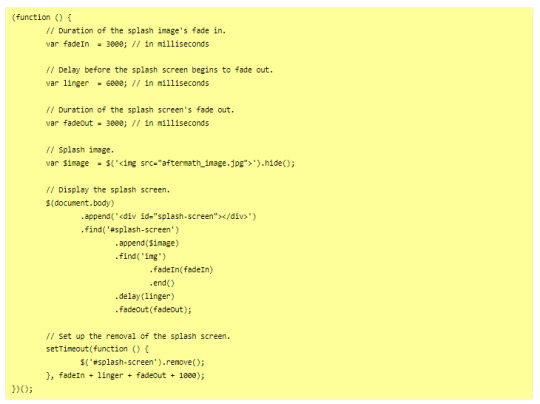
In the JavaScript, you will need to indicate the correct image you want to display on the screen, or any other element (like text).
In the Stylesheet, you will want to edit the colour of the background (and potentially the text colour) to match the vibe.
JavaScript
Here, you will want to edit the correct URL of the image you want to have on the screen.

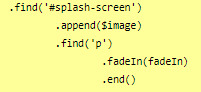
If you want text instead of the image, you can do so by wrapping it with a < p > markup (or other relevant HTML markup):

though, you will need to edit one more thing to make it work, in the .find() line, like below (p for the < p > element, and so on):
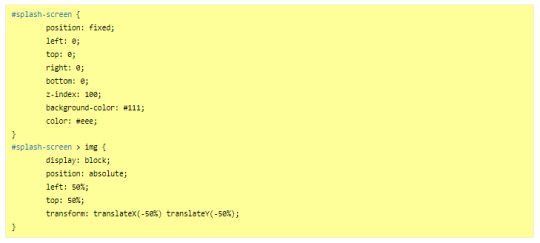
StyleSheet
The biggest change you'd need to make for the code in the style sheet will be with the code below:
currently, the colours match the basic SugarCube UI colours. So if you've changed the UI palette for your project, you will want to edit those colours (background especially, color is only useful for text)
If you are not using an image, but some text in your splash screen, you will also need to edit this part of the code, to replace the img with the correct HTML markup:
(in the example above, you'd need to change the img with p)
Testing
One important thing afterwards, will be to test the splash screen (for colour, position, or even animation). Note: if you are coding in Twine and used a local image in the splash screen, don't forget to publish to file and open the HTML, rather than test/play through Twine/
If you want to test the Splash Screen, and fiddle with the CSS with the Inspect Tool of your browser, I advise you change the amount of this line in the JavaScript:

Add a bunch of zeros to increase the time (but don’t forget to remove them before uploading your file anywhere).
---
Hope this helps!
27 notes
·
View notes
Text
JavaScript
Introduction to JavaScript Basics
JavaScript (JS) is one of the core technologies of the web, alongside HTML and CSS. It is a powerful, lightweight, and versatile scripting language that allows developers to create interactive and dynamic content on web pages. Whether you're a beginner or someone brushing up on their knowledge, understanding the basics of JavaScript is essential for modern web development.
What is JavaScript?
JavaScript is a client-side scripting language, meaning it is primarily executed in the user's web browser without needing a server. It's also used as a server-side language through platforms like Node.js. JavaScript enables developers to implement complex features such as real-time updates, interactive forms, and animations.
Key Features of JavaScript
Interactivity: JavaScript adds life to web pages by enabling interactivity, such as buttons, forms, and animations.
Versatility: It works on almost every platform and is compatible with most modern browsers.
Asynchronous Programming: JavaScript handles tasks like fetching data from servers without reloading a web page.
Extensive Libraries and Frameworks: Frameworks like React, Angular, and Vue make it even more powerful.
JavaScript Basics You Should Know
1. Variables
Variables store data that can be used and manipulated later. In JavaScript, there are three ways to declare variables:
var (old way, avoid using in modern JS)
let (block-scoped variable)
const (constant variable that cannot be reassigned)
Example:
javascript
Copy code
let name = "John"; // can be reassigned const age = 25; // cannot be reassigned
2. Data Types
JavaScript supports several data types:
String: Text data (e.g., "Hello, World!")
Number: Numeric values (e.g., 123, 3.14)
Boolean: True or false values (true, false)
Object: Complex data (e.g., { key: "value" })
Array: List of items (e.g., [1, 2, 3])
Undefined: A variable declared but not assigned a value
Null: Intentional absence of value
Example:
javascript
Copy code
let isLoggedIn = true; // Boolean let items = ["Apple", "Banana", "Cherry"]; // Array
3. Functions
Functions are reusable blocks of code that perform a task.
Example:
javascript
Copy code
function greet(name) { return `Hello, ${name}!`; } console.log(greet("Alice")); // Output: Hello, Alice!
4. Control Structures
JavaScript supports conditions and loops to control program flow:
If-Else Statements:
javascript
Copy code
if (age > 18) { console.log("You are an adult."); } else { console.log("You are a minor."); }
Loops:
javascript
Copy code
for (let i = 0; i < 5; i++) { console.log(i); }
5. DOM Manipulation
JavaScript can interact with and modify the Document Object Model (DOM), which represents the structure of a web page.
Example:
javascript
Copy code
document.getElementById("btn").addEventListener("click", () => { alert("Button clicked!"); });
Visit 1
mysite
Conclusion
JavaScript is an essential skill for web developers. By mastering its basics, you can create dynamic and interactive websites that provide an excellent user experience. As you progress, you can explore advanced concepts like asynchronous programming, object-oriented design, and popular JavaScript frameworks. Keep practicing, and you'll unlock the true power of JavaScript!
2 notes
·
View notes