#tf2 guide
Explore tagged Tumblr posts
Visit Tumblr Blog
Explore Tumblr blogs with no restrictions, modern design and the best experience.
Last Seen Tumblr Blogs


Fun Fact
Tumblr.com is the 103rd most visited website in the world.
Text
Gear's Guide To Engineer in MVM
First question: why should you listen to me? Because I play this gamemode daily, on expert and nightmare modes. i think i can at least give some tips on how to play engineer
also, sorry this took so long, i literally forgot i accidentally posted this privately instead of a draft and i never came back to actually reupload as not a private post LMAO anyway guide below
First things first, UPGRADES!
Start: Sentry
I always upgrade my sentry first, as I don't need to be on field with it as much as it needs to be on field. Often, I can leave my sentry alone for a few minutes while I go either upgrade myself, move buildings, or sometimes chase bomb (it happens, usually when you're moving your sentry and a bot gets past).
This obviously depends on your mission and starting money amount, but you want to try to upgrade your sentry's building health, your ammo capacity, and dispenser range first.
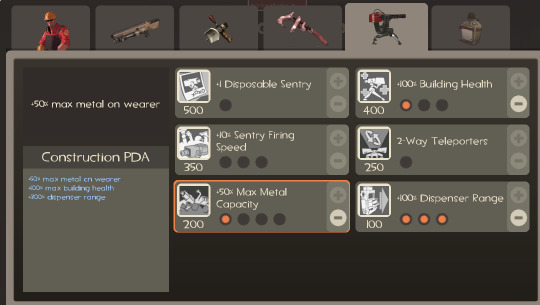
This is just a random mission i clicked on (custom map), and this is what my credits let me get. You always want to max out your dispenser range, as your teammates need it more than you do.
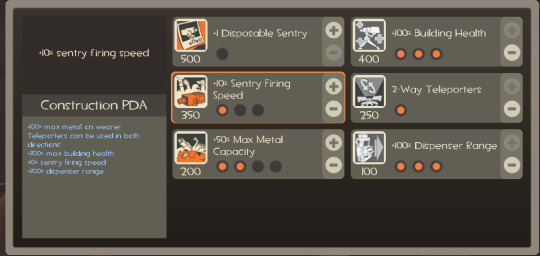
As you get more money (or if you're in nightmare with a bunch of money), you keep maxxing out your building health, get only 1 tick of sentry firing speed, then move onto your metal.
You only get one tick of firing speed, as the lovely shouc has pointed out the other ticks doesn't do anything. This goes for heavy as well. Save your money.
You only really get 2 way if you're in nightmare, as you don't get breaks in between to properly upgrade. The Disposable Sentry isn't needed, you can get it if you have enough money and you don't need any other upgrades. My only exception is in Ghost Town, I always get it before the spies show up to put behind us. It kinda helps. Otherwise, unless you have a fuckton of money and have no other upgrades needed, ignore the disposable sentry.
For example, here's a custom nightmare map. As you see, maxed health, 2 way since it's nightmare, one tick of firing speed, max dispenser range, and some metal. I actually had more money, but I save that for other upgrades. As more money comes in, if im not getting constantly demolished on the field I typically opt for maxing the metal.
CANTEENS:
For Canteens, upgrade buildings are your best friend. I don't literally touch any other one unless I'm another class. The literal only time I've not gotten them was in a glitched map where we needed to clear the tanks asap, otherwise they'd get stuck. As soon as I used my 3 crits I immediately went back to the upgrades.
However, don't let me stop you. If you want to run crits, that's fine. just be mindful of your loadout. I would say if you don't want to run upgrade buildings, maybe try rescue ranger and jag. I haven't tried it myself, so I'm not sure how it'd turn out, but that's the beauty of this game.

WEAPONS:
So.. This really depends on what you're running. For MVM primaries, you will want to either use Rescue Ranger, or Widow Maker. You could run Frontier Justice, but that's only really good for mini sentry, which you will almost never run in MVM, so I say ignore it.
Most players will choose Rescue Ranger, which I don't play with much, but when I do this is how I typically upgrade my Rescue.
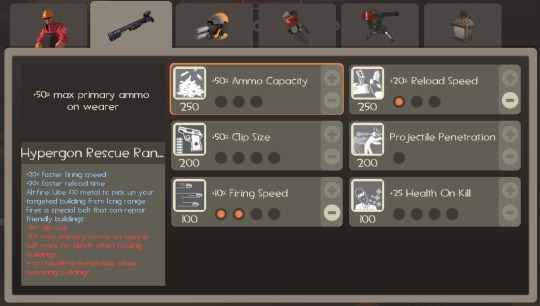
I typically try to focus on reload, clip, and firing speed. Most people using rescue (myself included) use it to move the buildings around, and to heal it. You want to be able to heal your machines fast if you're using this one. (also side note I just clicked on a random loadout, that's why I have mini sentry equipped. this is not indicative off what you should use loadout wise.)
Now, this may freak some people out, but I'm a Widowmaker main in MVM. You might be thinking, "why the fuck would i run widowmaker?" Well, Widowmaker is good for tank busting! That sentry firing speed is great, and I also use it to replenish my metal. This is how I upgrade my Widowmaker :
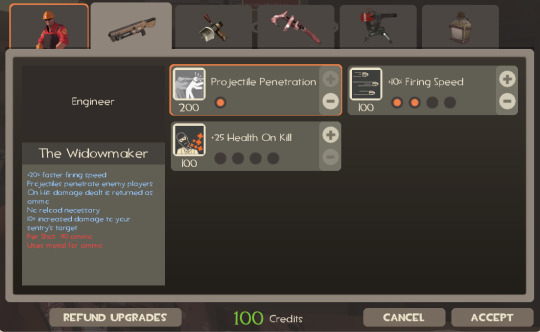
If there's a tank that round/second I'm at the upgrade station, I'll try to focus on the firing speed. Sometimes I'll even ignore the projectile penetration if I don't have enough money.
For beginners, I'd probably recommend you stay on RR, as you'll still be learning how to move around and such. However, that's entirely up to you. If you don't mind running all over the place to grab your stuff instead of just using RR, go ahead! That's the main downside to this.
For secondary, I always go wrangler. I'm usually playing expert/nightmare modes, so giant medics are common. If you have a giant medic, wrangle your sentry and don't let it target the medic's target heal. Focus on the Giant medic with your wrangled sentry. Though, in lower modes, you can go with another secondary of your choosing. Short circut isn't the best, but it is fun. You don't really ever use your pistol/secondary (minus wrangler) unless you actively choose to, so just be aware.
ENGINEER/YOURSELF:
How i go about it is when I have the money, I always go with maxing my fire and crit resistances first. As I get more money, I move onto to bullet and blast after my sentry is maxed. Of course, this always depends on the map for the exact order, sometimes you have to go ahead and get your resistances in order to keep upgrading your sentry. If I have to do this, I always make sure I have at least a tick or two of building health before doing so.
This is usually how I try to upgrade myself when I have the money:

This is typically what I use for nightmare modes, as they give you a bunch of money. The movement speed helps you scurry around to move between buildings and to help you move faster when you're carrying a building. Of course, this is something I normally get only on nightmare, as most expert/advanced missions don't give you the money you need to get what is required first and the the movement speed.
This is also map dependent, but if there's a good sentry spot (will be elaborating soon) that has a pile of boxes to jump on, and you're constantly being hindered by these boxes, you can also get the jump height. Of course, this isn't always needed, and I only really get the jump height if I'm in custom mvm. Normal default mvm you don't really have maps that need you to jump up, so I just usually ignore it.
BUILDING PLACEMENTS:
Teleporter:
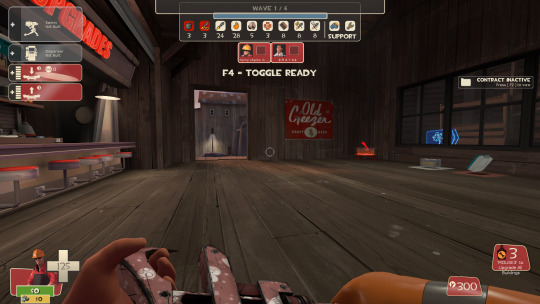
This one depends on your map. Like for my example here, the doors are spread apart from another, so I just picked the closest door to the path and placed my entrance tele.

In maps like below where the entraces line up with each other, put your tele in the middle. So many people will put it on just one door, which is okay if there are 2 engineers (the other can put his on the other), but usually most do not play 2 engie. It's not a issue for faster classes, but for heavy and soldier it's a massive inconvenience. Your job as Engineer is to help with bomb and also ease said inconveniences. Don't be a dick.

For your tele exit, try to keep it toward the front half of the map. My general rule of thumb when I'm not in nightmare mode is to try to put it not super far from front, but not to the point where if the bomb gets past the tele it becomes useless. This usually puts it towards the middle or 3/4 of the way in the map. You also want to make sure its not directly visible to bomb path, as you don't want anyone who's teleported in to be immediately targeted. Like in the image below, you can see the bomb path isn't far, and it's in a safe corner.
When I'm placing my tele, if I'm not sure about the placement in correlation to the bomb path, I'll pretend I'm a robot and trace the path myself to see how it goes. Usually if I see the tele at any point, I move it.
With Nightmare Mode, I treat teleporters for the most part the same, I just try to keep it on the ground floor and closer to the front than I would for a regular multiwave mission, as it's handy for getting upgrades.
For example, here is where i try to keep it when I'm playing ghost town:

depending on the path, I sometimes have it on the other side with the smaller fence, but I usually have it on this side.
Sometimes though, on some maps there are no safe spots on the ground. It sucks, but it happens. For those instances, I'll try to put it up top that is close to the front but you can easily access it.

Dispenser:
For your dispenser, listen to me when I say this: Your dispenser is NOT FOR YOU. It is for your teammates.
You generally want to build your sentry near an ammo pack, so you can leave your dispenser for your teammmates. So many people seem to think of only the Engineer's perspective, which is need ammo for building = keep dispenser near, but that's bad thinking. You need to consider the perspective of the other classes. If you don't have much experience with those other classes, play them. It'll give you an idea of how to play better as Engie.
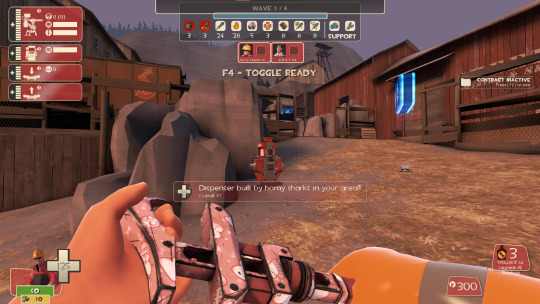
Try to build it on the ground, at the front, behind something. You want to have it near the edge, so you teammates don't have to stand behind the wall to recharge. You don't want to build it out in the open, so in case if your teammates are very low on health, they'll have a spot to hide and heal. Try to move it with your team. If you're pushed back, and your team begins to move back forward, literally pick up your dispenser and follow them, then try to place it on wall edges.

As you see above, the dispenser can be accessed from most sides. This position is typically the best, as it lets heavies have a constant replenishment of ammo while still being able to shoot at the front. This also applies for soldiers, demos, depending on how the map is set up even snipers too. Scouts and pyros can easily swing by for ammo as well before getting back onto the field.
Sentry:
So this is a building you will be moving a lot, and that's usually because of bomb. As Engineer, I usually try to stay with the bomb no matter what, unless a tank needs help and I think the rest of the team can cover bomb while I'm with tank. As soon as bomb begins to get pushed back again though, I'll leave tank for bomb unless it's nearly to hatch.
For actual placement, try to have it kinda like your dispenser: behind a wall, near the edge. You want to try to angle it where your sentry can still target plenty, but have it behind something so it doesn't immediately get targeted and destroyed. It can be kinda tough to figure how to set it up, but with practice it'll become easier to spot.
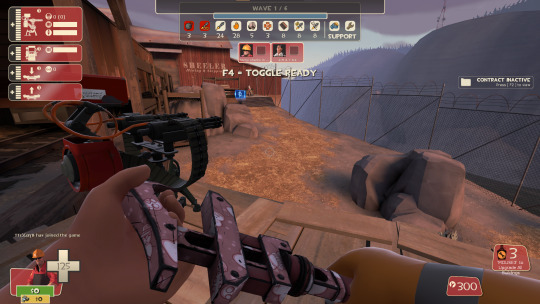
You can try to put it above the robots on a bridge like this (though this picture was actually at spawn on an overhang, i moved it shortly after bc i realised a spawn was behind me. however, on actual bridges this will be fine usually). I like bridges, as I can swap sides pretty quickly depending on the bomb and robots streaming through.

This is another good spot, as it's in the direct line of sight for bomb for a good range, the robots won't immediately attack it, and you can usually kill more robots than them kill your sentry.
Now, sometimes I will put it more in the open, like this. There is the wall right there, so if I need to pull back my sentry and hit it, I have the cover. I also try to set up in places where i know i can move around freely after the bomb spawns in, like for example in Ghost Town, I will try to build on top once the bomb gets past the first couple of fences so i can place my sentry alongside bomb path and not have to worry about getting shot/blown up.

more examples of sentry spots:


Honestly, with sentries it is a choose your own adventure, as you'll probably be the closest to it most of the time. I've just found it easier to try to keep it near the edge of something as it's harder to hit/I can pick up and move to repair quickly.
I feel like I need to add more to this but reading this I feel like i've hit most of the main points, so I think I'll end this here. If you have questions or anything reblog with them, or just ask me and I'll try to answer! A lot of my tips I've had to take awhile to learn, and even with them I still fail sometimes.
Just know that Engineer in mvm can be stressful, and if you're seriously getting upset over not playing him please take a break! He's not really hard to learn, it's just seriously overwhelming at first and can seem like it's way too much to handle.
I hope my little guide helped some! Now go out there and beat those machines!
#tf2#engineer team fortress 2#engineer#tf2 engie#team fortress 2#tf2 engineer#engie tf2#mvm#mann vs machine#tf2 mvm guide#tf2 guide#team fortress two#engineer tf2#engie#team fortress#tf2 mvm#tf2 mann vs machine#team fortress 2 mvm#mann vs machine team fortress 2
5 notes
·
View notes
Text
TF2: HOW TO FIGHT AGAINST THE BOTS
For those of you interested in TF2 and sick of the bots, I spent literally 8 1/2 hours last night typing up this guide on how to fight back against them
#tf2#team fortress#team fortress 2#team fortress two#tf2 bot crisis#bot crisis#fps#guide#tf2 guide#team fortress 2 guide#team fortress two guide#tf2 scout#tf2 soldier#tf2 pyro#tf2 demo#tf2 demoman#tf2 heavy#tf2 engi#tf2 engineer#tf2 engie#tf2 medic#tf2 sniper#tf2 spy
24 notes
·
View notes
Text


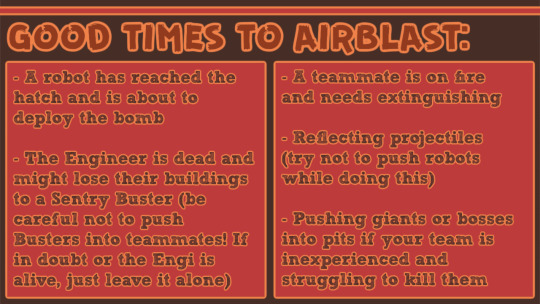

Airblast and why High-Tours hate it: an MVM guide about Pyro and airblasting! From someone who has an... unknown tourcount (I only play Bootcamp okay? I have the Silicon Slaughter achievement I promise I'm not a total beginner) I'm way too autism about TF2 and MVM right now that I'm definitely gonna end up making more. Sorrgy (/reference)
#tf2 guide#mann vs machine#mvm#mvm guide#tf2#pyro tf2#mvm pyro#pyro mvm#<- are those last two too niche? meh its fine
5 notes
·
View notes
Text
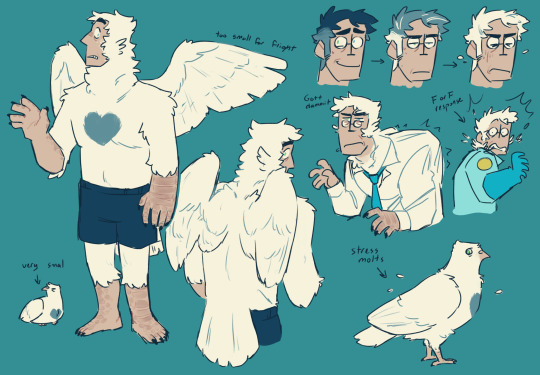
Looking thru @magpye-xio ‘s Amsel art made me wanna do a proper ref for bird hans yippee!!!
#grey art#tf2 medic#hans :]#definitely used their art a lot as a sort of guide for drawing more stylized bird stuff so ty#so cool#idk why I get so embarrassed about making stuff like this everyone here knows I’m weird
108 notes
·
View notes
Text
lil guys

I put the romantic pink background on as a joke but it makes the colors look really nice

also a little face shape guide I made for myself

I messed up on Harry's chin pretend the lines aren't there
I geuss that's what happens when I use pen
#my art#disco elysium#de#kim kitsuragi#harry du bois#digital art#art#kimharry#harrykim#Stuff from the guide thingy-->#Tf2#team fortess 2#medic tf2#heavy tf2
79 notes
·
View notes
Text

this twitter post and the angelbroth art i reblogged the other day came together beautifully in my mind and i spent all of work today dreaming of making this image. now it has come to life under my hands <3
#tf2#heavymedic#red oktoberfest#easyish to draw medic because i just needed the general outline of his body to guide the shirt#drawing heavy became very difficult when i got to the lineart because he is lovingly detailed and i am a homosexual#ik most of medics torso is covered by the shirt but i promise there are so so many bruises under there too <3#i did consider sketching one of the other mercs as like a 'live x reaction' but then i realized i didn't feel like it so rip#just know that they have walked into the base kitchen this way on like a random ass thursday morning and everyone else is in there Looking#i need these two middle-aged men so fuckin bad
62 notes
·
View notes
Note
So sorry if this has been asked before but I need to know. What breeds are the tf2 dogs I recognize a few but not all
That's alright pal! I get quite a few messages asking about this, so I'll leave it here for anyone who's interested
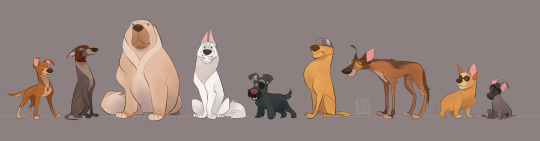
Scout: based on a basenji dog
Spy: no specific breed in mind, some kind of greyhound perhaps?
Heavy: based on a russian beardog
Medic: based on a white german shepherd / husky
Demo: scottish terrier (had to)
Soldier: again, no specific breed. ended up looking like a labrador
Sniper: no specific breed in mind
Engineer: no specific breed in mind
Pyro: i like the idea of him being a xolo dog (no fur to set on fire!)
When I design animal characters, I just go for shapes that fit the character's personality, which is why a lot of these aren't based on specific breeds. But then again, it's also fun to see people's different takes on this! I've seen people compare the sniper design to a dingo, which is great. So feel free to interpret them however you want!
#hope this can serve as a future guide for anyone wondering about this#just having fun! happy you guys are enjoying these silly dogs#ask#tf2
388 notes
·
View notes
Text


this is (almost) all you need to know about australian vernacular when writing sniper tf2 in your fics
#debtdeath writing corner#there is more to know i just havent posted my little guide yet#sniper tf2#tf2 sniper
720 notes
·
View notes
Text
How to Kitbash (or Head Hack) Models to Different Rigs
Kitbashing (aka "Head Hacking" in Source communities) is the technique of combining models together to create something new. This can be useful for allowing a character to have a different outfit or body. In this guide, we will be combining Sniper's head with Spy's body, as an example.
Kitbash Guide:
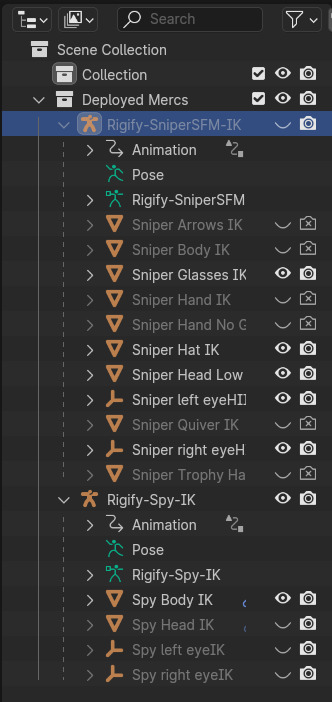
Create a scene with the two models you want to combine. Position them to be in the same spot. Hide the visibility of the armature of the model you want to keep the head of. In this example, the rigs are IK/FK Rigify armatures, but FK rigs should work too with this method.
Hide (viewport and render) visibility of the old head (Spy's) of the model you want to keep the body of (via the Outliner window). This is to make it eaiser to see what you're doing, and to prevent seeing the head when you're animating and rendering the armature.
Also hide the visibility of any meshes you don't plan on using for the final kitbash. (see: image)
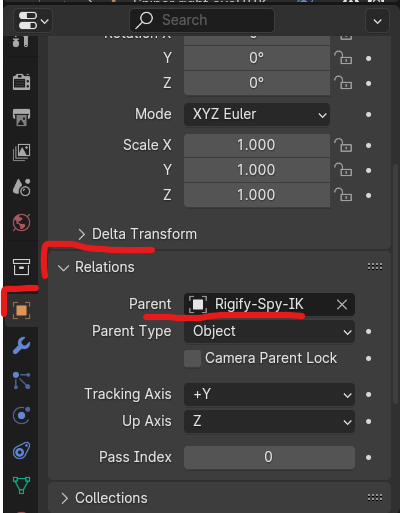
Reparent the Head Mesh: Select the head mesh of the head you want to add on (Sniper's) and go to the Object Properties tab. Under Relations > Parent, change the value from Sniper's rig to Spy's. The head is now parented to Spy's body.
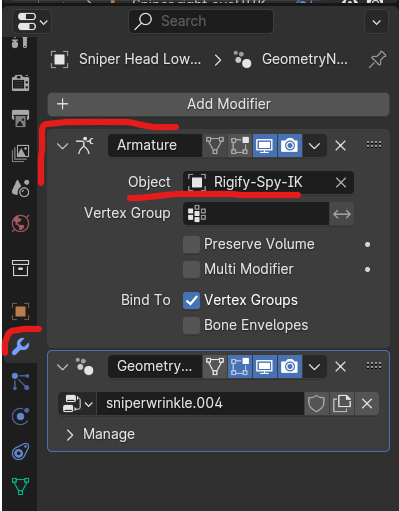
Edit Modifiers of the Head Mesh: In the Modifiers Property tab, Change the Armature modifier's Object value to Spy's rig. The head should now follow Spy's head controls.
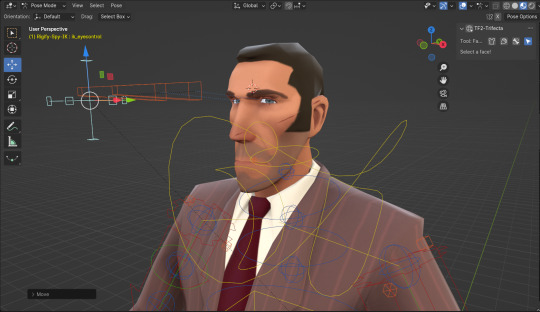
The Eye Controls: Select the left eye Empty sphere of Sniper's rig (Sniper left eyeHIIK). Snap the Viewport Cursor to the Empty's location (Object > Snap > Cursor to Selected). Set the Viewport Cursor to be in the same location of the left eye Empty sphere. Go to the Constaints property tab. Edit the Track To modifier's Object value to Spy's armature. Do the same for the Copy Scale modifier. The eye Empty will have moved position, which we don't want. Snap the eye Empty to the Viewport Cursor (Object > Snap > Selection to Cursor). Repeat these steps for the right eye.
Reposition the Head: (If you also want to include additional meshes from the old/Sniper's model, like his hat/sunglasses, see the "But what about Sniper's hat?" section below before doing this next step.) Select the head mesh, any additional meshes you want to add to the new rig, and the eye empties of the head you're adding. Move head mesh (and the additional things you've selected) in place, using the old head's placement as reference (toggle its viewport visibility on/off).
The head and eyes should now move with the new body rig. In this example, Sniper is wearing Spy's suit.
But what about Sniper's hat? And his sunglasses? Or other item the old rig has a control for that the new rig doesn't?
You can add an additional bone to the new rig by selecting the armature, switching to Edit Mode, and selecting Add > Single Bone. Move the bone where you want it (you can snap the viewport cursor to the old rig's hat control and then snap the new single bone's head to the viewport cursor), set the bone's parent (via the Bone Properties > Relations > Parent value), and rename the bone to the same name that bone on the old rig has. Using the same name is important, because that tells Blender what assigned weight paints (on the mesh) the bone should control.
To find the name of a particular bone, select it from the old rig and check its name in the Bone Properties tab (if you have trouble finding/selecting it in Edit Mode, switch to Pose Mode and select the control, then switch back to Edit mode. It will now be the bone selected). Also make note of the bone's Relations values in the same tab.
Then reparent and edit the modifiers of the hat mesh the same way you did for the head mesh.
Selecting the bone in Pose Mode should now move the hat.
This same methodology can be used for anything else you want to add to the kitbash that contains weight paints.
Tip: I recommend doing these steps for any additional meshes you plan on using just before the "Reposition the Head" step from earlier. That way, when you reposition the head mess and eye Empties, you can also select the hat and sunglasses and reposition them together to make sure they line up correctly.
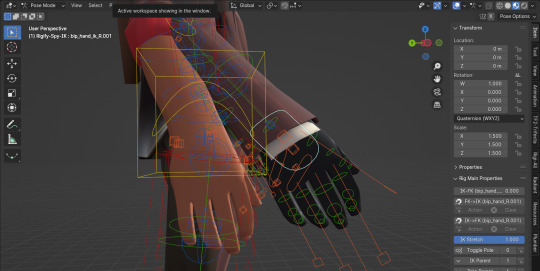
But now Sniper's hands look too small! How can I make them more Sniper-sized?
You can select controls for different body parts in Pose Mode and scale them to change the size of the corrosponding body part. Child controls should scale accordingly.
In this example, Spy's hand control has been scaled up by 1.5 and becomes a similar size to Sniper's.
I hope you have found this kitbashing guide useful, and I am looking forward to all the mixmatched models you make in the future!
9 notes
·
View notes
Text
I love when folks depict medic as a smart little guy whos sweet and helpful
Because It throws everyone for a loop when they look at the game and comics and see him being the most deranged, psychopathic, freak of a man to ever exist. It's like a jumpscare
#medic probably watched human centepede and took it as a step-by-step guide#everyone (including heavy) is just his little guinea pigs#he just has some he likes a little more#and those get the most helpful experiments#the others get baboon uteruses#hes insane i love him#tf2#medic tf2
21 notes
·
View notes
Text
youtube
I completely forgot to post this comp of shots I did for Soundsmith on anywhere but TY and Twitter. Shame.
61 notes
·
View notes
Text
About
I figure I should make an intro post its self since it's more accessible, but for further detail about me you check the about tab on my blog.
So, hello ^^ the username is Anonomy, but I go by Dominic or Camp. I'm older than 18 (that's all you need 2 know ^^). Aroace and bigender. I have GAD (+selective mutism), situational depression n I'm anemic.
He/him + She/her, please no they/them for me unless you didn't know beforehand.
My other interests aside from tf2 range from valve games, horror, cosmic horror and sci-fi/fantasy, aliens, the ocean, psychology, SPYFI, I LOVE SPYFI my favourite character ever is SPY TF2
This is my blog so I do blog things. I'm on a pursuit for law and love a good retro aesthetic. I'm into a lot of things, but especially TF2 (9 years and 5-6k hours in-game). Timezone is around PH.
I love writing, animating, drawing, all sorts of things like that.
I'm into TF2 as a WHOLE. That includes the spyfi 1960s setting, the surrounding lore, the characters, the gameplay, and pretty much EVERYTHING about it. I don't exagerrate when I say I'm crazy about tf2. I play the game very extensively and know a lot of niche mechanics, so if you need advice or tips on tf2 itself you can just ask, I love helping other players. My area of expertise is mainly engineer, medic, and pyro, but I've enjoyed plenty of other classes and subclasses.
Tags:
#myart - this is my art. i used to do a fandom tagging system for myart+[fandom] but tbh it got confusing to me so it's obsolete.
#nomi writes - textposts that I think fall under the category of what could be seen as writing. So like thinly veiled fanfics, posts I put a decent effort into, etc. It's like the formal tag for nomipad. Pr much all of my textposts will fall under this since i'm a perfectionist.
#nomipad - personal tag for any rambles or things that I don't think fit nomi writes. More messy. Tbh there is little difference but I thrive on micro organizing. But more often than not this is for regular rambles
#nomi asks - answers for asks. I'm always up to chat about TF2 but other things are okay as well of course. Specially about mental health, etc.
#tf2 gameplay - things related to the gameplay. sometimes I like to talk about the gameplay or recount stories about what I've seen in the many years of playing this game. Pretty meta.
Etc.
I occasionally disappear into the shadows and come back, it's normal. Sometimes I just get really busy or am cycling through one of my hobbies. I have a really specific way of doing things and I go on my own time :P
That's all, take care!
#intro post#tf2#horror#pretty fun tbh#will update this accordingly#also a good guide for myself cause everytime i dip and come back i have to relearn how to use this website xD
10 notes
·
View notes
Text
if anyone wants lore there are technically RED and BLU conductors ?????
you haven't seen them because um. one is warping the membrane of the universe as we know it and the other one works at an airport right now. sorry
ray has been in contact with both of them so if you want to ask any questions....
[one ask blog is enough man i'll explode :') cmon leave me be]
#bazposting#tf2 oc#team fortress 2#the conductor's guide to backstory#yeahhhh uh. they don't work for red and blu rip#they were SUPPOSED to but george thought it'd be more fun to have a doctor who complex#and huxley is juuuust smart enough to sit in front of a computer for a living
8 notes
·
View notes
Text
I don't play tf2 super often bc I'm really bad at it, but I'll keep watching tf2 clip comps and video essays about weapon balancing until the day I die probably
#tf2#team fortress 2#I wish I was good at it#I know I'd get better at it if I played it more shut up#I could give an extensive guide on how to be successful at any class but in practice I will fall on my face
10 notes
·
View notes
Note
Hey engy, would you potentially teach me how to make iron out of iron ore 🥺
Engineer: Ain't that hard, really. First thing you'll need to do is make yourself a furnace, or a bloomery whichever name you prefer, clay works the best for this. You'll wanna charge it, which means just heat it up to smeltin' temperatures. Then you'll wanna toss in a one-to-one mixture of iron ore and charcoal, the charcoal is t'help reduce the oxide into metal. That melted goop you'll get is called bloom - hence why the furnace is also called a bloomery. You'll let that cool, reheat it, and then beat it with a hammer to work out the impurities! Just that simple!
#tf2#team fortress 2#tf2 headcanons#tf2 engineer#//don't actually follow this as a guide#//I'm not sure if I'm even right I only vaguely remember the process#//I was playing minecraft during class back in high school and was curious about how it was actually done
23 notes
·
View notes
Text
those two guys who give directions in wayward guide are giving sniper and soldier from tf2
2 notes
·
View notes