#the image is so low quality uploaded here please
Text

velvet family. that's it. that's the post. this is a low effort thing but i ended up coloring it
#does anyone wanna get into marie gender discourse? anyone? anyone at all#oh boy i gotta tag so much#well here we go#flynndoodles#persona#persona 2#persona 3#persona 4#persona 5#velvet room#igor#belladonna#nameless#elizabeth#theodore#margaret#marie#lavenza#the image is so low quality uploaded here please
64 notes
·
View notes
Text
In advance of the nominations closing in about 48 hours and needing to get the flag information together for the tournament, I'm going through the entries more in depth, checking for inconsistencies and such. I may run into information that I'm unsure on how to proceed on and will ask for clarifying information on this post here.
In the event the person who submitted it sees one of these asks, please reach out so we can figure out what the best information is to proceed! Otherwise I will try to correct the information to be as close to what I can confirm is accurate and as similar to the submitted information as possible.
I recognize that some of these were submitted over 6 months ago, so the chances of everyone seeing everything is a little low, but I'd like to do right by your submission!
Ulaanbaatar, Mongolia - I can't figure out where the light blue flag comes from. Though it's the one given on the city's page on Wikipedia, digging through the city's website (though the images only go back a few years), I'm only able to find images of the dark blue version with gold outlines on a white figure in use. (You can see it in the background here.) I've been trying to determine if the submitted version is an official version or historical version of the flag so I know what to put it down as, but I haven't had any luck. Even the FOTW version appears to potentially be an interpretation of a written description (though it does note that a dark blue variant with colors on the garuda appears on government websites in 2008). (As a note, the Mongolian description of the flag FOTW refers to uses the word "хөх" which, according to Wiktionary, is exclusively for dark blue.) I'm...not sure how to proceed with this. I guess the options are 1) use the dark blue/gold/white one (current official flag) 2) use the dark blue colored flag (variant of the current flag) 3) use the light blue flag (variant but of ambiguous legitimacy).
RESOLVED
Brocēni, Latvia - The submitted flag does not seem to match what Wikipedia claims is the current version of the flag. This was changed on Wikipedia back on 30 July 2023. The white version of the flag was not explained nor can I find any information myself. If you happen to know if it was an old version of the flag or if you'd prefer for me to use the current flag please let me know!
Tifariti, Sahrawi Arab Democratic Republic - It seems like this is not an official flag, and one of (many, unfortunately) proposed flags made and uploaded by Wikipedia users without being associated with the region or labeled as such. At least, I have not seen any evidence to prove that it's real... If the person who submitted it happens to know more than this, please let me know! [For reference, the flag was crossposted to Reddit before it was deleted.] (If evidence is not provided I'll have to remove it, which is a pity 😔)
San Francisco, Antioquia, Colombia - The Wikipedia upload was provided for this flag. The comical bird faces prompted me to dig a little deeper, especially because FOTW provided a different design. While the official San Francisco govt website does use the Wikipedia image here, it does seem in practice that they use the design FOTW provides, evidenced here and here and here. To the submitter, if you see this -- would you be okay with me switching to the actual proper design? I'll vectorize it myself so the quality isn't poor. That being said, there is a somewhat silly but technically defensible argument that the presence of the wiki version on the govt website is enough to justify using that version, so while it's not my personal preference, it is up to you. (If an opinion is not provided, I will switch to the more official version.)
Santa Cruz, California, USA - I'm not sure if this is notification or a request for response, but Wikipedia is not very clear on the usage of the Santa Cruz [County] flag. FOTW confirms that it's for the county only and not the city, and provides this page for the city itself. (For me, images on the page won't load, but they linked the image of the new 2020 flag on the city's website.) I can't find evidence for historical use of the county flag for the city, otherwise I would simply just include it as a past flag... Unfortunately I think Santa Cruz County itself is a bit too large to qualify for this. My current plan is to omit it. Please let me know if you'd like me to do anything else!
14 notes
·
View notes
Text

Joining the Squad
The sun hung low in the sky, casting a warm, golden glow over the Astros gymnastics training facility. Hannah stood at the entrance, her heart pounding with excitement and a hint of nervousness. She had heard legends about the Astros, the most renowned gymnastics team in the country. Their gravity-defying moves and seemingly impossible feats left audiences in awe. Now, she was about to become a part of that legacy.
As Hannah stepped inside, she was immediately greeted by the sound of laughter and the sight of gymnasts stretching, twisting, and leaping with grace and precision. Her eyes widened as she took in the incredible talent that surrounded her.
Her coach, Coach Maria, approached with a warm smile. "Hannah, welcome to the Astros," she said. "We're thrilled to have you on the team."
Hannah couldn't help but feel a surge of pleasure at those words. It was an honor beyond her wildest dreams. She had worked tirelessly to get here, and now she was finally part of the best team in the country.
The other team members, a tight-knit group of girls who had trained together for years, surrounded her. Their enthusiasm was infectious as they introduced themselves and welcomed her with open arms. Hannah felt like she had found a second family.
The training began, and Hannah marveled at the Astros' incredible abilities. They effortlessly executed flips, spins, and contortions that seemed to defy the laws of physics. Hannah knew that if she wanted to keep up, she had to learn their secrets.
One day, after a grueling practice, her teammate Mia pulled her aside. "Hannah, I'll let you in on a little secret," she whispered. "It's all about flexibility. We've trained our bodies to be... super stretchy." she said as she leaned in close.
Hannah's eyes widened. She had heard rumors about the Astros' unique training methods, but she hadn't expected this. Mia reached over and touched Hannah's shoulder, and in an instant, Hannah felt a warm tingle course through her body. It was as if her muscles were relaxing into an almost rubber-like form. It was like Mia had transferred some kind of power to her that she couldn't yet understand.
Mia pulled her arms and torso, elongating them to stretch them past any normal limits. Hannah gasped in surprise but felt no pain, only a thrilling sensation of her body becoming more flexible by the second. It was as if she could stretch her limbs like elastic, and she marveled at the newfound abilities coursing through her. Each pull on her rubber-band body was increasingly more pleasurable, sending her almost into a frenzy. She stretched and twisted her body in ways she never thought possible, and each day, she became more and more like her fellow Astros. She could now effortlessly perform the seemingly impossible moves that had once left her in awe. She was super stretchy, just like her friends on the Astros, and it was incredible.
For more quality content like this and extensive stories accompanying these images, NSFW content, and so much more please check out and support my Patreon where new uploads are posted almost EVERY DAY! I guarantee you will like what you find at www.patreon.com/SF447Expansions! 😊
7 notes
·
View notes
Text
The Unexpected Hero
The Unexpected Hero
Evan Buckley x reader
Imagine: saving Buck (911) from and explosion and he's determined to find out who you are (from @procrastinatorimagines).
Requested: Nope.
Author’s Note: I’ve been wanting to write this ever since I saw this prompt image. Also (writing this on 7/12/22), My legs are dead after drumline camp, so I continued writing this on my night shift. Please give me feedback as this is my first time writing for 911. Was considering asking someone if they want to proof read just to make sure the content is good. Message me if anyone want to. I also reworked my masterlist so it’s not as crowded.
Requests are still OPEN. Feedback is always appreciated. Also, tell me if you want to be part of a Tag List and I’ll tag you when I upload something new. Also, I’m tagging @911readercollection here.
Warning: I’m not sure fire works how I exactly described it. Arsonist, bomb exploder/explodes, chase scene, arrests, I very much thought of old action movies when writing this. I didn’t proofread this. Athena being a queen.
Word Count: 1,854
It was another mind numbing day of staring at your computer as statistics went by so you could crunch the numbers for your penny pincher stick up his ass boss. And just to describe how frugal he is, he chose the cheapest office for his workers while he never showed up himself. Cheap in LA usually means poor quality, or not in a safe neighborhood. In this case, it meant both. You had to bring your own stool because you could not stand one more second of your legs sticking to those cheap plastic chairs that are “usually” used at graduation parties. At least you were left alone until you had to present your findings to your boss. However, this meant that your mind got distracted easily and sometimes fell asleep until your eyes and mind processed nothing that was on your screen.
Your mind woke up out of its stagnant state to that sound. You know, that sound. The sound that’s been drilled into your mind ever since you were young. The sound of a fire alarm going off along with its blinking lights. You were surprised the building even had working fire systems. But, you did what you were taught and you stayed low to the ground and crawled on your hands and knees keeping your hand along the wall to guide your way. You found your way to the side of the building out a fire exit. One of those exits near the trucking docks of your building. You stopped a mere couple feet from the building to catch your breath, which more ended up like you crouched to cough your lungs out. This is what you imagined smoking for 50 years felt like.
You looked up just as a firefighter started coming towards you. Do all firefighters have to imitate magazines and be super hot in uniform and way out of your league? He still had his smoke mask over his face and his helmet on, as he should , so you couldn’t make out much of what he actually looked like. “Ma’am, are you okay?”
You would have responded if something else didn’t catch your attention. Behind the fireman’s legs, you could see someone else in a gray hoodie walking away from the scene. Walking. As in “cool guys don’t look at explosions” walking, and that kind of walking away from a fire can never be good. He started to raise his right hand above his head while keeping his back turned toward you and STILL WALKING. You couldn’t be sure what he was doing or what is intentions are, but you had to take a chance.
With your strength that you found somewhere, you body slammed the fireman in the hips as hard as you could and that managed to get him, and yourself, to the ground. His arms encircled around you, out of instinct you think, and you were buried into his firejacket while his back took most of the brute hit from the ground. The office building behind you exploded like an action movie and you felt the heat from the building behind you multiply by 1000 and a loud noise ring your ears to the point where you could only hear white noise for a second.
You hesitantly opened your eyes expecting ash to sting them or you see the light of heaven letting you know that you died. Thankfully, you were still mostly in one piece, but the sight of the person you suspected was responsible running from said exploding building was the first thing you saw while lying on the ground. This isn’t an action movie, but you couldn’t convince your brain that it wasn’t.
You got up from the ground and started sprinting after the man, your body and lungs screaming at you to stop and rest, but your adrenaline said ‘no’. You kept following the man around a few corners, not even stopping to think if he was armed or not when a cop car came from an alley and hit him T-bone style. It didn’t kill him, but it flung him a few feet in the opposite direction. He definitely wouldn’t be resisting arrest anytime soon.
“Hands on your head.” you heard shout in front of you. You kept yours on the back of your head just so the cop would know you weren’t putting up a fight.
You took this opportunity to cough your lungs out in the middle of an alley because they were exhausted from being filled with smoke and then asked to run a marathon.
The cop was quick to cuff the man and lock him in the back of her squad car. She then came around and stood next to your hunched over figure. “Just try to breath deeply mame.” After a few more minutes of coughing your lungs out you finally had the strength to look up at her. Your eyes were watered and probably red from the smoke, but you could still make out most of what she looked like. She was a middle aged black woman and had short black hair that swooped to one side. She still was in her full uniform and a bullet proof vest.
“Did you get him?” Why was that the first thing you asked? No thank you, just that?
“Yes mame, we did. Your speed and quick thinking guided him right to us. What were you doing chasing a man like him anyway?”
You struggled to stand up, but you were able to keep some of your decency before you spoke to her. “I saw him walking away from my office building that exploded, and no one runs unless they have something to hide, so I just mindlessly chased after him. I chased him and you T-boned him. Problem solved.” You clapped your hands brushing the dust off them like you did a job well done.
“You were in the building five blocks from here that exploded into flames?” Have I really been running for five blocks? Wow. Might as well act as if you run regularly.
“Yes, and if the fire inspection comes to it, can I testify against my boss? He’s a frugal piece of shit, so I doubt that the building was up to code.” She seemed to give me a satisfied smirk.
“Ok. I like a strong independent women who knows what she wants. Come with me and I’ll give you a ride to the station and get a statement from you.”
“Thank you, Miss…”
“Athena, and if you ever want to be a cop or detective, I’ll put in a referral for you to get started into the training. We’d love to have you.”
So that’s how your day ended. Athena drove you and her suspect to the police station, you gave a statement of what happened and how bad the building you worked in was. You left your contact information incase they needed anything else or they wanted you for the detective job. She even gave you a ride back to your, surprisingly, not destroyed car that was parked outside of your office building.
________________________________________________________________
**Buck’s POV, later that day at station 118**
I walked back up the stairs after a shower to find most of the team in the kitchen. Bobby was making something that smelled delicious for dinner. I still couldn’t wrap my head around what happened earlier.
“Hey Hen, did some lady come to the ambulance at the fire of that warehouse office building today?” I sat down at the kitchen table next to her.
“We had a couple people there today but no one needed to go to the hospital, just needed some extra oxygen. Why, you recognize someone?”
“No it’s just…” Do I say that the muscles of a fireman lost against someone’s adrenaline. I decide to leave that part out. “Just someone was running away from the fire and after someone and I just wanted to make sure they’re ok. I couldn’t find them afterwards.”
“Hey everyone.” Athena walked up the stairs to the kitchen area and greeted everyone.
“Hey Athena.” I didn’t put too much enthusiasm into my greeting. She went and kissed Bobby really quick and came back to me. “Why you so down Buck?”
“He’s trying to find someone who ran off from the fire today.” Hen answered for me.
“You mean the one that body slammed you before the building blew up.”
Well, thanks for saving me the embarrassment Bobby. I gave him that you seriously just said that look that he’s probably given me a million times.
“Yes, that one. She just ran off after body slamming me and it wasn’t a reactionary thing she did it BEFORE the building blew up, like right before.” Athena gave me a knowingly smile apparently knowing something that I didn’t.
“Oh yes, I know who she is. She’s real sweet. Caught our bomber, gave a statement about what she witness, and was willing to testify.” She was saying this like it was no deal as easy as asking what you had for breakfast that morning.
“You know her. I wanted to see if I could thank her because she helped me avoid getting a face full of flames.”
“Well, I still have her number. But Buck …”
“Yes.” Athena always has something up her sleeve.
“Treat her right. She talked about the building she worked in. She deserves something good.”
“Yes mame.” That wasn’t even my intention, but Buck 3.0 is the most respectful out of all the Bucks.
Athena gave me her number and I went to one of the fire department office rooms where it was more quiet and less people would come in to interrupt or tease me for wanting to talk to a girl I barely met. I type in her number and wait while the ringtones go by. Then there’s that unfortunate monotone voice of an answering machine. I decide to leave a message anyway.
“Hey Y/n, it’s Buck. Well you don’t know my name yet but I’m the firefighter you slammed earlier today. Athena, the cop, gave me your number. I just wanted to thank you for saving me. You were really brave I heard, chasing down an armed aronsist. **Hurry up Buck, you have limited voicemail space** I just wanted to thank you and see if you wanted to go out sometime … so I can properly thank you in person I mean. Well I-.” The call hung me up. Hope that got saved.
I decided to take a walk around the trucks and clear my head. Before I made even one lap around, I got a text.
Hey Buck. Nice to finally know your name. Hope I didn’t hurt you too bad from the body slam earlier. My phone’s out of whack and not accepting calls since it got cracked in my street chase today, but I’d love to go to cheesecake factory with you sometime, or even just walking on the boardwalk. You text me your availability, since I’m out of a job for now. Hehe. -Y/n
Ok Buck, don't mess this up.
#911#9-1-1 imagine#9-1-1#9-1-1 fanfiction#9-1-1 fic#9-1-1 fandom#9-1-1 fox#911 fanfic#evan buckley imagine#evan buckley#buck#9 1 1#9 1 1 fox#9 1 1 fic#9 1 1 fandom#9 1 1 fanfiction#911 imagine#911 fox imagine#evan buck buckely#evan buckley x reader#evan buckley x you#buck x reader#athena grant#911 reader#911 x reader#buck/reader
508 notes
·
View notes
Note
Hiii, sorry to bother you but I was wondering if you could tell me how do you sharpen your gifs? The ones from your pinned post look so great I'm in love. I hope you're doing good 💗💗💗
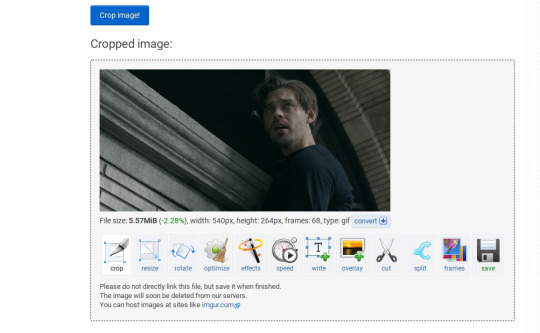
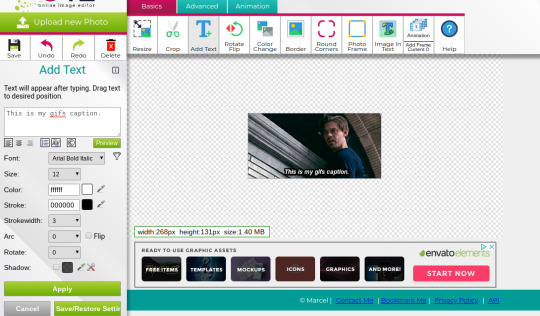
hii! don't worry you're not bothering me at all, i like getting asks :) thank you!! i don't think i do anything super out of the ordinary when sharpening my gifs, but i can show you some settings and give some tips!
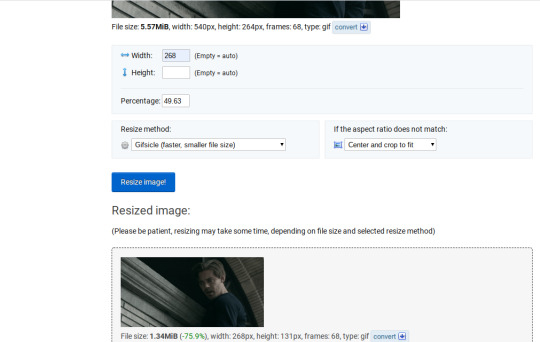
in short, the way i make my gifs is load it into photoshop, convert frames to timeline and make them a smart object, crop the image how i want and shrink it to 540px, then sharpen it and then colour it. it's best to work with an image that's same size as what you're actually uploading, bc if you edit the whole thing and then size it down you might lose quality.
as a general tip, i’ve noticed gifs of things like action scenes are usually less sharp bc there is a lot of movement, so keep that in mind. and ofc dark scenes are harder to get sharp.
to sharpen my gifs i use smart sharpen, these are my settings:

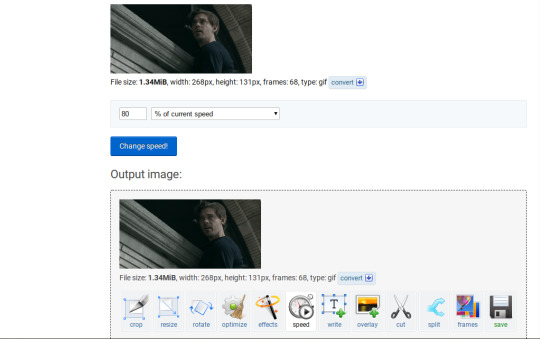
i've tried a lot of different sharpening settings over time, but i found out less is more. sometimes i also add noise, which can help sharpen a gif more, especially if its a dark scene. but it also increases your filesize so be aware of that.

for that i use these settings, although i might change it around a bit.
besides that i've noticed that it really helps to have a lot of contrast in your gifs! obvious shadows and highlights, and with a clear difference between colours. i like having vibrant gifs, but it also helps making them more clear. photoshop can only pick a palette of 256 colours, and your gif wil export sharper if there are more unique colours, instead of all being in a similar spectrum.
these are my export settings:
(instead of noise you could also increase lossy a bit, it has a similar effect but actually decreases your filesize. but don't add too much, if i use it i always keep it under 15)

this is the palette before and after i coloured my gif, with colouring is a lot less monotone!


and this is the difference with and without colouring (but with the same sharpening settings):


so you can see it isn’t just in the sharpening settings, it’s a lot of the colouring too!
i always upload my gifs to my drafts first so i can see how it looks on mobile (bc we all know there’s a huge difference unfortunately lmao). just also be aware that sometimes mobile doesn’t load the gifs correctly, which makes them look low quality even though they aren’t. what helps for me is to force stop the app and reopen it, until it looks like what i know it’s supposed to. the top gif here isn’t loaded correctly, the bottom one is.

so yeah that’s basically it! a combination of the right sharpening, colouring and export settings. please let me know if you have any questions, like i said you’re not bothering me, i promise! 😊
#ask#asks#tutorial#gif tutorial#sharpening tutorial#sharpening#photoshop tutorial#resources#mine#ive always looked up to peoples sharpening on gifs and wanting to be able to do that#and now that someone asks how i do it makes me feel like im finally there 🥺 :')#this is probably longer than intended but i want to explain it well hahah#i thought it also might have something to do with my pc having a very good graphics card but it doesnt#i tested it by exporting the exact same file on my pc and my laptop and the result is the exact same#so everyone should be able to do this!#i picked up a few small things from tutorials but most of it ive just learned through trial and error#ive been making gifs since like 2015 (not counting breaks) and i still learn new things!#also lemme know if you wanna see my psd file or actions or something im happy to share
173 notes
·
View notes
Text
wild tweets |
pairing: Harry Styles x Actress!Reader
summary: as newlyweds, you and harry read thirsty comments for buzzfeed.
warning: it's thirsty tweets, so below there is adult humor 😳
"It's a bright, sunny morning in Los Angeles, and there's nothing I want more than to be on BuzzFeed and read wild tweets alongside my husband."
"Thirsty tweets, babe." Harry corrected, laughing out loud with the producers behind the cameras.
"Thirsty Tweets." You said quickly, putting your hand over your mouth to stifle a giggle. "I'm terrible at that, I'm sorry. Can we start over?"
"Let's take a break for one to two minutes. You've given us a great introduction, Y/N."
You shook your head, smiling shyly before turning to Harry, who was already watching you with that easy smile at the corner of his lips. You liked how his hand remained firmly on yours, making those circular movements with the thumb that always served as a natural medice for your anxiety.
"You look so fucking beautiful."
The pleated dress with flounce sleeves fit you like a glove. You had made peace with the various shades of white since the wedding and knew that Harry liked to see you in that color too.
"Thank you, you're not too bad either, Styles."
You intimately suspected that Harry would always seem far beyond that "not bad" that came out as a euphemism from your mouth. He wore nothing but a pair of bell-bottom pants in a strong shade of blue and a soft vest printed with fluffy little sheep on a striped American collared shirt - in your opinion, no one could look better in farm animal clothing than Harry Styles and Princess Diana with her red "Black Sheep" sweater in the 1980s. In contrast, you knew your husband well enough to know that he was arrogant and knew exactly how hot he looked - you also made your thoughts clear enough when you kept him backstage beyond ten minutes in a rather heated kissing session.
"Are you anxious?" you asked curiously, remaining with downcast eyes fixed on the strokes that remained assiduous on your warm skin. "To read about how the whole internet dreams of fucking my wife?! Of course." Harry joked, leaning over to leave a small one on your cheek. "We agree on that, don't we? Although I'm a little nervous, I'm really interested to know all the crazy things they say about you. Everyone knows you're mine at the end of the day, that's enough."
At the end of the break, you and Harry made a silent agreement that you should be the first to pick up one of the scattered papers in the red pot. There were quite a significant amount of tweets, and as much as you were used to reading rather sordid things about your husband on the Internet, the excitement was there as if you were wading into uncharted territory.
"I would be a good girl all year round if Santa guaranteed me a threesome with Harry and Y/N Styles on Christmas Eve." You laughed, Harry staring at the camera with an expression close to the meme of the surprised Pikachu. "You guys are incredibly nasty, I love it."
"If that was the first one, I'm really worried about the next ones." Harry commented with a little corner smile, picking the next tweet out of the bucket. "I have an entire folder on Pinterest dedicated to Harry Styles' hands, and let me tell you why: those hands are art, and art needs to be recognized."
"What- Guys, you promised you wouldn't post my anonymous tweets here." You quipped with false reproach, laughing at your own stupid joke while everyone else in the studio did the same. "But I can't blame her, honestly." Shaking your shoulders, you opened another piece of paper. "Harry Styles finally confessed that he wrote Watermelon Sugar for Y/N!!!! Are you guys imagining the same thing as me?!!!!!! 🥵🍆💦"
"Exhausted emoji, eggplant emoji, and water emoji?" Harry frowned, staring at the tweet you held up. "I imagine you're in need of a vacation somewhere refreshing and you're craving a fruit that everyone eats like it's really a vegetable."
"That reminded me of that story-" You laughed, hiding your face on the table as Harry continued to offer a poker face to the camera, struggling not to keep up with you laughter. "I'm sorry, lovie, I have to share this with the rest of the world." You stated, wiping a few tears from the corner of your eyes. "Harry always wears those fancy suits to concerts, right?! Right! Turns out he looks really hot in some, like his ass molds perfectly into those tight pants and everything. I was home that night because I wasn't feeling well enough to face the big crowds, but I was still following everything on twitter. It was a concert in London, not so far from where we lived at the time, so it was obvious that he would come home after it was over. I follow some portals that do really fast updates of pictures, videos, etc; everything that happened at Harry's concert was on my timeline in a matter of seconds. When one of these profiles uploaded a picture of him with his back to the camera in a heavily accentuated black and white suit, I quickly sent him the image along with a peach emoji and then wrote "looks good tonight". He didn't reply to me until a few hours later, of course, but I obviously didn't expect a "ready for a Fifth Avenue peach salad for dinner?" and numerous cutlery emojis."
Harry rolled his eyes comically, indulging in laughter as did everyone else who occupied the backstage area.
"I'm against the eroticization of emojis." He said between uncompensated breaths, shaking his head negatively. "Let's go to the next ones, please, I'm already feeling exposed enough here."
"I like your old-fashioned spirit, baby." You assured him with a smile, laying on the sturdy shoulder hidden under the fluffy fabric.
Harry chuckled low, leaving a little kiss on the top of your head before selecting the next paper. The fans would die when that video aired, everyone was sure. You two easily forgot the cameras when you were side by side, and the public display of affection had never been a problem.
"My life mission is to look at someone the way Harry looks at Y/N and be reciprocated the way Y/N looks at Harry, then I could die happy." Harry read. "That was very good and healthy, thank you!" He smiled. "But don't settle for death in that case, please. Just make sure to keep that person around forever."
"Awn, we got so sweet now." You made a pout. "Thank you for sending us something so cute! I really hope you find the right person soon." Sending a kiss to the camera, you moved on to the next tweet. "I wouldn't want to get a golden ticket to visit Willy Wonka's factory, I would like to get a golden ticket to actively participate in Y/N and Harry Styles' Honeymoon.
"That was creative, so I will disregard the fact that you removed my last name from my wife's name." Harry joked.
"I will always be an Y/L/N." You flashed the tongue. "We had a great Honeymoon, but I know you guys already know all about it because there are pictures all over the internet of outings that I don't even remember existed."
"Even though we chose a rather reserved city, many paparazzi still managed to photograph some of our nights there." Harry agreed. "There was one particular day when we opted to have dinner at a restaurant near the beach. Y/N had found it even before the trip, it was pretty laid back and we could spend the evening at karaoke. I don't really remember what happened, but we woke up the next day with a terrible hangover, still wearing the clothes from the dinner and with several headlines saying that I was cheating on my wife in the middle of our Honeymoon with a blue-haired italian girl."
"That wig made me sexy, man." You blinked, laughing as you remembered the situation. "It's a shame the paparazzi only got low quality images, but I swear I looked really amazing that night. Italy, I miss you."
"We're coming to the end and I haven't had to ask production for a glass of water yet, thank you to whoever selected these tweets." Harry raised his thumb to the camera, smiling before turning his gaze back to the small paper he had chosen. "Y/N could literally punch me in the face and I would just bow down and thank them for it." He laughed. "She has heavy hands, so I would rethink that choice."
"It takes strong hands to be a superheroine." You blinked gracefully, referring to your works as a Marvel actress. "I move around a lot during the night, so I'll take this lovely opportunity to say that twitter can dismiss all the malicious theories about Harry always show up with a new bruise all over his body."
"Please stop making indecent assumptions while Y/N is aggressive with me at night only unconsciously, her father has access to social media."
You laughed, clearing your throat before reading the next obscenity aloud.
"I would sell all my possessions to have Y/N sitting on my lap for ten seconds."
"Oh my God." Harry laughed out loud, throwing his head back. "I should have said that in our wedding vows."
You shook your head, laughing low as you set the tweet aside.
"That was pretty funny and cheeky, I approve."
"Okay, looks like we finally got to the last one." Harry announced, waving the paper in the air dramatically before opening it. "Harry could literally crush me with those boots while fuc- I need that glass of water." He said dumbfounded, hiding his face between his hands after throwing the tweet over his shoulder. You laughed out loud next to the organizers, and meanwhile Harry leaned his head on your bust, staring at you still with wide eyes. "Please promise that we will be careful with our future children on the internet."
#harry styles imagine#imagine1d#imagine harry styles#harry x reader#harry styles x reader#harry imagine
701 notes
·
View notes
Note
your mobile header is so pretty!! could you please say how you did it?
absolutely, angel !! below the cut, you will find a STEP BY STEP tutorial on how to make a mobile header like these two examples !!
program ; i use adobe photoshop cc 2018, but any version of photoshop can work.
difficulty ; easy. knowledge of outer glows + stroke required
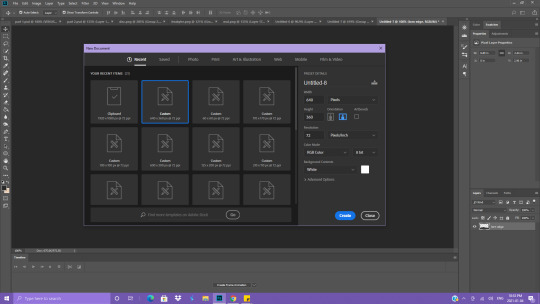
STEP ONE ; making your document
open up photoshop, or whatever program you are using to edit !! you’re gonna make a document that is 640 x 360 pixels. this will only work on your mobile header if you make sure to STRETCH HEADER IMAGE when uploading it, or it’s gonna look super wonky
STEP TWO ; torn paper
the next step is to make sure you have your torn edge ready to go !! i use a brush effect that my best friend gave me, but i’m sure you could also use an overlay / png !! right HERE is a link to a set of torn paper brushes for download, i THINK they’re the same ones i use but i’m not sure. either way, they should work exactly the same !! now you can move this as high or as low as you want, depending on how much tear you want and how much room you want for your content.

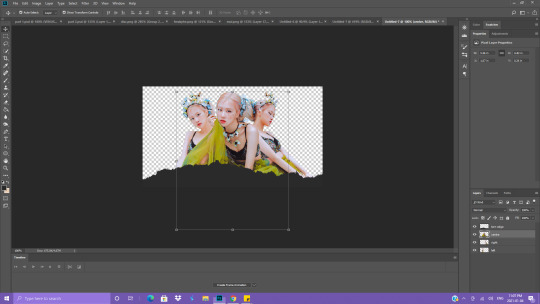
STEP THREE ; your object of interest
now you need to add your pngs !! i like to do the three, as i think it looks most pleasing to me, but you can get funky with it !! you can cut your own pngs, but that can be pretty time consuming, right ? i use THIS website absolutely religiously. it’s super accurate when cutting your photos into pngs, and will even do so for objects, not just people !!
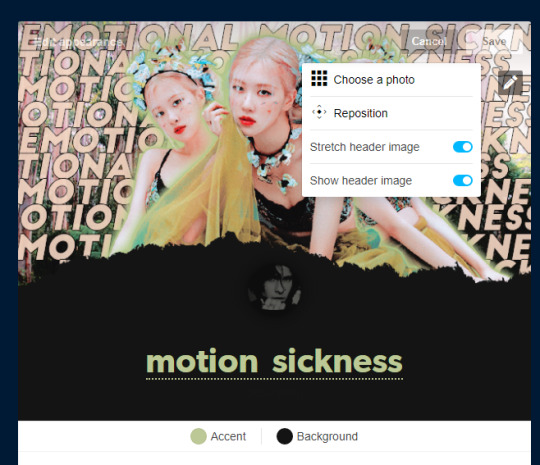
STEP FOUR ; choosing your background + png glows
you gotta use a photo that’s gonna compliment the colours of your pngs that you chose, or at least match the vibes !! now is a great time to add your psd so you know what’s gonna look best with your colouring for the end result. it’s also a great time for your png glows !! if you don’t know how to do it, no worries, it’s SUPER easy !! all you need is stroke + outer glow !! i’m sure the majority of you all know how to do them. these are my usual settings for outer glow, and the stroke is pretty simple once the tab opens up. i like to make my stroke about 2 pixels big, as any bigger makes it look super chunky. make sure it’s on the OUTSIDE. but to each their own !! you also do not have to add a glow ( as seen in the second example, there is no glow ), i just think it looks nice !!

STEP FIVE ; time for text and finishing touches
time to add all of your text !! super simple process, i swear on my life. make sure it covers the entire background, and then just duplicate and duplicate and DUPLICATE !!! shift each line a bit so it’s not the EXACT same. add a stroke on your text, just a simple black line works for me, but do whatever works for YOU and looks nice. a couple of the fonts i use the most are big john, abril fatface, cocogoose, and lemon/milk !! but use whichever font you want and think suits your project best. now is the time to add anything else you may want !! maybe an overlay, maybe some cute pngs, maybe some different text, who knows !! this is your soup, baby.

STEP SIX ; time to save
now we’ve reached the end of our goal !! we have a header we are happy with, and now it’s time to save our gorgeous creation that we worked so hard on !! i like to save all my images by going FILE > EXPORT > QUICK EXPORT AS PNG. this will give us a high quality image that we can be happy with.

STEP SEVEN ; uploading your header
great !! you’ve made it to the final step !! we can see the finish line and we’re just about there. remember what i said earlier ? do not show your icon, and your header should be stretched, but make sure you choose this option BEFORE you upload the header. going back into photoshop, use your colour picker to collect the colour of your ripped edge — odds are that with your psd over top everything, the colour you originally chose for the torn paper may have changed a little. for your accent + title, go ahead and use any colour within your header ( i went ahead and chose the colour of my glow ) and save your creation. voila !! your new header is officially finished, and your mobile theme looks gorgeous !! if you need any help whatsoever, or even want me to make you one, just send me an im !!
#photoshop help#photoshop tutorial#graphic tutorial#rpc#rpt#answered.#( i hope this is okay nonnie!! )
606 notes
·
View notes
Text
Hey There!
I started a youtube "archive", which I intended to put all the PuzzleBuddi content I could find, such as early development files, gameplay clips and so on as I wanted to provide a one-stop shop for Buddi stuffs since the official wiki got taken down.
However, I lost motivation very quickly, as I unfortunately have other things I need to do. Recently, I wanted to start it back up, and in absolute horror realised that since the beta animation files I have access to are all under a minute in length, they automatically become shorts and I cannot make them not shorts.
So, I'm going to move what is on the channel onto this blog!
I tried to take a more formal tone on the channel, but I'm going to abandon that here as if there is a god, surely the sins of this site outweigh any attempt to appear in good fashion. So im just gonna write however I want, as long as it gets all the relevant info in there.
My (now abandoned) Youtube channel will still have the stuff on there, but unless I find some stuff that won't automatically become a short, no new content will be uploaded :(
The channel desc reads:
"This is an archive dedicated to gathering all of the existing video, images, sprite sheets, audio clips and so on from the game Puzzle Buddy Version 17.5. Only official game assets and examples of the game will be displayed. Due to the history of the game, some published pieces may be low quality, or contain audio or visual disturbances not apart of the Game. When this occurs, the piece will be ladled with the specifications as to the alterations. Please let us know if you find any official game pieces. If you find pieces not from this version, media related to, but not officially from or merchandise/memorabilia/fan-works of the game, we would appreciate these findings as well, but they will not be added to this archive unless they are officially Puzzle Buddy Version 17.5 sourced or added works."
On this Blog, I will add fan works, because all sense of formality has left me. Fan-work will be tagged as #BuddiFanWork, so people can tell what is not official work. Fan-work will also only be shared with permission, and credit when possible.
Welcome to the Buddi Archive!
4 notes
·
View notes
Text
How to Get Top Dollar for Your Home in 2022: Real Estate Tips for Sellers
As Per Daniel Ballerini, there are a variety of real estate ideas for sellers that might assist you in selling your house. You must recognize that real estate is a competitive sector that needs patience and persistence. You should also be aware that your home may be rejected by a large number of prospective purchasers. You may achieve the greatest potential price for your house by applying real estate recommendations for sellers. Finding the appropriate real estate agent is crucial to selling your house. Here are some suggestions for sellers:
Before you put it on the market, make sure it's in excellent shape. Low mortgage interest rates, underdevelopment, and a solid employment market may all contribute to a seller's market. Demand for homes rises as more people move to the region in search of good employment. It may also be caused by development restrictions imposed by municipal governments. In this instance, the seller may have a difficult time getting the best price for their house. Here are some more real estate selling tips:
Take high-resolution photos of your home. For capturing high-quality images of your house, you'll need a decent camera and a steady hand. A professional photographer may also take 'A'-class photographs of your home and upload them on the internet. You can sell your house quickly and easily if you put your best foot forward! It's well worth the money since you'll save thousands of dollars in the long run and your home will sell quickly once it's listed.
Daniel Ballerini suggested that, respond to offers as soon as possible. Multiple offers will keep you on your toes while also allowing you to acquire experience. Remember to gently refuse offers that are too expensive for you. You may always set a minimum price for the property, but keep the price range between the minimum and the listed price flexible. You'll be pleased you took the time to do so! If you're a seller hoping for a rapid sale, keep these real estate seller recommendations in mind.
Participate in internet activities. To advertise your real estate, post articles and blogs on wiki sites, establish a newsletter, and join forums and Facebook groups. In order to attract more potential purchasers, put up signs. If your property has popcorn ceilings or textured walls, consider renovating it. Don't forget to keep the outside looking tidy and appealing. Make sure you sell your property quickly if you want to obtain the best price. Your house is worth more money, but you must arrange it so that buyers are willing to pay top cash. If you follow these guidelines, you should be able to sell your house for top price.
Make a professional marketing investment. Find a reputable real estate agent with a lot of expertise. A realtor is well-versed in the market and may provide important advice on how to sell your house and get it sold quickly. A knowledgeable Realtor may also assist you in setting price and speeding up the selling of your house. There are various real estate recommendations for sellers that may help you sell your home quickly. You may also make a video tour to assist prospective buyers in visualizing the property.
In Daniel Ballerini’s opinion, consider making improvements to your house. However, instead of focusing on the whole house, it's best to start with a small region. It's also crucial to de-clutter your home in addition to upgrading kitchens and bathrooms. This will provide extra room for a possible buyer. Cleaning and depersonalizing closets, as well as eliminating unwanted stuff, might help you sell your house quicker. Many purchasers will be attracted by listed pricing, but not all of them will be able to afford them.
Always do a comparative market analysis (CMA) before deciding on a price for your house. If your asking price is very high, consider lowering it to make your offering more competitive. Then you may use an app like Mashvisor, which allows you to compare comparable properties side by side. It is available for a free seven-day trial. A seller might also check comparable listings' prices to determine if they can obtain a better deal elsewhere.
Keep in mind that even little details may have a significant influence on the overall appearance of your property. People may get the idea that you're careless with your house and how you live if you don't pay attention to tiny things. In the long run, this might cost you time and money. It's important to keep your front door clean and open, as well as all the curtains open. Make sure your mattresses are made and your clothes aren't on the floor. Check the sinks and use lemon-scented items.
5 notes
·
View notes
Note
how does one deep fry memes. it’s for scientific purposes
Ok so! It’s actually really fun and pretty easy to do.
You can use almost any photo editing app, from Photoshop, to the built-in editing software of your phone. But you must be able to do two things: one is that you must be able to "save as” or “export single layer”/“export as” an image as a .jpg file. If possible use a program that allows you to dictate the quality of the copy, but if not, that’s ok. You can work around it. The other is the ability to apply filters/change the saturation and contrast of the image.
Here’s how I made the Technoblade meme (more or less):
(eyestrain images below the cut)

We start out here with an already low-quality, small .jpg screenshot. But you can use any quality, size, and format of image as long as you save it as a .jpg file later. It’s just easier to make .jpg artifacts pop on a smaller image than a bigger one, and that’s what we want. Remember, quality is of the utmost importance, in that there will be none whatsoever once we’re done here. It is at this point, before you start frying, you’ll want to made modifications like eye lasers, text, and emojis. I’m not gonna add any because I can’t be assed. Save the eye-bleeding color filters for the end, it’ll look better.
Onward!
↓ ↓ ↓
Once you have made your desired edits, just click the “save as” button and select “.jpg” from the file type options if they’re given. You have made a copy. Now take the copy and open it up in your editing software. “Save as” again, and now you have a copy of a copy. Repeat step 2 until your image starts accumulating an acceptable amount of jpg artifacts, which are those rainbow-y stripey squares and bars on the image.
If you actually know how to use a more complicated photo editing software (for example, Photoshop) check to see if it allows you to export files, it may also gives you the option to change a quality setting. I reccomend setting it to around 30%, that seems to be the magic number, and export a few generations of copies. It takes fewer generations than “save as”-ing.
Next! ↓ ↓ ↓
I posterized the image, and saved it as another .jpg copy. If you do not know what posterization is or how to do it, you can skip this step, but I think it makes some of the colors look funnier and I like that.
Please remember that it may take many generations of copies before the image looks this degraded, if you’re using software that doesn’t allow you to control the level of compression (the shittiness) of your jpg images.
↓ ↓ ↓
Sharpening the image makes the jpg artifacts on the image more prominent. Very helpful. This is yet another copy.
↓ ↓ ↓
Now you make the image brighter and more colorful. Slap a filter called “Vivid” or “Pop” or something on it, or adjust the brightness and saturation yourself. Here’s where I had basically stopped, when I made the meme I posted. It looks awful.
But we can go further beyond.
↓ ↓ ↓

Here I lowered the brightness of the image and upped the contrast. Now it looks even worse (better). But please note that while it does look more fried, it also loses details and other information that are useful in telling what it’s a picture of, such as the Technoblade’s IGN above his head. So just be aware of information your image might lose when you’re mangling it. Same goes for if you posterize it, Technoblade’s name could have been very easily lost by making it the same color as the background.
But I’d like to explain about how .jpg files actually work a little bit, because I feel it’s important as to why making copies of copies is important.
A .jpg file is a not a “lossless format”. It is a format that is supposed to compress the file size of an image by sacrificing just a little bit of quality. In other words, takes up less space on your computer but sometimes doesn’t look as nice as other formats.
But a smaller size is good, in some cases. For websites and online media where loading speed is important, jpg files are usually used. In fact, Tumblr converts any .png files (without transparent, see-through elements) uploaded to the site to .jpg files, to speed up how fast they load. You may have heard the term “jpg artifact” before and know those are the rainbow squares in low-quality .jpg images, yes? That’s the file compression. Generally, if you’re making an image, you’d want to save an original or a copy you’re going to keep modifying as a .png (because .png files don’t decrease quality), and if you were to make lower quality copies that you probably won’t be editing directly, you’d save them as .jpg files.
So, imagine: what happens if you modify a .jpg in photo editing software, and then “save as” a .jpg that was already a .jpg? Well you’ve just seen what happens: you get more jpg artifacts on top of the jpg artifacts that are already there, because the software can’t tell what is an artifact and isn’t.
That’s what tends to happen with memes that are edited and shared over and over again. They are saved and re-saved as .jpg files because that’s the file type that tends to be favored/uploaded to the web on social media. So the quality goes down over time the more it is shared.
And with a little tweaking, boom! Deep fried meme.
That’s all I have to say! If you want to stop further jpgification, you can always save the image as a .png file. Tumblr will turn it into a jpg again anyway when you post it, but that’s out of your hands.
Happy frying!
27 notes
·
View notes
Text
How to gif without photoshop
Hello! By popular demand (of like 4 people) I am going to write out a tutorial of how I make gifs when I’m on my personal laptop and don’t have access to photoshop. There is another method I use with a different software that is a bit more complicated and if people are interested, I will make a tutorial of that method as well. I’ll do my best to keep this concise, so let’s get started.
Warning that this is VERY text and image heavy because I know how frustrating it can be when a tutorial feels like it’s skipping steps and I want this to be as clear as possible. Also please read this on desktop, tumblr mobile kills the quality of gifs inside text posts.
This is the video I will be giffing and here is the gif I will be making!

What you need:
A video to gif
For the best results, I recommend a video that is either 720p or 1080p (basically the higher the quality, the better). Videos with good lighting and bright colors also turn out the best. Unfortunately for me, I gif the TV show Prodigal Son a lot and that show has neither of those things, which is why my gif example is from that show; if you can make a scene with zero lighting or vibrancy look even somewhat decent, you can make anything else look good.
A video downloader or screen recorder
This is the video downloader I use and this is the screen recorder but basically any youtube video download website or screen recorder program works. Keep in mind that ezgif has a pretty low upload limit for videos, so if you want to gif something longer than like ~4 minutes, cut the video down to the specific parts you want first on a website like this one.
ezgif
A very straight forward website that anyone can access. You don’t need to download anything, it’s all online.
Bonus: Online Image Editor (not required, but I use this website to add text to gifs)
1. Making the gif:
Once you have a video downloaded, you go to ezgif.com and go to the section video to gif. Click choose a file, scroll to your downloaded video, and hit upload video. Your screen should look like this now.
There are two ways to pull out the sections of the video you want to gif. You can either write in the start and end time in the little sections (you have to convert them to seconds: for example, if my gif started at 1:16 and ended at 1:20, it would be 76 seconds and 80 seconds respectively). Or you can do the method that I feel is easier, where you go to the section you want it to start on, hit pause, and hit the blue button that says “use current position” then let the video play until it hits your stopping point, hit pause again, and click on the second “use current position” button.
Once you have the start and end time recorded, scroll down to the next part of the screen with the size options. For size, select “540xAUTO (for Tumblr)” since tumblr gif sizes start at 540p and go down the more gifs are in a row. For frame rate, try to do either 20 or 25; the higher the frame rate, the smoother the gif will look. If you are trying to gif something in 540p that is longer, you might need to chose 10 to keep it under 5mb, which is the tumblr gif size limit. For method, leave it on FFMPEG. Then hit, convert to gif.

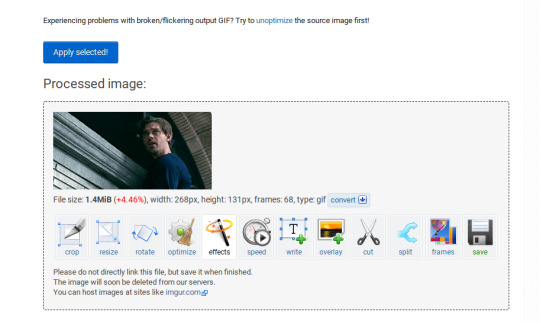
your gif will now look something like this!
Now, this gif is currently 5.7mb, which is above the size limit for tumblr (5mb or above gifs will still play if I recall, but the quality will be really bad when you post them). If I was planning on keeping the gif this size, I would go back and change the frame rate to either 20 or 10 to get the size down. However, I am going to resize the gif to 268p, so I don’t need to worry about it being to big.
Using the correct gif size for tumblr is one of the easiest ways to make sure the gif looks good! For gifs that take up a whole row, the size should be 540p wide. For two gifs in one row, the size is 268p each. For three gifs in one row, the sizes are 177p, 178p, and 177p in that order. Here is a visual of it.
The next step would normally be resizing the gif, but Prodigal Son youtube videos come with a black banner on the top and bottom that I need to crop out. You will see a menu full of options under your gif, and you want to click on “crop.”
Cropping is pretty straight forward; you just move the little box over the part you want cropped, then hit the “crop image” button. Make sure width stays 540p!

Your gif now looks like this
Next, you look at the options under your gif again, and go to “resize.”
Again, resizing is pretty straight forward. I just put in 268 into the “width” section and leave the “height” section blank since the site will automatically resize the height. You can ignore the other menu options.
Your gif now looks like this

Next step is optional, but I usually do it. Once again, you go to the menu of options under your gif and select “speed.”

Speed is also super straight forward. I almost always reduce the speed of my gifs somewhere from 90% to 80% no matter what, just because I think it makes it look smoother. For gifs that are of short scenes that go really fast, I will reduce it to anywhere from 70% to 50%. You can try different speeds to test out what you think looks best. For this gif, I’m going to put it at 80%.
Here’s what we have so far. Congrats, you have made a gif!

Now for the fun part!
2. Coloring the gif
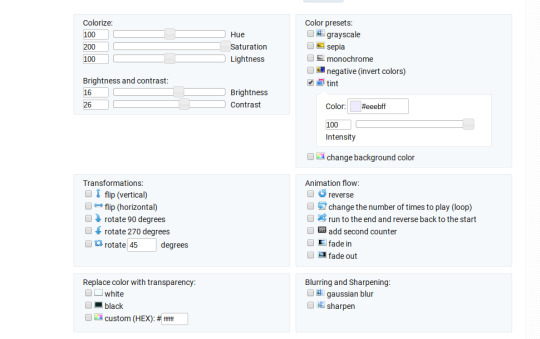
Go to the “effects” option, in the menu under your gif. You will see a LOT of options, but the panels I’m going to focus on are “colorize”, “brightness and contrast” and “color presets”. This section is going to vary a lot depending on what specific video you are giffing so remember to be flexible and try lots of different options out! It took me a while to get to a place where I can just eye a scene and know what settings to use. It’s super easy to go back and tweak a setting if the gif doesn’t look like how you want it the first time, but it’s a lot of trial and error.
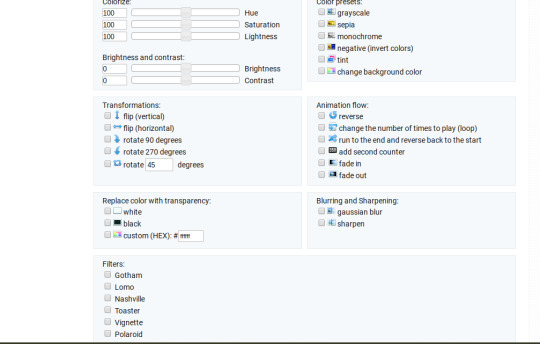
The main option I focus on in the “colorize” section, is “saturation.” This is what will make all the color in your gif pop out. The saturation I use varies a ton; for scenes that already are colorful/bright, I usually keep it around 120 to 150, since you don’t want it to be over saturated. If I’m making an edit that is supposed to look toned down or more grey/neutral tones, I’ll decreases the saturation in the range of like 90-40. For a show like Prodigal Son, where there is basically zero color vibrancy, I tend to go full out with saturation, usually in the 150-200 range. For this gif, I have it all the way up to 200.
Next is brightness and contrast. This also varies wildly, but a good rule of thumb is I always try to keep my contrast at least 5 points higher than whatever my brightness is, it just makes the lighting more even. You need to find a good balance; obviously, the darker the scene, the higher you want the brightness and contrast, but if you go too high, the gif with be staticy/grainy. For Prodigal Son, which has horrible lighting, my brightness is anywhere from 10-30 and my contrast is anywhere from 15-35. For this gif, my brightness is on the lower side since the scene is outside in natural light; brightness is 16, contrast is 26.

After you get those settings, I go over to “color presets” section and click on the “tint” option. It will pull up a color chart that looks like this
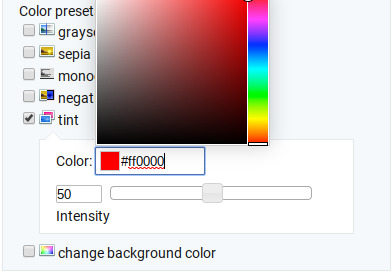
You ALWAYS want the intensity up to 100. This part is where the most trial and error occurs; there isn’t any one color option that works for every gif. The shade I use most often is light red/pink or light blue/light purple. For scenes that are lacking warm tones (which is almost all of Prodigal Son) I tend to go to the light reds, and for scenes that are lacking cool tones, I go to the light blues. The light reds are best for making characters skin tones look more...like actual skin tones and not totally washed out. To select a color, you just move your mouse around the chart. This is the range of color codes I tend to use.

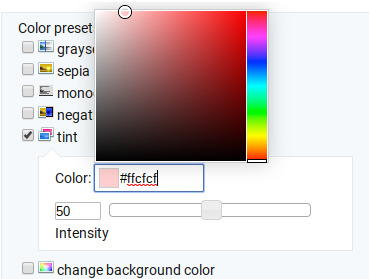
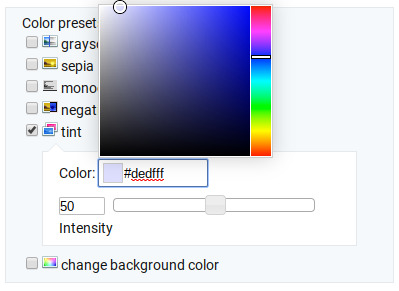
Again, intensity should be up to 100 (it automatically starts at 50 and I was too lazy to move it while getting screen shots :P).
For this gif, I actually used a new technique I’ve been trying out where I start with a light blue tint to even out the color tones, then once that gif is done, I go back to effects and add a layer of pink to make the colors brighter. Usually, one color works fine, but sometimes it’s hard to find a good balance (the red colors can get too red and the blue sometimes brings out too much of a yellow shade). For now, I have my color tint set at #eeebff.
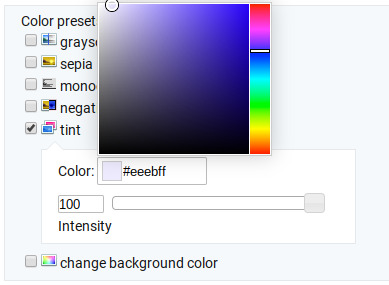
Ultimately, this is what my effect settings look like and this is what the gif looks like now.

Now, like I said before, I added another layer of tint to this gif. All you have to do is go to the menu under your gif, and click on effects again.
It will take you back to the panel you were just on, expect now your colored gif is on the top and all the settings are blank again. The only setting you need to use now is the tint option; go there, and select a light red shade. I used #fff0f0.

And here is the final gif! To save it, just right click and hit “save image as.”
I know it seems like a long process, but once you get a hang of it, it goes by super fast, especially if all your gifs are coming from the same video.
BONUS: Adding text
If you are trying to gif something with dialogue or you want a quote to put over your gif, you will want to put text over it. ezgif has a “text” option that you can use if you want, but I personally don’t really like their font options, so I use the website Online Image Editor.
This is what it looks like. You can either hit “upload an image” and upload your saved gif, or you can go back to ezgif, right click the gif, hit “copy image url” and paste that url into the “upload from url” option. The web page should now look like this.
It’s pretty straight forward from here; click on the “add text” button and a menu will appear on the left hand with options for the text.
Type whatever you want the caption to be in the “type text here” box. This website has a ton of font options you can play around with, but when I just want to caption a gif, I stick with “Arial Bold Italic.” For a 268p gif, the font size should be 10-12, depending on how much writing you plan to put on each gif (if some gifs are going to have more writing than others, pick a smaller font size so it stays consistent!) When I make a 540p, the font goes up to 14-16. I use white for the color and black for the stroke. I make the strokewith 3 because it makes the caption stand out more. Once all these settings are selected, hit the “preview” button under the text box.
You can now drag your text anywhere you want on the image! The only bad thing about this website is that it doesn’t automatically center text, so you either have to eyeball it, or if you’re picky, like me, open up one of those online ruler applications and use it to measure out the center. For captions, I move the text just slightly above the bottom of the gif.
Finally, you hit apply. Once your gif has the text on it, all you have to do to save it is right click it and hit “save image as.” And here is the finished project!
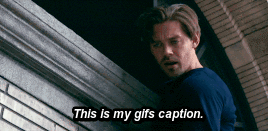
That got a lot longer than I thought it would, but I hope it was informative! If anything was unclear or if you have further questions, feel free to send me an ask. Thank you for reading.
#gif tutorial#giffing tutorial#giffing#gifmaking#mine#my gifs#long post#I hope this makes sense lol#pls rb if it helped!!!#also if mobile doesn't keep the read more...idek
335 notes
·
View notes
Text
QTVW Chapter 2
Future* President's Fiancee (II)
----
After An Mu Lan met Ling Xihan, the expression on Father An’s face when he turned his head to look at her was three parts disgust and seven parts satisfaction
Father An's attitude changed all because she analyzed the plot and memories, took the initiative to talk to him these days, and made some changes in line with the original owner's character.
After her father told An Mu Lan about the marriage, she took the initiative to approach him that night, expressing her gratitude to him for 'raising her' and expressing her remorse for always confronting him in the past.
She said that she would change her ways, worried about her father and would help him.
This conversation improved the relationship between the two, which changed Father An's attitude towards her a little bit, and these days, she also had an advantageous benefit, as she received strong support from him financially.
The first thing she did after this was to respond positively to the marriage.
In the past few days she has been ordering girly clothes, taking the initiative to dress herself and making the often cold room look warm and sweet. Some of her actions were changed to suit her father's preferences, in accordance with her tutor's teaching.
She did all this to project a good and obedient image to set the stage for her next move.
Because of these factors, Father An’s attitude towards her was more satisfied and valued, she only heard him say,
"I have something to discuss with Ling Xihan, you go back to your room and pack your luggage first.”
A father's advice to his daughter is evident in his words.
An Mu Lan had learned about this from the original owner's memory, so she didn't show too much reaction to hearing this, but answered obediently,
"Yes, father."
She watched the two go upstairs to Father An's study. She had only just returned to her room, packing her bags and reminiscing about their first meeting.
The villain, Ling Xihan, has not been written much in the novel, and was chosen as the character for this mission because the system selected her based on the criteria for defining a villain - powerful, complex background, ruthless tactics, protagonist's aura, strong luck, entanglement with the hero and heroine, and many other factors, after a multi-level selection process.
In the original owner's memory, there were a few impressions of her, plus today's personal contact, which let Mu Lan know that the subject of this mission was a woman whose joy and anger were not visible, and it was hard to let anyone see her mind. As for the task of raiding her, An Mu Lan could only take one step at a time and act like this for the time being.
As mentioned in the plot, by this time, Father An had made the news of the marriage public.
The fact that Ling Xihan is the fiancée of the youngest daughter of the An family has been reported in all the major media. And mostly under the title 'A millennium-old family joins forces with a rising economic power'
It was because of this that Father An was so angry when the original owner and Ling Xihan broke off their marriage. Because it's not just about marrying his daughter, it's about uniting the interests of the family.
The current An Mu Lan naturally won't choose to break the marriage, and her move to Ling Xihan’s residence will make it easier for her to raid the villain.
She quickly finished packing her luggage and ordered the maid to carry it downstairs, then she sat quietly on the sofa in the living room with her hands folded in her lap, looking very serious as she read a book on women and women's marriage.
After waiting for about half an hour, the sound of two people talking came from a distance, An Mulan was the first to stand up and looked up the stairs, she saw Father An with a cheerful and satisfied expression, every now and then he glanced at Ling Xihan, in his eyes, there was satisfaction and regard for her.
When Father An walked into the living room, he warmly invited Ling Xihan to join him for lunch, he ordered the kitchen to prepare a big meal and told the butler to call all the young masters back for dinner. Then he turned his head, lowered his face to look at An Mu Lan and said to her,
"Let's have a meal before we go, and you take Ling Xihan to your room to rest a bit. Xihan, what do you think?"
The corners of Ling Xihan’s mouth curled, and her clear, cold voice was on the low side as she said,
"I will listen to you, father-in-law, and I would like to spend some quality time with Mu Lan."
Hearing this, Father An became even more satisfied with Ling Xihan, he gestured with his eyes to An Mu Lan, who immediately answered,
"President Ling, my room is over here, please follow me."
An Mu Lan leads Ling Xihan towards her room. When Ling Xihan walked into her bedroom, what caught her eyes was a princess room decorated in pink and girly colours, Ling Xihan swept her eyes across the room and looked at An Mulan with a slightly unexpected look in her eyes.
An Mu Lan smiled nonchalantly and said,
"President Ling, this is my room, please have a seat."
As she said that, she guided Ling Xihan to the sofa in front of the window and sat down, while she herself knelt on both knees on the cushion beside the low table and asked her with a tilted head,
"Does President Ling like to drink tea or coffee?"
Ling Xihan sat on the backlit sofa, unable to see her expression, and only her cool, emotionless voice could be heard, saying,
"Tea, just fine."
An Mu Lan nodded, making tea with a smooth hand, her long, thin fingers curving as she demonstrated the art of tea. Her look is warm and focused, full of the charm of an Eastern woman.
When the tea was brewed, she immediately poured a cup of tea and pushed it in front of Ling Xihan, saying to her,
"It's done, you can taste it."
She took a sip of the tea and then leaned over to take a look at the young girl in front of her.
An Mu Lan's cheeks reddened under her gaze, she pulled open the cupboard of the low table with soft eyebrows, took out a biscuit box from it, handed it to Ling Xihan and said in a soft voice,
"President Ling, these are the complementary desserts for tea, they taste delicious, would you like to try them?"
Ling Xihan nodded, although she wasn't interested, she made a rare move to be different in the face of such a girl who was to her liking. She took a biscuit and ate it, the sweet taste filled her mouth, she looked up at An Mulan and saw that she was looking at her with a smile, two deep dimples at the corners of her mouth, she looked extraordinarily good and pretty, pure and soft.
Ling Xihan's heart fluttered, she had always liked girls like this. She thought it was a temporary business alliance, a union of interests, but she never thought it would bring her such a big surprise. She looked at the girl's smile and just felt that the other girl was sweeter than the taste of a biscuit in her mouth.
Ling Xihan lowered her eyes and took a small sip from her tea, the white smoke obscuring her expression as she said,
"Miss An, you can call me Xihan, after all, we are in a fiancée relationship and, as you are about to live with me, we, will have a more intimate relationship."
After she finished, she put down her tea and sat up straight, the corners of her mouth curled up in a rather amusing smile, which added a bit of vividness and beauty to her cold face, and she looked exceptionally attractive.
An Mu Lan's heart jumped and her cheeks brushed red as she hastily admonished herself, she's the one who's going after the villain, not the villain who's going after her! Hold on! Don't fall for the villain's beautiful tricks!
As she warned herself, she shyly lowered her head, hiding the look in her eyes and making a not-so-shy face, but still speaking graciously and fluently,
"Xihan, you can call me Mu Lan, the Mu of a wood to the right of the three dots of water and the Lan of orchids."
Seeing her earnestly saying her name with an indescribable naivety and delicacy, Ling Xihan arched her eyebrows and called out,
"Mu Lan."
They were meeting for the first time, so naturally, most of the conversation revolved around An Mu Lan. When Ling Xihan brought up the topic a little, An Mulan had already revealed her own situation, all to Ling Xihan.
At noon, reminded by the housekeeper's knock on the door, An Mu Lan and Ling Xihan went to the living room for lunch.
There were dozens of exquisitely shaped dishes on the dining table, from here we could see how much Father An valued Ling Xihan, and it was the first time An Mulan saw the entire An family at the dining table.
Her four older brothers, the eldest and second are already working in companies, the third is studying art and is a well-known artist, and the fourth is still at university and goes to the same school as An Mu Lan.
All four are excellent, the eldest is austere, the second is graceful, the third is literate and gentle, and the fourth is dashing and unrestrained. Powerful characters in the maid's harem.
But now An Mu Lan looked at them as if these people were just NPCs on her way for revenge, part of a mission.
After lunch, Father An walked Ling Xihan to the entrance of the An residence, and naturally her four brothers accompanied him all the way.
An Mu Lan secretly surveyed their expressions, and saw that the eldest and the second had masks on their faces and were emotionless, while the third had a sad frown, and the fourth had raised eyebrows and was clearly angry.
An Mu Lan knew that the video of the maid and her four brothers, which had been uploaded to the campus website, had still had a partial impact on these people.
This gave her great satisfaction and it seemed that all she had done before had not been in vain.
After today, she will move in with Ling Xihan, the An family's wild storms are no longer too relevant to her, and the four brothers can't find out the truth, and in the end, they will only push this matter to their rivals. Even if they suspected her, they would take into account her performance these days, focusing on the marriage, and the lack of motive to clear her of suspicion of committing the crime.
An Mu Lan was in a good mood as she said goodbye to the An family and took a car to the other side of the city, to Lings Xihan's villa.
Ling Xihan now lives in a villa area on the outskirts of the city, and from its residence, it fits perfectly with her emerging president's status, which is unremarkably low-key.
Within this villa of hers, there are no servants or housekeepers. Because Ling Xihan is a person with a strong sense of privacy, she does not like others to come near her territory, so there is no sign of outsiders in this villa, except for the occasional assistant who comes over to take care of the rooms.
Ling Xihan took her inside the villa and arranged a room for An Mu Lan near her bedroom, explaining,
"This room is yours."
After that, she left the villa in a hurry.
An Mu Lan surveyed the room, which had taken two days to set up neatly, during which time Ling Xihan had been away on business and had not returned home.
When Ling Xihan had finished the business at hand, she returned home at night and opened the door to see, wearing a pink nightgown with an apron, An Mu Lan, carrying a plate of home-cooked food, walking out of the kitchen.
13 notes
·
View notes
Text

I am super excited to announce that I currently have these two 4x6 art prints for sale at my Etsy store! I'm very pleased with how they turned out. Selling art prints is something I have always wanted to do, so this is very much a happy moment for me! :)
You can check them out here! (Please Note: The image here is a bit compressed/low quality from downscaling for uploading!) https://www.etsy.com/shop/SuperBeckyShop?ref=seller-platform-mcnav
> Please do not re-post or use my work in any way without my permission! Thanks! <
#undertale frisk#undertale sans#frisk undertale#sans undertale#undertale#undertale fanart#sans and frisk#undertale prints#undertale art prints#frisk and sans
5 notes
·
View notes
Text
Get Paid To Take Pictures With Your Phone – 20 Ways That Work(Previous)
This is an article quoting a blogger.For more high-quality content, please go to the subscription blog: https://italiangoat.com/
In the past, high-quality cameras were expensive, fragile devices used primarily by professional photographers. And while you can still spend a pretty penny on a top-of-the-line model, most modern smartphone cameras are more than capable of taking amazing pictures — even if all you know how to do is point and click.
And whether you’re a full-time photographer or an amateur in search of a good side hustle, there are dozens of ways to sell the images from your phone.
All you need is a smartphone with a camera and a good platform on which to sell your photos.
In this post, we’ll run down some of the best ways to get paid to take pictures with your phone, and we’ll answer a few of the most commonly asked questions about the process.
Getting Started
Starting a photography side hustle is not as easy as whipping out your phone to catch a pretty sunset, then selling the image online.
Before you can get started making money from your iPhone or Android photos, you’ll need some equipment, software and basic know-how. You don’t need to be an expert — just cover these basics and you’ll be ready to get started.
Smartphone with a high-quality camera: With technology constantly advancing, a good smartphone camera is essential if you want your images to sell. Even if your images are properly framed and well-lit, they’ll be tough to sell if they’re shot with an outdated lens or in low resolution. Here’s a post that outlines some good quality smartphone cameras that will serve you well.
Photo editing software: You can do basic edits on your phone, but if you’re optimizing photos for print (think wall art and merch), you’re better off editing your images on a computer. Adobe Photoshop and Lightroom have been the industry leaders in photo editing software for decades, but if the price tag is too steep, GIMP (desktop) and A Color Story (mobile) are cheaper alternatives for editing your photos.
#1. EyeEm
EyeEm has some exclusive technological advantages over other stock photo sites. The app’s algorithm analyzes your photos for aesthetic value and relevance and automatically tags their visual elements.
EyeEm also partners with Getty Images, a major stock photo website, which increases the exposure (and potential sale) of your images.
Completing photography “missions” (requests or contests from EyeEm clients) can get your photo licensed by big name brands, get your image shared on EyeEm’s social media channels, or earn you swag.
EyeEm pays a 50% royalty rate for sold images, and you retain all the copyrights to the photo.
#2. Foap
The Foap app offers clear guidelines on acceptance criteria for photos. You can also connect with other Foap photographers and get constructive feedback on your photos.
Foap offers 50% profit sharing on sold images. Payments are sent via PayPal.
Foap’s marketing is not as strong as some other big name stock image companies and apps. This has resulted in some users complaining about a lot of work for minimal pay. However, if you’re a new photographer looking to develop your skills and gain exposure, Foap can be a solid option.
#3. Snapwire
Snapwire has a fairly generous payout structure: you keep up to 100% on client requests and challenges, and you earn 50% on downloads from subscribers.
This app is much more based on client requests than others. Requesters can award points to photos that exemplify the look they’re going for. At the end of the contest, requesting companies buy the photos they want from the winner(s).
Photographers can “level up” with successful images and projects, gaining advantages with each level that helps them gain more exposure and sell more photos.
#4. AGORA Images
Based in Spain, the AGORA app is more like a social media platform than a stock photo website. They offer cash prizes for their weekly photo challenges, with winners determined by app users’ votes.
Payouts range from $1,000 to $25,000, along with the chance to be published in some of the leading newspapers and magazines around the world. Because they focus on a worldwide audience, competition is diverse but also steep.
AGORA is a great way to gain exposure. That said, while you may get lucky and win one of the contests, other apps may be a better fit if money is your primary goal.
Stock Photography Websites
When you see breathtaking landscapes and portraits with personality on stock photo websites, you may think they’re all shot by expert photographers with years of experience. But that’s not necessarily true. Many of these stock photography websites accept and sell images from shutterbugs of all types and experience levels.
#5. Adobe Stock
Formerly called Fotolia, Adobe Stock is woven into the Adobe suite of products. You can upload your photos directly from Lightroom or Bridge. If you’re new to tagging your photos, Adobe Stock’s AI will prompt you with relevant tags. Adobe stock pays 33% royalties to contributors via PayPal or Skrill.
#6. Shutterstock
Shutterstock is one of the most popular stock photo sites on the web. It offers a mobile app to help track sales, submit photos and get notifications of what customers want. Their payout structure is tiered, so the more lifetime earnings you have the greater the percentage of royalties you keep. Earnings top out at 30%.
#7. IStock By Getty Images
A great option for the experienced photographer, iStock by Getty Images requires you to get accepted to be a contributor. This is one of the most well-known stock photo websites, and while royalties start at only 15% (more for exclusive contributors), the high traffic makes it an option that’s well worth your time.
#8. 500XPrime
500X Prime offers high royalties for contributing photographers — 30% for non-exclusive and 60% with exclusive content. Each photo is reviewed prior to licensing for technical quality, originality, aesthetic value, and other requirements.Plus, their proprietary “Pulse” algorithm is designed to surface the submissions of new photographers so they can gain feedback and increase their exposure.
#9. Twenty20
Twenty20 is a part of the Envato ecosystem, which is an array of marketplaces for creative producers that offers everything from website templates to visual assets for use in video games.
If your photo gallery makes the Curated Collections, you’ll gain increased exposure on Twenty20’s website. Check out the Sold Feed to see what photos are selling in real time to help guide you on what to shoot.
Twenty20’s Subscriber Share is a more complicated payout structure than most, but it rewards photographers who have devoted, niche followings.
#10. DepositPhotos
Like Getty Images, DepositPhotos requires photographers to pass a short test and submit sample photos before they start uploading. Their compensation structure is generous: contributors earn 34% to 42% royalties from on-demand photos and $0.30 to $0.35 from subscription files. You can also level up your pay grade based on your overall amount of downloads. The more downloads your photos get, the greater your royalties on all your photos.
#11. Dreamstime
Dreamstime has been selling photographers’ stock photos since 2000. With a worldwide audience, the site supports multiple currencies and languages. It doesn’t require prior approval or testing to upload, but it does vet images to meet standards of commercial and creative appeal. Payouts range from 25% royalties for newbies to 60% for exclusive contributors.
Photos On Merchandise
You can create additional value by turning your photos into items for sale — especially if you have graphic design skills to create fresh, new images. From t-shirts to coffee mugs to wall hangings, there are online markets for all sorts of widgets to sell with your decorative photos.
#12. Etsy
On Etsy, you can sell prints, canvases, framed photos or digital image files — it’s all up to you. Opening your shop on their website is easy and free, and listing each item costs only 20 cents. Etsy handles the transaction while you do all the printing, packaging and shipping.
#13. Merch By Amazon
You can turn your art into t-shirts with Merch by Amazon. Amazon takes care of the business side of t-shirt production (printing, shipping and handling, and payment). Plus, they produce t-shirts as they’re ordered, so you don’t pay anything upfront (and you’re not stuck with boxes of t-shirts you can’t sell cluttering up your garage). Royalties are $1 to $10 per shirt.
#14. MiPic
If you want to go a step beyond t-shirts, MiPic can turn your photos into leggings, swimsuits, towels and more. Open your own customized print store and earn up to 20% commission on the sale of your items. There are no setup fees, and MiPic takes care of all of the manufacturing, sales and distribution aspects of the business.
#15. Society6
Society6 is more than just an online marketplace for selling items with your photos on them; it’s also a community of artists to engage with and inspire you. The website is very artist-focused, which is why they offer 10% commission on referred sales in addition to the 10% you make on your own items.
#16. Redbubble
Redbubble gives you a lot more leeway on setting your own prices than other photo sites. Rather than the website setting the price, then paying you a commission, Redbubble sets the base price, then you choose the markup on your items for sale. They offer a wide range of products to display your images, from scarves to coasters to journals.
#17. Instaprints
Instaprints has several unique marketing tools to increase your sales and exposure. You can sell on Facebook, through retail stores, and even license your art for the walls of TV show sets! The Instaprints mobile app lets customers see how your image will look on their wall before they buy.
Most features come with a free account, but premium members can access additional options like building your own website and sending promotional emails.
I will regularly share the high-quality content of the blog in order to help more people.
#make money online#make money at home#quick cash#money making blog#make money 2021#investment advice#Investment and financial management#virtual currency#make money on instagram#Hackers make money
2 notes
·
View notes
Link
Instagram for writers… whether you love it or hate it, there’s no denying Instagram’s prevalence in modern society. In 2019, more than 200 million users visited a business profile every day, and 60% of users learned about new products through Instagram.
So, what does this mean for you as a writer?
The bottom line is this: you should be on Instagram. If you want to build your platform and attract an audience as a writer, Instagram is one of the best places to do so.
Problem is, Instagram is a primarily visual platform. As writers creating words and books rather than photos, it can be difficult to translate our work to fit that mold.
It’s difficult, but not impossible.
A lot of writers think they just can’t do well on Instagram, or that there is no market for their work on the platform, but this is almost never the case. As long as you’re willing to put in some effort, you can make it work for you.
How do I know? After taking some courses, studying free resources, and honing my Instagram strategy, I organically grew my Instagram account to more than 7K followers (at time of post). I did not buy any followers, nor did I participate in any follow/unfollow schemes, comment/engagement pods, or anything like that.
All I did was put more time and effort into taking and editing photos, figured out my audience’s wants, planned my posts rather than winging them, and paid attention to my analytics.
Interested in making your Instagram account the best it can be? Keep reading to discover what you might be doing wrong—and how you can fix the issues.
You’re posting low-quality images.
This is one of the most prevalent issues I see in the world of Instagram for writers. As I mentioned earlier, Instagram is a primarily visual platform, so image quality matters. You can’t just put up a low-resolution, grainy, or poorly lit photo and expect it to gain any traction. Take your photos in bright, natural lighting, and avoid using too many filters, which can muddy an image. If it doesn’t look good, don’t post it.
All you post are screenshots.
So many writers are shooting themselves in the foot by only posting screenshots. In most cases, the screenshots are at least varied, but needless to say, this isn’t a good look. Here’s a big Instagram tip to help with this one, as well as most other aesthetic-related issues: check out your whole feed in your profile, and ask yourself if you would follow your account. If the answer is no, well, why should anybody else?
It’s okay to post a screenshot every once in a while, but try not to make it a habit. I share screenshots of Twitter posts regularly, but I put them on my Stories, where they’ll vanish after twenty-four hours and don’t conflict with the rest of my feed.
All you post are memes.
Same concept as the previous. Unless your author account is purely a meme account (which it shouldn’t be), avoid posting memes unless they’re directly related to your work. Jenna Moreci shares memes specific to her series, which totally works for her. You are not Jenna Moreci. Besides, Instagram should showcase your creative side, and what’s creative about reposting other people’s content?
It’s all about you.
Although your Instagram is your Instagram account, it shouldn’t be all about you. I have a harsh truth for you: if you’re a new writer, no one cares about your work. You have to make them care. How? By providing value, insight, and entertainment. You have to earn their trust and develop a relationship with people before you try to sell them them.
Your Instagram account should not be self-promos all the way down. Balance promotional posts with informative and educational content. When you’re posting, ask yourself, “Why does this matter to my audience?” If it doesn’t, don’t post.
Another bad look: Don’t comment on people’s photos or DM them anything along the lines of “hey, please check out my book!” or “follow my account!!!!” It’s off-putting, to say the least, especially if you’ve never spoken to that person before.
You treat Instagram like a Facebook photo album.
One of the biggest reasons I unfollow someone on Instagram is that they post too often. I can handle several times a day as long as the posts are spread out, but when someone uploads twenty-five photos from their most recent vacation—and the photos are only seconds apart—it’s spammy, and I’m out of there.
Instagram is not a Facebook photo album. When in doubt, share only the highlights rather than every single photo, and really make it count. If you want to share multiple photos, please spread them out too.
If you incorporate the tips I’ve given in this post, you should see great results. I started out on Instagram with almost zero guidance, especially because there aren’t many authors on Instagram using the platform to its full potential, but I’ve grown exponentially and want to help other writers do the same.
As an author, so many of my website page views and book sales come from Instagram. As an editor, most of my clients find and book me via Instagram too. I cannot say enough good things about the platform and its role in my business.
I want the same for you.
If you’d like to see more posts about Instagram, let me know. Also, if you have Instagram-specific woes or questions, leave those for me too and I’ll address them in future posts!
99 notes
·
View notes
Text
Is iPhone 12 Pro Worth a Buy? Here's an Ultimate Guide to Find Out!
Apple launched the new iPhone 12 Pro on October 13, 2020. A Smartphone with a lot of features that will help users do their tasks in no time. Let's take a look at all the features of the Apple's iPhone 12 Pro and find whether it’s really worth a buy in 2021.
What are the key features of iPhone 12 Pro?
Apple iPhone 12 Pro has 5G, A14 Bionic chip, a Pro camera system, LiDAR scanner, Super Retina XDR display (brightness is 1200 nits and contrast ratio is 2,000,000:1) and a brand new design with ceramic shield. It also supports multiple HDR formats like HDR 10, Dolby Vision and HLG.
What are the dimensions of the iPhone 12 Pro?
The exact dimensions of the Apple iPhone 12 Pro are 146.70 X 71.50 X7.40 mm and weigh 187.00 g.
Is the iPhone 12 Pro Waterproof?
The iPhone 12 Pro comes with an IP68 rating for water protection up to 6 meters deep for up to 30 minutes so you can now take pictures unwater without worrying about the phone. iPhone 12 Pro is protected against everyday spills, including coffee and soda.
Apple iPhone 12 Pro Camera
In the iPhone 12 Pro, the rear camera has 12 megapixels (f/1.6) (f/2.4) f/2.0) with autofocus and rear flash, while the front camera has 12 megapixels (f/2.2). Using wide-angle and ultra-wide-angle cameras, the iPhone 12 Pro can capture professional-quality images and videos even in low-light conditions. The device also features Apple ProRAW for more creative control over photos. The addition of night mode in multiple cameras enhances image quality in any lighting. iPhone 12 Pro has HDR video with Dolby Vision. The LiDAR scanner offers the fastest autofocus in low-light conditions.What is the Zoom Range of Apple's iPhone 12 Pro?
The device features 2x optical zoom in, 2x optical zoom out, 4x optical zoom and digital zoom up to 10x.
5G in Apple's iPhone 12 Pro
With each release, Apple improves the quality of iPhones. Now with 5G, the iPhone 12 Pro offers the next generation of performance.
"This is a huge leap for iPhone, bringing the best 5G experience to the market and delivering our most advanced technologies to users who want the absolute best from their iPhone," said Greg Joswiak, Apple's senior vice president of Worldwide Marketing.
5G on iPhone ensures faster downloads and uploads, high quality video streaming, more responsive gaming, real-time interactivity in apps, FaceTime in high definition and more. Customers will also be able to enjoy a secure, fast connection that offers speed of up to 4 Gbps, even in crowded areas. The iPhone 12 Pro also features Smart Data Mode, which extends battery life.
Apple's iPhone 12 Pro Battery
Apple uses Magsafe for wireless charging. MagSafe chargers efficiently and delivers up to 15W of power. It can simultaneously charge existing Qi-enabled devices. The iPhone 12 Pro has 2815 mAh capacity battery. You can also use a Type-C power adapter, which can charge the device up to 50 percent in half an hour. While MagSafe is an easy way to charge your iPhone 12 Pro, you can still use a wired charging method.
How do I charge the Apple iPhone 12 Pro with MagSafe?
Connect the USB-C port on your MagSafe charger to a recommended Apple USB-C power adapter rated at 20 watts (W) or more, or a compatible third-party USB-C adapter. You can also connect to a USB-C port on a Mac or PC.
Do not place credit cards, security badges, passports, or key fobs between your iPhone and the MagSafe charger, as this could damage the magnetic stripes or RFID chips in these items.
If you have a case that has one of these sensitive parts in it, remove it before charging or make sure it's not inbetween the back of your device and the charger.
Please visit our blog to read the full review about Apple’s iPhone 12 Pro.
#iPhone 12 Pro#Apple iPhone 12 Pro#iPhone 12 Pro Battery#iPhone 12 Pro Features#MagSafe Charger#iPhone 12 Pro Camera
1 note
·
View note
Last Seen Blogs

tahliah-rose94
What I Want From Life

idkthisbemyjournal
a personal journal

butlersaid69
Untitled

sunflower-815
Life with flowers

fuckyeahpipesofpan
Pipes of Pan