#tie dye tutorials
Video
youtube
Tie Dye T-Shirt Tutorial : Rainbow Spiral Portal with Shiitake Scrunch!
#youtube#hwi tie dye#tie dye#tshirts#how to tie dye#riahs tie dye#tie dye for beginners#tie dye tutorials#video#tie dye instructions#tie dye clothing#tutorials
2 notes
·
View notes
Photo


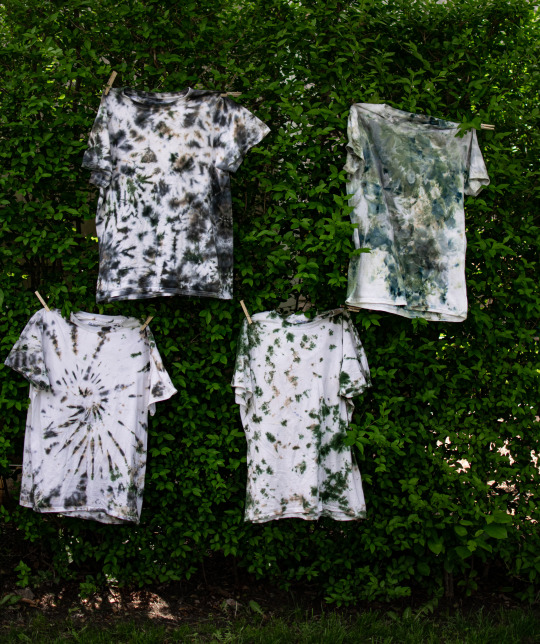
DIY Camo Tie Dye Shirts
For one, getting black tie dye to actually be black can be really difficult. More often than not, the color bleeds into whatever colors the company made to create it. I’ve found two key players in dying fabric black, and not purple or blue: heat and brand of dye.
✖✖✖✖✖✖✖✖
sew-much-to-do: a visual collection of sewing tutorials/patterns, knitting, diy, crafts, recipes, etc.
28 notes
·
View notes
Text
youtube
This tutorial video I put together on behalf of my small business Real Bad Shirts serves a twofold purpose: promoting the online storefront itself, but also transparently highlighting the D.I.Y. spirit that I have cultivated for the brand. Given the target demographic of artistic, conscious, alternative young adults, it made the most sense to target a laidback, conversational atmosphere, with matter-of-fact editing and captions evoking content often posted to TikTok. A balance between authenticity and professionalism was key.
#tutorial#tie dye#real bad shirts#small business#upcycled#videography#alternative fashion#lofi#Youtube
0 notes
Text
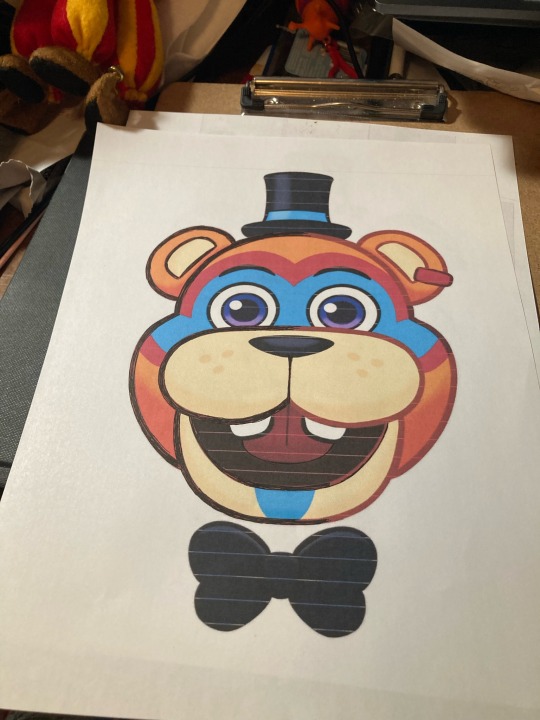
Solar Lunacy (or really any) Freddy Patch tutorial!
Two ways I feel work are Hot glue and sewing.
First things first: youll want one or two printed coppies of the freddy head template. I covered mine in tape.
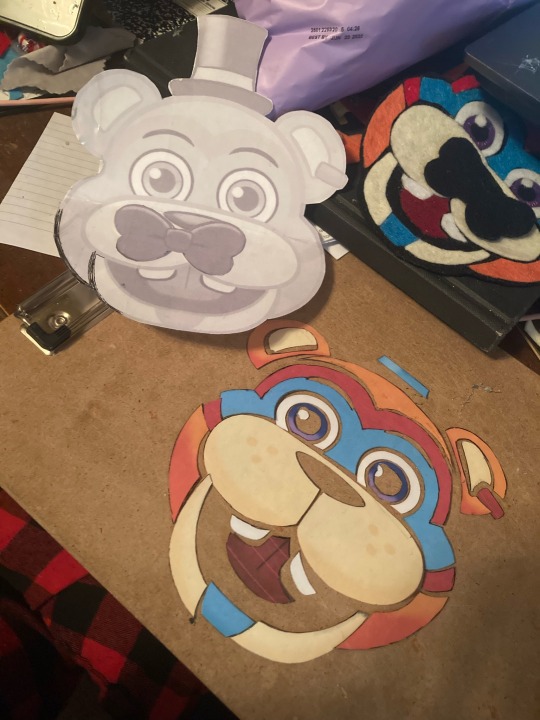
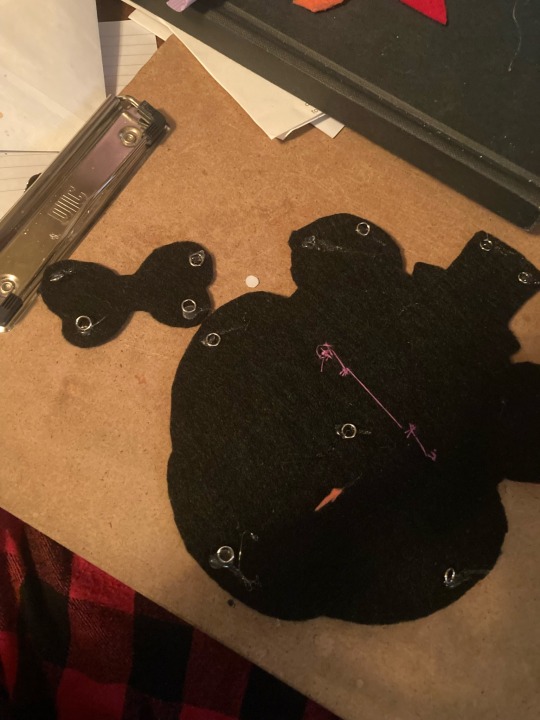
For black, cut out the freddy head and bow tie as a whole piece and cut it from a sheet of black felt. Then cut out the individual pieces by colour.
White: eye whites, eye shines, teeth
Cream: muzzle, jaw left, jaw right, inner ear left, inner ear right
Orange brown: (I had to dye my orange to the correct colour) cheek left, cheek right, head top, ear left, ear right
Red: cheek left, sheek right, brow, earring
Blue: chin, brow, hat band
dark red: tongue
Purple: irises
Optional: black: nose, pupils, eyebrows
If you have a cleaner cut job, yours will look better but hot glue those pieces on there. I recommend glueing or sewing in this order
Blue brow arch
Red brow arch
Muzzle
Tongue
Teeth
Chin
Eyes
Cheeks
Head
Ears
Hat

After sewing or glueing everything on, add in details like freckles and the line in the tongue. I decided to not do those because I already decided to redo the whole thing by hand sewing at a later date but anyway

After that either attach it to your jacket permanently or safety pin it from the inside. I added little loops for the safety pins to go through because I had them.
You can also see that I added in some light purple lines to the eyes. Sewing through glue is stupid so dont be like me and do this before hand if thats something you want
If I were to sew this (which I will probably be doing), id cover my thread ends with something like fabric glue to keep them from coming undone if it were to be removable otherwise id just sew it to the jacket.
If you intend for this to be a permanent fixture on your jacket, glue or sew that puppy -er- bear? On there securely. I mean add some stitches and glue to the center to keep it secure and everything
Or use peel and stick felt, im not your dad.
Happy crafting DCA simps and thanks @bamsara for the great fic and character designs
Ill try and post the jacket process later ✌️
851 notes
·
View notes
Text
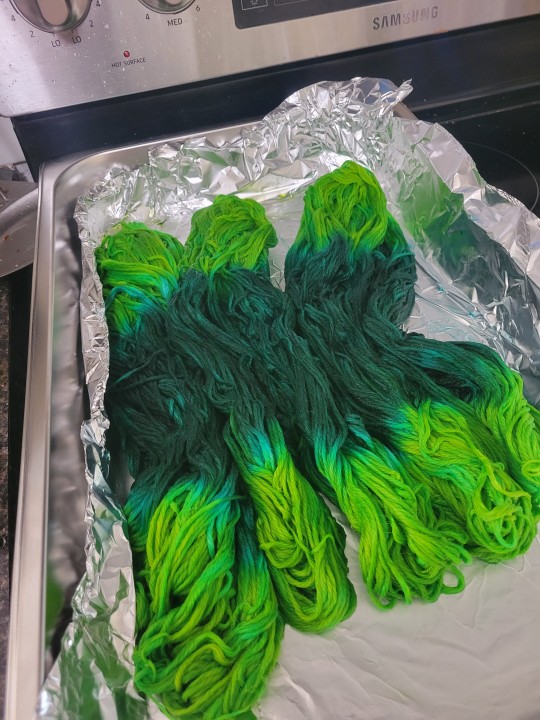
Trying dyeing in the oven following this knitpicks tutorial (undyed yarn is in sale this month at knitpicks so they sent out a link to this tutorial). I've been looking for a good oven dyeing tutorial so I can dye more than two skeins of hand painted yarn at a time since my dye pot with the steamer tray only fits 2 skeins of yarn at a time. I currently have six skeins in the oven! Like a cat that has learned a new trick I am now unstoppable hohohohohoho.
I used 16 oz of each color of dye liquid per 300g of yarn. I probably could've used another 4 oz of chartreuse dye liquid but that's okay. I did an intensity of 1TSP chartreuse dye per 8oz and 1/2 TSP emerald dye (Jacquard acid dye color names) per 8oz of water. So all total for 6 skeins I used 4 TSP chartreuse dye and 2 TSP emerald dye.
They both bled blueish green or just flat out blue. I left the emerald in the center a bit mottled on purpose because I am using this yarn to test my moss stitch shawl I'm designing and I thought the mottled look would add to the overall texture I am going for. I can't wait for them to dry so I can wind a skein into a cake and see how it looks! Definitely should've tied it off a couple more times because this came with only two ties in the skein. It's really annoying that knitpick's undyed yarn comes with only one or two tie offs. That's not enough.
Anyway, I'm having the time of my life dyeing yarn. This is art for me. It's like painting except after you do the painting you get to use the thing to make more art. It's the best!
72 notes
·
View notes
Text
DIY Goth Shorts
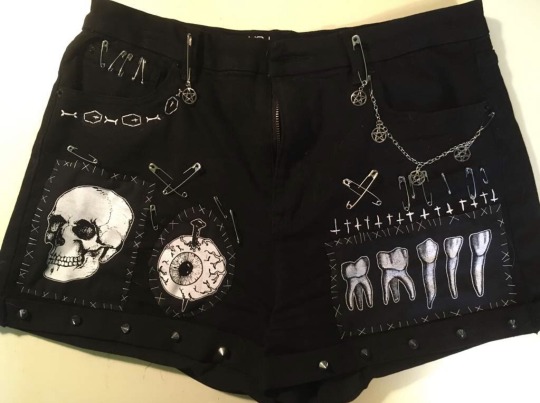

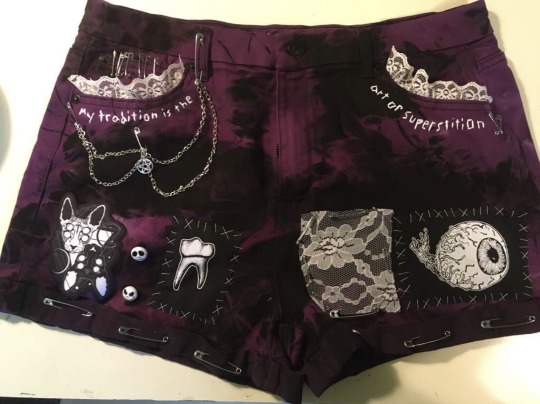
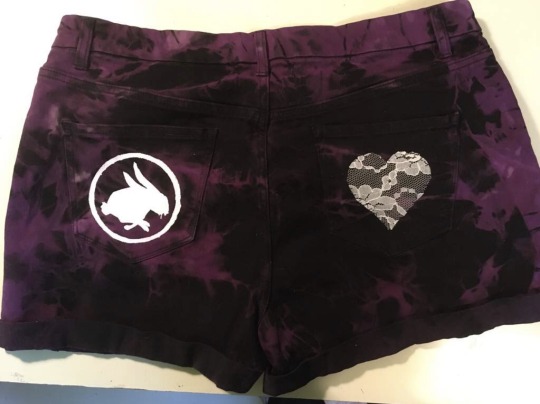

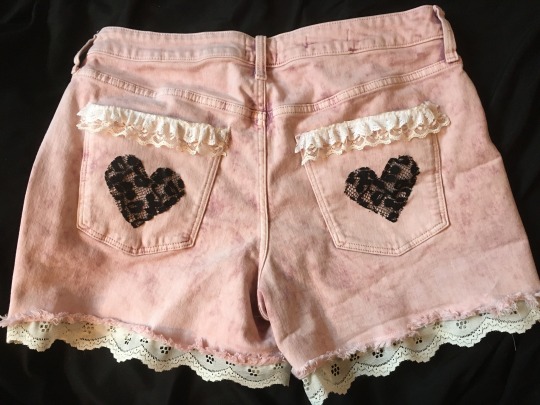


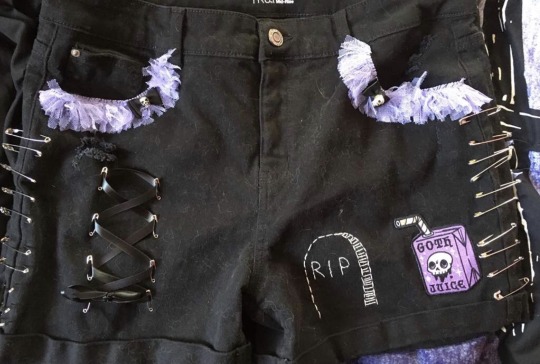
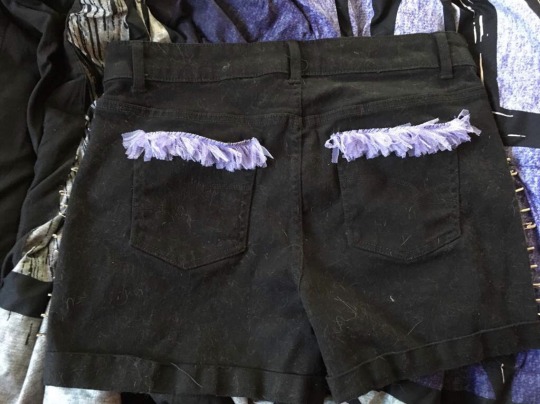
Goths of Tumblr, grab your sewing needles and safety pins, because have I got a fun and easily-customizable project for you!
I’ve been gothifying shorts and pants for a couple years, now, and they’re just so much fun to make! Very affordable, too, since all the shorts I get are either thrifted or from Walmart. From then on, I add anything I see fit—patches (bought from Hot Topic and Etsy or DIY), beads, chains, safety pins, fabric paint, embroidery, charms, ribbon, lace, buttons—you get the idea. Lots of my lace trim comes from thrift stores, charms are easy to find in bulk online, you can get beads at Walmart or your local craft store, embroidery floss and needles can be found at Walmart and are cheap (and easy to learn how to use!), and if you don’t want to buy patches you can easily make your own by creating stencils with freezer paper (tutorials are on YouTube) and dabbing on fabric or acrylic paint with a sponge brush.
I’ve also tie-dye bleached and dyed some black shorts for a cool black-and-red and black-and-purple pair. I’ve customized long pants for colder weather, as well, which may get their own post if people are interested.
If all this sounds intimidating to a new crafter, worry not! I have some really simple pairs that took no skill. I don’t have pictures, but I have one pair that just has 2-inch safety pins on the hem and a chain pinned at the pocket. That’s it! No sewing, no painting, just pins!
I also have a pair that has sew-on-studs on the hem and one patch on the leg for a less-busy design if all the eclectic clutter isn’t your vibe.
Point is, you can add whatever you want to some shorts to make them uniquely yours. They can be as busy or plain, colorful or monochrome, girly or grungy as you like! Heck, they don’t even have to be goth. I encourage anyone who knows how to hand-sew or embroider to customize their clothes, no matter their style. It’s fun!
358 notes
·
View notes
Note
Hii! I'm the one who sent the chopstick ask for &TEAM like 28383 years ago, so I'm ready to submit another one haha! I'm happy that you're back, I really enjoy the way you write the members!! So my request is; how would the members act with a very long haired s/o? Although you're free to decline if you don't feel like doing this request! Stay safe and take care! <33
This is brutal because I cut my hair whenever it's too long for my liking and now I want long hair lol. Here ya go!
Masterlist
&Team reaction to a long-haired s/o
Warnings: fluff, a bit of suggestive but nothing bad
Word Count: 1077

-K
-Loves your long hair so much but also feels like it must be a pain in the ass to take care of
-Watches you brush your hair and get frustrated by all the knots so he suggests to brush your hair for you
-The moment he comes across the first knot and the brush gets stuck he feels you wince in pain and he gives up
-Absolutely hates hurting you and will not continue to brush your hair knowing it hurts
-Watches you do your hair with admiration because he knows he would get angry at his hair if it were that long
-Always points it out to everyone you two meet.
-"Look at their beautiful hair!"
-Fuma
-Loves stroking your hair whenever and wherever you two might be
-Would have your head in his lap as he played with the strands of your hair.
-He would watch tutorials on hairstyles and try them out on you. The first couple of times are rough but he learns quickly and you swear he could becom a hairstylist
-Likes to experiment with hairstyles as well but he is still too afraid to use a curler or a straightener knowing he could burn off your hair
-He also watched many hair fails so he will not do anything that he is not familiar with because he is afraid he will break your beautiful hair.
-Has a weakness for you with two long dutch braids (especially if he was the one who braided them)
-Nicholas
-NO ONE, and I mean NO ONE is as enchanted by your hair as Nicholas
-You have a ponytail in and it sways left to right when you walk? He's enchanted
-You are doing something and your hair keeps falling in front of your cute face? Enchanted
-You are about to do something and put your hair together so it won't bother you? Enchanted!
-Will always point it out but to people who couldn't care less
-"Look at their beautiful long hair!" *heart eyes*
-"I know Nicholas, you've pointed it out like seven times today."
-EJ is done with him, I swear
-EJ
-Speaking of the devil, he is the most unbothered about your hair
-Until you have two ponytails in . . .
-Then he is gone
-He becomes such a school boy whenever you tie your hair into two ponytails. Starts stuttering, blushing and just overall nervous
-He has tried to do your hair on different occassions but it didn't really work out
-Remember how Fuma was too scared to use the straightener?
-EJ did and lets just say. . . there is a small strand that burned off and he felt so guilty that he bought you tons of chocolates to make up for it.
-Yuma
-A mess
-He loves your long hair, don't get me wrong, but he hates it as well
-Everytime you cuddle, your hair is in the way
-Or when he comes up behind you because he feels romantic for once and wants to kiss your shoulder, your hair is in the way
-Has a love hate relationship with your hair lol
-He loves it on days when you have a pretty hairstyle like braids or ponytails or even buns
-Absolutely touches it every day just to feel how soft it is
-Would suggest tons of weird colors to dye your hair into because he knows you will rock every single one
-Sometimes sneaks up to you with scissors just to scare you
-Jo
-Funnily also has a love-hate relationship with your long hair lmao
-He'd be the one to suggest a walk outside and then wind comes out of nowhere and he sees how much you struggle to keep the hair out of your face so he gets upset at your hair for bothering you
-He also loves to stroke your hair and just relax with you on the couch
-Whenever someone suggests you cut your hair, Jo is quick to defend you and say that your hair is perfect and doesn't need to be cut
-Has absolutely no idea what all the hair products are for but loves watching you take care of it
-Also gets angry at your hair whenever you try to brush it but it hurts too much because of all the knots
-Would love to brush your hair for you and does it so gently
-Harua
-My guy is just so confused on why you wanted such long hair
-I mean, yeah it looks good and God does it suit you perfectly but it's just a ton of work for basically just hair
-He would be the one to suggest you cut it like once a month and every time you tell him 'no'
-Is the one to annoy you by playing with your hair or gently pulling on it every now and then just to piss you off
-Would play it off like "See, I told you long hair is useless. You get stuck everywhere."
-Once you actually do cut your hair, he would cry.
-Absolutely devistated that you cut your beautiful long locks but gets over it in like 1 day
-Because hair grows and it will be long again in no-time lol
-Taki
-Unbothered but at the same time smitten
-Listen, most people have hair so he does not notice it immediately but you do find him stroking or playing with your hair unconsciously
-And whenever you point it out he gets so flustered like :0
-Watches you braid your own hair and suggests to teach him so he can do it next time.
-It takes practice, alright
-Lots and lots of practice. . .
-But once he manages to braid your hair perfectly, he's so happy and proud of himself
-Never stops and always braids your hair because he enjoys it so much
-Maki
-He would be getting flowers and put them in your hair
-Your nickname is Rapunzel now, deal with it (even if your hair is not blonde)
-Will recreate the Tangled hairstyle with the braid and the flowers and will make pictures so he can brag about it to everyone
-Loves it whenever you let him play with your hair
-He probably made you cut a small strand off so he could make a bracelet of your hair (it's a real thing I swear)
-Never takes the damn thing off
-He would love it if you curled your hair
-If you have natural curly hair, he would be enamoured in a heartbeat
#&team#&team drabbles#&team scenarios#&team imagines#&team fluff#&team headcanons#&team nicholas#&team k#&team ej#&team jo#&team fuma#&team yuma#&team harua#&team taki#&team maki
97 notes
·
View notes
Text
Acid Dyes In Squirt Bottles: kinda a tutorial
So I bought some silk scarves with an eye toward dyeing them to use for giftwrapping for Christmas, and I'd idly meant to research techniques but suddenly realized I'm running out of time.
Almost all the tutorials on dyeing anything at all that I can find lately are for ice dyeing. Which is cool and I love that that's so trendy now. But some of the ones I've watched...
Well, see the point of ice dyeing is that powdered dyes often split into components and so you get really cool edge-effects where the different pigments in the dye penetrate the fabric differently because of the slow wicking action of the melting ice etc. I watched a tutorial where someone just had three primary colors, which are generally pure pigments, and did this, and I was like, you could have put those into squirt bottles and saved yourself about 8 hours plus all the time you spent making that ice. It did give a nicely feathered spectrum effect but the ice mostly did not contribute anything to the process.
But what I did learn from that tutorial was some advice on how to get acid dyes to strike in a cold low-immersion process. So I'm going to write up what I did, since that's what I was actually looking for, and every bit of information I can currently find is contained in overly-long videos that spend most of their runtime on irrelevant stuff.
Mostly this is for my own reference later, as I'm now old enough that I keep stumbling across things I've made and being like "wait I don't remember how I did this. I really made this? I have to have, nobody else lives here. How did I do this??" So anyway, overly-long and underly-technical writeup below the cut. Pictures to follow in a separate post.
What do I mean, cold low-immersion process??
Immersion is how most dyeing works. You make a dye bath, and you dunk your fabric into it. Low-immersion means you lie your stuff all out on some flat surface, maybe over a wire rack maybe over a sheet of plastic, and just put enough dye on for it to soak in. That's low-immersion, and generally is how you're gonna get multiple unmixed colors on one object.
and cold? Well, acid dyes, which work best on protein-based fibers like wool and silk, need heat to strike, or actually bond to the fabric. If you just dunk some silk in a dye bath and then rinse it, the dye mostly rinses out. You need heat to set it.
Let's back up a second-- acid dyes?? So there are two main types of dyes you use on fabric. Acid dyes are called that because you add some vinegar once the dye has soaked in, to get it to stick. (Yes, you need acid and heat!) The other kind, which you usually use for ice dyeing, is fiber-reactive dyes. Fiber-reactive are what you want for cotton, linen-- plant-based fibers, and some synthetics. (Nylon works with acid dyes for some reason, rayon needs fiber-based. I don't remember why but the Internet surely knows, it's surely very simple.)
So anyway. Fiber-reactive dyes are applied to fabric that's been pre-treated with soda ash and then set without much heat, though they do need to "cure" at a high temperature-- it doesn't have to be as hot as with acid dyes though. (A black plastic bag in the sun, an electric blanket lying overtop the bag they're in, that level of heat at most.) So they're the usual, traditional type of dyes you use for tie-dyeing, which is normally done on cotton t-shirts, and which very often is done with low-immersion methods to let you get a bunch of colors on there, are fiber reactive dyes. Many many many tutorials exist for this, including how to tie them. Very cool stuff.
I wanted that effect on silk though.
(*the alkali pre-rinse is fine for cotton and linen and such. alkali on silk is Generally Bad News. This is another reason people generally don't do fiber reactive dyes on silk. Silk shrugs off acid reasonably well but alkali is no bueno. Also for the record never ever try to bleach silk for any reason, that dissolves it. Now You Know!)
So. I did find this tutorial from Dharma Trading, about space dyeing. Remember when space-dyed stuff was trendy?? Many of you whippersnappers probably don't. It used to be cool and is probably what led to the invention of ice-dyeing, which clearly like A Person invented but I have no idea who and I bet finding out would be difficult so my ADHD ass is NOT going down that rabbit hole right.
So i tried that. I used aluminum foil instead of plastic wrap for the simple reason that my kitchen is currently torn apart and all my worldly goods in cardboard boxes but I had a roll of aluminum foil in the basement for some reason. I put down a vinyl tablecloth on my washing machine and used it as a work surface. And I found a broken old steamer insert and set it in an old aluminum pot that lives in the basement.
I mixed up squirt bottles of four colors of acid dye in approximately the proportions from the Dharma tutorial. I don't have measuring implements currently, see above re: kitchen (I'm planning on retiring a number of my measuring implements to serve in fiber arts, and keeping only the nice ones for the new nice kitchen, but that hasn't happened yet) so it was all very approximate.
And then I just lay each silk scarf out on the aluminum foil on the dryer and went to town.
I learned to be careful and sparing with the amount of dyes, to keep them from pooling underneath the material-- silk scarves aren't very absorbent. Any excess dye pooling on the aluminum foil will of course spread and get muddy. So what I wound up doing was working from right to left (on my left was the laundry sink), and doing my lightest color on the right and my darkest on the left, and then when I was done, I used an eyedropper to apply white vinegar to lock in the pigment, and then I picked the whole works up very carefully and tipped it to the left and let everything extra run off into the sink. So having my, say, fuschia run across the back of what was supposed to be a dark purple section didn't lead to any notable color contamination. One colorway had bright lemon yellow in it, and I was incredibly careful not to let any smudges or drips touch that-- kept it on the right of my workspace, propped up slightly. The yellow draining across the red and purple of that colorway didn't cause a problem, but I did wind up with a fingerprint of darker color in the yellow area (I think that's what caused the blot anyway).
Anyway, once the dye was all applied, and I'd let it drip into the sink for a moment, I then folded up each scarf into its own packet, careful to still keep the lighter end upward, and put it into my busted-ass steamer basket which made this easier because one of the legs has fallen off it, see, so it tilts anyway, that's why I retired it, and put the lid on and steamed each packet for about half an hour to 45 minutes.
At the end of that I pulled each packet out (there were overlaps, where I'd put a second packet in halfway through the first one. Most of the Strict Rules About Steaming Silk don't apply to this process because drips aren't a problem, dips in temperature that might lead to uneven mottling aren't a problem, this is just meant to be pretty color splotches with random patterns so literally none of the intimidating stuff you have to do to achieve perfection are a problem here), I let it cool off a bit and then unwrapped it and rinsed the scarf. Not much color came off them, and I was able to reuse the foil, which it's not that I'm being eco-friendly so much as that I only had the one roll of foil with not much left on it and this was the last day I could really do this, so. Not very scientific, but in the end I really was very thrifty LOL. Yes! I was being eco-friendly, that's why i'm like this.
I then let the scarves dry on my drying rack overnight, and came back the next day to collect them. I brought them all back to my mother-out-law's to wash them in her washing machine since mine is currently not properly hooked up (additional nightmare, love it)-- I figured this wouldn't be messy in her impeccable laundry room and I was right, very little dye to rinse out. Gave them a wash with dharma's professional detergent, then a rinse with milsoft, then an extra rinse, and I've now let them dry again, ironed them, and have them in a plastic bag with some perfume because the detergent smells kind of awful LOL. I'm letting them sit like that for a day or two and then I'll get them out and package them up for gifts.
27 notes
·
View notes
Text
Blood-Splatter Tutorial
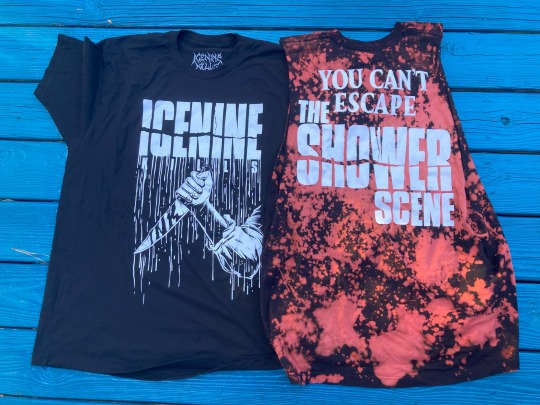
I recently altered one of my band shirts and I love how it came out! I used bleach tie-dye and then redyed it with red tie-dye, as well as cutting off the sleeves beforehand.
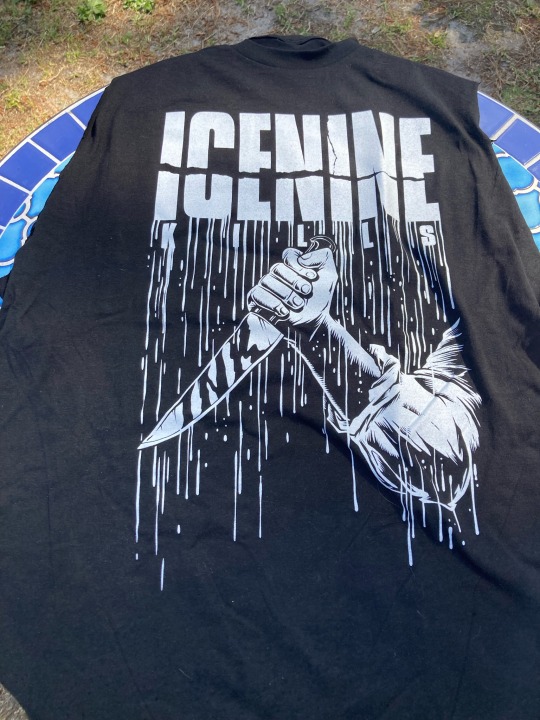
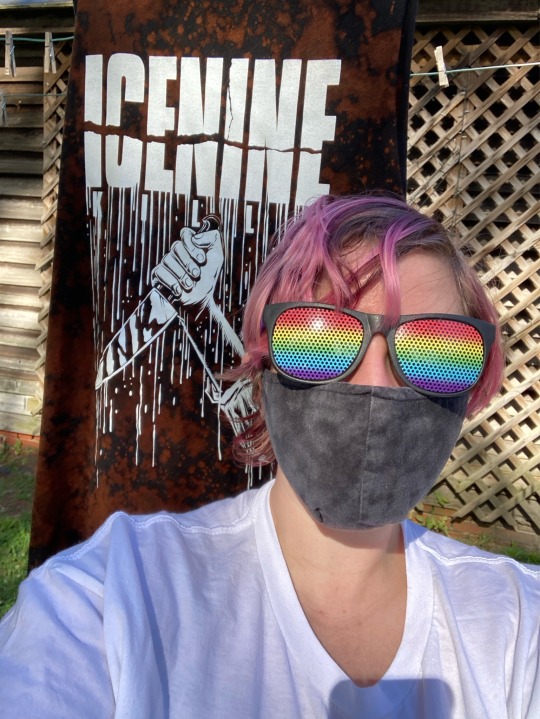
You can find my tutorial up on my Instagram if you’re interested!
#diy or die#blood splatter#ice nine kills#the shower scene#alt boy#alternative#diy punk#diy projects#diy ideas#horror#band shirt
71 notes
·
View notes
Text
A list of TMA headcanons that came out of a recent brainrot session with my cousin
Jon used to wear glasses but no longer needs to after waking up from his coma
they're small, square, gold glasses. he doesn’t start out with a glasses chain, but gets one eventually because grandma core
Jon damaged his glasses at some point so he taped m up. Then the skin on his nose got irritated because he kept pushing them up
the event that damaged Jon’s glasses may have been: the worm attack (MAG 39), breaking into getrude's appartment or the not!Sasha attack (MAG 79)
in s1 Jon cleans his glasses very often. He always has the little cloth with him, at all times. He cannot stand dirt on the lenses, but maybe more so than that, he thinks it makes him appear put together, important, smart etc. he will often clean them while in conversation with his colleagues, as an attempt to show dominance.
Jon stops cleaning his glasses regularly in s2
Jon does not handle it well if you put them down on his desk wrong
Jon gets a haircut the day before he starts as head archivist and then never again.
somewhere in s3 Jon starts brushing his hair less and less. it gets matted
somewhere in s3 Georgie tried to teach Jon how to sew. he stabbed himself a thousand times and gave up
during Jon’s coma, Martin would often come by and detangle his hair for him. he is so gentle about it. it takes multiple sessions, but when he’s done, he braids it. it’s a fancy braid, too
Jon does not redo the braid, he keeps it as it is. it gets floofier over time, with more loose strands
s2 Jon, Martin and Sasha all regularly put their glasses on top of their head and then forget them, but Sasha especially
Tim’s vision is pretty bad but he refuses to get glasses
Sasha’s glasses are big, gold wire and either octagonal or heptagonal, but with rounded corners. they have the type of lenses that turn blue in sunlight, funky stuff. She has a glasses chain
Sasha knows how to sew, knit, crochet etc. she makes a lot of her own clothing.
Sasha keeps fabric scraps and makes patchwork clothing out of them.
Sasha has a jar of buttons on a shelf. or maybe it's an ordered box with compartments. if it's a box, she made it herself.
Sasha has a shelf full of crafting supplies.
Sasha has a garden where she grows vegetables and herbs
Sasha makes her own strawberry jam.
Sasha loves cooking
Gertrude has those tiny little glasses that pinch onto her nose. they’re oval and silver.
Getrude knows how to knit, but only does it when she wants to look like a harmless old lady.
Elias also does not need glasses, but he wears them to be smug.
Elias’ glasses are small, half moon shaped and gold, He has a glasses chain with little eyes at the ends. they may or may not be prescription. it does not matter to him
Martins glasses are big, round dark blue wire.
Martin has some plushies
Martin mends his own clothes because he doesn’t wanna waste them
Martin is pretty good at knitting and crochet
Melanie dyes her hair blue
in s4 Melanie’s hair dye is faded and starts to grow out.
Melanie wears contacts. They are prescription, but also might be coloured, maybe to work better with her hair.
Melanie stops wearing her contacts in s4, because they are too much work to keep up with and she is not going to leave the archives to replace them, that’s too dangerous. Her prescription is pretty low, so it’s manageable.
as Melanie gets more and more affected by the ghost bullet, her irises slowly start to turn red.
Malanie has sewed some patches to her clothing. she’s also dyed some of it.
Melanie likes to tie her shoelaces in fun ways. She looked up some tutorials online.
Georgie loves sewing while listening to podcasts. the podcasts are mainly about true crime, media and art, and some political stuff.
Basira wears reading glasses. they’re rectangular, black, plastic glasses. they’re pretty cheap, she doesn’t wanna waste money she on glasses she only wears sometimes
#tma#tma spoilers#jon sims#jonathan sims#martin blackwood#melanie king#georgie barker#elias bouchard#gertrude robinson#basira hussain#tma headcanons#tma fandom#my posts
46 notes
·
View notes
Photo

DIY Bleach Stamping
Bleach stamping is a fun easy way to upcycle your clothing and add a little pizzazz. It’s a great idea for girls night in (or just something cute to send as a gift in the mail). It also works on masks!
✖✖✖✖✖✖✖✖
sew-much-to-do: a visual collection of sewing tutorials/patterns, knitting, diy, crafts, recipes, etc.
#DIY#clothes#clothing#fabric#dye#tie dye#stamp#stamping#bleach#upcycle#decorate#art#craft#tutorial#simple#easy#summer
29 notes
·
View notes
Text
“me and the bad bitch i pulled by being autistic”
(rambles under break!)
i really like using tumblr as a way to ramble abt my designs!! so here ^_^
i started with designing them both as a sketch on my phone
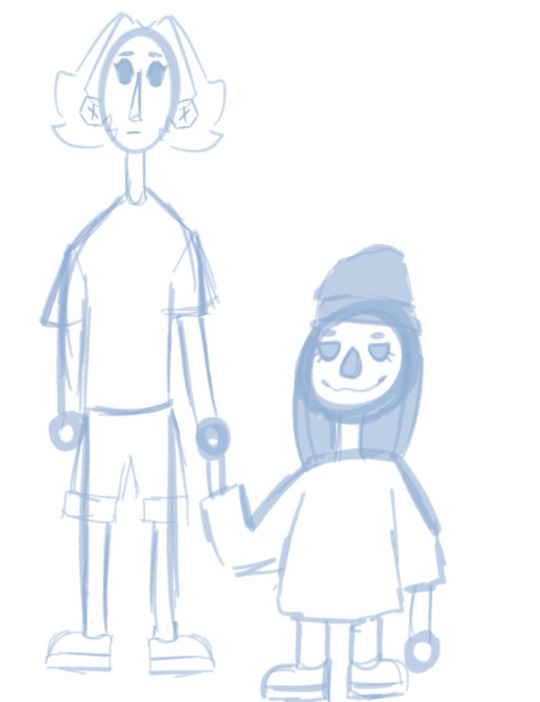
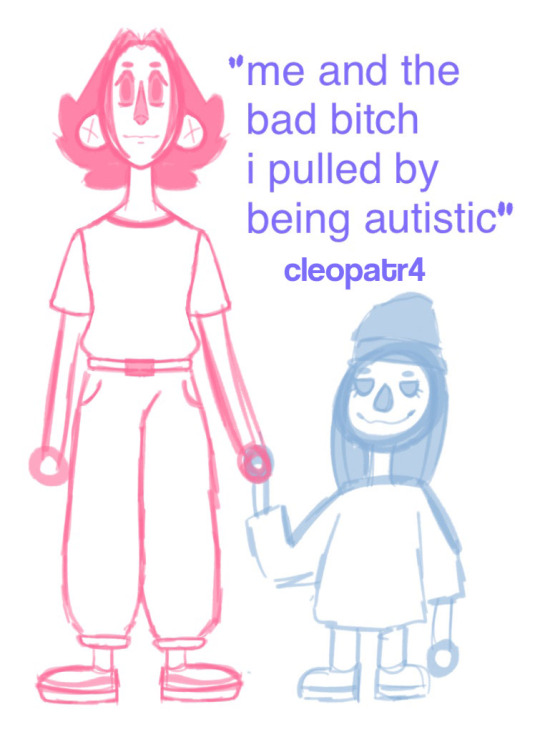
and guqqie actually had a few revisions bcs i wasn’t happy with the first version. as you can see the original is like pretty just boring and plain… I actually made aimseys first so after the first sketch i added it into illustrator and then blender to create aimsey and had completely finished and after making them i was like Hmmm i need guqqies to be more interesting too! so I used her design from the meet the artist video as a reference! I ended up with a silhouette i enjoyed way way more! (pink ver) it was a lot cleaner and just was a bit more unique!
Step 2 was vectorising in illustrator! As i mentioned i actually completely finished aimsey by the time i got to re-sketching guqqie but it was good because i was able to know what mistakes to avoid and it made the whole process so much quicker!
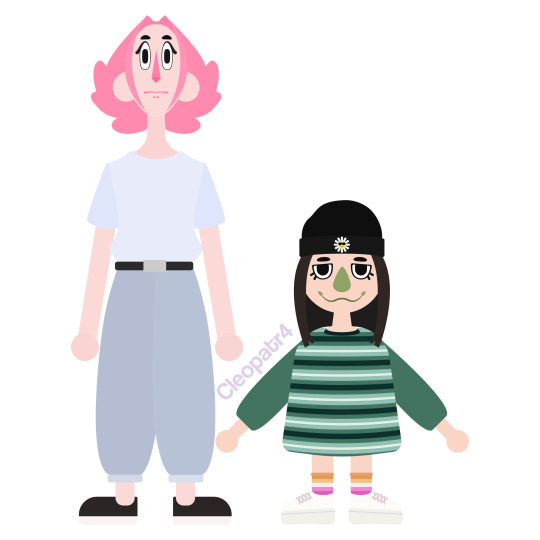
finally in blender i created them separately and then brought them into one combined file! Aimseys shirt was actually a fucking NIGHTMARE to make lmfao i started with doing what i know and using an image texture just a png of the stripes in illustrator but it just kept turning out… Wrong it looked bad and just didn’t fit at all! plus UV mapping was the worst thing ever bcs i had used sculpting for this so it was all very small tiny details!!! so after a bit of trial and error and some tutorials i landed on using colour ramps ! it also took a while to get the like size and rotation and all that jazz but i loved how it turned out!!! Their compensators were actually so much easier to make than i originally thought too! I watched a simple sneaker tutorial and was able to come up with everything myself following pictures online :D !! also lesbian socks Smile
Since guqqie has been talking about liking tie dye shirts a lot recently (esp the potential future merch) i wanted to incorporate it ! i watched a 5 minute tutorial and it was actually so so easy i’m so happy with how it turned out! it took a while to get the right saturation and brightness but i think it turned out nice!
23 notes
·
View notes
Note
Hey! I found this blog while looking for cosplay tips
I'm going to start making my first ever cosplay soon, so I'm looking for some tips!
I'm hoping to thrift as much of the outfit as I can but I'm guessing I'm gonna have to alter a lot.
But of course I have to choose a character with so many details. . . (I may simplify)
Anyways, any tips for this character? If you wanna look into him more it's Martin from Rune Factory 5 but I have refs all around

Hello there!
I love to see that you are doing Rune Factory cosplay!
That said, some parts of this will be very easy to thrift and modify, and others will need a little creativity and perhaps sacrificing of accuracy. I'd suggest something with fewer armor details for a first cosplay, but that's still doable with some work.
I'm coming at this from the angle that you are thrifting due to both skill level and budget.
From the top:
The grey shirt will be quite easy. Find a white or light grey ribbed shirt or sweater, cut off the sleeves and sew the edges so they don't fray. If you got a white shirt, check the fiber content -- I'd recommend a natural fiber like cotton -- and dye it to light grey. Use the cutoff sleeves to test the dye.
If you can't find a sweater with ribs, you can get one without the ribs and sew with a twin needle to fake it.
The vest is going to be difficult to get from a thrift store and alter due to the shape. You MIGHT be able to get a blazer or vest in the correct color and alter it, but that would probably be more difficult than making it from scratch.
If altering: remove the sleeves. Cut off the lapels and the collar. Cut open the front to the correct shape, and add the side dart to fit it, as well as fitting from the side seams.
If making: Alter a pattern to have the correct front opening shape, do a mockup, and take it in to fit.
Either way, you will need to sew on the brown leather portion and then line the vest. You can add the straps yourself by sewing them out of the same fabric as your vest.
The apron is easy -- simply take a rectangle of fabric, hem it, and sew a strip of fabric onto it so you can tie it around your waist. For the pockets, I'd do patch pockets and glue on fake rivets (painted googly eyes, anyone?). The zigzags can be done just with topstitching.
For the pants, you can buy the widest leg pants you can find, paint on the stripes, and take in the bottoms. You can use the excess fabric you cut off the length of the pants to create the cuffs.
For the armor, look through our website for armor tutorials -- I'd recommend foam for budget reasons.
Good luck! This will be a challenge to thrift most of, but with some mods, you can probably get something close enough.
—Fabrickind / Q&A Staff / Twitter
31 notes
·
View notes
Text
youtube
Ice dyeing is a fun way to create colorful patterns on fiber using flowers from your garden. Plus, it is a simple technique that you can do to capture a slice of summertime color. This tutorial will show you how to ice dye with whole flowers, as well as the resulting tie dye effect on silk gift bags pretreated in different mordants.
CHAPTERS
0:00 Intro - Ice dyeing with flowers
1:49 Dye flower fun
3:26 Flower pickin'
4:08 Silk fiber
5:07 Frozen flowers
5:52 Ice bundle build
8:29 Midway thaw
9:13 Reveal
11:37 Ice dye results
13:09 Wrap up
14:13 Sneak peek of next tutorial
15:00 Blooper
SUPPLY LIST
Dye flowers - coreopsis, sulfur cosmos, scabiosa/pincushion, geranium, marigold
Shears
Ice
Strainer
Pot
Mordant - alum acetate & gallo tannin used in video
Textile of choice - silk featured
#Margaret Byrd: Color Quest#solarpunk#how to#how to dye#natural dye#ice dye#dye#diy#do it yourself#flowers#silk#coreopsis#sulfur cosmos#scabiosa#pincushion#geranium#marigold#Youtube
11 notes
·
View notes
Text
DIY Goth Pants
Goth pants don’t have to be expensive. Just thrift some black jeans or get them at Walmart, and then do whatever suits your fancy! Reverse tie-dye, patches, studs, embroidery, fabric paint, chains, grommet tape and ribbon, lace, safety pins—black jeans are a blank canvas for you to customize to your heart’s content!


If you want more details as to how I made any of these, just message me or reply to this post. I’m happy to provide a tutorial if needed!
86 notes
·
View notes
Note
Have any tutorials of how you draw your tallest? (Or irkens in general?)
If Cini could wear any human casual clothing, what would he wear that is comfortable?
If he had it his way, would Cini change the life of Irken society?( you know with the whole tall and short thing.) or change everything with the empire expansion. We know their people must have many enemies with other alien races but if there was an alternative to that and not concur or go to war with them, would Cini be that one Tallest to break that cycles? I mean he looked tired of being tallest.
I'm not the best teacher. My drawings are pretty inconsistent. The best I can explain my process is, make a mark, erase a mark, rinse, repeat until it looks like a figure.
These were drawn super quick. Not sure how much help they'll be, but I tried to leave in as many reference lines in as possible.
These are some sketches on how I approach drawing a tallest with the typical JV bone-skinny body frame

The torso is where I struggle the most. I probably draw them too tall, but that's how it comes out.
It's fun to experiment with different body types;
From left to right; Tallest Spittle, Greezee and Blitz
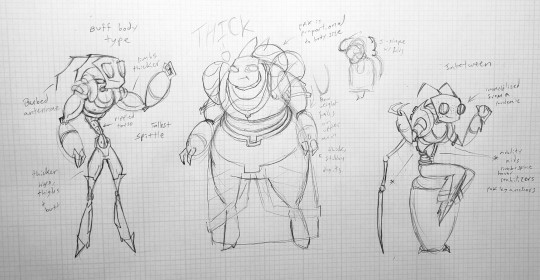
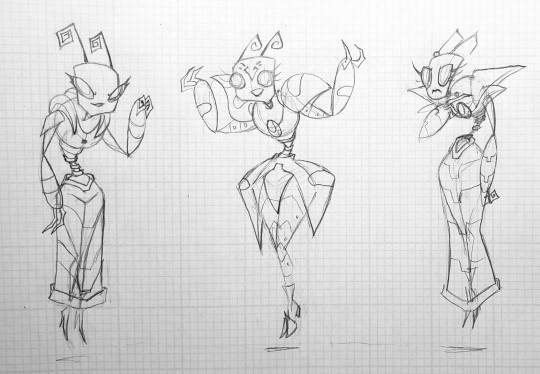
From left to right: Tallest Miyuki, Dava and Kii
I have a tendency to draw women tallests with big hips (because that's fun for me), but Irkens really don't have gender dimorphism, and their fashion/ clothing styles are all unisex, so there's no need to follow that rule when you design your own ocs.
I would have to look through my blog to find any posts about how I draw smaller Irkens. Mostly same advice.
As far as Cini's choice in comfortable human clothing; his robes are very uncomfortable, so anything would feel comfy by comparison.
But I imagine he would immediately gravitate towards those flimsy tie dye sun dresses you see in those little hippie boutiques at the mall. Tie dye is something he would never have seen in the empire plus so many swirls and colors!
He would have a field day dress shopping. Most human male clothes would be too lacking in flair.
And to address the third question; Irkens are brainwashed at birth into believing their height based hierarchy is the natural and correct way for their society to operate and have been brainwashed into believing this for MILLIONS and millions of years.
I'm not sure if it's within the limits of his imagination to conceive a reality where Irkens did not serve a tallest who carried out the will and executed the design of the control brains.
BUT Cini wished from the moment he was measured someone, ANYONE else had been measured taller than him. His favorite partabout being tallest was lounging and smoking record breaking amounts of pipe amber.
His passion was his trapeze act and watching performances at the civilian theater. No "important" occupation really appealed to him when he was a cadet; too boring, not enough fun music and visuals. He only served in the military because all Irkens are required to go through basic training. His stats were a joke as far as his height bracket went. He stayed the same rank for almost 200 years.
Cini tried as hard as he could to be a good tallest, as much as his imposter syndrome made it for him. MOST of his reign was actually spent improving infrastructure within the empire's existing territories. He was a generous patron of the arts and sciences (beyond military research). Service drones legally received more off time and better medical benefits. Cini avoided brute force unless absolutely necessary. He loved to play ambassador. The Vortians, the Space Bees, the Inquisitorians, ect all became official allies of the Irken Armada during Cini's rule. He genuinely took the time and effort to listen to their concerns and compromise.
Cini was wise enough to know it's better to make friends than enemies in the long game, especially unnecessarily. The empire wasn't perfect, but Irkens and alien citizens alike enjoyed a higher quality of living under Cini's leadership methods.
It wasn't until the very end of his reign did he declare a war. He did so because of pressure forced down on him by the control brains, who were intimidated by the corrupting freedoms the lesser drones seemed to be enjoying and deeply concerned by the lack of new conquests that have been made over the centuries.
The Irken/ Planet Jacker war was bloody from the very beginning.
Cini would not live down the shame of his decision. Too many casualties on his conscience.
Every drone is worthy of dignity; Cini believed that. He would change A LOT about Irken society if he could. He tried. He wish he had tried harder.
11 notes
·
View notes
Last Seen Blogs

lanceliquidgrey
Untitled

a-s-smb-playthroughs
A's Retro SMB playthroughs (for transfer)
monstermoviedean
dude, that's complex

my-loves-quotes-blog
Quotes & other things

guyonthepiano
MUSICIAN