#tmux installation
Explore tagged Tumblr posts
Visit Tumblr Blog
Explore Tumblr blogs with no restrictions, modern design and the best experience.
Last Seen Tumblr Blogs


Fun Fact
In 2020, 44% of users from Denmark used Tumblr daily.
Text
I've been working a lot on my phone for programming (for disability reasons) for give or take 3 years and nothing has worked as well as LazyVim installed on my dev server (under tmux accessed through ssh via Termux*) has over the past couple of months. It's simple, portable, and doesnt burn through resources like a GUI IDE does. Worth checking out imo:
* You can get LazyVim running directly on Termux via proot-distro (ubuntu-lts specifically worked for me) but my scenario requires using a server anyway
42 notes
·
View notes
Text
Code Blog, Project 001 Understanding Unicode
Day 02
Mostly I was setting up my environment today.
I got a very simple c program running on one of my servers when I realized I would need a better way to step through my code.
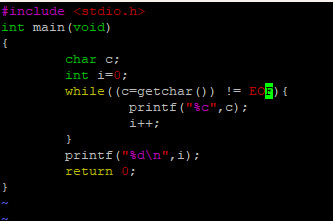
The code compiles and runs but more advanced debugging it could be a challenge.

Brainstorming:
I could get better at using tmux and find a command line debugger.
I could develop my C code in Visual Studio as a C++ project, upload the final files to my server and then figure out any incompatibilities.
I could Google for a C language IDE that can run on Windows.
Today's Path Forward:
I’m going to explore the third option today and see how things go.
I’m trying out a program called CLion

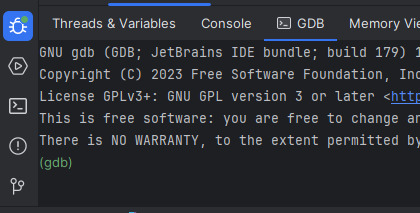
I got CLion installed, activated the free trial and got it to SSH into my server.
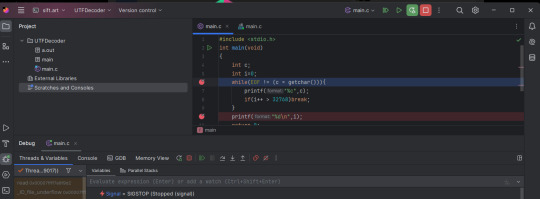
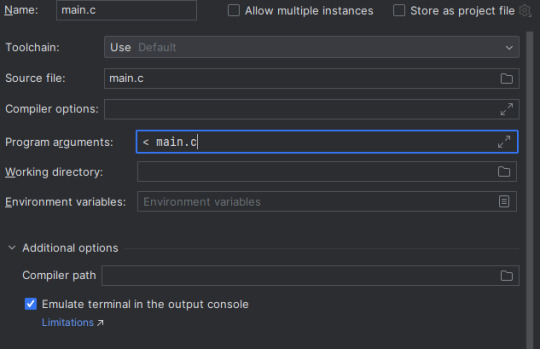
The current problem I'm stuck on is that I can't get it to read from standard in. I don't know if this feature exists in CLion.
I tried dumping the source file as a text sample into stdin. I did it as a Program argument. This probably isn't the way CLion expects things. When I ran the debugger the code doesn't seem to be reading anything.
Another issue I'm thinking of is that the debugging features seem to be just a GUI for GDB.
I will probably have to get good with GDB anyway. I may be better off just using a tmux terminal with GDB in one of the panes. I'm not sure which solution (tmux or CLion) to explore.
I may work on this some more today. I'll see where I'm at tomorrow.
11 notes
·
View notes
Text
Switching from tmux to Zellij
Terminal Multiplexer
If you've used terminal multiplexer in command line, you know tmux is cool! If you haven't, you really should use something like tmux, especially if you SSH into remote servers often!
Why?
Tell me: what do you do if suddenly your SSH connection is dropped while you're in the middle of an important installation or update process that needs your input?
That terminal session is lost and you cannot easily (if at all) get back to that installation process!
This may make your system a half cooked mess! A terminal multiplexer is what you need to solve this exact issue.
Let's just say: it'll save the day, by letting you log back into the session at the exact point you were dropped off from!

The switch
Tmux is not just a terminal multiplexer though, it's a lot more than that. But this post is not about tmux. It's about me switching from tmux to Zellij. Why? Because Zellij is just better, and with a lot more batteries included.
I was keeping an eye on Zellij for some time now, but didn't get enough time to switch. But today was that day. So here I come Zellij!
P.S. you don't need to learn tmux to start using Zellij. So if you've never used tmux, just start with Zellij right away. Here are some tutorials.
Installation
As it happened, Zellij cannot be directly installed on the OS I'm using: Ubuntu. Also, this is a new laptop I'm setting up, so I needed to take a few steps to install Zellij. So may be this post will be useful to someone!
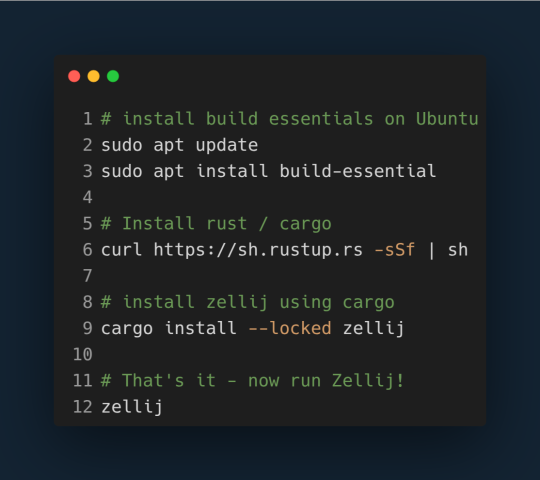
If you need to copy the above code: here's the link for the code!
Further info
Here's a useful video walk through with Zellij:
youtube
That's it! Happy CLI mastery with Zellij, Oh My zsh and Alacritty!

1 note
·
View note
Note
Is there a light CLI only version of qubes that uses tmux for a gui?
not officially, but you might get away with not logging in using the display manager and instead running everything from a tty in dom0
the primary benefit of qubes is its gui tools, though; you wouldn't be getting the same kind of clear, visually-enforced domain isolation in a tty. also you'd have to come up with some pretty gnarly workarounds for the lack of a place to display confirmation dialogs for actions like attaching usb devices and moving files between qubes
why do you ask? if you just live in terminals, then you're probably a lot like me and might want to use qubes' really good @i3-official integration (which is what i use)
0 notes
Text
How to Use tmux on Linux (and Why It's Better Than Screen)
Key Takeaways Install tmux from your Linux distribution’s repository, then run “tmux” in the Linux terminal. You can give each tmux session a unique name, create windows within each session, and put those windows into panes. The Linux tmux command is a terminal multiplexer, like screen. Its advocates are many and vocal, so we decided to compare the two. Is tmux really better, or is it just a…
0 notes
Text
Recap on what I've already done before continuing on to learning privilege escalation.
Following the module, I've learned the basics of using a VPN through the command line:
How to use SSH and what it's for. Essentially, being a more secure way to log into a website as an administrator via public/private keys, I think.
How to use Netcat and its basic function, though I really need to take the time to find a module on it more in depth to understand what it really does/can do. So far, I just understand that it's a way to connect and interact with different TCP and UDP ports, if I'm understanding things properly.
The module had me install Tmux, though as far as I understand it only lets me have multiple windows in my command terminal. (Not so useful for me outside specific circumstances I can imagine where I already have other terminals open and need a new space within something on screen already.)
It went over Vim, though even with it only being for text editing (as far as I can tell from its explanation), I don't quite understand it and its usage. I should definitely look into it more since keyboard only usage would be helpful, though I doubt I'd be able to full immerse myself in it.
Nmap was probably the thing I understood the fastest. Being just to preform a scan to see what ports are open or being used, it can be the easiest way to find open ports, but that would just be a basic scan. When using it for more in-depth scans, though it may take longer, the scans can indicate all open ports and even what versions each port is running on, giving you the information needed to find ways into a system. It also allows scripts to be ran giving extra functionality, a deeper dive into Nmap usage definitely seems warranted.
FTP (File Transfer Protocol) was something I honestly forgot about after it was showed to me, but given it's importance in acquiring data from a server, I'm sure I need to take the time to go back and understand how its used and what exactly it can do.
Interjecting here since as I was booting up my VM, I encountered an issue where the VM stays on a black screen when I logged in. It's a consistent issue, but just exiting Fullscreen fixes it. I guess I should figure out why so I don't have to deal with it later.
SMB (Server Message Block) seems like an important protocol to be able to exploit, but I don't think I paid enough attention to this section of the module to really understand what all I can do with it. Even as I reread the section right now, I don't think I understand it very well. I do understand there's a thing called smbclient that lets you access information within so you can get potentially get access to user files, but aside from this usage, I think I'm missing something
SNMP (No clue the expanded name) seems to be something for finding information on routers? It says that you could potentially find credentials being passed through it, but I don't really understand the explanation.
Taking a short break before recounting other parts of the module like Web Enumeration, Public Exploits, and the different types of Shells it explains.
0 notes
Text
Home server alive
Day 79 - Jan 23rd, 12.024
So... for some reason my Obsidian isn't opening today, and I don't know really why, it just isn't opening now. Another post directly created on Tumblr!
Today I was able to install and start the configuration of my home server, and the best of all of it, is that because of Nix I'm able to share config snippets between my desktop, home-server, and laptop (someday)! And be able to have things like my Tmux, Neovim, Zsh, etc. is really handy to have. Unfortunately, I wasn't able to do a lot yet, I have to admit that I procrastinated a lot today, but whatever, there's half a week entirely to do so.
---
Today's artists & creative things
Album: Minecraft - Volume Beta - by C418
---
Copyright (c) 2024-present Gustavo "Guz" L. de Mello <[email protected]>
This work is licensed under the Creative Commons Attribution-ShareAlike 4.0 International (CC BY-SA 4.0) License
1 note
·
View note
Video
instagram
I'll be changing the whole operating system if this fails 😉. Fingers crossed 😆. . . #vim #tmux #coding #cpp #programmerlife #programming #code #dev #development #developer #techie #tech #technology #linux #install #archlinux https://www.instagram.com/p/BsWXPDmB69l/?utm_source=ig_tumblr_share&igshid=ajdsw46o88o3
#vim#tmux#coding#cpp#programmerlife#programming#code#dev#development#developer#techie#tech#technology#linux#install#archlinux
7 notes
·
View notes
Text
Read more: Getting started with tmux
5 notes
·
View notes
Text
Two Ways To Access A Remote PulseAudio Session Over SSH

Despite what you may read elsewhere, there are two ways to control the volume on a remote machine running PulseAudio when you can only access it via SSH. I am not talking about using X forwarding here (which does NOT work), and I do not mean running a whole remote desktop session via VNC or X2Go just to mess with the volume. Nor do you need to run PulseAudio as a system service, or edit PulseAudio's configuration files at all. This is done using command line tools only. Specifically, tmux, pulsemixer, and volumerb. This works on a fresh install of Debian bookworm, where I have not altered any PulseAudio configuration files at all. The system in question has audio two devices - a "regular" audio output and a HDMI output. The Problem Because of some very good complicated security reason , unless you are running a system-wide configuration of PulseAudio (which is not a great idea ), you typically cannot connect to an already running PulseAudio daemon when you SSH into a system. When would this come up? In my particular case so that I can adjust the volume on my media center PC from my laptop with a few simple scripts. It's definitely one of those things not everyone will need, but when you do need it, you need it. The Solution For this, I've done the following (the PulseAudio setup is the default that Debian configured, and works perfectly fine locally): - sudo apt install tmux pulsemixer ruby - wget https://raw.githubusercontent.com/uriel1998/volumerb/master/volume.rb - sudo mv ./volume.rb /usr/local/bin/volume - sudo chmod +x /usr/local/bin/volume - Create a tmux session, have at least one open shell window in that session, and detach from it on the machine whose volume you want to control. Not "connected via SSH", but actually on that machine. The tmux portions are actually extra, but they give you a lot more flexibility. And if you're regularly using SSH and don't know about tmux, you'll be doing yourself a lot of favors by knowing even a little about it. pulsemixer is a fantastic TUI program for handling PulseAudio, and I thoroughly recommend it.

But, as you can see in the first video below, if I just SSH in, pulsemixer returns Failed to connect to pulseaudio. That's also what happens if you try X-forwarding, by the way. However, you can see that - for reasons I do not understand - the volumerb script works out of the box. That script is comparatively klunky compared to pulsemixer, but for some reason it works. The only change from that script's normal behavior is that it only seems to work on whichever sink is set as the "default" sink, not all of the sinks. The interesting part comes next in this second video. You have a tmux session still running on the machine that you just SSH'd into. You can attach to that existing session (tmux attach), and in any windows that were created on the local machine, you can use pulsemixer normally. It attaches to the running PulseAudio session with no difficulty. But again, this workaround only works with windows (and sessions) that were originally created locally. In the video you can see that I create - connected over SSH - a new window. In that new window, I once again cannot connect to the PulseAudio session. But as before, volume.rb still works. So there you go - two ways to control PulseAudio on a remote machine via SSH without running PulseAudio as a system service. I do not understand the specifics of it, nor do I understand it well enough to explain it, but just enough to take seriously the warnings that it is a Very Good Idea to not work around the security here. Featured Image by Gerd Altmann from Pixabay Read the full article
1 note
·
View note
Text
How to Install And Use Tmux in Linux with Example
How to Install And Use Tmux in Linux with Example
In this post, we are going to show that how to Install And Use Tmux in Linux. If your are going to Install and use Tmux on your Linux system then this post is ideal for you. Tmux is an open-source and popular terminal multiplexer for Unix-like operating systems. Tmux allows you to start a Tmux session and then open multiple windows within that session. It is an alternative to GNU Screen. It is…

View On WordPress
1 note
·
View note
Text
완벽한 Mac 작업환경 세팅하기 (vim, zsh, iterm)
그동안 개인 컴퓨터로도 수많은 프로그래밍 언어와 작업 환경을 만들었고, 회사에서도 수많은 인턴분들과 뉴커머들이 오고가면서 그들의 작업환경을 세팅해주고 가이드라인 해줬다, 필자는 최대한 많은 트릭과 신텍틱 슈거, 그리고 불필요한 노동시간을 줄이기위해 깊이있게 파고들고 또 파고드는 것을 좋아한다.
이번 시간에서는 맥 환경에서 작업하는 주 작업자들을 위해 여러분의 노동시간을 줄일 수 있는 몇가지 팁들을 소개하려고 한다. 이 글에서 tmux에 대한 내용까지 담으려고 했지만 tmux만 해도 내용이 너무 방대하므로 iTerm의 Split View기능으로 대체하고 tmux는 다음 시간에 다른 포스트에서 자세히 다루도록 하겠다.
터미널 환경 구성하기
내가 일하는 분���나 개인 프로젝트에서는 터미널을 열어 사용하는 경우가 다분하다, 아마 이 분야가 당연히 그렇다고 생각하고 있고 만약 터미널과 친하지 않는 유저라도 이 섹션에서 터미널 환경을 구성해서 이 기회에 터미널과 조금 더 친해져보는 시간을 가지도록 하자.

여러분이 가지고 있는 초기 터미널을 위와 같은 모양새라고 생각한다. 우리는 이것을 아래처럼 바꿀 것이고, 생각보다 어렵지 않기 때문에 끈기를 가지고 따라하기를 바란다.
1. Oh My ZSH 설치하기
가장 먼저 여러분이 해야 할 것은 기본 쉘을 새로운 쉘 프로그램으로 교체하는 일이다. 여러분의 맥 환경이 별다른 수정을 거치지 않았다면 기본적으로 bash가 여러분의 기본 쉘 프로그램일 것이다.
https://gist.github.com/KennethanCeyer/8c8420585f3d933e6703e43680d87ab3
먼저 아래 명령어를 통해 zsh를 설치해보자.
https://gist.github.com/KennethanCeyer/47c981fccd3690e1bd410f4a388de5ce
놀랍게도 이미 여러분의 쉘은 zsh로 변경이 되었다. oh-my-zsh 프로젝트는 zsh 쉘을 쉽게 설치하고 관리할 수 있게 도와준다, 덕분에 여러분은 단 한줄의 코드로 zsh를 쉽게 설치 / 업그레이드 할 수 있었다.

쉘 이름은 $0 환경변수로 확인할 수 있다. 여러분의 터미널에 `zsh`가 출력되는지 확인해보자, 아래 그림처럼 `zsh`가 나오면 정상적으로 설치된 것이다.

2. Powerlevel9k 테마 설치
zsh는 정상적으로 설치되었어도, 별도의 테마가 적용되지 않으면 굉장히 밋밋한 느낌의 터미널만이 제공된다. 필자는 여러가지 테마를 사용해봤지만 Powerlevel9k 보다 어썸하고 쿨한 테마를 찾지 못했다. 만약 더 좋은 테마를 알고있거나 제안하고 싶으면 이 블로그 하단 댓글로 남겨주시기 바란다.
아래 처럼 명령어를 입력하여 zsh themes 폴더 내에 powerlevel9k를 내려받는다.
https://gist.github.com/KennethanCeyer/2794384bce32ae8650eb9e94131c3da5
우리는 테마를 다운로드 받는 것까지는 완료했고, 최종적으로 .zshrc 파일을 수정하여 정확한 테마 이름을 zsh 쉘에 알려주어야 한다. 아래 명령어처럼 .zshrc 파일을 열어보자.
https://gist.github.com/KennethanCeyer/8739695df2d1ca420326d5a127511a25
아래 그림처럼 ZSH_THEME 단락을 `powerlevel9k/powerlevel9k`로 바꿔준다. 아마 여러분의 .zshrc의 기본 ZSH_THEME는 `robbyrussell`로 잡혀있을 것이다.
이해가 잘 가지 않는다면 아래 링크를 클릭하여 변경 방법을 살펴보자.
`.zshrc` 파일을 변경했다면, zsh 명령어를 통해 쉘을 다시 열어줘야 변경 사항이 확인이 가능하다.
https://gist.github.com/KennethanCeyer/4bfcc90111e69632111387d239931cb2
3. Iterm2 설치
여러분이 기본적으로 사용하는 터미널 프로그램은 터미널의 편의기능이 많이 부족하다. 따라서 아래의 편의 기능을 사용하기 위해 Iterm2를 설치하도록 하자. Iterm2에서 제공하는 기능 중 특별히 아래의 기능이 유용하다.
터미널 탭 기능 (+토글 단축키)
터미널 Split View
자동완성 기능
터미널 내에서 단어 찾기
마우스 없이 복사&붙여넣기
256 이상의 색상 지원
더 많은 기능 살펴보기: https://www.iterm2.com/features.html
그럼 본격적으로 설치를 진행해보자. 설치는 https://www.iterm2.com/downloads.html에서 진행할 수 있다. 링크에서 Stable Releases에서 최신 파일을 설치하자. 이 포스트 기준으로는 Iterm2 3.2.9 버전이 최신이다.

다운로드가 끝나면 아래와 같이 다운로드 폴더에 Iterm2가 있다, 프로그램을 어플리케이션으로 옮겨 설치를 해주자.

시스템 환경설정 > 보안 및 개인 정보 보호 > 개인 정보 보호 탭에서 ���금 설치한 Iterm2를 추가해주도록 하자.
설정이 끝났으면 어플리케이션에 설치된 iTerm 앱을 실행시켜보자.

맥은 기본적으로 인터넷에서 다운로드 받은 앱은 위와 같은 경고 메시지가 나타나게 된다. 열기 버튼을 클릭하면 앱이 정상적으로 실행되고 경고는 다시 나타나지 않는다. `열기`를 클릭하여 열어주자.

여기까지 잘 따라 오셨으면 위와 같은 터미널 창을 볼 수 있다. 이제 터미널 앱은 Dock에서 제거하고 작별을 고하자, 앞으로 여러분은 iTerm을 기본 터미널로 친해질 시간을 가질 날만 남았다.
4. Powerlevel9k font 설치
눈치가 빠른 독자라면 느끼겠지만 화면에 일부 텍스트가 깨지는 현상이 보인다. 아래 그림처럼 일부 박스가 깨져 제대로 보이지 않고 `?` 기호로 표시된다.

글자가 깨지는 이유는 우리가 앞서 설치한 Powerlevel9k 테마는 일부 특수 문자를 사용하여 TUI (Text User Interface) 화면을 꾸미기 때문에, Powerlevel9k에서 권장하는 폰트를 사용해줘야 한다. 아래와 같은 절차를 따라하여 폰트를 설치해보자.
https://gist.github.com/KennethanCeyer/6b7243146bb9e0730b32a53f2e116b5e
폰트 설치가 끝났으면 iTerm 설정을 통해 터미널 기본 폰트를 변경해주어야 한다. iTerm 화면에서 Command + ,(콤마) 단축키를 이용해 설정 창을 열어준다. 그 다음 Profiles > Text 탭의 Font 섹션 아래에 있는 `Change Font` 버튼을 클릭해주자.

좌측 탐색 영역에서 All Fonts를 클릭하고 스크롤을 내리다보면 `Meslo LG M DZ for Powerline` 폰트가 보인다. 그 폰트를 선택하고 글자 크기를 여러분이 원하는 크기로 세팅하고 창을 닫아준다. (필자는 12pt가 적당하다고 생각하지만, 넓은 화면을 가진 사용자의 경우 13pt가 가장 적절하다.)

이제 여러분은 아래 화면처럼 모든 텍스트가 깨짐없이 출력되는 것을 확인 할 수 있다.

5. iTerm color scheme 설정
이제 우리는 테마가 적용된 아름다운 터미널 구성 세팅이 끝났다. 하지만 컬러가 너무 시신경을 자극하고 컬러의 색체도 그렇게 아름답지 못한 것 같다. 따라서 컬러 스킴을 적용하여 조금 더 색체 배합이 아름다운 터미널로 교체해보자.
필자는 여러가지 컬러 스킴을 찾아 테스트를 해보았고 지금은 Brogrammer 스킴이 가장 필자의 선호도에 맞는 스킴이다. 따라서 이 포스트에서는 Brogrammer를 설치하는 가이드를 진행한다. 구글에 iterm color scheme이라 검색하여 여러분에 선호에 맞는 스킴을 설치할 수 있으므로 만약 이 포스트에서 나온 컬러 스킴을 원하지 않을 경우 여러분이 원하는 컬러 로 설정하면 된다.
https://gist.github.com/KennethanCeyer/a21f23327a0e5ac3bf7fb8b800ecc179
위 명령어를 입력하여 Brogrammer 컬러 스킴을 여러분의 홈 디렉토리 .iterm 폴더안에 다운로드 하였다. 다운로드가 끝났다면 iTerm 화면에서 Command + ,(콤마) 단축키로 설정 화면을 열고 Profiles > Colors 탭의 우측하단의 Color Presets 콤보박스를 열어 `Import` 옵션을 선택하자. 이해가 잘 안간다면 아래 그림을 보자.

탐색기에서 Command + Shift + g 단축키를 입력하여 경로 입력 창을 열고 `~/.iterm` 을 입력하여 ~/.iterm 폴더로 이동한 후 .iterm 폴더 내에 있는 Brogrammer.itermcolors파일을 선택해주자.

Import가 완료되었다면 아래와 같이 선택 화면에서 Brogrammer가 확인된다.

Brogrammer를 선택하고, 설정 화면을 닫아주자. 설정이 정상적으로 되었다면 아래와 같이 컬러가 변경된 터미널을 확인할 수 있다.

6. Powerlevel9k context 설정
Powerlevel9k 테마는 환경변수��� 통해 사용자 입맛에 맞게 커스터마이징 하는 기능을 제공하고 있다. https://github.com/bhilburn/powerlevel9k#prompt-customization 링크를 확인해보자.

위 그림의 예시처럼 환경변수는 좌측과 우측 라인에 기본적으로 표시되는 Context를 수정할 수 있게 제공해준다. 필자는 다음과 같은 내용을 .zshrc에 추가하였다.
https://gist.github.com/KennethanCeyer/d5658502e22a2be7e290de303e66ec66
만약 설정 방법이 이해가 안된다면 아래를 살펴보자.
설정 파일을 변경하더라도 바로 적용이 안되고 zsh 쉘을 다시 실행해야 한다. zsh 명령어를 입력하여 zsh 쉘을 다시 실행하여 보자. 설정이 잘 완료 되었다면 아래와 같이 터미널이 조금 더 간략화된다.

7. 작업 마무리하기
여러분의 터미널은 대부분의 설정이 끝났다. 이제 iTerm의 기능과 zsh 쉘의 기능, Powelevel9k 테마의 편리한 UI들을 사용할 수 있다. 대표적인 기능들을 둘러보자.
먼저 iTerm의 기능 중 Split view 기능을 살펴보자. 여러분의 iTerm 화면에서 Command + D 단축키를 통해 다음과 같이 Vertical View, Command + Shift + D를 통해 Horizontal View로 분리할 수 있다.

위 그림이 Vertical View Split,

그리고 위 그림이 Horizontal Split View이다.
커맨드 + W 단축키를 통해 현재 포커스가 잡힌 View를 닫을 수 있고, Command + 방향키를 통해 View 포커스를 스위칭 할 수 있다.
Command + T를 통해 탭을 생성할 수 있고 Command + 숫자로 특정 넘버의 탭으로 스위치를 할 수 있다. 마찬가지로 Command + W로 탭을 닫을 수 있다.
더 자세한 iTerm 편의 기능은 https://gist.github.com/squarism/ae3613daf5c01a98ba3a 링크에서 잘 설명하고 있다.
ZSH도 수 많은 편의 기능을 제공하고 있다. 먼저 cd 명령어를 생략하고도 특정 디렉토리로 이동할 수 있다.

그리고 .. (상위 폴더로 이동)에 추가적으로 점(.)을 붙여 어��� depth의 상위 디렉토리 까지 이동할지 지정이 가능하다. 예를들어 .... (점이 4개 사용되었을 때)의 경우 상위 3 depth의 폴더로 이동한다.

그 밖에 Tab으로 자동 완성(Auto complete)을 지원하는 기능도 폭 넓게 늘어나게 되는데 대표적으로 git을 사용하는 경우 branch 명이나 origin alias도 자동 완성으로 서포트하게 된다.
더 자세한 내용은 https://github.com/robbyrussell/oh-my-zsh/wiki/Cheatsheet 링크에서 살펴보자.
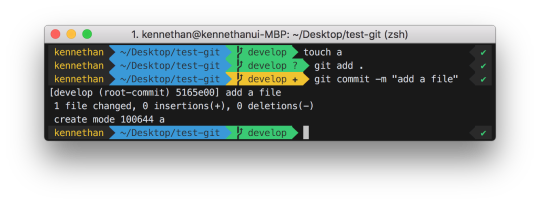
마지막으로 Powerlevel9K 테마가 제공해줄 수 있는 기능 중 vcs에 대해서 얘기해보고 싶다. 여러분이 git을 이용한 버전 컨트롤을 할 경우 아래와 같이 보기 편한 branch 상태 정보를 제공받게 된다.

위 사진에서 연두색 영역에서는 현재 git 디렉토리의 브랜치 이름을 보여주게 된다. (이 연두색 영역은 .git 디렉토리가 아니면 생략된다.)
그 밖에도 각각의 git status에 따라 이 부분의 색상과 내용이 조금 씩 변경된다.
더 자세한 Powerlevel9k의 기능은 https://bhilburn.org/powerlevel9k/ 링크에서 살펴보자.
Vim 환경 준비하기
여러분의 Mac에는 대부분 vi 커맨드가 기본적으로 내장되어 있다. vi 커맨드를 이용하여 에디터를 띄울 수 있는데 기본적으로 최근의 vi 커맨드는 vim(Vi IMproved) 커맨드와 동일하게 동작한다.
vi --version을 이용하여 버전 정보를 조회해보자.

vimrc 세팅하기
https://github.com/amix/vimrc를 이용하여 우리는 기본적인 vim 환경을 준비하고자 한다. 아래와 같은 명령어를 이용하여 vimrc를 세팅해보자.
https://gist.github.com/KennethanCeyer/3838790aa6eb1d1a3e5e201a9fad58b5

위 화면에서 처럼 Installed the Ultimate Vim configratuon successfully! Enjoy :-) 라는 문구가 보이면 정상적으로 설치된 것이다. vi 명령어를 실행해보자.

위 사진처럼 가장 기본적인 화면 구성은 vimrc가 다 세팅해주었기 때문에 어느정도 보기좋은 인터페이스로 구성이 되었다. 하지만 몇가지 추가로 기능을 이용하려면 추가적인 설정이 필요하다.
아래 명령어를 이용하여 .vimrc에 추가적인 설정을 추가해주자.
https://gist.github.com/KennethanCeyer/3742210bfcbb34ecdf7cbb9f2524687f
이제 vi 명령어를 통해 에디터를 열면 다음과 같은 화면을 볼 수 있다.


이 정도면 충분하다! 여러분이 vi를 통해 텍스트 편집이나 심지어 개발을 할 경우에도 이 정도의 설정으로 최소한의 요구사항은 충족할 수 있다. 이제 vim과 함께 즐거운 해킹을 하기 바란다. 설정에 부족함을 느끼는 독자들을 위해 다른 포스트에서 vim에 플러그인을 추가하여 파워 업을 할 수 있는 방법을 설명할 예정이다.
하나만 더! vim 테마 설정
이미 우리는 iTerm 컬러 스킴을 추가하여 충분한 컬러를 가지고 있지만 확실한 것을 원하는 유저를 위해 vim에 컬러 스킴을 추가하는 방법을 공유하겠다.
우리는 앞서 Brogrammer 색상 테마를 사용했기 때문에 vim도 같은 색상 팔레트로 통일하는 것으로 설명한다.
https://gist.github.com/KennethanCeyer/fe32c8d0ead2adafc6d59dc87d324509
먼저 위 명령어를 이용하여 brogrammer.vim을 ~/.vim/colors 폴더에 다운로드 한다. 그리고 아래 화면처럼 colorscheme brogrammer를 ~/.vimrc에 추가한다.

설정이 다 끝났으면, 아래와 같이 개발환경에서 vim의 다양한 화면 구성 및 색상 배치를 경험해볼 수 있다.

끝으로
이번 포스트는 개발 환경에 가장 기본이 되는 터미널과 vim 설정에 대해 알아봤다. 여러분은 고작 터미널 기능을 확장한 것 뿐에 불과하는데 굉장히 긴 포스트 글을 읽어보고 시행 착오를 겪어가며 고통을 느끼고 있을 것이라 생각한다.
이런 고통을 줄이기 위해 이후 더 다양한 포스트를 통해 유용한 트릭들을 공유하고 가이드해줄 수 있도록 할 예정이다. 다만 여러분이 이 글을 읽으며 얻은 공유는 나중에 잊지 않고 여러분이 다른 포스트를 써서 �� 다른 기술 공유라는 기여를 통해 개발자 네트워크에 보답을 해주기를 희망한다.
필자는 최근 https://github.com/KennethanCeyer/bire 프로젝트를 통해 이런 설치 과정을 몇줄의 커맨드로 최소화 할 수 있는 프로젝트를 기획하고 있다. 이 부분에 대해서도 경험기를 포스트로 공유할 계획이니 기대해주기를 바란다.
2 notes
·
View notes
Text
The other day I saw someone joke, about Emacs, "at this rate we'll never beat the operating system allegations".
This is of course in reference to the famous joke: Emacs is a great operating system, it just needs a good text editor.
But like, jokes aside, that's not a bad thing. Emacs is not really a text editor, it is a platform - a language, a standard library, a package system, and a GUI toolkit.
Emacs is a lot like Python: they ship "batteries included". More batteries than you'll ever need, including multiple older redundant implementations of things. And besides a bunch of libraries, those batteries include at least one REPL and at least one basic GUI text editor each (for Python that's IDLE).
As far as text editors go, Emacs is... not good. It's got some cool features and an unconventional UI which someone clearly put a lot of thought into, but as just a text editor, it loses. Dedicated text editors are faster and far more reliable - I've never caused Neovim or Notepad.exe to literally lock up. Dedicated IDEs ship with far more relevant features ready-to-go out-of-the-box.
As one of those users that primarily used a shell, vi, and some sort of external method for multitasking (Tmux, window manager, whatever) for most of my life, and who occasionally pulls out various IDEs to try or to get familiar with a language or a new code base... I would never recommend Emacs if you're just looking for a better text editor.
But if you're looking for a platform that can let you make the best (for you) editor, or shell, or file manager, or window manager, or [...]
.. if you're looking, in other words, for a good system which provides a common runtime and reusable facilities and powerful abstractions on top of which you can write and integrate code that does what you want...
.. well then, Emacs is a pretty decent mini operating system that you can nest inside any mainstream OS. It's kinda like Inferno was supposed to be but actually easy to install and with a vibrant community. It even has some similar network transparency and virtual file system niceties that Inferno inherited from Plan 9.
1 note
·
View note
Text
Creating a FreeBSD port
Enter the following into your terminal:
sudo pkg update
$ sudo pkg install -y bash vim-tiny tmux openjdk8 ruby ruby24-gems rubygem-rake
Work Cited
Cao, “How I Created My First FreeBSD Port”,
https://www.freebsdnews.com/2019/04/05/how-i-created-my-first-freebsd-port/
April 5, 2019 Impersonation of Hamza Sheikh
1 note
·
View note
Text
Using docker containers for development
Docker is a technology that allows users to bundle an application and run it within a loosely isolated environment referred to as a container. These containers are lightweight and self-contained, containing everything required to run the application without reliance on the host’s existing software. Containers can be shared effortlessly, ensuring that all recipients have access to the same working container.
Docker has become well-known for its deployment of production services such as application services and databases on enterprise servers or cloud instances. However, developers are increasingly employing containers for scenarios beyond deployment, including continuous integration, test automation, and complete software development environments, also known as development containers. These containers define a consistent environment in which an application can be developed before it is deployed.
One may question the benefits of containerizing the development environment. Have you ever found yourself cluttered with projects, libraries, languages, configurations, and tools when working on a new laptop or server? Wouldn’t it be beneficial to “restart” your software development environment to its original state?
Development containers provide a repeatable setup and consistent stateless development environment, allowing users to leave the underlying host free of project dependencies, specific language versions, and other factors. Furthermore, development containers enable users to utilize only the host machine’s computing resources. Finally, since the development environment is containerized, it can be replicated across many different systems with the Docker engine installed, ensuring a consistent development environment.
Numerous tools and services support the use of development containers, but Dockerfiles provide an option to customize your environment directly. Dockerfiles can extend images, add additional native OS packages, or make minor edits to the OS image. While many development images have been created by Microsoft available in Docker Hub, it is possible to create one from scratch.
To build a base development image, a parent image is required. The mcr.microsoft.com/vscode/devcontainers/universal image contains several runtime versions for popular languages, including Python, Node, PHP, Java, Go, C++, Ruby, and .NET Core/C#, as well as many popular tools and package managers. Using a custom Dockerfile, you can extend this image and add whatever you need.
For example, the Dockerfile shown above extends the parent image by first installing neovim and tmux to aid the development workflow. The user is then changed to codespace, and the working directory is set to the user’s home directory. Finally, configuration files for each tool are copied from the local machine.
Assuming the Dockerfile is in the same directory, the development image can be built with the following command:
$ docker build -t devcontainer .
The following command can be executed to start a development container from the newly created image:
$ docker run –privileged -it devcontainer bash
The -it flag opens an interactive container instance using bash as the Unix shell, and the –privileged flag starts the Docker container in privileged mode, granting the container root capabilities to all devices on the host system. This is beneficial when Docker is part of the development workflow. In addition, a volume can be mounted using the -v flag to persist data across different development containers, and a port can be mapped using the -p flag if developing a web application. This post was create by https://lzomedia.com
0 notes